Если вы работаете на Windows версии ниже 10 или хотите получить изолированную операционную систему Linux, да ещё и с графическим окружением, то можно воспользоваться сторонним бесплатным программным продуктом под названием VirtualBox.
Общая информация о технологии виртуализации
Вам потребуется:
-
Инсталлятор Oracle VM VirtualBox для Windows Hosts
Ссылка на скачивание: Download Oracle VM VirtualBox -
Образ операционной системы Ubuntu Linux в формате ISO
Ссылка на скачивание: Download Ubuntu Desktop
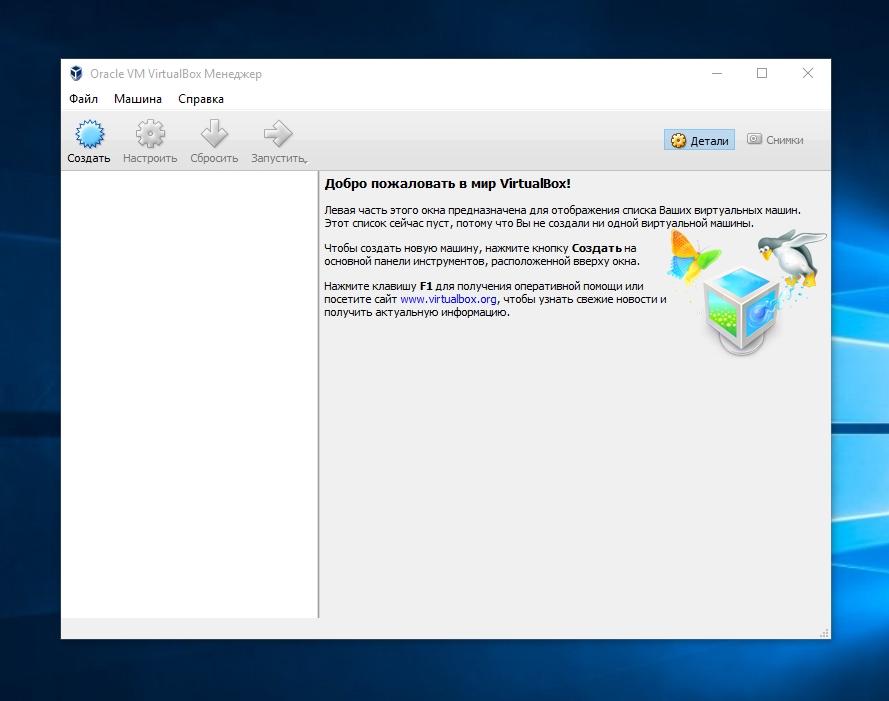
Для начала необходимо установить и запустить приложение VirtualBox.

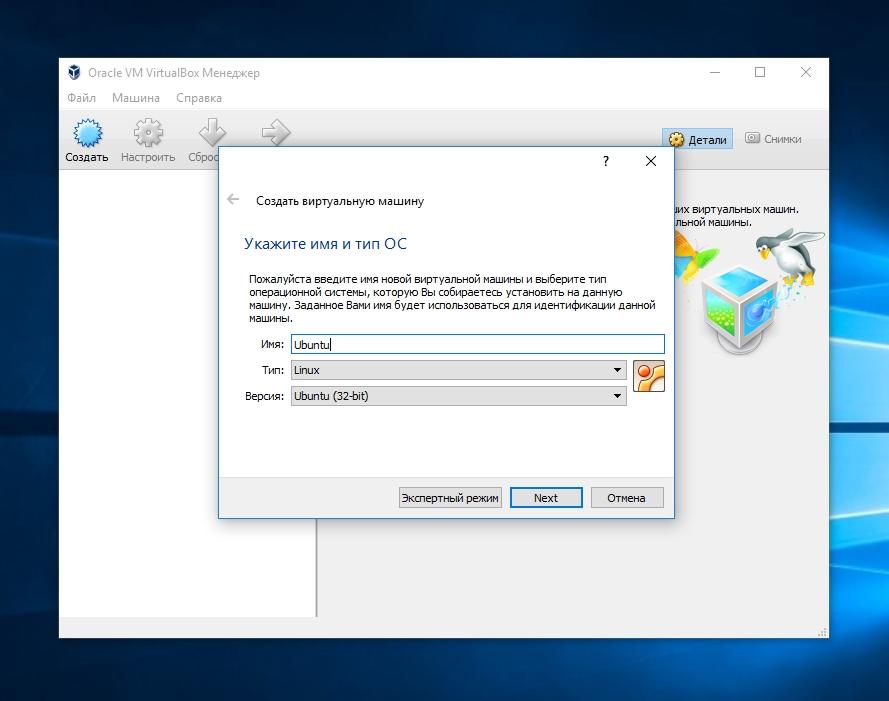
Нажимаем кнопку «Создать», выбираем из списка тип операционной системы «Linux», если нет своих предпочтений по дистрибутиву, то выбираем версию «Ubuntu» 32 или 64 битной архитектуры, а название можно ввести любое.

Указываем объём оперативной памяти выделенной под виртуальную систему. Рекомендованный объём составляет 1024 MB.

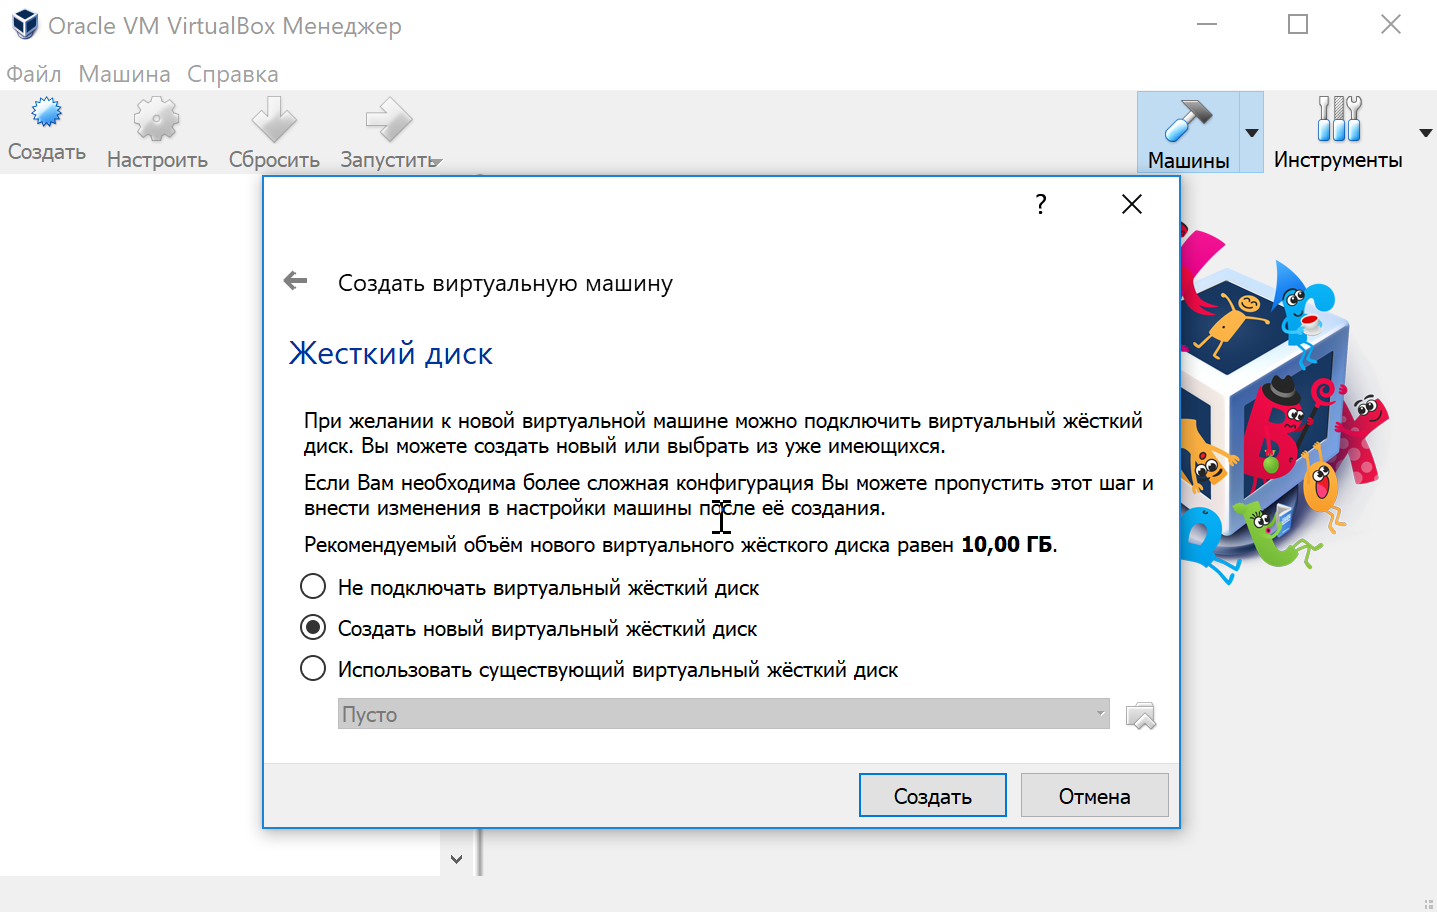
Указываем объём дискового пространства выделенного под виртуальную систему. Рекомендованный объём составляет 10 GB.
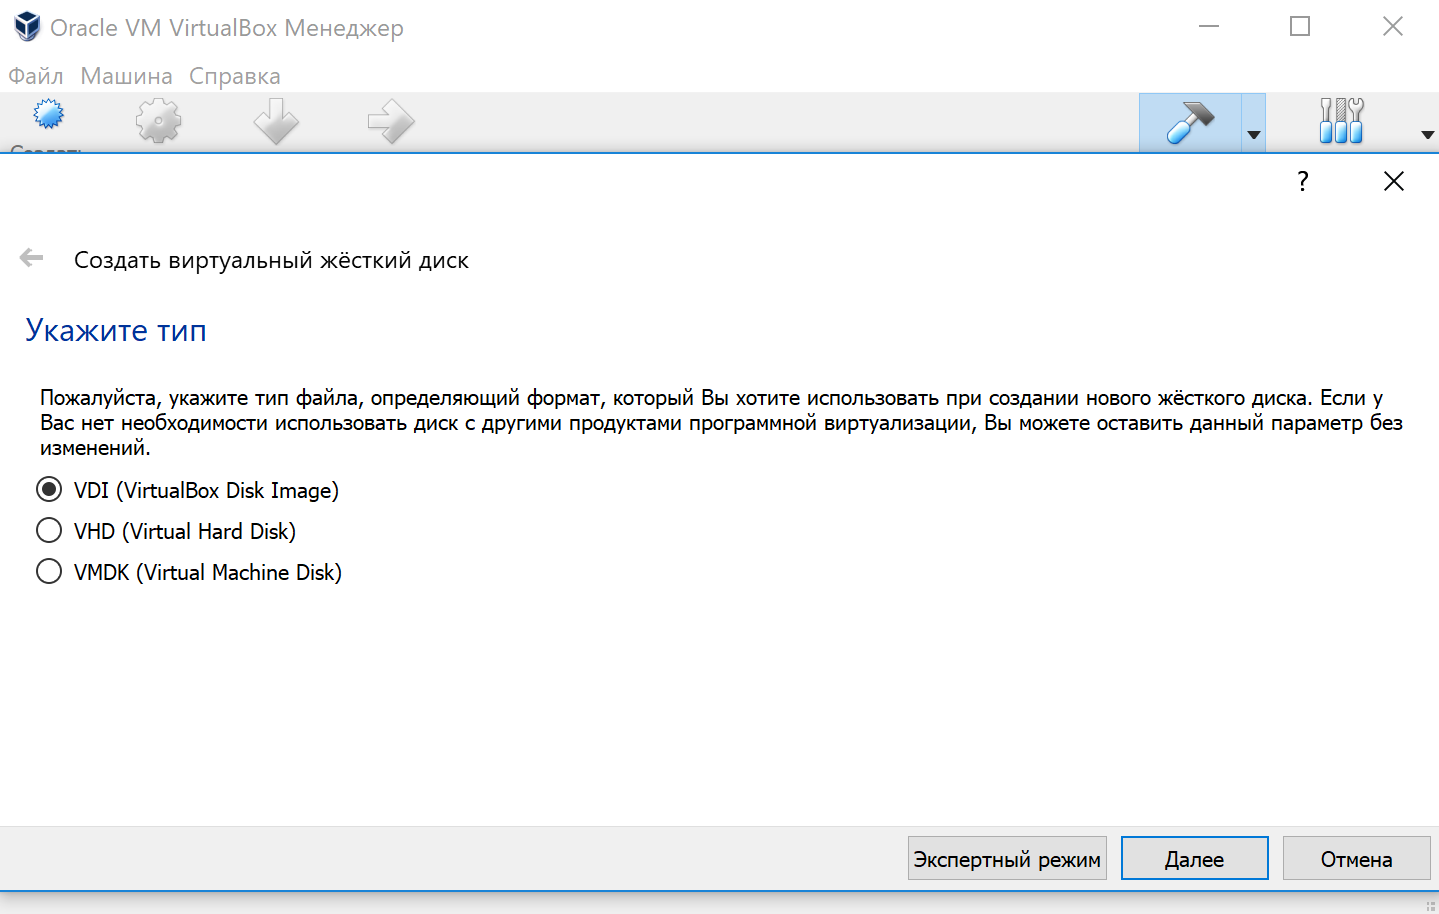
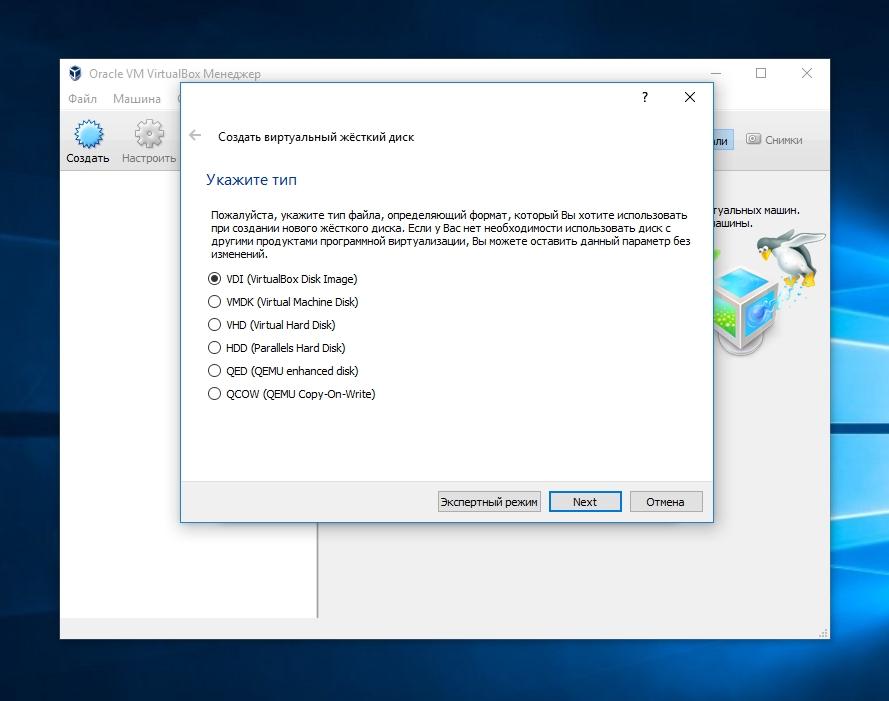
Тип виртуального жёсткого диска можно оставить как есть — VDI (VirtualBox Disk Image).
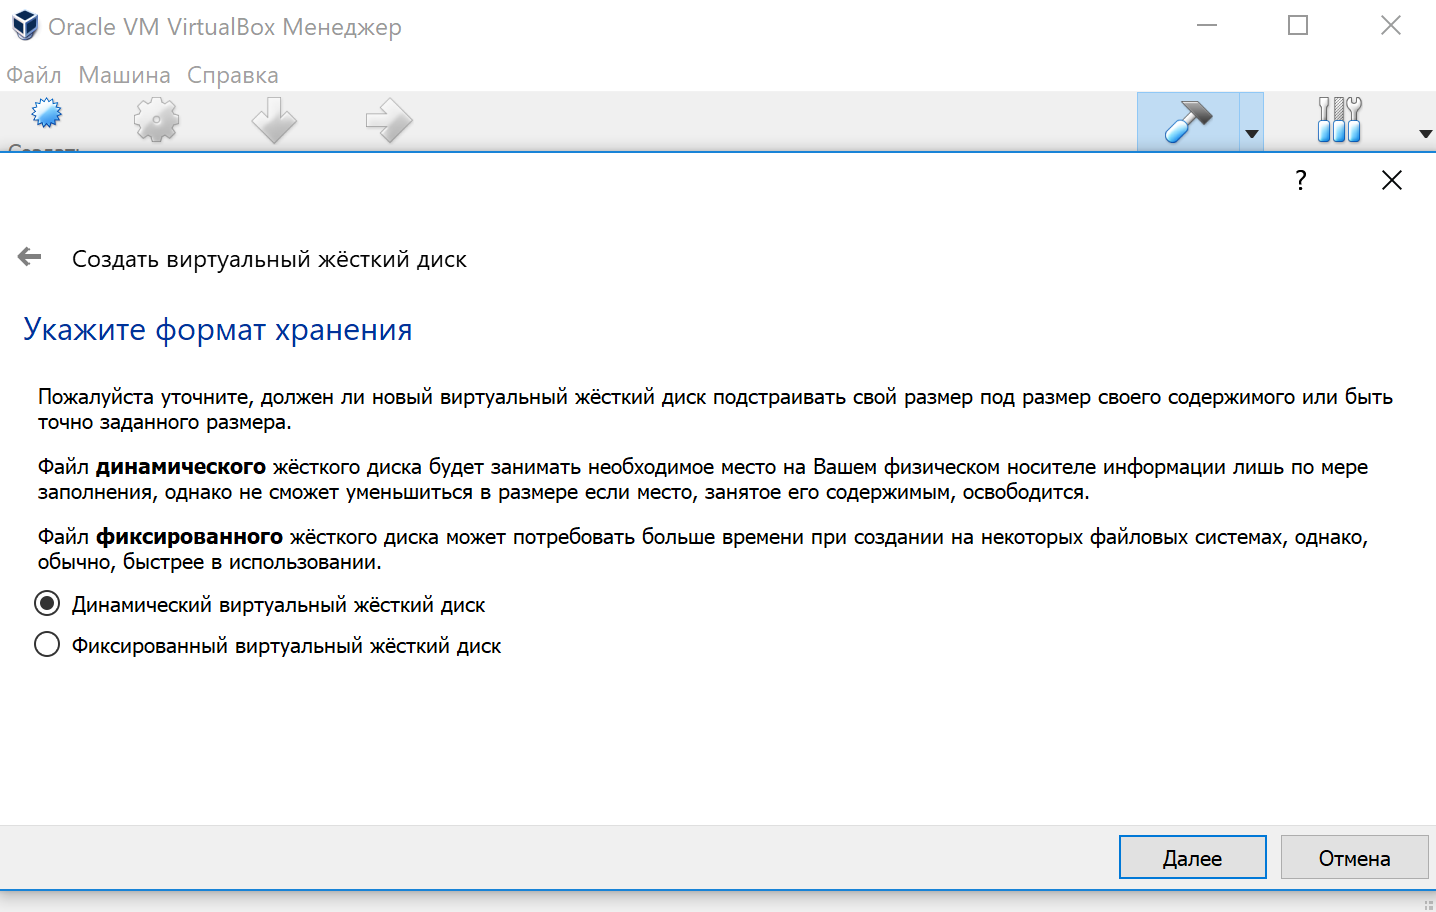
Формат хранения данных выберите исходя из личных предпочтений. Динамический виртуальный жёсткий диск растёт по мере заполнения, а фиксированный создаётся сразу того размера, который был указан на предыдущем шаге.
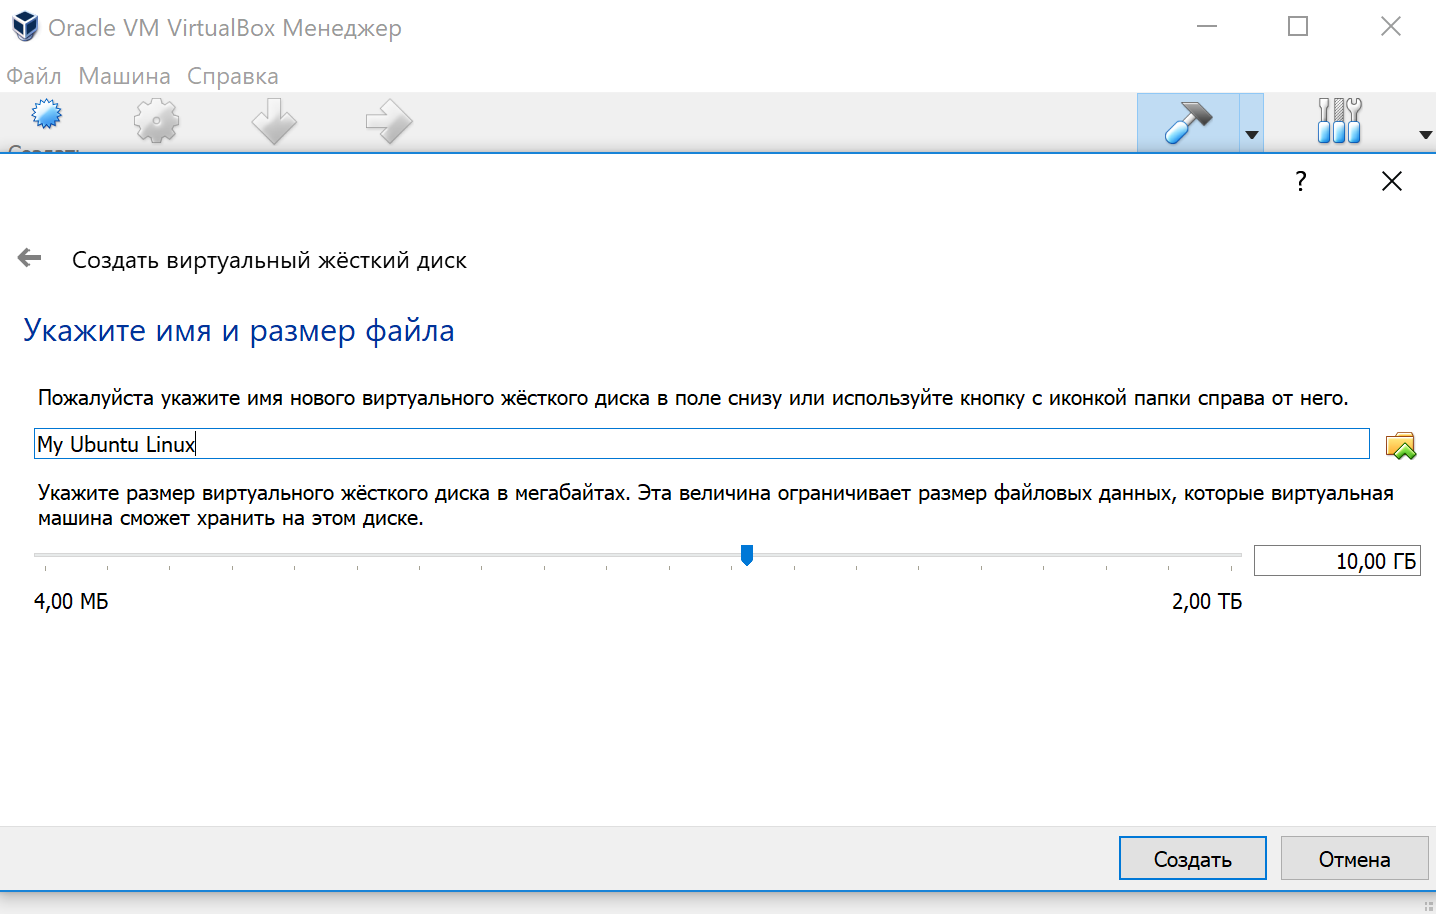
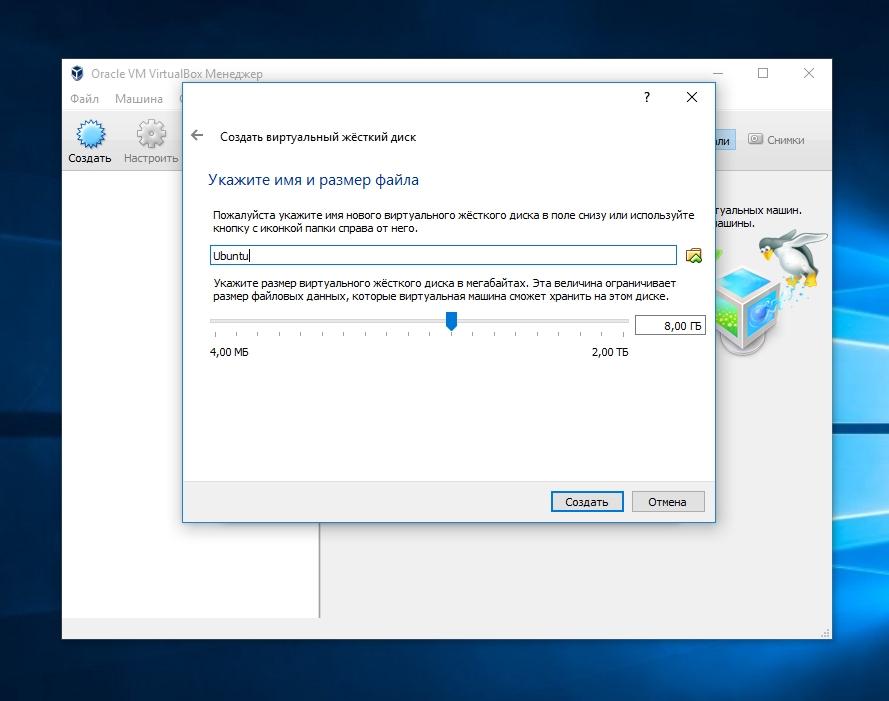
Имя и размер файла можно оставить без изменений и сразу нажать на кнопку «Создать».
По завершению у вас будет создана виртуальная машина, но она пока без операционной системы. Для того чтобы её установить, нужно скачать Ubuntu Linux (32-bit или 64-bit, в зависимости от того, что было выбрано на шаге, где мы указывали тип ОС).
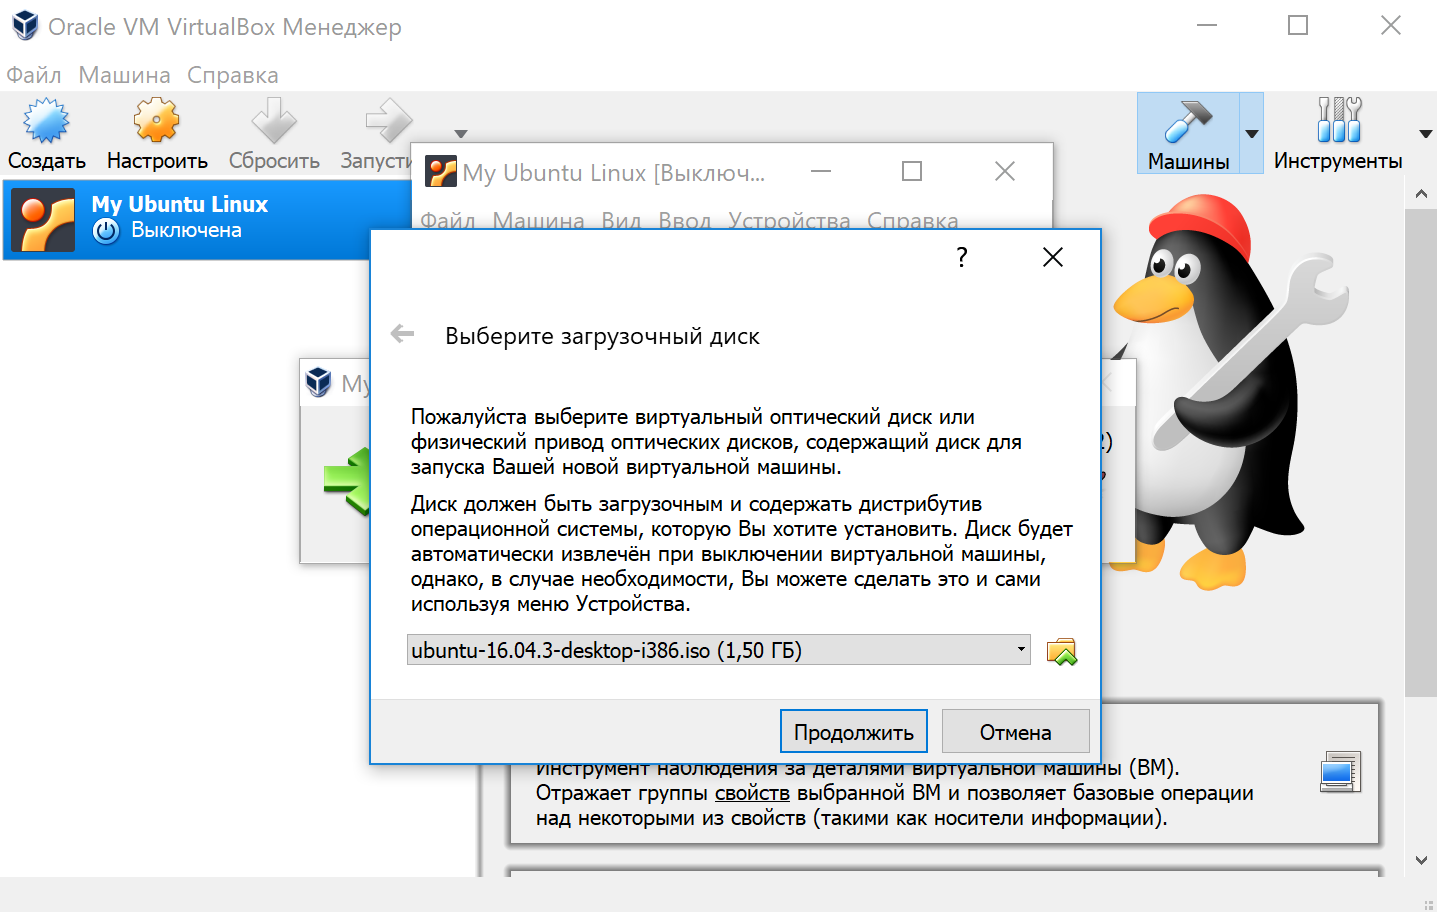
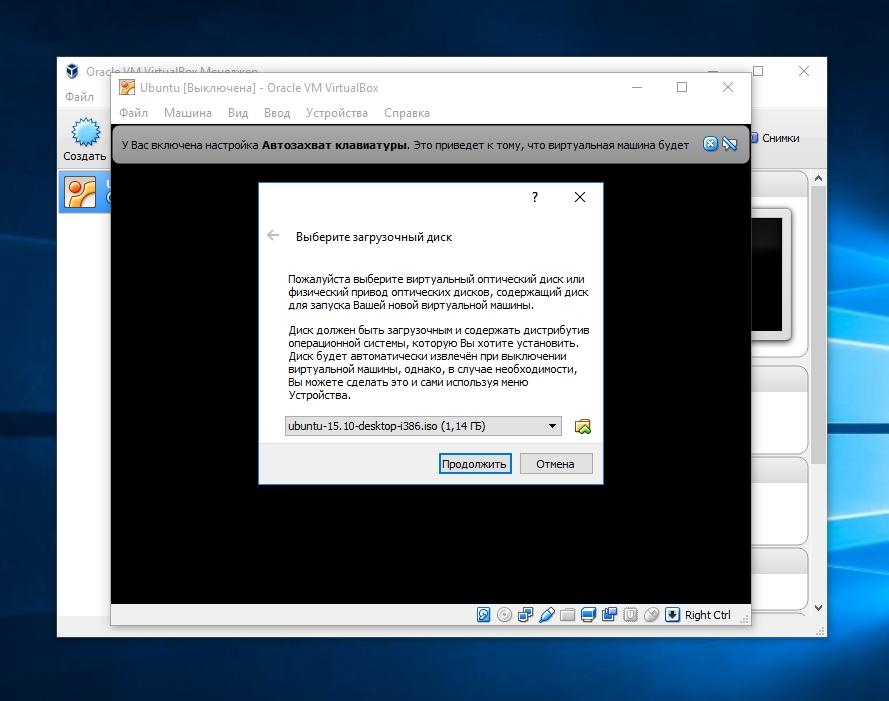
Нажатие на кнопку «Запустить» должно привести к появлению диалогового окна с предложением указать путь до скаченного ISO образа. Сделайте этого и нажмите кнопку «Продолжить»
Виртуальная машина автоматически будет выполнять часть процессов, но в некоторых операциях всё же потребуется участие пользователя.
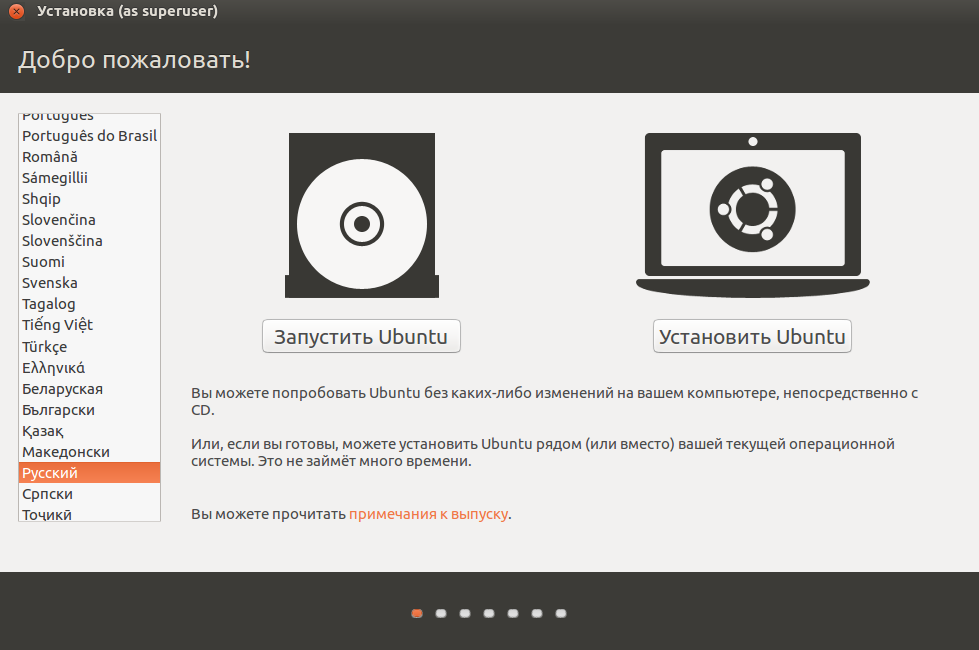
Выберите языковую поддержку в списке слева и нажмите «Установить Ubuntu».
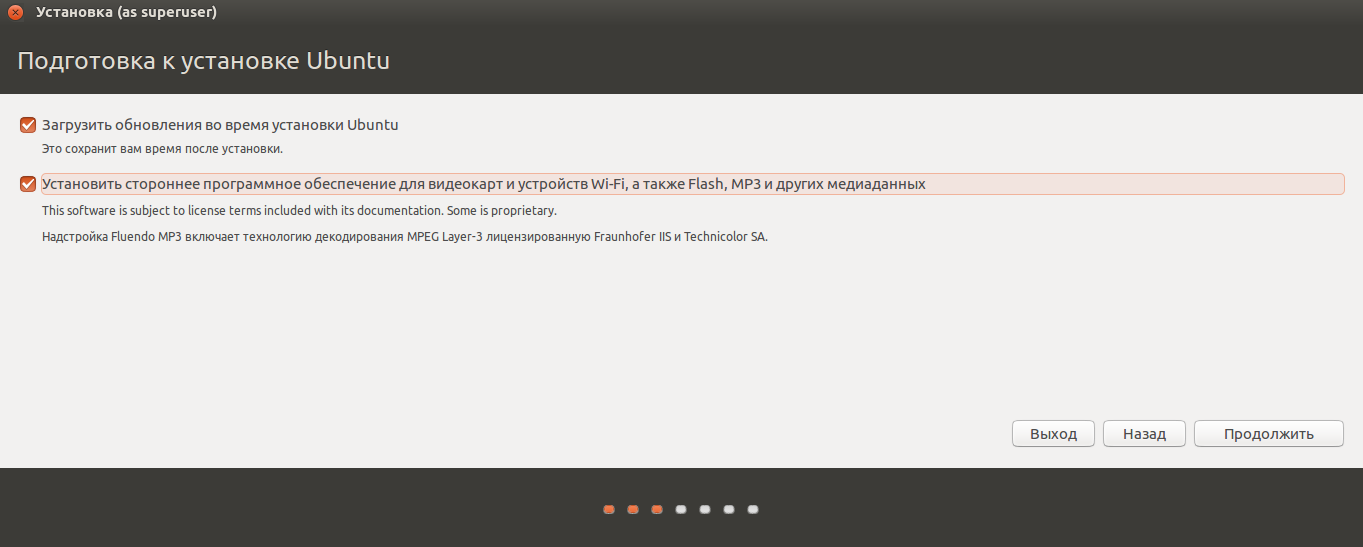
Можно загрузить обновления сразу на этапе установки.
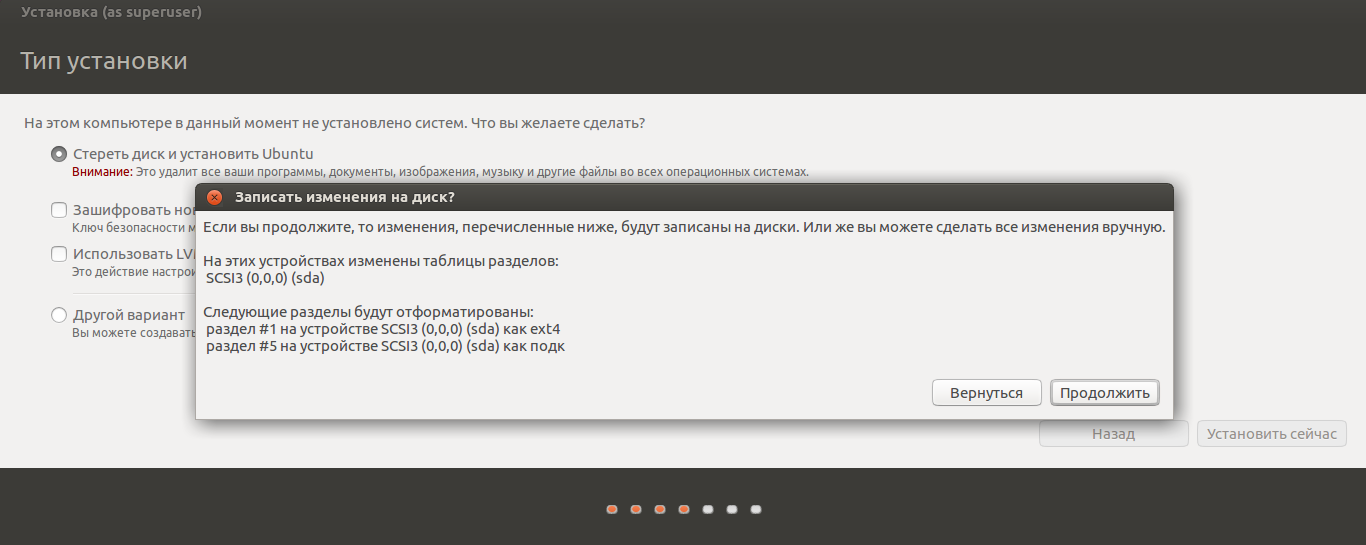
Без особых опасений выбираем пункт «Стереть диск и установить Ubuntu» и двигаемся дальше.
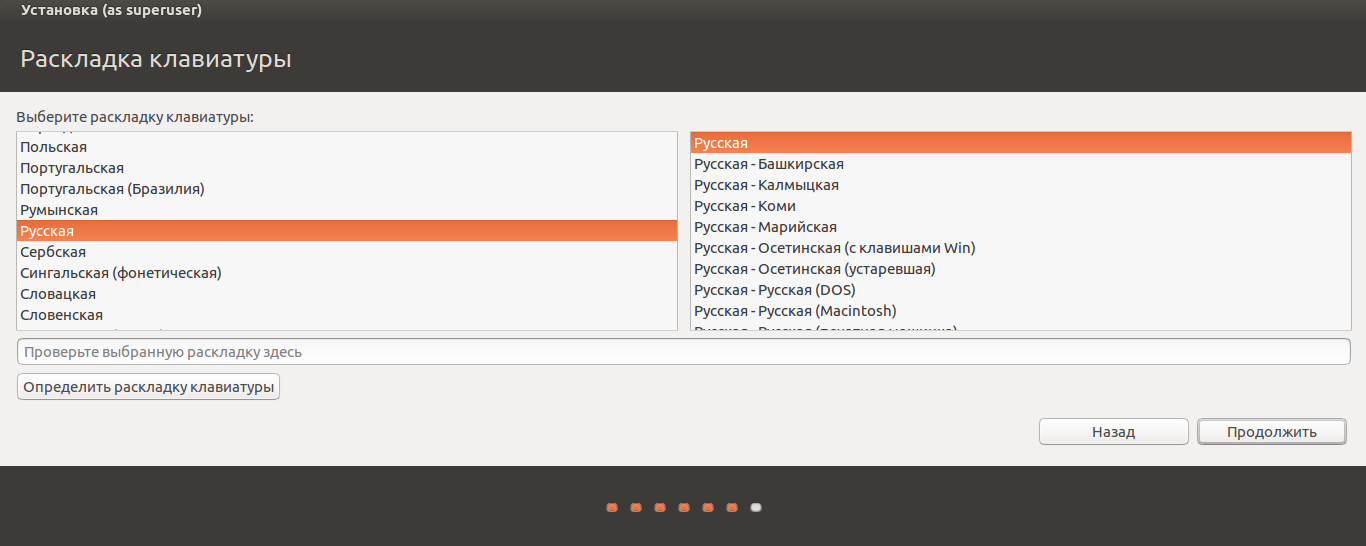
Если вы выбрали русский язык на первом этапе установки, то вам предложат русскую раскладку клавиатуры в качестве дополнительной.
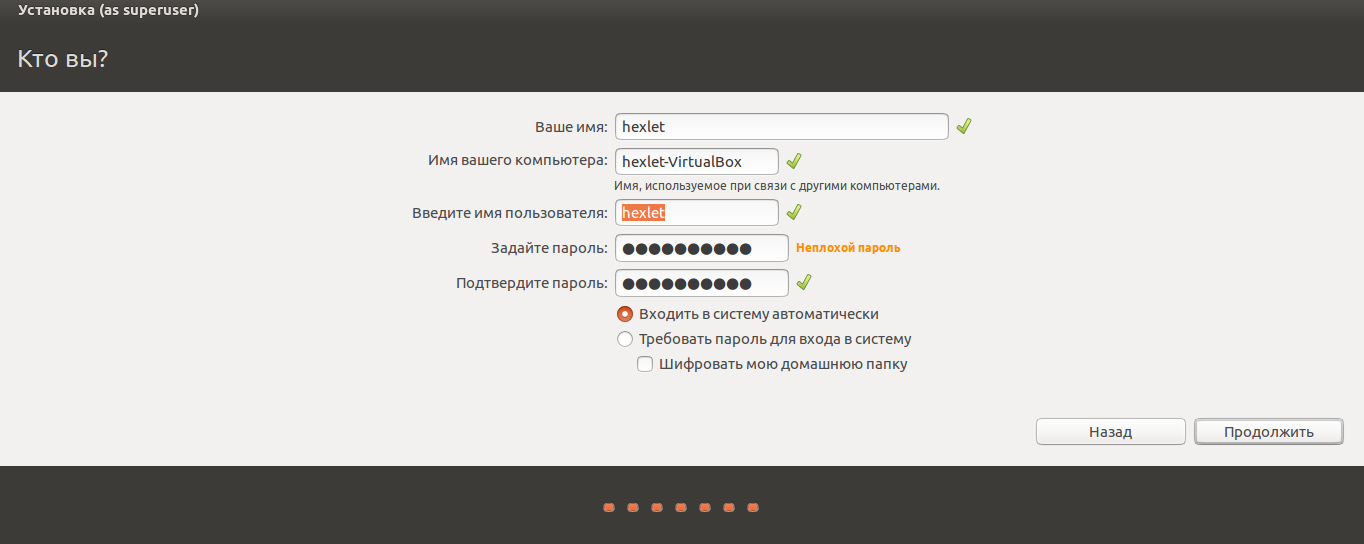
Заполните поля и выберите режим входа в систему.
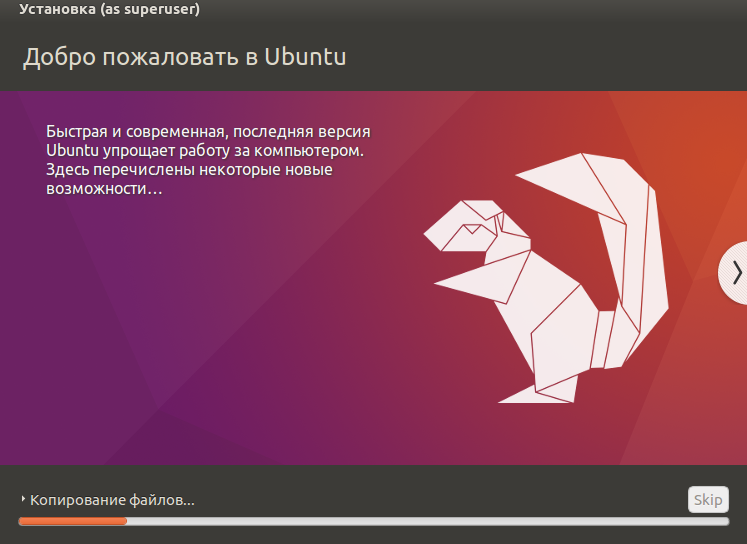
Далее начнётся процедура разметки диска, переноса файлов, установка обновлений и другие процессы, которые не потребуют прямого участия пользователя.
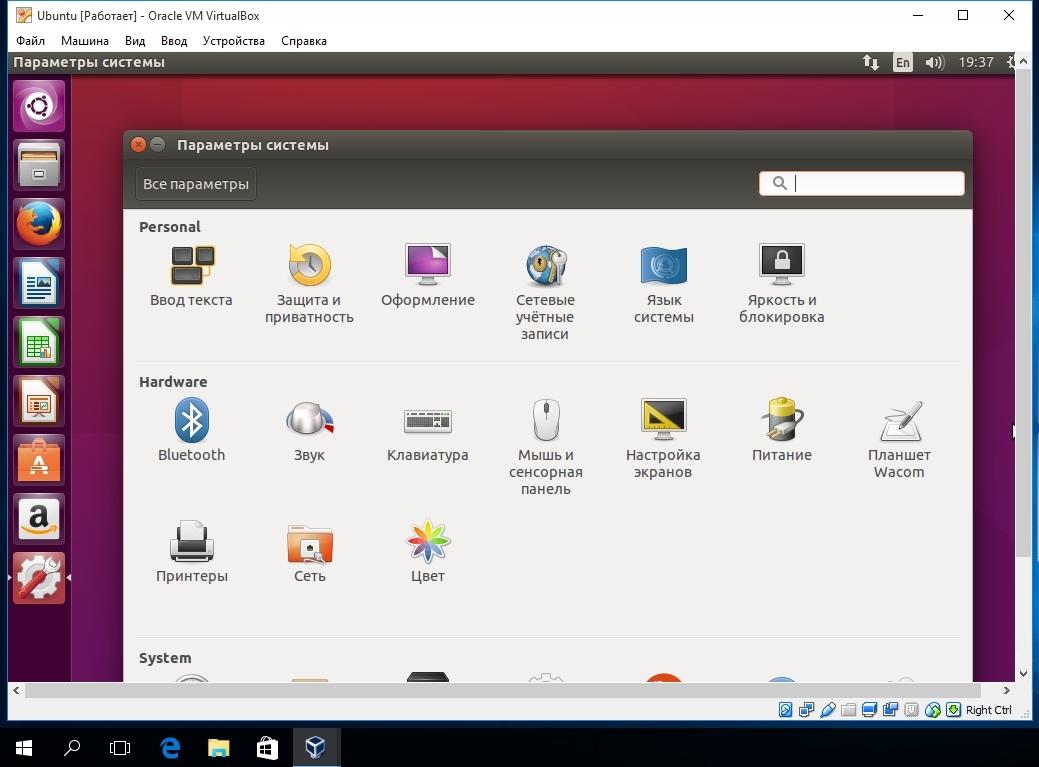
По завершению виртуальный компьютер перезагрузится и вы попадёте в уже установленную среду Ubuntu Linux.
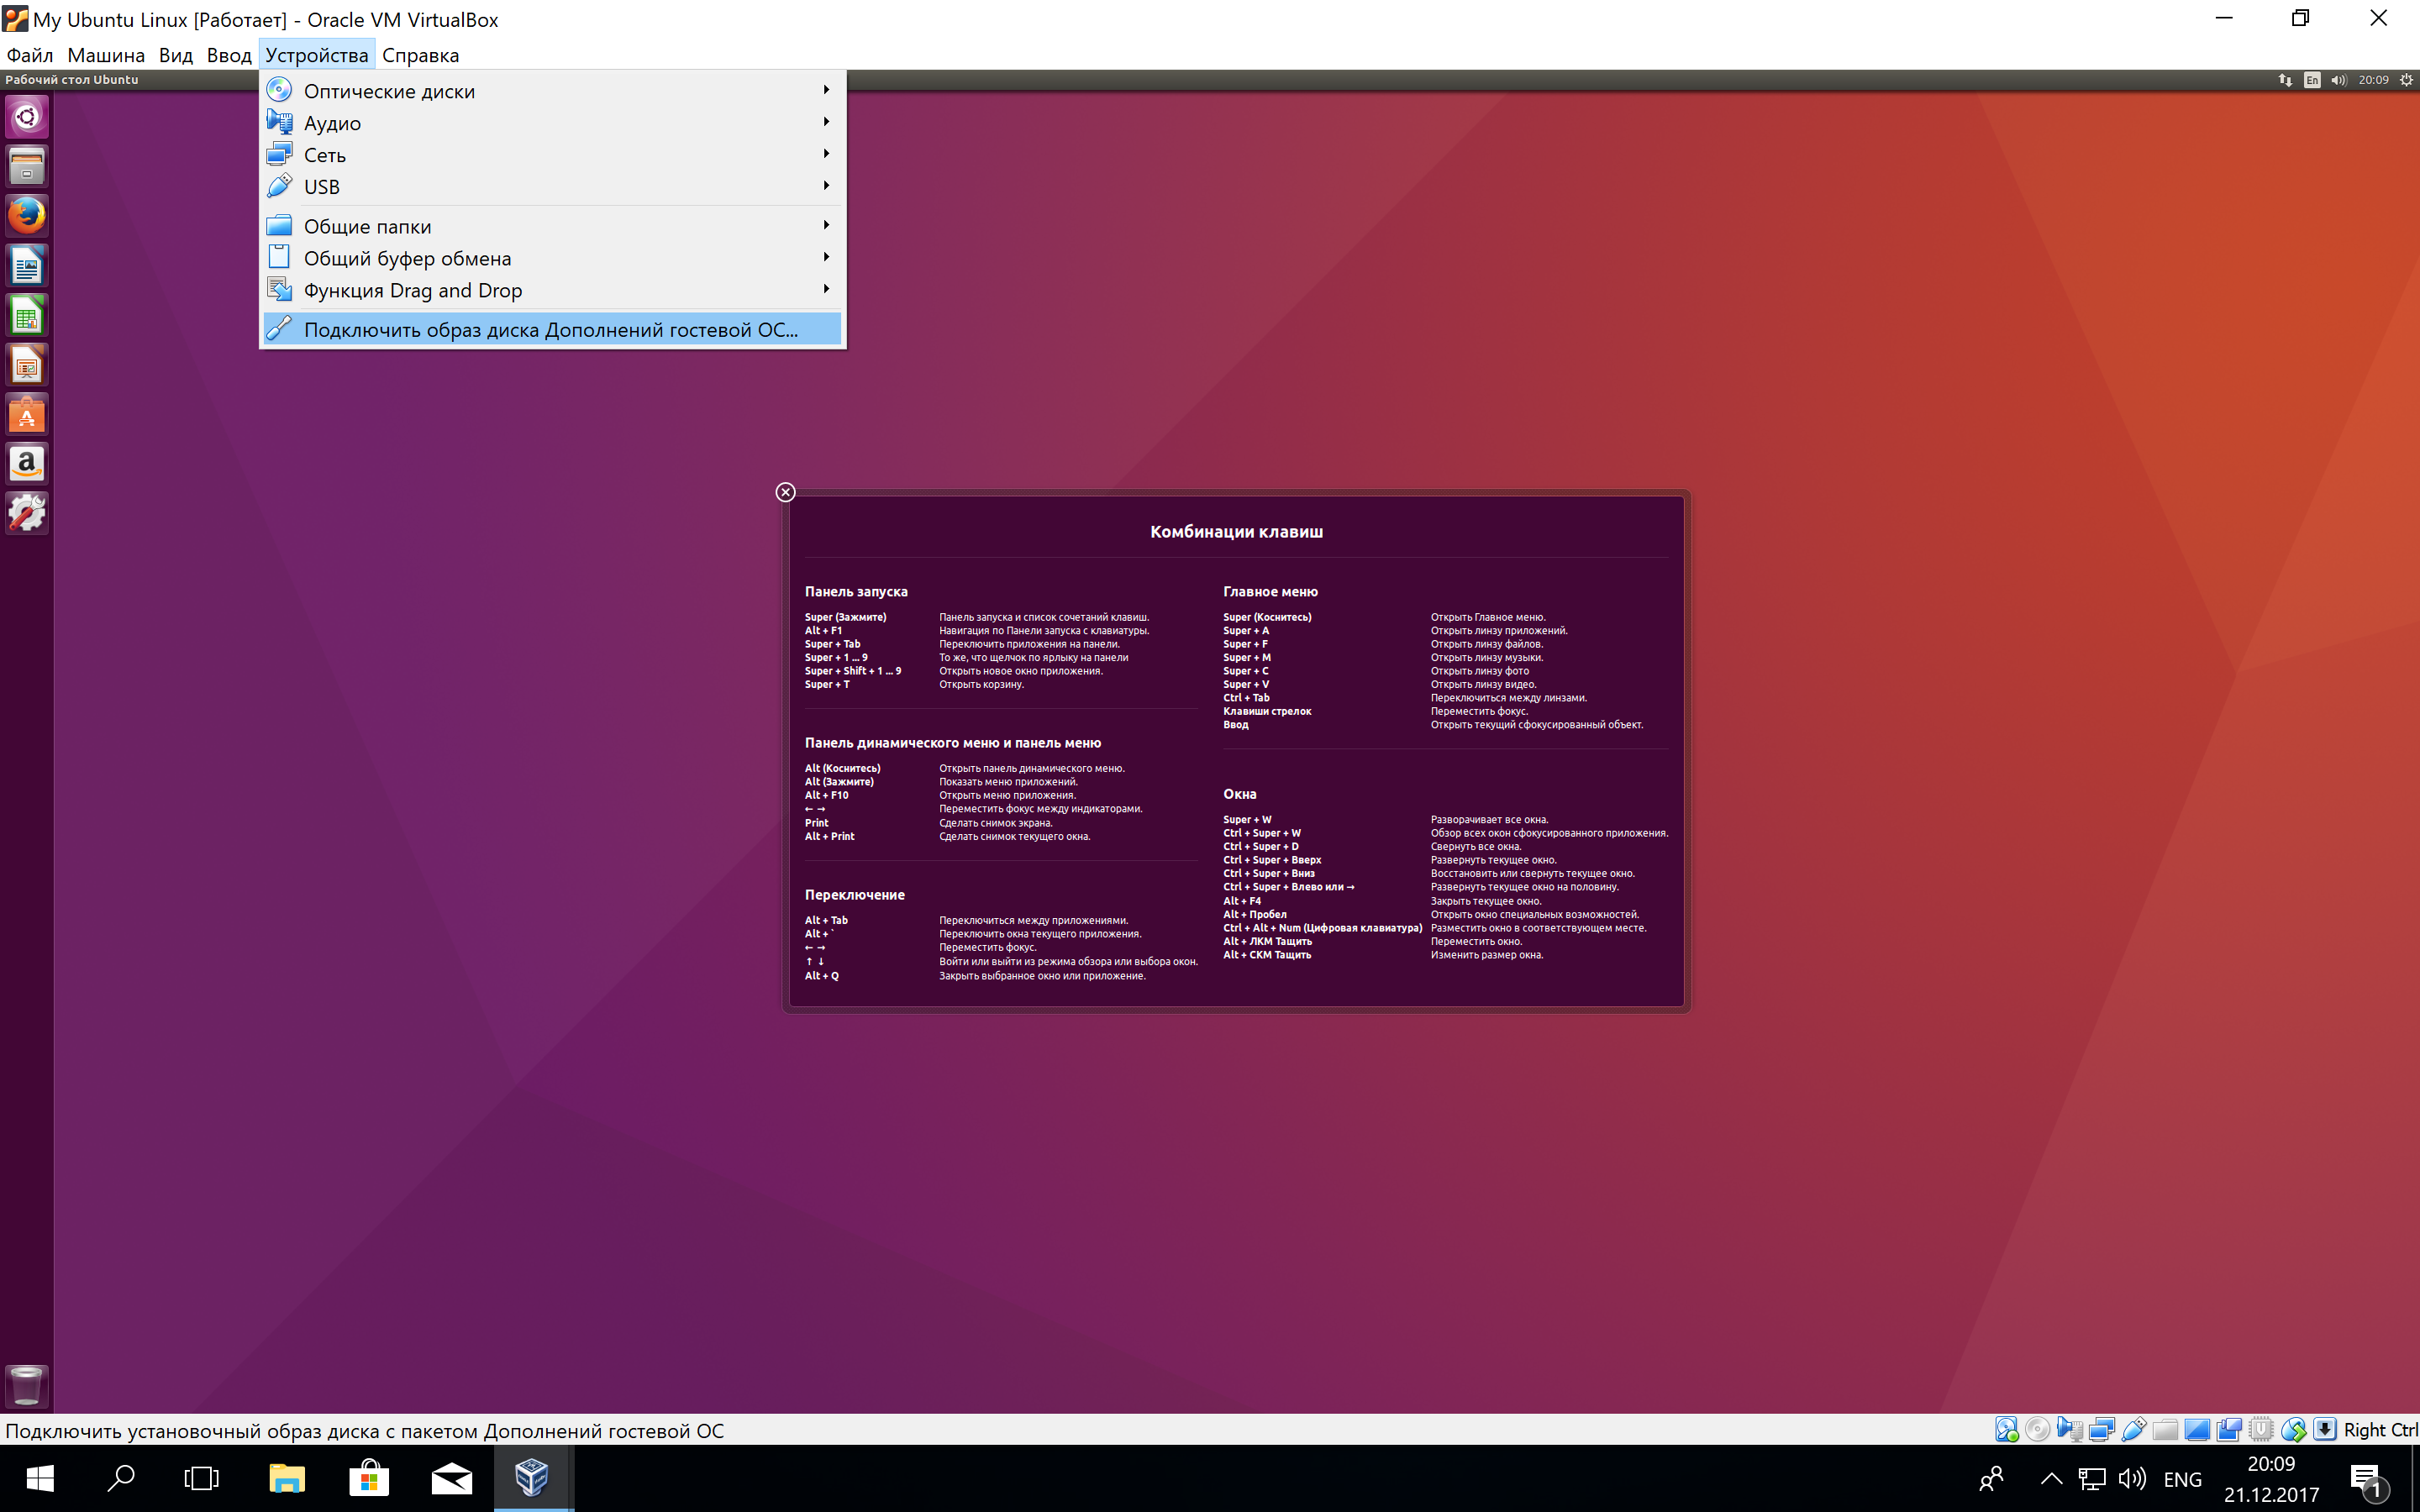
Но это ещё не всё. Весьма желательно установить так называемые «Дополнения гостевой ОС». Они содержат драйверы и прочие системные файлы, необходимые для наилучшей производительности и обеспечения дополнительных функциональных возможностей между виртуальной и гостевой операционными системами.
Выберите пункт меню «Устройства» программы VirtualBox, подпункт «Подключить образ диска Дополнений гостевой ОС…» и дождитесь предложение запустить приложение для автоматического запуска с виртуального привода.
Виртуальная ОС Ubuntu Linux установлена и готова к работе.
Ссылка на официальную документацию: Oracle VM VirtualBox User Manual
1. Overview
In this tutorial, we’ll walk you through one of the easiest ways to try out Ubuntu Desktop on a virtual machine. VirtualBox is a general purpose virtualiser that is available across Linux, Mac OS and Windows. It’s a great way to experience Ubuntu regardless of your current operating system.
VirtualBox 7 and above includes a new feature called Unattended Guest OS Install which significantly streamlines the setup experience for common operating systems like Ubuntu, making it easier than ever to get started.
Note: This tutorial will also work for other distributions, so try it out with some of the Ubuntu flavours as well!
What you’ll learn
- How to install and configure VirtualBox
- How to import an Ubuntu image
- How to run a virtual instance of Ubuntu Desktop
- Further configuration options
What you’ll need
- A PC with internet access!
Download an Ubuntu Image
Duration: 3:00
You can download an Ubuntu image here. Make sure to save it to a memorable location on your PC! For this tutorial, we will use the latest Ubuntu 22.10 release.

Download and install VirtualBox
Duration: 5:00
You can download VirtualBox from the downloads page here. This page includes instructions on how to install VirtualBox for your specific OS so we won’t repeat those here.
Once you have completed the installation, go ahead and run VirtualBox.

2. Create a new virtual machine
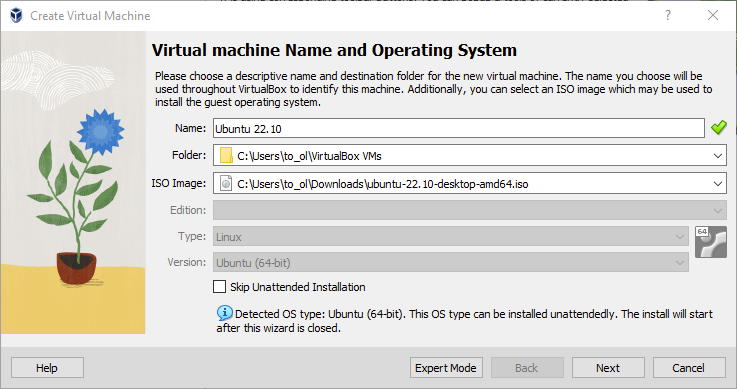
Click New to create a new virtual machine. Fill in the appropriate details:
- Name: If you include the word Ubuntu in your name the Type and Version will auto-update.
- Machine Folder: This is where your virtual machines will be stored so you can resume working on them whenever you like.
- ISO Image: Here you need to add a link to the ISO you downloaded from the Ubuntu website.
We want to install Ubuntu unattendedly so we can leave the checkbox to skip unchecked.
Create a user profile
To enable the automatic install we need to prepopulate our username and password here in addition to our machine name so that it can be configured automatically during first boot.
The default credentials are:
- Username: vboxuser
- Password: changeme
It is important to change these values since the defaults will create a user without sudo access.
Ensure your Hostname has no spaces to proceed!
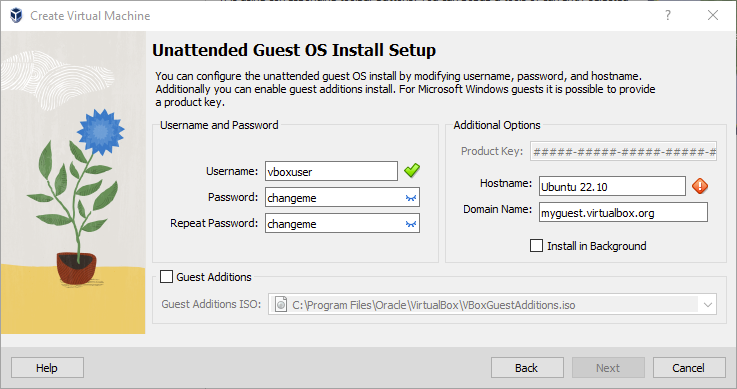
It is also recommended to check the Guest Additions box to install the default Guest Additions ISO that is downloaded as part of VirtualBox. Guest additions enables a number of quality of life features such as changing resolution and dynamic screen resizing so it is highly recommended!
Note: If you choose not to use unattended install then this step will be skipped and you will go straight to the following screen. Once your machine has been created you will be able to create a username and password by proceeding through the standard Ubuntu Desktop installation flow on first boot.
Define the Virtual Machine’s resources
In the next section we can specifiy how much of our host machine’s memory and processors the virtual machine can use. For good performance it’s recommended to provide your VM with around 8GB of RAM (althought 4GB will still be usable) and 4 CPUs. Try to remain in the green areas of each slider to prevent issues with your machine running both the VM and the host OS.

Then we need to specify the size of the hard disc for the virtual machine. For Ubuntu we recommend around 25 GB as a minimum. By default the hard disk will scale dynamically as more memory is required up to the defined limit. If you want to pre-allocate the full amount, check the ‘Pre-allocate Full Size’ check box. This will improve performance but may take up unnecessary space.
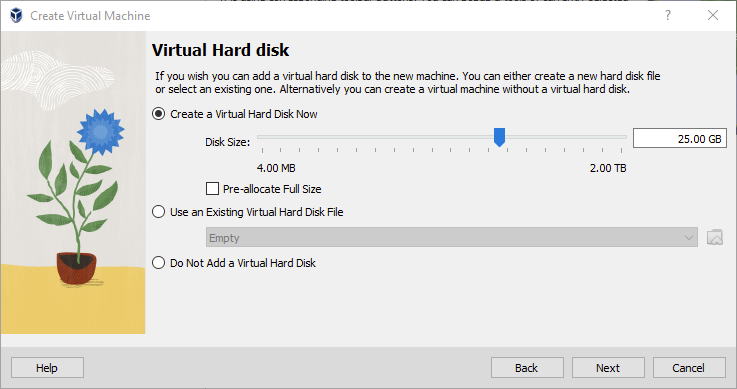
Click Next to continue and view a summary of your machine setting.

After this click Finish to initialize the machine!
3. Install your image
Click Start to launch the virtual machine.

You will see a message saying ‘Powering VM up …’ and your desktop window will appear.
On first boot the unattended installation will kick in so do not interact with the prompt to ‘Try and Install Ubuntu’ and let it progress automatically to the splash screen and into the installer.
Note: If you chose not to use unattended install then you will need to progress through the Ubuntu install manually. Check out our Ubuntu Desktop installation tutorial for more details.

You will notice at this stage that the resolution of the window is fixed at 800×600. This is because the Guest Additions features are not installed until after the Ubuntu installation has completed.

Once the installation completes, the machine will automatically reboot to complete the installation.

Finally you will be greeted with the Ubuntu log-in screen where you can enter your username and password defined during the initial setup (don’t forget that the default password is ‘changeme’ if you left everything as the default).

4. Explore Virtual Box
Enjoy your shiny new Ubuntu Desktop!
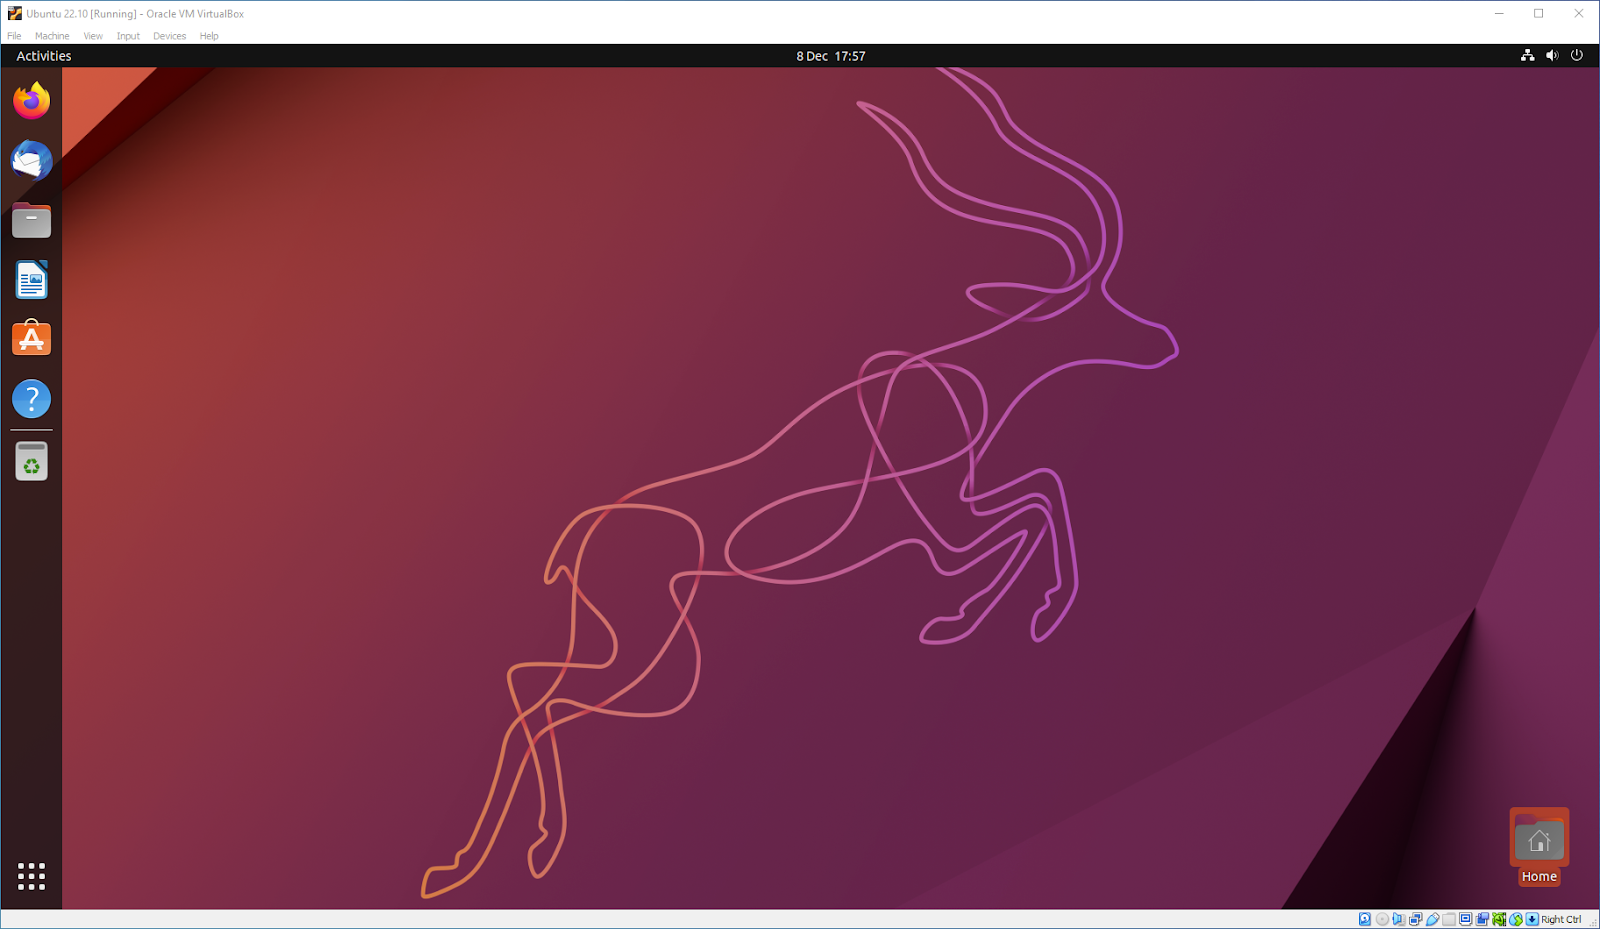
As always we recommend opening a terminal and running sudo apt update && sudo apt upgrade -y and then sudo snap refresh to get everything updated to the latest versions.
Once you’ve finished your session you can close your machine by clicking the X in the top right of the window and choosing whether to keep your machine frozen in its current state or shut it down completely.

As you can probably tell, there are tonnes of further configuration options available in VirtualBox and we’ve only scratched the surface.
VirtualBox allows you to create and configure multiple virtual machines, so don’t be afraid to create new instances of Ubuntu to try out different system and storage configurations to fine tune your performance.
Why not try following the tutorial above with one of the Ubuntu flavours!

5. Tell us your thoughts!
Thank you for following this tutorial, we’d love to hear how you got on.
Give us feedback in the Ubuntu Discourse if you have any issues.
To help us improve our tutorials, we’d love to hear more about you:
How will you use this tutorial?
Only read through it
Complete the exercise
What is your current level of experience?
Novice
Intermediate
Proficient
What operating system are you following this tutorial on?
Ubuntu
Other Linux OS
Windows
Mac OS
Was this tutorial useful?
Thank you for your feedback.
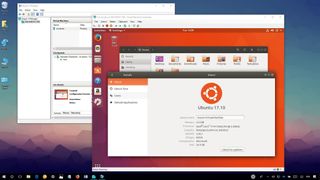
(Image credit: Windows Central)
Although it’s now possible to run a number of Linux distros natively on Windows 10, these environments can be somewhat limited in features and tools you can use. Also, you can only pick from three distros, including Ubuntu, SUSE Linux Enterprise, and OpenSUSE Leap, and you’re stuck with the command-line interface, which means that you can’t run any of the graphical experiences (e.g., GNOME, KDE, XFCE) or Linux-based graphical applications.
Of course, you can always install your favorite Linux distro on a second machine, but if you don’t have one, it’s still possible to run a full-blown version of Linux using a virtual machine (VM).
If you’re running Windows 10, you can enable Hyper-V on your device to create a VM to install your preferred distro whether you’re a developer or an enthusiast who just wants to know what’s the Linux fuzz all about.
In this Windows 10 guide, we’ll walk you through the steps to install most Linux distributions on virtual machines using Microsoft’s Hyper-V virtualization feature.
- Guide requirements
- How to enable Hyper-V on Windows 10
- How to create a virtual machine using Hyper-V
- How to install Ubuntu Linux using Hyper-V on Windows 10
Guide requirements
To run a Linux virtual machine on Windows 10, you’ll need the following:
- A computer with support for Hyper-V.
- An ISO file to install your preferred Linux distribution.
In this guide, we’ll be using Ubuntu version 17.10, which you can download from the official Ubuntu website. However, it’s possible to install version 16.04, which might be a more stable version of the open source project, and you can also install other distros, including:
- CentOS and Red Hat Enterprise Linux.
- Debian.
- SUSE.
- Oracle Linux.
- FreeBSD.
How to enable Hyper-V on Windows 10
Hyper-V is a virtualization technology from Microsoft available on Windows 10 Pro, Enterprise, and Education, and it allows you to create one or multiple virtual machines to install and run different OSes on the same physical hardware.
Verifying Hyper-V support
Although Hyper-V is part of Windows 10, there is a minimum hardware requirement a computer must meet to enable the feature.
- 64-bit CPU with Second Level Address Translation (SLAT).
- Processor must support VM Monitor Mode Extension (VT-c on Intel chips).
- 4GB of memory at a minimum.
In addition, you have to make sure the Virtualization Technology and Hardware Enforced Data Execution Prevention options are enabled on your system BIOS.
You can quickly verify your computer has the required support for Hyper-V using Systeminfo:
- Open Start.
- Search for Command Prompt and click the top result.
- Type the following command and press Enter:
systeminfo.exe - Under Hyper-V Requirements, if the result reads Yes, then you can run Hyper-V.
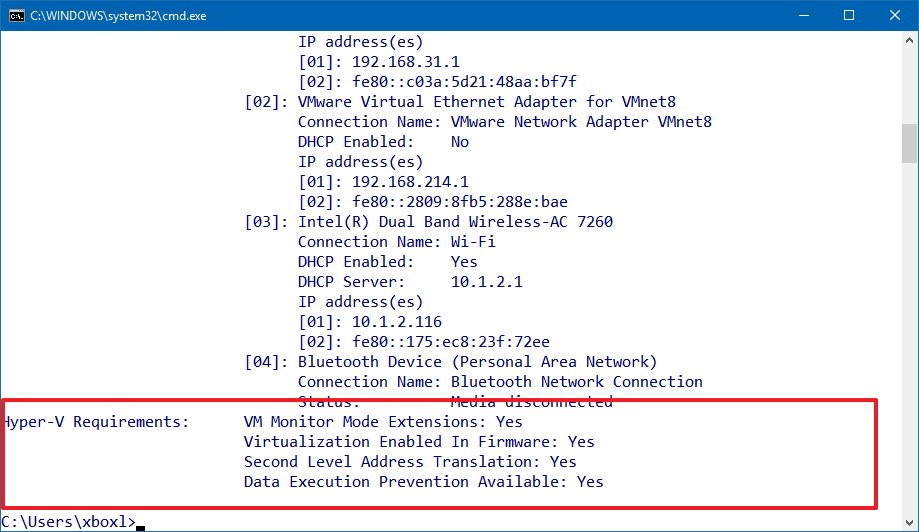
If the command displays No under Hyper-V Requirements, then your hardware doesn’t support this feature, or you need to make sure to enable it manually.
Enabling Hyper-V
Use the following steps to enable Hyper-V on Windows 10:
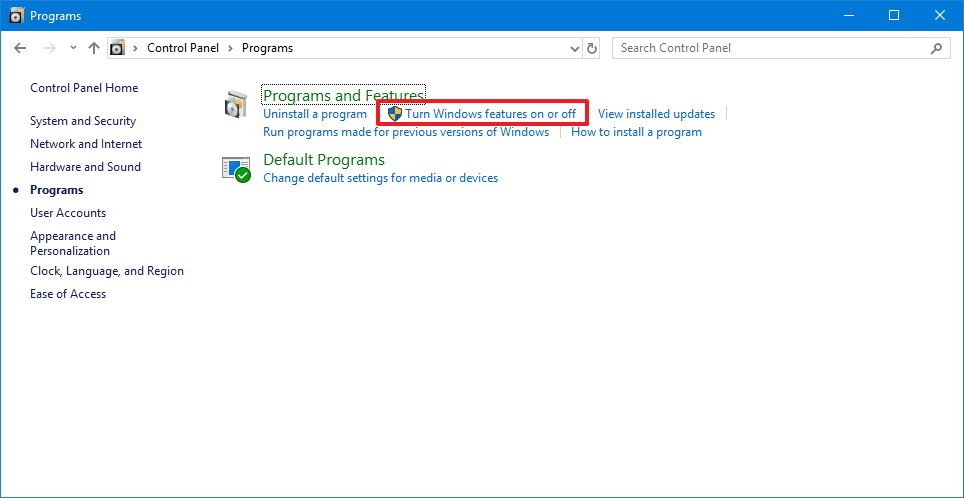
- Open Control Panel.
- Click on Programs.
- Click on Turn Windows features on or off.
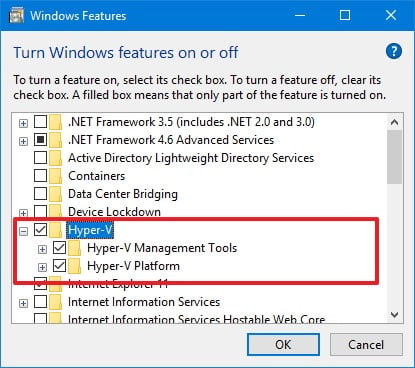
- Check the Hyper-V option making sure: Hyper-V Management Tools and Hyper-V Platform are also selected.
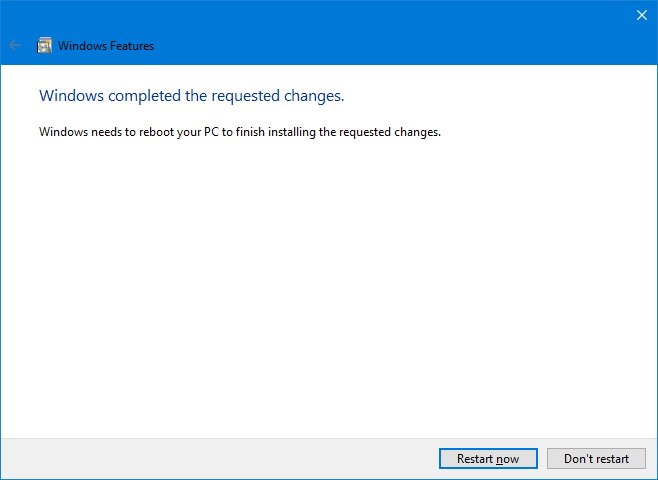
- Click OK to begin the process.
- After the installation completes, click Restart now to apply the changes.
How to create a virtual machine using Hyper-V
Once you’ve completed adding the virtualization layer to Windows 10, you’ll need to create a virtual machine for the Linux distribution you want to use.
However, before you do that, you must create a virtual switch to allow the VM to connect to the internet.
Creating a virtual switch
Use the following steps to configure a virtual switch on Hyper-V:
- Open Start.
- Search for Hyper-V Manager and click the top result.
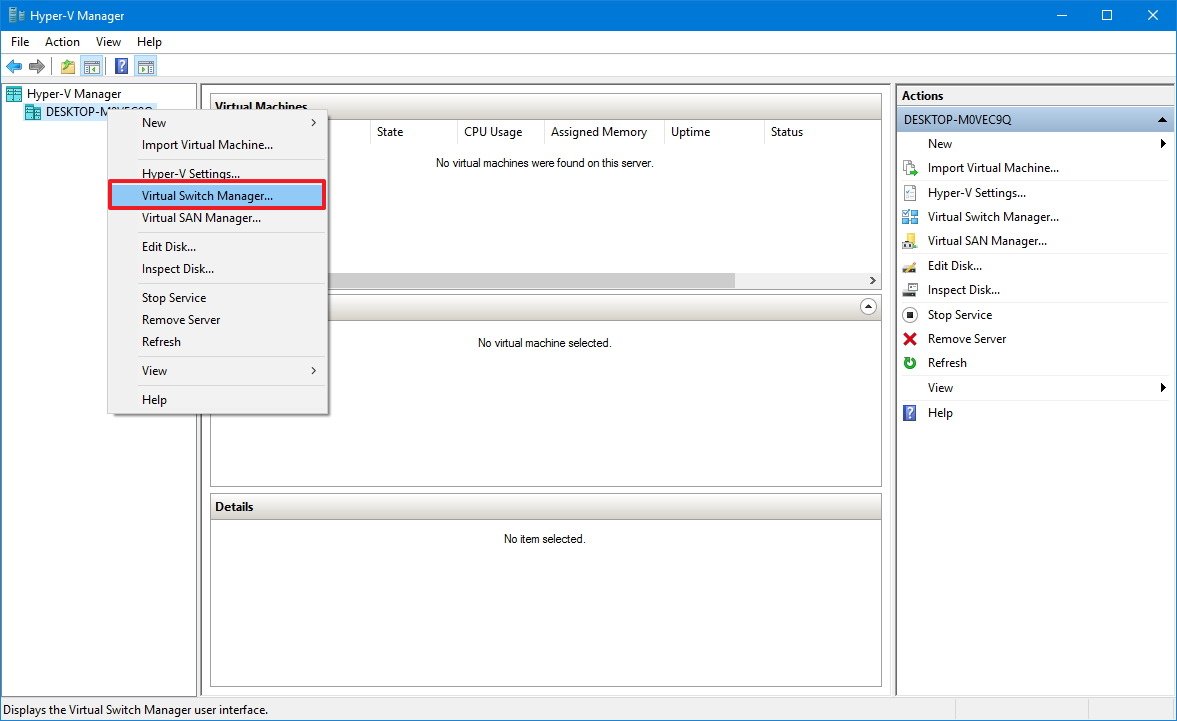
- Click on the Action menu.
- Select New and click on Virtual Switch Manager.
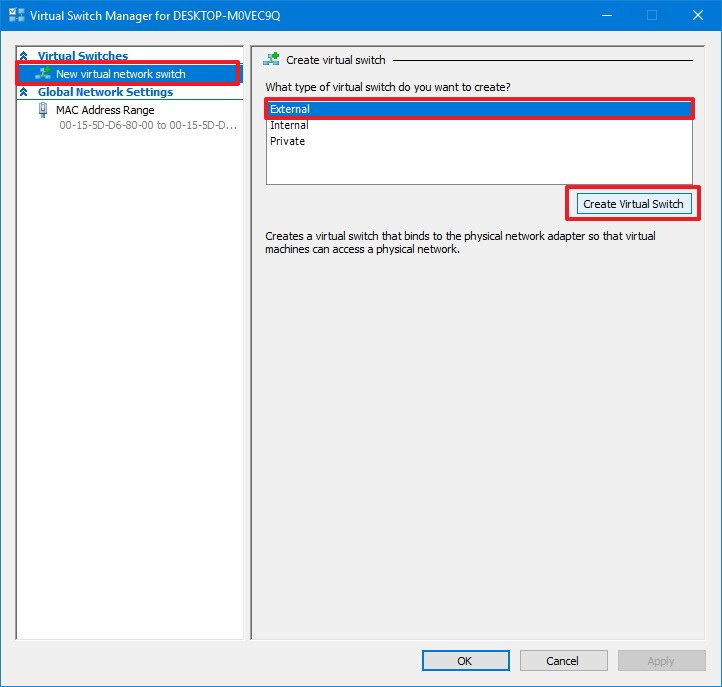
- On the left pane, select New virtual network switch.
- On the right, select External.
- Click the Create Virtual Switch button.
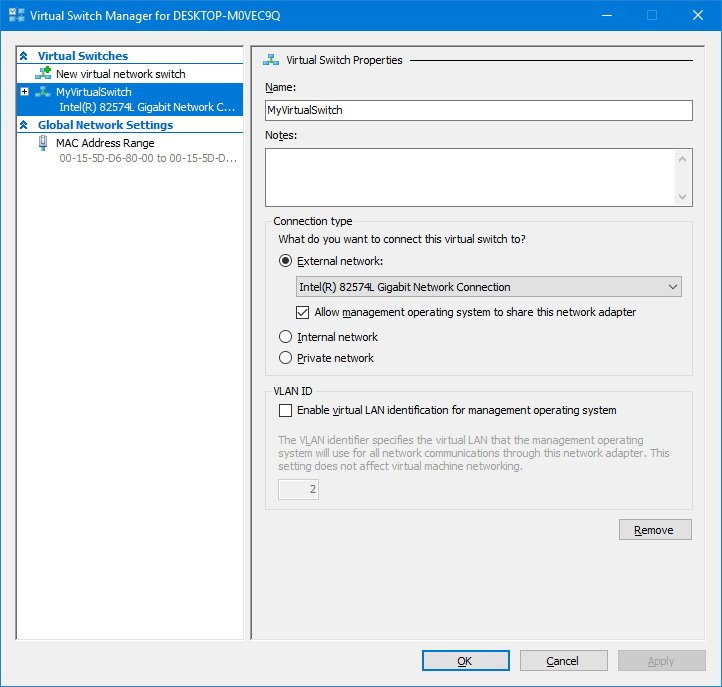
- Enter a new descriptive name for the switch (e.g., MyVirtualSwitch).
- Under connection type, make sure your network adapter is select on External network.
- Click Apply.
- Click OK.
Creating a virtual machine
After creating the virtual switch, you can proceed to create a new virtual machine:
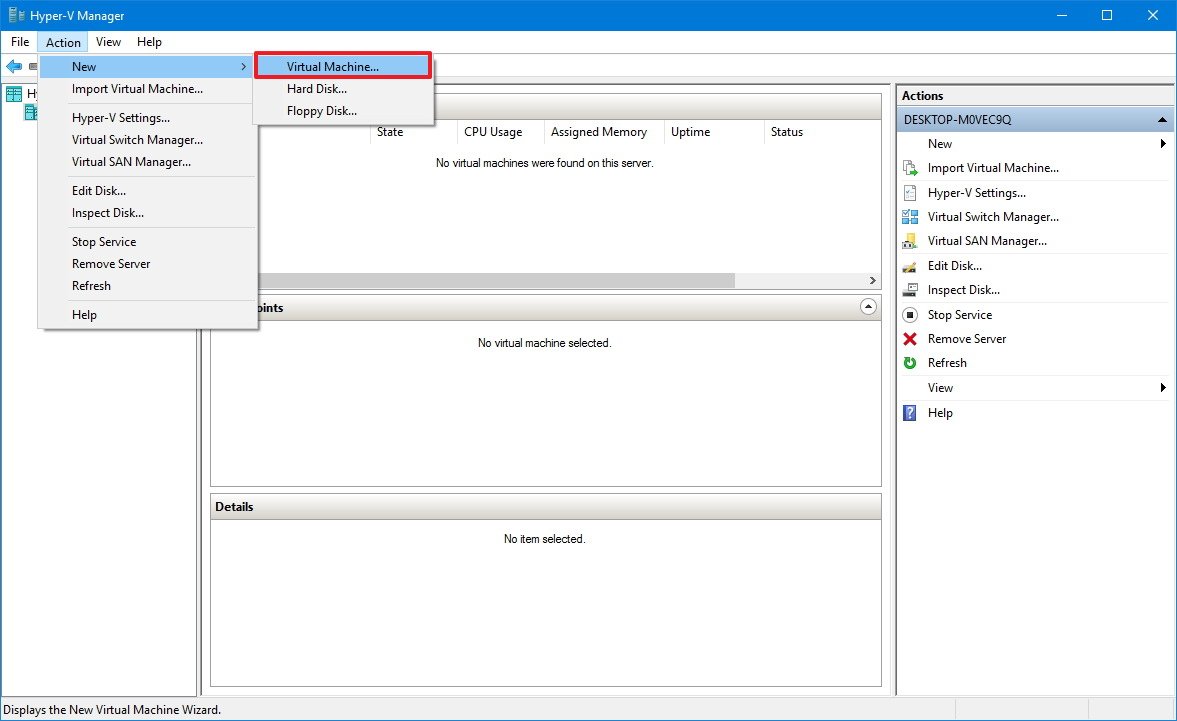
- Open Start.
- Search for Hyper-V Manager and click the top result.
- Click on the Action menu.
- Select New and click on Virtual Machine.
- Click the Next button.
- Enter a descriptive name for your virtual machine (e.g., vm-ubuntu).
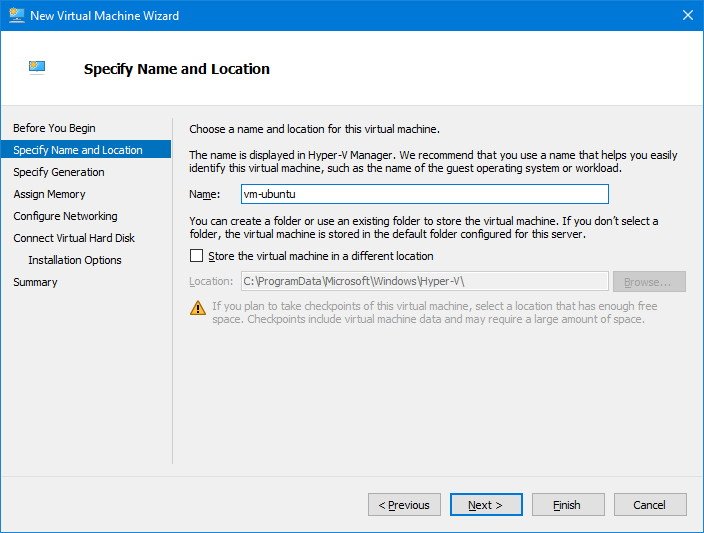
- Use the default location to store your virtual machine, or check the Store the virtual machine in a different location option to select a different path.
- Click Next to continue.
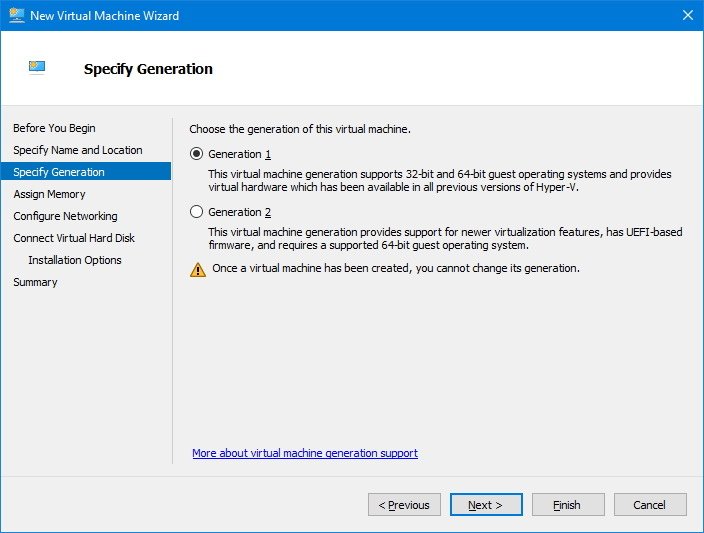
- You can leave the default Generation 1 option selected. Or you can select Generation 2 if you want a UEFI-based firmware.
- Click Next.
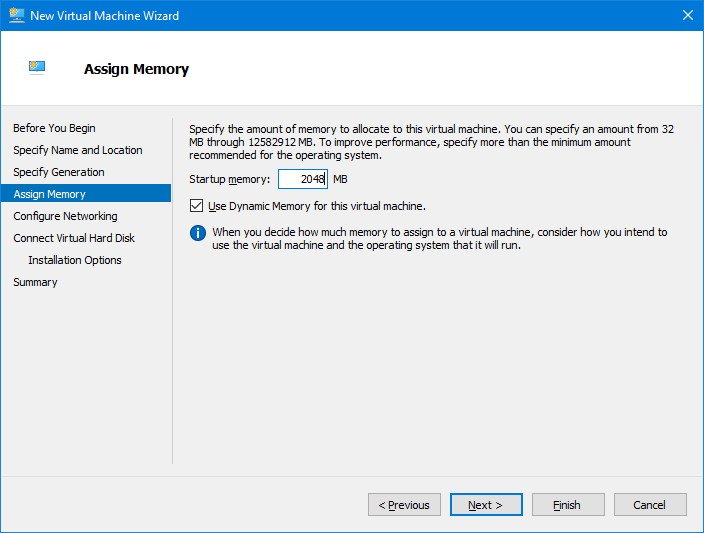
- Select the amount of RAM to allocate for your virtual machine. In the case of Ubuntu, you need a minimum of 2GB of memory.You can allocate as much memory as you want, but this setting will always depend on the physical memory available on your computer.
- Click Next.
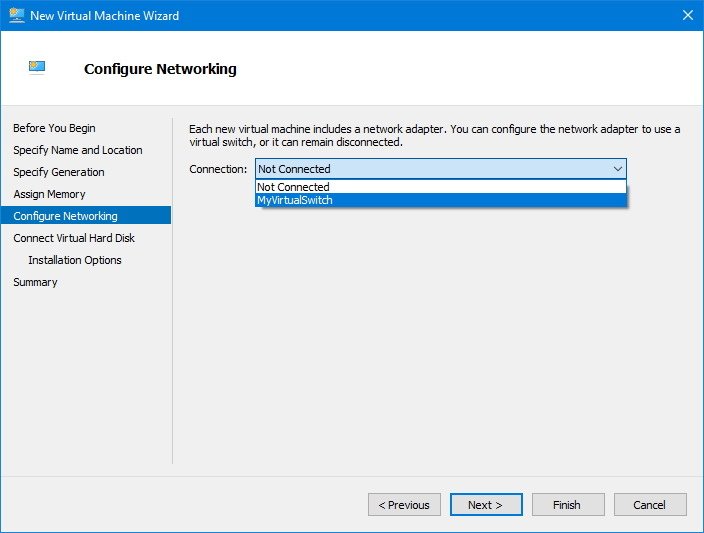
- Use the drop-down menu to select the virtual switch you created earlier.
- Click Next.
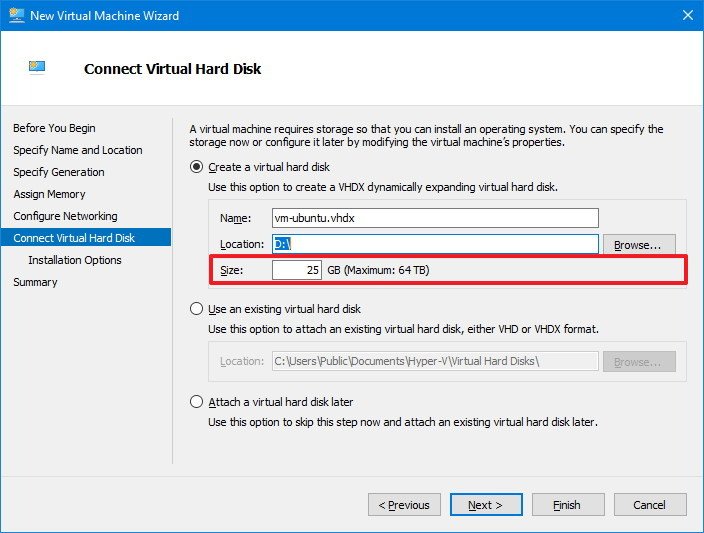
- You can leave all the default settings to create a virtual hard drive, but under Size make sure to allocated at least 25GB of storage, which is the minimum required to run Ubuntu.
- Click Next to continue.
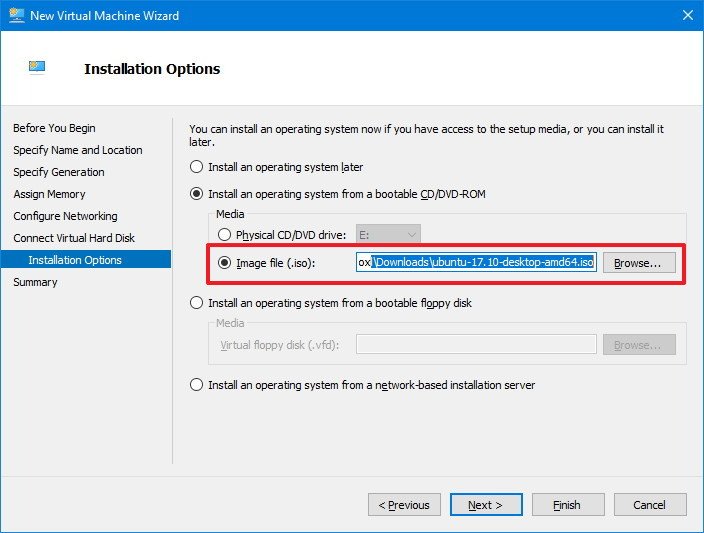
- On Installation options, select the Install an operating system from a bootable CD/DVD-ROM option.
- Select the Image file (.iso) option.
- Select the path for the ISO file with the Ubuntu installation files.
- Click Next.
- Click Finish.
How to install Ubuntu Linux using Hyper-V on Windows 10
The last step is to start the virtual machine and install the Linux distribution you want to use.
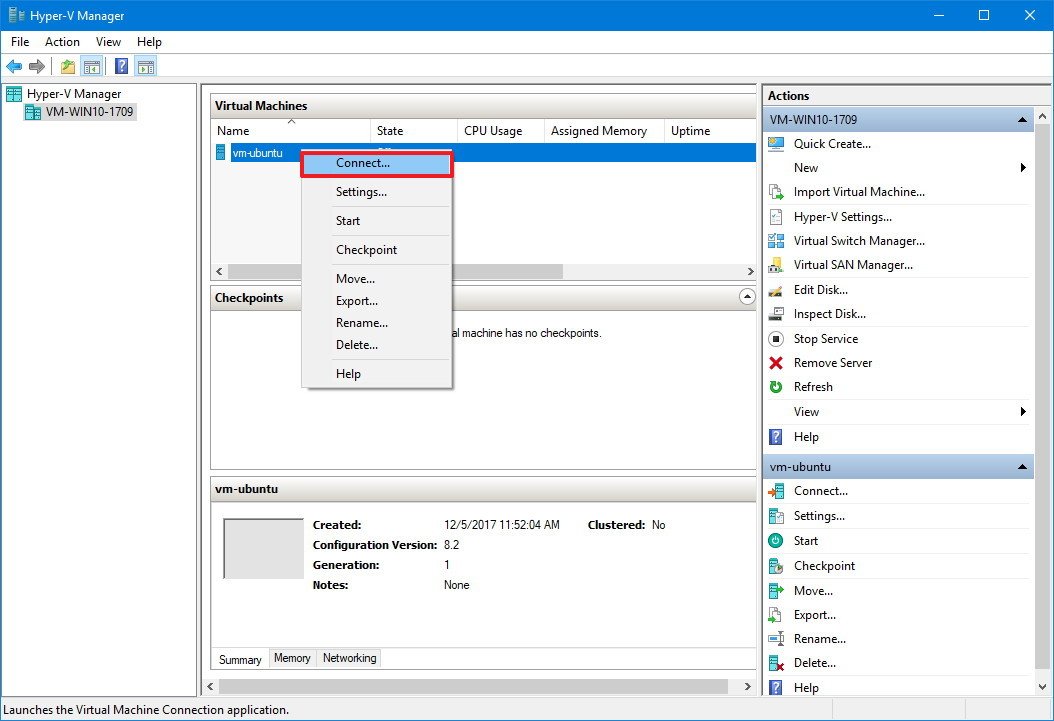
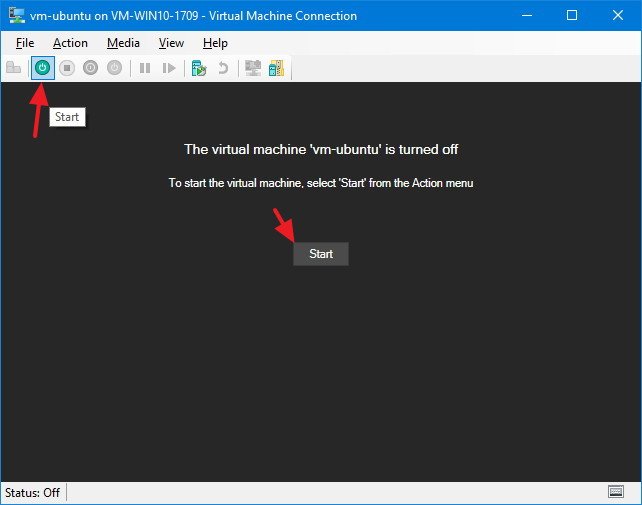
- On Hyper-V Manager, under Virtual Machine, right-click the newly created device, and select Connect.
- Click the Start (power) button.
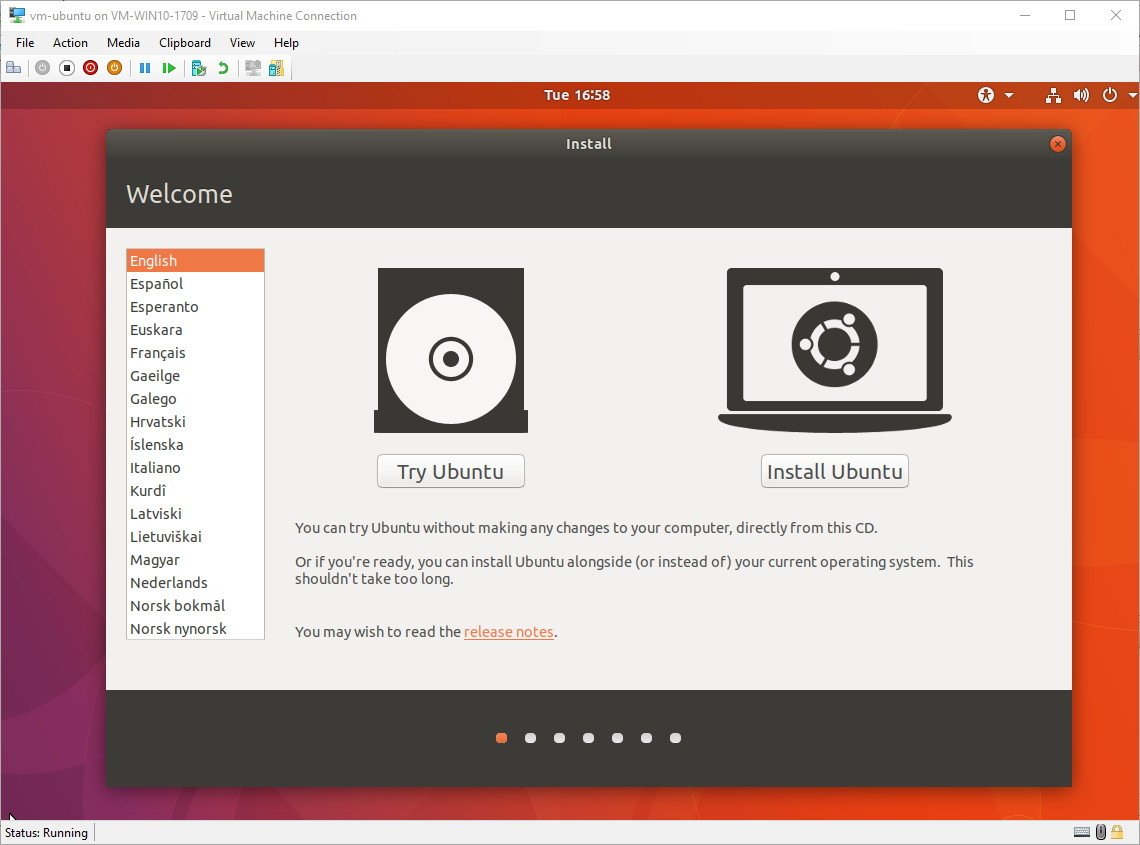
- Select your language.
- Click the Install Ubuntu button.
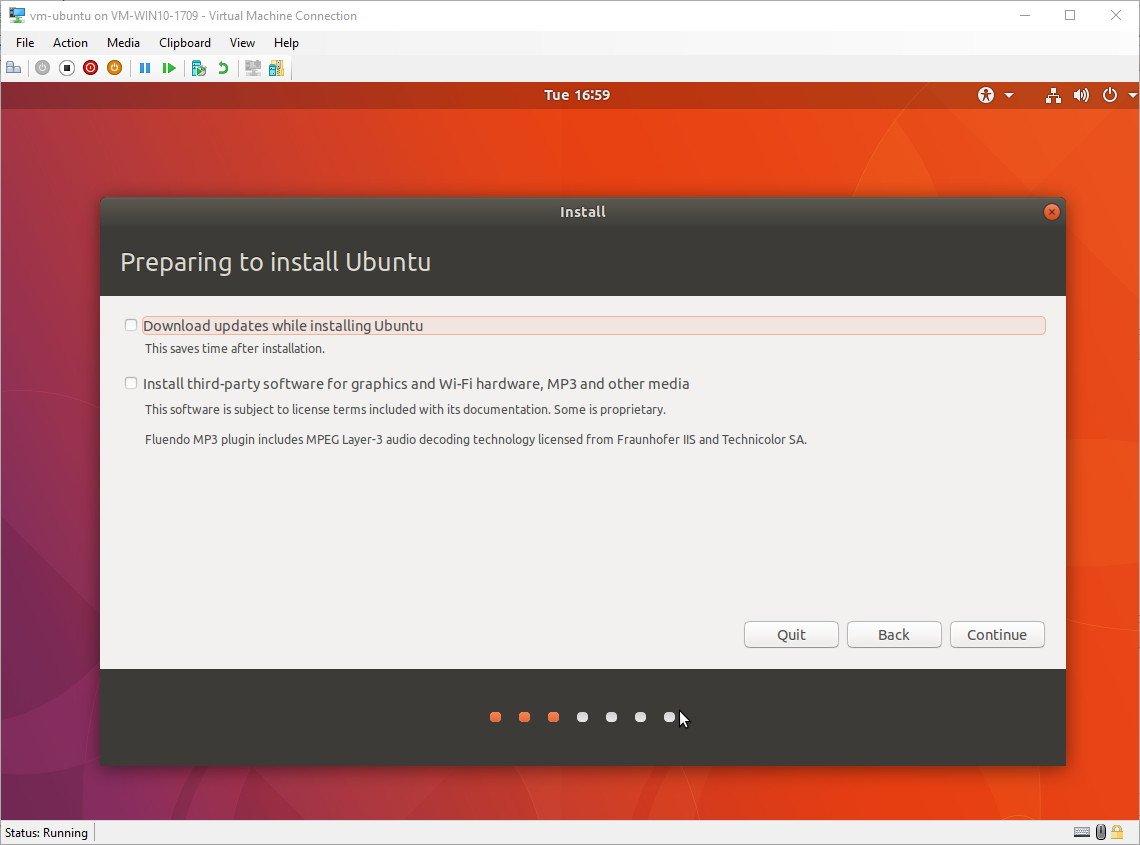
- Check the Install third-party software for graphics and Wi-Fi hardware, Flash, MP3 and other media option.
- Click Continue.
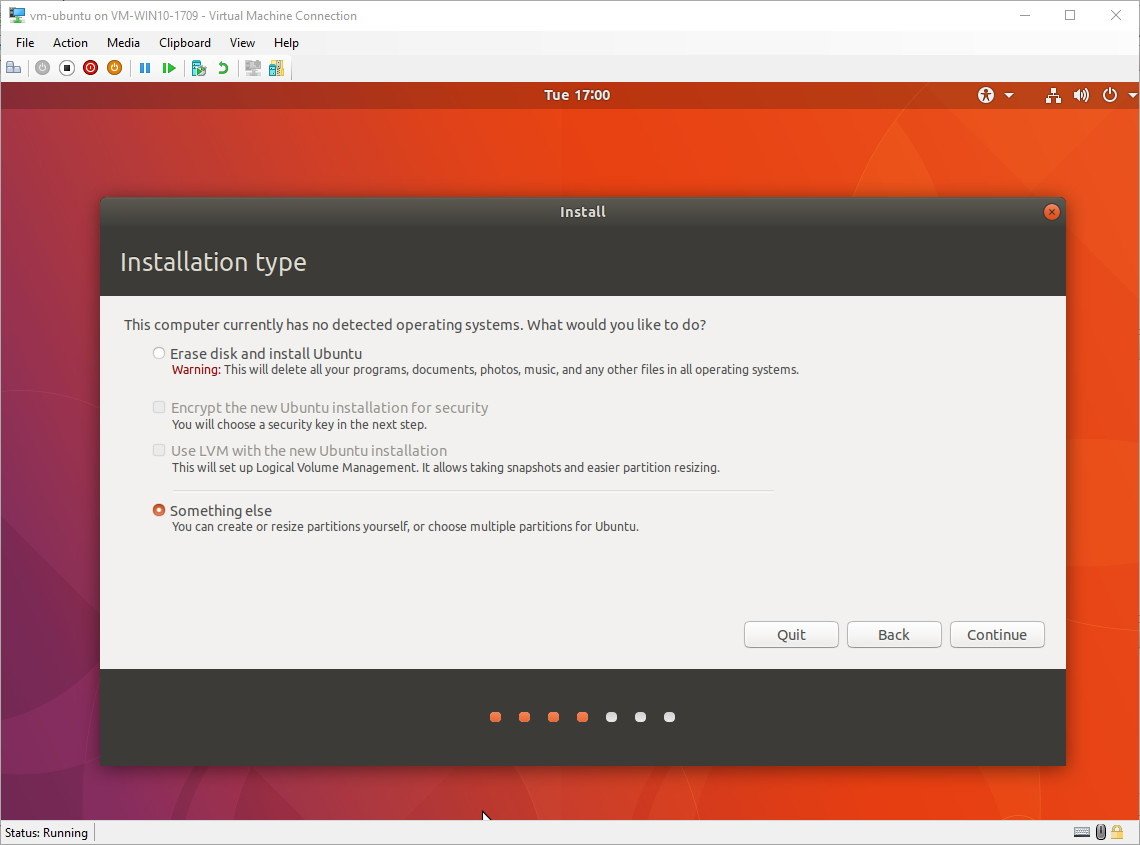
- Select the Something else option.
- Click Continue.
- Double-click the /dev/sda drive.
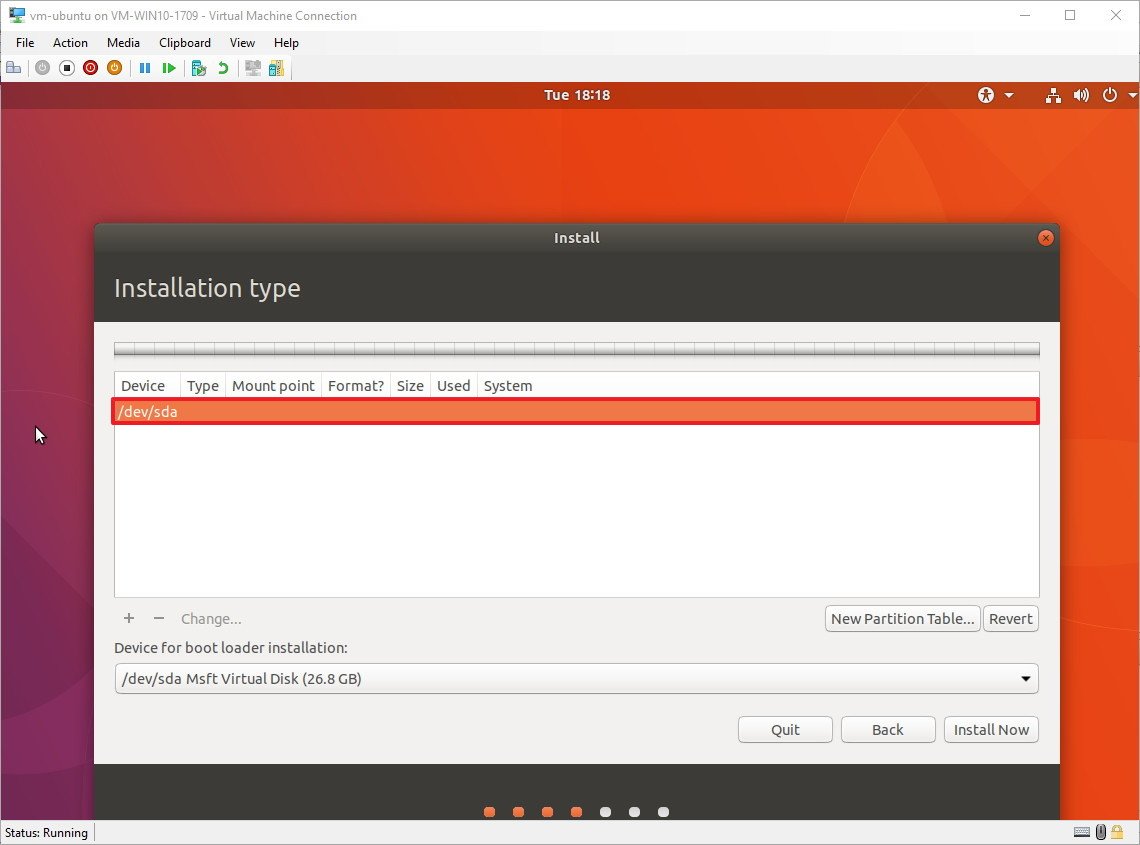
- Click Continue.
- Double-click free space.
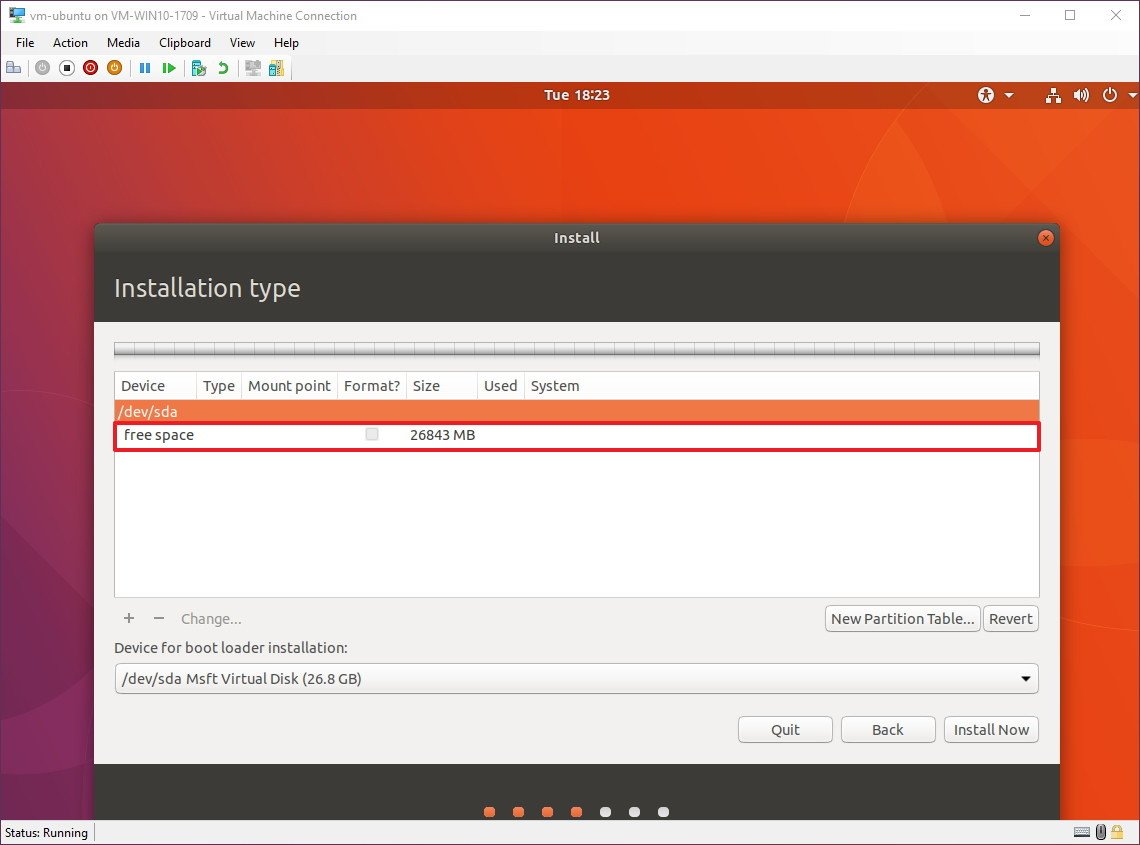
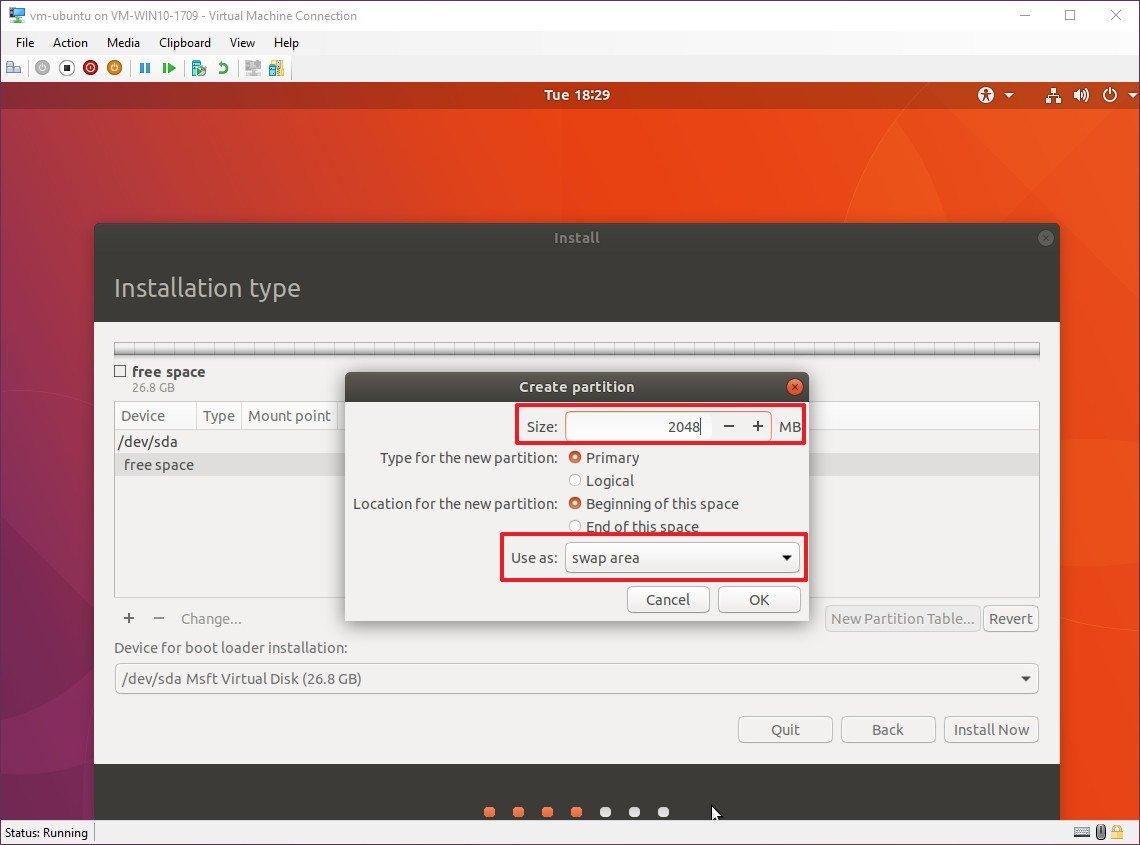
- Under «Use as,» use the drop-down menu and select Swap area to create a swap partition.
- Under «Size,» select the amount of space for the swap partition, which should be about 2x of the amount of RAM allocated for the virtual machine.
- Click OK.
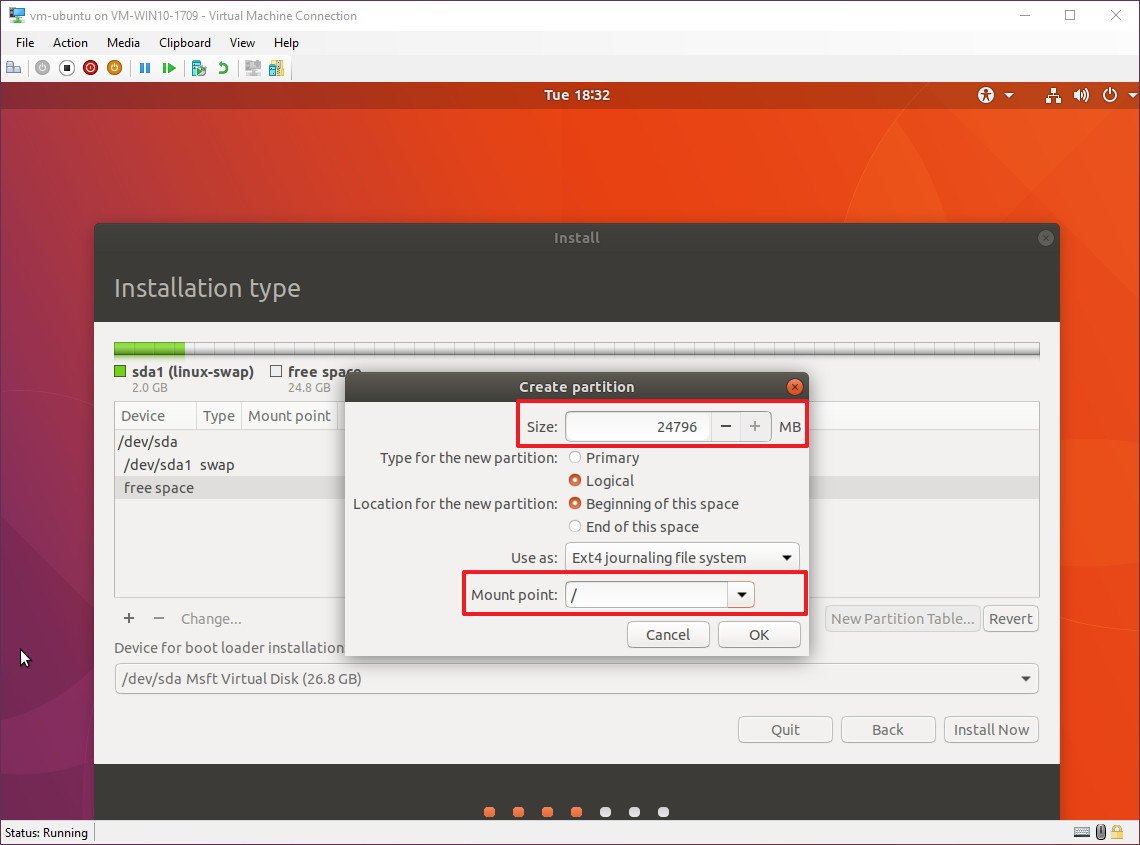
- Double-click free space again.
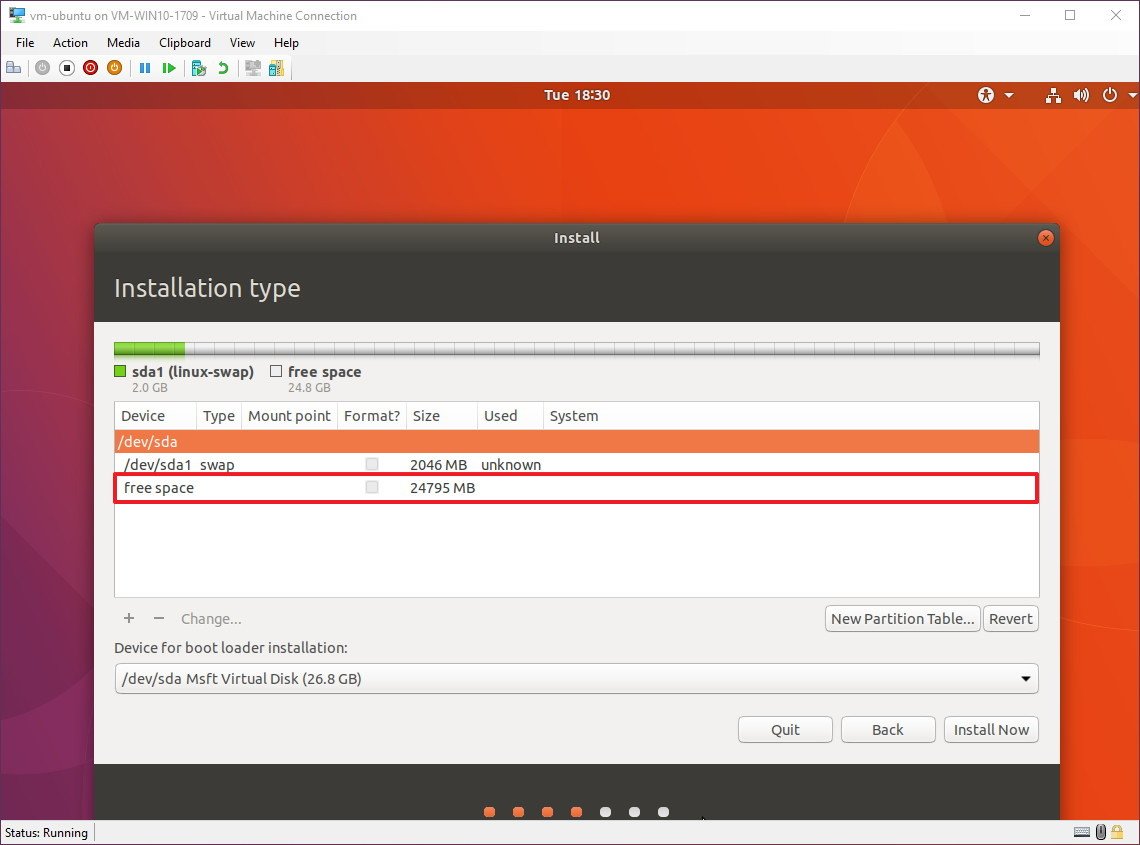
- Select the amount of space to allocate for the installation.
- Under «Mount point,» use the drop-down menu and select root /.
- Click OK.
- Select the ext4 partition from the list.
- Click the Install Now button.
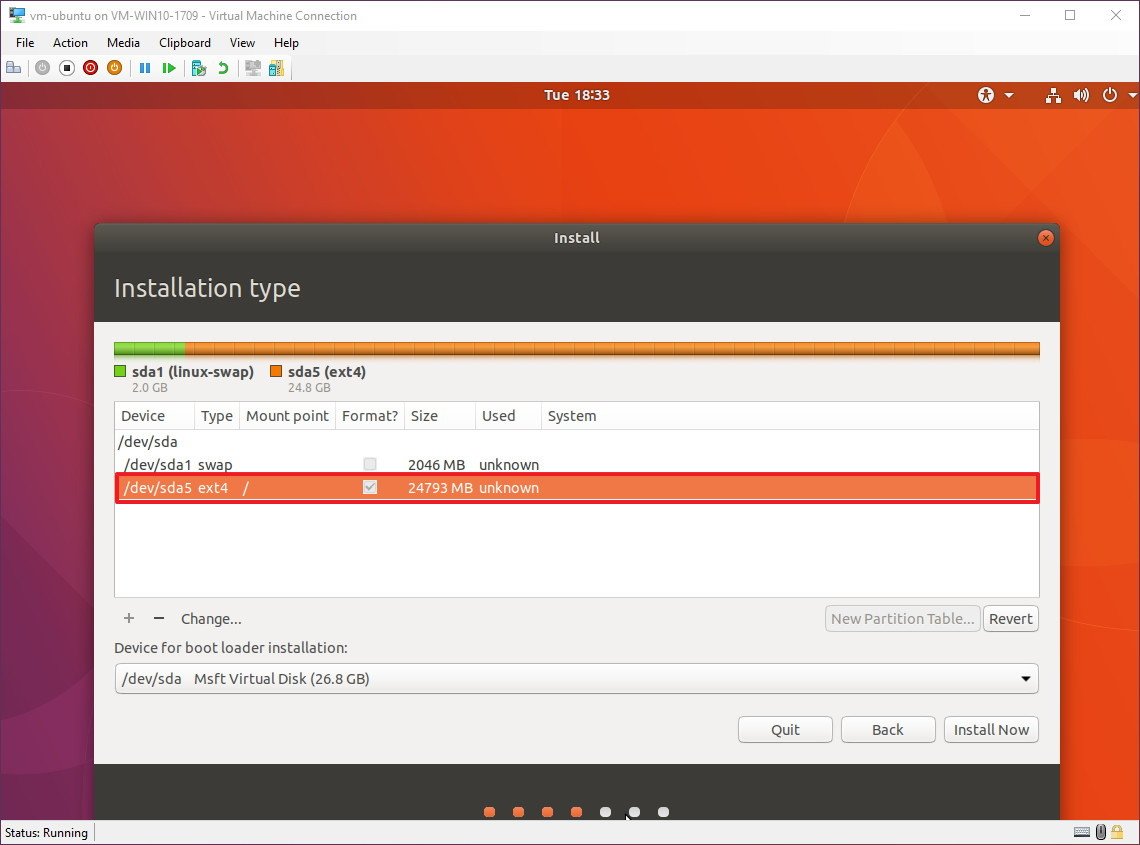
- Click Continue to install Ubuntu.
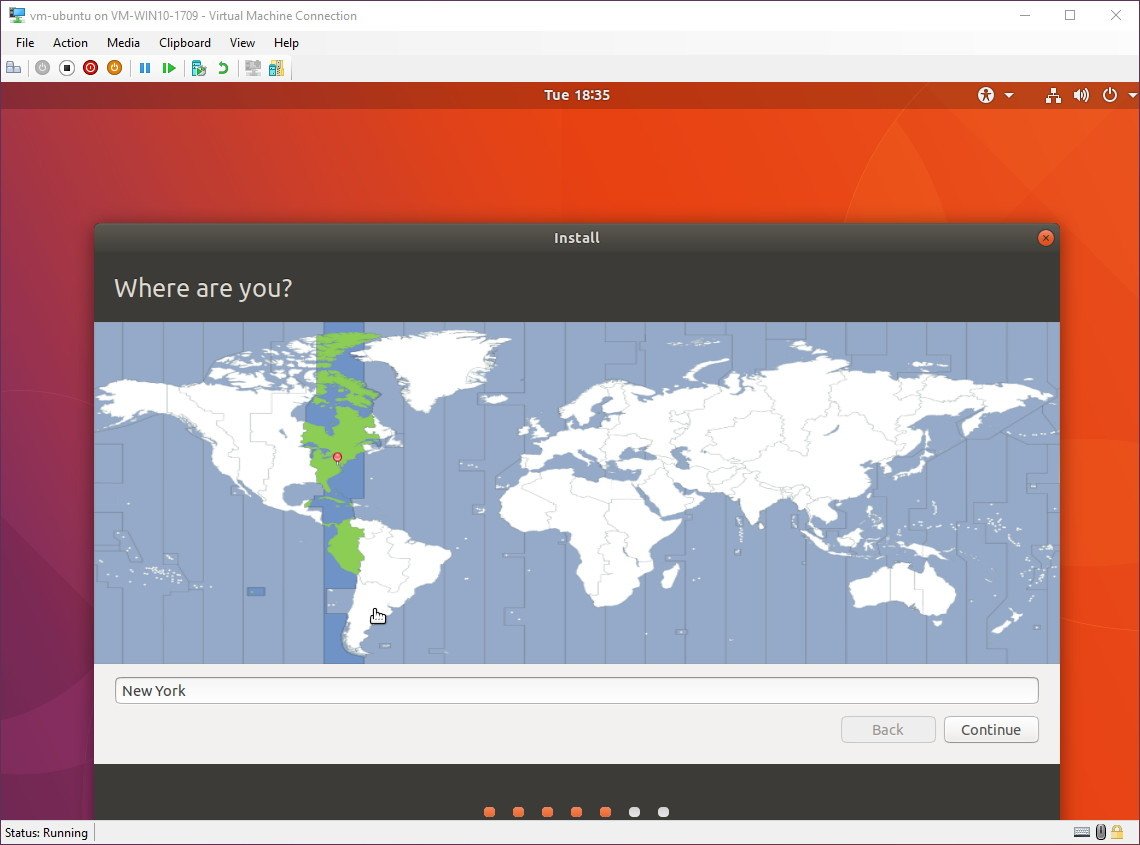
- Select your time zone.
- Click Continue.
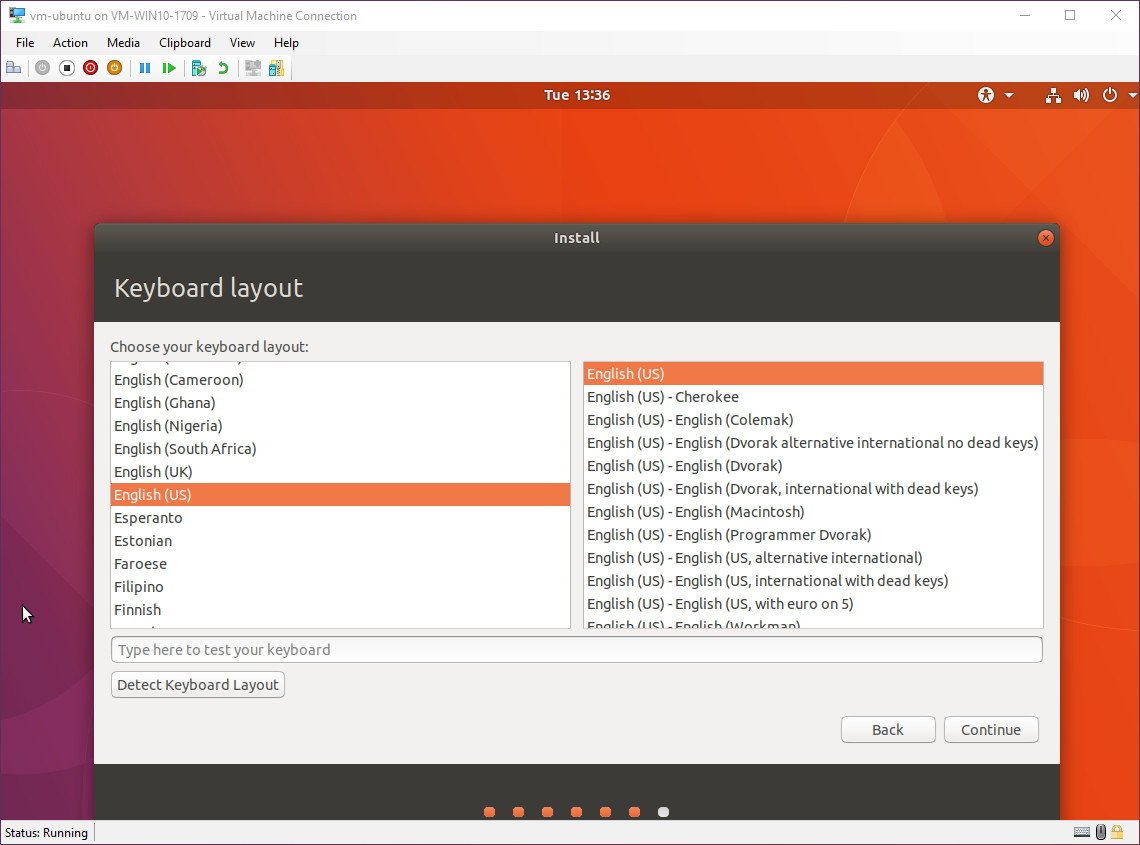
- Select the keyboard layout.
- Click Continue.
- Create a user account with your information.
- Click Continue.
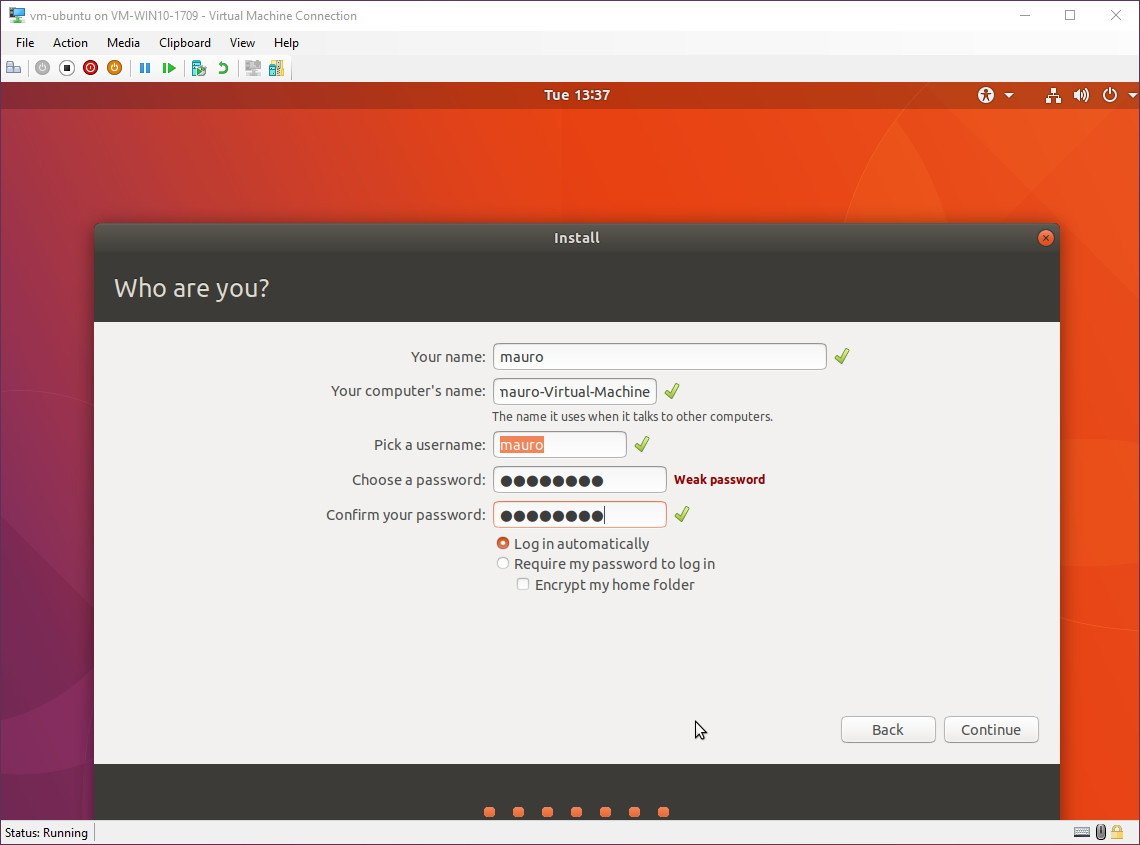
- Restart the virtual machine to finish the setup.Quick Tip: If during the final restart process, you get a message to remove the installation and press Enter, but hitting the key won’t restart the VM, just click the Turn off button and then turn it back on again.
After completing the steps, you can just turn on the VM and start using Ubuntu Linux alongside Windows 10.
While we’re focusing this guide setting up Ubuntu, you can also refer to these instructions to run other distributions of Linux.
More Windows 10 resources
For more helpful articles, coverage, and answers to common questions about Windows 10, visit the following resources:
- Windows 10 on Windows Central – All you need to know
- Windows 10 help, tips, and tricks
- Windows 10 forums on Windows Central
All the latest news, reviews, and guides for Windows and Xbox diehards.
Mauro Huculak is technical writer for WindowsCentral.com. His primary focus is to write comprehensive how-tos to help users get the most out of Windows 10 and its many related technologies. He has an IT background with professional certifications from Microsoft, Cisco, and CompTIA, and he’s a recognized member of the Microsoft MVP community.
Содержание
- 1 Загрузка и установка VirtualBox на Windows 10
- 2 Установка виртуальной машины на windows 10
- 3 Добавление общей папки
- 4 Итог
- 5 Видео по теме
На сегодняшний день существует много программных продуктов, позволяющие использовать виртуализацию для различных операционных систем. Наиболее интересным продуктом является программа VirtualBox, которую выпускает и поддерживает корпорация Oracle.
Эта программа распространяется по лицензии GNU GPL, что дает право использовать ее абсолютно бесплатно. Главной задачей VirtualBox является виртуализация операционных систем, то есть с помощью программы вы создаете виртуальную машину, на которой запускаете ОС. В данной статье мы подробно рассмотрим установку VirtualBox на новейшую операционную систему компании Microsoft — Windows 10.
Загрузка и установка VirtualBox на Windows 10
Для скачивания VirtualBox откройте любой установленный браузер в Windows 10 и перейдите по адресу www.virtualbox.org/wiki/Downloads. Перед вами откроется страница загрузки программы.

В данный момент VirtualBox 5.0.8 является самой новой версией программы и полностью совместима с Windows 10. Поэтому смело скачивайте эту версию, на которую ссылка находится в пункте «VirtualBox 5.0.8 for Windows hosts». После загрузки запустите инсталляционный файл, после чего откроется окно установки программы.
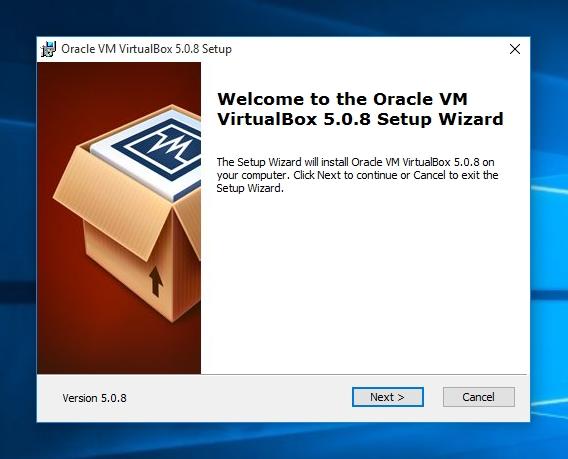
Нажимаем кнопку Next > и переходим к окну, где вам будет предоставлен выбор трех устанавливаемых компонентов:
- Virtualbox USB Support;
- Virtualbox Networking;
- Virtualbox Python 2 x Support.
Первый компонент отвечает за поддержку USB устройств, подключаемых к виртуальному компьютеру. Второй компонент отвечает за поддержку сети в такой машине, с его помощью создаются виртуальные сетевые адаптеры и устанавливаются драйвера для взаимодействия виртуальных адаптеров с физическими. Третий компонент устанавливается для поддержки скриптов, которые создаются на языке программирования Python.
Главной задачей скриптов является автоматизация задач в виртуалке. Также при нажатии кнопки Browse можно задать расположение установки исполняемых файлов.

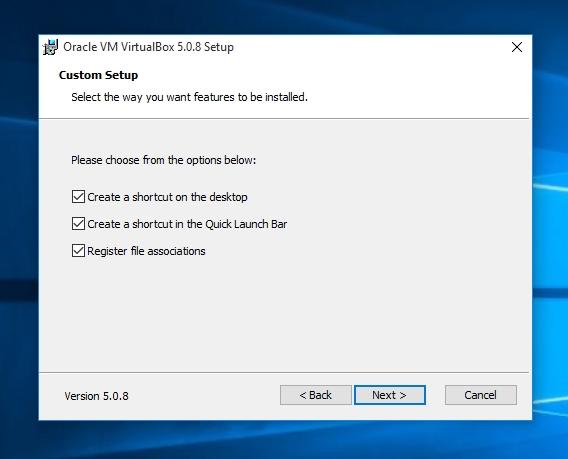
Следующее окно позволит создать ярлыки на рабочем столе и в меню пуск, а также позволит ассоциировать файлы виртуальных машин для работы в VirtualBox.
Далее идет окно с предупреждением «Warning Network Interface». Это окно означает, что следует установить дополнительные сетевые инструменты для виртуальных машин. Поэтому смело нажимайте кнопку Yes.

Теперь переходим к последнему окну инсталляции и нажимаем кнопку Install.

Начнется процесс инсталляции программы на компьютер, который займет пару минут.

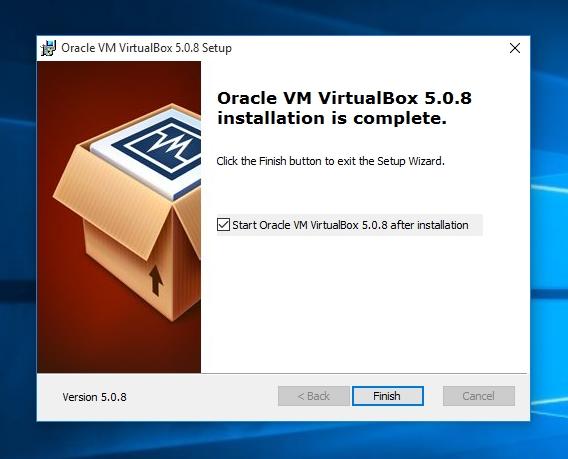
Как только инсталлятором будет завершена установка, появится окно с оповещением, что программа установлена. Также в окне будет стоять галочка с надписью «Start Oracle VM VirtualBox», которая позволит вам запустить VirtualBox после нажатия кнопки Finish.
После всех проделанных действий запустится главное окно программы, как показано на изображении ниже.
Установка виртуальной машины на windows 10
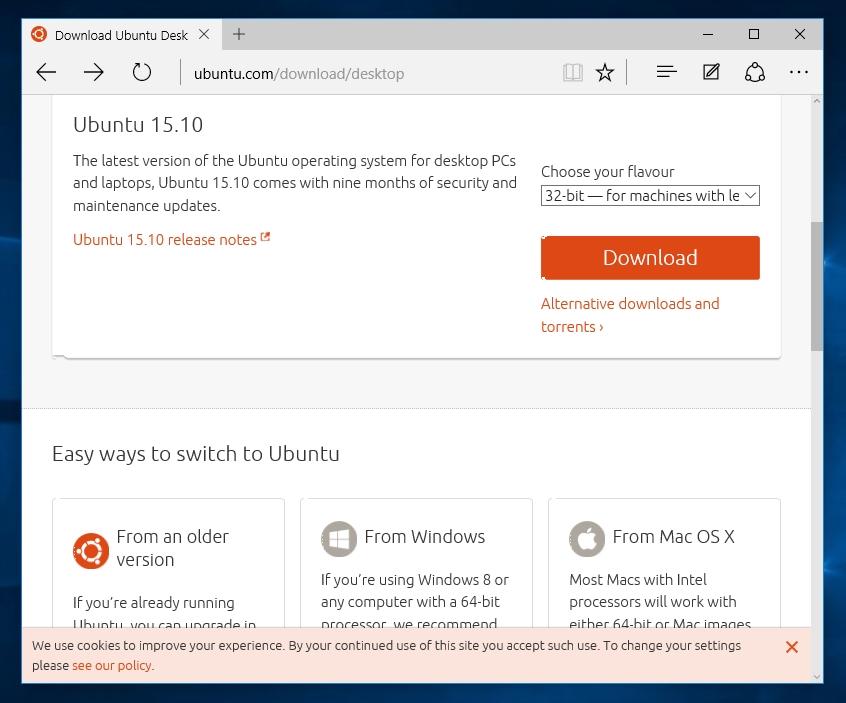
Вначале вы должны решить, для какой операционной системы создается виртуальная машина. Поэтому для начала подготовим образ ОС для инсталляции в нашу машину. Для примера мы возьмем образ бесплатной ОС Linux Ubuntu, который можно загрузить по адресу www.ubuntu.com/download/desktop. Выберем 32 битный образ Ubuntu и скачаем его на локальный диск ПК. Самым последним релизом Ubuntu является версия 15.10.
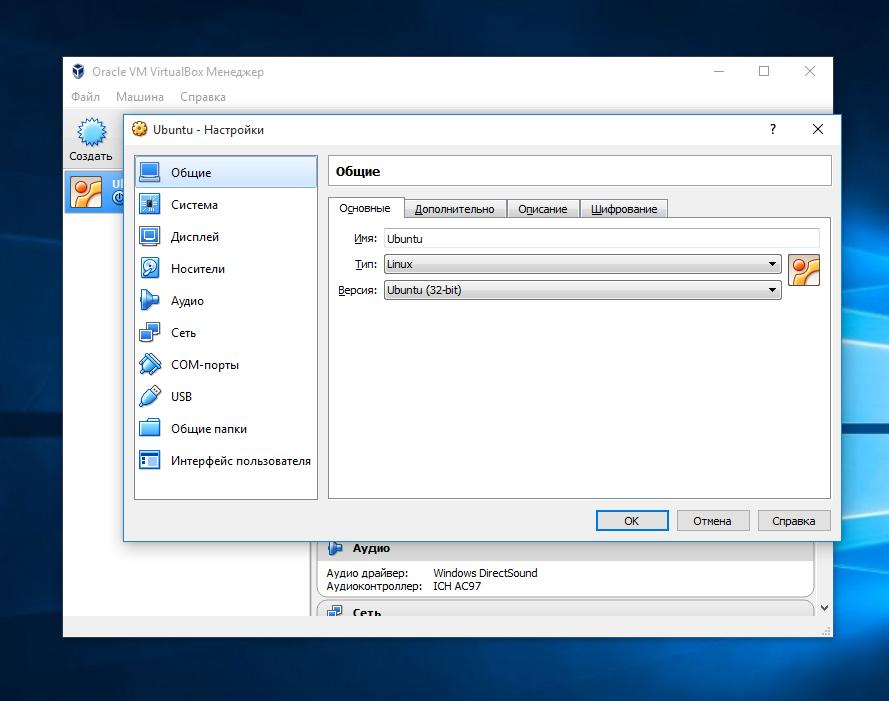
Теперь разберемся с таким наболевшим вопросом, как установить виртуальную машину на Windows 10. Для этого запускаем VirtualBox и нажимаем кнопку «Создать». В появившемся окне создаем имя виртуальной машины. Тип системы выбираем Linux, версию Ubuntu и переходим к следующему шагу.
Теперь укажем объем памяти, выделяемой для нашей виртуальной машины.

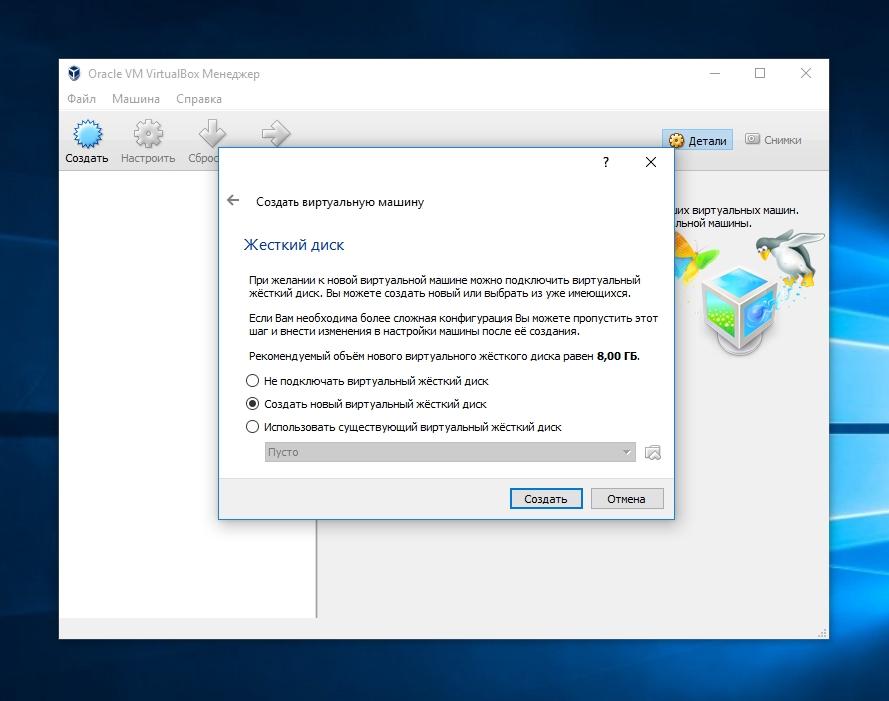
Следующим шагом будет создание виртуального диска, поэтому выбираем «создать новый виртуальный диск», нажимаем кнопку Создать и переходим к следующему окну.
Укажем тип нашего жесткого диска, поставив галочку «VDI».
Создадим динамический жесткий диск, который будет заполняться по мере записи на него информации, затем нажмем клавишу Next

Выберем имя и необходимый размер диска, наиболее вам подходящий и надавим кнопку Создать.
Все, наша виртуальная машина создана, в настройках которой можно изменять объем памяти, подключать и редактировать виртуальные жесткие диски, редактировать конфигурацию и настройки сети, задавать объем памяти видеоадаптера, а также задавать опции нагрузки на ваш процессор. Это лишь малая часть описанных настроек. Установив VirtualBox, вы сможете более подробно разобраться во всех тонкостях настройки конфигурации машины.

Создание нашего виртуального Linux компьютера закончено, теперь можно его запустить, кликнув по зеленой кнопке «Запустить». При запуске виртуальная машина предложит вам выбрать загрузочный диск. Выберите загрузочный диск ubuntu-15.10-desktop-i386.iso, который мы ранее скачали и нажмите Продолжить.
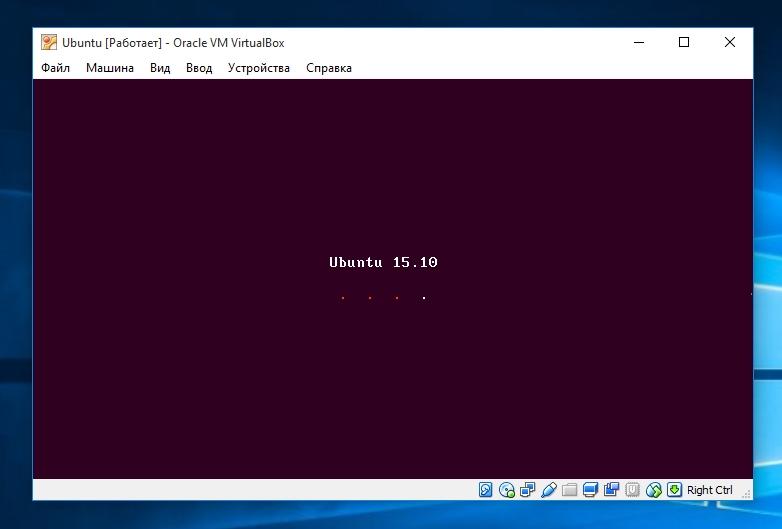
Как вы уже поняли, система начнет грузиться с выбранного нами образа.
Далее идет стандартная установка операционной системы, при которой вам предстоит выбрать жесткий диск, часовой пояс, раскладку клавиатуры, а также задать имя компьютера и пользователя. То есть дальнейшая установка пойдет так, как будто вы ставите Ubuntu на чистый компьютер.

После установки вы сможете использовать виртуальную машину как отдельный компьютер и использовать все возможности ОС Ubuntu, которые отсутствуют в Windows 10.
В VirtualBox можно настраивать конфигурацию на установленной виртуальной машине. Например, если вашему виртуальному компьютеру не хватает оперативной памяти, то ее можно быстро увеличить, перейдя в настройки виртуалки. Попасть в меню настройки можно при помощи нажатия кнопки «Настройки», предварительно выбрав редактируемую виртуалку.
В меню настройки вы увидите десять пунктов:
- Общие;
- Система;
- Дисплей;
- Носители;
- Аудио;
- Сеть;
- COM-порты;
- USB;
- Общие папки;
- Интерфейс пользователя.
Первый пункт позволяет изменять имя ВМ и тип операционной системы.
Второй позволяет изменять объем виртуальной памяти и порядок загрузки носителей информации. Также в этом пункте можно редактировать настройки процессора, выбирать количество ядер для вашей ВМ и включать поддержку технологии аппаратной виртуализации Intel-VT и AMD-V.
С помощью третьего пункта можно изменять объем памяти виртуального видеоадаптера и включать 3D-ускорение.
Пункт «Носители» дает возможность конфигурировать SATA/IDE носители информации и добавлять новые.
«Аудио» позволяет выбрать тип виртуальной звуковой карты.
Пункт «Сеть» может изменять конфигурацию сети, тип сетевого адаптера, а также позволяет подключать новые адаптеры.
Меню «COM-порты» позволяет использовать последовательный COM-порт и изменять его настройки.
С помощью меню «USB» можно включить контроллер USB и выбрать его тип, кроме этого можно добавлять, удалять и редактировать новые устройства USB.
Добавление общей папки
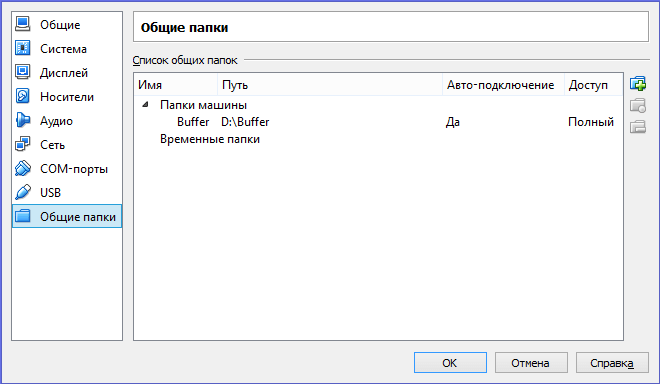
«Общие папки» дают возможность создавать общие директории между ВМ и физической системой. С помощью меню «Интерфейс пользователя» можно настроить интерфейс окна, в котором запущена ВМ.
Создать общую папку, на самом деле не так просто, как хотелось бы, однако, вот точная и работающая инструкция о том, как это сделать:
- Добавьте папку, которую вы хотите сделать общей в системе Windows 10 в разделе «Общие папки» настроек ВМ. Обратите внимание, что вы задаете имя — оно в дальнейшем пригодится.

- Убедитесь, что вы установили диск гостевой ОС в процессе установки ВМ. Если нет, то установите его.
- Далее, загрузите Ubuntu, создайте в ней папку, например, с именем buffer в вашей домашней папке. Через графический интерфейс, или через терминал с помощью команды
sudo mkdir ~/bufferДалее, в терминале введите командуsudo mount -t vboxsf Buffer ~/bufferгде, как вы наверное догадались, «Buffer» — имя папки, которое мы запомнили при выполнении пункта 1 инструкции, а «~/buffer» — путь к только что созданной папке Ubuntu.
Итог
Надеемся, что материал, изложенный в статье, поможет вам освоить методы виртуализации операционных систем, и у вас не будет возникать вопроса, как установить virtualbox на windows 10.
Также хочется дать несколько советов перед использованием виртуальных машин.
Перед созданием такой машины убедитесь, что у вас хватит аппаратных ресурсов компьютера для ее запуска. Поэтому для запуска виртуальных машин используйте мощный процессор, который поддерживает технологии аппаратной виртуализации Intel-VT и AMD-V. Также немаловажную роль играет объем оперативной памяти на вашем ПК. Например, если вы создадите виртуальную машину на базе ОС Windows 10, то вам потребуется минимум 2048 Мб оперативной памяти, которая будет выделена из основной системы.
Кроме этого, в VirtualBox можно использовать пакет плагинов Extension Pack, что существенно расширяет функциональные возможности программы и добавляет поддержку новых устройств.
Видео по теме
Windows 10 is not just a modern desktop operating system, and it also has some great IT Pro and Developer related features build in. One of them is client Hyper-V. This is the same hypervisor which powers virtualization in Windows Server and the Microsoft Azure datacenters. With Hyper-V, you can create virtual machines running on Windows 10, without the need for third-party software. You can not just run Windows virtual machines, and you can also run Linux virtual machines. In this blog post, I am going to show you how you can create an Ubuntu VM on Windows 10 using Hyper-V.
If you want to know more about Hyper-V on Windows 10, check out the Microsoft Docs.
Install Hyper-V
First, you will need to install Hyper-V on your Windows 10 computer. Hyper-V on Windows 10 has the following requirements:
- Windows 10 Enterprise, Professional, or Education (Home does not have the Hyper-V feature included)
- 64-bit Processor with Second Level Address Translation (SLAT)
- CPU support for VM Monitor Mode Extension (VT-c on Intel CPU’s)
- Minimum of 4 GB memory
The easiest way to enable Hyper-V on Windows 10 is to run the following PowerShell command as an administrator:
Enable-WindowsOptionalFeature -Online -FeatureName:Microsoft-Hyper-V -All
After you have installed Hyper-V, you need to restart your computer.
Create an Ubuntu virtual machine on Windows 10
To create an Ubuntu virtual machine on Windows 10 Hyper-V, you could download the Ubuntu ISO file and install it like any operating system. However, there is a much easier way, using the Hyper-V Quick Create feature. In the Hyper-V VM Gallery, you will find not just two Windows 10 virtual machines; you will also currently find Ubuntu 18.04 LTS and Ubuntu 19.04. These are prepared Hyper-V virtual machines images, ready for you to download and install.
Select the Ubuntu version you want to install and click on Create Virtual Machine. This will start downloading the virtual machine image.
After the image is downloaded, you can either connect to the virtual machine and start it, or you can first modify the virtual machine settings.
Optional: If you click on Edit settings, you will be able to configure the virtual machine hardware settings like vCPU or vRAM. You can also enable Secure Boot. If you enable Secure Boot for a Linux virtual machine, make sure you change the Secure Boot template to Microsoft UEFI Certificate Authority.
You can now start the Ubuntu VM.
This will boot you in the Ubuntu installation, where you can set up your Ubuntu operating system.
All the specific Hyper-V drivers for Ubuntu, are already included in the image. This allows you to use features like Hyper-V Enhanced Session Mode, which enables you also to use copy-paste, and others.
I hope this gives you a step-by-step guide, how you can create an Ubuntu VM on Windows 10 using Hyper-V. If you have any questions, please let me know in the comments.
Tags: Hyper-V, Linux, Microsoft, Secure Boot, Ubuntu, Ubuntu on Windows, Ubuntu on Windows 10, Virtual Machine, Virtualization, VM, VM Gallery, Windows, Windows 10, Windows 10 Hyper-V Last modified: June 26, 2019
About the Author / Thomas Maurer

Thomas works as a Senior Cloud Advocate at Microsoft. He engages with the community and customers around the world to share his knowledge and collect feedback to improve the Azure cloud platform. Prior joining the Azure engineering team, Thomas was a Lead Architect and Microsoft MVP, to help architect, implement and promote Microsoft cloud technology.
If you want to know more about Thomas, check out his blog: www.thomasmaurer.ch and Twitter: www.twitter.com/thomasmaurer