Version numbering
Since version 3.0.0, QEMU uses a time based version numbering scheme:
- major
- incremented by 1 for the first release of the year
- minor
- reset to 0 with every major increment, otherwise incremented by 1 for each release from git master
- micro
- always 0 for releases from git master, incremented by 1 for each stable branch release
The implication of this is that changes in major version number
do not have any bearing on the scope of changes
included in the release. Non-backward compatible changes may be made
in any master branch release, provided they have followed the
deprecation
policy which calls for warnings to be emitted for a minimum of two
releases prior to the change.
Содержание
- Установка QEMU
- Команды QEMU
- Основные
- Дополнительные
- Установка операционной системы в QEMU
- Запуск в QEMU образов LiveCD
- Qemu Manager
- Вопросы и ответы

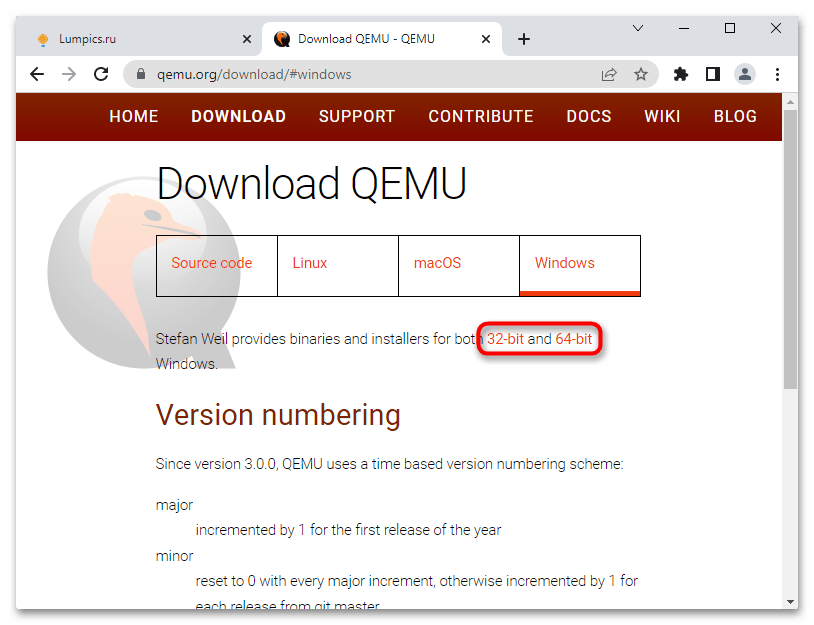
Эмулятор QEMU является кроссплатформенным приложением, доступным в том числе для 32- и 64-битной версии Windows.
Скачать QEMU с официального сайта
- Откройте официальную страницу разработчика и выберите приложение нужной вам разрядности.
- Скачайте актуальную (последнюю) версию эмулятора.
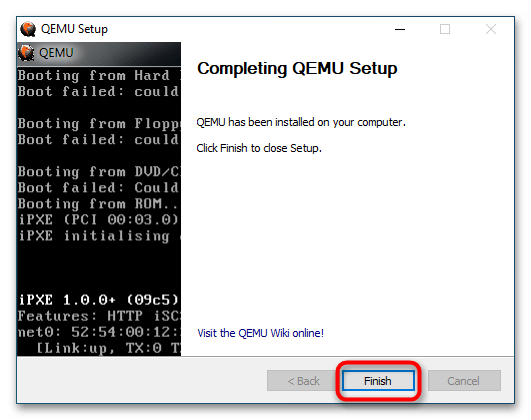
- Запустите исполняемый файл программы и проследуйте указаниям мастера-установщика. В ходе установки вам будет предложено выбрать язык (русский отсутствует), принять условия лицензии, выбрать компоненты и путь установки. Все настройки оставьте по умолчанию, по завершении процедуры инсталляции нажмите кнопку «Finish».
Команды QEMU
QEMU является консольным приложением, то есть для работы с ним вам придется использовать «Командную строку» и вводимые вручную текстовые команды. Команд и параметров много, но для начала достаточно выучить самые главные.
Основные
| Команда | Описание |
|---|---|
| qemu-system-архитектура | Определяет архитектуру эмулируемого устройства. Одноименные исполняемые файлы располагаются в папке установки эмулятора |
| qemu-img create | Команда создает файл в формате IMG, являющийся виртуальным диском, на который производится установка системы. В качестве аргумента передается произвольное имя IMG-контейнера |
| -hda | Параметр подключает созданный виртуальный жесткий диск, название которого передается в качестве аргумента |
| -m | Задает объем оперативной памяти, выделяемый эмулируемому устройству |
| -boot | Задает ресурс, с которого выполняется загрузка операционной системы. Имя ресурса должно соответствовать названию виртуального жесткого диска (без указания расширения) |
| cdrom | Эмулирует дисковод, используется для установки операционных систем и запуска LiveCD, то есть портативных ОС. В качестве аргумента передается путь к образу ISO |
Дополнительные
| Команда | Описание |
|---|---|
| -usb | Активирует поддержку USB |
| -smp | Эмулирует мультипроцессорную архитектуру |
| -full-screen | Запускает виртуальную машину в полноэкранном режиме |
| cpu | Задает тип процессора |
| -k | Задает раскладку клавиатуры по умолчанию |
| -soundhw | Подключает аудиокарту |
| usbdevice | Подключает устройства USB |
Установка операционной системы в QEMU
Предположим, вы хотите эмулировать компьютер с интеловским процессором и операционной системой Windows XP.
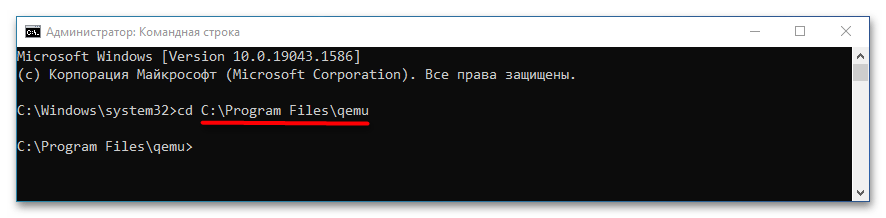
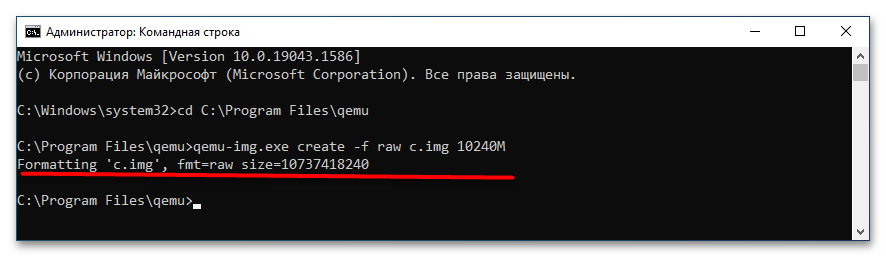
- Запустите классическую «Командную строку» и перейдите в расположение установки QEMU, для чего выполните команду
cd C:\Program Files\qemu. Если эмулятор устанавливался в другую папку, после cd укажите путь к ней. - Создайте виртуальный жесткий диск, на который станет устанавливаться операционная система. Для этого выполните команду
qemu-img.exe create -f raw c.img 10240M, где c.img — название виртуального диска, а 10240 — его размер в мегабайтах. Размер диска-контейнера должен соответствовать требованиям запускаемой/устанавливаемой операционной системы. - Запустите установку дистрибутива операционной системы командой
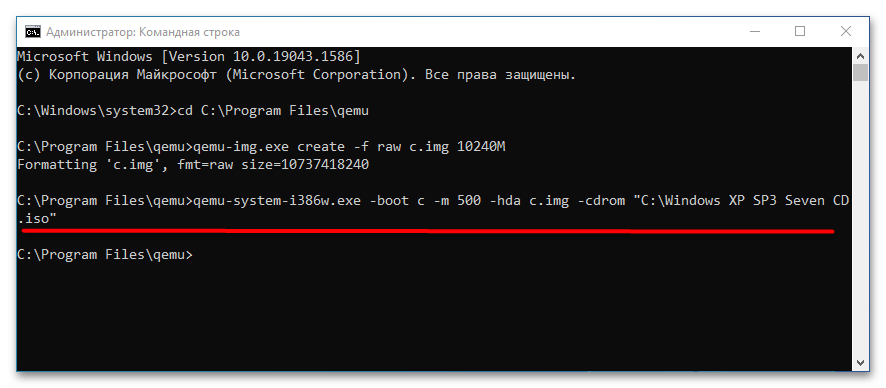
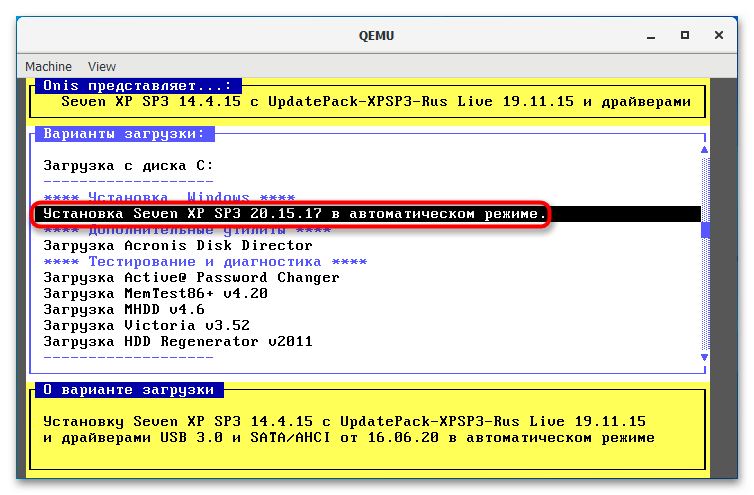
qemu-system-i386w.exe -boot c -m 512 -hda c.img -cdrom "C:\Windows XP SP3 Seven CD.iso". -i386w в данном примере указывает, что виртуальная машина эмулирует архитектуру х86, -boot указывает загрузку с диска с названием «c», -m 512 выделяет виртуальной машине 512 МБ оперативной памяти, -hda c.img указывает, что система будет устанавливаться в файл-контейнер «c.img». Наконец, содержимое прямых кавычек после параметра –cdrom представляет собой путь к установочному образу. - В открывшемся окне QEMU выберите с помощью клавиш-стрелок вниз-вверх нужный пункт, в данном примере это установка операционной системы. Выполните традиционную процедуру установки системы на виртуальный жесткий диск.
- По завершении установки системы вы сможете запускать последнюю командой
qemu-system-i386w.exe -hda c.img.
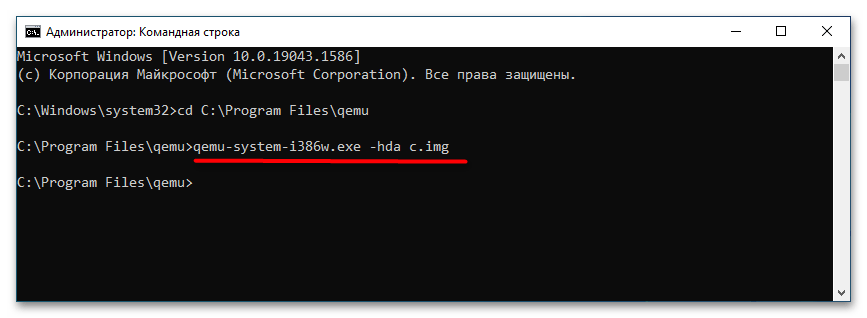
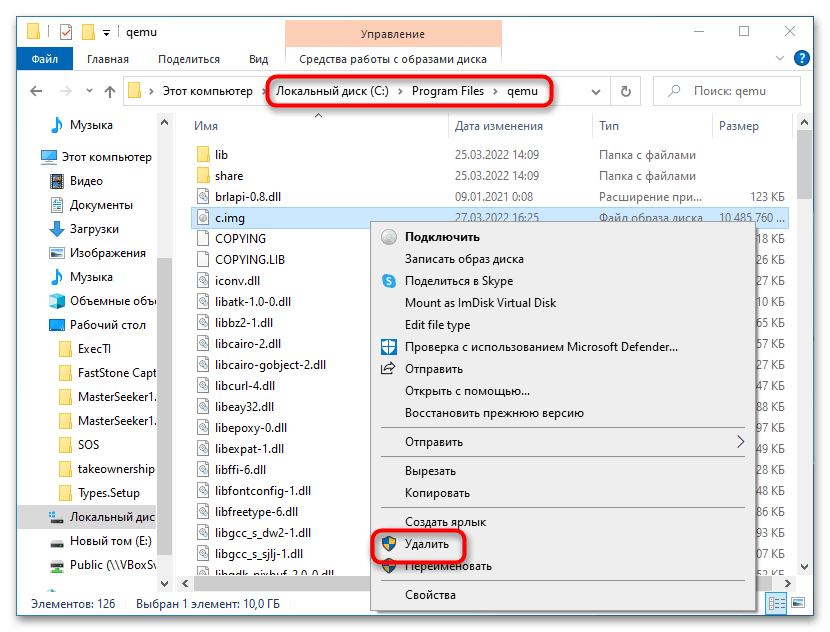
Если виртуальная система станет вам не нужна, удалите IMG-диск, на который она была установлена. По умолчанию файл диска IMG располагается в папке установки QEMU.
Запуск в QEMU образов LiveCD
Процедура запуска портативных операционных систем в QEMU намного проще, чтобы запустить в эмуляторе LiveCD, сформируйте и выполните команду следующего вида, заблаговременно перейдя в «Командной строке» в папку инсталляции эмулятора:
qemu-system-архитектура.exe -m 1024 -cdrom "путь к образу LiveCD"
Поскольку портативная ОС может загружаться в оперативную память, в предварительном создании виртуального диска нет необходимости.
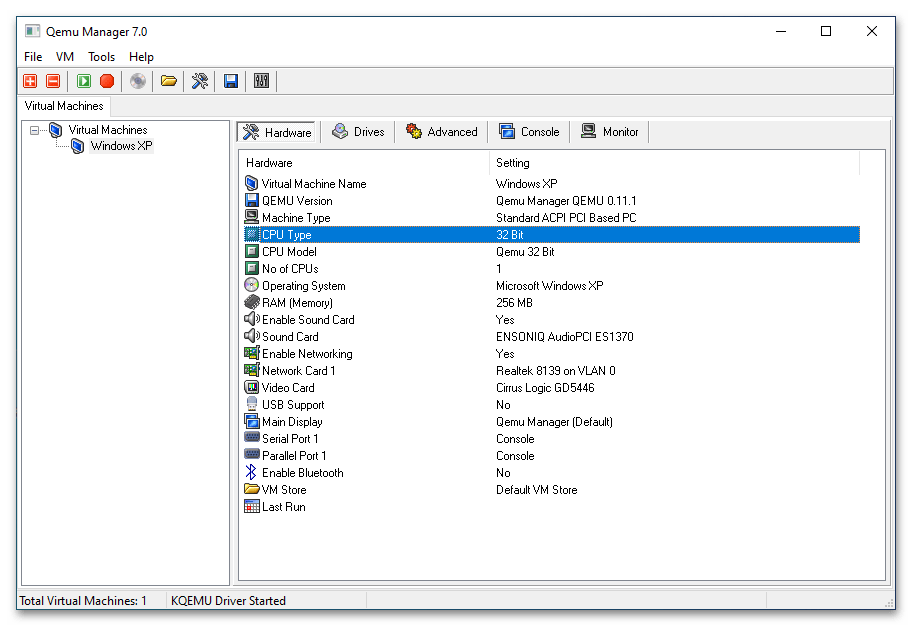
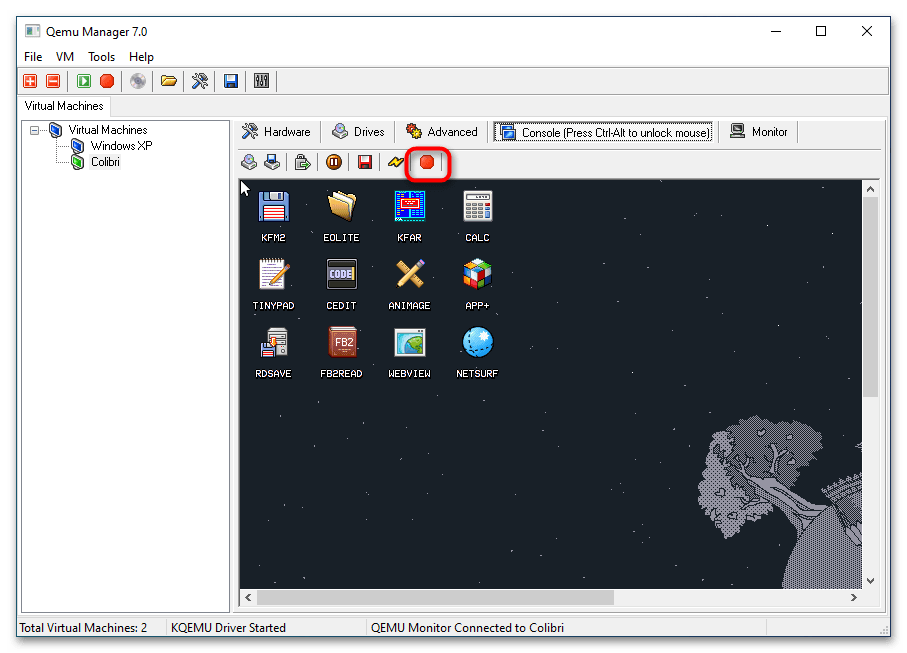
Qemu Manager
Если вы не имеете навыков работы со штатной программой «Командная строка», можете попробовать воспользоваться приложением Qemu Manager — графической оболочкой для эмулятора Qemu. Ниже прилагается краткая инструкция по использованию приложения.
- Скачайте, установите и запустите Qemu Manager. В открывшемся окне настроек по умолчанию нажмите «Save & Finish».
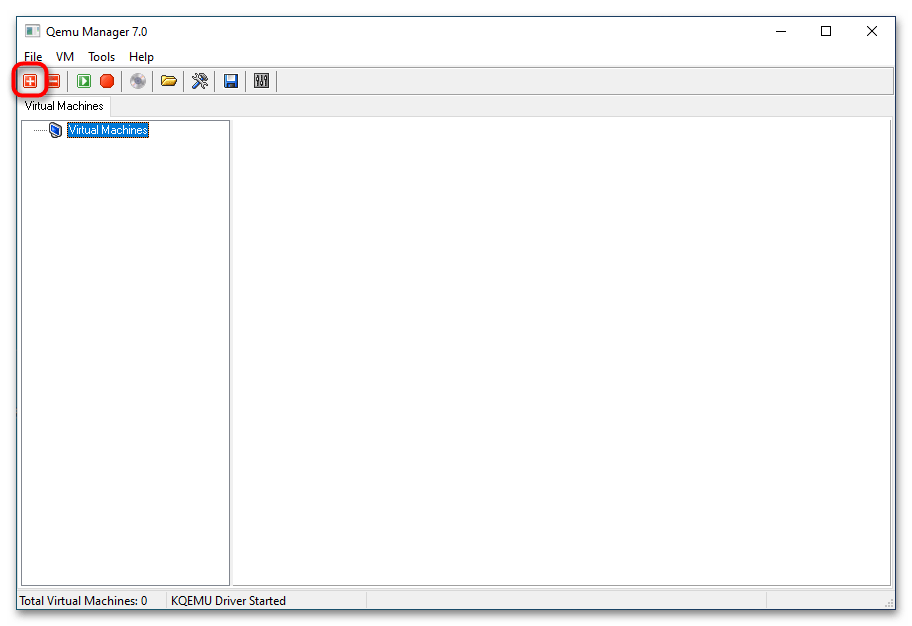
- В основном окне менеджера нажмите кнопку «+», чтобы приступить к созданию новой виртуальной машины (дальше VM).
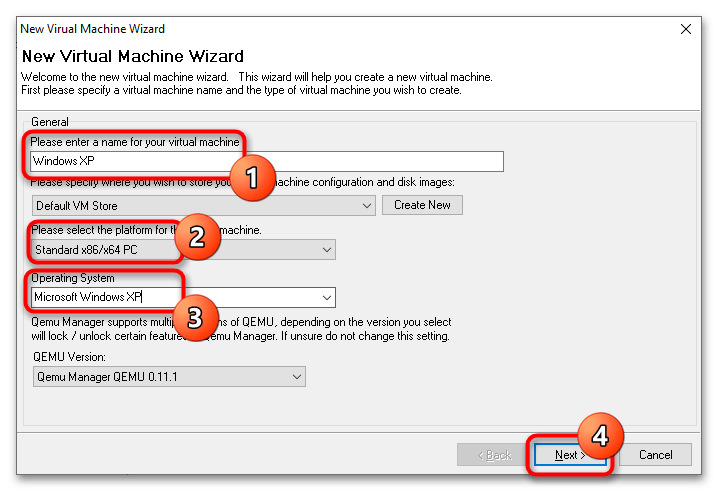
- В поле «Please enter a name for your virtual machine» введите произвольное название VM, в меню «Please select the platform for the virtual machine» укажите архитектуру VM, а из выпадающего списка «Operating System» выберите операционную систему.
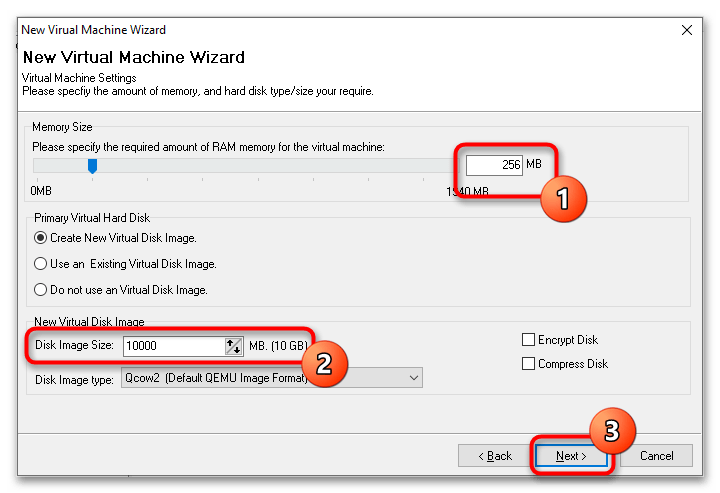
- Выделите с помощью ползунка «Memory Size» требуемый для VM объем оперативной памяти, а в меню «Disk Image Size» укажите размер виртуального диска. Если вы запускаете LiveCD, в настройках «Primary Virtual Hard Disk» следует выбрать опцию «Do not use an Virtual Disk Image».
- В следующем окне нажмите кнопку «Finish».
- В результате в основном окне менеджера появится новая виртуальная машина с конфигурацией по умолчанию. При желании вы можете отредактировать параметры VM: например, изменить архитектуру процессора, выделяемый объем памяти, включить поддержку USB, создать и подключить новый виртуальный жесткий диск и так далее.
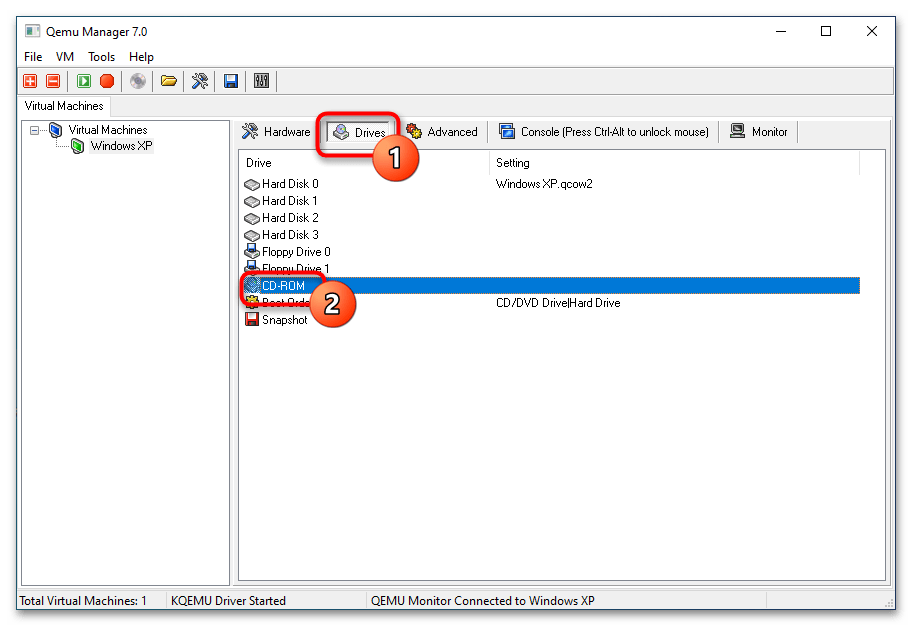
- Переключитесь на вкладку «Drives» и двойным кликом откройте настройку «CD-ROM».
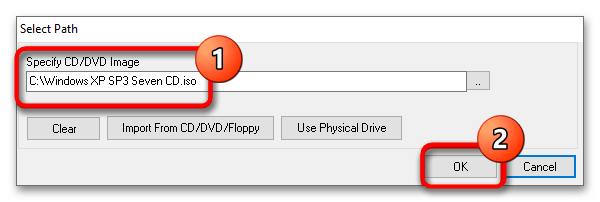
- Укажите путь к установочному образу операционной системы или дистрибутиву LiveCD и сохраните настройки.
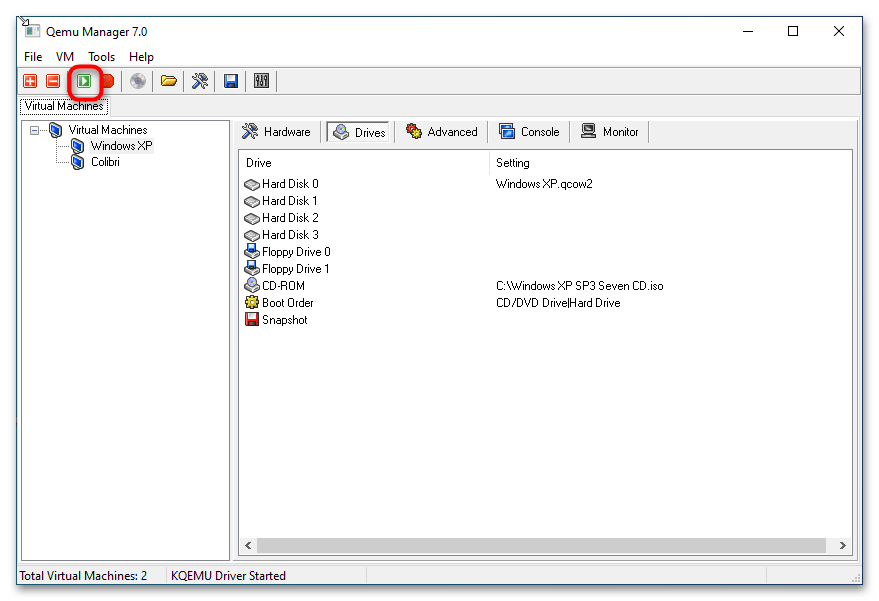
- Запустите виртуальную машину нажатием кнопки «Launch Selected VM». По умолчанию Qemu Manager захватывает мышку, так что она становится недоступной для хостовой операционной системы. Чтобы освободить курсор, нажмите комбинацию клавиш Ctrl + Alt.
- Чтобы завершить работу VM, нажмите кнопку «Quit Qemu».


Несмотря на отсутствие поддержки русского языка, Qemu Manager существенно упрощает работу с платформой Qemu. К сожалению, в настоящее время разработка данной программы прекращена, официальный сайт разработчика недоступен, но приложение по-прежнему доступно для скачивания из свободных источников.
Еще статьи по данной теме:
Помогла ли Вам статья?
Do you want to use QEMU for Windows? This post from MiniTool shows you how to download and install the QEMU software on Windows. It also shows you how to use QEMU on Windows to create an Ubuntu VM.
What Is QEMU
QEMU, short for Quick Emulator, is a free open-source hosted virtual machine manager that can execute hardware virtualization. With the help of KVM (Kernel-based Virtual Machine), QEMU can offer fast running speed. Therefore, it develops fast and is going to replace VirtualBox and VMware on Linux.
Tip: On Linux, with the help of quickgui, QEMU can create some macOS, Windows, and Linux virtual machines without downloading the ISO files manually. Please refer to this post: How to Install macOS and Windows 11 Virtual Machines on Ubuntu.
However, on Windows, the advantages of QEMU are not significant, because the KVM technology is not applicable on the Windows host machine. In addition, the quickgui is also not available to Windows. But QEMU develops fast and many people still want to use this VM software on Windows.
QEMU for Windows Download and Install
1. Download QEMU for Windows
To use QEMU for Windows, you should download and install it first. Please refer to the following QEMU download guide:
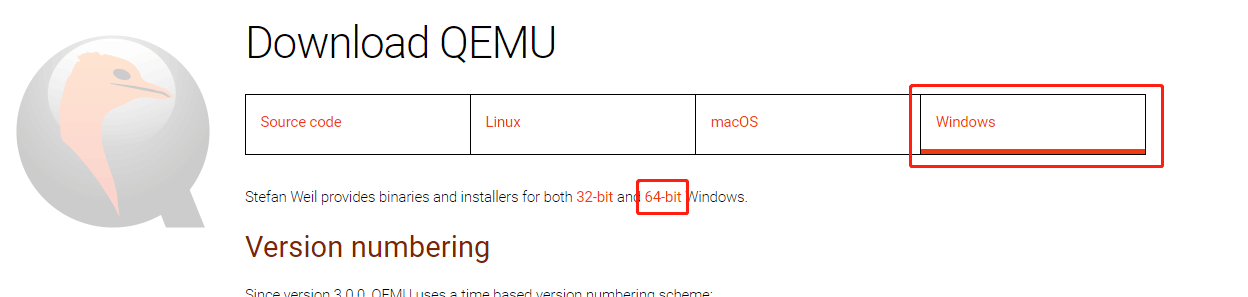
Step 1: Go to the official QEMU website (https://www.qemu.org). Click the Download button at the top section. You will go to the QEMU download page.
Step 2: Click the Windows tab to get the QEMU Windows version. Click 32-bit or 64-bit according to what OS you are running (for me, I click the 64-bit because my OS is 64-bit).
Step 3: On the new page, click the .exe file to download it. This file is the installer file.

2. Install QEMU for Windows
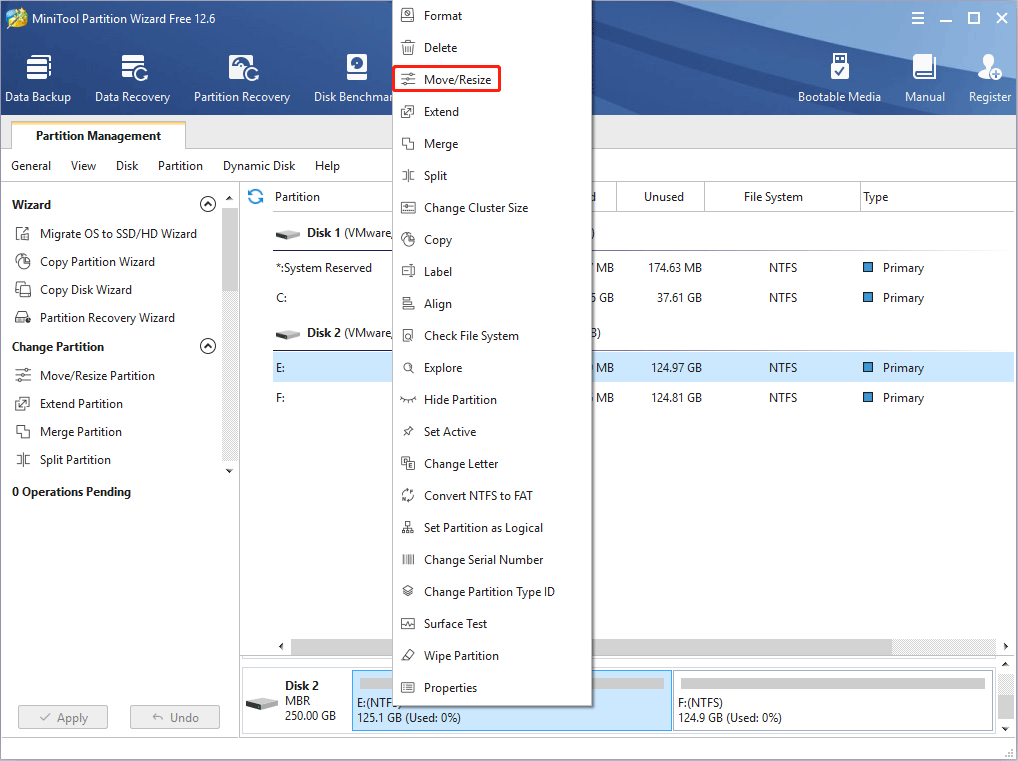
After the installer file is downloaded, you can double-click it to run directly. Before doing that, I recommend you to create a partition separately for it. For any virtual machine software, I will recommend you create a separate partition to store the software and the VM files so that you can manage them better.
To create a separate partition, you can use the shrink feature in the Windows Disk Management tool. But this tool can’t help you move the location of partitions, so I recommend you to use MiniTool Partition Wizard.
If the free space of one partition is not enough, you can move/resize another partition to get more unallocated space and then gather the unallocated space together to create one partition. Here is the guide:
MiniTool Partition Wizard FreeClick to Download100%Clean & Safe
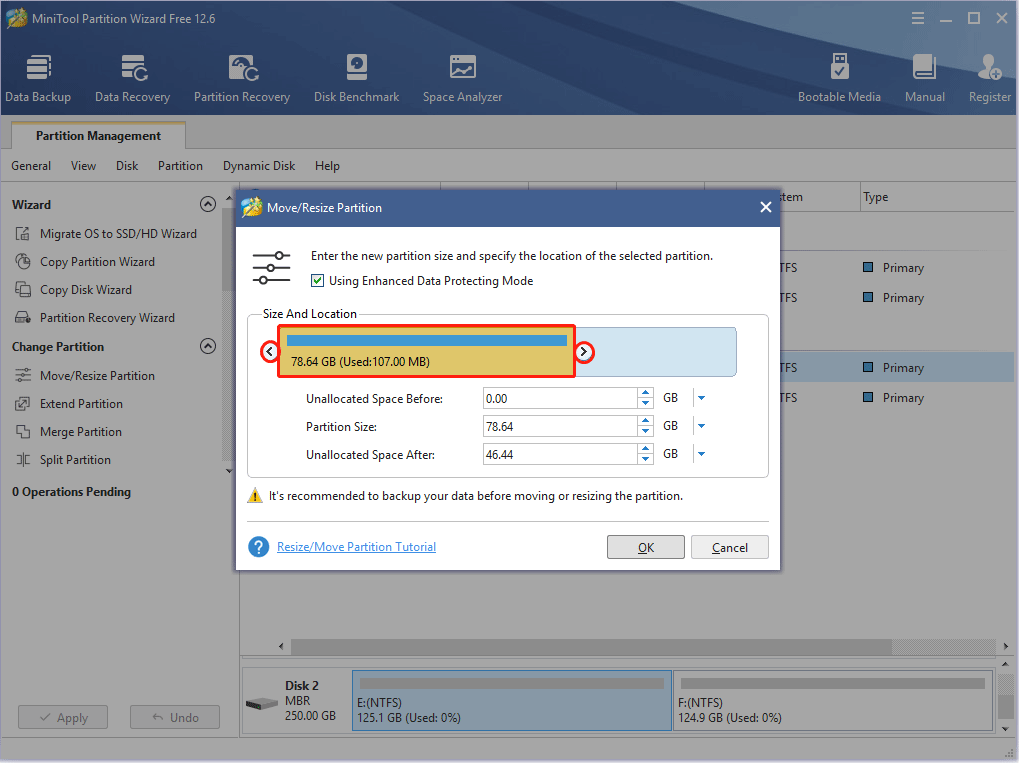
Step 1: Launch MiniTool Partition Wizard and go to its main interface. Right-click a partition and choose Move/Resize.
Step 2: Drag the two arrows on the two sides of the partition to shrink the partition, and then drag the block to move the location of the partition. Then, click the OK button. In this way, you can get unallocated space.
Step 3: Right-click the unallocated space and choose the Create button.

Step 4: Set parameters for the new partition. You can keep all of them to the default value if you don’t have specific demands. Then, click the OK button.

Step 5: Click the Apply button to execute pending operations.

How to Merge Unallocated Space in Windows 10 for a Large Drive
After the new partition is created, you can then double-click the QEMU installer file to install this VM software. You just need to follow the on-screen instructions to complete the installation.
Tip: When you are asked to choose the install location, please choose the newly-created partition (taking E drive as an example).

How to Use QEMU on Windows
After installing the QEMU Windows version, you may want to know how to use QEMU to create a virtual machine. Here are 2 ways and the 2nd way is better.
Way 1. Create a Virtual Machine Using Commands
QEMU doesn’t come with a GUI. If you don’t install a GUI manually, you need to use commands to run QEMU. Here is the guide on how to use QEMU on Windows to create a VM via commands (taking Ubuntu as an example).
Step 1: Download the Ubuntu ISO file from the official website.
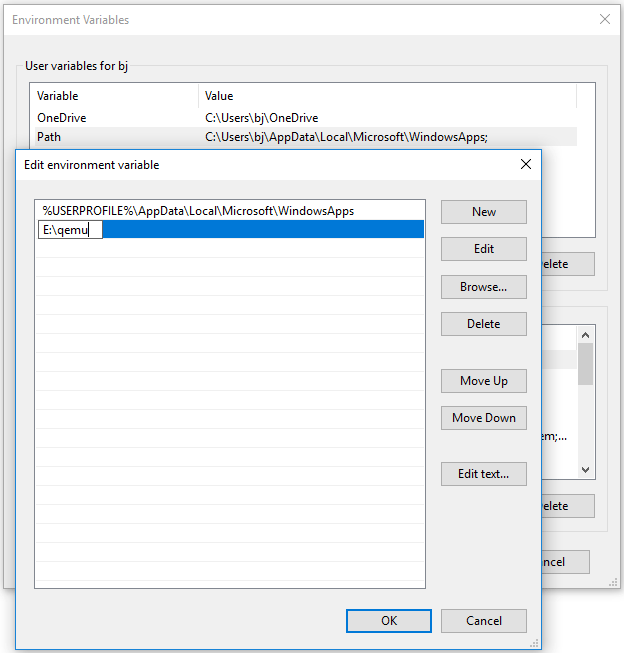
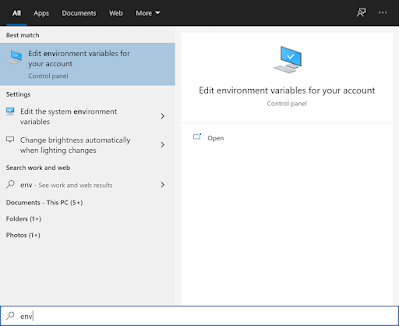
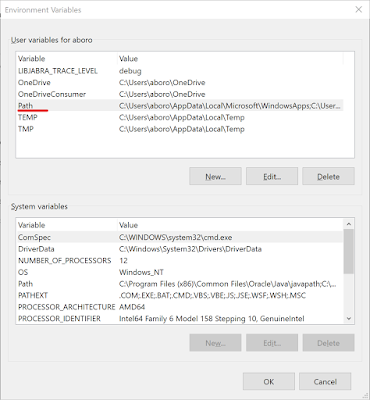
Step 2: Add QEMU path into Environment Variables.
- Open File Explorer, go to the QEMU installation location, and then copy the path (E:\qemu).
- Right-click This PC / Computer, choose Properties, and then click Advanced system settings.
- Under the Advanced tab, click Environment Variables.
- In the User variables box, double-click the Path variable, click New, and then paste the QEMU path.
- Click the OK button to save changes, and then click the OK button again to save and exit the Environment Variables
Tip:
1. If you use Windows 7, the adding process may be a little different.
2. If there is no Path variable under the User box, you can create one, or you can add the QEMU path into the System variables.
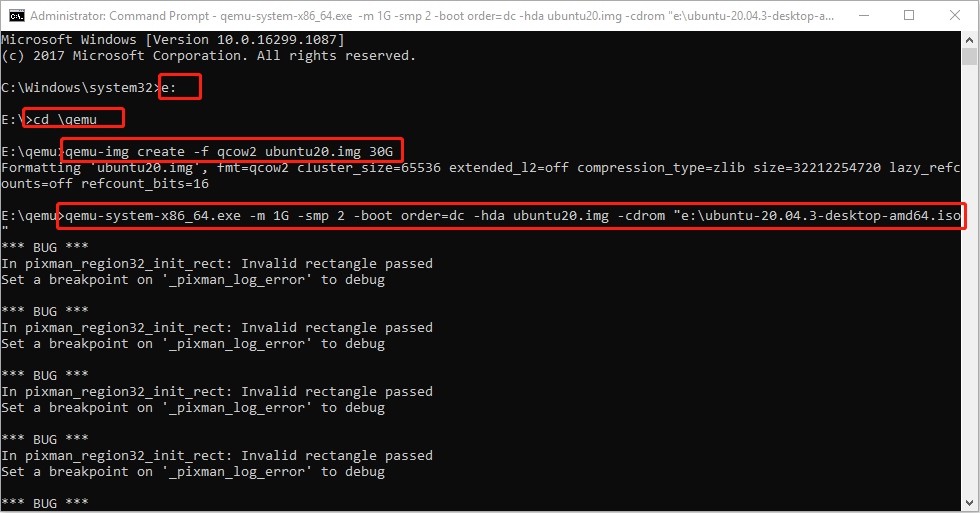
Step 3: Run Command Prompt as administrator and then execute the following commands.
- E: (this will open the e drive where QEMU is installed).
- cd \qemu (this will open the qemu folder).
- qemu-img create -f qcow2 ubuntu20.img 30G (this will create a virtual hard drive of 30GB).
- qemu-system-x86_64.exe -m 1G -smp 2 -boot order=dc -hda ubuntu20.img -cdrom “e:\ubuntu-20.04.3-desktop-amd64.iso” (this will run Ubuntu using CD/ROM).
Tip:
1. If you want to install other VMs (macOS, ARMs, etc.), the qemu-system may vary greatly.
2. The above commands are not perfect. If you have better commands, you can run them.
3. The QEMU installation path and the location of the Ubuntu ISO file in the above commands should be changed accordingly.
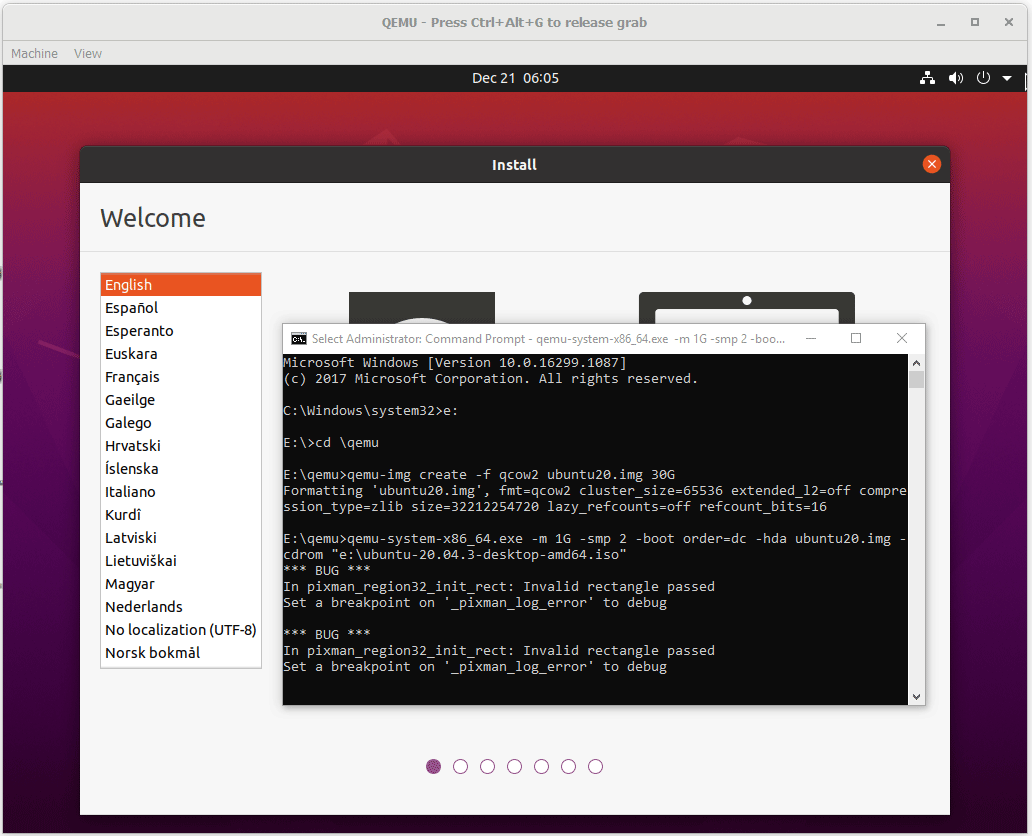
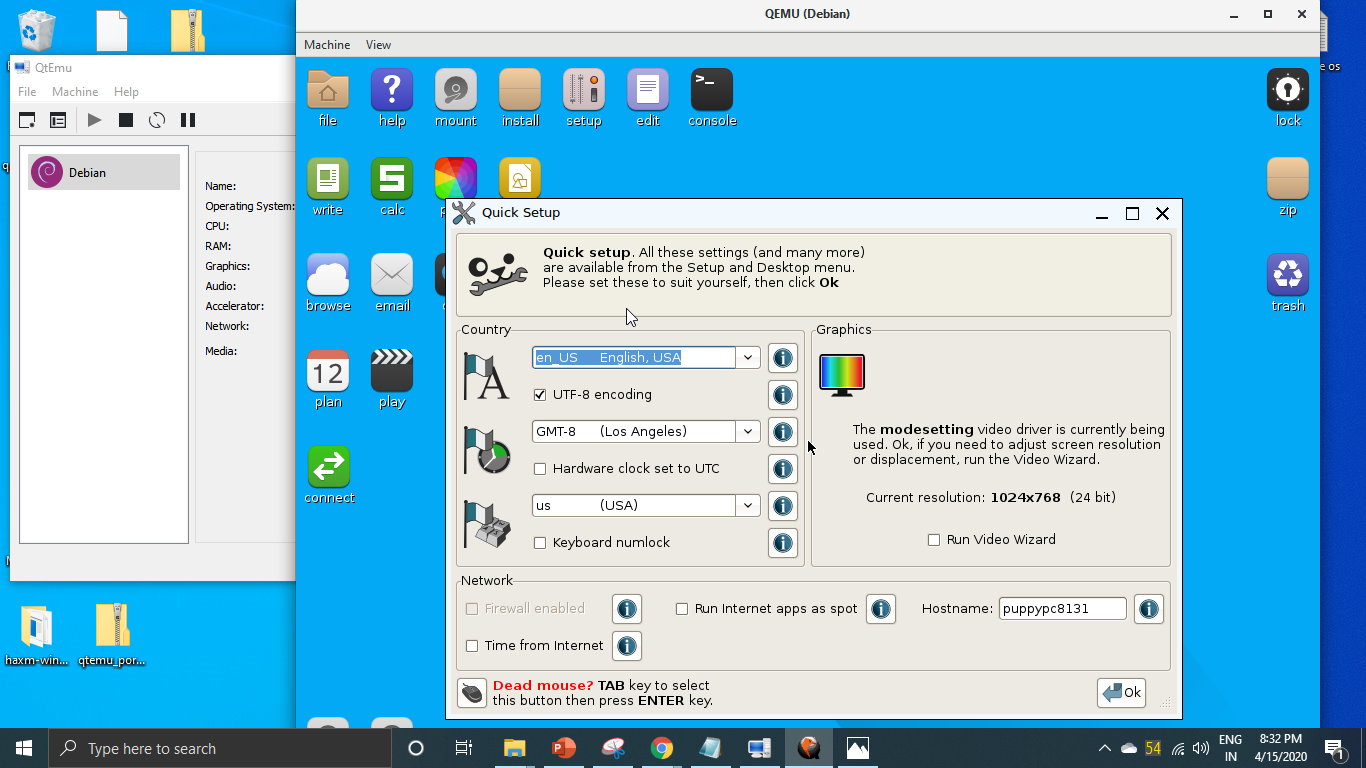
Step 4: Go through the Ubuntu installation process. Although there may be many bugs, I launch Ubuntu 20 successfully and then just need to complete the installation process.
How to Install Linux (Ubuntu) on Windows 10 [Ultimate Guide 2022]
Way 2. Create a Virtual Machine Using QtEmu
As you can see, creating a VM using QEMU via commands is a tough job. You need to search for various tutorials online. In addition, once errors occur, you may have no idea how to solve them. Therefore, I recommend you to use QtEmu, an open-source GUI for QEMU Windows.
How to use QEMU on Windows via QtEmu? Here is the guide:
Step 1: Download the Ubuntu ISO file and QtEmu. The QtEmu official website is https://qtemu.org and the QtEmu source is placed on https://gitlab.com/qtemu/gui. Go to the GitLab source page, scroll down to find the Downloads section, and click the first link to download the QtEmu installer.

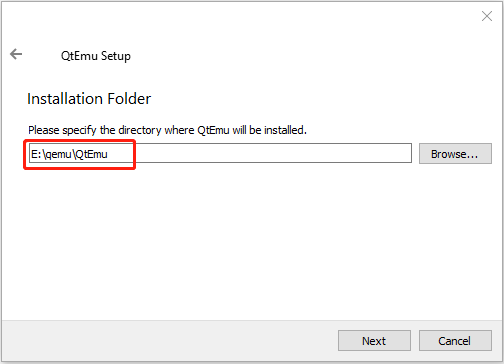
Step 2: Double-click the QtEmu installer file and go through the installation process. When you are asked to specify the installation location (where to create the QtEmu folder), please install the QtEmu under the QEMU folder. For me, I type: E:\qemu\QtEmu.
Step 3: After QtEmu is installed, go to E:\qemu\QtEmu. Right-click the qtemu.exe file and choose Send to > Desktop (create shortcut). Then, create a folder named VMs under the E drive to store all VM files to be created.
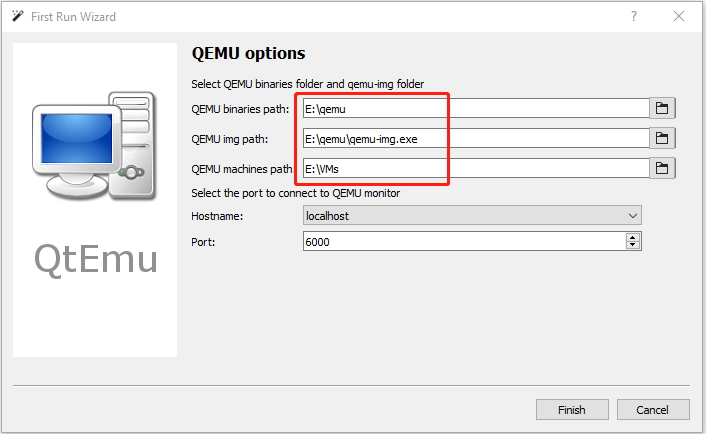
Step 4: Double-click the QtEmu shortcut to launch this software. In the QEMU options window, please set QEMU binaries path to E:\qemu, set QEMU img path to E:\qemu, and set QEMU machines path to E:\VMs. Then, click the Finish button.
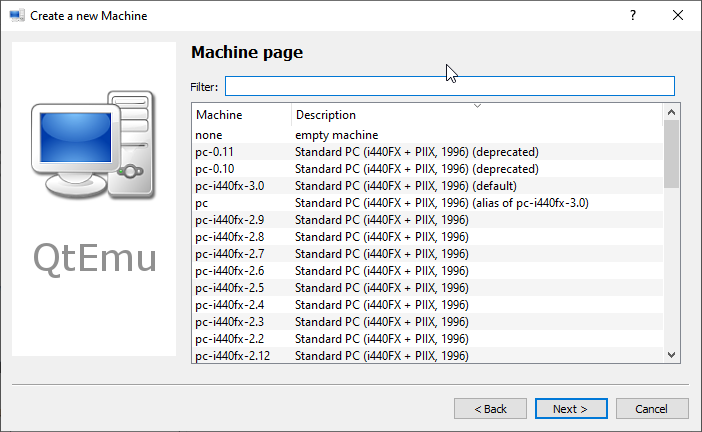
Step 5: Click Machine > New Machine. Then, give a name to the new machine (Ubuntu20), choose OS type (GNU/Linux), choose OS version (Ubuntu), and then click Next.
Step 6: On the Filter page, if you don’t need to specify certain motherboard chipsets, you can click the Next button directly to skip this step.
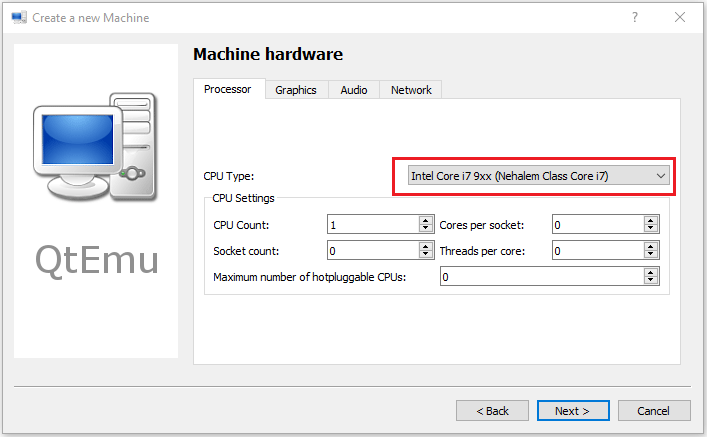
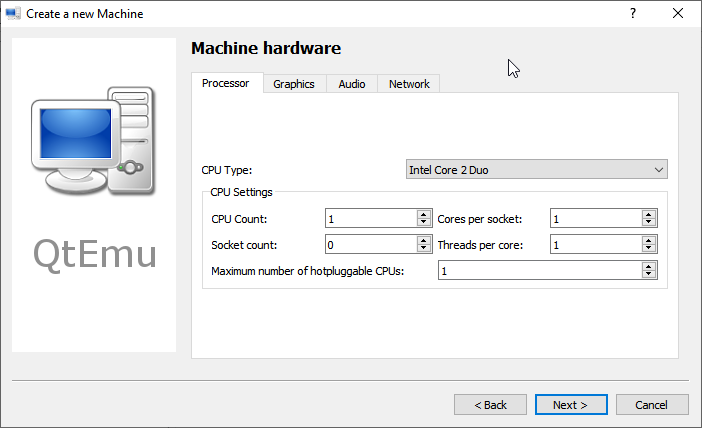
Step 7: Select a correct CPU Type, and set CPU, Graphics, Audio, and Network parameters. If all is OK, click the Next button.
Tip: The Ubuntu 20 version requires a 64-bit CPU. If you choose a 32-bit CPU, the VM may not boot.
What Is the Difference Between 32 Bit and 64 Bit (x86 vs x64)
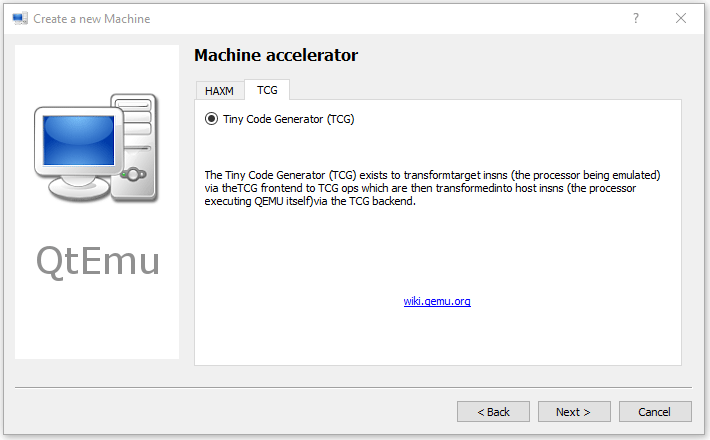
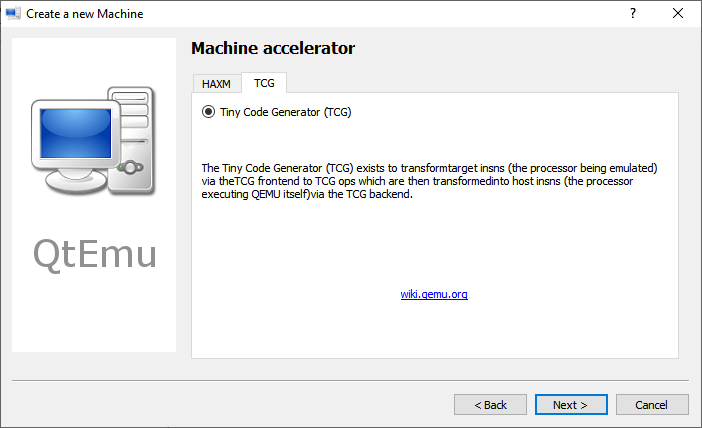
Step 8: Select the machine accelerator. HAXM is chosen by default. However, some computers may not support this technology. Therefore, I recommend you uncheck HAXM and then choose TCG instead. Then, click Next.
Tip: Some people report that nothing happens when they play the VM. The culprit is likely to be the HAXM. To ensure the VM can work on most PCs, TCG is recommended.
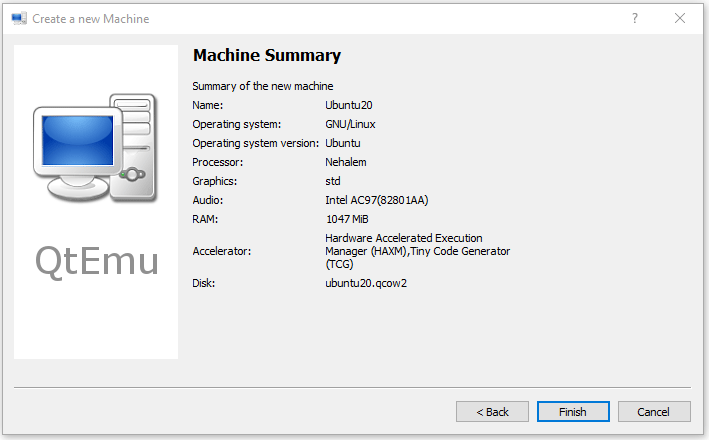
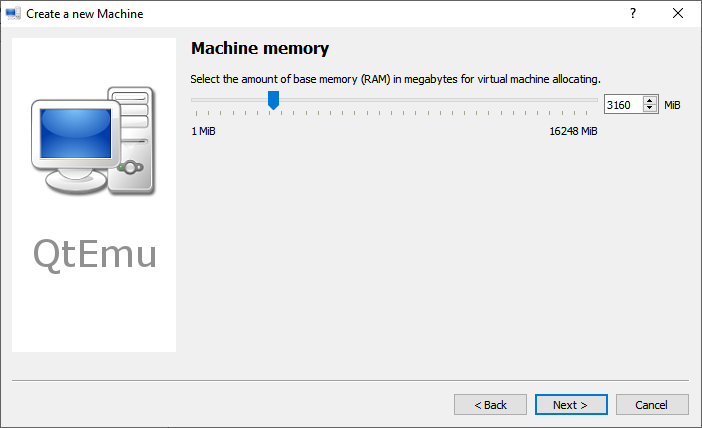
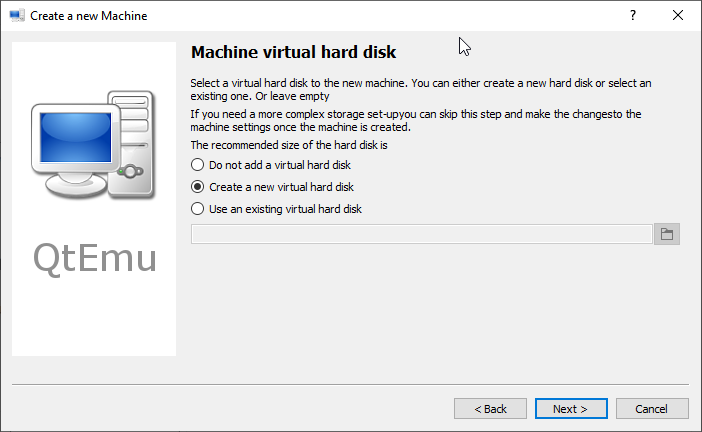
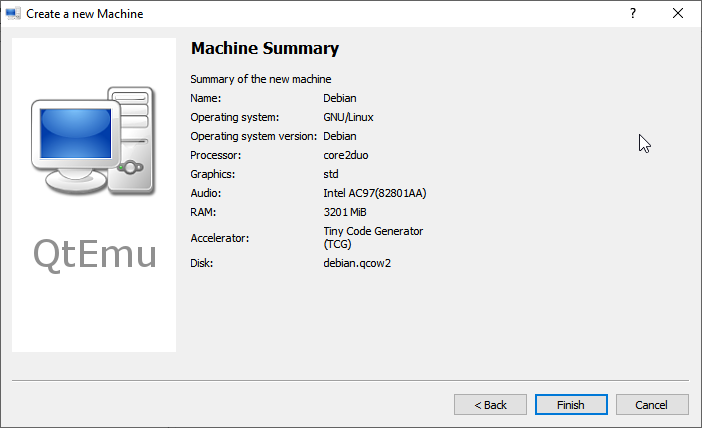
Step 9: Follow the on-screen wizard to set memory size, create a new virtual hard disk, set disk size and type, and then check the VM summary.
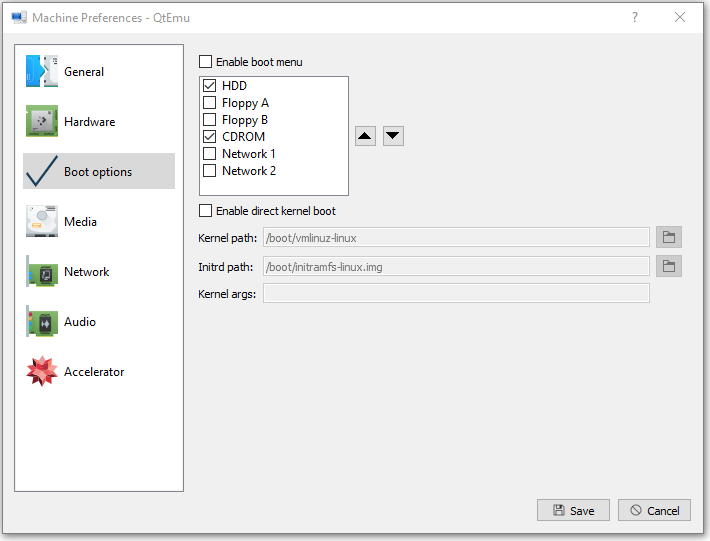
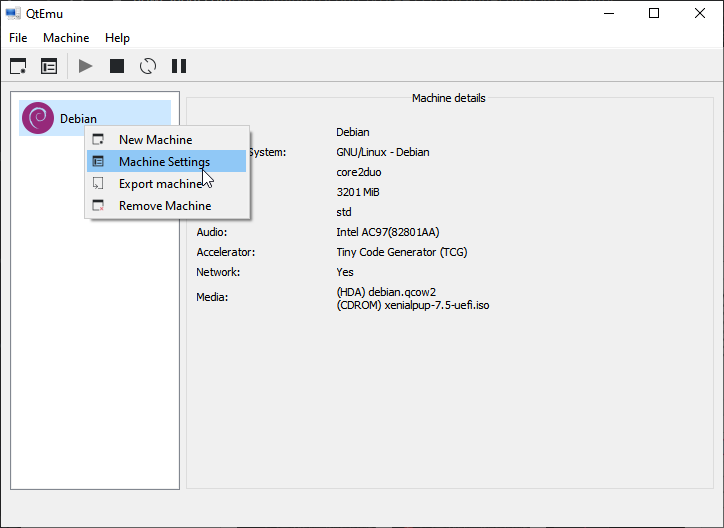
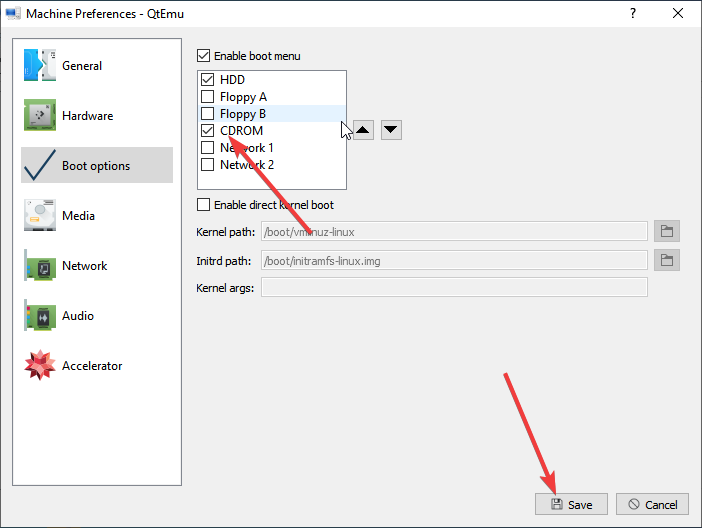
Step 10: Right-click on the newly-created VM and choose Machine Settings. Go to the Boot options tab, and tick CDROM.
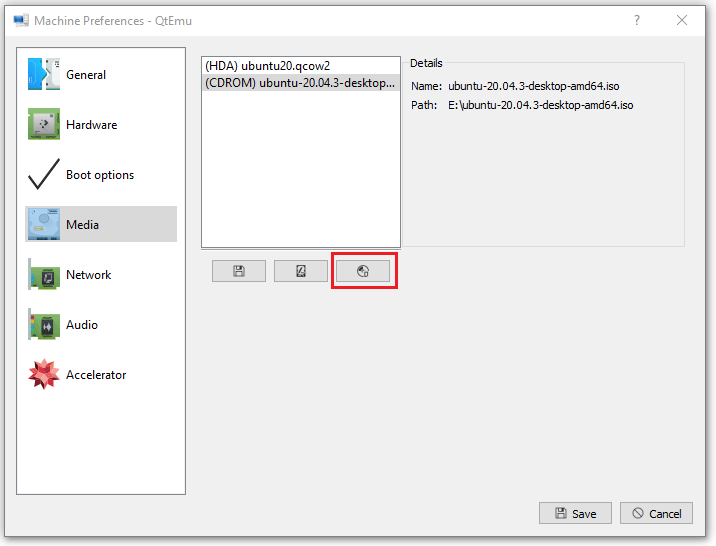
Step 11: Go to the Media tab, click the disc icon, and select the Ubuntu ISO file. Then, click Save.
Step 12: Select the VM and then click the Play icon. Then, you may need to go through the Ubuntu installation process. After the installation process is completed, you can enjoy the VM.
Best Virtual Machine for Windows, Linux, and Mac Systems
Here is a post talking about how to download, install, and use QEMU on Windows. If you are interested in this software, this post may help you.Click to Tweet
Bottom Line
Is this post helpful to you? Do you have other ideas about how to run QEMU on Windows? Please leave a comment in the following zone for sharing. In addition, if you have difficulty in moving or resizing partitions, please feel free to contact us via [email protected]. We will get back to you as soon as possible.
В прошлой статье я рассказывал про создание и запуск виртуальной машины при помощи QEMU на MacOS, а в этот раз давайте рассмотрим установку Linux на Windows 10 на основе QEMU. Да и как обычно, если тексту с картинками вы предпочитаете видео, то вот мой обзор QEMU на YouTube.
Шаг 1. Устанавливаем QEMU
С официального сайта QEMU можно скачать инсталлятор для Windows. Проверить установилась ли корректно программа, можно запросив версию QEMU следующей командой
qemu-system-x86_64 –version
Если установка программы прошла успешно, то вы увидите что-то вроде такого сообщения

Шаг 2. Прописываем QEMU в переменные окружения
Чтобы удобнее было пользоваться программой я рекомендую прописать путь, где была установлена программа в переменные окружения. В моем случае это “c:\Program Files\qemu”.
Проще всего это сделать так. В меню “Start/Пуск” написать “env” и выбрать “Edit environment variables for your account”
Выберите переменную Path и нажмите кнопку “ Edit..”
В появившемся окне нажмите кнопку “New” и добавьте путь к QEMU

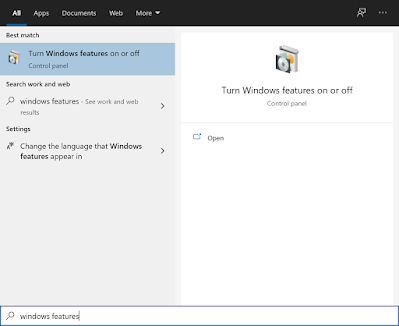
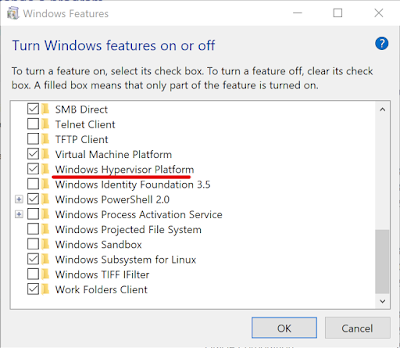
Шаг 3. Включаем Windows Hypervisor Platform
В меню Start/Пуск напишите “windows features”. Выберите пункт “Turn Windows features on or off”
В появившемся окне, в списке найдите и убедитесь, что помечен пункт “Windows Hypervisor Platform”
Шаг 4. Скачиваем iso-файл дистрибутива Linux
Для инсталляции Linux на виртуальную машину потребуется ее дистрибутив в формате ISO, который можно скачать с официального сайта. Я буду ставить Ubuntu Desktop.
Шаг 5. Создаем виртуальную машину
Основные приготовления сделаны. Теперь переходим к созданию виртуальной машины. Первым делом надо создать папку для виртуальной машины. Для удобства работы, скопируйте в нее скачанный ранее iso-файл с Ubuntu. Файл диска виртуальной машины создаётся командой
qemu-img create -f qcow2 ubuntu-20.10-desktop-amd64.qcow2 15G
Эта команда создаст файл виртуальной машины с именем ubuntu-20.10-desktop-amd64.qcow2 в формате QCOW2 на 15 Гб. Изначально файл не будет занимать сразу 15 Гб, а будет значительно меньше однако его предел — 15 Гб. Впрочем, это значение можно будет изменить позже.
Шаг 5. Устанавливаем Ubuntu
После того, как файл диска для виртуальной машины создан можно приступать к инсталляции Ubuntu. Для этого запустим виртуальную машину с подключенным iso-образом Ubuntu.
qemu-system-x86_64 ^
-machine type=q35,accel=whpx ^
-smp 2 ^
-hda ubuntu-20.10-desktop-amd64.qcow2 ^
-cdrom ubuntu-20.10-desktop-amd64.iso ^
-m 4G ^
-vga virtio ^
-usb ^
-device usb-tablet ^
-display default,show-cursor=on
Что означают параметры этой команды
- machine — Эмулируемая машина и тип акселератора. q35 — это один из последних типов машин, а whpx — это акселератор для Windows10.
- smp — Число процессоров для виртуальной машины
- m — Размер оперативной памяти для виртуальной машины
- hda — Ссылка на файл диска
- cdrom — Ссылка на ISO-файл
- vga — Графическая карта
- usb — Разрешает доступ к USB-порту
- device — Добавляем «usb-tablet» как устройство ввода, иначе мышь может не заработать
- display — Включаем отображение курсора мыши на экране. Отключено по умолчанию.
После старта виртуальной машины запустится инсталлятор Ubuntu. По завершению система предложит перегрузиться.

Вместо этого лучше перейти в терминал, в котором запускали виртуальную машину и выйти из QEMU клавишами Сtrl+C.
Шаг 6. Запускаем виртуальную машину
Виртуальная машина с Ubuntu полностью готова, только теперь для запуска нам не нужна ссылка на iso-образ Ubuntu. Поэтому немного модифицируем команду запуска виртуальной машины, убрав из нее параметр cdrom.
qemu-system-x86_64 ^
-machine type=q35,accel=whpx ^
-smp 2 ^
-hda ubuntu-20.10-desktop-amd64.qcow2 ^
-m 8G ^
-vga virtio ^
-usb ^
-device usb-tablet ^
-display default,show-cursor=on
Команда для запуска достаточно объёмная, советую скопировать ее в bat-файл и хранить его в том же директории где и файл диска виртуальной машины. Так будет удобнее запускать.
Qemu is open-source software for virtualization on Windows 10/8/7, Linux, and macOS but with a command-line interface, lightweight, and low hardware requirements.
QEMU stands for “Quick Emulator” and is the standard tool for virtualization and CPU emulation under Linux, Windows, and macOS. On Linux systems, QEMU uses the functions of the Linux kernel for virtualization (KVM- Kernel Virtual Machine), which are not available under Windows.
Thus, the binaries of Qemu’s ported version for Windows by Stefan Weil couldn’t provide the performance as it gives on Linux OS with KVM. Thus VirtualBox or Vmware player will be the best alternative options; still, if you want to try then here in this Qemu tutorial, we will let know the way to download, install and use Qemu on Windows 10 or 7 using its GUI VM manager Qtemu, an open-source software.
Qemu installation on Windows 10 with Qtemu GUI
Step 1: Download Qemu for Windows
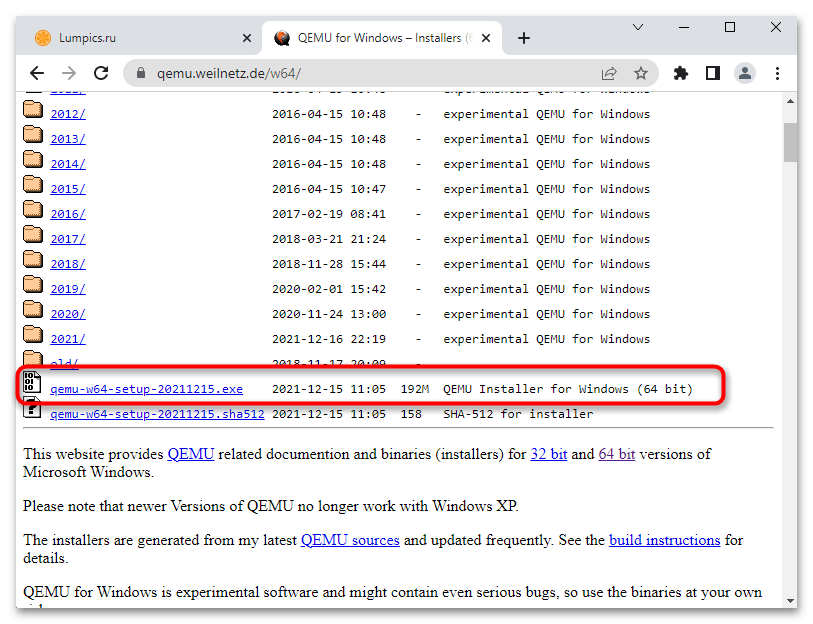
From the official website of the Qemu, we can download it easily even the source code. Visit it and click on the Windows tab, it will take you to another page https://qemu.weilnetz.de to download 32 bit or 64 bit of this virtualization platform. Here we are getting the 64 bit.
Step 2: Install Qemu
Now, like any other Windows 10/7 software, just double click on the downloaded setup of Qemu and follow the installation wizard.
- Accept the suggested language setting, by default it will be English. Select the “OK” button.
- Press the NEXT button.
- Confirm the usual license terms (GNU General Public License) with “Accept“.
- All modules required for QEMU have already been selected in the “Select components” dialogue. Confirm with “Next”.
- Check the suggested destination folder and go to “Install“.
- Click on “Finish” to complete the setup of QEMU.
Step 3: Install GUI for QEMU on Windows 10
As we know the QEMU uses the command line to create virtual machines by default. But it would be not feasible for standard computer users using CLI to manage virtual machines, thus we install another open-source application to provide a Graphical user interface (GUI) to QEMU. This program is known as Qtemu which is a fork of a dead project available at https://qtemu.org.
Here are the links to download an active Qtemu project for Windows 10/8/7 available on Gitlab.
Windows x86_64 installer
If you don’t want to install it, go for the portable version.
Windows x86_64 portable
Gitlab Page Link of the project.
Step 4: Setup QEMU manager Qtemu GUI
After the installation of Qtemu run it from the Windows Start menu.
- In the first column “QEMU binaries path” copy-paste this: C:\Program Files\qemu\ Or enter the path where you have installed the QEMU.
- For the second column enter the path of the Qemu-img file that is: C:\Program Files\qemu\qemu-img.exe
- Now create a folder anywhere on your computer where you want to save the virtual machines created by QEMU. And click on the folder icon given in the front of the third column to select that particular folder.
Note: You can change this configuration any time from the Qtemu Settings.

After that click on the Finish button.
Step 5: Create a Virtual machine
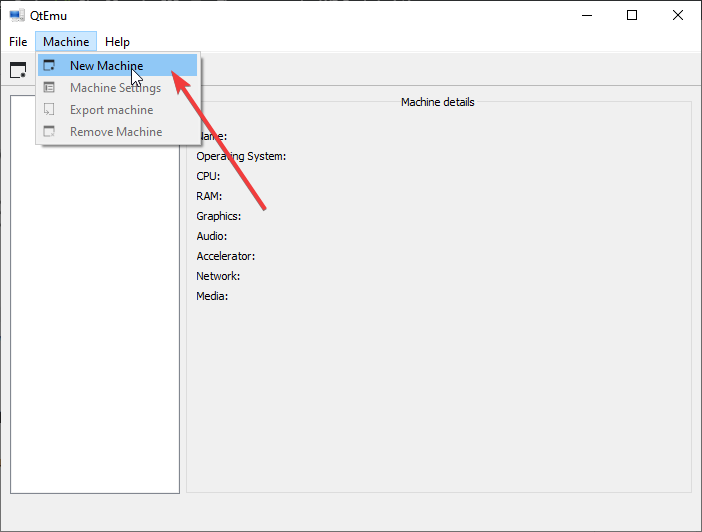
Now, from Qemu GUI manager Qtemu, simply click on Machine and select New Machine.
Leave the Machine which is meant to select some particular motherboard chipset.
Configure the Virtual Machine hardware, select the CPU type such as Core 2 Duo, Base, or any CPU that Qemu would be able to emulate on your system whereas setting the CPU count, cores, Thread as shown below screenshot.
By Default, the HAXM- Hardware Accelerated Execution will be selected in the Qtemu but in case the HAXM is not supported by your system or not available, thus uncheck it and check TCG- Tiny Code Generator.
Set the amount of RAM you want to assign to your VM.

Step 6: Set bootable medium CD/DVD
Now, everything is ready, we have created a Virtual machine, its time to set a bootable medium to CD; so that our ISO file could be used while booting the QEMU VM.
For that right-click on the created VM on the QTEMU interface and select Machine Settings.
There select the Boot options from the right-side panel and after that check the “Enable boot menu” and then the CD ROM option following the Save button.
Step 7: Insert ISO file in QEMU via Qtemu GUI
Under the Machine settings, go to the Media menu and click on the CD icon. This will open the Windows file explorer, navigate to the ISO file of the OS with which you want to boot in QEMU, and click on the Save button.

Step 8: Boot Qemu Virtual Machine via GUI
Now, on the main interface of the Qtemu GUI, select the created VM and click on the start button. This will open the boot screen.
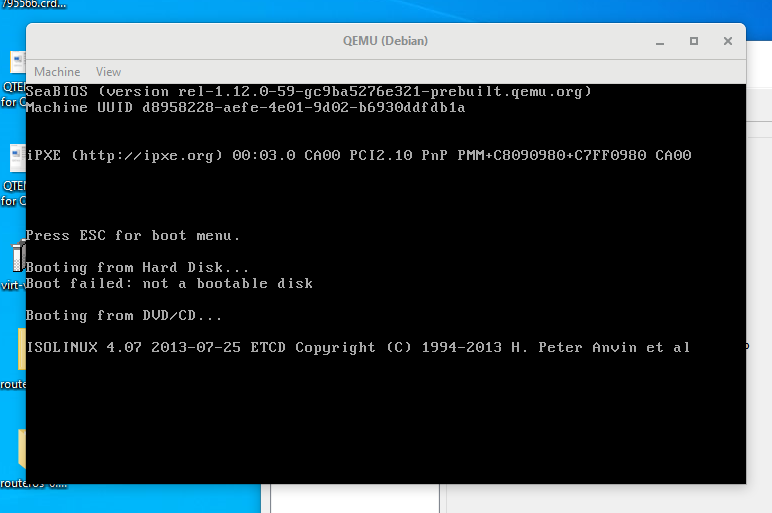
Wait for a few minutes depending upon the OS distribution you are using, it will show the LIVE screen of the same. However, I tried to boot and install Windows 10 on Qemu using the GUI but it was quite sluggish and slow.
Verdict:
Although the CLI can be used to create and manage a Virtual machine on Windows 10 using the QEMU, with the Qtemu GUI tool it becomes quite easy, however, in my case it worked well with Lightweight Linux Distros but for Windows guest VMs quite slow and low performance. I recommend using VirtualBox instead. Yet, if someone wants to experience Qemu on Windows 10 this is the easiest possible way. Still, be cautious with Qtemu hardware configuration because slight here and there will not let you boot the VM.