Порой возникает необходимость воспользоваться операционной системой отличной от установленной на компьютере. Есть разные методы сделать это в зависимости от ситуации и одним из таких способов будет запустить нужную операционку в виртуальной машине. Процесс не сложный, однако есть некоторые нюансы и занимающий много времени.
В данном примере рассмотрим установку Mac OS Mojave 10.14.6 в VirtualBox на Windows 10. В качестве процессора будет использован AMD Ryzen 3 2200G хотя на процессорах Intel все аналогично за небольшими изменениями, о которых будет сказано дальше.
Для запуска Mac OS в виртуальной машине VirtualBox нам потребуется сама программа которую можно бесплатно скачать на официальном сайте и пакет дополнений для гостевых операционных систем (Oracle VM VirtualBox Extension Pack) который можно загрузить там же. Устанавливайте последнюю версию которая будет на сайте, а в данном случае использовалась версия VirtualBox 6.1.
Так же необходим установочный диск с macOS Mojave. Вы можете воспользоваться образом, использовавшимся в данном примере скачав Mac OS Mojave 10.14.6 здесь или тут. Части архива взаимозаменяемые, так что можно загружать откуда вам больше нравится. Хеш образа диска SHA256: E700465D24B5D81CC694013D22497DDC6BD2EE6CAAF83BDCFA3B6792796BB4B2.
Останавливаться на установке программы мы не будем, желающие могут ознакомиться с подробной инструкцией на нашем сайте. Запускаете программу и нажимаете кнопку «Создать». Затем мы переключились в «Экспертный режим» нажав соответствующую кнопку внизу появившегося окна. Вводим имя нашей машины, лучше английскими символами и указываем тип операционной системы и ее разрядность, в данном случае Mac OS X 64-bit.
Папку машины, где хранятся ее настройки можно не менять. Передвигаем ползунок оперативной памяти выделив примерно половину имеющейся, но в красную зону лучше не залезать. Отмечаем «Создать новый виртуальный жесткий диск» и нажимаем кнопку «Создать».

Теперь нужно указать папку, где будет располагаться создаваемый виртуальный жесткий диск и его размер. Имейте в виду, что потом изменить размер диска Мак не позволит, так что сразу указывайте нужный вам размер. Тип и формат хранения можно сделать как на скриншоте.

После этого виртуальная машина будет создана. Выделяем ее в левой колонке и нажимаем кнопку «Настроить» в верхней панели. Выбираем в левой колонке открывшего окна пункт «Система». Здесь нужно указать в списке порядок загрузки первым оптический диск.

На вкладке «Процессор» выбираете сколько ядер процессора выделить для работы Mac OS и предел загрузки CPU. Кроме того, здесь и на вкладке «Ускорение» есть дополнительные настройки, которыми можно «поиграться» если в процессе загрузки ОС будет возникать ошибка. Все зависит от конкретных комплектующих вашего компьютера. Порой помогает отключение Nested Paging, а в моем случае включение галочки у пункта «Включить Nested VT-x/AMD» приводило к тому, что установка заканчивалась сообщением attempting system restart mach reboot.
В разделе «Дисплей» настраивается размер видеопамяти, выделенный виртуальной машине, а также тип графического контроллера и режимы ускорения. Их можно оставить по умолчанию или подбирать в случае проблем с запуском.
Переходим к разделу настроек «Носители». Здесь уже присутствует виртуальный жесткий диск, созданный нами на начальном этапе. Нам нужно указать оптический диск, с которого будет происходить установка Mac. Для этого выбираем его, нажав на «Пусто» и затем щелкаем по синему значку диска в верхней правой части окна. В открывшемся меню нужно указать местоположение образа нашего установочного диска или привод CD-ROM если он находится в нем. В результате должно получиться как на изображении ниже.

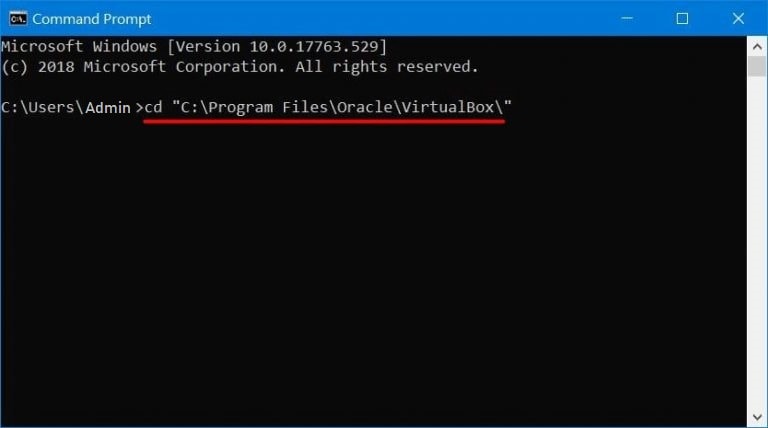
Теперь важный момент, сохраняем выполненные настройки и обязательно закрываем программу VirtualBox. Это нужно чтобы можно было сделать некоторые настройки виртуальной машины с помощью VBoxManage. Запускаем командную строку Windows и переходим в папку с установленной программой VirtualBox. Если вы не меняли путь по умолчанию при установке, то команда будет такой, в противном случае подставьте свой путь.
cd "C:\Program Files\Oracle\VirtualBox\"
Дальше нужно выполнить последовательно следующие команды, но заменив Имя Виртуальной Машины на реальное имя, указанное вами при ее создании.
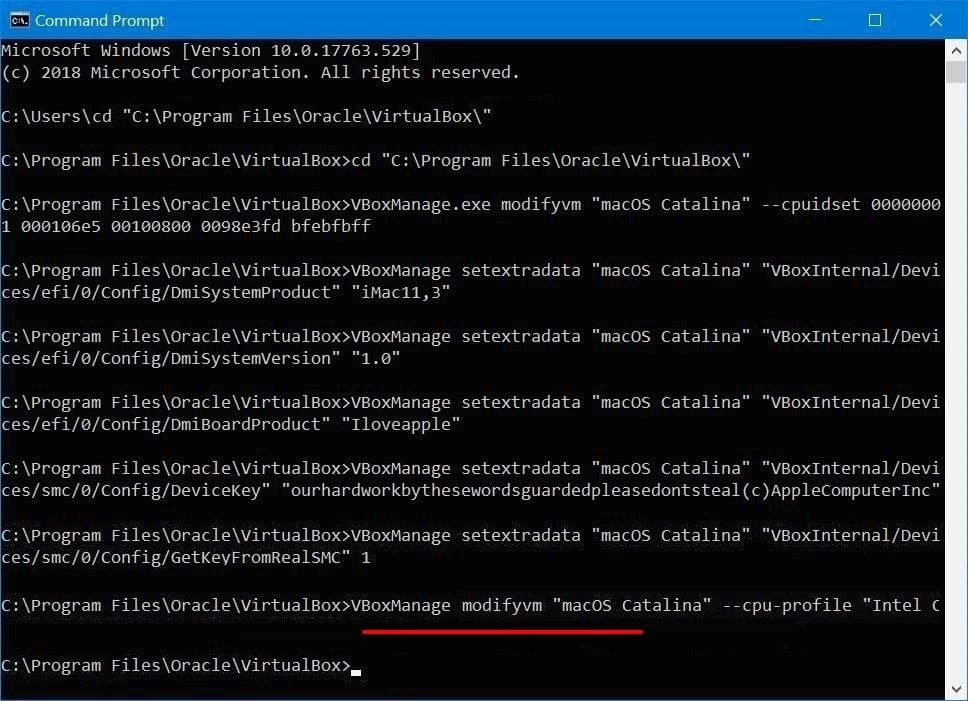
VBoxManage modifyvm "Имя Виртуальной Машины" --cpuidset 00000001 000106e5 00100800 0098e3fd bfebfbff
VBoxManage setextradata "Имя Виртуальной Машины" "VBoxInternal/Devices/efi/0/Config/DmiSystemProduct" "iMac11,3"
VBoxManage setextradata "Имя Виртуальной Машины" "VBoxInternal/Devices/efi/0/Config/DmiSystemVersion" "1.0"
VBoxManage setextradata "Имя Виртуальной Машины" "VBoxInternal/Devices/efi/0/Config/DmiBoardProduct" "Iloveapple"
VBoxManage setextradata "Имя Виртуальной Машины" "VBoxInternal/Devices/smc/0/Config/DeviceKey" "ourhardworkbythesewordsguardedpleasedontsteal(c)AppleComputerInc"
VBoxManage setextradata "Имя Виртуальной Машины" "VBoxInternal/Devices/smc/0/Config/GetKeyFromRealSMC" 1
Если у вас процессор AMD, то выполните дополнительно команду
VBoxManage modifyvm "Имя Виртуальной Машины" --cpu-profile "Intel Core i7-6700K"
Если при этом получаете сообщение об ошибке VBoxManage.exe: error: Invalid parameter '--cpu-profile', то попробуйте указать другой процессор, например:
VBoxManage modifyvm "Имя Виртуальной Машины" --cpu-profile "Intel Xeon X5482 3.20GHz"
VBoxManage modifyvm "Имя Виртуальной Машины" --cpu-profile "Intel Core i7-5600U"
VBoxManage modifyvm "Имя Виртуальной Машины" --cpu-profile "Intel Core i5-3570"
VBoxManage modifyvm "Имя Виртуальной Машины" --cpu-profile "Intel Core i7-2635QM"
Также можно сразу указать нужное разрешение экрана виртуальной машины выполнив следующую команду, где последние два числа как раз указывают ширину и высоту в пикселах. Впрочем, это всегда можно будет изменить в последствии снова выполнив эту команду с другим разрешением.
VBoxManage setextradata "Имя Виртуальной Машины" VBoxInternal2/EfiGraphicsResolution 1280x1024

На этом все подготовительные мероприятия закончены и можно переходить непосредственно к установке Mac OS Mojave в виртуальную машину. Снова запускаем VirtualBox, выбираем нашу машину и нажимаем кнопку «Запустить» в верхней панели. Откроется окно виртуальной машины VirtualBox и побегут строчки, показывающие процесс первоначальной загрузки операционной системы.

В некоторые моменты может казаться, что установка зависла, тогда можно ориентироваться на индикатор активности виртуального жесткого диска внизу окна программы. Теперь можно расслабиться и помедитировать пока не появится экран выбора языка, где указываем русский и щелкаем по стрелке вправо расположенной под ним. Прежде чем выполнять саму установку ОС необходимо инициализировать диск, поэтому на следующем шаге в окне «Утилиты MacOS» выбираем «Дисковая утилита».

В левом столбце выбираем наш виртуальный жесткий диск и нажимаем кнопку «Стереть» на верхней панели. Появится запрос на подтверждение действия, где можно задать какое-нибудь имя нашему диску и нажать снова «Стереть».

После завершения подготовки диска закрываем «Дисковая утилита» и снова попадаем в окно «Утилиты macOS», где теперь надо выбрать пункт «Установка macOS» и кликнуть «Продолжить». В следующем окне для продолжения установки будет предложено нажать соответствующую кнопку, а затем принять лицензионное соглашение. Дальше предложат выбрать диск для установки операционной системы, просто выделяем наш диск и щелкаем стрелку вправо после чего начнется установка MacOS на ваш компьютер.

В какой-то момент система без предупреждения перезагрузится и снова будет черный экран с бегущими строчками. Нам этого не надо, поскольку установка начнется опять с самого начала. Выключаем виртуальную машину закрыв окно с ней. Идем в ее настройки, выбираем наш iso образ с macOS Mojave и отключаем его от машины.

Сохраняем настройки, снова запускаем виртуальную машину VirtualBox и теперь установка продолжится непосредственно с жесткого диска. Когда первоначальная загрузка на черном фоне завершится, появится эмблема Эппл и индикатор оставшегося времени, верить которому не стоит. Это самый долгий этап установки macOS на Virtualbox по окончании которого виртуальная машина снова перезагрузится.
Если вместо продолжения установки вы видите UEFI Interactive Shell, то придется запустить ее самому. Для этого нужно последовательно выполнить команды:
fs1:
cd "macOS Install Data"
cd "Locked Files"
cd "Boot Files"
boot.efi
Фактически процесс установки завершен, осталось только выполнить первоначальные настройки и можно пользоваться. Выбираете страну из списка, затем раскладку клавиатуры, вопрос по миграции и Apple ID, если у вас нет Apple ID то пропустите соответствующий шаг нажав «Настроить позже».

Затем укажите имя вашей учетной записи и пароль. Дальше будут вопросы экспресс-настройки, которые можно оставить по умолчанию или настроить на свой вкус нажав «Настроить параметры».

После окончания всех настроек будет показан рабочий стол MacOS Mojave знаменующий окончание установки.

Хотя установка занимает много времени, последующая загрузка происходит довольно быстро. Стоит иметь в виду, что иногда по каким-то причинам в процессе загрузки может произойти ошибка хотя до этого все работало. В этом случае достаточно просто запустить загрузку заново.
Since the sixteenth massive update of the Mac operating system is finally live now with the most recent features and app. macOS Catalina’s name was encouraged by Santa Catalina Island, commonly known as Catalina. This operating system is significant update than macOS Mojave and much from macOS High Sierra. macOS Catalina is also the first version of macOS to support only 64-bit applications and the first to include Activation Lock, Sidecar and a bunch of other unique features. In this article, I’ll show how to Install macOS 10.15 Catalina on VirtualBox on AMD Systems.
The macOS Catalina runs typically on all the Macs that run Mojave. Even if it doesn’t, as well, you can definitely install macOS Catalina on your unsupported Mac. Catalina requires at least a 4GB of memory an addition 2 GB which runs Mojave. The macOS Catalina is one of the incredible operating systems. That you can not only install on Macs but also install Catalina on any version of Windows. You can also download other versions of MacOS with the help of the virtual machines such as VirtualBox and VMware.
- How to Install macOS Catalina on VMware on AMD Systems
The macOS Catalina is developed with the most amazing features and even updated than macOS Mojave and macOS Catalina. However, macOS Mojave and macOS High Sierra have also their own features, and improvements. But in macOS Catalina, in addition to those features, macOS Catalina has even more and better and improved those available features in it. You can probably download and install macOS Catalina, macOS Mojave and even macOS High Sierra on any Windows you’d like to. Here’s how to Install macOS 10.15 Catalina on VirtualBox on AMD Systems.
macOS Catalina
None of Apple’s operating system is useless and every one of them has its own benefits and advantages. But the only difference is that the new operating is more advanced features from the previous one. It also makes our work easier from the previous one. This new operating system opens the way for more creativity with its new features and apps. Such as Podcasts app, new Sidecar feature, Find My, new Photos interface, Reminders app, Voice Control, Dashboard feature, Apple TV app, iTunes Music Store and more other features and apps which are the most helpful, useful and effective.
If you want to download these files so we have provided that all downloading files for you guys. So if you want to download any of them, simply click, download them and enjoy them with all their features.
- How to Install macOS Mojave 10.14 on VMware on AMD Radeon
What is VirtualBox
VirtualBox is an open-source virtualization tool for 32 and 64-bit hardware. That is installed with server and desktop targeting and usage, allowing administrators to install and manage multiple operating systems on a single server. VirtualBox is designed for owners and guests. VirtualBox also allows supervisors and developers to quickly switch between guest and host. To know about these two, guest is any supported operating system running as a VM. A VirtualBox host can be run on Linux, Windows, or macOS.
Using VirtualBox, supervisors can adapt the host from ISO images or VDI / VMDK / VHD images. The most important and beneficial thing for a user is that it is free anyone can use it and easily can run as administrators. It’s also an easy route for testing and developing platforms.
- Install macOS Catalina on VMware on Windows PC
- Install macOS Catalina on VirtualBox on Windows PC
What is AMD System (Advanced Micro Devices)
AMD (Advanced Micro Devices) is the second-largest producer of personal computer microprocessors after Intel. They also create flash memory, integrated circuits for network devices and programable logic devices. Intel and AMD (Advanced Micro Devices) are two of the most competitve names in technology. Create chips that power millions of computers, graphics cards, servers, and other devices.
So what’s the difference between Intel and AMD. AMD processors has lots plus points, including power, graphics and speed performance, and processing power. In comparison, Intel processors are more expensive than AMD. In terms of performance, AMD chips perform well for editing and some other tasks.
- How to Optimize AMD Radeon for Gaming – Best Setting
Install macOS 10.15 Catalina on VirtualBox on AMD System
Now it’s the time to install macOS Catalina on VirtualBox on AMD Systems. So if you want to install it without any problems and issues, follow the steps carefully and attentively. It’s quite easy and interesting also it doesn’t take too much time. The macOS Catalina installation on AMD is a little different from the installation of macOS Catalina on Intel. how to Install macOS 10.15 Catalina on VirtualBox on AMD Systems.
1# Enter Commands For The Virtual Machine
As there’s little difference, particularly the difference is in the commands step. The commands for Intel is different and the commands for AMD are different. Rest of the steps are all fine and you can continue the installation. When you’re in this step, follow these steps.
First of all, open Run by pressing Windows + R then type Notepad and hit Enter.

Run
When Notepad is opened, copy this command from below then paste it to Notepad.
cd "C:\Program Files\Oracle\VirtualBox\"
VBoxManage.exe modifyvm "Your Virtual Machine Name" --cpuidset 00000001 000106e5 00100800 0098e3fd bfebfbff
VBoxManage setextradata "Your Virtual Machine Name" "VBoxInternal/Devices/efi/0/Config/DmiSystemProduct" "iMac11,3"
VBoxManage setextradata "Your Virtual Machine Name" "VBoxInternal/Devices/efi/0/Config/DmiSystemVersion" "1.0"
VBoxManage setextradata "Your Virtual Machine Name" "VBoxInternal/Devices/efi/0/Config/DmiBoardProduct" "Iloveapple"
VBoxManage setextradata "Your Virtual Machine Name" "VBoxInternal/Devices/smc/0/Config/DeviceKey" "ourhardworkbythesewordsguardedpleasedontsteal(c)AppleComputerInc"
VBoxManage setextradata "Your Virtual Machine Name" "VBoxInternal/Devices/smc/0/Config/GetKeyFromRealSMC" 1
VBoxManage modifyvm "Your Virtual Machine Name" --cpu-profile "Intel Core i7-6700K"
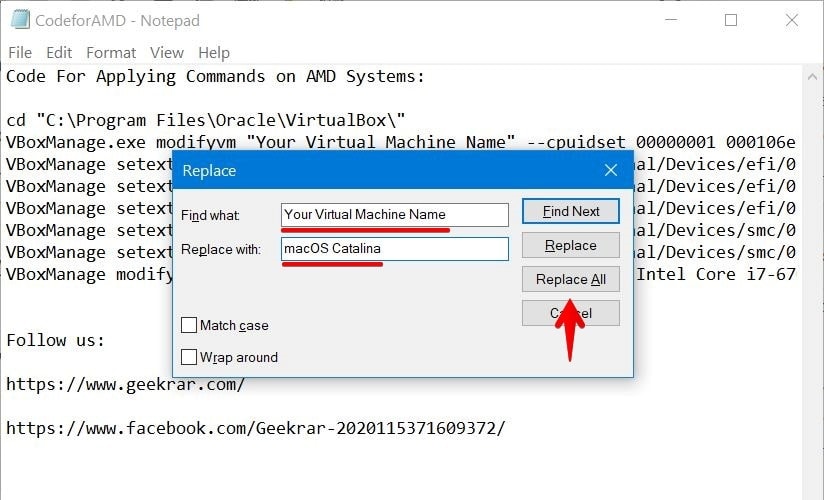
After pasting this code press Ctrl+ H for opening Replace window. Now type “Your Virtual Machine Name” in the first tab and on the second window with blank, write down your virtual machine name exactly without any difference. At last, click on Replace all. It will change the names of the virtual machine.

Replace All
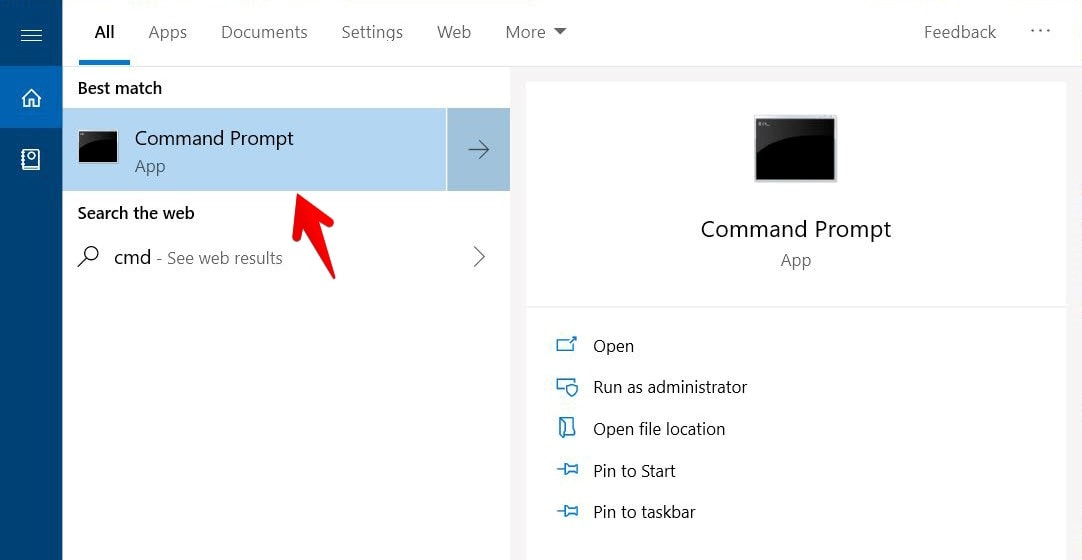
Now, without saving it, launch Command Prompt in your Start Menu and open that.
After you’ve done that, copy and paste all of the commands and click Enter.

Command Prompt
2# Boot macOS Catalina on VirtualBox
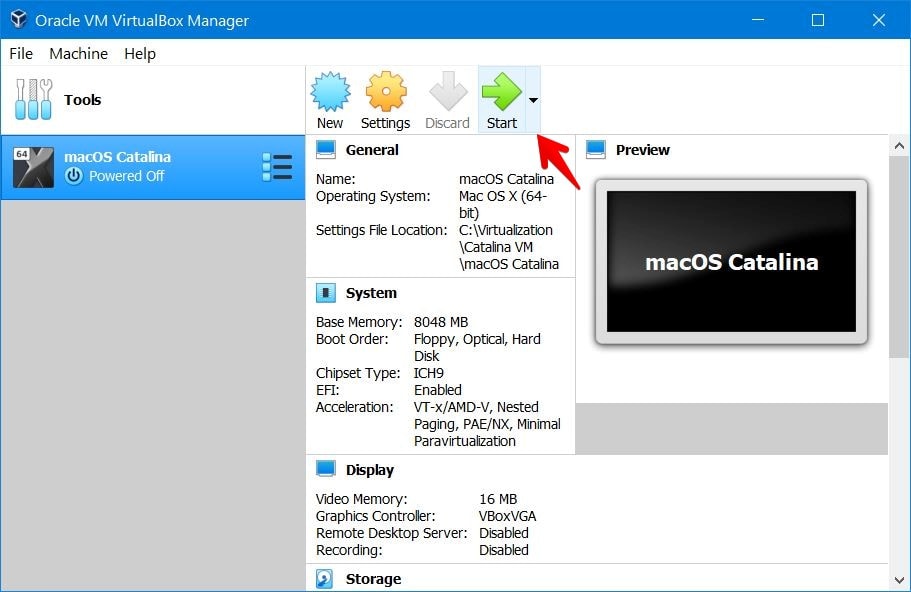
Now open your VirtualBox then click on Start.

Start Catalina
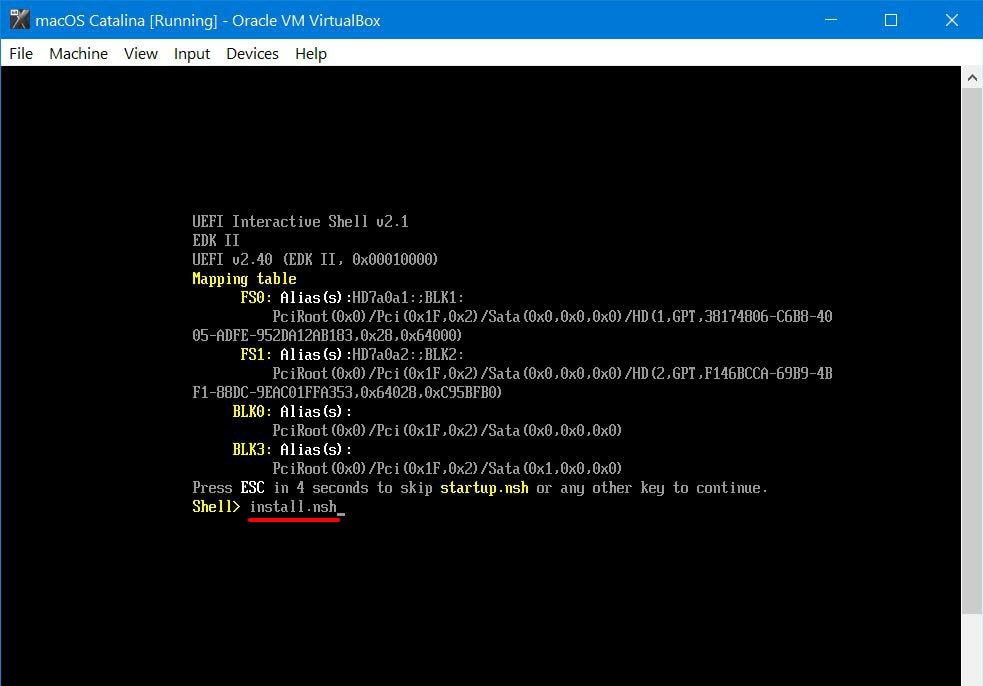
When the screen appears, straightly press Esc and type “install.nsh” to start the installation.

Install.nsh
3# Install macOS 10.15 Catalina on VirtualBox on AMD Systems
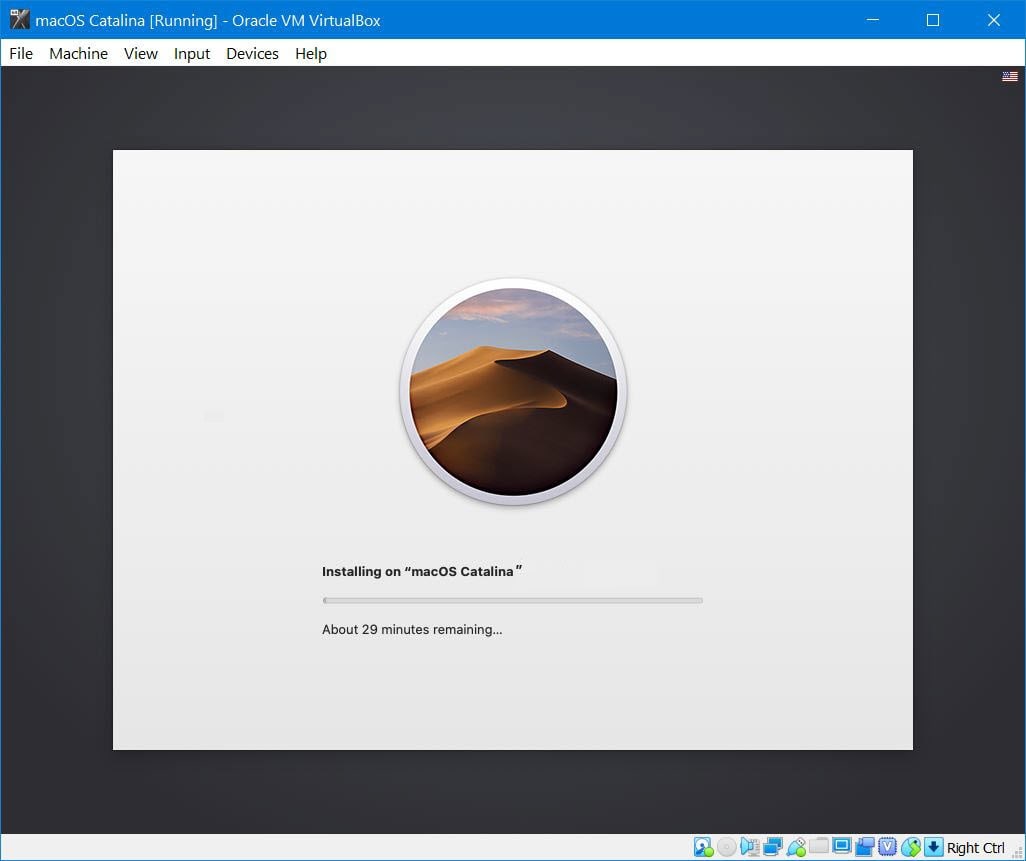
In a few minutes, macOS Catalina will be installed in VirtualBox.

Installing macOS Catalina
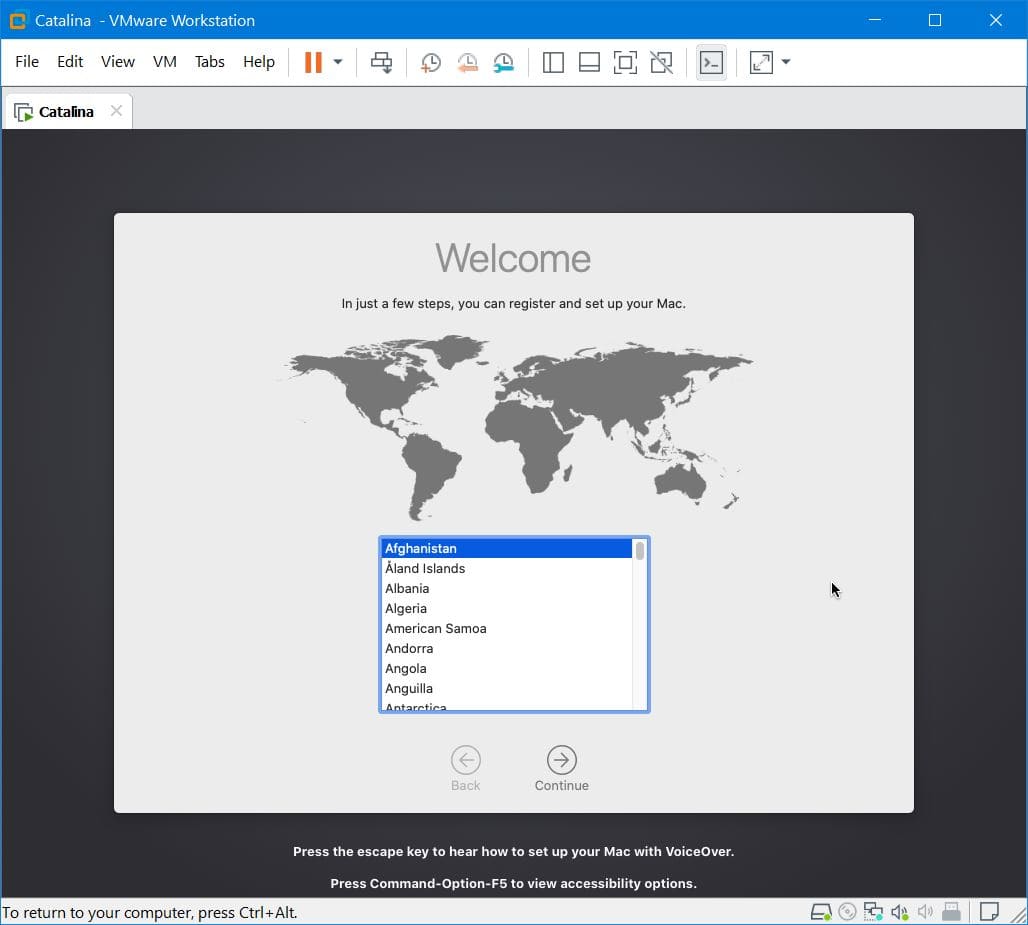
After installation, the virtual machine will restart, but this time it will a real installation where you need to personalize, create an account and more.

Welcome
After the settings up finished, then the macOS Catalina will be successfully installed.

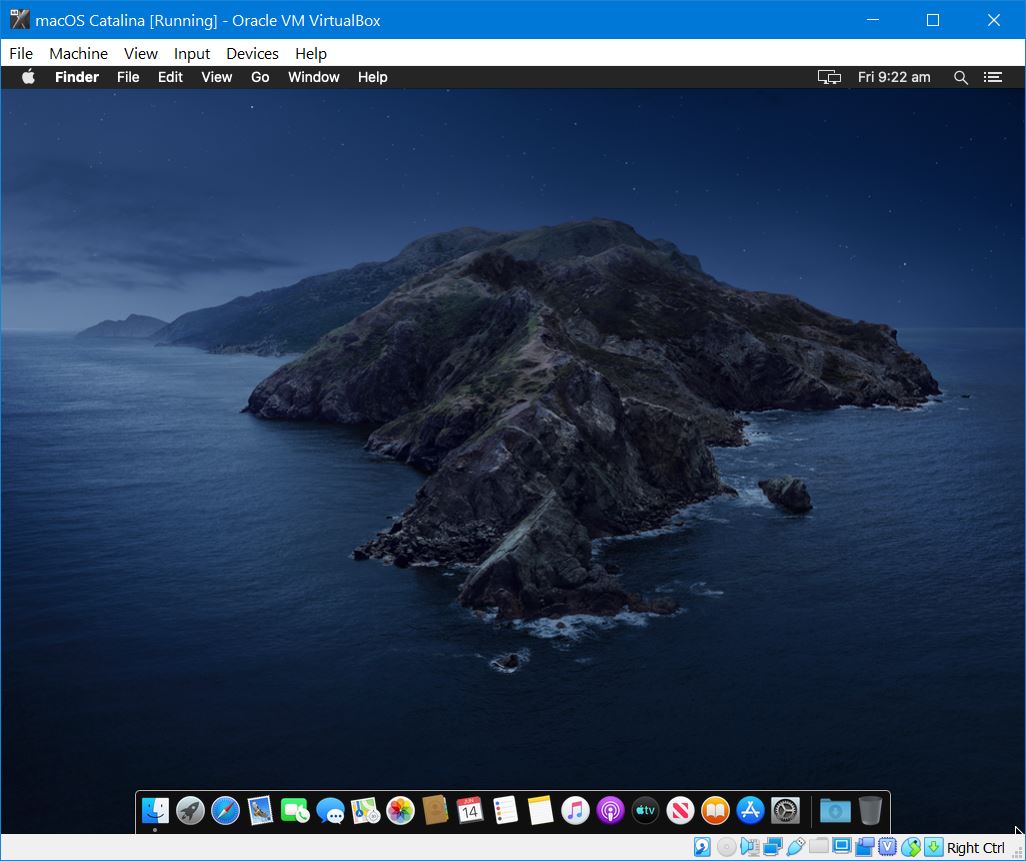
macOS Catalina Running on VirtualBox
Now everything is done you can macOS Catalina is running in your PC. You can continue and install macOS Catalina completely if you’ve left something.
- Install macOS Catalina on VMware on Windows PC [New Method]
- Install macOS Catalina on VirtualBox on Windows PC [New Method]
We’ve done our best to help you. We hope everything should work. However, if you encounter some problem, we’ve the comments forum open for you.
Table of Contents
In this post, we will learn How To Install macOS Catalina On Virtualbox On AMD Systems. There is a difference between installing macOS Catalina on an Intel-based system and installing macOS Catalina on an AMD system.
I am sure the process isn’t easy and works for everyone. You might face these common errors when installing MacOS X On VirtualBox On Windows- Here is a complete guide to help you fix those errors. Complete Guide To Fix VirtualBox Errors While Installing Mac OS X
Install macOS Catalina on VirtualBox on AMD Systems.
Installing macOS Catalina on a Windows computer might be a bit debatable; however, there is a difference between installing macOS Catalina on an Intel-based system and installing macOS Catalina on an AMD system.
One minor distinction related to installing macOS is the permission of hardware acceleration. While this capability is typically enabled on AMD systems, it is often disabled on Intel systems. However, there exist many more significant distinctions beyond this small variation.
These differences can sometimes create significant obstacles during macOS installation, causing the process to fail. For instance, installing macOS Catalina on VMware using AMD systems is impossible, but it is feasible on VirtualBox. However, it does not guarantee that every installation guideline will work for you. Nonetheless, a minor tweak works for Intel users to install macOS on AMD systems. Though the adjustment is minor, it can yield satisfactory results. In this tutorial, I will guide you through the process of installing macOS Catalina on VirtualBox using AMD systems.
Install macOS Catalina on VirtualBox on AMD Systems: 2-Step Guide
Step I: Apply Commands For The Virtual Machine
As previously stated, the process of installing macOS on Intel systems is not vastly distinct from installing it on AMD systems. In fact, the Catalina setup procedure we have outlined works seamlessly for both Intel and AMD users, except for the fifth step, where Intel users have to use an additional command that we will include here.
All right! If you are new to installing macOS Catalina, you might want to go through first 4 steps in the previous steps in this post: How to Install macOS Catalina on VirtualBox on Windows
Now, with the 5th step. You can continue with this guide.
With the virtual machine created and configured, you are now prepared to use some commands, especially for AMD computers.
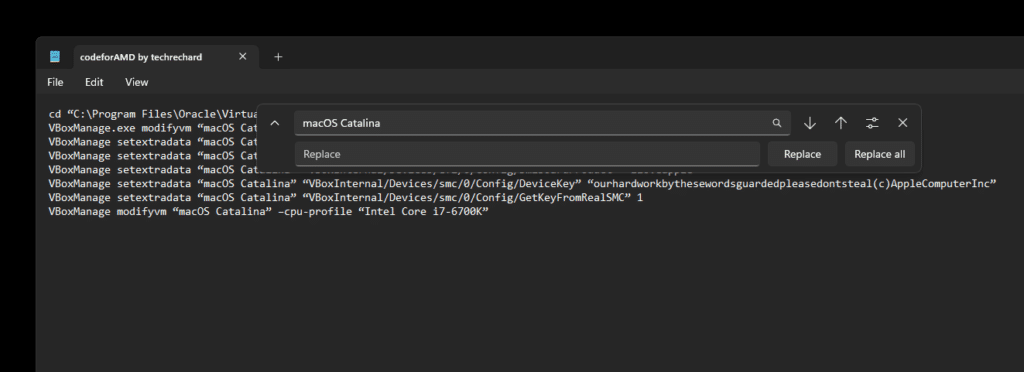
With this procedure, start CodeforAMD and press Ctrl + H. Now replace “macOS Catalina” with the virtual machine name you used while setting up the VM.
When you are finished, click Replace All. It’ll replace all the typos suggested to input your virtual machine title.
Immediately, without saving it, open the Command prompt.
Copy and paste the first point of those commands that look like this.
When you do this, copy and paste the remaining commands and hit Enter.
Step II: Install Macos Catalina On Virtualbox On Amd Systems
Start on the virtual machine and then wait patiently.
When you see the display, press Esc and type “install.nsh” to begin the setup.
If you see install.nsh error try using this guide- Install.nsh is Not Recognized as an Internal Command: 4 Possible Fixes – TechRechard
Now the macOS Catalina is currently installed onto VirtualBox, wait for a couple of seconds.
After the installation is completed, the virtual server will reboot, but this time it will boot to a genuine setup at which you will have to customize, make your accounts, and much more.
After setting everything up, the macOS Catalina soon be successfully installed.
Congrats, you have managed to Install macOS Catalina on VirtualBox on AMD Systems successfully. I hope this worked for you. Let us know if there is something that you would want to share or discuss with us. We will be glad to hear from you.
How to share folders on VirtualBox & Vmware? (Windows-MAC) Step by Step Guide
Here are some- Common macOS Catalina Problems and Solutions: 11 Key Errors and their Fix
Incoming Links:
Install macOS Catalina on VirtualBox on AMD Systems, How to Install macOS Catalina on VirtualBox on AMD Systems, Install macOS Catalina on AMD Systems, macOS Catalina on AMD Systems
The next huge update for Mac “macOS Catalina” is out now with public beta letting everyone try hands-on on their Macs. For Mac users, it’s as easy as installing a simple application. The downloading procedure is as simple as visiting Apple’s developer program. From there, they could download and open the installer file and continue with a few prompts. Once it’s finished, the software update will automatically search the installer, prompt you to download. Click on Upgrade Now to catch up downloading, and after it’s done, installing macOS Catalina is a matter of a few clicks. Congrats, you’ve done it. Here’s how to Install macOS Catalina on VirtualBox on AMD Systems.
But if you’re a Windows user who would like to try out, you’ve always the way open to it similar to what we’ve done with previous versions. Similar to installing Mojave on VMware and Mojave on VirtualBox, you can also install macOS Catalina on VMware or install macOS Catalina on VirtualBox. The process isn’t much tricky since we’ve created the macOS Catalina VMware & VirtualBox image files to different forms and uploaded to servers, so there’s isn’t much you’d need to do. Simply download the image and start with installing macOS Catalina on VMware or Catalina on VirtualBox.
But that doesn’t work always as it’s supposed to since Apple doesn’t support installing macOS on non-Apple hardware. So installing macOS Catalina or previous versions on a Windows computer are likely to encounter problems, no matter whether you’re installing Catalina on VMware or on VirtualBox or installing actually on your Hackintosh PC. The problems can appear in every stage and sometime you might end up without installation. We’ve already some of the problems and we’re stepping to help you solve every problem you might encounter.
Installing macOS Catalina on a Windows computer may be a little problematic however, there’s a difference between installing macOS Catalina on an Intel system and installing macOS Catalina on an AMD system. The reason there’s a difference between the installation of these two CPUs is the differences between these two. Like a tiny difference which matters for installing macOS is hardware acceleration enabled. While this feature is always enabled on AMD systems, it’s often disabled with Intel systems. But there are way bigger differences than this tiny variation. These differences make the installation different at least a little different.
Sometimes these difference make huge problems for installing macOS that even kick out from the installation. Like for now, you can’t install macOS Catalina on VMware on AMD systems instead you can install on VirtualBox. But that doesn’t mean every installation instructions would work for you. For installing macOS on AMD, there’s a little trick aside from the actual installation which works for Intel users. The change is small but will provide you the results. In this tutorial, I’ll walk you through how to install macOS Catalina on VirtualBox on AMD system.
Table of Contents
Step One: Apply Commands For The Virtual Machine
Like I said, installing macOS on Intel systems isn’t much different from installing AMD systems. In fact, the Catalina installation process we’ve walked you through works perfectly for Intel users but also works for AMD users, except the step five that a simple command they’ve to apply an additional command which we’ll do here.
All right! If you’re installing macOS Catalina newly, you may install macOS Catalina but for applying commands, you may use this instruction. I’m talking of AMD users.
With the virtual machine created and configured, you’re now ready to apply some commands specifically for AMD computer.
For this process, open CodeforAMD and press Ctrl + H. On the screen, now type “Your Virtual Machine Name” in the first Find What blank and on the second Replace with blank, write down your virtual machine name exactly without any difference. In my case, I’d write macOS Catalina.
When you’re done, click Replace All. It will replace all the typos which are indicating to enter your virtual machine name.
Now, without saving it, open Commands Prompt.
On there, copy and paste the first line of the commands which should seem like this.
After you’ve done that, copy and paste the rest of the commands and hit Enter.
Step Two: Install macOS Catalina on VirtualBox on AMD System
That makes all set! Just power on the virtual machine and wait.
When the screen appeared, immediately press Esc and type “install.nsh” to start the installation.
If you get install.nsh is not recognized- here is the complete fix –
https://forum.geekrar.com/forums/topic/fixing-install-nsh-issue/
You need to sign-up for the forum to access this.
The macOS Catalina is now installing on VirtualBox, wait for it.
When the installation finished, the virtual machine will reboot, but this time it will boot into an actual installation where you’ll need to personalize, create your account and more.
With setting up everything, the macOS Catalina will be successfully installed.
The result is on the screen in front of you. Hope that works. If there’s something you’d like to tell us, we’re happy to hear.
AMD Processors are compatible with Apple’s operating system, but somehow coders and programmers have managed to Install mac os on AMD Processors on Virtual Machines such as the Vmware and Virtualbox. In Intel processors, I mean 4th generation higher we can simply add the Unblocker tool to enable Apple Services. And we are using macOS on them exactly under Guest operating system of Apple. But when it comes to AMD Processors they have managed to create a bootloader containing the code to use Mac OS in it. In that bootloader, only AMD, Haswell, and Some HP laptops are compatible with it. Also, Don’t forget that the macOS will be boot under the guest operating system of Windows, not Apple. So, I that’s why today I have decided to show you How to Install Mac OS X Yosemite on AMD Processors on VirtualBox on Windows? So, let’s get started.

- Also Read- Install Mac OS X Yosemite on VMware on AMD Processors on Windows
Download Required Files:
- WinRAR
- Download VirtualBox
- Google Drive: Download Mac OS X Yosemite with Bootloader
- Mega Drive: Download Mac OS X Yosemite with Bootloader
Install Mac OS X Yosemite on AMD Processors on VirtualBox
Step 1. Install VirtualBox
You can Install VirtualBox yourself because it is so simple and easy but if you don’t know follow the below instructions. If you know the Installation process then skip step 1.
- Double-click on the setup to start the installation Wizard.
- On the Welcome Screen, click next.
- On the Custom setup page again click next.
- Decide you want to add shortcuts or no and click next.
- On the Network Interface Windows click Yes.
- Now click on the Install to install VirtualBox.
- When the Installation is done click finish.
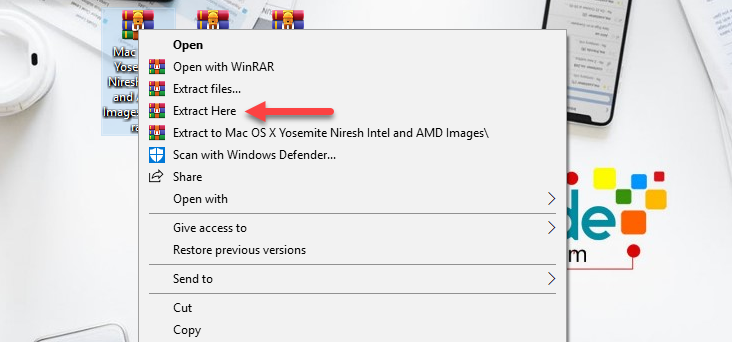
Step 2. Extract Mac OS X Yosemite
Mac OS X Yosemite is compressed using WinRAR because of its size. Without extraction, its size is 8 GB but with once it is zipped, it becomes 6 GB. For Extracting the Mac OS X Yosemite you can use the WinRAR or 7-Zip. 7-Zip is an open source which can zip and unzip files but WinRAR is not free & you need to buy if you want to use.
Step 3. Create A new Virtual Machine
Launch the VirtualBox select New> after that Name the Virtual Machine whatever you want but leave the guest operating system as Windows as it is. Then specify the amount of RAM but I recommend you to put it at least 2 GB.
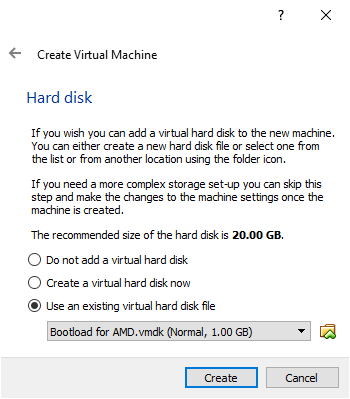
When you reached the Hard Disk Window select use an existing Virtual hard disk File. And locate the Mac OS X Yosemite Bootload VMDK File and load it.
Step 4. Attach Mac OS X Yosemite VMDK File
Once the Bootloader is added it is time for you to add the Mac OS X Yosemite VMDK File. To add it open the created Virtual Machine’s settings> then head over to the storage click on the Plus icon and add the Mac OS X Yosemite. Select Add Hard disk> choose an existing Virtual Disk and locate the Mac OS X Yosemite VMDK File.
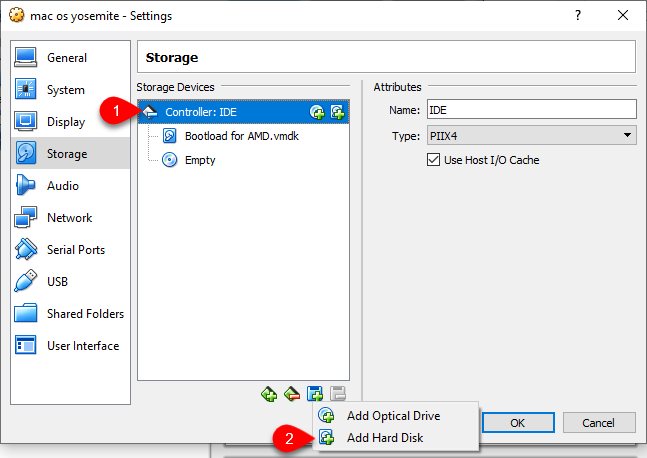
Once you are done with the settings > click Ok to save them.

Step 5. Install macOS Yosemite on VMware
The Installation process is really simple and you can install it without any problem. But the only problem is that other PCs or rather Intel Processors can naturally support macOS. But HP, AMD, and Haswell you have to type the Custom Kernal In order to Install.
- In HP laptops you have to type the Kernal /hp or /hp1
- In Haswell, you need to type /Haswell
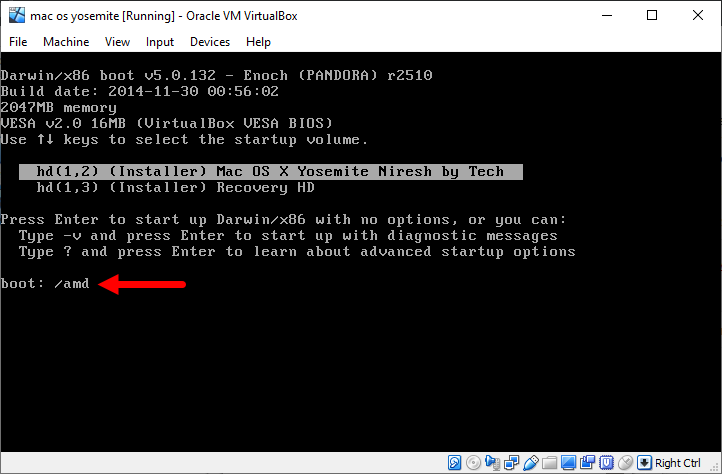
But in AMD Processors the kennels are listed below:
- /amd
- /amd1
- /amd2
- /amd64
- /amd32 (its actually a 64 bit kernel)
- /amdfx
In order to use the Kernal, start the Virtual Machine and it will be directly in the Kenal window, where you need to type your Kernal and hit enter on the keyboard.
Once you typed the Kernal, wait until the Gray Screen should go away and you will on the welcome screen.
- On the welcome window select your country and click continue.
- Select your Keyboard Layout and click continue.
- Select Local Internet and click Continue.
- Select Don’t Transfer any information to this mac and click continue.
- Agree to the Terms and conditions and click continue.
- Type your Account Name and Password and click continue.
- Click continue on the diagnostics and usage.
- Now, wait until the mac should set up.
Conclusion
well, It was all about How to Install Mac OS X Yosemite on AMD Processors on VirtualBox on Windows? I hope it was helpful to install mac os x Yosemite on VirtualBox. If you like this post please share it with your friends and relatives, plus subscribe to IntoGuide’s YouTube Channel.