Я сегодня подготовил для вас тяжёлый, большой, но очень полезный материал! Я собрал и настроил готовый образ виртуальной машины windows XP на базе Vmware Player.
Бывает ещё виртуальная среда Oracle VM VirtualBox, и вы также можете скачать данный образ на нашем сайте и для VirtualBox, и другие среды, но принципиальной разницы между ними нет.
В этой публикации вы сможете скачать по сути готовую виртуальную машину windows XP SP3, со встроенными, уже установленными в неё некоторыми программами. Там даже работает звук и интернет! Я делал упор на то, чтобы пользователь смог скачать Vmware Player 6, (это сама программа запуска образов виртуальных машин), и сам готовый образ (архив, если быть точным). После чего ему будет достаточно в 1 клик запустить и пользоваться виртуальной машиной:

Вот так будет выглядеть давно забытая windows XP, когда запустите её в Vmware Player 6.
Для чего нужны виртуальные машины?
Виртуальная машина — это целый симулятор компьютера, завёрнутый в окно программы Vmware Player/Virtual box. Т.е. под управлением одного компьютера, в 1 клик запускается ещё один, с совершенно другой операционной системой. Это даёт невероятные и безопасные возможности для тестирования, запуска каких-то скриптов, старых программ, даёт возможность в рамках одного единственного ПК содержать целый парк других ПК, различных по своим параметрам.
Как вы понимаете, чтобы осуществить запуск «компьютера в компьютере» нужны приличные ресурсы. Т.е. слабый компьютер может не потянуть запуск сразу двух компьютеров. Попросту не хватит ресурсов. Но… что касается именно виртуальной Windows XP, то тут как раз исключение из правил, и ресурсов вашей host-машины должно по любому хватить. 🙂 А вот если бы вы захотели запускать виртуальную машину Windows 10 или не дай Бог Windows 11, то это потребовало значительных ресурсов вашего ПК (хост — машины). И не на каждом железе такое возможно было бы осуществить.
Скачать Vmware Player 6
Как вы уже догадались, для того чтобы иметь возможность запускать образы любых виртуальных машин, вы должны скачать и установить так называемую утилиту, программу управления виртуальными машинами, в данном случае, это Vmware Player 6. Почему именно Vmware Player 6, когда на официальном сайте vmware.com есть уже 16-ая версия??
Отвечу. Во-первых, для указанной задачи хватит и Vmware Player 6, которая весит всего 83 Мб. В то время как Vmware Player 16 только один дистрибутив весит более 580 Мб.! В установленном виде намного больше. Кроме того, 16-ая версия куда прожорливее с точки зрения системных ресурсов. Она будет запускаться в 2-3 раза медленнее, и на не очень сильных машинах, таких как intel core i3, будет банально тормозить.
Кроме того, образ самой виртуальной машины в 16-ой версии Vmware Player тут же потребует обновлений и донастроек! Оно вам надо? Впрочем, любители «скачать только самое свежее» всегда есть, и выбор в любом случае за вами. Убедил я вас?) Тогда вот:
Скачать Vmware Player 6
Для тех, у кого по какой-то причине не видна/не работает кнопка, вот прямая ссылка на скачивание: ⏩Скачать vmware Player
Итак, первое действие — это скачивание и установка Vmware Player — программы управления виртуальными машинами на ПК. И оно выполнено! Теперь перейдём с скачиванию самого образа виртуальной машины.
Образ — громко сказано, конечно. 🙂 Это архив .rar, содержащий подготовленные и настроенные файлы, необходимые для запуска и работы виртуальной машины Windows XP. Его необходимо скачать, распаковать в какую-либо папку на вашем ПК, и затем с помощью Vmware Player указать на эту папку один раз, и в дальнейшем программа уже будет «помнить» параметры и пути, и вам останется только пользоваться, впрочем, обо всём по порядку! Поехали:
Скачать готовый образ WindowsXP [4GB]
Зеркало
Скачиваем, распаковываем, не торопимся. Если кнопочка не видна, а такое бывает, то даю прямую ссылку: ⏩ СКАЧАТЬ
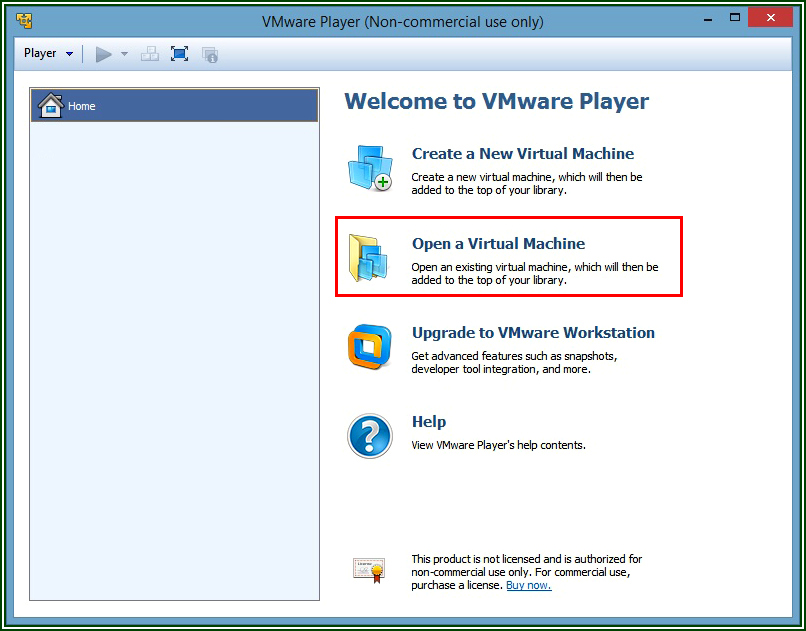
После этого запускаем Vmware Player, и там нажимаем на кпоночку «Open a Virtual Machine». Что можно перевести как «открыть существующую виртуальную машину». Пусть вас не смущает английский интерфейс, букв в принципе в программе не много:
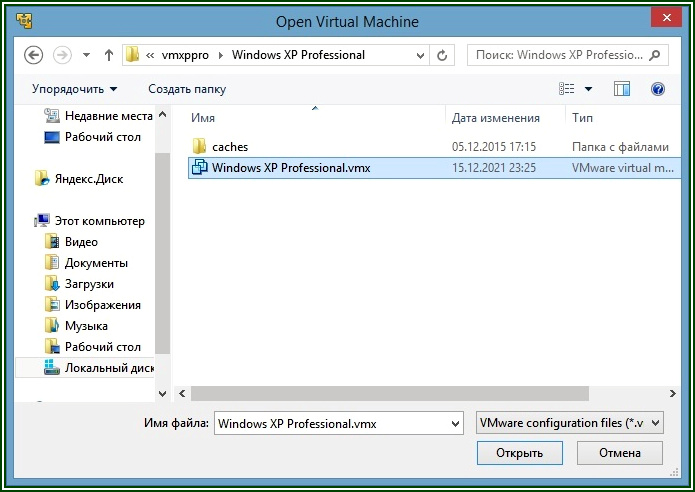
Откроется окно, в котором вы должны будете указать путь до конфигурационного файла скачанной виртуальной машины, смотрим иллюстрацию:
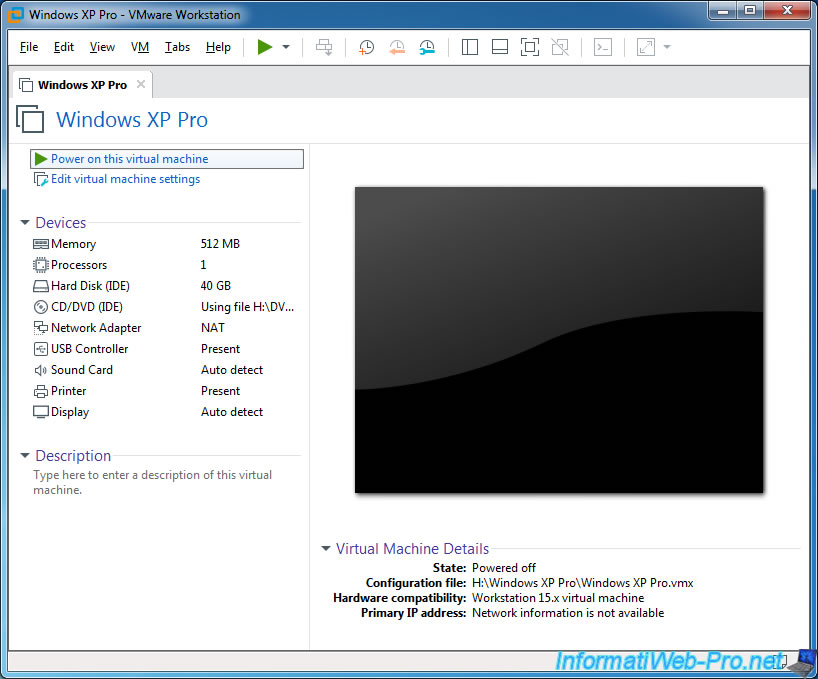
В результате чего в окне Vmware Player тут же появится скачанная вами, подготовленная мной виртуальная машина Windows XP Professional:
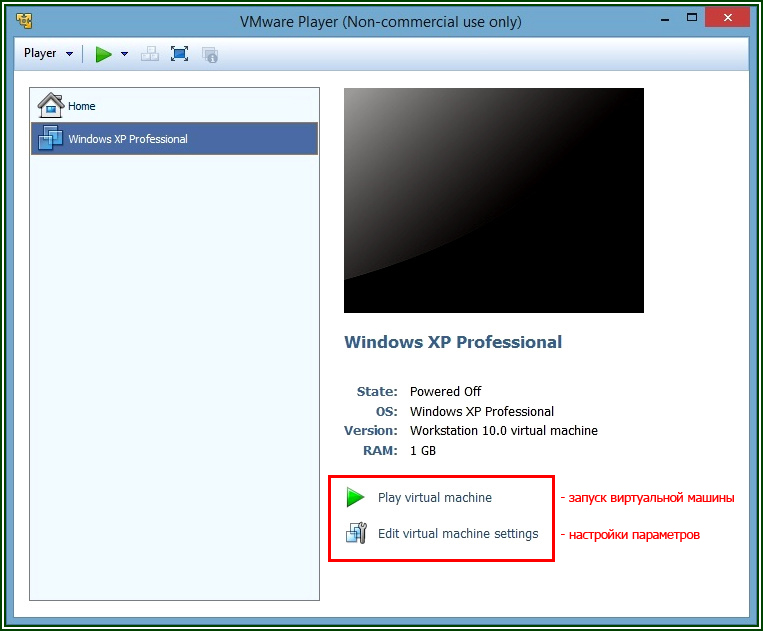
Как видите, всё довольно просто! Теперь Вы можете сделать первый запуск образа, он должен загрузиться довольно быстро. Или же, нажав на «edit virtual machine settings», донастроить под свои нужды параметры данного образа:

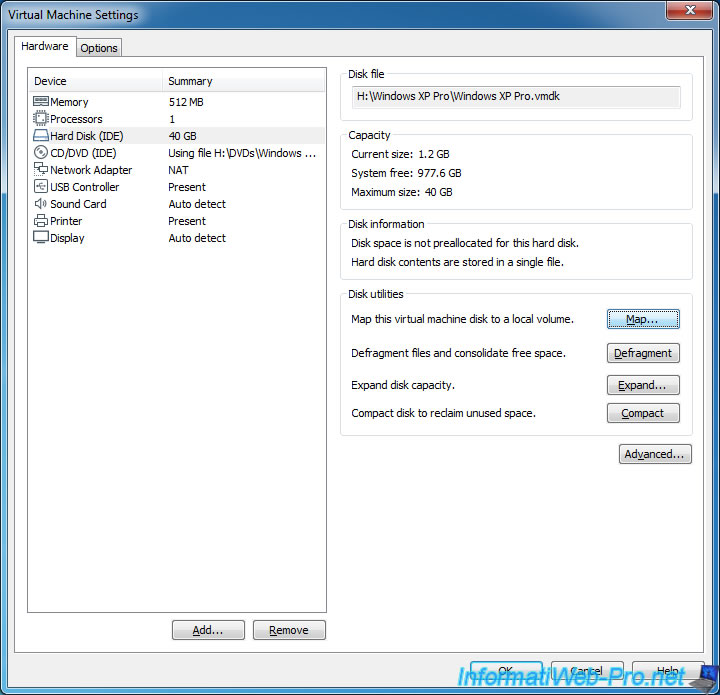
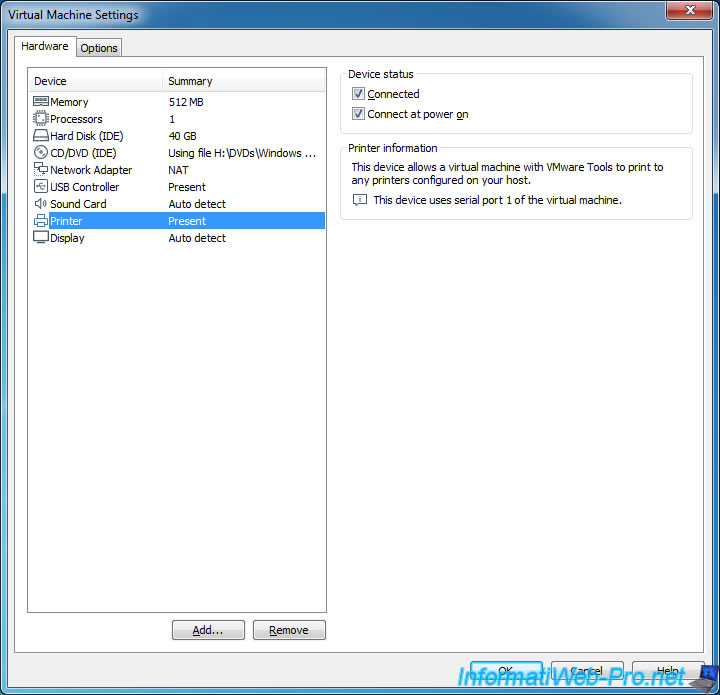
Я подчеркнул красным слово NAT на этом скрине не с проста. Это настройка поведения сетевого адаптера внутри образа windows XP. Который подразумевает, что если на машине подключен интернет, то и виртуальная машина сразу же получит доступ в интернет. Впрочем, любые настройки вы можете на этой закладке изменять. Короче, пора поговорить о «начинке» этого образа. 🙂
Настройки образа моей виртуальной машины windows XP SP3
1) Настройка железа:
- Количество оперативной памяти 1 Гб — вполне хватает для работы windows XP;
- Размер дискового пространства 10 Гб;
- CD/DVD — ДА;
- Сетевой адаптер включен в режиме NAT;
- Звуковая карта — авто настройка;
- Принтер — поддерживается;
- Разрешение экрана 1024х768, легко меняется внутри гостевой машины.
2) Установленное в образ программное обеспечение:
- Winrar;
- Microsoft office 2003 + File Format converter, позволяющий открывать .docx;
- Faststone image viewer — для просмотра изображений;
- Notepad ++
- Mozilla firefox ESR.
Обратите внимание, что копировать файлы в гостевую машину можно простым перетаскиванием мышки!
Надеюсь, этот материал кому-то, да пригодится! Удачи!
You can import a Windows XP Mode virtual machine and run it in Workstation Pro. When you import a Windows XP Mode virtual machine, Workstation Pro creates a new virtual machine in VMware runtime (.vmx) format.
You can power on only one Windows XP Mode virtual machine at a time in Workstation Pro. If you move a Windows XP Mode virtual machine to another host system, it becomes a new virtual machine and you must activate it.
Note:
Changes made to the original Windows XP Mode virtual machine through Virtual PC do not affect the virtual machine imported in Workstation Pro.
Prerequisites
-
Verify that the Windows 7 Professional, Enterprise, or Ultimate edition operating system is running on the host system. Importing Windows XP Mode virtual machines is not supported on Linux host systems or on host systems that are running other versions of Windows.
-
Download and install the Windows XP Mode virtual machine on the host system.
Procedure
- Select and browse to the virtual machine configuration (.vmc) file.
If you have never virtualized a physical machine or imported a third-party virtual machine in Workstation Pro, you need to download and install VMware vCenter Converter Standalone. After the VMware vCenter Converter Standalone installation is finished, you must restart the import.
- Type a name for the new virtual machine, type or browse to the directory for the virtual machine files, and click Import.
Workstation Pro begins importing the Windows XP Mode virtual machine.
Results
After Workstation Pro successfully imports the Windows XP Mode virtual machine, a new virtual machine appears in the virtual machine library.
2.3. Update Windows XP to SP2 or SP3
As mentioned before, you will not be able to transfer the installation file easily without the VMware Tools.
Nevertheless, you have 2 options available :
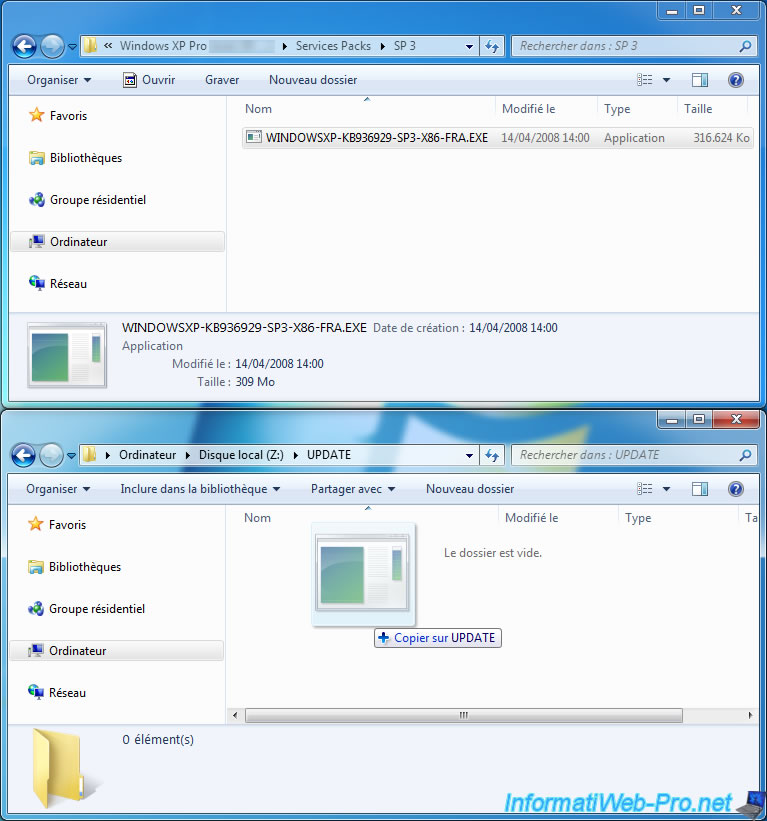
- use an USB key : you connect it to the host PC. You transfer the desired service pack installation file to this USB key. Then, you connect it to the virtual machine.
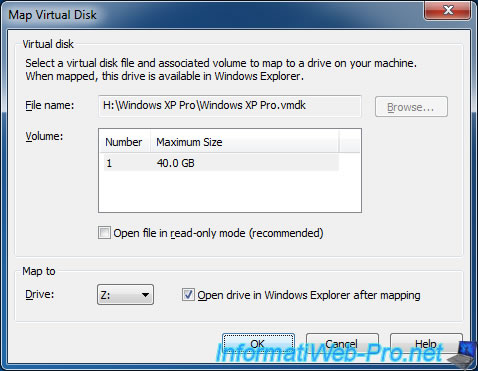
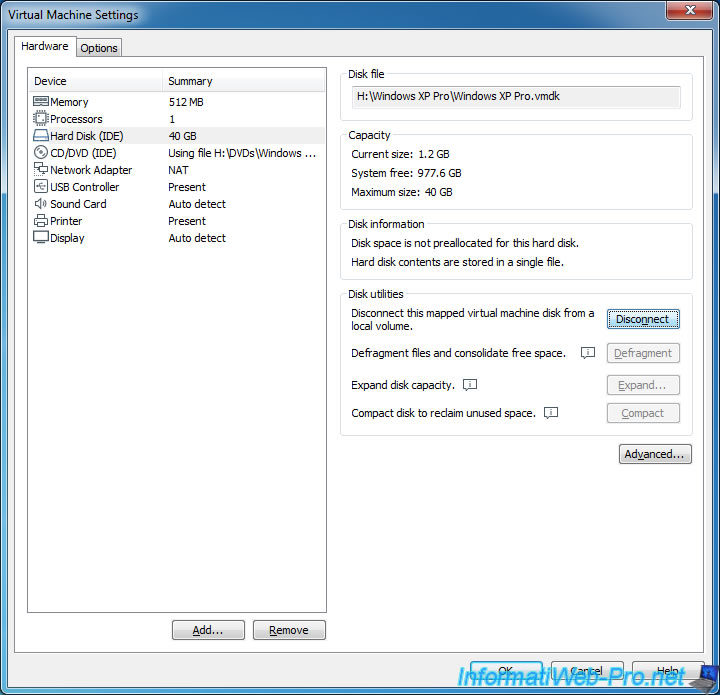
- transfer the file directly into the virtual hard disk of your virtual machine. To do this, you stop it, then in the settings of it, you can map its virtual hard disk on your host PC.
Select the first volume (by default, there is only one) and uncheck the «Open file in read-only mode (recommended)» box.
Then, click OK.
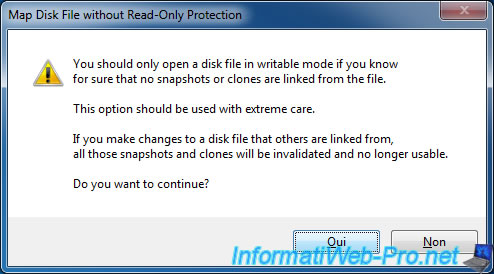
Ignore the warning about disabling the «read-only» protection by clicking Yes.
The contents of the C partition of the virtual machine (Windows XP) appears.
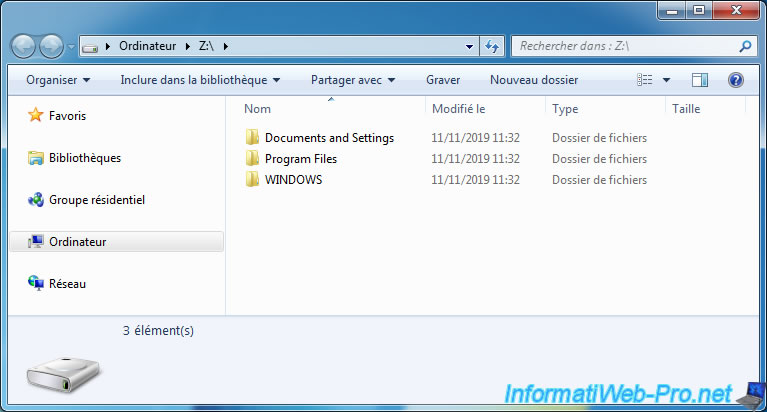
Create a new folder at the root of this partition.
Note : you will not be able to store the file directly to the root due to rights issues.
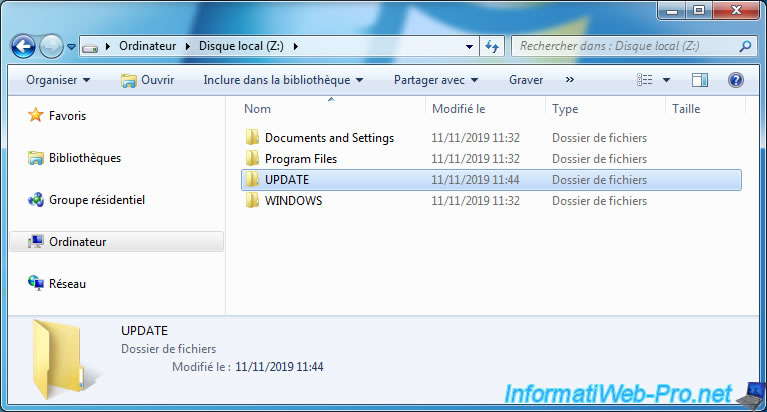
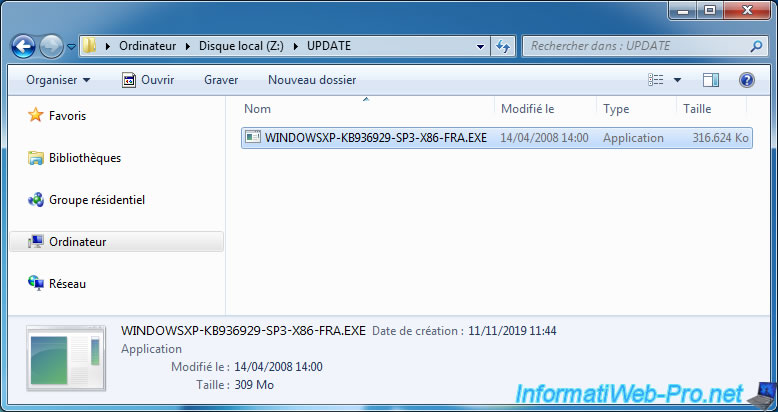
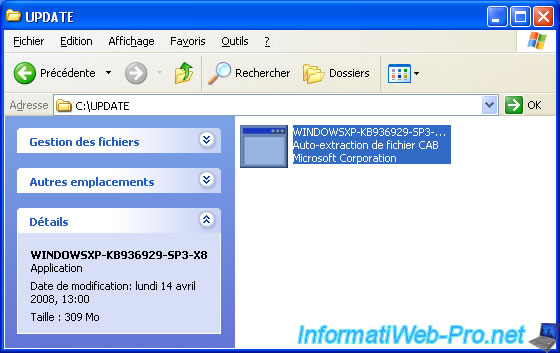
Copy the service pack 2 or 3 installation file to drive Z.
- Windows XP Service Pack 2
- Windows XP Service Pack 3
Now, the installation file is in the virtual hard disk of our virtual machine.
Once the transfer is complete, return to your virtual machine settings and click Disconnect.
Then, leave this window.
Start the virtual machine.
Go to the previously created folder in drive Z and launch this file.
A «Extract files» window is displayed.
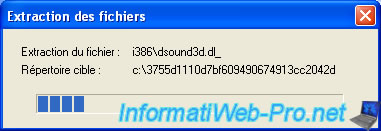
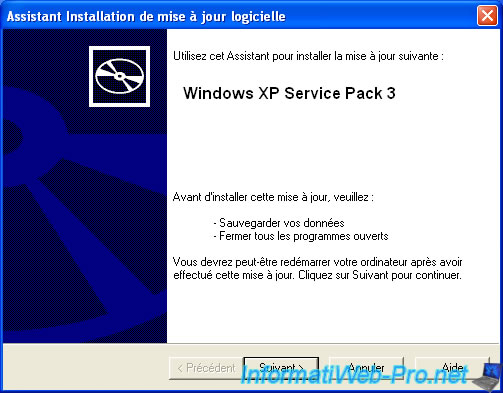
Click Next to install the desired service pack.
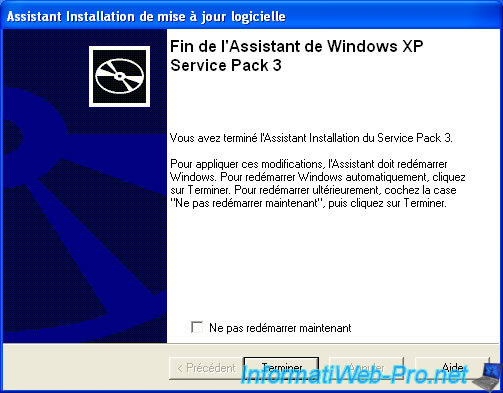
At the end, click Finish to restart the virtual machine.
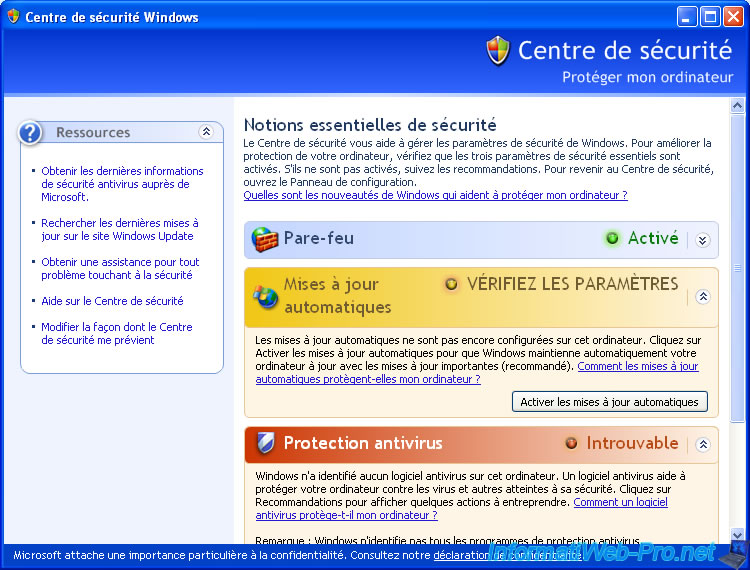
As expected, the security center that appeared with Windows XP Service Pack 2 appears.
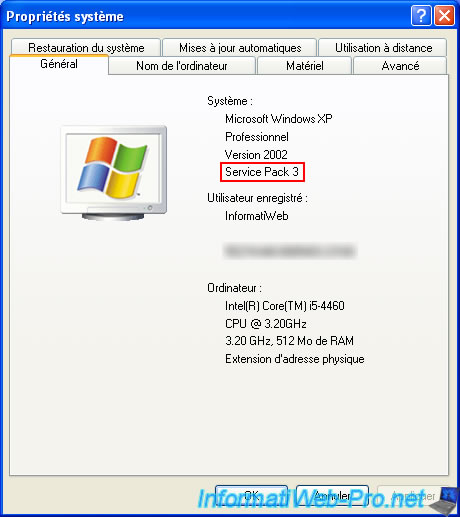
And in the system properties of Windows XP, you will see that the service pack installed has changed.
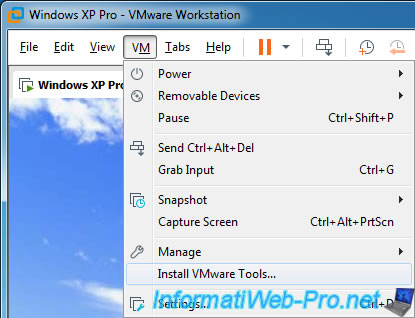
2.4. Install VMware Tools
To install VMware Tools, go to the VM menu and click Install VMware Tools.
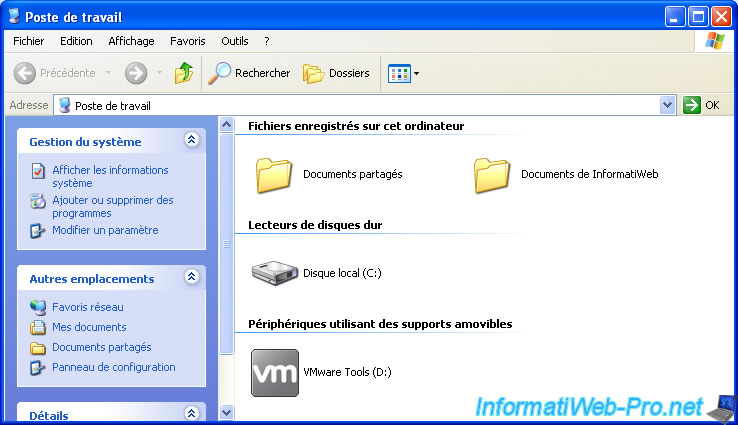
The VMware Tools CD appears.
By default, the automatic execution of CDs is activated in Windows XP. So, wait for the installation to start.
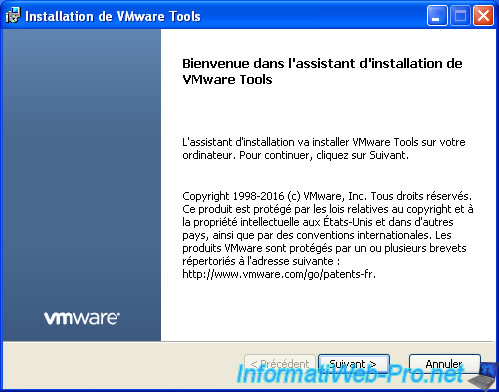
The VMware Tools Installation wizard appears.
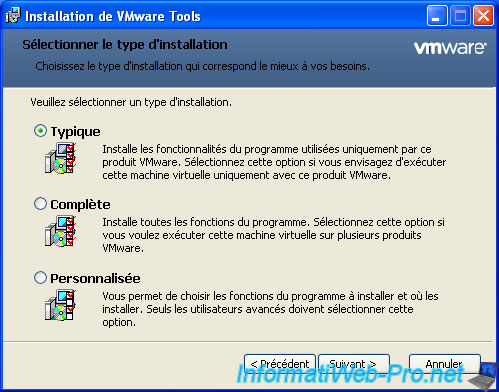
Perform a Typical installation.
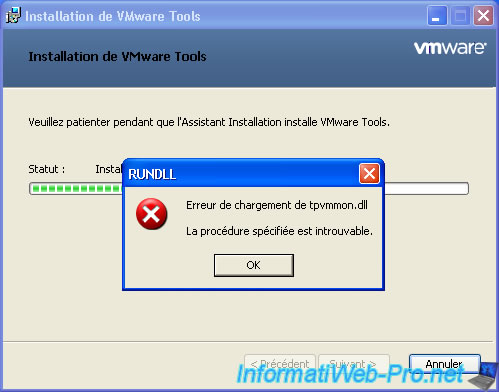
If the SP2 or SP3 of Windows XP is not installed, this error will be displayed :
Error loading tpvmmon.dll
The specified module could not be found.
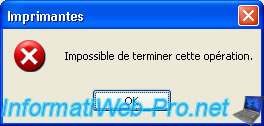
Click OK and the following error will appear :
Plain Text
Printers
Can not complete this operation.
Otherwise the installation will finish without problem and will ask you to restart.
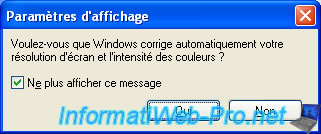
When restarting, click on the bubble displayed at the bottom right and then click on Yes.
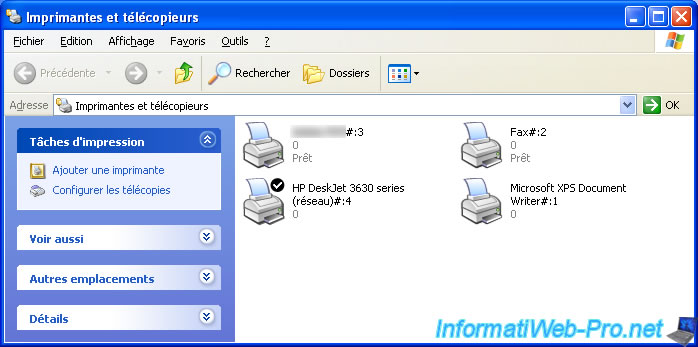
By default, the Printer device is enabled in the settings of your virtual machine.
With the installation of ThinPrint drivers during VMware Tools installation, you will be able to use host PC printers from the guest OS (Windows XP).
Although Virtual Printer exists in VMware Workstation 15.5, you will not be able to install it in Windows XP and you will not need it.
VMware Tools will be sufficient in this case for this feature to work with Windows XP as a guest.
Has
Windows XP Pro SP3
VM Tools
All Updates And Security Patches
- Addeddate
- 2019-10-01 21:01:42
- Identifier
- windowsxpprofessionalvmware.7z
- Scanner
- Internet Archive HTML5 Uploader 1.6.4
- Year
- 2019
comment
Reviews
Reviewer:
Nabil Hassani
—
favoritefavoritefavoritefavoritefavorite —
February 14, 2023
Subject:
Works — what is the user’s password?
RagdollFan2005 is the user, but we don’t have the account password…
Please provide.
Thanks.
PS Actually he didn’t restrict it as I could set a user, & setup administrative accounts.
I needed it because an old Vmware XP was not working too well.
21,400
Views
8
Favorites
1
Review
DOWNLOAD OPTIONS
Uploaded by
TASF05
on
Table of contents
- Introduction
- Video
- Download Links
- Setting up a Windows XP Virtual Machine
- Extracting the Virtual Hard Disc File
- Adding the Virtual Hard Drive to your Virtual Machine
- Installing Windows XP Mode (Keyboard Only)
- Uninstalling Virtual PC Integration Components
- Installing VMware Tools
- Microsoft Product Activation
- Enabling XP Mode in the Virtual Machines Configuration File
- «30 Day» Trial
- Nested VM
- Windows 10 Host Download
- Windows 7 Guest Download
- Windows 7 Host Download
- Windows XP Guest Download
- Windows 10 Host Download
- Telephone Activation
- Change Key
- Enabling XP Mode in the Virtual Machines Configuration File
Introduction
XP Mode was a free Windows XP Virtual Machine available for Windows 7 Pro, Windows 7 Ultimate and Windows Enterprise Licenses. Unfortunately it required Windows Virtual PC which is far inferior to VMware Workstation Player. This guide will look at downloading the XP Mode Installer from Microsoft and creating a XP Mode Virtual Machine within VMware Workstation Player.
Note this by default will give a virtual machine that lasts for only 30 Days if carried out on Windows 8.1 Pro or Windows 10 Pro. If carried out on Windows 7 Pro, Windows 7 Ultimate or Windows Enterprise there is an official line of code that can be added to the Virtual machines Configuration File to allow Product Activation.
Video
Download Links
Setting up a Windows XP Virtual Machine
Launch VMware Workstation Player:

Select Player → File → New Virtual Machine…

Select I will install the Operating System Later:

Select Microsoft Windows:

You can use the default names given but take a note of the Location as we will need to access it later:

This screen doesn’t matter as we will replace this Virtual Hard Drive with the one from XP Mode. Select Next:

By default VMware will give very poor default hardware. To amend this select Customise Hardware. This guide assumes you are running a modern (5 years old) Windows 10 PC or one of the last PCs that supported Windows 7 (i.e. a 6th Generation Skylake i5/i7 Processor with at least 8 GB of RAM) with Windows 7 Pro.

Change the RAM to 4 GB. Windows XP Mode is a 32 Bit OS and can use up to a maximum of 4 GB.

Change the number of Cores to 2 otherwise the VM will run very slowly:

Most Modern PCs don’t have optical drives so uncheck Connect at Power On:

It is ill advised to connect a >6 Years End of Life OS to the internet. So under Network Adaptor, uncheck Connect at Power On:

There is only support for USB 2.0 on Windows XP:

Leave the Sound Card as default:

Leave the Printer as Default:

Up the Display to 1 GB:

When done select Close:

Select Finish:

Do not Start your Virtual Machine yet:

Install 7-zip and right click the XP Mode Application. Select Open Archive:

Double click the Sources Folder:

Double click the XPM folder:

Single click the VirtualXPVHD and select Extract:

Select OK:


By default the dot is missing in the file name. So right click it and select rename:

Add the . before the VHD file extensionL:

In Windows 10 an icon will appear (this won’t appear in Windows 7 as Windows 7 doesn’t natively recognise VHD files)

Open up your Virtual Machine’s folder and copy this Virtual Hard Drive to it:

Adding the Virtual Hard Drive to your Virtual Machine
Now select Edit Virtual Machine Settings:

Highlight the HardDisk and then select Remove:

Now select Add…

Select Hard Disk and then select Next:

Select IDE and then Next:

Select Use an Existing Virtual Hard Drive and then select Next:

Select Browse:

Change the File Extension to the bottom right to All Files. Then Load your VirtualXP.VHD file:

Select Finish:

Select Convert:

Installing Windows XP Mode (Keyboard Only)
Unfortunately the Virtual Machine has a mouse driver prebundled which doesn’t play with the mouse. As a result you can click into the Virtual Machine but the mouse doesn’t move. The keyboard is however functional. We will need to complete the XP setup using the keyboard only.
The tab [↹], arrows [↓], [↑], enter [↵] and [Esc] keys are your best friends here. You will also need the keyboard combination [+] + [a] to select the license agreement. The keyboard combination [Ctrl] + [Alt] can be used to escape the VM.
The setup will hang with a black screen in couple of cases and you will need to restart the Virtual Machine.
Select the play button.


The Windows XP setup will begin:

Click into the VM. Your mouse will now be stuck:

Press [↹] as you do you will see what you have highlighted is enclosed in a black dotted box:

To accept the License Agreement press [+] + [a]:

Then highlight Next and press [↵]:

By default the VM will be setup for English US. Again press the [↹] to highlight Customise and then select [↵]:

Use the [↑] and [↓] to select your standards and formats:

in this case I will change it to English (United Kingdom):

Press the [↹] to get to the Location and once again use the [↑] or [↓] to go through the options:

When done, use the [↹] to get to OK and press [↵]:

Use the [↹] to get to Details and [↵] to enter the setting:

Once again use the [↓] and [↑] to select your desired option:

Use the [↹] to highlight Ok and press [↵]:

Use the [↹] to highlight Next and press [↵]:

Use the [↹] to highlight the Computer Name and input your Computers name:

Use the [↹] to highlight Next and press [↵]:

Use the [↹] to highlight Time Zone:

Once again use the [↓] and [↑] to select your desired option:

Use the [↹] to highlight Next and press [↵]:

The setup will hang on a black screen. Press [Ctrl] + [Alt] to escape the VM:

Select Player → Power → Restart Guest:

Select Yes:

The setup will continue:

Select [Esc] multiple times to ignore the Found New Hardware Wizards:

Select [Esc] to ignore Automatic Updates:

The setup will complete:

You will be taken to the Windows XP Desktop:

Uninstalling Virtual PC Integration Components
The Virtual PC Integration Components are to blame for the mouse problem and the setup freezing at a black screen. We need to uninstall these.
Press the Windows [⊞] and [r] key to open run. Then type in:
appwiz.cpl
Then press [↵].

To launch Add or remove programs.

Press the [↓] key to highlight Virtual PC Integration Components:

Now press [↹] until Remove is highlighted. Then press [↵]:

Press [↵] to confirm the removal:


Press [↵] to restart the VM:

You will get stuck at a black screen. Press [Ctrl] + [Alt] to escape the VM:

Then select Player → Power → Restart Guest:

Select Yes:

You should be able to use the Mouse in the VM. The default password is left empty:

Close the Found New Hardware Wizard:

To the bottom of the VM select Update Tools (if this yellow balloon at the bottom of the VM does not show select Player → Manage → Install VMware Tools):

The VMware Tools wizard should display. (If not go to the Windows XP VM Computer and launch the setup from the CD). Select Next:

Select Typical and the Next:

Select Install:


To restart select Finish:

Select Yes:

Once the VM has restarted, you should be able to resize it and copy and paste files from the Host PC.


Microsoft Product Activation
Enabling XP Mode in the Virtual Machines Configuration File
It is possible to activate the XP Mode VM if you are running a Windows 7 Pro, Windows 7 Ultimate or Windows 7 Enterprise Host PC. Ensure the Virtual Machine is shut down. Then open up the folder of your Virtual Machine and right click the Virtual Machine’s configuration file and select Edit with Notepad++:

To the bottom add the line:
xpmode.enabled = "TRUE"

Then save the file. Launch the VM as normal and it should be activated (you will get no activation nags and it will work past 30 days).
When the VM is powered down it is recommended to create a copy of the VirtualXP.VHD. Performing an in place update with the copy will allow you to revert to a clean install. You should also considering creating copies of the VirtualXP.VHD once you have installed additional software installed to have a backup in that state. (Copy the entire folder if you are going to move the VM to another Host PC).
Unfortunately this activation mechanism will not work on a Windows 10 Pro Host. Instead you will get this error message:
This system is not allowed to run «Windows XP Mode». The virtual machine will now power off.

«30 Day» Trial
The VM will therefore expire after 30 Days. If Windows XP is Booted and the system clock is past 30 days from the date of initial install. You will be harassed by the following error message:

As a workaround you can create a copy of the VirtualXP.VHD file and create a text file with the date of installation. Then in the Virtual Machine’s configuration file add the line:
bios.bootdelay = 20000
This will allow you to access the VM’s Virtual BIOS Setup when you launch the VM by pressing [F2]:

Then you can change the VM’s system clock to your date of installation:

If the current installation still doesn’t work after the system clock has changed. Then power off your VM and delete the VirtualXP.VHD and replace it with a copy of your copy. This copy will never have experienced the system clock exceeding its upper bound and will remain activated.
Nested VM
It is possible to get around this on powerful hardware with a Windows 10 Pro OEM License by created a Nested VM. Essentially using Windows 10 Pro OEM to invoke downgrades to Windows 7 Pro OEM in a VM and then using the Windows 7 Pro VM to invoke downgrade rights to a Windows XP Mode VM.

Windows 10 Host Download
Windows 7 Guest Download
This VM requires at least 8 GB of RAM, 120 GB Free Space from a SSD, 4 Processor Cores and all Processor Virtualisation options.

The SLIC 2.1 has to be ported to the VM by modifying the VMware configuration file. See my Windows 7 VM Guide for more details:
Windows 7 Host Download
Windows XP Guest Download
The VM can be accessed by using XP Mode Activation as it has a Windows 7 Pro Host.
Telephone Activation
By default the Product won’t be activated leading to a 30 Day Trial. You will see the Windows Wizard for Activation Prompts.

You can select Yes I want to telephone a Customer Service Representative to Activate Windows:

You can then select the region to get the automated phone number:

You can then use the automated phone service to input your Installation ID. Unfortunately it isn’t accepted automatically and you will need to speak to a Microsoft Customer Service Representative. It is at their discretion to allow or decline the Product Activation.

Change Key
Note it is possible to change the Product Key on the Phone Activation Screen. However the XP Mode Installation Media is OEM which means it will reject Retail keys (which are under the correct license agreement to run in a VM).
It will only accept OEM keys for example an old COA from an aging XP Computer. Technically according to the License Agreement you are not allowed to transfer OEM Product Keys however Microsoft may be a bit more lax about activating Windows XP these days in a Virtual environment especially if it moves away from ancient physical hardware and prevents the continued use of the End of Life Windows 7 Pro OS as a Host OS opposed to Windows 10 Pro. As mentioned earlier Product Activation is at Microsoft’s discretion. You will need to contact a Microsoft Customer Service Representative however having a valid XP Product Key may help you to convince them to allow you to activate.