Many people reported that they can’t update Windows 10 because VirtualBox needs to be uninstalled. How to uninstall VirtualBox? Now, this post of MiniTool summarizes several effective ways for VirtualBox uninstalling.
VirtualBox is one of the most popular solutions used to manage and run virtual machines. It can run a guest operating system in a virtualized environment and some people like to try a new OS in it. Sometimes, however, this program can trigger various errors and issues such as “VirtualBox not 64-bit”, “VirtualBox E_FAIL (0x80004005)”, and the one discussed here.
Can’t Update Windows 10 Because VirtualBox Needs to Be Uninstalled
Many users complain that they can’t update Windows 10 because VirtualBox needs to be uninstalled. Sometimes the error even occurs when you haven’t the VirtualBox installed, like the user report from the superuser.com forum:
I would like to uninstall Virtualbox from my Windows10 computer, but I cannot find it in the Programs and Features list. I was looking for an uninstaller exe in the install directory and on the internet, but I haven’t found anything. How is it possible to remove it, and all of its drivers?https://superuser.com/questions/1227993/how-to-uninstall-virtualbox-on-windows10
Why does Windows 10 ask you to uninstall VirtualBox, but you can’t find it? After investigating extensive user reports, we find the main reason is that other emulation apps like “VMware, BlueStacks, Oracle, etc.” are installed on your systems.
How to Uninstall VirtualBox on Windows 10
If you cannot update Windows 10 because VirtualBox needs to be uninstalled, then you need to do the VirtualBox uninstallation. How to uninstall VirtualBox? Here you can try the following 5 methods.
# 1. VirtualBox Uninstall via Control Panel
If you do have the VirtualBox installed on Windows 10, then you can try uninstalling it via Control Panel. To do so, follow the detailed steps below:
Step 1. Type control in the search box and select the Control Panel app from the context menu.
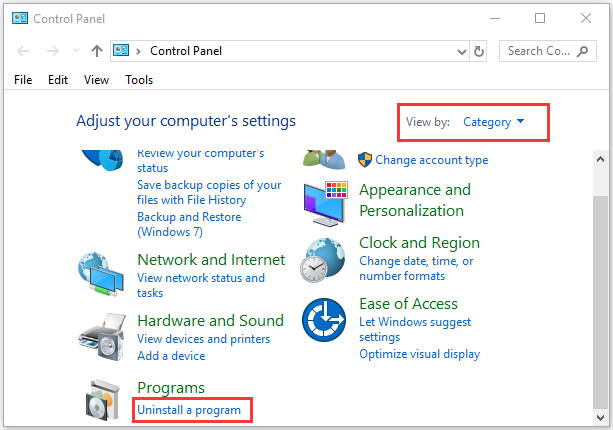
Step 2. Change the View by type to Category, and then click on Uninstall a program under the Programs section.
Step 3. Navigate to VirtualBox from the list of install programs, and then right-click it and select Uninstall. Click on Yes to confirm the VirtualBox uninstallation and follow the on-screen prompts to complete it.
Step 4. Press the Win + E keys to open the File Explorer, and then go to the View tab and tick the checkbox next to Hidden items to show all hidden files and folders.
Sep 5. Type %localappdata% in the search bar and hit Enter. Then find all folders and files related to VirtualBox and delete them.
Step 6. Again type %userprofile% in the search box and delete all VirtualBox files. Then locate the C:/Program Files/Oracle/VirtualBox directory and delete the folder.
Once uninstalled, you can check if the “VirtualBox needs to be uninstalled to update Windows 10” error gets solved.
# 2. Uninstall the LinuxLive Software
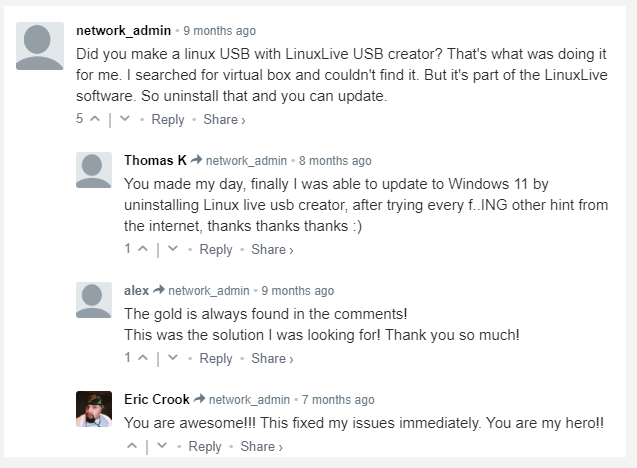
Some users reported that the “cannot update Windows 10 because of VirtualBox need to be uninstalled” error can be triggered by the LinuxLive USB creator. If you also make a Linux USB via this software, you may encounter this problem when updating Windows 10. Here you can uninstall this software like VirtualBox uninstalling we explain above.
# 3. Delete and Uninstall All VirtualBox Related Programs and Files
As mentioned above, the main reason you can’t update Windows 10 because VirtualBox needs to be uninstalled is related to other emulation apps. If you don’t have the VirtualBox or LinuxLive USB creator installed, you can try opening your C drive and searching for the apps like VMware, BlueStacks, and Oracle, then removing them from your system.
# 4. Use the Office VirtualBox Uninstaller
In addition, you can uninstall VirtualBox via its official uninstaller. Here’s how to use the VirtualBox uninstaller.
Step 1. Click here to download VirtualBox uninstaller from its official website.
Step 2. Once downloaded, double-click the .exe file to run it.
Step 3. Then you will be prompted whether you want to install, repair, or remove the software during the installation process. Select remove and proceed with the on-screen instructions.
Once finished, reboot your computer and see if the error gets fixed.
# 5. Delete the Remnants of VirtualBox via Registry Editor
Sometimes the “VirtualBox needs to be uninstalled to update Windows 10” error can occur due to the remnants of the software. Here’s how to delete VirtualBox remnants completely via Registry Editor.
Note: The Registry Editor is a powerful Windows built-in tool, and improper operation could lead to your system being unstable or even inoperable. So, we highly recommend you back up the Registry in case anything goes wrong.
Step 1. Make sure you disconnect your system from the internet and turn off OneDrive, Google Drive, and other system-invasive tools.
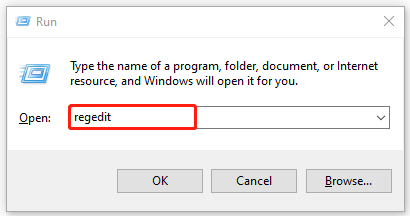
Step 2. Press the Win + R keys to open the Run dialog box, and then type regedit in it and hit Enter.
Step 3. Click on Yes when a User Account Control window pops up.
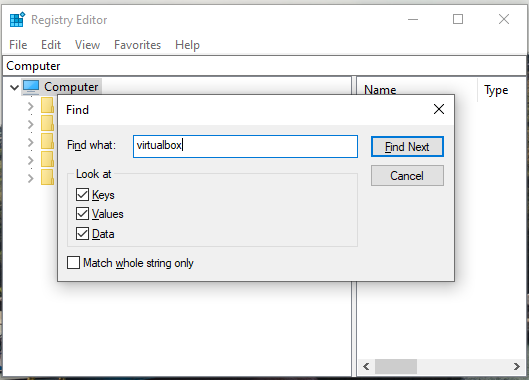
Step 4. In the Registry Editor window, press the Win + F keys to open the Find what box, then type VirtualBox in it and hit Enter.
Step 5. Once scanned, delete all folders, keys, and values related to the VirtualBox software. Then do the same procedure to delete other emulation apps installed on your system by using the name of the software.
Contents
- Is It Necessary to Uninstall VirtualBox Before Updating Windows?
- How to Uninstall VirtualBox on Windows 10 PCs
- Fix 1: Uninstall VirtualBox and Delete Its Leftover Files
- To delete the leftover files, follow this quick guide:
- Fix 2: Use the Official Installer
- Here is how this method works:
- Fix 3: Uninstall Emulation Applications
- Fix 4: Edit the Registry
- Here’s how to enable System Restore on your computer:
- Now follow the steps below to create a restore point:
- If you need to use the restore point, follow these instructions:
- These steps will guide you through backing up the registry:
- To use the backup file, follow these steps:
- Use this procedure to remove VirtualBox from your machine via the registry:
- Wrapping Up
Updating Windows is vital as it eliminates bugs that expose your computer to risks. Doing it is usually a seamless process but, that might not be the case if you have VirtualBox on your PC. Many people with the software say they always bump into an error when updating Windows. If you have been experiencing the same problem, stick around to learn how to permanently resolve it.
Is It Necessary to Uninstall VirtualBox Before Updating Windows?
VirtualBox is a third-party virtualization software that emulates other operating systems, like Hackintosh and Linux. It runs smoothly on Windows without demanding any special hardware but also seems to interfere with system updates.
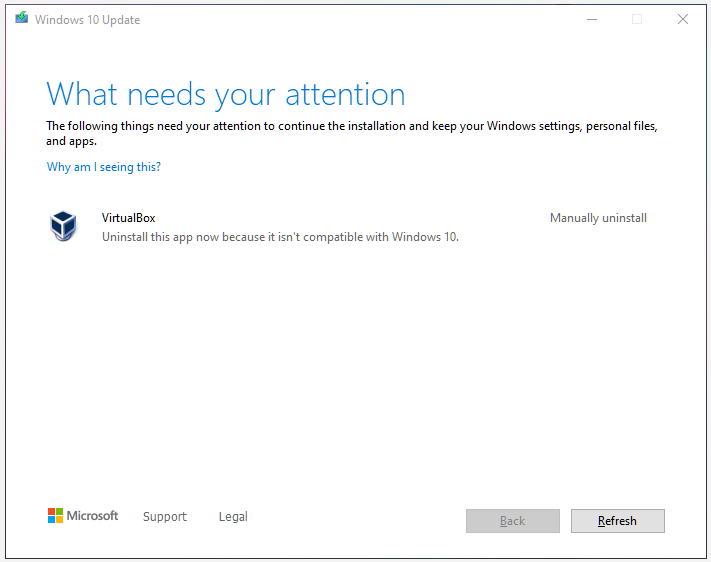
Many people say they see the following error message when trying to update Windows 10:
“The following things need your attention to continue the installation and keep your Windows settings, personal files, and apps.
Virtual Box
Uninstall this app because it isn’t compatible with Windows 10.”
As the error dictates, you must uninstall VirtualBox to fix the issue. However, you may scroll through your entire apps’ list and not see VirtualBox, making it hard to uninstall it. Some people say they have never even used the program but still get the error message, which can be pretty confusing.
How to Uninstall VirtualBox on Windows 10 PCs
Although the issue seems complicated, it is still solvable. Below are several proven methods that can help resolve it. We have started with the easiest tactics so, apply them in order until the problem is eliminated.
Let’s dive in.
Fix 1: Uninstall VirtualBox and Delete Its Leftover Files
Since the error message suggests you uninstall VirtualBox to solve the issue, do so via the Control panel, and then delete its remnant files. Also, if you have used VirtualBox before, ensure you delete any leftover files as they could be the culprit.
Here is how to do so:
- Press the Win + S key combo to bring up the Windows search box.
- Type in “control” (no quotes) and then select the Control Panel search result.
- Click on the View By dropdown arrow in the upper-right corner of the window. Then, choose Large icons.
- Next, select Programs and Features.
- Scroll down the Uninstall or change a program section to locate VirtualBox.
- Right-click on it and select Uninstall. Then, follow any further instructions to complete the process.
To delete the leftover files, follow this quick guide:
- Use the Windows key + E combination to summon the File Explorer.
- Switch to the View tab and then select the checkbox for Hidden Items.
- Open Local Disk (C:) and go to Users.
- Double-click on the User folder and open AppData.
- Go to Local and scroll down the window to find the “.VirtualBox” folder.
- Right-click on it and select Delete.
- Next, go to the Windows search bar (Win + S) and type in “%userprofile%” (without quotes). Hit Enter.
- Look for .VirtualBox, right-click on it, and then choose Delete.
- Next, open the File Explorer (Win + E) and go to Local Disk (C:).
- Open the Program Files folder and then go to Oracle.
- Locate the VirtualBox folder and select it. Then, use the Shift key + Del combo to delete it.
- Reboot your computer.
Fix 2: Use the Official Installer
VirtualBox’s official installer offers an option to remove the app from your device, which you can also use.
Here is how this method works:
- Download VirtualBox from this website.
- Go to the installation folder and double-click on the .exe file.
- Proceed to the window that asks you whether to install, repair, or remove the program.
- Select the remove option and then follow the on-screen instructions to finish the uninstallation.
- Once done, restart the machine.
- Now try updating Windows.
Fix 3: Uninstall Emulation Applications
If you don’t have VirtualBox on your computer but still get the error under discussion, then there is definitely a simulation software triggering the issue. Some emulation programs use VirtualBox’s elements, hence being treated as VirtualBox by Windows.
LD Player is the most common culprit, but other apps like Nemu, Bluestacks, and Android Studio can also trigger the problem.
These steps will guide you through uninstalling your emulation program:
- Press Win + I keys at the same time to open the Settings app.
- Click on the Apps icon.
- Go to the Apps & features section and locate the emulation software.
- Select it, then click on the Uninstall button.
- Once it’s uninstalled, follow the steps in fix 1 to get rid of leftover files. This will increase the chances of successfully resolving the error.
- Restart your machine and then check for the issue.
Fix 4: Edit the Registry
If the error is still hindering you from updating Windows, the only way out is to tweak the registry. However, you must remember that the Windows registry is extremely sensitive. So, you must be extra careful when editing it because a simple mistake can cause great damage. To be on the safe side, we recommend creating a System Restore point and backing up the registry before using this method. You can also use a quality registry cleaner such as Auslogics BoostSpeed Registry Cleaner to eliminate problematic registry keys that may trigger annoying errors.
Here’s how to enable System Restore on your computer:
- Press the Windows + S combination to open Search.
- Type in “restore” (no quotes) and click on “Create a restore point”.
- Immediately the System Properties window opens, select your primary drive under Protection Settings.
- Then, click on the Configure button.
- Choose “Turn on system protection”.
- Finally, click on the Apply button and then select OK.
Now follow the steps below to create a restore point:
- Go back to the System Properties window.
- Head to the Protection Settings section and choose Create.
- Name your restore point and then click on the Create button.
- Choose Close and then select OK on the System Properties page.
If you need to use the restore point, follow these instructions:
- Open Search (Win + S) and type in “restore” (no quotes).
- Select “Create a restore point” and then choose System Restore on the new window.
- Click on the Next button to see your restore points. Select the “Show more restore points” option if you can’t see the one you want.
- Pick a restore point and then select “Scan for affected programs”.
- Choose Close, then click on the Next button.
- Select Finish.
These steps will guide you through backing up the registry:
- Use the Win + R key combo to open the Run dialog box.
- Type in “regedit” (without quotes) and click on the OK button.
- Select Yes in the User Account Control (UAC) window.
- When the Registry Editor opens, choose Computer at the top of the left pane. Then, right-click on it and select Export.
- Name the file and select where to save it.
- Click on the Save as type dropdown box and then choose “registration files (*.reg)”.
- Go to the Export range section and choose All.
- Click on the Save button.
To use the backup file, follow these steps:
- Go back to the Registry Editor.
- Click File at the top of the window and select Import.
- Navigate to where you saved the file and select it.
- Click on the Open button.
Use this procedure to remove VirtualBox from your machine via the registry:
- Open Run (Win + R) and type in “regedit” (no quotes). Then, press Enter.
- Next, click Yes in the UAC prompt box.
- Immediately the Registry Editor opens, select Edit on the menu bar and then click on Find Next.
- Type “VirtualBox” (without quotes) into the Find what box. Make sure the checkboxes for Keys, Values, and Data are selected. Then, click on the Find Next button.
- Delete any found keys, folders, and values.
- Reboot your device.
You could also use the same steps to get rid of other emulation software on your PC.
Wrapping Up
You now know how to uninstall VirtualBox for Windows Update to run smoothly, right? However, feel free to comment below if you have further questions.
Do you like this post? 🙂
Please rate and share it and subscribe to our newsletter!
4 votes,
average: 4.00 out of
5
Loading…
Some users reporting that they’re seeing an error message to uninstall VirtualBox while updating their Windows 10 PC. Usually, this Windows update problem when they’re trying to install the latest Windows 10 20H2 release. The full error message reads:
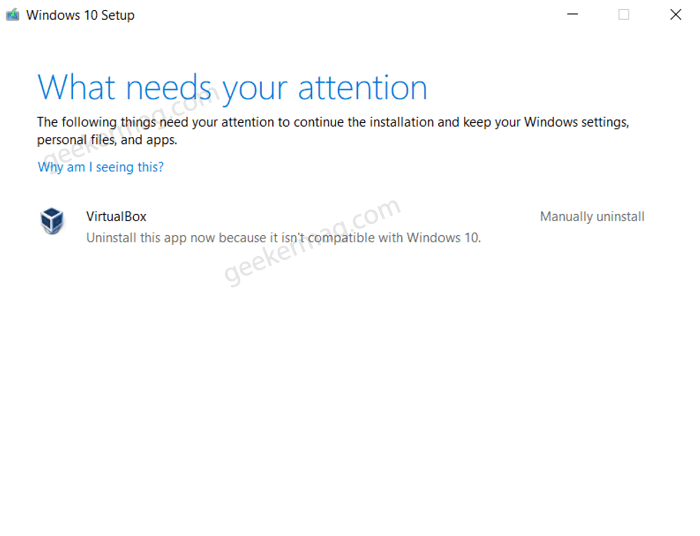
VirtualBox: Uninstall this app now because it isn’t compatible with Windows 10
What weird about this error message is that, even if users don’t have Virtualbox installed on their PC, they’re see the message, which prevents them from updating their system. So, what can be the cause of it, and how to fix it?
If you don’t have Virtualbox installed but still seeing the message, which is preventing you from updating Windows 10, then it is possible that there might be some app installed on your device that is using Virtualbox in the background. And this might also be the cause of the ‘Uninstall Virtualbox’ message appearing while installing the Windows 10 update.
FYI, Virtualbox is a virtualization software, and it is used by software for emulation.
So, what can be done to prevent this error? To fix the error, you will have to uninstall apps in Windows 10 that might be using visualization. It could be Android Studio, Bluestacks, or even more. Here’s how you can do that:
Launch Settings app by pressing WIN + I keyboard combo.
Select Apps and then Apps & features.
On the right side, you will find list of apps installed on your device. You will have to manually search for the app that might use visualization.
Click on Uninstall button twice.
Reboot your computer and try to update the system to latest version and this time you will be able to install the update.
Are you seeing Uninstall Virtualbox error message while updating your PC? What was app causing the issue? Or you used other solution to fix the issue. Let us know in the comments.
As an independent platform, it takes a lot of effort to create and curate quality content daily. Our content is totally funded by users like you.
Therefore, if you find information on this website useful, we kindly ask for your support in maintaining the longevity of our platform. If each person who benefits from our website contributes, we can secure a brighter future for our website.
Donate on Paypal or Buy us a coffee if you find the information shared in this blog post useful. Mention ‘Coffee’ in the Subject. So that I can thank you
Viney Dhiman, the mind behind GeekerMag, is a seasoned content writer with over 12 years of experience. Specializing in simplifying complex tech concepts, he covers Windows OS, Android, iOS, web apps, and product reviews. His work can be found on popular tech websites like Gizmodo and The Verge, and he has been interviewed by the Microsoft Edge team.
In some cases, if a user tries to update Windows 10 to a new release like Windows 10 20H2 or Windows 11, the setup would ask you to uninstall Virtualbox. This article helps you to correct the same error and proceed with Updating Windows 10.
A user being asked to uninstall Virtualbox
Background
The setup error is very generic, and it does not help much to root the issue. What happens is, Virtualbox is a virtualization software; that is, it allows running an Operating System on top of Windows(called as emulation), like Android, a Windows Install, etc. Under the hood, Virtualbox is used by a variety of applications. Hence, in reality, though you may not have Virtualbox installed, some other application is likely be using it in the background, which is installed on your computer. So if you remove the software, the error would no longer be. Alongside this, if the Software developer has updated his software with the new version of Virtualbox, you should not see the message.
Virtualbox Uninstall this App now because it isn’t compatible with Windows 10 error
To fix the Virtualbox blocking Windows 10 update to a new version, please go through the steps below.
- Right-click the Start button and Choose Apps and features.
- In the list of apps, locate the app(s) which may be using virtualization. Examples Include Bluestacks, LD Player, Android Studio, etc. If you have Virtualbox software itself, remove that as it may have older traces. For example, Virtualbox is used by LD Player and is located in the path C:\Program Files\dnplayerext2, and C:\Program Files\ldplayerbox. You need to manually delete both of these folders. In addition, they may be hidden so show the files beforehand.
- Restart your computer and try again.
Applies To: Windows 10
These steps would help you to remove Virtualbox so that you can update Windows 10 to the latest release.
Install Windows 11 manually or offline
VirtualBox Uninstall this app now [Full fix]
by Teodor Nechita
Eager to help those in need, Teodor writes articles daily on subjects regarding Windows, Xbox, and all things tech-related. When not working, you may usually find him either… read more
Updated on
- VirtualBox uninstall this app now message might prevent you from installing a newer version of Windows, so it’s important to fix it.
- The easiest way to fix this problem is to use specialized software to remove VirtualBox completely.
- Alternatively, you can find the problematic file manually and move it to fix the issue.
- This guide will also show you how to uninstall VirtualBox on PC, so it can help you with other issues as well.
Certain older applications might not be fully compatible with Windows 10, but many users reported VirtualBox uninstall this app now message while trying to update to a new version of Windows 10.
This is an unusual problem, but it can be fixed in a matter of minutes, and in this guide, we’re going to show you how to properly fix this problem.
Before we start, it’s a good idea to check this short guide on What needs your attention error for more useful solutions.
What do I do if VirtualBox uninstall this app now message appears?
1. Search for the problematic file manually
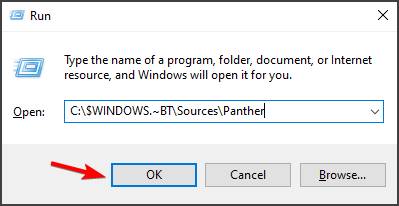
- Press Windows Key + R and enter the following line:
C:$WINDOWS.~BTSourcesPanther
- Press Enter.
- Now locate the file that ends with _APPRAISER_HumanReadable.xml. The format should be
<array of symbols> _APPRAISER_HumanReadable.xml. - Open the file with Notepad.
- Press Ctrl + F and search for the following values:
<Property Name="DT_ANY_FMC_BlockingApplication" Value="TRUE" - Go few rows up to the Property-List Type Inventory section.
- There you should find LowerCaseLongPathUnexpanded property followed by a Value to a certain file path.
- Open that file path in File Explorer and move or remove virtualbox.exe.
After doing that, check if the Uninstall this app now because it isn’t compatible with Windows 10 message is gone. This is a complicated solution, so be sure to follow the instructions carefully.
2. Remove VirtualBox with specialized software
Removing the application manually doesn’t always fix the problem because there are many leftover files and registry entries, and this is why it’s recommended to use uninstaller software.
The software will keep an eye on any newly installed applications, and if needed, it can completely uninstall any application from your PC, along with all of its files.
Once you download this software, remove VirtualBox with it and the VirtualBox uninstall this app now message should be gone.
⇒ Get CCleaner
3. Use Microsoft’s script

- Download Microsoft’s script.
- Extract the contents of the AppRPS directory.
- Now run the appraiser.bat file.
After running this file, you should see the paths to the files that are causing this error. Now simply move those files and check if that fixes the What needs your attention Windows 10 error.
These are just a couple of quick and easy solutions that you can use to fix the VirtualBox uninstall this app now error. If a different solution worked for you, feel free to share it with us in the comments below.
