The following guide explains how to install VirtualBox Guest Additions in Windows 10 Virtual Machine.
When you first install Windows 10 in Oracle VM VirtualBox, some advanced features won’t be enabled (as well as correct screen resolution) without guest additions. The features enabled by Guest Additions are: correct screen resolution, mouse pointer integration, seamless windows, time synchronization, shared folders, and shared clipboard.
We can install VirtualBox Guest Additions in Windows 10 by performing these steps:
Access the virtual machine’s menu and go to devices and click: «Install Guest Additions CD Image…».

Go to My Computer (This PC in Windows 10) and open the Guest Additions CD drive under the Devices and drivers section.

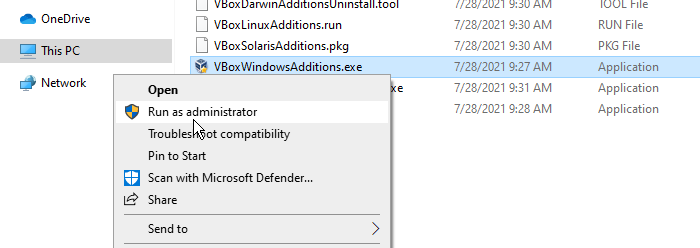
When you double-click the CD drive, the installer may start automatically. If not, right-click on VBoxWindowsAdditions and select Run as administrator.
The Guest Additions Setup Wizard will start automatically.
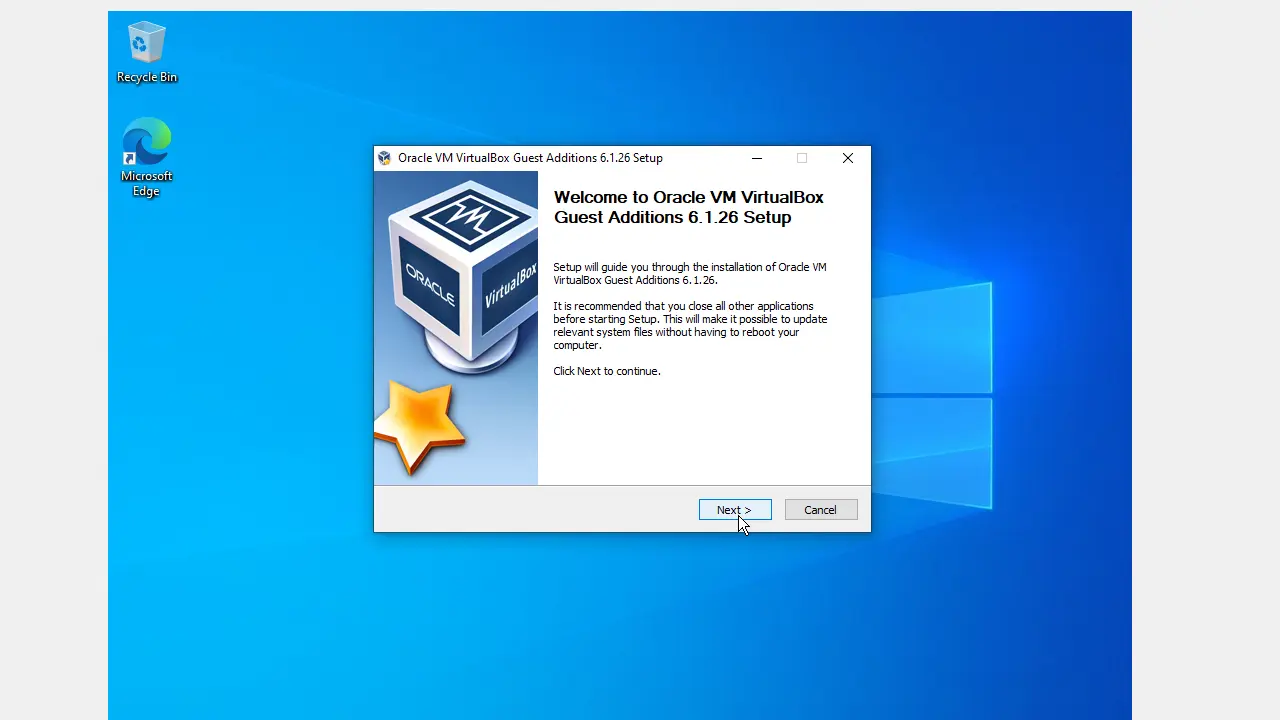
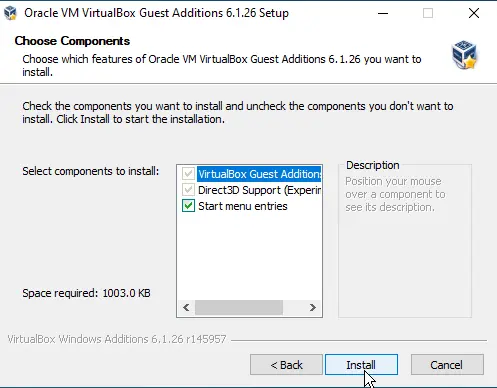
Click Next to continue with default settings and click on Install to begin the process. The setup wizard will begin to install VirtualBox Guest Additions on Windows 10.
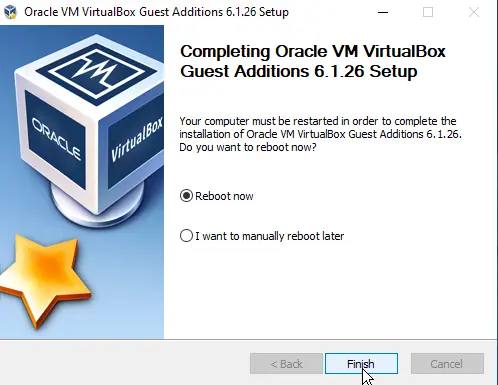
To complete the installation process, we need to reboot the virtual machine. Click on Finish to reboot Windows 10 VM.
With the Guest Additions installed, you’ll be able to access advanced virtual machine features such as keyboard and mouse integration, 3D and 2D video acceleration features, Shared clipboard, Shared folders.
Download Windows Speedup Tool to fix errors and make PC run faster
VirtualBox developed by Oracle is a powerful type-2 Hypervisor x86 and AMD64/Intel64 virtualization product for enterprise as well as home use. In this post, we will show you how to install VirtualBox Guest Additions on Windows 11/10. For a better experience, you must install this tool in all VMs you create when using VirtualBox.

What is VirtualBox Guest Additions?
The VirtualBox Guest Additions consist of device drivers and system applications that ship with your copy/version of VirtualBox that optimize the operating system for better performance and usability. The Guest Additions offer the following features:
- Mouse pointer integration
- Shared folders
- Better video support
- Seamless windows
- Generic host/guest communication channels
- Time synchronization
- Shared clipboard
- Automated logins (aka credentials passing)
The VirtualBox Guest Additions package installs the virtual video drivers to improve system performance and advanced graphics capabilities including hardware acceleration, multi-monitor support, and seamless windows to run applications as if they were installed on the host device. This means without the drivers, the virtual machine is likely to take a performance hit, and many advanced features such as the ability to change the screen resolution, control transparency, mouse support, etc won’t be available or work correctly.
After you must have successfully installed Windows in a VirtualBox VM, you must install the Guest Additions package for better usability and performance – to perform this task, do the following:
- Launch VirtualBox.
- Right-click the virtual machine, select the Start submenu.
- Next, choose the Normal Start option.
- Sign in to your Windows 11/10 account.
- Click the Devices menu.
- Select the Insert Guest Additions CD image option.
- Next, open File Explorer in the virtual machine.
- On the left navigation pane, click on This PC.
- Under the Devices and drives section, double-click to open the VirtualBox Guest Additions disc.
- Next, double-click the VBoxWindowsAdditions.exe file to launch the installer.
- Click the Next button.
- Click the Next button again.
- Click the Install button.
- Select the Reboot now option.
- Click the Finish button.
The virtual drivers will now install and after the restart, Windows will be able to run normally in a virtual environment. You can follow the same step-by-step instructions above to update the Guest Additions on your Windows 11/10 machine when a new version of VirtualBox is released with more recent drivers.
That’s it!
Where is Guest Additions located?
VirtualBox ships with an image ISO file called “VBoxGuestAdditions. iso” containing Guest Additions installers for all supported guest operating systems. This file is located on the host machine and can be mounted on the guest system using the VirtualBox GUI manager. The VBoxGuestAdditions.iso is located in the VirtualBox installation folder (in this path: C:\Program Files\Oracle\VirtualBox), which you can use to add the package manually.
How do I uninstall and reinstall VirtualBox Guest Additions?
You can uninstall VirtualBox OSE Guest Additions via Apps and Features in Settings app or Programs and Features in Control Panel. Look for VirtualBox OSE Guest Additions in the list and click on it. The next step is to click on uninstall, so you can initiate the uninstallation.
What is Extension Pack for VirtualBox?
VirtualBox Extension Pack is a binary package intended to extend the functionality of VirtualBox. The Extension pack adds the following functionality: Support for USB 2.0 and USB 3.0 devices. To get the Oracle version, you need to download the Extension Pack for all supported platforms. Once the package has downloaded, do the following:
- Launch VirtualBox.
- Click File > Preferences.
- Click the Extension tab.
- Click the + button.
- Navigate to where you saved the Extension Pack.
- Select the Extension Pack.
- Click Open.
- When prompted, click the Install button.
- Scroll through the EULA and then click I Agree.
Is VirtualBox Guest Additions free?
The Basic Package and the Guest Additions are free, however, the Extension Pack that you can install just as easily to go with VirtualBox is distinctly not free.
Obinna has completed B.Tech in Information & Communication Technology. He has worked as a System Support Engineer, primarily on User Endpoint Administration, as well as a Technical Analyst, primarily on Server/System Administration. He also has experience as a Network and Communications Officer. He has been a Windows Insider MVP (2020) and currently owns and runs a Computer Clinic.
Officially VirtualBox Guest Additions download includes VirtualBox 7.0.8 latest version. Support on Windows 11, 10, 8, 7 and Mac/ Linux.
Latest Version Overview
Virtualbox is a free virtual machine software that allows you to create virtual machines. It emulates common operating systems on your computer such as Windows 11/10/8/7/XP, Linux and MacOS.
When you simulate the virtual operating system on the computer is really bent to carry both operating systems and can not run at the same time as the real machine.
Therefore, the virtual machine software is only suitable for computers with relatively strong configurations and ram 4GB or more memory to run well. Next to USB connectivity, keyboard, drive connection and data transfer between real computer and virtual machine.
Table of Contents
What are the benefits of VirtualBox 7.0.8?
As stated in the introduction already was told that is VirtualBox used to virtualize operating systems. So can you with Oracle VM VirtualBox use Windows 10 to Windows 11, Windows 7 to Windows 8 and Windows 8 to Windows 10 while you are running?
Also on Linux and OS X (Macintosh), you can use other operating systems. This is especially important if you, for example, have some programs that do not work on Linux or Mac OS X.
One speaks of two different operating systems (OSes) when using Virtual Box 64 bit and 32 bit. So you have a host OS, for example, Windows, Ubuntu or OS X Leopard that starts when your computer turns on.
VirtualBox Guest Additions Download ISO File
In April 2023 the latest version came out with an open source edition that was licensed under the GNU General Public License (GPL) Version 2. Meanwhile, Sun (the company behind VirtualBox) was acquired by Oracle.
Oracle has the continued development of VirtualBox which is a type-2 hypervisor for x86 virtualization. It enables you to run more than one operating system at a time. It is very surprising.
VirtualBox guest additions were released as its source but it is already available free of charge for personal use. It required an ISO file which is open to all.
Use Different Operating Systems
Many people want to get the benefit of different operating systems on their PC. This is ideal software for them. It’s the perfect software if you want to try to start another operating system in already used operating system.
Well, now you can easily install the VirtualBox 2023 on your typical virtual machine GUI. Finally, control the machine from the command line. It is a general-purpose full virtualizer for x86 hardware.
In addition, you have guest OSes. These are the operating systems that your virtual used via VirtualBox Guest Additions. On this site, you’ll find a list of possible guest OSes.
Key Features
- Shared folders
- Mouse integration
- Command Line Integration
- A clean user interface
- 3D virtualization
- Microsoft VHD support (Virtual PC HD)
- Only for Closed Source version
- USB integration
- Remote desktop control
Install VirtualBox Guest Additions
It’s a complete setup file. There are no boring options in it. Its best feature is its accessibility. This package is compressed into an ISO format.
Simply VirtualBox Guest Additions download on your PC. Extract with Power ISO or WinRAR software.
Finally, you go to the “VBoxGuestAdditions_7.0.8” folder. Install the setup file according to your operating system.
You can follow the tips below.
Install VirtualBox for Windows
In principle, it is possible to host OS to use each operating system. But the main ones are Windows edition. Installing VirtualBox on the Windows operating system is very easy.
First download its latest version from here. Next, click on “VirtualBox-7.0.8-156879-Win.exe” installer.
You can follow the tips below.
Install VirtualBox for Mac
Currently, VirtualBox is very compatible with Mac operating systems such as macOSX and ARM based.
Its Mac installer is developed in two separate packages. You can download any package according to your operating system. Follow its instructions to install it. You can follow the tips below.
Verdict
VirtualBox is still not widely used in the business world. Therefore, the integration and deployment possibilities are still too limited. Also, the competition from both Microsoft (with Hyper V etc) and VMWare is fierce.
VirtualBox is well due to the fact that it is free for personal use and there is an open-source version is available. It is compatible with all operating systems.
To experience superiority, you are invited to get VirtualBox and VirtualBox Guest Additions download ISO latest version.
What’s New/ Version history/ Changelog in v7.0.8?
VMM:
- Fixed EFLAGS.TF handling for CPUID instructions when Hyper-V is used
- Fixed MONITOR/MWAIT crash with Solaris guests when Hyper-V is used on Windows 11
- Introduced general improvements in nested visualization area
GUI:
- Brought back Restore current snapshot checkbox of Close VM dialog
- Fixes and validation for VM settings USB filters editor, filter port value is now properly saved/restored
- Fixes for VM name and OS type embedded editors of Details pane
Oracle VM VirtualBox Extension Pack:
- Fixed shipping the cryptographic support module for full VM encryption
E1000:
- Fixed possible guru meditation when changing network attachments
virtio-net:
- Follow up fixes for FreeBSD 12.3 and pfSense 2.6.0
3D:
- Fixed various graphics issues with Windows 7 guests
Main/UefiVariableStore:
- Added API to add signatures to the MOK list
VBoxManage:
- Introduced modifynvram enrollmok sub-command to enroll Machine Owner Key into NVRAM, so Linux guest kernel can pick it up in order to verify signature of modules signed with this key
Guest Control/Main:
- Fixed deleting files via built-in toolbox
Linux host:
- Added possibility to bypass kernel modules signature verification once VBOX_BYPASS_MODULES_SIGNATURE_CHECK=”1″ is specified in /etc/vbox/vbox.cfg, useful in case if Linux distribution does not provide necessary tools to verify kernel module signature
Linux Guest Additions and host Installer:
- Improved detection if system is running systemd as the init process
- Introduce initial support for kernel 6.3
Technical Details
| Latest Version: | VirtualBox Guest Additions 7.0.8 |
| Update Released: | April 18, 2023 |
| License: | Free |
| Publisher: | ORACLE |
| Main Category: | Virtualization |
| Setup File: | VBoxGuestAdditions_7.0.8.iso |
| File Size: | 51.00 MB |
| Uploaded: | Publisher |
Screenshots
Содержание
- Подключение образа
- Способ 1: Настройки виртуальной машины
- Способ 2: Подключение внутри гостевой ОС
- Установка
- Вопросы и ответы

VirtualBox Guest Additions (дополнения гостевой операционной системы) – пакет расширений, который устанавливается в гостевую операционную систему и расширяет ее возможности по интеграции и взаимодействию с хостовой (реальной) ОС.
Дополнения, например, позволяют связать виртуальную машину с реальной сетью, без чего невозможен обмен файлами посредством создания общих папок, а также выход виртуалки в интернет. Кроме того, Guest Additions позволяет подключить видеодрайвер, который дает возможность менять расширение экрана виртуальной машины через апплет «Персонализация».
Образ с дополнениями входит в состав дистрибутива VirtualBox, загружаемого с официального сайта, дополнительно его скачивать не нужно.
Подключение образа
Есть два способа подключить образ.
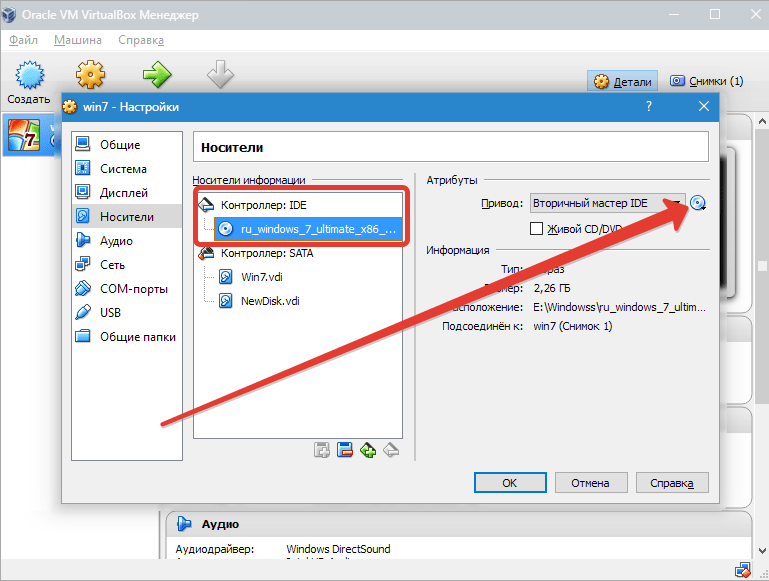
Способ 1: Настройки виртуальной машины
Первый – через настройки виртуальной машины в менеджере. Машина при этом должна быть остановлена.
- Выбираем нужную машину в списке и нажимаем «Настроить».
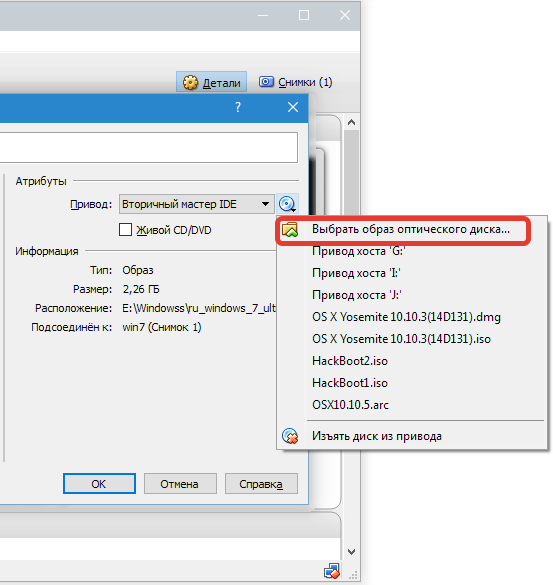
- Переходим на вкладку «Носители», выделяем виртуальный CD привод и нажимаем на значок выбора образа. Затем выбираем пункт «Выбрать образ оптического диска».
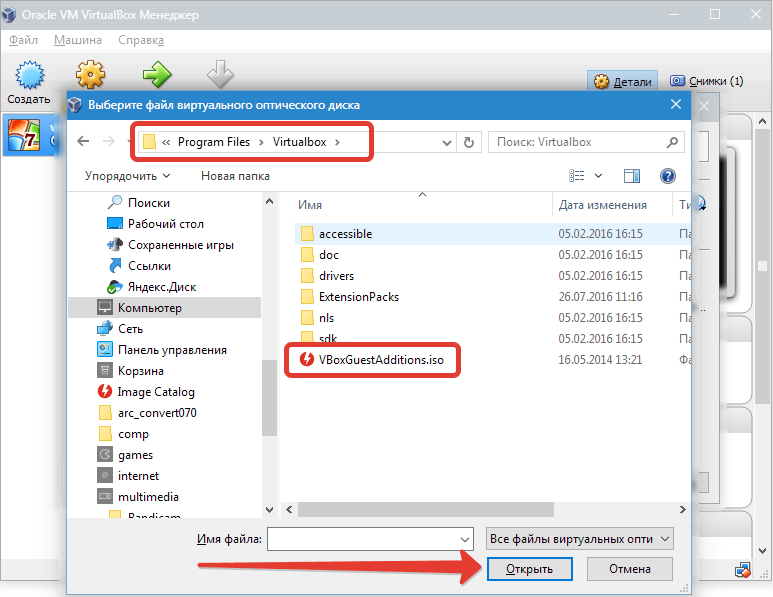
- В открывшемся окне находим образ дополнений. Он находится в корне папки с установленной VirtualBox.
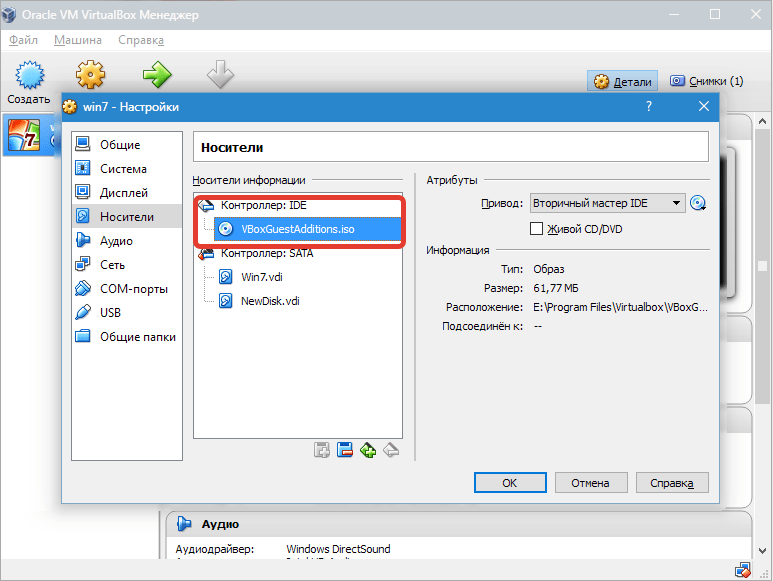
- Образ смонтирован, теперь запускаем виртуальную машину.
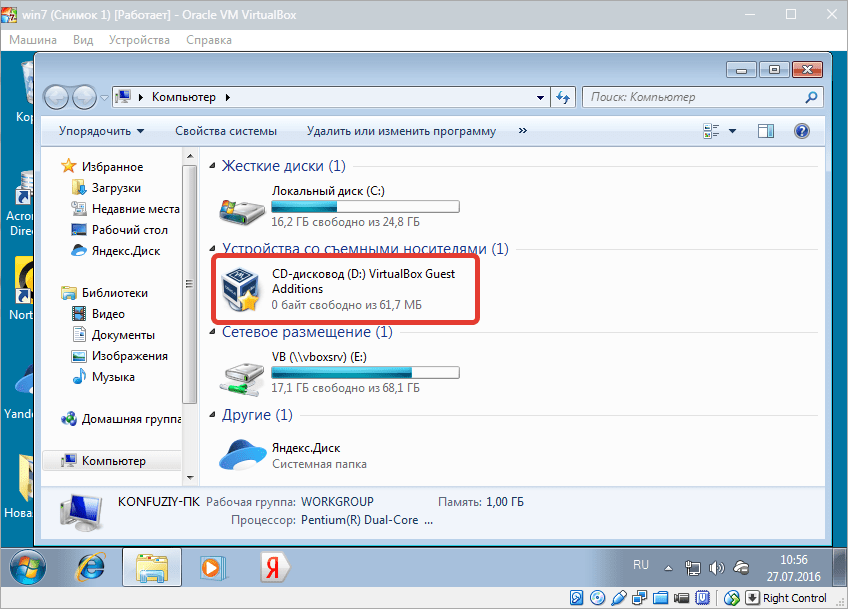
- Открываем папку «Компьютер» (в виртуалке) и видим смонтированный образ.

Такое решение является универсальным для подключения образов дисков к виртуальным машинам. Оно может пригодиться в случае, если Вы подключаете образ, не входящий в состав дистрибутива.
Способ 2: Подключение внутри гостевой ОС
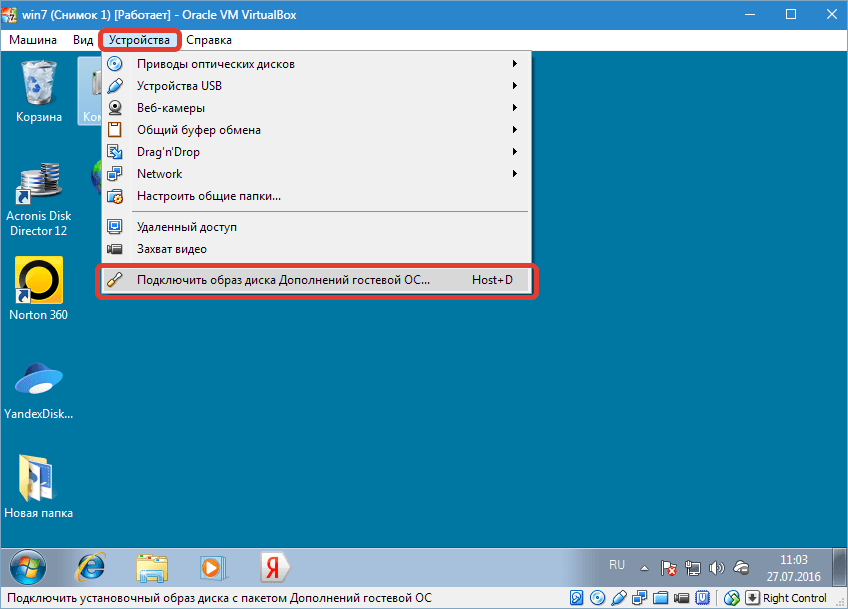
Второй, гораздо более простой способ – подключить Guest Additions прямо из меню запущенной машины.
- Переходим в меню «Устройства» и выбираем пункт «Подключить образ диска Дополнений гостевой ОС».
- Как и в предыдущем варианте, образ появится в папке «Компьютер» на виртуалке.
Установка
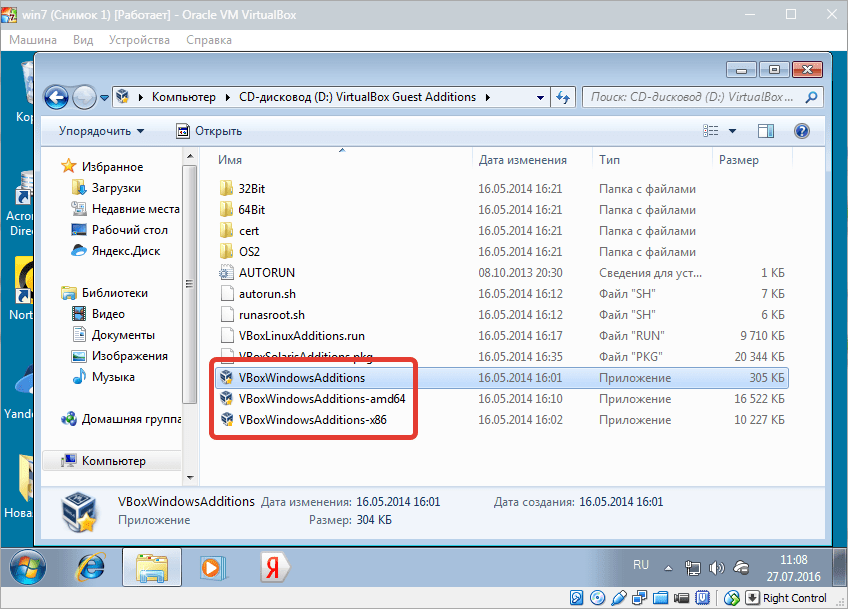
- Открываем смонтированный диск с дополнениями и запускаем файл VBoxWindowsAdditions. Здесь также возможны варианты: можно запустить универсальный установщик, либо выбрать версию, учитывая разрядность гостевой операционной системы.
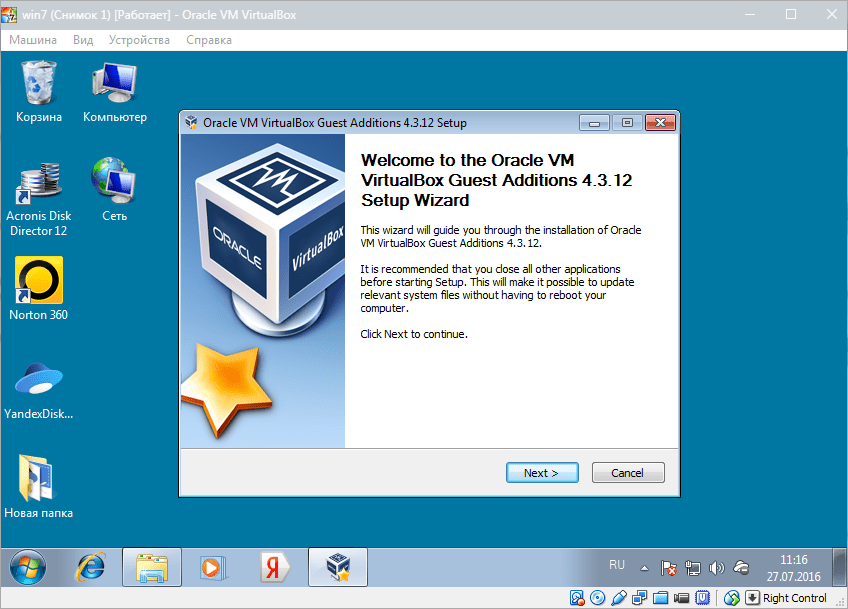
- В открывшемся окне установщика нажимаем «Далее».
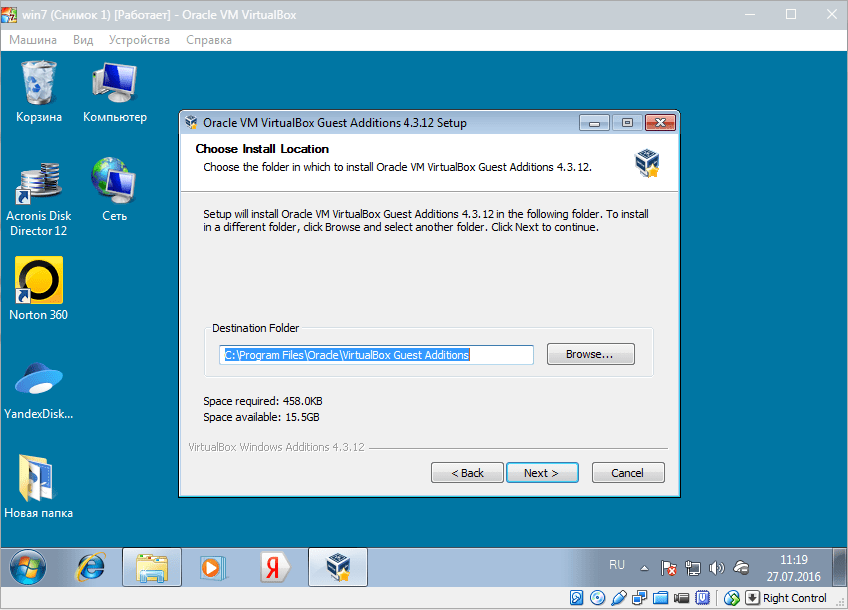
- Выбираем место для установки. В данном случае ничего не меняем.
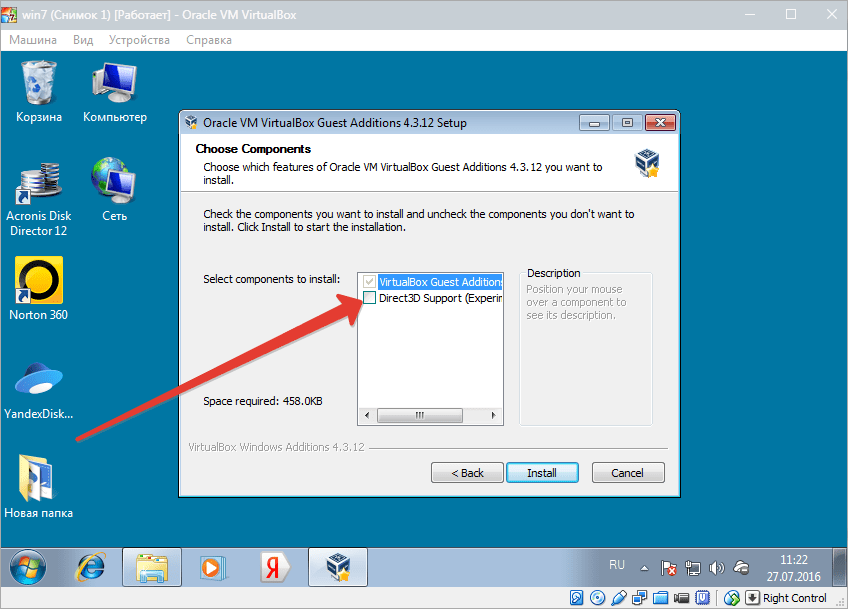
- Здесь видим пустой чекбокс рядом с «Direct 3D Support». Данный драйвер можно установить только в безопасном режиме, поэтому галку не ставим и нажимаем «Install».
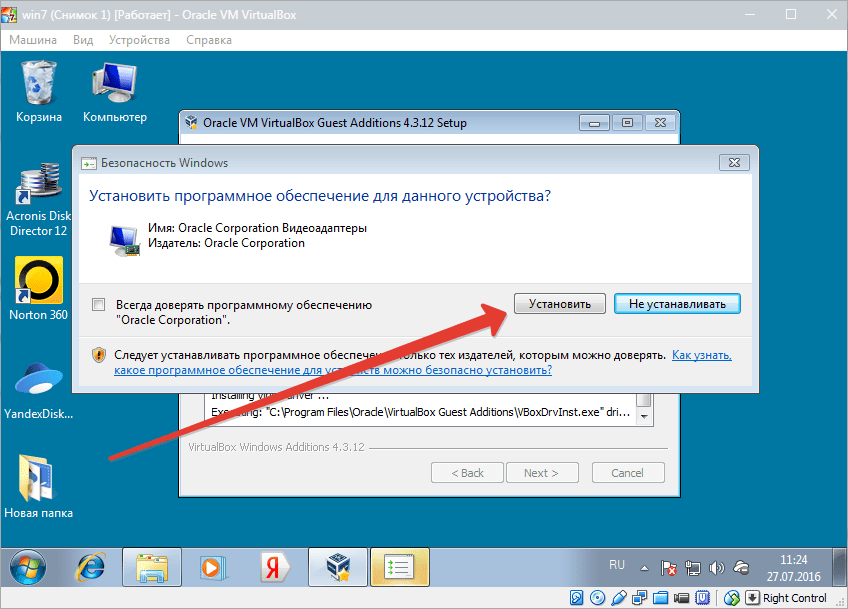
- В процессе установки несколько раз появится окно с предложением подтвердить установку драйверов. Везде соглашаемся.
- По завершению установки VirtualBox предложит перезагрузить машину. Это необходимо сделать.
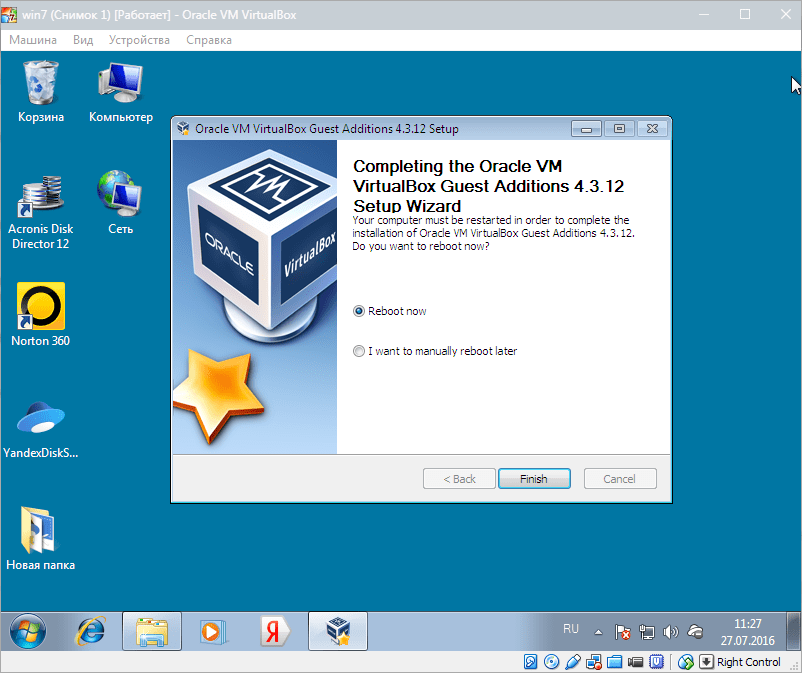
На этом процесс установки VirtualBox Guest Additions завершен. Теперь можно менять разрешение экрана, создавать общие папки и выходить в интернет с виртуальной машины.
Еще статьи по данной теме:
Помогла ли Вам статья?
UPDATED 8/21/2023: On VirtualBox, the “Guest Additions” package contains the drivers that allow the Windows 10 virtual machine to operate correctly in a virtualization environment. The VirtualBox Guest Additions is provided as a virtual image to optimize the guest machine with the mouse pointer and keyboard integration so you can navigate the environment and release the peripherals seamlessly.
The package also installs the virtual video drivers to improve the system performance and advanced graphics capabilities, such as hardware acceleration, multi-monitor support, and seamless transition between windows to run apps as if they were installed on the host device. Furthermore, you also get time synchronization, the ability to share the clipboard content and automated logging.
In other words, without the drivers, the virtual machine would perform slow, and many advanced features (such as the ability to change the screen resolution, control transparency, mouse support, etc.) won’t be available or work correctly.
In this guide, you will learn the steps to install the VirtualBox drivers on Windows 10.
To install the Guest Additions on a Windows 10 virtual machine, use these steps:
-
Open VirtualBox on Windows 10.
-
Right-click the virtual machine, select the Start submenu, and choose the Normal Start option.
-
Sign in to your Windows 10 account.
-
Click the Devices menu and select the “Insert Guest Additions CD image” option.

-
Open File Explorer in the virtual machine (Windows key + E).
-
Click on This PC from the left side.
-
Under the “Devices and drives” section, double-click to open the “VirtualBox Guest Additions” disc.
-
Double-click the VBoxWindowsAdditions.exe file to launch the installer.

-
Click the Next button.
-
Click the Next button again.
-
Click the Install button.
-
Select the Reboot now option.
-
Click the Finish button.


Once you complete the steps, the virtual drivers will install, and after the restart, Windows 10 will be able to run normally in a virtual environment.
When a new version of VirtualBox becomes available with more recent drivers, you can use the same instructions to update the Guest Additions on Windows 10. The setup will replace the virtual drivers with the versions as you run the installer.
If you cannot mount the image into that machine, the VBoxGuestAdditions.iso is located in the VirtualBox installation folder (in this path: C:\Program Files\Oracle\VirtualBox), which you can use to add the package manually.
We may earn commission for purchases using our links to help keep offering the free content. Privacy policy info.
All content on this site is provided with no warranties, express or implied. Use any information at your own risk. Always backup of your device and files before making any changes. Privacy policy info.