VirtualBox’s Drag and Drop (DnD) is a very popular and convenient feature, but it also has several requirements for working properly that most users aren’t aware of.
First off, drag and drop is only properly supported on VirtualBox 5.0 and newer versions. Only experimental support for Linux guest operating systems was included in older versions.
VirtualBox Guest Additions need to be installed for drag and drop to work. After the installation, you must manually enable drag and drop support as it’s disabled by default on new VMs.
Drag and drop only works between Host to Guest and vice versa. Additionally, it’s only supported on the official “VirtualBox Manager” frontend. You won’t have much success if you try using it with other frontends like VBoxHeadless or VBoxSDL.
Generally, fulfilling these requirements will get drag and drop working on your system. But in case it still doesn’t work, the solutions and workarounds we’ve listed in this guide will be helpful.
Table of Contents
Before you start, if you’re using an older version of VirtualBox, we recommend switching to the latest stable build. As various DnD-related bugs have been patched in the newer versions, updating could be all that’s needed to fix the issue.
Ensure Guest Additions are Installed
With Guest Additions, just mounting the CD is not enough. You actually have to install it as well. If you want, you can first check whether Guest Additions is properly installed with the following steps:
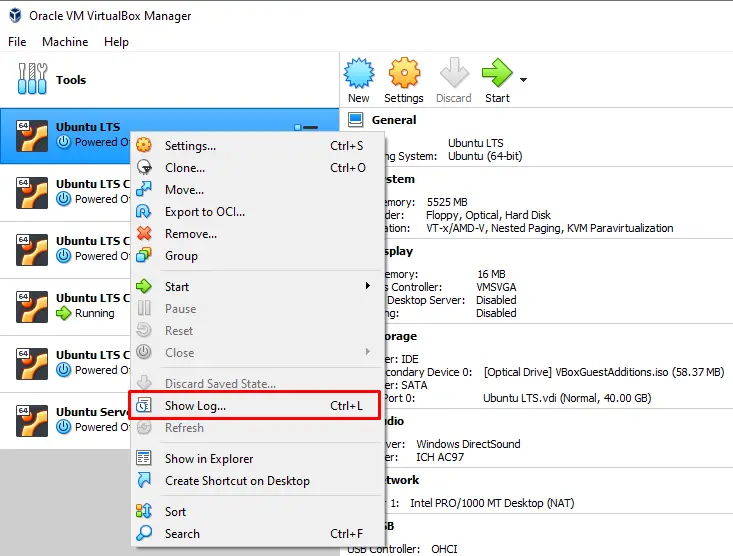
- Launch VirtualBox, right-click the VM from the left pane, and select Show Log.

- In the first tab, click on Find and enter Guest Additions information report.

If the installed Guest Additions and VirtualBox version don’t match, that means Guest Additions didn’t install properly. In such cases, you can reinstall Guest Additions with the following steps:
- Select the VM and press Start to power it on.
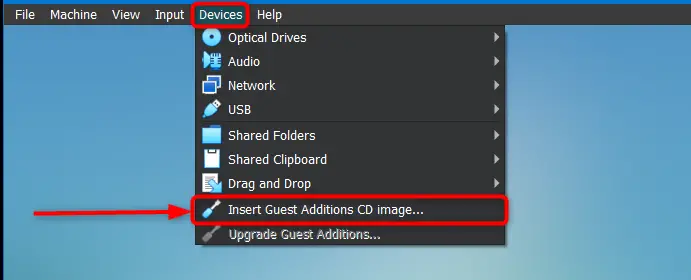
- Select Devices > Insert Guest Additions CD Image from the menu bar.
- In the VM, navigate to the mounted directory and open the
VBoxAdditions.exefile. For instance, in the case of Windows VMs, this file is namedVBoxWindowsAdditions.exe.
- Accept the UAC prompt and follow the on-screen instructions to complete the installation.
- Afterward, restart the guest OS.
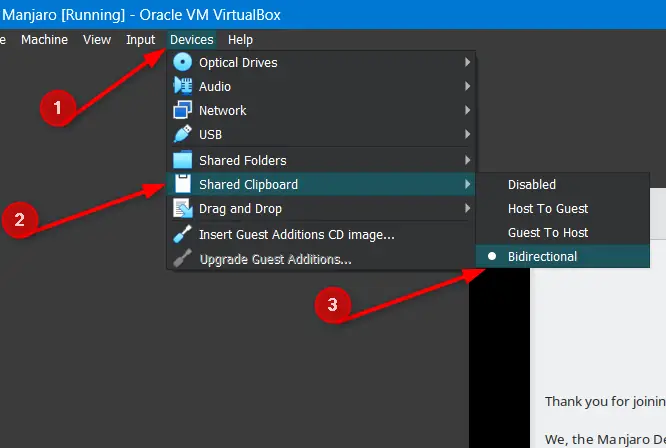
- Select Devices > Drag and Drop > Bidirectional from the menu bar.


Install Linux Headers
With Linux VMs, you must install a few packages before installing Guest Additions. Additionally, it’s also recommended to update the Linux headers. Here’s how you can do so:
- Download Qt 5.6.2 or later and SDL 1.2.7 or later.
- Locate the
.runfiles and open them. - Select Run in Terminal and follow the on-screen instructions to run the installer.
- Additionally, use the following command to update the headers:
sudo apt-get install linux-headers-$(uname -r)
- Restart the VM, install Guest Additions with the steps shown above, and check if drag and drop works now.

Drag and Drop Mechanics
Drag and drop is a work in progress. It has a history of locking up after a few uses. There are also recently patched issues where you couldn’t drop files to the recycle bin, or you couldn’t drop files in the current folder after hovering over a folder.
There are still many such undocumented problems that could be preventing you from using this feature properly. As such, it’s worth trying to drag other files or folders and drop them into different locations to try and figure out ways to get DnD working.
Resolve File Explorer Issues
In addition to the requirements we’ve already discussed, drag and drop has a few built-in limitations.
On Windows hosts, you can’t drag and drop items between UAC-elevated and non-elevated programs. For example, users often run VirtualBox as admin, but this is not the case with file explorer. In such scenarios, you’d also need to run explorer as admin for drag and drop to work.
Similarly, on Linux hosts, certain file managers like LXDE’s PCManFM tend to query for drag and drop while the process is still going on, which can prevent DnD from working. DnD is also incompatible with Xubuntu’s Thunar file manager. To work around this, you can use another file manager that is compatible with drag and drop, such as Nautilus.
Use Shared Folders
If drag and drop is still not working, you can instead use shared folders to transfer files to the VM. Here are the steps to do so:
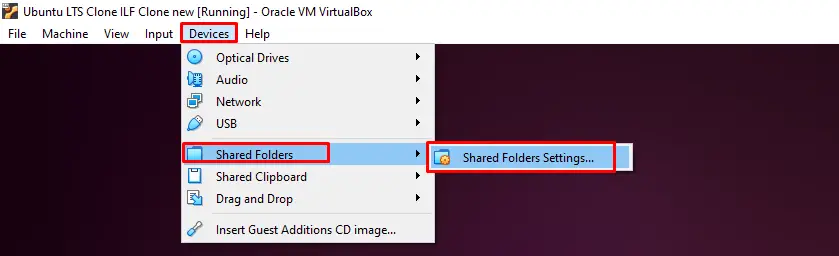
- Select Devices > Shared Folders > Shared Folder Settings.
- Click on the Add new shared folders button from the right.
- In the Folder Path section, select Other and browse the folder you’re trying to share.
- Enable the Auto-mount option and press Ok.


If you want, you could also network share the folders on the host OS and access them via the guest OS.
VirtualBox is a widely used tool that allows running several operating systems on a single computing device. While working with VirtualBox, the Drag and Drop feature is not enabled by default. Therefore, the error “VirtualBox drag and drop not working” arises when the user attempts to drag/drop between the host and remote machines.
This post will address the possible reasons and the solutions to the error:
- Reason 1: Older Version of the VirtualBox
- Solution: Install the Latest VirtualBox
- Reason 2: Guest additions are not installed
- Solution: Install the Guest Additions
- Alternate Solution: Create a Shared Folder
Reason 1: Older Version of the VirtualBox
The drag-and-drop feature is supported by VirtualBox version 5 or newer versions. This is one reason your VirtualBox version does not support drag/drop.
Solution: Remove the Current Package and Install the Latest VirtualBox
Before installing a fresh copy, ensure you have removed the old version of VirtualBox installed on the system.
Step 1: Remove the Current Installed VirtualBox
To remove the VirtualBox, use the command as per your Linux distribution:
$ sudo apt remove --purge virtualbox                       #For Debian/Ubuntu-Based
$ sudo dnf remove --purge virtualbox                       #For RHEL-Based
$ sudo pacman -Rcns virtualbox                              #For Arch-Based
Step 2: Install the Latest VirtualBox
To install the updated version of VirtualBox, it is recommended to update the packages list via the command:
$ sudo apt update                                                    #For Debian/Ubuntu-Based
$ sudo yum/dnf update                                            #For RHEL-Based
$ sudo pacman -Syu                                                #For Arch-Based
Once the packages list is updated, use the command to install VirtualBox on Linux:
$ sudo apt install virtualbox                                        #For Debian/Ubuntu-Based
$ sudo dnf install virtualbox                                        #For RHEL-Based
$ sudo pacman -S virtualbox                                      #For Arch-Based
Reason 2: Guest additions are not installed
Guest Additions adds some extra functionality to the VirtualBox, including the drag/drop, copy/paste, screen resolution and much more. The absence of “Guest Additions” is the primary reason the drag and drop is not working.
To verify if the “Guest Additions” is installed or not, just follow the instructions:
Then, click on the “Find” option and type “guest additions information report,” and it will highlight
The guest additions version if it is installed:

The red colour of the search bar shows no matches found, which means the guest additions are not installed. If they are installed, then the below-mentioned screen will appear:
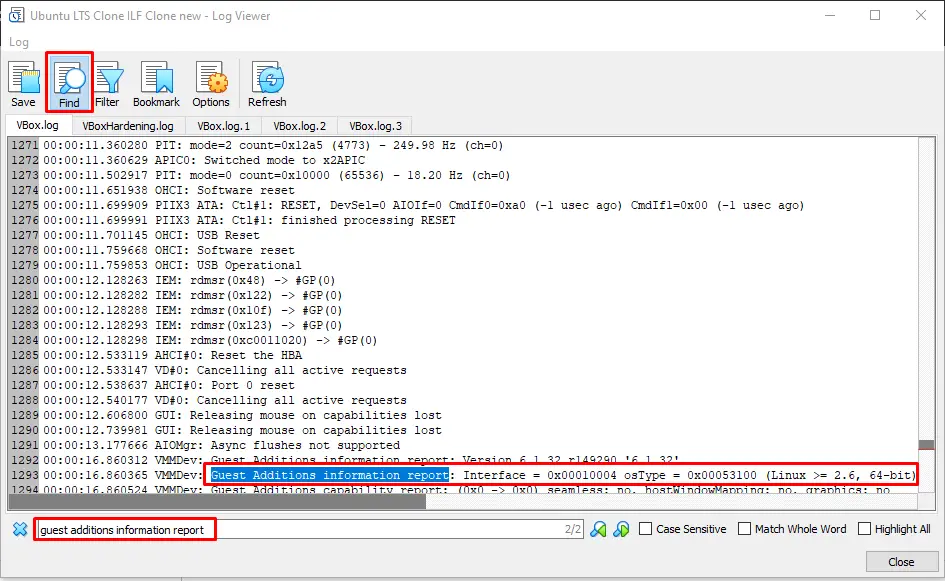
The clear figure of the version details is:

In our case, version 6.1.32 is installed on the computer.
Solution: Install the Guest Additions
To resolve the above mentioned reason, install the Guest Additions on the respective Linux distributions.
The commands to install Guest Additions are provided below:
Install Guest Additions on Debian/Ubuntu:
$ sudo apt update && sudo apt upgrade
$ sudo apt install build-essential dkms linux-headers-$(uname -r)
For Arch-Based Distributions:
$ sudo pacman -Syyu
$ sudo pacman -S virtualbox-guest-utils
After the successful installation, you need to stop the virtual machine and go to the “Devices” option on the menu bar and click on the “Insert Guest Additions CD image..” to mount the guest additions.
If the Guest Additions CD is already mounted, locate it via the commands:
$ ls /media/$USER/VBox*
$ ls /media/cdrom*/VBox*
Now, run it via the command provided below:
$ sudo /media/$USER/VBox*/VBoxLinuxAdditions.run
Solution 3: Enable the Drag/Drop Functionality
If none of the solutions are working for you, then you have to enable the Drag and Drop functionality. For this, hit the “Devices” tab and hover over the “Drag and Drop”. Set its value to bidirectional:

For better usability, set the “Shared Clipboard” option to “Bidirectional” as well:
Alternate Solution: Create Shared Folder
If you are not interested in the VirtualBox Drag-and-Drop feature, then you can use the “Shared Folders” for transferring files from the host OS to the VirtualBox. To do so, launch the Ubuntu machine and then Select Devices > Shared Folders > Shared Folder Settings:
Then specify the “Folder Path”, and “Folder Name”, and then also specify the “Mount Point”:
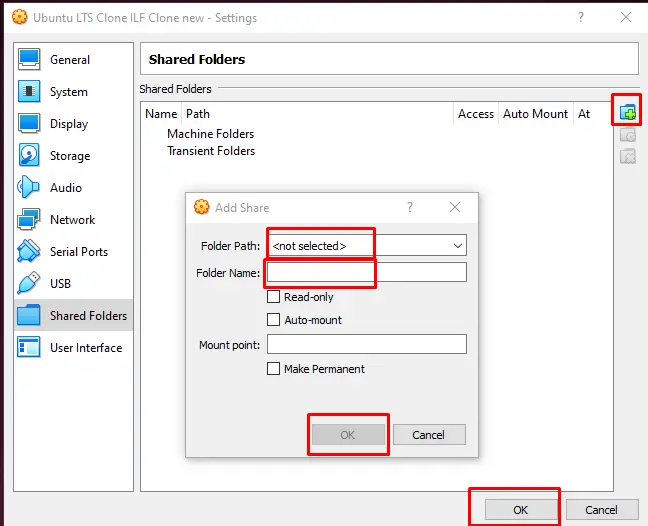
Finally, press the “OK” button.
Conclusion
The “virtualbox drag and drop not working” error occurs if the guest additions are not installed, or the VirtualBox has version 5 or earlier. To fix this error, you need to get the latest version of VirtualBox and install the guest additions. This post has briefly explored the reasons and the solutions to VirtualBox’s drag-and-drop working issue.
Virtual Box, Виртуализация, Программное обеспечение
- 05.10.2016
- 112 133
- 15
- 30.08.2020
- 122
- 109
- 13
- Содержание статьи
- Установка гостевых дополнений
- Включаем общий буфер обмена
- Включаем Drag & Drop
- Комментарии к статье ( 15 шт )
- Добавить комментарий
Установка гостевых дополнений
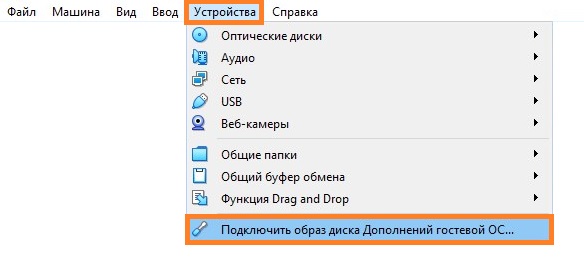
Для включения возможности обмена буфером обмена между хостом (компьютером на котором установлен VirtualBox,) и виртуальной машиной (компьютером, запущенным в виртуальной машине), необходимо установить «Гостевые дополнения», которые находятся на виртуальном образе, примонтировать который можно через меню VirtualBox «Устройства — Подключить образ диска Дополнений гостевой ОС».
После этого в виртуальной машине появится привод с диском, на котором находятся нужные для установленной операционной системе дополнения, которые следует установить. Во время установки достаточно просто нажимать «Далее» («Next»), после чего потребуется перезагрузка.
Подробнее про установку гостевых дополнений можно прочитать в отдельной статье.
Включаем общий буфер обмена
В том же пункте меню «Устройства» необходимо открыть подменю «Общий буфер обмена» в котором необходимо выбрать один из четырех вариантов:
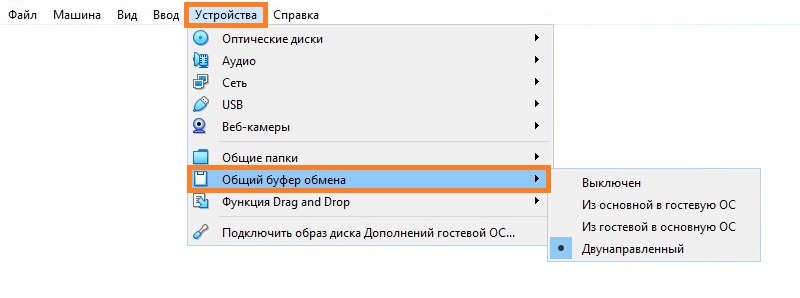
Общий буфер обмена предназначен только для копирования и вставки текста!
Для передачи файлов используйте функцию Drag & Drop (см. ниже).
- Выключен — в данном случае возможность что-либо скопировать или вставить из реального компьютера в виртуальный, или наоборот, будет отсутствовать;
- Из основной ОС в гостевую ОС — обмен «буфером обмена» будет возможен только в одну сторону — с реального компьютера, в виртуальный;
- Из гостевой ОС в основную ОС — будет возможность копирования с виртуального компьютера на хост, с хоста в виртуальную машину не будет;
- Двухнаправленный — буфер обмена будет работать в обе стороны;
Изменения функции обмена буфером обмена между основным компьютером и виртуальным будут применены сразу после изменения настроек.
Включаем Drag & Drop
Drag’n’Drop называют действие, которое можно перевести на русский язык как «перетаскивание». Конкретно в VirtualBox оно позволяет перетащить файл с виртуальной машины в реальную, и наоборот. Для этого нужно включить в настройках виртуальной машины поддержку этой функции. Делается это следующим образом:
- В верхнем меню VirtualBox находим пункт «Устройства». В нем будет находится подпункт «Функция Drag & Drop».

- Выбираем подходящий параметр:
- Выключен — функция Drag & Drop выключена;
- Из основной ОС в гостевую ОС — возможность перетаскивать файлы и папки только в виртуальную машину, но не из неё;
- Из гостевой ОС в основную ОС — возможность перетаскивать файлы и папки только из виртуальной машины, но не в неё;
- Двухнаправленный — возможность перетаскивать файлы и папки как с виртуальной машины, так и в неё;
- Настройки применяются сразу, а значит после включения функции Drag & Drop можно сразу ей воспользоваться.

VirtualBox – это специальная программа, имитирующая независимый компьютер внутри вашего устройства, что позволяет испытывать новые виды ПО и операционных систем без риска заразить основную машину вирусами. Обычно VirtualBox используют разработчики и тестировщики приложений, программисты, но иногда и простые обыватели, например, чтобы апробировать новую операционную систему без ущерба для старой. Для удобства работы VirtualBox имеет буфер обмена, благодаря которому можно переносить часть информации либо внутри виртуального компьютера, либо между реальной ОС и тестируемой. Перенос осуществляется привычными клавишами Ctrl+C, Ctrl+V или перетаскиванием. Но иногда ничего не выходит: буфер обмена не работает.

Решение проблем с буфером обмена в VirtualBox.
Настройки тестируемой системы
Если в VirtualBox не работает буфер обмена, в первую очередь, нужно проверить, настроили вы его или нет.
- Откройте тестируемую систему в VirtualBox.
- Нажмите Ctrl + S, чтобы открылось окошко с опциями.
- Выберите «Свойства» – «Общие» – «Дополнительно».

- Затем обратите внимание на строку «Общий буфер обмена» и зафиксируйте функцию «Двунаправленный» – вы найдёте её в списке.

- То же самое выбираем для строчки Drag&Drop.
- После повторного входа в тестируемое пространство вы увидите, что неполадка исчезла, нужные элементы свободно переносятся между ОС.


Сброс настроек и переустановка
Если же вы добрались до настроек и обнаружили, что все значения уже заданы, а буфер всё же не работает, попробуйте следующее:
- Сбросьте параметры общего буфера обмена.
- Установите заголовочный файл ядра, имеющий следующий вид: apt-get install make gcc linux-headers-$(uname -r).
- Заново переустановите расширение VirtualBox Guest Additions – оно уже предусмотрено в пакете установки, если у вас официальная версия продукта.
- Выполните перезагрузку и вернитесь к параметрам буфера обмена, о которых говорилось ранее.

Как активировать Guest Additions
Если у вас лицензионная версия VirtualBox, то запустить расширение довольно просто:
- Перейдите во вкладку «Устройства» в работающей виртуальной ОС, найдите в конце списка «Подключить образ диска дополнений гостевой ОС».
- Откройте раздел «Компьютер», там вы обнаружите Guest Additions в списке подключенных устройств (как будто вы вставили диск в дисковод).
- Кликните по условному «диску», и заработает программа установки.
- Периодически будут вылетать окошки с предложением инсталлировать драйвер – нажмите «ОК».
- Перезагрузите компьютер, когда об этом попросит программа установки.

Если вы загружали дополнение отдельно, переместите его в корневую папку VirtualBox,а далее:
- Остановите экспериментальную ОС и зайдите в менеджер.
- Откройте «Настройки» – «Носители».
- В окошке выбираем «Контроллер IDE», и сбоку в настройках «Вторичный мастер IDE».

- Нажимаем значок с изображением диска и жмём «Выбрать образ оптического диска».
- Откроется окошко с предложением найти нужный файл, ищем его в корневой папке, куда ранее поместили, он имеет расширение «.iso», нажимаем «открыть».
- Теперь можно запустить тестируемую ОС и щёлкнуть по значку «Компьютер», где обнаружится Guest Additions.
- Далее начинаем процесс инсталляции, описанный выше.

Данное расширение позволяет не только пользоваться буфером обмена, но и выходить в интернет непосредственно через экспериментальную операционную систему, работать с драйвером видео и многое другое.
Довольно долго (наверно, несколько лет) использовалась «максимальная производительность», при ней процессор всегда работает на полную мощность, хоть в нагрузке, хоть без нагрузки.
Было всё нормально, но решила вернуться на сбалансированную схему, для экономии электроэнергии. После переключения, как и положено, процессор стал снижать частоту и напряжение, когда нет нагрузки, температура понизилась на 5 градусов (стало всего 25), система работала нормально, только пару раз возникли небольшие зависания.
Но после выключения компьютера, обратно он уже не включался (вернее, система не загружалась). Система вроде загружается, но дольше обычного, доходит до экрана «Добро пожаловать», потом чёрный экран и курсор, рабочий стол не появляется. Иногда даже до этого не доходило, а всё зависало на экране «Добро пожаловать». Пробовала загружаться в безопасном режиме, запускался тоже долго, но после запуска ничего невозможно было делать, всё висло.
Короче, запустить систему удалось только после восстановления с последней контрольной точки, режим питания обратно стал «максимальная производительность». Сейчас на нём всё нормально работает и перезагружается.
Что может быть не так со сбалансированной схемой, почему с ней система не запускается?
В системном журнале, после переключения на сбалансированную схему появились ошибки: «Был произведен возврат к устройству \Device\RaidPort0.», так понимаю из-за этого и возникли проблемы с загрузкой.
P.S. Система Windows 10 (свежая), характеристики ПК в подписи.