Download
Current releases
virt-manager 4.1.0 (gpg) Thursday August 04, 2022
- Fix build with setuptools-61 (Peter Alfredsen, Miro Hrončok)
- add UI and cli support for qemu-vdagent channel (Jonathon Jongsma)
- cli: More –iothreads suboptions (Lin Ma)
- launch_security: Use SEV-ES policy=0x07 if host supports it (Charles Arnold)
- cli: Add support for URL query with disks (Martin Kletzander)
virt-viewer 11.0
(gpg)
Friday November 18th, 2021
Win x86 MSI
(gpg)
Win x64 MSI
(gpg)
Virt-viewer releases are GPG signed with a key having the fingerprint:
DAF3 A6FD B26B 6291 2D0E 8E3F BE86 EBB4 1510 4FDF (4096R)
This same fingerprint is listed at time of the release announcements mails
on the mailing list
- Minimum libgovirt is now 0.3.7
- CentOS 7 is no longer a supported build platform
- Use header bar for oVirt ISO dialog
- Add change CD button to toolbar for oVirt
- Support using ISOs in oVirt DATA storage domains
- Remove clashing -r command line shortcut for ‘resize’ that clashed with
existing ‘reconnect’ shortcut - Support modifier-only hotkeys for cursor release
- Fix smartcard and USB hotkey configuration regression
- Add USB device reset hotkey support
- Fix various mixed up GTK actions for hotkeys
- Release keyboard grab at same time as mouse grab with SPICE
- Fix misc compiler warnings with glib > 2.68
- Fix creation of window when guest uses multiple heads with a single QXL
video card - Updated translations from weblate
- Avoid warnings from GTK from overly strict minimum desktop width/height rules
- Update window action sensitivity to fix regression causing disabled send key
menu items - Fix mixed up action / menu state when user cancels a quit request
- Ensure auth dialog credential fields are cleared
- Fix setting os-id when building RPMs
- Avoid extra hyphen in build ID strings
- Explicitly disable spice/ovirt features when invoking meson for RPM builds
- Fix uninitialized variable for keymaps
virt-bootstrap 1.1.1 (gpg) Tuesday Jul 9th, 2019
- Don’t expose the root password via command line
- Set SElinux file context of destination folder
- Use absolute destination path
- safe-untar: Inherit SElinux context
- don’t allow overwriting of the root partition
Previous releases
- virt-manager: Sources and Changelogs
- virt-viewer: Sources and Changelogs
- virt-bootstrap: Sources and Changelogs
Verifying gpg signatures
As a quick guide, to import a key from the key servers and verify downloads use.
$ gpg --recv-key 0xBE86EBB415104FDF
$ gpg --fingerprint 0xBE86EBB415104FDF
...check it matches fingerprint above...
$ gpg --verify SIGNATURE-FILE  SOURCE-FILE
Время на прочтение
7 мин
Количество просмотров 16K

Если вы отвечаете за управление Hyper-V в своей организации, то вам необходимо знать о преимуществах и недостатках шести лучших инструментов управления Hyper-V.
Hyper-V Manager — это инструмент Microsoft, поставляемый в комплекте с ролью Hyper-V. Его можно использовать для управления виртуальными машинами (virtual machine, VM), работающими на локальных или удалённых хостах Hyper-V.
▍ Плюсы Hyper-V Manager
- Он доступен бесплатно и поставляется в составе инструментов Microsoft для управления Hyper-V для Windows Server и Windows 10/11.
- Поскольку это встроенный инструмент, он стабилен и имеет хорошую производительность.
- Он позволяет создавать локальные и удалённые VM, чекпоинты VM, VHD, виртуальные коммутаторы и репликацию, а также управлять ими; по сути, это все функции, которые поддерживает Hyper-V.
- Можно выполнять аутентификацию при помощи учётных данных, отличающихся от локального аккаунта, для подключения к удалённому хосту Hyper-V, используя DNS-имя или IP-адрес хоста.
- Можно экспортировать и импортировать VM, и эта возможность применима как простой способ резервного копирования VM.
▍ Минусы Hyper-V Manager
Hyper-V Manager — отличный инструмент для небольших окружений виртуализации, однако он имеет и недостатки:
- Удаление VM в Hyper-V Manager на самом деле не удаляет соответствующие файлы виртуальных жёстких дисков (VHD), поэтому подчищать их администратору приходится вручную.
- Системе не хватает расширенных функций, например, возможности создания кластеров Hyper-V и автоматического создания VM. Хотя она способна распознавать хосты-кластеры, для кластерных VM не поддерживаются некоторые операции (например, изменение VHD).
- Система поддерживает только хосты Hyper-V; то есть управление хостами VMware ESXi или Citrix XenServer невозможно. Следовательно, её нельзя использовать в гетерогенных окружениях виртуализации.
PowerShell
PowerShell — отличный инструмент управления Hyper-V для администраторов, привыкших работать с командной строкой и скриптами. PowerShell remoting упрощает администраторам удалённое управление несколькими хостами Hyper-V и автоматизацию рабочих процессов при помощи скриптов. PowerShell Direct (PowerShell, запущенный внутри виртуальной машины из хоста Hyper-V) существенно расширяет возможности, позволяя управлять гостевыми VM под Windows без предварительного конфигурирования сети.

Запуск интерактивной сессии PowerShell remoting с сервером Hyper-V
▍ Плюсы PowerShell
Использование PowerShell для управления Hyper-V имеет следующие преимущества:
- PowerShell бесплатен, поставляется в комплекте с Windows и полностью интегрирован с Hyper-V и Windows.
- Поскольку PowerShell также является скриптовым языком, по сути, можно автоматизировать любую задачу управления, не поддерживаемую GUI-инструментами.
- Поддержка кроссплатформенности CLI упрощает администраторам удалённую работу с хостами Hyper-V, запущенными на гостевых VM без Windows (например, с Linux).
- Инструменты командной строки обычно быстры, менее подвержены багам и сбоям по сравнению с GUI-инструментами.
▍ Минусы PowerShell
Как и у любого инструмента, у PowerShell есть свои недостатки. Давайте рассмотрим минусы использования PowerShell в качестве инструмента управления Hyper-V.
- Поскольку это инструмент командной строки, его будет сложно осваивать администраторам, привыкшим к GUI-инструментам.
- PowerShell remoting требует ручного конфигурирования хостов и VM Hyper-V.
- PowerShell Direct работает только с гостевыми VM, на которых запущены Windows 10 и Windows Server 2016 (или выше) на хостах Hyper-V.
Windows Admin Center
Windows Admin Center — это свободный браузерный инструмент, который можно скачать из Microsoft Evaluation Center. Можно установить его или на Windows-сервер, или на присоединённом к домену компьютеру с Windows 10/11. Если инструмент установлен на сервере, он работает в качестве шлюза, позволяя нескольким администраторам вашей организации управлять хостами Hyper-V и другими устройствами, не увеличивая стоимость лицензирования.

Windows Admin Center
▍ Плюсы Windows Admin Center
- Это интегрированный набор инструментов для управления хостами Hyper-V, кластерами Hyper-V, Azure Stack HCI, Windows-серверами, рабочими станциями Windows и Azure VM.
- Он позволяет нескольким администраторам организации удобно управлять хостами Hyper-V через веб-браузер.
- Он использует внутренние технологии Windows (PowerShell, WMI и WMF) и не требует никакой установки агентов на хостах.
- Можно конфигурировать его так, чтобы он безопасным образом управлял хостами из любой точки мира через Интернет.
- Поддерживает современные способы аутентификации и управление доступом на основе ролей, давая вам детальный контроль за тем, кто к чему имеет доступ.
- Также он позволяет использовать расширения, добавляющие функции и возможности.
▍ Минусы Windows Admin Center
На мой взгляд, недостатков у использования Windows Admin Center в качестве инструмента управления Hyper-V нет. Однако существуют некоторые проблемы, которые иногда сложно устранять, в частности, в окружениях рабочих групп без Active Directory. Если вы считаете, что Windows Admin Center имеет недостатки, напишите об этом в комментариях.
System Center Virtual Machine Manager
System Center — это коммерческий пакет Microsoft для управления дата-центрами, содержащий инструмент управления Hyper-V под названием Virtual Machine Manager (VMM), также иногда называемый System Center Virtual Machine Manager (SCVMM). VMM не распространяется как отдельный продукт. Он также может использоваться и для управления Hyper-V, однако в первую очередь рассчитан на использование в гетерогенных системах, состоящих из разных типов гипервизоров, таких как Microsoft Hyper-V, VMware ESXi и Citrix XenServer.

System Center Virtual Machine Manager 2022
▍ Плюсы SCVMM
SCVMM обладает следующими достоинствами:
- Предоставляет все основные и расширенные функции для управления хостами и кластерами Hyper-V в одной плоскости управления. Он может работать не только с Hyper-V, но и эффективно управлять гипервизорами ESXI и XenServer.
- Его интегрированная конверсия physical-to-virtual (P2V) позволяет с лёгкостью виртуализовать физические серверы или машины.
- Позволяет осуществлять быстрое развёртывание и миграцию при помощи шаблонов VM. Администраторы могут создавать и разворачивать VM серийно, что просто необходимо, если вам нужно управлять множеством VM.
- Предоставляет возможность централированного мониторинга и отчётности, что обеспечивает администраторам подробную информацию обо всей инфраструктуре серверов дата-центра.
▍ Минусы SCVMM
С точки зрения малых и средних организаций инструмент имеет следующие недостатки:
- Покупка всего пакета System Center может оказаться слишком дорогой для вашей организации, если он нужен вам только для управления Hyper-V.
- Запуск SCVMM имеет высокие аппаратные и программные требования.
- Из-за сложности продукта администраторам нужно вкладывать больше времени в обучение для использования инструмента.
- SCVMM требует установки агента на каждый хост, которым нужно управлять.
ProHVM компании Probus IT
ProHVM — коммерческий инструмент управления Hyper-V, позволяющий администрировать любую версию Hyper-V, работающую на Windows Server, Server Core, Windows 10/11 или на bare-metal-сервере Hyper-V. Для каждого хоста Hyper-V, которым нужно управлять, требуется приобретение лицензии Professional, а лицензия Technician позволяет одному пользователю управлять неограниченным количеством хостов Hyper-V. Версия ProHVM Standard полностью бесплатна для личного и коммерческого использования.

ProHVM
▍ Плюсы ProHVM
- Поддержка управления хостами Hyper-V в разных доменах и рабочих группах с использованием разных наборов учётных данных.
- Версия Standard бесплатна для коммерческого использования с ограниченным набором функций. Кроме того, коммерческая версия выгоднее, чем у многих других инструментов управления Hyper-V.
- Инструмент позволяет управлять файлами и папками на удалённых хостах.
- Включает в себя cVM — превосходную альтернативу VMConnect.exe или RDP-клиенту. В cVM можно использовать параметры для создания горячих клавиш или скриптов логина для удобного подключения к VM.
- Поддерживает расширенные возможности, например, экспорт и импорт VM, миграцию накопителей, поддержку кластеров, живую миграцию и Hyper-V Replica.
▍ Минусы ProHVM
- Это традиционное десктопное приложение, требующее установки на рабочую станцию каждого администратора. Отсутствует опция централизованной установки и поддержка веб-браузера.
- При использовании стороннего продукта могут возникать сомнения в надёжности, безопасности и поддержке.
Igiko Management Tools
Igiko Management Tools — ещё одно коммерческое веб-приложение, которое можно использовать для удалённого управления хостами и VM Hyper-V, а также их мониторинга. Можно установить его на машину с Windows, а затем использовать веб-браузер для удалённого управления хостами Hyper-V, то есть его можно запускать под Windows, Linux или macOS.

Igiko Management Tools
▍ Плюсы Igiko Management Tools
- Этот легковесный браузерный инструмент предоставляет нескольким администраторам доступ для удалённого управления хостами и VM Hyper-V без необходимости установки на каждой рабочей станции.
- Он имеет возможность подключения гостевых VM в RDP-консоли на основе HTML5 при помощи веб-браузера.
- Он позволяет переносить файлы между локальными и удалёнными хостами.
- Встроенный удалённый шлюз позволяет подключать хосты и VM Hyper-V из любой точки мира через Интернет, а затем управлять ими. Защищённый веб-тоннель даже не требует статического IP-адреса или DNS.
- Он предоставляет живой контроль за хостами и гостевыми VM Hyper-V, передавая информацию о таких параметрах, как потребление ресурсов ЦП, памяти, аптайме и версии ОС.
- Он имеет модель аутентификации с подходом claims-based для пользователей и групп Windows.
- Возможна установка прав на хосты и VM Hyper-V отдельным пользователям или группам.
▍ Минусы Igiko Management Tools
- Первоначальное подключение к удалённым хостам и VM может быть сложным, а ошибки иногда трудно устранять.
- RDP-консоль на основе HTML5 в прошлом имела баги и иногда у неё возникают проблемы с масштабированием экрана.
- Многие функции инструмента доступны и в Hyper-V Manager.
Заключение
Выбор наиболее подходящего для вашей организации инструмента управления Hyper-V сильно зависит от размеров сети и, разумеется, от бюджета. На мой взгляд, если вы работаете в небольшой организации с десятками хостов Hyper-V, то для ваших потребностей хорошо подойдёт Hyper-V Manager (возможно, в сочетании с Failover Cluster Manager). Если вам не нравится Hyper-V Manager, то стоит попробовать ProHVM — превосходную стороннюю альтернативу, имеющую отличное соотношение цены и возможностей.
Если вы работаете в организации средних размеров, имеющей сотни хостов Hyper-V, то эффективно управлять ими вам поможет Windows Admin Center, не требующий трат на лицензирование.
Провайдеры Managed Service Provider (MSP) и крупные организации часто лицензируют System Center, поэтому логичным выбором для их корпоративных сетей является VMM.
RUVDS | Community в telegram и уютный чат

Updated – 15/09/2023 – Please note that starting with SCVMM 2022 UR1 update, you can install SCVMM 2022 on Windows Server 2022 and SQL Server 2022 as well.
In this article, we will show you how to install System Center Virtual Machine Manager (SCVMM) 2022 on top of Windows Server 2022 and SQL Server 2019. In a follow-up blog post, we will dive into the new features and improvements.
Table of Contents
Introduction
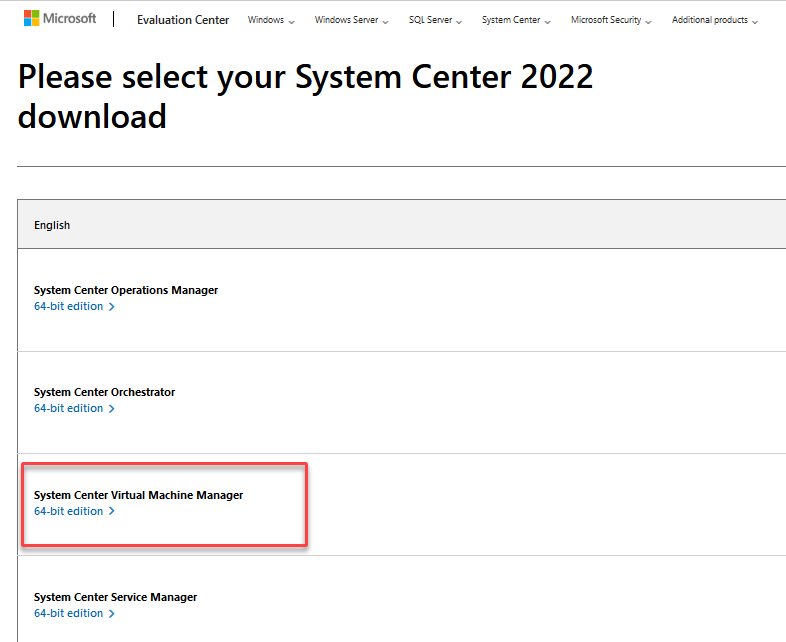
Microsoft announced the release of System Center 2022 under the Long-Term Servicing Channel (LTSC). LTSC provides 5 years of standard and 5 years of extended support. After the release of System Center 2022, the suite will continue to accrue value through the Update Rollup releases every six months over the mainstream support window of 5 years. You can read about the GA announcement for System Center 2022 on the Windows Server Blog. You can download the media from the Volume Licensing Service Center (VLSC), or you can download the evaluation bits from the following link.
> You can download the evaluation media for SCVMM 2022 directly from the following link.
There are a lot of improvements and new features introduced in this release.
In System Center 2022 Virtual Machine Manager, Microsoft added several new features:
- Windows Server 2022 and Azure Stack HCI, version 21H2.
- Manage Azure stack HCI clusters.
- Registration of Azure Stack HCI clusters.
- Support for managing Windows Server 2022.
- Support for dual-stack (IPv4 + IPv6) SDN deployment.
- SQL Server 2019 as VMM database.
- Windows 11 support.
To learn more about what has been improved in the previous System Center 2019 Virtual Machine Manager, please check the following article.
* System Center Data Protection Manager 2022 will be available on May 1st, 2022.
Prepare VMM 2022 Installation
The following prerequisites and components should be installed on the server before you install VMM:
- The Deployment Tools feature from the Windows® Assessment and Deployment Kit for Windows Server 2022 must be installed on this computer to run Microsoft System Center 2022 – Virtual Machine Manager. To download the Windows® Assessment and Deployment Kit, go to Windows Assessment and Deployment Kit (ADK).
- The Windows Preinstallation Environment feature. Starting with Windows 10, version 1809, and later, ADK does not include Windows PE by default. It’s a separate add-on download Download the Windows PE add-on for the ADK (Windows 11 and Windows Server 2022).
- PowerShell 5.0 or later.
- .NET 4.6 or later.
- Microsoft Visual C++ 2013 Redistributable Package. To complete the installation, you must reboot the computer.
- Ensure that a domain controller for the Active Directory domain is available.
- Ensure that the domain account used for the VMM service is a member of the Administrators group on the local VMM server (more on this in the next section).
Please note that if VMM 2022 and SQL Server 2019 are installed on the same machine, you will encounter the following error appears. Please reboot your machine for a successful installation.
The Microsoft Visual C++ 2015-2019 Redistributable Package was successfully installed. However, in order to complete the installation, you must reboot the computer. Shut down all active programs and restart the computer.

The installation of VMM is straightforward using the graphical user interface (GUI).
Updated – 15/09/2023 – Please note that starting with SCVMM 2022 UR1 update and later versions, SQL Server 2022 is supported for the VMM database. The same steps will apply to SQL Server 2022 as well.
In this article, we will show you how to automate the installation of System Center 2022 Virtual Machine Manager and SQL Server 2019 on top of Windows Server 2022. The same steps will also apply to Windows Server 2019 and to SQL Server 2022.
Windows Assessment and Deployment Kit Installation
To automate the Windows Assessment and Deployment Kit Installation, take the following steps:
Open an elevated command prompt window, navigate to the adksetup.exe location, and then run the following command on a single line to install Windows ADK in silent mode:
adksetup.exe /quiet /installpath D:\ADK /features OptionId.DeploymentToolsWindows PE Installation
To automate the Windows PE installation, take the following steps:
Open an elevated command prompt window, navigate to the adkwinpesetup.exe location, and then run the following command on a single line to install Windows PE in silent mode. This command will also restart the VMM machine:
adkwinpesetup.exe /quiet /installpath D:\ADK /features OptionId.WindowsPreinstallationEnvironment /forcerestartAutomate SQL Server 2019 Installation
Please note that System Center 2022 Virtual Machine Manager supports local and remote SQL Instances. You can disregard this step if you already have a SQL Server deployed locally or on another server in your environment.
Mount SQL Server 2019 Standard media and then open an elevated command prompt window, navigate to the SQL Server 2019 media, and run the following command on a single line:
Please make sure to update the domain name, SQL service accounts, and passwords according to your environment. As a side note, you can also use a parameter (configuration) file and pass it to the setup for SQL instead of typing the long CLI below, either way, will work. For more information on how to install SQL Server using a configuration file, please check the following article. To specify the configuration file at the command prompt, use the following syntax: Setup.exe /ConfigurationFile=”D:\MyConfigFile.ini”
Setup.exe /Q /ACTION=install /IACCEPTSQLSERVERLICENSETERMS /FEATURES=SQLEngine
/INSTANCENAME=VMM2022 /INSTANCEDIR="D:\Program Files\Microsoft SQL Server"
/INSTALLSHAREDWOWDIR="D:\Program Files (x86)\Microsoft SQL Server"
/INSTALLSHAREDDIR="D:\Program Files\Microsoft SQL Server"
/SQLSVCACCOUNT="domain\username" /SQLSVCPASSWORD="vmm2022##"
/SQLSYSADMINACCOUNTS="domain\username" /AGTSVCACCOUNT="NT AUTHORITY\Network Service"
/AGTSVCSTARTUPTYPE="Automatic" /SECURITYMODE=SQL /SAPWD="vmm2022##"
/SQLTEMPDBDIR="D:\Program Files\Microsoft SQL Server\TempDB\\"
/SQLUSERDBDIR="D:\Program Files\Microsoft SQL Server\SQLData\\"
/SQLUSERDBLOGDIR="D:\Program Files\Microsoft SQL Server\SQLLog\\"
After a short period, the installation will be completed as shown in the figure below without error:

A quick validation with PowerShell to verify that SQL services are up and running by running the command below:
Get-Service *SQL* | FT -AutoSize
Starting with SQL 2016 onward, SQL Server Management Studio (SSMS) is now packaged and installed separately with only a web link to each download page within the SQL Server Installation Center. At the time of writing, SSMS version 18.10 is the current General Availability (GA) which you can download from here.
Within the same command prompt window, type the following command to install SQL Server Management Studio (SSMS) in silent mode. SSMS installation will take around 5 to 10 minutes to complete.
SSMS-Setup-ENU.exe /install /quiet /norestart /log log.txtOnce you install the SSMS package, open SQL Server Management Studio (SSMS) and verify you are able to connect to the VMM SQL instance name.

Now we are ready to install SCVMM 2022.
Automate SCVMM 2022 Installation
Now before we install SCVMM, we need to add the domain account for the VMM service as a member of the local Administrators group on the VMM server. Open Windows PowerShell and type the following command (make sure to update the domain name and service account):
Net localgroup Administrators domain\vmmsvc /add
Get-LocalGroupMember Administrators
Copy the following details into Notepad and save the file on the VMM server as VMServer.ini.
You can use the same script below whether the SQL Server instance is installed on the VMM server or on a remote server.
When creating the VMServer.ini, replace the text inside < > with values from your own environment.
[OPTIONS]
ProductKey=xxxxx-xxxxx-xxxxx-xxxxx-xxxxx
UserName=<User Name>
CompanyName=<Organization Name>
ProgramFiles=<VMM Server Installation Path>
CreateNewSqlDatabase=1
SqlInstanceName=<SQL Instance Name>
SqlDatabaseName=<VMM Database Name>
RemoteDatabaseImpersonation=1
SqlMachineName=<SQL Server Machine Name>
IndigoTcpPort=8100
IndigoHTTPSPort=8101
IndigoNETTCPPort=8102
IndigoHTTPPort=8103
WSManTcpPort=5985
BitsTcpPort=4443
CreateNewLibraryShare=1
LibraryShareName=MSSCVMMLibrary
LibrarySharePath=<Library Share Path>
LibraryShareDescription=Virtual Machine Manager Library Files
SQMOptIn=0
MUOptIn=0
VmmServiceLocalAccount=0
TopContainerName=<Container for Distributed Key Management (DKM); for example: CN=VMMDKM,OU=SysCtr MGT,OU=VIRT LAB,DC=VIRT,DC=LAB>
HighlyAvailable=0
VmmServerName=<VMM Server Name>
# VMMStaticIPAddress = comma-separated-ip-for-HAVMM
Here is a real example of the VMServer.ini file that we will use in this example:

After you edit the file, open an elevated command prompt and run setup.exe with the parameters below.
For example, to use a VMServer.ini file that is stored in C:\Temp with a SQL Server administrator account of domain\vmmadmin and password, and a VMM service account of domain\vmmsvc and password, use the following command:
Setup.exe /server /i /f C:\Temp\VMServer.ini /SqlDBAdminDomain DOMAIN /SqlDBAdminName vmmadmin /SqlDBAdminPassword PASSWORD /VmmServiceDomain DOMAIN /VmmServiceUserName vmmsvc /VmmServiceUserPassword PASSWORD /IACCEPTSCEULASit back and relax… after 10 minutes VMM will be installed automatically as shown in the figure below:

You can also verify that the VirtualManager2022 database is created successfully in SQL Server Management Studio.

That’s it there you have it!
__
Thank you for reading my blog.
If you have any questions or feedback, please leave a comment.
-Charbel Nemnom-
Managing your virtualized infrastructure via a centralized management tool may sound too good to be true. Well, say hello to the System Center Virtual Machine Manager (SCVMM).
With SCVMM, you would be walking in what seems like a fantasy land where you can effectively manage and deploy virtual machines (VMs). And in this tutorial, you will learn how to perform various management tasks in a virtualized environment via SCVMM.
Discover SCVMM and start virtualizing your dream infrastructure!
Prerequisites
Before you dive deep into the SCVMM, ensure you have the following in place:
- A domain-joined machine running a Windows Server Standard/Datacenter Edition with Hyper-V roles enabled – This tutorial uses Windows Server 2022 Datacenter Edition 64-bit.
- A Microsoft SQL Server Standard/Enterprise Edition installed – This tutorial uses Microsoft SQL Server 2017 Standard Edition.
- SQL Server Management Studio (SSMS) installed – This tutorial uses SQL Server Management Studio 19.
- Windows Preinstallation Environment and Windows Assessment and Deployment Kit (ADK) installed on your server.
Downloading and Extracting the SCVMM Setup Files
SCVMM is a Microsoft management tool that allows you to manage and deploy VMs across virtualization platforms, such as Hyper-V and VMware. But to take advantage of SCVMM, you must first download and extract the SCVMM files on your Windows Server, as follows:
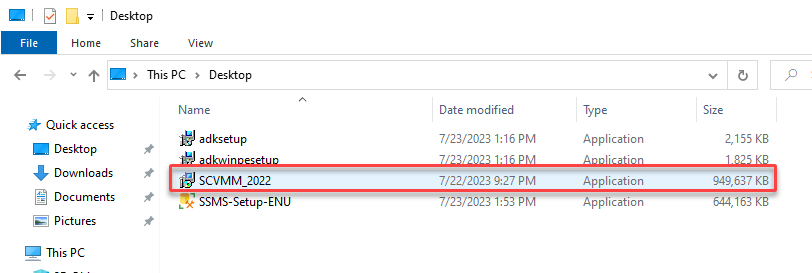
1. Open your preferred web browser, navigate to Microsoft’s official evaluation center page, and download the SCVMM installation file.
2. Next, open the SCVMM package (i.e., SCVMM_2022).
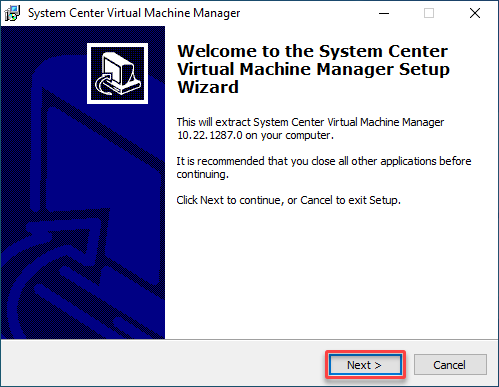
3. On the welcome screen, click Next to extract the SCVMM setup files.
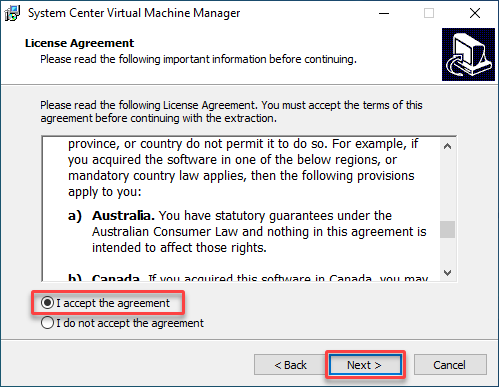
4. Now, accept the license agreement, and click Next.
5. Choose an appropriate folder location to extract files, and click Next.
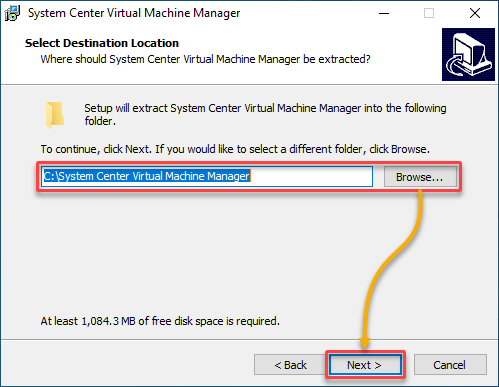
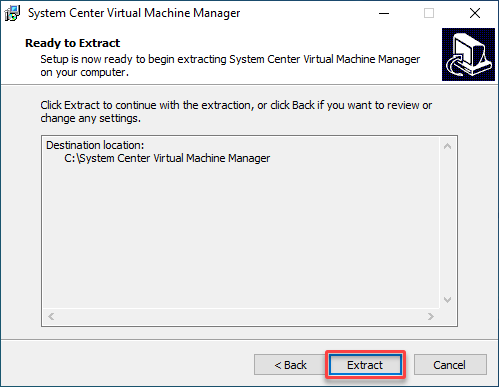
6. Confirm the settings and destination folder, and click Extract to extract the setup files.
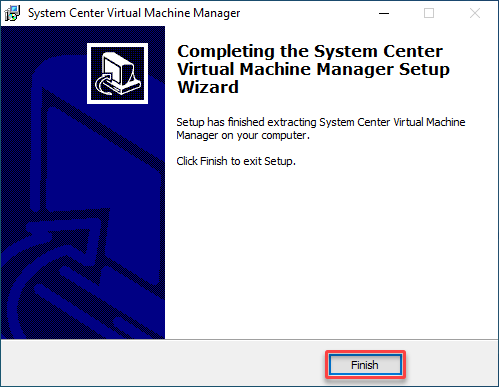
7. Lastly, click Finish to close the wizard.
Installing and Configuring SCVMM on a Windows Server
Extracting the setup files does not automatically install SCVMM. Like any other tools/software, you must install and configure SCVMM on your Windows Server.
To install SCVMM, follow these steps:
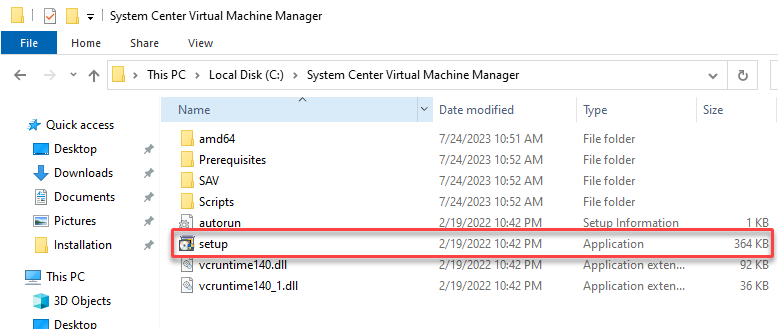
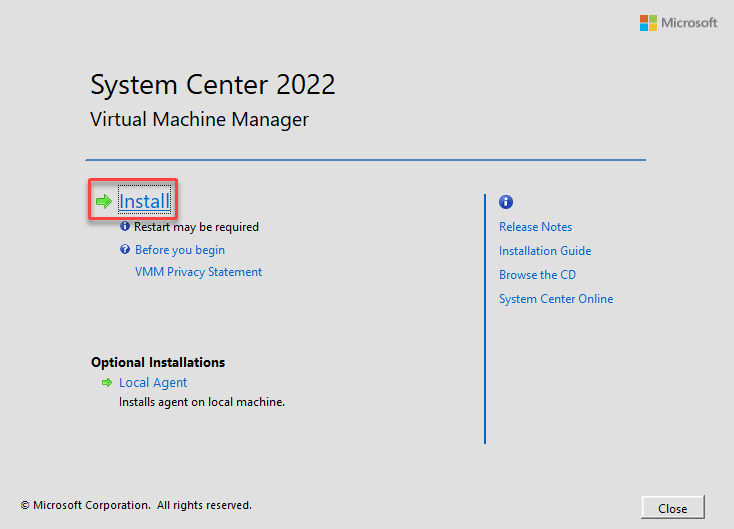
1. Open your file manager, navigate to where you extracted the SCVMM setup files, and launch the setup.exe file in the System Center Virtual Machine Manager folder.
2. Next, in the SCVMM prompt, click Install to begin installing SCVMM.
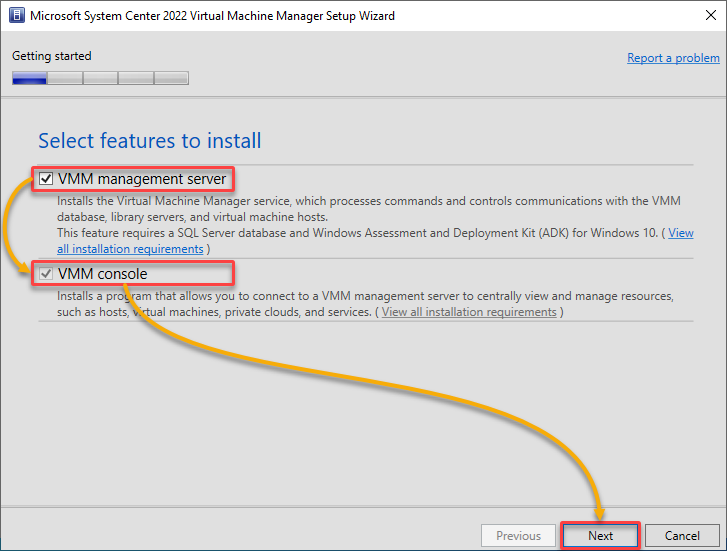
3. Tick the VMM management server box and the VMM console box that appears, and click Next.
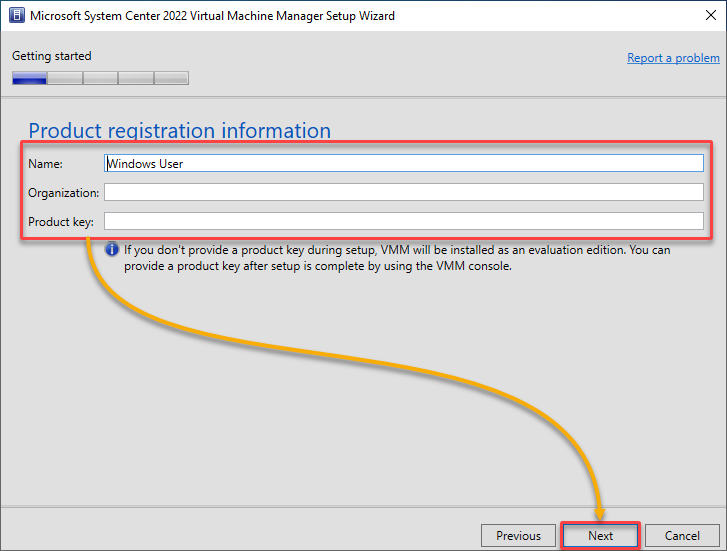
4. Fill in the Product registration information on the next page, and click Next.
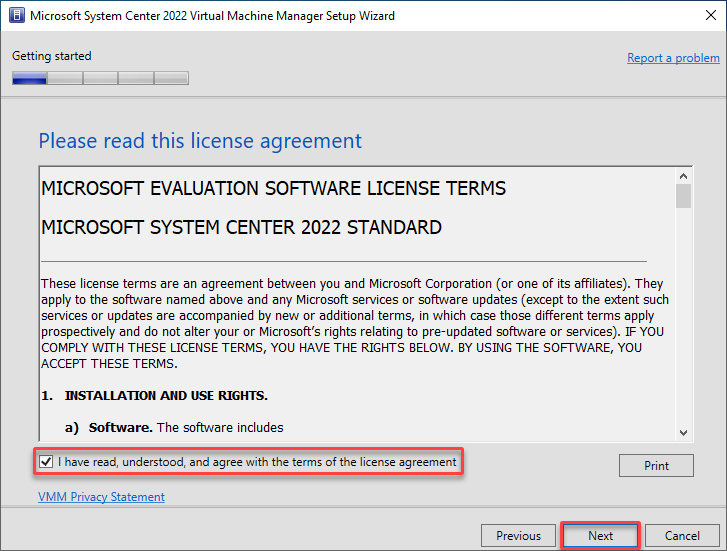
5. Accept the license agreement, and click Next.
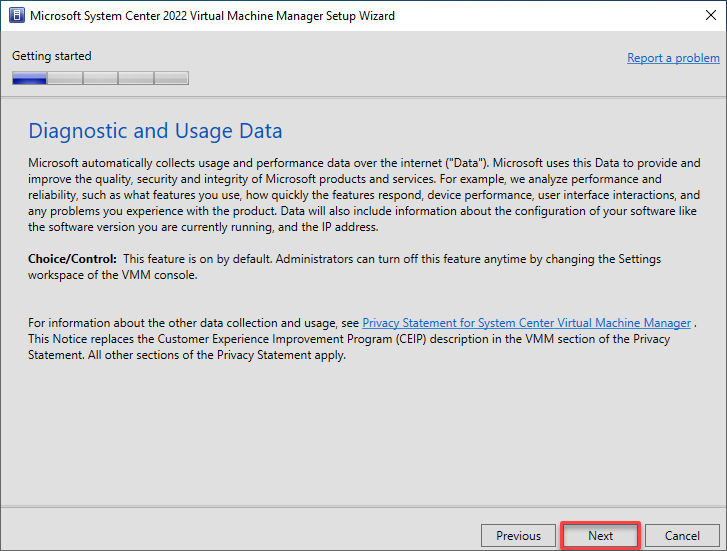
6. Read about the Diagnostic and Usage Data, and click Next.
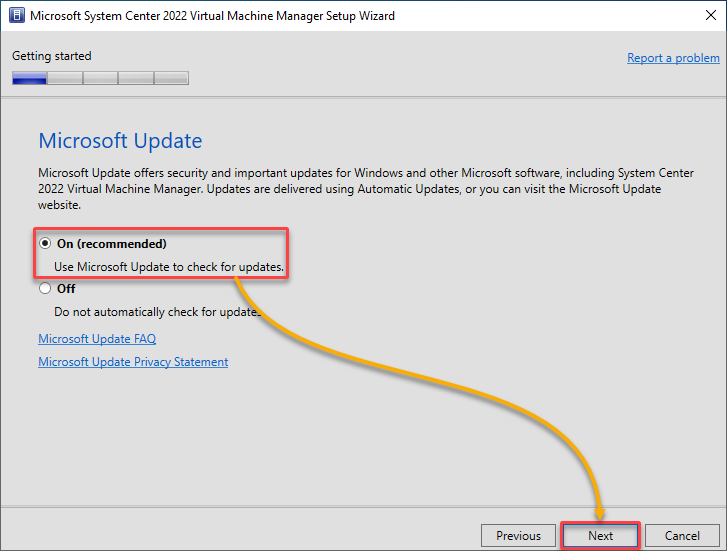
7. Turn On the Microsoft Update for updating SCVMM, and click Next.
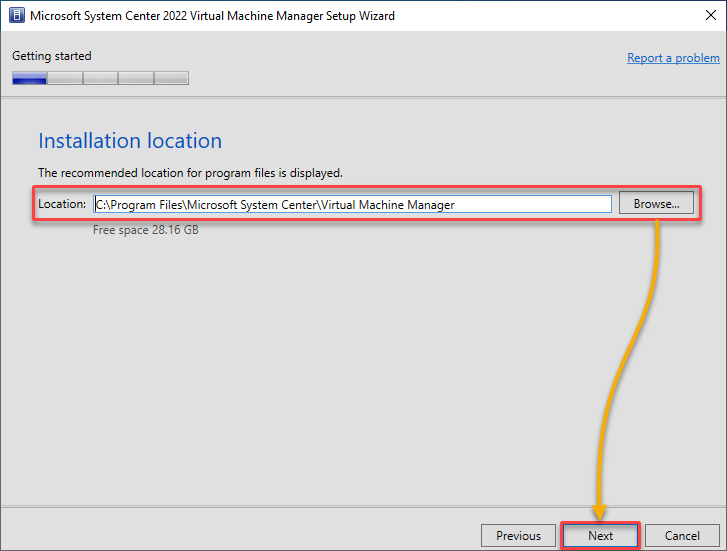
8. Choose a location to install SCVMM, and click Next.
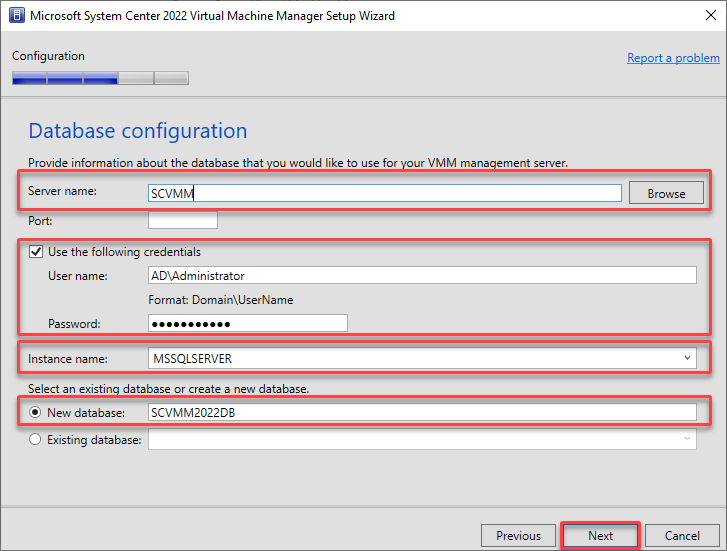
9. Configure your database, as shown below:
- Server name – Browse or input the name of your computer running your SQL Server.
- Use the following credentials – Tick this box, fill in the User name and Password of your computer running the SQL Server.
- Instance name – Choose your Microsoft SQL Server’s instance name.
- New database – Choose this option to create a new database called SCVMM2022DB (arbitrary).
Once configured, click Next to continue.
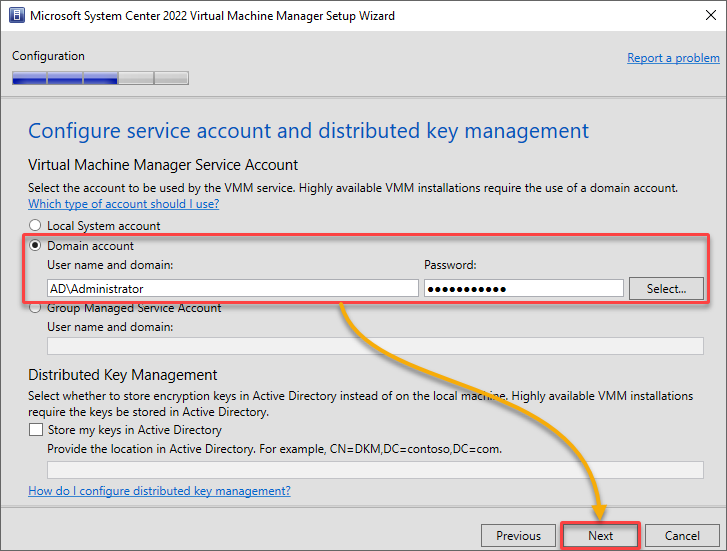
10. Next, provide your domain’s User name and Password, and click Next.
💡 Optionally, you can configure the distributed key management. Distributed key management allows the control of encryption keys for securing data across multiple locations. In SCVMM, the encryption keys are stored in the Active Directory.
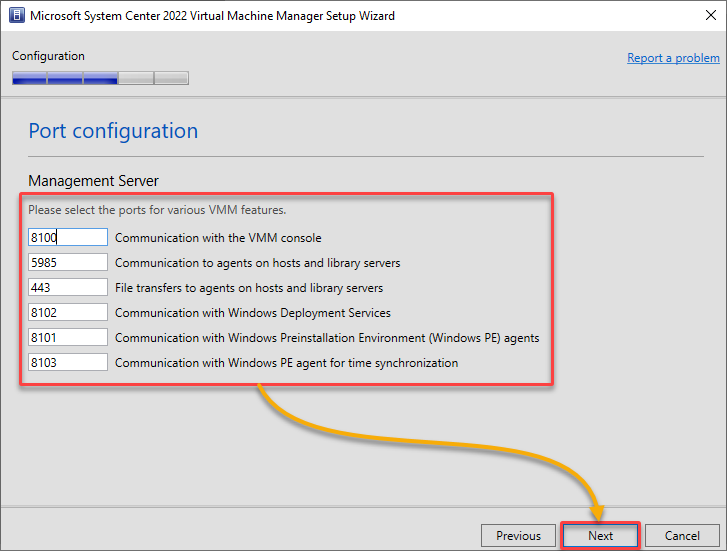
11. Now, configure or leave the default port settings, and click Next to proceed.
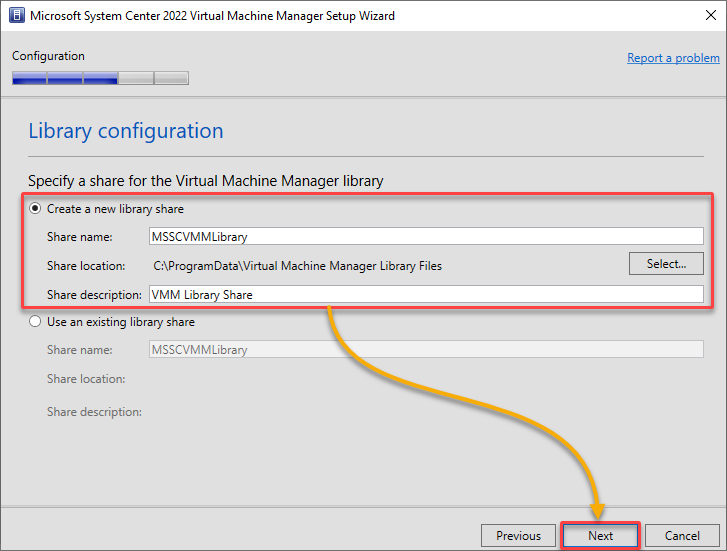
12. Choose the Create a new library share option, specify the VMM library Share name, location, and description, and click Next.
The VMM Share Library allows you to create and manage a centralized library of resources, such as VM templates, ISO images, scripts, and other files. Different SCVMM instances within your virtualized infrastructure can share and access this library.
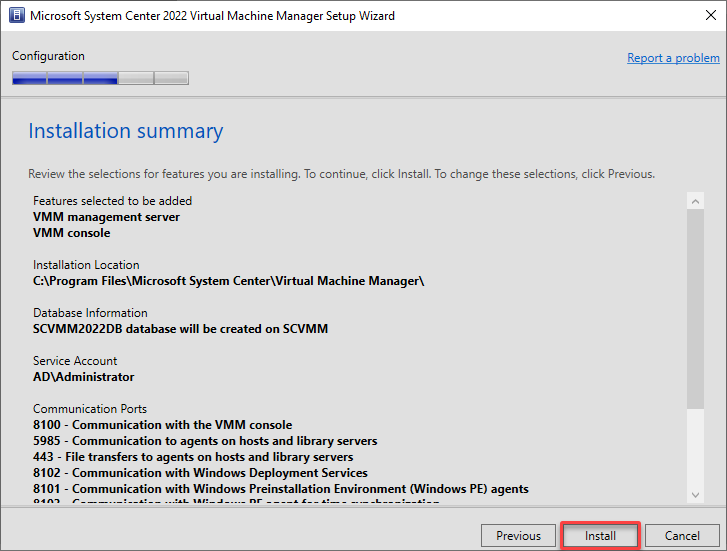
13. Verify the installation summary, and click Install.
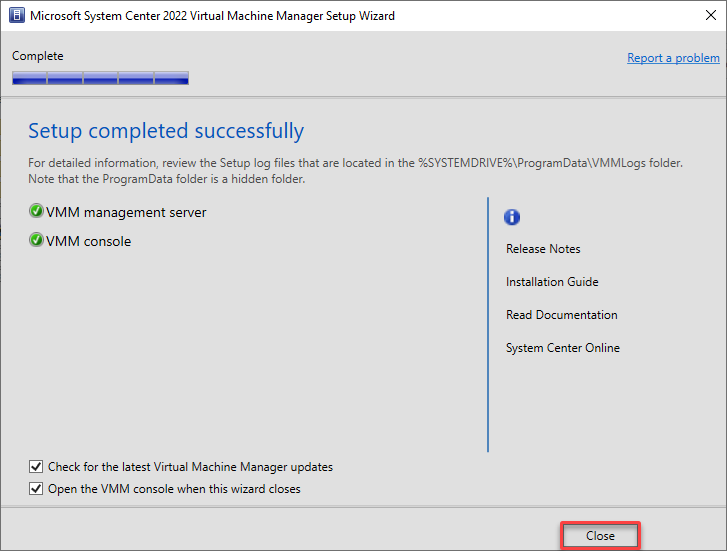
14. Once installed, click Close to exit the wizard.
Adding Virtualization Hosts
After completing the installation and initial configuration, you are almost ready to use SCVMM to manage your virtualization environment. But first, you need a virtualization host, a physical server, that runs a hypervisor and hosts VMs.
SCVMM allows you to centrally manage and administer these virtualization hosts, regardless of the underlying hypervisor technology, such as Hyper-V or VMware vSphere.
To add a virtualization host in the SCVMM, do the following:
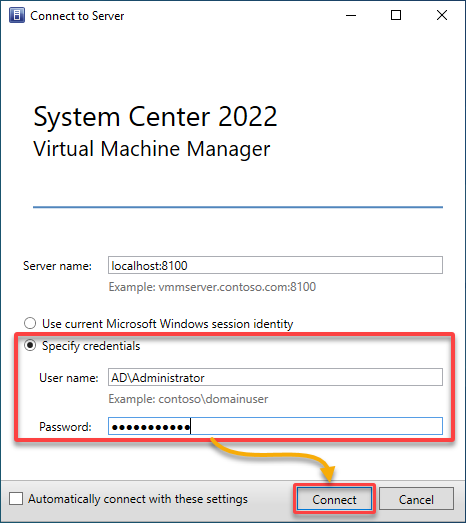
1. Launch SCVMM you installed on your Windows Server.
2. Next, provide your domain credentials to connect to your SCVMM server.
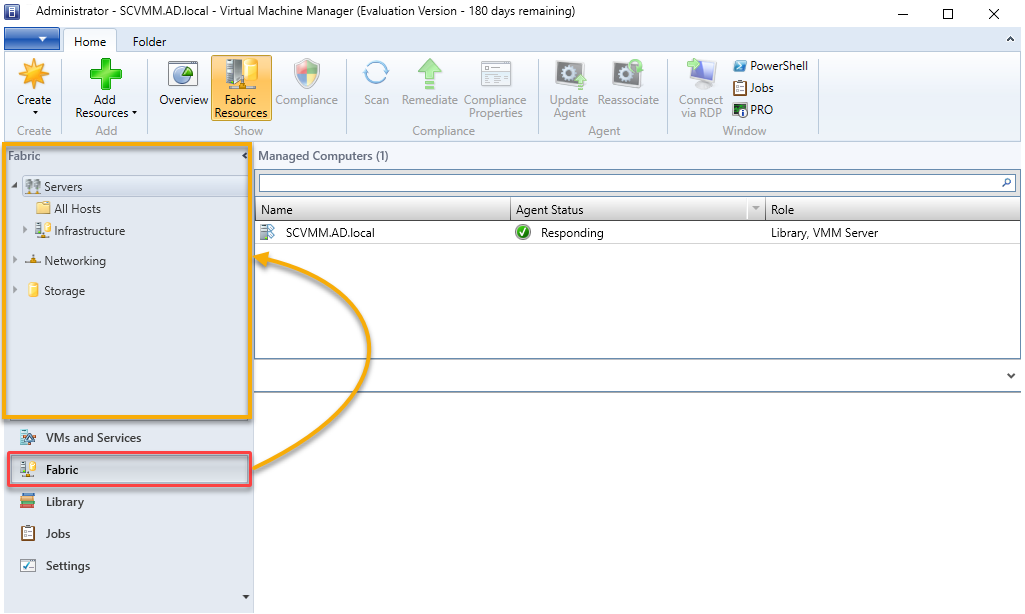
3. In the SCVMM console, navigate to Fabric (bottom-left), which opens the Fabric workspace. This workspace is where you can manage infrastructure elements, including virtualization hosts.
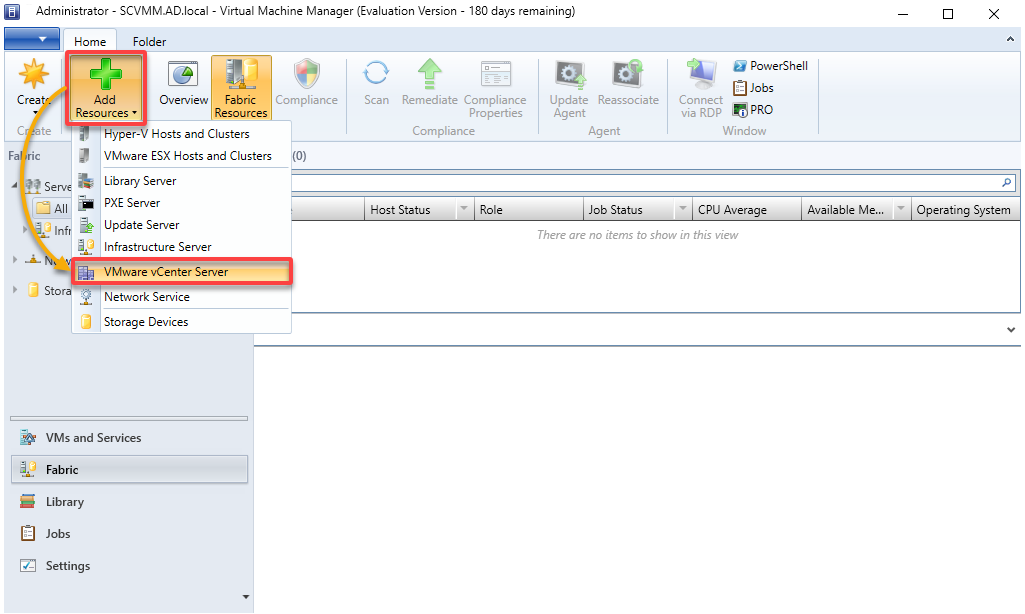
4. Now, click the Add Resources drop-down, and choose VMware vCenter Server to initiate adding a vCenter Server.
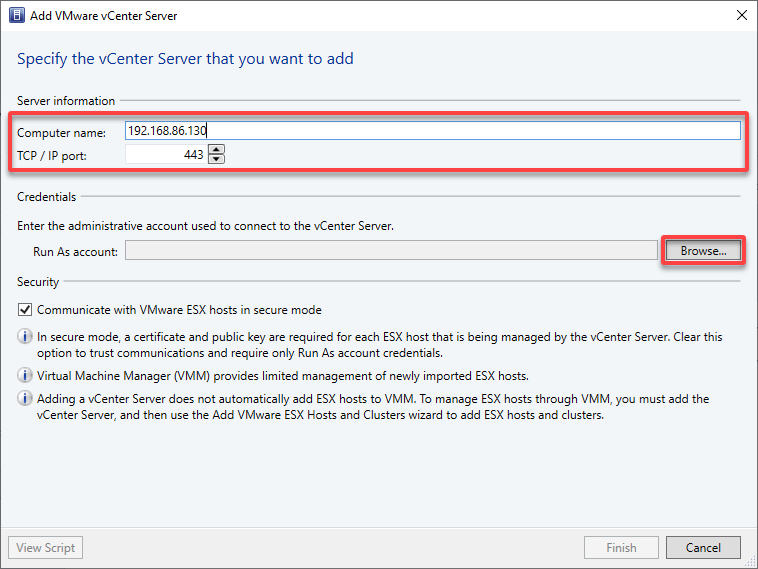
5. Specify the vCenter Server you wish to add as follows:
- Computer name – Specify the name (IP address) of your vCenter Server.
- TCP / IP port – Add the port needed to connect to the vCenter server (443 by default).
- Run As account – Click Browse to choose the administrative account you used to connect to the vCenter Server.
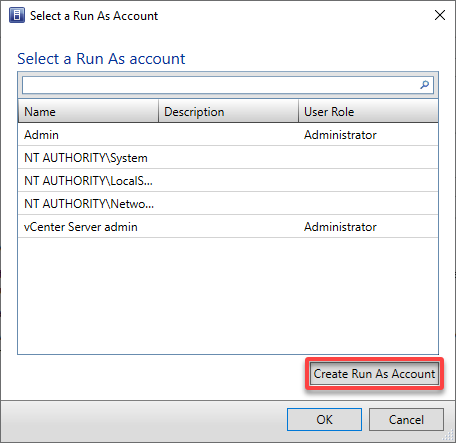
6. Select an existing user from the list on the Select a Run As Account window or click Create Run As Account to create a new one.
But in this example, click Create Run As Account to create a new user account.
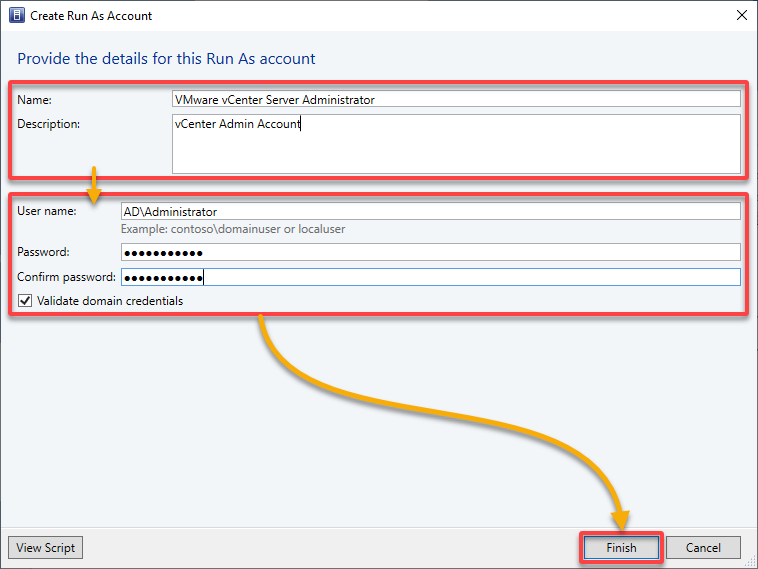
7. Provide a Name and Description for the Run As account, authenticate with your vSphere credentials, and click Finish to save the entry.
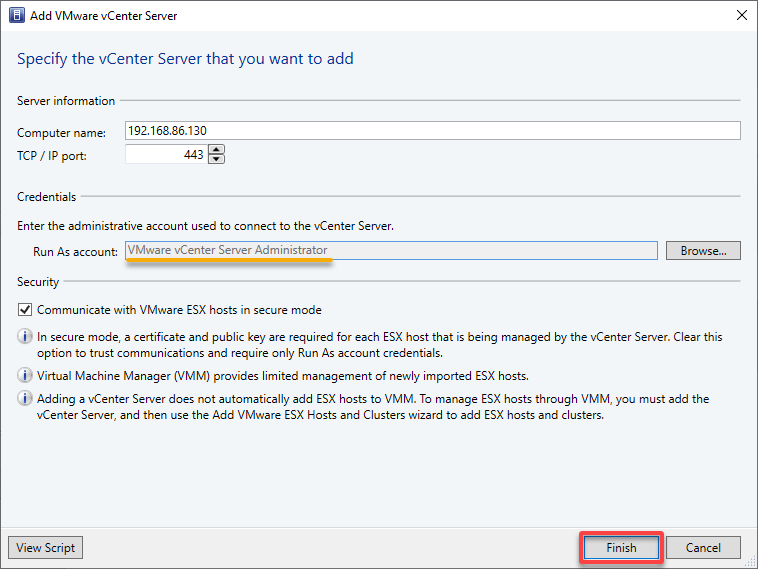
8. With the Run As account created, click Finish to add a vCenter Server.
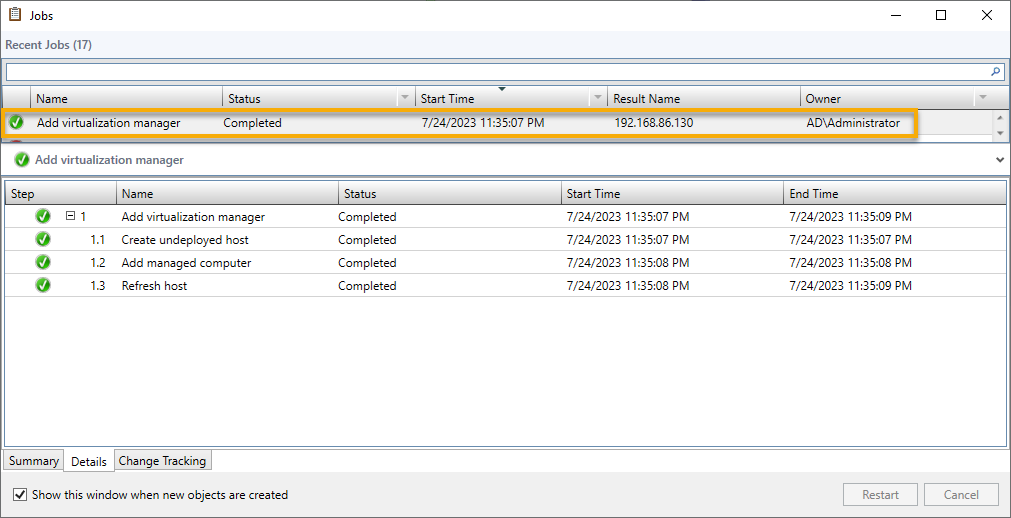
9. Navigate to the Jobs tab, as shown below, to view all jobs.
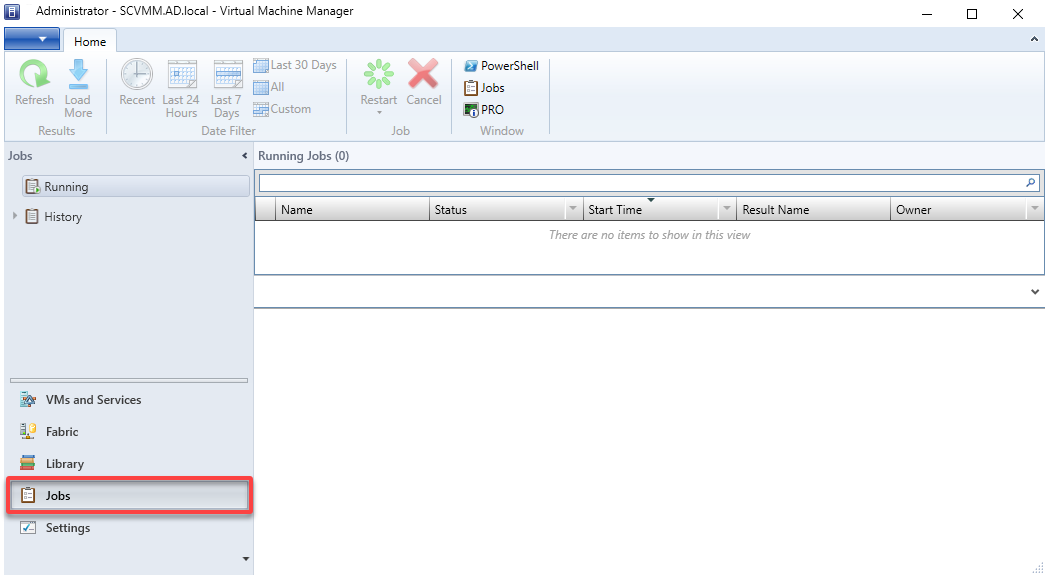
Below, you can see the Add virtualization manager job has been completed, which indicates you have successfully added a vCenter Server.
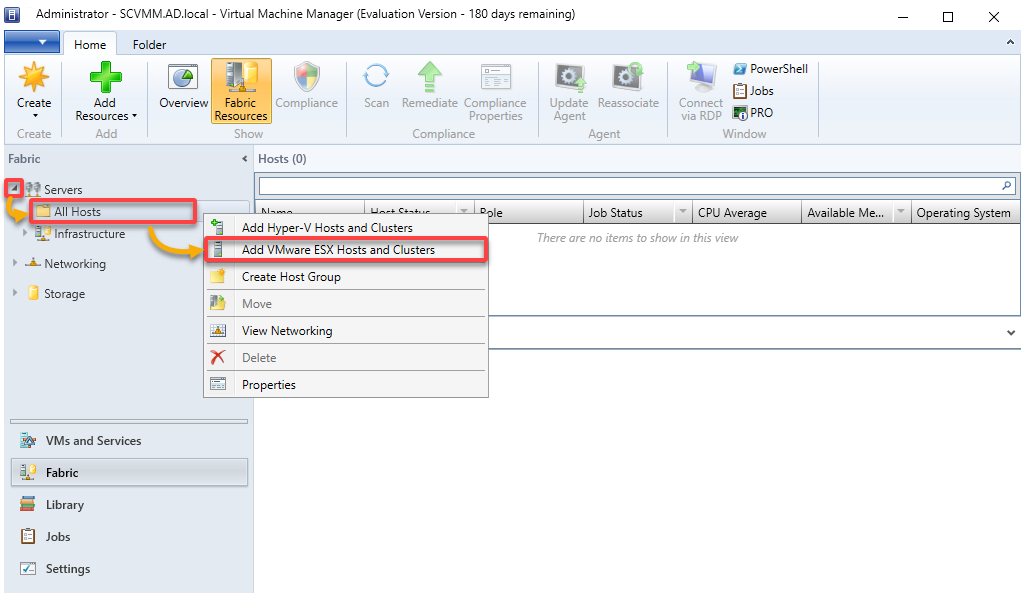
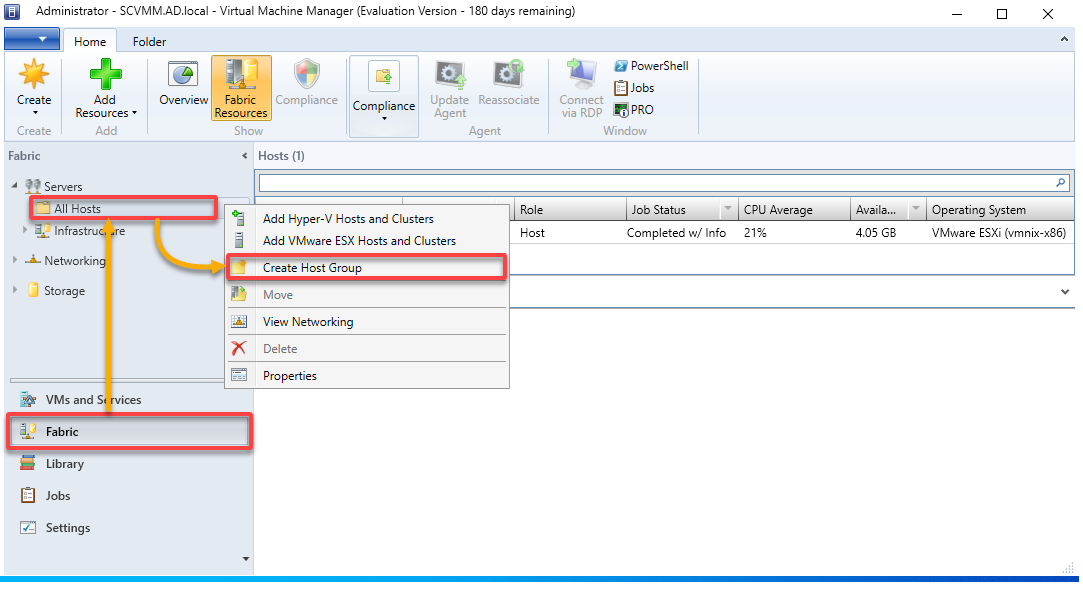
10. Under Fabric, expand Servers, right-click All Hosts, and select Add VMware ESX Hosts and Clusters. A wizard opens where you can add new ESXi host resources (step 11).
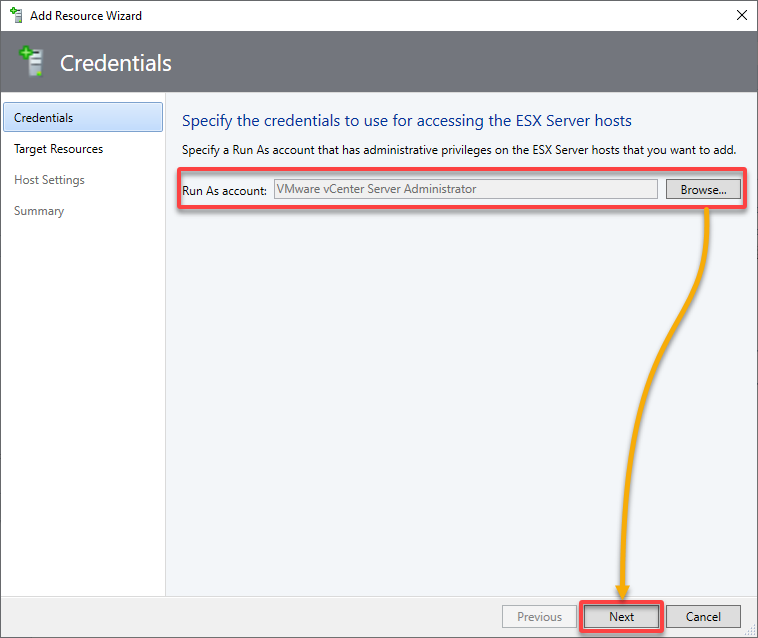
11. Select the credentials for your vCenter Server on the Add Resource Wizard, and click Next.
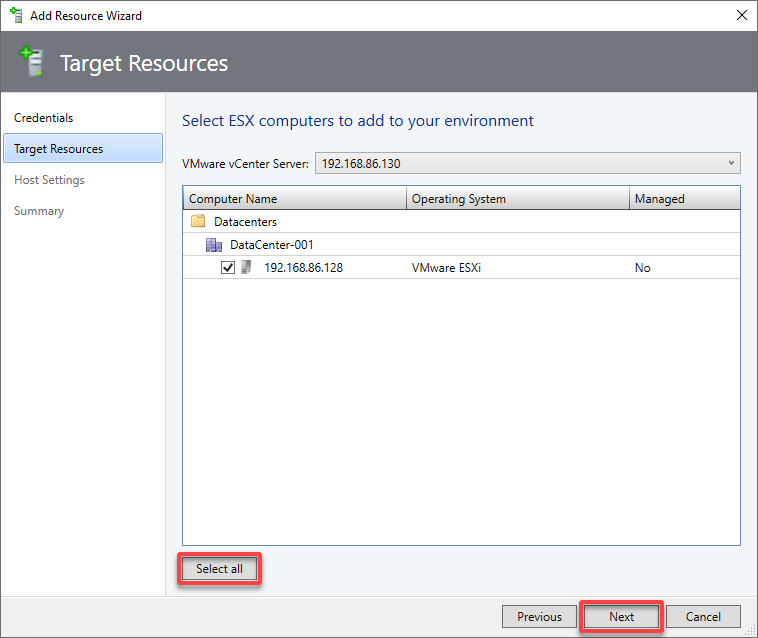
12. In the Target Resources page, click the Select all button to pull in all the hosts in the cluster, and click Next.
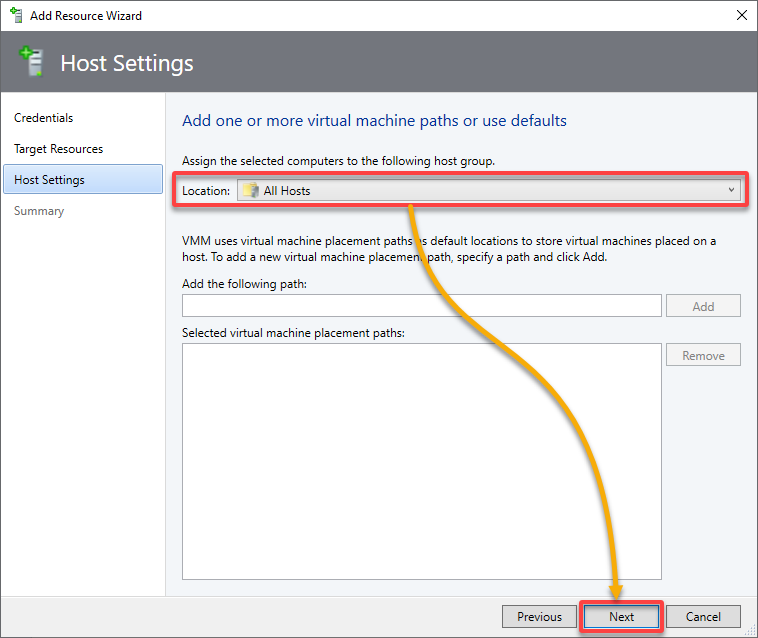
13. Select the location to import the VMware ESXi hosts, and click Next.
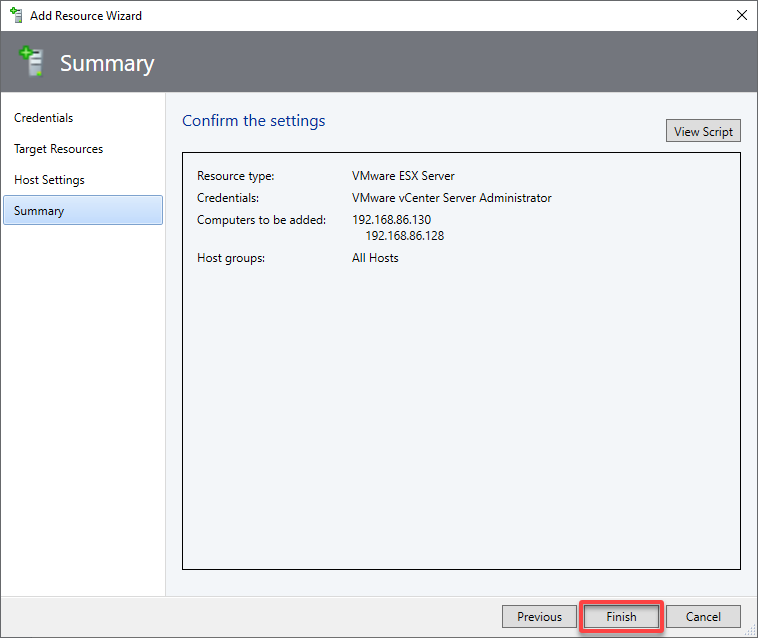
14. Review your selected settings, and click Finish to add ESXi host resources to SCVMM.
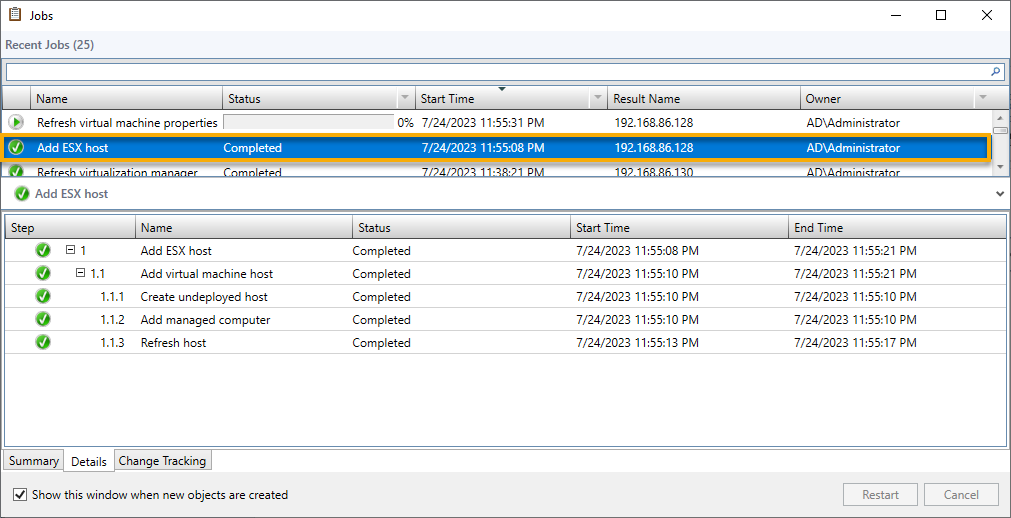
The Jobs window shows the job to add the ESXi hosts to SCVMM completed.
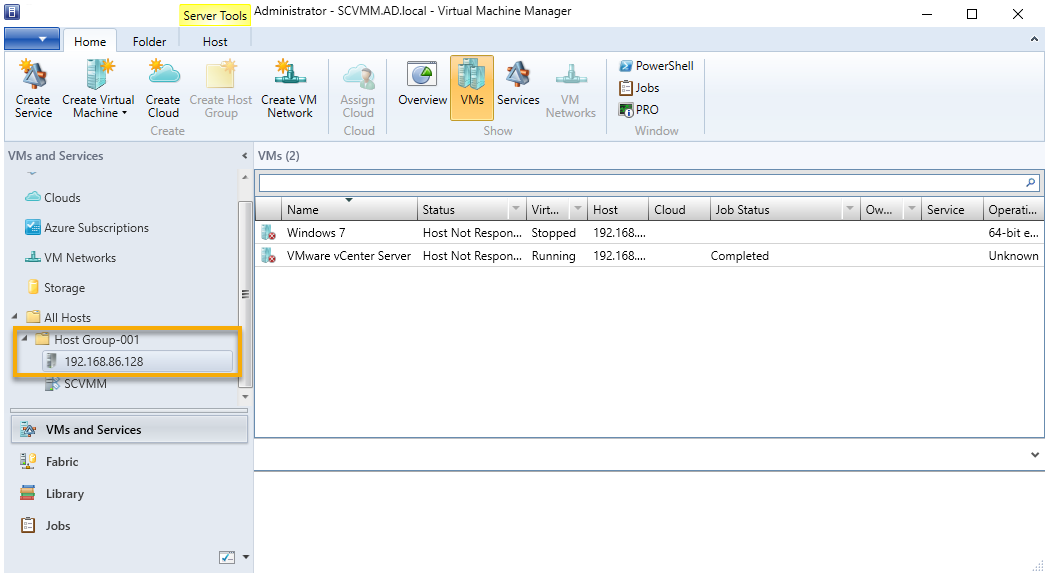
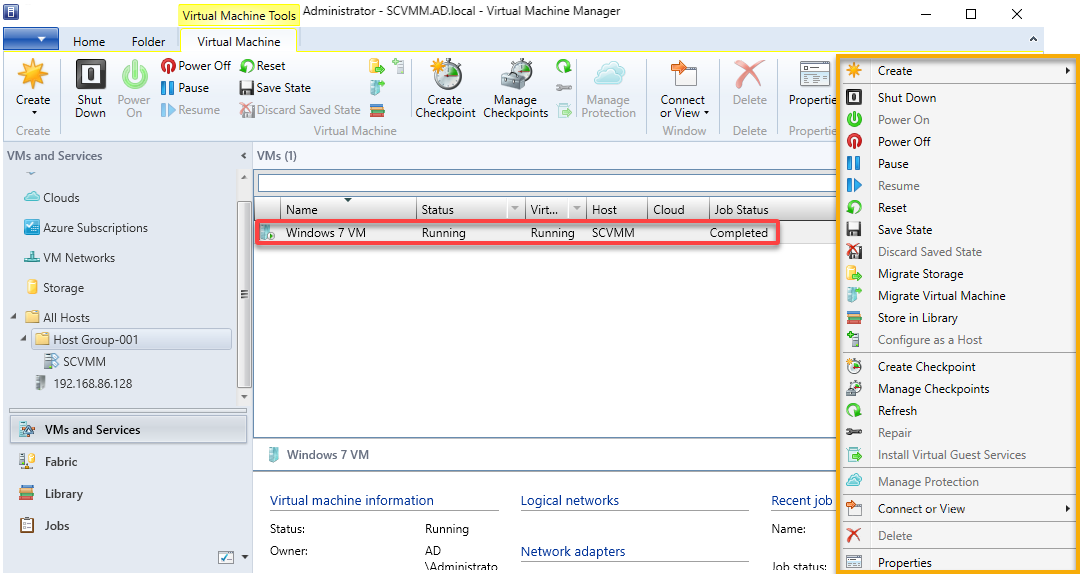
15. Ultimately, navigate to VMs and Services, and right-click on one of the VMs listed to view the available options.

Creating and Configuring Host Groups
As your virtualization hosts are now managed by SCVMM 2022, you can start creating and managing VMs through the SCVMM console. But first, you need a way to organize and manage virtualization hosts.
To create a host group, a local container, within SCVMM, follow these steps:
1. Navigate to Fabric workspace, right-click the All Hosts folder, and choose Create Host Group to create a new host group.
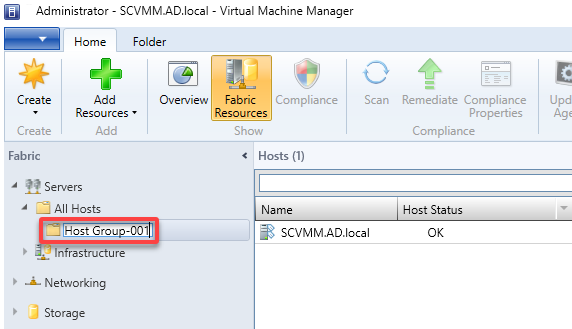
2. Next, provide a descriptive host group name (i.e., Host Group-001).
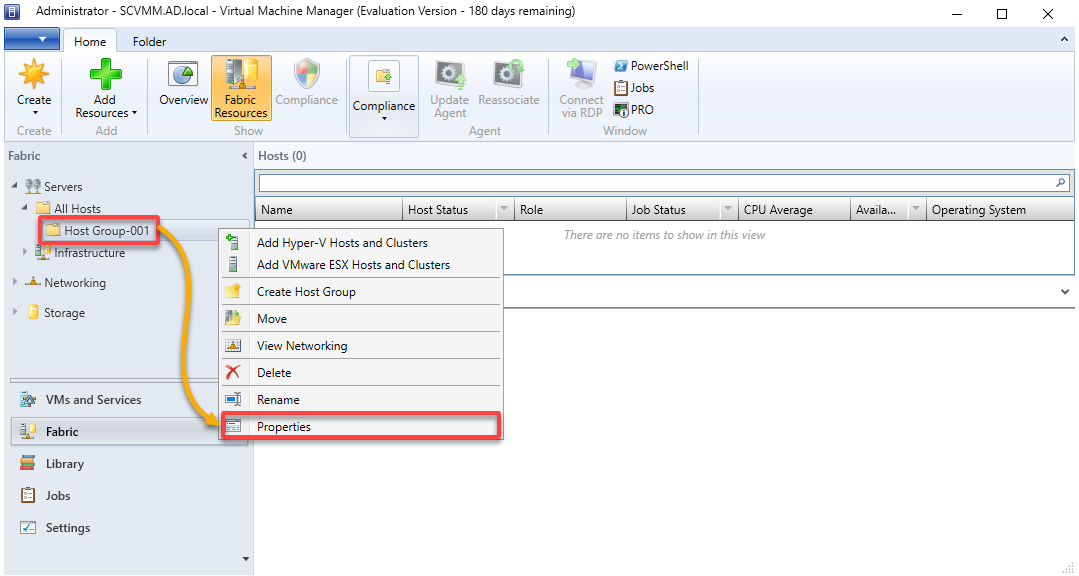
3. Right click on your newly-created host group, and select Properties to access its properties in a new window.
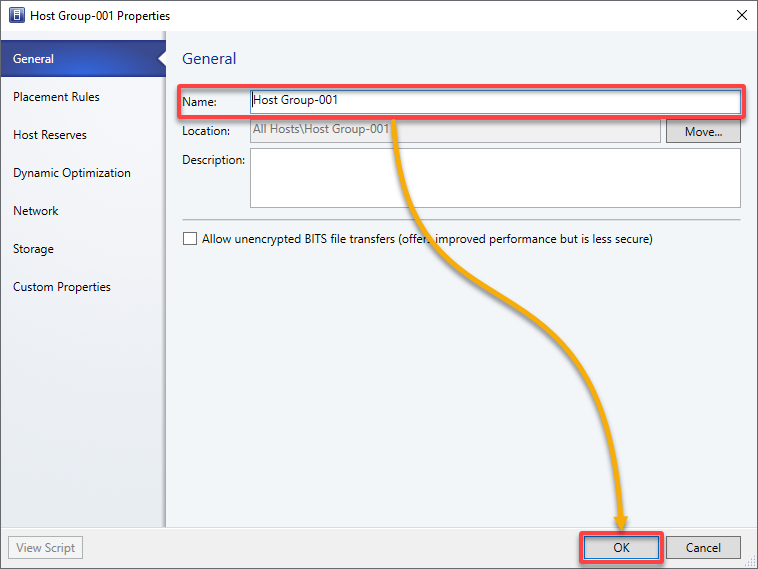
4. Now, change the Name, Location, and Description of your host group as you desire, and click OK.
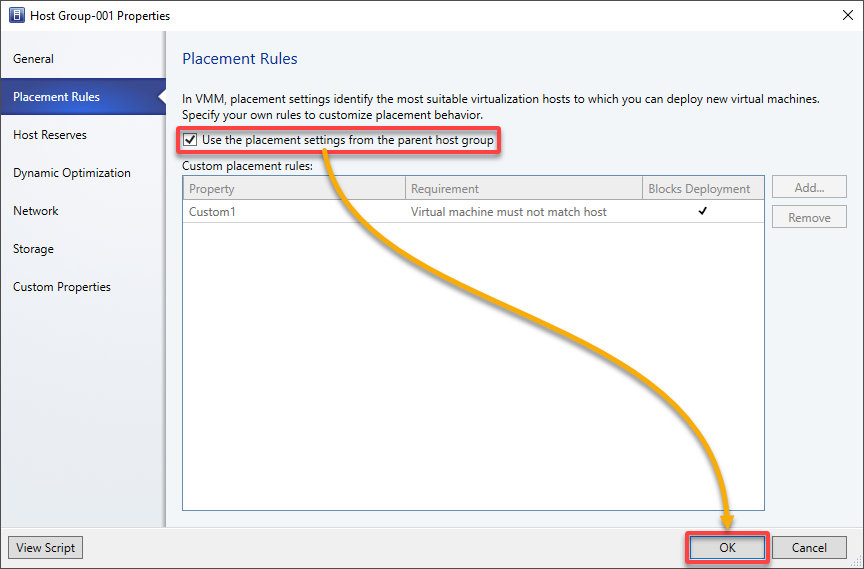
5. Leave the placement rules settings as default, where a host group uses the placement settings from the parent host group, and click OK.
💡 Optionally, configure the placement settings for the Host Group, which define the preferred host ratings, load-balancing settings, and availability options.
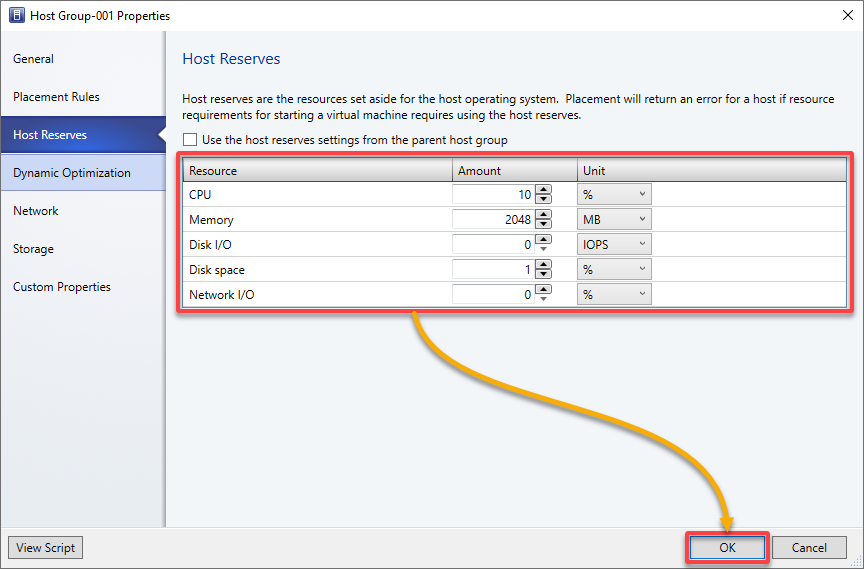
6. Under Host Reserves, configure the host reserve values for the CPU, Memory, Disk I/O, Disk space, and Network I/O, and click OK.
Host reserve settings let you specify the resources VMM sets aside for the host O/S to use.
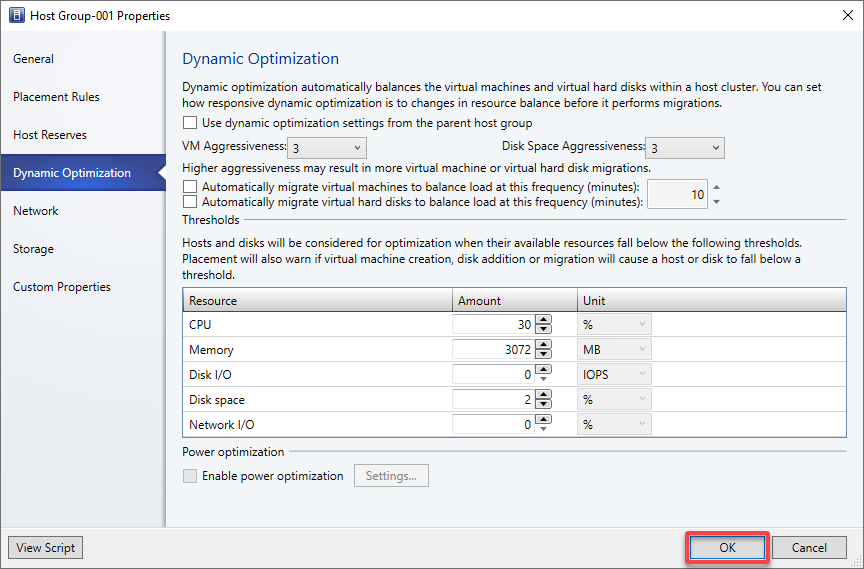
7. Configure dynamic optimization and power optimization settings, and click OK.
Dynamic optimization balances the VM’s load within a host cluster, while Power optimization enables VMM to evacuate hosts of a balanced cluster and turn them off to save power.
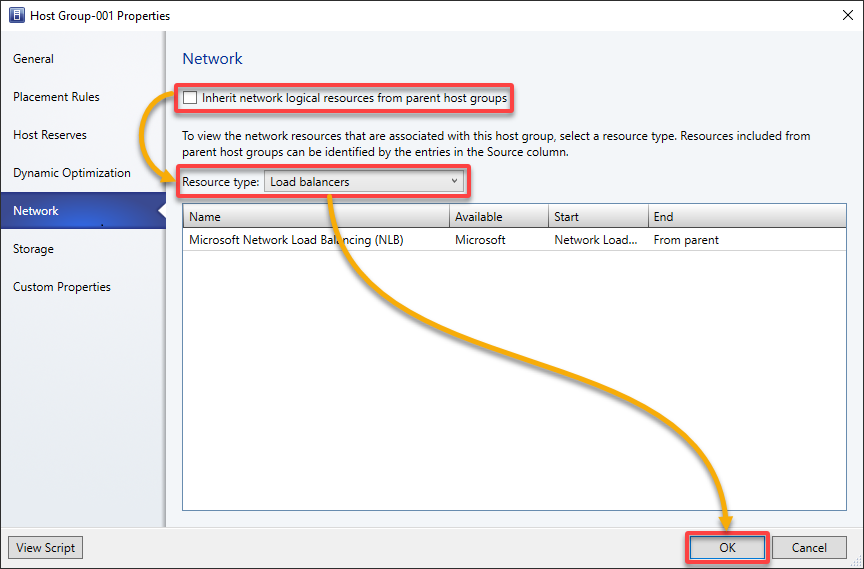
8. Configure the network settings as follows:
- Tick the box to Inherit network local resources from parent host groups.
- Resource type – Select a resource type from the drop-down to view the network resources associated with your selected host group.
Once configured, click OK to proceed.
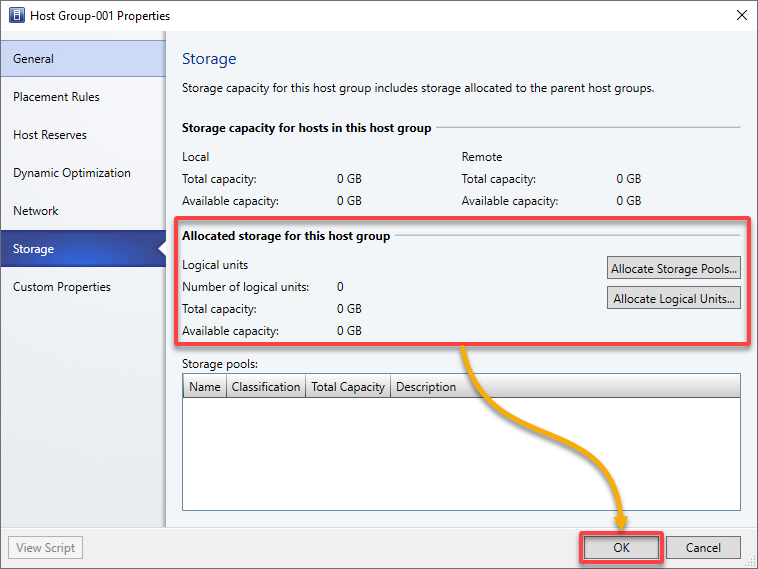
9. View and allocate storage to your host group, and click OK.
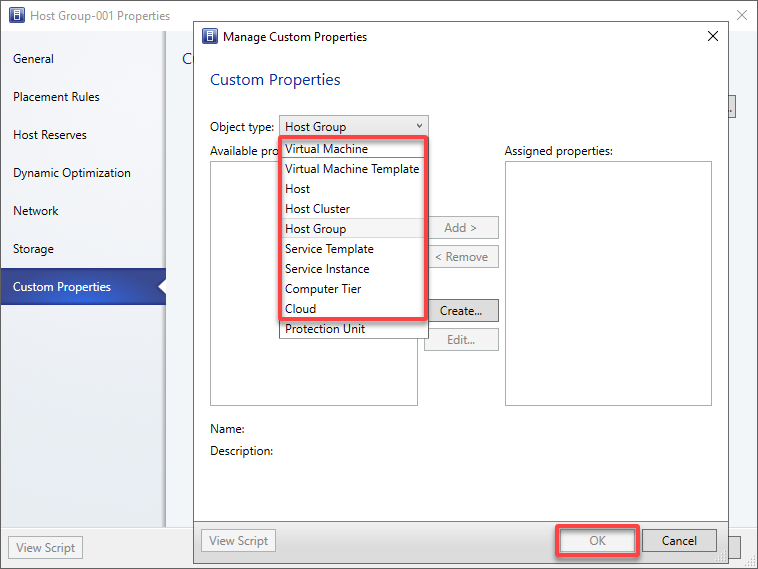
10. Manage custom properties for Virtual Machine, Virtual Machine Template, Host, Host Cluster, Host Group, Service Template, Service Instance, Computer Tier, and Cloud, and click OK.
11. Finally, click OK to save the changes.

Assigning a Host to an Existing Host Group
With a host group created in SCVMM, you must assign a host to the host group, so you can quickly manage and apply common settings to multiple hosts simultaneously.
This setup helps streamline your virtualized infrastructure management and simplifies configuring networking, storage, and other host-specific settings across a group of hosts.
To assign a host to your host group:
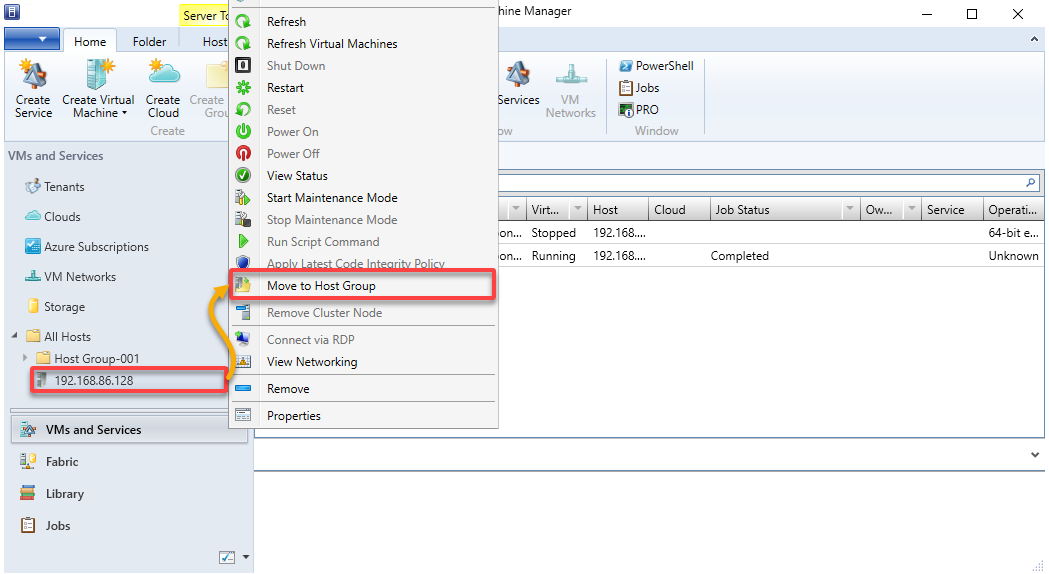
Right click on the host to assign to your host group and select Move to Host Group to initiate assigning the host.
Now, choose the target host group from the Parent host group drop-down list, and click OK to confirm.
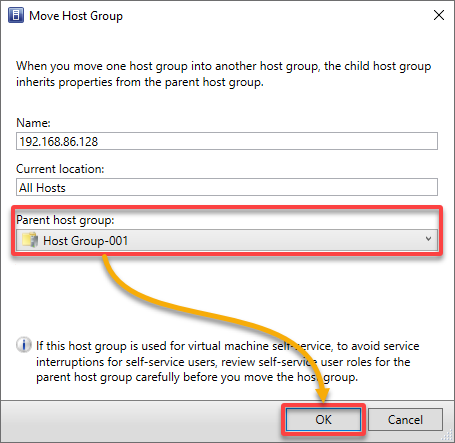
After confirming the move, the host is assigned to the new host group. The host is listed under the corresponding host group, as shown below.
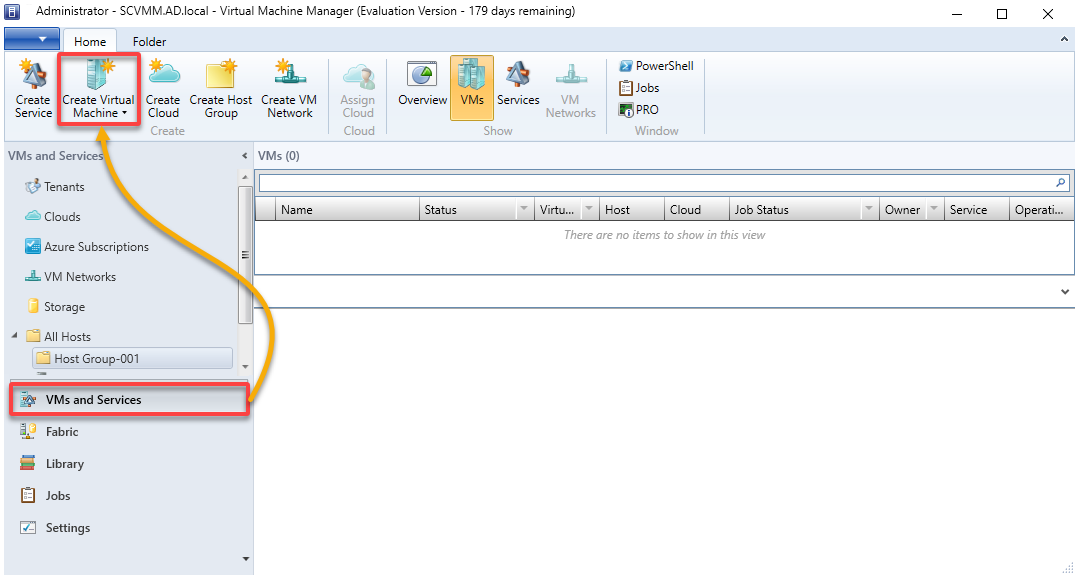
Creating and Deploying VMs in SCVMM
In SCVMM, VMs form the fundamental units of virtualized infrastructure you can create, manage, and operate. With SCVMM’s cross-platform management capabilities, you can create VMs for physical-to-virtual (P2V) and virtual-to-virtual (V2V) migrations.
To create a VM in SCVMM, follow these steps:
1. Navigate to VMs and Services (left pane), and click Create Virtual Machine in the toolbar to initiate creating a new VM.
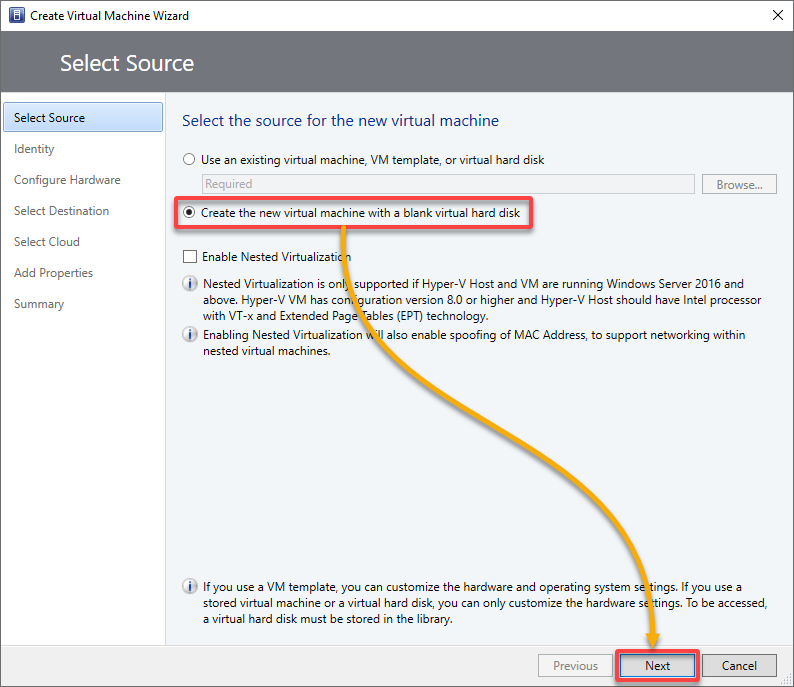
2. In the wizard below, choose the Create the new virtual machine with a blank virtual hard disk option since you are creating your first VM, and click Next.
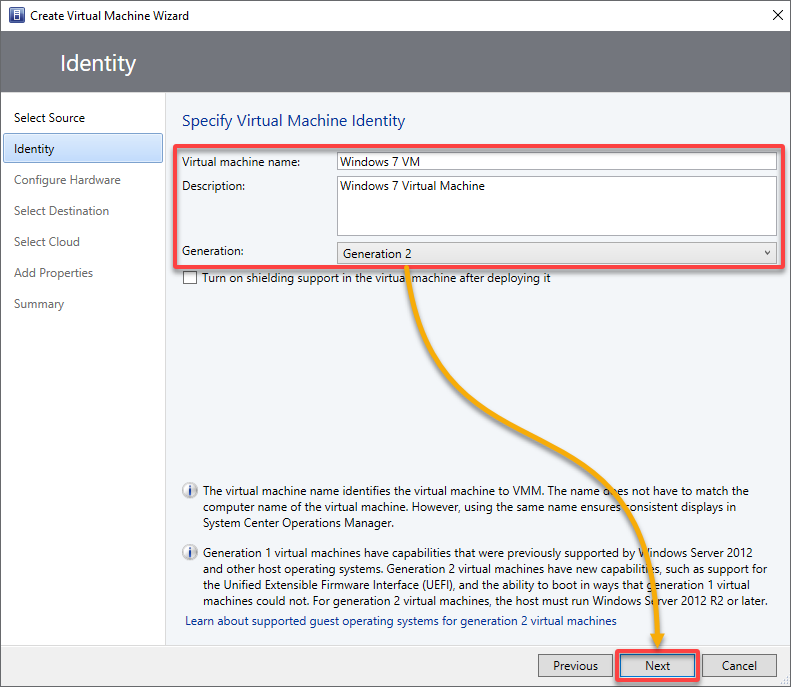
3. Next, configure the VM identity as follows:
- Virtual machine name – Specify a unique name for your VM.
- Description (optional) – Distinguishes your VMs from one another.
- Generation – Choose one below depending on your virtualization environment’s specific needs and the guest OS’s compatibility requirements.
| Generation 1 | VMs are better suited for legacy or less demanding workloads. |
|---|---|
| Generation 2 | VMs offer more modern features and are better equipped to handle newer OSes and security requirements. |
Once configured, click Next to proceed.
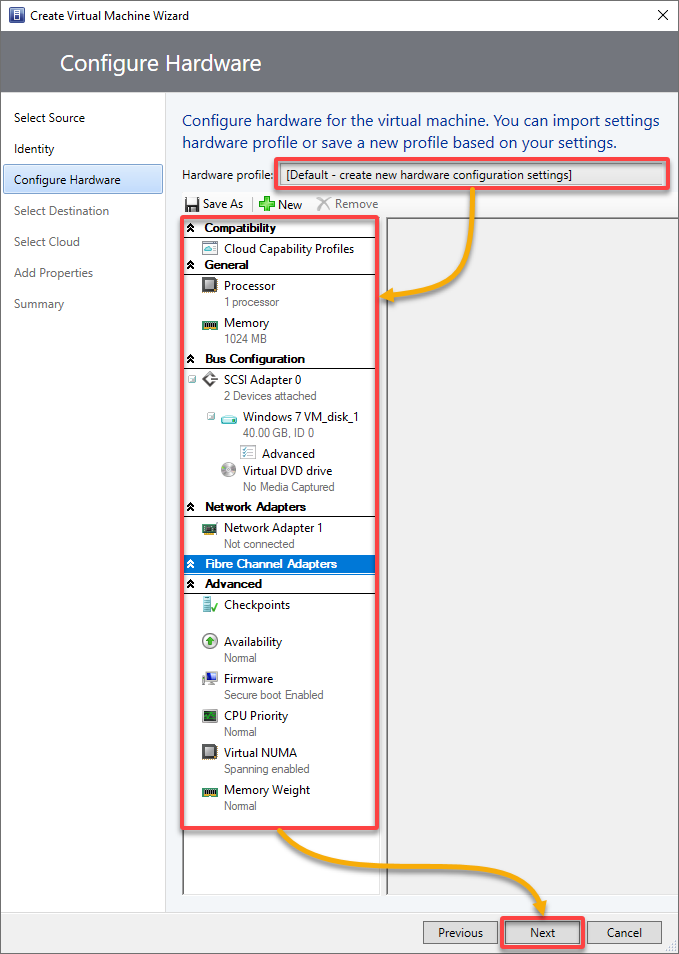
4. Now, select the profile from the Hardware profile list or configure the hardware settings manually, and click Next.
The hardware settings differ depending on your chosen Generation machine (Generation 1 or Generation 2).
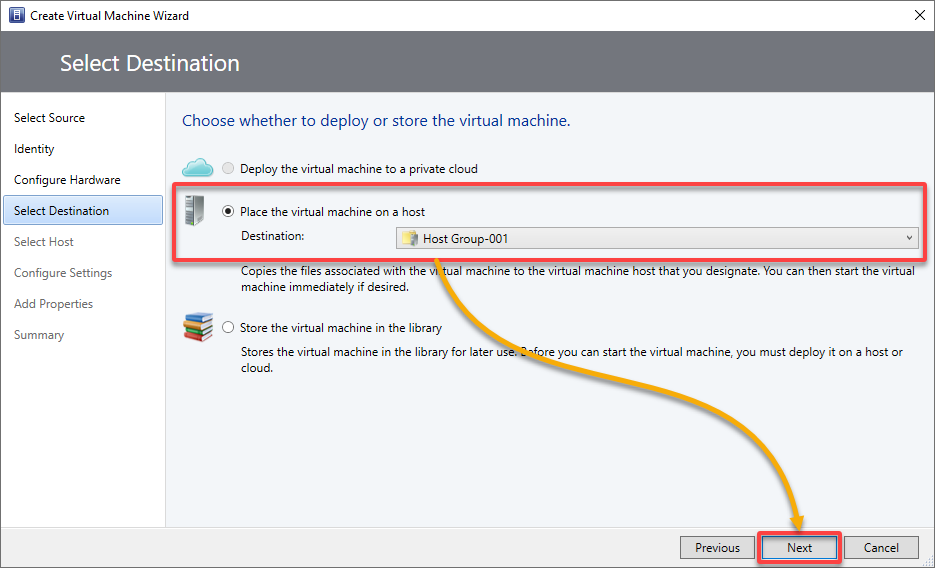
5. In the Select Destination page, specify how the VM should be deployed, and click Next.
This tutorial’s choice is to deploy the VM on a specified destination host.
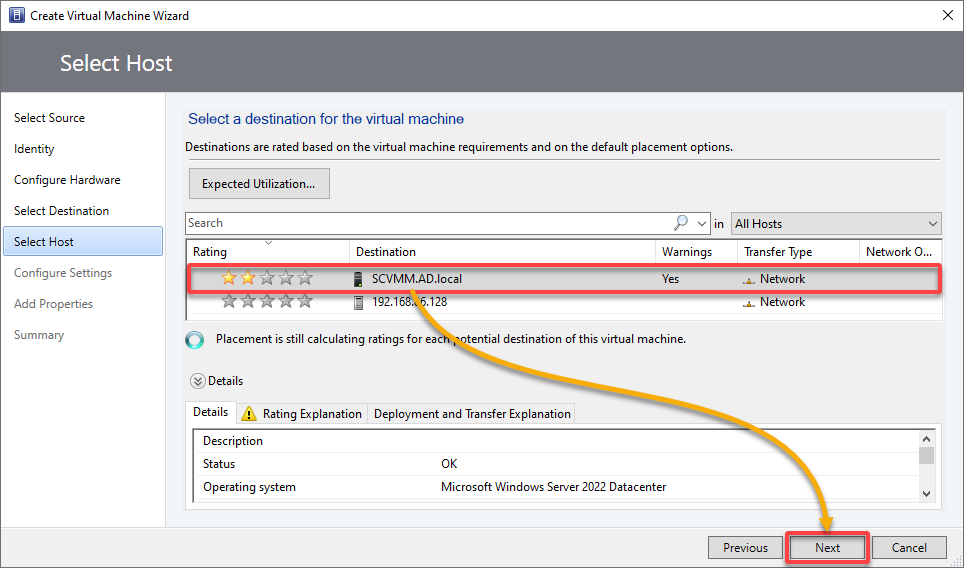
6. View the ratings, choose the host to deploy the VM, and click Next.
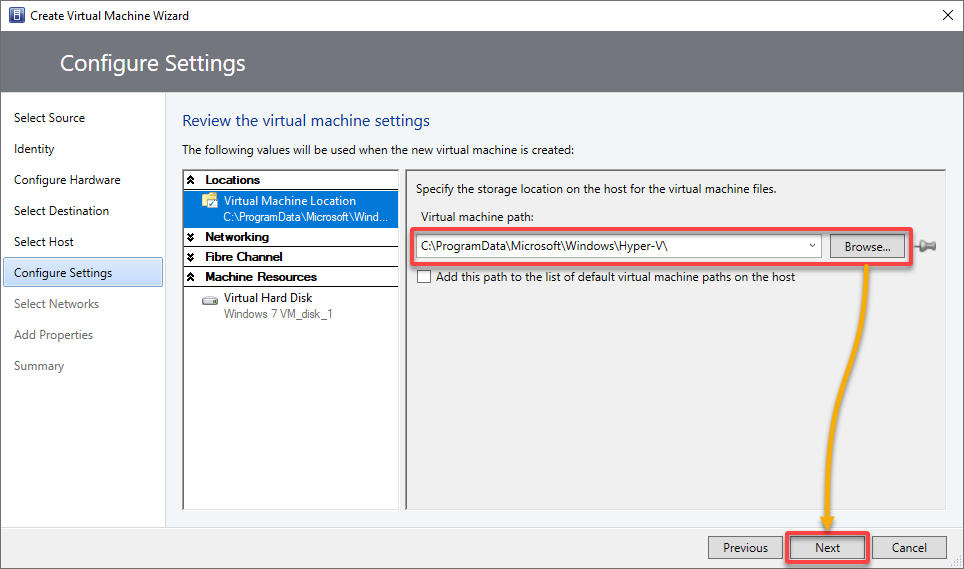
7. Next, review the VM settings, accept the default VM path on the host or specify a different location, and click Next.
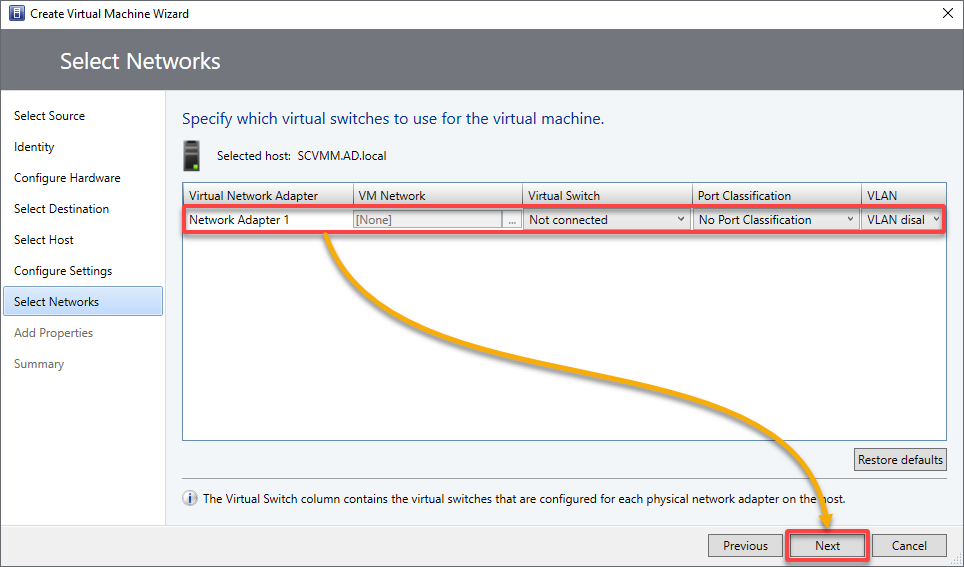
8. In Select Networks, select the network adapter that appears, and click Next.
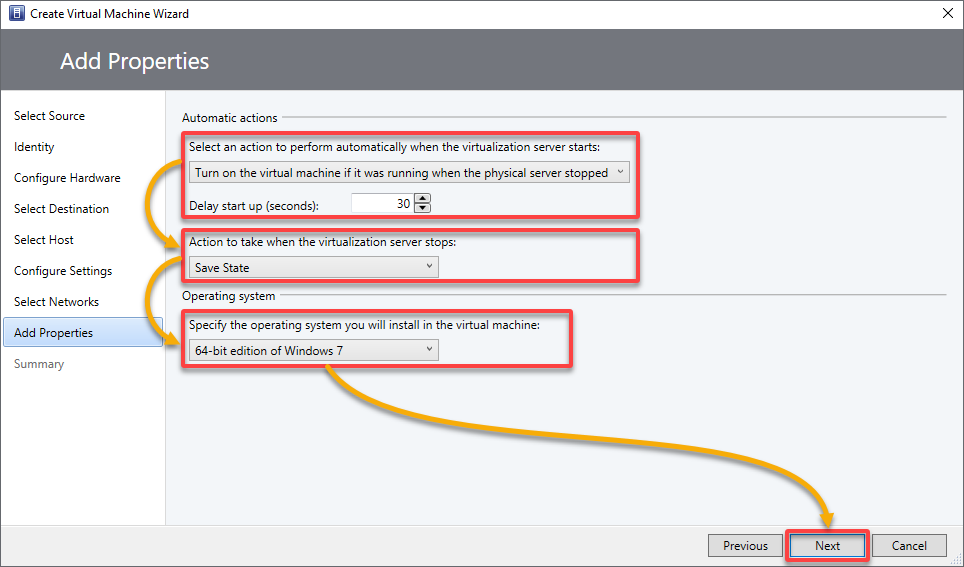
9. Configure the Automatic actions to take when the host starts or stops and the OS to install on your VM, and click Next.
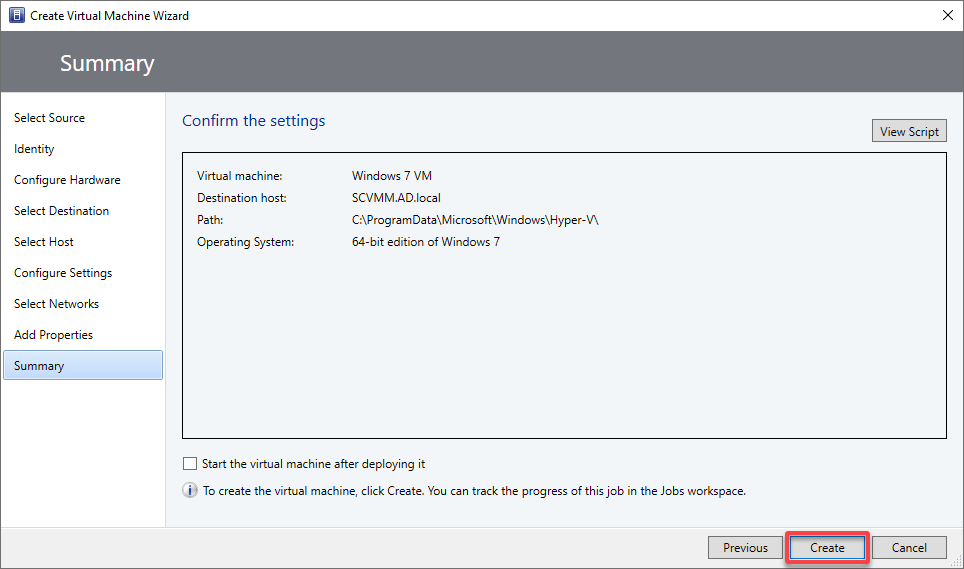
10. Lastly, review your selected settings and click Create to finalize creating your VM.
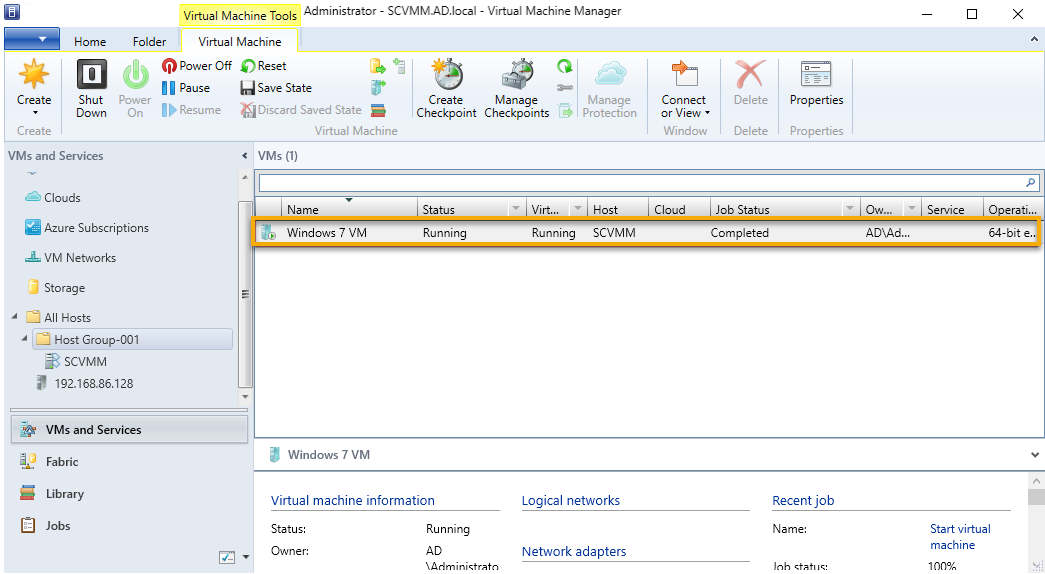
Below, you can see your newly-created VM in the list within a host group.
Optionally, you can right-click your VM, as shown below, and modify its configuration and properties as necessary.
💡 Note that some changes require you to restart your VM for the changes to take effect. Additionally, always ensure that you have appropriate permissions and resources and understand the impact of your changes to VM properties.
Creating a Logical Network
Your VM is running but must be connected to your physical network infrastructure. Worry not, though! SCVMM provides tools to create, manage, and configure virtual networks efficiently.
You will connect your VM to your physical network infrastructure by creating a logical network, a physical network in your datacenter. Logical networks provide an abstraction layer allowing you to define and manage VM networking for VMs independently of the underlying physical infrastructure.
To create a logical network, follow the below steps:
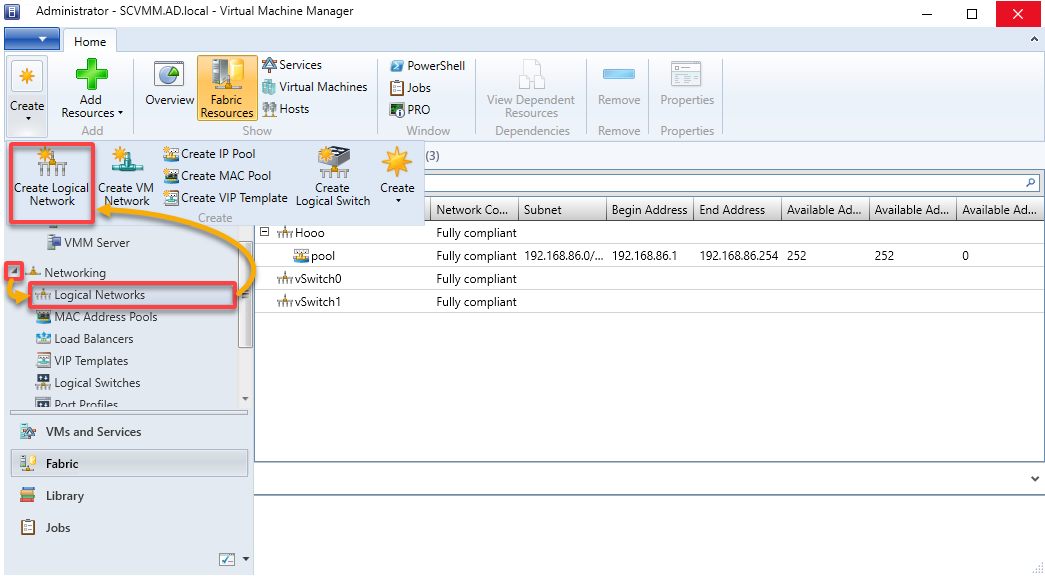
1. In the Fabric workspace, expand Networking, select Logical Networks, and click Create Logical Network to configure your new logical network.
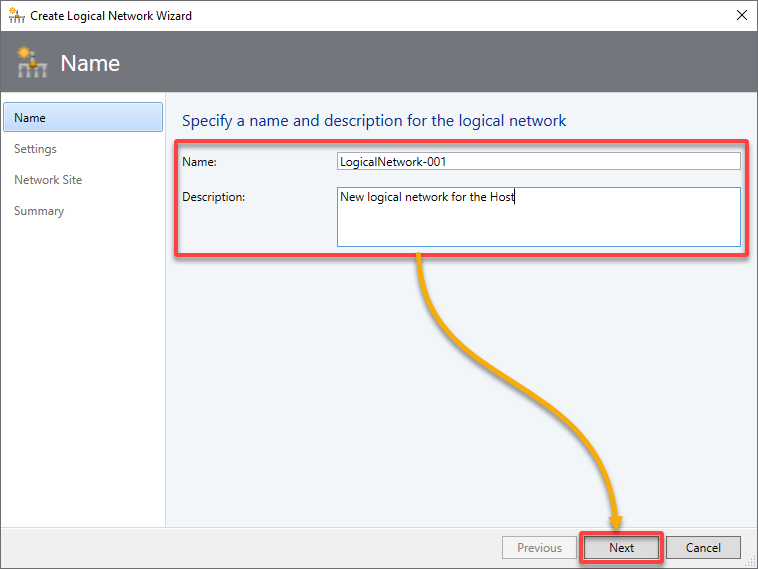
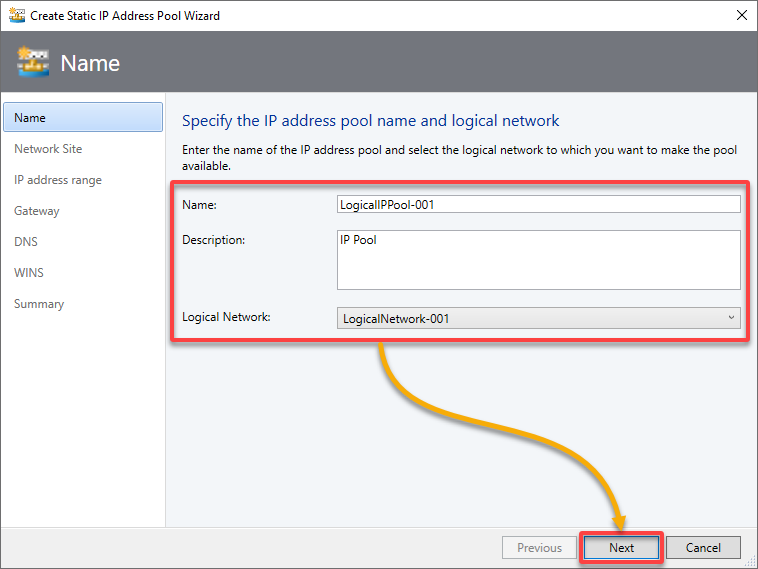
2. Next, provide a descriptive Name and Description for your logical network, and click Next.
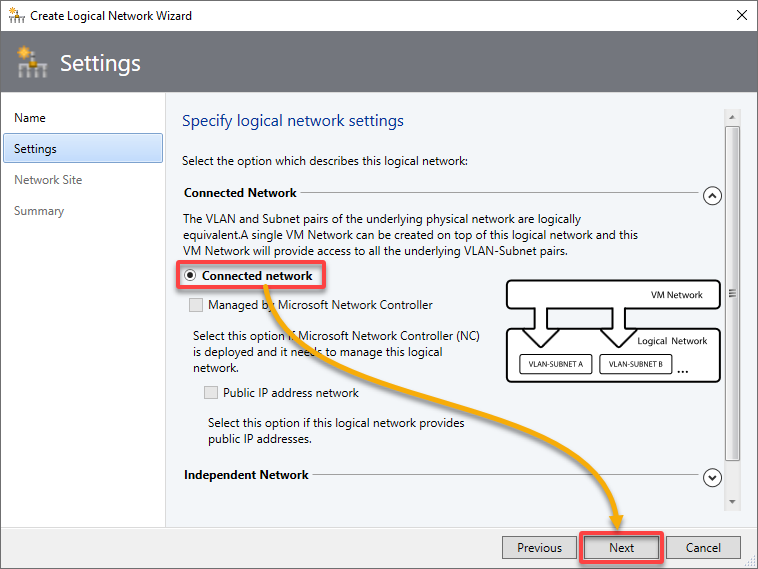
3. Select the Connected network option to link your logical network to your physical network infrastructure, and click Next.
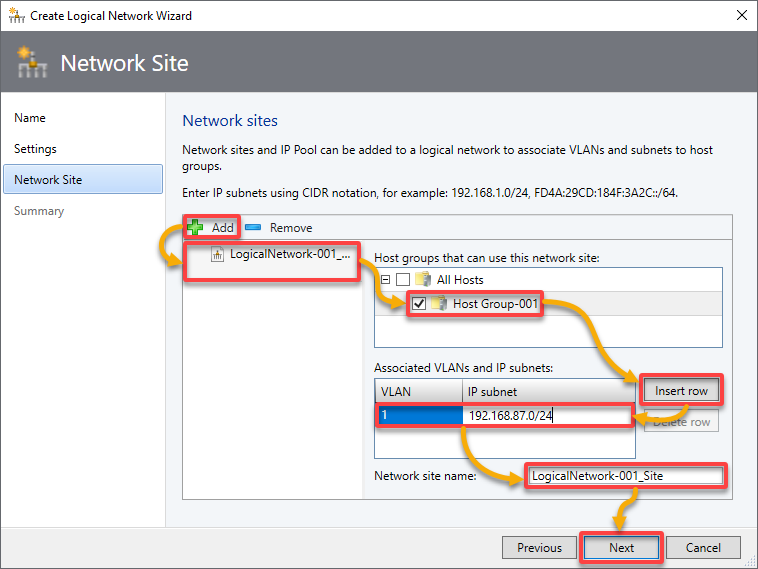
4. On the Network Site page, add a network site to your logical network as follows:
- Click Add, select your logical network (LogicalNetwork-001), and select your host group (Host Group-001) from the list.
- Click Insert row, and enter the VLANs and IP subnets to assign to the logical network definition.
- Name your logical network, and click Next to continue.
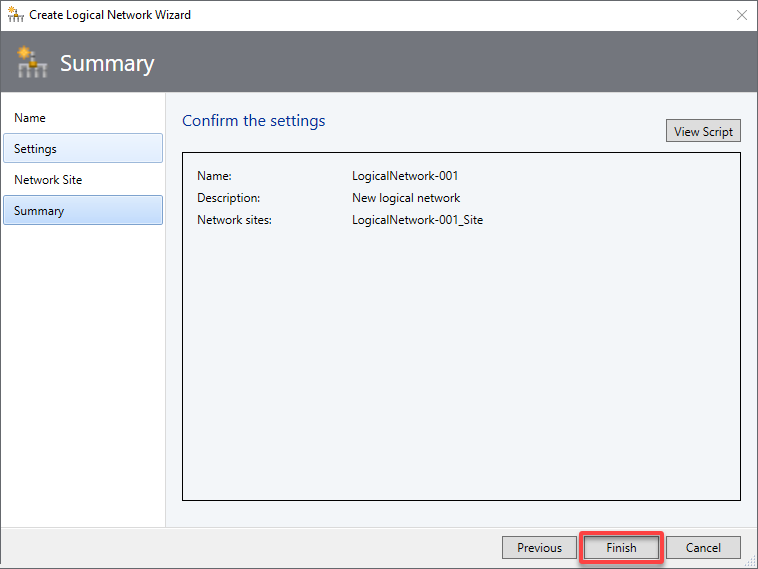
5. Review your selected settings, and click Next to create your logical network.
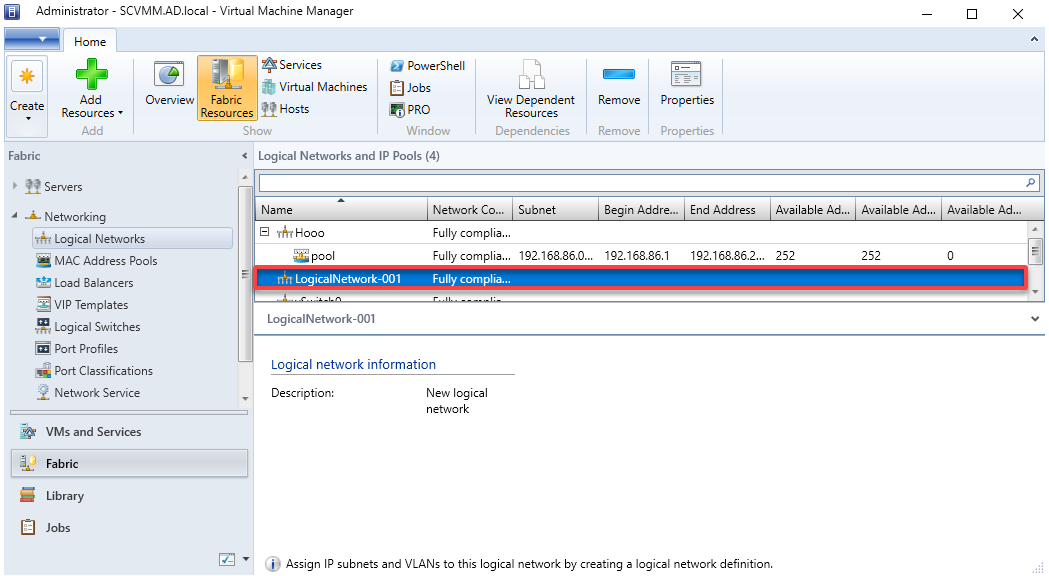
6. Finally, select your newly-created logical network to view its network information and verify the correct settings.
Creating IP Address Pools
Unfortunately, IP address conflict is a thing, so you must ensure IP address assignments for your VMs are in place. How? You must create IP address pools to automatically assign IP addresses to your VMs for quicker network management.
SCVMM allows you to define IP address pools for different logical networks to ensure efficient IP address utilization.
To create IP address pools in SCVMM:
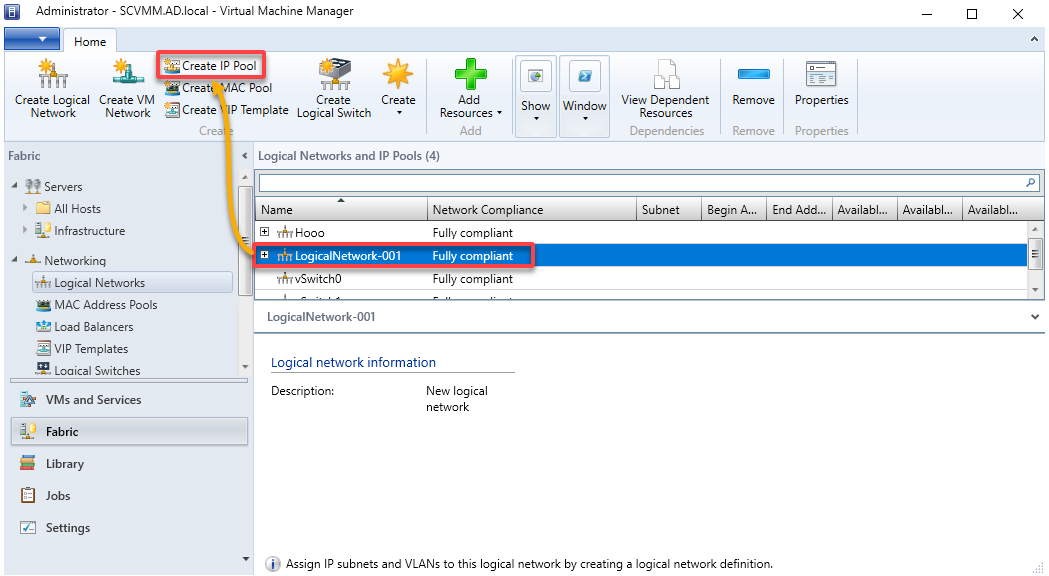
1. In the Logical Networks table, select your logical network (LogicalNetwork-001) where you wish to create the IP pool and click Create IP Pool.
A wizard appears where you will configure your new IP pool (step three).
2. In the wizard below, specify a Name and Description (optional) for the new IP address pool, select your Logical Network, and click Next.
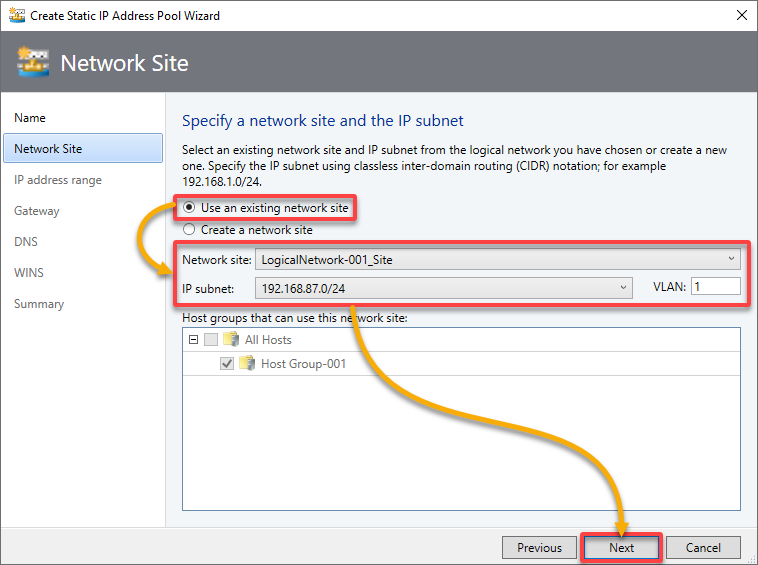
3. Now, in Network Site, choose to Use an existing network site, select the IP subnet (or create a new site) from which to create the pool, and click Next.
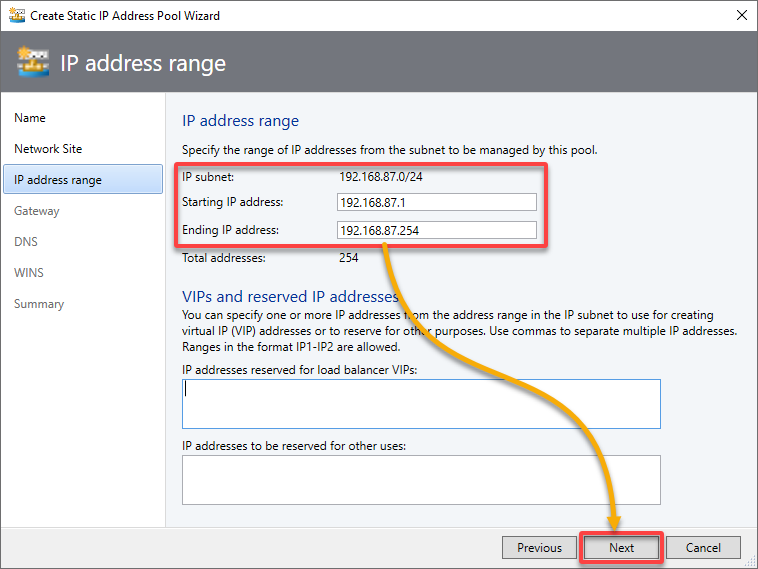
4. For the IP address range, provide the Starting and Ending IP address for the IP pool (which must be contained within the subnet), and click Next.
💡 Optionally, specify the IP address range you want to reserve for VIPs under the VIPs and reserved IP addresses section.
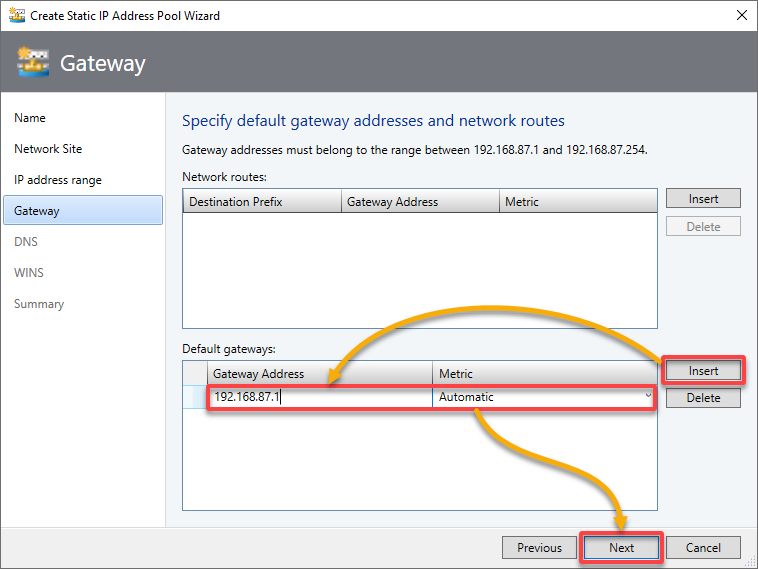
5. On the Gateway page, click Insert, specify one or more default gateways and the metric, and click Next.
The default gateway address must be in the same subnet range as the IP address pool but does need to be part of the pool.
6. For the DNS settings, Insert specific DNS-related information, and click Next.
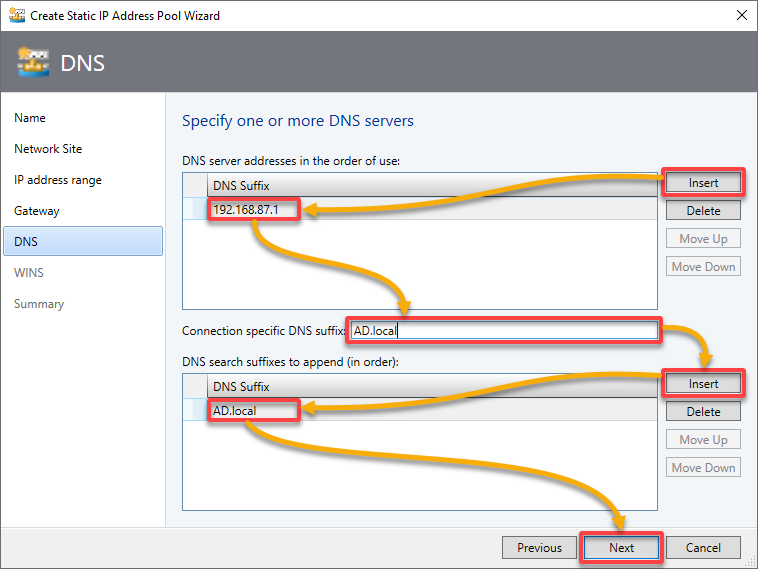
7. Skip specifying a Windows Internet Name Service (WINS) server, and click Next to continue since you will not need one in this tutorial.

8. Review your selected settings, and click Finish

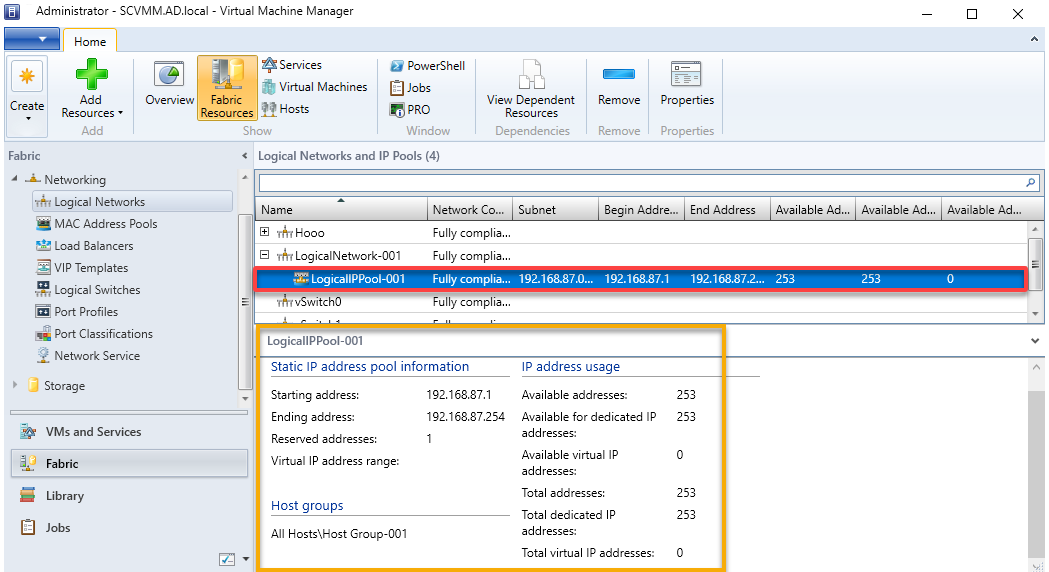
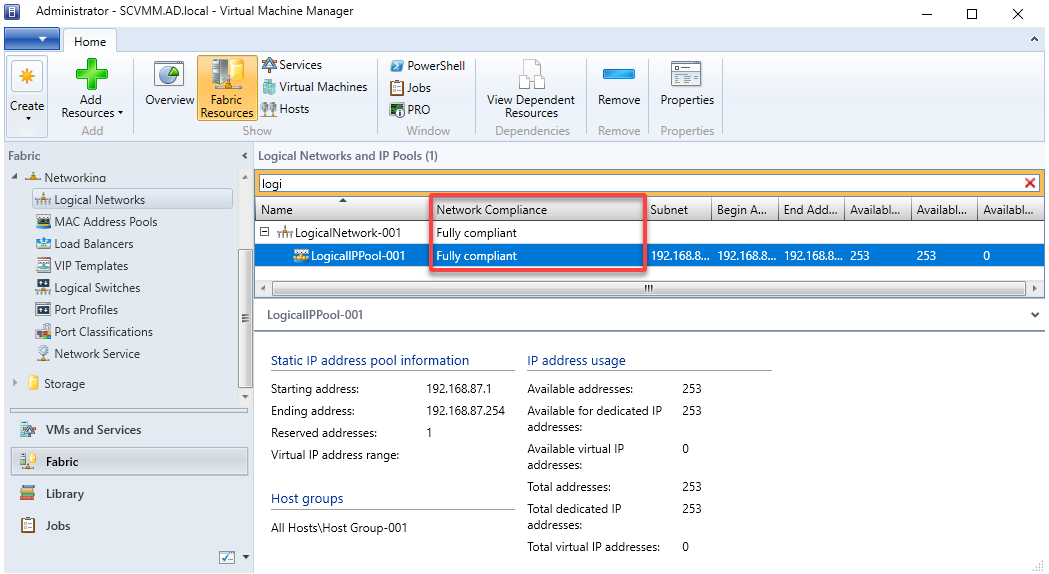
9. Now, expand the subnet where you created your IP address pool, and select the IP Address pool. Doing so lets you view the static IP address pool information in the SCVMM console.
💡 By configuring IP address pools in SCVMM, you reduce the manual effort involved in assigning IP addresses. Moreover, you ensure efficient IP address utilization within your virtualized environment.
Configuring SCVMM for an External Virtual Network
With an IP address pool created, you must enable communication and internet access for your VMs to interact with the outside world. How? By connecting your logical network to an external virtual network.
To make logical networks available to VMs on an external virtual network:
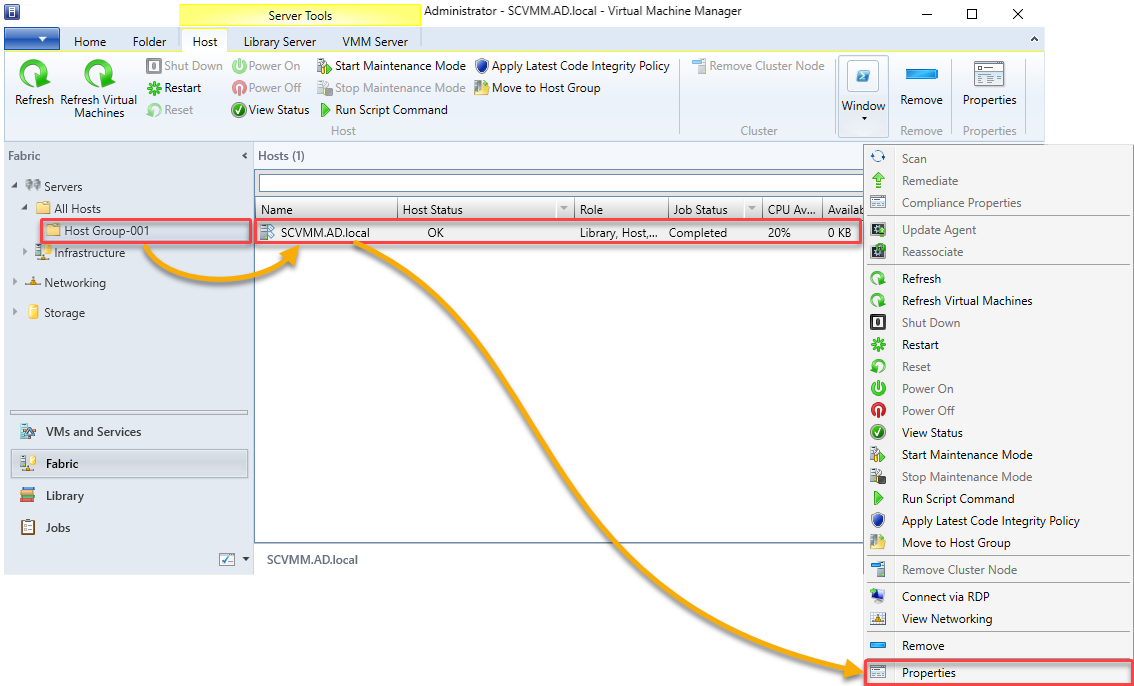
1. Navigate to your host group (Host-Group-001), right-click on your host, and choose Properties.
2. Next, navigate to the Hardware tab (left pane), and configure the following:
- Select the physical network adapter to use for the logical network.
- Tick the box beside the logical network name to associate with your selected adapter.
Once configured, click OK to proceed.
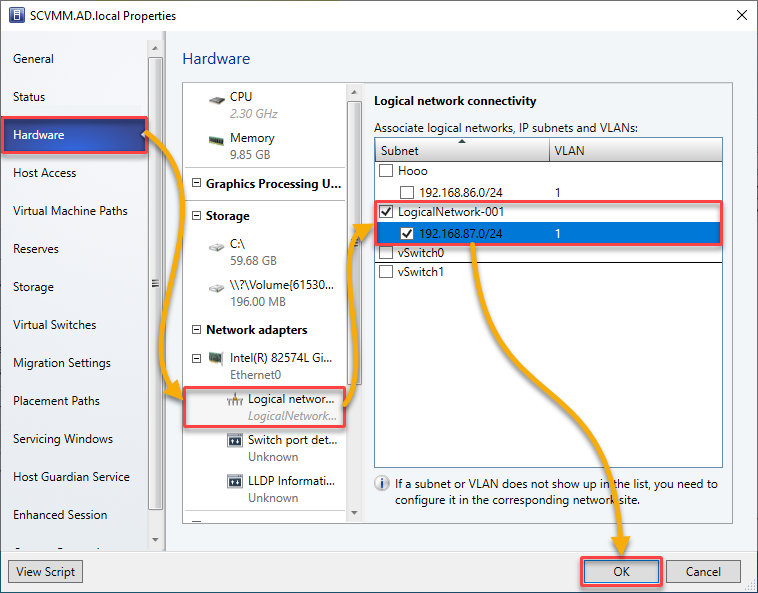
3. Click OK when prompted to enable the logical network.
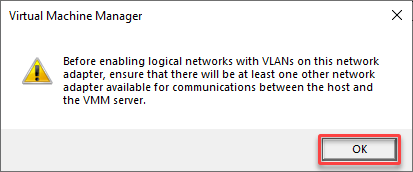
4. Finally, verify that the Network Compliance status of your logical network is Fully compliant, as shown below.
Conclusion
Throughout this tutorial, you have learned to leverage various features the SCVMM provides to administer and manage your virtual infrastructure effectively centrally.
With a solid understanding of SCVMM’s capabilities, why not consider integrating your SCVMM with Azure and Hybrid Cloud? Explore deploying and managing VMs in both on-premises and Azure Cloud environments!
Virt-Manager – графическая консоль для управления виртуальными машинами KVM от компании Red Hat. С помощью Virt-Manager можно, создавать, редактировать, запускать и останавливать виртуальные машины на гипервизоре KVM. Можно выполнять настройку параметров виртуальных машин, что значительно упрощает работу по сравнению с управлением KVM из интерфейса командной строки.
В статье мы рассмотрим установку Virt-Manager на сервер с KVM, типовые задачи управления виртуальными машинами в графической консоли и покажем, как использовать virt-manager из Windows-клиента.
Содержание:
- Установка Virt-Manager в Linux
- Управление KVM через virt-manager из Windows
- Использование Virt-Manager для управления виртуальными машинами KVM
- Типовые проблемы с Virt-Manager
Установка Virt-Manager в Linux
Прежде всего нужно установить необходимые пакеты из базового репозитория на сервере с KVM (в нашем примере сервер KVM установлен на Linux CentOS). Выполните следующую команду yum (или dnf):
# yum install -y virt-manager xorg-x11-xauth liberation-sans-fonts
Чтобы удаленно подключаться к virt-manager с Windows-компьютера, нужно дополнительно настроить SSH. Откройте файл sshd_config:
# nano /etc/ssh/sshd_config
Включите следующие параметры:
X11Forwarding yes
X11DisplayOffset 10
X11UseLocalhost yes
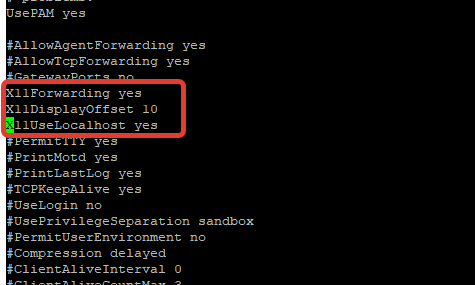
Перезапустите сервис sshd:
# service sshd restart
Управление KVM через virt-manager из Windows
Для удалённого подключения к virt-manager с Windows компьютера, вам понадобится следующее ПО:
- Putty – ssh клиент
- Xming – порт сервера для ОС Windows.
Скачать putty можно с официального сайта https://www.putty.org/, а Xming по ссылке https://sourceforge.net/projects/xming/
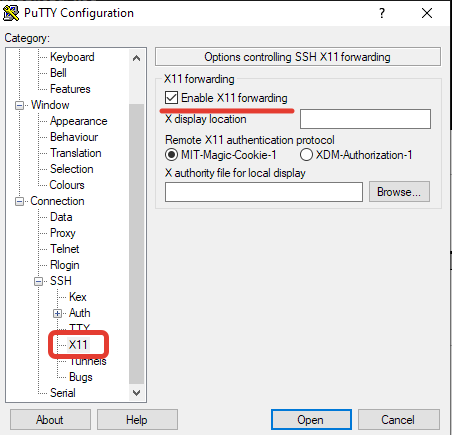
Откройте Putty, перейдите в Connection—>SSH—X11. Включите опцию “Enable X11 Forwarding“.
Теперь на вкладке Session, укажите адрес KVM сервера, имя сессии, укажите порт и сохраните подключение.
Чтобы из Windows удаленно подключаться к KVM серверу через virt-manager, используется следующий порядок:
- Сначала запускаете Xming;
- Запускаете сохраненную сессию Putty с опцией X11 Forwarding;
- Подключаетесь к virt-manager.
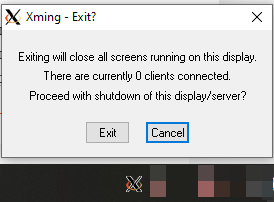
После включения Xming у вас в трее должен светиться значок X:
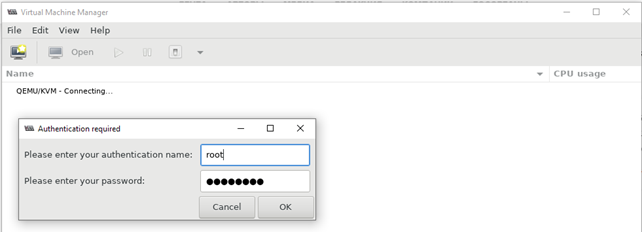
Далее запустите Putty, и после авторизации на сервере, выполните:
# virt-manager
Через несколько секунд у вас должно открыться окно управления virt-manager и окно дополнительной авторизации, где нужно ввести данные для подключения к серверу:
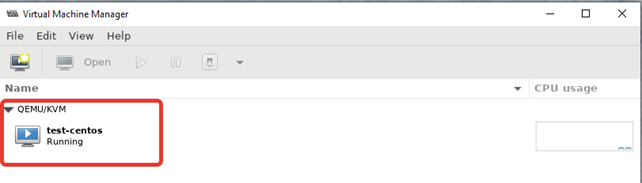
После авторизации вы должны увидеть список виртуальных машин.
Использование Virt-Manager для управления виртуальными машинами KVM
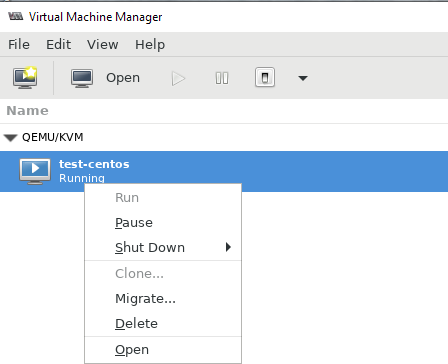
Щелкнув ПКМ по виртуальной машине, вы можете выключить, перезагрузить, включить ВМ.
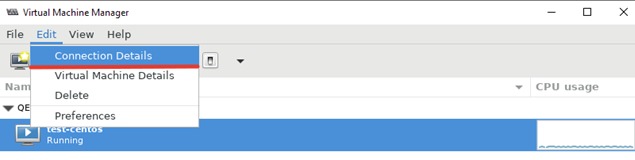
Далее я хочу изменить директорию для хранения файлов виртуальных машин, так как основное место на диске при установке операционной системы на сервере с KVM, я отдал под директорию VZ. Чтобы поменять стандартную директорию, перейдите в меню “Edit -> Connection Details”.
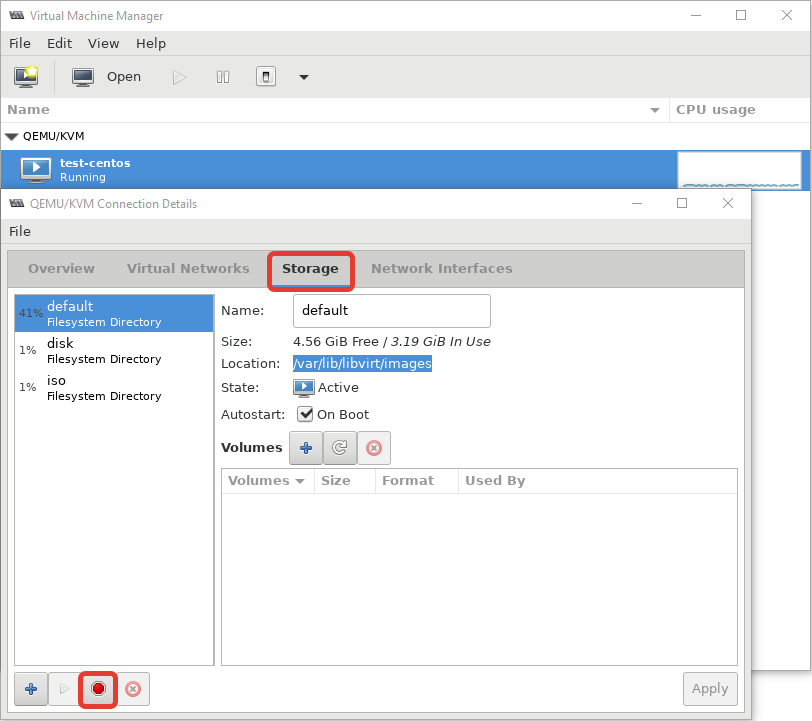
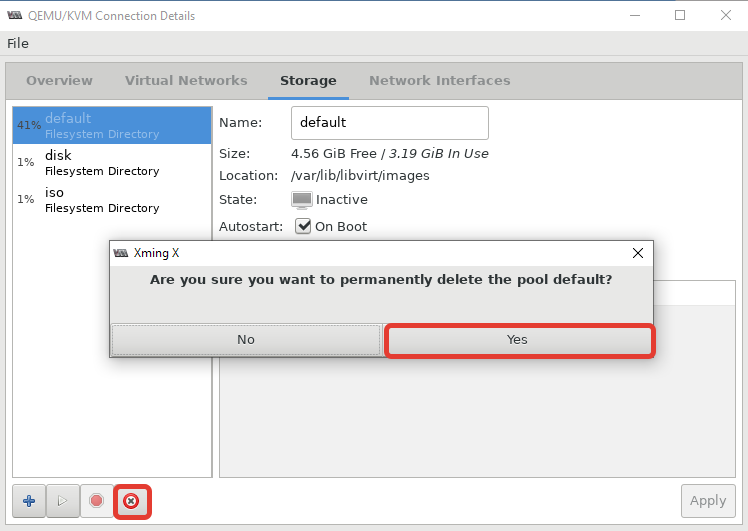
 В открывшемся окне, нужно перейти во вкладку “Storage”. Для создания нового пула, нужно остановить работу текущего и после чего удалить его:
После установки пула, кнопка удаления станет активна:
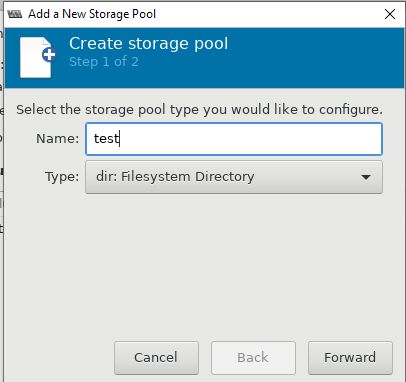
Теперь можно создать пул в нужной вам директории или разделе:
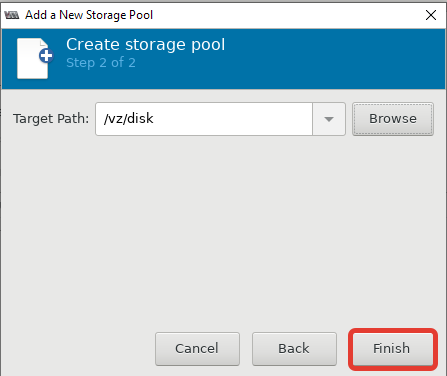
После этого, у меня стал активным мой основной раздел для файлов ВМ:

Либо просто удалить первоначальную директорию и создал симлинк на нужный раздел:
# rm -rf /var/lib/libvirt/images/
# ln -s /vz/disk/ /var/lib/libvirt/images
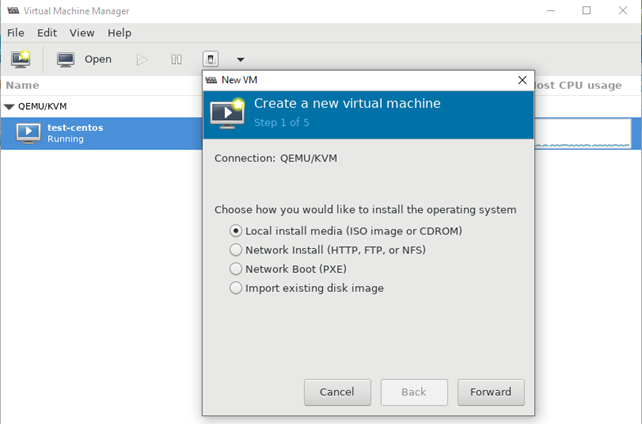
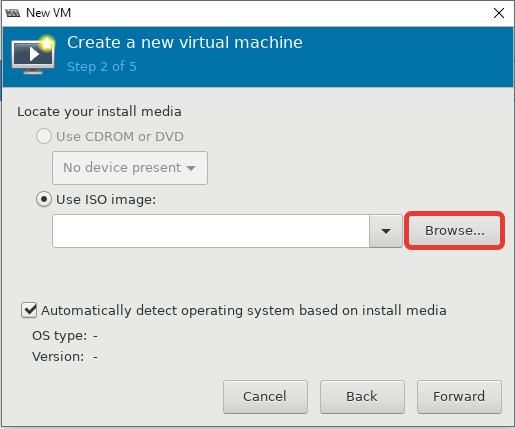
Теперь можно попробовать создать новую виртуальную машину KVM. Ниже я прикреплю ряд скриншотов, на которых по шагам будет все более-менее понятно. В конце опишу весь процесс создания машины.
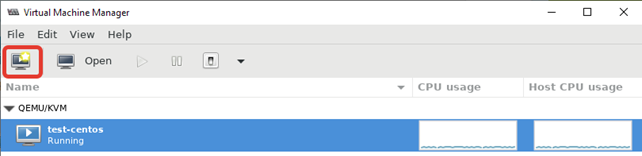
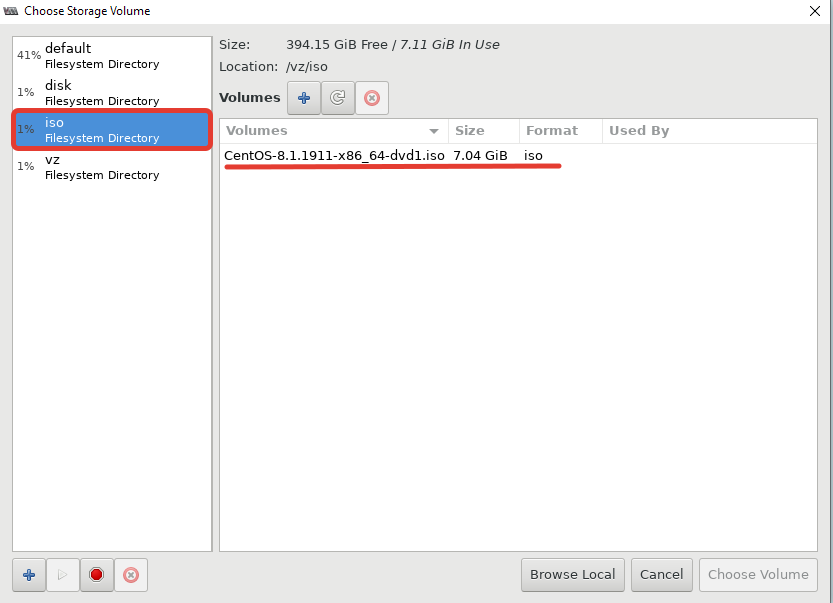
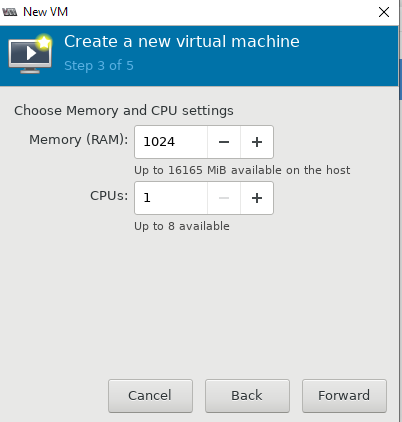
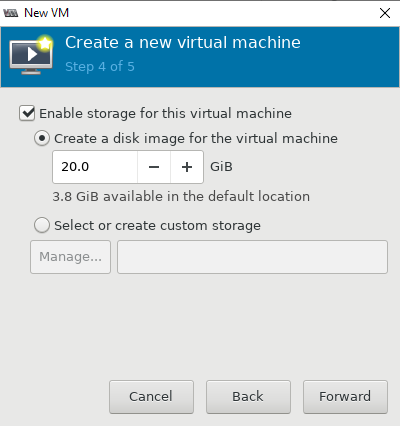
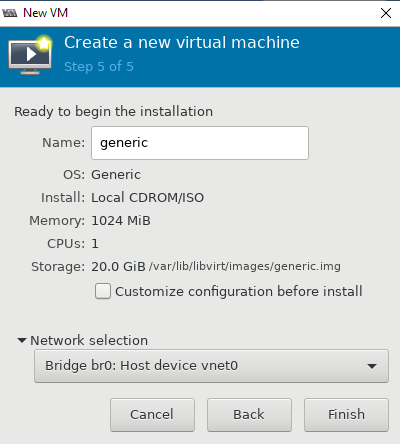
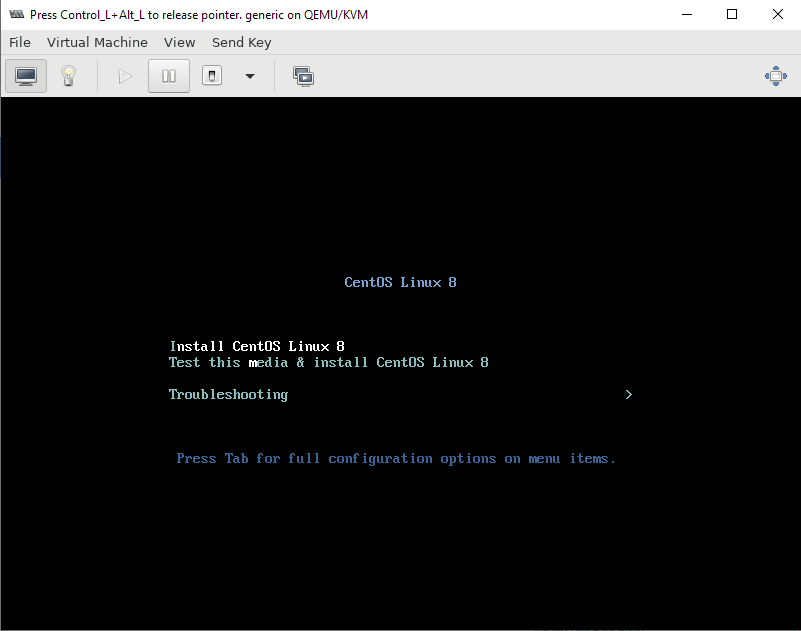
- При нажатии кнопки на первом скриншоте, запускается процесс создания новой виртуальной машины KVM;
- Затем указываем, откуда запускать установку ОС на виртуальной машине. Я использовал локальный ISO образ с дистрибутивом CentOS 8;
- Далее настраиваются ресурсы виртуальной машины: количество памяти и vCPU, размер виртуального диска (при необходимости его можно будет расширить или уменьшить), имя, и указываем сеть;
- После создания ВМ к ней сразу будет примонтирован установочный образ ОС, который указали при создании.
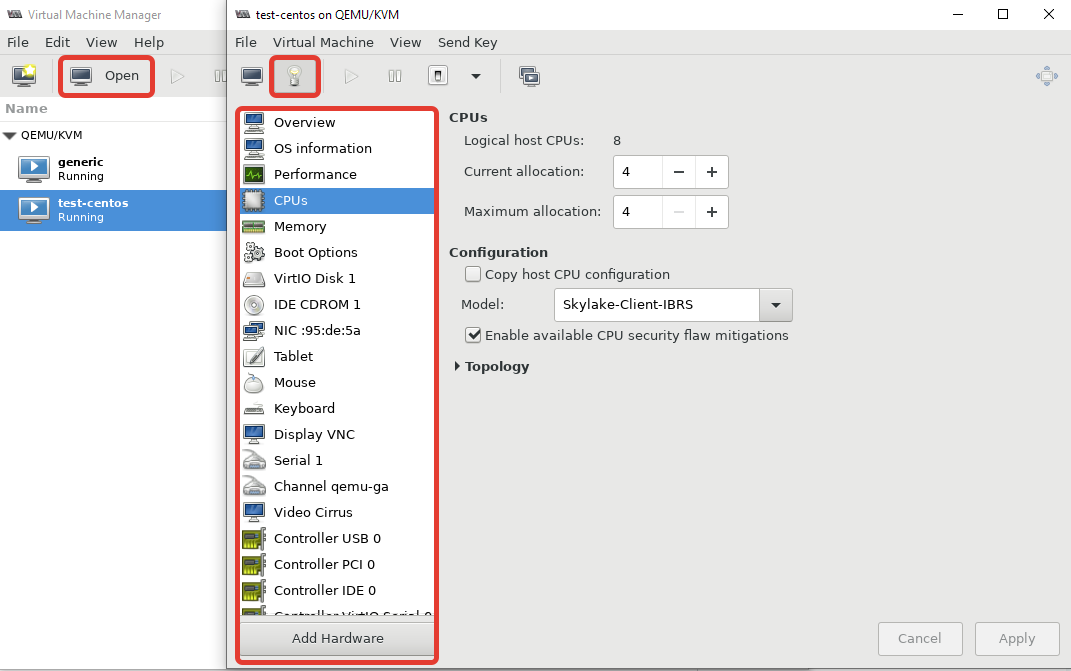
Чтобы изменить ресурсы или какие-то параметры уже созданной машины, вам нужно выделить ее и нажать кнопку “Open”. В открывшемся меню нажмите на лампочку и у вас откроется список параметров виртуальной машины KVM.
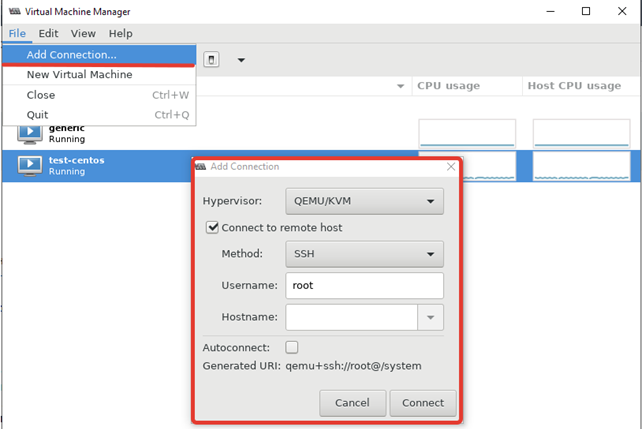
Чтобы добавить новый сервер KVM, выполните следующее “File -> Add Connection” и заполните данные в открывшемся окне:
Red Hat Linux изменила статус virt-manager в RHEL 8 на deprecated, и возможно в следующих релизах OC этот пакет будет недоступен. Вместо него предлагается использовать веб интерфейс Cockpit. Однако на данный момент в модуле управления KVM в Cockpit пока нет хватает всех необходимых функций, доступных в virt-manager.
Типовые проблемы с Virt-Manager
Во время изучения интерфейса virt-manager, я столкнулся с несколькими ошибками и решил описать их в статье. Первая ошибка, с которой я столкнулся, вышла на стадии создания новой виртуальной машины:
libvirt error: cannot execute binary /etc/libvirt/hooks.qemu: No such file or directory.
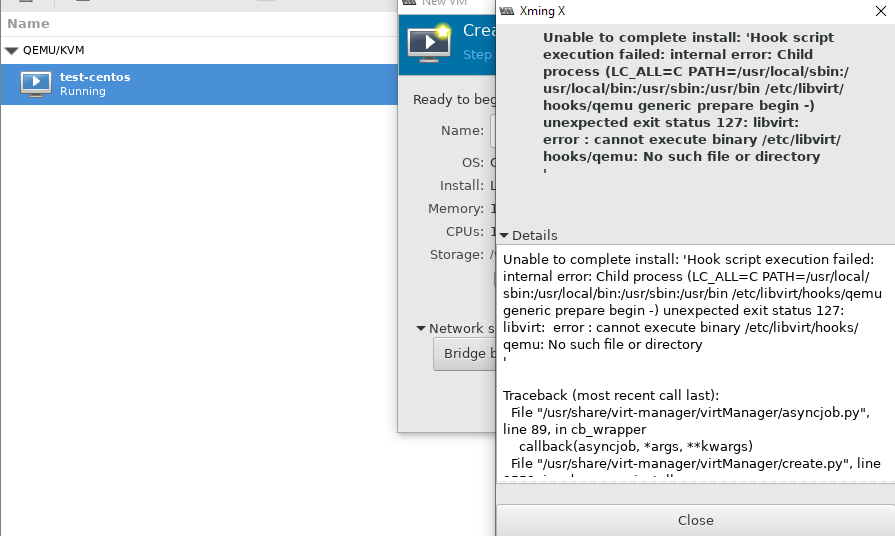
Система ругается на отсутствие файла, который скорее всего должен быть создан при установке KVM на сервер, но в моем случае он отсутствовал. Решился вопрос, созданием файла:
# touch /etc/libvirt/hooks/qemu
После этого нужно перезапустить сервис libvirtd:
# service libvirtd restart
Следующая ошибка ожидала меня сразу же на следующем шаге установки:
Unable to complete install: “NoneType object has no attribute storageVolLookupByPath“
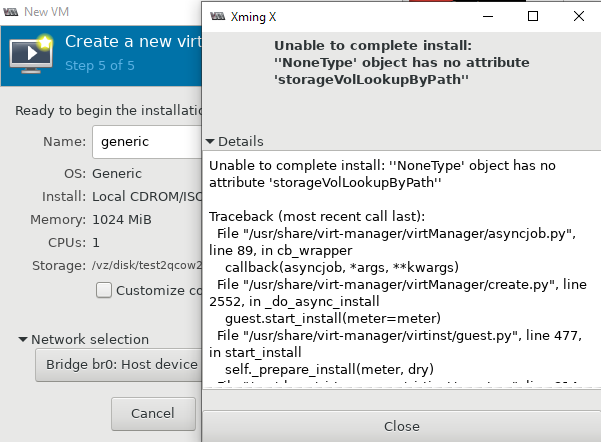
Чтобы решить эту проблему и возможно последующие другие, нужно установить пакет qemu-kvm-tools:
# yum install qemu-kvm-tools -y
После выполненных действий, виртуальная машина создалась без ошибок, и я смог выполнить установку гостевой операционной системы на ней.
Управлять KVM через virt-manager очень удобно. Вы значительно сократите время на выполнение рядовых операций с виртуальными машинами, а также сможете подключиться к ним из Windows.