VFD – представляет собой виртуальный Floppy-дисковод, в который можно вставлять образы дискет следующих форматов: .BIN, .DAT, .FDD, .FLP, .IMA, .IMG, .VFD.
Программа позволяет создавать одновременно, ни один, а целых два виртуальных устройства, в которые можно вставлять свои образы и полнофункционально работать с ними.
Чтобы приступить к работе, нужно распаковать утилиту, запустить, установить через интерфейс служебный драйвер. После чего, нужно активировать флоппи-приводы (на скриншоте, вкладки Drive0 и Drive1), путём присвоения букв-дисков и вставить образы, с помощью кнопки Open/Create.
При необходимости, утилита может интегрироваться в контекстное меню Windows, для последующего упрощения вставки образов.
Можно активировать режим защиты от записи, чтобы данные в образах, случайно не перезаписались из-за неосторожных действий или под воздействием вредоносных программ.
Как заявляет разработчик, утилита совместима со следующими операционными системами: Windows NT / 2000 / XP / 2003 / Vista / Windows 7. Причём, для X64-систем, нужно использовать другую версию служебного драйвера, который следует взять из архива vfd-x64-critical0. Лично я не проверял работу программы на 64-битной системе, но пишут, что предварительно нужно отключить проверку цифровой подписи драйверов. На Windows XP, никаких танцев с бубном не надо.
СКАЧАТЬ \ DOWNLOAD
Virtual Floppy Drive v1.01 ; vfd.rar; size: 59 326 bytes
Virtual Floppy Drive v2.1 ; vfd21-080206.rar; size: 126 588 bytes
Virtual Floppy Drive v1.01 Source ; vfdsrc.rar; size: 67 406 bytes
Virtual Floppy Drive v2.1 Source ; vfdsrc-080206.rar; size: 137 209 bytes
Virtual Floppy Drive x64-critical0 ; vfd-x64-critical0.rar; size: 7 807 bytes
<- ВЕРНУТЬСЯ НАЗАД, К ДРУГИМ УТИЛИТАМ ДЛЯ ФЛЭШЕК
Virtual Floppy Drive 2.1
This is a virtual floppy drive for Windows, developed by Ken Kato since 2003, and abandoned by him in 2008.
Now, compatible with 64-bit Windows, incl. Windows 10!
You can mount a floppy image file as a virtual floppy drive and directly access the contents — view, edit, rename, delete or create files on a virtual floppy, format a virtual floppy, launch a program on a virtual floppy… almost anything you can do with a real floppy.
FILES and DIRECTORIES
.\cmd\          VFD.EXE program source and VC++ project file
.\gui\          VFDWIN.EXE program source and VC++ project file
.\inc\          Files shared between user mode programs and the driver
.\lib\          VFD.DLL library source and VC++ project file
.\sys\          VFD.SYS driver source and DDK makefile

.\vfd.vcxproj   wrapper VC++ project to build all vfd programms at once
.\vfd.sln       VC++ workspace file
BUILD
User mode programs:
Use the .\vfd.sln workspace file
Requirements:
-
Microsoft Visual C++
- Compatible with Visual C++ 2019
- If you can convert the project files, you should be able to use
other compilers
-
Preferably the latest Windows Platform SDK.
Kernel mode driver:
Run the BUILD DDK utility from the .\sys\ subdirectory
Requirements:
- Microsoft Windows DDK
- Windows 2000 DDK or Windows XP DDK preferred,
although Windows NT DDK should also be OK.
- Windows 2000 DDK or Windows XP DDK preferred,
FAQ & known issues (including unconfirmed)
-
Super FAQ: NTFS compressed/encrypted files cannot be mounted directly. It is intentional to avoid the Windows cache manager dead lock.
-
Super FAQ: Current VFD can not create image from or save to actual floppy disk. Use programs like WinImage or RawWriteWin for that purpose.
-
Windows XP Explorer shows virtual drives as removable drives, not as floppy drives. Also it shows a 5.25″ floppy icon if a virtual drive is A: or B:, and a removable drive icon otherwise. I’d say it’s a bug of the Explorer. Other properly designed programs won’t have any such problem.
-
Windows XP Explorer sometimes doesn’t respond properly when you add / change drive letters of virtual drives. I think it’s also an Explorer bug, because the same thing happens when I change drive letters of a hard drive, a CD drive, etc. Restart the Explorer or, if that fails, log off and log on again and the the virtual drives will be recognized correctly.
-
Windows Explorer’s check disk does not work with VFD drives.
Use command line CHKDSK.EXE instead. -
Changing a virtual media between 3.5″ and 5.25″ does not update the drive type display of the Explorer. It’s just cosmetic. Any programs which have to distinguish them should recognize the drive type correctly.
-
Some programs (especially old ones) assume floppy drives to be either A: or B:. If certain programs don’t recognize a VFD drive, try changing the drive letter to A: or B:.
-
Windows 2000/XP sometimes assign conflicting drive letters, especially with removable devices such as USB drives and network drives. If a VFD drive suddenly becomes unaccessible, try changing the drive letter.
-
Conflict with swapfs (http://www.acc.umu.se/~bosse/) is reported by Suzu. (unconfirmed)
-
Some users have reported gradual system slow down and eventual lock up while copying a large amount of data to/from virtual drives. (unconfirmed)
Windows 10, Windows 11, Windows 7, Windows 8, Windows Server, Windows Vista, Windows XP
- 20.02.2022
- 10 184
- 3
- 06.03.2022
- 13
- 13
- 0
- Содержание статьи
- Использование ImDisk Virtual Disk Driver
- Использование графического интерфейса
- Использование командной строки
- Комментарии к статье ( 3 шт )
- Добавить комментарий
- Использование ImDisk Virtual Disk Driver
Использование ImDisk Virtual Disk Driver
Скачиваем дистрибутив ImDisk Virtual Disk Driver с официального сайта, и устанавливаем его. Для установки достаточно просто запустить скачанный файл, больше никакого взаимодействия с пользователем не потребуется.
Использование графического интерфейса
В данной главе мы рассмотрим необходимые действия, которые нужно осуществить в графической оболочке программы ImDisk Virtual Disk Driver для того, чтобы создать и смонтировать образ флоппи-диска, а так же повторно подключить его после размонтирования или перезагрузки компьютера.
Создание и монтирование образа
- Открываем Панель управления (о том, как открыть Панель управления в Windows 10, можно прочитать в этой статье).
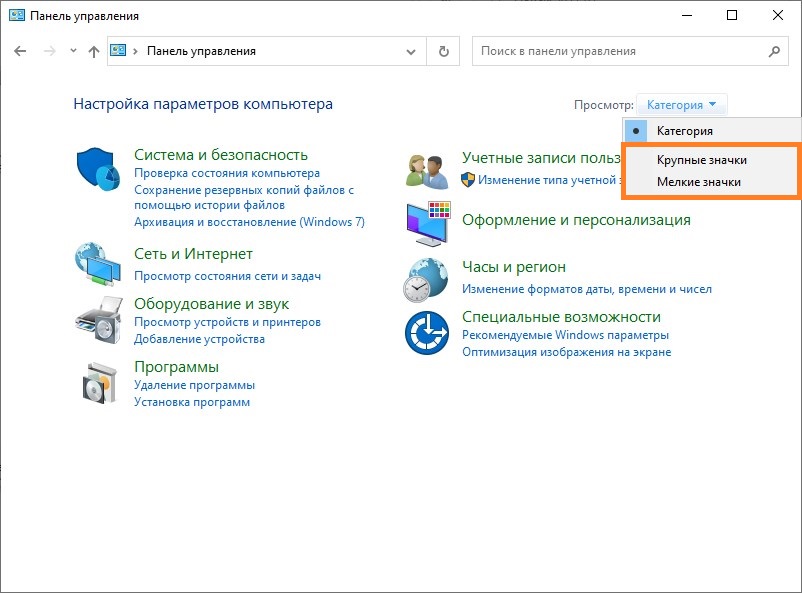
- Если в Панели управления включен вид отображения по категориям, переключаем его на «Крупные значки«, или на «Мелкие значки«.
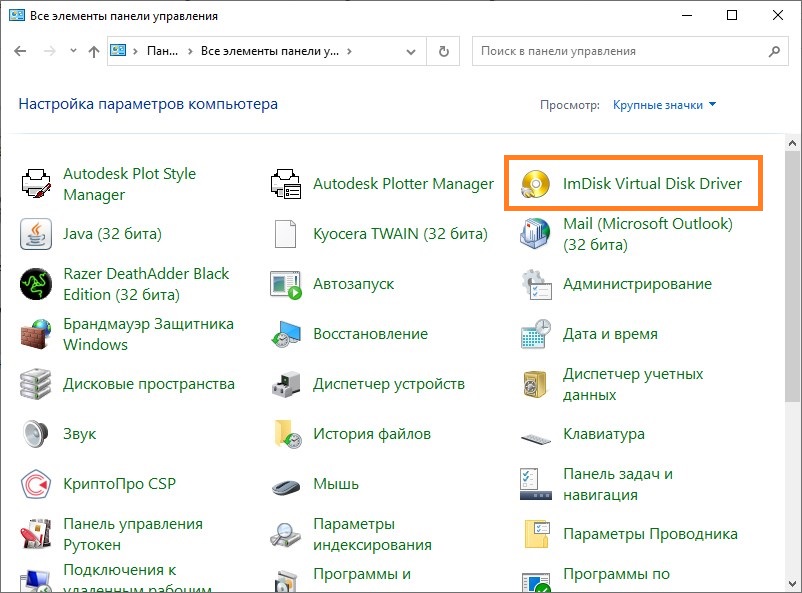
- Теперь, находим раздел Панели управления под названием «ImDisk Virtual Disk Driver«, и открываем его.
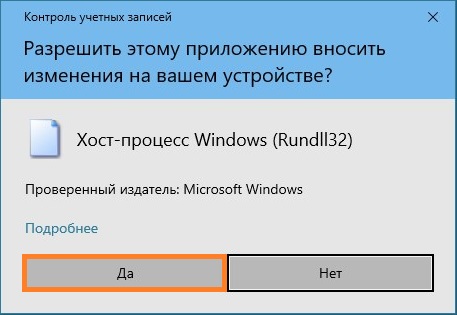
- Если появляется сообщение «Разрешить этому приложению вносить изменения на вашем устройстве?», то нажимаем «Да».
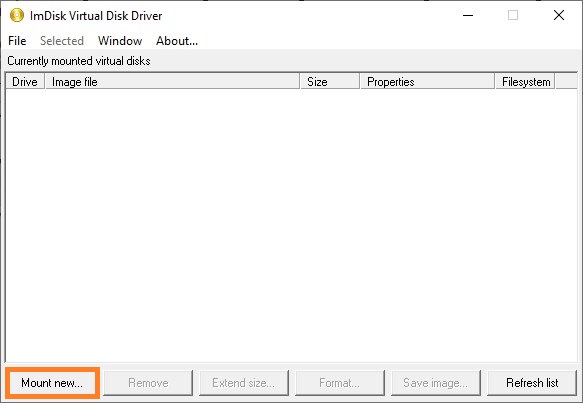
- В появившемся окне ImDisk, нажимаем на кнопку «Mount new…«.
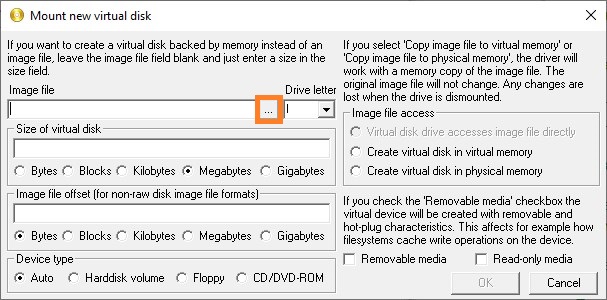
- Появится окно с созданием образа, который в дальнейшем будет использоваться как образ дискеты (флоппи-диска). Здесь, нужно у пункта «Image file» нажать на кнопку с тремя точками.
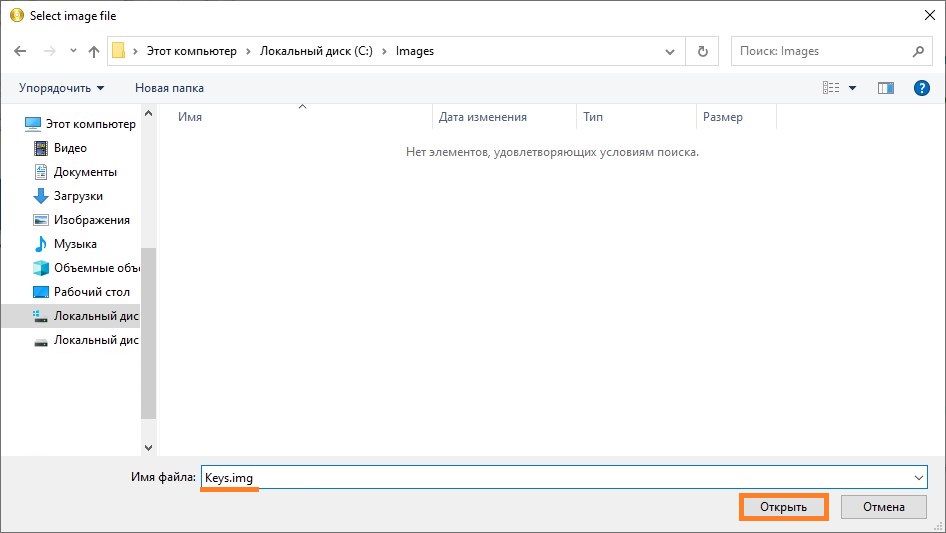
В открывшемся окне, надо выбрать ту папку, в которой собираетесь хранить создаваемый образ дискеты. Для примера, предположим, что это будет директория C:\Images. Перейдя в неё, набираем название создаваемого образа (для примера — keys), после чего в конец через точку добавляем расширение img — чтобы в итоге вышло keys.img, и нажимаем на кнопку «Открыть«.
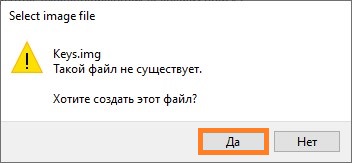
Появится справедливое замечание, что такого файла нет, и логичное предложение его создать. Отвечаем «Да«.
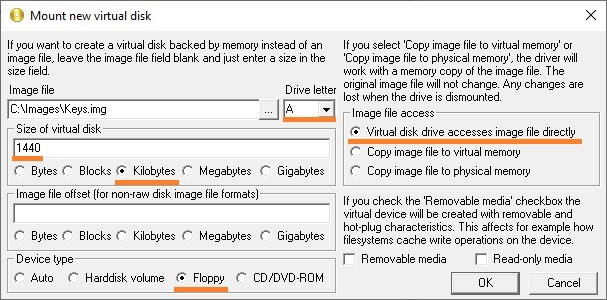
Теперь, так же выполняем следующие настройки:- В поле «Drive letter» ставим букву, с которой будет смонтирован образ дисковода, например классическую букву «А».
- В поле «Size of virtual disk» пишем 1440, а сразу под ним отмечаем «Kilobytes«, чтобы создать образ со стандартным размером дискеты.
- В самом низу, у пункта «Device type» устанавливаем «Floppy«.
- В правой части отмечаем пункт «Virtual disk drive accesses image file directly».
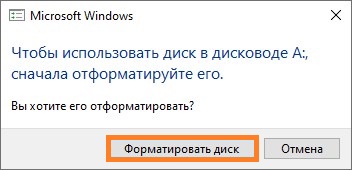
По окончанию установки нужных настроек, нажимаем на кнопку «ОК». - После этого, будет создан и смонтирован файл образа в виде дискеты. Поскольку, образ пустой и не содержит никакой файловой системы, то Windows предложит его отформатировать. Для этого, нажимаем на кнопку «Форматировать диск«.
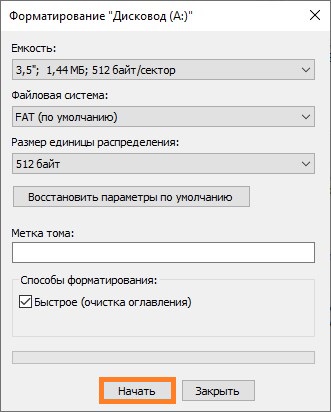
Если же, окно с предложением отформатировать диск не появляется, значит нужно попробовать вызывать его вручную, открыв диск А через Проводник. - Оставляем все параметры по умолчанию, и нажимаем на кнопку «Начать«.
- Windows предупредит вас, что в случае форматирования будут уничтожены все данные — поскольку в нашем случае, образ пустой, и терять нечего, нажимаем на кнопку «ОК», чтобы запустить процедуру форматирования.
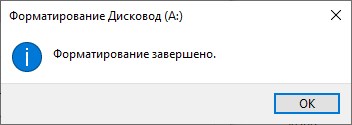
- По завершению форматирования, появится соответствующее уведомление. Теперь можно закрыть окно с форматированием, и начать пользоваться виртуальным образом дискеты, как настоящим.
Повторное монтирование образа
Тем не менее, после перезагрузки, данный образ придется монтировать заново. Для этого, придется повторить примерно ту же процедуру, только с меньшим количеством действий.
- Так же запускаем ImDisk через Панель управления, и нажимаем на кнопку «Mount new…«.
- Нажимаем на кнопку с тремя точками, и находим ранее созданный образ, выбираем его и нажимаем «Открыть«.
- Выбираем удобную для использования букву, отмечаем «Virtual disk drive accesses image file directly«, остальное оставляем по умолчанию. После этого, нажимаем на кнопку «ОК«, и ранее созданный образ будет примонтирован вновь.
Для автоматизации монтирования образа после перезагрузки, можно создать BAT файл и поместить его в автозагрузку — про это будет рассказано в конце следующего раздела.
Использование командной строки
ImDisk Virtual Disk Driver позволяет выполнить все необходимые действия через командную строку, без использования графического интерфейса.
Создание и монтирование образа
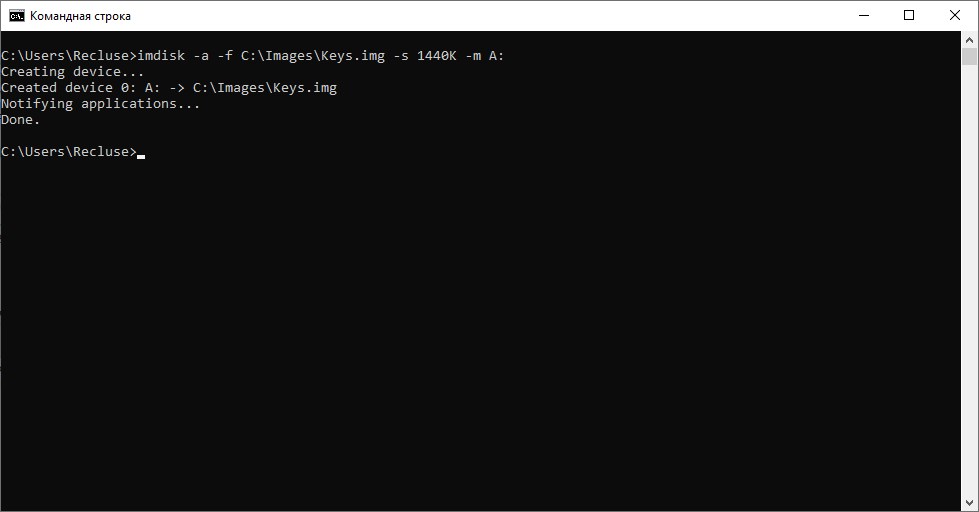
Для того, чтобы была возможность создать образ дискеты, и смонтировать его, нужно выполнить следующую команду в командной строке:
imdisk -a -f C:\Images\Keys.img -s 1440K -m A:Используемые параметры обозначают следующее:
- -a — подключить образ
- -f — путь к образу
- -s — размер создаваемого образа. Для того, чтобы образ был смонтирован как флоппи-диск, его размер должен быть равен одному из стандартных значений: 160K, 180K, 320K, 360K, 640K, 720K, 820K, 1200K, 1440K, 1680K, 1722K, 2880K, 123264K, 234752K.
- -m — буква диска
Повторное монтирование образа
Смонтировать уже ранее созданный диск можно при помощи следующей команды:
imdisk -a -f C:\Images\Keys.img -m A:Как должно быть видно, она не сильно отличается от вышеописанной команды, был лишь удален параметр -s.
vfd.exe states
This is a virtual floppy drive for Windows NT / 2000 / XP developed by Ken Kato
(Reported to work also on 2003 Server and Vista).
Note !!! This version works only on 32 bit systems !!!
There looks to be some info there but considering the changelog for the latest version states Added platform checking so that VFD does not start on 64 bit OS. you may be out of luck with the version you have.
Unless you are comfortable compiling from source or are willing to trust a patched executable submitted from a single person on the internet then you may be out of luck as this software appears abandoned.
You might have some luck extracting the disk files using something like 7-zip if they are in a standard disk image format.
Related videos on Youtube
01 : 15
Floppy Disk On Windows 10
07 : 03
Creating A Virtual Floppy Drive FREE
02 : 31
Simplified Virtual Floppy Drive VFD — Install
04 : 16
Run VFDWin Virtual Floppy Drive under Windows 7 x64 and x86
02 : 01
How to use virtual floppy drive on windows 10 64 bit?
Comments
-
I want to install images of 1.44 floppy disks.
These images come with a program called vfd.The install with
vfd.exe installworks fine.
The required
vfd.exe startsaborts with the message
Failed to start the Virtual FD driver. This driver has been blocked from loading.I did this from a cmd.exe with Admin Privileges.
Any suggestions ??
-
If the driver is not signed and you are using a 64-bit version of Windows 10 then you will have to disabled driver enforcement to use unsigned drivers
-
That is one route I’ll follow.
-
-
Is it possible to create a 32 bit virtual machine on a 64 bit system ?
-
The files are designed to run a floppy drive, it is an install of a classic program.
-
@niloderoock it definitely is possible and would probably be the easiest way to get access. It’s probably worth using Windows XP 32-bit for compatibility, if you can find or have access to a legitimate copy.
Recents
Related
This is a virtual floppy drive for Windows NT / 2000 / XP / 2003 / Vista / Windows 7 (both 32-bit and 64-bit versions)
License
GNU General Public License version 2.0 (GPLv2)
QuickApps is a set of powerful SharePoint web apps that lets you build applications that are easily supported, maintained and upgraded, ensuring their long-term impact and return on investment.
User Ratings
4.1
out of 5 stars
★★★★★
★★★★
★★★
★★
★
ease
1 of 5
2 of 5
3 of 5
4 of 5
5 of 5
3 / 5
features
1 of 5
2 of 5
3 of 5
4 of 5
5 of 5
3 / 5
design
1 of 5
2 of 5
3 of 5
4 of 5
5 of 5
3 / 5
support
1 of 5
2 of 5
3 of 5
4 of 5
5 of 5
1 / 5
User Reviews
- All
- ★★★★★
- ★★★★
- ★★★
- ★★
- ★
-
Press F8 when booting windows to access the menu that has the «allow unsigned drivers» option, and select that option.
Once in windows, you can install properly, but you have to do this trick every time you use it, and windows will likely b**** about the unsigned driver when you don’t, OR:
While in Windows, open the start menu, then select «run». Next type in to the white box and press enter:
Bcdedit.exe -set TESTSIGNING ON
This hidden option will make it permanent.
If you want to go back to normal follow the above instructions, and input this command instead:
Bcdedit.exe -set TESTSIGNING OFF
Description of the option is here:
docs.microsoft.com/en-us/windows-hardware/drivers/install/the-testsigning-boot-configuration-option
This is for Windows Vista / Windows 7 (both 32-bit and 64-bit versions)
Win 8, 8.1, and 10 = Out of luck, unless you can make it work in a Virtual Machine, with one of the above versions of windows, and trick\hidden settings, of course! -
not working on Windows 7 x64
-
It was a waste of 30 minutes. The instructions are not complete for 64bit Vista and up.
Here is a compilation with documentation that works. I tried to email the author from his site, but there is no reference to his email address, so maybe he will find it here and implement / revise.
Put your http here -> <-www.windows8downloads.com/win8-simplified-virtual-floppy-drive-vfd—rebgdudv/download.html->> -
i cant run it from windows 7 Ultimate 64 Bit
But it tested on my xp
please repair it -
Great software. Very useful!!
Read more reviews >

