Introduction
This is a set of best practices to follow when installing a Windows Server 2008 R2 guest on a Proxmox VE server 2.x (2.3 at time of writing). Right now it’s a work in progress but hopefully soon it will be a comprehensive and reliable document. Please feel free to add to it, even if just to pose a potential best practice.
Install
Prepare
- After clicking «Create VM» enter a Name: for your vm, select your Resource Pool (if you have one) and click Next
- Select Microsoft Windows 7/2008 in the OS tab and click Next.
- Select an ISO Image: for Windows Server 2008 in the CD/DVD tab and click Next.
- Select Bus/Device: IDE, Storage: «your preferred storage» and Cache: Write back in the Hard Disk tab and click Next.
- Select number of Sockets and cores (the default of 1 is mostly sufficient) in the CPU tab and click Next.
- Select Automatically allocate memory and set the Maximum memory to a number you may require in the memory tab and click Next.
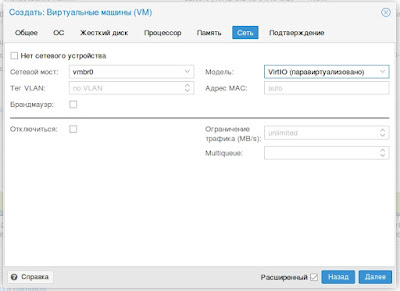
- Select Model: VirtIO (paravirtualized) in the Network tab and click Next
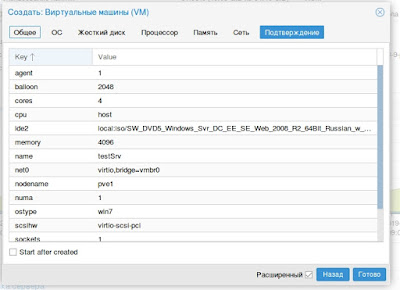
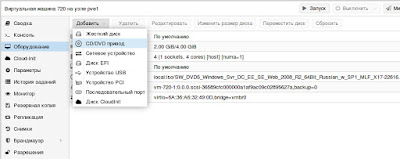
- Click finish and go to the Hardware tab of your newly created VM and click Add -> CD/DVD drive
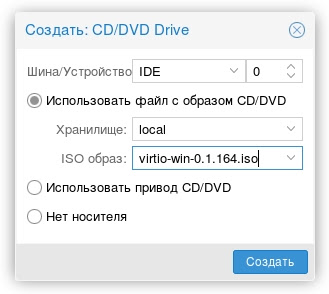
- Select Storage:local and ISO image: virtio-win-x.x.iso and click create.
- To add a temporary disk for installing VirtIO block driver go to the Hardware tab of your newly created VM again and click Add -> Hard Disk
- Select Bus/Device: VIRTIO, Storage: «your preferred storage» and Cache: Write back and click Add
Launch Windows install
- start your newly created virtual machine using the «Start» link in the upper right.
- wait until the vm icon has turned white before you login using the «Console» link in the upper right. (NOTE: Sometimes the java console does not start at the first attempt. Please click refresh/reload in this case)
- Start the server install with «Install Now» and select the Operating System Flavor you like and click next and select «Custom: Install Windows only»
- Wait until Windows is installed and select a Password for the local Administrator account and login to Windows.
Install additional VirtIO drivers
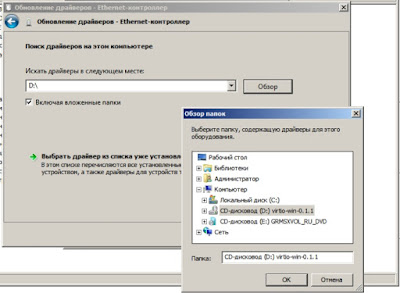
- Start Explorer, Go to CDROM, copy folder WIN7\AMD64 to C:\Program Files\ and rename AMD64 to C:\Program Files\VirtIO
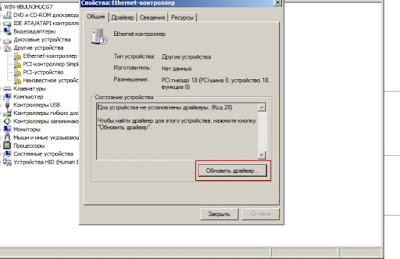
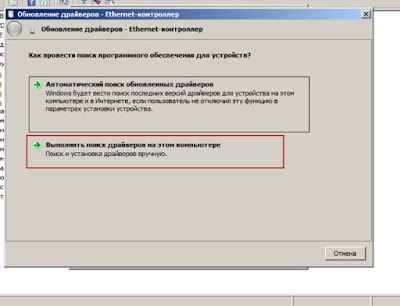
- open Device Manager and right click on Other Devices -> Ethernet Controller and select update driver software
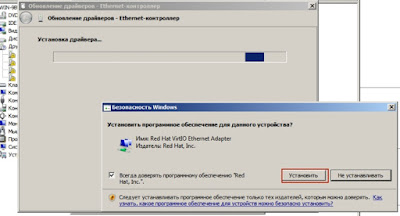
- select «Browse my computer» select folder «C:\Program Files\VirtIO» and click «Install» for Red Hat VirtIO Ethernet Adapter.
- again in Device Manager right click on Other Devices -> PCI Device and select update driver software
- again «Browse my computer» select folder «C:\Program Files\VirtIO» and click «Install» for VirtIO Ballon Driver.
- open a powershell window, cd to «C:\Program Files\VirtIO» and enter: blnsvr.exe -i.
The BallonService that can help free up memory is installed. The BallonService is also responsible for displaying the correct amount of memory in the Proxmox console.
further info
raw vs qcow2
Raw file format provides better performance while qcow2 offers advanced features such as copy on write and snapshots. As of Qemu 1.4 / PVE 2.3 qcow2 is expected to provide superior performance.
virtio drivers
Use virtio dirvers for best performance. More info:
Paravirtualized Block Drivers for Windows
latest iso with virtio drivers :
https://fedorapeople.org/groups/virt/virtio-win/direct-downloads/latest-virtio/
Power settings
- In Windows Server 2008, you need to disable the ‘Shutdown Event Tracker’. This setting in Group Policy. If the server is part of a domain, you need to edit the group policy for the organizational unit with the server. If you’re not using a domain, you can edit the local group policy. This can be accessed by doing the following:
- Start -> Run -> gpedit.msc -> ok -> open «Computer Configuration» then «Policy» then «Administrative Templates» then «System». In the right pane, double click on ‘Display Shutdown Event Tracker’ and select ‘disable’ and OK. To make sure the new group policy is applied. Go to Start -> run -> cmd -> ok and type in ‘gpupdate /force’ without the quotes. Now when you select shutdown, you won’t be promoted with the box asking why you are shutting down the server.
- In order to make Windows 2008 R2 guest shutdown cleanly on the event of a shutdown (power button) on the Proxmox VE host you need make the following changes:
- Control Panel -> System and Security -> Power Options -> Edit Plan Settings -> Turn off the display: Never
See also
Windows 2003 guest best practices
Windows 2012 guest best practices
Описываю оптимальную, на мой взгляд, установку Windows 2008R2:
-
В режиме просмотра по хранилищам, в хранилище «local» ноды, на которой
создается VM необходимо загрузить установочный образ W2008R2 и актуальный
стабильный
образ
virtio-win drivers
-
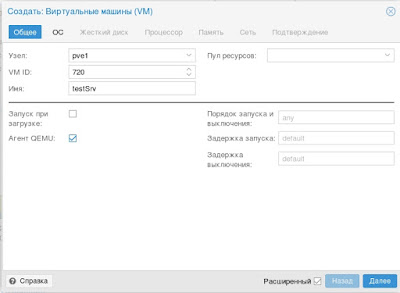
В правом верхнем углу интерфейса жмем кнопку «Создать VM»

-
Попадаем на первую вкладку мастера — задаем VM ID, имя машины, ставим
галку агента:
-
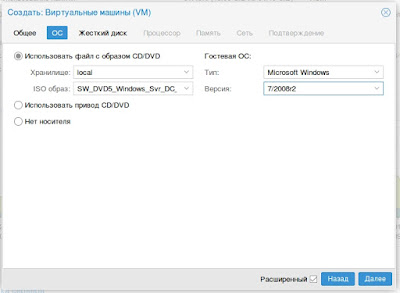
Выбираем,загруженный на шаге 1, образ
диска с Windows и тип операционной системы
-
Далее
создаем/подключаем образ диска VM (я использовал iSCSI таргет, вы можете
указать хранилище и размер создаваемого образа). Обратите внимание на тип
шины и птицу нет резервных копий.
-
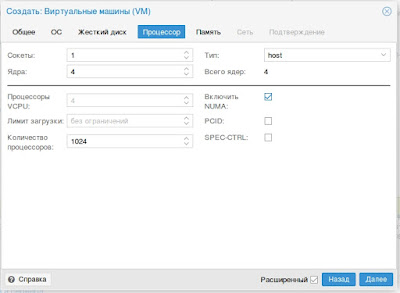
Указываем тип и количество сокетов/ядер процессора (по умолчанию «KVM64» —
самый совместимый, я выбираю «host»), обращаю внимание на птицу NUMA, если
ядер больше 1
-
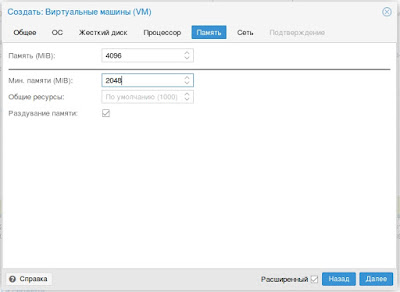
Настраиваем память: можно использовать динамическое выделение — для этого
указать верхнюю и нижнюю границы
-
Настраиваем сеть — обратите внимание на тип интерфейса
-
Проверяем сводные характеристики VM, при необходимости правим на
соответствующих вкладках
-
Переключаемся в режим просмотра по серверам, становимся на новосозданную
VM и заходим во вкладку оборудование, жмем кнопку
«Добавить»->»CD/DVD»
-
В процессе создания привода выбираем образ virtio-win

-
Запускаем VM

-
Переходим во вкладку «Консоль»

-
Идет тривиальная установка Winows вплоть до выбора диска для установки

-
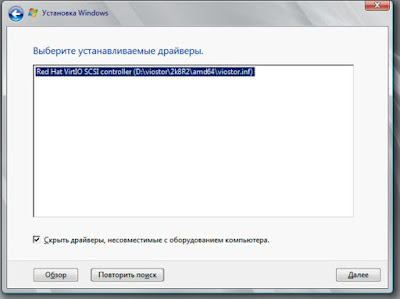
Жмем на загрузку и на диске с virtio-win выбираем папку
d:\viostor\2k8r2\amd64
-
Устанавливаем драйвер, после чего продолжаем и заканчиваем установку.

-
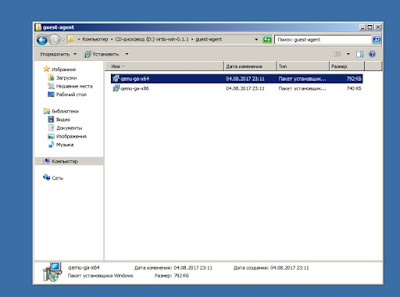
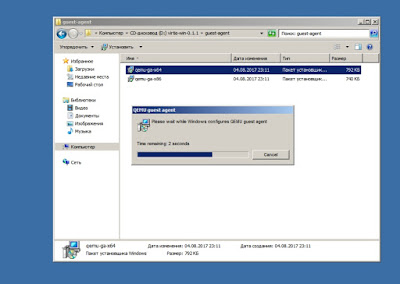
После завершения установки заходим в систему и ставим гостевой агент,
который находится в папке guest-agent диска virtio-win

-
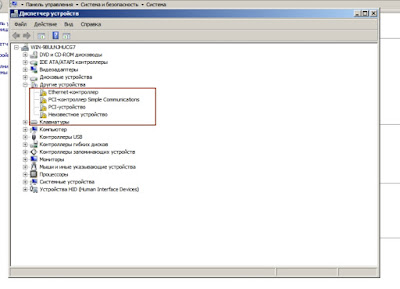
После установки агента идем в диспетчер устройств
-
Устанавливаем недостающие драйвера


-
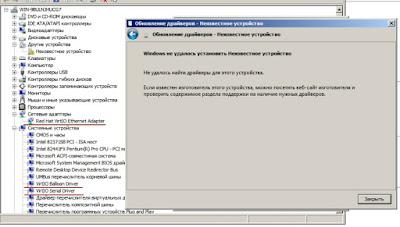
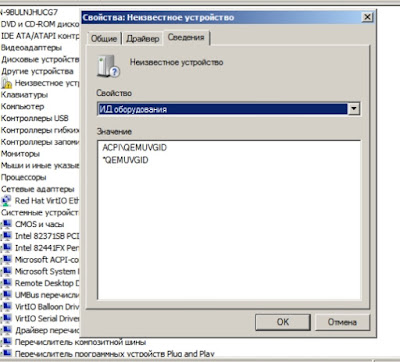
На одном из устройств получаем следующее сообщение:

-
Смотрим dev_id устройства — дело в том, что последние версии Proxmox VE
поддерживают Virtual Machine Generation ID, поддержка которого Windows,
появилась только начиная с 8/2012 версий
-
Для удаления неподдерживаемого усторйства выключаем VM, заходим по SSH на
ноду Proxmox VE и выполняем:qm set vm_id -delete vmgenidвместо vm_id ID вашей машины, в моем случае 720

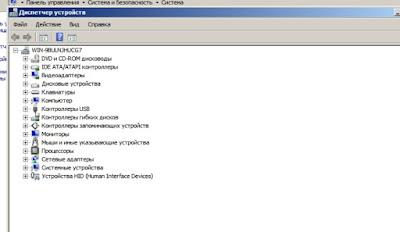
-
Запускаем VM и смотрим в диспетчере устройств


Установка VM завершена — дальше идет обычная настройка сервера..
Рекомендуемые настройки:
- Отключить автоматическое обновление
-
Система -> Дополнительные параметры системы ->дополнительно
->загрузка и восстановление ->малый дамп памяти -
Диспетчер сервера -> отключить отчеты об ошибках


Windows Server 2008 R2 является одной из самых популярных операционных систем для серверов, но у нее есть одна проблема — отсутствие встроенной поддержки драйверов для виртуальных устройств Virtio. Virtio — это открытый интерфейс взаимодействия между хост-системой и виртуальной машиной, который позволяет обеспечить высокую производительность и эффективность работы виртуализации.
Установка и настройка Virtio драйвера для Windows Server 2008 R2 может показаться сложной задачей, но на самом деле она довольно проста. Сначала необходимо скачать драйверы Virtio с официального сайта проекта. После этого необходимо запустить установку драйверов и следовать инструкциям на экране.
После установки драйверов Virtio необходимо настроить сетевое подключение. Для этого откройте «Панель управления» и выберите «Сеть и интернет». Затем выберите «Центр управления сетями и общим доступом». В открывшемся окне выберите «Изменение настроек сети адаптера» и найдите виртуальный адаптер Virtio. Выберите его и нажмите «Свойства». В окне «Свойства» выберите «Протокол Интернета версии 4 (TCP/IPv4)» и нажмите «Свойства».
В окне настройки IPv4 выберите «Использовать следующий IP-адрес» и введите подходящий IP-адрес и маску подсети. Нажмите «ОК» для сохранения изменений. Теперь ваше сетевое подключение настроено и готово для использования с Virtio драйвером.
Содержание
- Установка и настройка Virtio драйвера для Windows Server 2008 R2
- Что такое Virtio драйвер и зачем он нужен?
- Предварительные требования для установки Virtio драйвера
Драйвер Virtio представляет собой виртуальный драйвер, который обеспечивает оптимизацию работы гостевой операционной системы при работе на виртуализированном сервере. В данной статье будет рассмотрен процесс установки и настройки Virtio драйвера для Windows Server 2008 R2.
Шаг 1: Подготовка к установке
Перед установкой Virtio драйвера необходимо загрузить его с официального сайта разработчика. После загрузки необходимо распаковать архив с драйвером на хост-системе.
Шаг 2: Установка драйвера
Для установки драйвера необходимо открыть меню «Панель управления» в операционной системе Windows Server 2008 R2 и выбрать пункт «Установка оборудования». В открывшемся окне следует выбрать опцию «Добавить новое оборудование» и нажать кнопку «Далее». Затем нужно выбрать опцию «Установить оборудование вручную из списка» и нажать кнопку «Далее». После этого следует выбрать тип оборудования «Сетевой адаптер» и нажать кнопку «Далее». Затем нужно выбрать опцию «Использовать диск» и указать путь к распакованному архиву с драйвером Virtio. После указания пути следует нажать кнопку «Далее» и подтвердить установку драйвера.
Шаг 3: Настройка сетевого соединения
После установки драйвера необходимо настроить сетевое соединение. Для этого нужно открыть «Сетевые подключения» в меню «Панель управления». В открывшемся окне следует выбрать сетевое соединение, соответствующее установленному Virtio драйверу, и открыть его свойства. Затем нужно выбрать IPv4 протокол и нажать кнопку «Свойства». В открывшемся окне следует выбрать опцию «Получить IP-адрес автоматически» и нажать кнопку «OK». Это позволит настроить автоматическое получение IP-адреса для сетевого соединения.
Шаг 4: Проверка работы драйвера
После настройки сетевого соединения можно проверить работу Virtio драйвера. Для этого следует открыть командную строку и выполнить команду «ipconfig». Если в выводе команды присутствует информация о сетевом подключении с IP-адресом, то драйвер успешно установлен и настроен.
Важно помнить, что для успешной работы Virtio драйвера необходимо выполнять все шаги установки и настройки в точном соответствии с инструкцией.
Что такое Virtio драйвер и зачем он нужен?
Драйверы Virtio предназначены для взаимодействия между гипервизором (KVM) и виртуальными устройствами внутри виртуальной машины. Они позволяют оптимально использовать ресурсы физического оборудования и обеспечивают максимальную производительность работы виртуальных машин.
Виртуальные машины, работающие на сервере с установленными драйверами Virtio, получают доступ к гипервизору и используют его возможности непосредственно. Это позволяет достичь максимальной производительности и эффективности работы виртуальных машин. Без установки драйверов Virtio, виртуальные машины могут испытывать некоторые проблемы с производительностью и задержкой, так как они будут работать через обобщенные драйверы.
Использование драйверов Virtio также повышает безопасность и надежность виртуальных машин, так как они обеспечивают прямой доступ к гипервизору и позволяют защитить виртуальные машины от воздействия вредоносных программ и атак.
Установка и настройка Virtio драйверов на Windows Server 2008 R2 позволяет оптимально использовать возможности гипервизора и создать надежную и высокопроизводительную виртуальную среду для работы с серверами, базами данных и другими приложениями, работающими на этой операционной системе.
Предварительные требования для установки Virtio драйвера
Перед тем, как приступить к установке и настройке Virtio драйвера для Windows Server 2008 R2, необходимо выполнить следующие предварительные требования:
1. Проверьте совместимость операционной системы.
Убедитесь, что ваша операционная система Windows Server 2008 R2 совместима с Virtio драйвером. Поддерживаемые операционные системы указаны в документации Virtio.
2. Создайте резервную копию данных.
Перед установкой нового драйвера рекомендуется создать резервную копию важных данных на вашем сервере. Это поможет избежать потери информации в случае непредвиденных ситуаций.
3. Установите все обновления операционной системы.
Перед установкой Virtio драйвера убедитесь, что на вашем сервере установлены все имеющиеся обновления для операционной системы Windows Server 2008 R2. Обновления могут включать исправления ошибок и улучшения, которые могут быть важными для правильной работы драйвера.
4. Ознакомьтесь с документацией Virtio.
Для успешной установки и настройки Virtio драйвера рекомендуется ознакомиться с документацией от разработчика. В документации вы можете найти подробную информацию о требованиях, поддерживаемых функциях и настройке драйвера.
После выполнения всех предварительных требований вы можете приступить к установке Virtio драйвера на ваш сервер с операционной системой Windows Server 2008 R2.
Hello World,
Today, we will provide a quick how to guide. If you have noticed, Proxmox VE wiki provides a lot of information about how to install Windows XP/Windows 2003 operating systems and how to install virtio drivers. However, you will not see much information about installing/configuring a Windows 7/Windows 2008 (or later) operating system. As I mentioned in other posts, It’s time to move on and start to use and work with the recent operating systems version. This post is a first step in that direction.
1. Preparing your Windows 2008 R2/Windows 7 installation
We assume that you have a running Proxmox VE infrastructure in your infrastructure.
Step 1 – Get Windows 2008R2/Windows 7 and Virtio ISO images
To perform such installation , you will need to upload the following iso images
- Windows 7/windows 2008 R2 Iso image
- Virtio Drivers (can be downloaded from the Fedora project web site : http://alt.fedoraproject.org/pub/alt/virtio-win/latest/images/bin/)
Step 2 – Upload your ISO Images
To upload the ISO images on your Proxmox VE server, you simply open the web interface. On the navigation menu, in the VM Manager Section (on the left side on your screen, you click on the ISO images. You will be presented with the following screen

Click to Enlarge
You click on the Browse button, you specify the location where you have stored you ISO images and then you click on Upload link. When the upload is completed, at the bottom of the page, you can list the ISO Files that have been loaded

Click to enlarge
Step 3 – Create you Virtual Machine
In this post, we have explained in details how to create a virtual machine. We assume that you have a working experience with the Proxmox VE software and we will simply describe the big steps of creating the virtual machine.
Within the Interface, you click on virtual machine in the left menu. In the virtual machine page, you have to click on the Create tab. The virtual machine creation form will be displayed as shown in the following screenshot

Click to Enlarge
In this page, be sure to select the following options :
- Disk type : Virtio
- Guest Type: Windows 2008
- Network Card: Virtio
- Installation medio : the Windows 2008 or Windows 7 ISO image
Press on the create button. Click then on the List Tab and you will see that your new virtual machine has been created. You are ready to move to the next step : Installation of the operating system
Perform your Windows 2008 R2/Windows 7 installation
We are ready to perform our standard Windows 2008/Windows 7 installation. This post will demonstrate how to install the Windows 2008 Operating System. The procedure should be the same for Windows 7 installation.
Within the Proxmox VE (PVE) web interface, you click on the Virtual machine link (on the menu on the left). Click on the virtual machine you’ve just created in the previous section. In the Virtual Machine Configuration page, click on the Start button. After a short time, you will see a link called Open VNC Console
Note : Do not close you browser, we will need to come back to this screen
Step A – Starting the Windows 2008 Setup routine
Click on the link to access the virtual machine through the console. After sometime, you will see the familiar Windows Setup Wizard starting. Select your settings accordingly and press Next

Click to Enlarge
In the Install Windows Page, Click on Install Now

Click to Enlarge
Select the Correct version of the Operating System you want to install and Press Next

Click to Enlarge
Step B – Upload Drivers
At this stage, you will be presented with the following window. As you can see, there is no disks detected by the Setup routine. We are indeed using VIRTIO drivers. The new Setup routine make it more easy (compared to windows 2003) to specify additional drivers. On this page, you can click on the Load Driver option

Click to Enlarge
You will then be presented with a screen where you will be asked to specify the location of the additional drivers to be used

Click to Enlarge
Before continuing, we will need to go back the PVE Web Interface, in the Virtual Machine Configuration Page and we will need to click on the Hardware Tab. There, we have to load the Virtio ISO image into the CD-ROM Drive. When this is done, we can go back to the Virtual machine and proceed with the installation.

Click to Enlarge
Back on the Virtual Machine, you can browse to the CD-Rom device and select the appropriate drivers

Click to Enlarge
As you can see on the screenshot below, the VIRTIO Drivers are now recognized by the Setup routine and we are ready to install them onto the system. Press Next

Click to Enlarge
At the end of this process, you will see that the installation wizard page is now presenting you 1 or more disks (depending on your configuration).

Click to Enlarge
Step C – Setup Routine Installation Completion
We are almost there. But you will notice that the button Next is greyed out and that a warning message is available at the bottom of the dialog box. You can click on Show details to have more information.

Click to Enlarge
What’s does that means ? Okay, no panic ! This cryptic message simply means that the Windows installation files are not available. We simply need to go back the PVE Web interface and again unload the Virtio drivers and reload the Windows installation iso image into the cdrom of the virtual machine (same procedure as above – Step B)
When the Windows CD is reload into the virtual machine, you will see that you can now indeed click on the next button and that the Windows Setup process will simply continue as it should.

Click to Enlarge

Click to Enlarge
Final Steps
The Setup routine will finalize the installation and the system will reboot automatically. When the virtual machine reboots, you will get a running Windows 2008 R2 virtual machine. However, we haven’t finished yet. If you have a look at your network connections, you will see that no network card are available within your virtual machine.

Click to Enlarge
If you open the Device Manager, you will see that the ethernet controller is there but that no drivers are available for it.

Click to Enlarge
Again, we have to load the Virtio ISO in the virtual machine and install the missing drivers. Simply right-click the Ethernet controller in the device manager and click on Update Drivers. The Wizard will start. You simply specify to the wizard where to look for the needed drivers. During the wizard, you might see a warning message. Simply press Install to authorize installation of the virtio drivers and have your network card installed within Windows operating system.

Click to Enlarge
Note : You might be prompted to reboot your server after installing the driver
At the end of the process, you should see your network card (as shown below). We are done. Now simply configure your virtual machine as you need.

Click to Enlarge
Conclusion
In this post, we explained how to create a Windows 2008R2/Windows 7 Virtual machine using VIRTIO drivers when using a Proxmox VE infrastructure. As you have seen the process is quite straightforward (isn’t it !). Because we are using virtio drivers, you will need to perform some additional operations in order for windows to recognize the storage controller. The process to specify additional drivers within Windows 2008 R2/Windows 7 is far easier than with previous versions.
In the future post, we will see how we can integrate the drivers into your windows installation file
Till then, Stay Tuned
See ya
Introduction
This is a set of best practices to follow when installing a Windows Server 2008 R2 guest on a Proxmox VE server 2.x (2.3 at time of writing). Right now it’s a work in progress but hopefully soon it will be a comprehensive and reliable document. Please feel free to add to it, even if just to pose a potential best practice.
Install
Prepare
- After clicking «Create VM» enter a Name: for your vm, select your Resource Pool (if you have one) and click Next
- Select Microsoft Windows 7/2008 in the OS tab and click Next.
- Select an ISO Image: for Windows Server 2008 in the CD/DVD tab and click Next.
- Select Bus/Device: IDE, Storage: «your preferred storage» and Cache: Write back in the Hard Disk tab and click Next.
- Select number of Sockets and cores (the default of 1 is mostly sufficient) in the CPU tab and click Next.
- Select Automatically allocate memory and set the Maximum memory to a number you may require in the memory tab and click Next.
- Select Model: VirtIO (paravirtualized) in the Network tab and click Next
- Click finish and go to the Hardware tab of your newly created VM and click Add -> CD/DVD drive
- Select Storage:local and ISO image: virtio-win-x.x.iso and click create.
- To add a temporary disk for installing VirtIO block driver go to the Hardware tab of your newly created VM again and click Add -> Hard Disk
- Select Bus/Device: VIRTIO, Storage: «your preferred storage» and Cache: Write back and click Add
Launch Windows install
- start your newly created virtual machine using the «Start» link in the upper right.
- wait until the vm icon has turned white before you login using the «Console» link in the upper right. (NOTE: Sometimes the java console does not start at the first attempt. Please click refresh/reload in this case)
- Start the server install with «Install Now» and select the Operating System Flavor you like and click next and select «Custom: Install Windows only»
- Wait until Windows is installed and select a Password for the local Administrator account and login to Windows.
Install additional VirtIO drivers
- Start Explorer, Go to CDROM, copy folder WIN7AMD64 to C:Program Files and rename AMD64 to C:Program FilesVirtIO
- open Device Manager and right click on Other Devices -> Ethernet Controller and select update driver software
- select «Browse my computer» select folder «C:Program FilesVirtIO» and click «Install» for Red Hat VirtIO Ethernet Adapter.
- again in Device Manager right click on Other Devices -> PCI Device and select update driver software
- again «Browse my computer» select folder «C:Program FilesVirtIO» and click «Install» for VirtIO Ballon Driver.
- open a powershell window, cd to «C:Program FilesVirtIO» and enter: blnsvr.exe -i.
The BallonService that can help free up memory is installed. The BallonService is also responsible for displaying the correct amount of memory in the Proxmox console.
further info
raw vs qcow2
Raw file format provides better performance while qcow2 offers advanced features such as copy on write and snapshots. As of Qemu 1.4 / PVE 2.3 qcow2 is expected to provide superior performance.
virtio drivers
Use virtio dirvers for best performance. More info:
Paravirtualized Block Drivers for Windows
latest iso with virtio drivers :
https://fedorapeople.org/groups/virt/virtio-win/direct-downloads/latest-virtio/
Power settings
- In Windows Server 2008, you need to disable the ‘Shutdown Event Tracker’. This setting in Group Policy. If the server is part of a domain, you need to edit the group policy for the organizational unit with the server. If you’re not using a domain, you can edit the local group policy. This can be accessed by doing the following:
- Start -> Run -> gpedit.msc -> ok -> open «Computer Configuration» then «Policy» then «Administrative Templates» then «System». In the right pane, double click on ‘Display Shutdown Event Tracker’ and select ‘disable’ and OK. To make sure the new group policy is applied. Go to Start -> run -> cmd -> ok and type in ‘gpupdate /force’ without the quotes. Now when you select shutdown, you won’t be promoted with the box asking why you are shutting down the server.
- In order to make Windows 2008 R2 guest shutdown cleanly on the event of a shutdown (power button) on the Proxmox VE host you need make the following changes:
- Control Panel -> System and Security -> Power Options -> Edit Plan Settings -> Turn off the display: Never
See also
Windows 2003 guest best practices
Windows 2012 guest best practices
Hello World,
Today, we will provide a quick how to guide. If you have noticed, Proxmox VE wiki provides a lot of information about how to install Windows XP/Windows 2003 operating systems and how to install virtio drivers. However, you will not see much information about installing/configuring a Windows 7/Windows 2008 (or later) operating system. As I mentioned in other posts, It’s time to move on and start to use and work with the recent operating systems version. This post is a first step in that direction.
1. Preparing your Windows 2008 R2/Windows 7 installation
We assume that you have a running Proxmox VE infrastructure in your infrastructure.
Step 1 – Get Windows 2008R2/Windows 7 and Virtio ISO images
To perform such installation , you will need to upload the following iso images
- Windows 7/windows 2008 R2 Iso image
- Virtio Drivers (can be downloaded from the Fedora project web site : http://alt.fedoraproject.org/pub/alt/virtio-win/latest/images/bin/)
Step 2 – Upload your ISO Images
To upload the ISO images on your Proxmox VE server, you simply open the web interface. On the navigation menu, in the VM Manager Section (on the left side on your screen, you click on the ISO images. You will be presented with the following screen
Click to Enlarge
You click on the Browse button, you specify the location where you have stored you ISO images and then you click on Upload link. When the upload is completed, at the bottom of the page, you can list the ISO Files that have been loaded
Click to enlarge
Step 3 – Create you Virtual Machine
In this post, we have explained in details how to create a virtual machine. We assume that you have a working experience with the Proxmox VE software and we will simply describe the big steps of creating the virtual machine.
Within the Interface, you click on virtual machine in the left menu. In the virtual machine page, you have to click on the Create tab. The virtual machine creation form will be displayed as shown in the following screenshot
Click to Enlarge
In this page, be sure to select the following options :
- Disk type : Virtio
- Guest Type: Windows 2008
- Network Card: Virtio
- Installation medio : the Windows 2008 or Windows 7 ISO image
Press on the create button. Click then on the List Tab and you will see that your new virtual machine has been created. You are ready to move to the next step : Installation of the operating system
Perform your Windows 2008 R2/Windows 7 installation
We are ready to perform our standard Windows 2008/Windows 7 installation. This post will demonstrate how to install the Windows 2008 Operating System. The procedure should be the same for Windows 7 installation.
Within the Proxmox VE (PVE) web interface, you click on the Virtual machine link (on the menu on the left). Click on the virtual machine you’ve just created in the previous section. In the Virtual Machine Configuration page, click on the Start button. After a short time, you will see a link called Open VNC Console
Note : Do not close you browser, we will need to come back to this screen
Step A – Starting the Windows 2008 Setup routine
Click on the link to access the virtual machine through the console. After sometime, you will see the familiar Windows Setup Wizard starting. Select your settings accordingly and press Next
Click to Enlarge
In the Install Windows Page, Click on Install Now
Click to Enlarge
Select the Correct version of the Operating System you want to install and Press Next
Click to Enlarge
Step B – Upload Drivers
At this stage, you will be presented with the following window. As you can see, there is no disks detected by the Setup routine. We are indeed using VIRTIO drivers. The new Setup routine make it more easy (compared to windows 2003) to specify additional drivers. On this page, you can click on the Load Driver option
Click to Enlarge
You will then be presented with a screen where you will be asked to specify the location of the additional drivers to be used
Click to Enlarge
Before continuing, we will need to go back the PVE Web Interface, in the Virtual Machine Configuration Page and we will need to click on the Hardware Tab. There, we have to load the Virtio ISO image into the CD-ROM Drive. When this is done, we can go back to the Virtual machine and proceed with the installation.
Click to Enlarge
Back on the Virtual Machine, you can browse to the CD-Rom device and select the appropriate drivers
Click to Enlarge
As you can see on the screenshot below, the VIRTIO Drivers are now recognized by the Setup routine and we are ready to install them onto the system. Press Next
Click to Enlarge
At the end of this process, you will see that the installation wizard page is now presenting you 1 or more disks (depending on your configuration).
Click to Enlarge
Step C – Setup Routine Installation Completion
We are almost there. But you will notice that the button Next is greyed out and that a warning message is available at the bottom of the dialog box. You can click on Show details to have more information.
Click to Enlarge
What’s does that means ? Okay, no panic ! This cryptic message simply means that the Windows installation files are not available. We simply need to go back the PVE Web interface and again unload the Virtio drivers and reload the Windows installation iso image into the cdrom of the virtual machine (same procedure as above – Step B)
When the Windows CD is reload into the virtual machine, you will see that you can now indeed click on the next button and that the Windows Setup process will simply continue as it should.
Click to Enlarge
Click to Enlarge
Final Steps
The Setup routine will finalize the installation and the system will reboot automatically. When the virtual machine reboots, you will get a running Windows 2008 R2 virtual machine. However, we haven’t finished yet. If you have a look at your network connections, you will see that no network card are available within your virtual machine.
Click to Enlarge
If you open the Device Manager, you will see that the ethernet controller is there but that no drivers are available for it.
Click to Enlarge
Again, we have to load the Virtio ISO in the virtual machine and install the missing drivers. Simply right-click the Ethernet controller in the device manager and click on Update Drivers. The Wizard will start. You simply specify to the wizard where to look for the needed drivers. During the wizard, you might see a warning message. Simply press Install to authorize installation of the virtio drivers and have your network card installed within Windows operating system.
Click to Enlarge
Note : You might be prompted to reboot your server after installing the driver
At the end of the process, you should see your network card (as shown below). We are done. Now simply configure your virtual machine as you need.
Click to Enlarge
Conclusion
In this post, we explained how to create a Windows 2008R2/Windows 7 Virtual machine using VIRTIO drivers when using a Proxmox VE infrastructure. As you have seen the process is quite straightforward (isn’t it !). Because we are using virtio drivers, you will need to perform some additional operations in order for windows to recognize the storage controller. The process to specify additional drivers within Windows 2008 R2/Windows 7 is far easier than with previous versions.
In the future post, we will see how we can integrate the drivers into your windows installation file
Till then, Stay Tuned
See ya
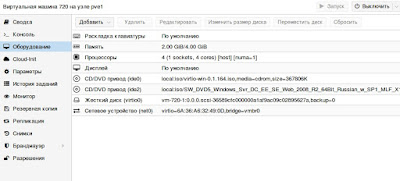
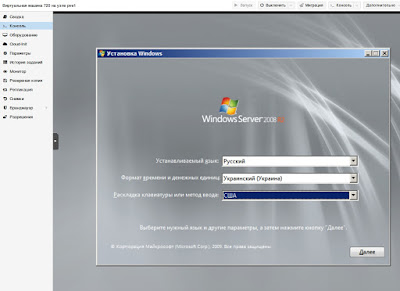
При создании VM внутри proxmox 6.4.4 с осью Windows Server 2008 R2 Ent (из образа) SW_DVD5_Windows_Svr_DC_EE_SE_Web_2008_R2_64Bit_English_w_SP1_MLF_X17-22580.ISO
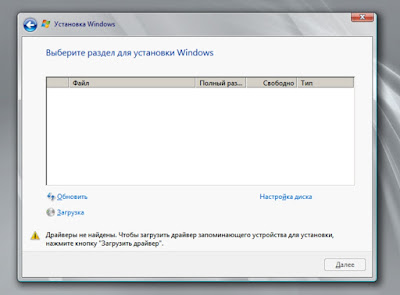
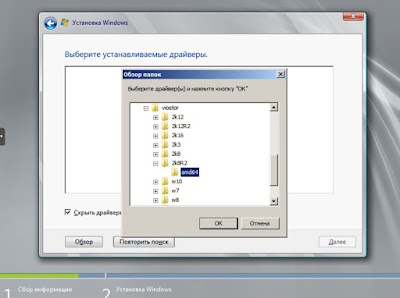
Если диск выбран Virtio SCSI, то установщик его не видит “No drives were found. Click Load Driver to provide a mass storage driver for installation” выбираю второй привод куда примонтирован образ с драйверами из пакета virtio-win-0.1.185.iso: Browse - CD Drive (EJ virtio-0.1.185.iso) - viostor - 2k8R2 - amd64 и нажимаю OK, но не все так гладко, в ответ получаю ошибку:
No signed device drivers were found. Make sure that the installation media contains the correct drivers, and then click OK.

Странно такого никогда не было, монтирую к VM образ с драйверами, которыми я пользуюсь всегда и составлял образ Windows с применением файлов ответов: virtio-win-0.1.171.iso
VM нужно перезагрузить
Снова дохожу до этапа разметки дисков
и указав путь: virtio-win-0.1.171.iso: Browse - CD Drive (EJ virtio-0.1.171.iso) - viostor - 2k8R2 - amd64 и нажимаю OK, установщик подхватывает указанные драйвера для диска и установка далее проходит успешно:

В дальнейшем установка драйверов на сетевую карту, видеодрайвер, агент успешна если образ драйверов virtio-0.1.171.iso, но если попытаться использовать virtio-0.1.185.iso
Мой компьютер: E: запускаю virtio-win-guest-tools.exe и постигает неудача, образ предназначен для VM начиная от Windows 8 и выше, а Windows Server 2008 R2 в этот список не входит.

Поэтому я использую свои наработки и действую только по ним чтобы все было стандартизировано.
На этом практическая заметка завершена, с уважением автор блога Олло Александр aka ekzorchik.
This is a follow up to a pervious question. I have a Ubuntu host with a Win 2008 KVM. To improve performance the network and IO — @dyasny and the documentation recommends installing virtIO drivers. I did follow this :
http://www.linux-kvm.org/page/WindowsGuestDrivers/Download_Drivers
Downloaded the ISO from:
http://alt.fedoraproject.org/pub/alt/virtio-win/latest/images/
Now I am not sure how to proceed. I have the Win 2008 VM already installed with the virtual disk in RAW format with an IDE bus.
I opened the iso and have several folders. Like
E:Balloon
E:NetKVM
E:vioserial
E:viostor
I am assuming NetKVM is for the network drivers and viostor is for the disk drivers.
For the NetKVM, there is only Vista and XP sub-folders.
Similarly for the viostor: there is a folder structure like below.
E:viostorWin7
E:viostorWlh
E:viostorWnet
E:viostorWXp
So in summary, my questions:
- Which folders should we use for Win
2008 64 bit? - How do I install the NetKVM for an
existing VM? - How do I ins tall the viostor for
an existing VM? - Finally, just out of curiosity,
what is Ballon and vioserial drivers
for?
Thanks a ton for your help!
The source for the Windows drivers is hosted in a repository on GIT hub. Anonymous users can clone the repository
git clone git://github.com/virtio-win/kvm-guest-drivers-windows.git
Browse GIT repository online
Binary Drivers
Binary drivers are provided by some Linux distributions including WHQL Certified drivers.
For example the binary drivers for Ubuntu can be found here.
64-bit versions of Windows Vista and newer (this currently includes Windows Server 2008, Windows 7, Windows 8, Windows Server 2008 R2 and Windows Server 2012) require the drivers to be digitally signed to load.
If your distribution does not provide binary drivers for Windows, you can use the package from the Fedora Project. These drivers are digitally signed, and will work on 64-bit versions of Windows:
Latest VirtIO drivers for Windows from Fedora
Code signing drivers for the Windows 64bit platforms
- Drivers should be signed for Windows 64bit platforms.
- Here are some links how to self sign and install self signed drivers:
- Installing Test-Signed Driver Packages
- How to Release-Sign File System Drivers
KVM/QEMU Windows guest drivers (virtio-win)
This repository contains KVM/QEMU Windows guest drivers, for both
paravirtual and emulated hardware. The code builds and ships as part
of the virtio-win RPM on Fedora and Red Hat Enterprise Linux, and the
binaries are also available in the form of distribution-neutral ISO
and VFD images. If all you want is use virtio-win in your Windows
virtual machines, go to the
Fedora virtIO-win documentation
for information on obtaining the binaries.
If you’d like to build virtio-win from sources, clone this repo and
follow the instructions in Building the Drivers.
Note that the drivers you build will be either unsigned or test-signed
with Tools/VirtIOTestCert.cer, which means that Windows will not load
them by default. See Microsoft’s driver signing page
for more information on test-signing.
If you want to build cross-signed binaries (like the ones that ship in
the Fedora RPM), you’ll need your own code-signing certificate.
Cross-signed drivers can be used on all versions of Windows except for
the latest Windows 10 with secure boot enabled. However, systems with
cross-signed drivers will not receive Microsoft support.
If you want to produce Microsoft-signed binaries (fully supported,
like the ones that ship in the Red Hat Enterprise Linux RPM), you’ll
need to submit the drivers to Microsoft along with a set of test
results (so called WHQL process). If you decide to WHQL the drivers,
make sure to base them on commit eb2996de or newer, since the GPL
license used prior to this commit is not compatible with WHQL.
Additionally, we ask that you make a change to the Hardware IDs so
that your drivers will not match devices exposed by the upstream
versions of KVM/QEMU. This is especially important if you plan to
distribute the drivers with Windows Update, see the
Microsoft publishing restrictions for more details.
Сегодня постараюсь описать все трудности в пути установки операционной системы (ОС) семейства Windows (а конкретнее Windows Server 2008 R2) на виртуальную машину KVM (используется qemu-kvm) в ОС Linux (а именно Debian 7)
Сложностей с установкой kvm возникнуть не должно
apt-get install qemu-kvm
Далее необходимо скопировать установочный образ операционной системы куда-нибудь на диск. К примеру можно скопировать в ~/kvm.
sudo dd if=/dev/cdrom of=Window_Server_2008_R2.iso
Самое необходимое: скачайте драйвера virtio, без них установка будет очень-очень долгой.
wget https://launchpad.net/kvm-guest-drivers-windows/20120712/20120712/+download/virtio-win-drivers-20120712-1.iso
Затем создадим папку для файлов виртуального жёсткого диска
cd ~ && mkdir KVM && cd KVM
И сам файл виртуального жёсткого диска, где 25G — его размер
qemu-img create -f qcow2 WIN2K8R2.qcow2 25G
и самое главное — запуск самой виртуальной машины.
qemu-system-x86_64 —enable-kvm -m 2048 -boot d -drive file=WIN2K8R2.qcow2,if=virtio -cdrom Win2K8X64R2Ent.iso -drive file=virtio-win-drivers-20120712-1.iso,media=cdrom -net nic,model=virtio -net user
, где -m 2048 — объём оперативной памяти для неё, WIN2K8R2.qcow2 — файл виртуального жёсткого диска, созданного ранее, if=virtio — источник драйверов для подключения жёсткого диска к виртуальной машине, Win2K8X64R2Ent.iso — образ операционной системы.
К сожалению, мне пришлось подключаться к удалённому рабочему столу, потому что по ssh установить Windows не удавалось, система требовала графический интерфейс.
Для запуска qemu под юзером производим следующие шаги:
Редактируем /etc/libvirt/qemu.conf, чтобы виртуальные машины работали у нас от непривилегированного пользователя:
user = "username"

group = "libvirt"
Поскольку у нас будут использоваться tun-устройства, нужно выставить capability CAP_NET_ADMIN, сделать это можно как для отдельного исполняемого файла, так и для пользователя в целом, или настроить чтобы libvirt не сбрасывал нужные права для qemu/kvm.
Выставляем для отдельного файла:
sudo setcap cap_net_admin=ei /usr/bin/kvm
Или выставляем для пользователя в целом в файле /etc/security/capability.conf:
cap_net_admin username
Или выставляем соответствующую настройку в /etc/libvirt/qemu.conf:
clear_emulator_capabilities = 0
Добавим пользователя в группу libvirt и kvm:
# adduser username libvirt
Установка Windows Server проста до безобразия, если знать когда подсунуть файлы драйверов для жёсткого диска.
Приведу краткий перечень действий, необходимых для корректной установки:
- Нажимаем Install
- Выбираем тип ОС
- Соглашаемся с лицензионным соглашением
- Выбираем Полная установка
- Щёлкаем по ‘Загрузить драйвер’
- Обзор
- Выбираем диск с драйверами Virtio. дисков должно быть два: один с Windows, другой — с драйверами.
- Выбираем ‘Virtio Drivers’ => STORAGE => SERVER2008R2 => AMD64
- OK
- Драйвер ‘Red Hat VirtIO SCSI controller’ будет выбран. Если его не видно, значит что то пошло не так 🙁
- Жмакаем Далее. Драйвер загрузится и вернёт на экран выбора дисков для установки ОС. Если размер не меняли, то там будет 25 Гб.
- Щёлкаем на пустом диске и жмём Далее. Всё. Установка идёт стандартным путём.
Единственная трудность случилась в конце установки, когда нужно придумать пароль для учётной записи администратора. Через RDP почему то не печатались иностранные символы, пришлось воспользоваться экранной клавиатурой.
Потребление памяти и утилизация процессора в пределах нормы и не превышала пары процентов при простое системы. Проц — Celeron G1620 🙂
Теперь осталось пробросить эту машину во внешку и подключится к ней по RDP, минуя RDP хостовой системы. Это пока не решено.