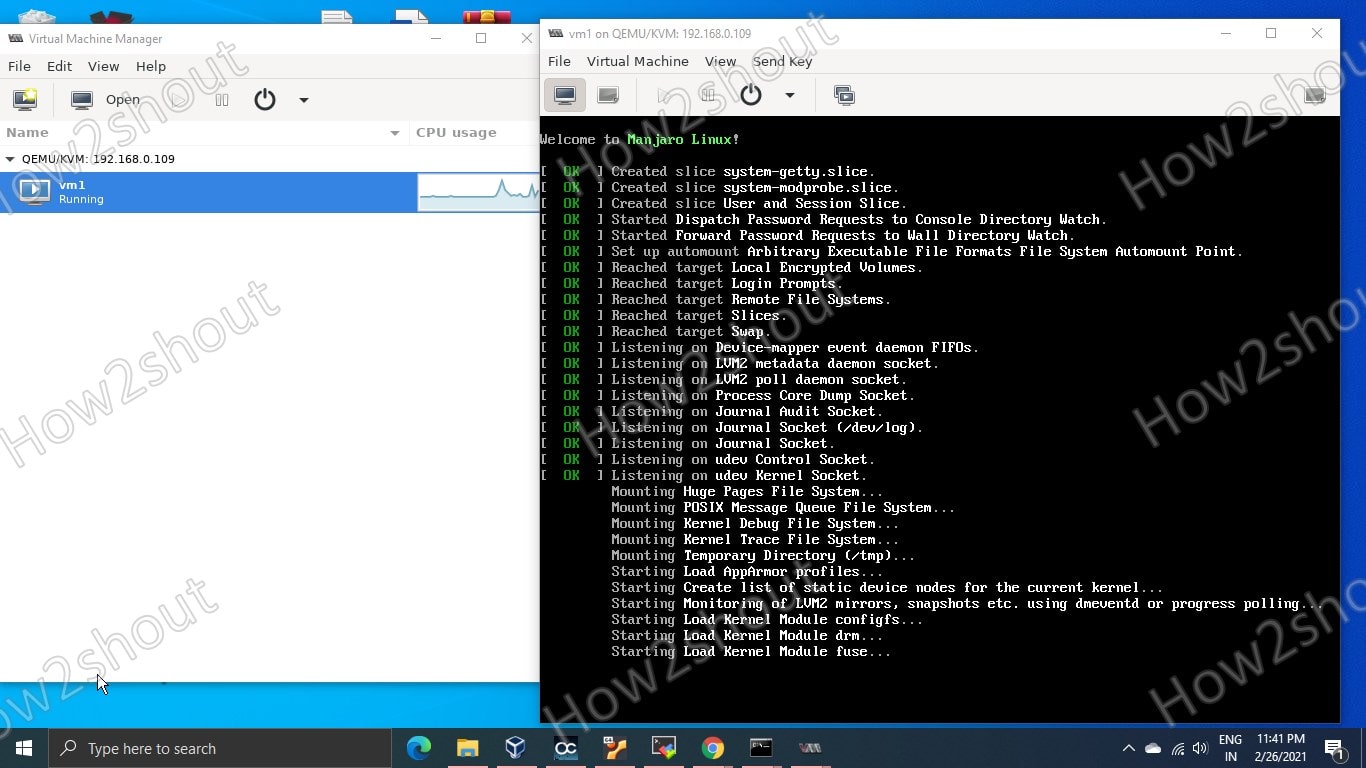
Virt-Manager – графическая консоль для управления виртуальными машинами KVM от компании Red Hat. С помощью Virt-Manager можно, создавать, редактировать, запускать и останавливать виртуальные машины на гипервизоре KVM. Можно выполнять настройку параметров виртуальных машин, что значительно упрощает работу по сравнению с управлением KVM из интерфейса командной строки.
В статье мы рассмотрим установку Virt-Manager на сервер с KVM, типовые задачи управления виртуальными машинами в графической консоли и покажем, как использовать virt-manager из Windows-клиента.
Содержание:
- Установка Virt-Manager в Linux
- Управление KVM через virt-manager из Windows
- Использование Virt-Manager для управления виртуальными машинами KVM
- Типовые проблемы с Virt-Manager
Установка Virt-Manager в Linux
Прежде всего нужно установить необходимые пакеты из базового репозитория на сервере с KVM (в нашем примере сервер KVM установлен на Linux CentOS). Выполните следующую команду yum (или dnf):
# yum install -y virt-manager xorg-x11-xauth liberation-sans-fonts
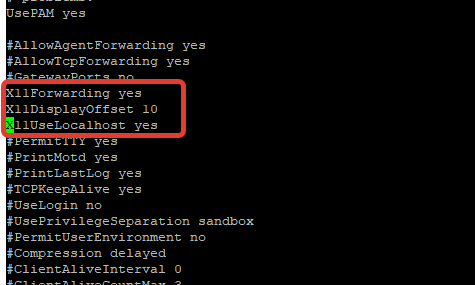
Чтобы удаленно подключаться к virt-manager с Windows-компьютера, нужно дополнительно настроить SSH. Откройте файл sshd_config:
# nano /etc/ssh/sshd_config
Включите следующие параметры:
X11Forwarding yes
X11DisplayOffset 10
X11UseLocalhost yes
Перезапустите сервис sshd:
# service sshd restart
Управление KVM через virt-manager из Windows
Для удалённого подключения к virt-manager с Windows компьютера, вам понадобится следующее ПО:
- Putty – ssh клиент
- Xming – порт сервера для ОС Windows.
Скачать putty можно с официального сайта https://www.putty.org/, а Xming по ссылке https://sourceforge.net/projects/xming/
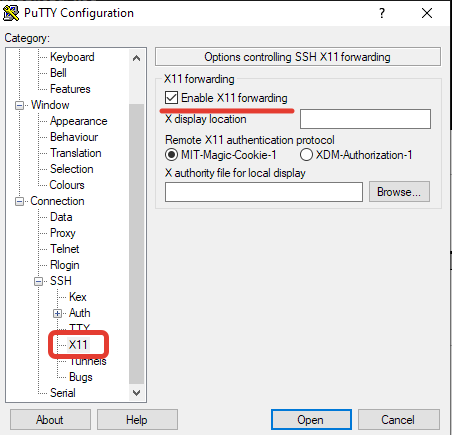
Откройте Putty, перейдите в Connection—>SSH—X11. Включите опцию “Enable X11 Forwarding“.
Теперь на вкладке Session, укажите адрес KVM сервера, имя сессии, укажите порт и сохраните подключение.
Чтобы из Windows удаленно подключаться к KVM серверу через virt-manager, используется следующий порядок:
- Сначала запускаете Xming;
- Запускаете сохраненную сессию Putty с опцией X11 Forwarding;
- Подключаетесь к virt-manager.
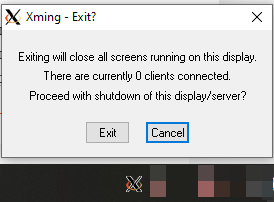
После включения Xming у вас в трее должен светиться значок X:
Далее запустите Putty, и после авторизации на сервере, выполните:
# virt-manager
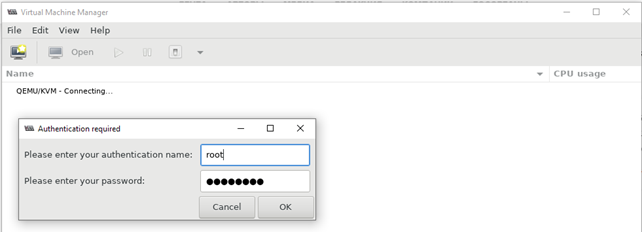
Через несколько секунд у вас должно открыться окно управления virt-manager и окно дополнительной авторизации, где нужно ввести данные для подключения к серверу:
После авторизации вы должны увидеть список виртуальных машин.
Использование Virt-Manager для управления виртуальными машинами KVM
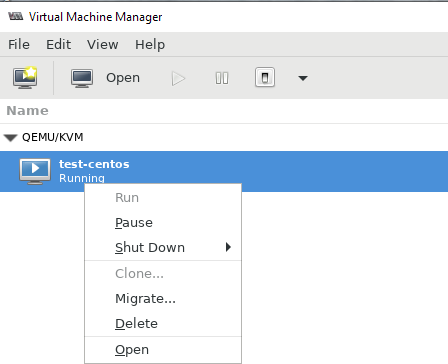
Щелкнув ПКМ по виртуальной машине, вы можете выключить, перезагрузить, включить ВМ.
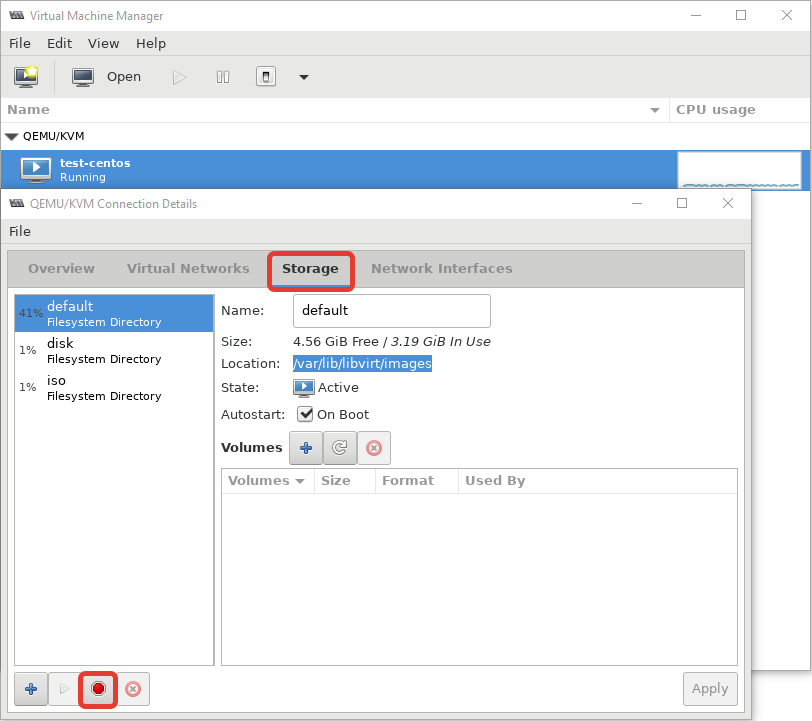
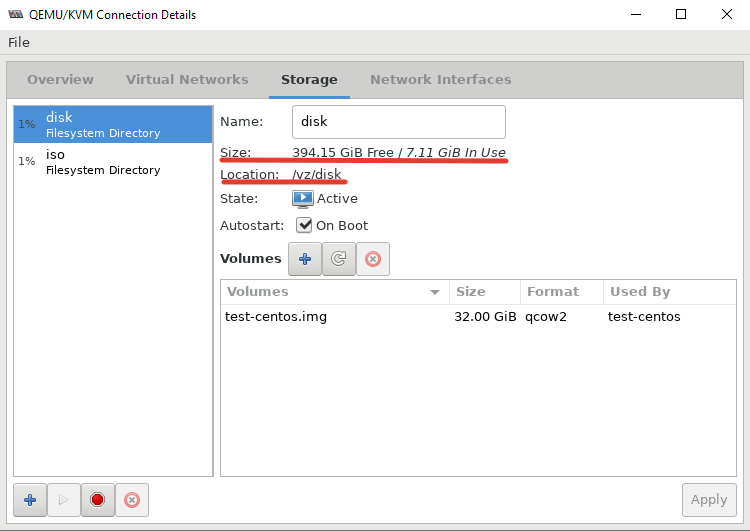
Далее я хочу изменить директорию для хранения файлов виртуальных машин, так как основное место на диске при установке операционной системы на сервере с KVM, я отдал под директорию VZ. Чтобы поменять стандартную директорию, перейдите в меню “Edit -> Connection Details”.

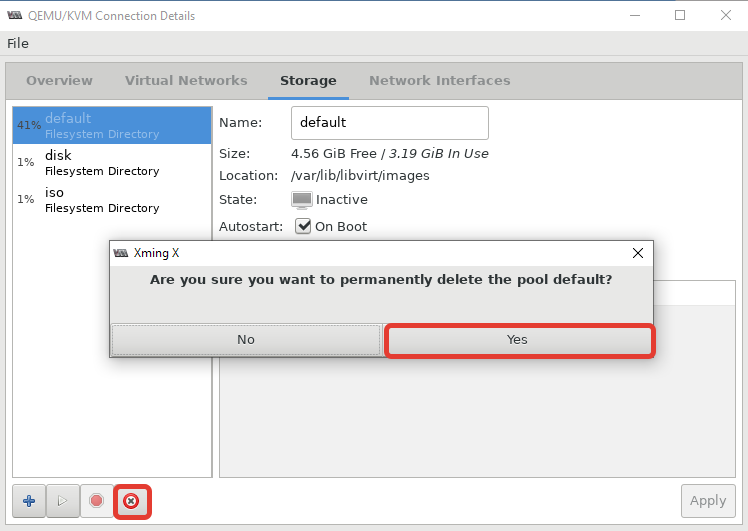
После установки пула, кнопка удаления станет активна:
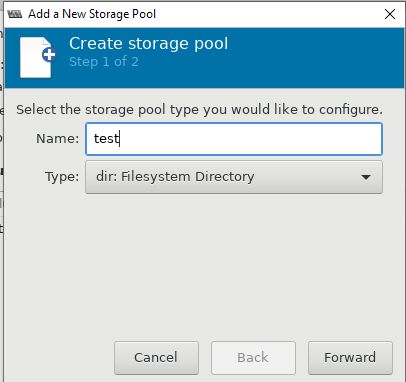
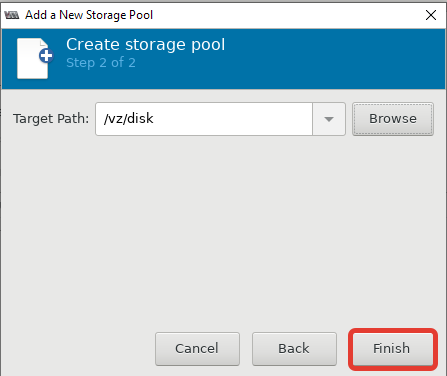
Теперь можно создать пул в нужной вам директории или разделе:
После этого, у меня стал активным мой основной раздел для файлов ВМ:
Либо просто удалить первоначальную директорию и создал симлинк на нужный раздел:
# rm -rf /var/lib/libvirt/images/
# ln -s /vz/disk/ /var/lib/libvirt/images
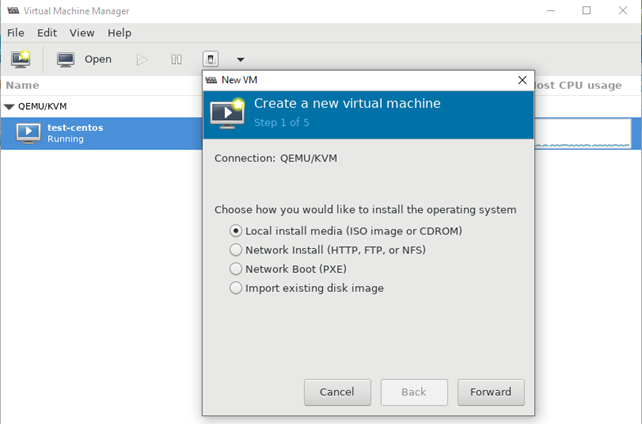
Теперь можно попробовать создать новую виртуальную машину KVM. Ниже я прикреплю ряд скриншотов, на которых по шагам будет все более-менее понятно. В конце опишу весь процесс создания машины.
- При нажатии кнопки на первом скриншоте, запускается процесс создания новой виртуальной машины KVM;
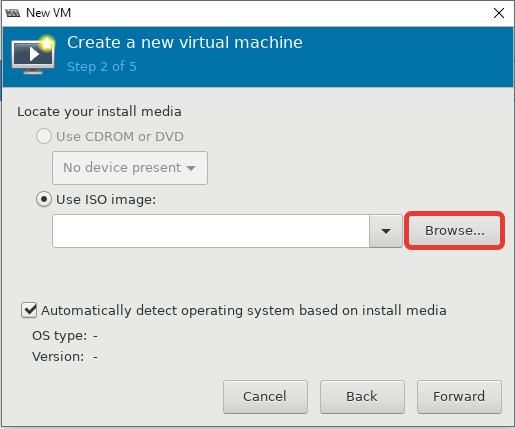
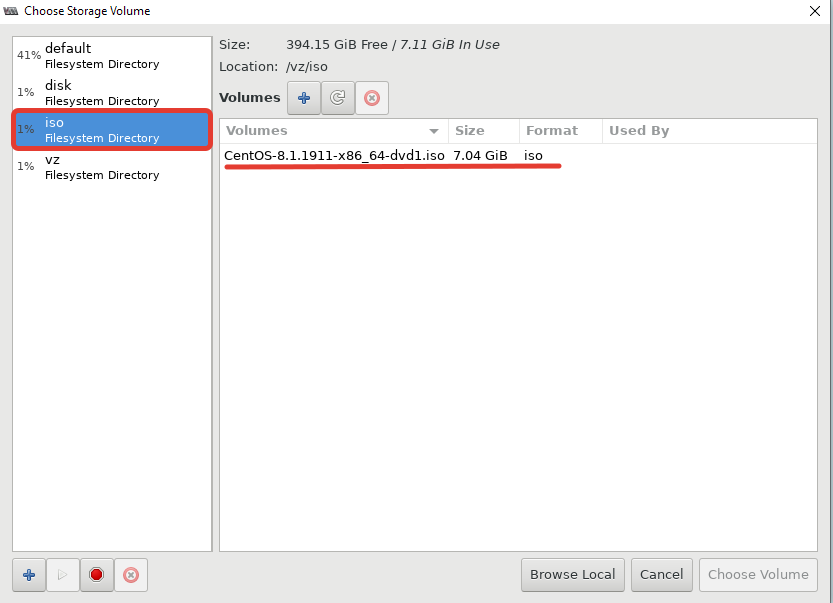
- Затем указываем, откуда запускать установку ОС на виртуальной машине. Я использовал локальный ISO образ с дистрибутивом CentOS 8;
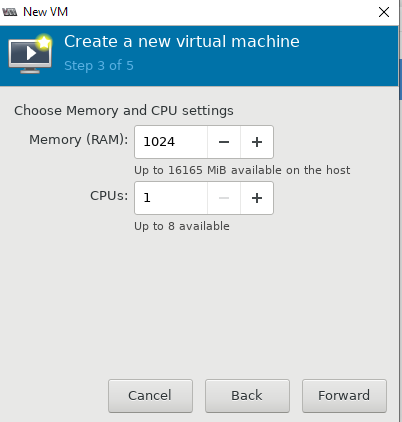
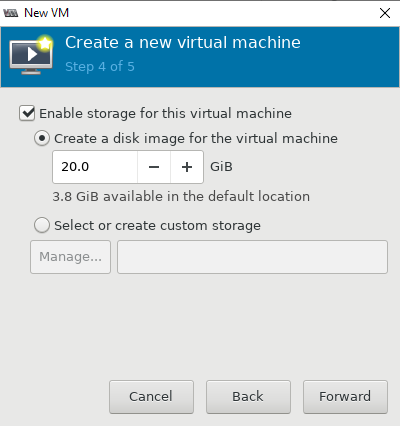
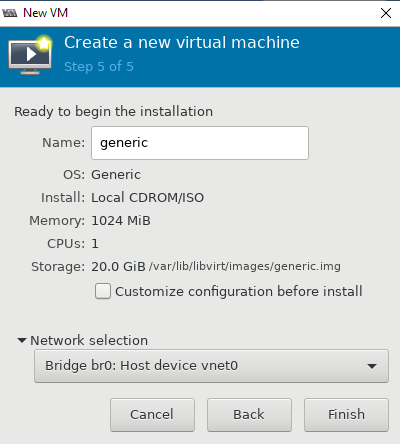
- Далее настраиваются ресурсы виртуальной машины: количество памяти и vCPU, размер виртуального диска (при необходимости его можно будет расширить или уменьшить), имя, и указываем сеть;
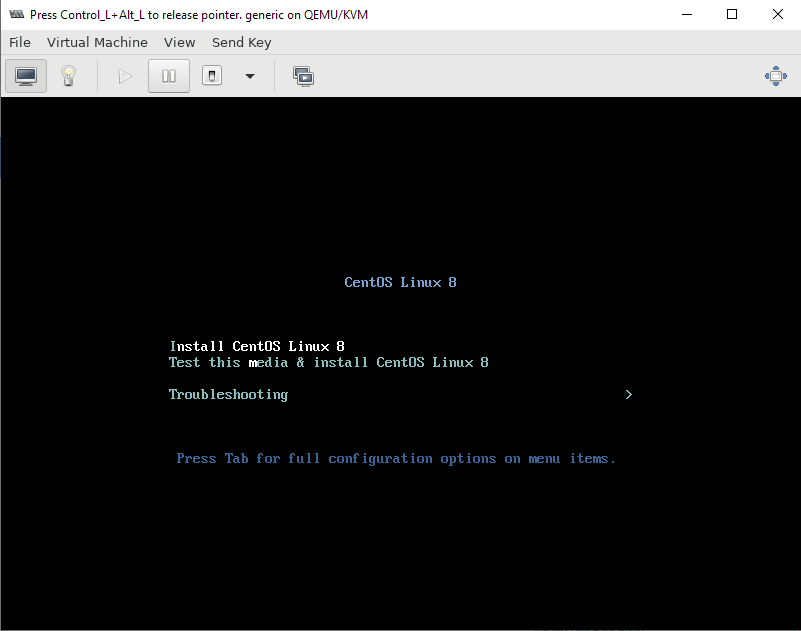
- После создания ВМ к ней сразу будет примонтирован установочный образ ОС, который указали при создании.
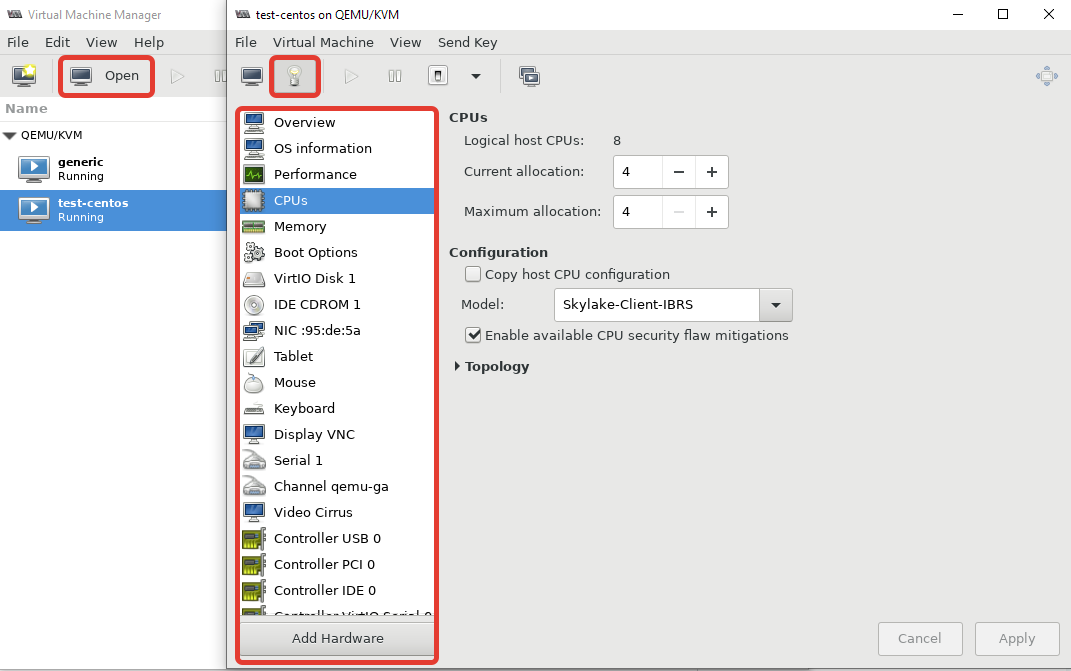
Чтобы изменить ресурсы или какие-то параметры уже созданной машины, вам нужно выделить ее и нажать кнопку “Open”. В открывшемся меню нажмите на лампочку и у вас откроется список параметров виртуальной машины KVM.
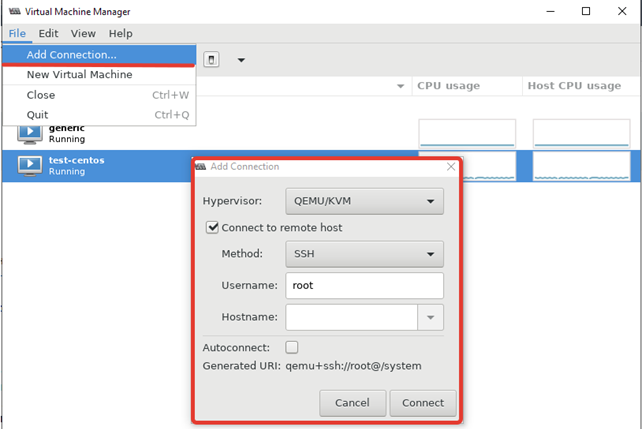
Чтобы добавить новый сервер KVM, выполните следующее “File -> Add Connection” и заполните данные в открывшемся окне:
Red Hat Linux изменила статус virt-manager в RHEL 8 на deprecated, и возможно в следующих релизах OC этот пакет будет недоступен. Вместо него предлагается использовать веб интерфейс Cockpit. Однако на данный момент в модуле управления KVM в Cockpit пока нет хватает всех необходимых функций, доступных в virt-manager.
Типовые проблемы с Virt-Manager
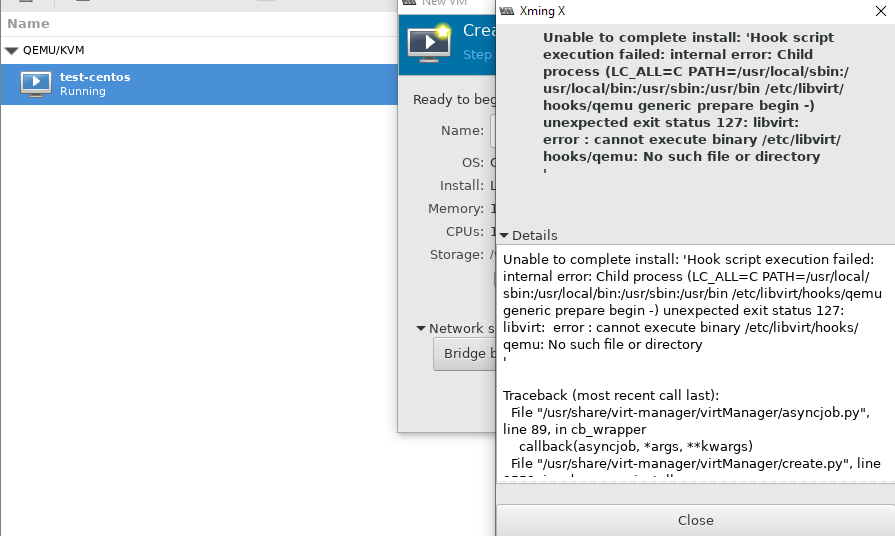
Во время изучения интерфейса virt-manager, я столкнулся с несколькими ошибками и решил описать их в статье. Первая ошибка, с которой я столкнулся, вышла на стадии создания новой виртуальной машины:
libvirt error: cannot execute binary /etc/libvirt/hooks.qemu: No such file or directory.
Система ругается на отсутствие файла, который скорее всего должен быть создан при установке KVM на сервер, но в моем случае он отсутствовал. Решился вопрос, созданием файла:
# touch /etc/libvirt/hooks/qemu
После этого нужно перезапустить сервис libvirtd:
# service libvirtd restart
Следующая ошибка ожидала меня сразу же на следующем шаге установки:
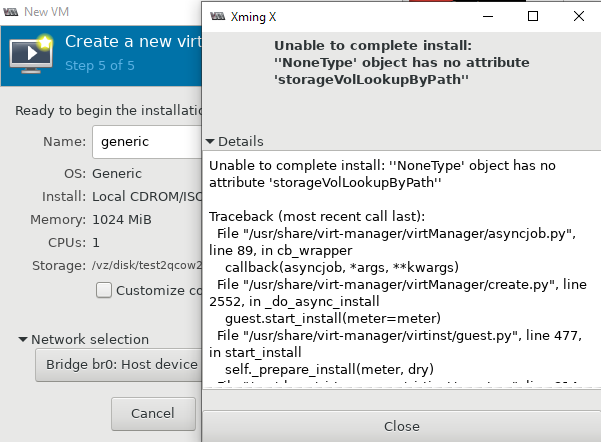
Unable to complete install: “NoneType object has no attribute storageVolLookupByPath“
Чтобы решить эту проблему и возможно последующие другие, нужно установить пакет qemu-kvm-tools:
# yum install qemu-kvm-tools -y
После выполненных действий, виртуальная машина создалась без ошибок, и я смог выполнить установку гостевой операционной системы на ней.
Управлять KVM через virt-manager очень удобно. Вы значительно сократите время на выполнение рядовых операций с виртуальными машинами, а также сможете подключиться к ним из Windows.
Installing Virt-Manager on Windows 10 is not like any other application method because it is a Linux program and meant to manage Linux running virtual machines. However, don’t forget we have a Windows Subsystem for Linux on Windows 10, thus it is quite possible to run the GUI interface of Virt-Manager on Windows like any other application. Here are the steps to follow…
Virt-Manager is an open-source app that provides a graphical user interface to command line Type 1 hypervisor platforms such as Qemu, KVM, and Xen.
1. Enable WSL – Windows 10 subsystem for Linux
The steps given here are straightforward, however, before following them make sure on your Windows 10, you have WSL enabled and have at least Ubuntu 20.04 or 18.04 LTS version running over it. If you don’t know how to do that then see our tutorial on how to enable WSL and install Ubuntu over it.
2. Download and install MobaXterm
MobaXterm is a free application that provides a wide range of tools and server services to makes the job of developers and administrators a lot easier. In short, it is an enhanced terminal for Windows with an X11 server, tabbed SSH client, network tools, and much more. Here is the link to download the MobaXterm home edition. After downloading, install it like any other normal Windows software.
3. Open MobaXterm and run WSL Linux
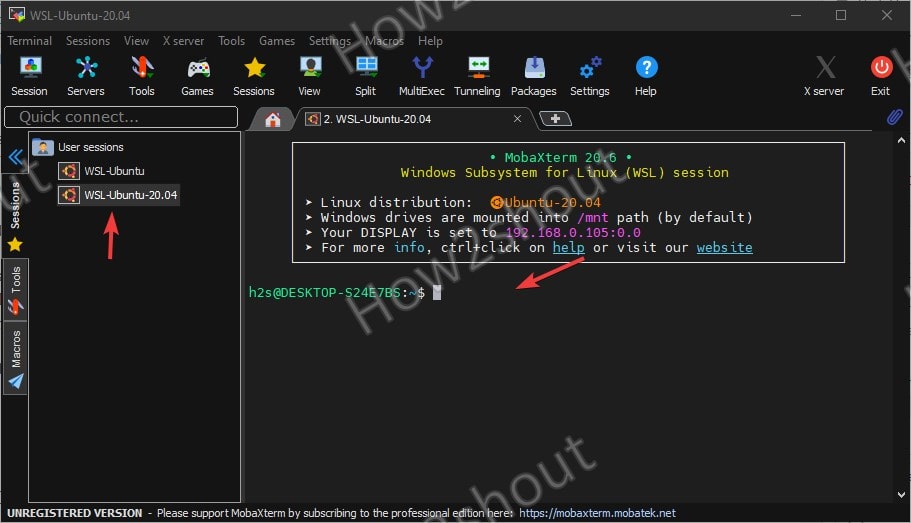
As you open this advanced terminal for Windows 10, WSL installed Ubuntu app will show on the left side panel of it. Double click on that to start the WSL session.
2. Install Virt-Manager
Once you have started the WSL on your Windows 10 installed MobaXterm, the next thing is to run the Ubuntu system update command.
sudo apt update
After that in the command line terminal of Linux, simply run the Virt-Manager installation command as we do on any regular Linux distro of Debian.
sudo apt install virt-manager
3. Run Virt-Manager GUI on Windows 10
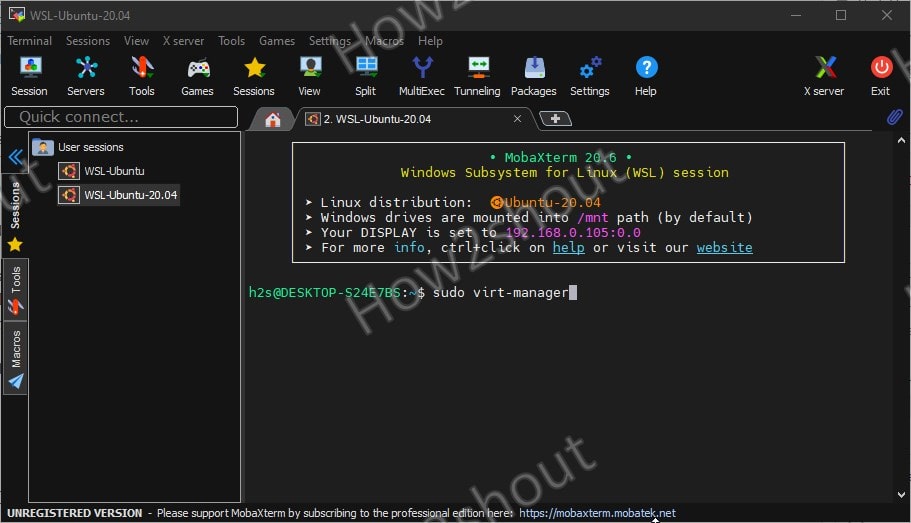
Everything is ready, we already have our Linux Virtual Machine Manager installed on Windows 10 WSL, it’s time to open its GUI interface. For that run:
sudo virt-manager
Note: Remember the Graphical user interface of applications installed on Linux can only be accessed on MobaXterm, directly on WSL 1, it is not possible because of no X server availability.
4. Connect Remote KVM on Virt- Manager
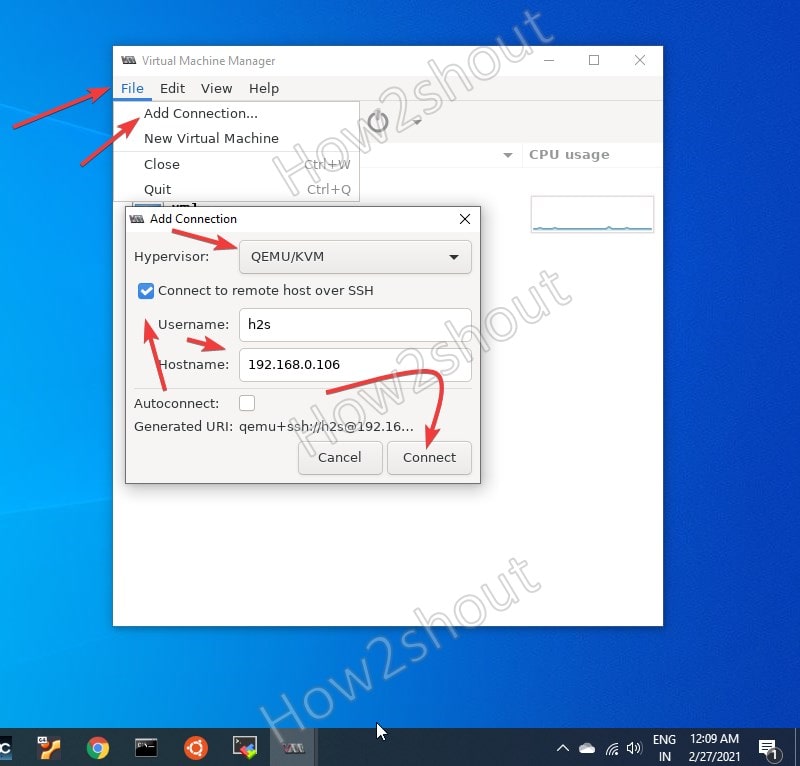
As we cannot install KVM on the Windows platform, thus obviously the reason for using this Linux Virtual Machine manager is to connect some remote Linux server running with KVM. Therefore, click on the File menu of Virt-Manager and select “New Connection“.
Then check “Connect to a remote host over SSH” and enter the user and hostname of the remote KVM server you want to connect.
5. Start managing KVM Virtual Machines
Once connected, you will have the list of Virtual machines running on remote KVM on Windows 10 running Virt-Manager. Now, you can directly control or view them.
Other Tutorials:
- How to use Virt-Manager GUI to manage Multipass Ubuntu VMs
- How to install GUI File Manager Nautilus on WSL -Windows 10 Subsystem for Linux
- How to enable WSL 2 Windows 10 Subsystem for Linux
Для установки Virt-Manager на ОС Windows необходимо выполнить следующие шаги:
1. Перейти на официальный сайт Virt-Manager и скачать установщик, соответствующий архитектуре (x86 или x64) локального устройства.
2. Запустить скачанный установщик, щелкнув по нему левой кнопкой мыши.
3. Следовать инструкциям мастера установки Virt-Manager.
После завершения установки Virt-Manager для запуска VNC консоли необходимо:
1. Перейти в панель управления Invapi.
2. Открыть раздел «Console and IPMI Access».
3. Нажать на кнопку «Launch VNC console». Это приведет к загрузке файла console.vv.
4. Щелкнуть левой кнопкой мыши по скачанному файлу console.vv для запуска VNC-консоли.
Guide to run virt-manager on a Windows box bare metal, instead of using X11 forwarding to a remote window of virt-manager.
CYGWIN + Virt-Manager
Download: https://www.cygwin.com/setup-x86_64.exe
Install Cygwin64.
The bare minimum packages required:
Click View: Full
Use the search box and look for these packages by name.
X11 => xinit: X.Org X server launcher
X11 => xlaunch: GUI tool for configuring and starting the XWin X server
X11 => xorg-server: X.Org X servers
Net => openssh: The OpenSSH server and client programs
Gnome => gnome-openssh-askpass: Gnome GTK+ passphrase grabber ssh-add
Debug => gnome-ssh-askpass-debuginfo: Debug info for gnome-ssh-askpass
Debug => python-gi-debuginfo: Debug info for python-gi
Python => python-gi-devel: Python GObject Introspection bindings
Python => python27-cairo: Python bindings to libcairo
Python => python-cairo-devel: Python bindings to libcairo
Python => python37-cairo: Python bindings to libcairo
System => virt-manager: Virtualization manager
Right click “Cygwin64 Terminal” run as administrator.
or
If you want Cygwin64 to always run as administrator right click the “Cygwin64 Terminal”.
Click Properties.
Click Compatibility Tab.
Priviledge Level
(Check) Run this program as an administrator
Note: If it is disabled click “Change settings for all users” first.
Then run “Cygwin64 Terminal”.
Create A Batch File & Start virt-manager From GUI Icon With askpass
lxqt-openssh-askpass (password popup) instead of the terminal password entry below.
Make sure you followed the steps above to add the system link to fix askpass for virt-manager.
Create a batch file to start X11.
Note: You will see a tray icon next to the windows clock when it loads.
x11start.bat
C:\cygwin64\bin\run.exe /usr/bin/bash.exe -l -c /usr/bin/startxwin
If the only reason you have Cygwin64 installed is to run virt-manager you can make it auto start when it runs X11.
Make a file C:\cygwin64\home<USERNAME>.startxwinrc
.startxwinrc
When X11 Loads it will also run virt-manager.
Otherwise run “Virtual Machine Manager” from the “x applications menu on :0” (Taskbar beside the clock CYGWIN logo)
Click System Tools => Virtual Machine Manager
Wait for virt-manager to load…
Add a Hypervisor connection: File => Add Connection...
Click Connect To Remote Host Checkmark.
Type in the IP address to the Hypervisor in the Hostname box.
Click Connect.
Then you should just have to click on your connection and type yes in askpass to add the ssh key and then type the password for the hypervisor into askpass.
Start virt-manager From GUI Icon With No askpass
Run lxterminal from the “x applications menu on :0” (Taskbar beside the clock CYGWIN logo)
Type virt-manager --no-fork
Note: no-fork makes so you don’t require the use of openssh-askpass
Wait for virt-manager to load…
Add a Hypervisor connection: File => Add Connection...
Click Connect To Remote Host Checkmark.
Type in the IP address to the Hypervisor in the Hostname box.
Click Connect.
Look in the LXTerminal window, it should be waiting for you to type your hypervisor password.
You should now see your VM’s load.
Start X11 & lxterminal From a batch file To Run virt-manager
Create a batch file to start X11.
Note: You will see a tray icon next to the windows clock when it loads.
x11start.bat
C:\cygwin64\bin\run.exe /usr/bin/bash.exe -l -c /usr/bin/startxwin
Make a file C:\cygwin64\home<USERNAME>.startxwinrc
.startxwinrc
When X11 Loads it will also run lxterminal which you then can just type:
Note: After you click your virtual machine pay attention to the terminal window as you will have to type your hypervisor password there.
or just virt-manager if you setup askpass properly above.
Manual Run From Cygwin64 Terminal
If you don’t want to configure stuff above just run it all manually.
Load X11 in the background, export x11’s display to our current CLI, run virt-manager in that display.
startxwin >/dev/null 2>&1 &
export DISPLAY=:0.0
virt-manager --no-fork
Example
windowsuser@windowsbox ~
$ startxwin >/dev/null 2>&1 &
[1] 7840

windowsuser@windowsbox ~
$ export DISPLAY=:0.0

windowsuser@windowsbox ~
$ virt-manager --no-fork
root@10.0.1.10's password:
Note: The password prompt will show up after you make a connection in the virt-manager window.
or just virt-manager if you setup askpass properly above, which will fire off a GUI password box instead of using the terminal.
Troubleshooting
Trouble
Unable to connect to libvirt qemu+ssh://root@X.X.X.X/system.
End of file while reading data: sh: nc: command not found: Input/output error
Shoot
Install BSD Version of NetCat on your Hypervisor.
Trouble
Unable to connect to libvirt qemu+ssh://root@X.X.X.X/system.
The remote host requires a version of netcat/nc which supports the -U option.
Shoot
Install BSD Version of NetCat on your Hypervisor.
pacman -R gnu-netcat
pacman -S openbsd-netcat
Trouble
Askpass dialog not popping up.
Shoot
You may have installed lxqt-openssh-askpass instead of gnome-openssh-askpass either reinstall gnome-openssh-askpass or make a systemlink for lxqt-openssh-askpass to work.
Only if you install lxqt-openssh-askpass. Not if you install gnome-openssh-askpass
Create a system link to fix the broken link for askpass in virt-manager, virt-manager points to /usr/sbin/ssh-askpass, cygwin installs it to /bin/lxqt-openssh-askpass.
ln -s /bin/lxqt-openssh-askpass /usr/sbin/ssh-askpass
Embed
What would you like to do?
Install virt-manager in Windows 11 WSL (qemu, Windows Subsystem for Linux)
This file contains bidirectional Unicode text that may be interpreted or compiled differently than what appears below. To review, open the file in an editor that reveals hidden Unicode characters.
Learn more about bidirectional Unicode characters
| # Inside WSL… | |
| # Install virt-manager | |
| sudo apt install -y virt-manager | |
| # Add youself to kvm and libvirt group | |
| sudo usermod —append —groups kvm,libvirt «${USER}» | |
| # Fix-up permission to avoid «Could not access KVM kernel module: Permission denied» error | |
| sudo chown root:kvm /dev/kvm | |
| sudo chmod 660 /dev/kvm | |
| # Start required services | |
| sudo libvirtd & | |
| sudo virtlogd & | |
| # Launch virt-manager | |
| virt-manager & |
