Подборка плейлиста на Spotify – отличный способ расслабиться под любимую музыку. Кроме того, некоторые геймеры предпочитают не слушать звук игры и позволяют своему любимому плейлисту Spotify работать в фоновом режиме. Однако вместо переключения из окна в окно для доступа к игре и приложению Spotify есть другой способ.
В игровую панель Windows встроена функция Spotify, которая позволяет пользователям мгновенно вызывать оверлей. Вы можете узнать все об использовании этого наложения ниже.
Необходимые действия
Прежде чем вы сможете активировать наложение Spotify, необходимо выполнить три требования. Это:
- Создайте учетную запись Spotify.
- Загрузите и установите приложение Spotify для Windows 10.
- Включите игровую панель Windows.
Хотя игровая панель включена по умолчанию, некоторые пользователи отключили ее из-за проблем с производительностью. В другом разделе мы расскажем, как вы можете снова включить его.
Если у вас уже есть учетная запись Spotify, вам следует загрузить настольное приложение. Вы можете получить его здесь.
- Загрузите приложение Spotify для настольного компьютера.

- Введите данные своей учетной записи или войдите одним из нескольких других способов.
- Теперь приложение готово для интеграции с игровой панелью.


Включить игровую панель
Пользователи, отключившие игровую панель Windows необходимо повторно активировать его, чтобы использовать виджет Spotify. Вот шаги.
- Щелкните правой кнопкой мыши меню «Пуск».
- Выберите “Настройки”
- Перейдите в раздел “Игры” category.
- Переключить панель “Xbox Game Bar” on.
- Нажмите клавишу Windows + G, чтобы проверить это.


Если ярлык по умолчанию открывает игровую панель, значит, вы выполнили все необходимые действия. шаги. Однако последовательность также может быть заменена другим ярлыком. В меню «Настройки» под переключателем будет отображаться текущий ярлык.
Нажатие клавиши Windows + G или пользовательского ярлыка вызовет игровую панель. Практически любая компьютерная игра позволит вам без помех запускать фоновые приложения, тем более что современные компьютеры достаточно мощные, чтобы вмещать гигабайты оперативной памяти. Ниже приведены инструкции по использованию оверлея Spotify в первый раз.
- Нажмите клавишу Windows + G во время игры.
- Нажмите “Виджеты” меню слева.
- Найдите значок “Spotify” option.
- Введите свои учетные данные и войдите в систему.
< img src=»/wp-content/uploads/2022/12/66fe5873a274fcb54a614b732c092add.png» /> - Чтобы создать ярлык, нажмите на звездочку рядом с названием виджета.
- Чтобы проверить, работает ли это, выйдите из меню игровой панели и откройте его снова.


Вы можете вернуться к игре, щелкнув пустое место или нажав клавишу Escape. Чтобы вызвать оверлей Spotify, все, что вам нужно сделать, это нажать клавишу Windows + G и щелкнуть значок Spotify для управления проигрывателем. Вам не нужно входить в систему всякий раз, когда вы хотите послушать свои любимые мелодии.
Доступ к оверлею Spotify в Windows 11
Игровая панель Windows — это функция, также доступная в Windows 11. Вызов оверлея Spotify работает так же, как и в Windows 10. Разница лишь в том, где расположены некоторые кнопки и значки.
Сначала мы поможет вам активировать игровую панель, если она отключена.
- Нажмите правой кнопкой мыши на меню «Пуск».
- Выберите “Настройки”
- Перейдите в “Игры”
- Нажмите “Xbox Игровая панель.”
- Включите переключатель.
- Проверьте и посмотрите, поднимается ли панель при нажатии клавиши Windows + G.


После этого вы можете продолжить настройку игровой панели. Это очень важно, если вы хотите подключить свою учетную запись Spotify. Это нужно сделать только один раз, если вы не хотите войти в другую учетную запись.
- Нажмите клавишу Windows + G, чтобы открыть игровую панель.
- Нажмите “Виджеты” Список слева.
- Выберите “Spotify” в раскрывающемся меню.
- Свяжите свою учетную запись и войдите в систему. и разрешите Game Bar получить доступ к вашей учетной записи Spotify.
- Нажмите на звездочке рядом с названием виджета Spotify.


Выполнение всех этих шагов позволит вам управлять оверлеем Spotify даже в середине напряженная перестрелка во время Overwatch или Counter-Strike: Global Offensive. Игровая панель всегда доступна, если у вас есть клавиатура.
Не останавливайте музыку
Переключаться между окнами несложно, просто чтобы управлять своей учетной записью Spotify. На самом деле, вы можете даже проиграть игру, если захотите сменить музыку, но не сможете поставить игру на паузу. К счастью, игровая панель и ее виджет Spotify спасают жизнь в этом отношении. Вы можете следить за происходящим во время поиска идеального саундтрека.
Насколько велик ваш плейлист Spotify? Какие улучшения вы предлагаете для виджета Spotify? Сообщите нам свое мнение в разделе комментариев ниже.

You can add a Spotify widget on your phone’s home screen to control the music. This post from MiniTool MovieMaker explains how to make a Spotify widget for Android and iOS devices as well as Windows PCs.
A widget is a mini-app that appears on your phone’s home screen. You can access it without opening the app itself. Spotify has widgets for both Android and iOS devices. How to get the Spotify widget on your device? Check the instructions below.
Step 1. Make sure that you’ve installed the Spotify app on your Android phones or tablets. If not, go to the Google Play Store to get this app.
Step 2. Use your fingers to press and hold any empty area on the device’s home screen. Tap Widgets when it appears.
Step 3. From the Widgets menu, scroll down to Spotify and click it.
Step 4. Then you can use your fingers to put the Spotify widget as you like.
Step 5. To resize the Spotify widget, move the dots on the slides. Tap the Spotify widget and you can use it.
The Spotify Widget for Android will show the song you’re playing now. You can play, pause, fast forward your song, etc. Click the song’s name and you’ll open the Spotify app and jump to the playlist or album you’re listening to.
If you want to remove the widget, just press and hold it, and drag it to the X Remove, the widget will be removed when you release it.
Step 1. First, the Spotify app should be installed on your iPhone or iPad.
Step 2. Long press on the empty area on your iPhone/iPad home screen.
Step 3. A plus icon appears on the top, and click it.
Step 4. Scroll down to the list and choose Spotify and tap Add Widget.
Step 5. You can drag and drop the Spotify widget to any page you want, and click Done.
Then, the Spotify widget for iPhone will show the recently-played albums, playlists, artists, or podcasts. Click one of them to open Spotify and go to that album.
If you want to remove the Spotify widget for iPhone, tap on it, select Remove Widget, and click Remove.
Tips:
If the Spotify widget is not working properly on your iPhone or Android, you can delete it first. Then remove the Spotify app and reinstall it again. Then, follow the above steps to make a new Spotify widget and check if this widget works.
When you play PC games in full screen, you can also enjoy Spotify songs with the Spotify widget. How to get the Spotify widget on Windows 11/10?
Firstly, you must install the Spotify for Windows app on your PC. You can download it from the official website and the Microsoft Store. Then, sign in or sign up to Spotify to use it.
To add a Spotify widget on Windows 11/10, press the Win + G keys, click on the Widget Menu icon on the left side, then choose Spotify from the list. Click the Spotify icon on the top toolbar, click LINK ACCOUNT, enter your Spotify username and password to link your Spotify account with Game Bar, and click Agree.
Now, a floating Spotify player appears on the screen. You can pin Spotify or click Launch Spotify to play music.
Related:
- How to Share Liked Songs on Spotify & Unlike All Songs on Spotify
- Everything About Spotify Wrapped 2022: Release Date and More
- Solved: How to Fix Spotify Login Error 409 on Android/iOS/Desktop
- Solved: How to Fix Spotify Not Working on PS5
Conclusion
It’s easy to add a Spotify widget on your Android, iPhone/iPad, and Windows 11/10 PCs. Follow the steps to make a Spotify for your device to quickly access the playlist you’ve recently played.
Spotify is a popular music streaming platform that allows you to listen to your favorite songs, discover new artists, and create personalized playlists. If you’re using Windows 11 and want to add Spotify to your desktop for easy access, this tutorial will guide you through the process.
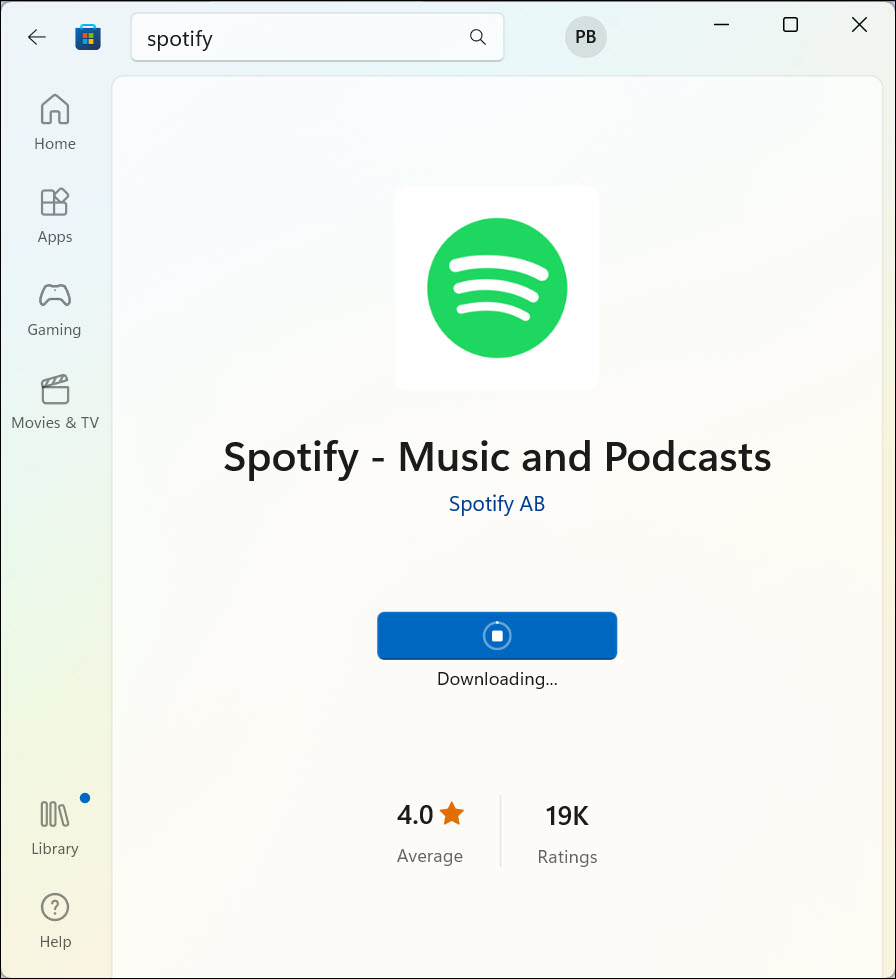
Step 1: Open the Microsoft Store on your Windows 11 desktop. You can do this by clicking on the Microsoft Store icon in the taskbar or by searching for «Microsoft Store» in the search bar.
Step 2: In the Microsoft Store, type «Spotify» in the search bar located at the top-right corner of the window.
Step 3: From the search results, click on the Spotify app. It should be the official Spotify app developed by Spotify AB.
Step 4: On the Spotify app page, click on the «Get» button to start downloading and installing Spotify on your Windows 11 desktop.
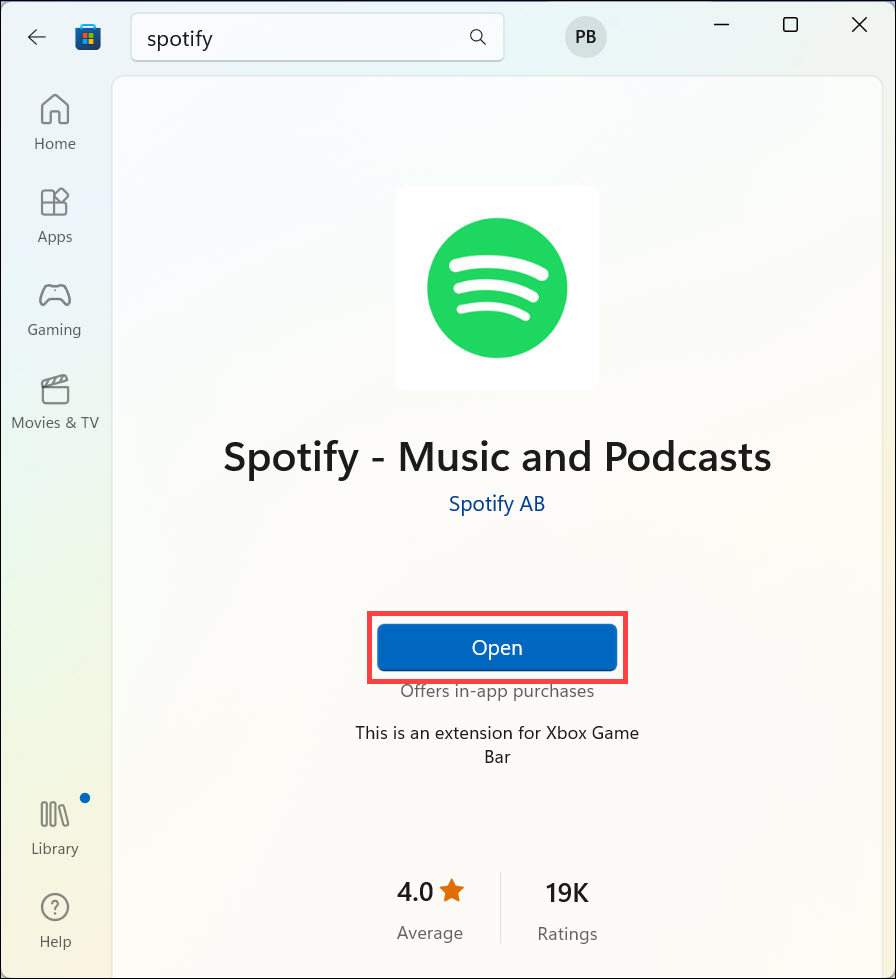
Step 5: Wait for the installation process to complete. Once it’s done, you can find the Spotify app in your list of installed applications or by searching for «Spotify» in the Windows 11 search bar.
Step 6: Launch the Spotify app by clicking on its icon. When the app opens, you may need to sign in with your Spotify account credentials or create a new account if you don’t have one.
Step 7: After signing in, you can start exploring the vast library of music available on Spotify, create playlists, follow your favorite artists, and enjoy personalized recommendations.
Now, let’s take a look at the pros and cons of adding Spotify to your Windows 11 desktop in a table format:
| Pros | Cons |
|---|---|
| 1. Access to a wide range of music and podcasts. | 1. Requires an internet connection to stream music. |
| 2. Create personalized playlists and discover new music easily. | 2. Free version includes ads and some limitations. |
| 3. Sync your music across multiple devices. | 3. Premium subscription required for offline listening and higher audio quality. |
| 4. Discover new artists and genres through customized recommendations. | 4. Limited control over song selection in the free version. |
Adding Spotify to your Windows 11 desktop provides convenient access to your favorite music and podcasts. Whether you’re working, studying, or relaxing, you can enjoy an immersive music experience with Spotify’s vast collection of songs.
Video Tutorial:How do I add icons to my desktop?
How do I create a shortcut on my desktop in Windows 11?
Creating a shortcut on your desktop in Windows 11 is a straightforward process that allows you quick access to your frequently used files, folders, or applications. Here’s a step-by-step guide on how to create a shortcut on your Windows 11 desktop:
1. Begin by finding the file, folder, or application that you want to create a shortcut for. It could be located in your File Explorer or on your desktop itself.
2. Once you’ve identified the file or folder, right-click on it. This will open a context menu with various options.
3. On the context menu, hover your cursor over the «Send to» option. A sub-menu will appear with additional options.
4. From the sub-menu, select «Desktop (create shortcut)«. This action will create a shortcut for the selected file or folder on your desktop.
5. The new shortcut will appear on your desktop, usually with an arrow icon indicating that it is a shortcut. You can then rename the shortcut to something more recognizable if desired. To do this, right-click on the shortcut, select «Rename,» and enter the new name.
6. Once you have renamed the shortcut, you can move it anywhere on your desktop by clicking and dragging it to the desired location.
7. To access the file, folder, or application quickly, simply double-click on the shortcut icon on your desktop, and it will open or launch as expected.
Creating shortcuts on your desktop in Windows 11 can help streamline your workflow and provide easy access to your frequently used resources. Remember that shortcuts are only a representation of the original file, folder, or application, so make sure the original item remains in its original location for the shortcut to function properly.
How do I put Spotify on my desktop screen Windows 11?
To install Spotify on your Windows 11 desktop screen, follow these steps:
1. Open the Microsoft Store: In the Windows 11 taskbar, click on the Microsoft Store icon, which looks like a shopping bag.
2. Search for Spotify: Once the Microsoft Store is open, use the search bar located in the top right corner to search for «Spotify.» Press Enter or click the magnifying glass icon.
3. Select Spotify: From the search results, click on the official Spotify app.
4. Click Install: On the Spotify app page, click the Install button to begin the installation process.
5. Wait for installation: The Microsoft Store will handle the installation automatically. You’ll see a progress bar indicating the installation process. This might take a few moments depending on your internet speed.
6. Launch Spotify: After the installation is complete, you can launch Spotify by locating it in your Start menu or by clicking on the Open button within the Microsoft Store.
7. Log in or sign up for Spotify: If you already have a Spotify account, you can log in using your credentials. Otherwise, sign up for a new account to get started.
8. Customize Spotify settings: Once you’re logged in, you can customize Spotify’s preferences according to your liking, such as audio quality, notification settings, and more.
9. Pin Spotify to your desktop: To have quick access to Spotify, you can pin it to your desktop. Locate the Spotify app in the Start menu, right-click on it, and then click on the «Pin to taskbar» option.
Now you have successfully installed Spotify on your Windows 11 desktop screen. Enjoy your favorite music and podcasts with ease!
How do I put Spotify on my desktop?
To install Spotify on your desktop, follow these simple steps:
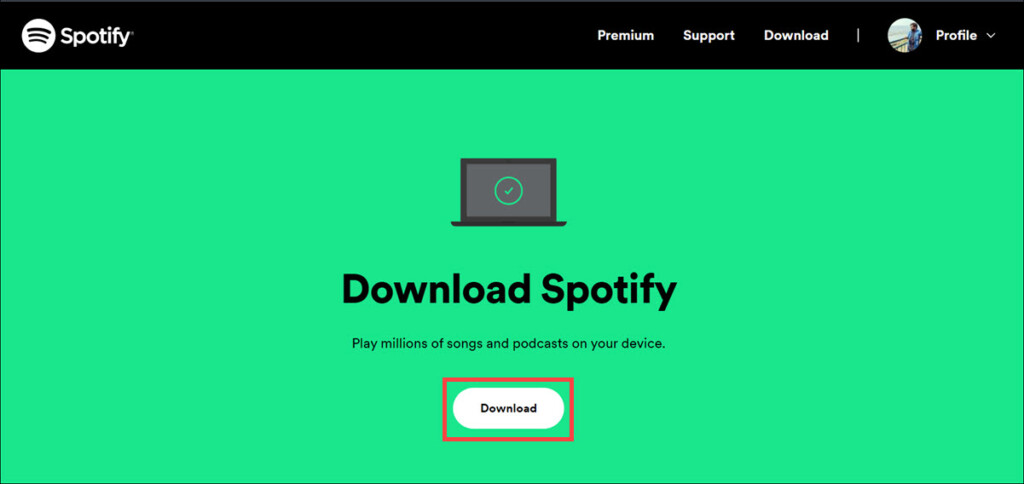
1. Open your preferred web browser and navigate to the official Spotify website.
2. Look for the «Download» or «Get Spotify» button on the homepage. Click on it.
3. On the download page, choose the appropriate version for your operating system. Spotify is available for both Windows and Mac.
4. Once you select your OS, the download should start automatically. If not, click on the download button to initiate the process.
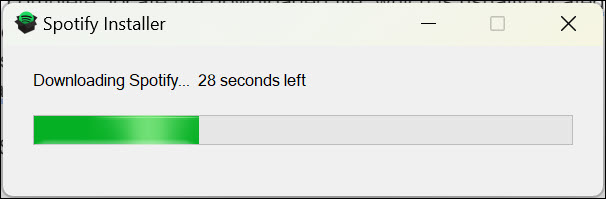
5. After the download is complete, locate the Spotify installation file in your computer’s downloads folder or designated location.
6. Double-click on the installation file to launch the Spotify installer.
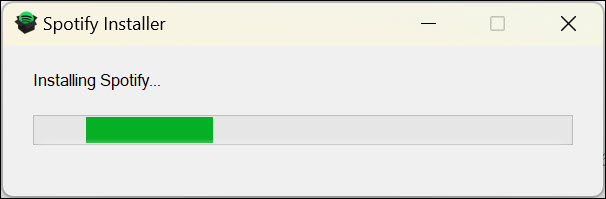
7. Follow the on-screen instructions to install Spotify on your desktop. You may have to accept the terms and conditions, choose an installation location, and decide if you want Spotify to run automatically on startup.
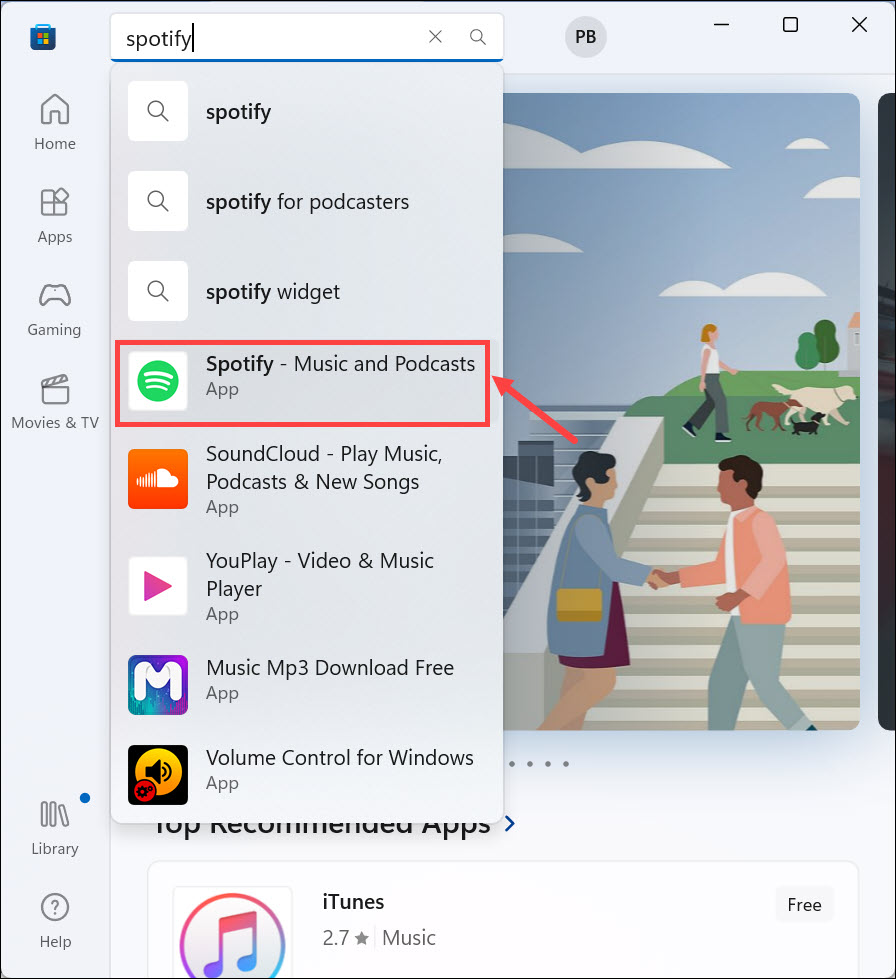
8. Once the installation is complete, launch the Spotify application by double-clicking its icon on the desktop or finding it in the Start menu/launcher.
9. If you are a new user and want to create an account, you’ll need to provide your details and select a subscription plan. If you already have an account, log in using your credentials.
10. After logging in, you can start enjoying Spotify on your desktop. Explore the vast music library, create playlists, discover new artists, and enjoy personalized recommendations.
Remember, an active internet connection is required to stream music, and it is advisable to keep your Spotify app updated regularly for the best experience.
How do I create a shortcut directly to my desktop?
Creating shortcuts on your desktop can be a convenient way to access your frequently used files, folders, or applications. Here are the steps to creating a shortcut on your desktop:
1. Locate the file, folder, or application you want to create a shortcut for. This can be done by browsing through your file explorer or searching for the item using the search bar.
2. Once you have found the item, right-click on it to open a context menu. In the context menu, hover over the «Send to» option.
3. Another menu will expand showing various options. From this menu, select «Desktop (create shortcut).» This action will automatically create a shortcut for the selected item and place it on your desktop.
4. By default, the newly created shortcut on your desktop will have the same name as the original file or folder. If you wish to rename it, right-click on the shortcut and select «Rename.» You can then enter a new name for the shortcut.
That’s it! You have successfully created a shortcut on your desktop. From now on, you can simply double-click on the shortcut to quickly access the associated file, folder, or application.
Why can’t I use Spotify on my desktop?
If you’re having trouble using Spotify on your desktop, there could be several reasons for this issue. Here are some steps you can take to troubleshoot and resolve the problem:
1. Check your internet connection: Ensure that you have a stable internet connection. Spotify requires a reliable connection to function properly. If your internet connection is weak or intermittent, it may prevent Spotify from working correctly.
2. Update the Spotify app: Make sure you are using the latest version of the Spotify desktop app. Outdated versions may have compatibility issues or bugs that could cause problems. Update the app from the official Spotify website or through the desktop app itself.
3. Clear cache and data: Clearing the cache and data of the Spotify app can help resolve any temporary issues. Close the Spotify app, open your computer’s file explorer, navigate to the folder where Spotify is installed, typically in the AppData directory, and delete any cache or local storage folders related to Spotify. Then, reopen the app.
4. Disable any VPN or proxy: If you are using a Virtual Private Network (VPN) or proxy server, it may interfere with Spotify’s functionality. Try disconnecting from the VPN or disabling the proxy temporarily and check if Spotify works.
5. Check firewall or antivirus settings: Verify that your firewall or antivirus software is not blocking Spotify. Sometimes, these security settings may inadvertently prevent the app from accessing the internet. Temporarily disable your firewall or antivirus software and see if that resolves the issue. If it does, reconfigure the settings to allow Spotify access.
6. Restart your computer: Rebooting your computer can help resolve various software glitches or conflicts. Close all running applications, restart your computer, and then try launching Spotify again.
7. Reinstall the Spotify app: If the issue persists, consider uninstalling and reinstalling the Spotify app. This process can fix any corrupted files or configuration settings that might be causing the problem. Download the latest version of the Spotify desktop app from the official website, then uninstall the app from your computer, and finally install it again.
8. Contact Spotify support: If none of the above steps work, it may be helpful to reach out to Spotify support directly. They have dedicated resources to assist users with troubleshooting and resolving specific issues.
Remember, these steps are general recommendations that can aid in resolving common issues with using Spotify on a desktop computer. Different scenarios may require additional troubleshooting steps or assistance from support.
How do I add apps to my desktop Windows 11?
To add apps to your desktop in Windows 11, follow these steps:
1. Click on the «Start» button or press the Windows key on your keyboard to open the Start menu.
2. Locate the app you want to add to your desktop. You can either scroll through the list of applications or search for the specific app using the search bar.
3. Once you find the app, right-click on its icon. This will open a context menu with several options.
4. From the context menu, select «More» and then choose «Pin to taskbar» or «Pin to Start.«
– If you select «Pin to taskbar,» the app’s icon will be added to the taskbar at the bottom of the screen, allowing you to easily access it.
– If you choose «Pin to Start,» the app’s icon will be added to the Start menu’s app list. You can then resize the Start menu or customize the layout to make the app more accessible.
5. If you want to add the app to your desktop directly, without going through the Start menu or taskbar, you can right-click on the app’s icon in the Start menu, select «More,» and then choose «Open file location.» This will open the folder where the app’s shortcut is stored.
6. Once in the folder, you can right-click on the app’s shortcut and select «Send to» > «Desktop (create shortcut).» This will create a shortcut on your desktop, allowing you to launch the app directly from there.
By following these steps, you can easily add apps to your desktop in Windows 11, providing convenient access to your favorite applications without having to search through menus or the Start menu every time.
Spotify is a popular music streaming platform that allows you to access a vast library of songs, podcasts, and other audio content. If you recently upgraded to Windows 11 and want to enjoy your favorite music on Spotify, this guide will walk you through the process of installing and using Spotify on the new operating system.
What are the System Requirements for Installing Spotify on Windows 11
Before proceeding with the installation, it’s important to ensure that your system meets the minimum and optimum requirements for running Spotify on Windows 11. Here are the system requirements:
| Specifications | Minimum Requirements | Optimum Requirements |
| Operating System | Windows 10 operating system | Windows 11 operating system |
| Processor | 1 GHz processor | 2 GHz or faster processor |
| RAM | 2 GB of RAM | 4 GB of RAM or more |
| Free Disk Space | 100 MB of free disk space | 250 MB of free disk space or more (for downloads) |
| Internet Connection | 20 Mbps bandwidth | 100 Mbps bandwidth for high-quality streaming (when many devices are connected to the Wi-Fi) |
Make sure your system meets these requirements to ensure a smooth experience with Spotify on Windows 11.
Follow these steps to download and install Spotify on your Windows 11 computer:
1. Open your preferred web browser and navigate to the official Spotify download page
2. On the Spotify download page, click on the Download button. This will start downloading the Spotify installer file.
3. Once the download is complete, locate the downloaded file, which is usually located in the “Downloads” folder or the location you specified during the download.
4. Double-click on the installer file. It will start downloading the latest Spotify app.
5. After the download is finished, the installation of the app will start.
6. Once the installation is finished, Spotify will be launched automatically.

Congratulations! You have successfully installed Spotify on your Windows 11 computer.
Install Spotify Using Microsoft Store
Although the Spotify app downloaded and installed from the official website is safe to use, there are many users who don’t install applications from external sources and rely totally on Microsoft Store applications.
If you prefer only Microsoft Store applications, you can also install Spotify from there. Here is how:
1. Launch the Microsoft Store app from the Windows taskbar or search it from the Start Menu
2. On the search bar located at the top of the window, type “Spotify” and click on its icon.
3. Next, click the Install button to begin downloading and installing the Spotify app.

4. The app will begin downloading.
5. Finally, click the Open button to launch the app.
How to Use Spotify on Windows 11
Now that Spotify is installed on your Windows 11 computer let’s learn how to use it:
1. Launch Spotify by locating the desktop shortcut or searching for “Spotify” in the Windows Start menu.
2. If you’re a new user, you’ll be prompted to create a Spotify account. Follow the on-screen instructions to sign up and create your account. If you already have a Spotify account, simply log in using your credentials.

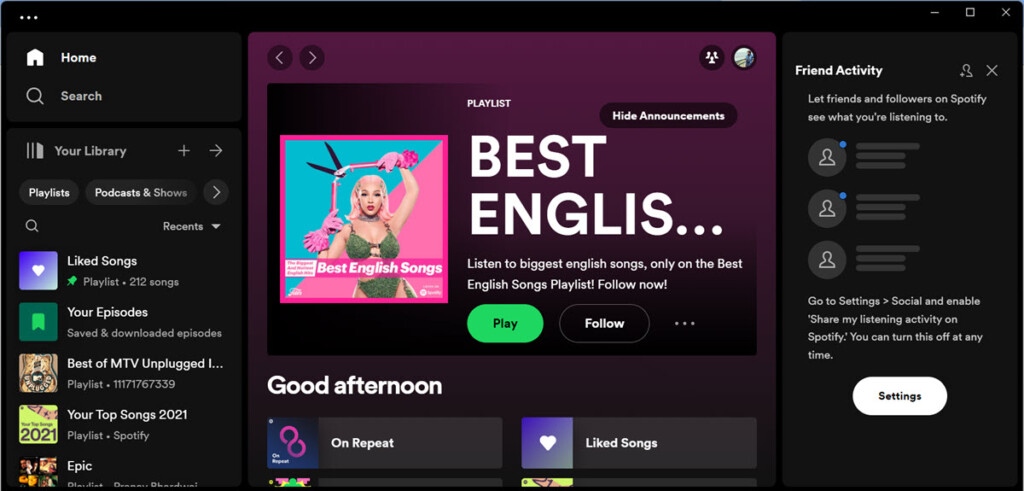
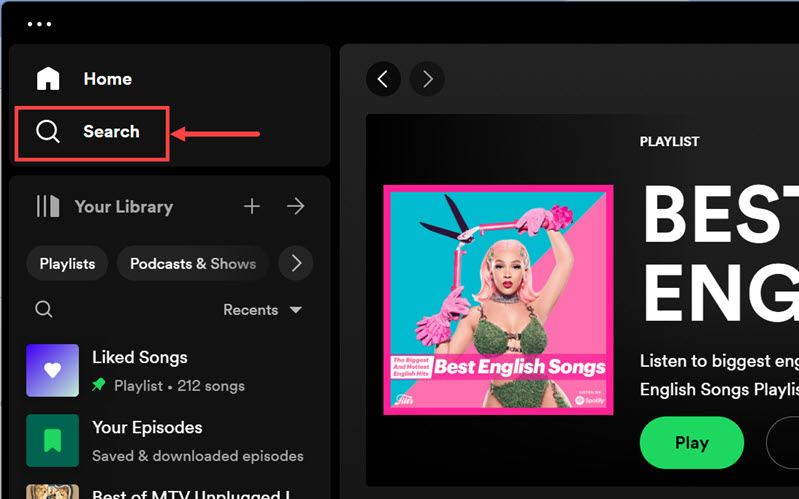
3. Once logged in, you’ll be presented with the Spotify main window. Here, you can explore various sections like Home, Browse, Radio, and Your Library.
4. To search for specific songs, artists, or albums, use the Search option located at the top left of the window below the Home option. Type your search query and press “Enter” to view the search results.
5. Click on any song or album to start playing it. You can control playback using the playback controls at the bottom of the Spotify window.
6. Customize your listening experience by creating playlists, following artists, and exploring personalized recommendations based on your music preferences.
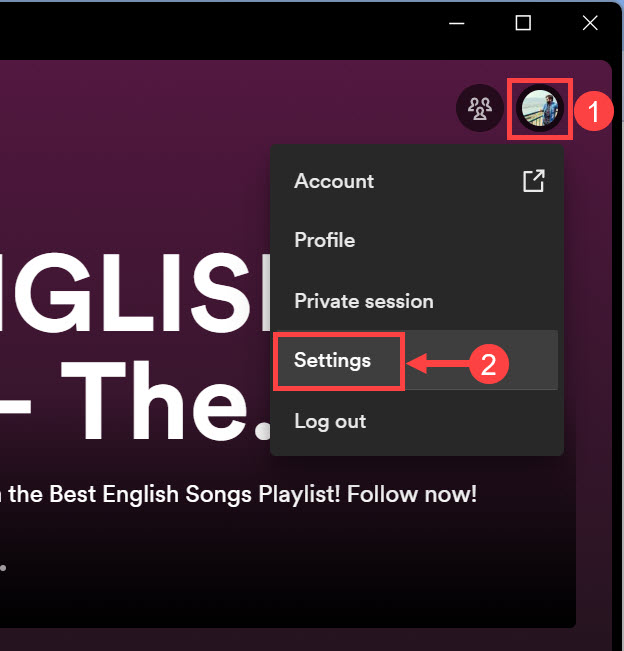
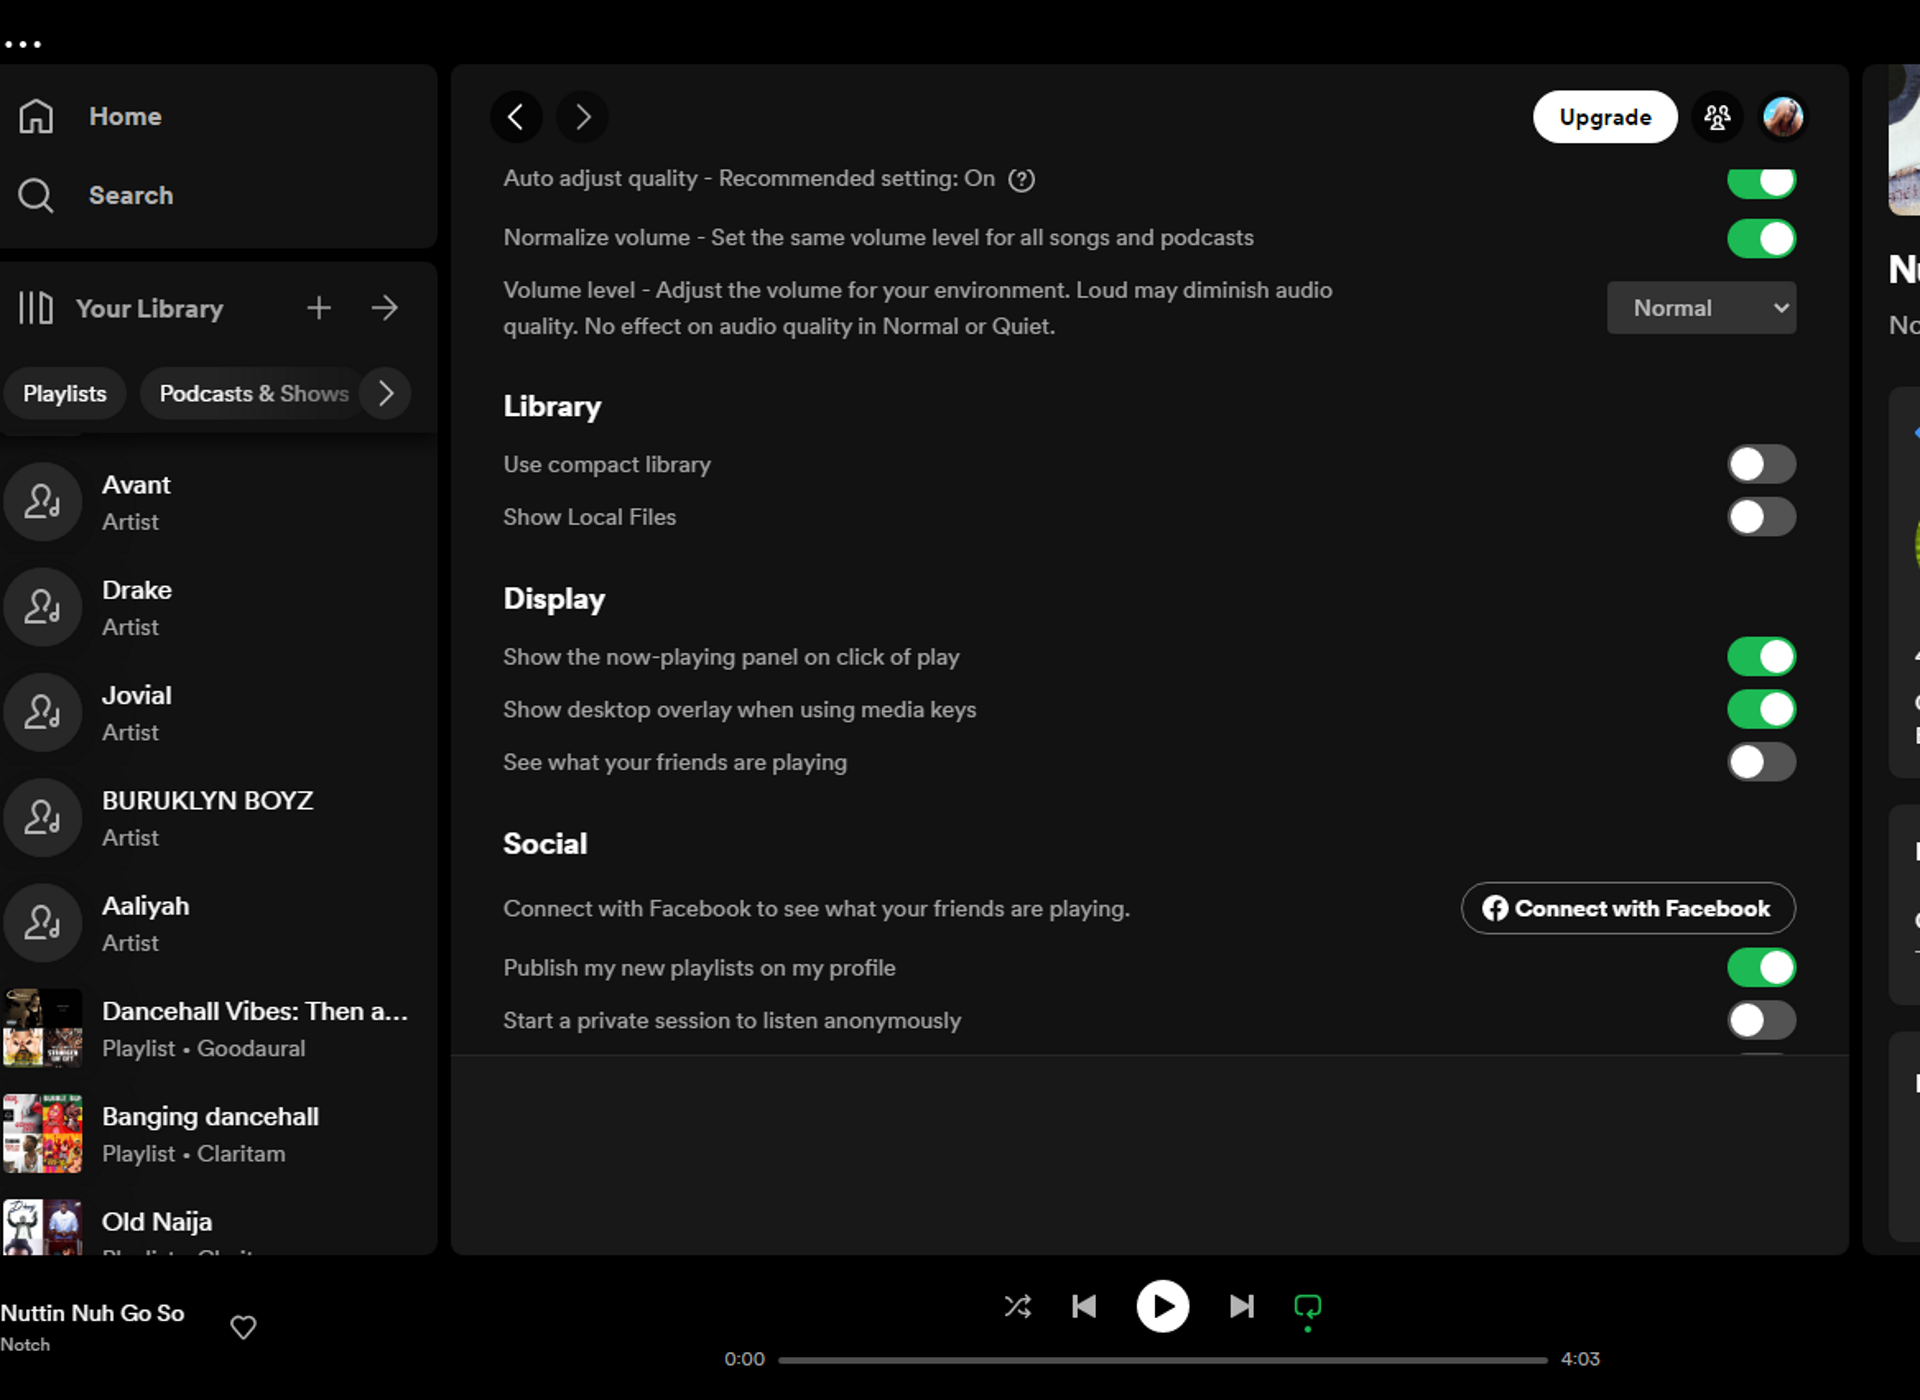
7. To adjust settings, click on your profile picture located in the top right corner of the Spotify window. From the drop-down menu, select “Settings” to access various options, including audio quality, notifications, and social sharing preferences.
Now you’re ready to enjoy your favorite music and discover new tracks on Spotify!
FAQs
How to make a desktop shortcut for Spotify Windows 11?
To create a desktop shortcut for Spotify on Windows 11, simply locate the Spotify icon in the Windows Start menu or on your desktop (if you have already created a shortcut). Right-click on the Spotify icon and select “Create shortcut” from the context menu. A new shortcut will be created on your desktop, allowing you to double-click on it to launch Spotify directly.
How to uninstall Spotify Windows 11?
If you wish to uninstall Spotify from your Windows 11 computer, follow these steps: Open the Windows Start menu and navigate to “Settings.” In the Settings window, click on “Apps” or “Apps & features,” depending on your Windows 11 version. Scroll through the list of installed apps and locate “Spotify.” Click on Spotify, and a menu with various options will appear. Choose “Uninstall” and follow the on-screen instructions to complete the uninstallation process.
How to update Spotify Windows 11?
Spotify usually updates automatically, but if you want to check for updates manually, you can do so by following these steps: Launch Spotify on your Windows 11 computer and click on your profile picture located in the top right corner of the Spotify window. From the drop-down menu, select “Help” and then click on “Check for Updates.” Spotify will check for updates and, if available, download and install them automatically, ensuring you have the latest version of the application.
Bottom Line
By following the steps outlined in this guide, you should now have Spotify up and running on your Windows 11 computer. Enjoy your favorite music, podcasts, and audio content seamlessly on the popular music streaming platform.
If you have any further questions or encounter any issues, don’t hesitate to refer to the FAQs or seek support from Spotify’s official channels. Happy listening!
Roll back to a previous Spotify version to restore the feature
by Claire Moraa
Claire likes to think she’s got a knack for solving problems and improving the quality of life for those around her. Driven by the forces of rationality, curiosity,… read more
Updated on
- The Spotify overlay is a feature that allows you to control your music playback with a floating window that appears over your desktop.
- If this feature is unavailable or not working, you can either check for the latest updates or roll back to a previous app version.
XINSTALL BY CLICKING THE DOWNLOAD
FILE
Music is a huge part of our lives. Some people cannot work without music playing in the background, as it boosts their productivity. Spotify is a top music streaming app and is available on Windows, making it a highly downloaded program.
One of its major features is its overlay, which lets you quickly switch to the next song without opening the app. However, it may not be working at times. If this is the case, you’ll find this article insightful in helping you figure this out.
Why isn’t my Spotify overlay working?
Spotify overlay is a feature that allows you to control playback by hovering your mouse over the album artwork. It doesn’t work on all systems, but if it does work on your system, it’s a convenient way to listen to music.
Since Windows 11 was released, Microsoft has been working tirelessly to change its design, so you may have noticed a change in where some features are positioned. However, some of the main reasons why your overlay is not working include:
How we test, review and rate?
We have worked for the past 6 months on building a new review system on how we produce content. Using it, we have subsequently redone most of our articles to provide actual hands-on expertise on the guides we made.
For more details you can read how we test, review, and rate at WindowsReport.
- Multiple instances of Spotify – If you have multiple instances of Spotify open at once, then this can cause problems with your overlay being displayed properly.
- Your device isn’t compatible – You may be using a device that does not meet Spotify’s system requirements hence why the overlay feature is unavailable.
- Geographical restrictions – Spotify isn’t available in some countries, so the feature may not work well if you’re in a certain region.
- Conflicting apps – If you have recently installed an application similar to Spotify, it may be interfering with how some features are displayed.
How do I enable Spotify overlay in Windows 11?
We recommend you check off this basic list before proceeding to the complex solutions:
- Ensure you’re running an updated version of Spotify.
- Check under Spotify settings to ensure you have enabled the overlay feature.
- Close all other applications using up memory or CPU, like browsers or other music programs.
- End all Spotify processes from the Task Manager, then reopen the app.
- If you have any third-party overlays installed, try disabling them temporarily and see if the problem persists.
- Check and install any Windows updates if available.
- Try a VPN and check whether the problem is with your location.
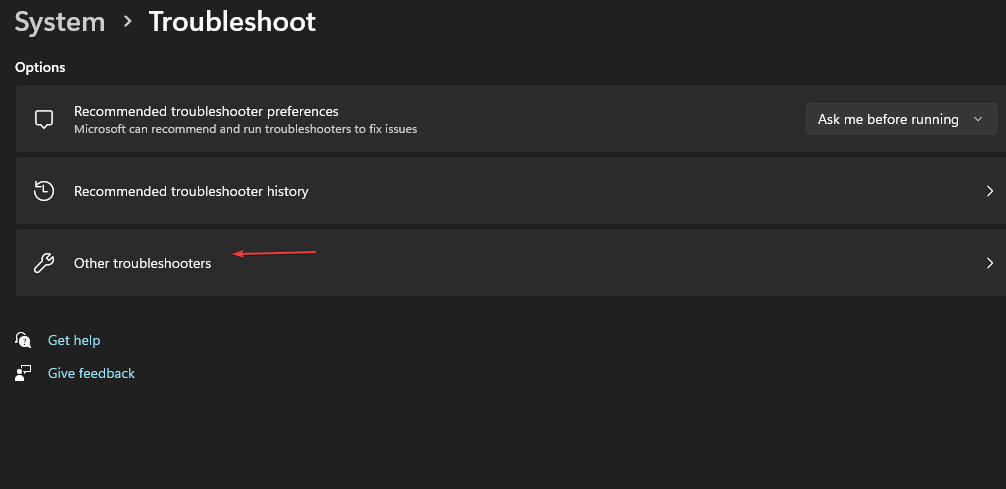
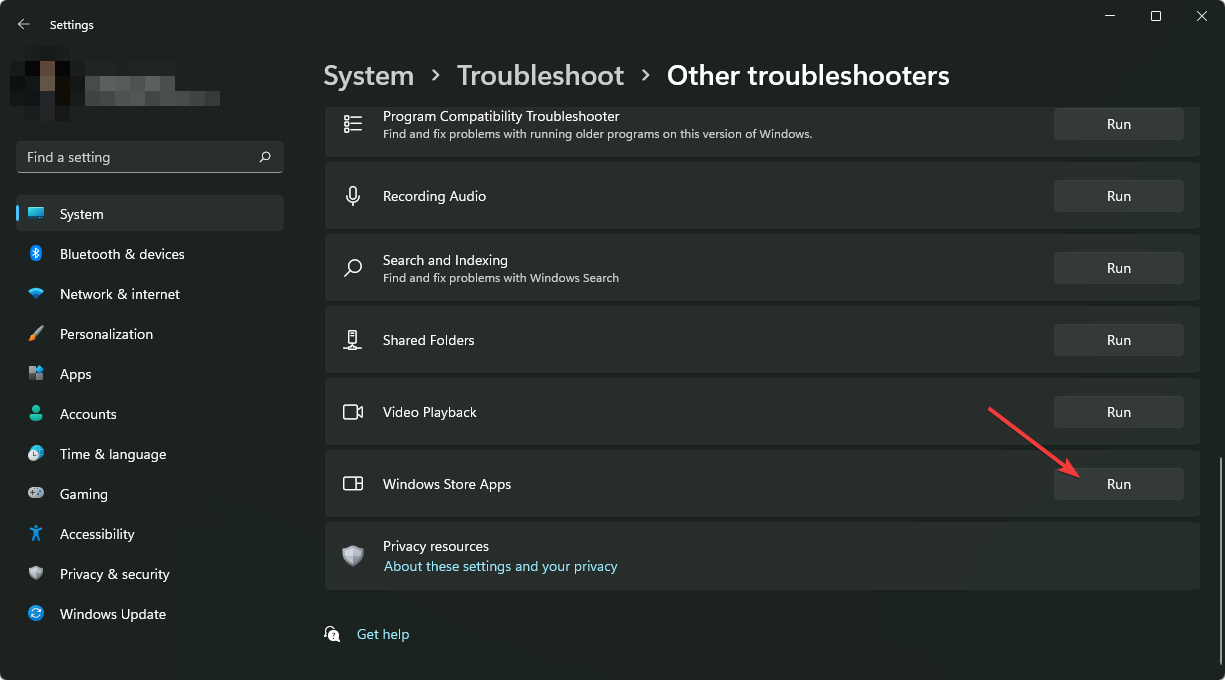
1. Run the Windows Store apps troubleshooter
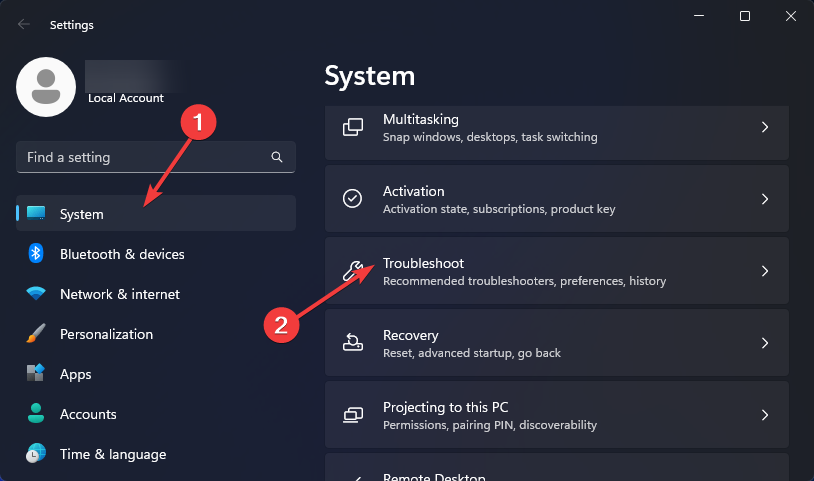
- Hit the Windows key and click on Settings.

- Navigate to System on the left pane, then click on Troubleshooters.

- Select Other troubleshooters.

- Find the Windows Store Apps troubleshooter and click the Run button.

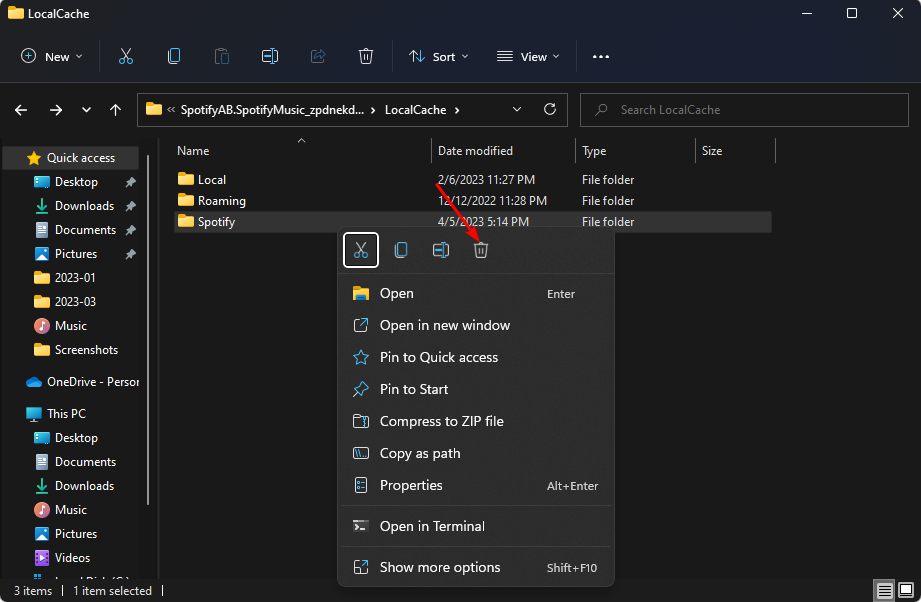
2. Clear Spotify cache
- Hit the Windows + E keys to open File Explorer.
- Navigate to the following location by pasting it on the address bar. Note that because this is the cache folder, it may be hidden. If so, follow the steps to reveal hidden folders:
AppData > Local > Packages > SpotifyAB.SpotifyMusic_zpdnekdrzrea0 > LocalCache - Right-click on the Spotify folder and select the Delete icon to clear the cache.

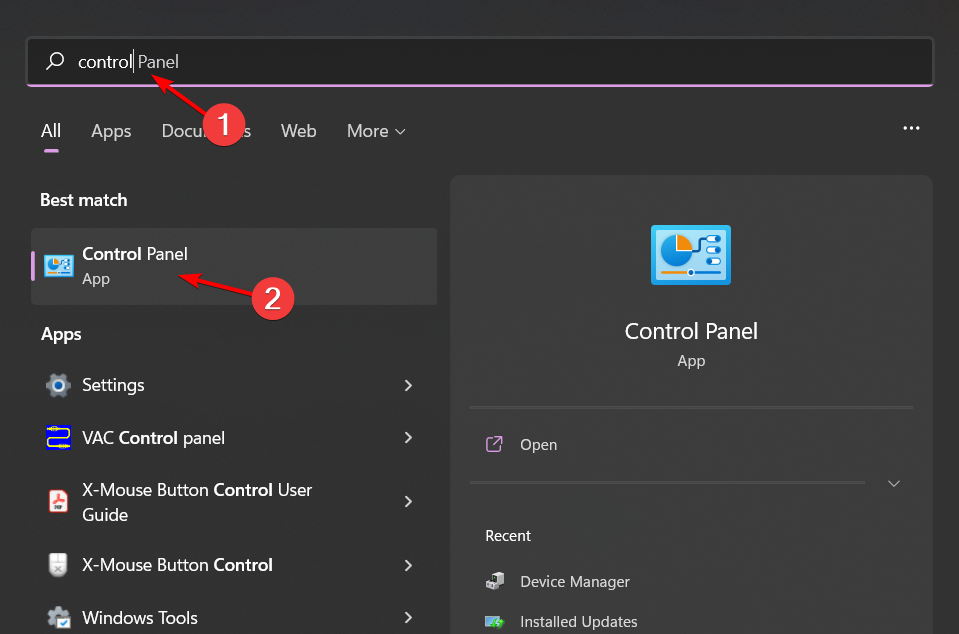
3. Reinstall Spotify
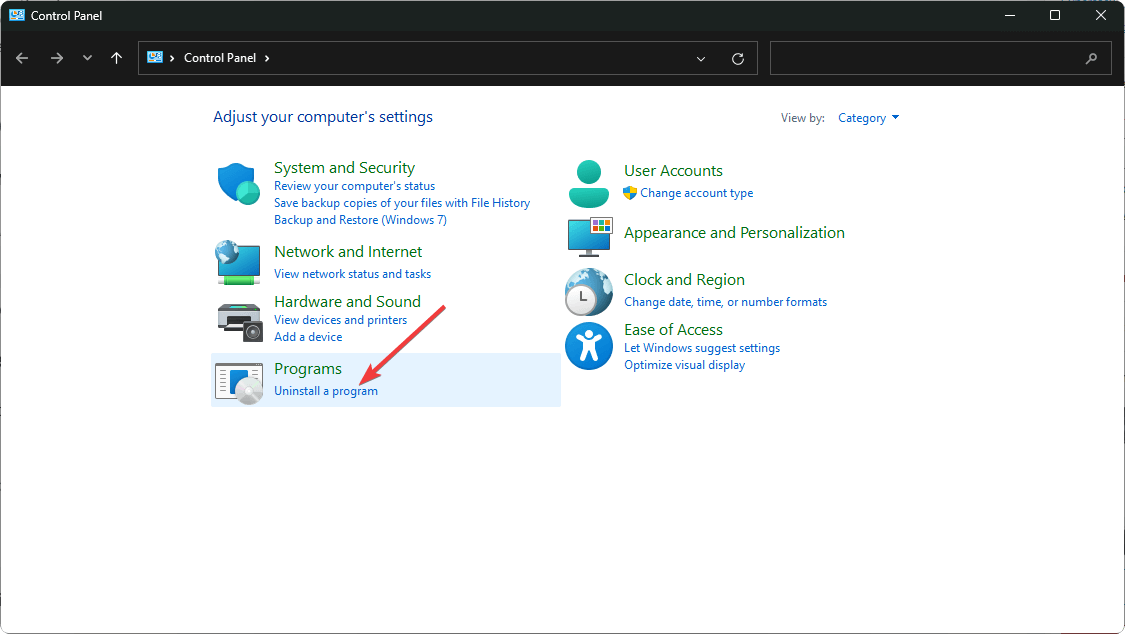
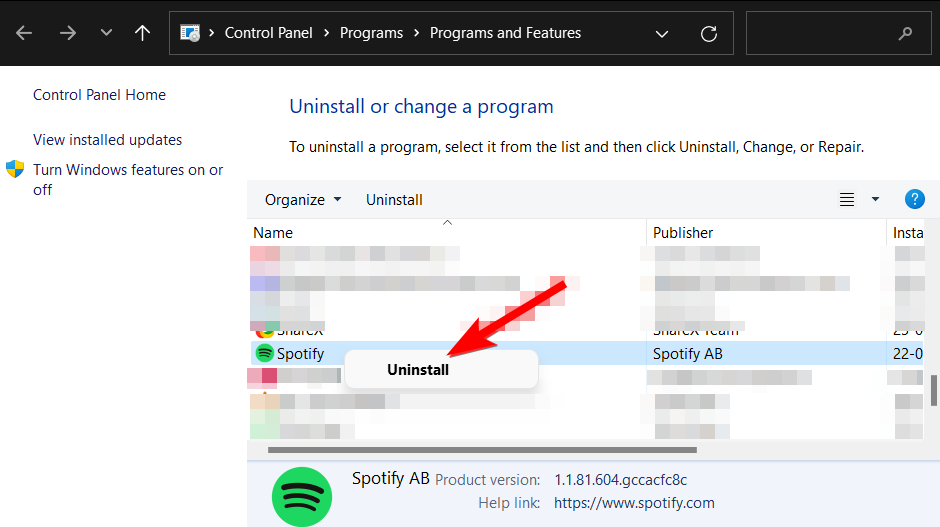
- Hit the Windows key, type Control Panel in the search bar, and click Open.

- Navigate to Uninstall a program under Programs.

- Locate Spotify, right-click on it, and select Uninstall.

- Launch the Microsoft Store and download Spotify.
Sometimes reinstalling the application will allow the app to register all the updates, and the overlay feature will work again.
- Character AI Please Try Again Error: How to Fix This Network Error
- Error Authenticating With Venmo: 6 Ways to Fix it
- Fix: Immersive Reader not Working in OneNote
4. Try an older version of Spotify
Spotify constantly releases new updates for its app to fix minor bugs and improve performance. However, sometimes these updates can cause problems too.
If you have the latest version, try returning to one or two versions. Some users have reported that going back to an older version of Spotify solved their issues with Spotify overlay not working properly in Windows 11.
If that works, then it’s likely that your issue is related to the latest update.
5. Use a third-party overlay tool
If you’re at this step and still can’t get the Spotify overlay to work on your Windows 11, it may be time to try another alternative.
There are many options available for you to choose from; however, some are better than others. If you want to use one of these overlays with Spotify, we recommend using ModernFlyouts.
This app is available in the Microsoft Store, so you can be sure it has already passed rigorous security and compatibility tests.
While you’re still here, check out our article on how to navigate playback issues on Spotify. If you’re more of a browser person and prefer the web version, we have an awesome list of Spotify extensions that will elevate your listening experience.
Let us know if you have been able to fix this issue and what solution did it for you in the comment section below.
![]()