#статьи
-

0
Знакомимся с библиотекой Tkinter — пишем на Python кросс-платформенный калькулятор, который рассчитывает вес человека.
Иллюстрация: Merry Mary для Skillbox Media

Изучает Python, его библиотеки и занимается анализом данных. Любит путешествовать в горах.
Десктопные приложения пишут на разных языках программирования: C++, C#, C, Python и других. Начинающим разработчикам проще всего использовать Python и его библиотеки для работы над графическими интерфейсами.
Одна из таких библиотек — Tkinter. Она входит в стандартный пакет Python и позволяет создавать приложения для Windows, mac OS и Linux. Давайте разберёмся, как устроена эта библиотека, и напишем десктопный калькулятор, помогающий рассчитать вес человека.
GUI (Graphical User Interface) — это графический интерфейс пользователя, оболочка программы, с которой мы взаимодействуем с помощью клавиатуры и мыши. На современных операционных системах почти все программы работают с графическим интерфейсом, и мы каждый день сталкиваемся с GUI: читаем статьи в браузере, набираем текст в редакторе или играем в игры.
Противоположность графическому интерфейсу — командная строка, позволяющая управлять приложением с помощью текстовых команд. Такой интерфейс реализован в терминале macOS и командной строке Windows.
Для работы с GUI в Python есть четыре библиотеки:
- Tkinter;
- Kivy;
- Python QT;
- wxPython.
Мы выбрали Tkinter, потому что она не требует дополнительной установки и позволяет быстро создавать приложения с простым графическим интерфейсом.
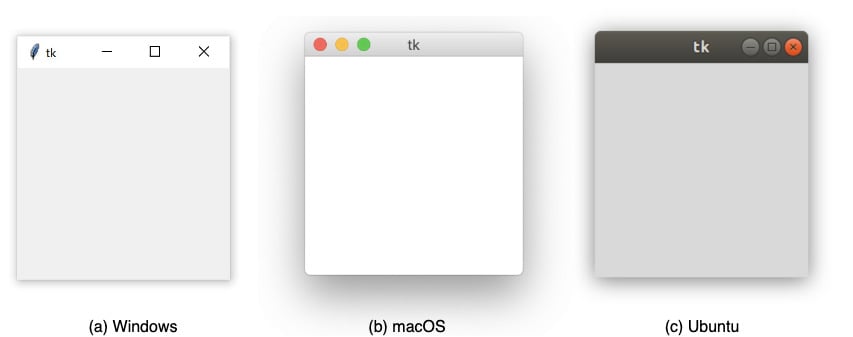
Tkinter — это удобный интерфейс для работы со средствами Tk. Приложения, созданные на основе этой библиотеки, кросс-платформенные, то есть могут запускаться на разных операционных системах.
Схематично работу с Tkinter можно представить в виде четырёх шагов:
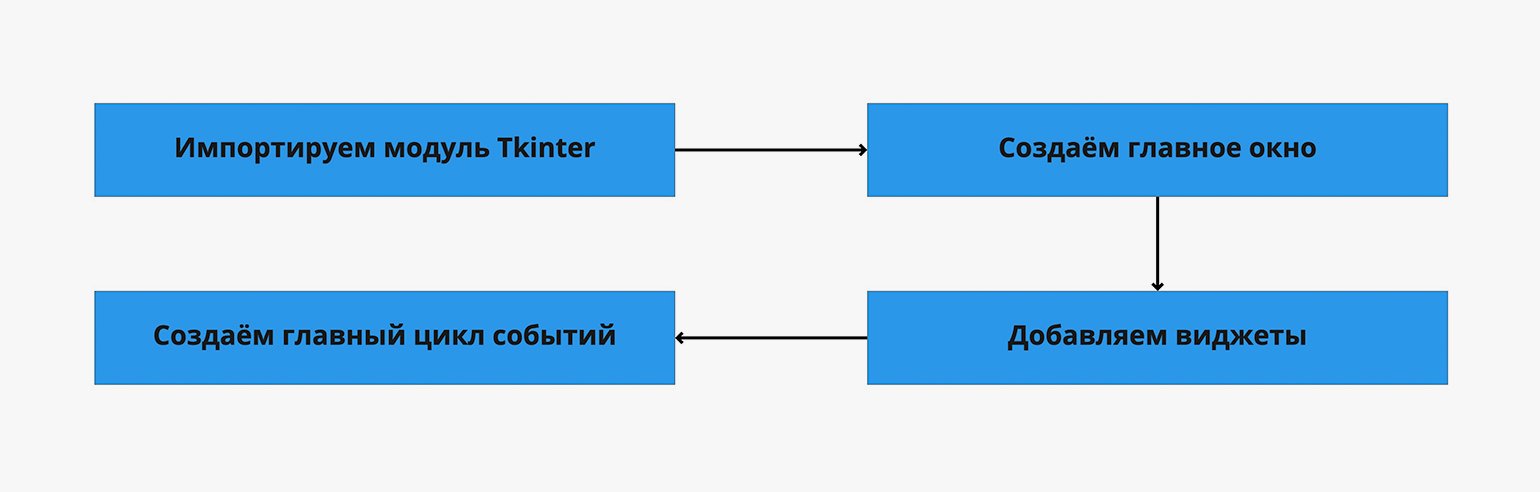
Что здесь происходит:
- Мы подключаем библиотеку Tkinter с помощью директивы import.
- Создаём главное окно приложения, в котором будут размещаться все графические элементы.
- Добавляем виджеты — визуальные элементы, выполняющие определённые действия.
- Создаём главный цикл событий — он включает в себя все события, происходящие при взаимодействии пользователя с интерфейсом.
Ключевые объекты в работе с Tkinter — виджеты. Это аналоги тегов из HTML, которые позволяют создавать интерактивные и неинтерактивные элементы, например надписи или кнопки. Всего их 18, но чаще всего используют следующие:
- Button — кнопки;
- Canvas — «холст», на котором рисуют графические фигуры;
- Entry — виджет для создания полей ввода;
- Label — контейнер для размещения текста или изображения;
- Menu — виджет для создания пунктов меню.
Понять работу с виджетами легче всего на практике. Но прежде чем к ней приступить, обсудим идею нашего первого десктопного приложения.
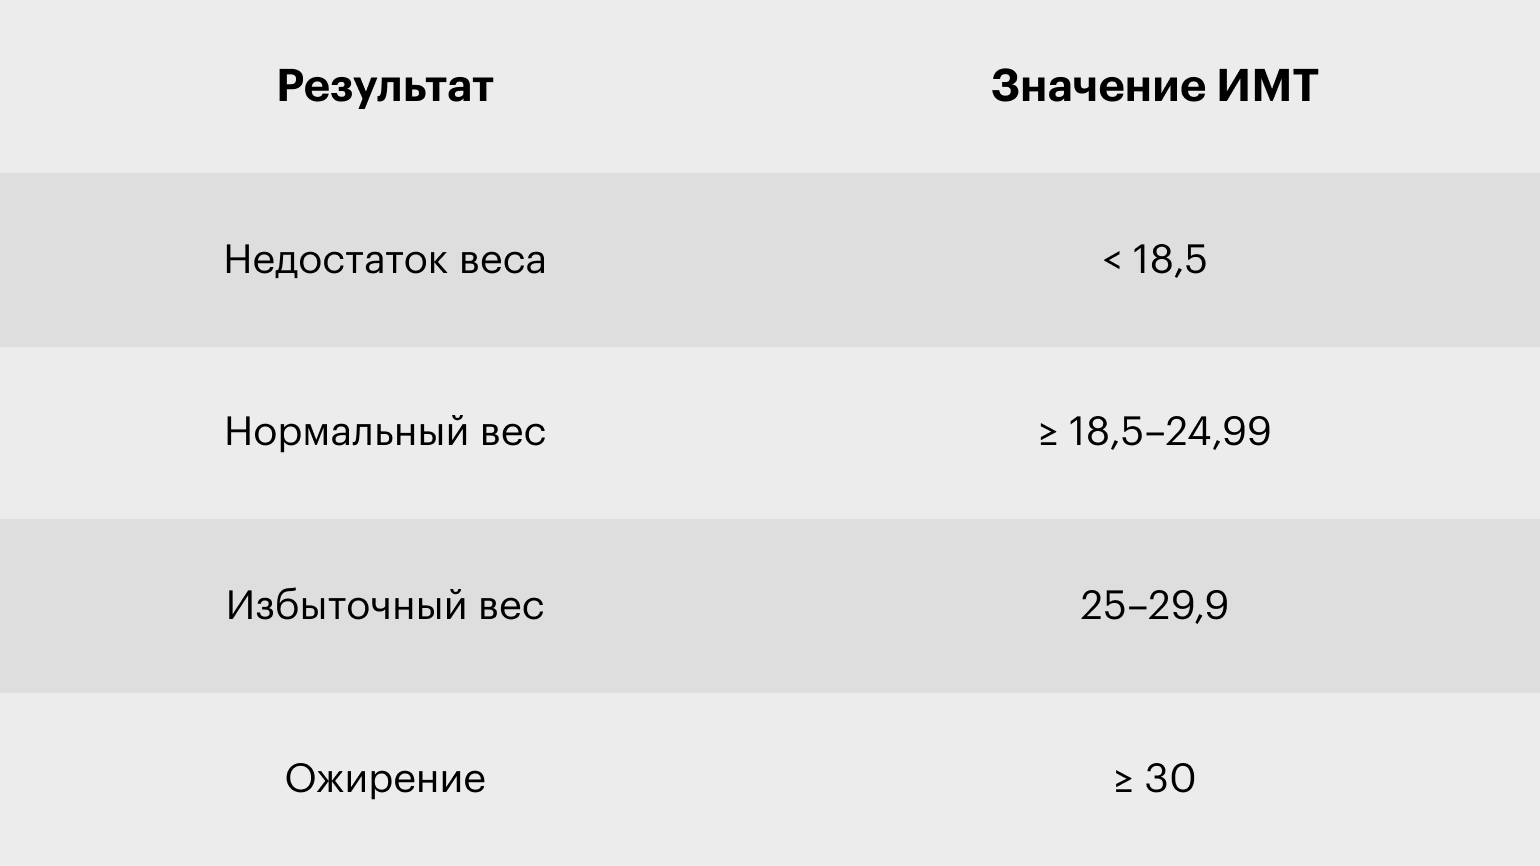
Мы напишем калькулятор индекса массы тела. ИМТ — это важный медицинский показатель, который позволяет оценить, есть ли у человека избыточный вес или ожирение. Он рассчитывается по следующей формуле:
Результаты расчётов оценивают с помощью специальной таблицы. У врачей она имеет много градаций, мы же воспользуемся упрощённой версией:
Писать код на Python лучше всего в специальной IDE, например в PyCharm или Visual Studio Code. Они подсвечивают синтаксис и предлагают продолжение кода — это сильно упрощает работу программиста. Весь код из этой статьи мы писали в Visual Studio Code.
Библиотека Tkinter предустановлена в Python. Поэтому её нужно только импортировать:
import tkinter as tk
Теперь мы можем использовать любые модули из этой библиотеки.

Прежде чем писать код, необходимо ответить на несколько вопросов:
- Какие данные мы хотим получить от пользователя и в каком виде?
- Какое событие будет запускать расчёт ИМТ: нажатие кнопки, получение приложением всех необходимых данных или что-то другое?
- Как будем показывать результат?
В нашем случае необходимо получить от пользователя вес и рост в виде целых чисел. При этом вес должен быть введён в килограммах, а рост — в сантиметрах. ИМТ будет рассчитываться по нажатии кнопки, а результат — выводиться во всплывающем окне в виде значения ИМТ и категории, к которой он относится.
Схематично графический интерфейс нашего калькулятора будет выглядеть так:

Теперь попробуем реализовать интерфейс и работу калькулятора с помощью Python и Tkinter.
После импорта библиотеки в Python загрузим её методы:
from tkinter import *
from tkinter import messagebox
Первая строка позволяет нам загрузить все методы Tkinter и использовать их в коде без ссылки на их наименование. Второй строкой мы явно импортируем метод messagebox, который будем использовать для вывода всплывающего окна с результатом. Это удобно, так как метод потребуется нам несколько раз.
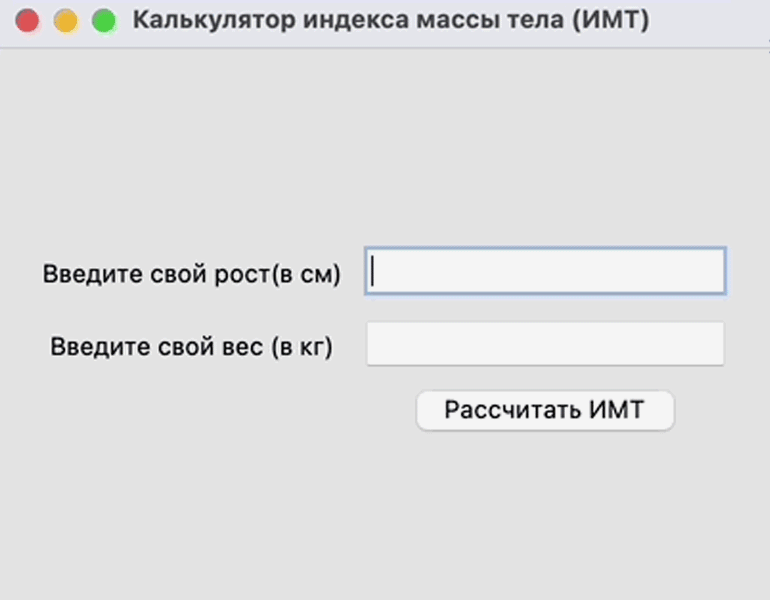
Теперь создадим окно нашего приложения. Для этого воспользуемся модулем Tk. Приложение назовём «Калькулятор индекса массы тела (ИМТ)»:
window = Tk() #Создаём окно приложения.
window.title("Калькулятор индекса массы тела (ИМТ)") #Добавляем название приложения.
После запуска кода ничего не произойдёт. Это не ошибка. На самом деле код выполнился и окно закрылось. Необходимо явно указать, что окно приложения не должно закрываться до тех пор, пока пользователь сам не сделает этого. Для этого к коду добавим функцию window.mainloop (), указывающую на запуск цикла событий:
window.mainloop()
Запустив код, увидим экран приложения:
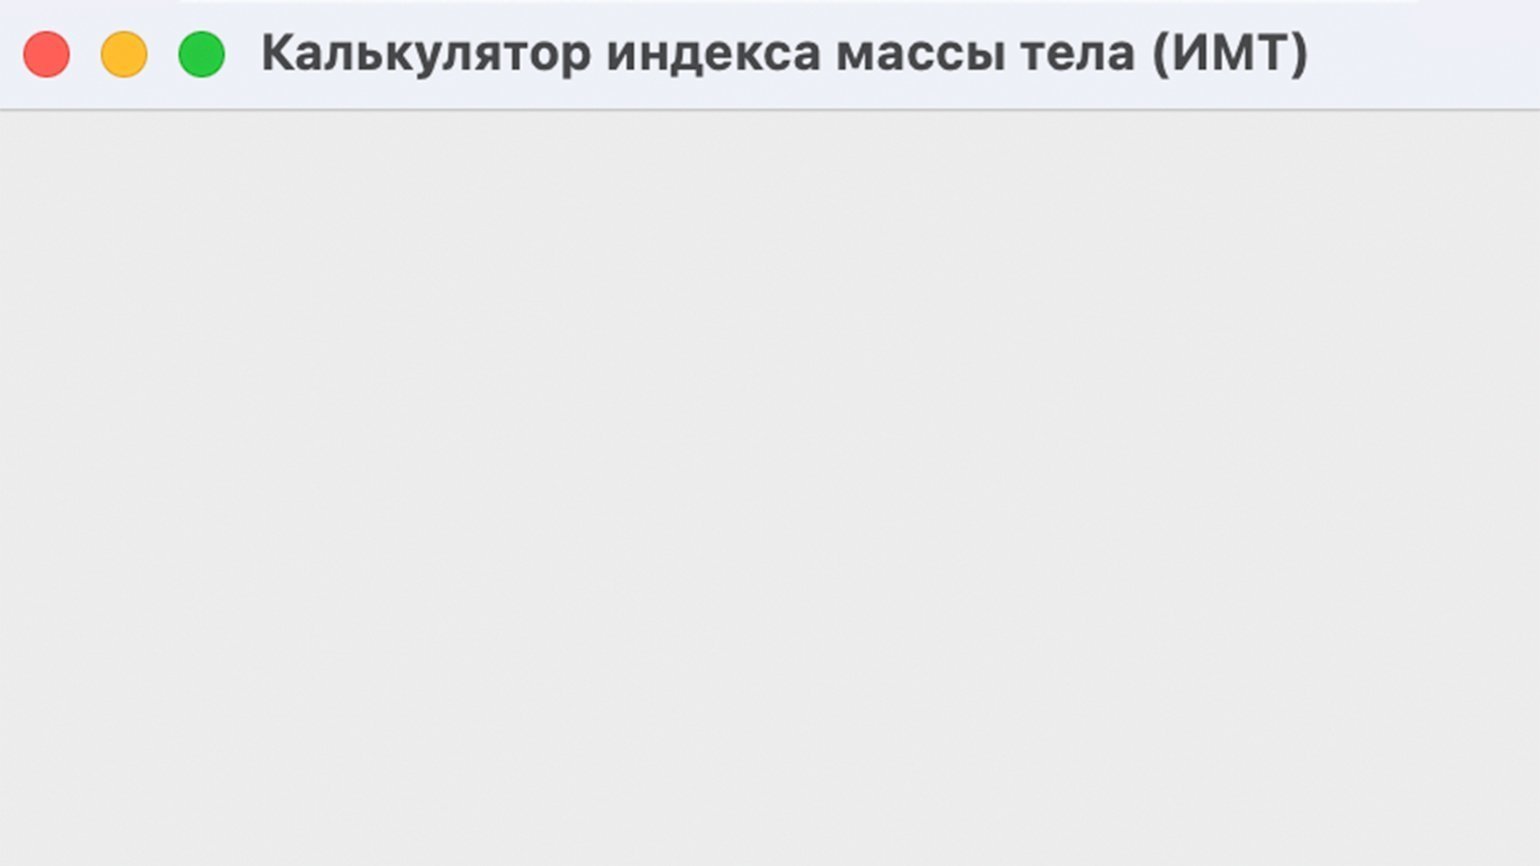
Мы не указали размер окна, поэтому название приложения не помещается в него полностью. Исправим это с помощью метода geometry:
window.geometry('400x300')
Теперь название приложения видно полностью:
В окне приложения необходимо разместить несколько элементов с нашего эскиза: два поля ввода информации с подписями и одну кнопку. Важно, чтобы поля не накладывались друг на друга и не уходили за пределы окна. В Tkinter для этого есть несколько методов:
- pack — используется, когда мы работаем с контейнерами для элементов. Позволяет позиционировать кнопки, надписи или другие элементы внутри контейнеров.
- place — позволяет позиционировать элементы, указывая точные координаты.
- grid — размещает элементы по ячейкам условной сетки, разделяющей окно приложения.
Мы воспользуемся комбинацией методов pack и grid. Для начала создадим виджет Frame для размещения надписей, полей ввода и кнопок. Подробное описание работы виджета есть в документации. Мы же используем только два свойства: padx и pady.
Обозначим отступы по вертикали и горизонтали в 10 пикселей для элементов, которые будут расположены внутри Frame:
frame = Frame(
   window, #Обязательный параметр, который указывает окно для размещения Frame.
   padx = 10, #Задаём отступ по горизонтали.
   pady = 10 #Задаём отступ по вертикали.
)
frame.pack(expand=True) #Не забываем позиционировать виджет в окне. Здесь используется метод pack. С помощью свойства expand=True указываем, что Frame заполняет весь контейнер, созданный для него.
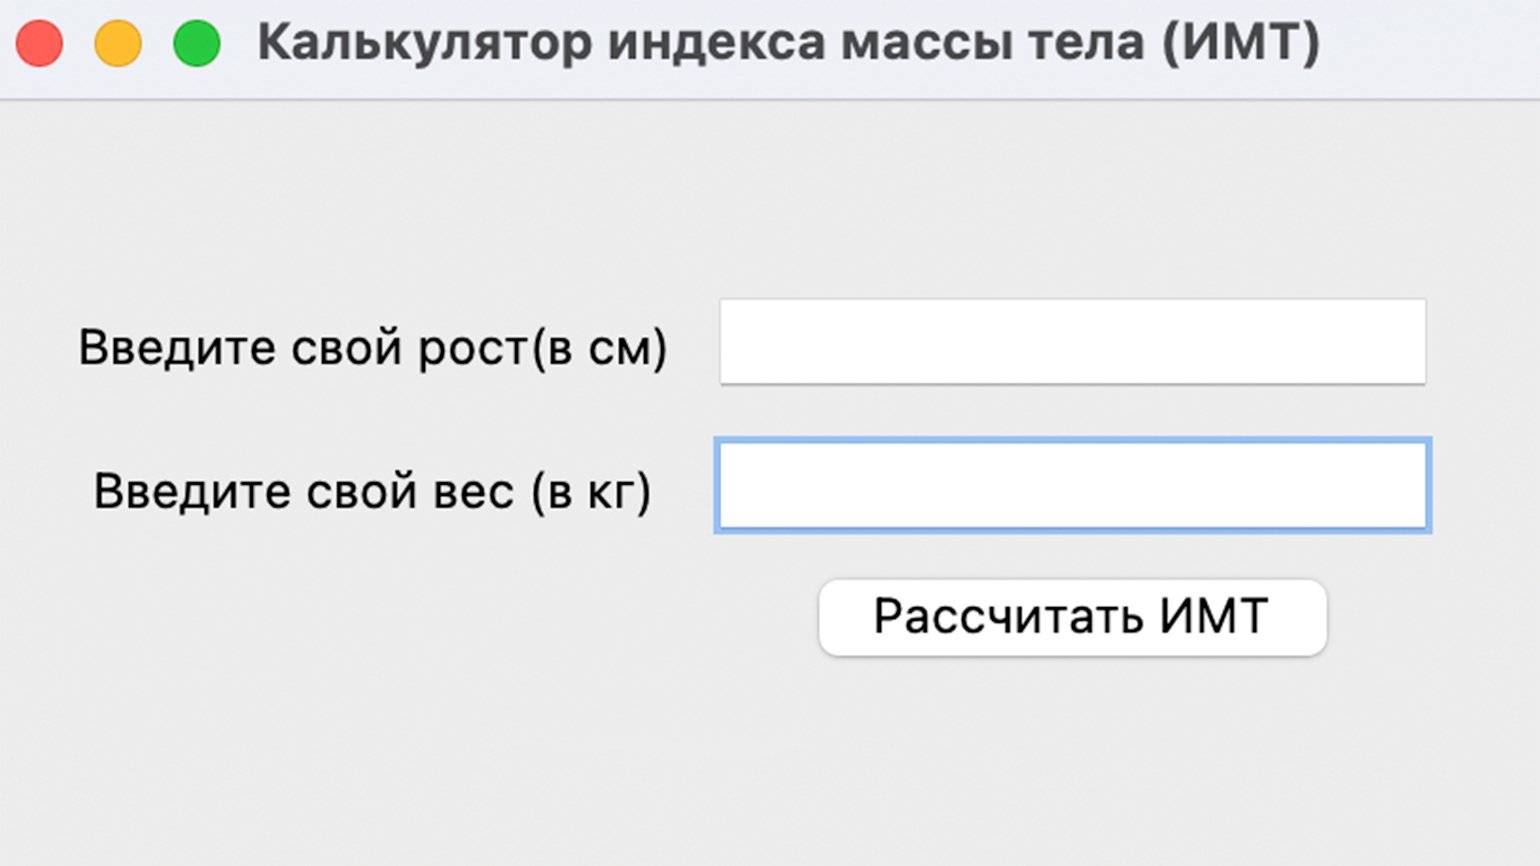
В окне приложения нам необходимо добавить три вида виджетов: поле для ввода информации (Entry), текстовые надписи (Label) и кнопку (Button).
Начнём с надписей. Воспользуемся виджетом Label:
height_lb = Label(
   frame,
   text="Введите свой рост (в см)  "
)
height_lb.grid(row=3, column=1)
Мы передаём виджету Label два параметра:
- frame — используем заготовку виджета Frame, в которой уже настроены отступы по вертикали и горизонтали.
- text — текст, который должен быть выведен на экран.
Для позиционирования виджета используем метод grid. Укажем, что текст должен располагаться в ячейке с координатами «3-я строка, 1-й столбец». Если запустим код, то увидим там единственный элемент:
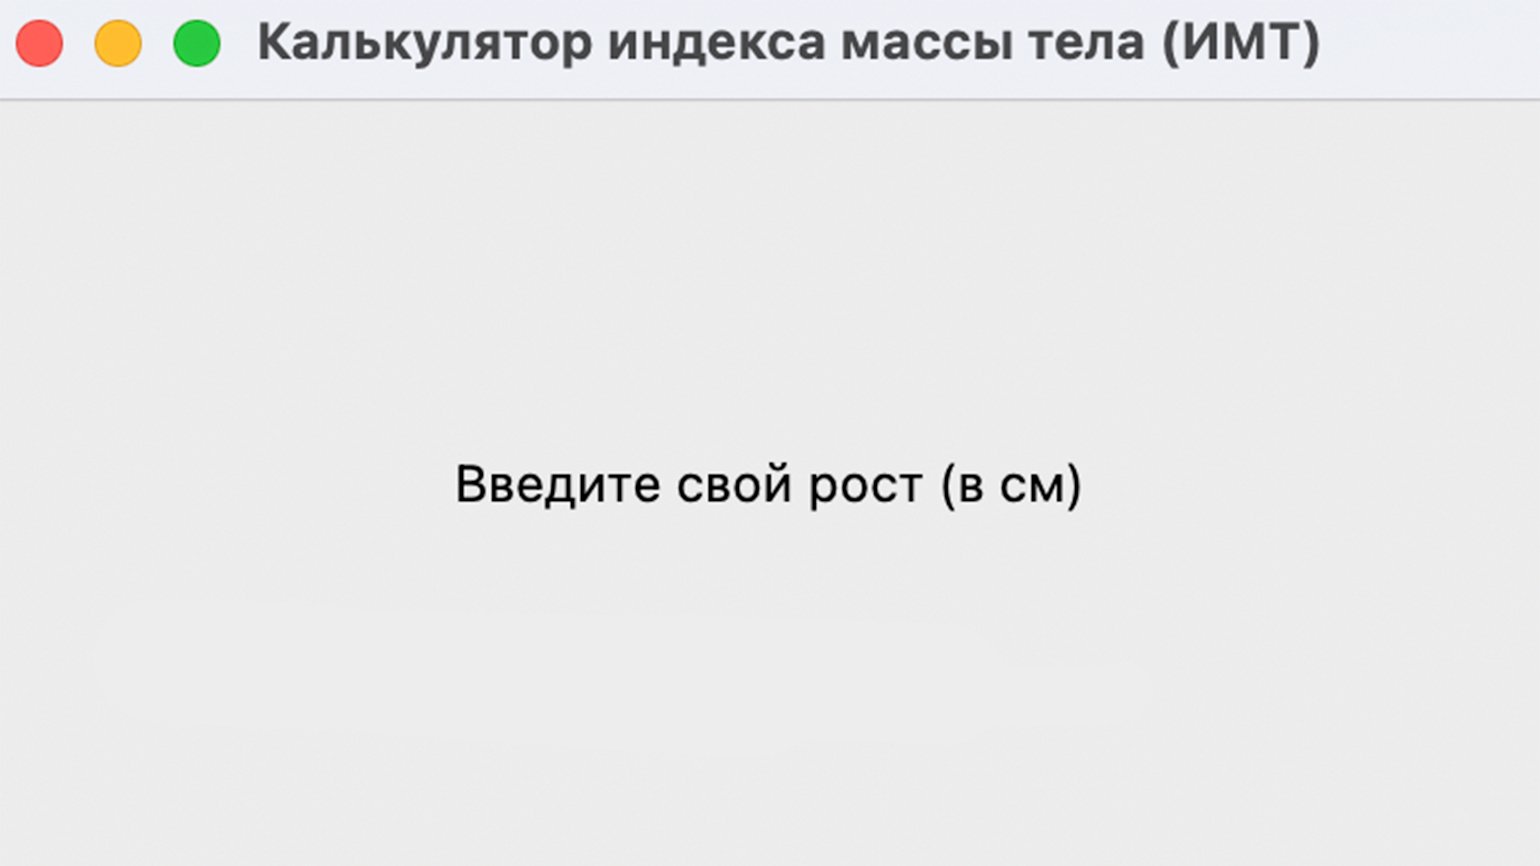
Сейчас элемент расположен в центре окна, но он займёт правильное положение, когда мы напишем другие элементы.
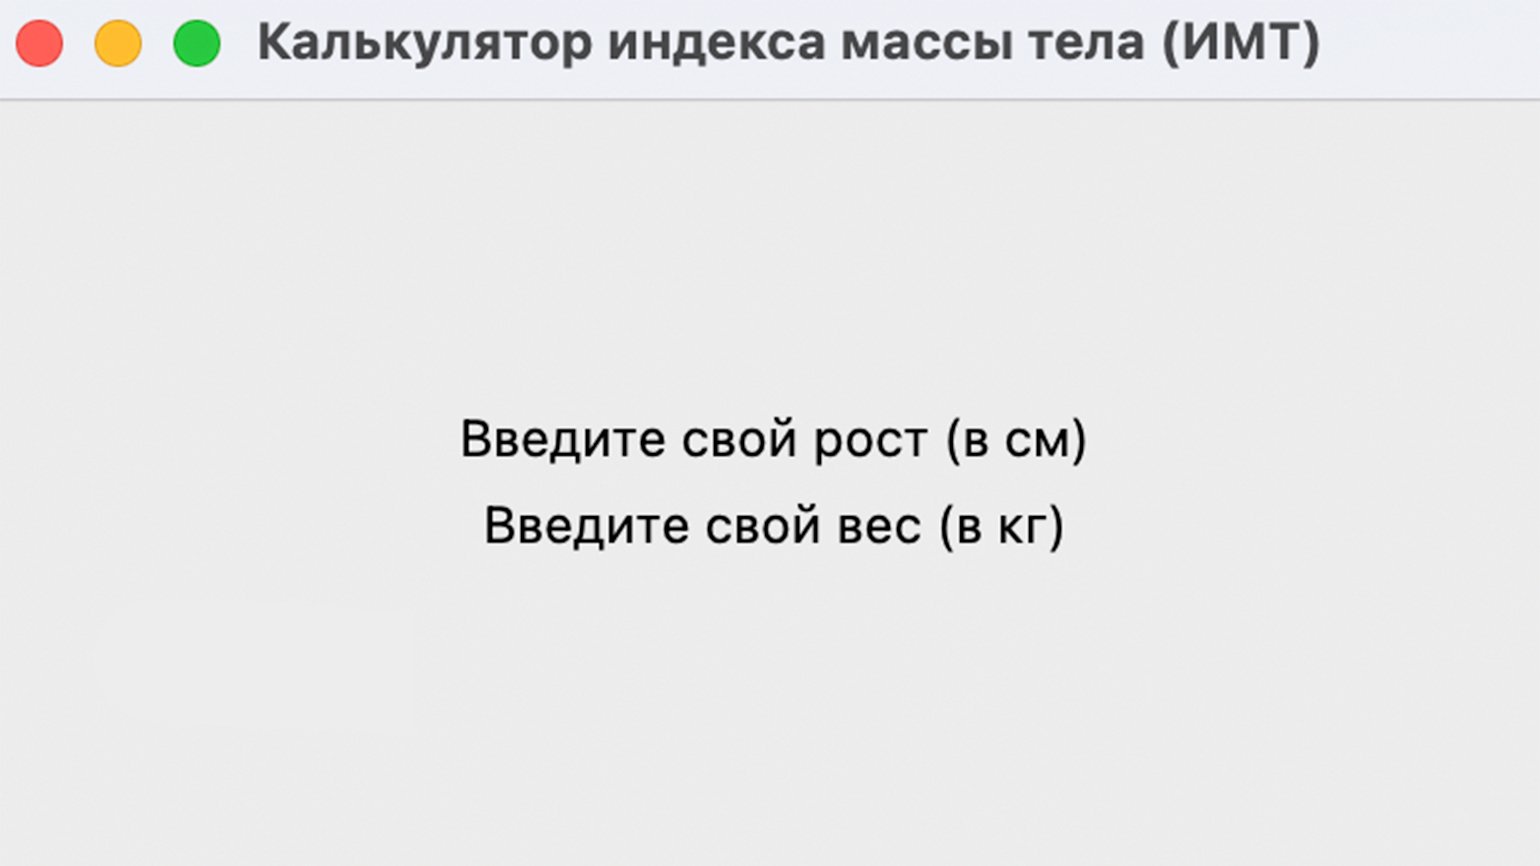
Добавим вторую надпись о весе аналогичным образом, но при позиционировании в grid укажем следующую, четвёртую строку:
weight_lb = Label(
   frame,
   text="Введите свой вес (в кг)  ",
)
weight_lb.grid(row=4, column=1)
Запускаем код и смотрим на результат:
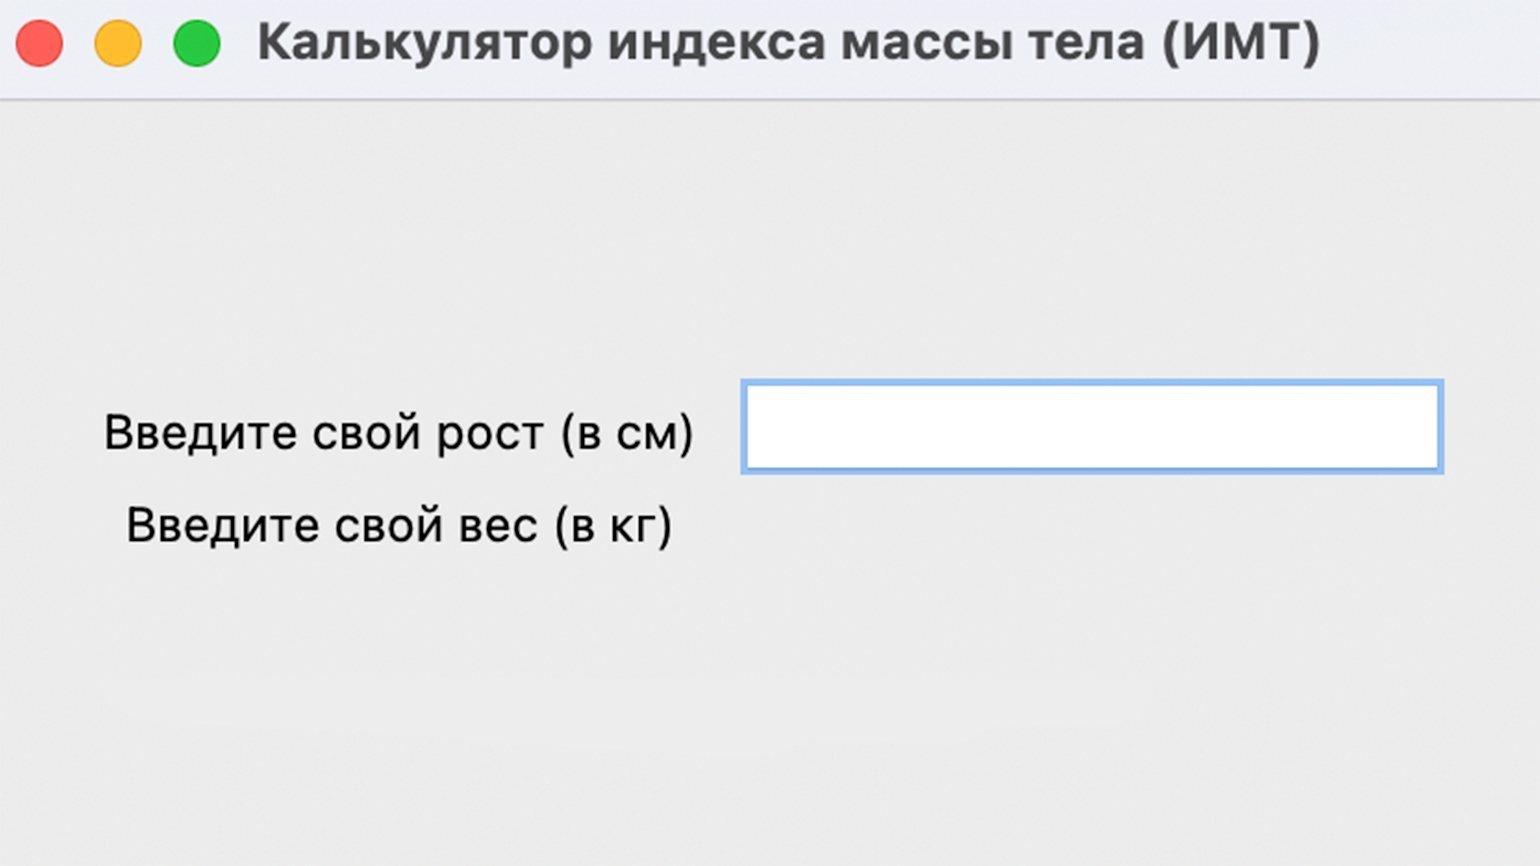
Теперь добавим поля для ввода пользовательской информации, используя виджет Entry:
height_tf = Entry(
   frame, #Используем нашу заготовку с настроенными отступами.
)
height_tf.grid(row=3, column=2)
Для позиционирования мы также воспользовались методом grid. Обратите внимание, что наш элемент должен быть расположен напротив надписи «Введите свой рост (в см)». Поэтому мы используем ячейку в той же строке, но уже во втором столбце. Запустим код и посмотрим на результат:
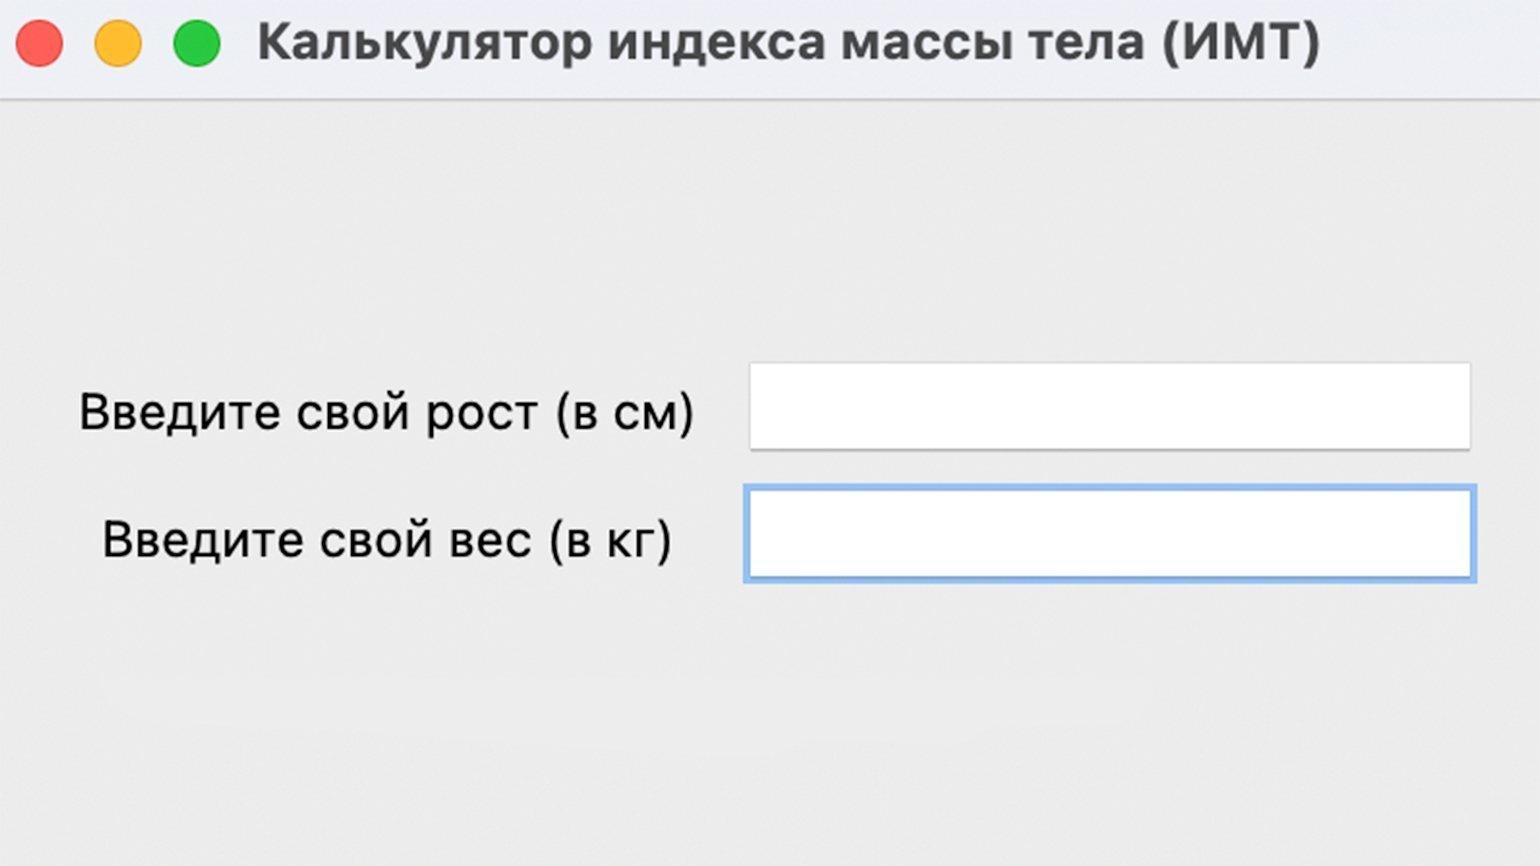
Всё получилось. Остаётся по аналогии добавить поле ввода веса:
weight_tf = Entry(
   frame,
)
weight_tf.grid(row=4, column=2, pady=5)
Посмотрим на результат:
Теперь добавим кнопку, которая будет запускать расчёт ИМТ. Сделаем это с помощью виджета Button:
cal_btn = Button(
   frame, #Заготовка с настроенными отступами.
   text='Рассчитать ИМТ', #Надпись на кнопке.
)
cal_btn.grid(row=5, column=2) #Размещаем кнопку в ячейке, расположенной ниже, чем наши надписи, но во втором столбце, то есть под ячейками для ввода информации.
Посмотрим на результат:
Теперь в приложении есть все графические элементы. Остаётся лишь написать код, который будет получать информацию из виджетов Entry и рассчитывать индекс массы тела.
Напишем простую функцию и разберём её построчно:
def calculate_bmi(): #Объявляем функцию.
   kg = int(weight_tf.get()) #С помощью метода .get получаем из поля ввода с именем weight_tf значение веса, которое ввёл пользователь и конвертируем в целое число с помощью int().
   m = int(height_tf.get())/100 #С помощью метода .get получаем из поля ввода с именем height_tf значение роста и конвертируем в целое число с помощью int(). Обязательно делим его на 100, так как пользователь вводит рост в сантиметрах, а в формуле для расчёта ИМТ используются метры.
   bmi = kg/(m*m)#Рассчитываем значение индекса массы тела.
   bmi = round(bmi, 1) #Округляем результат до одного знака после запятой.
Функция готова. Но теперь нам необходимо оценить полученный результат расчёта и вывести сообщение для пользователя.
Дополним нашу функцию calculate_bmi. Воспользуемся условным оператором if, чтобы учесть полученные значения ИМТ, и методом Tkinter messagebox для отображения сообщения во всплывающем окне:
if bmi < 18.5:
       messagebox.showinfo('bmi-pythonguides', f'ИМТ = {bmi} соответствует недостаточному весу')
   elif (bmi > 18.5) and (bmi < 24.9):
       messagebox.showinfo('bmi-pythonguides', f'ИМТ = {bmi} соответствует нормальному весу')
   elif (bmi > 24.9) and (bmi < 29.9):
       messagebox.showinfo('bmi-pythonguides', f'ИМТ = {bmi} соответствует избыточному весу')
   else:
       messagebox.showinfo('bmi-pythonguides', f'ИМТ = {bmi} соответствует ожирению')
Остаётся последний шаг — наша функция должна запускаться при нажатии на кнопку «Рассчитать ИМТ». Для этого добавим свойство command в виджет Button:
cal_btn = Button(
   frame,
   text='Рассчитать ИМТ',
   command=calculate_bmi #Позволяет запустить событие с функцией при нажатии на кнопку.
)
cal_btn.grid(row=5, column=2)
Запустим код и посмотрим на результат:
Всё работает. Функция получает данные из полей ввода и рассчитывает индекс массы тела, показывая результат на экране.
from tkinter import *
from tkinter import messagebox

def calculate_bmi():
   kg = int(weight_tf.get())
   m = int(height_tf.get())/100
   bmi = kg/(m*m)
   bmi = round(bmi, 1)

   if bmi < 18.5:
       messagebox.showinfo('bmi-pythonguides', f'ИМТ = {bmi} соответствует недостаточному весу')
   elif (bmi > 18.5) and (bmi < 24.9):
       messagebox.showinfo('bmi-pythonguides', f'ИМТ = {bmi} соответствует нормальному весу')
   elif (bmi > 24.9) and (bmi < 29.9):
       messagebox.showinfo('bmi-pythonguides', f'ИМТ = {bmi} соответствует избыточному весу')
   else:
       messagebox.showinfo('bmi-pythonguides', f'ИМТ = {bmi} соответствует ожирению')

window = Tk()
window.title('Калькулятор индекса массы тела (ИМТ)')
window.geometry('400x300')


frame = Frame(
   window,
   padx=10,
   pady=10
)
frame.pack(expand=True)


height_lb = Label(
   frame,
   text="Введите свой рост (в см)  "
)
height_lb.grid(row=3, column=1)

weight_lb = Label(
   frame,
   text="Введите свой вес (в кг)  ",
)
weight_lb.grid(row=4, column=1)

height_tf = Entry(
   frame,
)
height_tf.grid(row=3, column=2, pady=5)

weight_tf = Entry(
   frame,
)
weight_tf.grid(row=4, column=2, pady=5)

cal_btn = Button(
   frame,
   text='Рассчитать ИМТ',
   command=calculate_bmi
)
cal_btn.grid(row=5, column=2)

window.mainloop()
Узнать о возможностях Tkinter и особенностях работы с виджетами можно в официальной документации. А если хотите найти больше реальных примеров для практики, советуем две книги:
- Python GUI Programming with Tkinter. Develop responsive and powerful GUI applications with Tkinter, Алан Мур.
- Tkinter GUI Programming by Example, Дэвид Лав.

Жизнь можно сделать лучше!
Освойте востребованную профессию, зарабатывайте больше и получайте от работы удовольствие. А мы поможем с трудоустройством и важными для работодателей навыками.
Посмотреть курсы
Skip to content
Sign up
Search code, repositories, users, issues, pull requests…
Provide feedback
We read every piece of feedback, and take your input very seriously.
Include my email address so I can be contacted
Saved searches
Use saved searches to filter your results more quickly
Sign in
Sign up
#
desktop-widget
Star
Here are
9 public repositories
matching this topic…
Language:
Python
Filter by language
All
9
JavaScript
10
Python
9
C#
5
Shell
4
C
2
CoffeeScript
2
HTML
2
Lua
2
QML
2
Rust
2
NotCookey
/
Venus
Star
21
A Windows Dock Widget Written in Pure Python
python
widgets
rainmeter
desktop-widget
windows-customization
rainmeter-python
-
Updated
Feb 24, 2022 -
Python
Shubham567
/
Neat-Conky
Star
8
Conky Desktop widget Theme Customization for Linux with a Rick and Morty flavour.
linux
theme
conky
ubuntu
arch
desktop-widget
rick-and-morty
conky-manager
-
Updated
Jul 6, 2022 -
Python
akhilesh-balaji
/
PyWidget
Star
4
Create amazing and functional desktop widgets in Python Tkinter
python
windows-10
tkinter
desktop-widget
-
Updated
Dec 8, 2020 -
Python
munagekar
/
MJRDarkConky
Star
3
This is a Dark Theme For Concky Manager. It was created for Manjaro XFCE but should work fine with any distro
theme
productivity
conky
stock-market
system-information
desktop-widget
weather-forecast
-
Updated
Oct 21, 2017 -
Python
dglent
/
sansimera-qt
Star
2
Systemtray application for the events from sansimera.gr
python
desktop
greek
desktop-application
desktop-widget
greek-language
systemtray-application
-
Updated
Oct 4, 2023 -
Python
InterVi
/
DeWidgets
Star
2
Migrate to https://bitbucket.org/InterVi/dewidgets
desktop-app
widget
pyqt5
widgets
python3
desktop-application
desktop-widget
qt5-widgets
-
Updated
May 26, 2018 -
Python
spignelon
/
Clocky
Star
2
Clocky: a simple Python/Tkinter clock widget that displays the current time as an overlay.
python
windows
productivity
clock
tkinter
desktop-widget
time-tracking
-
Updated
Apr 1, 2023 -
Python
Dannyb3334
/
Tkinter-Desktop-Widgets-py-
Star
2
Tkinter Desktop Widgets (py)
desktop-app
python
selenium
webscraper
desktop-widget
tkinter-gui
-
Updated
Nov 19, 2022 -
Python
null-p01ntr
/
SpotiMini-Player
Star
1
Cross-platform desktop player for Spotify
music
open-source
player
spotify
desktop-widget
-
Updated
Jan 18, 2023 -
Python
Improve this page
Add a description, image, and links to the
desktop-widget
topic page so that developers can more easily learn about it.
Curate this topic
Add this topic to your repo
To associate your repository with the
desktop-widget
topic, visit your repo’s landing page and select «manage topics.»
Learn more
Windows 10 предоставляет разработчикам возможность создавать собственные виджеты, которые могут быть добавлены на рабочий стол и предлагать дополнительные функции и информацию для пользователей. Если вы знакомы с языком программирования Python и хотите создать собственный виджет для Windows 10, то это руководство поможет вам в этом процессе.
В этом пошаговом руководстве мы рассмотрим основные шаги, необходимые для создания и установки виджета на рабочий стол Windows 10. Мы также рассмотрим различные функции и возможности, которые вы можете добавить в свой виджет с помощью Python.
Прежде чем приступить к созданию виджета, вам понадобятся следующие инструменты и материалы: Python 3.x или более поздняя версия, интегрированная среда разработки (IDE) для Python (например, PyCharm или Visual Studio Code), базовые знания Python и понимание работы с Windows 10.
Теперь, когда мы установили все необходимые инструменты, давайте начнем создание виджета для Windows 10 на Python!
Обратите внимание: для взаимодействия с API Windows 10 и добавления функций, таких как уведомления и доступ к персональным данным пользователей, вам может потребоваться провести дополнительные настройки и запросить соответствующие разрешения.
Содержание
- Подготовка к созданию виджета
- Установка необходимых инструментов
- Создание базового приложения
Подготовка к созданию виджета
Для создания виджета на Windows 10 с использованием языка программирования Python вам понадобятся следующие инструменты:
1. Python: Убедитесь, что у вас установлен интерпретатор Python на вашем компьютере. Вы можете загрузить его с официального сайта python.org и выполнить установку в соответствии с инструкцией для вашей операционной системы.
2. Установка пакета tkinter: Пакет tkinter является стандартной библиотекой для создания графического интерфейса пользователя в Python. Для установки пакета tkinter вам необходимо выполнить следующую команду в командной строке:
pip install tk3. Редактор кода: Откройте любой редактор кода, который вам нравится, для написания и редактирования кода виджета. Рекомендуется использовать Visual Studio Code, PyCharm или IDLE.
После установки необходимых инструментов вы готовы начать создание виджета для Windows 10 на языке Python.
Установка необходимых инструментов
Чтобы создать виджет для Windows 10 на Python, вам понадобятся несколько инструментов. Обратите внимание, что эти инструкции применимы только для пользователей операционной системы Windows 10.
- Python: Первым шагом является установка Python. Вы можете скачать установочный файл с официального веб-сайта Python и выполнить его установку. Убедитесь, что выбрана версия Python, совместимая с вашей операционной системой.
- IDE (интегрированная среда разработки): Рекомендуется использовать IDE для разработки виджетов на Python. Некоторые популярные IDE для Python включают Visual Studio Code, PyCharm и IDLE. Выберите IDE, который наиболее соответствует вашим потребностям и установите его на ваш компьютер.
- Пакетный менеджер pip: По умолчанию Python поставляется с пакетным менеджером pip. Убедитесь, что pip установлен и доступен в вашей командной строке, проверив его версию с помощью команды «pip —version». Если pip не установлен, вам нужно установить его отдельно. Вы можете найти инструкции по установке pip на официальном веб-сайте Python.
После установки всех необходимых инструментов, вы будете готовы приступить к созданию виджета для Windows 10 на Python.
Создание базового приложения
Перед началом работы нам понадобится установить несколько необходимых инструментов:
| Python | Скачать и установить Python версии 3.x. |
| Python IDE | Выбрать и установить интегрированную среду разработки (IDE) для Python, например PyCharm или Visual Studio Code. |
| Установщик пакетов pip | Проверить наличие установщика пакетов pip, введя в командной строке команду pip --version. Если pip не установлен, то его можно установить, выполнив команду python -m ensurepip --upgrade (для Python версии 3.x) или python get-pip.py (для Python версии 2.x). |
После установки всех необходимых инструментов мы готовы приступить к созданию базового приложения. Для начала откроем IDE и создадим новый пустой проект Python.
Далее, создадим новый файл с расширением .py и введем следующий код:
import tkinter as tk
class MainWindow(tk.Tk):
def __init__(self):
super().__init__()
self.title("Мое первое приложение")
self.geometry("400x300")
self.label = tk.Label(self, text="Привет, мир!")
self.label.pack()
self.button = tk.Button(self, text="Нажми меня", command=self.button_click)
self.button.pack()
def button_click(self):
self.label.config(text="Кнопка нажата!")
if __name__ == "__main__":
window = MainWindow()
window.mainloop()
В данном примере мы создаем класс MainWindow, который является наследником класса tkinter.Tk. В методе __init__ мы инициализируем главное окно приложения, задаем его заголовок и размеры.
Затем мы создаем метку (tk.Label) и кнопку (tk.Button) с помощью метода pack для автоматической компоновки элементов. Метка и кнопка добавляются в главное окно приложения.
Метод button_click вызывается при нажатии на кнопку и изменяет текст метки.
В конце файла мы создаем экземпляр класса MainWindow и вызываем метод mainloop, который запускает основной цикл обработки событий приложения.
Теперь, когда базовое приложение создано, мы можем запустить его и убедиться, что оно работает правильно.
В следующих разделах мы будем постепенно расширять наше приложение, добавлять новые функции и позволять пользователю взаимодействовать с ним.
Виджеты — это удобные и многофункциональные инструменты, которые позволяют пользователям Windows 10 быстро получать доступ к нужным данным без необходимости открывать полноценные приложения. Если вы являетесь разработчиком и хотите создать свой собственный виджет для операционной системы Windows 10 с помощью языка программирования Python, то эта инструкция поможет вам в этом процессе.
Прежде всего, вам потребуется установить Python на свой компьютер, если у вас его пока нет. Вы можете скачать его с официального веб-сайта Python. После установки Python убедитесь, что ваша версия Python совместима с вашей операционной системой Windows 10.
Затем вам понадобится выбрать интегрированную среду разработки (IDE) для написания кода вашего виджета. В качестве рекомендации рассмотрите использование PyCharm или Visual Studio Code, так как они являются одними из самых популярных IDE для разработки на Python.
Важно помнить, что для создания виджетов для Windows 10 на Python вам также потребуется обладать базовыми навыками программирования на языке Python и знать основы разработки для операционной системы Windows.
После выбора IDE вам следует создать новый проект и создать новый файл Python. Затем вы можете начинать писать код для вашего виджета. При разработке виджета вам пригодится знание библиотеки PyQt5, которая позволяет создавать графический интерфейс приложений на языке Python для операционной системы Windows 10.
Когда ваш виджет будет готов, вы сможете сохранить его как исполняемый файл с расширением .exe и установить его на свой компьютер с операционной системой Windows 10. После установки вы сможете использовать свой собственный виджет и настраивать его в соответствии с вашими потребностями.
Содержание
- Выбор инструментов и языка программирования
- Установка необходимого программного обеспечения
- Создание основного класса виджета
- Добавление интерфейса виджета
- Определение функционала виджета
- Тестирование и отладка виджета
Выбор инструментов и языка программирования
Для создания виджета для Windows 10 на Python вам потребуются следующие инструменты:
| Язык программирования: | Python 3.x |
| Библиотека для работы с графическим интерфейсом: | PyQt5 |
| Интегрированная среда разработки (IDE): | PyCharm |
| Операционная система: | Windows 10 |
Python является высокоуровневым языком программирования, который отлично подходит для создания виджетов и приложений с графическим интерфейсом. Версия Python 3.x предпочтительна, поскольку она является последней стабильной версией языка.
Для создания графического интерфейса вы будете использовать библиотеку PyQt5, которая является оберткой над библиотекой Qt. PyQt5 предоставляет широкий набор инструментов для создания интерактивных и пользовательских интерфейсов, которые вы сможете использовать для вашего виджета.
PyCharm — это одна из самых популярных и мощных интегрированных сред разработки для Python. Она обладает широким набором функций, таких как автодополнение кода, отладка, интеграция с системами контроля версий и многое другое. PyCharm упрощает процесс разработки и позволяет вам сосредоточиться на написании кода вместо рутинных задач.
Чтобы разрабатывать виджеты для Windows 10, вам, конечно, понадобится компьютер с установленной операционной системой Windows 10. Учитывайте, что некоторые функции могут быть специфичны для этой операционной системы и могут не работать на других платформах.
Установка необходимого программного обеспечения
Перед тем, как приступить к созданию виджета для Windows 10 на Python, вам потребуется установить некоторое программное обеспечение. Вот список необходимых инструментов:
- Python: Сначала вам нужно установить Python на ваш компьютер. Вы можете скачать установщик Python с официального сайта python.org и запустить его. Убедитесь, что вы выбираете подходящую версию Python для вашей операционной системы.
- IDE: Вы можете выбрать любую удобную вам интегрированную среду разработки (IDE) для программирования на Python. Некоторые из популярных вариантов включают в себя PyCharm, Visual Studio Code, Sublime Text. Выберите IDE, которая подходит вам по функциональности и предпочтениям.
- Библиотека tkinter: Tkinter является стандартной библиотекой Python для создания графического интерфейса. Она должна быть установлена вместе с Python, поэтому вам не понадобится ничего дополнительно скачивать.
После установки Python и выбора IDE вы будете готовы начать создание виджета для Windows 10 на Python.
Создание основного класса виджета
Разработка виджетов для Windows 10 на языке программирования Python включает создание основного класса виджета. Этот класс будет определять основные функции и свойства виджета.
Для создания основного класса виджета можно использовать библиотеку tkinter, которая является стандартной библиотекой Python для создания графического интерфейса пользователя.
Ниже приведен пример кода для создания класса виджета:
from tkinter import *
class Widget():
def __init__(self, parent):
self.parent = parent
self.canvas = Canvas(parent, width=300, height=200)
self.canvas.pack()
def draw_circle(self, x, y, radius):
self.canvas.create_oval(x - radius, y - radius, x + radius, y + radius, fill="blue")
def draw_square(self, x, y, length):
self.canvas.create_rectangle(x - length/2, y - length/2, x + length/2, y + length/2, fill="red")
В этом примере создается класс Widget, который имеет методы __init__, draw_circle и draw_square. Метод __init__ инициализирует класс, создавая экземпляр класса Canvas из библиотеки tkinter и устанавливая его размеры.
Метод draw_circle рисует окружность на холсте виджета, принимая координаты центра окружности и ее радиус. Метод draw_square рисует квадрат, принимая координаты его центра и длину стороны.
Для создания виджета на основе этого класса необходимо создать экземпляр класса Widget и передать ему родительский элемент, на котором будет размещаться виджет. Например:
root = Tk()
widget = Widget(root)
root.mainloop()
В результате создается окно для виджета с родительским элементом root, на котором будет размещаться виджет.
Теперь вы знаете, как создать основной класс виджета на языке программирования Python для Windows 10.
Добавление интерфейса виджета
Чтобы создать интерфейс виджета в Windows 10 на Python, мы будем использовать библиотеку Tkinter. Tkinter входит в состав стандартной библиотеки Python, поэтому вам не нужно устанавливать дополнительные пакеты.
Первым шагом является импорт модуля Tkinter:
import tkinter as tk
Затем следует создать экземпляр главного окна приложения:
root = tk.Tk()
Далее мы можем настроить главное окно виджета, установив его размеры, заголовок, фоновый цвет и другие параметры:
root.geometry("400x300")
root.title("Мой виджет для Windows 10")
root.configure(bg="white")
После этого мы можем создать и расположить элементы интерфейса, такие как кнопки, метки и текстовые поля. Например, чтобы создать кнопку, мы можем использовать следующий код:
button = tk.Button(root, text="Нажми меня")
button.pack()
Дополнительные элементы интерфейса и их настройки могут быть добавлены аналогичным образом. После создания всех элементов интерфейса следует вызвать метод mainloop() для отображения виджета и обработки событий:
root.mainloop()
После выполнения кода вы увидите окно с интерфейсом виджета в соответствии с настройками, которые вы указали.
Теперь, когда вы знаете, как добавить интерфейс виджета, вы можете настраивать его в соответствии с вашими потребностями и добавлять функциональность, используя Python.
Определение функционала виджета
Функционал виджета может быть очень разнообразным и зависит от конкретной задачи или потребностей пользователей. Однако, есть некоторые общие возможности, которыми обычно обладают виджеты:
| Отображение информации | Виджет может выводить на экран различные данные или сообщения для пользователя. Например, это могут быть данные о погоде, курсе валют, новостях и т.д. |
| Интерактивность | Виджет может обрабатывать пользовательский ввод, например, с помощью кнопок или полей ввода. Также он может реагировать на действия пользователя, выполнять определенные задачи или открывать другие программы или веб-страницы. |
| Настройки и персонализация | Виджет может предоставлять возможность настройки его внешнего вида, поведения или отображаемой информации. Например, пользователь может выбрать тему виджета, изменить шрифт или цветовую схему. |
| Работа с данными | Виджет может осуществлять обмен данными с другими программами или веб-сервисами. Например, он может получать данные из базы данных или отправлять запросы на сервер для получения актуальной информации. |
Конечный функционал виджета определяется в соответствии с контекстом и требованиями проекта. Порой функционал может быть очень простым, а иногда требовать сложных вычислений или обработки больших объемов данных.
После того, как функционал виджета определен, можно переходить к разработке и воплощению его идей в коде на Python.
Тестирование и отладка виджета
После создания виджета важно протестировать его на правильность работы и исправить возможные ошибки перед публикацией. В этом разделе мы рассмотрим основные методы тестирования и отладки виджета.
1. Модульное тестирование
Модульное тестирование позволяет проверить отдельные компоненты или функции виджета на корректность выполнения. Для этого нужно создать набор тестовых сценариев, которые проверят каждый компонент виджета в изоляции. Если тесты успешно проходят, значит каждая функция работает правильно.
2. Интеграционное тестирование
Интеграционное тестирование проверяет работу виджета в комплексе с другими компонентами или модулями программы. Например, можно проверить взаимодействие виджета с базой данных или с внешними API. Важно проверить, что виджет правильно обрабатывает данные и взаимодействует с другими системами.
3. Тестирование на разных платформах и ОС
Виджет, созданный для Windows 10, должен быть протестирован на разных платформах и операционных системах. Например, виджет может отличаться внешним видом или функциональностью на Windows 7 или Windows 8. Также стоит проверить, что виджет работает корректно на разных разрешениях экрана и диагоналях устройств.
4. Отладка виджета
В процессе тестирования и разработки виджета могут возникнуть ошибки. Для их поиска и исправления используется отладка. В Python есть множество инструментов для отладки, например, pdb (Python Debugger) или использование print-функции для вывода промежуточных результатов. Отладка позволяет следить за выполнением программы, изучать значения переменных и искать места возникновения ошибок.
Тестируя и отлаживая виджет, вы можете убедиться в его правильной работе и повысить качество своего продукта перед его публикацией. Не забывайте также учесть отзывы и пожелания пользователей при дальнейшей разработке и обновлении виджета.
Python has a lot of GUI frameworks, but Tkinter is the only framework that’s built into the Python standard library. Tkinter has several strengths. It’s cross-platform, so the same code works on Windows, macOS, and Linux. Visual elements are rendered using native operating system elements, so applications built with Tkinter look like they belong on the platform where they’re run.
Although Tkinter is considered the de facto Python GUI framework, it’s not without criticism. One notable criticism is that GUIs built with Tkinter look outdated. If you want a shiny, modern interface, then Tkinter may not be what you’re looking for.
However, Tkinter is lightweight and relatively painless to use compared to other frameworks. This makes it a compelling choice for building GUI applications in Python, especially for applications where a modern sheen is unnecessary, and the top priority is to quickly build something that’s functional and cross-platform.
In this tutorial, you’ll learn how to:
- Get started with Tkinter with a Hello, World application
- Work with widgets, such as buttons and text boxes
- Control your application layout with geometry managers
- Make your applications interactive by associating button clicks with Python functions
Once you’ve mastered these skills by working through the exercises at the end of each section, you’ll tie everything together by building two applications. The first is a temperature converter, and the second is a text editor. It’s time to dive right in and learn how to build an application with Tkinter!
Building Your First Python GUI Application With Tkinter
The foundational element of a Tkinter GUI is the window. Windows are the containers in which all other GUI elements live. These other GUI elements, such as text boxes, labels, and buttons, are known as widgets. Widgets are contained inside of windows.
First, create a window that contains a single widget. Start up a new Python shell session and follow along!
With your Python shell open, the first thing you need to do is import the Python GUI Tkinter module:
>>>
>>> import tkinter as tk
A window is an instance of Tkinter’s Tk class. Go ahead and create a new window and assign it to the variable window:
When you execute the above code, a new window pops up on your screen. How it looks depends on your operating system:
Throughout the rest of this tutorial, you’ll see Windows screenshots.
Adding a Widget
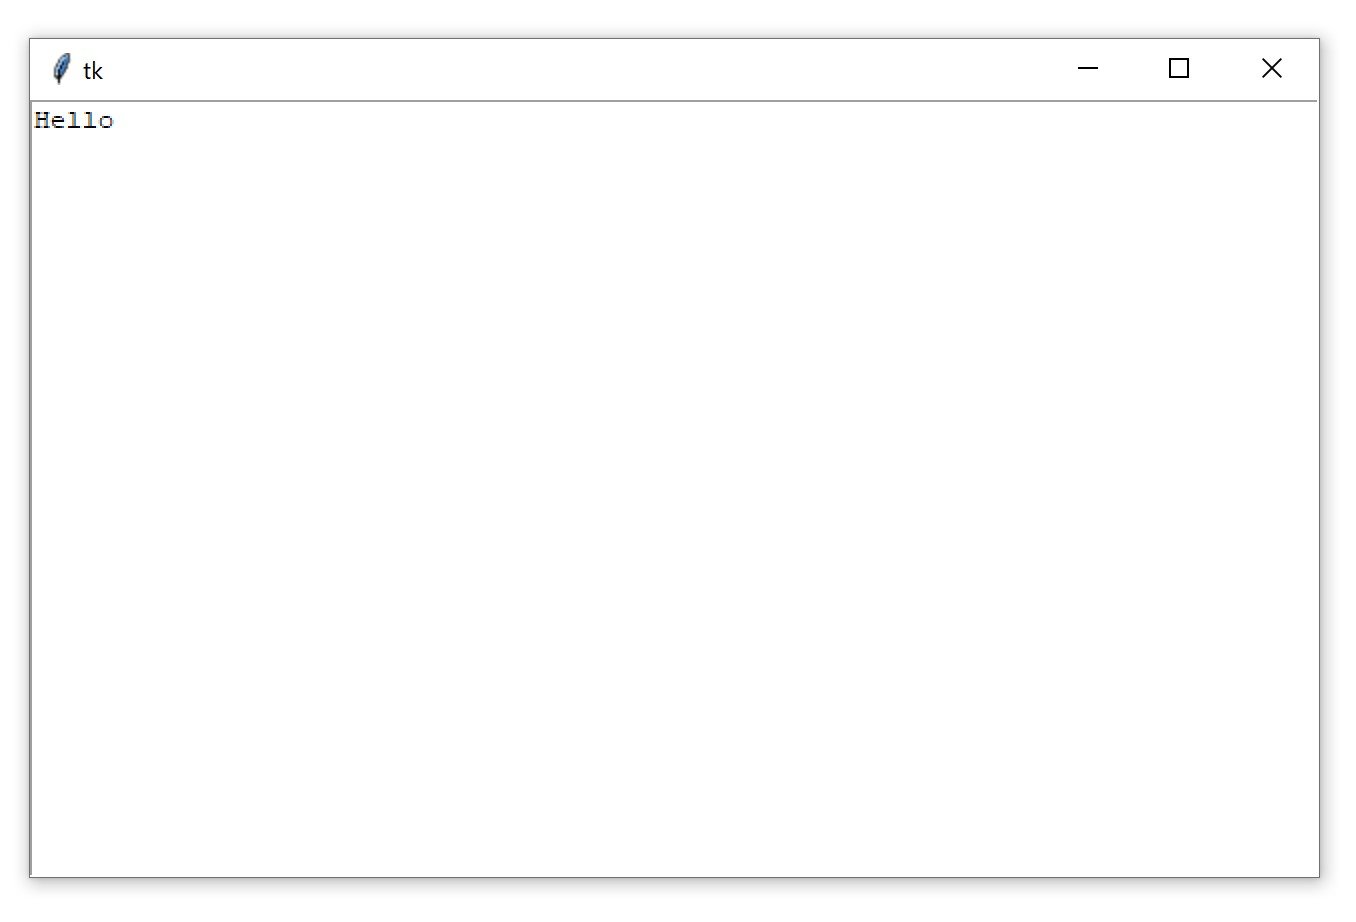
Now that you have a window, you can add a widget. Use the tk.Label class to add some text to a window. Create a Label widget with the text "Hello, Tkinter" and assign it to a variable called greeting:
>>>
>>> greeting = tk.Label(text="Hello, Tkinter")
The window you created earlier doesn’t change. You just created a Label widget, but you haven’t added it to the window yet. There are several ways to add widgets to a window. Right now, you can use the Label widget’s .pack() method:
The window now looks like this:
When you pack a widget into a window, Tkinter sizes the window as small as it can be while still fully encompassing the widget. Now execute the following:
Nothing seems to happen, but notice that no new prompt appears in the shell.
window.mainloop() tells Python to run the Tkinter event loop. This method listens for events, such as button clicks or keypresses, and blocks any code that comes after it from running until you close the window where you called the method. Go ahead and close the window you’ve created, and you’ll see a new prompt displayed in the shell.
Creating a window with Tkinter only takes a couple of lines of code. But blank windows aren’t very useful! In the next section, you’ll learn about some of the widgets available in Tkinter, and how you can customize them to meet your application’s needs.
Check Your Understanding
Expand the code blocks below to check your understanding:
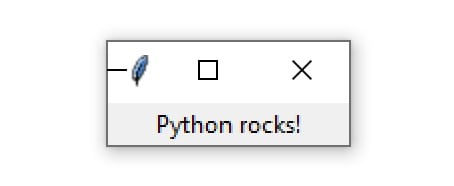
Write a full Python script that creates a Tkinter window with the text "Python rocks!".
The window should look like this:
Try this exercise now.
You can expand the code block below to see a solution:
Here’s one possible solution:
import tkinter as tk

window = tk.Tk()
label = tk.Label(text="Python rocks!")
label.pack()

window.mainloop()
Keep in mind your code may look different.
When you’re ready, you can move on to the next section.
Widgets are the bread and butter of the Python GUI framework Tkinter. They’re the elements through which users interact with your program. Each widget in Tkinter is defined by a class. Here are some of the widgets available:
| Widget Class | Description |
|---|---|
Label |
A widget used to display text on the screen |
Button |
A button that can contain text and can perform an action when clicked |
Entry |
A text entry widget that allows only a single line of text |
Text |
A text entry widget that allows multiline text entry |
Frame |
A rectangular region used to group related widgets or provide padding between widgets |
You’ll see how to work with each of these in the following sections, but keep in mind that Tkinter has many more widgets than those listed here. The widget’s choice gets even more complicated when you account for a whole new set of themed widgets. In the remaining part of this tutorial, you’re only going to use Tkinter’s classic widgets, though.
If you’d like to learn more about the two widget types, then you can expand the collapsible section below:
It’s worth noting that there are currently two broad categories of widgets in Tkinter:
- Classic widgets: Available in the
tkinterpackage, for exampletkinter.Label - Themed widgets: Available in the
ttksubmodule, for exampletkinter.ttk.Label
Tkinter’s classic widgets are highly customizable and straightforward, but they tend to appear dated or somewhat foreign on most platforms today. If you’d like to take advantage of widgets with a native look and feel familiar to users of a given operating system, then you might want to check out the themed widgets.
Most of the themed widgets are near drop-in replacements for their legacy counterparts, but with a more modern look. You can also use a few brand-new widgets, such as the progress bar, which weren’t available in Tkinter before. At the same time, you’ll need to continue using some of the classic widgets that don’t have a themed alternative.
When working with regular and themed widgets in Tkinter, it’s customary to declare the following aliases for the Tkinter packages and modules:
>>>
>>> import tkinter as tk
>>> import tkinter.ttk as ttk
Aliases like this let you explicitly refer to either tk.Label or ttk.Label, for example, in one program depending on your needs:
>>>
>>> tk.Label()
<tkinter.Label object .!label>

>>> ttk.Label()
<tkinter.ttk.Label object .!label2>
However, you may sometimes find it more convenient to use a wildcard import (*) to automatically override all legacy widgets with the themed ones where possible, like so:
>>>
>>> from tkinter import *
>>> from tkinter.ttk import *

>>> Label()
<tkinter.ttk.Label object .!label>

>>> Text()
<tkinter.Text object .!text>
Now, you don’t have to prefix the widget’s class name with its corresponding Python module. You’ll always create a themed widget as long as it’s available, or you’ll fall back to the classic widget otherwise. The two import statements above must be placed in the specified order to have an effect. Because of that, wildcard imports are considered a bad practice, which should generally be avoided unless used consciously.
For a full list of Tkinter widgets, check out Basic Widgets and More Widgets in the TkDocs tutorial. Even though it describes themed widgets introduced in Tcl/Tk 8.5, most of the information there should also apply to the classic widgets.
For now, take a closer look at the Label widget.
Displaying Text and Images With Label Widgets
Label widgets are used to display text or images. The text displayed by a Label widget can’t be edited by the user. It’s for display purposes only. As you saw in the example at the beginning of this tutorial, you can create a Label widget by instantiating the Label class and passing a string to the text parameter:
label = tk.Label(text="Hello, Tkinter")
Label widgets display text with the default system text color and the default system text background color. These are typically black and white, respectively, but you may see different colors if you’ve changed these settings in your operating system.
You can control Label text and background colors using the foreground and background parameters:
label = tk.Label(
    text="Hello, Tkinter",
    foreground="white",  # Set the text color to white
    background="black"  # Set the background color to black
)
There are numerous valid color names, including:
"red""orange""yellow""green""blue""purple"
Many of the HTML color names work with Tkinter. For a full reference, including macOS- and Windows-specific system colors that the current system theme controls, check out the colors manual page.
You can also specify a color using hexadecimal RGB values:
label = tk.Label(text="Hello, Tkinter", background="#34A2FE")
This sets the label background to a nice, light blue color. Hexadecimal RGB values are more cryptic than named colors, but they’re also more flexible. Fortunately, there are tools available that make getting hexadecimal color codes relatively painless.
If you don’t feel like typing out foreground and background all the time, then you can use the shorthand fg and bg parameters to set the foreground and background colors:
label = tk.Label(text="Hello, Tkinter", fg="white", bg="black")
You can also control the width and height of a label with the width and height parameters:
label = tk.Label(
    text="Hello, Tkinter",
    fg="white",
    bg="black",
    width=10,
    height=10
)
Here’s what this label looks like in a window:
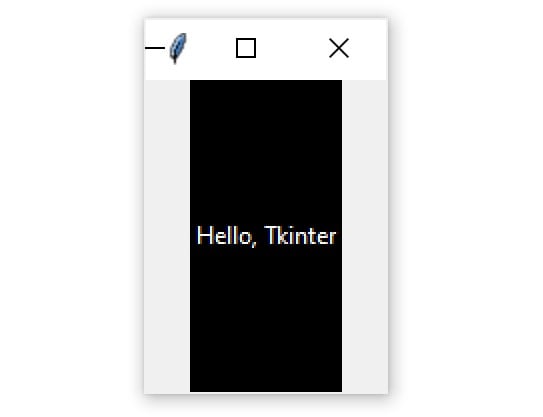
It may seem strange that the label in the window isn’t square even though the width and height are both set to 10. This is because the width and height are measured in text units. One horizontal text unit is determined by the width of the character 0, or the number zero, in the default system font. Similarly, one vertical text unit is determined by the height of the character 0.
Labels are great for displaying some text, but they don’t help you get input from a user. The next three widgets that you’ll learn about are all used to get user input.
Displaying Clickable Buttons With Button Widgets
Button widgets are used to display clickable buttons. You can configure them to call a function whenever they’re clicked. You’ll cover how to call functions from button clicks in the next section. For now, take a look at how to create and style a button.
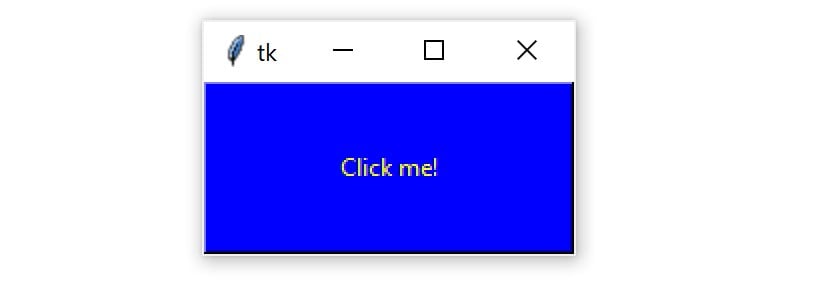
There are many similarities between Button and Label widgets. In many ways, a button is just a label that you can click! The same keyword arguments that you use to create and style a Label will work with Button widgets. For example, the following code creates a button with a blue background and yellow text. It also sets the width and height to 25 and 5 text units, respectively:
button = tk.Button(
    text="Click me!",
    width=25,
    height=5,
    bg="blue",
    fg="yellow",
)
Here’s what the button looks like in a window:
Pretty nifty! You can use the next two widgets to collect text input from a user.
Getting User Input With Entry Widgets
When you need to get a little bit of text from a user, like a name or an email address, use an Entry widget. It’ll display a small text box that the user can type some text into. Creating and styling an Entry widget works pretty much exactly like with Label and Button widgets. For example, the following code creates a widget with a blue background, some yellow text, and a width of 50 text units:
entry = tk.Entry(fg="yellow", bg="blue", width=50)
The interesting bit about Entry widgets isn’t how to style them, though. It’s how to use them to get input from a user. There are three main operations that you can perform with Entry widgets:
- Retrieving text with
.get() - Deleting text with
.delete() - Inserting text with
.insert()
The best way to get an understanding of Entry widgets is to create one and interact with it. Open up a Python shell and follow along with the examples in this section. First, import tkinter and create a new window:
>>>
>>> import tkinter as tk
>>> window = tk.Tk()
Now create a Label and an Entry widget:
>>>
>>> label = tk.Label(text="Name")
>>> entry = tk.Entry()
The Label describes what sort of text should go in the Entry widget. It doesn’t enforce any sort of requirements on the Entry, but it tells the user what your program expects them to put there. You need to .pack() the widgets into the window so that they’re visible:
>>>
>>> label.pack()
>>> entry.pack()
Here’s what that looks like:
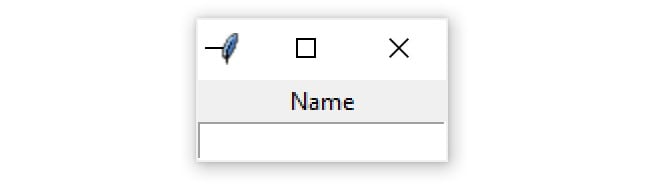
Notice that Tkinter automatically centers the label above the Entry widget in the window. This is a feature of .pack(), which you’ll learn more about in later sections.
Click inside the Entry widget with your mouse and type Real Python:
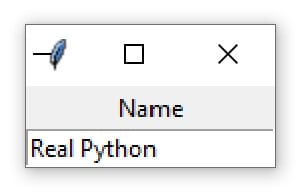
Now you’ve got some text entered into the Entry widget, but that text hasn’t been sent to your program yet. You can use .get() to retrieve the text and assign it to a variable called name:
>>>
>>> name = entry.get()
>>> name
'Real Python'
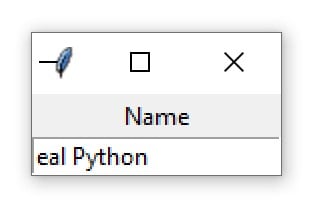
You can delete text as well. This .delete() method takes an integer argument that tells Python which character to remove. For example, the code block below shows how .delete(0) deletes the first character from Entry:
The text remaining in the widget is now eal Python:
Note that, just like Python string objects, text in an Entry widget is indexed starting with 0.
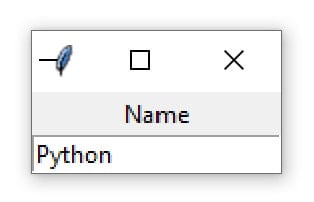
If you need to remove several characters from an Entry, then pass a second integer argument to .delete() indicating the index of the character where deletion should stop. For example, the following code deletes the first four letters in Entry:
>>>
>>> entry.delete(0, 4)
The remaining text now reads Python:
Entry.delete() works just like string slicing. The first argument determines the starting index, and the deletion continues up to but not including the index passed as the second argument. Use the special constant tk.END for the second argument of .delete() to remove all text in Entry:
>>>
>>> entry.delete(0, tk.END)
You’ll now see a blank text box:
On the opposite end of the spectrum, you can also insert text into an Entry widget:
>>>
>>> entry.insert(0, "Python")
The window now looks like this:
The first argument tells .insert() where to insert the text. If there’s no text in Entry, then the new text will always be inserted at the beginning of the widget, no matter what value you pass as the first argument. For example, calling .insert() with 100 as the first argument instead of 0, as you did above, would’ve generated the same output.
If Entry already contains some text, then .insert() will insert the new text at the specified position and shift all existing text to the right:
>>>
>>> entry.insert(0, "Real ")
The widget text now reads Real Python:
Entry widgets are great for capturing small amounts of text from a user, but because they’re only displayed on a single line, they’re not ideal for gathering large amounts of text. That’s where Text widgets come in!
Getting Multiline User Input With Text Widgets
Text widgets are used for entering text, just like Entry widgets. The difference is that Text widgets may contain multiple lines of text. With a Text widget, a user can input a whole paragraph or even several pages of text! Just like with Entry widgets, you can perform three main operations with Text widgets:
- Retrieve text with
.get() - Delete text with
.delete() - Insert text with
.insert()
Although the method names are the same as the Entry methods, they work a bit differently. It’s time to get your hands dirty by creating a Text widget and seeing what it can do.
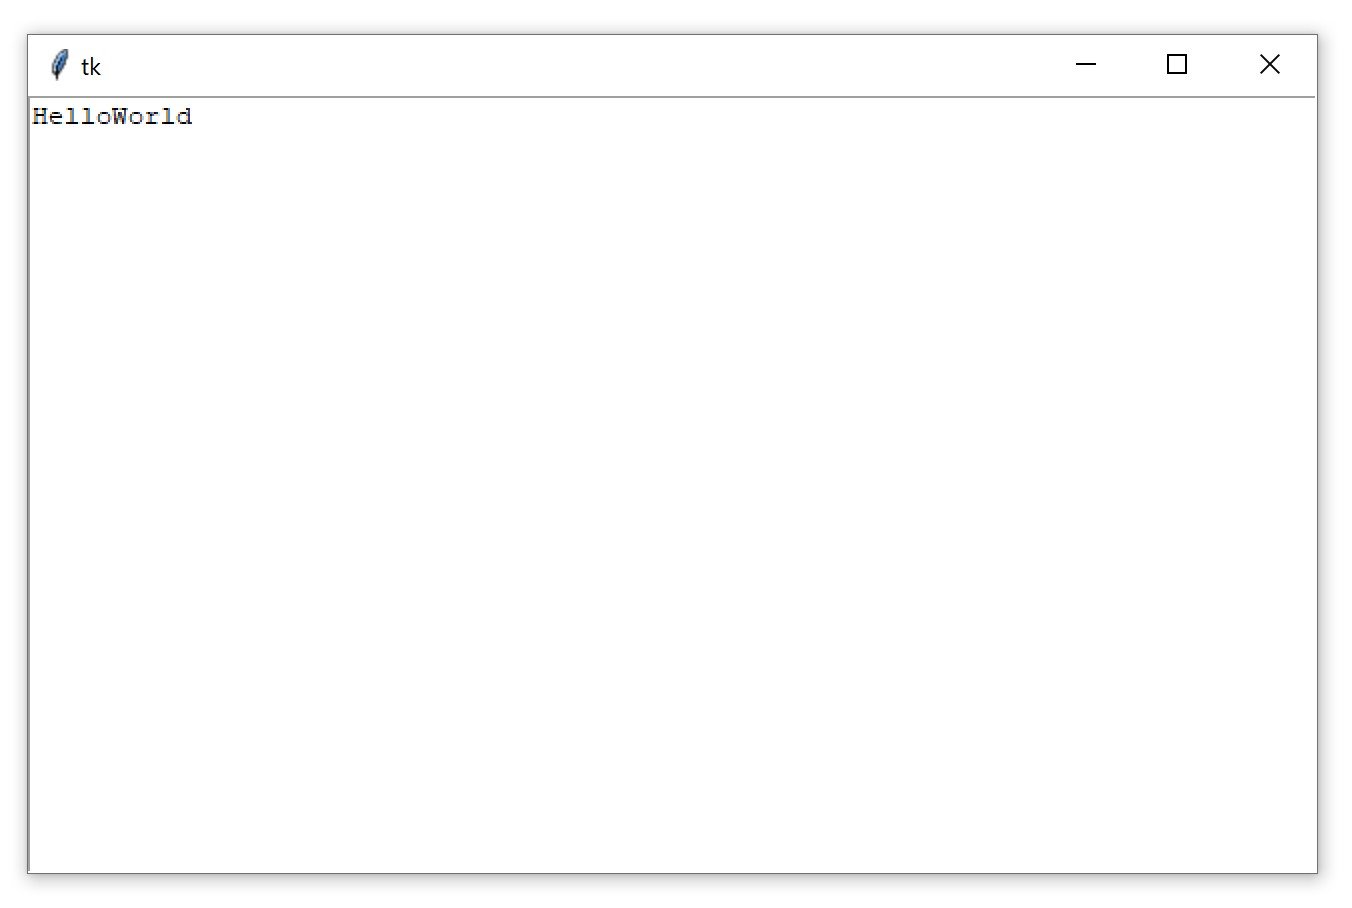
In your Python shell, create a new blank window and pack a Text() widget into it:
>>>
>>> window = tk.Tk()
>>> text_box = tk.Text()
>>> text_box.pack()
Text boxes are much larger than Entry widgets by default. Here’s what the window created above looks like:
Click anywhere inside the window to activate the text box. Type in the word Hello. Then press Enter and type World on the second line. The window should now look like this:
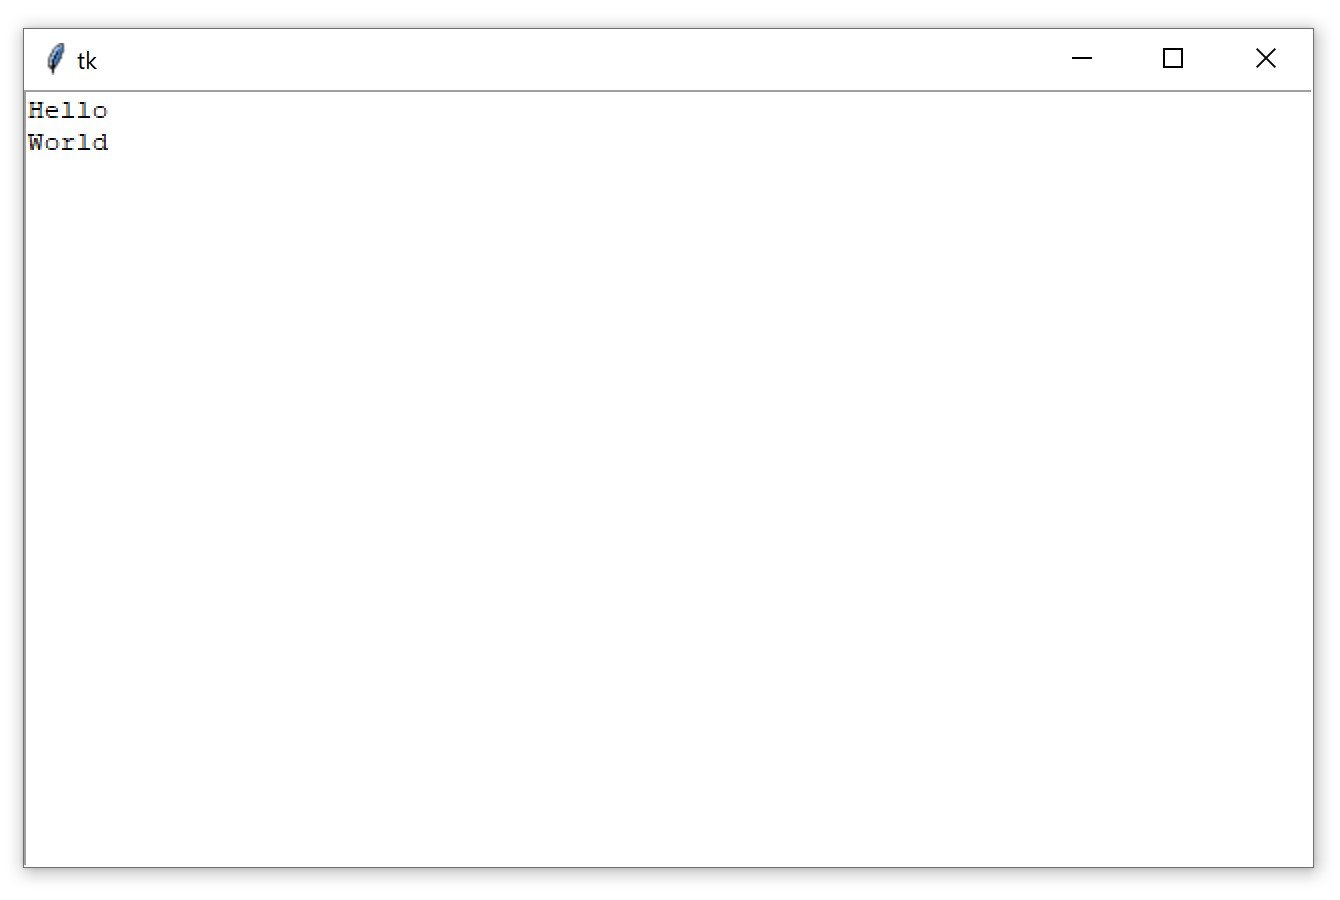
Just like with Entry widgets, you can retrieve the text from a Text widget using .get(). However, calling .get() with no arguments doesn’t return the full text in the text box like it does for Entry widgets. It raises an exception:
>>>
>>> text_box.get()
Traceback (most recent call last):
  ...
TypeError: get() missing 1 required positional argument: 'index1'
Text.get() requires at least one argument. Calling .get() with a single index returns a single character. To retrieve several characters, you need to pass a start index and an end index. Indices in Text widgets work differently than in Entry widgets. Since Text widgets can have several lines of text, an index must contain two pieces of information:
- The line number of a character
- The position of a character on that line
Line numbers start with 1, and character positions start with 0. To make an index, you create a string of the form "<line>.<char>", replacing <line> with the line number and <char> with the character number. For example, "1.0" represents the first character on the first line, and "2.3" represents the fourth character on the second line.
Use the index "1.0" to get the first letter from the text box that you created earlier:
>>>
>>> text_box.get("1.0")
'H'
There are five letters in the word Hello, and the character number of o is 4, since character numbers start from 0, and the word Hello starts at the first position in the text box. Just like with Python string slices, in order to get the entire word Hello from the text box, the end index must be one more than the index of the last character to be read.
So, to get the word Hello from the text box, use "1.0" for the first index and "1.5" for the second index:
>>>
>>> text_box.get("1.0", "1.5")
'Hello'
To get the word World on the second line of the text box, change the line numbers in each index to 2:
>>>
>>> text_box.get("2.0", "2.5")
'World'
To get all of the text in a text box, set the starting index in "1.0" and use the special tk.END constant for the second index:
>>>
>>> text_box.get("1.0", tk.END)
'Hello\nWorld\n'
Notice that text returned by .get() includes any newline characters. You can also see from this example that every line in a Text widget has a newline character at the end, including the last line of text in the text box.
.delete() is used to delete characters from a text box. It works just like .delete() for Entry widgets. There are two ways to use .delete():
- With a single argument
- With two arguments
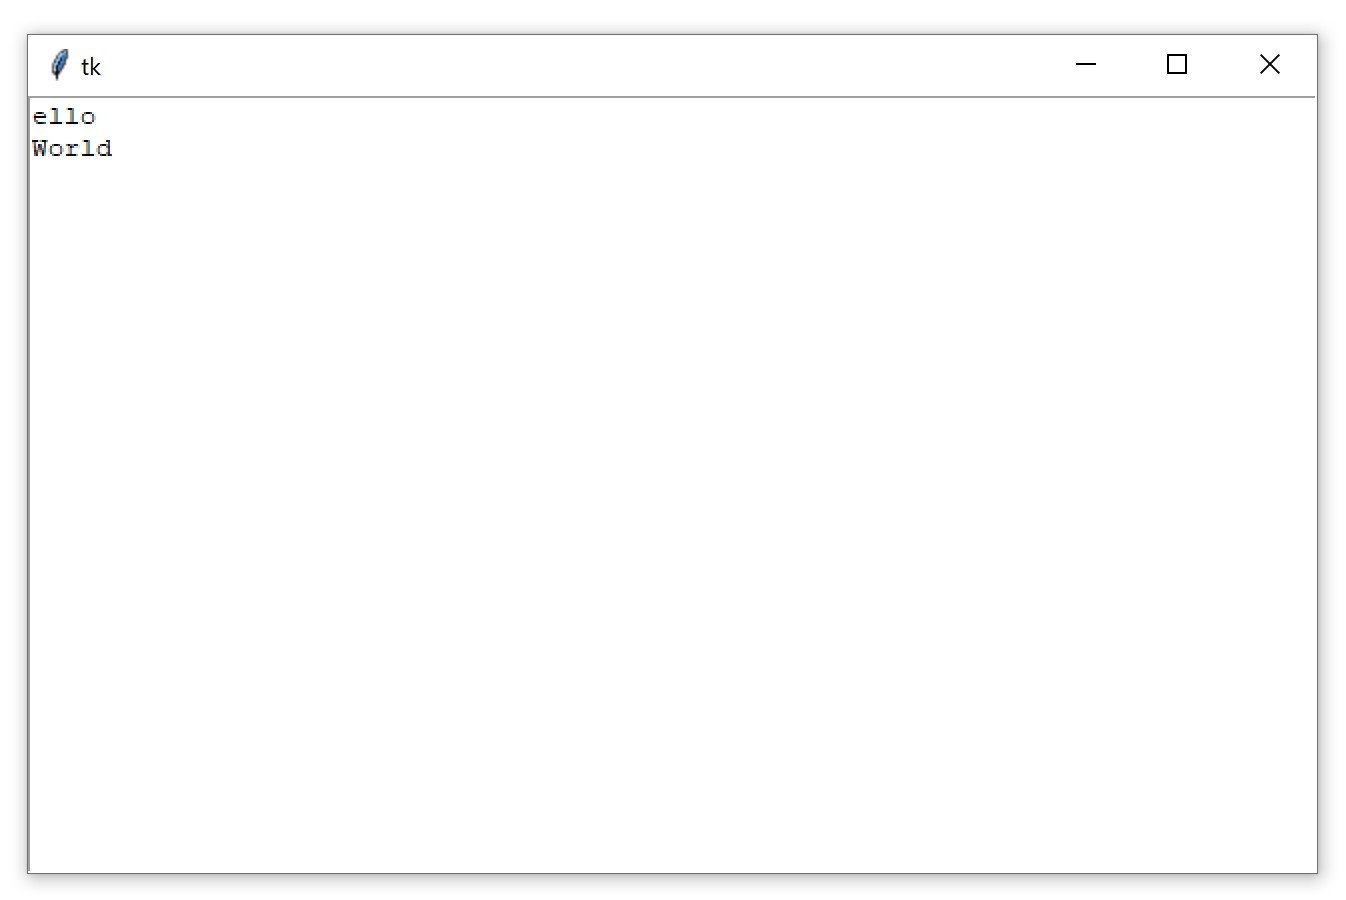
Using the single-argument version, you pass to .delete() the index of a single character to be deleted. For example, the following deletes the first character, H, from the text box:
>>>
>>> text_box.delete("1.0")
The first line of text in the window now reads ello:
With the two-argument version, you pass two indices to delete a range of characters starting at the first index and up to, but not including, the second index.
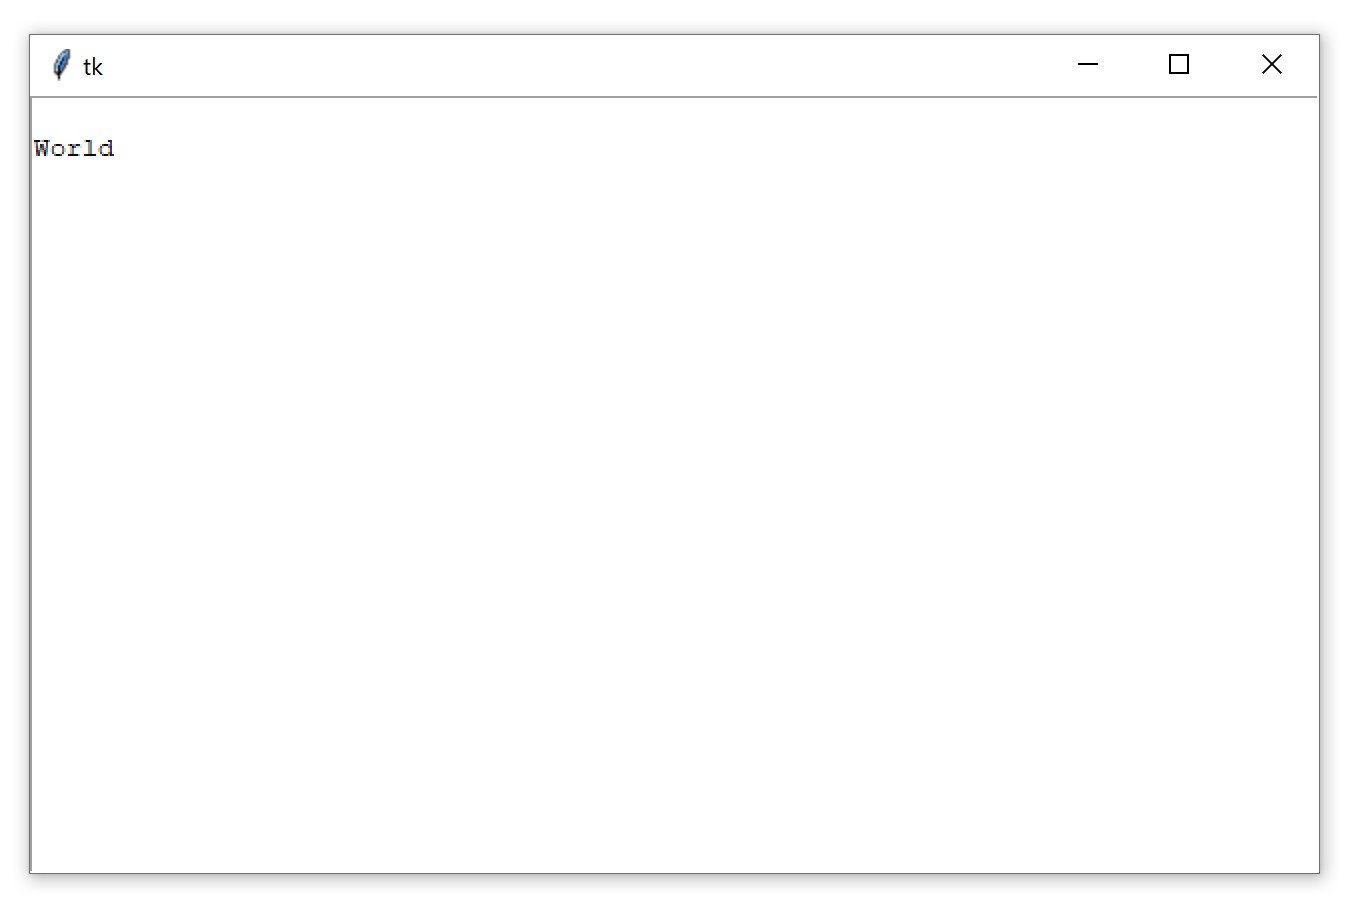
For example, to delete the remaining ello on the first line of the text box, use the indices "1.0" and "1.4":
>>>
>>> text_box.delete("1.0", "1.4")
Notice that the text is gone from the first line. This leaves a blank line followed the word World on the second line:
Even though you can’t see it, there’s still a character on the first line. It’s a newline character! You can verify this using .get():
>>>
>>> text_box.get("1.0")
'\n'
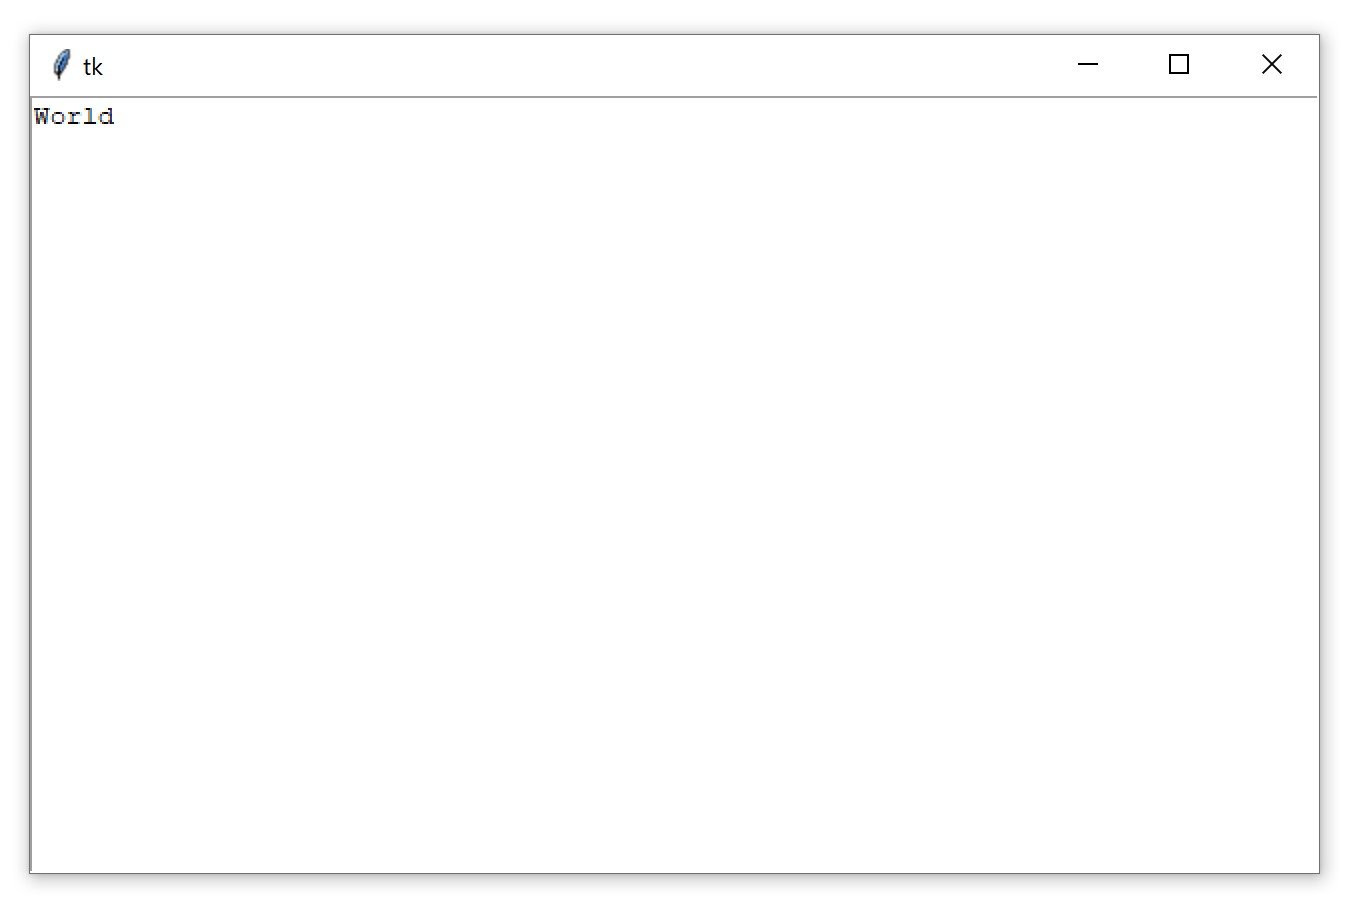
If you delete that character, then the rest of the contents of the text box will shift up a line:
>>>
>>> text_box.delete("1.0")
Now, World is on the first line of the text box:
Try to clear out the rest of the text in the text box. Set "1.0" as the start index and use tk.END for the second index:
>>>
>>> text_box.delete("1.0", tk.END)
The text box is now empty:
You can insert text into a text box using .insert():
>>>
>>> text_box.insert("1.0", "Hello")
This inserts the word Hello at the beginning of the text box, using the same "<line>.<column>" format used by .get() to specify the insertion position:
Check out what happens if you try to insert the word World on the second line:
>>>
>>> text_box.insert("2.0", "World")
Instead of inserting the text on the second line, the text is inserted at the end of the first line:
If you want to insert text onto a new line, then you need to insert a newline character manually into the string being inserted:
>>>
>>> text_box.insert("2.0", "\nWorld")
Now World is on the second line of the text box:
.insert() will do one of two things:
- Insert text at the specified position if there’s already text at or after that position.
- Append text to the specified line if the character number is greater than the index of the last character in the text box.
It’s usually impractical to try and keep track of what the index of the last character is. The best way to insert text at the end of a Text widget is to pass tk.END to the first parameter of .insert():
>>>
>>> text_box.insert(tk.END, "Put me at the end!")
Don’t forget to include the newline character (\n) at the beginning of the text if you want to put it on a new line:
>>>
>>> text_box.insert(tk.END, "\nPut me on a new line!")
Label, Button, Entry, and Text widgets are just a few of the widgets available in Tkinter. There are several others, including widgets for checkboxes, radio buttons, scroll bars, and progress bars. For more information on all of the available widgets, see the Additional Widgets list in the Additional Resources section.
Assigning Widgets to Frames With Frame Widgets
In this tutorial, you’re going to work with only five widgets:
LabelButtonEntryTextFrame
These are the four you’ve seen so far plus the Frame widget. Frame widgets are important for organizing the layout of your widgets in an application.
Before you get into the details about laying out the visual presentation of your widgets, take a closer look at how Frame widgets work, and how you can assign other widgets to them. The following script creates a blank Frame widget and assigns it to the main application window:
import tkinter as tk

window = tk.Tk()
frame = tk.Frame()
frame.pack()

window.mainloop()
frame.pack() packs the frame into the window so that the window sizes itself as small as possible to encompass the frame. When you run the above script, you get some seriously uninteresting output:

An empty Frame widget is practically invisible. Frames are best thought of as containers for other widgets. You can assign a widget to a frame by setting the widget’s master attribute:
frame = tk.Frame()
label = tk.Label(master=frame)
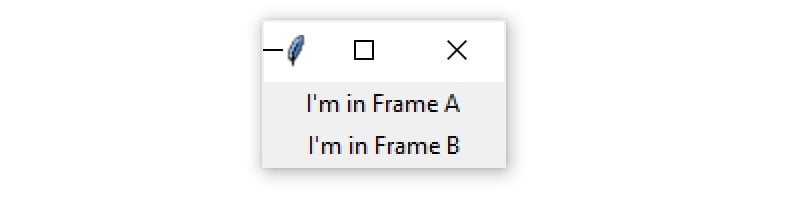
To get a feel for how this works, write a script that creates two Frame widgets called frame_a and frame_b. In this script, frame_a contains a label with the text "I'm in Frame A", and frame_b contains the label "I'm in Frame B". Here’s one way to do this:
import tkinter as tk

window = tk.Tk()

frame_a = tk.Frame()
frame_b = tk.Frame()

label_a = tk.Label(master=frame_a, text="I'm in Frame A")
label_a.pack()

label_b = tk.Label(master=frame_b, text="I'm in Frame B")
label_b.pack()

frame_a.pack()
frame_b.pack()

window.mainloop()
Note that frame_a is packed into the window before frame_b. The window that opens shows the label in frame_a above the label in frame_b:
Now see what happens when you swap the order of frame_a.pack() and frame_b.pack():
import tkinter as tk

window = tk.Tk()

frame_a = tk.Frame()
label_a = tk.Label(master=frame_a, text="I'm in Frame A")
label_a.pack()

frame_b = tk.Frame()
label_b = tk.Label(master=frame_b, text="I'm in Frame B")
label_b.pack()

# Swap the order of `frame_a` and `frame_b`
frame_b.pack()
frame_a.pack()

window.mainloop()
The output looks like this:

Now label_b is on top. Since label_b is assigned to frame_b, it moves to wherever frame_b is positioned.
All four of the widget types that you’ve learned about—Label, Button, Entry, and Text—have a master attribute that’s set when you instantiate them. That way, you can control which Frame a widget is assigned to. Frame widgets are great for organizing other widgets in a logical manner. Related widgets can be assigned to the same frame so that, if the frame is ever moved in the window, then the related widgets stay together.
In addition to grouping your widgets logically, Frame widgets can add a little flare to the visual presentation of your application. Read on to see how to create various borders for Frame widgets.
Adjusting Frame Appearance With Reliefs
Frame widgets can be configured with a relief attribute that creates a border around the frame. You can set relief to be any of the following values:
tk.FLAT: Has no border effect (the default value)tk.SUNKEN: Creates a sunken effecttk.RAISED: Creates a raised effecttk.GROOVE: Creates a grooved border effecttk.RIDGE: Creates a ridged effect
To apply the border effect, you must set the borderwidth attribute to a value greater than 1. This attribute adjusts the width of the border in pixels. The best way to get a feel for what each effect looks like is to see them for yourself. Here’s a script that packs five Frame widgets into a window, each with a different value for the relief argument:
 1import tkinter as tk
 2
 3border_effects = {
 4    "flat": tk.FLAT,
 5    "sunken": tk.SUNKEN,
 6    "raised": tk.RAISED,
 7    "groove": tk.GROOVE,
 8    "ridge": tk.RIDGE,
 9}
10
11window = tk.Tk()
12
13for relief_name, relief in border_effects.items():
14    frame = tk.Frame(master=window, relief=relief, borderwidth=5)
15    frame.pack(side=tk.LEFT)
16    label = tk.Label(master=frame, text=relief_name)
17    label.pack()
18
19window.mainloop()
Here’s a breakdown of this script:
-
Lines 3 to 9 create a dictionary whose keys are the names of the different relief effects available in Tkinter. The values are the corresponding Tkinter objects. This dictionary is assigned to the
border_effectsvariable. -
Line 13 starts a
forloop to loop over each item in theborder_effectsdictionary. -
Line 14 creates a new
Framewidget and assigns it to thewindowobject. Thereliefattribute is set to the corresponding relief in theborder_effectsdictionary, and theborderattribute is set to5so that the effect is visible. -
Line 15 packs the
Frameinto the window using.pack(). Thesidekeyword argument tells Tkinter in which direction to pack theframeobjects. You’ll see more about how this works in the next section. -
Lines 16 and 17 create a
Labelwidget to display the name of the relief and pack it into theframeobject you just created.
The window produced by the above script looks like this:

In this image, you can see the following effects:
tk.FLATcreates a frame that appears to be flat.tk.SUNKENadds a border that gives the frame the appearance of being sunken into the window.tk.RAISEDgives the frame a border that makes it appear to stick out from the screen.tk.GROOVEadds a border that appears as a sunken groove around an otherwise flat frame.tk.RIDGEgives the appearance of a raised lip around the edge of the frame.
These effects give your Python GUI Tkinter application a bit of visual appeal.
Understanding Widget Naming Conventions
When you create a widget, you can give it any name you like, as long as it’s a valid Python identifier. It’s usually a good idea to include the name of the widget class in the variable name that you assign to the widget instance. For example, if a Label widget is used to display a user’s name, then you might name the widget label_user_name. An Entry widget used to collect a user’s age might be called entry_age.
When you include the widget class name in the variable name, you help yourself and anyone else who needs to read your code to understand what type of widget the variable name refers to. However, using the full name of the widget class can lead to long variable names, so you may want to adopt a shorthand for referring to each widget type. For the rest of this tutorial, you’ll use the following shorthand prefixes to name widgets:
| Widget Class | Variable Name Prefix | Example |
|---|---|---|
Label |
lbl |
lbl_name |
Button |
btn |
btn_submit |
Entry |
ent |
ent_age |
Text |
txt |
txt_notes |
Frame |
frm |
frm_address |
In this section, you learned how to create a window, use widgets, and work with frames. At this point, you can make some plain windows that display messages, but you’ve yet to create a full-blown application. In the next section, you’ll learn how to control the layout of your applications using Tkinter’s powerful geometry managers.
Check Your Understanding
Expand the code block below for an exercise to check your understanding:
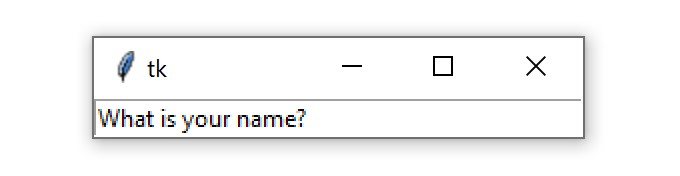
Write a complete script that displays an Entry widget that’s 40 text units wide and has a white background and black text. Use .insert() to display text in the widget that reads What is your name?.
The output window should look like this:
Try this exercise now.
You can expand the code block below to see a solution:
There are a couple of ways to solve this exercise. Here’s one solution that uses the bg and fg parameters to set the Entry widget’s background and foreground colors:
import tkinter as tk

window = tk.Tk()

entry = tk.Entry(width=40, bg="white", fg="black")
entry.pack()

entry.insert(0, "What is your name?")

window.mainloop()
This solution is great because it explicitly sets the background and foreground colors for the Entry widget.
On most systems, the default background color for an Entry widget is white, and the default foreground color is black. So, you might be able to generate the same window with the bg and fg parameters left out:
import tkinter as tk

window = tk.Tk()

entry = tk.Entry(width=40)
entry.pack()

entry.insert(0, "What is your name?")

window.mainloop()
Keep in mind your code may look different.
When you’re ready, you can move on to the next section.
Controlling Layout With Geometry Managers
Up until now, you’ve been adding widgets to windows and Frame widgets using .pack(), but you haven’t learned what exactly this method does. Let’s clear things up! Application layout in Tkinter is controlled with geometry managers. While .pack() is an example of a geometry manager, it isn’t the only one. Tkinter has two others:
.place().grid()
Each window or Frame in your application can use only one geometry manager. However, different frames can use different geometry managers, even if they’re assigned to a frame or window using another geometry manager. Start by taking a closer look at .pack().
The .pack() Geometry Manager
The .pack() geometry manager uses a packing algorithm to place widgets in a Frame or window in a specified order. For a given widget, the packing algorithm has two primary steps:
- Compute a rectangular area called a parcel that’s just tall (or wide) enough to hold the widget and fills the remaining width (or height) in the window with blank space.
- Center the widget in the parcel unless a different location is specified.
.pack() is powerful, but it can be difficult to visualize. The best way to get a feel for .pack() is to look at some examples. See what happens when you .pack() three Label widgets into a Frame:
import tkinter as tk

window = tk.Tk()

frame1 = tk.Frame(master=window, width=100, height=100, bg="red")
frame1.pack()

frame2 = tk.Frame(master=window, width=50, height=50, bg="yellow")
frame2.pack()

frame3 = tk.Frame(master=window, width=25, height=25, bg="blue")
frame3.pack()

window.mainloop()
.pack() places each Frame below the previous one by default, in the order that they’re assigned to the window:
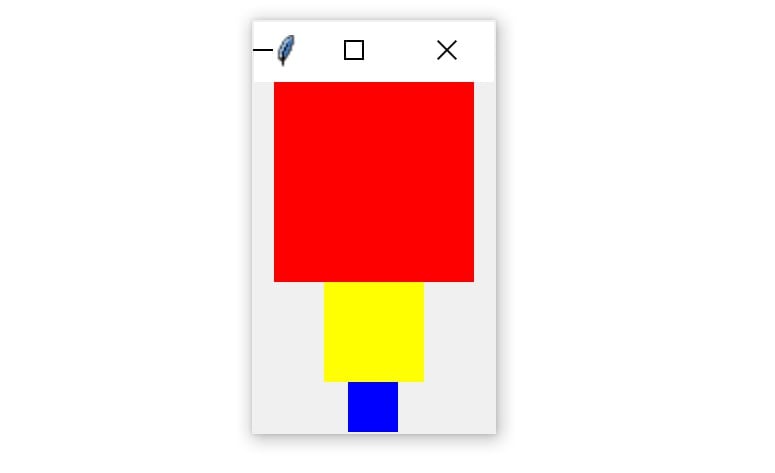
Each Frame is placed at the topmost available position. Therefore, the red Frame is placed at the top of the window. Then the yellow Frame is placed just below the red one and the blue Frame just below the yellow one.
There are three invisible parcels, each containing one of the three Frame widgets. Each parcel is as wide as the window and as tall as the Frame that it contains. Because no anchor point was specified when .pack() was called for each Frame, they’re all centered inside of their parcels. That’s why each Frame is centered in the window.
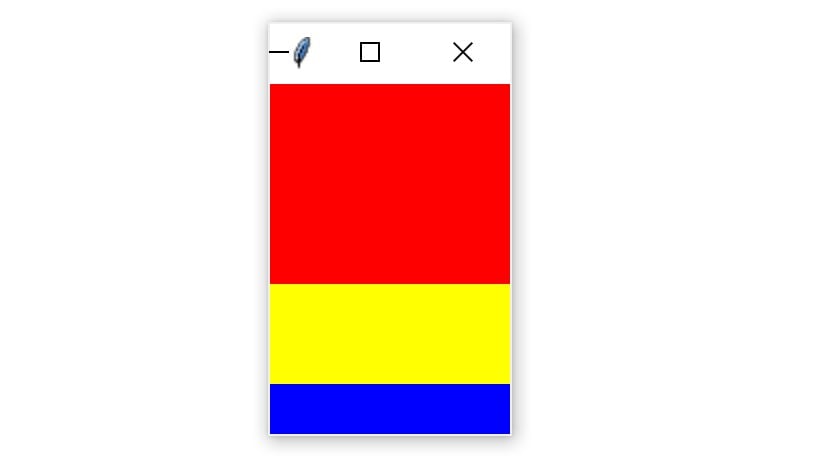
.pack() accepts some keyword arguments for more precisely configuring widget placement. For example, you can set the fill keyword argument to specify in which direction the frames should fill. The options are tk.X to fill in the horizontal direction, tk.Y to fill vertically, and tk.BOTH to fill in both directions. Here’s how you would stack the three frames so that each one fills the whole window horizontally:
import tkinter as tk

window = tk.Tk()

frame1 = tk.Frame(master=window, height=100, bg="red")
frame1.pack(fill=tk.X)

frame2 = tk.Frame(master=window, height=50, bg="yellow")
frame2.pack(fill=tk.X)

frame3 = tk.Frame(master=window, height=25, bg="blue")
frame3.pack(fill=tk.X)

window.mainloop()
Notice that the width is not set on any of the Frame widgets. width is no longer necessary because each frame sets .pack() to fill horizontally, overriding any width you may set.
The window produced by this script looks like this:
One of the nice things about filling the window with .pack() is that the fill is responsive to window resizing. Try widening the window generated by the previous script to see how this works. As you widen the window, the width of the three Frame widgets grow to fill the window:
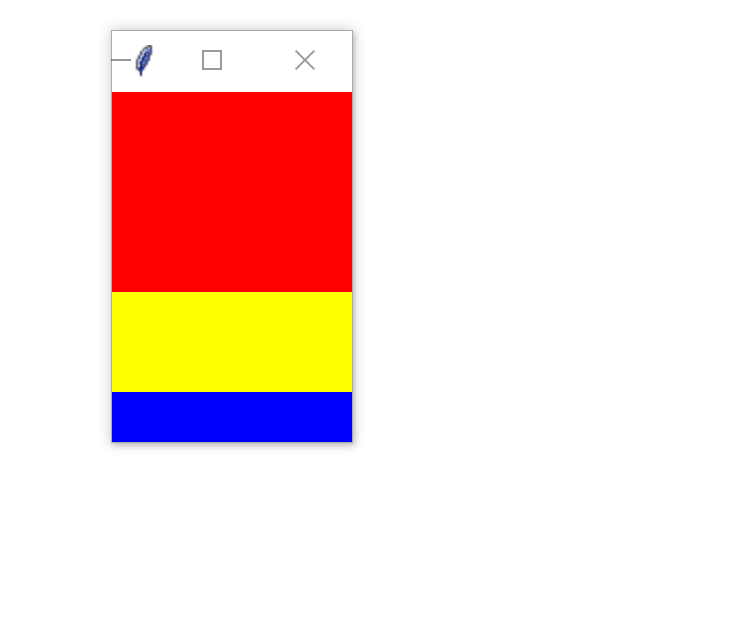
Notice, though, that the Frame widgets don’t expand in the vertical direction.
The side keyword argument of .pack() specifies on which side of the window the widget should be placed. These are the available options:
tk.TOPtk.BOTTOMtk.LEFTtk.RIGHT
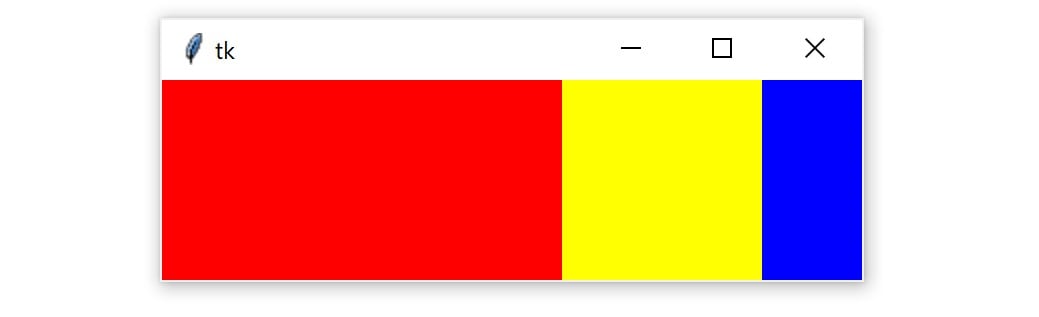
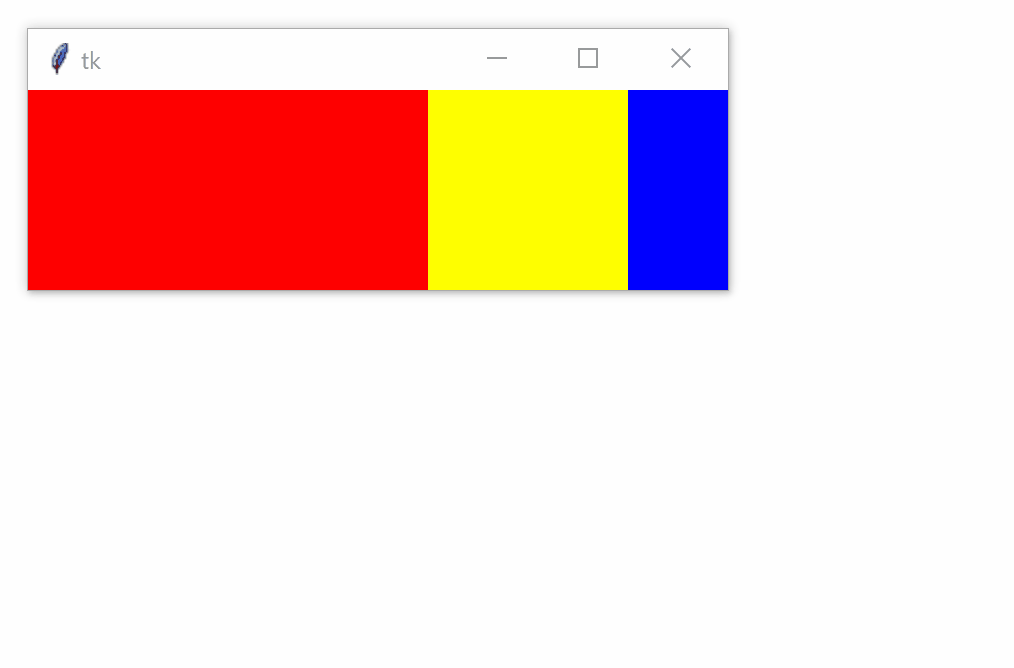
If you don’t set side, then .pack() will automatically use tk.TOP and place new widgets at the top of the window, or at the topmost portion of the window that isn’t already occupied by a widget. For example, the following script places three frames side by side from left to right and expands each frame to fill the window vertically:
import tkinter as tk

window = tk.Tk()

frame1 = tk.Frame(master=window, width=200, height=100, bg="red")
frame1.pack(fill=tk.Y, side=tk.LEFT)

frame2 = tk.Frame(master=window, width=100, bg="yellow")
frame2.pack(fill=tk.Y, side=tk.LEFT)

frame3 = tk.Frame(master=window, width=50, bg="blue")
frame3.pack(fill=tk.Y, side=tk.LEFT)

window.mainloop()
This time, you have to specify the height keyword argument on at least one of the frames to force the window to have some height.
The resulting window looks like this:
Just like when you set fill=tk.X to make the frames responsive when you resized the window horizontally, you can set fill=tk.Y to make the frames responsive when you resize the window vertically:
To make the layout truly responsive, you can set an initial size for your frames using the width and height attributes. Then, set the fill keyword argument of .pack() to tk.BOTH and set the expand keyword argument to True:
import tkinter as tk

window = tk.Tk()

frame1 = tk.Frame(master=window, width=200, height=100, bg="red")
frame1.pack(fill=tk.BOTH, side=tk.LEFT, expand=True)

frame2 = tk.Frame(master=window, width=100, bg="yellow")
frame2.pack(fill=tk.BOTH, side=tk.LEFT, expand=True)

frame3 = tk.Frame(master=window, width=50, bg="blue")
frame3.pack(fill=tk.BOTH, side=tk.LEFT, expand=True)

window.mainloop()
When you run the above script, you’ll see a window that initially looks the same as the one you generated in the previous example. The difference is that now you can resize the window however you want, and the frames will expand and fill the window responsively:
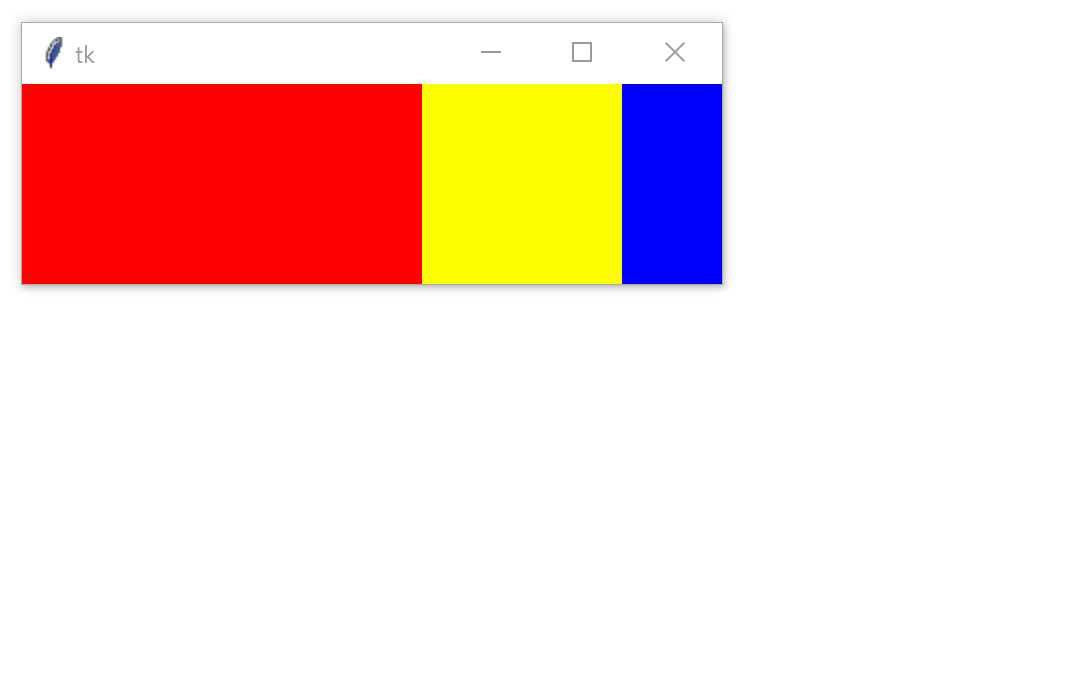
Pretty cool!
The .place() Geometry Manager
You can use .place() to control the precise location that a widget should occupy in a window or Frame. You must provide two keyword arguments, x and y, which specify the x- and y-coordinates for the top-left corner of the widget. Both x and y are measured in pixels, not text units.
Keep in mind that the origin, where x and y are both 0, is the top-left corner of the Frame or window. So, you can think of the y argument of .place() as the number of pixels from the top of the window, and the x argument as the number of pixels from the left edge of the window.
Here’s an example of how the .place() geometry manager works:
 1import tkinter as tk
 2
 3window = tk.Tk()
 4
 5frame = tk.Frame(master=window, width=150, height=150)
 6frame.pack()
 7
 8label1 = tk.Label(master=frame, text="I'm at (0, 0)", bg="red")
 9label1.place(x=0, y=0)
10
11label2 = tk.Label(master=frame, text="I'm at (75, 75)", bg="yellow")
12label2.place(x=75, y=75)
13
14window.mainloop()
Here’s how this code works:
- Lines 5 and 6 create a new
Framewidget calledframe, measuring150pixels wide and150pixels tall, and pack it into the window with.pack(). - Lines 8 and 9 create a new
Labelcalledlabel1with a red background and place it inframe1at position (0, 0). - Lines 11 and 12 create a second
Labelcalledlabel2with a yellow background and place it inframe1at position (75, 75).
Here’s the window that the code produces:

Note that if you run this code on a different operating system that uses different font sizes and styles, then the second label might become partially obscured by the window’s edge. That’s why .place() isn’t used often. In addition to this, it has two main drawbacks:
- Layout can be difficult to manage with
.place(). This is especially true if your application has lots of widgets. - Layouts created with
.place()aren’t responsive. They don’t change as the window is resized.
One of the main challenges of cross-platform GUI development is making layouts that look good no matter which platform they’re viewed on, and .place() is a poor choice for making responsive and cross-platform layouts.
That’s not to say you should never use .place()! In some cases, it might be just what you need. For example, if you’re creating a GUI interface for a map, then .place() might be the perfect choice to ensure widgets are placed at the correct distance from each other on the map.
.pack() is usually a better choice than .place(), but even .pack() has some downsides. The placement of widgets depends on the order in which .pack() is called, so it can be difficult to modify existing applications without fully understanding the code controlling the layout. The .grid() geometry manager solves a lot of these issues, as you’ll see in the next section.
The .grid() Geometry Manager
The geometry manager you’ll likely use most often is .grid(), which provides all the power of .pack() in a format that’s easier to understand and maintain.
.grid() works by splitting a window or Frame into rows and columns. You specify the location of a widget by calling .grid() and passing the row and column indices to the row and column keyword arguments, respectively. Both row and column indices start at 0, so a row index of 1 and a column index of 2 tells .grid() to place a widget in the third column of the second row.
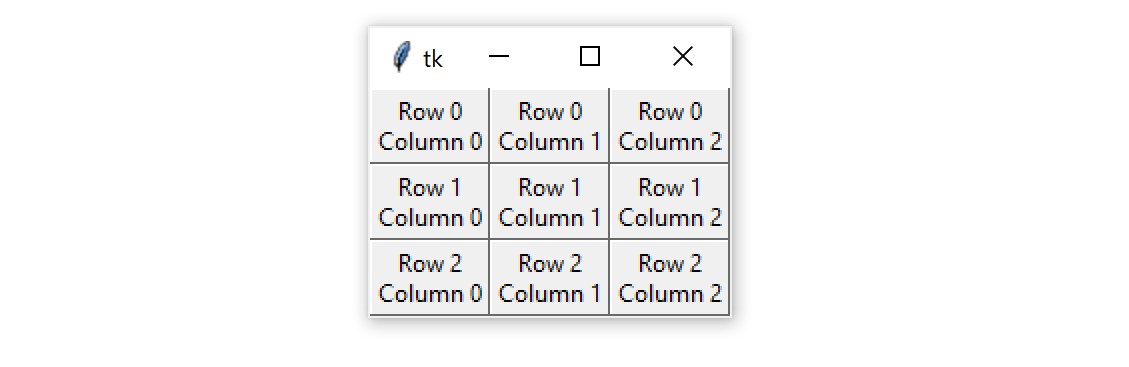
The following script creates a 3 × 3 grid of frames with Label widgets packed into them:
import tkinter as tk

window = tk.Tk()

for i in range(3):
    for j in range(3):
        frame = tk.Frame(
            master=window,
            relief=tk.RAISED,
            borderwidth=1
        )
        frame.grid(row=i, column=j)
        label = tk.Label(master=frame, text=f"Row {i}\nColumn {j}")
        label.pack()

window.mainloop()
Here’s what the resulting window looks like:
You’re using two geometry managers in this example. Each frame is attached to window with the .grid() geometry manager:
import tkinter as tk

window = tk.Tk()

for i in range(3):
    for j in range(3):
        frame = tk.Frame(
            master=window,
            relief=tk.RAISED,
            borderwidth=1
        )
        frame.grid(row=i, column=j)
        label = tk.Label(master=frame, text=f"Row {i}\nColumn {j}")
        label.pack()

window.mainloop()
Each label is attached to its master Frame with .pack():
import tkinter as tk

window = tk.Tk()

for i in range(3):
    for j in range(3):
        frame = tk.Frame(
            master=window,
            relief=tk.RAISED,
            borderwidth=1
        )
        frame.grid(row=i, column=j)
        label = tk.Label(master=frame, text=f"Row {i}\nColumn {j}")
        label.pack()

window.mainloop()
The important thing to realize here is that even though .grid() is called on each Frame object, the geometry manager applies to the window object. Similarly, the layout of each frame is controlled with the .pack() geometry manager.
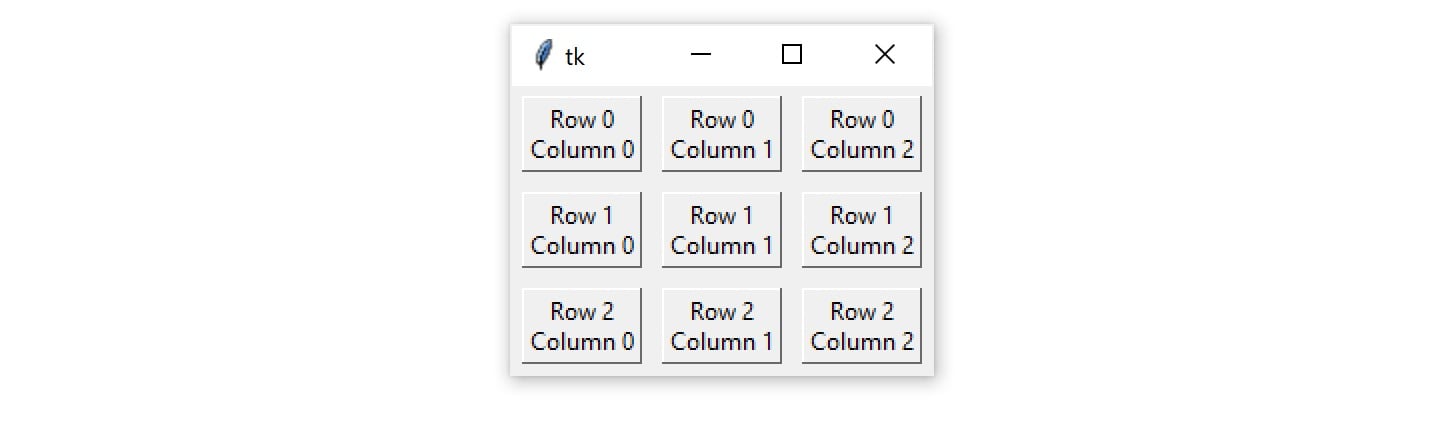
The frames in the previous example are placed tightly next to one another. To add some space around each frame, you can set the padding of each cell in the grid. Padding is just some blank space that surrounds a widget and visually sets its content apart.
The two types of padding are external and internal padding. External padding adds some space around the outside of a grid cell. It’s controlled with two keyword arguments to .grid():
padxadds padding in the horizontal direction.padyadds padding in the vertical direction.
Both padx and pady are measured in pixels, not text units, so setting both of them to the same value will create the same amount of padding in both directions. Try to add some padding around the outside of the frames from the previous example:
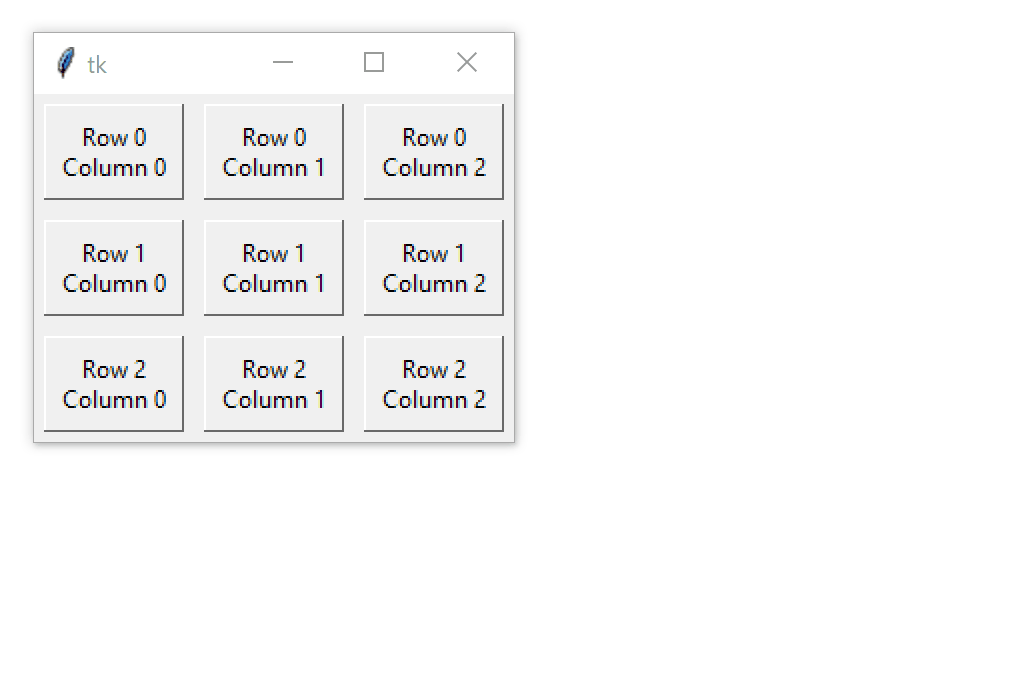
import tkinter as tk

window = tk.Tk()

for i in range(3):
    for j in range(3):
        frame = tk.Frame(
            master=window,
            relief=tk.RAISED,
            borderwidth=1
        )
        frame.grid(row=i, column=j, padx=5, pady=5)
        label = tk.Label(master=frame, text=f"Row {i}\nColumn {j}")
        label.pack()

window.mainloop()
Here’s the resulting window:
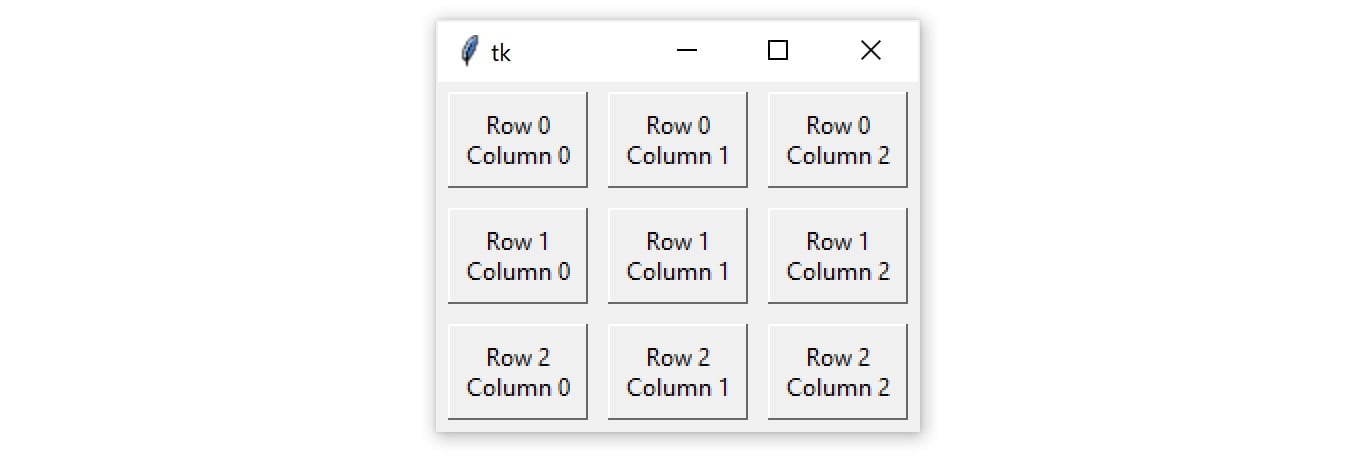
.pack() also has padx and pady parameters. The following code is nearly identical to the previous code, except that you add five pixels of additional padding around each label in both the x and y directions:
import tkinter as tk

window = tk.Tk()

for i in range(3):
    for j in range(3):
        frame = tk.Frame(
            master=window,
            relief=tk.RAISED,
            borderwidth=1
        )
        frame.grid(row=i, column=j, padx=5, pady=5)
        label = tk.Label(master=frame, text=f"Row {i}\nColumn {j}")
        label.pack(padx=5, pady=5)

window.mainloop()
The extra padding around the Label widgets gives each cell in the grid a little bit of breathing room between the Frame border and the text in the label:
That looks pretty nice! But if you try and expand the window in any direction, then you’ll notice that the layout isn’t very responsive:
The whole grid stays at the top-left corner as the window expands.
By using .columnconfigure() and .rowconfigure() on the window object, you can adjust how the rows and columns of the grid grow as the window is resized. Remember, the grid is attached to window, even though you’re calling .grid() on each Frame widget. Both .columnconfigure() and .rowconfigure() take three essential arguments:
- Index: The index of the grid column or row that you want to configure or a list of indices to configure multiple rows or columns at the same time
- Weight: A keyword argument called
weightthat determines how the column or row should respond to window resizing, relative to the other columns and rows - Minimum Size: A keyword argument called
minsizethat sets the minimum size of the row height or column width in pixels
weight is set to 0 by default, which means that the column or row doesn’t expand as the window resizes. If every column or row is given a weight of 1, then they all grow at the same rate. If one column has a weight of 1 and another a weight of 2, then the second column expands at twice the rate of the first. Adjust the previous script to better handle window resizing:
import tkinter as tk

window = tk.Tk()

for i in range(3):
    window.columnconfigure(i, weight=1, minsize=75)
    window.rowconfigure(i, weight=1, minsize=50)

    for j in range(0, 3):
        frame = tk.Frame(
            master=window,
            relief=tk.RAISED,
            borderwidth=1
        )
        frame.grid(row=i, column=j, padx=5, pady=5)
        label = tk.Label(master=frame, text=f"Row {i}\nColumn {j}")
        label.pack(padx=5, pady=5)

window.mainloop()
.columnconfigure() and .rowconfigure() are placed in the body of the outer for loop. You could explicitly configure each column and row outside of the for loop, but that would require writing an additional six lines of code.
On each iteration of the loop, the i-th column and row are configured to have a weight of 1. This ensures that the row and column expand at the same rate whenever the window is resized. The minsize argument is set to 75 for each column and 50 for each row. This ensures that the Label widget always displays its text without chopping off any characters, even if the window size is extremely small.
The result is a grid layout that expands and contracts smoothly as the window is resized:
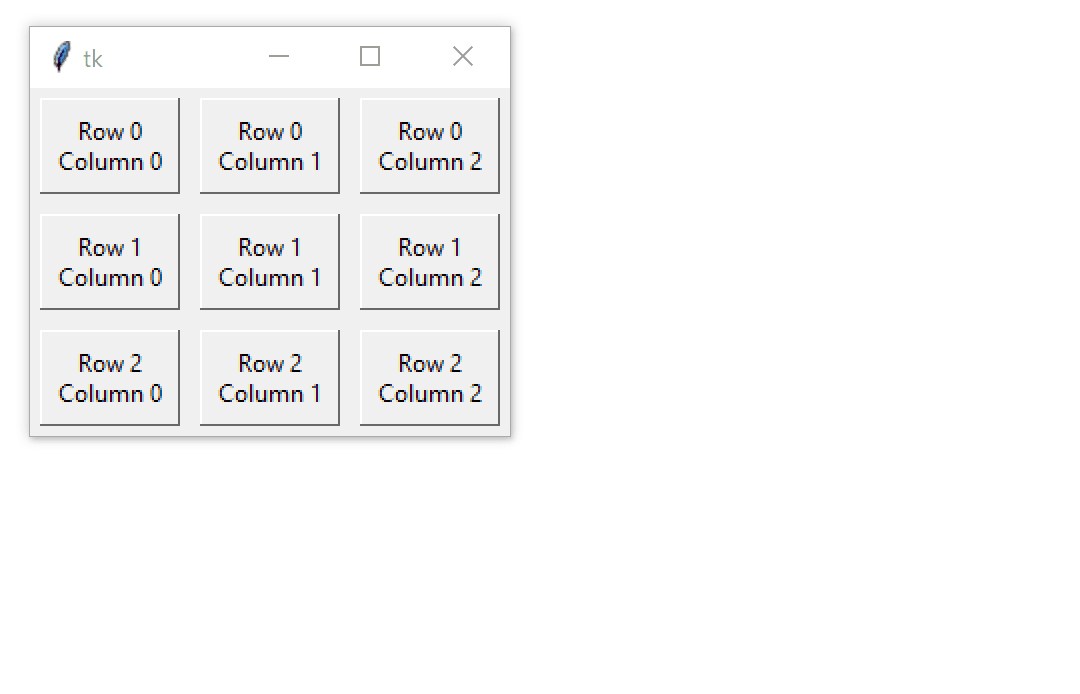
Try it yourself to get a feel for how it works! Play around with the weight and minsize parameters to see how they affect the grid.
By default, widgets are centered in their grid cells. For example, the following code creates two Label widgets and places them in a grid with one column and two rows:
import tkinter as tk

window = tk.Tk()
window.columnconfigure(0, minsize=250)
window.rowconfigure([0, 1], minsize=100)

label1 = tk.Label(text="A")
label1.grid(row=0, column=0)

label2 = tk.Label(text="B")
label2.grid(row=1, column=0)

window.mainloop()
Each grid cell is 250 pixels wide and 100 pixels tall. The labels are placed in the center of each cell, as you can see in the following figure:
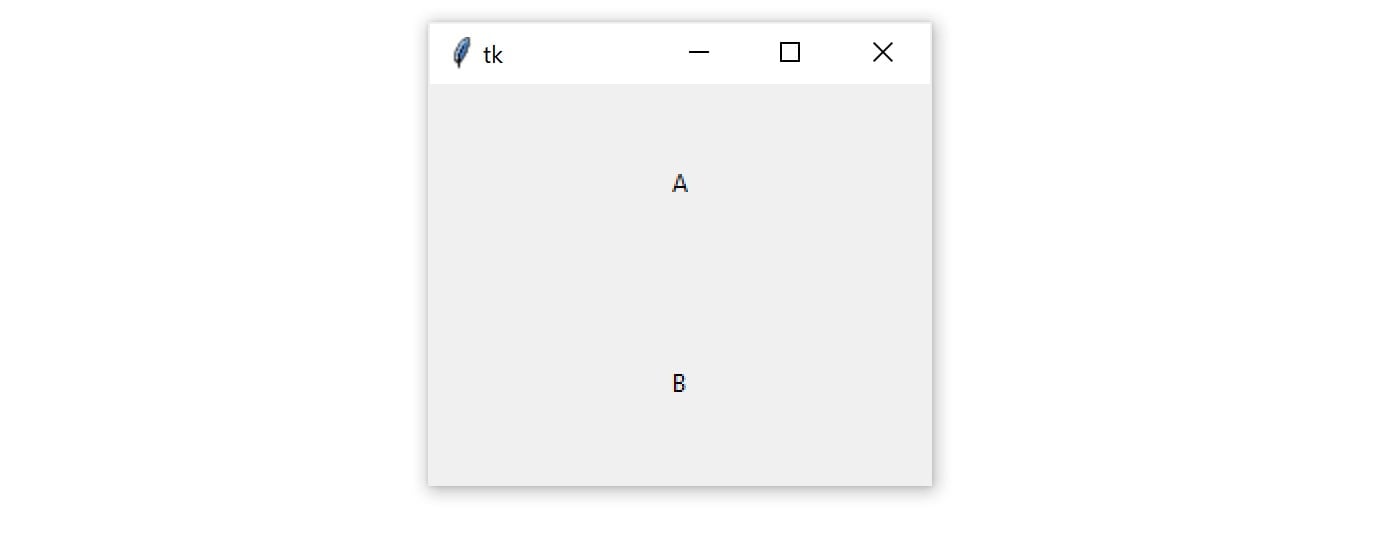
You can change the location of each label inside of the grid cell using the sticky parameter, which accepts a string containing one or more of the following letters:
"n"or"N"to align to the top-center part of the cell"e"or"E"to align to the right-center side of the cell"s"or"S"to align to the bottom-center part of the cell"w"or"W"to align to the left-center side of the cell
The letters "n", "s", "e", and "w" come from the cardinal directions north, south, east, and west. Setting sticky to "n" on both labels in the previous code positions each label at the top-center of its grid cell:
import tkinter as tk

window = tk.Tk()
window.columnconfigure(0, minsize=250)
window.rowconfigure([0, 1], minsize=100)

label1 = tk.Label(text="A")
label1.grid(row=0, column=0, sticky="n")

label2 = tk.Label(text="B")
label2.grid(row=1, column=0, sticky="n")

window.mainloop()
Here’s the output:
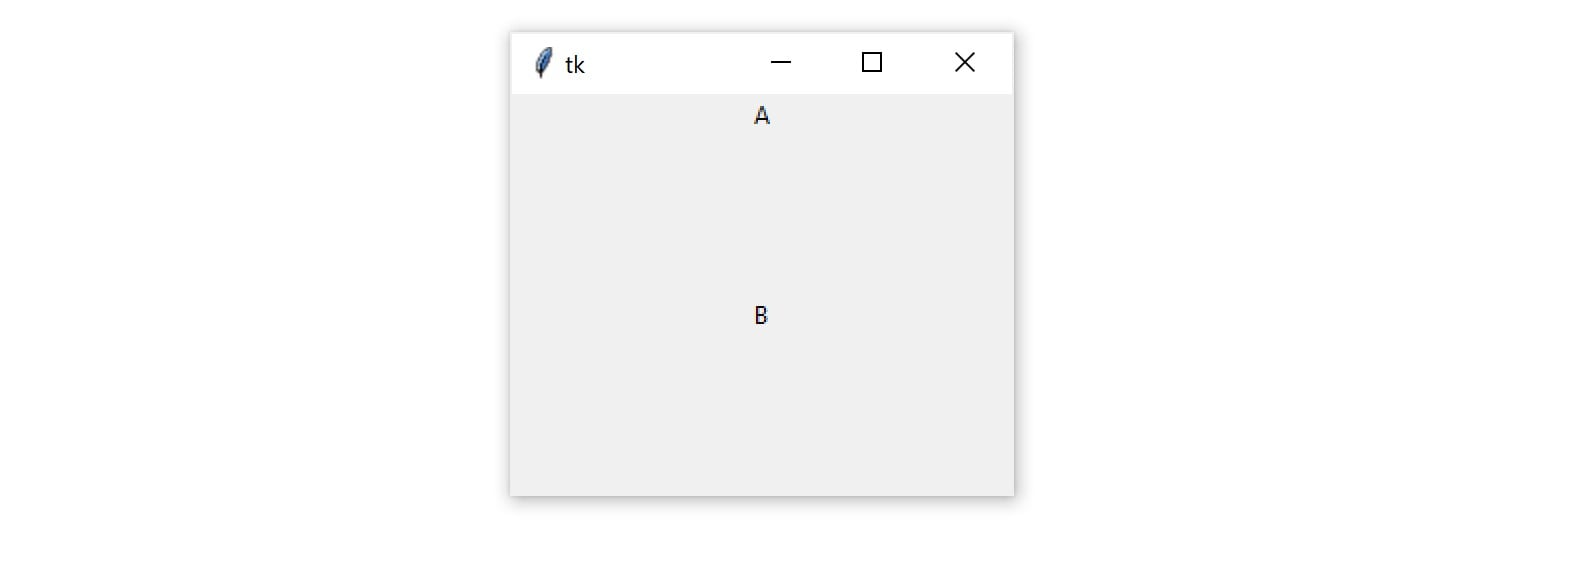
You can combine multiple letters in a single string to position each label in the corner of its grid cell:
import tkinter as tk

window = tk.Tk()
window.columnconfigure(0, minsize=250)
window.rowconfigure([0, 1], minsize=100)

label1 = tk.Label(text="A")
label1.grid(row=0, column=0, sticky="ne")

label2 = tk.Label(text="B")
label2.grid(row=1, column=0, sticky="sw")

window.mainloop()
In this example, the sticky parameter of label1 is set to "ne", which places the label at the top-right corner of its grid cell. label2 is positioned in the bottom-left corner by passing "sw" to sticky. Here’s what that looks like in the window:
When a widget is positioned with sticky, the size of the widget itself is just big enough to contain any text and other contents inside of it. It won’t fill the entire grid cell. In order to fill the grid, you can specify "ns" to force the widget to fill the cell in the vertical direction, or "ew" to fill the cell in the horizontal direction. To fill the entire cell, set sticky to "nsew". The following example illustrates each of these options:
import tkinter as tk

window = tk.Tk()

window.rowconfigure(0, minsize=50)
window.columnconfigure([0, 1, 2, 3], minsize=50)

label1 = tk.Label(text="1", bg="black", fg="white")
label2 = tk.Label(text="2", bg="black", fg="white")
label3 = tk.Label(text="3", bg="black", fg="white")
label4 = tk.Label(text="4", bg="black", fg="white")

label1.grid(row=0, column=0)
label2.grid(row=0, column=1, sticky="ew")
label3.grid(row=0, column=2, sticky="ns")
label4.grid(row=0, column=3, sticky="nsew")

window.mainloop()
Here’s what the output looks like:
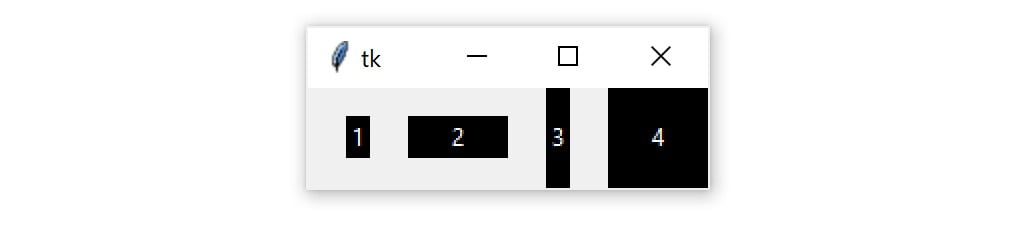
What the above example illustrates is that the .grid() geometry manager’s sticky parameter can be used to achieve the same effects as the .pack() geometry manager’s fill parameter. The correspondence between the sticky and fill parameters is summarized in the following table:
.grid() |
.pack() |
|---|---|
sticky="ns" |
fill=tk.Y |
sticky="ew" |
fill=tk.X |
sticky="nsew" |
fill=tk.BOTH |
.grid() is a powerful geometry manager. It’s often easier to understand than .pack() and is much more flexible than .place(). When you’re creating new Tkinter applications, you should consider using .grid() as your primary geometry manager.
Now that you’ve got the fundamentals of geometry managers down for the Python GUI framework Tkinter, the next step is to assign actions to buttons to bring your applications to life.
Check Your Understanding
Expand the code block below for an exercise to check your understanding:
Below is an image of an address entry form made with Tkinter:
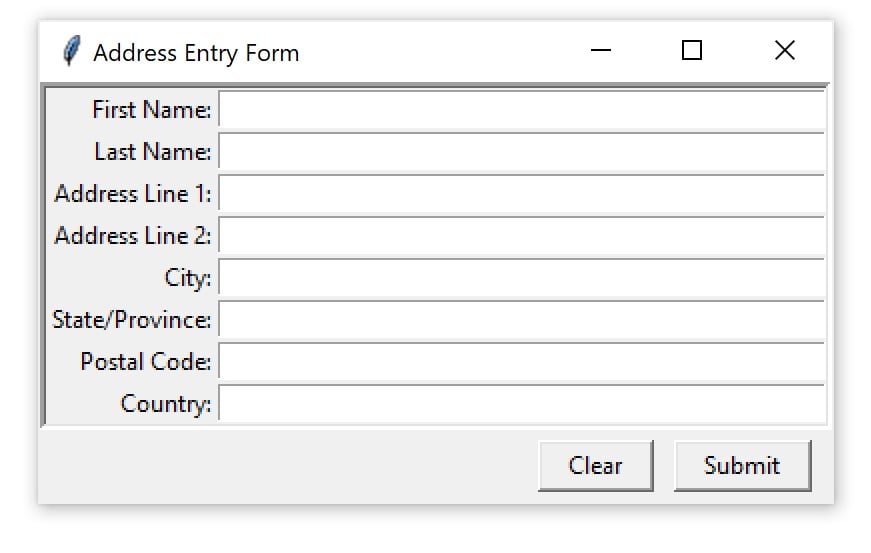
Write a complete script that re-creates the window. You may use any geometry manager you like.
You can expand the code block below to see a solution:
There are many different ways to solve this exercise. If your solution generates a window identical to the one in the exercise statement, then congratulations! You’ve successfully solved the exercise! Below, you can look at two solutions that use the .grid() geometry manager.
One solution creates a Label and Entry widget with the desired settings for each field:
import tkinter as tk

# Create a new window with the title "Address Entry Form"
window = tk.Tk()
window.title("Address Entry Form")

# Create a new frame `frm_form` to contain the Label
# and Entry widgets for entering address information
frm_form = tk.Frame(relief=tk.SUNKEN, borderwidth=3)
# Pack the frame into the window
frm_form.pack()

# Create the Label and Entry widgets for "First Name"
lbl_first_name = tk.Label(master=frm_form, text="First Name:")
ent_first_name = tk.Entry(master=frm_form, width=50)
# Use the grid geometry manager to place the Label and
# Entry widgets in the first and second columns of the
# first row of the grid
lbl_first_name.grid(row=0, column=0, sticky="e")
ent_first_name.grid(row=0, column=1)

# Create the Label and Entry widgets for "Last Name"
lbl_last_name = tk.Label(master=frm_form, text="Last Name:")
ent_last_name = tk.Entry(master=frm_form, width=50)
# Place the widgets in the second row of the grid
lbl_last_name.grid(row=1, column=0, sticky="e")
ent_last_name.grid(row=1, column=1)

# Create the Label and Entry widgets for "Address Line 1"
lbl_address1 = tk.Label(master=frm_form, text="Address Line 1:")
ent_address1 = tk.Entry(master=frm_form, width=50)
# Place the widgets in the third row of the grid
lbl_address1.grid(row=2, column=0, sticky="e")
ent_address1.grid(row=2, column=1)

# Create the Label and Entry widgets for "Address Line 2"
lbl_address2 = tk.Label(master=frm_form, text="Address Line 2:")
ent_address2 = tk.Entry(master=frm_form, width=50)
# Place the widgets in the fourth row of the grid
lbl_address2.grid(row=3, column=0, sticky=tk.E)
ent_address2.grid(row=3, column=1)

# Create the Label and Entry widgets for "City"
lbl_city = tk.Label(master=frm_form, text="City:")
ent_city = tk.Entry(master=frm_form, width=50)
# Place the widgets in the fifth row of the grid
lbl_city.grid(row=4, column=0, sticky=tk.E)
ent_city.grid(row=4, column=1)

# Create the Label and Entry widgets for "State/Province"
lbl_state = tk.Label(master=frm_form, text="State/Province:")
ent_state = tk.Entry(master=frm_form, width=50)
# Place the widgets in the sixth row of the grid
lbl_state.grid(row=5, column=0, sticky=tk.E)
ent_state.grid(row=5, column=1)

# Create the Label and Entry widgets for "Postal Code"
lbl_postal_code = tk.Label(master=frm_form, text="Postal Code:")
ent_postal_code = tk.Entry(master=frm_form, width=50)
# Place the widgets in the seventh row of the grid
lbl_postal_code.grid(row=6, column=0, sticky=tk.E)
ent_postal_code.grid(row=6, column=1)

# Create the Label and Entry widgets for "Country"
lbl_country = tk.Label(master=frm_form, text="Country:")
ent_country = tk.Entry(master=frm_form, width=50)
# Place the widgets in the eight row of the grid
lbl_country.grid(row=7, column=0, sticky=tk.E)
ent_country.grid(row=7, column=1)

# Create a new frame `frm_buttons` to contain the
# Submit and Clear buttons. This frame fills the
# whole window in the horizontal direction and has
# 5 pixels of horizontal and vertical padding.
frm_buttons = tk.Frame()
frm_buttons.pack(fill=tk.X, ipadx=5, ipady=5)

# Create the "Submit" button and pack it to the
# right side of `frm_buttons`
btn_submit = tk.Button(master=frm_buttons, text="Submit")
btn_submit.pack(side=tk.RIGHT, padx=10, ipadx=10)

# Create the "Clear" button and pack it to the
# right side of `frm_buttons`
btn_clear = tk.Button(master=frm_buttons, text="Clear")
btn_clear.pack(side=tk.RIGHT, ipadx=10)

# Start the application
window.mainloop()
There’s nothing wrong with this solution. It’s a bit long, but everything is very explicit. If you want to change something, then it’s clear to see exactly where to do so.
That said, the solution can be considerably shortened by recognizing that each Entry has the same width, and that all you need for each Label is the text:
import tkinter as tk

# Create a new window with the title "Address Entry Form"
window = tk.Tk()
window.title("Address Entry Form")

# Create a new frame `frm_form` to contain the Label
# and Entry widgets for entering address information
frm_form = tk.Frame(relief=tk.SUNKEN, borderwidth=3)
# Pack the frame into the window
frm_form.pack()

# List of field labels
labels = [
    "First Name:",
    "Last Name:",
    "Address Line 1:",
    "Address Line 2:",
    "City:",
    "State/Province:",
    "Postal Code:",
    "Country:",
]

# Loop over the list of field labels
for idx, text in enumerate(labels):
    # Create a Label widget with the text from the labels list
    label = tk.Label(master=frm_form, text=text)
    # Create an Entry widget
    entry = tk.Entry(master=frm_form, width=50)
    # Use the grid geometry manager to place the Label and
    # Entry widgets in the row whose index is idx
    label.grid(row=idx, column=0, sticky="e")
    entry.grid(row=idx, column=1)

# Create a new frame `frm_buttons` to contain the
# Submit and Clear buttons. This frame fills the
# whole window in the horizontal direction and has
# 5 pixels of horizontal and vertical padding.
frm_buttons = tk.Frame()
frm_buttons.pack(fill=tk.X, ipadx=5, ipady=5)

# Create the "Submit" button and pack it to the
# right side of `frm_buttons`
btn_submit = tk.Button(master=frm_buttons, text="Submit")
btn_submit.pack(side=tk.RIGHT, padx=10, ipadx=10)

# Create the "Clear" button and pack it to the
# right side of `frm_buttons`
btn_clear = tk.Button(master=frm_buttons, text="Clear")
btn_clear.pack(side=tk.RIGHT, ipadx=10)

# Start the application
window.mainloop()
In this solution, a list is used to store the strings for each label in the form. They’re stored in the order that each form field should appear. Then, enumerate() gets both the index and string from each value in the labels list.
When you’re ready, you can move on to the next section.
Making Your Applications Interactive
By now, you have a pretty good idea of how to create a window with Tkinter, add some widgets, and control the application layout. That’s great, but applications shouldn’t just look good—they actually need to do something! In this section, you’ll learn how to bring your applications to life by performing actions whenever certain events occur.
Using Events and Event Handlers
When you create a Tkinter application, you must call window.mainloop() to start the event loop. During the event loop, your application checks if an event has occurred. If so, then it’ll execute some code in response.
The event loop is provided for you with Tkinter, so you don’t have to write any code that checks for events yourself. However, you do have to write the code that will be executed in response to an event. In Tkinter, you write functions called event handlers for the events that you use in your application.
You’ll write your own event loop in order to better understand how Tkinter’s event loop works. That way, you can see how Tkinter’s event loop fits into your application, and which parts you need to write yourself.
Assume there’s a list called events that contains event objects. A new event object is automatically appended to events every time an event occurs in your program. You don’t need to implement this updating mechanism. It just automatically happens for you in this conceptual example. Using an infinite loop, you can continually check if there are any event objects in events:
# Assume that this list gets updated automatically
events = []

# Run the event loop
while True:
    # If the event list is empty, then no events have occurred
    # and you can skip to the next iteration of the loop
    if events == []:
        continue

    # If execution reaches this point, then there is at least one
    # event object in the event list
    event = events[0]
Right now, the event loop that you’ve created doesn’t do anything with event. Let’s change that. Suppose your application needs to respond to keypresses. You need to check that event was generated by a user pressing a key on their keyboard, and if so, pass event to an event handler function for keypresses.
Assume that event has a .type attribute set to the string "keypress" if the event is a keypress event object, and a .char attribute containing the character of the key that was pressed. Create a new handle_keypress() function and update your event loop code:
events = []

# Create an event handler
def handle_keypress(event):
    """Print the character associated to the key pressed"""
    print(event.char)

while True:
    if events == []:
        continue

    event = events[0]

    # If event is a keypress event object
    if event.type == "keypress":
        # Call the keypress event handler
        handle_keypress(event)
When you call window.mainloop(), something like the above loop is run for you. This method takes care of two parts of the loop for you:
- It maintains a list of events that have occurred.
- It runs an event handler any time a new event is added to that list.
Update your event loop to use window.mainloop() instead of your own event loop:
import tkinter as tk

# Create a window object
window = tk.Tk()

# Create an event handler
def handle_keypress(event):
    """Print the character associated to the key pressed"""
    print(event.char)

# Run the event loop
window.mainloop()
.mainloop() takes care of a lot for you, but there’s something missing from the above code. How does Tkinter know when to use handle_keypress()? Tkinter widgets have a method called .bind() for just this purpose.
Using .bind()
To call an event handler whenever an event occurs on a widget, use .bind(). The event handler is said to be bound to the event because it’s called every time the event occurs. You’ll continue with the keypress example from the previous section and use .bind() to bind handle_keypress() to the keypress event:
import tkinter as tk

window = tk.Tk()

def handle_keypress(event):
    """Print the character associated to the key pressed"""
    print(event.char)

# Bind keypress event to handle_keypress()
window.bind("<Key>", handle_keypress)

window.mainloop()
Here, the handle_keypress() event handler is bound to a "<Key>" event using window.bind(). Whenever a key is pressed while the application is running, your program will print the character of the key pressed.
.bind() always takes at least two arguments:
- An event that’s represented by a string of the form
"<event_name>", whereevent_namecan be any of Tkinter’s events - An event handler that’s the name of the function to be called whenever the event occurs
The event handler is bound to the widget on which .bind() is called. When the event handler is called, the event object is passed to the event handler function.
In the example above, the event handler is bound to the window itself, but you can bind an event handler to any widget in your application. For example, you can bind an event handler to a Button widget that will perform some action whenever the button is pressed:
def handle_click(event):
    print("The button was clicked!")

button = tk.Button(text="Click me!")

button.bind("<Button-1>", handle_click)
In this example, the "<Button-1>" event on the button widget is bound to the handle_click event handler. The "<Button-1>" event occurs whenever the left mouse button is pressed while the mouse is over the widget. There are other events for mouse button clicks, including "<Button-2>" for the middle mouse button and "<Button-3>" for the right mouse button.
You can bind any event handler to any kind of widget with .bind(), but there’s a more straightforward way to bind event handlers to button clicks using the Button widget’s command attribute.
Using command
Every Button widget has a command attribute that you can assign to a function. Whenever the button is pressed, the function is executed.
Take a look at an example. First, you’ll create a window with a Label widget that holds a numeric value. You’ll put buttons on the left and right side of the label. The left button will be used to decrease the value in the Label, and the right one will increase the value. Here’s the code for the window:
 1import tkinter as tk
 2
 3window = tk.Tk()
 4
 5window.rowconfigure(0, minsize=50, weight=1)
 6window.columnconfigure([0, 1, 2], minsize=50, weight=1)
 7
 8btn_decrease = tk.Button(master=window, text="-")
 9btn_decrease.grid(row=0, column=0, sticky="nsew")
10
11lbl_value = tk.Label(master=window, text="0")
12lbl_value.grid(row=0, column=1)
13
14btn_increase = tk.Button(master=window, text="+")
15btn_increase.grid(row=0, column=2, sticky="nsew")
16
17window.mainloop()
The window looks like this:
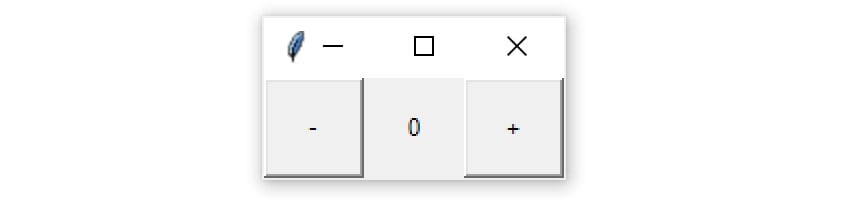
With the app layout defined, you can bring it to life by giving the buttons some commands. Start with the left button. When this button is pressed, it should decrease the value in the label by one. In order to do this, you first need to get answers to two questions:
- How do you get the text in
Label? - How do you update the text in
Label?
Label widgets don’t have .get() like Entry and Text widgets do. However, you can retrieve the text from the label by accessing the text attribute with a dictionary-style subscript notation:
label = tk.Label(text="Hello")

# Retrieve a label's text
text = label["text"]

# Set new text for the label
label["text"] = "Good bye"
Now that you know how to get and set a label’s text, write an increase() function that increases the value in lbl_value by one:
 1import tkinter as tk
 2
 3def increase():
 4    value = int(lbl_value["text"])
 5    lbl_value["text"] = f"{value + 1}"
 6
 7# ...
increase() gets the text from lbl_value and converts it to an integer with int(). Then, it increases this value by one and sets the label’s text attribute to this new value.
You’ll also need decrease() to decrease the value in value_label by one:
 5# ...
 6
 7def decrease():
 8    value = int(lbl_value["text"])
 9    lbl_value["text"] = f"{value - 1}"
10
11# ...
Put increase() and decrease() in your code just after the import statement.
To connect the buttons to the functions, assign the function to the button’s command attribute. You can do this when you instantiate the buttons. For example, update the two lines that instantiate the buttons to the following:
14# ...
15
16btn_decrease = tk.Button(master=window, text="-", command=decrease)
17btn_decrease.grid(row=0, column=0, sticky="nsew")
18
19lbl_value = tk.Label(master=window, text="0")
20lbl_value.grid(row=0, column=1)
21
22btn_increase = tk.Button(master=window, text="+", command=increase)
23btn_increase.grid(row=0, column=2, sticky="nsew")
24
25window.mainloop()
That’s all you need to do to bind the buttons to increase() and decrease() and make the program functional. Try saving your changes and running the application! Click the buttons to increase and decrease the value in the center of the window:
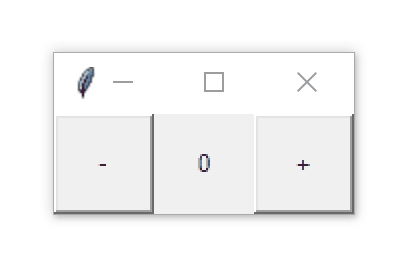
Here’s the full application code for your reference:
import tkinter as tk

def increase():
    value = int(lbl_value["text"])
    lbl_value["text"] = f"{value + 1}"

def decrease():
    value = int(lbl_value["text"])
    lbl_value["text"] = f"{value - 1}"

window = tk.Tk()

window.rowconfigure(0, minsize=50, weight=1)
window.columnconfigure([0, 1, 2], minsize=50, weight=1)

btn_decrease = tk.Button(master=window, text="-", command=decrease)
btn_decrease.grid(row=0, column=0, sticky="nsew")

lbl_value = tk.Label(master=window, text="0")
lbl_value.grid(row=0, column=1)

btn_increase = tk.Button(master=window, text="+", command=increase)
btn_increase.grid(row=0, column=2, sticky="nsew")

window.mainloop()
This app isn’t particularly useful, but the skills you learned here apply to every app you’ll make:
- Use widgets to create the components of the user interface.
- Use geometry managers to control the layout of the application.
- Write event handlers that interact with various components to capture and transform user input.
In the next two sections, you’ll build more useful apps. First, you’ll build a temperature converter that converts a temperature value from Fahrenheit to Celsius. After that, you’ll build a text editor that can open, edit, and save text files!
Check Your Understanding
Expand the code block below for an exercise to check your understanding:
Write a program that simulates rolling a six-sided die. There should be one button with the text Roll. When the user clicks the button, a random integer from 1 to 6 should be displayed.
The application window should look something like this:
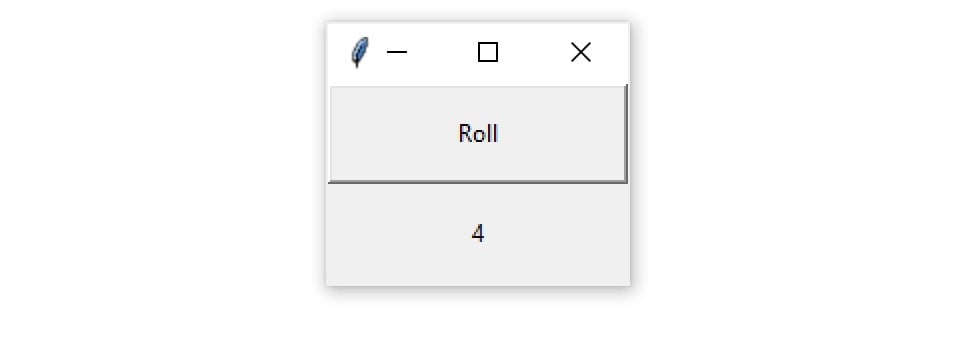
Try this exercise now.
You can expand the code block below to see a solution:
Here’s one possible solution:
import random
import tkinter as tk

def roll():
    lbl_result["text"] = str(random.randint(1, 6))

window = tk.Tk()
window.columnconfigure(0, minsize=150)
window.rowconfigure([0, 1], minsize=50)

btn_roll = tk.Button(text="Roll", command=roll)
lbl_result = tk.Label()

btn_roll.grid(row=0, column=0, sticky="nsew")
lbl_result.grid(row=1, column=0)

window.mainloop()
Keep in mind that your code may look different.
When you’re ready, you can move on to the next section.
Building a Temperature Converter (Example App)
In this section, you’ll build a temperature converter application that allows the user to input temperature in degrees Fahrenheit and push a button to convert that temperature to degrees Celsius. You’ll walk through the code step by step. You can also find the full source code at the end of this section for your reference.
Before you start coding, you’ll first design the app. You need three elements:
Entry: A widget calledent_temperaturefor entering the Fahrenheit valueLabel: A widget calledlbl_resultto display the Celsius resultButton: A widget calledbtn_convertthat reads the value from theEntrywidget, converts it from Fahrenheit to Celsius, and sets the text of theLabelwidget to the result when clicked
You can arrange these in a grid with a single row and one column for each widget. That gets you a minimally working application, but it isn’t very user-friendly. Everything needs to have labels.
You’ll put a label directly to the right of the ent_temperature widget containing the Fahrenheit symbol (℉) so that the user knows that the value ent_temperature should be in degrees Fahrenheit. To do this, set the label text to "\N{DEGREE FAHRENHEIT}", which uses Python’s named Unicode character support to display the Fahrenheit symbol.
You can give btn_convert a little flair by setting its text to the value "\N{RIGHTWARDS BLACK ARROW}", which displays a black arrow pointing to the right. You’ll also make sure that lbl_result always has the Celsius symbol (℃) following the label text "\N{DEGREE CELSIUS}" to indicate that the result is in degrees Celsius. Here’s what the final window will look like:
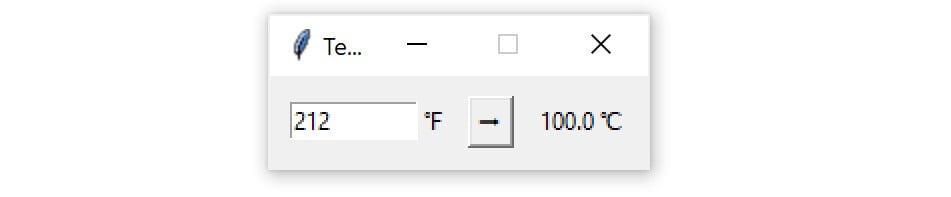
Now that you know what widgets you need and what the window is going to look like, you can start coding it up! First, import tkinter and create a new window:
 1import tkinter as tk
 2
 3window = tk.Tk()
 4window.title("Temperature Converter")
 5window.resizable(width=False, height=False)
window.title() sets the title of an existing window, while window.resizable() with both arguments set to False makes the window have a fixed size. When you finally run this application, the window will have the text Temperature Converter in its title bar. Next, create the ent_temperature widget with a label called lbl_temp and assign both to a Frame widget called frm_entry:
 5# ...
 6
 7frm_entry = tk.Frame(master=window)
 8ent_temperature = tk.Entry(master=frm_entry, width=10)
 9lbl_temp = tk.Label(master=frm_entry, text="\N{DEGREE FAHRENHEIT}")
The user will enter the Fahrenheit value in ent_temperature, and lbl_temp is used to label ent_temperature with the Fahrenheit symbol. The frm_entry container groups ent_temperature and lbl_temp together.
You want lbl_temp to be placed directly to the right of ent_temperature. You can lay them out in frm_entry using the .grid() geometry manager with one row and two columns:
 9# ...
10
11ent_temperature.grid(row=0, column=0, sticky="e")
12lbl_temp.grid(row=0, column=1, sticky="w")
You’ve set the sticky parameter to "e" for ent_temperature so that it always sticks to the rightmost edge of its grid cell. You also set sticky to "w" for lbl_temp to keep it stuck to the leftmost edge of its grid cell. This ensures that lbl_temp is always located immediately to the right of ent_temperature.
Now, make the btn_convert and the lbl_result for converting the temperature entered into ent_temperature and displaying the results:
12# ...
13
14btn_convert = tk.Button(
15    master=window,
16    text="\N{RIGHTWARDS BLACK ARROW}"
17)
18lbl_result = tk.Label(master=window, text="\N{DEGREE CELSIUS}")
Like frm_entry, both btn_convert and lbl_result are assigned to window. Together, these three widgets make up the three cells in the main application grid. Use .grid() to go ahead and lay them out now:
18# ...
19
20frm_entry.grid(row=0, column=0, padx=10)
21btn_convert.grid(row=0, column=1, pady=10)
22lbl_result.grid(row=0, column=2, padx=10)
Finally, run the application:
22# ...
23
24window.mainloop()
That looks great! But the button doesn’t do anything just yet. At the top of your script file, just below the import line, add a function called fahrenheit_to_celsius():
 1import tkinter as tk
 2
 3def fahrenheit_to_celsius():
 4    """Convert the value for Fahrenheit to Celsius and insert the
 5    result into lbl_result.
 6    """
 7    fahrenheit = ent_temperature.get()
 8    celsius = (5 / 9) * (float(fahrenheit) - 32)
 9    lbl_result["text"] = f"{round(celsius, 2)} \N{DEGREE CELSIUS}"
10
11# ...
This function reads the value from ent_temperature, converts it from Fahrenheit to Celsius, and then displays the result in lbl_result.
Now go down to the line where you define btn_convert and set its command parameter to fahrenheit_to_celsius:
20# ...
21
22btn_convert = tk.Button(
23    master=window,
24    text="\N{RIGHTWARDS BLACK ARROW}",
25    command=fahrenheit_to_celsius  # <--- Add this line
26)
27
28# ...
That’s it! You’ve created a fully functional temperature converter app in just twenty-six lines of code! Pretty cool, right?
You can expand the code block below to see the full script:
Here’s the full script for your reference:
import tkinter as tk

def fahrenheit_to_celsius():
    """Convert the value for Fahrenheit to Celsius and insert the
    result into lbl_result.
    """
    fahrenheit = ent_temperature.get()
    celsius = (5 / 9) * (float(fahrenheit) - 32)
    lbl_result["text"] = f"{round(celsius, 2)} \N{DEGREE CELSIUS}"

# Set up the window
window = tk.Tk()
window.title("Temperature Converter")
window.resizable(width=False, height=False)

# Create the Fahrenheit entry frame with an Entry
# widget and label in it
frm_entry = tk.Frame(master=window)
ent_temperature = tk.Entry(master=frm_entry, width=10)
lbl_temp = tk.Label(master=frm_entry, text="\N{DEGREE FAHRENHEIT}")

# Layout the temperature Entry and Label in frm_entry
# using the .grid() geometry manager
ent_temperature.grid(row=0, column=0, sticky="e")
lbl_temp.grid(row=0, column=1, sticky="w")

# Create the conversion Button and result display Label
btn_convert = tk.Button(
    master=window,
    text="\N{RIGHTWARDS BLACK ARROW}",
    command=fahrenheit_to_celsius
)
lbl_result = tk.Label(master=window, text="\N{DEGREE CELSIUS}")

# Set up the layout using the .grid() geometry manager
frm_entry.grid(row=0, column=0, padx=10)
btn_convert.grid(row=0, column=1, pady=10)
lbl_result.grid(row=0, column=2, padx=10)

# Run the application
window.mainloop()
It’s time to kick things up a notch! Read on to learn how to build a text editor.
Building a Text Editor (Example App)
In this section, you’ll build a text editor application that can create, open, edit, and save text files. There are three essential elements in the application:
- A
Buttonwidget calledbtn_openfor opening a file for editing - A
Buttonwidget calledbtn_savefor saving a file - A
TextBoxwidget calledtxt_editfor creating and editing the text file
The three widgets will be arranged so that the two buttons are on the left-hand side of the window, and the text box is on the right-hand side. The whole window should have a minimum height of 800 pixels, and txt_edit should have a minimum width of 800 pixels. The whole layout should be responsive so that if the window is resized, then txt_edit is resized as well. The width of the frame holding the buttons should not change, however.
Here’s a sketch of how the window will look:
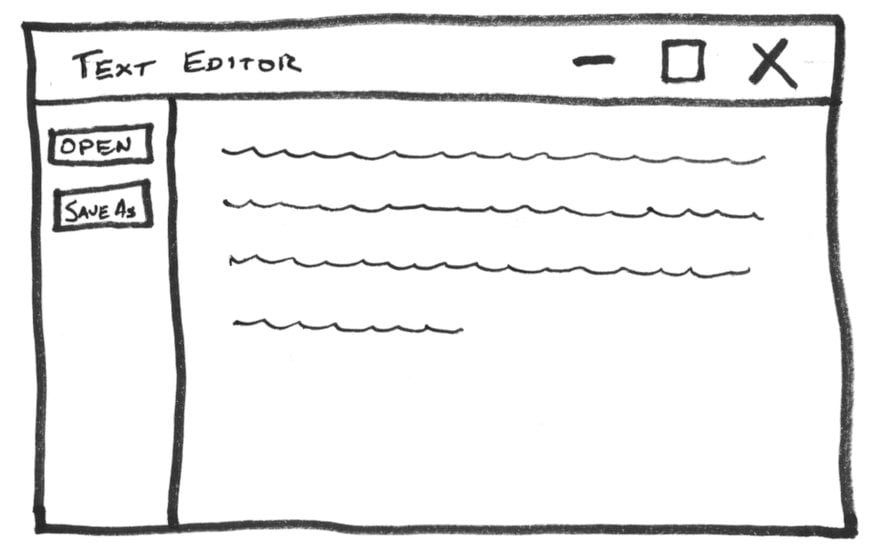
You can achieve the desired layout using the .grid() geometry manager. The layout contains a single row and two columns:
- A narrow column on the left for the buttons
- A wider column on the right for the text box
To set the minimum sizes for the window and txt_edit, you can set the minsize parameters of the window methods .rowconfigure() and .columnconfigure() to 800. To handle resizing, you can set the weight parameters of these methods to 1.
In order to get both buttons into the same column, you’ll need to create a Frame widget called frm_buttons. According to the sketch, the two buttons should be stacked vertically inside of this frame, with btn_open on top. You can do that with either the .grid() or .pack() geometry manager. For now, you’ll stick with .grid() since it’s a little easier to work with.
Now that you have a plan, you can start coding the application. The first step is to create all of the widgets you need:
 1import tkinter as tk
 2
 3window = tk.Tk()
 4window.title("Simple Text Editor")
 5
 6window.rowconfigure(0, minsize=800, weight=1)
 7window.columnconfigure(1, minsize=800, weight=1)
 8
 9txt_edit = tk.Text(window)
10frm_buttons = tk.Frame(window, relief=tk.RAISED, bd=2)
11btn_open = tk.Button(frm_buttons, text="Open")
12btn_save = tk.Button(frm_buttons, text="Save As...")
Here’s a breakdown of this code:
- Line 1 imports
tkinter. - Lines 3 and 4 create a new window with the title
"Simple Text Editor". - Lines 6 and 7 set the row and column configurations.
- Lines 9 to 12 create the four widgets you’ll need for the text box, the frame, and the open and save buttons.
Take a look at line 6 more closely. The minsize parameter of .rowconfigure() is set to 800, and weight is set to 1:
window.rowconfigure(0, minsize=800, weight=1)
The first argument is 0, which sets the height of the first row to 800 pixels and makes sure that the height of the row grows proportionally to the height of the window. There’s only one row in the application layout, so these settings apply to the entire window.
Let’s also take a closer look at line 7. Here, you use .columnconfigure() to set the width and weight attributes of the column with index 1 to 800 and 1, respectively:
window.columnconfigure(1, minsize=800, weight=1)
Remember, row and column indices are zero-based, so these settings apply only to the second column. By configuring just the second column, the text box will expand and contract naturally when the window is resized, while the column containing the buttons will remain at a fixed width.
Now you can work on the application layout. First, assign the two buttons to the frm_buttons frame using the .grid() geometry manager:
12# ...
13
14btn_open.grid(row=0, column=0, sticky="ew", padx=5, pady=5)
15btn_save.grid(row=1, column=0, sticky="ew", padx=5)
These two lines of code create a grid with two rows and one column in the frm_buttons frame since both btn_open and btn_save have their master attribute set to frm_buttons. btn_open is put in the first row and btn_save in the second row so that btn_open appears above btn_save in the layout, just you planned in your sketch.
Both btn_open and btn_save have their sticky attributes set to "ew", which forces the buttons to expand horizontally in both directions and fill the entire frame. This ensures that both buttons are the same size.
You place five pixels of padding around each button by setting the padx and pady parameters to 5. Only btn_open has vertical padding. Since it’s on top, the vertical padding offsets the button down from the top of the window a bit and makes sure that there’s a small gap between it and btn_save.
Now that frm_buttons is laid out and ready to go, you can set up the grid layout for the rest of the window:
15# ...
16
17frm_buttons.grid(row=0, column=0, sticky="ns")
18txt_edit.grid(row=0, column=1, sticky="nsew")
These two lines of code create a grid with one row and two columns for window. You place frm_buttons in the first column and txt_edit in the second column so that frm_buttons appears to the left of txt_edit in the window layout.
The sticky parameter for frm_buttons is set to "ns", which forces the whole frame to expand vertically and fill the entire height of its column. txt_edit fills its entire grid cell because you set its sticky parameter to "nsew", which forces it to expand in every direction.
Now that the application layout is complete, add window.mainloop() to the bottom of the program and save and run the file:
18# ...
19
20window.mainloop()
The following window is displayed:
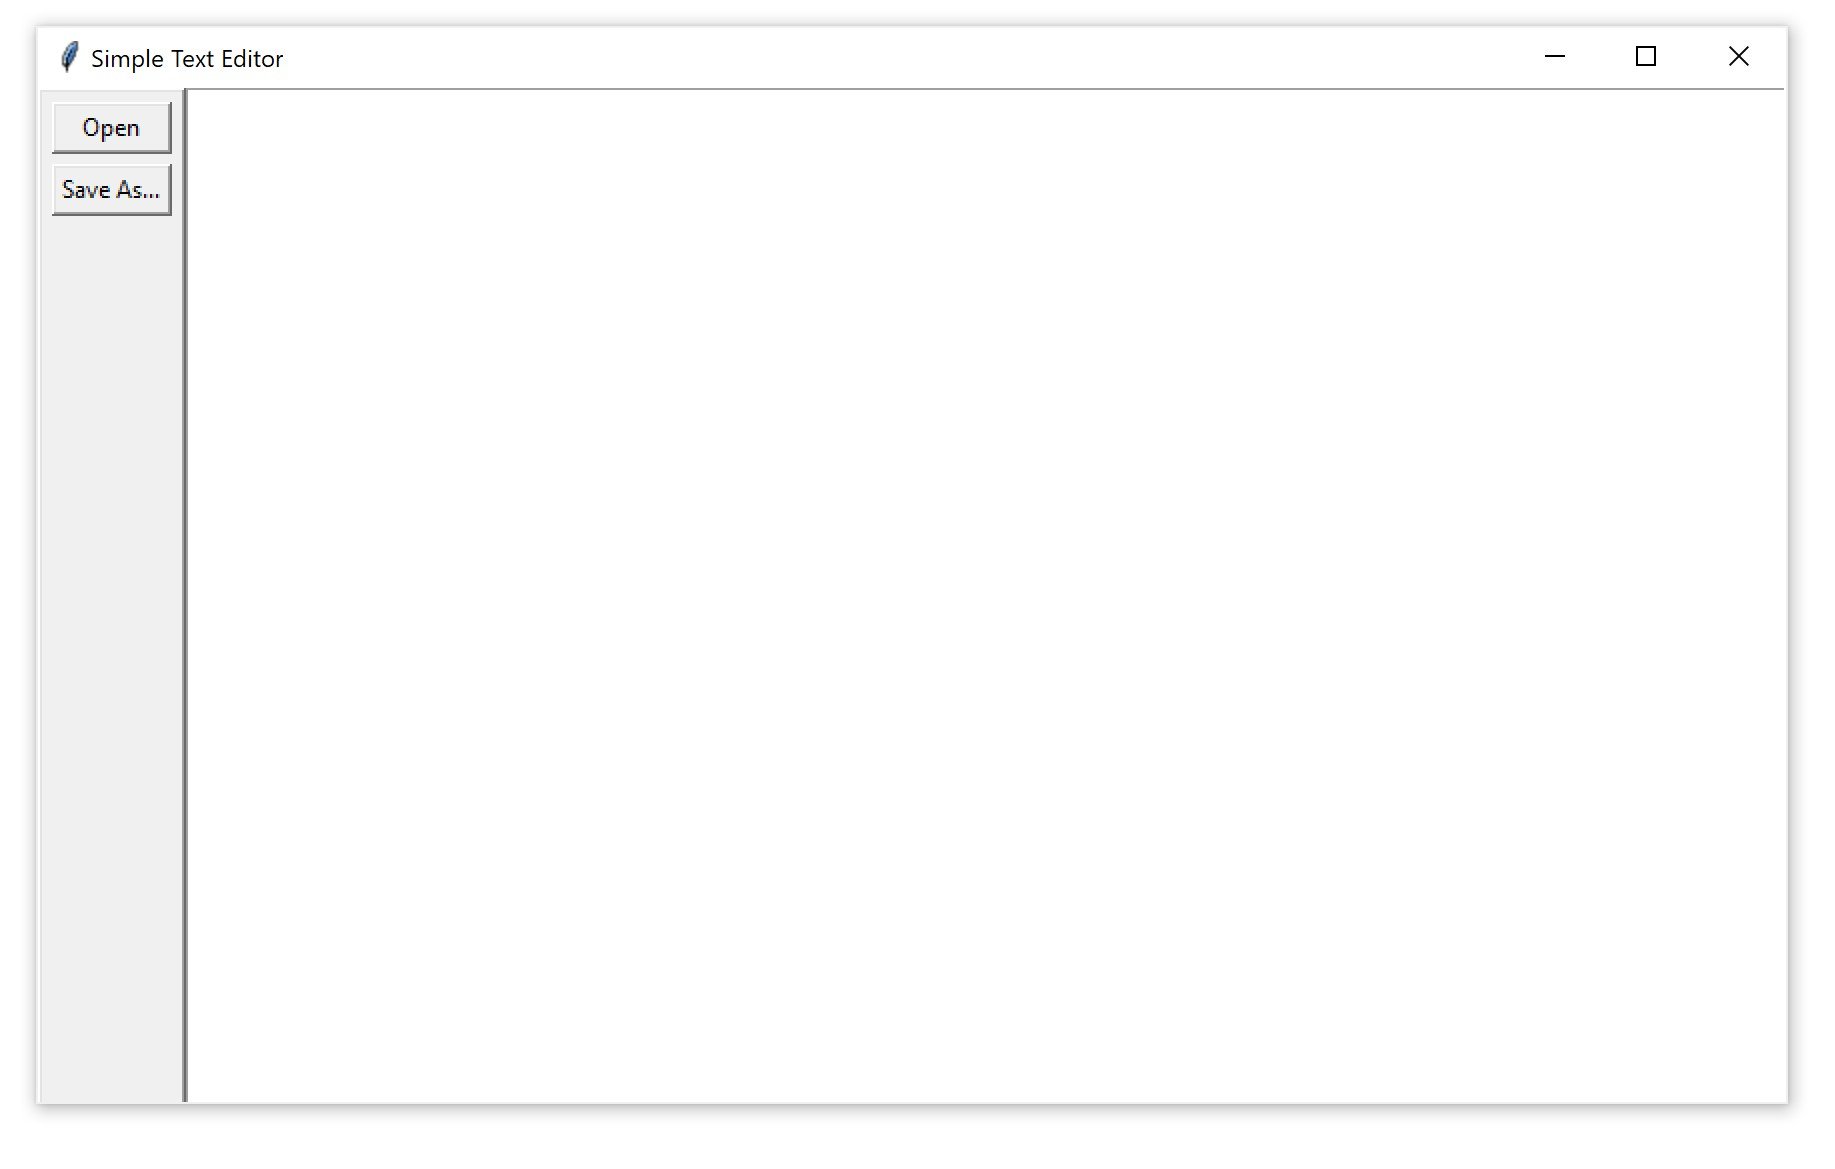
That looks great! But it doesn’t do anything just yet, so you need to start writing the commands for the buttons. btn_open needs to show a file open dialog and allow the user to select a file. It then needs to open that file and set the text of txt_edit to the contents of the file. Here’s an open_file() function that does just this:
 1import tkinter as tk
 2
 3def open_file():
 4    """Open a file for editing."""
 5    filepath = askopenfilename(
 6        filetypes=[("Text Files", "*.txt"), ("All Files", "*.*")]
 7    )
 8    if not filepath:
 9        return
10    txt_edit.delete("1.0", tk.END)
11    with open(filepath, mode="r", encoding="utf-8") as input_file:
12        text = input_file.read()
13        txt_edit.insert(tk.END, text)
14    window.title(f"Simple Text Editor - {filepath}")
15
16# ...
Here’s a breakdown of this function:
- Lines 5 to 7 use the
askopenfilename()dialog from thetkinter.filedialogmodule to display a file open dialog and store the selected file path tofilepath. - Lines 8 and 9 check to see if the user closes the dialog box or clicks the Cancel button. If so, then
filepathwill beNone, and the function willreturnwithout executing any of the code to read the file and set the text oftxt_edit. - Line 10 clears the current contents of
txt_editusing.delete(). - Lines 11 and 12 open the selected file and
.read()its contents before storing thetextas a string. - Line 13 assigns the string
texttotxt_editusing.insert(). - Line 14 sets the title of the window so that it contains the path of the open file.
Now you can update the program so that btn_open calls open_file() whenever it’s clicked. There are a few things that you need to do to update the program. First, import askopenfilename() from tkinter.filedialog by adding the following import to the top of your program:
 1import tkinter as tk
 2from tkinter.filedialog import askopenfilename
 3
 4# ...
Next, set the command attribute of btn_opn to open_file:
 1import tkinter as tk
 2from tkinter.filedialog import askopenfilename
 3
 4def open_file():
 5    """Open a file for editing."""
 6    filepath = askopenfilename(
 7        filetypes=[("Text Files", "*.txt"), ("All Files", "*.*")]
 8    )
 9    if not filepath:
10        return
11    txt_edit.delete("1.0", tk.END)
12    with open(filepath, mode="r", encoding="utf-8") as input_file:
13        text = input_file.read()
14        txt_edit.insert(tk.END, text)
15    window.title(f"Simple Text Editor - {filepath}")
16
17window = tk.Tk()
18window.title("Simple Text Editor")
19
20window.rowconfigure(0, minsize=800, weight=1)
21window.columnconfigure(1, minsize=800, weight=1)
22
23txt_edit = tk.Text(window)
24frm_buttons = tk.Frame(window, relief=tk.RAISED, bd=2)
25btn_open = tk.Button(frm_buttons, text="Open", command=open_file)
26btn_save = tk.Button(frm_buttons, text="Save As...")
27
28# ...
Save the file and run it to check that everything is working. Then try opening a text file!
With btn_open working, it’s time to work on the function for btn_save. This needs to open a save file dialog box so that the user can choose where they would like to save the file. You’ll use the asksaveasfilename() dialog in the tkinter.filedialog module for this. This function also needs to extract the text currently in txt_edit and write this to a file at the selected location. Here’s a function that does just this:
15# ...
16
17def save_file():
18    """Save the current file as a new file."""
19    filepath = asksaveasfilename(
20        defaultextension=".txt",
21        filetypes=[("Text Files", "*.txt"), ("All Files", "*.*")],
22    )
23    if not filepath:
24        return
25    with open(filepath, mode="w", encoding="utf-8") as output_file:
26        text = txt_edit.get("1.0", tk.END)
27        output_file.write(text)
28    window.title(f"Simple Text Editor - {filepath}")
29
30# ...
Here’s how this code works:
- Lines 19 to 22 use the
asksaveasfilename()dialog box to get the desired save location from the user. The selected file path is stored in thefilepathvariable. - Lines 23 and 24 check to see if the user closes the dialog box or clicks the Cancel button. If so, then
filepathwill beNone, and the function will return without executing any of the code to save the text to a file. - Line 25 creates a new file at the selected file path.
- Line 26 extracts the text from
txt_editwith.get()method and assigns it to the variabletext. - Line 27 writes
textto the output file. - Line 28 updates the title of the window so that the new file path is displayed in the window title.
Now you can update the program so that btn_save calls save_file() when it’s clicked. Again, there are a few things you need to do in order to update the program. First, import asksaveasfilename() from tkinter.filedialog by updating the import at the top of your script, like so:
 1import tkinter as tk
 2from tkinter.filedialog import askopenfilename, asksaveasfilename
 3
 4# ...
Finally, set the command attribute of btn_save to save_file:
28# ...
29
30window = tk.Tk()
31window.title("Simple Text Editor")
32
33window.rowconfigure(0, minsize=800, weight=1)
34window.columnconfigure(1, minsize=800, weight=1)
35
36txt_edit = tk.Text(window)
37frm_buttons = tk.Frame(window, relief=tk.RAISED, bd=2)
38btn_open = tk.Button(frm_buttons, text="Open", command=open_file)
39btn_save = tk.Button(frm_buttons, text="Save As...", command=save_file)
40
41btn_open.grid(row=0, column=0, sticky="ew", padx=5, pady=5)
42btn_save.grid(row=1, column=0, sticky="ew", padx=5)
43
44frm_buttons.grid(row=0, column=0, sticky="ns")
45txt_edit.grid(row=0, column=1, sticky="nsew")
46
47window.mainloop()
Save the file and run it. You’ve now got a minimal yet fully functional text editor!
You can expand the code block below to see the full script:
Here’s the full script for your reference:
import tkinter as tk
from tkinter.filedialog import askopenfilename, asksaveasfilename

def open_file():
    """Open a file for editing."""
    filepath = askopenfilename(
        filetypes=[("Text Files", "*.txt"), ("All Files", "*.*")]
    )
    if not filepath:
        return
    txt_edit.delete("1.0", tk.END)
    with open(filepath, mode="r", encoding="utf-8") as input_file:
        text = input_file.read()
        txt_edit.insert(tk.END, text)
    window.title(f"Simple Text Editor - {filepath}")

def save_file():
    """Save the current file as a new file."""
    filepath = asksaveasfilename(
        defaultextension=".txt",
        filetypes=[("Text Files", "*.txt"), ("All Files", "*.*")],
    )
    if not filepath:
        return
    with open(filepath, mode="w", encoding="utf-8") as output_file:
        text = txt_edit.get("1.0", tk.END)
        output_file.write(text)
    window.title(f"Simple Text Editor - {filepath}")

window = tk.Tk()
window.title("Simple Text Editor")

window.rowconfigure(0, minsize=800, weight=1)
window.columnconfigure(1, minsize=800, weight=1)

txt_edit = tk.Text(window)
frm_buttons = tk.Frame(window, relief=tk.RAISED, bd=2)
btn_open = tk.Button(frm_buttons, text="Open", command=open_file)
btn_save = tk.Button(frm_buttons, text="Save As...", command=save_file)

btn_open.grid(row=0, column=0, sticky="ew", padx=5, pady=5)
btn_save.grid(row=1, column=0, sticky="ew", padx=5)

frm_buttons.grid(row=0, column=0, sticky="ns")
txt_edit.grid(row=0, column=1, sticky="nsew")

window.mainloop()
You’ve now built two GUI applications in Python and applied many of the skills that you’ve learned throughout this tutorial. That’s no small achievement, so take some time to feel good about what you’ve done. You’re now ready to tackle some applications on your own!
Conclusion
In this tutorial, you learned how to get started with Python GUI programming. Tkinter is a compelling choice for a Python GUI framework because it’s built into the Python standard library, and it’s relatively painless to make applications with this framework.
Throughout this tutorial, you’ve learned several important Tkinter concepts:
- How to work with widgets
- How to control your application layout with geometry managers
- How to make your applications interactive
- How to use five basic Tkinter widgets:
Label,Button,Entry,Text, andFrame
Now that you’ve mastered the foundations of Python GUI programming with Tkinter, the next step is to build some of your own applications. What will you create? Share your fun projects down in the comments below!
Additional Resources
In this tutorial, you touched on just the foundations of creating Python GUI applications with Tkinter. There are a number of additional topics that aren’t covered here. In this section, you’ll find some of the best resources available to help you continue on your journey.
Tkinter References
Here are some official resources to check out:
- The official Python Tkinter reference documentation covers Python’s Tkinter module in moderate depth. It’s written for more advanced Python developers and isn’t the best resource for beginners.
- Tkinter 8.5 reference: a GUI for Python is an extensive reference covering the majority of the Tkinter module. It’s exhaustive, but it’s written in the reference style without commentary or examples.
- The Tk Commands reference is the definitive guide to commands in the Tk library. It’s written for the Tcl language, but it answers a lot of questions about why things work the way they do in Tkinter.
Additional Widgets
In this tutorial, you learned about the Label, Button, Entry, Text, and Frame widgets. There are several other widgets in Tkinter, all of which are essential for building real-world applications. Here are some resources to continue learning about widgets:
- The TkDocs Tkinter Tutorial is a fairly comprehensive guide for Tk, the underlying code library used by Tkinter. Examples are presented in Python, Ruby, Perl, and Tcl. You can find several examples of widgets beyond those covered here in two sections:
- Basic Widgets covers the same widgets as this tutorial, plus a few more.
- More Widgets covers several additional widgets.
- The official Python docs cover additional widgets:
- ttk themed widgets covers the Tk themed widget set.
- Scrolled Text Widget details a
Textwidget combined with a vertical scroll bar.
Application Distribution
Once you’ve created an application with Tkinter, you probably want to distribute it to your colleagues and friends. Here are some tutorials to get you going with that process:
- Using PyInstaller to Easily Distribute Python Applications
- 4 Attempts at Packaging Python as an Executable
- Building Standalone Python Applications with PyOxidizer
Other GUI Frameworks
Tkinter isn’t your only choice for a Python GUI framework. If Tkinter doesn’t meet the needs of your project, then here are some other frameworks to consider:
- How to Build a Python GUI Application With wxPython
- Python and PyQt: Building a GUI Desktop Calculator
- Building a Mobile Application With the Kivy Python Framework
- PySimpleGUI: The Simple Way to Create a GUI With Python