1.
Немного про видео режимы для Windows
98 в VirtualBox
По умолчанию, после инсталляции в VirtualBox,
Windows
98 будет запущена с разрешением экрана 640x480
и 16 цветами (4-х битный режим).
 |
| Разрешение экрана для Windows 98 в VirtualBox |
Видеокарта
определяется Стандартный видеоадаптер PCI(VGA):
 |
| Видеоадаптер Windows 98 в VirtualBox по умолчанию |
VirtualBox
не оптимизирован для 16-ти цветовой (4-х битный) эмуляции, в которой запускается
Windows
98. Эта эмуляция будет работать очень медленно.
Имея
32 битный True
Color
драйвер можно сделать Windows
98 ,запускаемую в VirtualBox,
намного быстрее
Если
вы хотите True
color
или высокое разрешение, вы должны загрузить специальные
драйвера
2.
Универсальный VESA/VBE Видеодрайвер
Драйвер
в формате ISO
скачать можно здесь: Vbe9x.iso или здесь: Vbe9x.iso. Можно сразу присоединить, как образ, к
оптическому диску и ставить его в
Windows
98.
3.
Установка Универсального VESA/VBE Видеодрайвера
Перейти
Экран-Настройка-Дополнительно-Адаптер-Изменить-Далее
На
окошке Обновление драйверов (Какое действие должна выполнить Windows) выбрать:
 |
| Какое действие должна выполнить Windows |
Далее на следующем окошке Обновление драйверов ( Выбор местонахождения драйверов ) выбрать путь к
драйверу в файле ISO, который на оптическом диске ( в примере это диск D: ) :
 |
| Выбор местонахождения драйверов |
Windows 98
найдет драйвер на диске и в следующем окне Обновление драйверов (Поиск драйвера Windows для устройства) сообщит :
 |
| Поиск драйвера Windows для устройства |
По
окончанию установки в окошке Обновление драйверов следующее сообщение Завершена установка обновленного драйвера для данного оборудования :
 |
| Завершена установка обновленного драйвера |
Потребуется
перезагрузка Windows 98. После перезагрузки можно установить нужный монитор, нужную глубину
цвета и нужное разрешение:
 |
| Новое разрешение экрана для Windows 98 в VirtualBox |
Теперь
видеокарта определяется как VBE
Miniport—
Standart
PCI
Grafics
Adapter(VGA):
 |
| Новый видеоадаптер Windows 98 в VirtualBox |
Vesa Video Display Driver ISO Image for Windows 9x
Installation video drivers for:
Windows 95, 98(SE), Me
ISO image for easier installation in VirtualBox
From:
http://bearwindows.zcm.com.au/vbe9x.htm
comment
Reviews
Reviewer:
Uploader419
—
—
September 9, 2023
Subject:
how to install
right click on the desktop.
click propreties.
click Tab named «settings»
click Advanced.
click Tab named «adapter»
click next.
click next(again).
check option «specify location».
write down where INF file is(per example: D:\64mb).
click next until it asks you to restart the machine.
Reviewer:
AWEsome5199
—
—
July 4, 2023
Subject:
Help
Ok, how do I install it, like there’s no .EXE file in there.
Reviewer:
Fliggle Giggle
—
favoritefavoritefavoritefavoritefavorite —
February 8, 2023
Subject:
very amazing
good but the dingus windows 95 wasn’t able to become 16:9 aspect
Reviewer:
Wish13
—
favoritefavoritefavoritefavoritefavorite —
December 4, 2022
Subject:
Remember
Change «D:/WIN95» to «D:/064mb» otherwise, great!
Reviewer:
Zeromega801
—
favoritefavoritefavoritefavoritefavorite —
June 22, 2022
Subject:
works in oracle vm with 9x prohect install of win 95
Absolute perfection, the 064mb worked for me
Why do this?
If you feel nostalgic for a bit of Windows 9x action, or you just want to play some old games that are between DOS and Windows XP, you can either build a retro PC gaming rig, or you can test the water with VirtualBox.
Once it’s all done, you too can see how pointless it all is. 🙂
Update March 2019: Due to popularity of this post, I’ve run through this again on OSX with Virtualbox 6. I’ve also added some new content and will continue to do so.
What you will need:
- Windows 98SE ISO (link here, and key – HQ23F-WXWFF-7V3HJ-KCVXT-4FRRM)
- SCITech Display Doctor (this will be the video driver) – https://docs.google.com/file/d/0BycgkMZbeQOzWXE5NUhnWGRycVE/edit?pli=1
- VirtualBox (https://www.virtualbox.org/wiki/Downloads)
- Opera 9.6 (http://www.oldversion.com/windows/opera-9-64)
- Unofficial Windows 98 SE update roll up pack (http://files.platesteel.net/win98/U98SESP3.exe)
- Some other software from http://files.platesteel.net/win98se
Create the VM and Install Windows 98 SE
- Create new VM on Virtualbox

- Type: Microsoft Windows
- Version: Windows 98
- RAM: 512MB
- Create new fixed size HDD – 2GB (VDI is fine)
- Edit the settings of the VM:
- Display -> Video Memory ->
- 128MB
- Enable 2D Acceleration – Yes
- Enable 3D Acceleration – Yes
- Display -> Video Memory ->
- Install Windows 98SE
- Boot with your 98SE ISO mounted (you’ll have to find this yourself)
- Boot with option 2 – Start computer with CD-ROM support
- Run fdisk and accept all the defaults to create an 8GB partition on your virtual drive.
- Restart the virtual machine
- Boot with option 2 – Start computer with CD-ROM support
- Format the virtual drive using format on the Windows CD
- D:\win98\format c:
- Run: D:\setup.exe /ie /im /is /nr
- /ie Disables create a boot disk (causes crashing on VBox and 98SE installer)
- /im Disables checking conventional RAM
- /is Disables scandisk
- /iv Don’t disable billboards
- /nr Disable registry check
- Run through the Windows installer with all the defaults
- After reboot – Boot from Hard Disk
- Enter your name and the CD key for Win98SE (DMWRC-T9XP4-GJ2P8-26G66-V9WBB); install will continue.
- If everything went well, you should see Windows 98 desktop and hear some tragic music. 🙂
- I recommend that you take a snapshot of the VM and call it “BASE INSTALL”


Install Video Driver
- Shutdown Windows (and the VM)
- Edit Settings of the VM -> Storage -> Add another device to the IDE controller (click the CD with the green plus) and mount the scitech-display-doctor-7.iso file you downloaded earlier.
- You should see a CD drive with Sdd7 – double click that then run the scitech-display-doctor-win-7.0 installer – Express installation is fine.
- Register the Sci-Tech Display driver with either the name/serial in the text file on the mounted ISO, or use:
- Name: CSCKnight
- Serial: 0B5E-12B4-A8A4-0B
- Register the Sci-Tech Display driver with either the name/serial in the text file on the mounted ISO, or use:
- OS will restart, when it returns, SciTech Display Doctor will load. Either register it or start the 21 day trial.
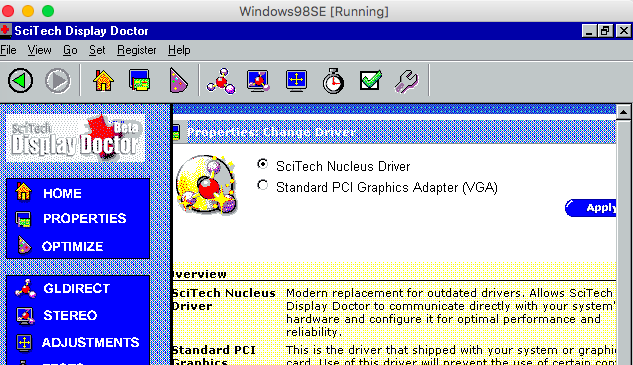
- On the HOME page, underneath Current Configuration, there is a section called Active Features. Click ‘Disabled’ next to SciTech Display Driver then select SciTech Nucleus Driver and apply.
- OS will reboot again (remember how annoying this used to be?)
- SciTech reloads and you’ll see that VESA VBE 2.0 Oracle VM VirtualBox VBE Adapter is now selected.
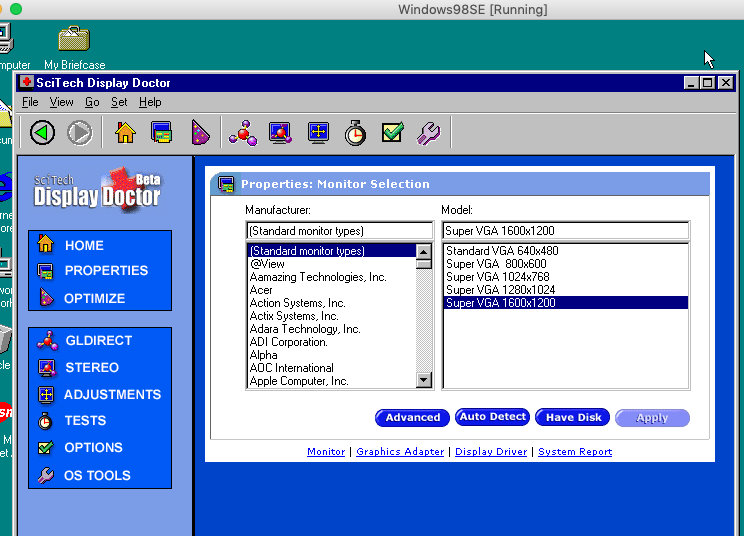
- Once the SciTech window returns; click the ‘Monitor not selected!’ link and choose SuperVGA 1600×1200, then reboot Windows.
- Once back into Windows after the reboot; right click Desktop then Properties then Settings
- Here you should see Default Monitor on SciTech Display Doctor 7.0
- Click the monitor model, and select Super VGA 1600×1200.
(Strangely, I wasn’t able to pick anything higher than 1024×768, so select that, it’ll make you reboot. Once you return, go back into the settings, and you’ll now see 1600×1200 32bit)- I’ve had issues trying to change resolution at the same time.
- I’ve also had issues when the restart didn’t work – if so, restart the VM yourself – no need to go into safe mode, it should boot the second time OK.
- Right click Desktop -> Properties -> Settings; now you can select 1600×1200 32bit True Color no problem.
- Reboot one more time to be sure.
- Hello accelerated Windows desktop!
- Take another VM snapshot and call it something like “Display Driver Installed”


Configure for basic Internet access (NAT)
This will allow you to access the Internet, albeit in a basic and broken way.
- Start -> Settings -> Control Panel -> Internet Options -> Connections -> Setup
- I want to set up my Internet connection manually … or local area network (LAN).
- I connect through a local area network (LAN).
- Accept everything except for setting up a mail account.
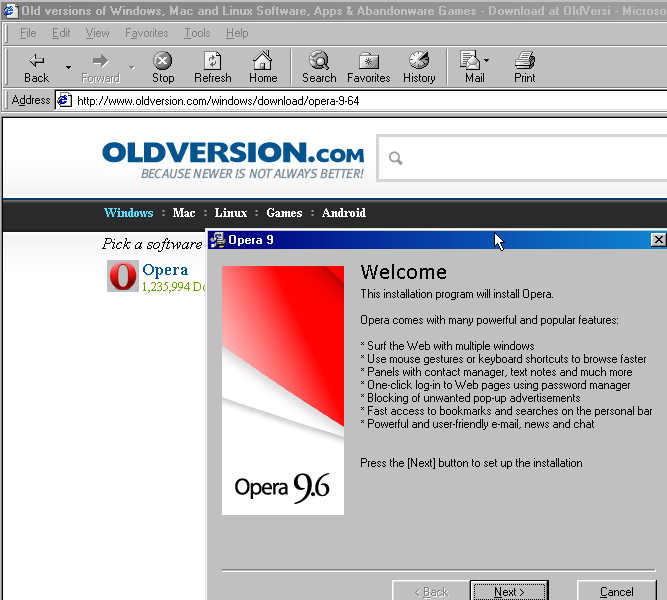
- Internet Explorer 5 will load. I recommend that you download Opera 9.64 (Opera 10 and above doesn’t support Windows 9x) – http://www.oldversion.com/windows/opera-9-64
- It will download it as a IFHDIH.PHP file that’s about 5MB – don’t worry. Just rename this to opera.exe and it *will* run.
- It will complain that Msimg32.dll is missing or too old. Don’t worry, it’ll still work and we’ll come back to fix this later.
Install Mouse Driver
- Not strictly necessary, but I find that the mouse works better with this driver/software installed.
- Download and run Belkin PS2 Mouse Driver 1.0 from http://files.platesteel.net/win98se/F8E850_SW_v1.exe
- Select PS/2 connection type. It will make you reboot again.
- Driver installed will look like:


Install some Essential Applications and Tools
- Install 7zip – http://files.platesteel.net/win98se/7z920.exe
- Download, unzip and install TweakUI – http://files.platesteel.net/win98se/7z920.exe
- Right click the inf file then install; it will ask you for a disk. Just browse to the directory that it was decompressed in, and select the catalog file.
Install Internet Explorer 6
- Not a strict necessity, but it’s better than having IE5.
- Probably a good idea to snapshot here – “Pre-IE6”
- Download, unzip, and install from – http://files.platesteel.net/win98se/ie60sp1.7z

Customizations
- In Explorer/Folder window -> View -> Folder Options -> View
- Show all files
- Display the full path in title bar
- Don’t hide file extensions for known file types
- Show window contents while dragging
- Smooth edges of screen fonts
- Click Apply then Like Current Folder
Install AC97 soundcard
The default VM setting is SoundBlaster 16 compatible. You can use the Windows Midi Synth, but I’ve seen some issues with games. In turn, we can use 9x drivers for AC97. Warning: lots of these drivers don’t work, so use mine.
- Download my Win 95 AC97 driver from http://files.platesteel.net/win98se/0001-VXD_A406.exe but do *NOT* run it.. simply right click and use 7zip to extract it to a directory.
- Shutdown the VM and go into Settings -> Audio, and change the audio hardware to ICH AC97, then boot up the machine.
- It will complain about no driver, select find driver and point it at the 0001-VXD_A406\Win95 directory. It will find and install the driver for you without crashing/or no audio, possibly after a reboot. You will also see it installing Realtek SB Emulation.
- Should have audio and wavetable MIDI when it returns.
- You can test this by running C:\windows\system\dxdiag.exe again.


Install Unofficial Windows 98SE Update Roll Up Pack (pseudo SP3)
- Download Windows 98SE SP3from http://files.platesteel.net/win98se/
- Instructions aren’t very good, it will pop up a Windows Help file. You can close this, then it’ll show you the install menu.
- Install DirectX 9.0c by itself, it will require a reboot after, then run installer again.
- Install Main Updates/System Core Files by itself. When complete, it will return with “Installation is now complete” and reboot, then run installer again (remember close the help window each time).
- At this point, I install (all at the same time) (with a reboot at the end):
- Adaptec ASPI Layer
- Animated Boot Up and Shutdown Logos
- DMA for all hard disks
- Microsoft Pain Graphic Filters
- Microsoft Word 97 SR-2
- Performance Tweaks
- Remote Desktop Connection
- Time Zone Update
- TrueType Fonts
- Universal Plug-n-PLay
- WinTop
- Snapshot! Call this “Windows 98SE Updated All Drivers and Clean”

Optional: Install 98SE2ME
- 98SE2ME will update over 700 of the system files with the newer versions from Windows ME. I don’t personally install it, at this time, but you can read more about it from the installer. http://www.mdgx.com/9s2m/read1st.php
- You will need a Windows ME ISO to use this.
Optional: Install KernelEx
- KernelEx adds an open source compatibility layer to Windows 98 that will let you run more modern software (like later versions of Opera, Firefox, etc).
I don’t personally have it installed, at this time, but you can read more about it here: http://kernelex.sourceforge.net/
Optional: Install Revolution Pack 9
- Revolution Pack makes the 98SE installation look more like XP/Vista. I don’t personally install it, but you can read more about it here: http://rp9.win98.nl/
Info: Resizing Windows 98SE Partition
If you get into a situation where you don’t have enough disk space. You can solve it by extending the virtual disk within VirtualBox, then grow the fat32 partition with gparted live ISO. The only caveat is that you need to remove all snapshots first.
To resize the VDI:
/Applications/VirtualBox.app/Contents/Resources/VirtualBoxVM.app/Contents/MacOS/VboxManage modifyhd –resize <MEGABYTES> <PATH TO VDI>
Then, boot from the gparted ISO.. you should see the total disk size and utilized. Right click the partition and hit resize, then apply. Once it’s complete, Windows 98 should have the extra space available. I would run scandisk just to be sure everything is OK, too.
Software
Games
The biggest problem with VirtualBox and Windows 9x is the lack of Guest Additions. This prevents any hardware emulation for Direct3D.
N – Does not work
Y – Does work
P – Works, with issues.
- N – C&C Gold 95
- Y – Civilization 2 Ultimate Collection – works perfect (dx5 game)
- N – Star Trek: Birth of the Federation 1.0.2 Software Emulation (video)
Applications
- Y – Visual Studio 6 Enterprise
Всем доброго времени суток, друзья!
Давненько меня здесь не было, а, стало быть пора напомнить «городу и миру» о своём присутствии и поделиться результатами своих экспериментов.
Всё началось в этой
viewtopic.php?f=2&t=931
теме, где я рассказывал про то, как легко и изящно приспособил для видеокарты VmWare SVGA II гостевой видеодрайвер от виртуальной машины Parallels Workstation, решив таким образом большую часть проблем, которые возникают у пользователей VmWare («Халва» искаропки завелась!). Но ведь всё надо проверить и перепроверить, не?
Эксперименты были перенесены на Qemu, которая тоже умеет эмулировать VmWare SVGA II. Для начала я попробовал установить «родной» для этой карты, который на неё встал, выдал после перезагрузки 32-х битный цвет и оказался весьма шустрым.
Вы не поняли, в ЧЁМ прикол? Да где же это видано, чтобы видеодрайвера времён 9х искаропки 32-х битный цвет выдавали? К тому же в случае с Qemu видеодрайвер только 32 бита и мог. Я начал «разбираться» — и глаза у меня стали большие-пребольшие. Оказалось, что видеобиос VmWare SVGA II в Qemu «работает» ПОВЕРХ видеобиоса «стандартной» VGA-карты и сей «костыль» машина тащит в себе по сей день. «Родной» видеодрайвер сию конструкцию ниосилил, а вот «параллельный» — справился.
Ну вот и отлично, скажете вы — но всё только начиналось. Раз «варькин» видеобиос работает поверх видеобиоса VGA-карты, то почему бы не попробовать, как эта самая карта будет работать с «параллельным» видеодрайвером? Оказалось — нормально работает. А как, кстати, «обзывается» эта самая VGA-карта с точки зрения Аиды? Ах, Yamaha 6388? Где же я с этой картой «пересекался»-то? А вот где!
- 0006.jpg (193.7 Кб) Просмотров: 4656
- 0007.jpg (206.86 Кб) Просмотров: 4650
Вот она, альтернатива SDD и UNIVBE. С одной стороны — легковесная, а с другой — написана какими-никакими, а профессионалами. Но это были только «цветочки», но перед тем, как угостить вас «ягодками» я проведу с вами маленький «ликбез».
Если вы думаете, что выбрав в конфигурации Досбокса pentium_mmx вы получите Pentium I MMX, то вашей детской наивности можно только позавидовать. Вы получаете своего рода «недоатом», а именно, i486 с набором инструкций Пентиума и набором инструкций ММХ. И точно по такому же принципу в «Кеми» и Досбоксе эмулируются CL 5446 и S3 764/ Берётся VGA-карта с VESA-расширениями и к ней прикручиваются кое-какие «плюшки» вышеупомянутых карт, после чего винда пытается с весьма переменным успехом с этими карточками работать. А коли так…
- 0012.jpg (173.17 Кб) Просмотров: 4573
- 0013.jpg (169.53 Кб) Просмотров: 4653
Да, и на Досбоксе сей драйвер работает, и на Qemu работает и на… Virtual PC работает, где эмулируемая S3 732 куда менее «фейковая», чем карточки двух предыдущих «мафынок». А посему, дорогие мои любители «Писюема» и его форков, ждет вас «халтура». Хост мой древний и полумёртвый, мучать его тяжеловесной машиной мне жалко, а вот вы с этими вашими i7 могли бы «параллельный» драйверок потестить на реальных картах, рассчитаных на работу на PCI-шине. Ещё раз напоминаю, на всякий случай, что перед установкой видеодрайвера надо обновлять драйвера чипсетов.
Теперь — о вложениях. Драйвер вы получите в 2-х видах.
Первый — совместим со всем и вся, цветность ограничена 8-ю битами, три самых «ходовых» разрешения, не считая VGA.
Второй — предназначен непосредственно для Virtual Box-а и сразу оговорюсь, что это Lite-версия. Дело в том, что универсального видеодрайвера под 9х по определению быть — НЕ МОЖЕТ. У одних карт максимальная цветность 24 бита, другие умеют ещё и 32 бита, а третьи умеют 32 бита, но не умеют 24. Если вы ограничиваетесь 3-м Директом, то вы можете вписатьть в inf такие разрешения, как 320х200х8 и 320х240х8, а если у вас директ — пятый, то этого делать не надо, потому что винда с этими разрешениями будет работать через ModeX. Короче, надо «подгонять» драйвера и под конкретные карты, и под версии директа, и под версии винды. Дерзайте, юноши!
Последний раз редактировалось Oldgamer 30 сен 2023, 23:40, всего редактировалось 2 раз(а).
-
whatsupdoc
- Posts: 1
- Joined: 26. Dec 2015, 07:25
Win98 Guest Graphics driver or Adapter
Hi — I wanted to run my old MS flight simulator 98, So I thought using a VB Guest with Win 98SE would be good.
But — the Flight simulator needs 256 colours and when I install Win98 second edition the VGA only offers 2 or 16 colours and a fixed screen resolution.
Is there any way to «upgrade the video card» in a virtual machine?
or get it to offer some more options?
So far I tried just changing the adapter to SVGA under the Windows settings — that crashed.
I’m running Virtual box 5.010 on Win 7 64 bit machine.
Thanks
-
mpack
- Site Moderator
- Posts: 38868
- Joined: 4. Sep 2008, 17:09
- Primary OS: MS Windows 10
- VBox Version: PUEL
- Guest OSses: Mostly XP
Re: Win98 Guest Graphics driver or Adapter
Post
by mpack »
VirtualBox emulates a VESA compatible graphics card, so yes, you can install a VESA graphics driver. Please see the «Howtos and Tutorials» section. I prefer the BearWindows Universal driver, as the Display Doctor one is trialware and you can never register it now.
-
mpack
- Site Moderator
- Posts: 38868
- Joined: 4. Sep 2008, 17:09
- Primary OS: MS Windows 10
- VBox Version: PUEL
- Guest OSses: Mostly XP
Re: Win98 Guest Graphics driver or Adapter
Post
by mpack »
dlharper wrote:Note that the original URL for downloading the Bearwindows driver will no longer work. It is currently available from http://bearwindows.zcm.com.au/.
Thanks, but I’m pretty sure I changed the tutorials in mid year to correct the broken BearWindows links (edit: yes I did).
-
dlharper
- Posts: 291
- Joined: 25. Aug 2011, 19:17
- Primary OS: MS Windows 10
- VBox Version: PUEL
- Guest OSses: MS Windows (several versions); DOS
Re: Win98 Guest Graphics driver or Adapter
Post
by dlharper »
Some of the links have indeed been changed (possibly most of them) but some still point to the old address. I noticed the one in Section 10 of viewtopic.php?f=28&t=59559. I have not been through all of the tutorials in detail, so this may be the only one left, as far as I know.
-
mpack
- Site Moderator
- Posts: 38868
- Joined: 4. Sep 2008, 17:09
- Primary OS: MS Windows 10
- VBox Version: PUEL
- Guest OSses: Mostly XP
Re: Win98 Guest Graphics driver or Adapter
Post
by mpack »
I see, thanks. I don’t really care for that tutorial — too much sprawling detail packed into one post — so I’ve never done more than skim content. Link fixed now.