Ошибка VIDEO_MEMORY_MANAGEMENT_INTERNAL считается критической проблемой управления памятью, которая также приводит к появлению «Синего экрана смерти». Это может быть связано с обновлением драйверов дисплея или с несовместимостью некоторых приложений. В частности, она появляется в результате проблем с производительностью и приводит к сбоям и зависаниям системы.
Такая ситуация может произойти в результате заражения Windows вредоносным ПО, повреждения системных файлов или из-за конфликтующих программ. Кроме того, ошибка может появиться из-за отсутствия данных из библиотеки DLL или проблем управления видеопамятью. В некоторых случаях сообщение VIDEO_MEMORY_MANAGEMENT_INTERNAL появляется при запуске определённых программ или игр. Так или иначе, каждая из причин появления ошибки решаема. Ниже приведены методы по её устранению.
Решение 1: проверьте компьютер на наличие вирусов
В результате заражения ПК вредоносными программами, файлы системы могут быть повреждены, в том числе важные данные реестра Windows. Поэтому первым, и самым очевидным решением будет — проверить компьютер на наличие вирусов. Это можно сделать как встроенным Защитником Windows, так и специальным ПО.
Стоит отметить, что разработчики антивирусных программ на своих сайтах предоставляют бесплатно пробные версии своих продуктов, а также различные утилиты, исправляющие самые разные ошибки. Поэтому, в случае отсутствия такого обеспечения на компьютере можно воспользоваться бесплатными решениями. Что касается Защитника Windows, то найти его и применить можно по следующему пути:
- Нажмите правой кнопкой мыши на значок Windows (в левом нижнем углу).
- Перейдите в раздел Панель управления и выберите Защитник Windows.
- Обновите защитник, если это необходимо.
- Далее выберите Полная проверка и запустите процесс.
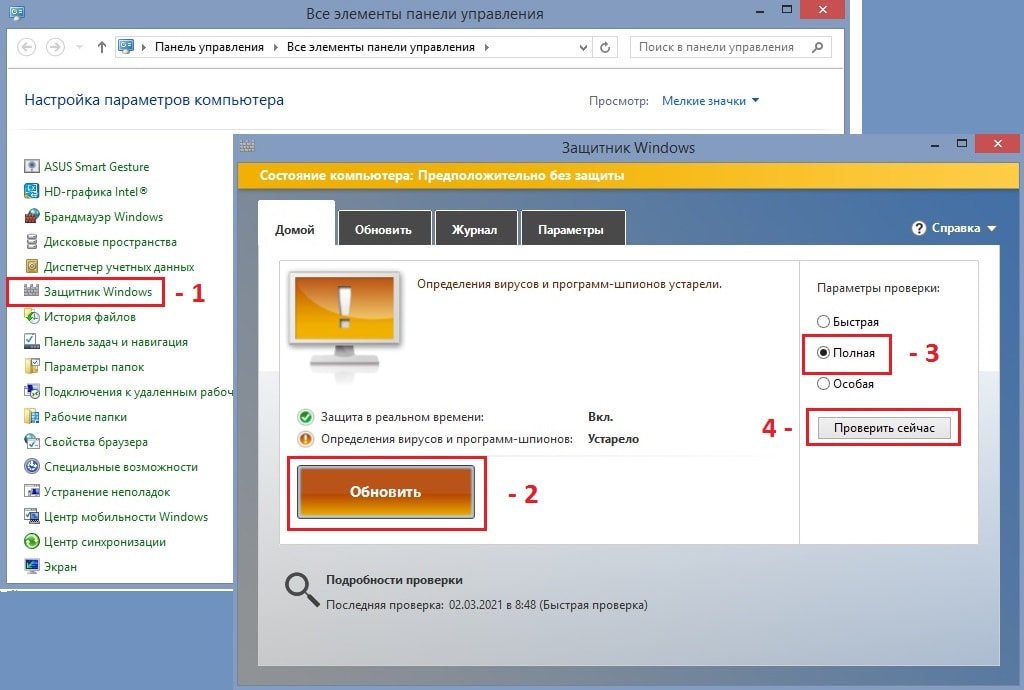
Полная проверка может занять продолжительное время, но это даст уверенность, что на компьютере нет вирусов, либо они будут найдены и удалены.
Решение 2: обновите драйверы дисплея
Как происходит процедура обновления:
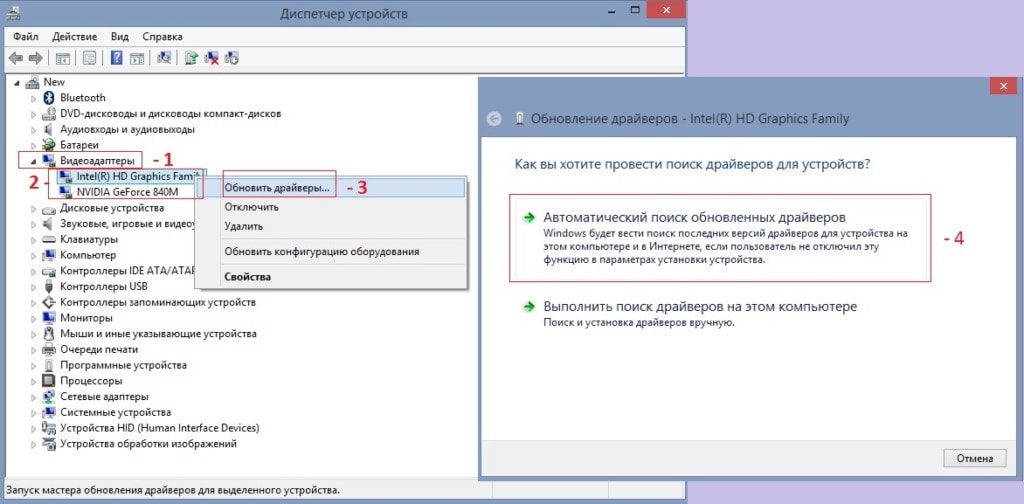
- Щёлкните правой кнопкой мыши на значок Windows и найдите Диспетчер устройств.
- Разверните раздел Видеоадаптеры.
- Выберите конкретный драйвер, и щёлкните по нему ПКМ.
- Нажмите Обновить драйвер;
- Примените Автоматический поиск обновлённых драйверов.
- Дождитесь завершения и установки программного обеспечения, а затем перезагрузите компьютер.
Решение 3: запуск программы в режиме совместимости
В некоторых случаях ошибка VIDEO_MEMORY_MANAGEMENT_INTERNAL появляется после установки и запуска определённых программ или игр. Поэтому одним из решений является включение такого приложения в режиме совместимости.
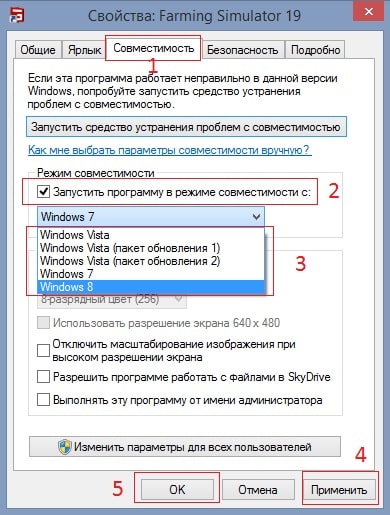
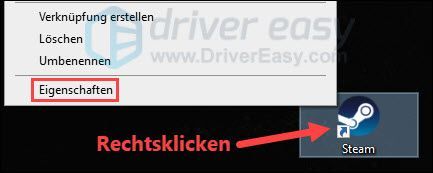
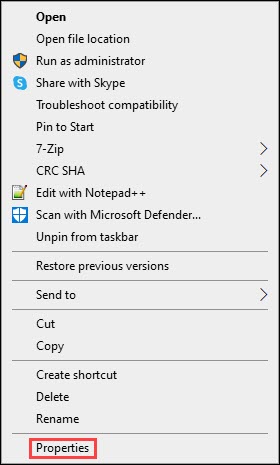
- Нажмите ПКМ по ярлыку проблемной программы и выберите Свойства
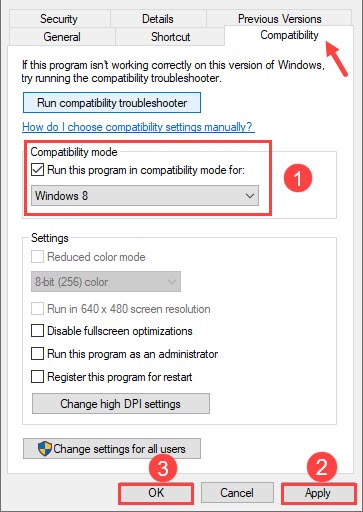
- Перейдите во вкладку Совместимость.
- Поставьте флажок «Запустить программу в режиме совместимости».
- Выберите другую версию Windows, например, 8 или 7.
- Нажмите Применить и ОК.
Решение 4: запустите средство проверки системных файлов
Как это сделать:
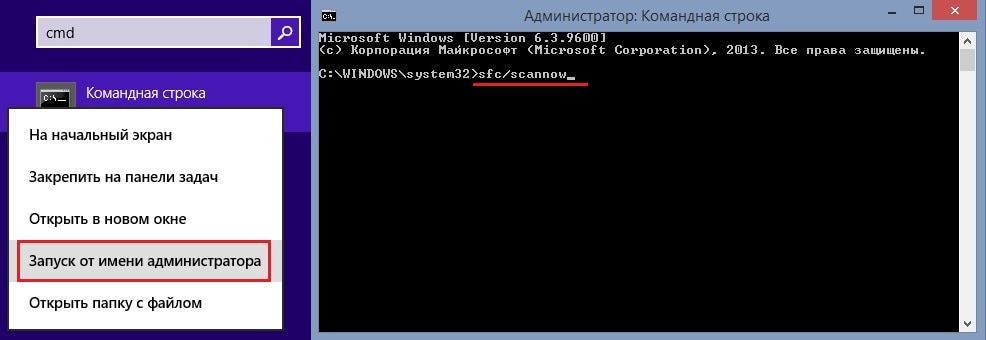
- Введите cmd в поиске Windows.
- Щелкните ПКМ по результату «Командная строка» и выберите Запуск от имени администратора.
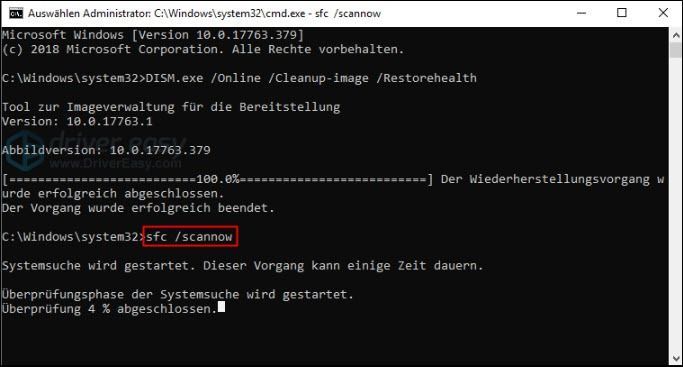
- В открывшемся окне введите sfc/scannow и нажмите Enter.
- Дождитесь, пока Windows просканирует и восстановит все повреждённые системные файлы.
Попробуйте наш инструмент устранения неполадок
Выберите операционную систему
Выберите язык програмирования (опционально)
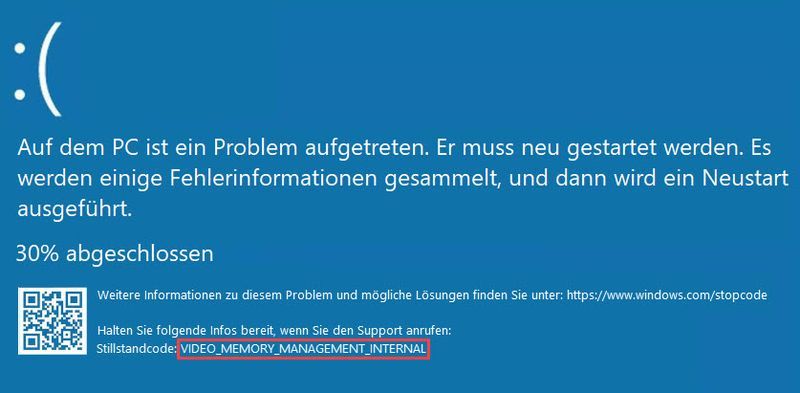
Синий экран ошибки смерти (ошибка BSoD) с кодом взаимоблокировки VIDEO_MEMORY_MANAGEMENT_INTERNAL обычно вызвано ненормальным поведением графического драйвера. В этом посте мы покажем вам, что вы можете с этим сделать.
Получите эти решения:
Всего перечислено 6 решений. Вам не нужно выполнять их все. Работайте с решениями по порядку, пока не найдете то, которое работает.
- Переустановите графический драйвер Запустите приложение в режиме совместимости Удалите установленные обновления Windows Проверьте и восстановите системные файлы Разрядите бортовую электронику вашего ноутбука Сбросить или переустановить Windows 10
Большинство решений могут только после регистрации выполняться с помощью Windows на пораженном ПК. Если у вас возникли проблемы с обычной перезагрузкой компьютера, запустите компьютер в безопасный режим новый, чтобы продолжить с решениями.
Решение 1. Переустановите графический драйвер
Проблемный драйвер видеокарты является наиболее распространенной причиной ошибки синего экрана. VIDEO_MEMORY_MANAGEMENT_INTERNAL . Удалите его и переустановите полностью совместимый драйвер.
Удалите графический драйвер
1) Скачать и установить Программа удаления драйвера дисплея (DDU) .
2) Загрузите вашу систему в безопасном режиме Новый.
3) Беги БОГ и выберите из выпадающих списков графический процессор и марка вашей видеокарты вне.
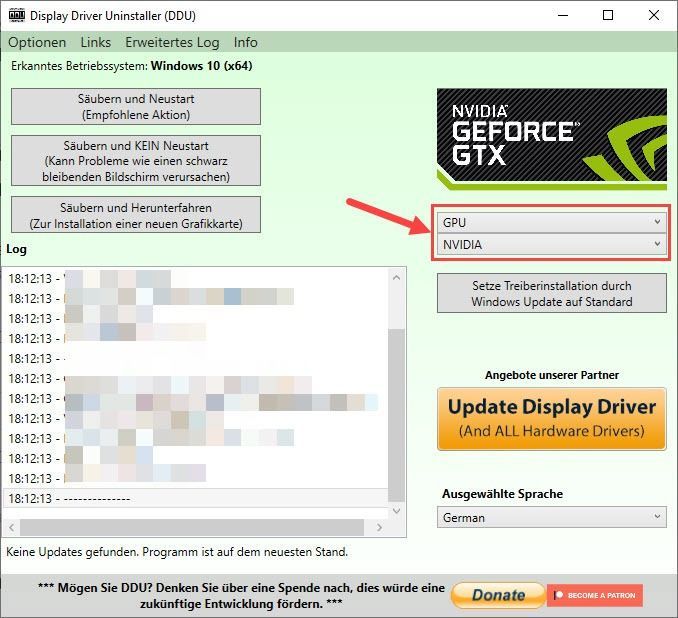
Только для иллюстрации
4) Нажмите Очистить и перезагрузить (рекомендуемое действие) .
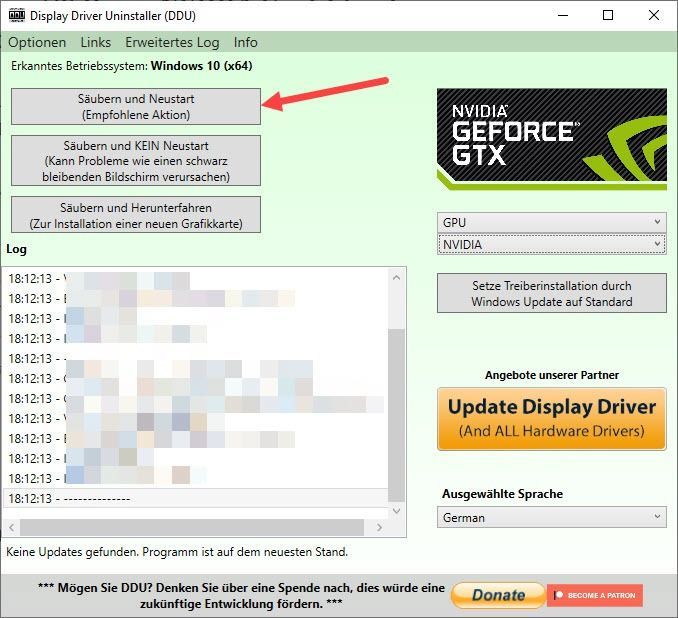
5) Ваш компьютер автоматически перезагрузится в обычном режиме, и ваш графический драйвер будет удален.
Установите графический драйвер
После перезагрузки компьютера ваша видеокарта будет распознана, и ее драйвер будет установлен автоматически. Посмотрите, исправлена ли ошибка синего экрана. Если нет, установите совместимый драйвер.
- Если вы получили этот синий экран после обновления графического драйвера, возможно, новый драйвер несовместим. В этом случае простая переустановка не пройдет и потребуется предыдущая версия драйвера .
- Если вы давно не обновлялись, возможно, ваш графический драйвер устарел или поврежден. Вы должны Обновите графический драйвер до последней версии .
Установите более старую версию драйвера
Убедитесь, что предыдущая версия вашего графического драйвера все еще находится в вашем хранилище, и вы можете напрямую откатить свой графический драйвер.
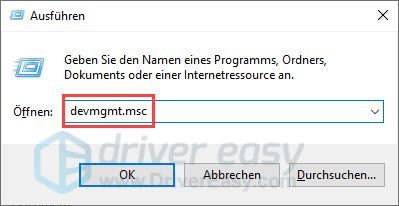
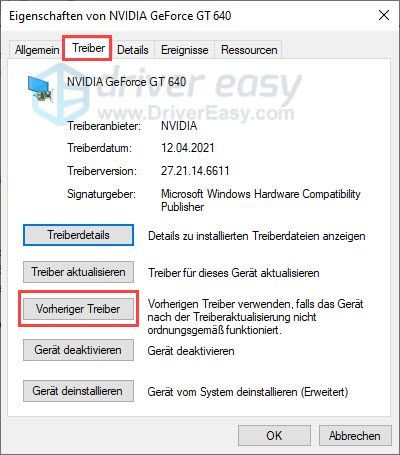
1) На клавиатуре одновременно нажмите Оконная станция + R , Дайте devmgmt.msc один и нажмите кнопку Введите ключ чтобы вызвать Диспетчер устройств.
2) Дважды щелкните видеокарты чтобы развернуть эту категорию, затем дважды щелкните свою Графическая карта (У меня NVIDIA GeForce GT 640).

3) Перейдите на вкладку Водитель .
- нажмите на Предыдущий водитель и перейдите к следующему шагу.
- Если кнопка «Откатить драйвер» неактивна, в вашей системе нет драйвера более старой версии. В этом случае вам необходимо связаться с производителем вашей видеокарты или вашего компьютера, чтобы получить соответствующую версию драйвера.
4) Выберите Предыдущая версия драйвера мне кажется более надежной выключить и нажать И .
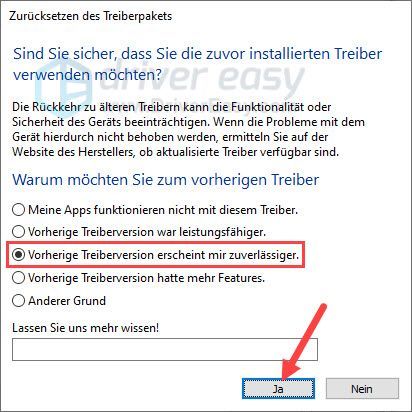
5) Подождите некоторое время. Между тем, ваш экран может мерцать во время отката вашего графического драйвера.
Затем проверьте, не возникает ли ошибка BSoD. VIDEO_MEMORY_MANAGEMENT_INTERNAL больше не появляется.
Если откат графического драйвера работает, см. эта почта как заблокировать автоматическое обновление драйверов для вашей видеокарты.
Обновите графический драйвер
Если старая версия драйвера не помогла и ваш графический драйвер давно не обновлялся, вам необходимо установить последнюю версию графического драйвера.
Вы можете изменить свой графический драйвер вручную обновите, если хотите, посетив веб-сайт производителя вашей видеокарты, найдя страницу загрузки драйвера, найдя нужный драйвер, загрузив и установив его.
Но если вам трудно иметь дело с драйверами устройств или у вас просто нет времени, мы рекомендуем взять их с собой. Драйвер Легкий обновить.
Вот как это работает с Driver Easy:
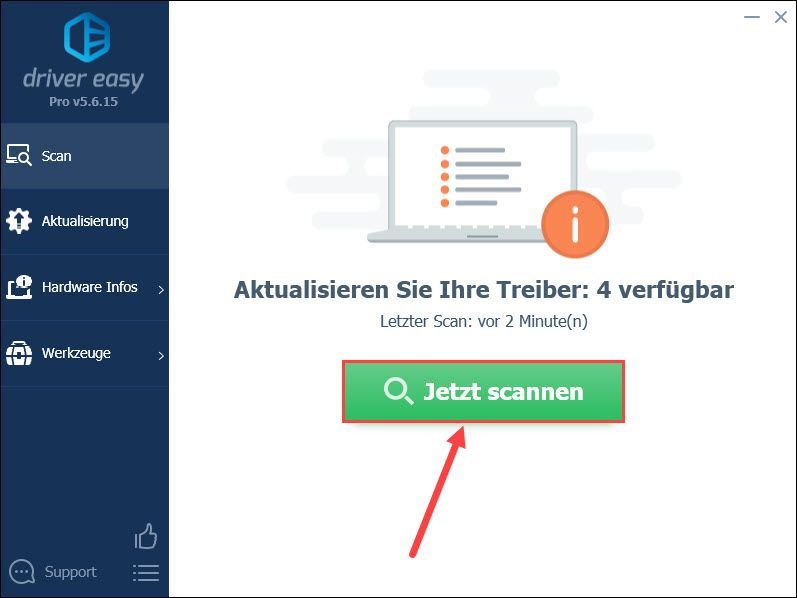
один) Скачать и установите драйвер Easy.
2) Бежать Драйвер Легкий выключить и нажать Сканировать сейчас . Все проблемные драйверы в вашей системе будут обнаружены в течение минуты.
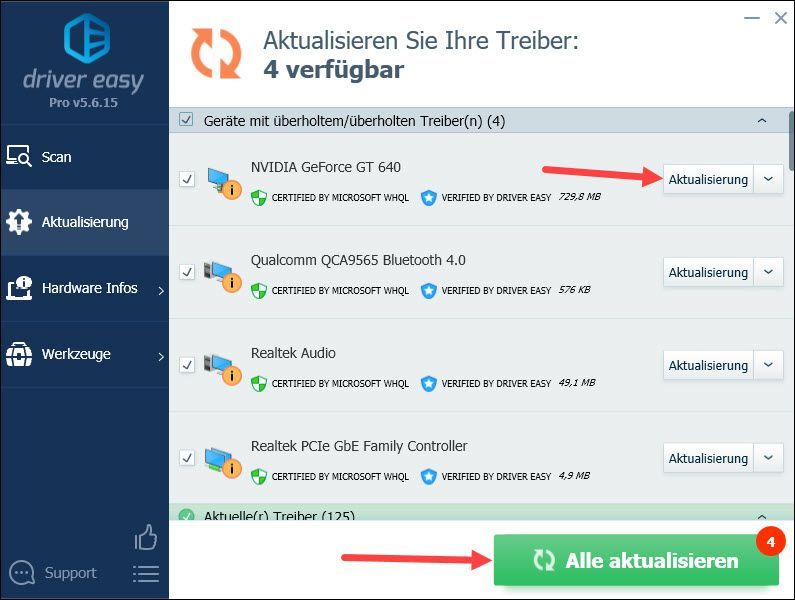
3) Если ты умрешь БЕСПЛАТНАЯ версия в Driver Easy нажмите Обновлять рядом с названием устройства вашей видеокарты, чтобы загрузить последнюю версию драйвера. Тогда придется производить установку вручную.
У вас уже есть PRO-версия из Driver Easy, просто нажмите Обновить все для автоматического обновления всех проблемных драйверов устройств в вашей системе.
4) Перезагрузите компьютер и проверьте, правильно ли он запускается и работает.
Решение 2. Запустите приложение в режиме совместимости
Если ошибка BSoD появляется только при запуске любого приложения или файла, особенно видеоигры, вы можете попробовать запустить это приложение или файл в режиме совместимости.
Ниже показан процесс на примере игрового клиента Steam.
1) Щелкните правой кнопкой мыши приложение или файл, который вызывает синий экран VIDEO_MEMORY_MANAGEMENT_INTERNAL, и выберите характеристики вне.
2) Перейдите на вкладку совместимость , поставить галочку напротив него Запустите программу в режиме совместимости для: и выберите из выпадающего меню версия для Windows вне.
нажмите на Перенимать а потом вверх В ПОРЯДКЕ .
Вероятно, вам потребуется протестировать разные версии Windows, чтобы определить, какая из них совместима. 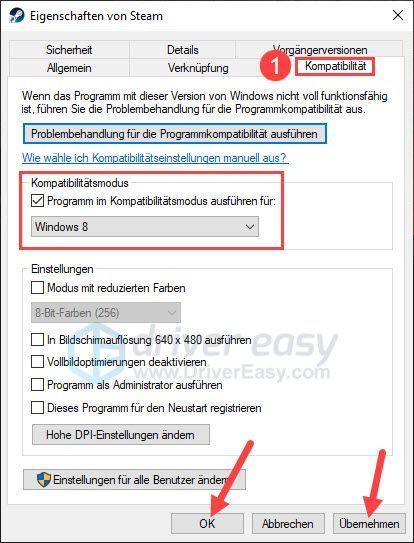
3) Запустите затронутое приложение или файл. Посмотрите, больше не появляется синий экран смерти с кодом ошибки VIDEO_MEMORY_MANAGEMENT_INTERNAL.
Решение 3. Удалите установленные обновления Windows.
Ошибка BSoD. Управление видеопамятью Внутреннее также может быть связано с недавно установленными обновлениями Windows. Поскольку обновление Windows иногда может запускаться автоматически без вашего ведома, сначала проверьте наличие недавно установленных обновлений, а затем выполните удаление.
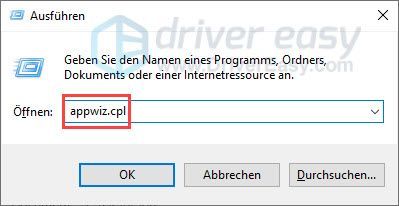
1) На клавиатуре одновременно нажмите Оконная станция + R , Дайте appwiz.cpl один и нажмите кнопку Введите ключ .
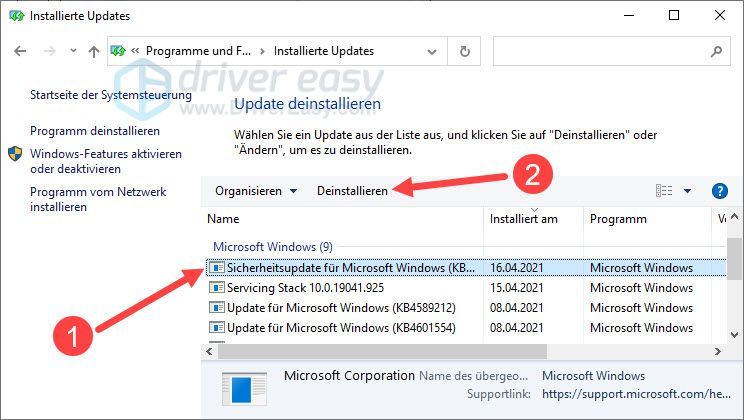
2) Нажмите Просмотр установленных обновлений .

3) Нажмите на вкладку Установлено на для сортировки установленных обновлений по дате.
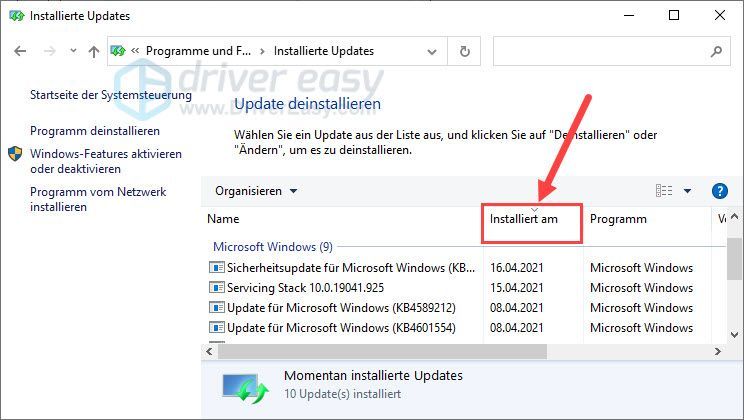
4) Выделить последнее установленное обновление и нажмите Удалить .
Если в один и тот же день было установлено несколько обновлений, повторяйте этот шаг, пока все они не будут удалены.
5) Проверьте, можете ли вы использовать свою систему, не сталкиваясь с ошибкой синего экрана и т.п.
Решение 4. Проверьте и восстановите системные файлы
Поврежденные системные файлы могут привести к неправильной загрузке вашей системы и возникновению ошибки BSoD. Запустите средство проверки системных файлов Windows, чтобы проверить системные файлы и при необходимости восстановить их.
1) На клавиатуре одновременно нажмите Вкус Windows + S чтобы открыть окно поиска.
2) Войти команда один, щелкните правой кнопкой мыши командная строка и выбрать Выполнить от имени администратора вне.
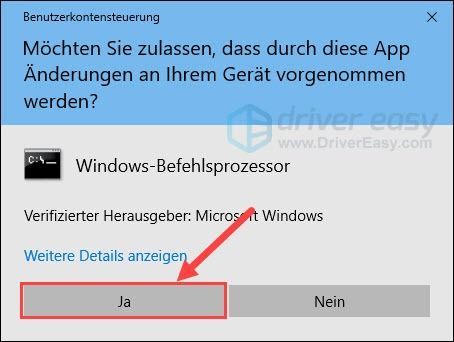
3) Нажмите И , когда отображается диалоговое окно контроля учетных записей.
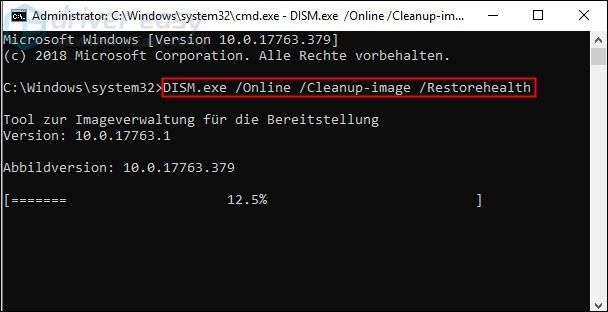
4) Введите в командной строке DISM.exe/Online/Cleanup-image/Restorehealth один и нажмите кнопку Введите ключ .
Дождитесь завершения процесса.
|_+_| 
5) Войти sfc/scannow один и нажмите кнопку Введите ключ для проверки и восстановления системных файлов.
|_+_| 
6) Перезагрузите компьютер и посмотрите, избавится ли это от ошибки VIDEO_MEMORY_MANAGEMENT_INTERNAL.
Переизображение это профессиональное программное обеспечение для восстановления Windows. Он может тщательно сканировать вашу систему, чтобы обнаружить поврежденные и отсутствующие файлы программного обеспечения Windows, а затем выполнить ремонт. С ним ваша система будет восстановлена практически до исходного состояния, при этом ваши программы и настройки не потеряются.
один) Скачать и установить Reimage.
2) Бежать Переизображение выключить и нажать И .
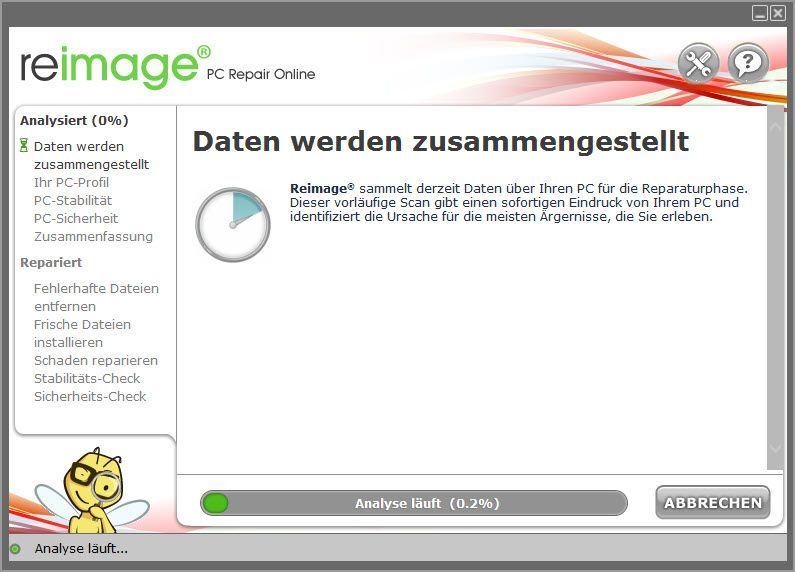
3) Сканирование запускается автоматически и занимает несколько минут. Дождитесь окончания процесса анализа.
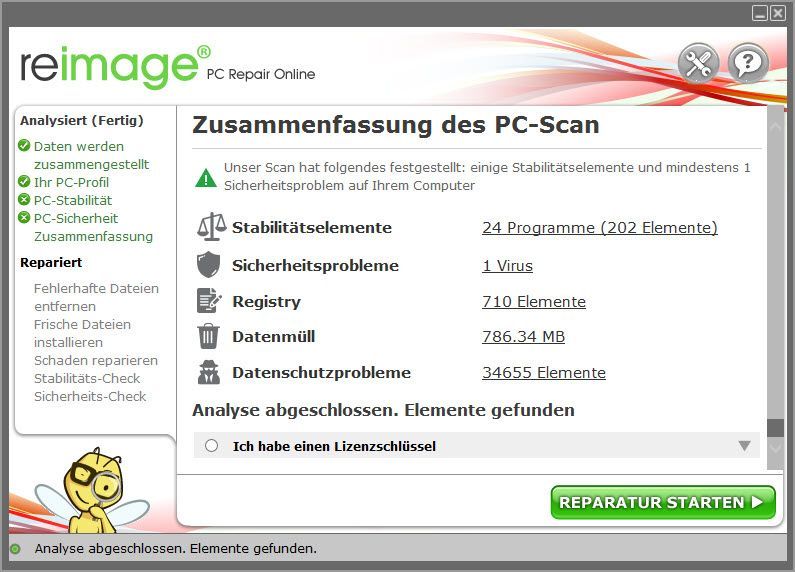
4) После бесплатного сканирования в вашей системе будет сгенерирован отчет, в котором будет указано, в каком состоянии находится ваша система и какие у нее проблемы.
Для автоматического восстановления системы нажмите НАЧАТЬ РЕМОНТ .
(Для этого требуется полная версия Reimage, которая также включает бесплатную техническую поддержку и 60-дневная гарантия возврата денег содержит.)
Решение 5. Разрядите бортовую электронику вашего ноутбука
Когда вы видите синий экран на ноутбуке Управление видеопамятью Внутреннее можно попробовать разрядить бортовую электронику ноутбука для устранения неполадок.
1) Перетащите источник питания ваш ноутбук, чтобы отключить его.
2) Удерживаем кнопку питания около 30 секунд нажал.
3) Запустите ноутбук как обычно и снова проверьте, все ли в порядке.
Решение 6. Сбросьте или переустановите Windows 10
Если приведенные выше решения не сработали, рассмотрите возможность сброса или переустановки системы.
Если у вас все еще есть доступ к файлам, которые вы сохранили, перенесите важные файлы на внешнее хранилище.
Подробные инструкции см. ниже. Попробуйте сначала сбросить систему. Если сброс действительно не помогает, то сделайте чистую переустановку.
- Сбросить Windows 10 Чистая установка Windows 10
Надеюсь, этот пост помог вам. Если у вас есть другие вопросы или другие предложения, пожалуйста, оставьте комментарий ниже.
- Синий экран смерти
- BSoD
- Windows 10
Getting a BSOD error with the stop code: VIDEO_MEMORY_MANAGEMENT_INTERNAL? You’re not alone. It’s one of the common blue screen errors that many Windows users may encounter. The good news is there are a few fixes available. Read on and find out what they are…
Why am I getting this error?
VIDEO_MEMORY_MANAGEMENT_INTERNAL error (code: 0x0000010E) can be triggered under many circumstances. Some possible causes include corrupt system files, a problematic graphics card driver, and defective RAM.
Try these fixes…
You don’t have to try them all, just work your way down the list until you find the one that does the trick!
1: Run in compatibility mode
2: Repair corrupted system files
3: Uninstall Windows Updates in Safe Mode
4: Test your RAM
5: Update your graphics driver
6: Microsoft Hotfix (for Windows Vista and Windows Server 2008)
7: Reinstall Windows
Fix 1: Run in compatibility mode
If you encounter this error when using a program, such as playing video games, you can try to run it in compatibility mode:
- Right-click the software and click Properties.

- Under the Compatibility tab, select Run this program in compatibility mode for and choose an OS version. Click Apply then OK.

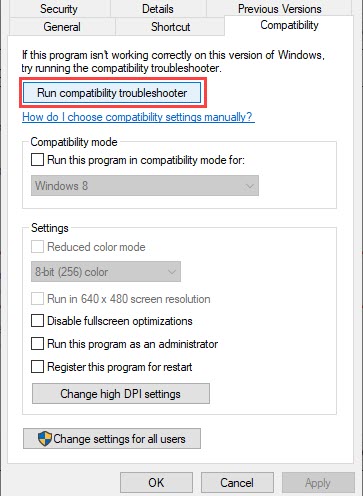
- If you don’t know which OS version would work, click Run compatibility troubleshooter.

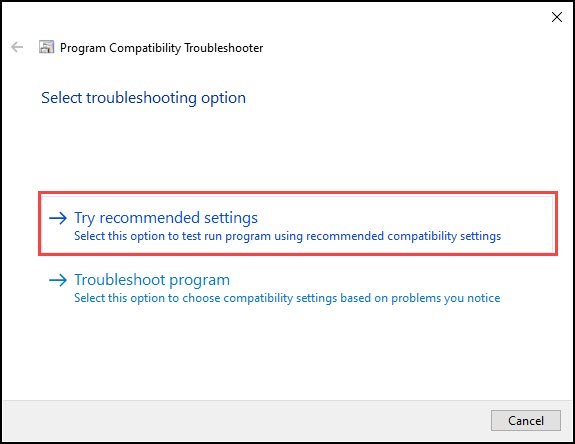
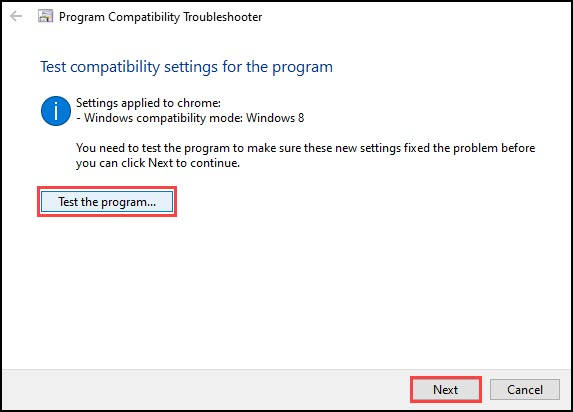
- Click Try recommended settings.

- Click Test Program then click Next.

- If the program runs properly, click Yes, save these settings for this program.
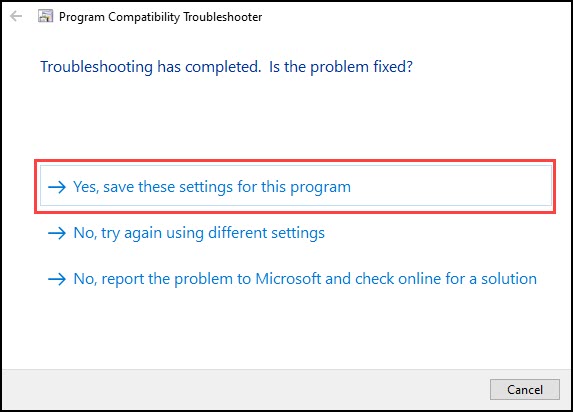
If running the app in compatibility mode doesn’t solve your problem, try the next fix.
Fix 2: Repair corrupted system files
Sometimes this error can result from missing or broken system files. To scan and restore the corrupted system files, you can try the System File Checker tool first (sfc /scannow). This tool is handy in locating the problem, but in most cases, manual repair is required.
You can try a more powerful tool to repair your system. Fortect is a professional system repair software that can diagnose your Windows problems and fix corrupted system files without affecting your data. It specializes in fixing BSOD errors with a large up-to-date database as the repair source.
- Download and install Fortect.
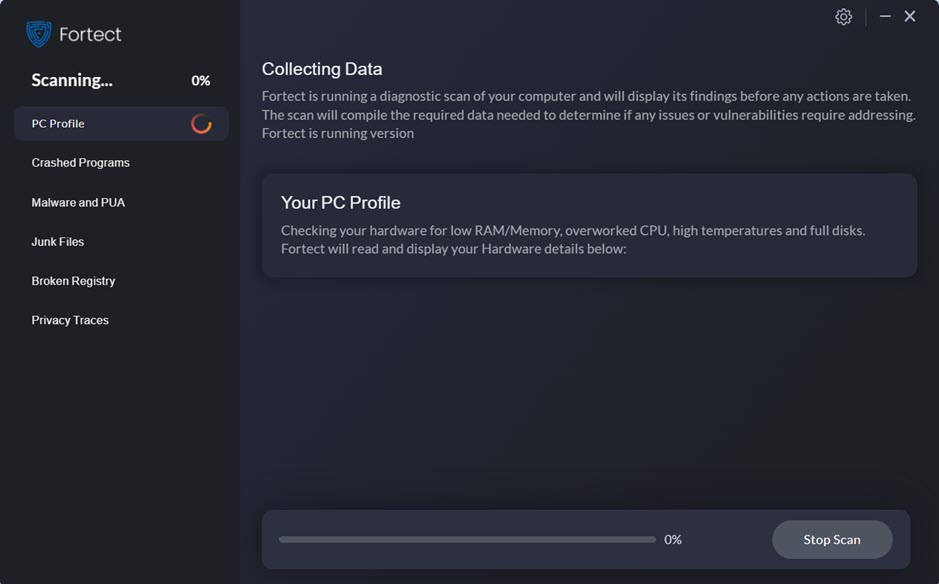
- Open Fortect. It will run a free scan of your PC and give you a detailed report of your PC status.

- Once finished, you’ll see a report showing all the issues. To fix all the issues automatically, click Start Repair (You’ll need to purchase the full version. It comes with a 60-day Money-Back Guarantee so you can refund anytime if Fortect doesn’t fix your problem).

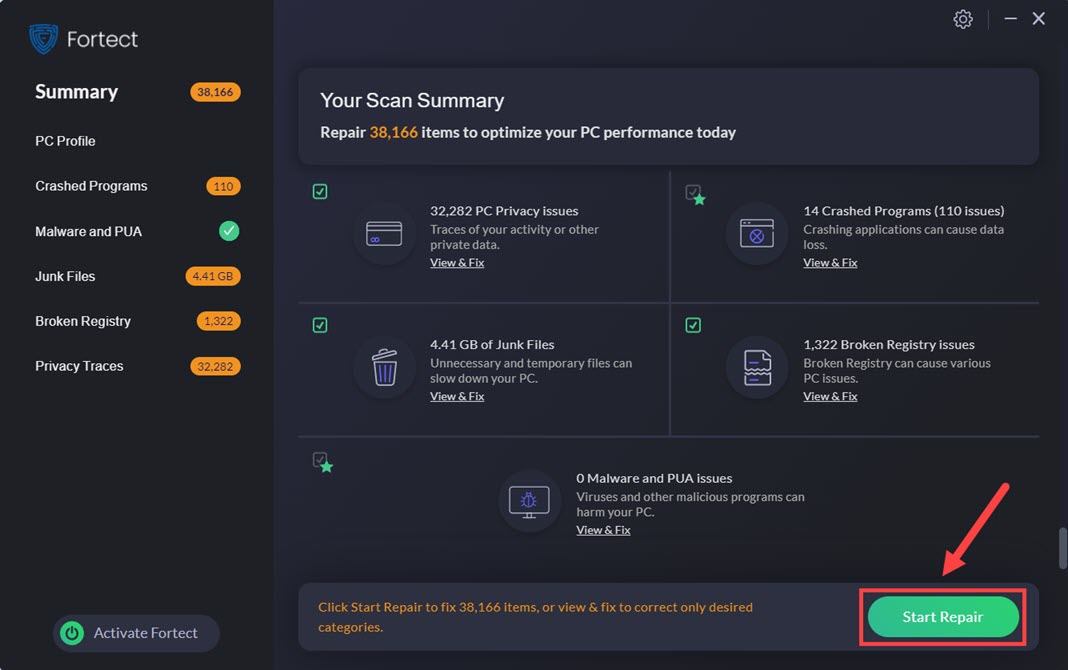
Fortect comes with a 60-day Money-Back Guarantee. If you’re not satisfied with Fortect, you can contact support@fortect.com for a full refund.
Fix 3: Uninstall Windows Updates in Safe Mode
Windows Updates can occasionally trigger random issues in software drivers. You can try to enter Safe Mode and uninstall the most recent updates:
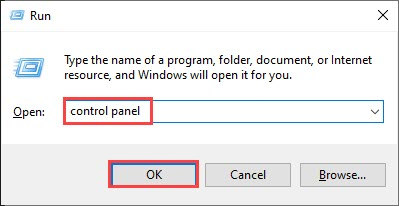
- Boot into Safe Mode. Press the Windows logo key and R on your keyboard to invoke the Run box.
- Type control panel, then click OK.

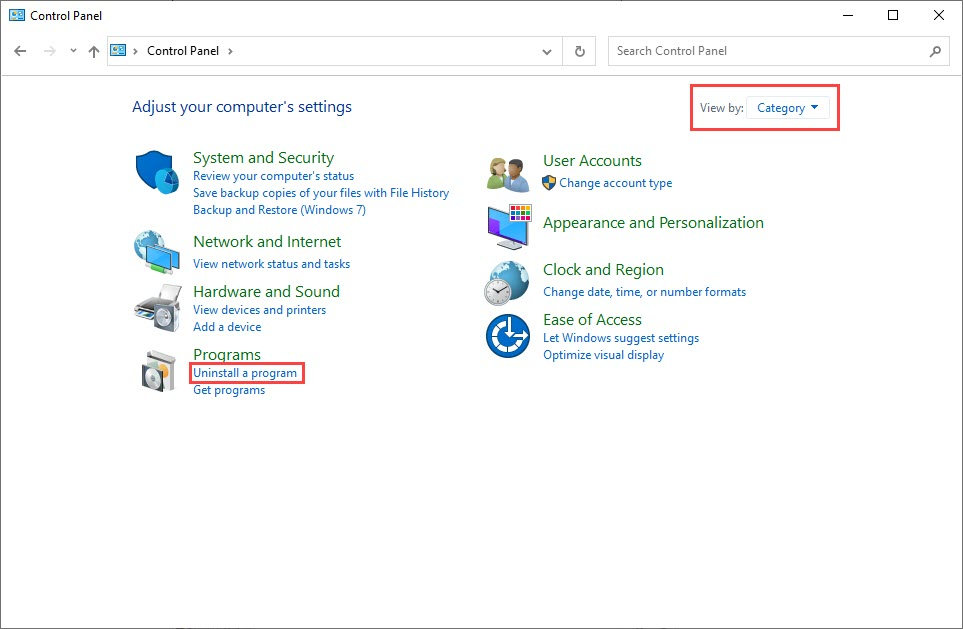
- Select View by: Category, then click Uninstall a program.

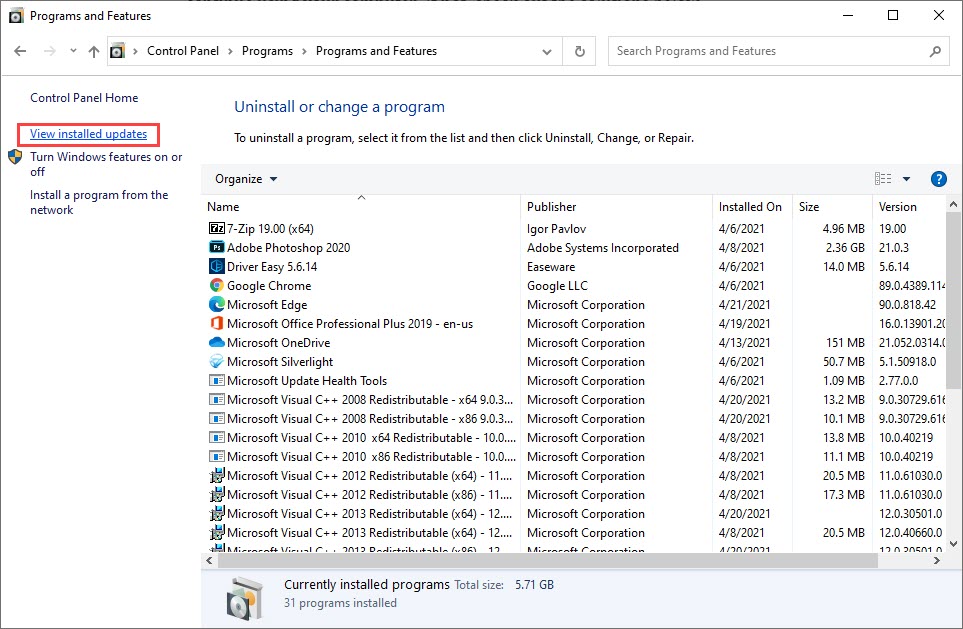
- Click View installed updates.
- Select the problematic update, then click Uninstall.
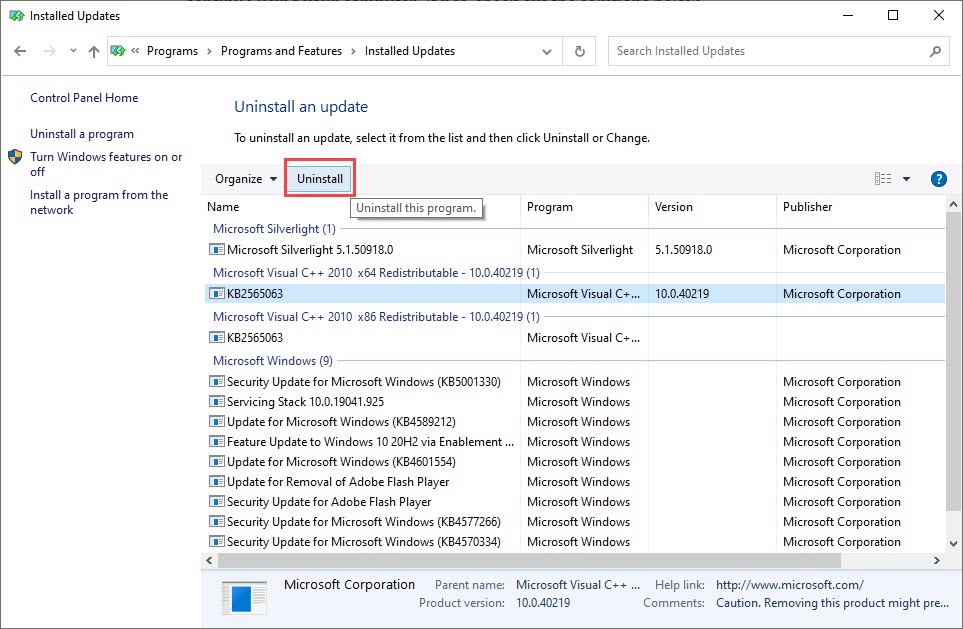
To identify the problematic updates, look for recent Windows updates or those related to graphics cards drivers.
Restart your PC and check if the problem persists.
Fix 4: Test your RAM
Faulty RAM could also trigger this error, but things can be a little tricky if it’s the root cause. You can use the Windows Memory Diagnostic tool as the following instructs:
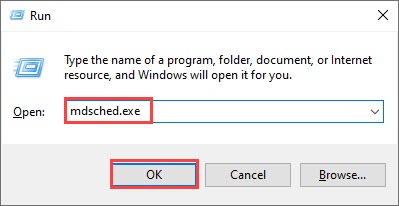
- Press the Windows logo key and R on your keyboard to invoke the Run box.
- Type mdsched.exe, then click OK.
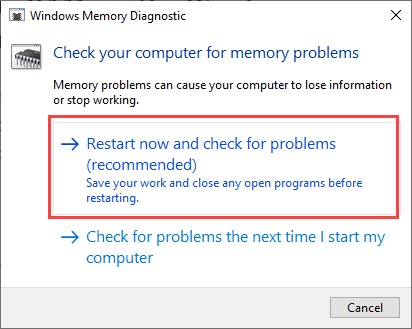
- Click Restart now and check for problems (recommended).
IMPORTANT: Make sure to save all your work before restarting.
- Windows will run diagnosis automatically, which can take a few minutes. When it’s finished, your PC will reboot.
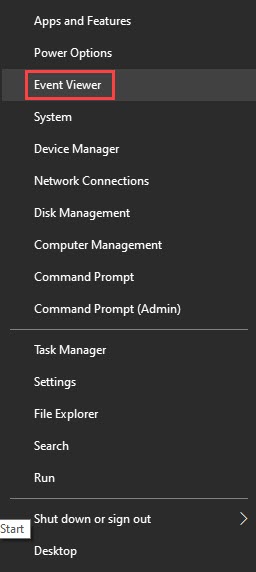
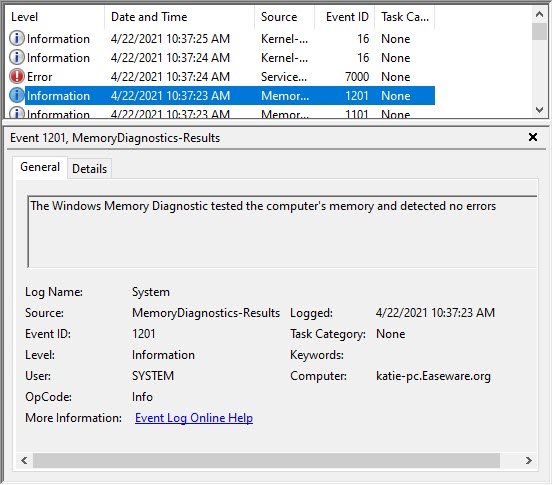
- The results will be shown on your desktop. If you don’t see any notification, right-click the Start menu then click Event Viewer.
(Windows 7 users: Click Start >> Control Panel >> Administrative Tools >> Event Viewer.)
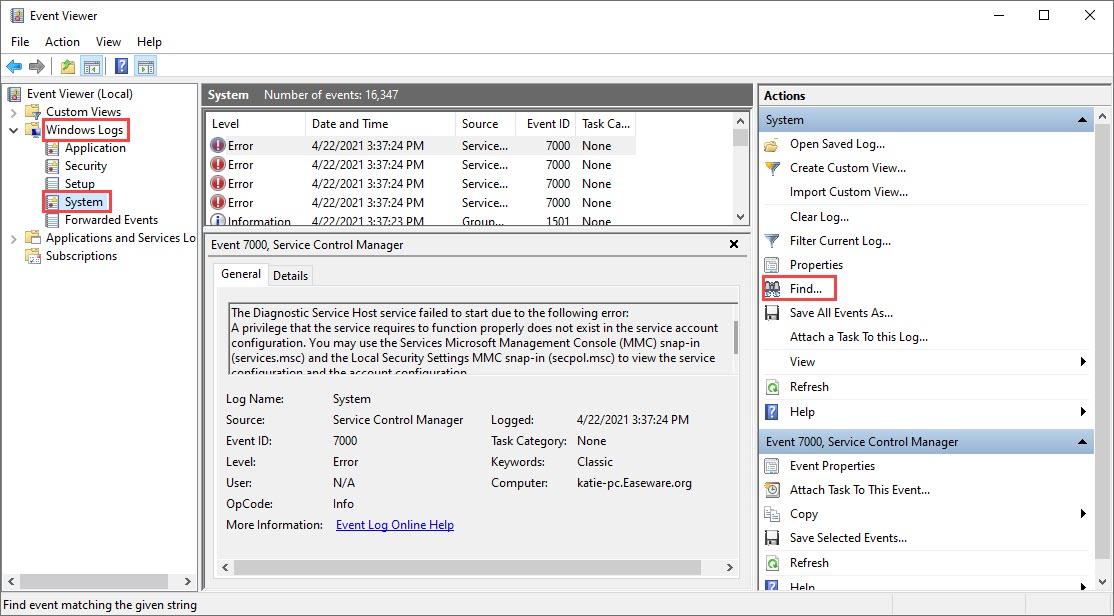
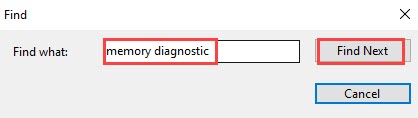
- Click Windows Logs >> System >> Find.

- Type memory diagnostic, then click Find Next.

- If you see “no errors”, it means your RAM is functioning well and did not cause the BSOD error. Try other solutions to solve your problem.

Here comes the tricky part…
If you do see an error, you may consider replacing your RAM. Even though it may not be the cause of your BSOD error, it WILL probably cause your PC to crash at some point.
Check if your device is still under warranty or consult your machine’s manufacturer for assistance.
Fix 5: Update Your graphics card driver
This BSOD error can also indicate a driver issue. You will need to check if your graphics driver is faulty or outdated.
There are two ways to keep your graphics card driver up-to-date. One is to manually update it via Device Manager. If Device Manager fails to detect the latest available update for you, you can also search on the manufacturer’s website. Be sure to choose only the driver that is compatible with your Windows version.
Automatic driver update – If you don’t have the time, patience, or computer skills to update your driver manually, you can, instead, do it automatically with Driver Easy. Driver Easy will automatically recognize your system and find the correct driver for your exact graphics card and your Windows version, then it will download and install it correctly:
- Download and install Driver Easy.
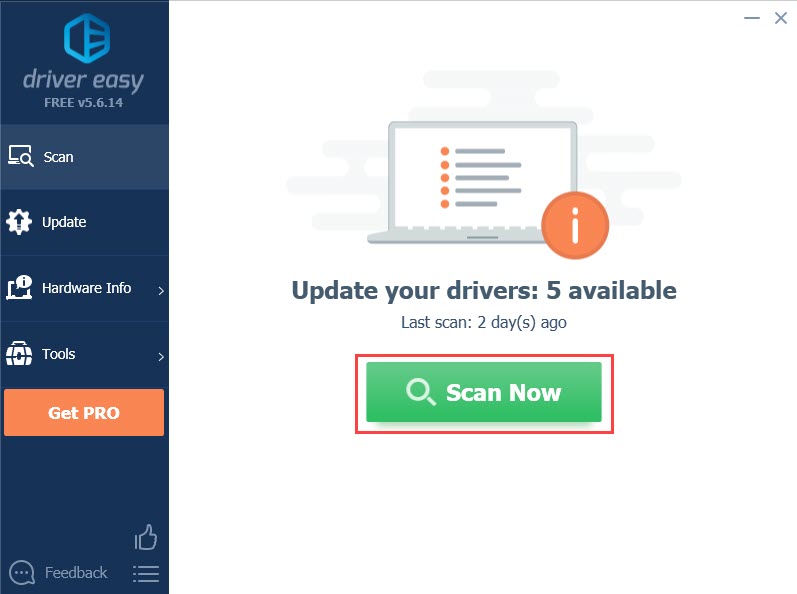
- Run Driver Easy and click the Scan Now button. Driver Easy will then scan your computer and detect any problem drivers.

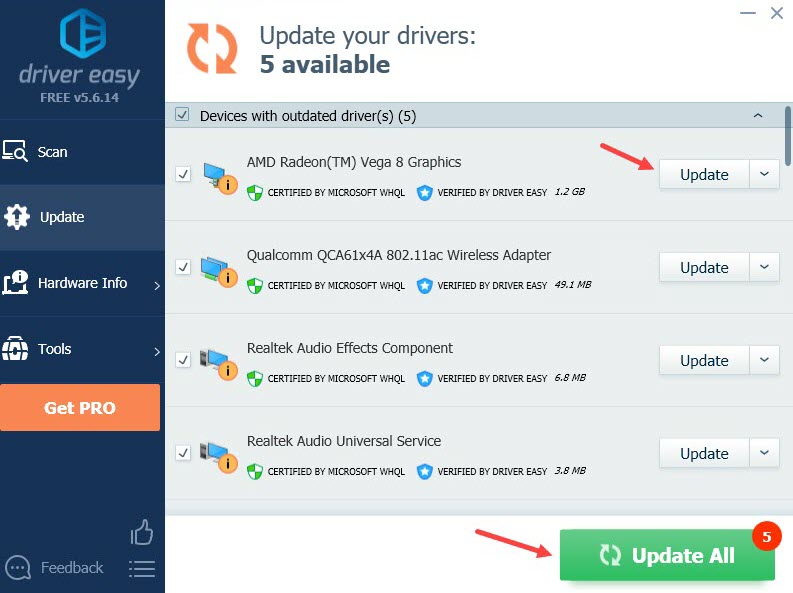
- Click the Update button next to the flagged graphics card driver to automatically download the correct version of the driver, then you can manually install it (you can do this with the FREE version).
Or click Update All to automatically download and install the correct version of all the drivers that are missing or out of date on your system. (This requires the Pro version which comes with full support and a 30-day money-back guarantee. You’ll be prompted to upgrade when you click Update All.)

The Pro version of Driver Easy comes with full technical support. If you need assistance, please contact Driver Easy’s support team at support@drivereasy.com.
Fix 6: Microsoft Hotfix (for Windows Vista and Windows Server 2008)
Microsoft has developed a hotfix for this sort of error. But it only works on Windows Vista or Windows Server 2008.
Fix 7: Reinstall Windows
Reinstalling Windows can solve quite a lot of problems, but it’s just not our first choice. You would need to back up files and apps in advance, and things can get messy.
The good news is you don’t need a third-party tool, just Windows itself will do. You can refer to this article for detailed instructions: how to install Windows from a bootable USB.
Make sure to BACK UP your files before you reset your PC.
Hopefully this article helps! Please feel free to leave a comment if you have any questions.
12
12 people found this helpful
You might have come across the BSOD error where the system gets crashed up with a message for restarting your computer. Today, we will deal with one such common issue VIDEO_MEMORY_MANAGEMENT_INTERNAL along with a bug check value of 0x0000010E. When there is an intensive problem in the system, a blue-colored prompt shows up on the screen. To slow down the consequences of these damages, the PC restarts itself randomly which leads to the ceasing of many operations.
The aforementioned stop code is an interpretation of the infinite spinning of a thread in a device. The malfunctioning of the graphics card or its driver is the main reason for the appearance of this Blue Screen of Death. Moreover, the absence of system resources, as well as the presence of outdated drivers, are also responsible for this issue. Furthermore, less disk space, issues of memory, and bad sector in the hard disk, also lead to the BSOD error.
Here is how to fix VIDEO_MEMORY_MANAGEMENT_INTERNAL in Windows 10 –
1] Update the corrupted Drivers with Device Manager
Whenever you are going to face a BSOD error then the main reason behind this is the use of obsolete and faulty device drivers. Thus, you must follow a series of systematic steps to update them with the help of Device Manager. Moreover, as we already mentioned earlier faulty drivers are one of the main causes of VIDEO_MEMORY_MANAGEMENT_INTERNAL. Follow the steps as discussed below to check and resolve any such situations –
- Right-click on the Start button and select Device Manager located on the upper part of the list.
- Search for the devices having exclamation mark beside them
- As soon as you get it, just double click on them.
- Right-click on each of them and choose the Update driver option to start the process.
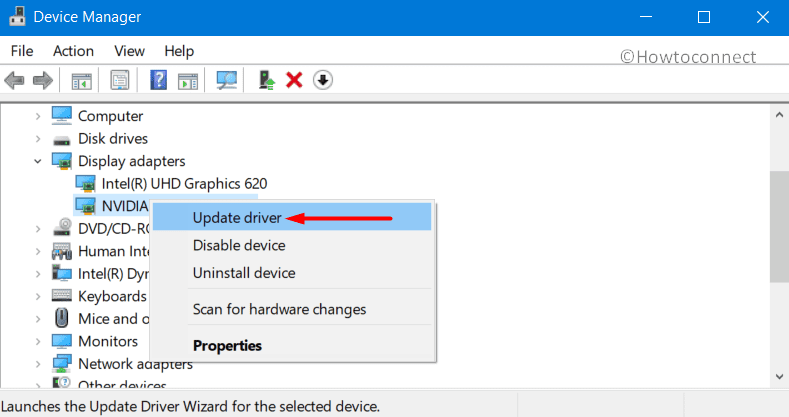
- Your computer will display two options; select Search automatically for drivers.
- Restart your computer to make the changes effective.
2] Repair Windows System Files Using SFC Tool
The corrupted and missing system resources are one of the possible reasons behind the occurrence of VIDEO_MEMORY_MANAGEMENT_INTERNAL error. System File Checker utility can be a much helpful way to recover and correct the corrupted DLL files. The tool is executed in an Elevated Command Prompt which automatically attempts to resolve the problems. Follow the guidelines to access the utility –
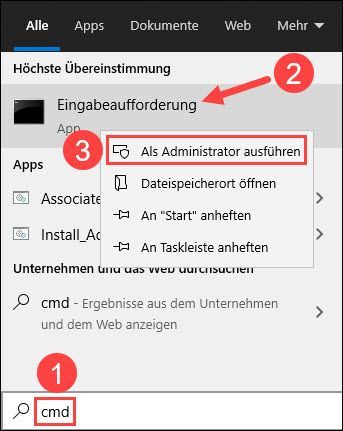
- Access the Taskbar Search by pressing Win + Q keys.
- Type cmd in the vacant text area. Once you get the Command Prompt in the result, go to the right side and choose Run as administrator.
- When UAC asks for permission, select Yes.
- You will get a black window, type
sfc / scannowand press the Enter key. - The utility will detect and fix the issues all by itself.
- As the process may take a while, don’t close the system and wait until the scan gets over.
- Reboot the device and upon startup, check for the error and the stop code.
3] Use Window Security to scan full PC
Malware and Viruses are some of the worst enemies in this tech developing world. We are not at all secure as they are present everywhere on the Internet. Whenever you are clicking on some suspicious link or going on a malicious site, they enter into the computer. The slowdown of the PC deteriorates the system resources and loses DLL files, resulting in the initiation of VIDEO_MEMORY_MANAGEMENT_INTERNAL error. Windows Security is one of the well-known security software provided by Microsoft. This application is very much handy in dealing with a virus and to get rid of them. Follow the process as listed below –
- Click the Windows Security system tray icon to quickly access the app.
- Go to Virus & threat protection category.
- Click Scan options link on the right pane.
- Choose the Full Scan option and hit the Scan now button to initiate the scanning process. This may take hours of time as every corner of the system will be scanned.
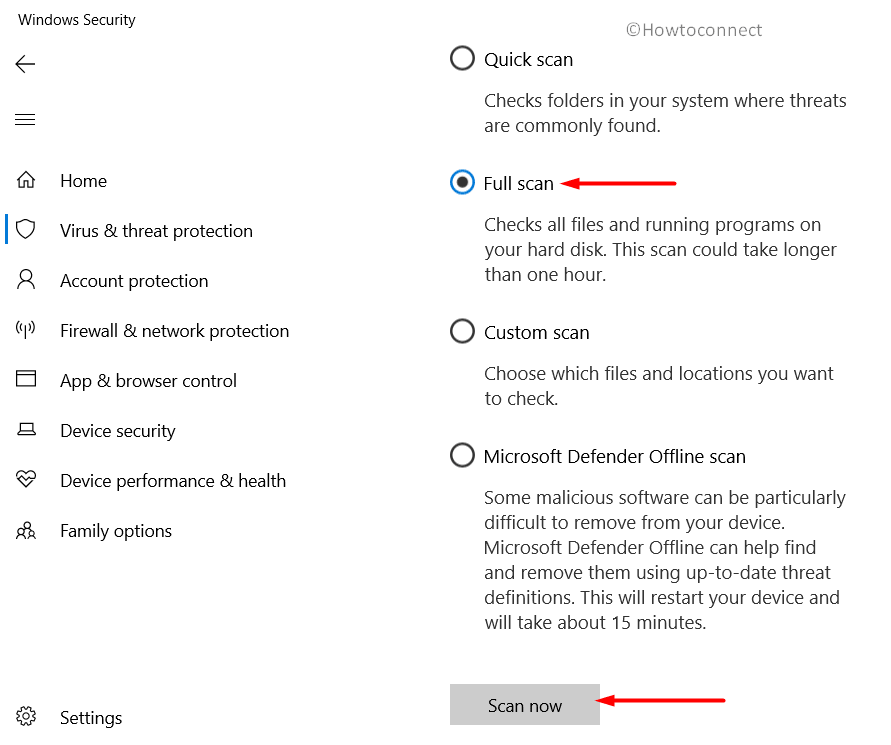
- Once it reports you about the scan, take necessary action and immediately get rid of the threats.
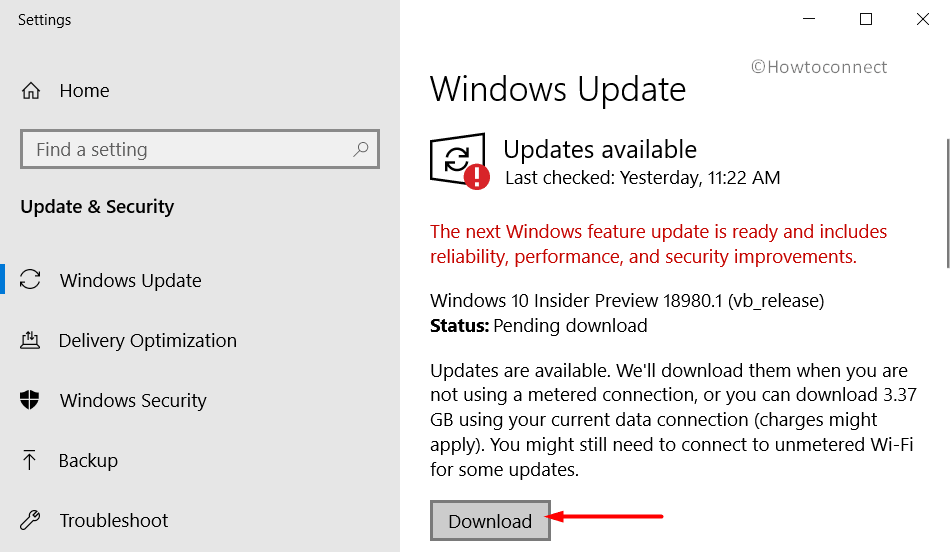
4] Get all possible Windows Updates
There is a much higher chance for an outdated Operating System to get harmed by issues like BSOD error. All cumulative update released by Microsoft regularly consists of fixes of problems and bugs. Downloading and installing them will make the system strong and much more secure from the VIDEO_MEMORY_MANAGEMENT_INTERNAL issue. This is possible through the Windows Settings app and is automatic. Just disable Metered Connection if you are using a mobile hotspot. Our recommendation is to use high-speed internet to decrease the consumption of time. Once ready, go through the steps as stated below –
- Press the Win logo and I key to launch the Settings program.
- Choose the Update and Security icon.
- Move to the right of Windows Update on the following result.
- Click on Check for updates button.
- The system will initiate the process of exploring updates for your OS.
- As soon as the searching process will get over, all the updates will be displayed on the screen.
- Click the Download button and then follow the installation guidelines to finish the process.
5] Use Deployment Image Servicing and Management (DISM) tool
The corruption of Windows Image files is one of the reasons which results in a VIDEO_MEMORY_MANAGEMENT_INTERNAL error. Thus, it is important that we should solve this problem and to defend it, we have the DISM tool. This application can only be executed in an Elevated Command Prompt so go through the steps as stated below –
- Invoke the taskbar by pressing the Windows and S key together.
- Write cmd.exe in the vacant space.
- As soon as the result flashes up right-click on it and choose Run as administrator from the context menu.
- Click on the Yes option if the UAC prompt up.
- Write the given code and press Enter key –
DISM.exe / Online / Cleanup-image / Restorehealth
Note – Generally the process gets stuck at 20 percent. If you are experiencing the same thing, you need not take stress about it as it’s a normal process.
- After the scan gets over, restart the system and see for the error.
6] Run Blue Screen Troubleshooter to fix VIDEO_MEMORY_MANAGEMENT_INTERNAL
Windows 10 is featured with the Blue Screen Troubleshooter which is an inbuilt software to solve any BSOD error on the computer. This application can easily catch a problem linked with VIDEO_MEMORY_MANAGEMENT_INTERNAL and can fix it as well. Follow the steps as given below to use this tool –
- Right-click on the Start menu and choose Settings.
- Click the Update and Security section from the consecutive page.
- Choose Troubleshoot from the left side and switch to the corresponding right.
- Use your mouse to scroll and find the Blue Screen option.
- As soon as you get that just select Run the troubleshooter from the extended area.
Running the tool properly will help you to fix Windows 10 BSOD error code VIDEO_MEMORY_MANAGEMENT_INTERNAL automatically.
7] Boot the OS of your system to safe mode
To defend and tackle issues related to Windows 10, one of the best and simple way is Booting in Safe Mode. Basically, this is the special Startup technique where Windows get loaded up with only the basic root applications. If your issue is getting generated from some advanced settings or any other additional apps, VIDEO_MEMORY_MANAGEMENT_INTERNAL BSOD may get disappeared while booting into the Safe Mode. Go through the guidelines below to utilize the tool –
- Open up Windows Settings by pressing Win and I key together.
- Select Update and Security.
- Choose Recovery and go to the right side.
- Select the Restart now button present below the Advanced startup area.
- The Windows will restart itself and will ask you to choose the next step. From the Startup Screen select Troubleshoot.
- Choose Advanced Options in the Troubleshoot menu and subsequently on Startup Settings.
- During this phase, you will be informed that your machine can be restarted using additional settings i.e. Enable Safe Mode. Select Restart.
- Select “Enable Safe Mode” by choosing F4.
The operating system will get initiated with default services and apps. If the error appears again then it will be very sure that either a problem in the Hardware or a third party application is the real culprit.
8] Remove the Faulty Windows update files
Microsoft rolls out cumulative updates for Windows quite frequently which consists generally of bug fixes and updated features. The team wants its users to get these updates downloaded into their computers using the Settings application. There are very fewer chances of facing trouble in the midway of the installation process but if the process terminates abnormally then one can have a VIDEO_MEMORY_MANAGEMENT_INTERNAL BSOD issue in the system. Files that will be creating problem needs to be eliminated as soon as possible. Go through the steps to do so –
- Go to the Action Center and click All Settings.
- Choose the Update and Security section.
- Windows Update page will open up.
- Click the link of View update history from the adjacent right.
- Select Uninstall updates.
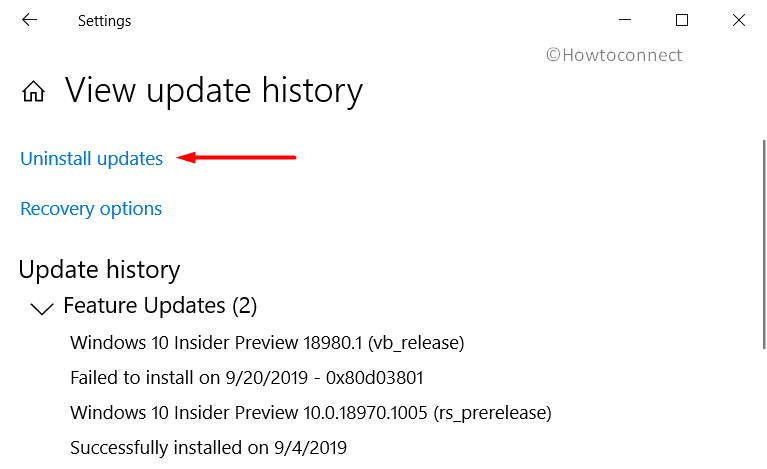
- Right-click the recently installed update and choose Uninstall. Go through the directions on the screen to remove the update files.
9] Reconnect the External Hardware Devices
It is seen that most often the VIDEO_MEMORY_MANAGEMENT_INTERNAL occurs after connecting an additional hard drive with the computer. In such a case, one needs to remove it and then connect it again. Go through the guidelines as provided below –
- Remove all the plugged-in accessories from the computer and then Restart Windows 10 PC.
- When the OS has loaded itself successfully, connect the external devices to the computer and then check for the error VIDEO_MEMORY_MANAGEMENT_INTERNAL.
- After this, get the updated drivers for that specific hardware from the manufacturer website and then install them.
10] Uninstall the program that causes VIDEO_MEMORY_MANAGEMENT_INTERNAL issue
In some cases having different applications that carry out the same task creates some conflicts which lead to VIDEO_MEMORY_MANAGEMENT_INTERNAL in the computer. This makes crashes in the framework prompting a failing PC. You can defend your system from this by uninstalling some extra applications. Follow the steps to do it –
- Press the Windows key and select the cog icon to access Settings.
- Choose the category specified as Apps.
- Move to the right pane on the following page and search for the program that might lead to VIDEO_MEMORY_MANAGEMENT_INTERNAL or the one that you have installed recently.
- When you get it, select and click the Uninstall option from the extended pane.
- Click on the Uninstall option from a small pop-up window to confirm the process.
11] Get rid of 3rd party antivirus software to solve VIDEO_MEMORY_MANAGEMENT_INTERNAL
Earlier, we used to suggest several 3rd party antivirus software to secure the PC from bugs. Using such tools often creates a mess in the operating system which might further lead to VIDEO_MEMORY_MANAGEMENT_INTERNAL. Thus, it is better to uninstall these programs if you are using them by going through the steps below –
- Right-click on the Start icon and choose Run.
- Write appwiz.cpl in the vacant space and choose OK.
- Search for the 3rd party anti-malware application on the Programs and Features from the list provided.
- Select on the Uninstall button from the top menu.
- Follow the app’s instructions to remove it from the PC.
- Reboot the device to completely get rid of all elements of the antivirus software.
12] Run CHKDSK utility to fix VIDEO_MEMORY_MANAGEMENT_INTERNAL
Due to long term use, bad sectors are generated in a Hard Disk that eventually results in VIDEO_MEMORY_MANAGEMENT_INTERNAL. You can tackle this problem using an appropriate command in Elevated Command Prompt. Go through the guidelines as stated below –
- Click on Start and type cmd.exe.
- When the results show an option for Command Prompt, right-click on it.
- Choose Run as administrator from the context menu.
- Select the Yes button if the UAC is displayed on the screen.
- Write the command in the following format –
chkdsk [Drive:] [parameters] - Using the above syntax, the system will show you only the status of the disk but will not solve any existing issues.
- Thus, we need to write the command in the following way – /f /r /x
“f” will make the utility to settle the found issues from the volume.
“r” will search for poor sectors in the Hard Disk.
“x” will dismount the whole volume before beginning the process.
Thus, the command will look like – chkdsk C: /f /r /x
Important – Here the OS is installed in C: drive. If you have used other drivers to carry out the same job then replace C: with D:, E: etc.
13] Use Disk Cleanup utility to clear all junk from your PC
With the execution of every task, junk files are created continuously inside the computer and get stored in the disk storage. These data are useless for the system, thus it is important to delete them. Additionally, they keep on piling up into the PC and with time they take up a large space in the drive. Hence, Hard disk works in low space which affects its performance and results in a VIDEO_MEMORY_MANAGEMENT_INTERNAL. However, we can delete these using the tool named as Disk Cleanup. Check the instructions as shown below –
- Press the Windows key from the keyboard and type in cleanmgr.
- Select the Disk Cleanup desktop app from the results.
- You will get a wizard that will pop up asking for a preferable drive.
- Select C: from the dropdown menu and press Enter key
- The Disk Cleanup utility will get initiated by figuring out the amount of space it can recover in the C: drive and appear in a window.
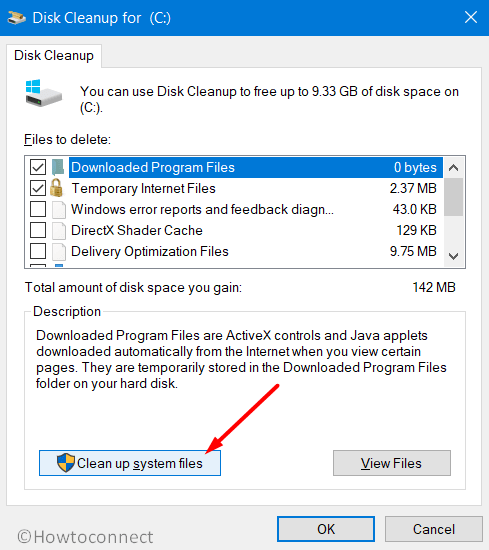
- Click on the Cleanup system files button present at the bottom of the window.
- A pop up will appear again on the screen asking to select the drive.
- Select C: from the dropdown menu and press Enter key from the keyboard.
- When the Disk Cleanup for (C:) comes into the display, check all boxes except Downloads
- Click on OK to initiate the cleanup process in the system.
14] Resolve the issue linked with RAM
A defective, unreliable, and wrong allocation of RAM (Random Access Memory) may result in the VIDEO_MEMORY_MANAGEMENT_INTERNAL issue in Windows 10. Thus, a perfect solution is mandatory to rectify these problems. Scanning the RAM issues is a bit complex but the Memory Diagnostic tool works excellently to resolve the problematic sectors. Go through the steps as discussed below-
- The very first thing that you need to ensure is that you close and save all the on-progress applications in your system.
- Press the Windows and S key simultaneously to enable the Taskbar Search to appear on the screen.
- Write Windows Memory Diagnostic in the allowed field and choose it from the list as prompted.
- Choose Restart now and check for problems (recommended) from the wizard.
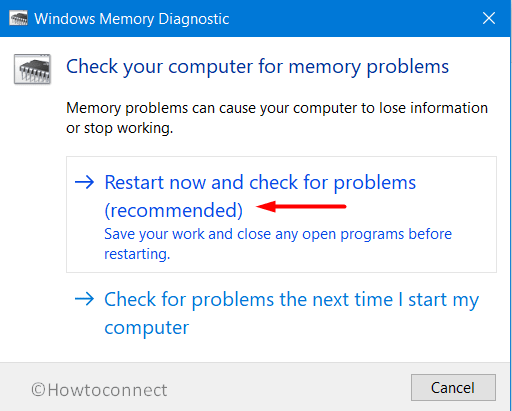
- As soon as the system will start, it will scan all the memory troubles.
- When the process will reach 100 percent, Windows will automatically restart itself.
- Once it will get started again, you will be seeing a list in the notification area of the taskbar.
15] Utilize Previous System Restore Point
Whenever some changes take place inside the computer, the Windows Registry files are also affected. If something goes wrong while uninstalling or installing a registry file then it may cause VIDEO_MEMORY_MANAGEMENT_INTERNAL. One of the best ways to get rid of this issue is to revert all these changes and this can only be possible using System Restore.
- Invoke the Run dialog box by pressing Win and R keys simultaneously from the keyboard.
- Write ‘rstrui’ and press Enter key.
- This will open up System Restore wizard on the screen.
- Select the Next option to make the system reveal the Restore points.
- Click the Show more restore points option to see further of time and date.
- Choose the first row showing the latest point you have created on the device.
- Select the Next option.
- At last, select Finish to start the complete restoration procedure.
16] Disabling of Auto Restart feature
In the case of BSOD error, the shutdown of the system is a common experience by many users. But if this process is taking place for a majority of the time then you need to note that your computer has gone into some critical issues like VIDEO_MEMORY_MANAGEMENT_INTERNAL. If you are facing this issue too often then keep reading below to stop it.
- To get the taskbar search bar press Windows and S key in one go.
- Write Control in the search bar and then press Enter.
- Change its view to either large or small icon, search for System applet and then click on it.
- Choose Advanced System Settings from the left column.
- Go to the Advanced tab as soon as a wizard comes up on the screen.
- Under Startup and Recovery section click Settings.
- Unmark the box of Automatically restart from System failure.
- Select the OK button to get ahead.
<
17] Carry out a complete installation to fix VIDEO_MEMORY_MANAGEMENT_INTERNAL
Hopefully, you will solve the VIDEO_MEMORY_MANAGEMENT_INTERNAL using the above techniques. In case you are not able to solve it, you can just go for a clean installation of Windows 10. This method is going to make your system get rid of all kinds of bugs and error and thus there will be no further issues.
We recommend you to save all your important files and data at a safer place as Backup. Since this resolution requires professional skills, you might need someone to guide you.
Methods:
1] Update the corrupted Drivers with Device Manager
2] Repair Windows System Files Using SFC Tool
3] Use Window Security to scan full PC
4] Get all possible Windows Updates
5] Use Deployment Image Servicing and Management (DISM) tool
6] Run Blue Screen Troubleshooter
7] Boot the OS of your system to safe mode
8] Remove the Faulty Windows update files
9] Reconnect the External Hardware Devices
10] Uninstall the program that causes issue
11] Get rid of 3rd party antivirus software
12] Run CHKDSK utility
13] Use Disk Cleanup utility to clear all junk from your PC
14] Resolve the issue linked with RAM
15] Utilize Previous System Restore Point
16] Disabling of Auto Restart feature
17] Carry out a complete installation
That’s all!!
Repair any Windows problems such as Blue/Black Screen, DLL, Exe, application, Regisrty error and quickly recover system from issues using Reimage.
С синим экраном смерти рано или поздно сталкивается большинство пользователей Windows, и порой даже опытные юзеры не знают, как реагировать на такое поведение компьютера или ноутбука. Сегодня мы поговорим о конкретной разновидности ошибки, вызывающей отказ в работе ПК. Это ошибка «Memory Management», которая появляется чаще всего и кодируется комбинацией 0x0000001A.
Отметим, что вид синего экрана может различаться в зависимости от версии операционной системы, но содержимое в части информирования пользователя об ошибке одинаковое, что позволяет с довольно грубой погрешностью классифицировать неисправность и приступить к её уточнению и исправлению.
Что означает ошибка «Memory Management» в Windows 10
Данное словосочетание переводится как «Управление памятью», то есть можно предполагать, что произошёл сбой в подсистеме памяти компьютера на аппаратном, программном или операционном уровнях.
Чтобы уточнить диагноз, возможно, придётся осуществлять проверки на всех трёх указанных уровнях.

При возникновении любой BsoD происходит формирование дампа памяти в момент сбоя, после чего компьютер перегружается, если в настройках не выставлен запрет на перезагрузку в подобных случаях. Если это случайная неполадка, пользователь может и не успеть прочитать надпись. Неслучайный сбой может привести к циклическим перезагрузкам. Чтобы избежать подобного сценария, эксперты рекомендуют выставить опцию запрета на перезагрузку.
Отметим, что причин появления синего экрана смерти с такой надписью существует немало, поэтому и способов поиска неисправности и её устранения тоже имеется большое количество. Обычно сбой происходит во время обмена данными между приложением, запущенным пользователем, и ядром ОС, чаще всего на уровне драйверов.

Например, уточнение ошибки в Windows 10 в виде надписи «video memory management internal» говорит о том, что проблема возникла в видеоподсистеме компьютера, и для её решения необходимо попробовать переустановить драйвер видеокарты, в редких случаях замены требует драйвер монитора. Обычно это происходит при смене карты или монитора.
Причины появления кода ошибки «Memory Management»
Ядро Windows может конфликтовать с драйверами устройств и/или пользовательскими приложениями по следующим причинам:
- из-за повреждения драйвера или при установке новой версии, содержащей критические ошибки, проявляющиеся в определённых ситуациях;
- повреждения могут появиться в самой оперативной памяти (например, ослабление контактов планки с гнездом);
- фрагментарно может повредиться диск или важные системные файлы;
- «слетели» настройки BIOS или операционной системы по части электропитания.

И это далеко не полный перечень причин возникновения BsoD.
Методы устранения ошибки
Существует несколько популярных решений, позволяющих решить возникшую проблему без наличия навыков в данной сфере. Рассмотрим их в рамках небольшого обзора.
Отмена последних изменений
Это самый простой и весьма эффективный способ избавиться от проблем, возникших не на аппаратном уровне. Возможно, сбой произошёл после того, как вы установили новое устройство с драйвером, или инсталлировали понравившуюся программу.

«Правильное» удаление таких программ (через панель управления) вполне может устранить проблему. Если после этого компьютер работает стабильно, поищите альтернативные версии удалённого программного обеспечения, если оно для вас критически важно.
Удаление драйверов
Вторым источником возникновения синего экрана смерти в Windows 10, как мы уже отмечали, является другой тип ПО – драйвера устройств. Обычно, если вы устанавливаете новое оборудование или меняете старое (например, сломавшуюся сетевую карту или морально устаревший графический видеоадаптер), драйвер для нового устройства устанавливается либо автоматически, либо самим пользователем. Найденный драйвер может оказаться не полностью совместимым с установленным оборудованием, и в этом случае возникают конфликты на уровне ядра Виндовс, которые в итоге выливаются с крах системы.

Бывает, что установка нового устройства не привела к смене драйвера, и это тоже вполне вероятная причина сбоя из-за несовместимости драйверного ПО.
Что делать в подобных случаях, понятно: нужно просто удалить неподходящий драйвер. Но без него устройство работать не будет, так что придётся заняться поисками подходящего ПО. Проверенные работоспособные драйверы часто можно скачать на сайтах изготовителей компьютерного оборудования или на специализированных форумах, где хранятся управляющие программы, в том числе для давно не выпускаемого оборудования.
Драйвер можно удалить по-разному, один из самых популярных способов – через «Диспетчер устройств». Он запускается из вкладки «Пуск» или через «Мой компьютер». В перечне присутствующих в системе устройств найдите проблемное, наведите на него курсор и нажмите правой кнопкой мышки. В появившемся окошке нажмите на пункт «Свойства», а в новой вкладке – на надпись «Драйвер». Завершающее действие – нажатие кнопки «Удалить».
Возврат заводских настроек
Нередко проблемы возникают после изменения определённых настроек в BIOS. Это могут быть как опции, связанные с управлением памятью, так и попытка разгона процессора. Хотя современные CPU допускают увеличение частоты по сравнению со штатной, в результате разгона работа системы становится нестабильной. Вот тогда и выскакивает ошибка Виндовс с синим экраном и надписью «Video Memory Management Internal».

Чтобы решить проблему, следует вернуть настройки BIOS к заводским. Практически все микропрограммы БИОС от ведущих производителей материнских плат допускают такую возможность. Хотя интерфейс у них разный, откат на заводские установки можно легко найти по наличию слова Default.
Новое аппаратное обеспечение
Установка в настольный компьютер или ноутбук нового оборудования (необязательно внутреннего) также становится частой причиной возникновения синего экрана с перезагрузкой. Часто ошибка 0x0000001A возникает при установке платы памяти (взамен старой или с целью расширения доступного пула оперативки). Если сбои начали появляться вскоре после такого апгрейда, стоит протестировать новую память на другом компьютере или поработать со старой. Отсутствие проблем в последнем случае будет гарантированно свидетельствовать о бракованной планке, которую придётся менять. Если же сбои продолжатся, нужно искать иную причину.
Такой принцип применим практически ко всему железу.
Но бывает и так, что аппаратная часть оказывается исправной, а причина краха системы заключается в некорректно установленном или содержащем ошибки драйвере. Как её исправить, мы уже рассматривали.
Редко, но случается, что причина кроется в исправном, но некорректно работающем оборудовании. Тут выход только один – обратиться в сервисный центр, где смогут провести полноценную диагностику устройства.
Проверка оперативной памяти
Если вы давненько не устанавливали новое программное обеспечение, то возникновение ошибки «Memory Management» в Windows 10, 8, 7 или XP может быть связано со сбоями в работе оперативной памяти. Собственно, само название ошибки косвенно на это и указывает. Такое случается, если одна из планок начала работать нестабильно, со сбоями. Существует немало методов диагностирования проблемы. Для начала не помешает провести визуальный осмотр, чтобы убедиться в отсутствии видимых дефектов. Если таковых не замечено, попробуйте вынуть планки из слота и протереть контакты спиртовым раствором (не слишком концентрированным) или обычной резинкой для карандашей.

Если сбои будут продолжаться и после этого, следующий шаг – программная проверка памяти на наличие сбойных участков. Такие системные утилиты имеются в составе Виндовс, но более точные результаты демонстрирует ПО от сторонних разработчиков. Одна из лучших таких программ – MemTest86. Цифры в названии пускай вас не смущают – это не год выпуска, а применимость к определённой архитектуре, в данном случае – x86.
Алгоритм поиска ошибок RAM системными средствами:
- одновременно зажимаем клавиши Win+S;
- в появившейся строке набираем «Диагностика проблем оперативной памяти компьютера»;
- выбираем первый вариант из двух появившихся;
- компьютер перезагрузится, после чего появится надпись «Средство проверки памяти Windows»;
- как только проверка завершится, произойдёт повторная перезагрузка, после которой и высветятся результаты проверки.
Проведение восстановления системы
Многие пропускают все вышеописанные шаги, начиная именно с этого. В целом восстановление системы действительно решает проблему, если таковая вызвана проблемами софта. Следует учесть, что подобный шаг не всегда оправдан, поскольку при откате к предыдущим состояниям все позже инсталлированные программы исчезнут.

Кроме того, данная опция может быть отключена в настройках (в Windows XP она отключена по умолчанию).
Для запуска функции после нажатия Win+S наберите «Восстановление системы» и выберите соответствующую утилиту в открывшемся списке. Далее следуйте инструкциям.

СОВЕТ. Хотя это обратимая операция, выбирайте контрольную точку, не слишком удалённую от текущей даты. Так вы минимизируете возможные потери данных.
Переустановка Windows
Самый кардинальный способ, к которому прибегают, если ничего из перечисленного не помогло и имеется уверенность, что дело не в железе. Обычно на свежеустановленной ОС синий экран смерти не появляется.