Microsoft Windows Backup Made Easy
Centralized, automated protection for your Microsoft ecosystem
Protect Windows Like Never Before
Take full control of your Microsoft Windows backups with Veeam® Backup & Replication™. Achieve comprehensive protection, migration, physical to virtual conversion and recovery capabilities beyond conventional use cases.
-
What’s New
-
Release Notes
-
Windows Backup Best Practices
Windows Protection Anywhere
Protect Your Entire Windows Enterprise
Safeguard your Windows workloads in any environment.
Centralize Management and Deployment
Manage your hybrid cloud workloads from a unified console.
Secure Policy-driven Protection
Meet your protection requirements with full flexibility.
Take Control of Windows Backup and Recovery
Reliable Windows Server Backup
Ensure timely and reliable backups for Microsoft Windows servers with multiple flexible configurations and without all the complexity.
Reduce Production Impact From Scale
Process server-extensive data sets using Changed Block Tracking (CBT) with Block-Level Incremental Backup (BLIB), parallel disk processing and Storage Snapshot integrations.
Remain Safe From Cyberthreats
Take full advantage of immutable, direct-to-object storage backups that naturally scale with your needs.
Stay Resilient and Highly Available
Experience flexible recovery that ranges from bare-metal applications to granular objects and files.
BaaS for Endpoints
Configure backup to the cloud, cache on premises and resume paused backups and other flexible options to confidently protect your endpoints.
Instant Recovery and Mobility
Migrate or recover a physical workload to the cloud or virtual environments in a moment’s notice while also maintaining the ability to easily restore to new hardware.
Application-Aware Backups
Capture an application’s ideal state and combine transaction logs for the full spectrum of consistent protection and advanced explorer recovery.
Laptops on the Move
With remote work at an all-time high, Veeam is here to help with laptop-friendly features including image-based backup, built-in cache and file recovery wizards.
Bare Metal Recovery
Completely recover any windows server or workstation to dissimilar hardware from a single-pass backup.
Veeam Data Platform
NEW Direct to Object Storage Backups
![]() Trusted Immutability
Trusted Immutability
![]() Cyber-Resilient
Cyber-Resilient
![]() Hybrid Cloud Optimized
Hybrid Cloud Optimized
Veeam Data Platform
Delivering Data Security, Data Recovery and Data Freedom to your entire hybrid environment, including cloud, virtual and physical workloads. Available in three powerful, enterprise-grade editions.
- Backup & Recovery Own, control, backup and recover all your data, anywhere in the hybrid cloud.
- Backup & Recovery Own, control, backup and recover all your data, anywhere in the hybrid cloud.
- Monitoring & Analytics Maintain full visibility for proactive management and recovery success.
- Backup & Recovery Own, control, backup and recover all your data, anywhere in the hybrid cloud.
- Monitoring & Analytics Maintain full visibility for proactive management and recovery success.
- Recovery Orchestration Always be compliant and ready for disaster with orchestrated recovery.
FAQs
What is Windows Server Backup?
Windows Server Backup is a feature that Microsoft provides for its Windows Server operating systems. It allows you to perform full image, volume, files and folders backup and recovery.
What are the advantages of Veeam Backup & Replication over Windows Server Backup?
Veeam Backup & Replication offers you more features and benefits than Windows Server Backup, such as synthetic full backup, Veeam Changed Block Tracking Driver, direct-to-object storage backups, immutable backups, hybrid cloud optimization, flexible recovery options, application-aware backups, bare metal recovery and more.
How can I backup and restore my Windows servers with Veeam Backup & Replication?
You can backup and restore your Windows servers with Veeam Backup & Replication by installing and configuring the Veeam Agent for Microsoft Windows on your servers. You can then schedule and manage your backups from a unified console and store them on a Veeam backup repository. You can also perform various recovery options, such as Instant VM Recovery, application-items restore, restore to AWS and Azure and more.
How can I protect my Windows endpoints with Veeam Backup & Replication?
You can protect your Windows endpoints with Veeam Backup & Replication by installing and configuring the Veeam Agent for Microsoft Windows on your laptops and desktops. You can then backup your endpoints to the cloud, cache on premises and resume paused backups. You can also recover your endpoints to new hardware or migrate them to virtual environments.
Let’s Get Started
![]()
Technical Support
Find answers to your questions with Veeam’s technical documentation
![]()
Veeam R&D Forums
Get help for your Veeam products and software
Резервное копирование важно для каждой организации, особенно сейчас, когда мы ежедневно сталкиваемся с атаками вирусов вымогателей. Вот инструкция о том, как легко создать резервную копию вашего сервера Windows с помощью агента Veeam.
Скачивание и установка Veeam агента
Сначала нам нужно скачать Veeam backup agent с официального сайта.
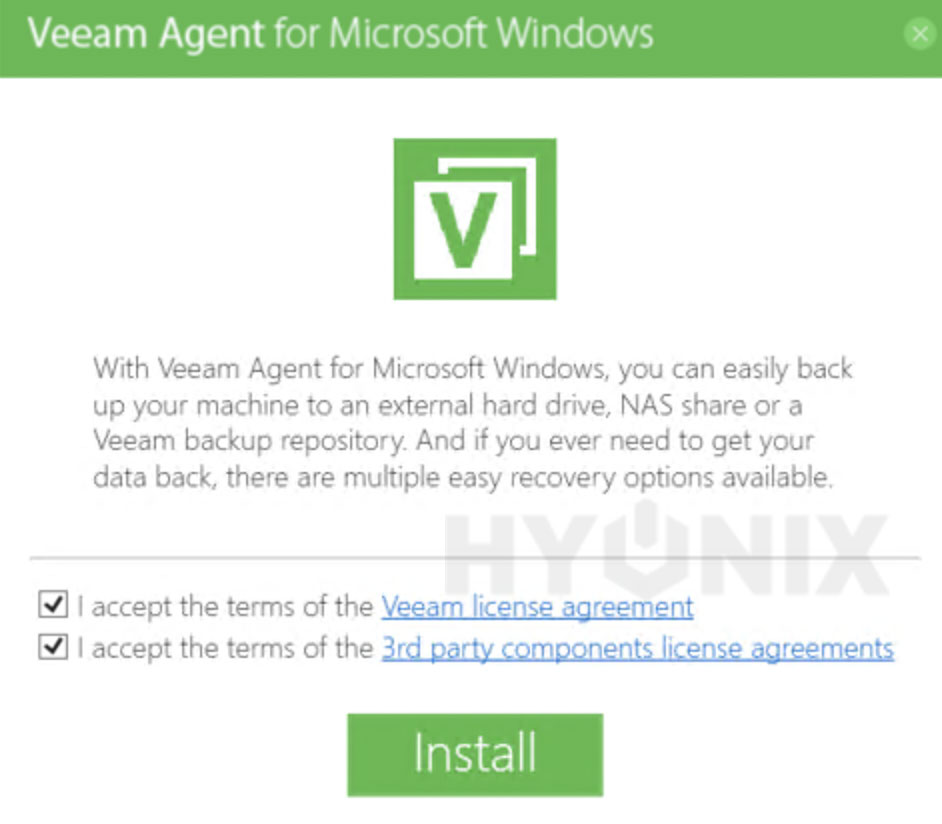
После завершения загрузки нам нужно установить это программное обеспечение, для этого вам понадобятся права администратора. Распакуйте Veeam Agent Windows и запустите его.

Примите все условия и приступайте к установке. Установка проста и завершится автоматически.
Пропустите настройку резервного копирования на внешнее устройство.

И в следующем окне нажмите кнопку Finish
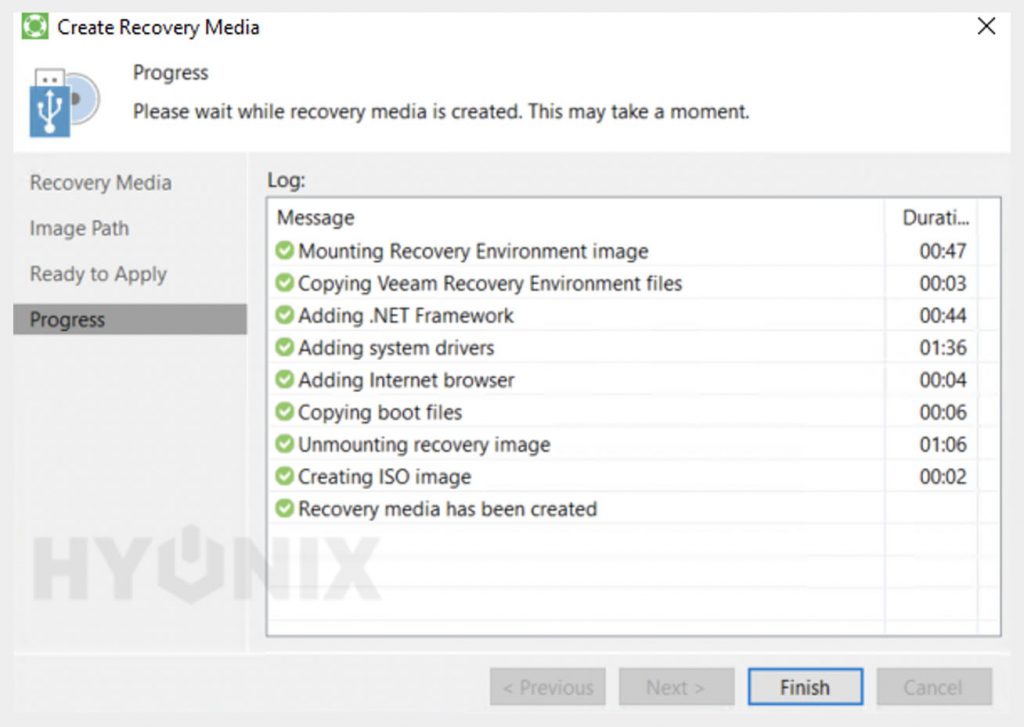
Создание образа восстановления
Сначала нам нужно создать образ для восстановления, оставьте все по умолчанию и нажмите Next

Выберите место, где вы хотите сохранить этот образ, вы можете использовать для этого локальное или сетевое хранилище, в моем случае я сохраню его на локальном диске, нажмите Next и Create. Дождитесь завершения создания образа, это займет некоторое время.

Нажмите Finish и откройте Veeam Agent в трее Windows.
Настройка Veeam Backup Agent
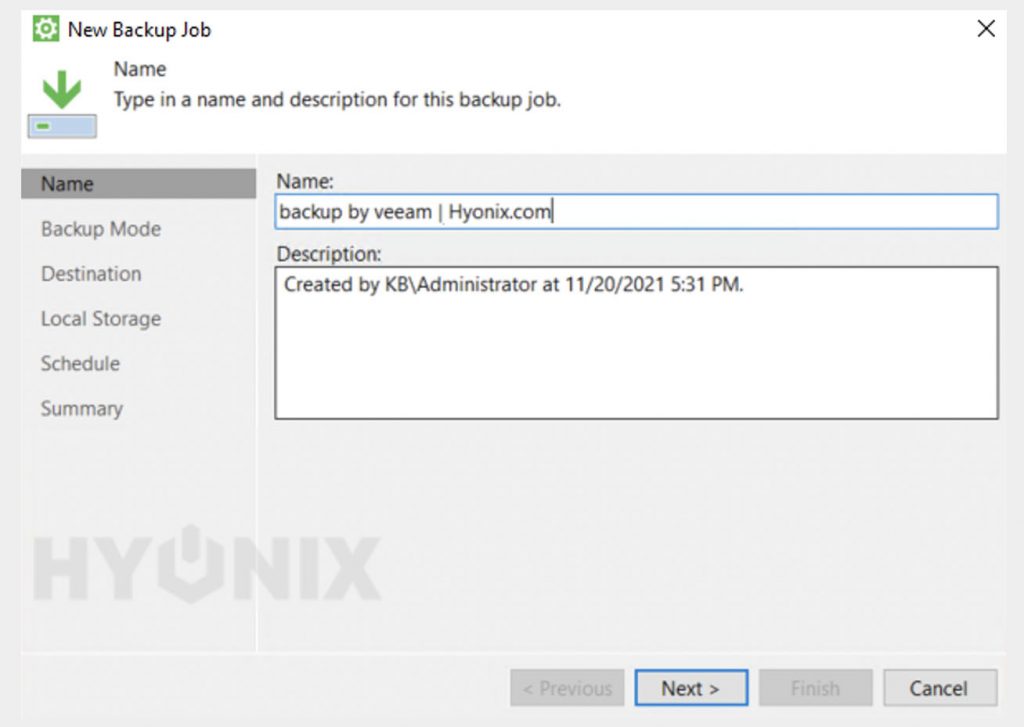
Сначала он попросит установить файл лицензии, нажмите No и затем “Add new job”. Откроется мастер.

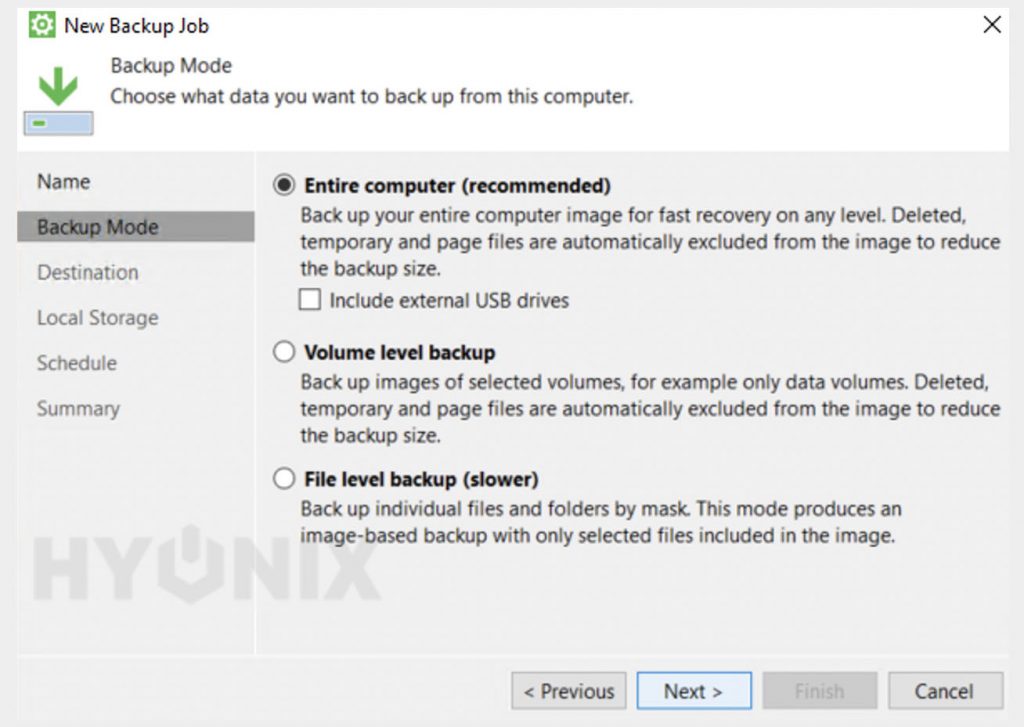
Здесь нам нужно указать имя задания и нажать Next. После этого нужно выбрать тип резервного копирования. В нашем примере я буду делать полную резервную копию всей системы.

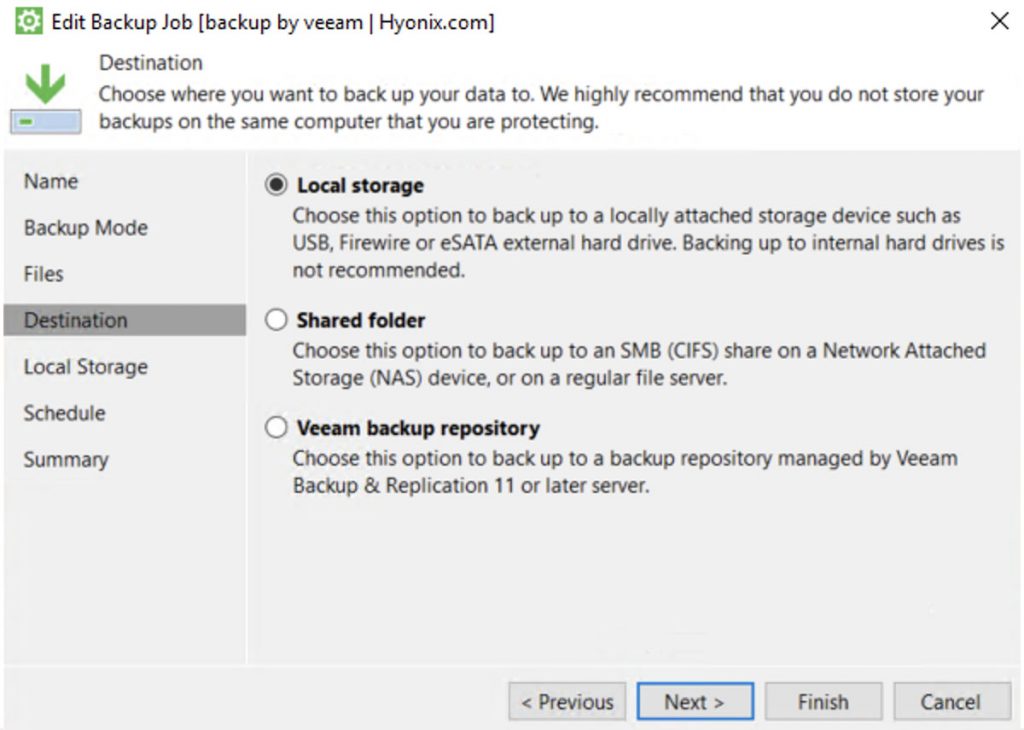
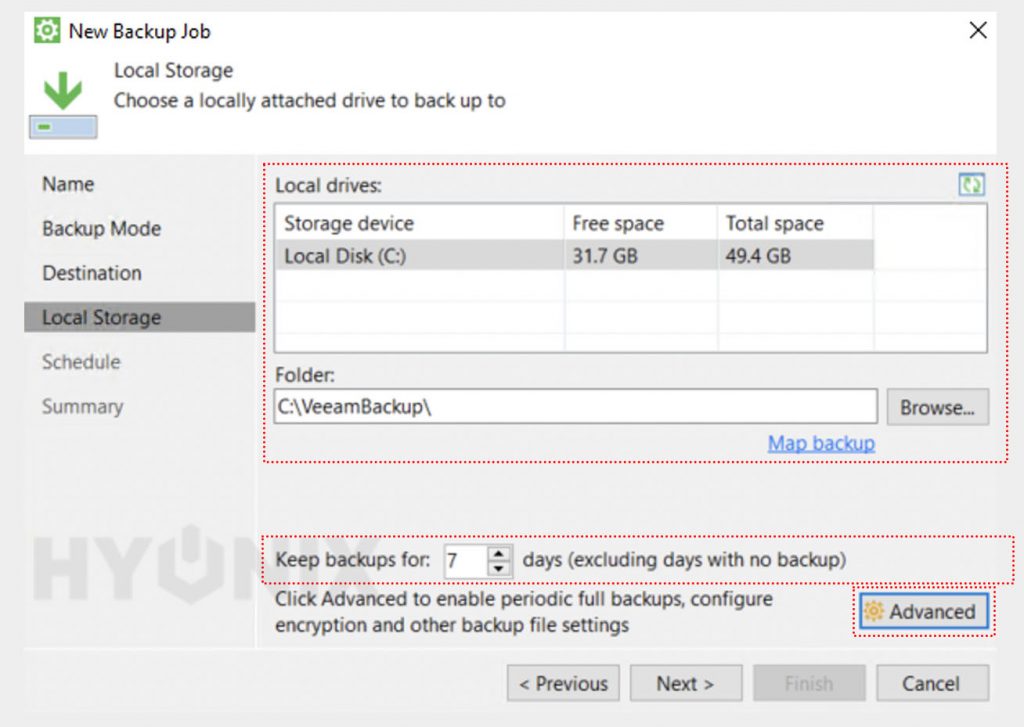
Нажмите Next выберите место назначения резервной копии, в нашем примере мы сделаем резервную копию на общий диск.

Опция хранение резервных копий в течение 7 дней определяет глубину архива. Это количество дней, в течение которых вы хотите хранить резервные копии на сервере. Если вы делаете резервное копирование каждый день и указываете 8 дней, то резервные копии системы будут сохранены за последние 8 дней. Если вы делаете резервное копирование каждый второй день, то за 4 дня и так далее.
Можно создать несколько заданий с разной глубиной резервного копирования. Например: каждый день 7 дней, раз в неделю 30 и раз в месяц 365. Таким образом, у вас всегда будут последние 7 резервных копий системы за эту неделю. Затем одна резервная копия в неделю за последний месяц и 12 резервных копий в месяц за последний год.
Нажмите кнопку Дополнительно, чтобы добавить некоторые дополнительные настройки, вам нужно перейти на вкладку Storage и включить шифрование резервных копий:

Создайте, введите, а затем сохраните надежный пароль в менеджере паролей. Нажмите Ок, затем Next.
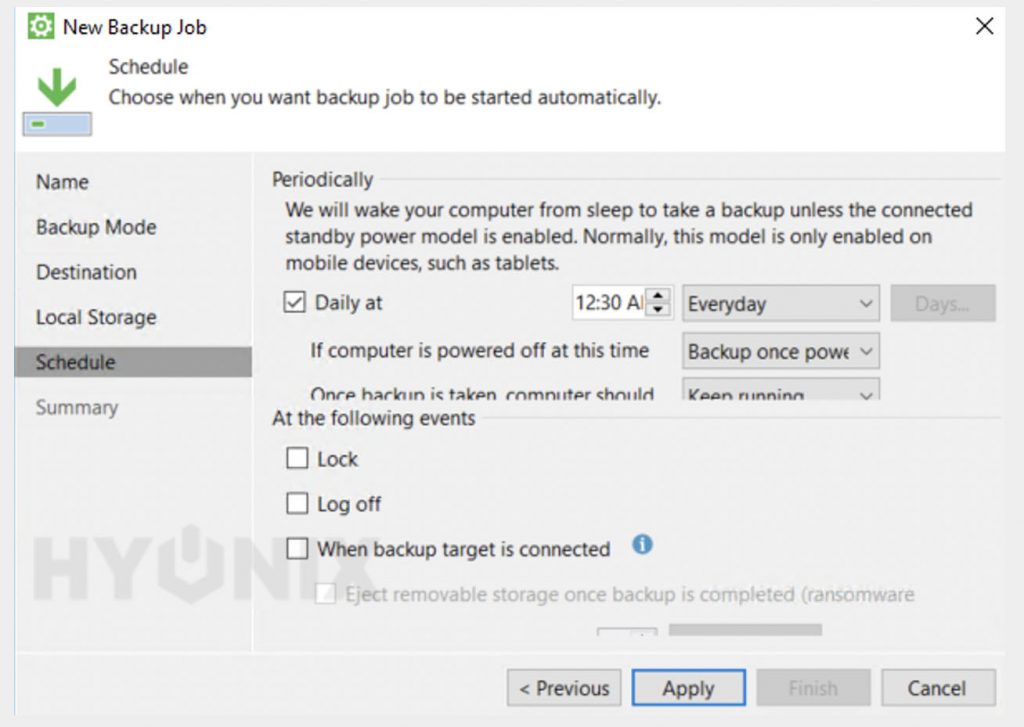
Теперь нам нужно настроить расписание, в этом примере я буду делать только одну резервную копию. Поэтому я сниму флажок с опции Daily.

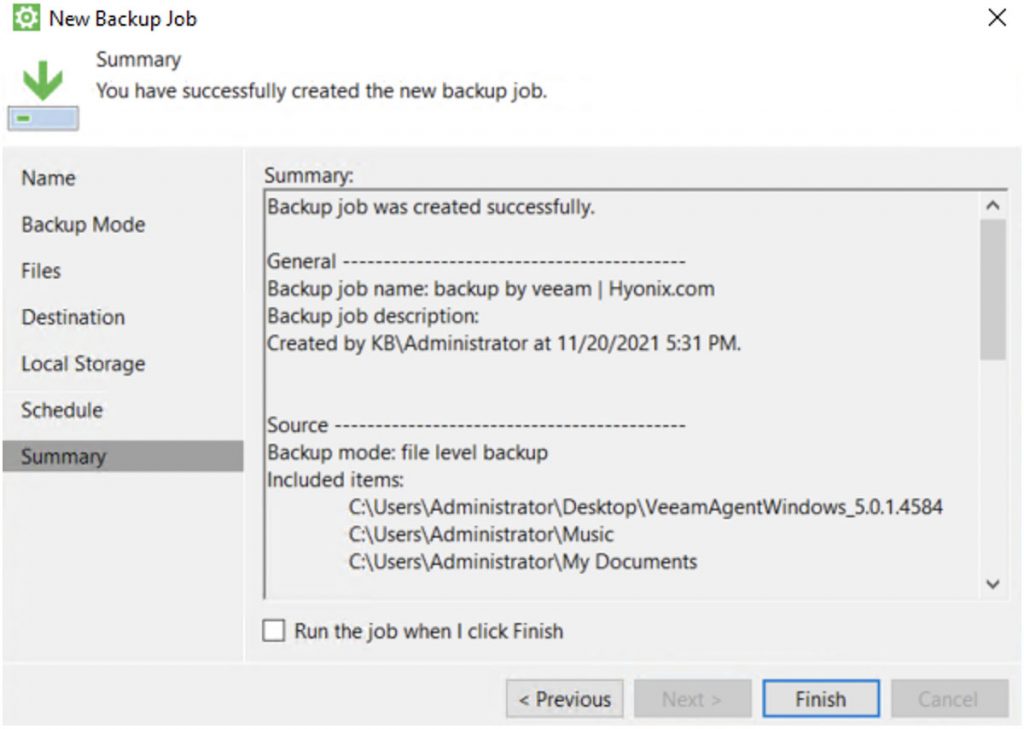
Нажмите кнопку Apply, проверьте Summary и отметьте опцию ” Run the job when I click Finish “. И нажмите Finish.

Резервное копирование сразу же начнется, и мы можем проверить его состояние, нажав на задание, а затем на “Processing”.
191028
Санкт-Петербург
Литейный пр., д. 26, Лит. А
+7 (812) 403-06-99
![]()
700
300
ООО «ИТГЛОБАЛКОМ ЛАБС»
191028
Санкт-Петербург
Литейный пр., д. 26, Лит. А
+7 (812) 403-06-99
![]()
700
300
ООО «ИТГЛОБАЛКОМ ЛАБС»
Backups are always important for every organization, especially now when we face ransomware attacks everyday. Here is the instruction on how to easily make a backup of your windows server using Veeam agent.
Downloading and Installing Veeam Backup Agent
First, we need to download Veeam backup agent from official web site, here is the download link:
https://www.veeam.com/windows-endpoint-server-backup-free.html
After download is complete, we need to install this software, you will need admin rights for that. Unzip the Veeam Agent Windows and run it.

Accept all terms and proceed to install. The install is straightforward and will finish automatically.
Skip the removable backup target

And in the next window click Finish
Creating Recovery Media
Now we need to create recovery media, keep all things by default and click Next

Select a path where you want to store this media, you can use local or network storage for that, in my case I will save it on local drive, click Next and Create. Wait until the image creation is complete, it will take some time.

Click Finish and open Veeam Agent in Windows tray.
Configuring Veeam Backup Agent
It will ask to install a license file, click No and then “Add new job”. The wizard will open.

First you need to specify the name of the job and click Next. After that we need to select the backup type. In our example I will make a full backup of entire computer.

Click Next and chose the backup destination, in this example we will make a backup to shared drive.

“Keep backups for 7 days” option specifies the depth of the archive. That’s the number of days you want to keep backups on the server. If you make a backup every day and specify 8, the system backups for the last 8 days will be preserved. If you backup every other day, then 4 days, and so on.
You can create several tasks with different backup depths. For example: every day 7 days, once a week 30, and once a month 365. This way you will always have the last 7 backups of the system for that week. Then one backup per week for the last month and 12 backups per month for the last year.
Click on Advanced to add some extra settings, you need to go to Storage tab and enable backup encryption:

Create, enter and save strong password in your password manager. Click Ok, then Next.
Now we need to setup the Schedule, in this example I will make just one backup. So, I uncheck the daily option.

Click Apply, check the summary and check “Run the job when I click Finish” option. And click Finish.

The backup will begin shortly, and we can check full its status by clicking on the job and then on “Processing”

After job is complete, we can view our backup on our network drive:

33145
North Miami, FL, United States
2520 Coral Way apt 2-135
+1 302 425-97-76
![]()
700
300
ITGLOBAL.COM CORP
33145
North Miami, FL, United States
2520 Coral Way apt 2-135
+1 302 425-97-76
![]()
700
300
ITGLOBAL.COM CORP
It is essential nowadays to keep a backup of your data. There is no guarantee of hardware failure; for our safety and to avoid future unexpected, unplanned disasters, KEEP BACKUP OF THE DATA! On the windows server earlier, we have covered how to backup the windows server with Duplicati. Learn, How to backup windows server data with Veeam Backup Agent?
Download the Veeam backup application using: https://www.veeam.com/windows-backup-free-download.html
You must need to get yourself registered on veeam.com to download the free version of the veeam backup agent. So, enter the valid email address at the time of registration.
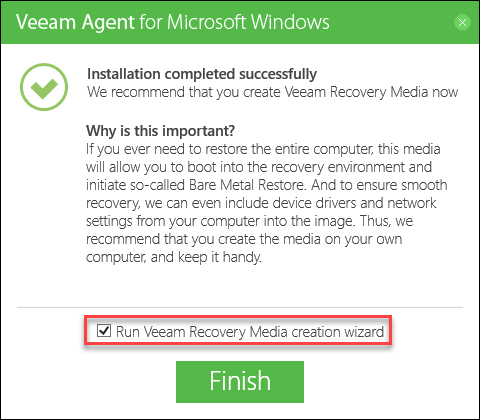
First, once you install and open the Veeam application, you will be asked to set up the recovery media. It is a .iso template that will be created for the backup and to avoid the unexpected problem.
1. Install and Open Veeam application.
2. Recovery Media, here you can see ISO Image File is pre-selected → Click on Next.
3. Enter the ISO Filename and the location → If location is user-protected, check “This share required credentials” and enter the username, password → Click on Next.
4. Ready To Apply, here you have summary of the recovery media ISO file → Click on Create.
5. Congratulations! Veeam Reovery Media has been created → Click on Finish.
Configure Veeam Backup Agent
1. Open Configure Backup → Enter the name → Click on Next.
2. Select the required backup mode → Click on Next.
Entire computer: Back up your entire computer image for fast recovery on any level.
Volume level backup: Back up images off selected volumes.
File-level backup: Back up individual files and folders by mask.
3. Destination, here you need to select the destination to save the backups. For this article, we are going ahead with Local storage → Click on Next.
Local storage: Store the backups locally.
Shared Folder: Choose this option to backup up to an SMB.
Veeam backup repository: It is paid option to save the backups on the cloud.
4. Configure the local storage for the backup or you can specify the Folder to save the backups. On the same interface specify the days to keep the backup (Keep backup for X days). To configure the advance option click on Advance.
5. Now, configure the schedule for the backup → Click on Apply.
6. Finally, click on Finish.
Conclusion
In the article, we went through how to backup windows server data with Veeam Backup Agent. The free version has limitation on the backup but its worth to try and use for the windows server backup.
Hyonix was founded in early 2018, as we believed the current pricing of Windows VPS was far too overpriced for most consumers. This makes it nonuser and budget-friendly for many people around the world. Our main goal is to change that – providing powerful licensed Windows VPS at a reasonable price so that everyone can grab one without thinking twice about the performance/price that you will get. Get yourself fully optimized Windows VPS starting @ $6.5/mo from Hyonix.com.
Are you struggling to back up your data? Or do you run into countless errors performing a Windows Server backup? The data on your computer is doubtlessly important, and ensuring timely and reliable backups for your Windows Server can be challenging.
How to stop agonizing over your Windows Server backup? Let Veeam take away the agony! In this tutorial, you’ll learn how to quickly and securely back up your data with Veeam.
Make your life easier and turn to Veeam for your Windows Server backups!
Prerequisites
This tutorial is a hands-on demonstration. If you’d like to follow along, make sure you have the following in place:
- A Windows machine or server.
- Veeam Backup & Replication installed on your computer – This tutorial uses Veeam Backup & Replication 11.
- A Veeam recovery account.
Creating a Veeam Recovery Media for Windows Server Backup
When you need to backup your data, but your computer stops working, or the hard disk fails, Veeam Recovery Media is your best option. The Veeam Recovery Media allows you to boot to a media drive, so you can use Veeam and Microsoft tools to fix errors.
At the same time, when you have Veeam Recovery Media, you can recover your computer’s system image along with your data.
To create a Veeam Recovery Media:
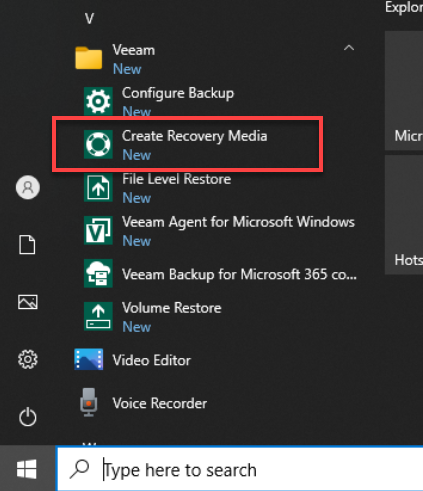
1. Download and install the Standalone Veeam Agent for Microsoft Windows.
As shown below, you’ll be prompted to create a recovery media so long as you keep the Run Veeam Recovery Media creation wizard enabled.
Alternatively, you can launch the Veeam Recovery Media creation wizard from the Start menu, as shown below.
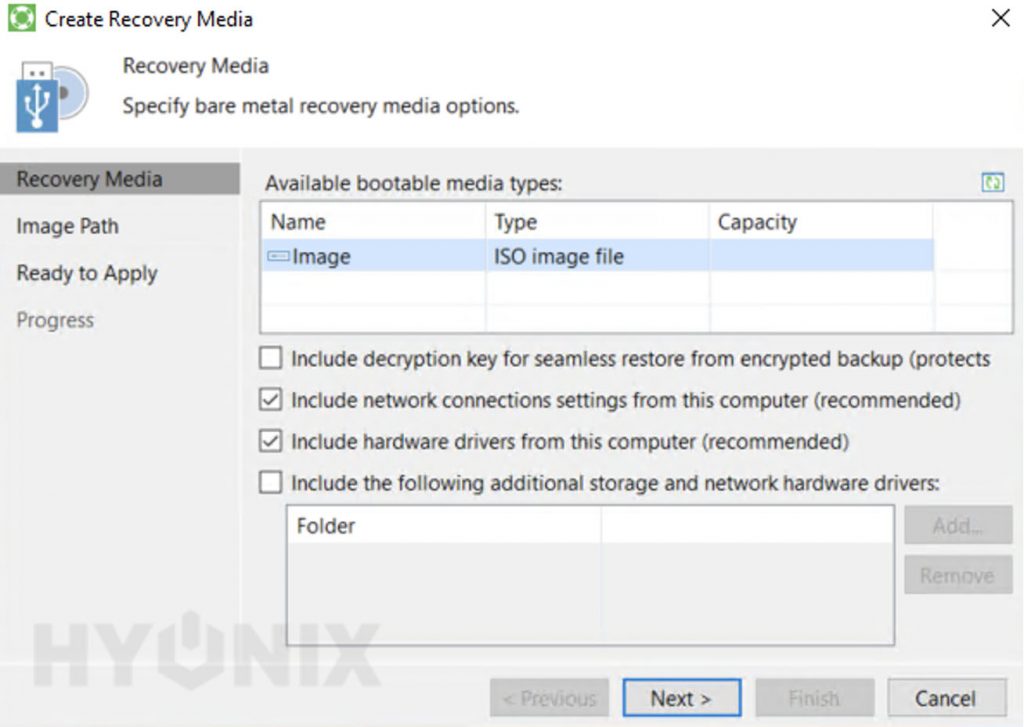
2. Select a bootable media type from the list under Recovery Media, and click Next.
You can see below that the second and third options are enabled by default. But optionally, you may tick other boxes to:
- First option – Includes the decryption key on your backup.
- Fourth option – Includes additional external drives to your backup.
But in this tutorial, leave the defaults. You can’t select a different bootable media type because you’re saving a media file, and only an Image file type is available.  Selecting a media type for recovery media backup
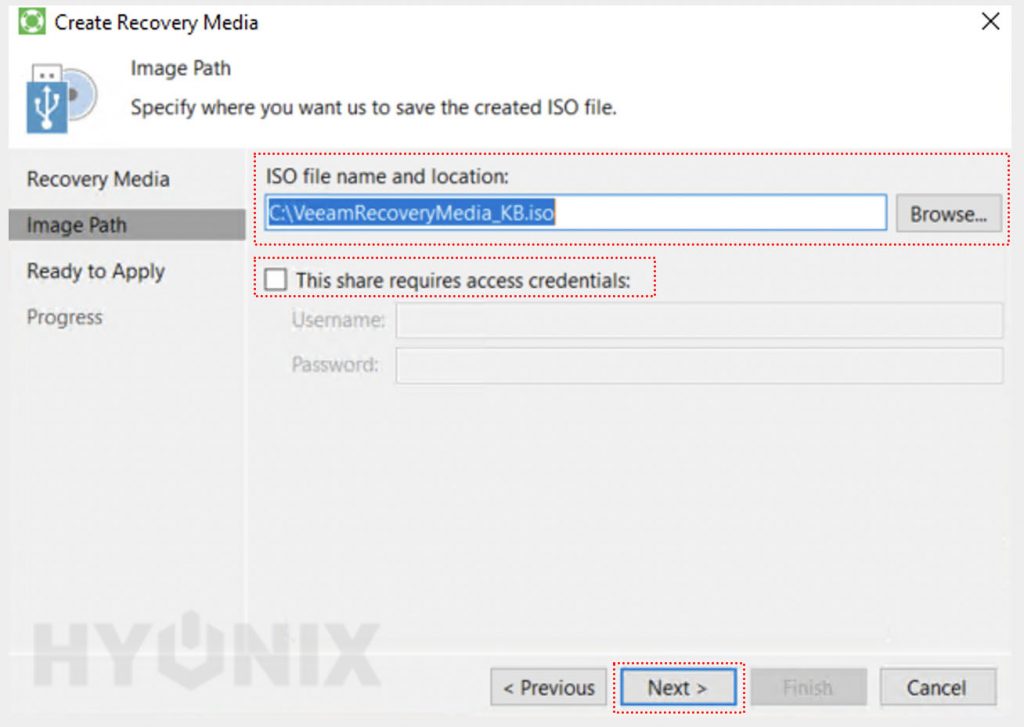
3. Click on Browse to specify the location to save the recovery media’s ISO file, and click Next.  Defining the file name and destination for the recovery media ISO file
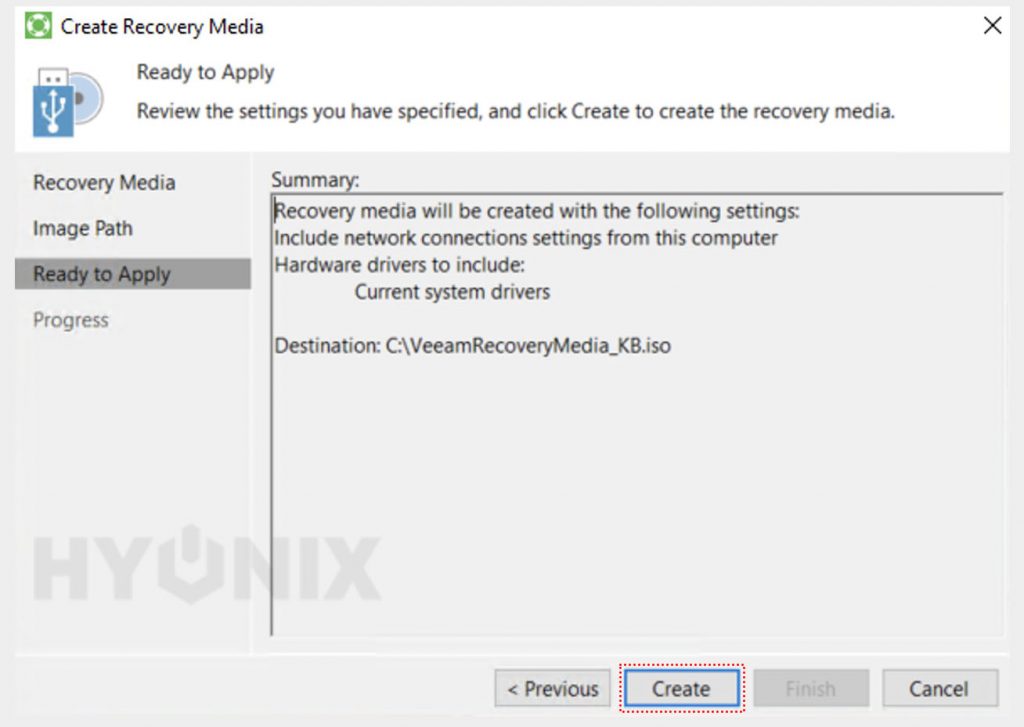
4. Now, review the summary of the settings you chose for creating the recovery media, as shown below, and click Create to finalize creating the Veeam recovery media.  Reviewing the summary of configuration for the recovery media
5. Finally, wait for the recovery media creation process to complete, and click on Finish.
And that’s it! You’ve just created a recovery media that you can burn to a CD/DVD or send to a USB flash drive.  Finalizing the recovery media creation
Creating a Backup Job to Automatically Secure Data
Apart from creating a Recovery Media that you can use when your computer fails to work correctly, you also need a way to assure your data is secure. But is it possible to perform a backup without manually doing so on your own? Yes! A backup job will come in handy in these situations.
A backup job systematically backs up your data even when you’re inactive. You can schedule a backup event anytime, any day. This feature lets you freely move along your day-to-day activity.
To create a backup job with Veeam:
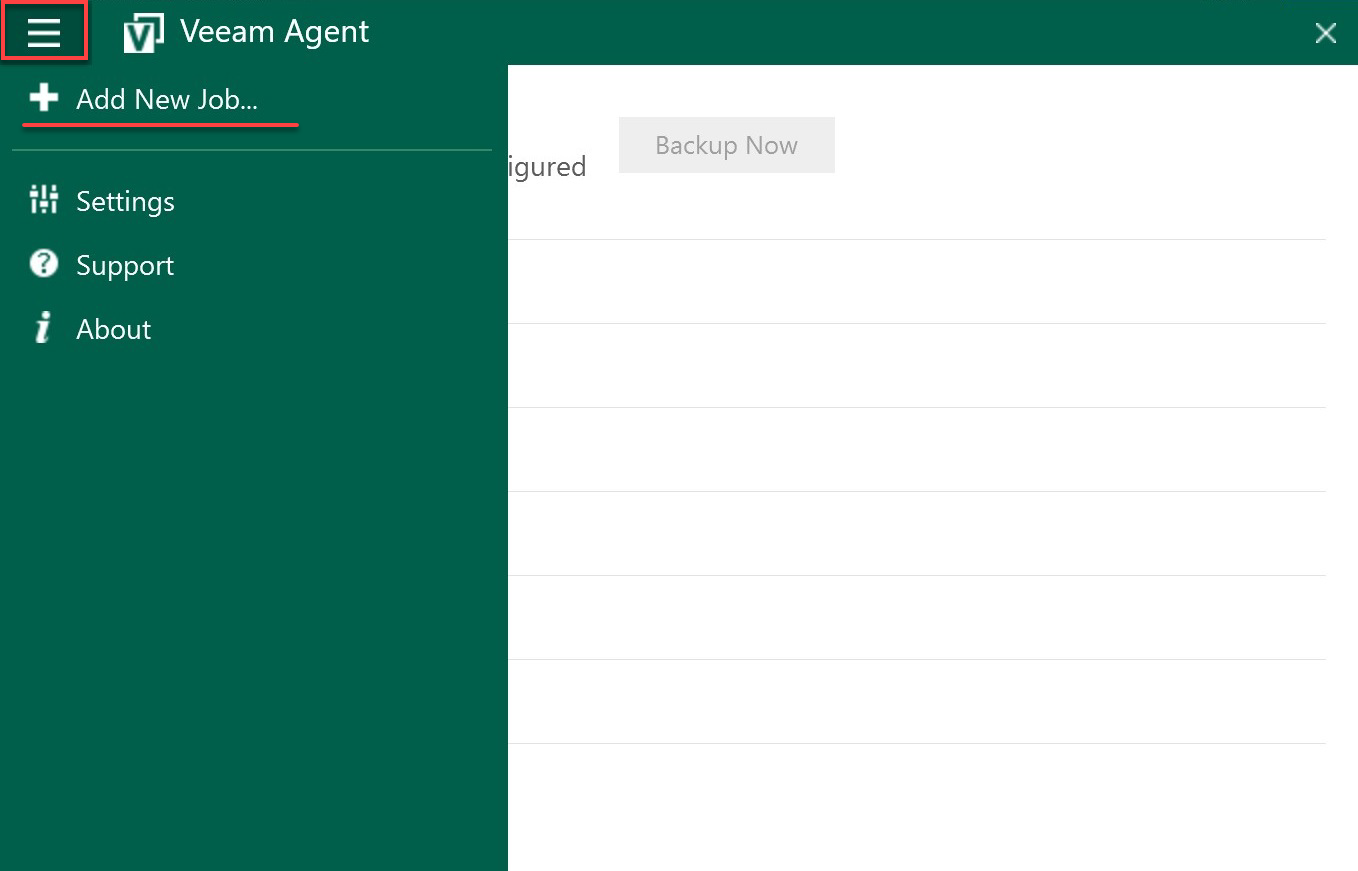
1. Open the Veeam Agent, click the main menu (top-left), and choose Add New Job from the menu panel. A pop-up window appears, where you’ll configure your backup job.
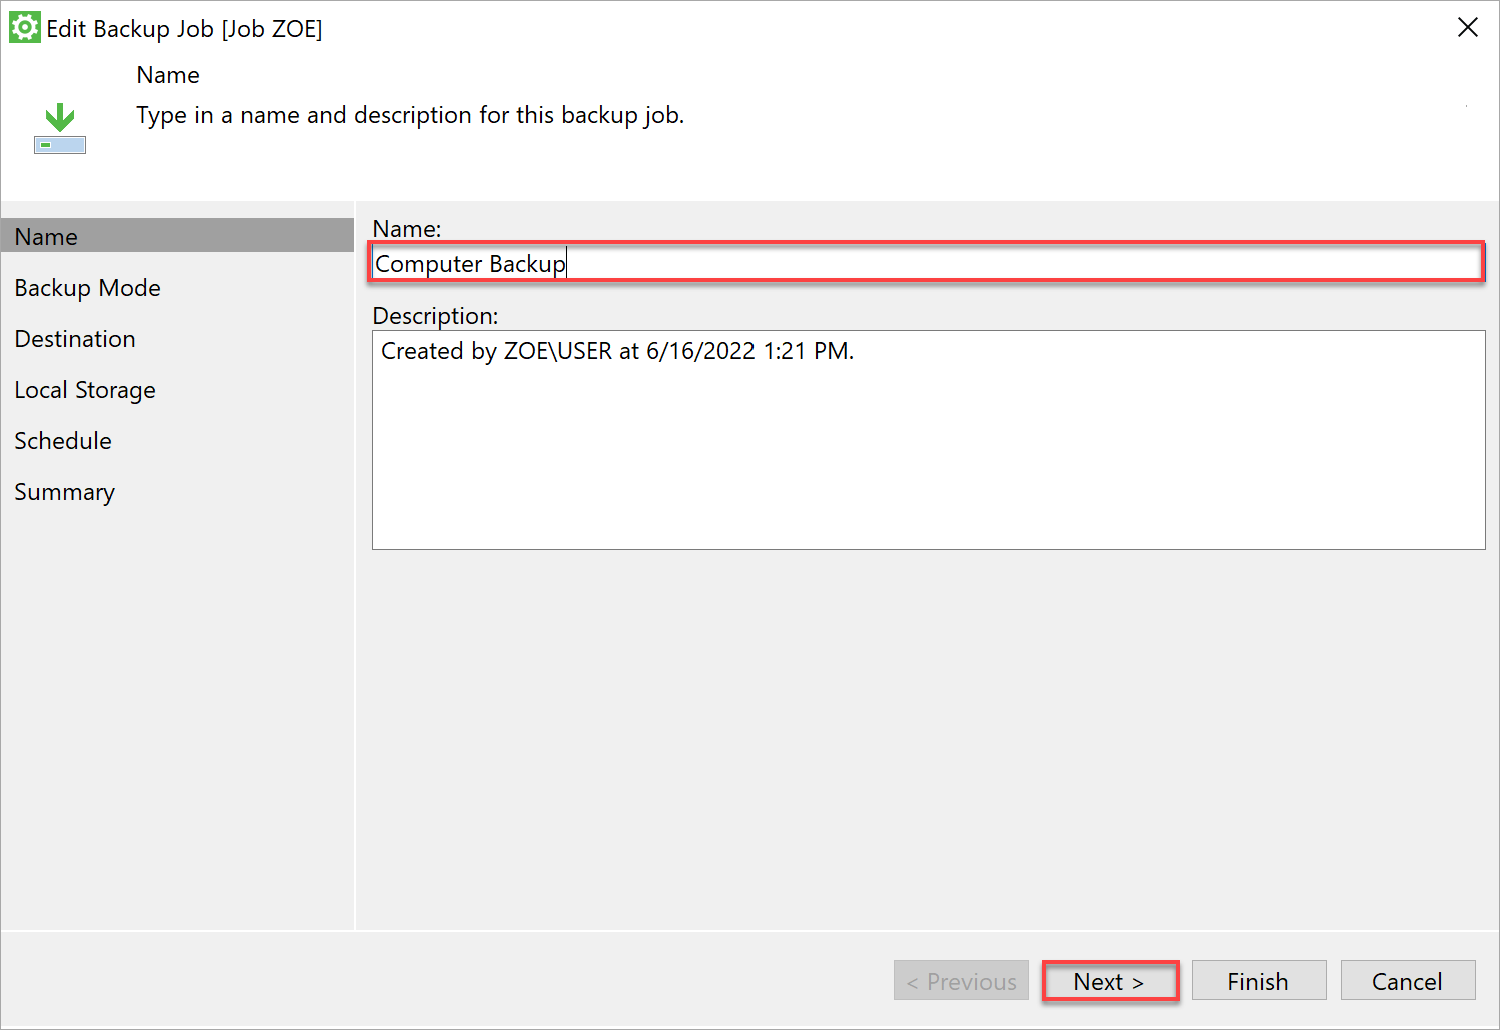
2. Next, name the backup job with the following, and click Next:
- Provide a descriptive name for the backup job. This tutorial’s choice is Computer Backup for simplicity.
- Setting a description is optional but would be great for identifying what the backup job is about.
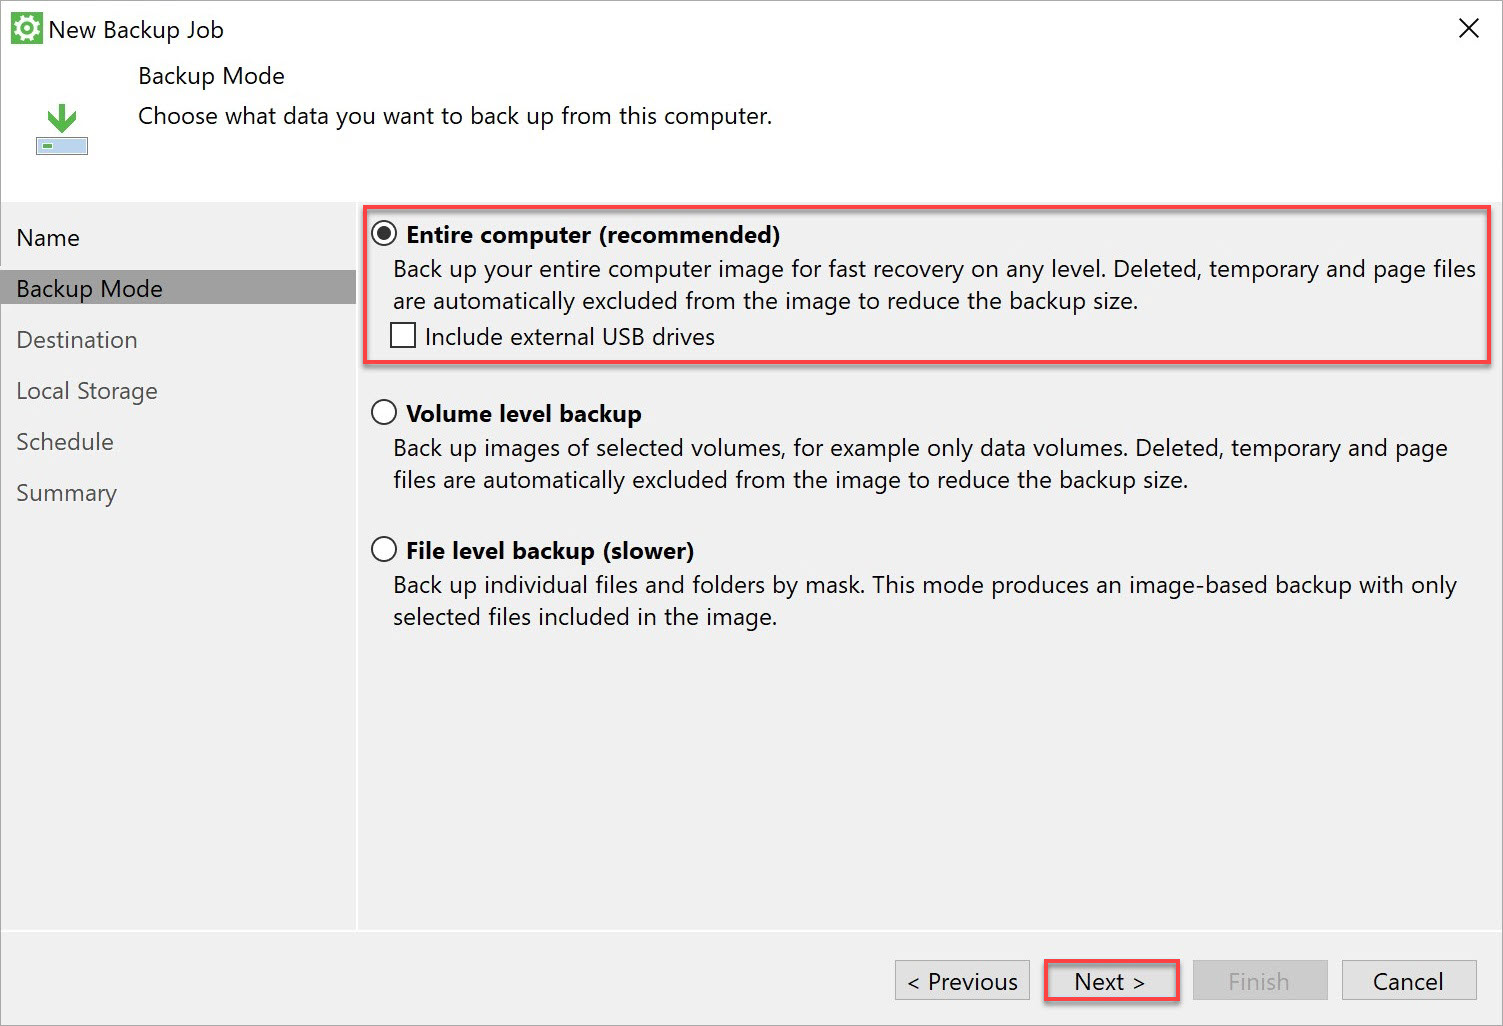
3. Choose a backup mode for the job depending on your need as follows:
- Entire computer – You can choose to backup every file, video, or document on your entire Windows computer. This mode is the first option recommended if you’re trying to change your laptop without losing any information.
- Volume level backup – You can choose the file’s volume to backup. This mode is useful if you plan to back up just a portion of your PC, like an important folder.
- File-level backup – You can perform backup using the folder-by-folder or file-by-file method, basically, one file or folder at a time. But note that the backup process is prolonged on this mode.
But in this, you’ll choose the Entire computer backup mode to backup everything on your Windows Server.
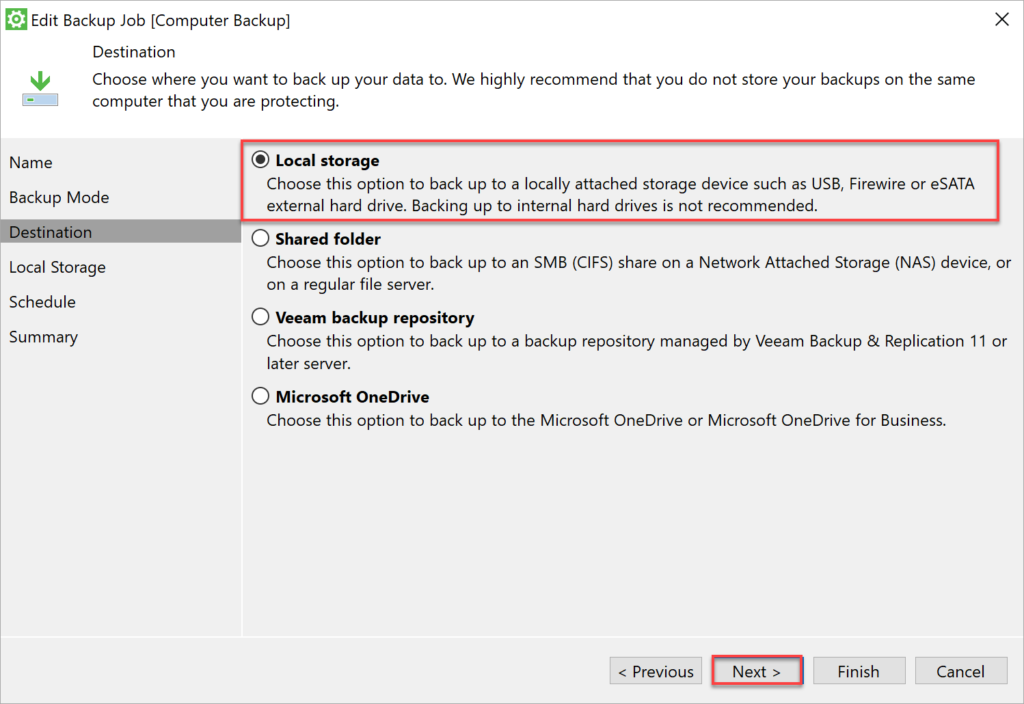
4. Now, select a destination for your backup based on which storage is available to you as follows:
- Local storage – As the name implies, this destination will be on a USB or an external hard drive (with enough space). Selecting an internal drive as local storage is never a good thing.
- Shared folder – This destination lets you back up data to a shared network, like in an office setting or a file server you can access.
- Veeam backup repository – This destination backs up to a repository or a network managed and maintained by Veeam Backup & Replication server. But you must have access-right to the repository before you can use this option.
- Microsoft OneDrive – This destination lets you back up data on your personal Microsoft OneDrive account or Microsoft OneDrive Business account. This option comes in handy if you don’t have access to the Veeam repository, an external drive, or a shared network.
But in this tutorial, you’ll choose the local storage as your backup’s destination. Ensure you have a USB or an external hard drive with enough space.
5. Select the external hard drive, USB, or any other storage device you wish to backup your computer. At this stage, you can also choose how long you want your backups to stay in your backup destination. But in this tutorial, the backups remain for 14 days.
Click Advanced to set the compression level for your backups (step six).  Choosing a storage device for backups
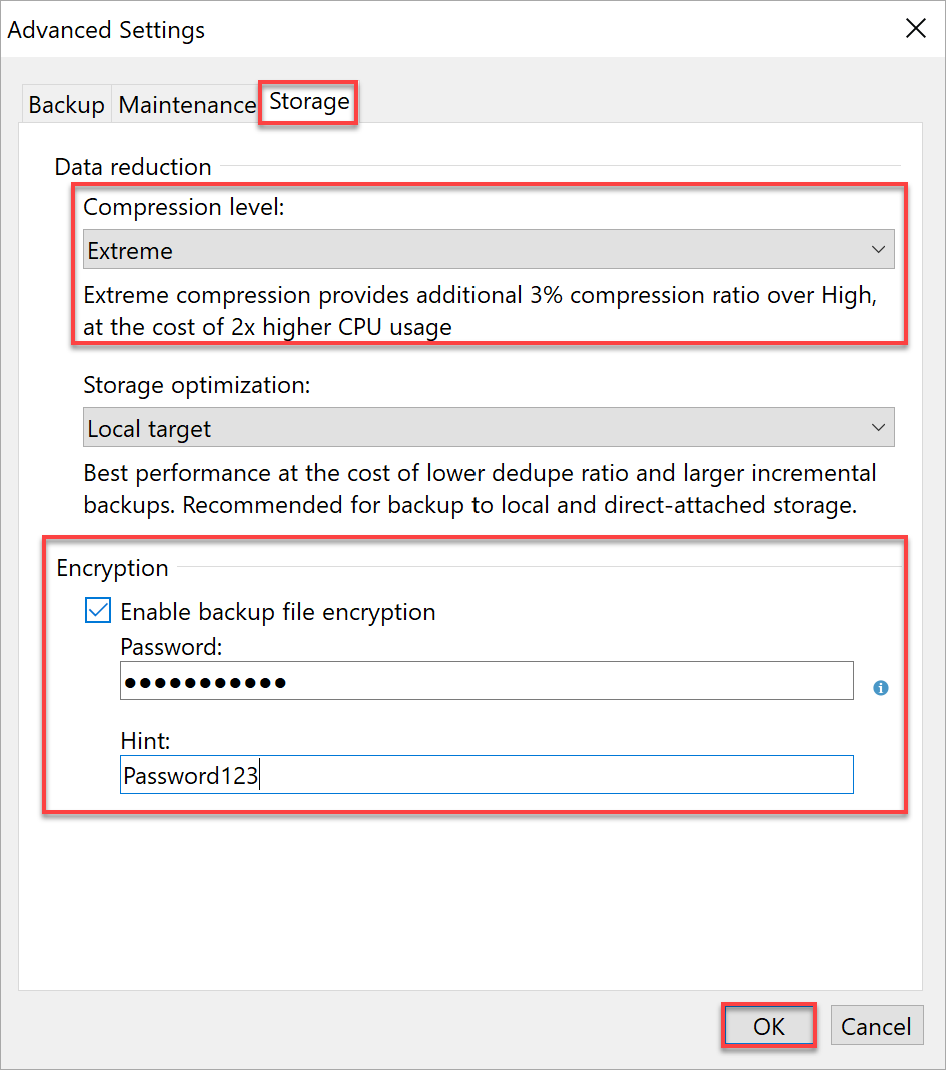
6. On the Advanced Settings window, configure the backup job’s advanced settings as follows:
Navigate to the Storage tab, and set the Compression level to Extreme.
Compression lets you backup your folders/files that are too large so that you can save some storage space.
Set a Password and a Hint to encrypt your backups automatically.
Important files you don’t wish anyone to see can be encrypted when handling files or folders on your local machine or server.
- Click OK to save the advanced storage settings and switch to the New Backup Job wizard.
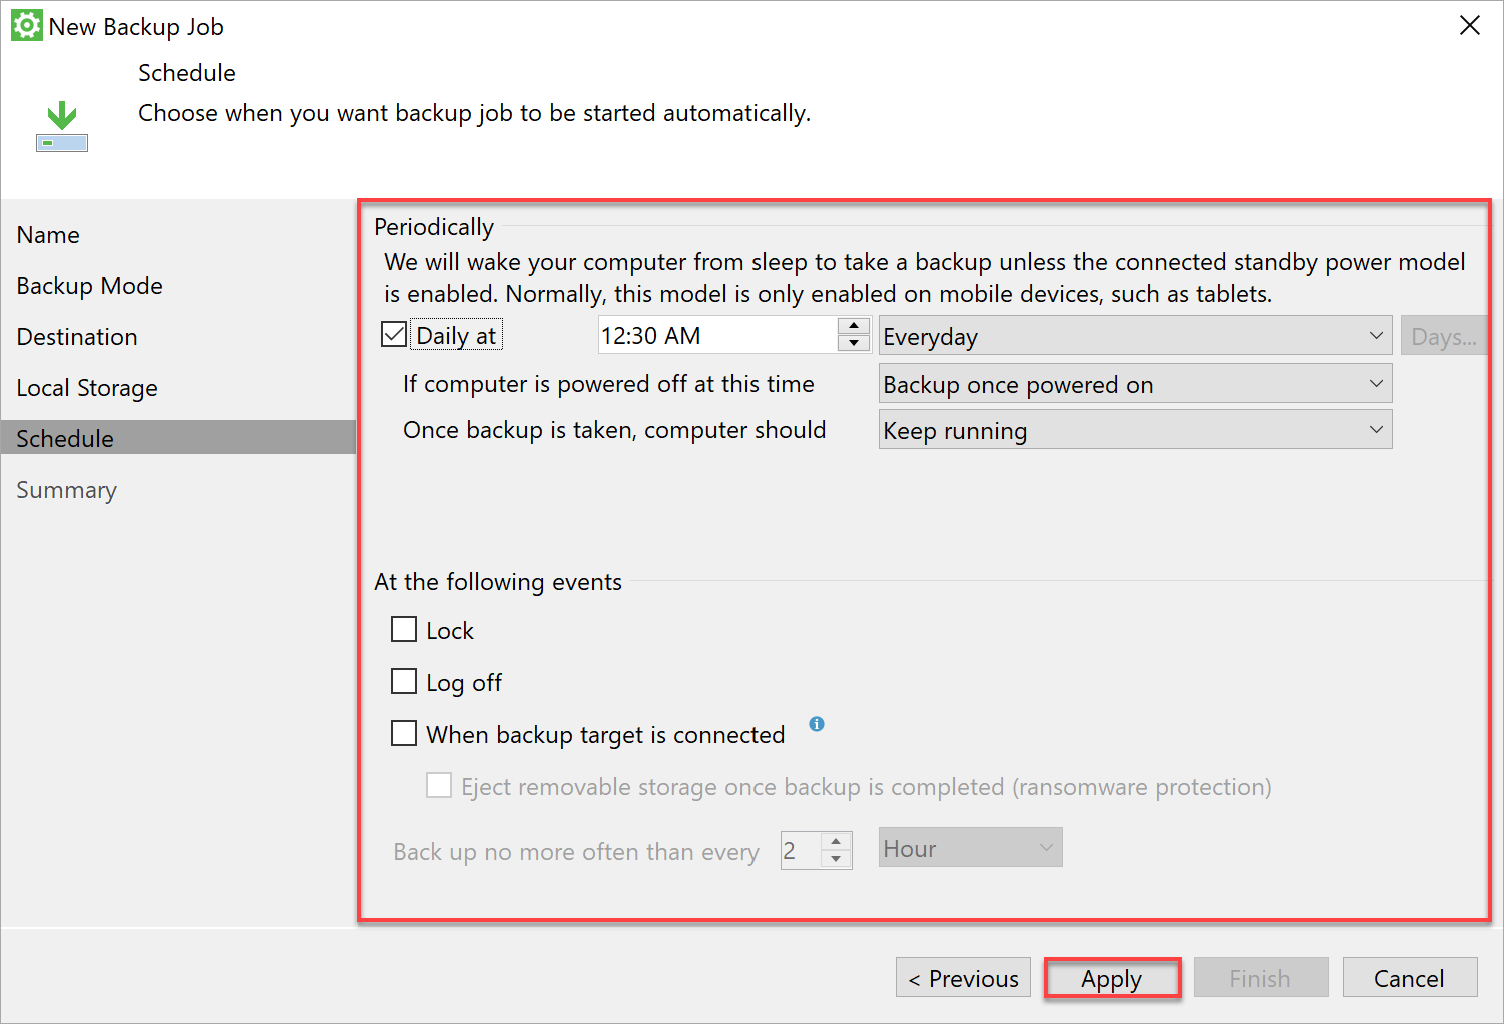
7. Next, set a schedule when your backup job starts and what action your computer takes after backup, and click Apply.
Different settings are there for you that help you start a backup event automatically when you’re busy.
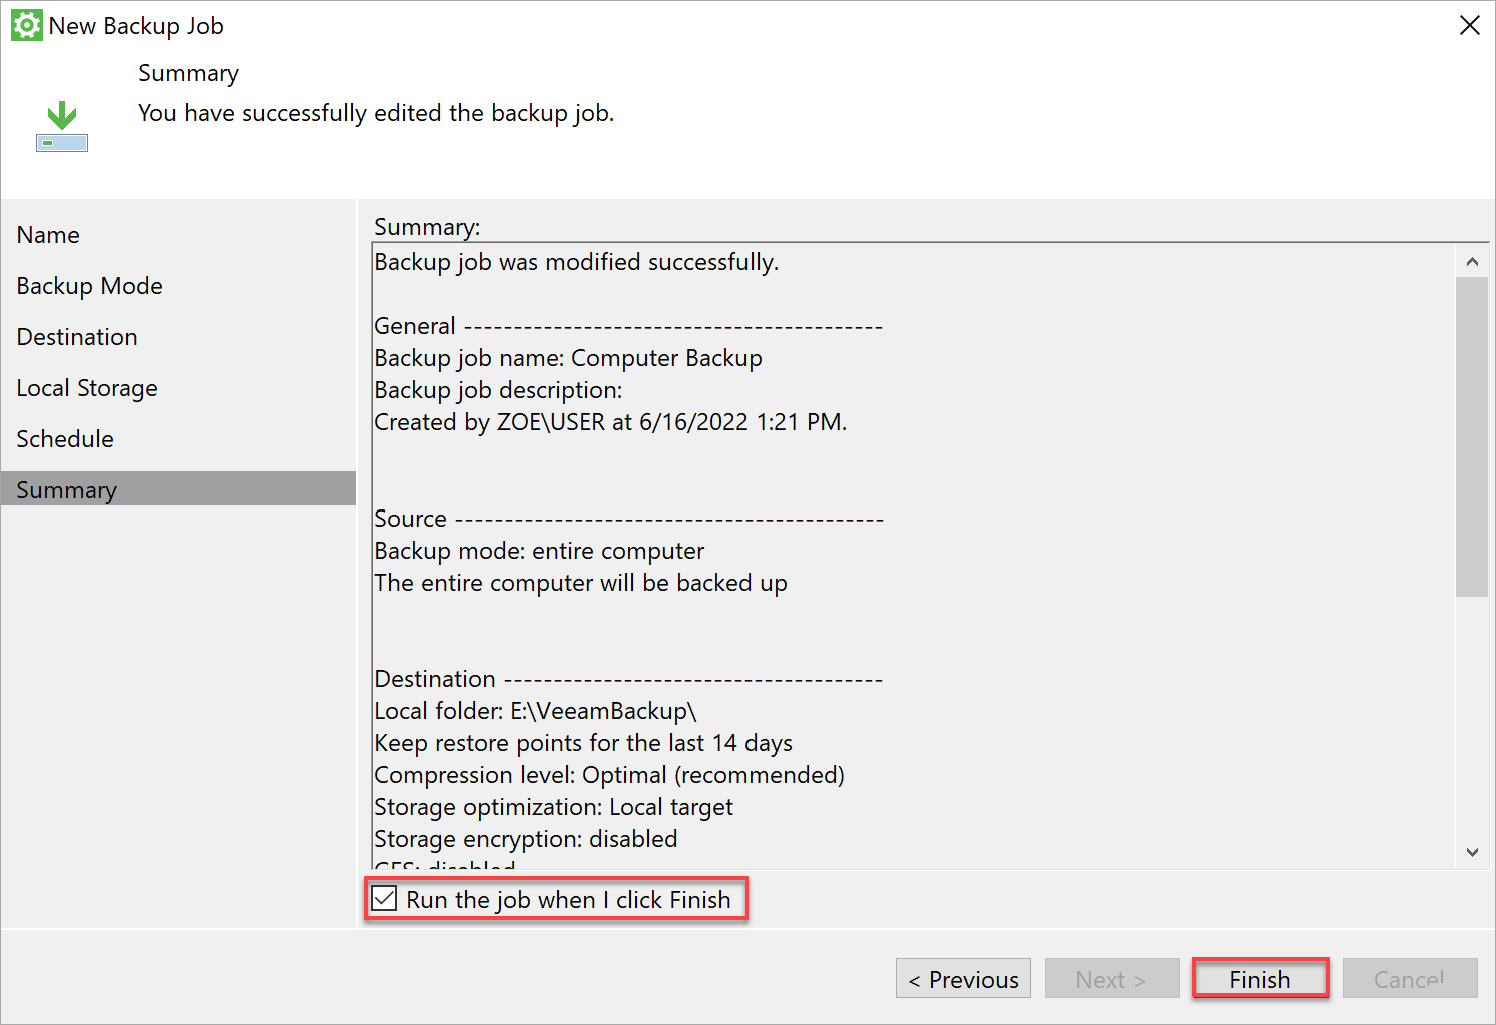
8. Review the summary of what you configured for the backup job.
Enable the Run the job when I click Finish option, then click Finish to run the backup job after you finalize the configuration.
Below, you can see Veeam performed an initial backup on your computer, as shown below. Note that the following backup becomes faster as they increment.  Overviewing the first backup job
Restoring Backups Using the Veeam Recovery Media
Restoring is a great way to know if the backup has been set up and works properly. And your Veeam Recovery Media will come in handy if you need to correct something on your backup.
How to restore backups? Veeam has dedicated software to restore backup files, the File Level Restore.
To restore backup files with File Level Restore:
1. Open File Level Restore from your Start menu.  Opening File Level Restore
2. Next, browse your external drive or where your backed up data is stored, and click Next.
Usually, Veeam detects the location automatically.

3. Select a restore point and click Next. Veeam allows you to browse the folder on the Veeam Agent and choose files to restore (step four).
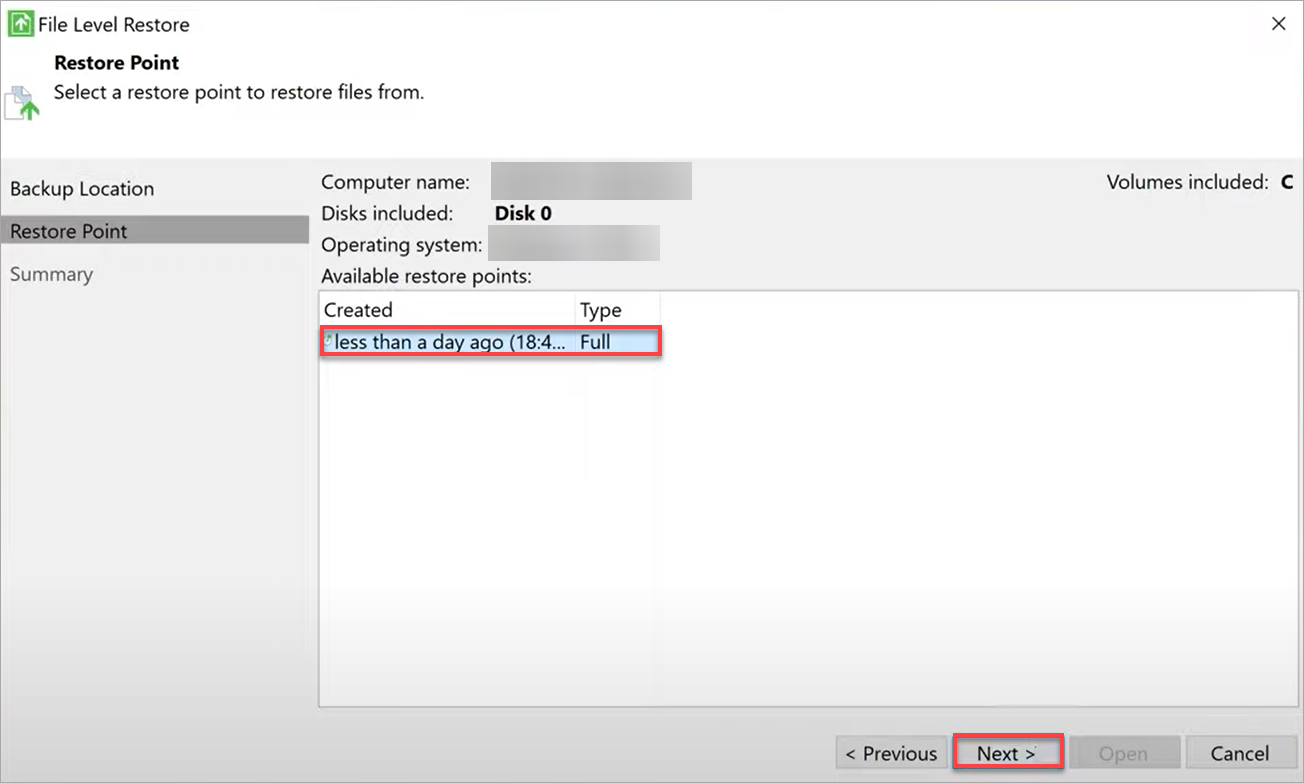
4. Now, navigate to the folder that holds the file to restore.  Navigating to the folder of the files to restore
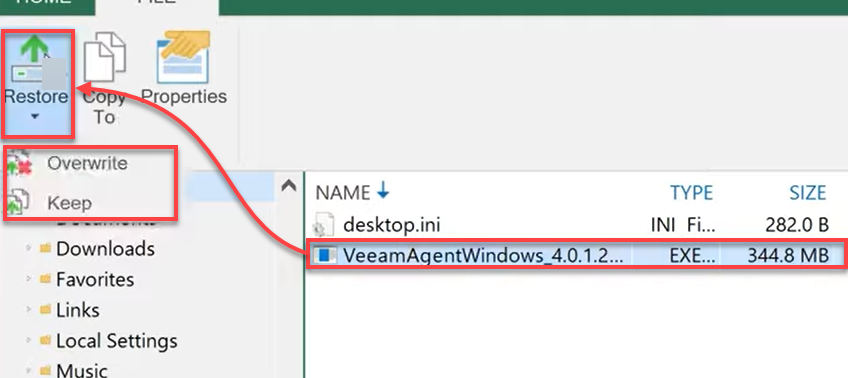
5. Once inside the folder, select all the files you like to restore and click Restore (top left).
Choose to Overwrite any existing files with the same file name, or Keep the current file and rename the newly-restored data.
If you can’t find the file to restore, that file may have been deleted already before you performed a backup. In that case, try recovering the file from your computer instead.
Once restored, you’ll see the following output.  Verifying successful file restoration
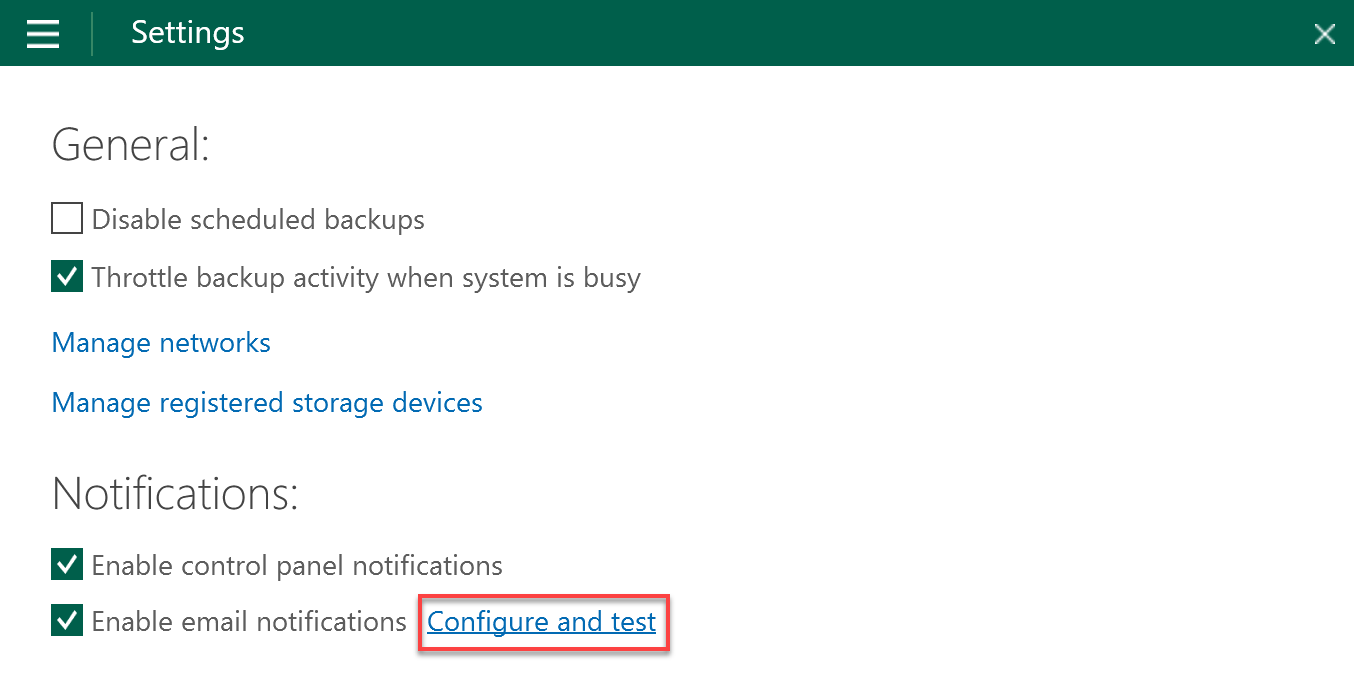
Setting up a Backup Email Notification
Having a scheduled backup job that runs at every certain point in time is great and all. But you may want to get a notification whenever the backup runs to better monitor that everything still works.
Luckily, with Veeam, you can set up an email notification that notifies you about a backup run on your server. This feature also helps when you want to know if a backup is successful without trying to restore what you just backed up.
To set up a backup email notification:
1. Open Veeam Agent for Windows, and navigate to the Settings section.
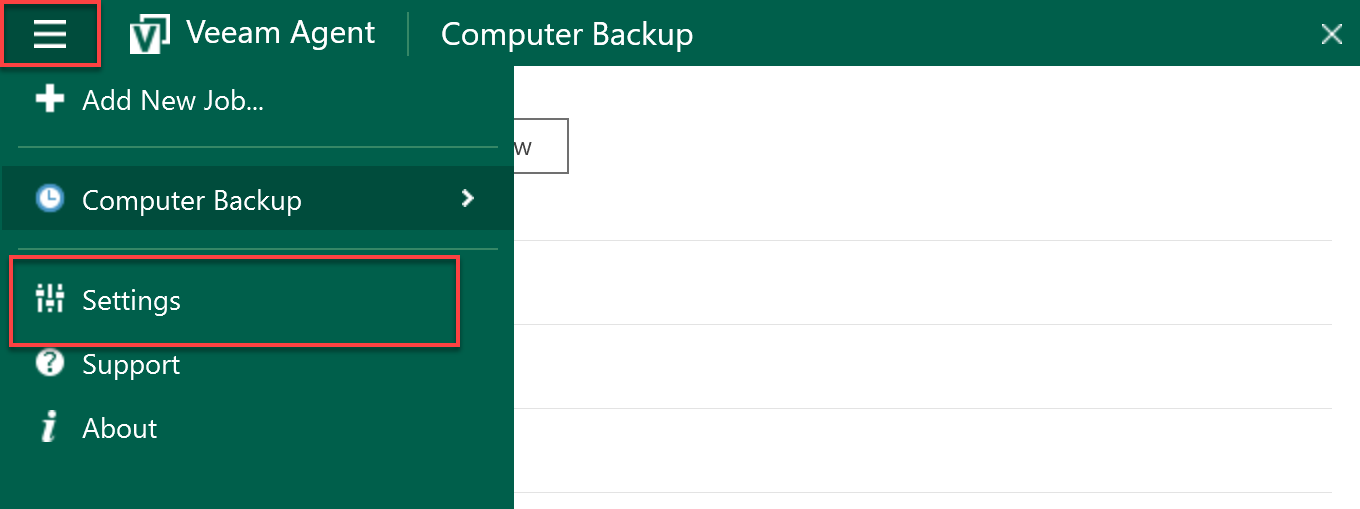
2. Next, tick the Enable email notifications option.
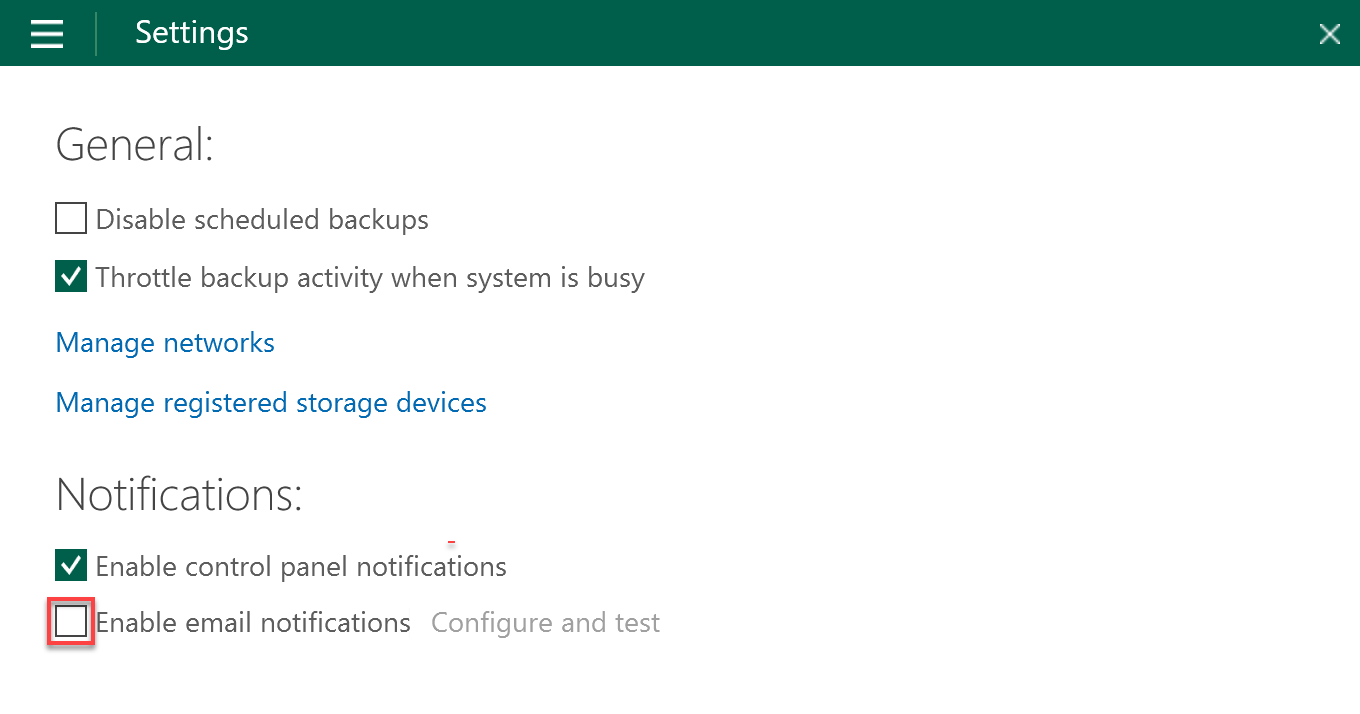
3. Click on Yes when prompted to install Veeam Agent Tray, as shown below. 
Installing Veeam Agent Tray
4. Now, click on the Configure and test link to configure the email notification.
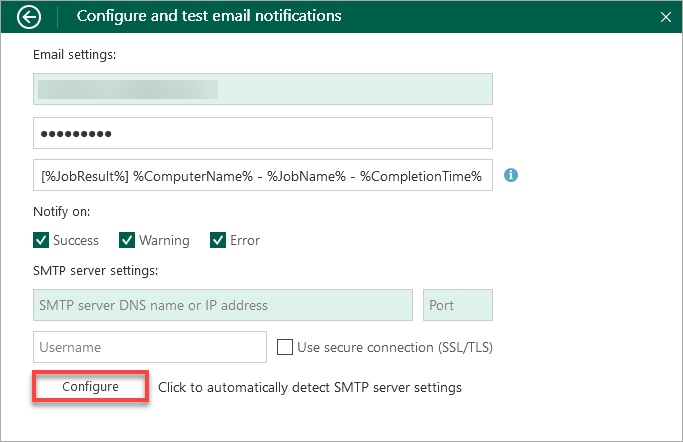
5. Configure your email notification with the following:
- Your email address – Set the email address where you want to receive the email notification.
- Password – Set a password to secure the email so only you can open the email.
- Set how you want the description to be displayed. Click on the information icon to learn more about the description format.
- Notify on – Tick the options to set when you want to be notified. But leaving all options ticked is strongly recommended.
- SMTP server settings – You can also set up an SMTP server but not needed in this tutorial.
- Click Configure to save the email notification configurations.
Another type of restoration that Veeam software agents provide is the bare metal restore. This method is more hands-on, letting you restore if the computer is unavailable or if you are restoring to a new machine and require the recovery media (ISO).
Conclusion
Backing up Windows Servers can be daunting. But with Veeam, you can set up a schedule to securely back up your servers automatically, even without human interventions. You’ve set an email notification to get notified if your backup event goes through or not.
Now you never have to worry about losing data even if your computer gives up on you. Will you let Veeam back up your videos, images, folder, and important documents from now on? Perhaps you’re looking to back up data stored in your Office 365 services?