 В этом обзоре — о простом, мощном и бесплатном инструменте резервного копирования для ОС Windows: Veeam Agent for Microsoft Windows Free (ранее программа называлась Veeam Endpoint Backup Free), позволяющем удобно создавать образы системы, резервные копии дисков или разделов диска с данными как на внутренних, так и на внешних или сетевых накопителях, восстанавливать эти данные, а также реанимировать систему в некоторых распространенных случаях.
В Windows 10, 8 и Windows 7 присутствуют встроенные средства резервного копирования, позволяющие сохранить состояние системы и важных файлов в определенный момент времени (см. Точки восстановления Windows, История файлов Windows 10) или создать полную резервную копию (образ) системы (см. Как создать резервную копию Windows 10, подойдет и для предыдущих версий ОС). Существуют также и простые бесплатные программы для резервного копирования, например, Aomei Backupper Standard (описана в предыдущей упомянутой инструкции).
Однако, в случае, если требуется «продвинутое» создание резервных копий Windows или дисков (разделов) с данными, встроенных средств ОС может оказаться недостаточно, а вот рассматриваемой в статье программе Veeam Agent for Windows Free вероятнее всего хватит для большинства задач резервного копирования. Единственный возможный недостаток для моего читателя — отсутствие русского языка интерфейса, но я постараюсь рассказать об использовании утилиты максимально подробно.
Установка Veeam Agent Free (Veeam Endpoint Backup)
Установка программы не должна вызывать особенных сложностей и выполняется с помощью следующих простых шагов:
- Согласитесь с условиями лицензионного соглашения, поставив соответствующую отметку и нажмите «Install».
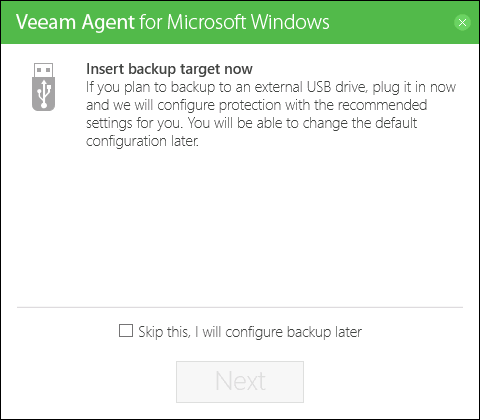
- На следующем шаге вам будет предложено подключить внешний накопитель, который будет использоваться для резервного копирования для его настройки. Делать это не обязательно: вы можете выполнять резервное копирование на внутренний накопитель (например, второй жесткий диск) или выполнить настройку позже. Если во время установки вы решите пропустить этот этап, отметьте пункт «Skip this, I will configure backup later» и нажмите «Next» (далее).

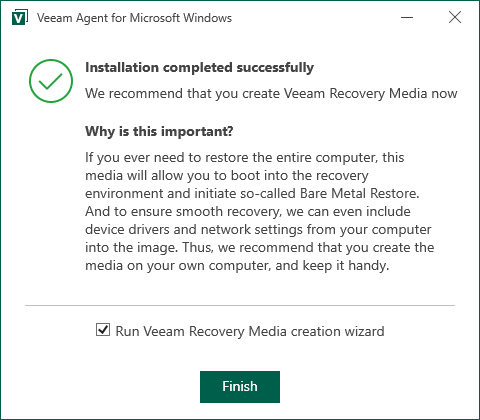
- По завершении установки вы увидите окно с сообщением о том, что установка была завершена и установленной по умолчанию отметкой «Run Veeam Recovery Media Creation wizard», запускающей создание диска восстановления. Если на этом этапе вы не хотите создавать диск восстановления, можете снять отметку.

Диск восстановления Veeam
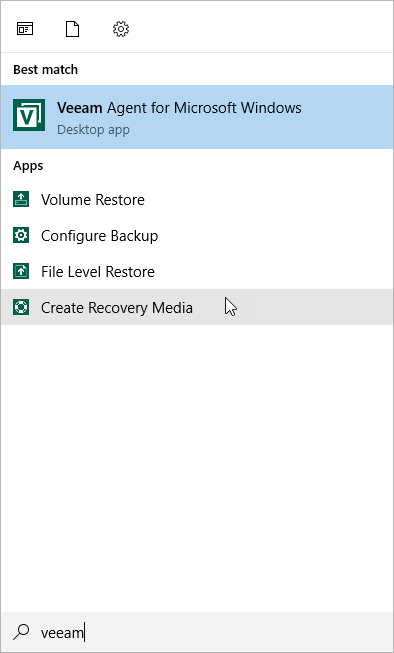
Создать диск восстановления Veeam Agent for Microsoft Windows Free можно сразу после установки, оставив отметку из п.3 выше или же в любой момент, запустив «Create Recovery Media» из меню Пуск.
Для чего потребуется диск восстановления:
- Прежде всего, если вы планируете создавать образ всего компьютера или резервную копию системных разделов диска, восстановить их из резервной копии можно будет только загрузившись с созданного диска восстановления.
- Диск восстановления Veeam также содержит несколько полезных утилит, которые можно использовать для восстановления Windows (например, сброс пароля администратора, командная строка, восстановление загрузчика Windows).
После запуска создания Veeam Recovery Media, вам потребуется выполнить следующие шаги:
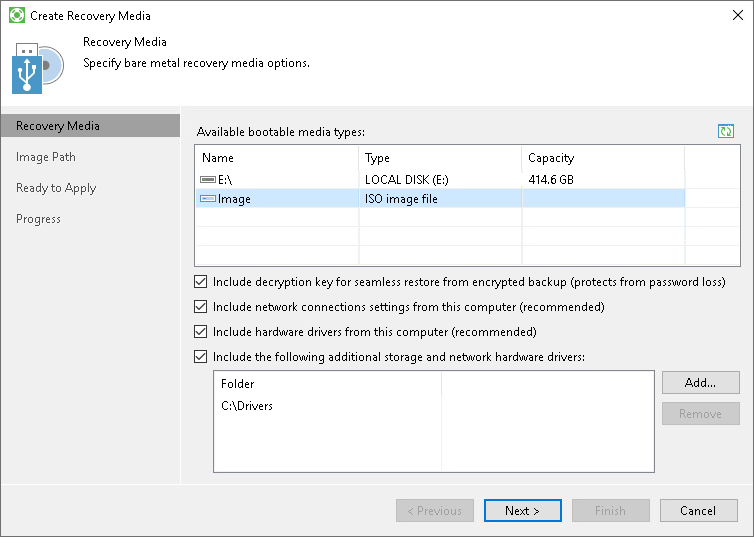
- Выбрать тип создаваемого диска восстановления — CD/DVD, USB-накопитель (флешка) или ISO-образ для последующей записи на диск или флешку (у меня на скриншоте отображается только ISO-образ, т.к. компьютер без оптического привода и подключенных флешек).

- По умолчанию отмечены пункты, включающие в себя параметры сетевых подключений текущего компьютера (пригодится для восстановления с сетевого накопителя) и драйверы текущего компьютера (также пригодится, например, для того чтобы после загрузки с диска восстановления был доступ к сети).
- При желании вы можете отметить третий пункт и добавить дополнительные папки с драйверами в состав диска восстановления.
- Нажмите «Next». В зависимости от выбранного типа накопителя вы попадете в разные окна, например, в моем случае, при создании образа ISO — в выбор папки для сохранения этого образа (с возможностью использовать сетевое расположение).
- На следующем шаге останется лишь нажать «Create» и дождаться завершения создания диска восстановления.

На этом всё готово для создания резервных копий и восстановления из них.
Резервные копии системы и дисков (разделов) в Veeam Agent
Прежде всего, необходимо настроить резервное копирование в Veeam Agent. Для этого:
- Запустите программу и в главном окне нажмите «Configure Backup».

- В следующем окне вы можете выбрать следующие опции: Entire Computer (резервная копия всего компьютера, обязательно должна сохранятся на внешнем или сетевом диске), Volume Level Backup (резервная копия разделов диска), File Level Backup (создание резервных копий файлов и папок).
- При выборе варианта Volume Level Backup будет предложено выбрать, какие именно разделы следует включать в резервную копию. При этом, при выборе системного раздела (у меня на скриншоте — диск C), в образ будут включены и скрытые разделы с загрузчиком и средой восстановления, как на EFI так и на MBR системах.
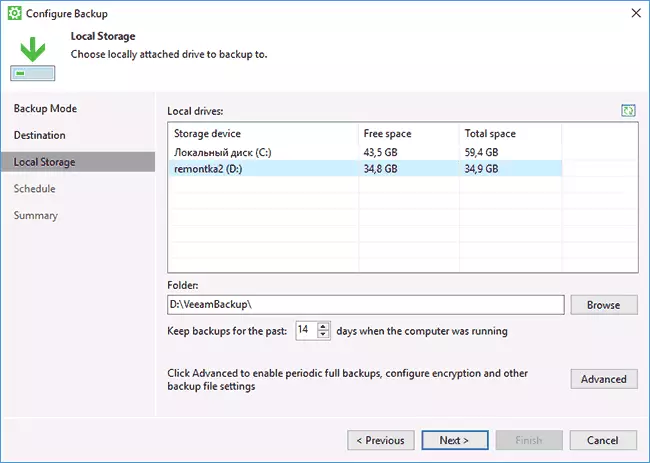
- На следующем этапе требуется выбрать место сохранения резервной копии: Local Storage, куда включаются как локальные диски, так и внешние накопители или Shared Folder — сетевая папка или NAS-накопитель.
- При выборе локального хранилища на следующем шаге нужно указать, какой именно диск (раздел диска) использовать для сохранения резервных копий и папку на этом диске. Здесь же указывается, в течение какого времени хранить резервные копии.
- По нажатию на кнопку «Advanced» вы можете создать частоту создания полных резервных копий (по умолчанию сначала создается полная резервная копия, а в дальнейшем записываются только изменения, которые произошли с момента ее создания. В случае включения периодичности Active full backup, каждый раз в указанное время будет запускаться новая цепочка резервных копий). Здесь же, на вкладке Storage можно задать степень сжатия резервных копий и включить шифрование для них.

- Следующее окно (Schedule) — настройка частоты создания резервных копий. По умолчанию, они создаются ежедневно в 0:30, при условии, что компьютер включен (или находится в режиме сна). Если выключен — создание резервной копии начинается после следующего включения. Также можно задать создание резервных копий при блокировке Windows (Lock), выходе из системы (Log off) или при подключении внешнего накопителя, заданного в качестве целевого для хранения резервных копий (When backup target is connected).


После применения настроек вы можете создать первую резервную копию вручную, просто нажав кнопку «Backup Now» в программе Veeam Agent. Время создания первого образа может быть продолжительным (зависит от параметров, количества сохраняемых данных, скорости накопителей).

Восстановление из резервной копии
При необходимости произвести восстановление из резервной копии Veeam, вы можете сделать это:
- Запустив Volume Level Restore из меню Пуск (только для восстановления резервных копий не системных разделов).
- Запустив File Level Restore — чтобы восстановить только отдельные файлы из резервной копии.
- Загрузившись с диска восстановления (для восстановления резервной копии Windows или всего компьютера).
Volume Level Restore
После запуска Volume Level Restore потребуется указать место хранения резервной копии (обычно определяется автоматически) и точку восстановления (в случае если их несколько).

И указать какие разделы требуется восстановить в следующем окне. При попытке выбора системных разделов вы увидите сообщение о том, что их восстановление внутри запущенной системы невозможно (только с диска восстановления).

После этого дождаться восстановления содержимого разделов из резервной копии.
File Level Restore
Если необходимо восстановить только отдельные файлы из резервной копии, запустите File Level Restore и выберите точку восстановления, затем на следующем экране нажмите кнопку «Open».
Откроется окно Backup Browser с содержимым разделов и папок в резервной копии. Вы можете выбрать любые из них (в том числе выделить несколько) и нажать кнопку «Restore» в главном меню Backup Browser (появляется только при выборе файлов или файлов + папок, но не только папок).

Если была выбрана папка — нажмите по ней правой кнопкой мыши и выберите пункт «Restore», а также режим восстановление — Overwrite (перезаписать текущую папку) или Keep (сохранить обе версии папки).
При выборе второго варианта на диске останется папка в текущем виде и восстановленная копия с именем RESTORED-ИМЯ_ПАПКИ.
Восстановление компьютера или системы с использованием диска восстановления Veeam
В случае необходимости восстановления системных разделов диска, потребуется загрузиться с загрузочного диска или флешки Veeam Recovery Media (может потребоваться отключить Secure Boot, поддерживается загрузка EFI и Legacy).
При загрузке во время появления надписи «press any key to boot from cd or dvd» нажмите любую клавишу. После этого откроется меню восстановления.
- Bare Metal Recovery — использование восстановления из резервных копий Veeam Agent for Windows. Всё работает так же, как и при восстановлении разделов в Volume Level Restore, но с возможностью восстанавливать системные разделы диска (При необходимости, если программа не обнаружит расположение сама, укажите папку с резервной копией на странице «Backup Location»).
- Windows Recovery Environment — запуск среды восстановления Windows (встроенных средств системы).
- Tools — полезные в контексте восстановления системы инструменты: командная строка, сброс пароля, загрузка драйвера оборудования, диагностика оперативной памяти, сохранение журналов проверки.


Пожалуй, это всё на тему создания резервных копий с помощью Veeam Agent for Windows Free. Надеюсь, если будет интересно, с дополнительными опциями вы сможете разобраться.
Скачать программу можно бесплатно с официальной страницы https://www.veeam.com/ru/windows-endpoint-server-backup-free.html (для загрузки потребуется регистрация, которая, однако, не проверяется каким-либо образом на момент написания статьи).
You can create a Veeam Recovery Media — a recovery media for your computer. The Veeam Recovery Media contains all data that is required to run the Microsoft Windows RE. If your computer stops working or the hard disk fails, you can boot from the Veeam Recovery Media, instead of booting from the hard drive. After booting, you can use Veeam and Microsoft tools to fix errors, recover the system image of your computer and your data.
|
NOTE: |
|
In some cases, Windows Recovery Environment components may be missing on the system, and Veeam Agent for Microsoft Windows will not find them during the Veeam Recovery Media creation. In such case you will be prompted to do one of the following:
Keep in mind that the Veeam Recovery Media created with MS ADK components will not contain the following tools:
|
Step 1. Launch Create Recovery Media Wizard
You can launch the Create Recovery Media wizard right after the product installation process or at any time later.
To launch the Create Recovery Media wizard after installation:
- At the last step of the installation wizard, select the Run Veeam Recovery Media creation wizard check box.
- Click Finish. Veeam Agent for Microsoft Windows will automatically launch the Create Recovery Media wizard.
To launch the Create Recovery Media wizard at any time, from the Microsoft Windows Start menu, select All Programs > Veeam > Tools > Create Recovery Media or use the Microsoft Windows search to find the Create Recovery Media option on your computer.
Step 2. Specify Recovery Media Options
At the Recovery Media step of the wizard, specify on which type of media you want to create a recovery image and what drivers you want to include in the recovery image.
- In the Available bootable media types list, select a media for the recovery image. You can create the following types of recovery images:
- Recovery image on a removable storage device. You can create a recovery image on a USB drive, SD card and so on. Veeam Agent for Microsoft Windows displays all removable storage devices currently attached to your computer. Select the necessary one in the list.
- Recovery image on an optical disk. You can create a recovery image on a CD, DVD or BD. Veeam Agent for Microsoft Windows displays all CD, DVD and BD drives available on your computer. Select the necessary one in the list.
- ISO file with the recovery image. You can create a recovery image in the ISO file format and save the resulting file locally on your computer or in a network shared folder.
- If you have enabled data encryption options for the backup job and want to include the decryption key in the recovery image, select the Include decryption key for seamless restore from encrypted backup check box. In this case, when you use the created recovery image to perform bare metal recovery, you will not have to enter the password used for encryption.
- If you want to include in the recovery image current network settings, make sure that the Include network connections settings from this computer check box is selected. When you use the created Veeam Recovery Media to boot your computer, these settings will be automatically applied and will be used to connect to the remote backup storage.
- If you want to include in the recovery image storage and network drivers that are currently installed on your computer, make sure that the Include hardware drivers from this computer check box is selected. Veeam Agent for Microsoft Windows will detect hard disk controller drivers, network adapter drivers and USB controller drivers and include them into the recovery image. When you use the created Veeam Recovery Media to boot your computer, these drivers will be automatically injected into Windows RE.
- If you want to include in the recovery image additional storage and network drivers that you may need when booting from the recovery image, select the Include the following additional storage and network hardware drivers check box, click Add and select a folder containing necessary drivers. The folder that you select must contain all files of the driver package (files in CAT, INF and SYS formats).
It is strongly recommended that you enable this option if you use drivers that are not included into the Microsoft Windows installation DVD. For example, you can include drivers for a discrete network card, third party USB 3.0 controllers and non-standard hard disk controllers.
|
IMPORTANT! |
|
Mind the following:
|
Step 3. Specify Path to ISO
The Image Path step of the wizard is available if you have selected to create an ISO file with the recovery image.
Select a location where you want to save the ISO file.
- In the ISO file name and location field, specify a real path to the folder where you want to save the created recovery image and the ISO file name. You can save the ISO file in the following locations:
-
- Local folder: select the necessary folder on your computer.
- Network shared folder: specify a UNC path to a network shared folder. Keep in mind that a UNC path always starts with two back slashes (\\).
It is strongly recommended that you store the recovery image in a location other than a local computer drive. If you choose to save the recovery image in a local folder on your computer, you can copy it to an external location afterwards. In this case, the recovery image will always be available should computer volumes get corrupted or the computer fail to start.
- If you chose to save the ISO file in a network shared folder and this folder requires authentication, select the This share requires access credentials check box and enter the user name and password in the Username and Password fields. The user name must be specified in the DOMAIN\Username format.
To view the entered password, click and hold the eye icon on the right of the Password field.

Step 4. Review Recovery Image Settings
At the Ready to Apply step of the wizard, review settings of the recovery image that you plan to create and click Create.
Veeam Agent for Microsoft Windows will collect files necessary for recovery image creation and write the resulting recovery image to the specified target or burn it to CD/DVD/BD.
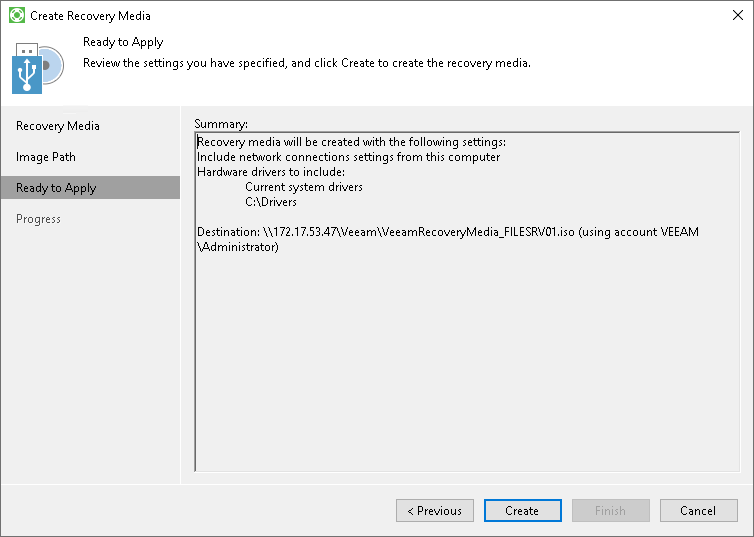
The process of recovery image creation may take some time. Wait for the process to complete and click Finish to exit the wizard.
If you want to interrupt the process of recovery image creation, click Cancel or close the wizard window.
[For ISO] After the recovery image is created, you can burn the created ISO to a CD/DVD/BD. To do this, you can use native Microsoft Windows tools or third-party software.
Let’s have a look at this article, on how to create Veeam recovery media. You can start the Create Recovery Media wizard right after the Veeam Agent for the Microsoft Windows installation process or at any time later. In the previous article, we installed Veeam Agent for Windows for free. Now we are going to look at how to start with the Veeam Agent. The Veeam agent recovery media contain all the data that is required to run Windows.
If the system stops working or your hard drive fails, you can boot the system from a Veeam Agent Recovery Media, instead of booting from the hard disk. After booting, we can use the Veeam agent and Microsoft tools to fix errors and recover the system image of the computer and data. I am not starting the installation, which is very easy to install Veeam Agent, however.
After the installation, the recovery wizard will ask you if you wish to configure a backup with the default settings. In order to start this, you need a USB flash drive that is at least half the size of the chosen source (entire system). For lots of users, the default settings will be ideal, and they can proceed with doing so.
Create Veeam Recovery Media
Search Create recovery media Veeam and then open it.

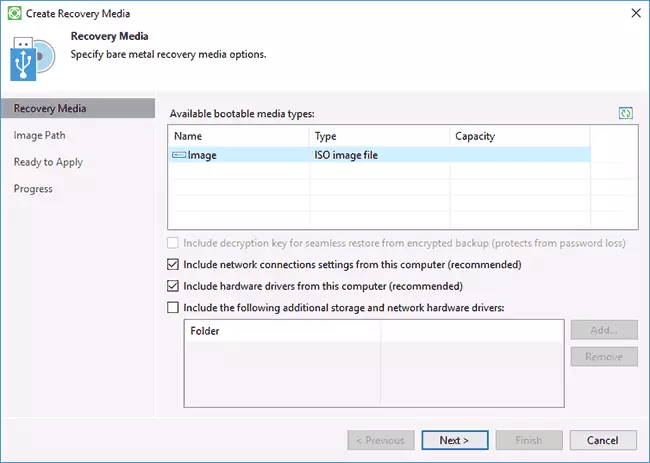
You can specify recovery media options. I want to create ISO media, so I choose an ISO image file as the available bootable media. I chose “Include network connection settings from this computer” and “recommended and included hardware drivers from this computer”. Then click on the next button.

Now decide where you have to save the Veeam recovery media ISO file by browsing the target path.
I want to save the created Veeam agent recovery media ISO image in my document and then click on Next.

Veeam recovery media is ready to apply, so, click on the Create button to start the recovery media process.

The Veeam agent recovery media was successfully completed, Click on the finish button.

The Veeam recovery media ISO image.

Conclusion:
Getting started with Veeam Agent for Microsoft Windows is very simple. Accepting the default settings, which will be perfect for users. Do not forget to create the Veeam recovery media so you can boot your system when necessary.
Visit Veeam to learn more about creating recovery media.
In this post, I’m going to introduce you to a tool which can be used to safeguard your Windows 10 devices. Have you seen boot failure issues with Windows 10 and server devices? You can use this tool to boot the Windows 10 and server 2016 devices from pre-created recovery media and recover the data. Windows 10 Recovery media can be created a tool called Veeam agent for Microsoft Windows.
Why is Windows 10 Recovery Media Important?
The Windows 10 recovery media or image can be helpful if one of the following errors occur:
- The Windows 10 on the computer fails to start or boot
- The Windows 10 computer is blocked with malware, and you cannot get access to your data
- When you want to perform a bare-metal restore from the backup on the computer without the Windows 10 and other software installed
- When you want to restore the Windows 10 system volume of the computer
Veeam Agent for Microsoft Windows
You can create Windows 10 recovery media using Veeam agent for Windows. In case of a disaster, you can start the Windows 10 OS from the Veeam Recovery Media and use Veeam Agent for Microsoft Windows and standard Microsoft Windows tools to diagnose and fix problems.
This tool can be used for creating recovery media for the following Windows operating systems:
- Windows 7 SP1
- Windows 8.x
- Windows 10
- Windows Server 2008 R2 SP1
- Windows Server 2012
- Windows Server 2012 R2
- Windows Server 2016
In this video post, I installed Veeam agent for Windows in Windows 10 1809 machine and created a recovery media.
Download Veeam Agent for Microsoft Windows?
Download the free version of Veeam agent for Microsoft Windows and use it for desktop and laptops. Also, there is an option for you to try the trial version of FULL Veeam agent for Microsoft Windows for 30 days.
- Free Veeam Agent for Windows Desktop and Laptops (Windows 10)
- Thirty (30) Days trail Veeam Agent for Windows Workstations & Servers
Download the Free version of Veeam agent for Windows 10 backup and recovery from the following link:
https://www.veeam.com/windows-backup-download.html
Install Veaam Agent for Microsoft Windows
Install Veeam backup and recovery agent for Windows 10. You can use this agent to create Windows 10 recovery media. The installation process is straightforward, and the installer itself install the other dependant required software. List of prerequisite software are:
- .NET Framework 4.5.2
- SQL Server 2012 Express LocalDB Edition
- SQL Server 2012 Management Objects
- SQL Server System CLR Types
As you can see in the above video, the installation is straightforward. Veeam agent for Windows V2.2 is compatible with Windows 10 1809 version.
Create Windows 10 Recovery Media – Veeam Agent for Windows
As I mentioned above, Veeam Agent for Windows can be used to create recovery media for server and desktop operating systems like Server 2012, 2016, etc. In this video post, I’m going to explain how to create recovery media for Windows 10 1809.
I used the four (4) GB USB drive to create the recovery media for Windows 10 1809 machine. You can create a recovery image on different kinds of media:
- Removable storage devices such as USB drives or SD cards
- CD/DVD/BD
- ISO images on local or external computer drives
How to Launch – Veeam Agent for Windows to Create Recovery Media?
Once you install Veeam agent for Microsoft Windows, you can launch “Create Recovery Media” shortcut from Windows 10 Start Menu – Veeam folder.
Drivers required to run hardware and devices on your Windows 10 computer will be added to recovery media. Also, network and wireless network drivers will be added to the media. There is an option to add additional drivers from a network folder into Windows 10 recovery media using Veeam Agent for Microsoft Windows.
Default Folder Path – C:\ProgramData\Microsoft\Windows\Start Menu\Programs\Veeam\Tools

Steps – Windows 10 Recovery Media – Veeam Agent for Windows
The following are the high-level steps involved in the creation of Windows 10 recovery media using Veeam agent for Microsoft Windows. As I mentioned above, I used four GB USB drive to create the recovery media.
Note – The all the data in the USB media will be erased while creating the recovery media.
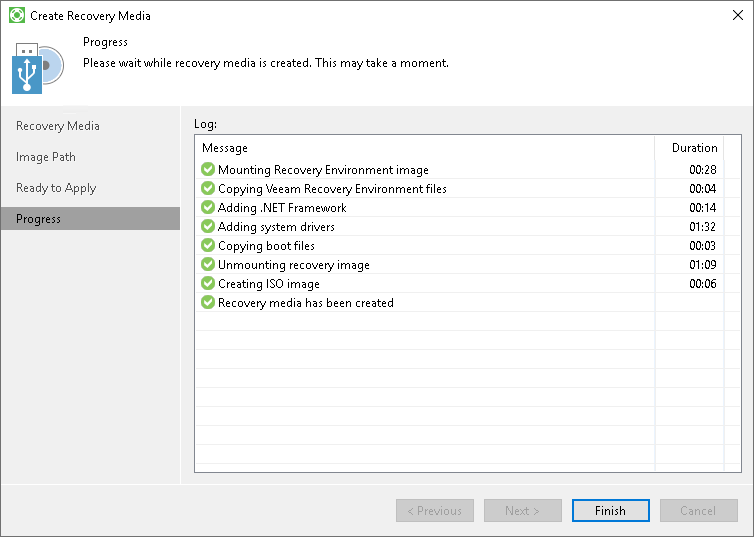
- Mounting Recovery Environment Image
- Copying Veeam Recovery Environment Files
- Adding the .NET Framework
- Adding Wireless networking support files
- Adding System Drivers
- Adding Internet Browser
- Copying Boot Files
- Unmounting Recovery Image
- Preparing USB Disk
- Copying Data to USB Disk
- Recovery Media Has Been Created
How to Boot Windows 10 device with USB Recovery Media
Plug in the Windows 10 recovery media created with Veeam agent for Microsoft Windows and the select the option to boot the Windows device from USB media.
There are several options given in the Veeam Recovery Media for Windows 10. I have explained most of them in details in the above video tutorial.
Resource
Veeam Agent https://www.veeam.com/veeam_agent_windows_2_2_release_notes_rn.pdf
PWA Windows Desktop And Mobile Experience – https://howtomanagedevices.com/pwa-windows-desktop/

In this review — about a simple, powerful and free backup tool for Windows: Veeam Agent for Microsoft Windows FREE (formerly the program was called Veeam Endpoint Backup Free), which allows you to conveniently create system images, backup copies of discs or data disk sections as internal And on external or network drives, restore these data, as well as to reanimate the system in some common cases.
In Windows 10, 8 and Windows 7, there are built-in backup tools that allow you to save the status of the system and important files at a certain point in time (see Windows Recovery Points, Windows 10 File History) or create a full backup (image) of the system (see how Create a backup of Windows 10 will be suitable for previous versions of OS). There are also simple free software for backups, such as Aomei Backupper Standard (described in the previous mentioned instruction).
However, if the «advanced» copy of Windows or Disc Copies (partitions) is required, the built-in OS funds may not be enough, but the VEEAM Agent For Windows Free version is most likely enough for most backup tasks. The only possible drawback for my reader is the lack of the Russian language interface, but I will try to tell about the use of the utility as detailed as possible.
Installing Veeam Agent FREE (Veeam Endpoint Backup)
The installation of the program should not cause special difficulties and is performed using the following simple steps:
- Agree with the terms of the license agreement, putting the appropriate mark and click «Install.»
- In the next step, you will be prompted to connect an external drive that will be used for backup to configure it. It is not necessary to do this: you can back up to an internal drive (for example, a second hard disk) or configure later. If you decide to skip this stage during installation, check the «Skip This, I Will Configure Backup Later» item and click «Next».

- Upon completion of the installation, you will see a window with a message that the installation has been completed and set by default «Run Veeam Recovery Media Creation Wizard» that starts creating a recovery disk. If at this stage you do not want to create a recovery disk, you can remove the mark.


Recovery disk veeam
You can create a VEEAM Agent for Microsoft Windows Free recovery disk immediately after installation, leaving the mark from clause 3 or at any time, running «Create Recovery Media» from the Start menu.
What will require a recovery disc:
- First of all, if you plan to create the image of the entire computer or a backup of the disk system partitions, you can only restore them from a backup copy from the created recovery disk.
- The recovery disk VEEAM also contains multiple useful utilities that can be used to restore Windows (for example, the administrator password reset, the command line, the Windows boot recovery).
After starting the creation of Veeam Recovery Media, you will need to perform the following steps:
- Select the type of recovery disc created — CD / DVD, USB drive (flash drive) or ISO image for subsequent recording on a disk or flash drive (only an ISO image is displayed in my screenshot, because computer without optical drive and connected flash drives) .
- By default, items are marked, including the network connection of the current computer (useful for recovery from a network drive), and the current computer’s drivers (also useful, for example, to boot from the recovery after a disk has been access to the network).
- If you wish, you can mark the third item and add additional folders with drivers to the recovery disk.
- Click «Next». Depending on the selected storage type, you will fall into different windows, for example, in my case, when creating an ISO image — in the choice of a folder to save this image (with the ability to use a network layout).
- The next step will only be left to click «Create» and wait for the completion of the recovery disk.
This is all ready to create backup copies and recovery from them.
Backup copies of the system and disks (partitions) in Veeam Agent
First of all, you need to configure backups in Veeam Agent. For this:
- Run the program and in the main window, click «Configure Backup».
- In the next window, you can select the following options: Entire Computer (backup of the entire computer, must be saved on an external or network disk), Volume Level Backup (backup of the disk partitions), File Level Backup (Create backup files and folders).
- If you select the VOLUME LEVEL Backup version, you will be prompted to choose which partitions should be included in the backup. At the same time, when choosing a system partition (in my screenshot, a C drive C), hidden partitions with a loader and a recovery medium, both on EFI and MBR systems, will be included in the image.
- In the next step, you need to select a backup location: Local Storage, where both local disks are turned on and external drives or Shared Folder — network folder or NAS drive.
- When you select a local storage, you need to specify which disc (disc partition) to save backups and folder on this disk. It also indicates how time to store backup copies.
- By clicking on the «Advanced» button, you can create a frequency of creating full backups (a full backup is first created by default, and later the changes that occurred from the moment of its creation are recorded. In case of inclusion of the Active Full Backup frequency, each time in the specified The time will be launched a new backup chain). Here, on the Storage tab, you can set the compression ratio of backup copies and enable encryption for them.
- Next window (Schedule) — setting the frequency of creating backup copies. By default, they are created daily at 0:30, provided that the computer is turned on (or is in sleep mode). If off — the backup is created after the next inclusion. You can also set backups when blocking Windows (LOCK), output from the system (Log Off) or when connecting an external drive specified as the target to store backups (When Backup Target Is Connected).


After applying the settings, you can create a first backup manually by simply pressing the «Backup Now» button in the VEEAM AGENT program. The creation time of the first image may be long (depends on the parameters, the number of stored data, the speed of the drives).

Restore from backup
If necessary, to restore from the backup of Veeam, you can do it:
- By running the VOLUME LEVEL Restore from the Start menu (only to restore backup copies of non-system partitions).
- Running File Level Restore — To restore only individual files from the backup.
- After downloading from the recovery disk (to restore the backup of Windows or the entire computer).
VOLUME LEVEL RESTORE
After starting the Volume Level Restore, you will need to specify the backup storage location (usually determined automatically) and the recovery point (in case there are several of them).

And specify which parts you want to recover in the next window. When you try to select system partitions, you will see a message that their restoration inside the running system is impossible (only from the recovery disk).

After that, wait to restore the contents of sections from the backup.
File Level Restore.
If you need to restore only individual files from a backup, start the File LEVEL Restore and select the recovery point, then on the next screen, click Open.
The Backup Browser window opens with the contents and folders in the backup. You can choose any of them (including select multiple) and press the «Restore» button in the Home Menu Backup Browser (appears only when files or files are selected + folders, but not just folders).

If a folder has been selected — right-click on it and select «Restore», as well as Restore mode — Overwrite (Overwrite the current folder) or Keep (Save both version of the folder).
When you select a second option on the disk, the folder will remain in the current form and the recovered copy called the RESTORED name_name.
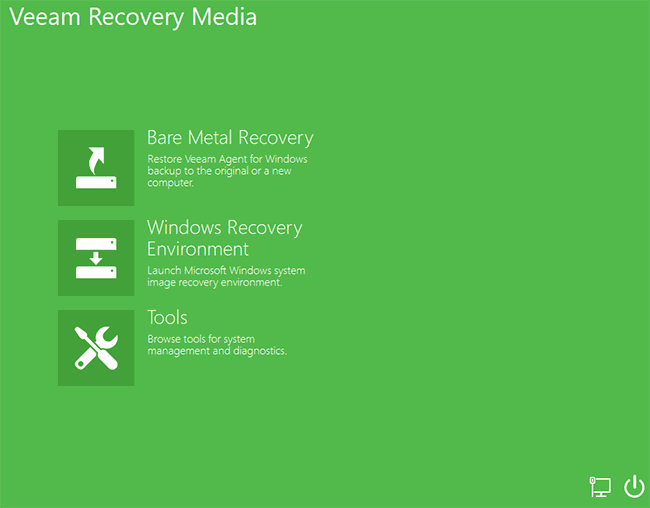
Restoring a computer or system using a VEEAM recovery disk
If you need to restore the system partitions of the disk, you will need to boot from the boot disk or the VEEAM Recovery Media flash drive (you may need to disable Secure Boot, the EFI and Legacy download is supported).
When loading during the appearance of the inscription «Press Any Key to Boot from CD or DVD», press any key. After that, the recovery menu opens.

- Bare Metal Recovery — Using recovery from backups Veeam Agent for Windows. Everything works in the same way as when restoring partitions in the Volume Level Restore, but with the ability to restore system disk system partitions (if necessary, if the program does not detect the location itself, specify the backup folder on the Backup Location page).
- Windows Recovery Environment — Running Windows Recovery Environment (Built-in System Research).
- Tools — useful in the context of the system recovery tools: command line, password reset, download hardware driver, diagnostics of RAM, saving verification logs.

Perhaps this is all on creating backups using Veeam Agent for Windows FREE. I hope if it is interesting, you can deal with additional options.
You can download the program for free from the official page https://www.veeam.com/ru/windows-endpoint-server-backup-free.html (registration will require registration, which, however, is not checked in any way at the time of writing the article ).