You can install vCenter Server with an embedded Platform Services Controller, Platform Services Controller, or vCenter Server with an external Platform Services Controller on a Windows virtual or physical machine.
You download the vCenter Server installer ISO file, mount it to the Windows host machine on which you want to perform the installation, start the installation wizard, and provide the inputs that required for the installation and setup.
Before installing vCenter Server that uses an external database, you must prepare your database. See Preparing vCenter Server Databases for Install.
Important: For topologies with external
Platform Services Controller instances, you must install the replicating
Platform Services Controller instances in a sequence. After the successful deployment of all
Platform Services Controller instances in the domain, you can perform concurrent installations of multiple
vCenter Server instances that point to a common external
Platform Services Controller instance.
Despite VMware’s stride to push for the adoption of vCenter Server Appliance (vCSA) instead of its Windows-based twin, the latter is still an integral part of vSphere 6.5. In this short how-to post, I’ll guide you through the steps required to install the latest incarnation of vCenter. To keep matters simple, I went for an embedded Platform Services Controller and PostgreSQL database solution. This setup will suffice for most SMBs out there. Broadly speaking, most SMB VMware based environment will fall under the Tiny or Small categories as per VMware’s literature.
The table shows the different types of environments, their respective capacity in terms of the number of ESXi hosts and deployed VMs and the compute resources that need to be allocated to vCenter Server.
| Type | ESXi Hosts | VMs | VC RAM (GB) | VC CPUs |
| Tiny | 10 | 100 | 10 | 2 |
| Small | 100 | 1000 | 16 | 4 |
| Medium | 400 | 4000 | 24 | 8 |
| Large | 1000 | 10000 | 32 | 16 |
| X-Large | 2000 | 35,0000 | 48 | 24 |
Note: vCenter Server for Windows 6.5 runs on Windows Server 2008 SP2 or better. As per earlier versions, installing vCenter on an Active Directory Domain Controller IS NOT supported.
A complete list of requirements is available on the VMware vSphere 6.5 documentation site.
[thrive_leads id=’18673′]
Getting on with the installation
Step 1: Prepare a VM or physical server. The specifications should reflect the environment you expect to be managing. Remember to allocate at least 10GB of RAM, 2 CPUs and 17GB of disk space over and above what’s required for the Windows OS and other installed software. Also keep in mind that in time, the vCenter database will grow in size, so factor in this as well when allocating disk capacity.
Step 2: Decide on a hostname for vCenter (ex. vcw65). Create the corresponding A and PTR records on a DNS server and make sure that the records resolve correctly.
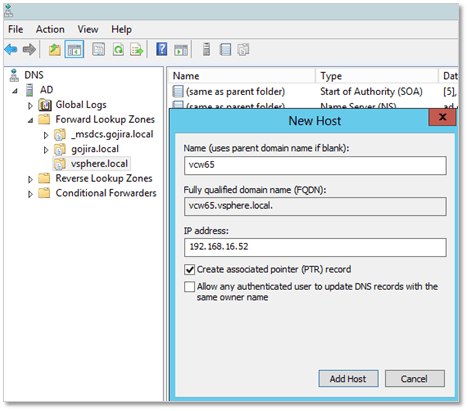
Figure 1 – Creating the DNS records for the vCenter Server for Windows instance
Step 3: Install Windows Server as you would normally do. After the install, apply all pending updates and patches.
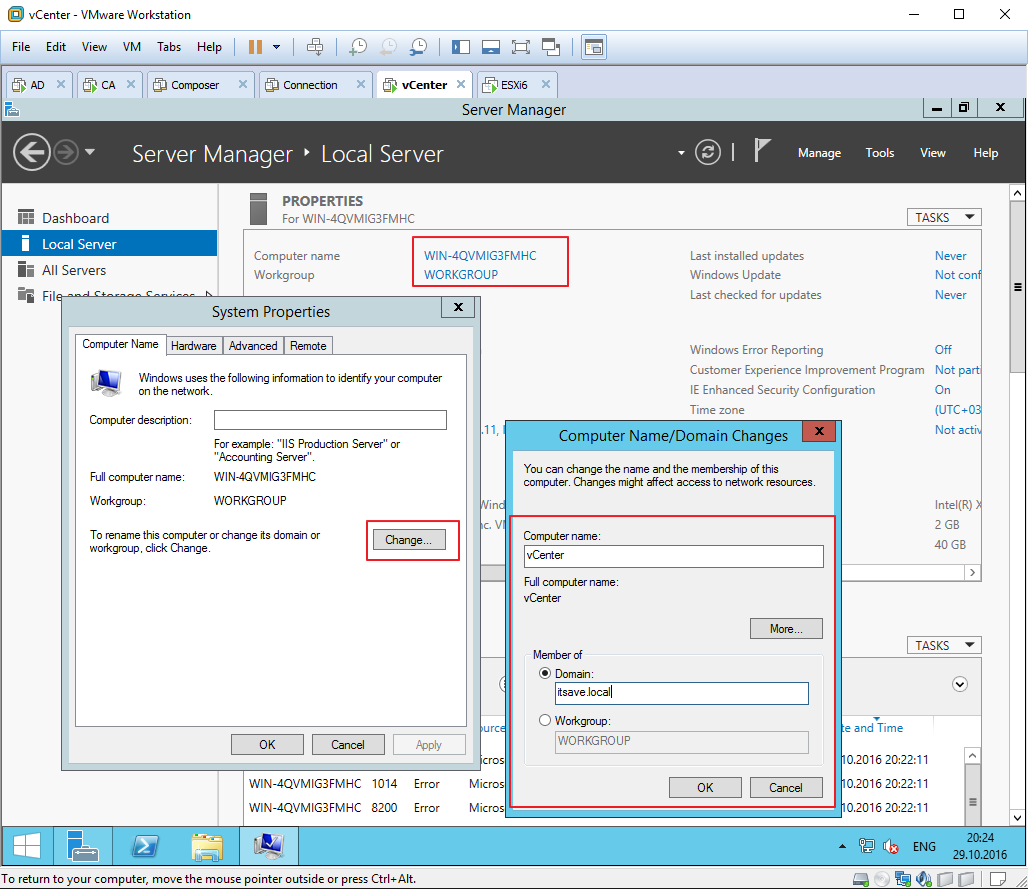
Step 4: Make sure the Windows computer name matches the vCenter hostname i.e. vcw65. Reboot the server.
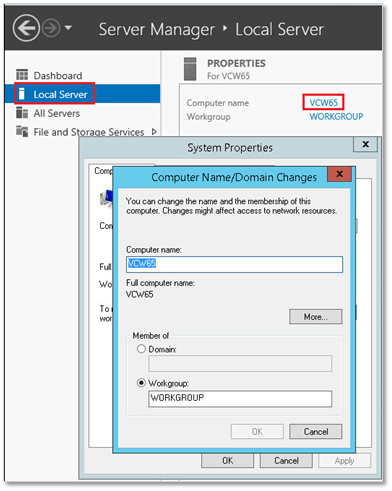
Figure 2 – Setting the vCenter Server Windows computer name
Step 5: Download the latest vCenter Server 6.5 ISO from my.vmware.com.
Step 6: When deploying vCenter to a VM, you can mount the ISO image as a DVD drive directly from a datastore or from local disk. If a physical machine is used instead, you can copy the ISO image to a folder on the Windows server and then mount it as a drive from the OS itself; right-click on the file and mount!
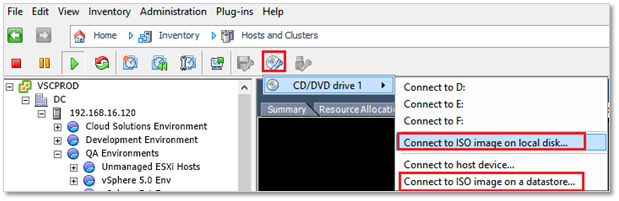
Figure 3 – Mount the ISO image on a VM from a local disk
Step 7: Login as administrator on the Windows box.
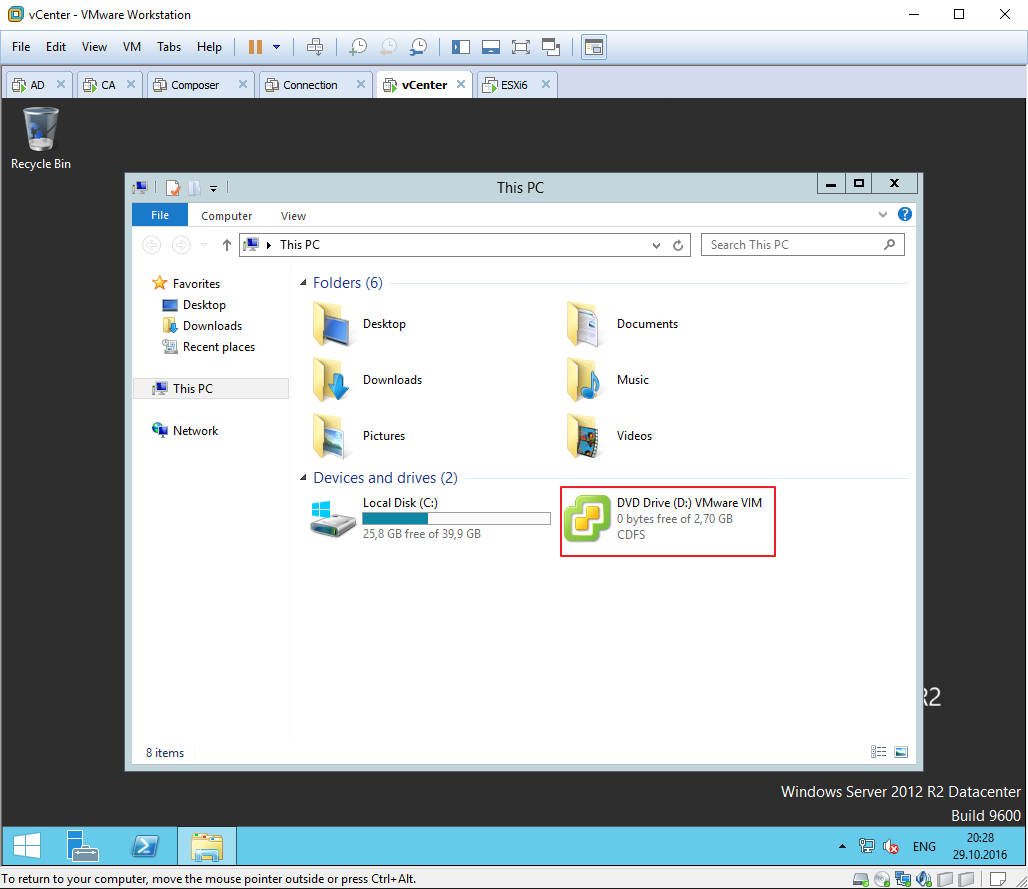
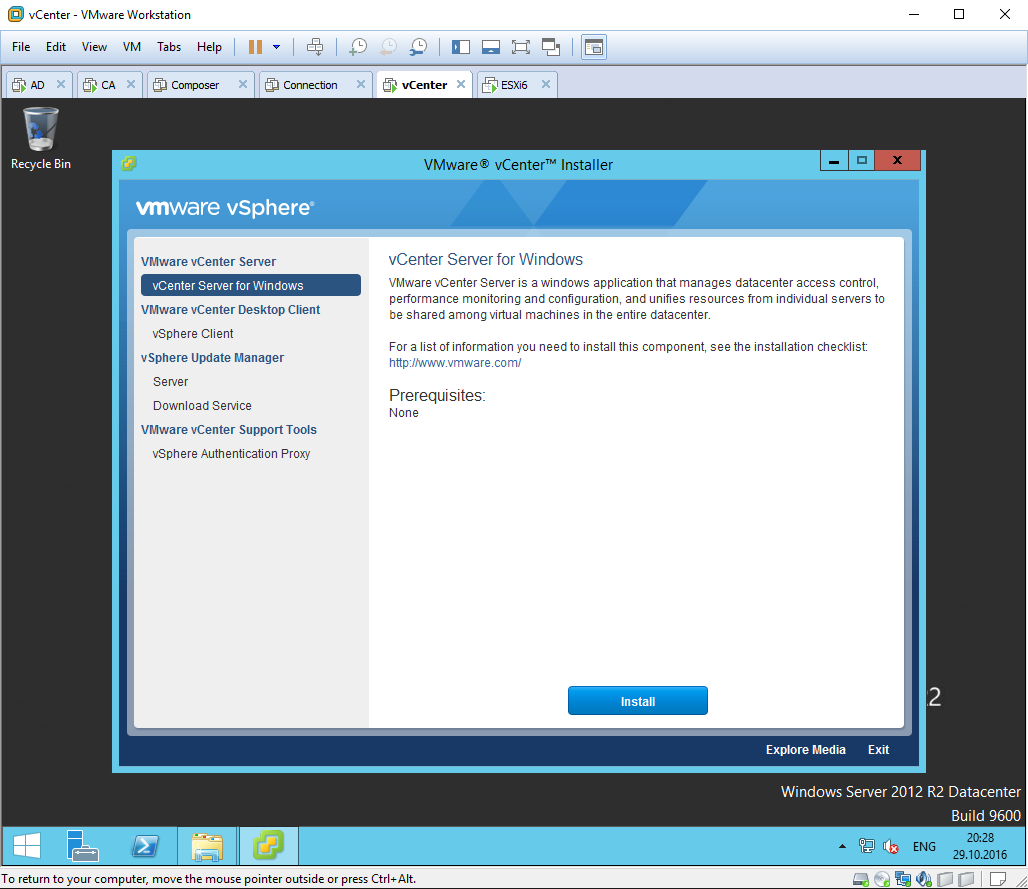
Step 8: Double-click on the DVD drive just mounted. This launches the VMware vCenter Installer.
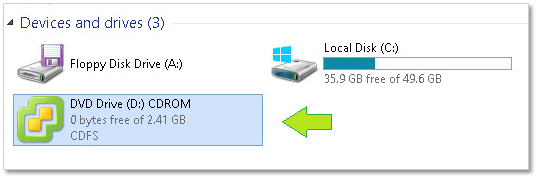
Figure 4 – The mounted ISO image in Windows Explorer
Step 9: From here on, the installer takes you through a series of screens and options, most of which are self-explanatory. Regardless, I listed the whole lot in a sequential order each accompanied by a brief note as follows.
The process is 100% identical to installing vCenter Server 6.0 for Windows as described in my somewhat old post How to set up a nested vSphere 6 nested environment. So really, very little has changed from an installation perspective. Under the hood, however, there have been some changes as explained here.
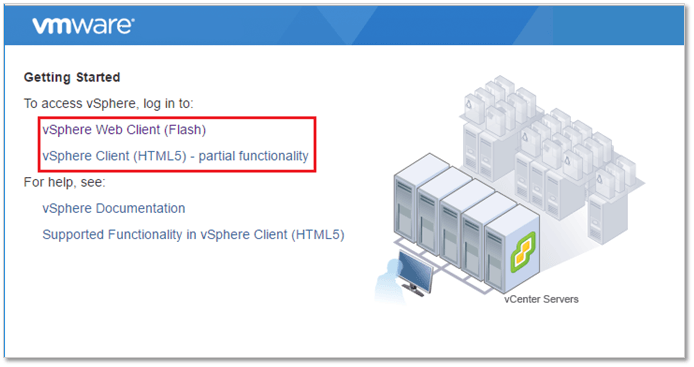
Figure 5 – The vCenter Server web landing page
Conclusion
Installing vCenter Server 6.5 for Windows is pretty straightforward provided you prepare the groundwork first. Compared to earlier versions, very little has changed except that vCenter is now a little bit more resource hungry. The thick (C#) vSphere client is, officially, no longer supported. This means that getting used to the vSphere Web client (or HTML5 client) is no longer optional.
I would also have loved to see the Web client laid to rest once and for all but since its new HTML5 alternative is still not up to par, I guess we will all have to wait until vSphere 7 is released!
UPDATE: vSphere 6.5 U1 has recently been released. It brings the HMTL5 client almost up to par with the vSphere Web client in terms of functionality. Read about it here.
[the_ad id=”4738″]
Установка vCenter Server 6.0.0 под операционную систему Windows server стала значительно проще и быстрее, чем была на предыдущих версиях. Есть основанное на опыте мнение, что администрирование Windows версии vCenter на порядок понятнее, чем vCenter Server Appliance. Работа Windows версии, опять же, по опыту стабильнее. Так или иначе, для стенда по Horizon 7 необходима установка vCenter, т.к. он используется VMware Connection сервером для создания пользовательских виртуальных машин под VDI. Другой гипервизор и другой сервер управления для VMware Horizon не подходит, только ESXi и только vCenter.
Приступаем к установке vCenter server 6.0.0
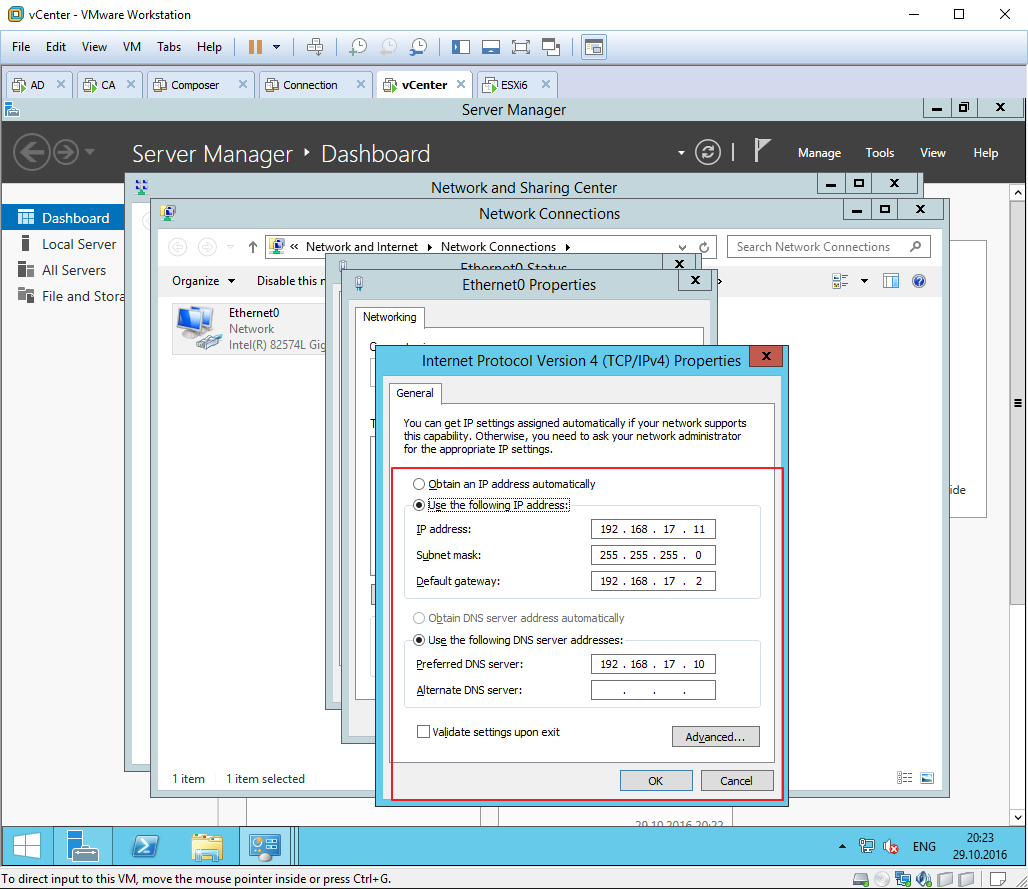
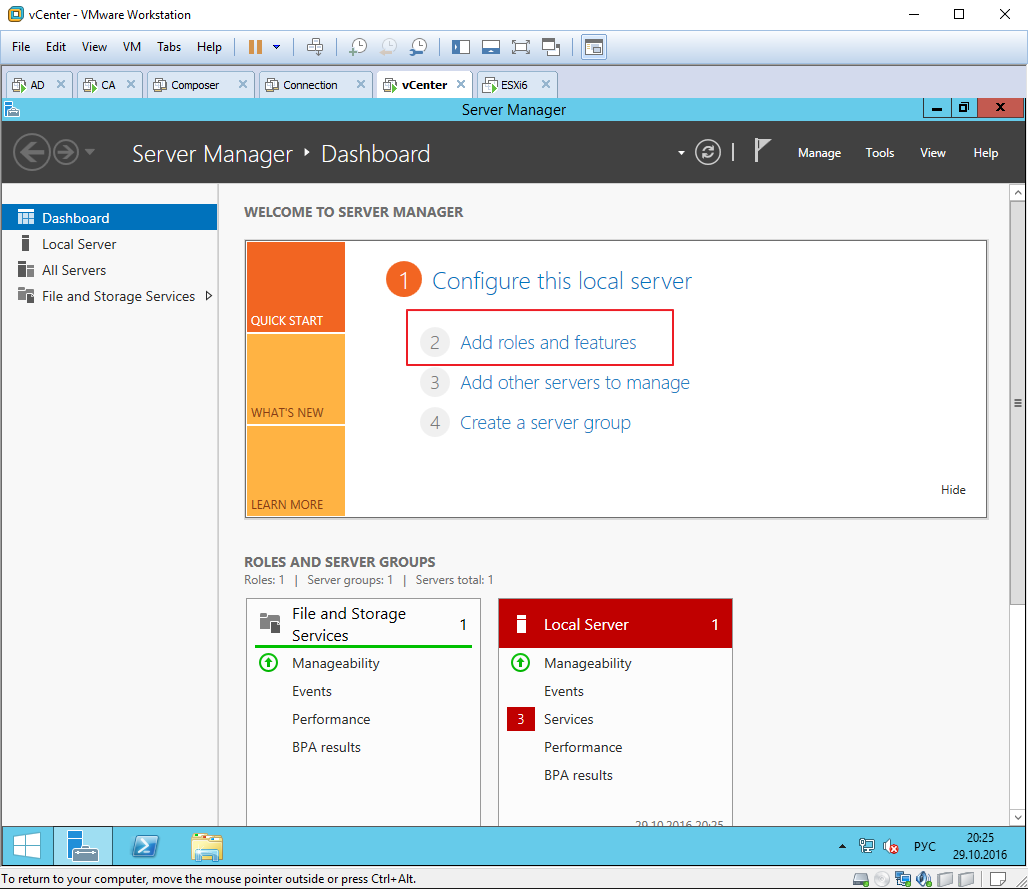
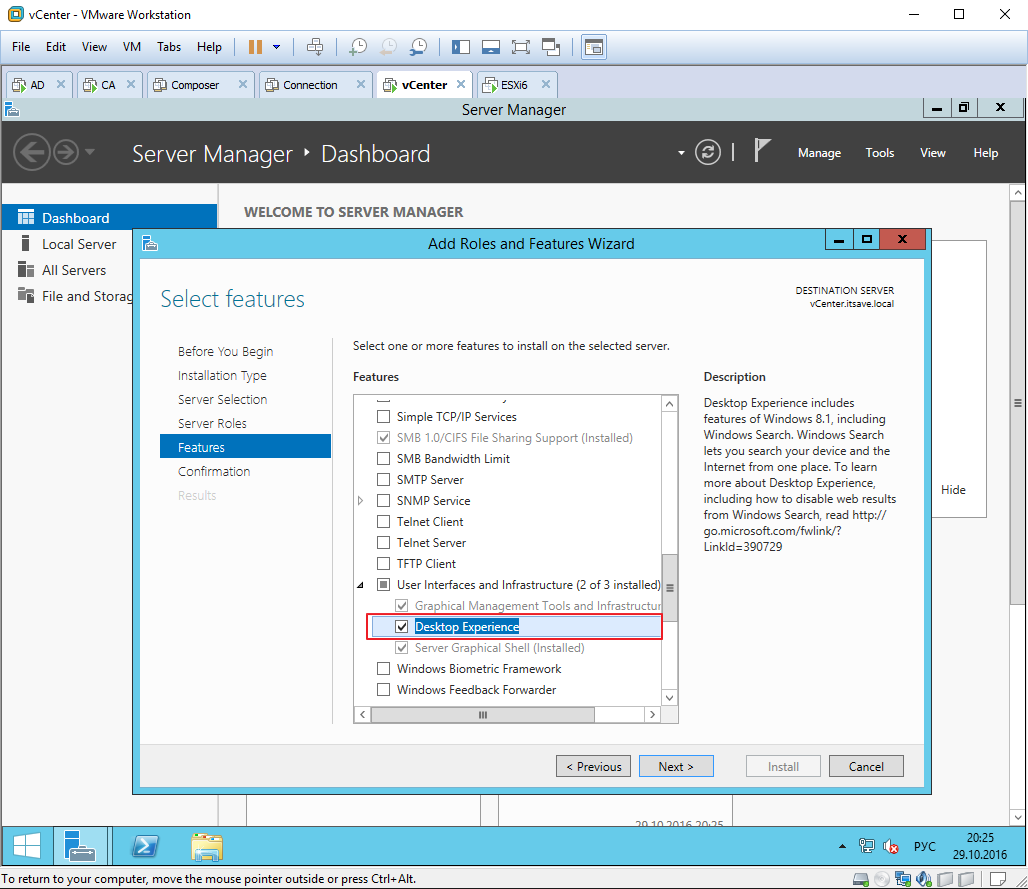
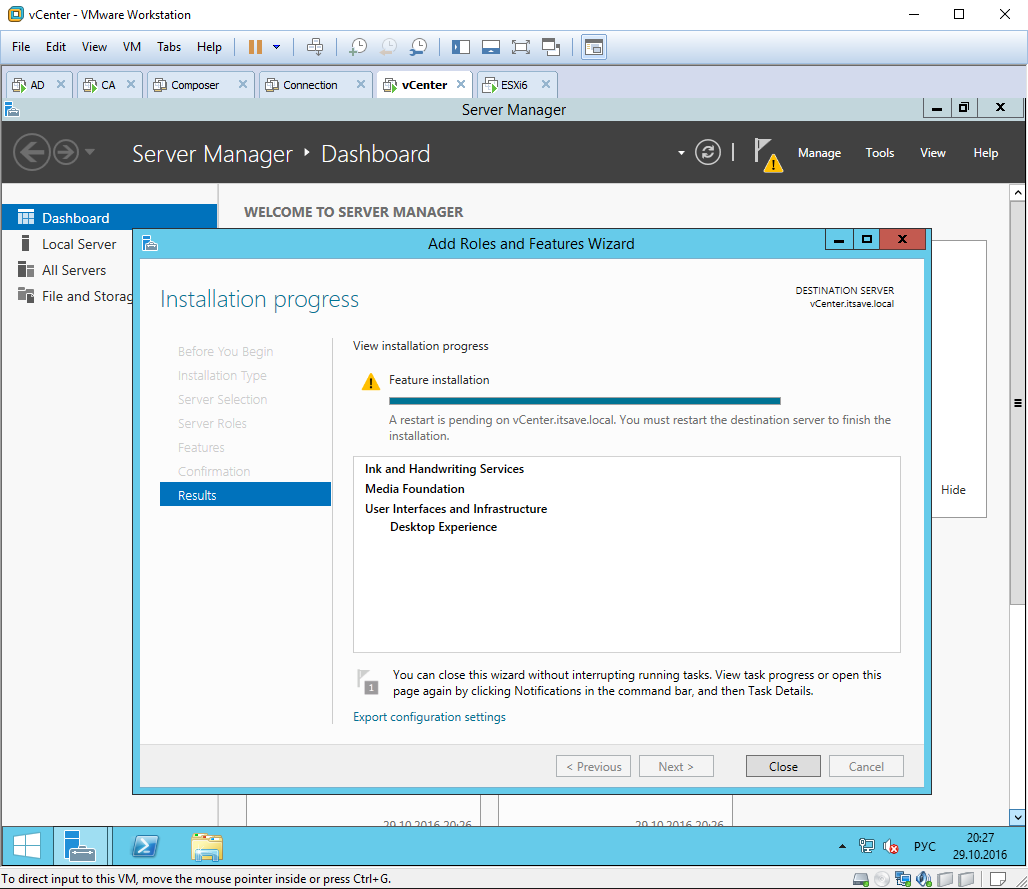
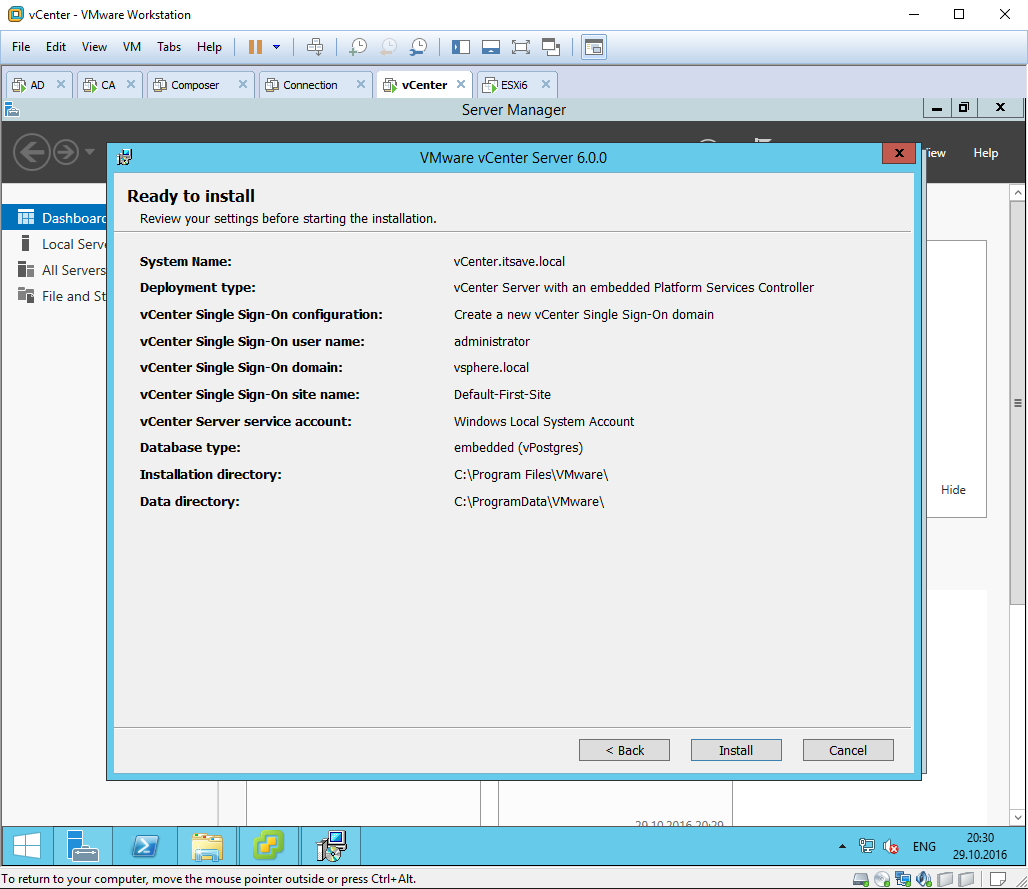
1 -6 Из шаблона развернута операционная система Windows server 2012 R2. На нее уже установлены последние обновления и .NET 3.5 В сетевых настройках рекомендуется прописать статический IP адрес, после чего машина вводится в домен itsave.local Для работы с уже установленным vCenter server через Web консоль управления потребуется браузер с поддержкой Adobe Flash. По умолчанию Windows server 2012 R2 в IE 11 не поддерживает Flash, чтобы это исправить нужно установить компонент «Desktop Experience»
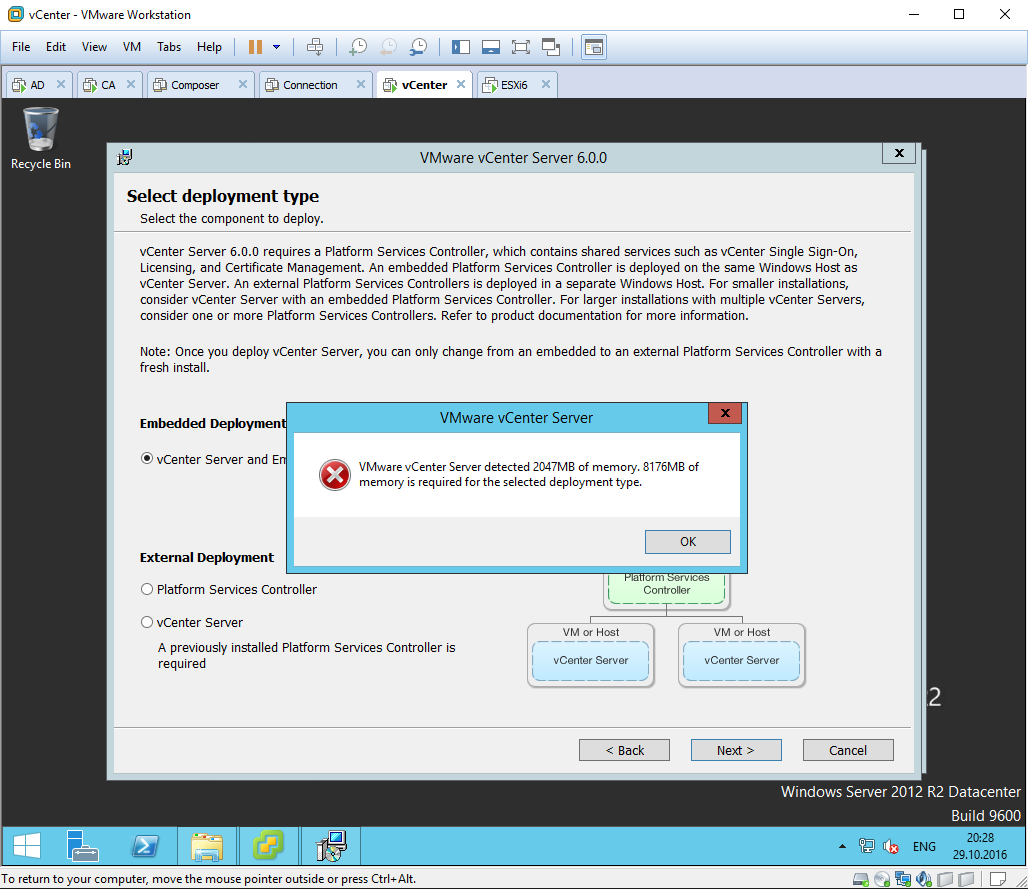
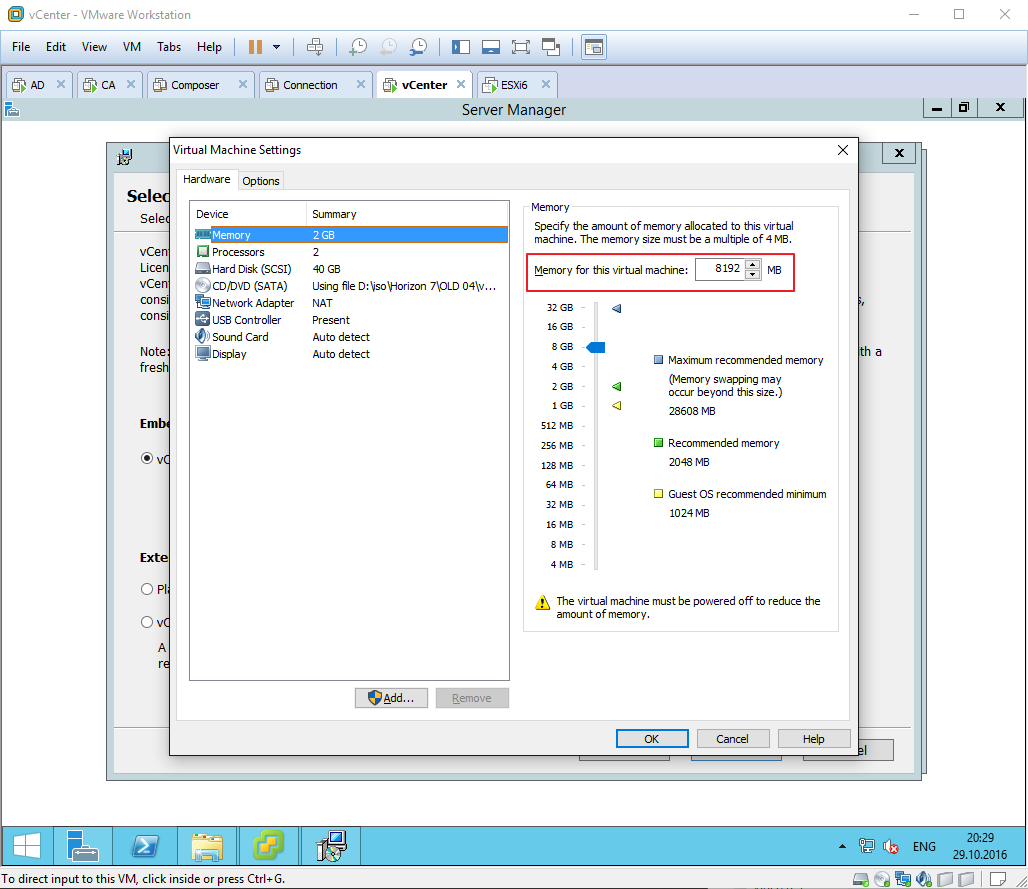
7 — 16 Можно приступать к установке vCenter server 6.0.0 Для этого к виртуальной машине монтирую установочный дистрибутив, скачанный с официального сайта VMware. Критичным для установки является объем оперативной памяти, — не менее 8 Гб ОЗУ. В противном случае продолжить установку законным способом не получится.
Для тех, кто переходит на 6-ую версию VMware vSphere будет любопытно узнать, что по умолчанию для vCenter server используется база данных Posgres SQL, причем как для Linux версии vCenter, так и для Windows. Теперь сервисы vCenter server разделены на 2 основные части: Platform Services Controller и vCenter Server. Эти части можно разделять, разносить по разным виртуальным, создавать отказоустойчивые кластеры, что актуально для больших распределенных инфраструктур.
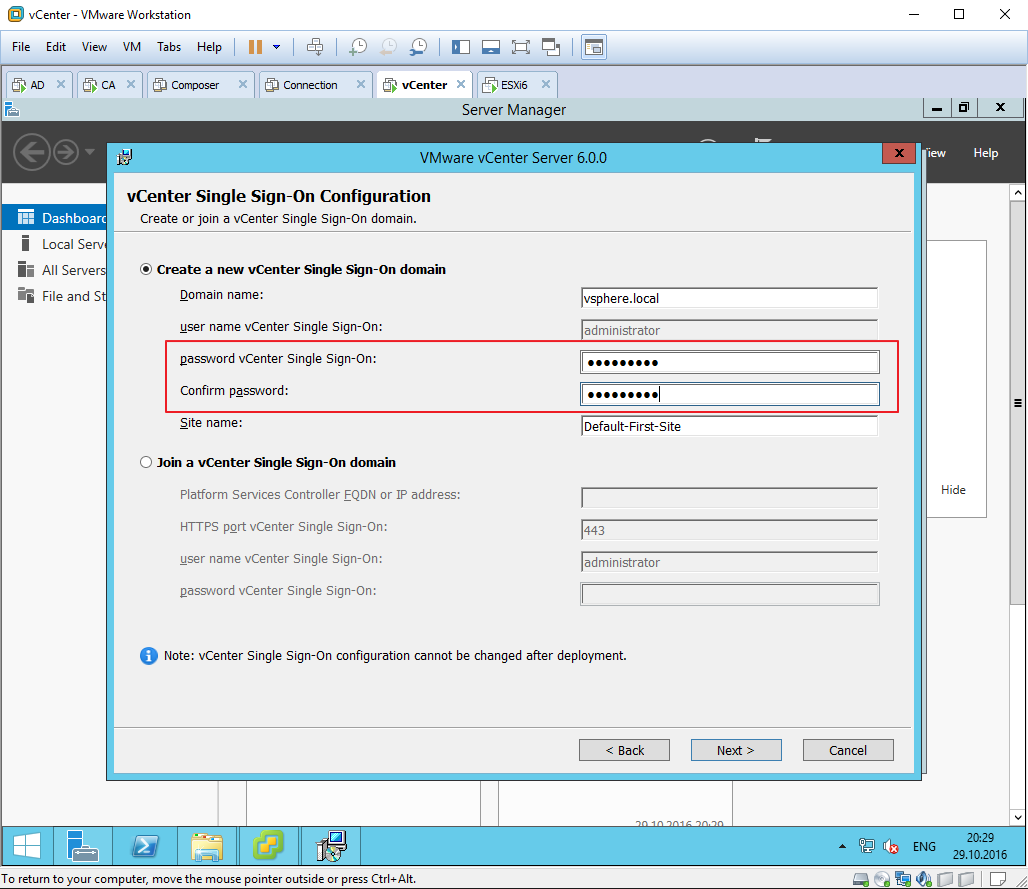
В Platform Service Controller есть служба единого входа Single Sign-On, которая позволяет для учетной записи внутреннего домена (по умолчанию vsphere.local) давать доступ к различным сервисам vSphere. На этапе первоначальной установки необходимо задать пароль для учетной записи administrator@vsphere.local, у которой будут глобальные неограниченные права на доступ.
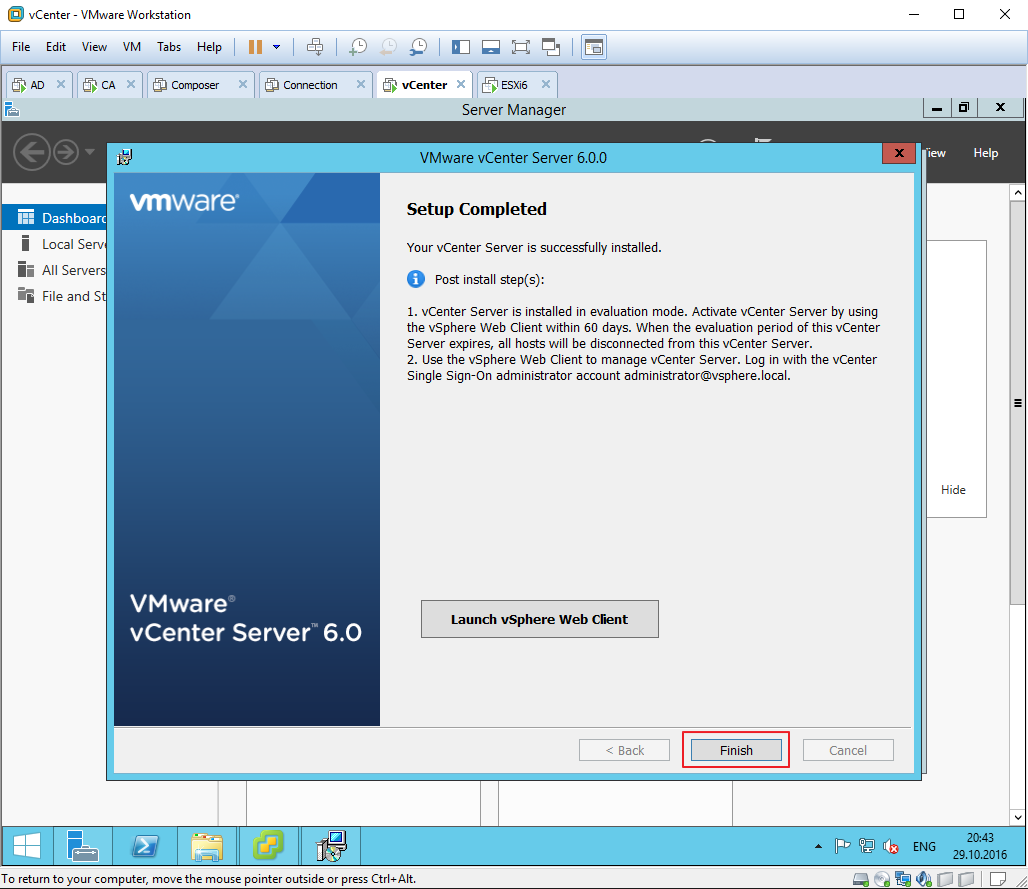
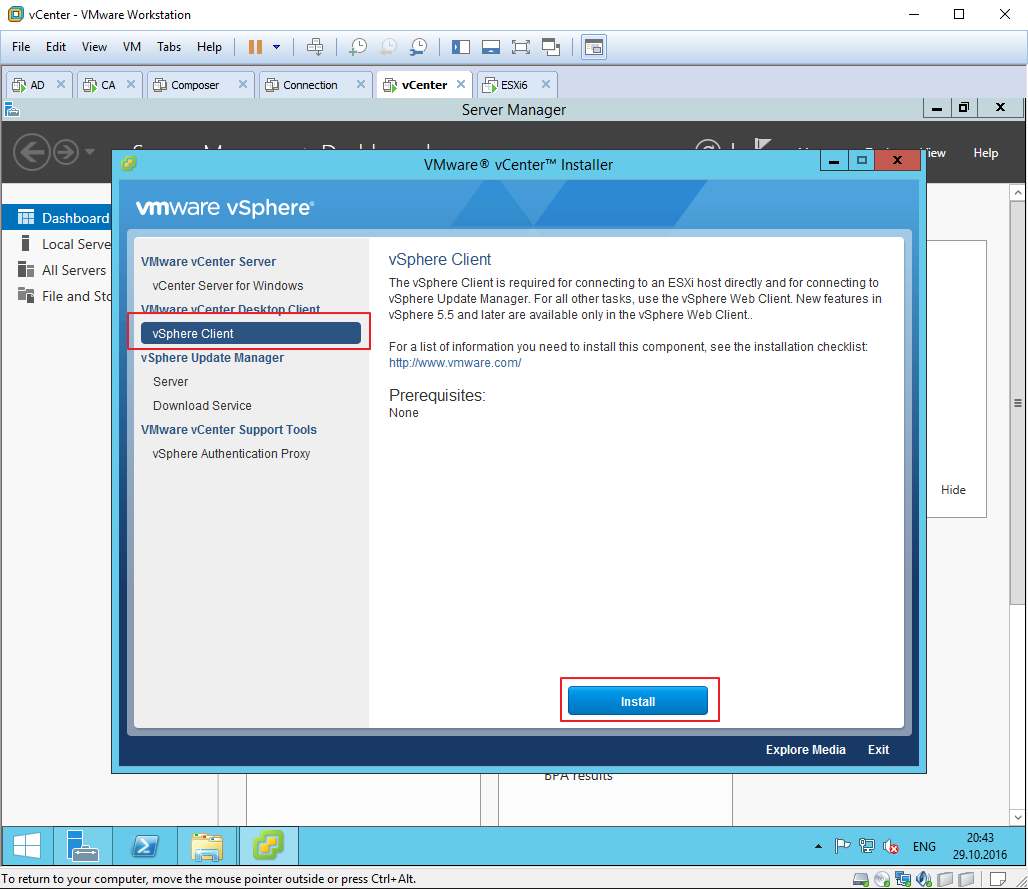
17 — После установки vCenter server можно поставить «толстый» vSphere client. Для привыкших к его интерфейсам администраторам, работать в нем намного проще, чем в Web клиенте. Особенно удобно реализована в толстом клиенте консоль подключения к виртуальной машине.
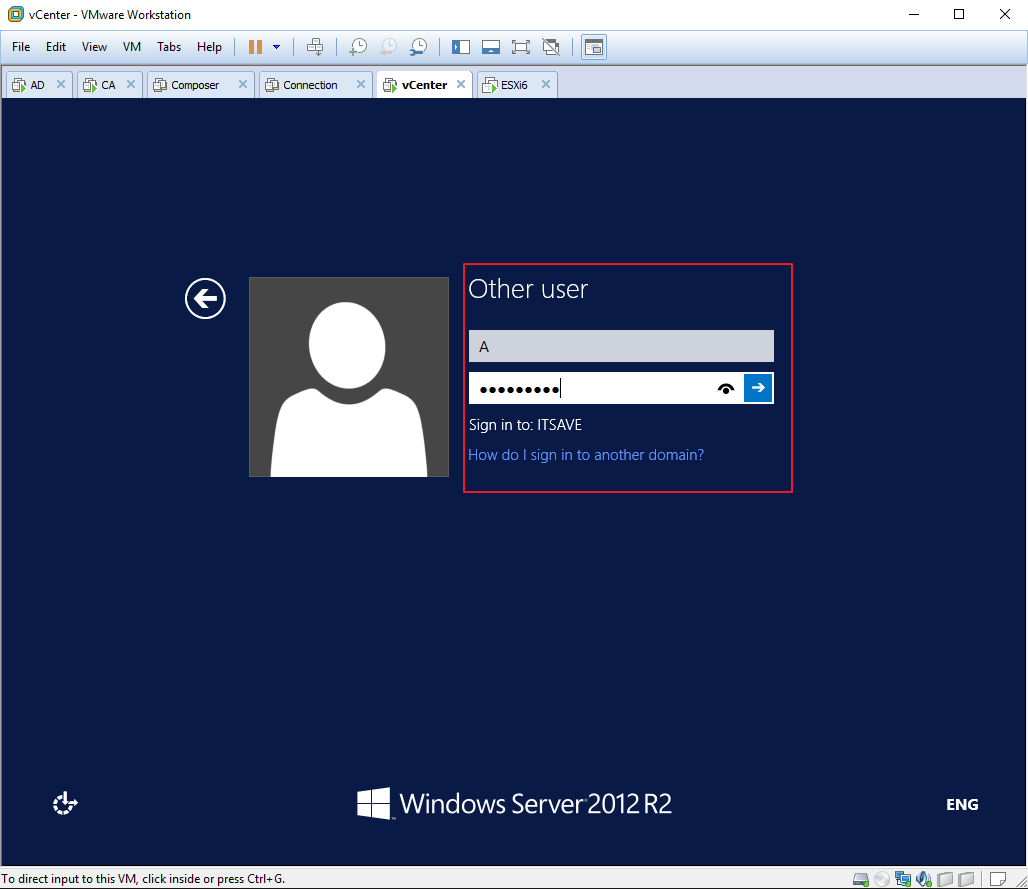
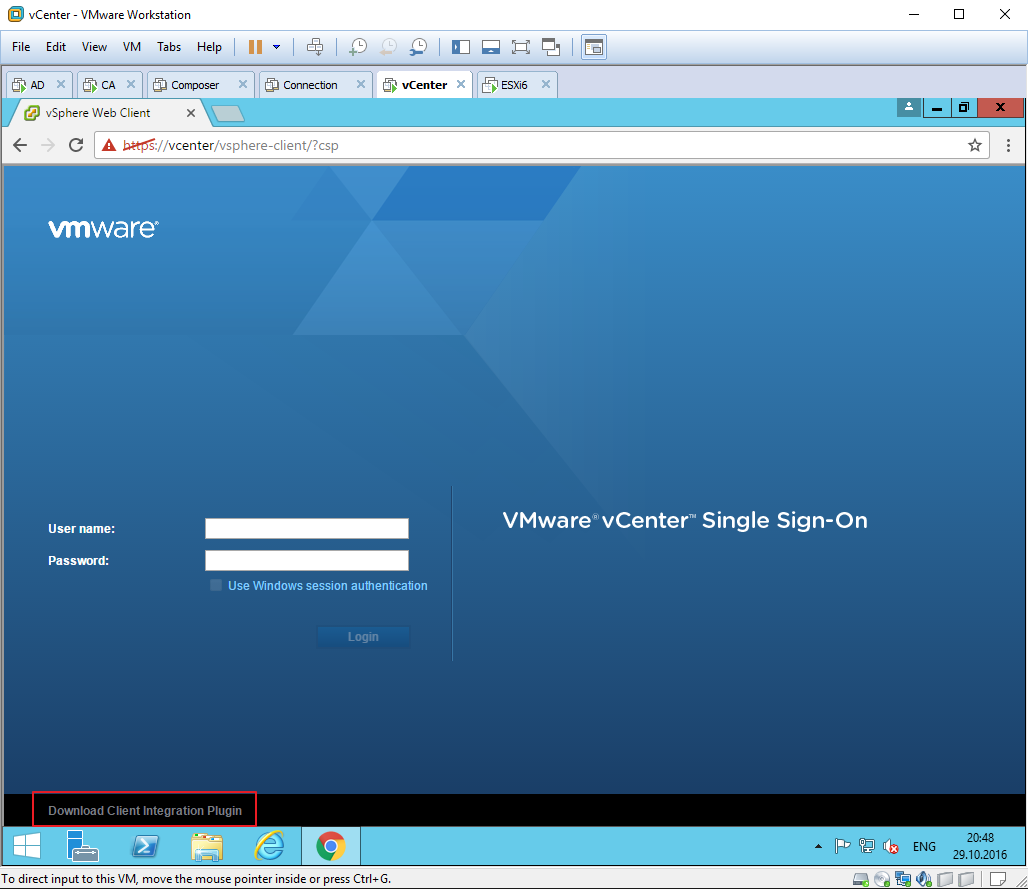
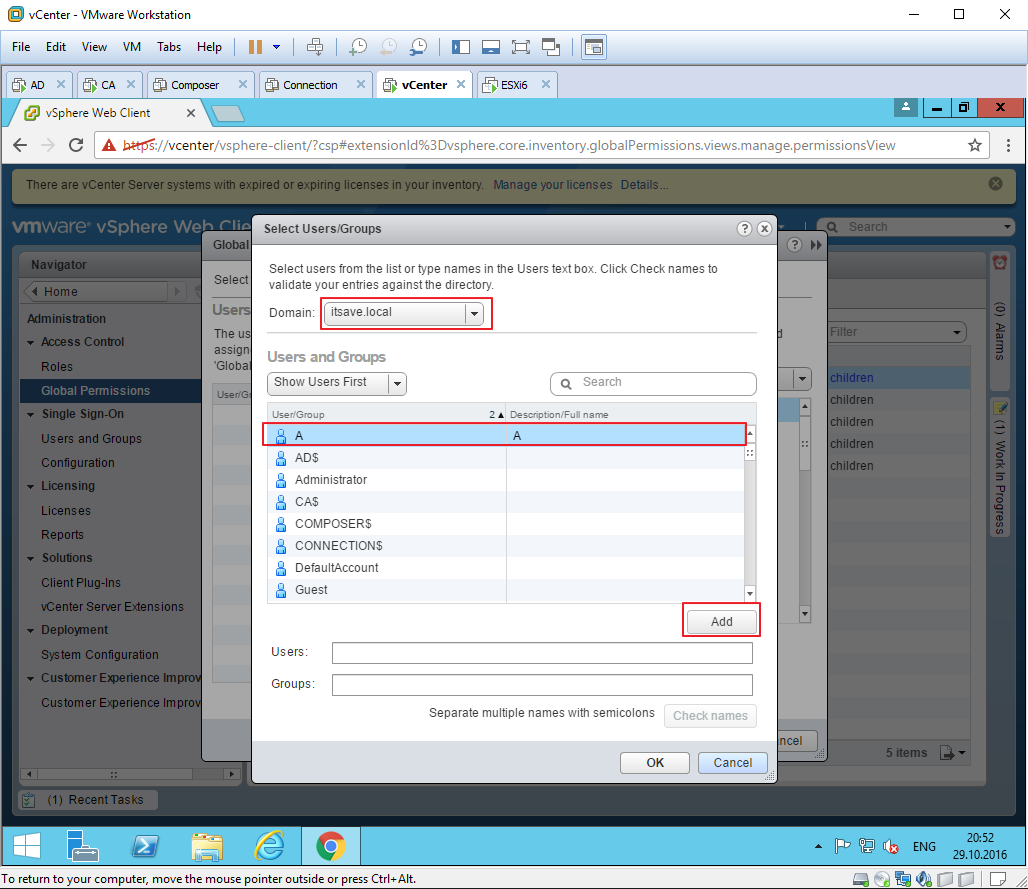
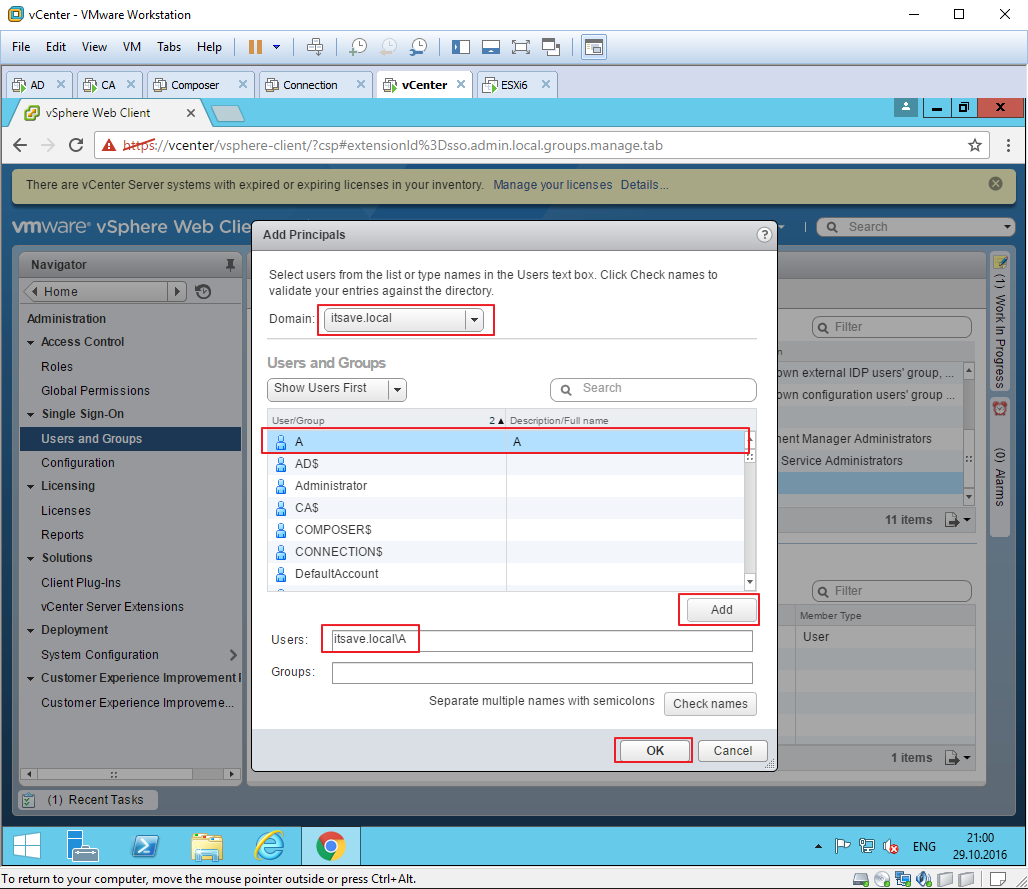
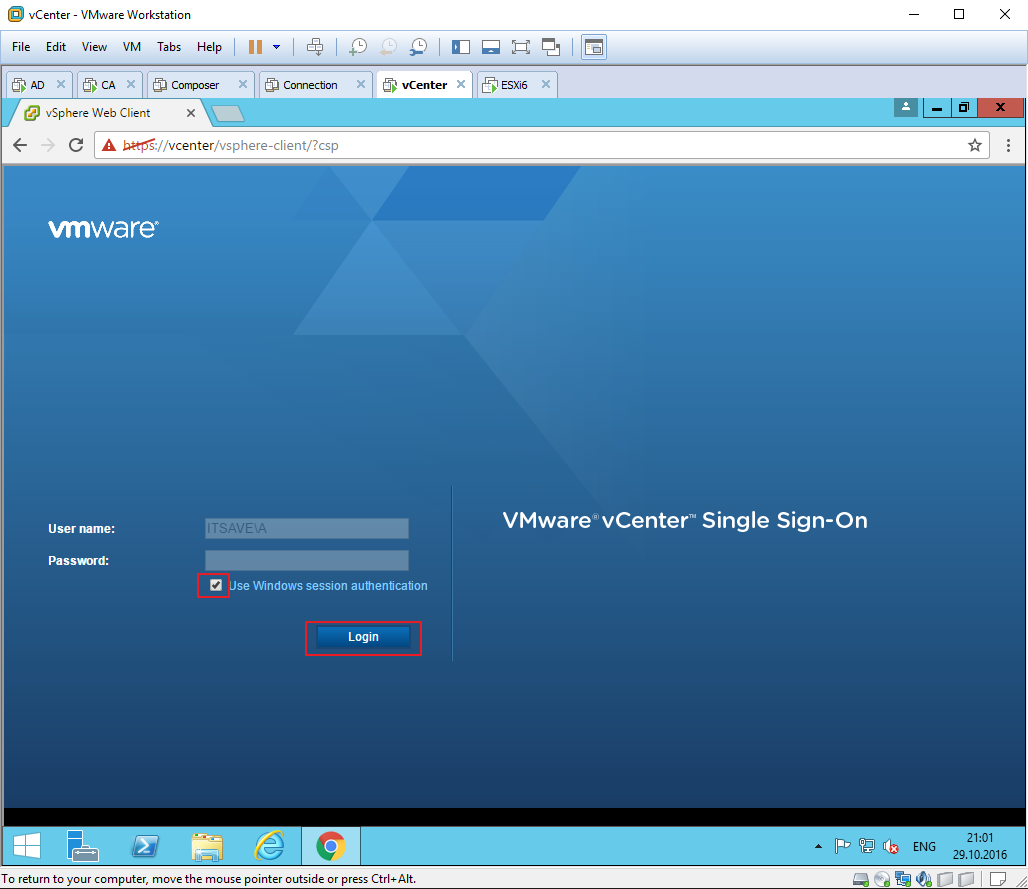
18 — 33 Первая задача дать права администратора доменной учетной записи a@itsave.local . Internet Explorer так и не дал мне доступ к Web клиенту vSphere, поэтому в пару кликов устанавливаю Google Chrome и перехожу по адресу https://vcenter.itsave.local/vsphere-client
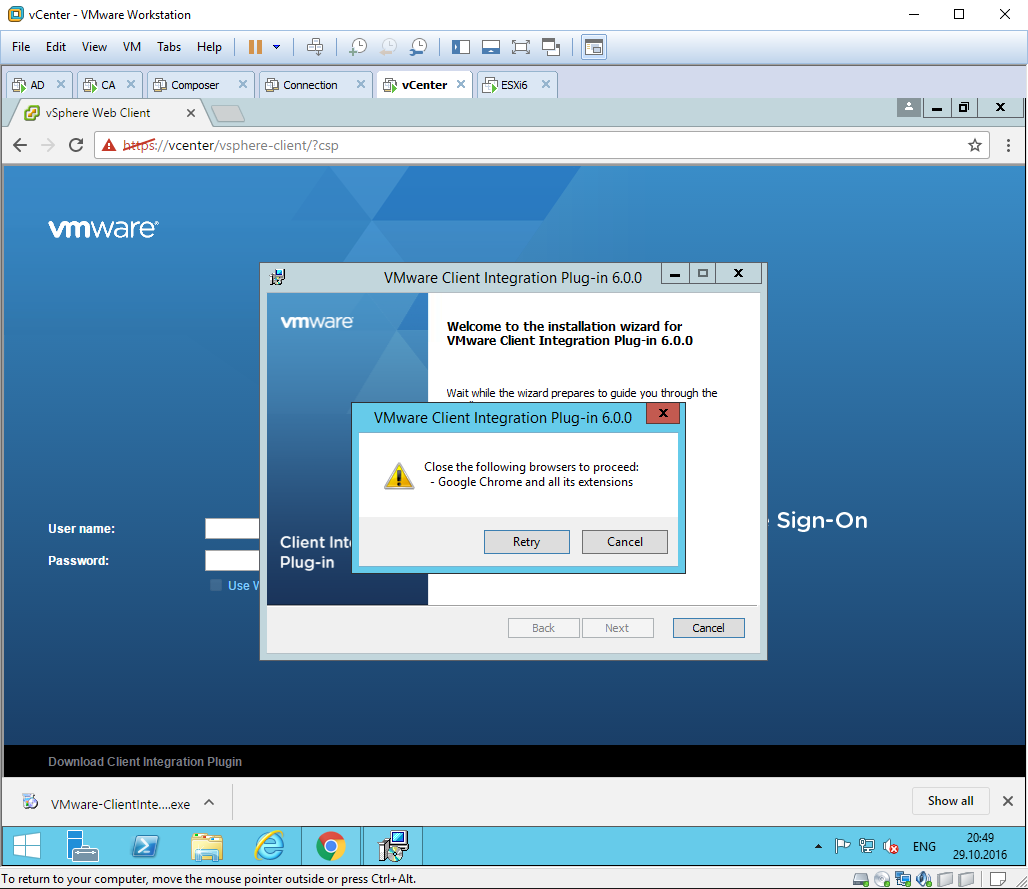
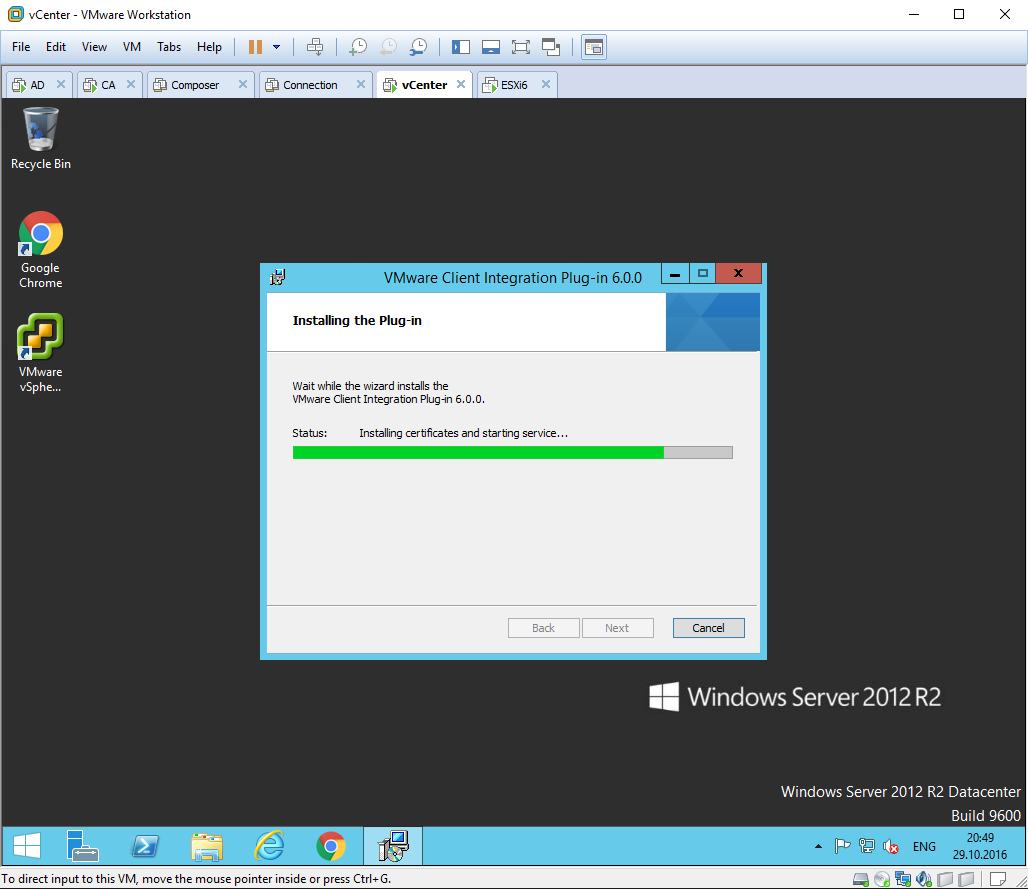
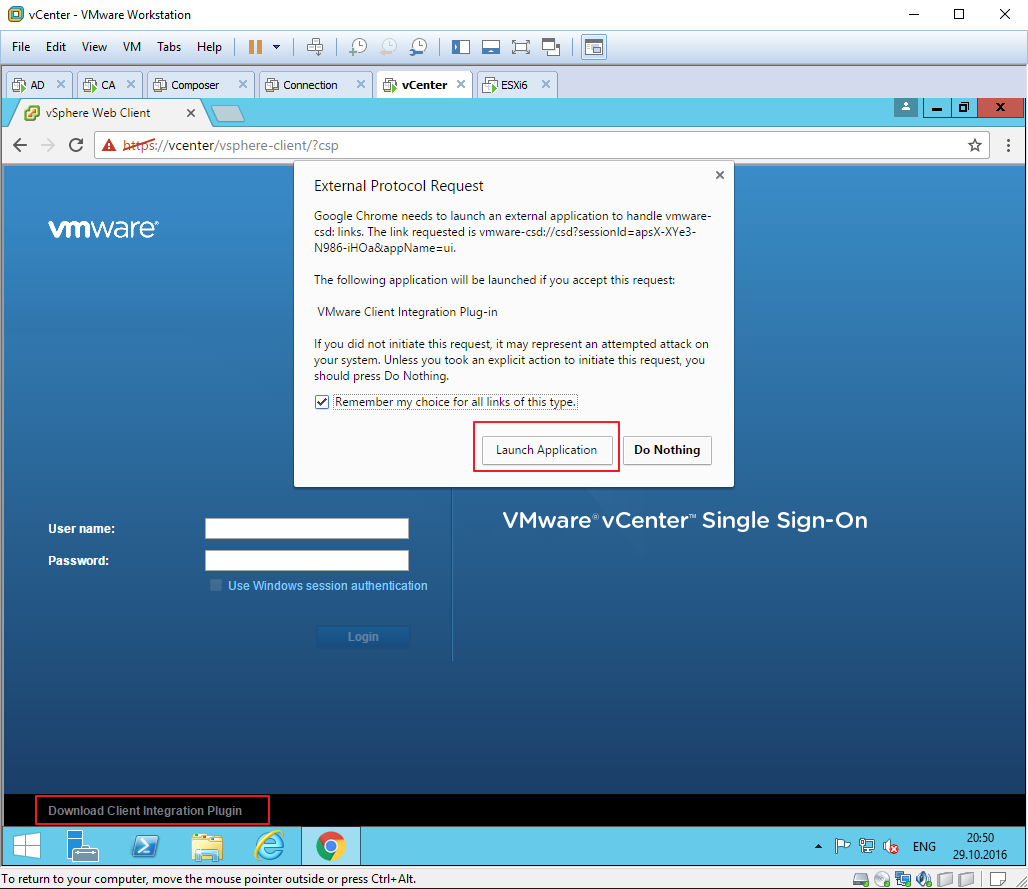
Для получения всех возможностей от работы с Web клиентом необходимо установить VMware Client Integration Plugin. Например, он нужен для того, чтобы иметь возможность передавать файлы на datastore с локального компьютера.
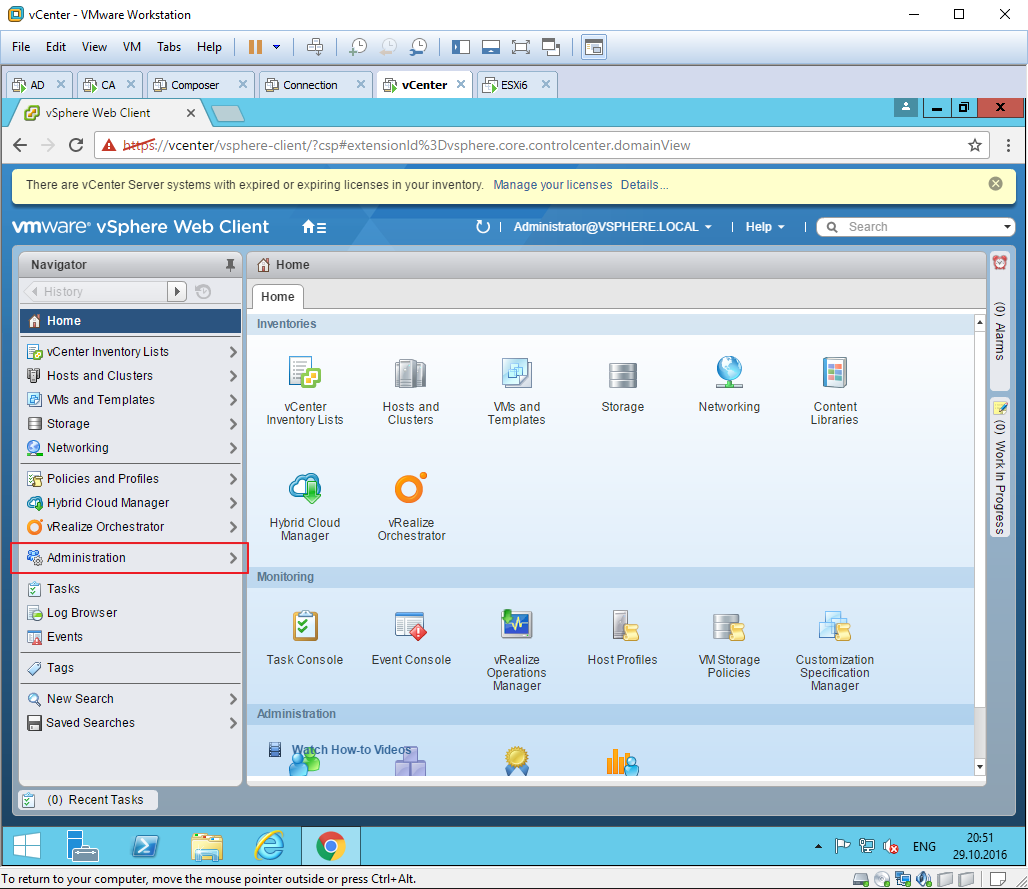
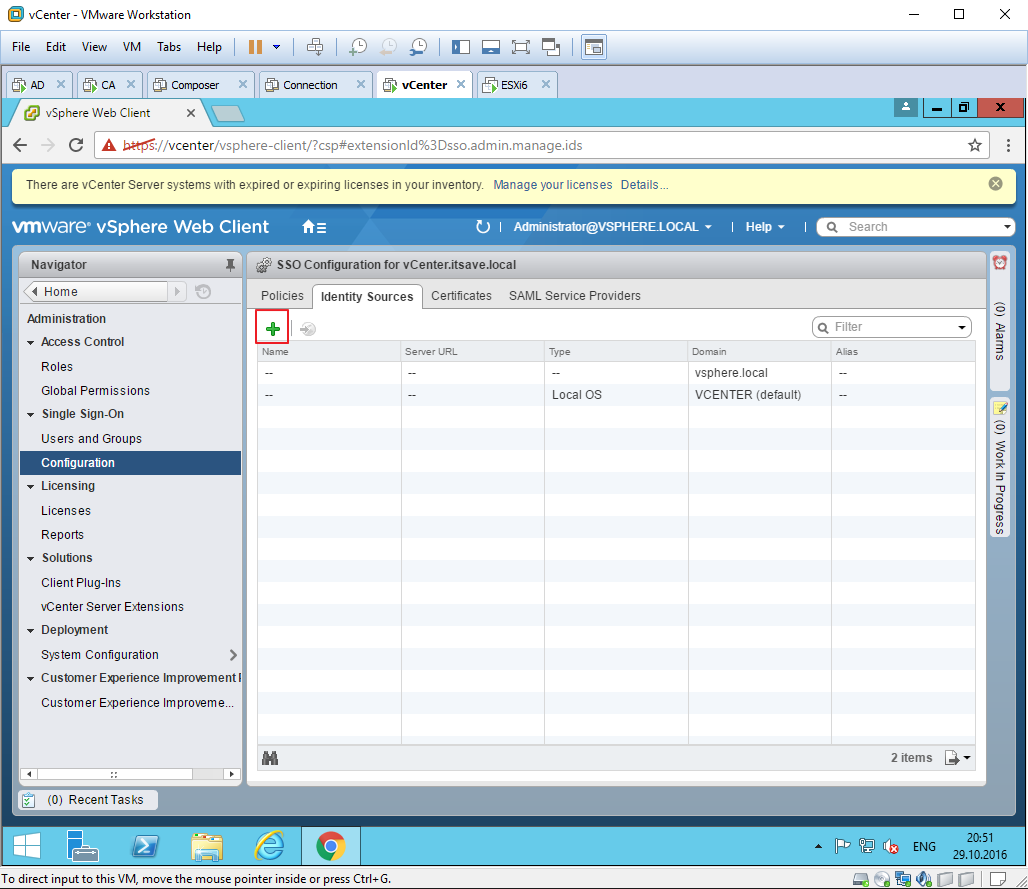
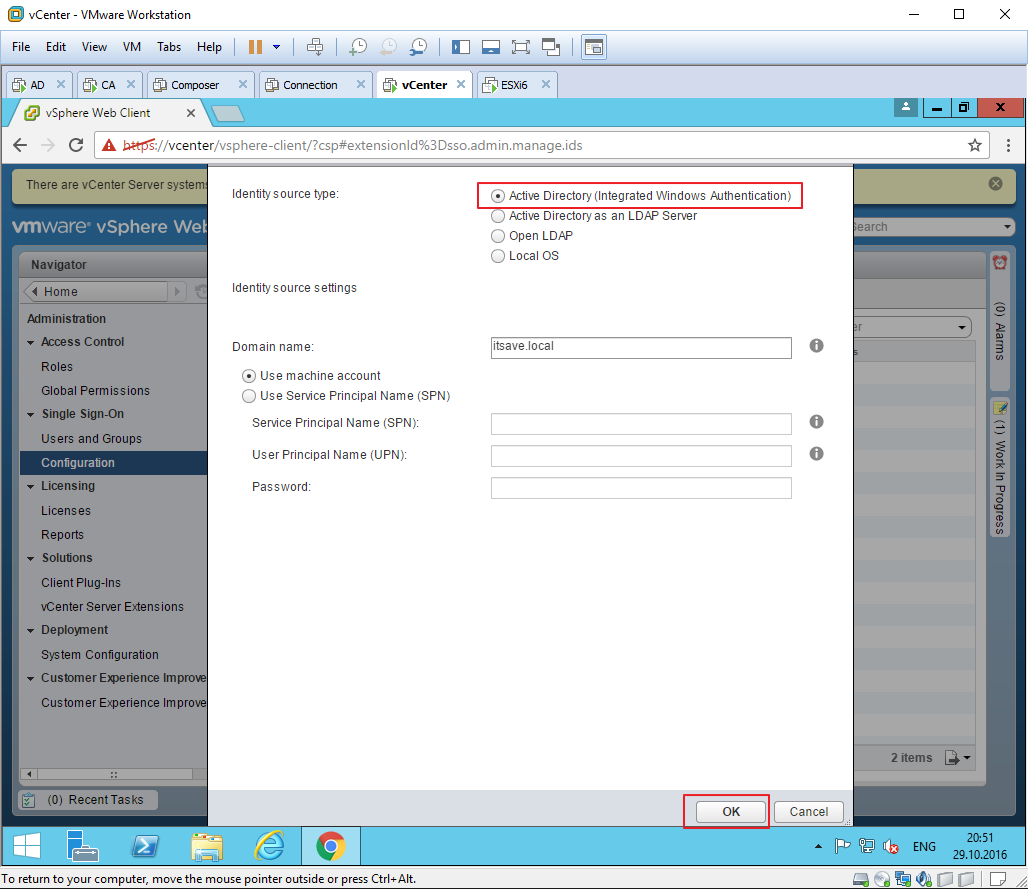
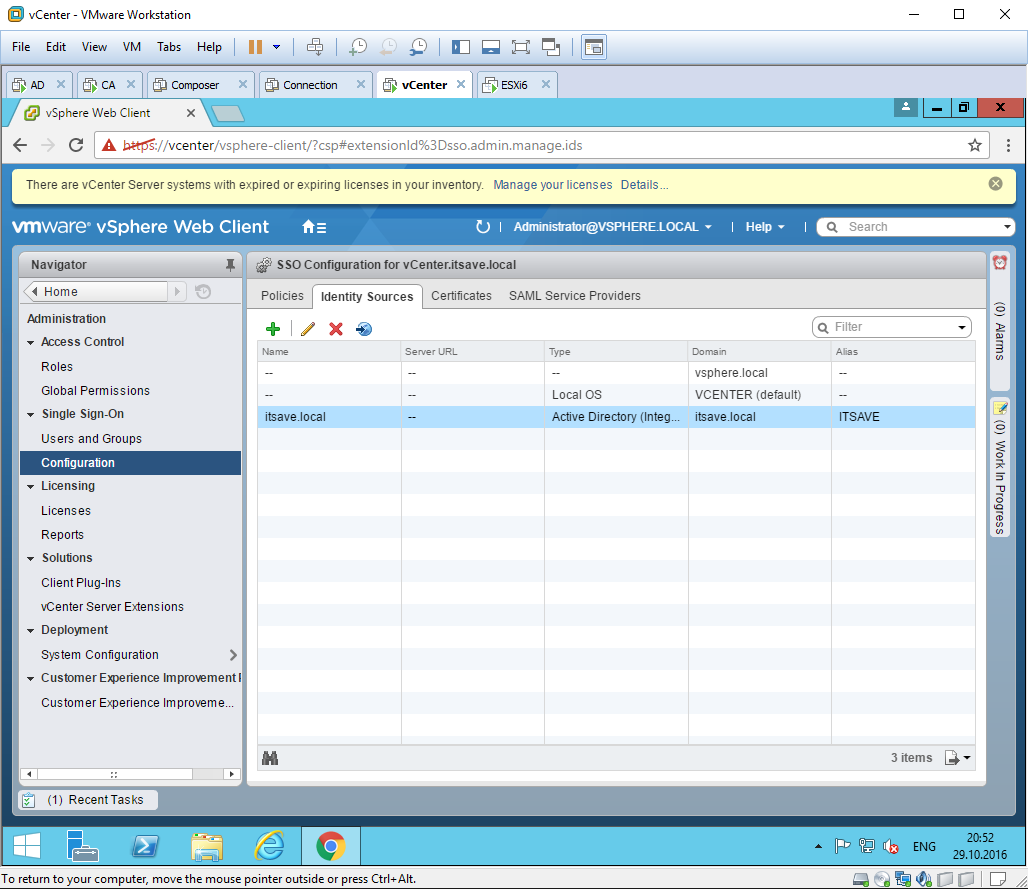
После установки плагина, входим под учетной записью administrator@vsphere.local В левом меню выбираем пункт Administration -> Configuration -> Identity Sources Для добавления домена itsave.local в качестве источника учетных записей, жмем на зеленый плюс.
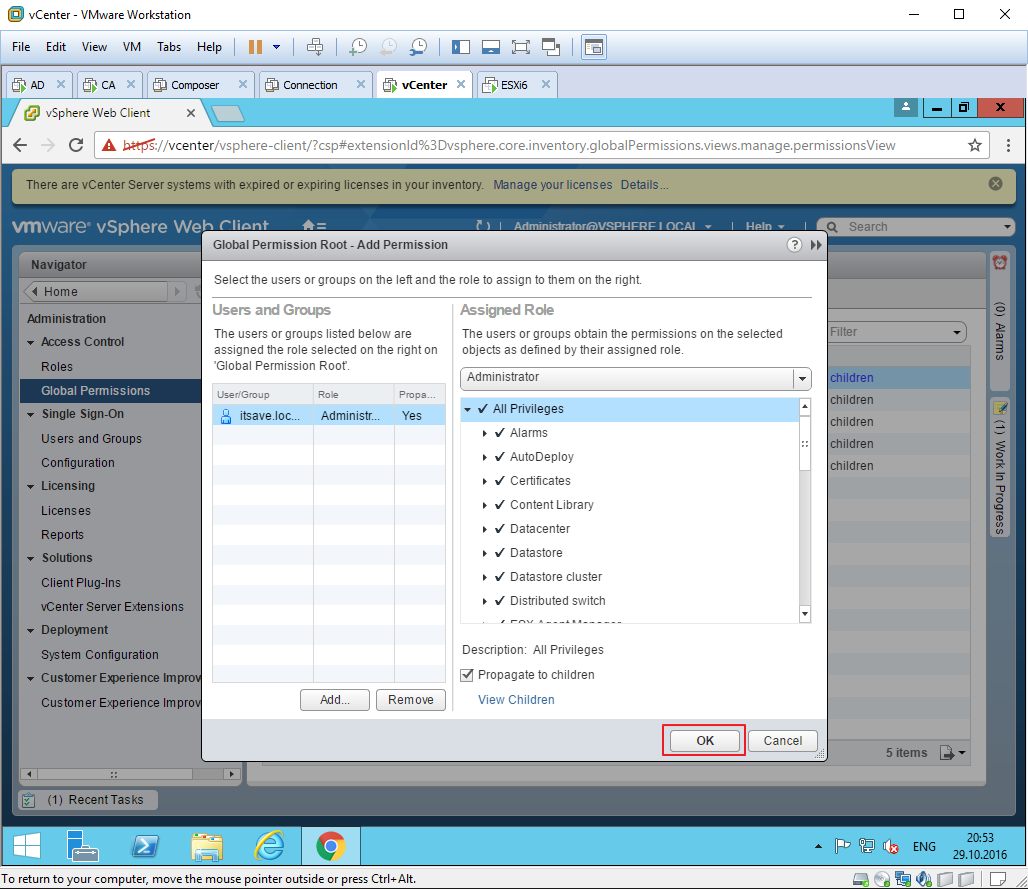
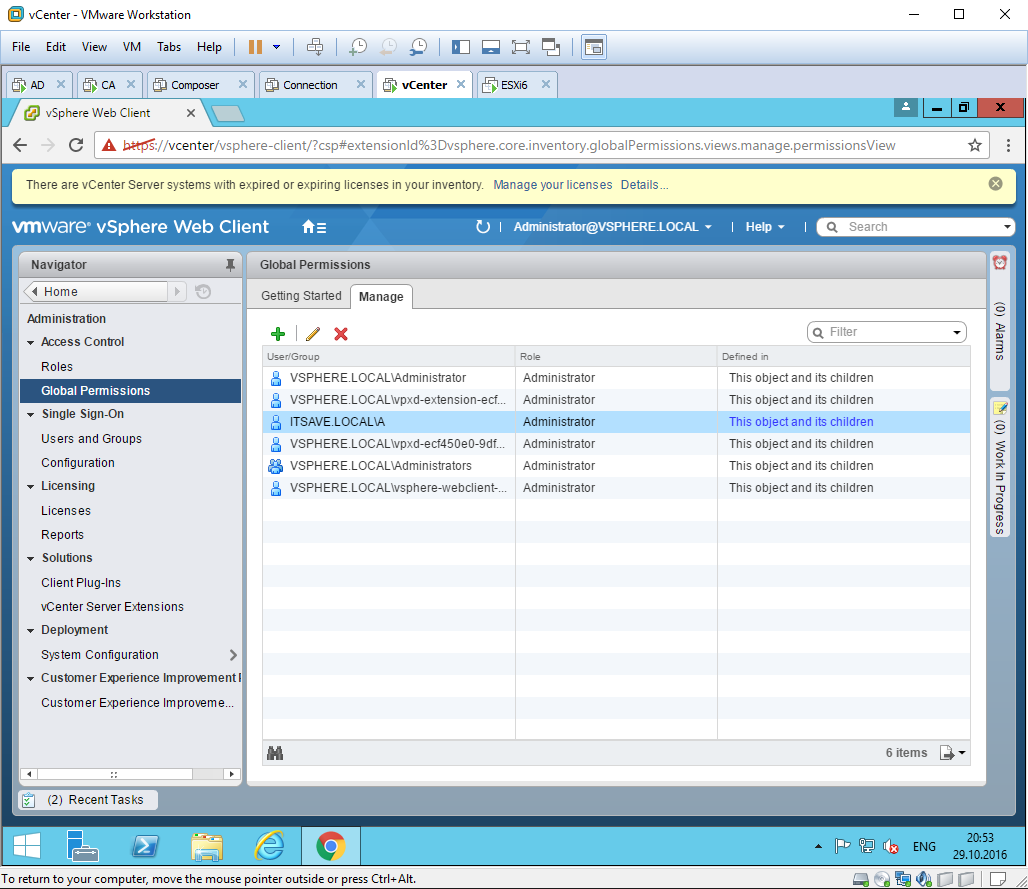
После чего даю учетной записи доменного администратора роль глобального администратора vsphere.local и администратора vCenter server.
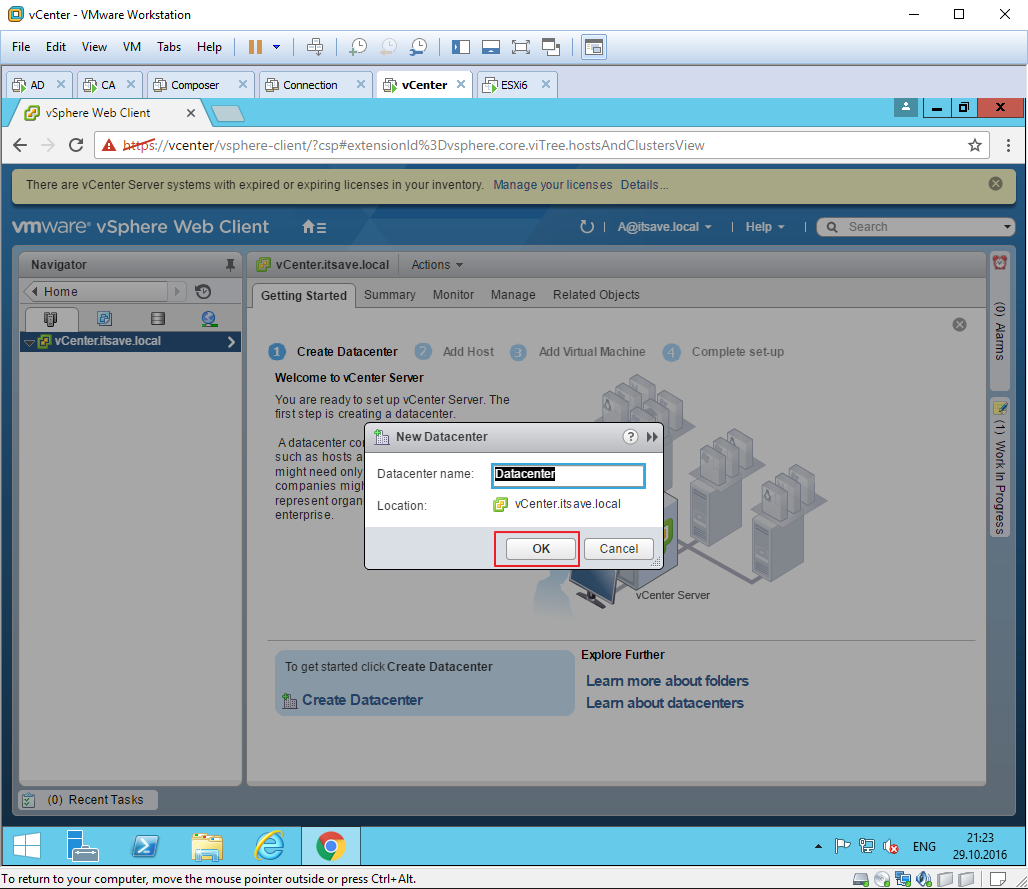
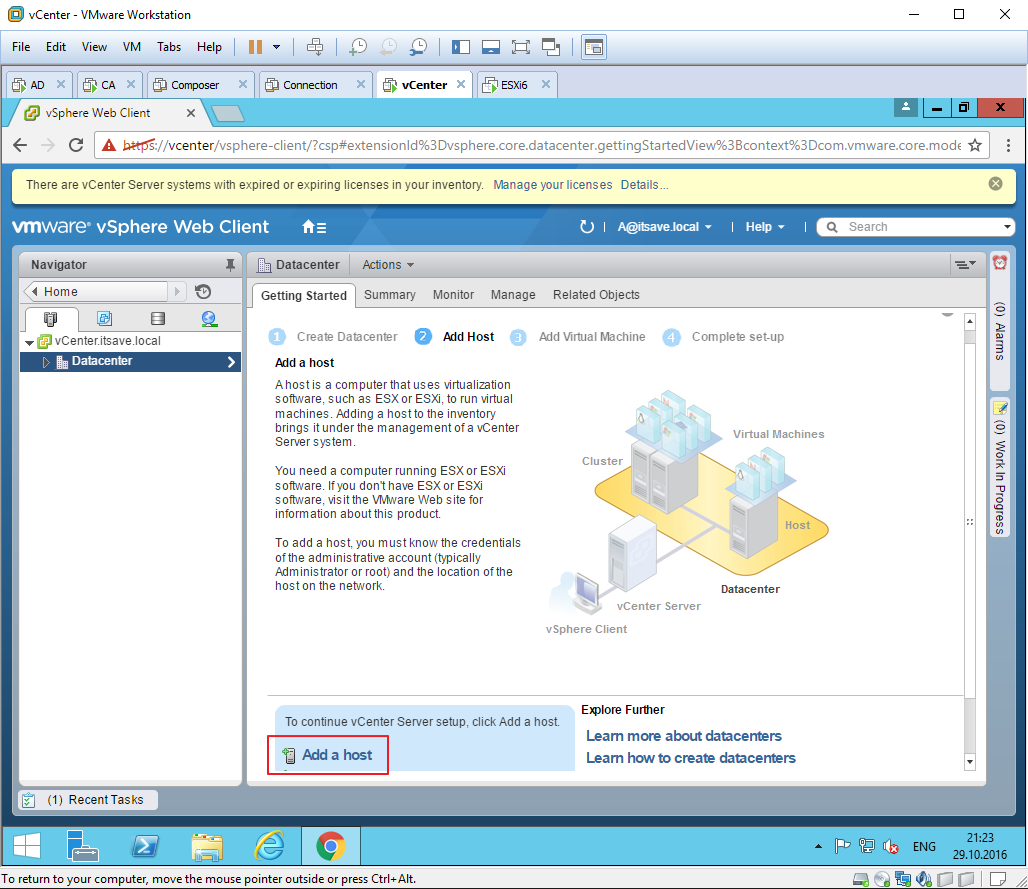
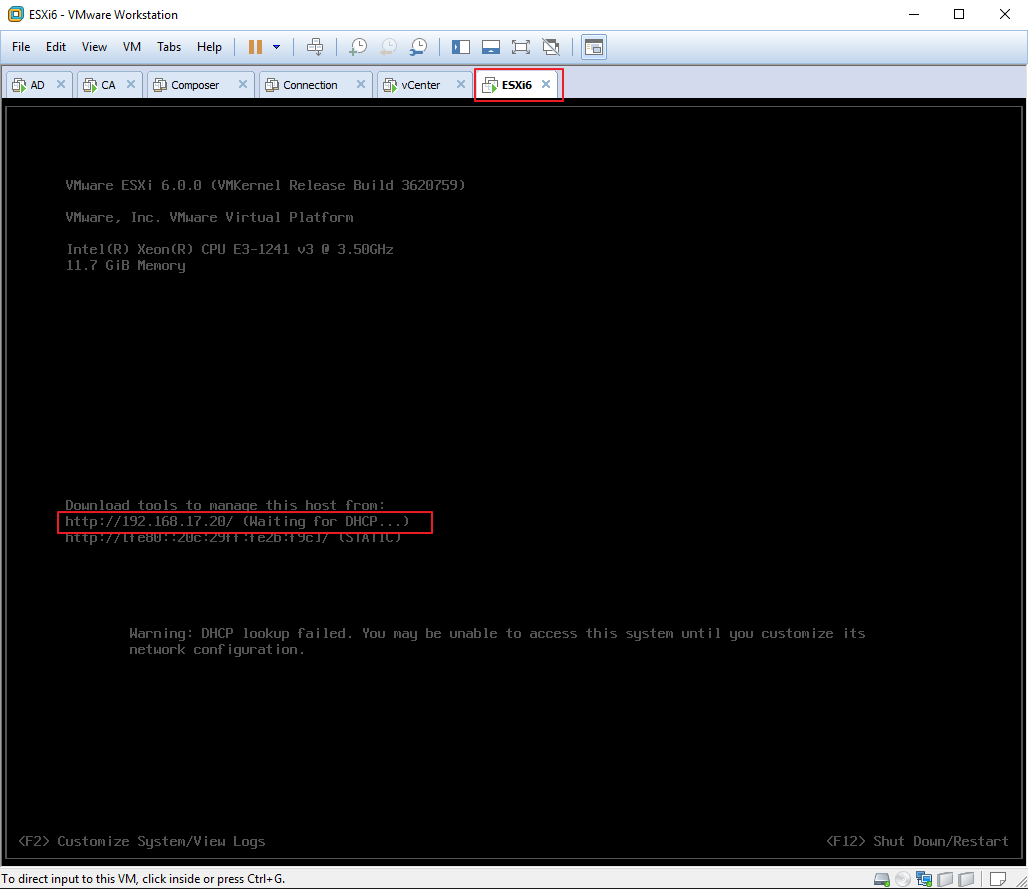
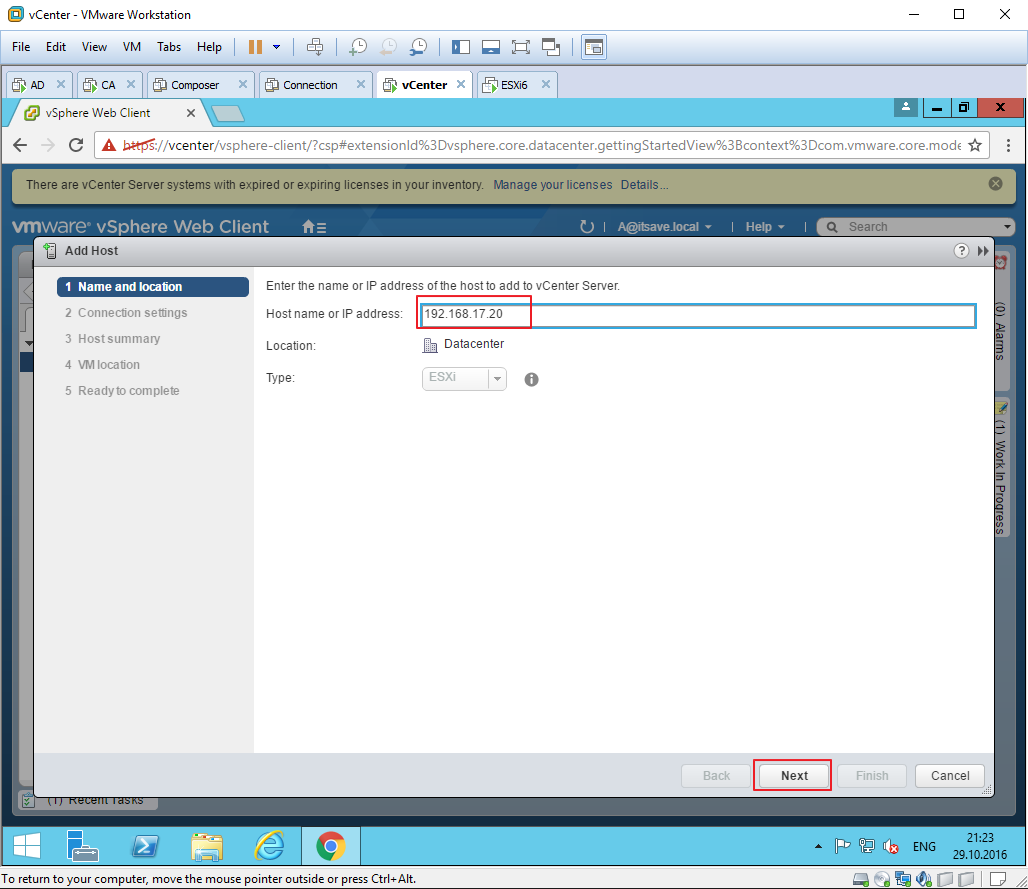
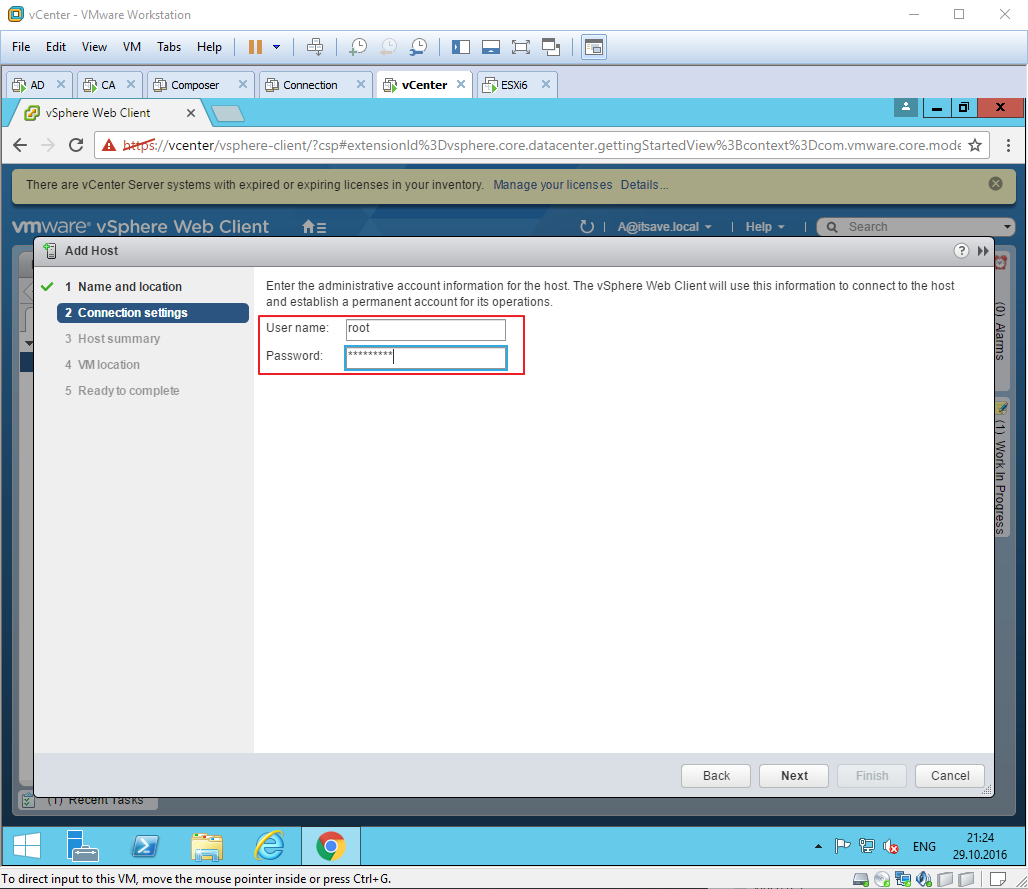
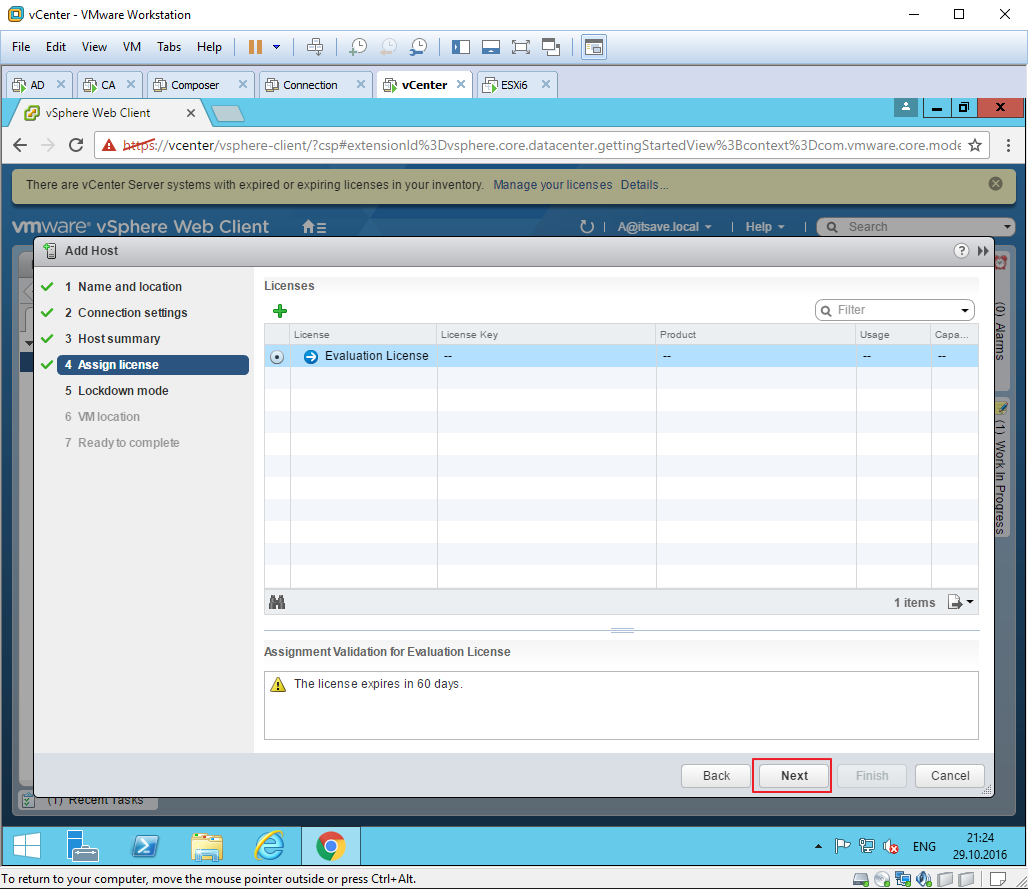
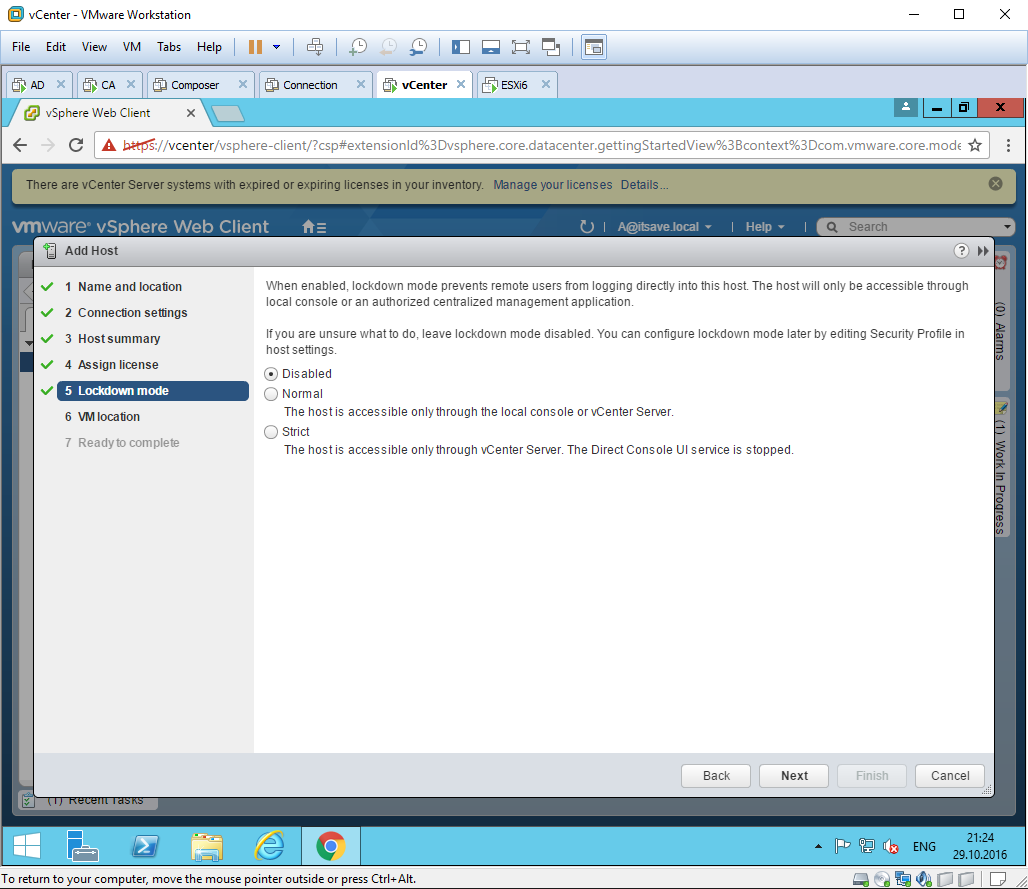
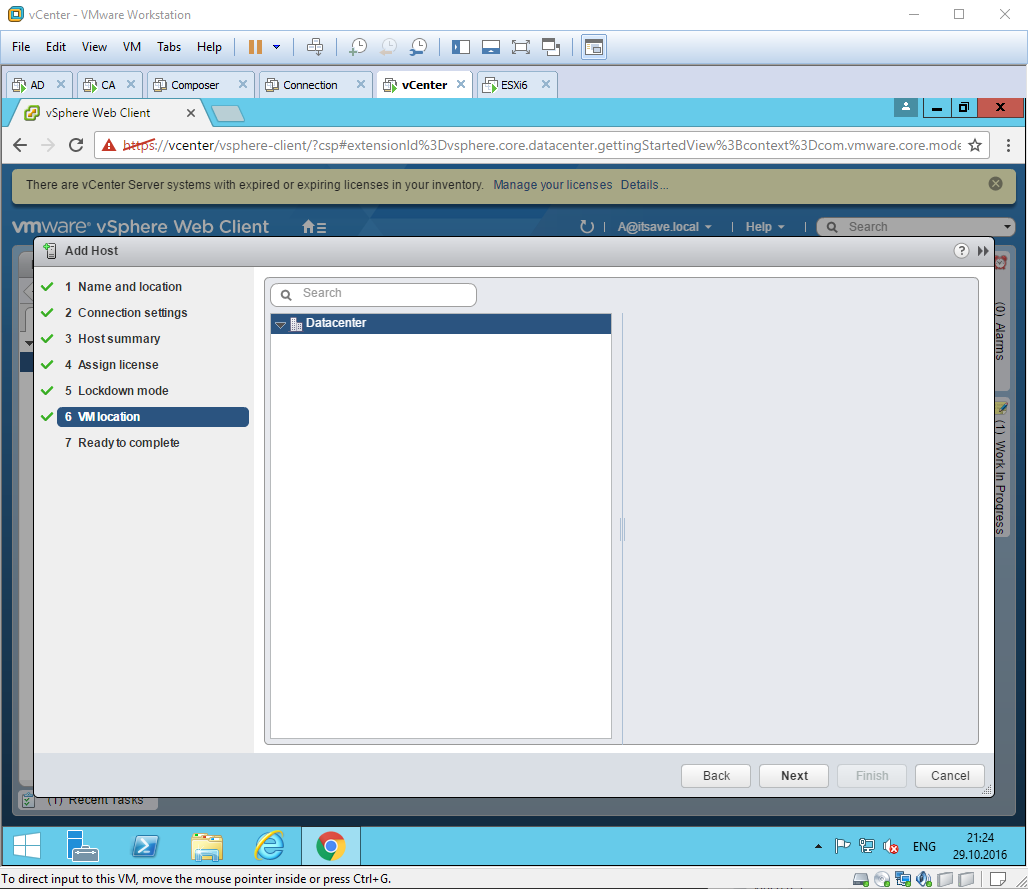
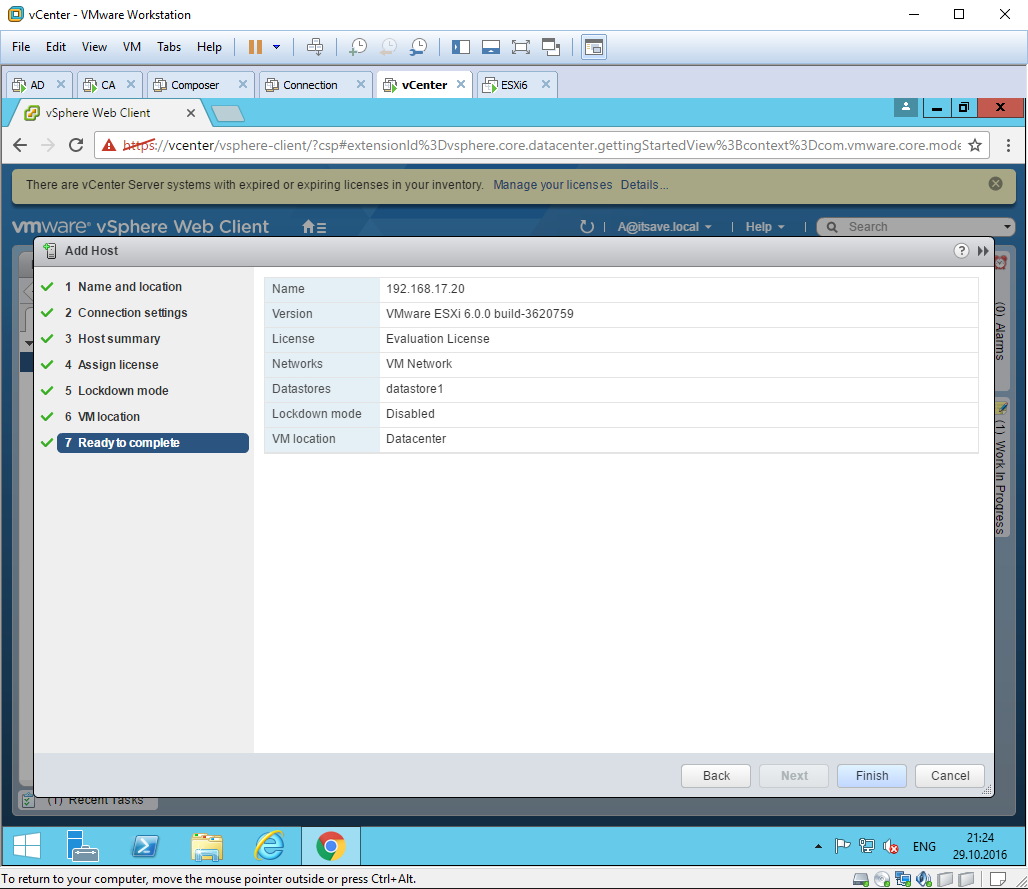
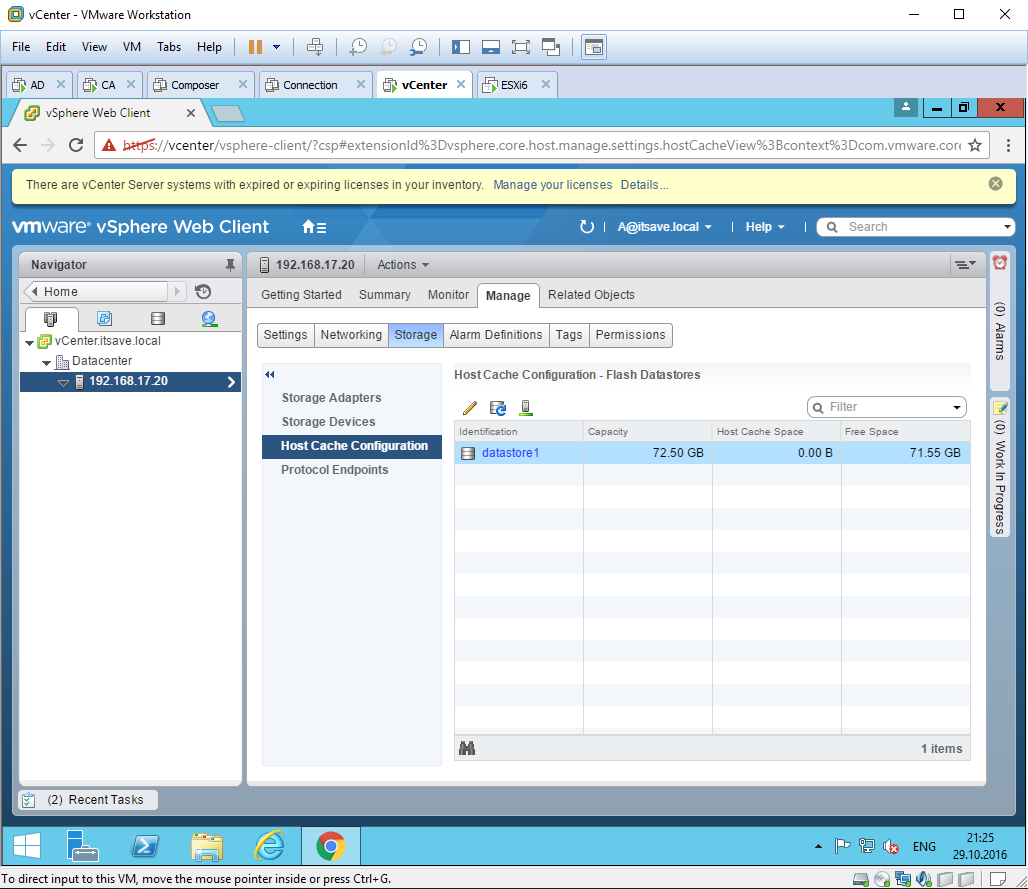
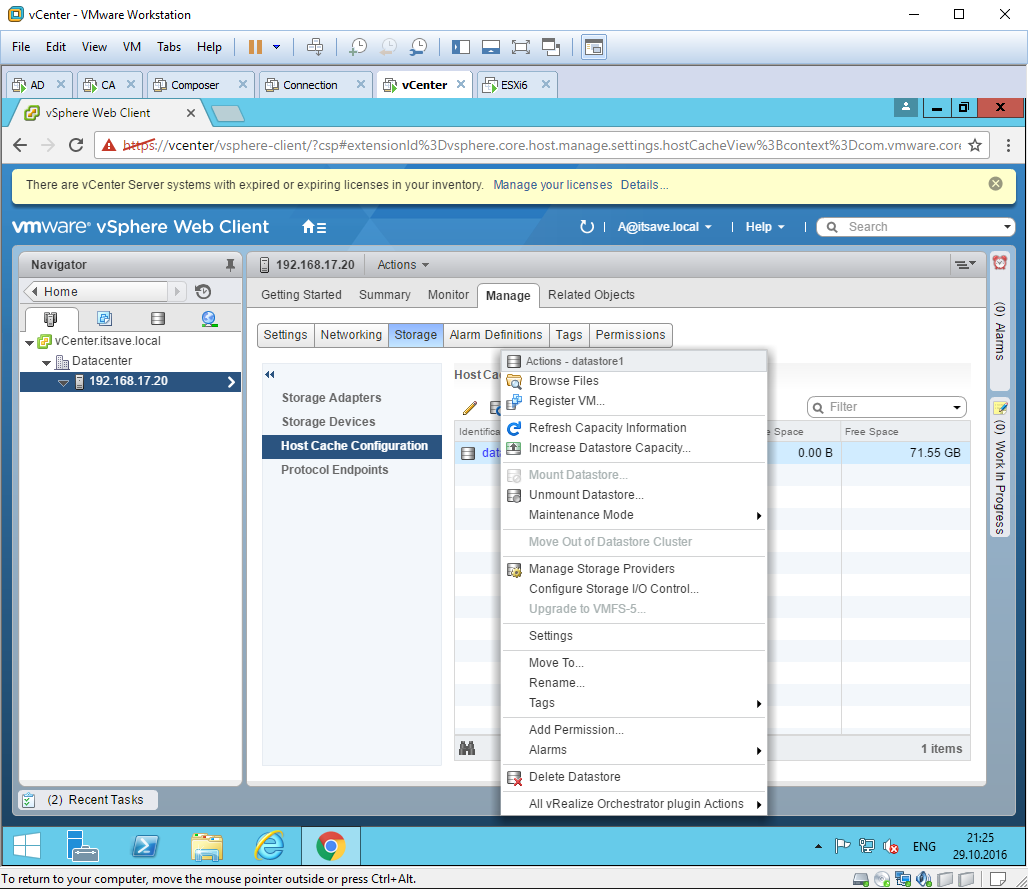
34 — 47 Логинимся под доменным администратором в vCenter serever. Добавляем хост ESXi через пункт меню Hosts and Clusters. Проверяю, что на хосте ESXi доступны 4 виртуальных ядра процессора, 12Gb оперативной памяти и локальное хранилище на 71Gb
1
2
3
4
5
6
7
8
9
10
11
12
13
14
15
16
17
18
19
20
21
22
23

24
25
26
27
28

29
30
31
32
33
34
35

36
37
38
39
40
41
42
43
44
45

46
47
Till now in this series we have discussed a lot of theory about vCenter Server/VCSA, deployment type etc and also we looked into system requirements for vCenter Server and PSC installation. Now its lab time where we will see the installation/configuration of the components.
If you have missed earlier post of this series, you can read them from below links:
1: Installing and Configuring Esxi
2: VCSA Overview
3: vCenter Server and PSC Deployment Types
4: System Requirements for Installing vCenter Server
In my lab I am going to use an external SQL server database. My database version is SQL 2014.
1: Preparing vCenter Server Databases for Install
You can use following script to install the database and configure login,permission etc. This script will also configure the database schema for you
[code]
/ *** Create a SQL Server Database and User for vCenter Server *** /
use [master]
go
CREATE DATABASE [VCDB] ON PRIMARY
(NAME = ‘vcenter65’,
FILENAME = ‘C:Program FilesMicrosoft SQL ServerMSSQL12.MSSQLSERVERMSSQLDATAvcenter65.mdf’,
SIZE = 10MB,
FILEGROWTH = 10% )
LOG ON
(NAME = ‘vcdb_log’,
FILENAME = ‘C:Program FilesMicrosoft SQL ServerMSSQL12.MSSQLSERVERMSSQLLogvcenter65.ldf’,
SIZE = 1000KB,
FILEGROWTH = 10%)
COLLATE SQL_Latin1_General_CP1_CI_AS
go
use VCDB
go
CREATE LOGIN [vpxuser] WITH PASSWORD=N’Telstra@123′, DEFAULT_DATABASE=VCDB, DEFAULT_LANGUAGE=us_english, CHECK_POLICY=OFF
go
CREATE USER [vpxuser] for LOGIN [vpxuser]
go
use MSDB
go
CREATE USER [vpxuser] for LOGIN [vpxuser]
go
/ *** Create Database Roles and the VMW Schema and set Database Permissions ***/
CREATE SCHEMA [VMW]
go
ALTER USER [vpxuser] WITH DEFAULT_SCHEMA =[VMW]
if not exists (SELECT name FROM sysusers WHERE issqlrole=1 AND name = ‘VC_ADMIN_ROLE’)
CREATE ROLE VC_ADMIN_ROLE;
GRANT ALTER ON SCHEMA :: [VMW] to VC_ADMIN_ROLE;
GRANT REFERENCES ON SCHEMA :: [VMW] to VC_ADMIN_ROLE;
GRANT INSERT ON SCHEMA :: [VMW] to VC_ADMIN_ROLE;
GRANT CREATE TABLE to VC_ADMIN_ROLE;
GRANT CREATE VIEW to VC_ADMIN_ROLE;
GRANT CREATE Procedure to VC_ADMIN_ROLE;
if not exists (SELECT name FROM sysusers WHERE issqlrole=1 AND name = ‘VC_USER_ROLE’)
CREATE ROLE VC_USER_ROLE
go
GRANT SELECT ON SCHEMA :: [VMW] to VC_USER_ROLE
go
GRANT INSERT ON SCHEMA :: [VMW] to VC_USER_ROLE
go
GRANT DELETE ON SCHEMA :: [VMW] to VC_USER_ROLE
go
GRANT UPDATE ON SCHEMA :: [VMW] to VC_USER_ROLE
go
GRANT EXECUTE ON SCHEMA :: [VMW] to VC_USER_ROLE
go
sp_addrolemember VC_USER_ROLE , [vpxuser]
go
sp_addrolemember VC_ADMIN_ROLE , [vpxuser]
go
use MSDB
go
if not exists (SELECT name FROM sysusers WHERE issqlrole=1 AND name = ‘VC_ADMIN_ROLE’)
CREATE ROLE VC_ADMIN_ROLE;
go
GRANT SELECT on msdb.dbo.syscategories to VC_ADMIN_ROLE
go
GRANT SELECT on msdb.dbo.sysjobsteps to VC_ADMIN_ROLE
go
GRANT SELECT ON msdb.dbo.sysjobs to VC_ADMIN_ROLE
go
GRANT SELECT ON msdb.dbo.sysjobs_view to VC_ADMIN_ROLE
go
GRANT EXECUTE ON msdb.dbo.sp_add_job TO VC_ADMIN_ROLE
go
GRANT EXECUTE ON msdb.dbo.sp_delete_job TO VC_ADMIN_ROLE
go
GRANT EXECUTE ON msdb.dbo.sp_add_jobstep TO VC_ADMIN_ROLE
go
GRANT EXECUTE ON msdb.dbo.sp_update_job TO VC_ADMIN_ROLE
go
GRANT EXECUTE ON msdb.dbo.sp_add_jobserver TO VC_ADMIN_ROLE
go
GRANT EXECUTE ON msdb.dbo.sp_add_jobschedule TO VC_ADMIN_ROLE
go
GRANT EXECUTE ON msdb.dbo.sp_add_category TO VC_ADMIN_ROLE
go
sp_addrolemember VC_ADMIN_ROLE , [vpxuser]
go
use master
go
grant VIEW SERVER STATE to [vpxuser]
go
GRANT VIEW ANY DEFINITION TO [vpxuser]
go
/ *** Create a vCenter Server User by Using the dbo Schema and db_owner Database Role *** /
use VCDB
go
sp_addrolemember @rolename = ‘db_owner’, @membername = ‘vpxuser’
go
use MSDB
go
sp_addrolemember @rolename = ‘db_owner’, @membername = ‘vpxuser’
go
[code]
2: Create 64 bit DSN for ODBC Connection
Instructions for doing so can be read from here
Install vCenter Server
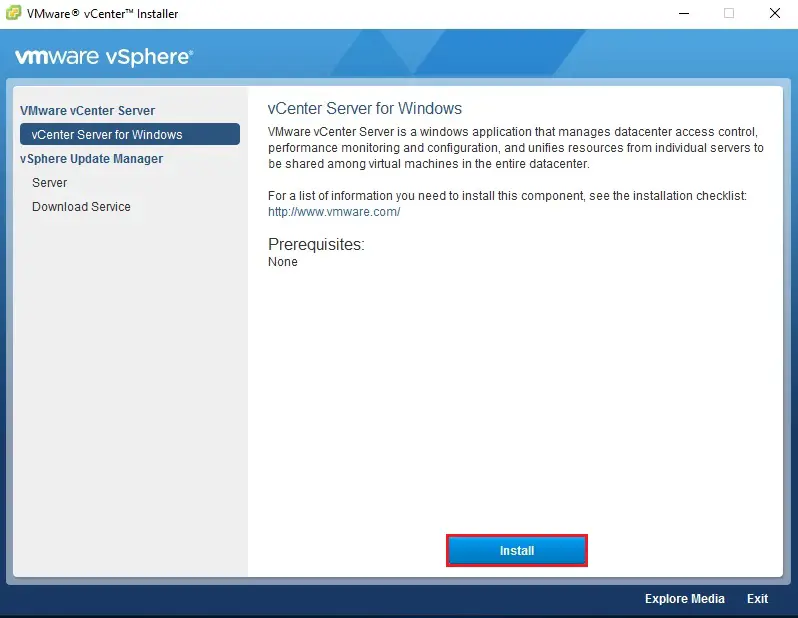
1) Mount the vSphere 6.0 installation media. Execute the “autorun.exe”
The installation wizard appears. In the left pane select “vCenter Server for Windows” and click on Install.
2: Press Next to continue

3: Accept the licence agreement and hit“Next”

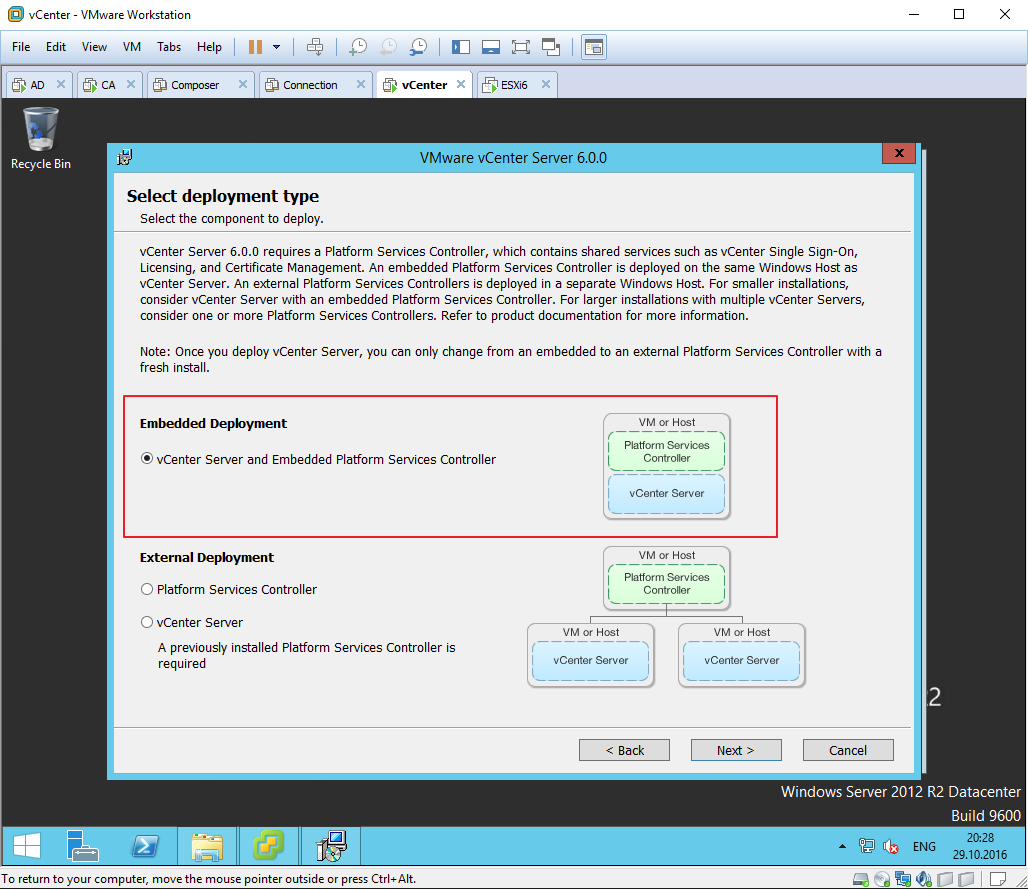
4) Under Select Deployment type choose “Embedded Platform Services Controller” and press “Next”

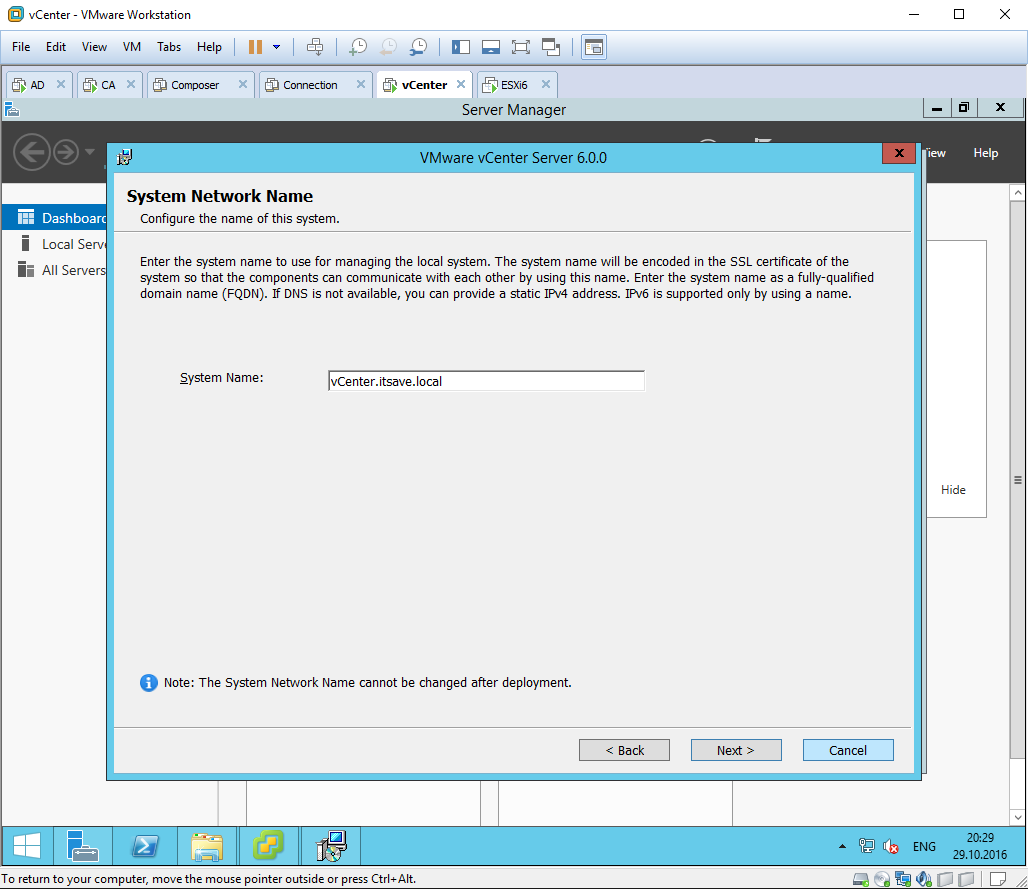
5) Verify the “System Name” is a valid FQDN and press “Next”.
Note that system name can’t be changed post installation.

6) On “vCenter Single Sign-ON Configuration” page enter vCenter Single Sign-On domain (default is vsphere.local), “Password” for administrator user and “Site Name”and press next.

7) In the “vCenter Service Account” window, select “specify a user service account” and supply the username in format Domainusername and the password for service account and press “Next”.

Note: If you are planning to run your vCenter Server using a dedicated service account then make sure it has been granted “Log on as a service” rights and added to local Administrator group of same machine where you are installing vcenter Server.
 On “Database Settings” page , select “Use an external database” and enter the DSN name, DB username and password and hit Next to continue.

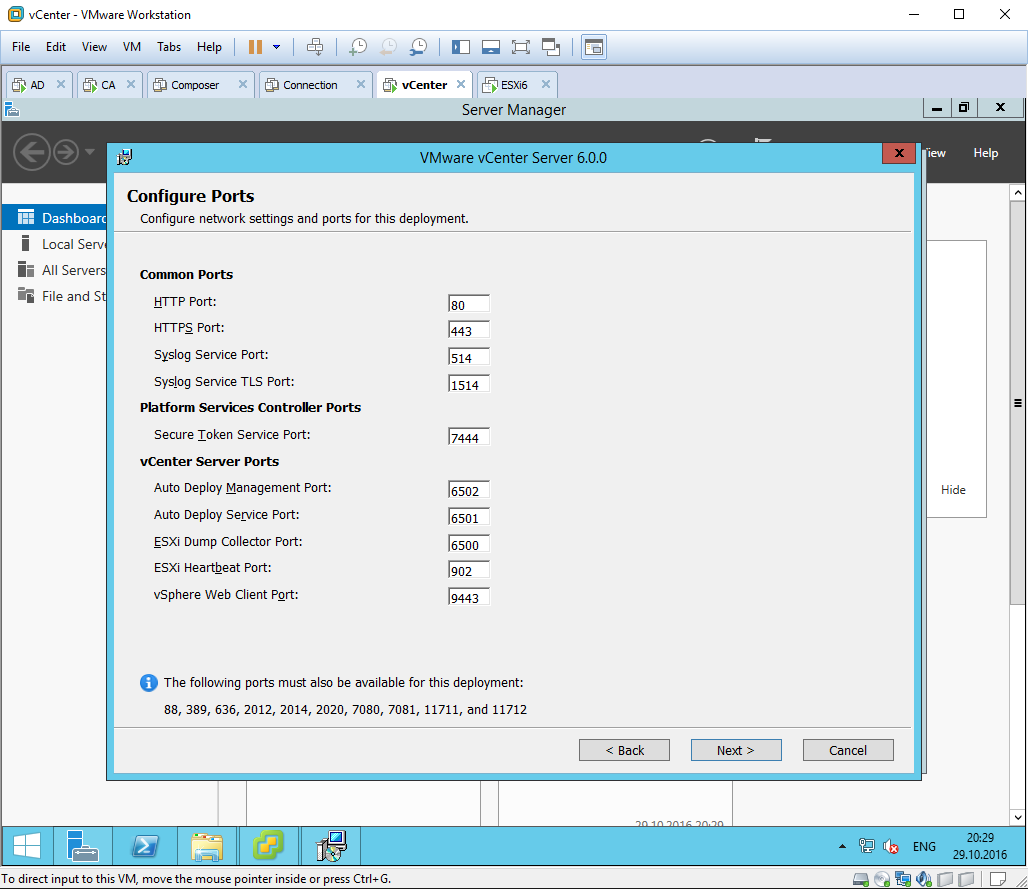
9) On “Configure Ports” page, verify the default ports and press “Next”.

10) In the “Destination Folder” window, change the destination folder if necessary and select “Next”.

11) On ready to Install page review your settings and if everything is OK hit Install button.

12) Let the installer run and install the components


13) Once the installer has finished installation, Click on Launch vSphere Web-Client and then click on Finish button to complete installation.

14: Clicking on launch vSphere Web Client will bring the login page of vCenter Web-Client. Login with administrator@vsphere.local user

Verify that login to Web-Client is successful.

In next post of this series we will look into basic configuration of vcenter server.
I hope this post is informational to you. Feel free to share this on social media if it is worth sharing. Be sociable 
Install VMware vCenter Server 6.7 for Windows, VMware vCenter Server is a windows materiality that comports datacenter brings admission to control, performance monitoring, and configuration, and unifies resources from individual servers to be shared among virtual machines within the entire datacenter. we will manage all our vSphere products like ESXi and Virtual Machines. vCenter is that the windows application which is provided by VMware which may only be utilized in the windows servers. vSphere Installation and Setup is meant for knowledgeable administrators who want to put in and Configure vCenter Server and deploy and configure the vCenter Server Appliance.
Hardware Requirements Click vCenter 6.7 Hardware Requirements
Storage Requirements Click vCenter 6.7 Storage Requirments
Software Requirements Click vCenter Software Requirments
Database Requirements Click vCenter Database Requirments
Install vCenter Server 6.7 for Windows
Download the VMware vCenter Server 6.7 and Modules for Windows Download VMware vCenter Server 6.7
1- After downloading the vCenter Server ISO file, Mount your VMware vCenter Server 6.7 ISO and then double click on autorun.exe to start the installation.

2- The VMware vCenter Installer Windows will open, Select vCenter Server for Windows and then click on the Install button.
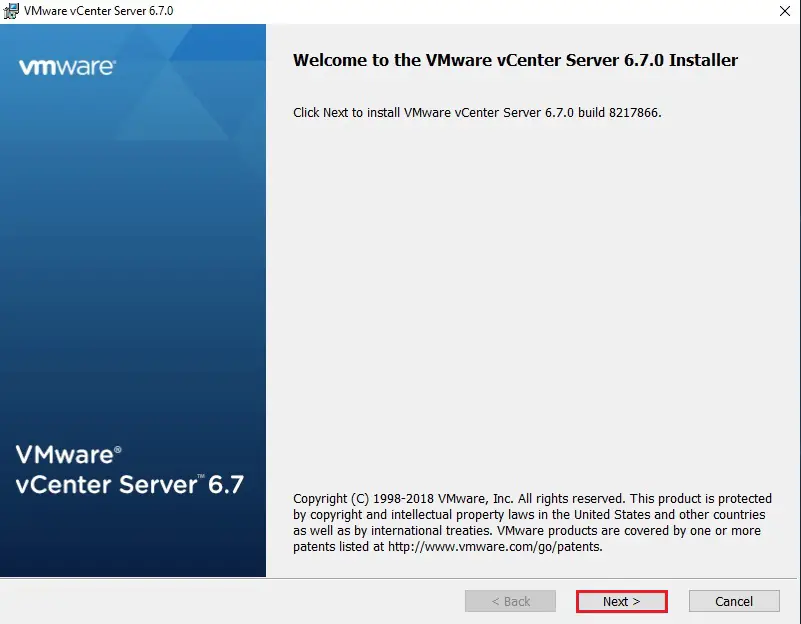
3- Welcome to the VMware vCenter Server 6.7 Installer, so click next.
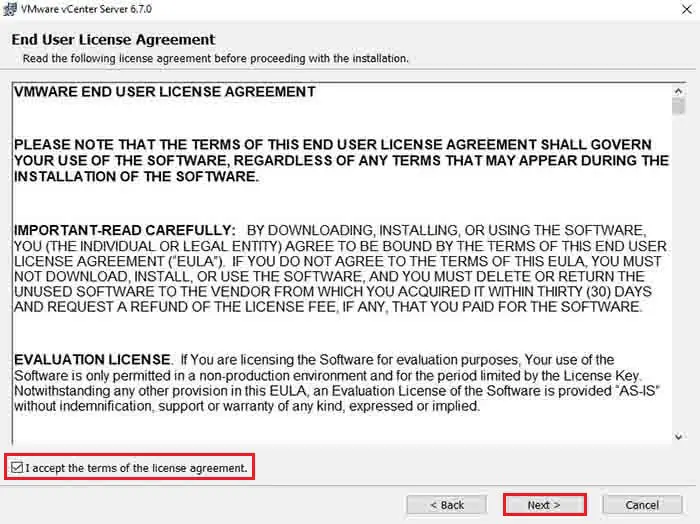
3- Select I accept the end-user license agreement and then click on Next.
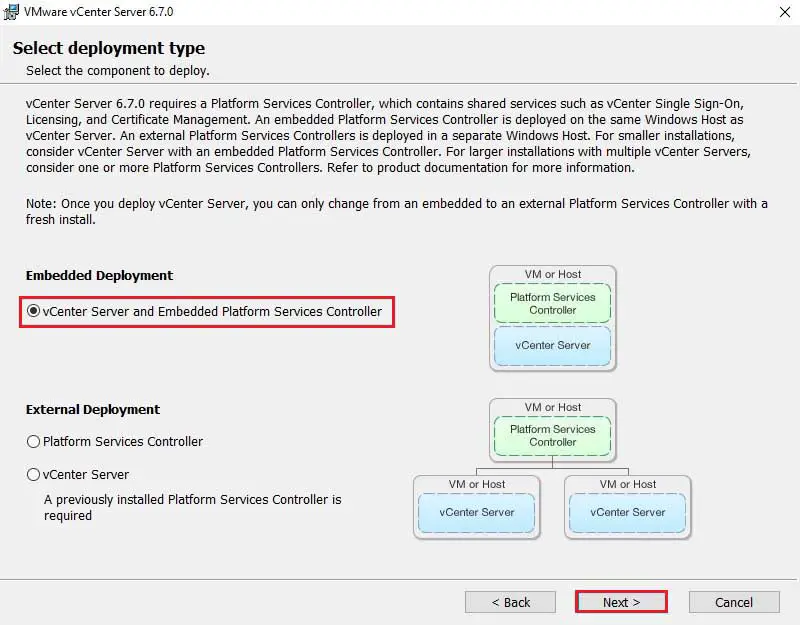
4- Now Under deployment type, Select the vCenter Server and Embedded platform services controller and then click on Next.
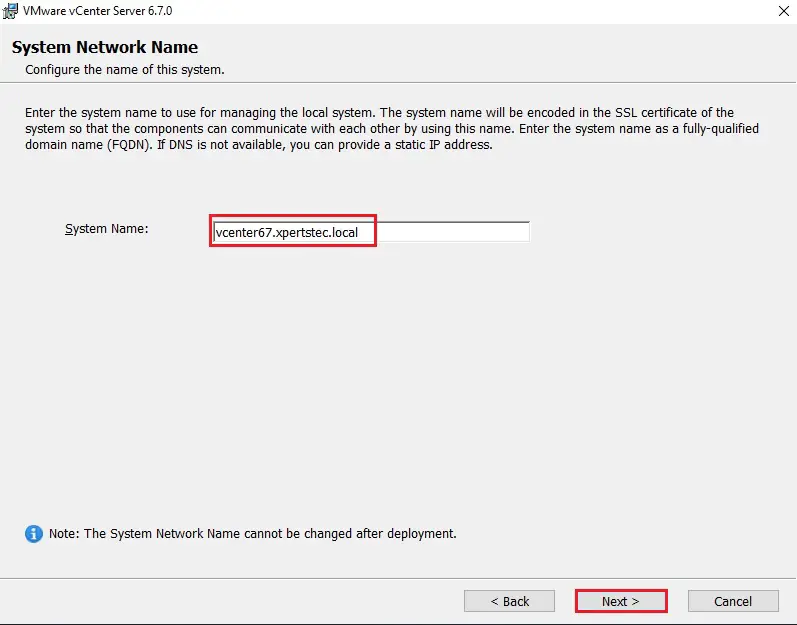
5- Type your fully qualified domain name in the System Name field and then click on Next.
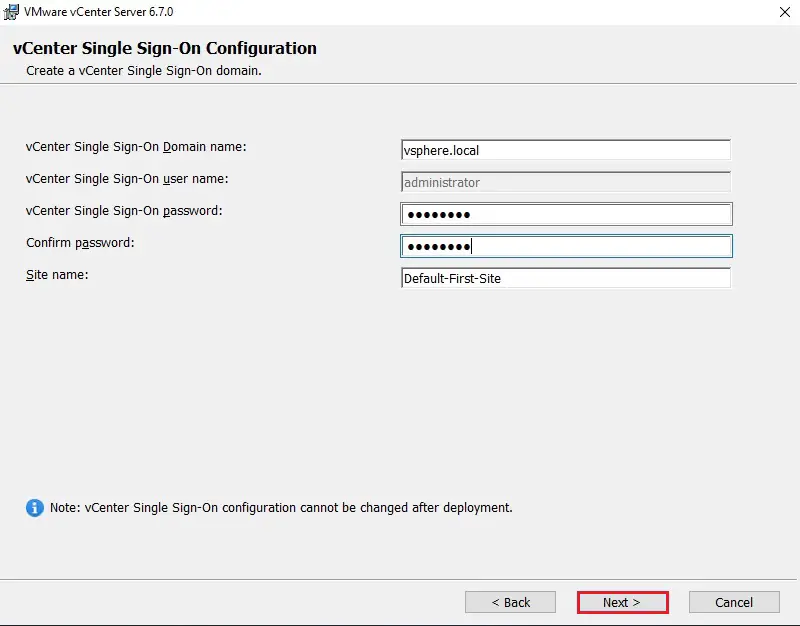
6- vCenter Single Sign-On configuration, Now Leaves it as the default vsphere.local (not the same as your Active Directory name). Type your password for the SSO administrator account and then click on Next.
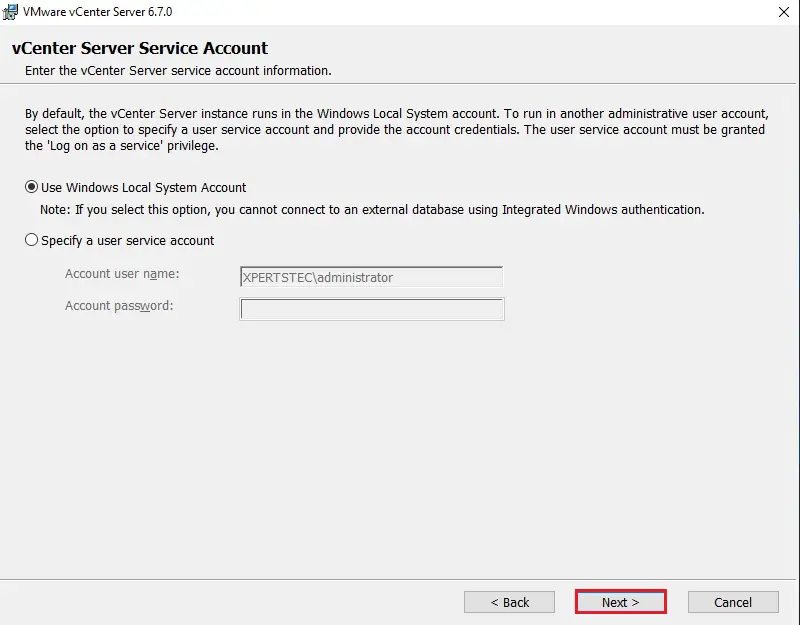
vCenter Server Service Account
7- vCenter Server Service Account, select use Windows local system account and then click on Next.
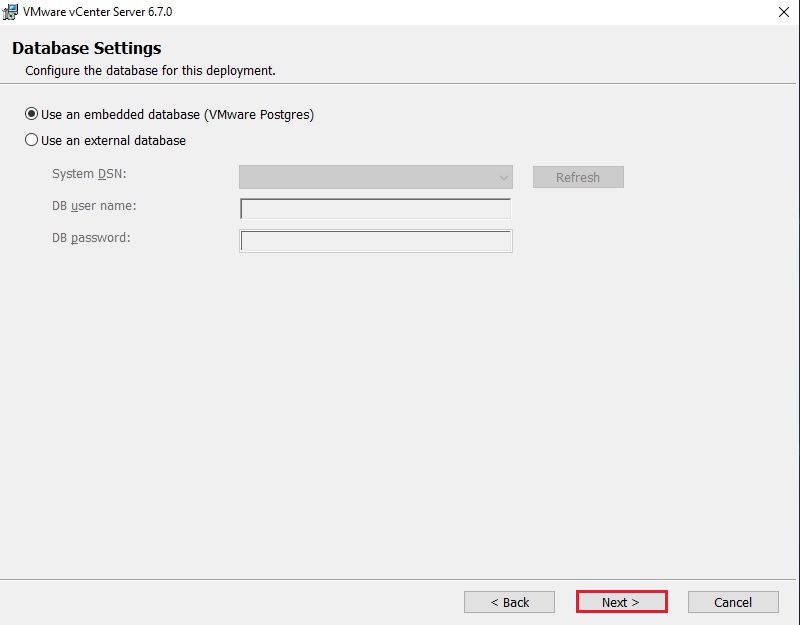
8- Select the use of an embedded database (VMware Postgres) and then click on Next.
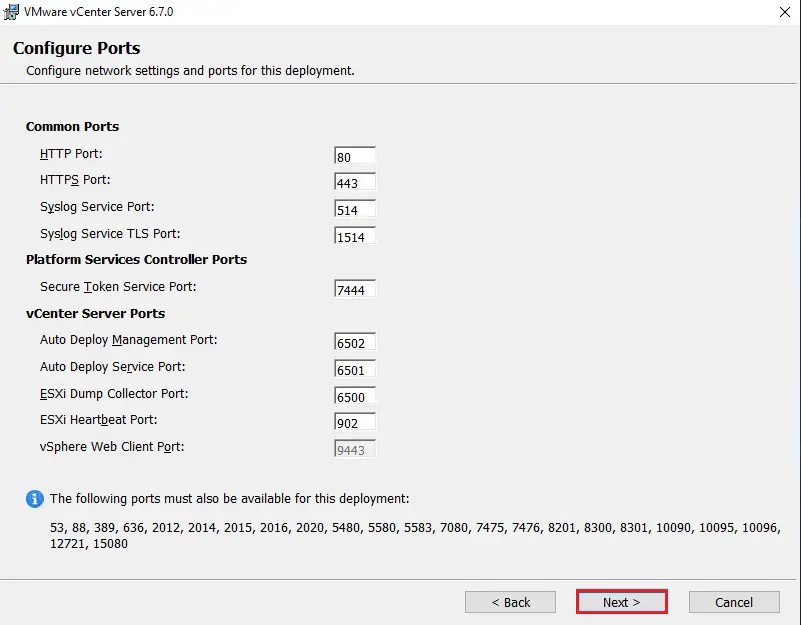
9- Leave the default port configuration and then click on Next.
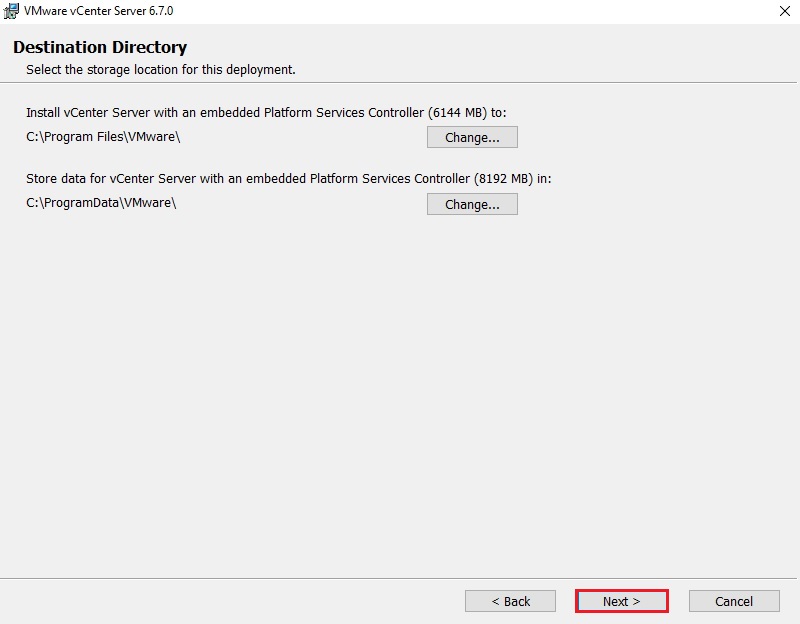
10- Select the destination directory where you want to install vCenter services and then click on Next.
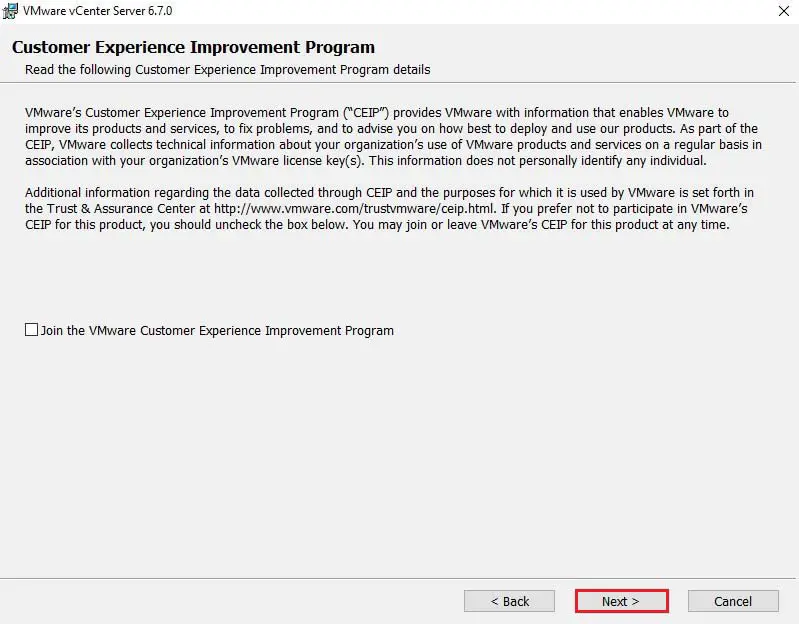
11- Now check or uncheck the VMware Customer Experience Improvement Program and then click on Next.
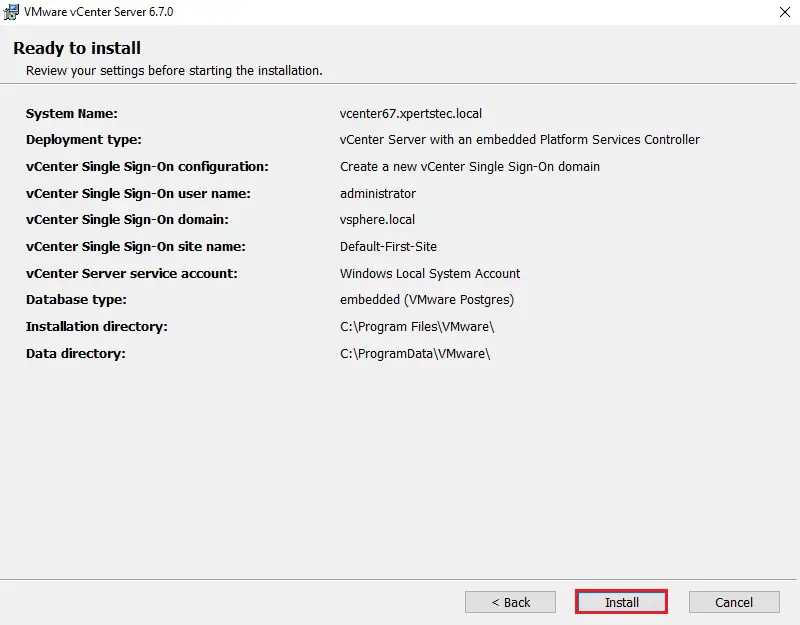
12- Review the VMware vCenter Server configuration and then click the Install button to start the installation process.
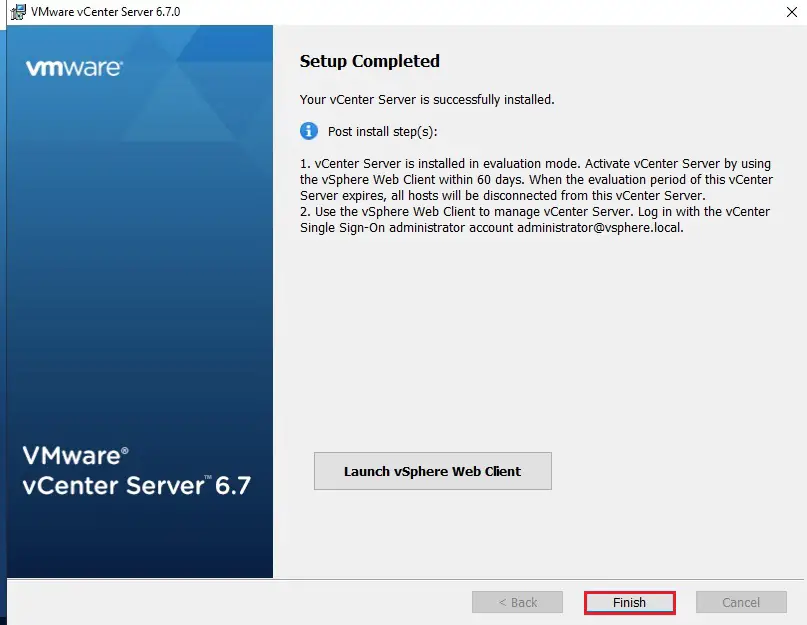
13- Your vCenter Server is successfully installed, so click on Finish.
VMware vCenter Server Post-Installation
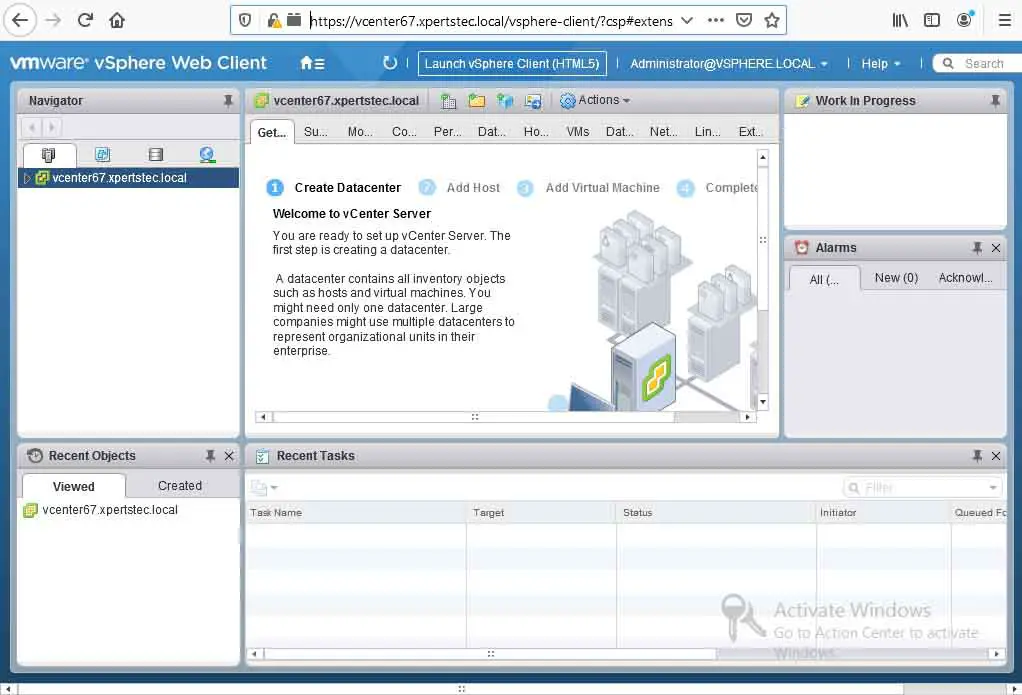
14- Open your browser and type your vCenter IP address or FQDN. Now Connect your vSphere vCenter Server by clicking on Launch vSphere Client (HTML5) or Launch vSphere Web Client (FLEX).
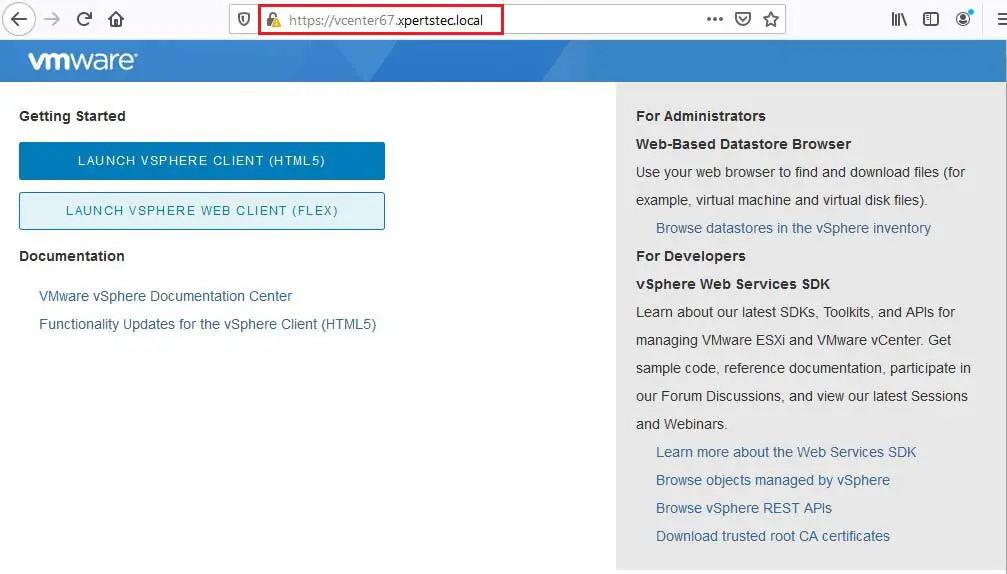
15- VMware vCenter Server 6.7 login with 60 days trial period.
Jamil Parvezhttps://www.xpertstec.com
Jamil Pervez works as a Network Administrator, based in Kuwait with a Primary focus on Microsoft technologies. Microsoft Certified MCSE, MCTP, MCITP, CCNP, CCIP, CCVP with 20 years of experience in administering Windows Servers, Exchange, VMWare, Veeam B&R, Veritas BackupExec.