Contents:
VcRuntime140.dll Overview
Why is the VcRuntime140.dll Missing from Windows 10/11
5 Ways to Fix VcRuntime140.dll not found on Windows 10/11
VcRuntime140.dll Overview
The DLL refers to Dynamic Link Libraries which is used to process various programs. There are considerable DLL files on each computer and different DLL files are used by different programs, for instance, the VcRuntime140.dll is available for Visual C++ Redistributable for Visual Studio 2015.
So you can see the DLL files missing or not found is a common error on Windows system, besides the VcRuntime140.dll, such as Xinput1_3.dll.
Tips: Though the error message prompts you the VcRuntime140.dll is missing or not found on your PC, it is advisable that you download it from website casually.
Why is the Vcurntime140.dll Missing from Windows 10/11?
The reasons are as below:
1. The resources on these sites are not reliable as they may even not be verified.
2. This missing Vcrunrtime140.dll lies in the Visual C++ Redistributable included in specific applications like Skype, KODI.
3. The programs themselves run into issues.
The main cause of the not found or disappeared VcRuntime140.dll consists in that when some programs, such as Skype, WAMP, KODI, and Photoshop, is running on your PC, they require the code Vrcuntime140.dll files to process, but to their surprise, this DLL file cannot be found, it is just missing.
In this way, what you can do is to get back the VcRuntime140.dll in virtue of different methods.
How to Fix This Program Can’t Start as the VcRuntime140.dll is Missing?
Go for all troubles to solve this DLL or Visual C++ Redistributable issue as soon as possible.
Solutions:
- 1: Remove the Microsoft Visual C++ Redistributable
- 2: Reinstall the Microsoft Visual C++ Redistributable
- 3: Download Vcruntime140.dll File
- 4: Run System File Checker
- 5: Update Drivers for Windows 10/11
Solution 1: Remove the Microsoft Visual C++ Redistributable
Normally, when Vcruntime140.dll is missing or cannot be found on Windows 10/11, perhaps it is the Microsoft Visual C++ package that goes corrupted, thus making Vcurntime140.dll unavailable.
What’s more, some applications usually come to your PC with its affiliated Visual C++ Redistributable, they may hit upon issues as well. So you need to remove the problematic Microsoft Visual C++ and then download a new one again along with its component Vcruntime140.dll file.
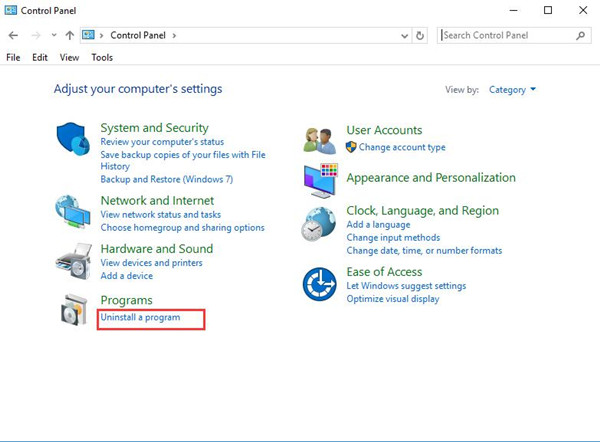
1. Go to Control Panel.
2. In Control Panel, change to View by Category and then locate Uninstall a program under Programs.
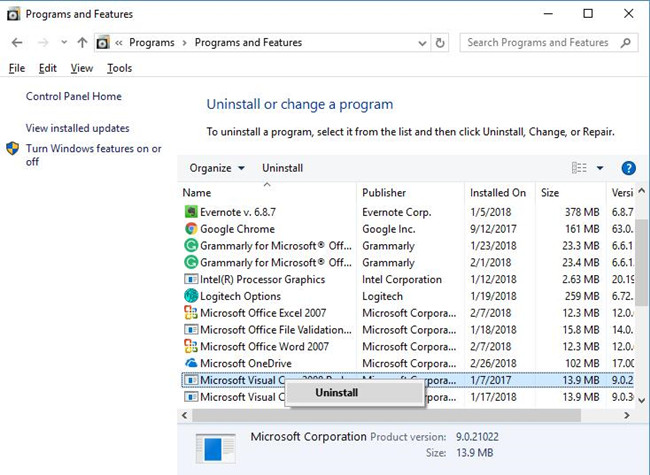
3. In Programs and Features, find out and right click the Microsoft Visual C++ Redistributable to Uninstall it.
Now you will have successfully removed the Microsoft Visual C++ Redistributable on Windows 10, begin to reinstall it for your PC.
Here if you keep receiving an alert that the program can’t start because Vcruntime140.dll is missing from your computer in some apps like Skype, and some Autodesk products, you would better uninstall these problematic applications as well.
Solution 2: Reinstall the Microsoft Visual C++ Redistributable
At this moment, you need to install a new Microsoft Visual C++ Redistributable for the Visual audio 2015 so as to tackle the problem that VcRuntime140.dll missing was not found on Windows 10.
If you hope to get Vcruntime140.dll missing fixed by downloading Visual C++ Redistributable package, it is advisable that you make full use of Driver Booster, which will find the specific Microsoft Visual C++ Redistributable package for specific applications. You can depend on it to download and install the packages for Windows 10/11.
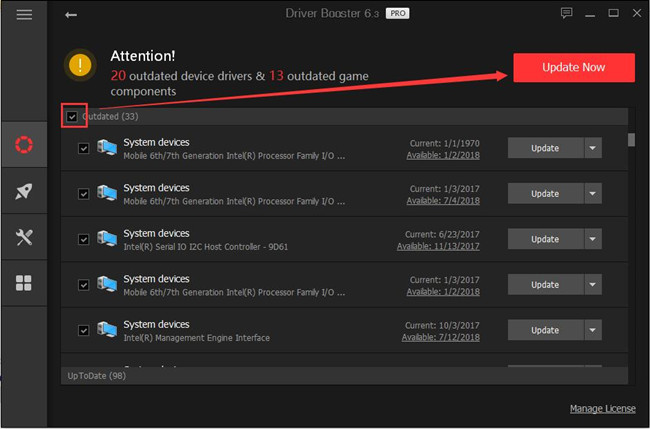
1. Download, install and run Driver Booster on your PC.
2. Click Scan. Driver Booster will begin to detect the outdated, missing, and corrupted drivers and components.

3. Find out all the Game Support and try to update them all by hitting Update Now.
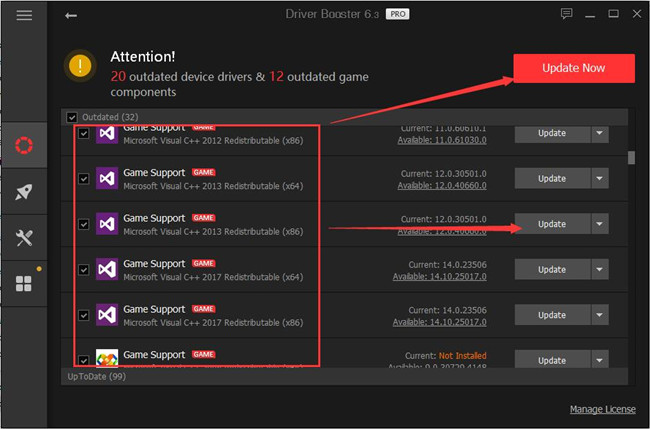
If carefully enough, you can also observe the presence of Vcruntime140.dll file in Driver Booster, if you haven’t installed it, install it. Or choose to Update it.
Quickly, you can restore the missing Vcruntime140.dll file to Windows 10 as Visual C++ Redistributable package is reinstalled as well.
It is also natural that you can download Visual C++ Redistributable from Microsoft site.
1. Download the Microsoft Visual C++ Redistributable from here.
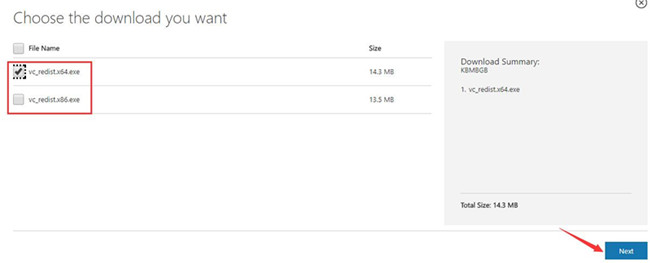
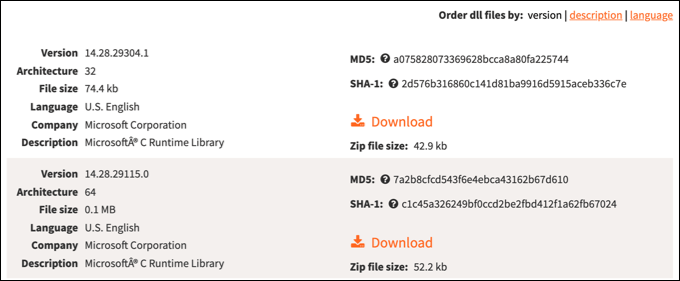
2. The site would need you to select a suitable file on your system.
Here if you are in the 32bit system, choose vc_redist.x86.exe.
If it is 64bit, pick out vc_redist.x64.exe.
3. Follow up the on-screen instructions on the installation interface to finish the installation.
You will find it rather simple to reinstall the Microsoft Visual C++ Redistributable for Windows 10. Once it is running on the computer, check if the error pops up again telling you the Vcurntime140.dll is missing.
Solution 3: Download Vcruntime140.dll File
If reinstalling Microsoft Visual C++ Redistributable package can’t resolve Vcruntime140.dll was not found Windows 10, such programs like Skype, KODI can’t still start, there is much need for you to directly install Microsoft Vcruntime140.dll file.
As it can be burdensome to find and download the Vcruntime140.dll by yourself, you might as well take advantage of DLL_Files Client to help you install the missing Vcruntime140.dll automatically.
1. Download DLL_Files Client on your PC.
2. After installing and running it, in the search box, input Vcruntime140.dll and then get started to Search for DLL file.

3. Locate Vcruntime140.dll from the search result and then Install it on Windows 10.
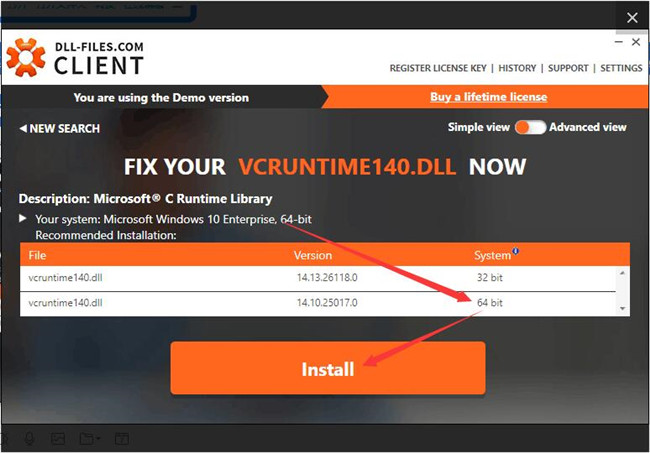
Here as you can see, DLL-FILES Client will automatically figure out your Windows system information, so you can directly hit Install to download Vcruntime140.dll.
Solution 4: Run System File Checker
Before you try any way to cope with the missing VcRuntime140.dll problem, you would better do a full scan of the system files. If the DLL files are problematic, maybe the System File Checker would repair them for you.
1. Type in Command Prompt in the search box and right click the result to Run as administrator.
2. In the Command Prompt, input sfc/scannow and then hit Enter to use the SFC.
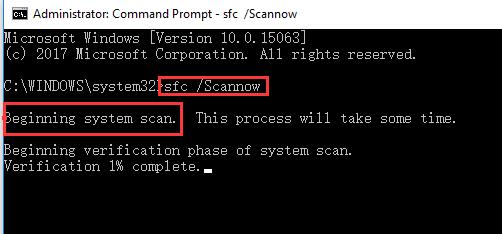
If you are lucky, the System File Checker would detect the corrupted files and correct for you, including the VcRuntime140.dll.
Solution 5: Update Drivers for Windows 10/11
To keep all the drivers for Windows 10 are up to date is extremely necessary and helpful to avoid some system issues, such as the not found VcRuntime140.dll disappearing.
But it may seem troublesome to download all the latest drivers manually from the website or device manager. Hence it is highly recommended that you manage to rely on Driver Booster to update all the drivers for your PC.
The minute you ran the Driver Booster on Windows 10, it will ask you to click Scan and Update Now to update all the device drivers for Windows 10/11.
With the help of Driver Booster, you can get all the updated drivers quickly. For the sake of convenience, it is wise for you to use it to handle the VcRuntime140.dll not found or missing problem.
In a word, the main ways to deal with the VcRuntime140.dll issue is to install a new Microsoft Visual C++ Redistributable for Windows 10.
More Articles:
Fixed: MSVCR71.dll Is Missing Windows 10/11
Solved: WLDCore.dll Missing on Windows 10/11
Fixed: d3dx9_43.dll Missing Windows 11, 10, 8, 7
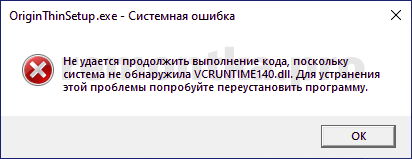
 При запуске относительно новых программ и игр вы можете столкнуться с ошибкой «Не удается продолжить выполнение кода, поскольку система не обнаружила VCRUNTIME140.DLL» или «Запуск программы невозможен, так как на компьютере отсутствует vcruntime140.dll» и начать искать, где скачать этот файл. Ошибка с равной вероятностью может появиться во всех последних версиях Windows.
В этой инструкции — подробно о том, как скачать оригинальный vcruntime140.dll с сайта Майкрософт для Windows 10, 8.1 и Windows 7 (x64 и x86) и исправить ошибки при запуске программ, связанные с отсутствием этого файла. Отдельная инструкция про очень похожий файл — VCRUNTIME140_1.DLL
- Как исправить ошибку система не обнаружила vcruntime140.dll
- Как скачать vcruntime140.dll — видео инструкция
- Дополнительная информация
Как правильно исправить ошибку Система не обнаружила VCRUNTIME140.DLL или vcruntime140.dll отсутствует на компьютере
Никогда при появлении ошибок DLL не следует начинать решение проблемы с поиска сторонних сайтов, где эти файлы лежат «отдельно». Как правило, каждый такой файл .dll является частью каких-то системных компонентов, которые необходимы для запуска программ и, скачав где-то один отдельный файл, вы, скорее всего, получите новую ошибку, связанную с отсутствием следующей библиотеки из состава этих компонентов.
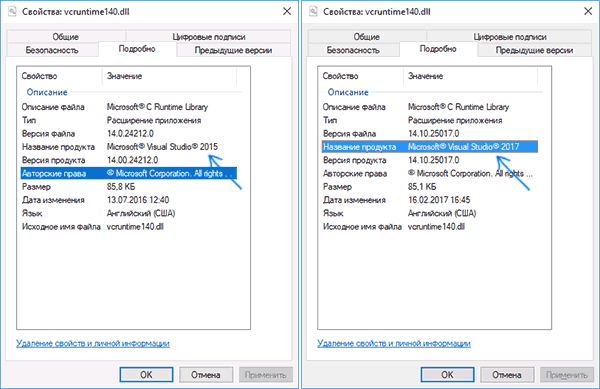
Файл vcruntime140.dll входит в состав «Распространяемый компонент Microsoft Visual C++ 2015» (Microsoft Visual C++ 2015 Redistributable), а более новые версии этого файла присутствуют в составе распространяемого пакета Visual C++ для Visual Studio 2017 и 2019. Даже если эти библиотеки вы уже устанавливали, возможно вы не учли один важный момент, который будет описан далее.
Все эти компоненты можно одновременно скачать для Windows 10, 8.1 и Windows 7 x64 и x86 (32-бит) с официального сайта Майкрософт, они же будут включать в себя необходимый файл vcruntime140.dll, особое внимание обратите на нюанс на 3-м шаге:
- Зайдите на официальный сайт https://support.microsoft.com/ru-ru/help/2977003/the-latest-supported-visual-c-downloads
- В разделе Visual Studio 2015, 2017 и 2019 загрузите следующие файлы:
- Для Windows 10, 8.1 и Windows 7 x64 (64-бит) скачайте vc_redist.x64.exe и, обязательно vc_redist.x86.exe

- Для 32-бит Windows загрузите только файл vc_redist.x86.exe
- Запустите загруженные файлы и установите необходимые компоненты. Если при запуске одного из двух файлов вам сообщат, что компоненты уже установлены, перейдите к установке второго. По завершении установки лучше будет, если вы перезагрузите ваш ПК или ноутбук.

Причина, по которой мы для Windows 10 x64 (и предыдущих версий системы) загружаем не только 64-бит файл, но и x86 (32-бит) заключается в том, что многие программы до сих пор являются 32-битными и им нужны именно такие файлы DLL, независимо от того, какая разрядность вашей системы.
После описанных шагов, файл vcruntime140.dll должен появиться в нужных папках C:\Windows\System32 и C:\Windows\SysWOW64, а программа или игра, которая ранее не запускалась, запустится без ошибок: во всяком случае, без рассматриваемой в этой статье ошибки.
Как скачать оригинальный vcruntime140.dll — видео инструкция
Дополнительная информация
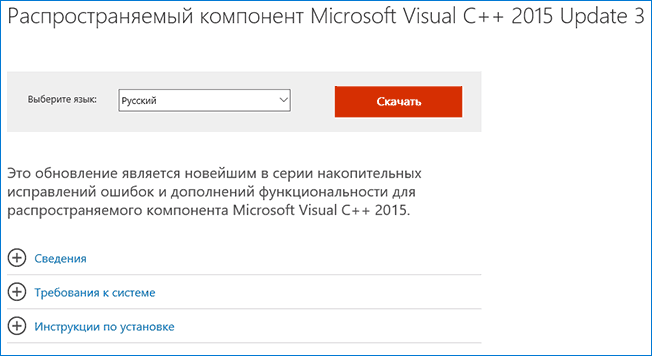
Если вы столкнетесь с тем, что предложенный выше установщик не срабатывает на вашей не самой новой системе, можете попробовать отдельно загрузить только версию 2015. Загрузка распространяемого пакета Microsoft Visual C++ 2015 выглядит следующим образом:
- Зайдите на страницу https://www.microsoft.com/ru-ru/download/details.aspx?id=53840 и нажмите «Скачать».

- Если у вас 64-бит Windows, выберите и vc_redist.x64.exe и vc_redist.x86.exe (т.е. в 64-битной системе нужны компоненты и для 32-битных программ), если 32-бит, то только x86.

- После загрузки этих двух файлов, по очереди установите каждый из них.

- Проверьте, была ли исправлена ошибка запуска программ, связанная с отсутствием vcruntime140.dll на компьютере.


Надеюсь, инструкция помогла, нужный файл загружен и установлен, программа запускается, а сообщений о том, что Системе не удалось обнаружить vcruntime140.dll больше не появляется. Если на каком-то из шагов возникли проблемы, полезным может оказаться отдельное руководство Как скачать распространяемые компоненты Visual C++ Redistributable 2008-2017.
Ошибка «VCRUNTIME140.dll is missing» появляется из-за неудачной установки определенной программы или после обновления Windows 10. Расскажу, как её исправить.

VCRUNTIME140.DLL — библиотека Microsoft C Runtime Library, находится в папке System32. Кроме того, это файл, который используется Visual C++ Redistributable for Visual Studio 2015/2017/2019 и является частью файлов C++package. Некоторые программы добавляют файл VCRUNTIME140.dll вместе с установщиком, и при неудачной установке или обновлении Windows он может быть поврежден или удален.

Перерегистрируйте файл VCRUNTIME140.dll
Вы можете перерегистрировать отсутствующий файл VCRUNTIME140.dll с помощью команды Regsvr32 в командной строке. Для этого выполните следующие действия:
1. Откройте командную строку с правами администратора.

2. Вам нужно отменить регистрацию файла, набрав следующую команду и нажав Enter:
regsvr32 /u VCRUNTIME140.dll
3. Перерегистрируйте файл dll, набрав приведенную ниже команду и нажав Enter:
regsvr32 VCRUNTIME140.dll
4. После выполнения обеих команд закройте командную строку и попробуйте снова запустить проблемную программу.
Переустановите Visual C++ Redistributable
Если вы получаете ошибку VCRUNTIME140.dll is missing, то рекомендуется попробовать переустановить Visual C++ Redistributable for Visual Studio 2015/2017/2019, чтобы исправить ее.
1. Перейдите на официальный сайт Microsoft, чтобы загрузить Visual C++ Redistributable.
2. Вам будут показаны два файла: «vc_redist.x64.exe» и «vc_redist.x86.exe». Файл x86 предназначен для 32-разрядной ОС Windows, а .x64 – для 64-разрядной ОС Windows. В зависимости от конфигурации вашего компьютера загрузите соответствующий файл.

3. Отметьте файл, который вы хотите загрузить, и нажмите кнопку Далее в правом нижнем углу.
4. После завершения загрузки откройте файл, согласитесь с условиями лицензии Microsoft Software License Terms и нажмите кнопку Install.

Запустите программу проверки системных файлов
Существует инструмент под названием System File Checker, который встроен в Windows 10. Он также называется SFC Scan и является одним из лучших способов исправления поврежденных файлов и других проблем, связанных с системой.
1. Откройте командную строку с правами администратора.
2. Введите приведенную ниже команду и нажмите Enter:
sfc /scannow

3. Программа проверки системных файлов начнет проверку на наличие ошибок. Если он обнаружит какие-либо проблемы (в нашем случае отсутствует VCRUNTIME140.dll), то SFC Scan автоматически исправит их.
Замените отсутствующий файл VCRUNTIME140.dll вручную
Если причиной ошибки VCRUNTIME140.dll is missing в Windows 10 является конкретная программа, то вы также можете попробовать загрузить и вручную заменить файл в каталоге приложений.
1. Посетите сайт DLL-Files и загрузите файлы VCRUNTIME140.dll. Опять же, это зависит от того, является ли ваш компьютер 32-битным или 64-битным.
2. Будет загружен zip-файл. Распакуйте его с помощью программ типа WinRAR или 7zip.

3. Просто скопируйте и вставьте файл «vcruntime140.dll» в директорию проблемной программы.
4. Обязательно замените исходный файл при появлении соответствующего запроса.
Обновите Windows 10
Еще одно решение, которое вы можете попробовать, — обновить свою копию Windows 10 до последней версии. Microsoft выпускает новые обновления для ОС, которые включают в себя множество исправлений. Существует большая вероятность того, что более новое обновление Windows 10 сможет исправить ошибку VCRUNTIME140.dll на ПК с Windows 10.
Переустановите проблемную программу
Если ни одно из вышеперечисленных решений не помогло вам решить эту проблему, то в крайнем случае попробуйте переустановить проблемную программу.
Спасибо, что читаете! На данный момент большинство моих заметок, статей и подборок выходит в telegram канале «Левашов». Обязательно подписывайтесь, чтобы не пропустить новости мира ИТ, полезные инструкции и нужные сервисы.
Респект за пост! Спасибо за работу!
Хотите больше постов в блоге? Подборок софта и сервисов, а также обзоры на гаджеты? Сейчас, чтобы писать регулярно и радовать вас большими обзорами, мне требуется помощь. Чтобы поддерживать сайт на регулярной основе, вы можете оформить подписку на российском сервисе Boosty. Или воспользоваться ЮMoney (бывшие Яндекс Деньги) для разовой поддержки:
Заранее спасибо! Все собранные средства будут пущены на развитие сайта. Поддержка проекта является подарком владельцу сайта.
Microsoft offers numerous apps for increased efficiency, such as Skype for long-distance communication, OneDrive for document organization and backup, and Microsoft Photos for organizing digital memories.
But what if, while opening one of these applications, you encounter an error message saying, “The program can’t start because VCRUNTIME140.dll is missing from your computer,” what would you do?
In this post, we will discuss all there is to know about the VCRUNTIME140.dll is missing error on Windows 10/11.
What Is the VCRUNTIME140.dll File?
Before we delve deep into what the VCRUNTIME140.dll error is all about, let us first understand the role of the VCRUNTIME140.dll file.
The VCRUNTIME140.dll file is a part of Microsoft Visual Studio‘s runtime libraries. This means it is among the many DLL files that build up the libraries that are required to run applications using the Microsoft Visual Studio suite.
Just a quick overview of what a DLL file is, it stands for Dynamic Link Libraries, and it may contain data and codes that can be used by more than one program all at once. Its main function is to help the operating system and applications load faster. Simply said, it helps promote efficient memory usage by reusing code.
Here are important bits of information about the VCRUNTIME140.dll:
- Program name: Microsoft Visual Studio (Visual C++) 2015/2017/2019
- Software Developer: Microsoft Visual Studio
- Executable File: vcruntime140.dll
- Operating System: Windows XP, 7, 8, 8.1, and 10
- File Location: C:\WINDOWS\system32
- File Size: 86KB
So, what does this error mean? Why is the VCRUNTIME140.dll file missing?
This error sometimes appears when the Microsoft Visual Studio version installed on your device is outdated. If you have recently installed a Windows update, then you may need to update the version of your VCRUNTIME140.dll file as well to ensure compatibility.
Another reason that this error happens is when the VCRUNTIME140.dll file is accidentally deleted or becomes corrupted. It could be deleted while you’re getting rid of junk files or a malware entity has infected your existing file.
It is also possible that the VCRUNTIME140.dll file encountered a problem in the process that caused it to become damaged. And because of that, it can no longer load properly. To resolve this, you need to reinstall the VCRUNTIME140.dll file on your device.
What Causes the “VCRUNTIME140.dll Is Missing” Error on Windows 10/11?
Like other errors on Windows 10/11, the “VCRUNTIME140.dll Is Missing” error has many different causes. And in this article, we have compiled all the common causes of this issue:
- The VCRUNTIME140.dll file is corrupted or has been deleted. Among all causes, this is the most common. Without the VCRUNTIME140.dll file, all other apps that depend on it cannot launch or start. In this case, you have to download it again or restore it.
- There is an existing error with Adobe Creative Cloud. It is known that an issue exists in Adobe Creative Cloud and Adobe has already rolled out a fix. According to reports, the error started showing when they migrated to Visual C++.
- Your system is attacked by malware. It is likely that your system has been attacked by a malware entity or a virus. This has caused the VCRUNTIME140.dll file to be corrupted and you are now seeing the “VCRUNTIME140.dll Is Missing” error.
- Your system files are corrupted. System files are known to be victims of corruption and errors. This normally happens after upgrading your operating system, resetting Windows, or installing a malicious application.
- The essential Visual Studio 2015 files are missing. We know that the VCRUNTIME140.dll file is associated with the Visual Studio 2015 software. If it goes missing or becomes damaged, then you will see the “VCRUNTIME140.dll Is Missing” error.
It is worth noting that these aren’t the only causes of the error message. There are many other possible triggers, too. But the good news is that no matter what’s causing it, the solutions below can resolve it.
What to Do About the “VCRUNTIME140.dll Is Missing” Error on Windows 10/11
If you are getting the “VCRUNTIME140.dll Is Missing” error, then it’s a sign that something is wrong with your computer and it has to be fixed. It could be a malware infection or a program that needs to be reinstalled. Whatever is causing the error to appear, the solutions should resolve it.
But before you do that, try to restart your computer first. It is possible that the DLL error is only temporary and that all your system needs is a restart. If that doesn’t work, then proceed with these solutions:
Solution #1: Repair the Microsoft Visual C++ Software
As mentioned above, the VCRUNTIME140.dll is part of the Microsoft Visual Studio’s runtime library. And it plays a crucial role in compiling software components so they can run on a Windows environment. Now, if this file goes missing, this error will appear.
To resolve this, the first thing you may try to do is repair the Microsoft Visual C++ Studio software. If it doesn’t work, reinstall it instead.
Below is a step-by-step guide on what to do:
- Click the Start button and select the Settings menu. This is the one with the gear icon.
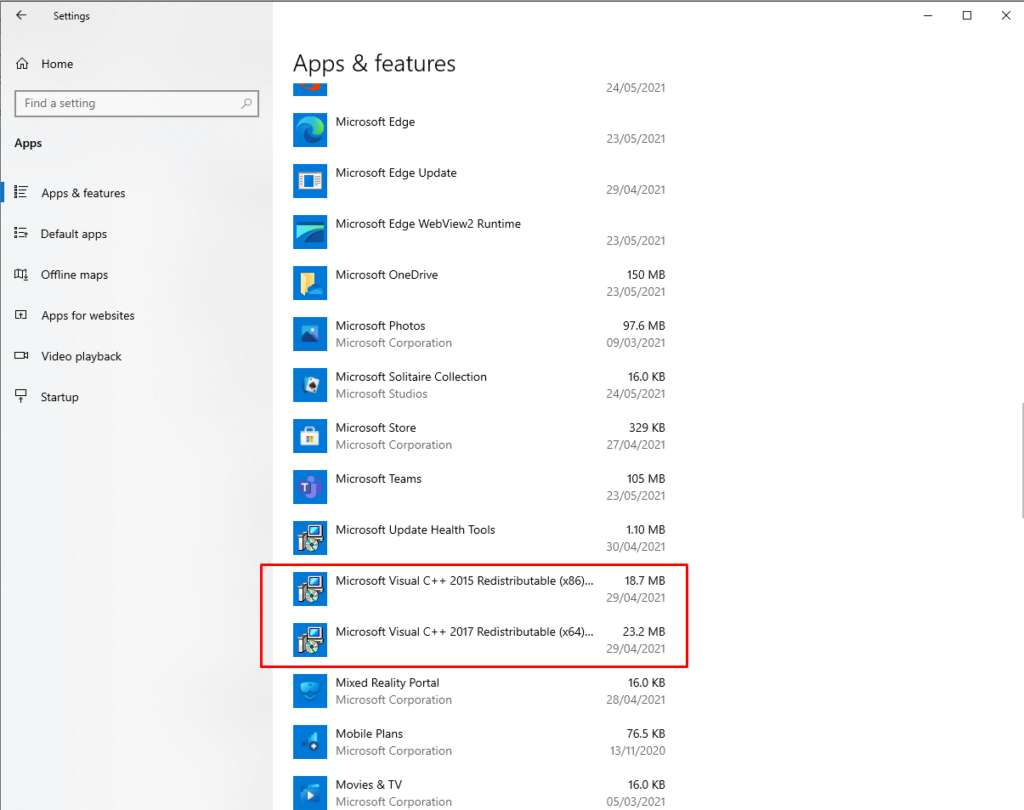
- In the window that appears, go to Apps and select Apps and Features.
- On the left pane, you should see a list of all installed apps. Scroll down and find Microsoft Visual Studio. Click on it.

- Next, choose the Modify option.
- A new window will now open. Click the Repair button.
- Wait for the process to complete before restarting your computer.
- If you still see the error after restarting, disable the software instead. To do so, go to Settings > Apps > Apps and Features. And then, click the Uninstall button.
- The Microsoft Visual C++ Redistributable window will now open. Hit the Uninstall button here and follow the on-screen prompts.
- Once done, restart your computer.
After uninstalling Microsoft Visual C++, it’s time to reinstall it. Without it, the software programs that rely on it will not work or launch. To proceed with the reinstallation of Microsoft Visual C++, do the following:
- Open your preferred browser and go to the official Visual Studio website to download the latest version of Microsoft Visual C++. Scroll down to the bottom of the page and click the Other Tools, Frameworks, and Redistributable category.
- Choose the version that matches your CPU’s architecture and hit the Download button.
- Once the download is finished, run the installer file. It is generally named VC_redist.x64.exe.
- In the installation wizard, agree to the license terms and click Install.
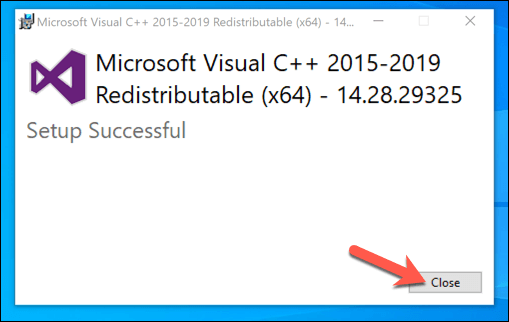
- Wait for the installation process to complete. If the software installs without any problems, click the Close button.
- Restart your computer.
For the most part, this should resolve the “VCRUNTIME140.dll Is Missing” error on Windows 10/11. But if it doesn’t work, then try other solutions.
Solution #2: Run the Windows Update Utility
More often than not, Microsoft rolls out security updates for the Microsoft Visual C++ software via the Windows Update utility. So, if you are having issues with the “VCRUNTIME140.dll Is Missing” error, you may try checking for any available updates via the Windows Update service.
Although this won’t fix problems with problematic installations, installing new updates can fix your installation problem right away. To run the Windows Update utility and install any pending update, do the following:
- Click the Start menu and select Settings.
- Next, go to Update and Security and choose Windows Update.
- Hit the Check for Updates button to begin searching for updates. If updates are available, click the Restart Now button.

- All updates will then be installed. Once done, restart your computer.

Solution #3: Download the Missing DLL File
As you can see, the “VCRUNTIME140.dll Is Missing” error is quite specific. It tells you that the VCRUNTIME140.dll file is missing. And with that, you will be tempted to just download the missing file elsewhere to fix the problem.
Yes, there are many sites that host these DLL files. But we highly recommend avoiding these sites. Why? DLL files are crucial elements of the Windows operating system. Unless you are sure about your source, it is best that you just remove the entire Visual C++ library.
Now, if you really feel the need to replace the file, the best option is to copy it from another PC of the same specifications and paste it into the designated folder.
Here’s how:
- Copy the VCRUNTIME140.dll file from another computer. It should be in a ZIP format. Unzip it first and copy it.
- Next, paste the copied file to your computer. Put it in this location: C:/Windows/System32.
- Now, try to run the program again. Hopefully, it would work.
- Run the program once again and see if the error still shows.
Solution #4: Reinstall the Problematic App
If you encountered the “VCRUNTIME140.dll Is Missing” error while trying to launch other programs like Skype, then try to uninstall the program first and reinstall it. Here’s how:
- Go to the Start menu.
- Select Settings and navigate to Apps.
- Click Apps and Features.
- From the list of installed apps, find the app where you encountered the error and click on it.
- Hit the Uninstall button.
- Follow the on-screen instructions to completely remove the program.
- After removing it, try to reinstall it. Go to the official manufacturer website of the program and download the installer file once again.
- Install the program by double-clicking on the EXE file.
- Once the problematic app has been reinstalled, open it and see if the error is resolved.
Solution #5: Re-Register the VCRUNTIME140.dll File
If you have already tried reinstalling the VCRUNTIME140.dll file but the error still shows, you might have to re-register it into the registry. For this, you need to use the Command Prompt.
To re-register the DLL file, do the following:
- Press the Windows + R keys to launch the Run utility.
- Type cmd into the text field.
- Press the Ctrl + Shift + Enter keys simultaneously to launch Command Prompt with administrator privilege.
- Hit the Yes button to proceed.
- Next, un-register the file by entering this command followed by Enter: regsvr32 /u VCRUNTIME140.dll.

- And then, re-register it by entering this command: regsvr32 VCRUNTIME140.dll.
- Exit the Command Prompt and run the problematic app once again.

Solution #6: Run an SFC Scan
Windows 10/11 comes with a utility that allows you to find corrupt system files and fix them. It is called the System File Checker.
Follow these steps to initiate an SFC scan:
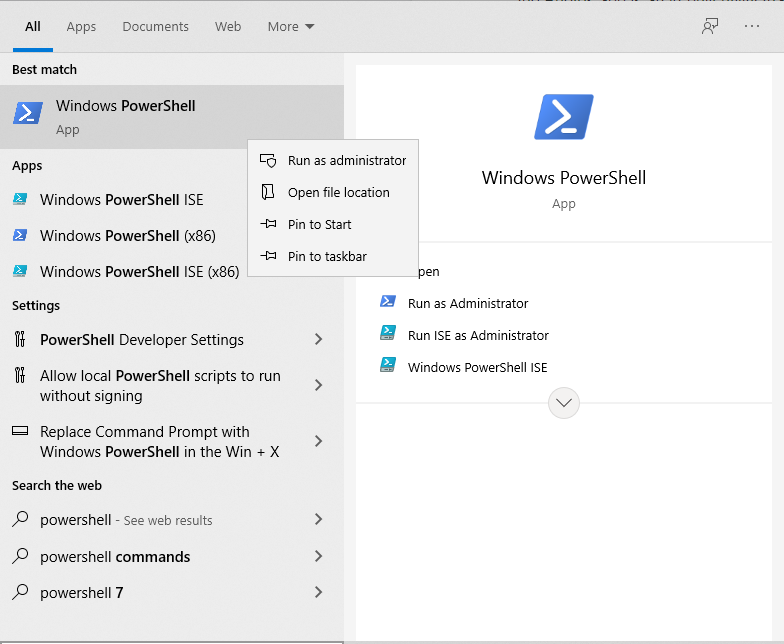
- Click the Start button and input windows powershell into the search field.

- Right-click on the most relevant search result and select Run as Administrator.
- A blue window will appear on your screen. Here, type the sfc /scannow command and hit Enter.
- The SFC utility will begin locating any corrupt files and fix them. Once done, restart your computer.
Solution #7: Update Your Device Drivers
Many of the Windows errors we encounter are caused by faulty and outdated device drivers. To resolve them, the best course of action is to update them to the latest version.
Follow the steps below to update your device drivers:
- Right-click on the Windows menu and select Device Manager.
- Click on a driver and hit the Update Driver button.
- Repeat the above steps for all the device drivers.
- After that, restart your computer to apply the changes.
If you have installed a plethora of device drivers, then this solution would be very time-consuming. To speed things up, you would need the help of a device driver updater tool. In just a few clicks, you can update any faulty or outdated drivers. Plus, you don’t have to worry about compatibility issues.
Solution #8: Perform a System Restore
Another efficient and fast way to resolve errors on Windows 10/11 is by using System Restore. With this utility, you can restore your system to an earlier version. This is especially helpful if you suspect that the error is caused by new updates or recent software installations.
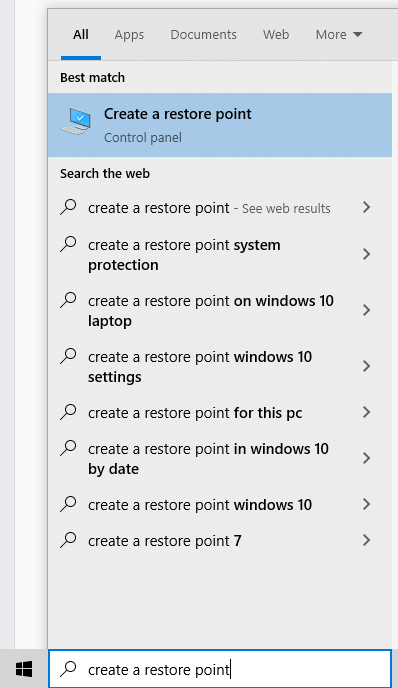
How to Create a System Restore Point
- Into the search field, input create a restore point.
- Click on the most relevant search result.

- The System Properties window will now open. Go to the System Protection tab and select Create.
- Provide a description for the restore point and tap Create.
- Lastly, hit OK.
How to Perform a System Restore
- Click the Start button.
- Type control panel into the search field.
- Select the top-most result.
- Go to Recovery and select Open System Restore.
- Hit Next to proceed.
- Select the restore point that you have just created.
- Proceed by clicking Next then Finish.
Solution #9: Use the Deployment Image Servicing and Management Tool
Also called the System Update Readiness Tool, the Deployment Image Servicing and Management (DISM) tool is designed to fix file corruption errors in Windows 10/11. So, you may try it to resolve your problem.
- Open the Start menu.
- Input cmd into the search field and right-click on the top result.
- Select Run as Administrator.
- Into the command line, type this command: DISM /Online /Cleanup-Image /CheckHealth.
- Hit Enter.
- After that, DISM will begin to scan and verify any file or data corruption issue.
If you wish to perform a more advanced scan, use these steps:
- Go to the Start menu.
- Type cmd into the search field and click on the top-most result.
- Choose Run as Administrator.
- Into the command line, type this command: DISM /Online /Cleanup-Image /ScanHealth.
- This scan will take minutes to complete. Make sure you don’t disrupt the process.
Solution #10: Disable Your Antivirus Temporarily
According to some users, an antivirus program can interfere with Microsoft Visual Studio’s processes and prevent you from running the required DLL files. If this happens, you may need to disable your antivirus program temporarily.
To disable Windows Defender temporarily, here’s what you should do:
- Click the Start button and go to Settings.
- Select Update and Security.
- Under Windows Security, click Firewall and Network Protection.
- Select a network profile.
- Find the Microsoft Defender Firewall setting and toggle it to Off.
To disable your third-party antivirus software, do the following:
- In the system tray, locate the icon of your antivirus program. Right-click on it.
- Select the Disable or Exit option.
Take note that disabling your antivirus software can make your device vulnerable to threats and unauthorized access. So, if the issue has already been resolved, make sure to enable it again.
Solution #11: Do an In-Place Upgrade
Another possible solution to the error involves performing an in-place upgrade. Here’s how to do it:
- Download the Windows 10/11 ISO from the official website of Microsoft. Be sure that you download the version that is compatible with your system architecture.
- Once the ISO file is downloaded, double-click on it.
- Windows will then prepare all the files needed for the installation.
- Select your desired options and hit Next.
- At this point, Windows will download all the necessary updates. This may take time so we suggest that you be patient.
- Click Accept to agree to the Terms of Service.
- Once you see the Ready to Install screen, hit the Change What to Keep button.
- Choose the Keep Personal Files option and proceed.
- The upgrade process will begin. Don’t interrupt it.
- Restart your computer.
- Check if the error still appears.
Keep Windows 10/11 Performing at Its Best
The “VCRUNTIME140.dll Is Missing” error is only a sign that your computer is having some issues. So, the moment that you resolve it, you have to keep up with regular maintenance. Here are a few maintenance tips that we suggest:
Tip #1: Keep Windows Updated
By keeping your operating system updated, you can ensure that you have the most recent bug fixes. You also have access to the latest features that Microsoft has rolled out for Windows 10/11. Finally, you can have peace of mind knowing that your system is up to date with the latest security measures.
Tip #2: Run Regular Malware Scans
Malware entities are notorious causes of DLL errors. Therefore, to remove any threats that could put your computer at risk for such errors, we suggest that you perform regular malware scans using Microsoft Defender or any third-party antivirus tool of your choice.
To initiate a scan using Windows Defender, do the following:
- Go to Settings and select Update and Security.
- Click Windows Defender from the list.
- Hit the Open Windows Defender Security Center button.
- Select Quick Scan.
- Windows Defender will now start scanning your system for viruses and other threats.
- After that, your system will restart.
Tip #3: Get Rid of System Junk
Most importantly, you must make it a habit to regularly free your system of junk and unwanted files. Malware entities can disguise as junk or cache files in your system folders. If left unattended, they can pose serious harm to your system. So, if you have a chance, remove this unnecessary junk. For this, you can use the in-built Disk Cleanup tool or any PC repair tool you have.
To use the Disk Cleanup utility, follow these steps:
- Click the Start button.
- Type disk cleanup into the search field.
- Hit Enter to open the Disk Cleanup utility.
- At the Drives list, select the drive you want to clean up.
- Choose the types of files you want to remove.
- Hit OK.
- Click the Delete Files button to proceed.
Wrapping Up
The VCRUNTIME140.dll file is important in the Windows 10/11 environment. Not only does it help programs load faster, but it also promotes the efficient use of resources.
So, when you encounter problems with it, such as the “VCRUNTIME140.dll Is Missing” error, then you have to do something about it. Your first repair option is to fix the Microsoft Visual C++ software, which is the program it belongs to. If it doesn’t work, then run the Windows Update utility to install any available Windows update. Another solution that is worth trying is downloading the missing DLL file manually, though this is something that should be done with caution to avoid more serious errors.
Other easier and more straightforward solutions to try include reinstalling the problematic application, re-registering the DLL file, running an SFC scan, updating your device drivers, performing a System Restore, using the DISM tool, disabling your antivirus temporarily, and performing an in-place upgrade.
However, if all these solutions are too tricky for you, feel free to ask for help from Microsoft’s team. They can provide you with a more specific approach to handle your issue.
And once you have resolved the error, we recommend that you perform regular maintenance to avoid similar errors to appear in the future. You can begin with installing every single Windows update available. And then, perform regular malware scans and make it a habit to get rid of system junk.
What other solutions do you suggest that can resolve the “VCRUNTIME140.dll Is Missing” error in Windows 10/11? We’d like to know! Share them below.
Give us some love and rate our post!
If you’re seeing a missing DLL error on your Windows PC, it’s usually a sign that something has gone wrong. It could be that your software is corrupted and needs reinstalling, or it could point to deeper issues with your PC, such as corrupt system files or a stubborn malware infection.
Another major cause, however, are missing or corrupted software libraries that allow programs to run on Windows. A “vcruntime140.dll is missing” error, for instance, points to a missing or corrupted Microsoft Visual C++ runtime installation. If you want to fix this issue, here’s what you’ll need to do.
Repairing or Removing a Microsoft Visual C++ Installation
The vcruntime140.dll file is part of the Microsoft Visual C++ software runtime library. Provided by Microsoft, this library is used as part of the process of compiling software (created in C++ using Visual Studio) to run on Windows PCs. If the file is missing, the “vcruntime140.dll is missing” error will appear.
To fix this issue, the first thing you should attempt is to repair the Visual C++ installation on your PC. If that doesn’t work, you should remove it entirely by following these steps, then proceed to the next section to reinstall it.
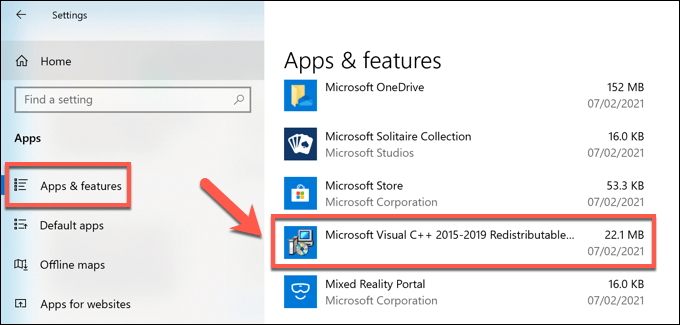
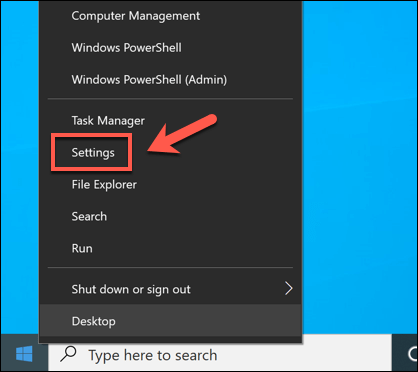
- To repair a Visual C++ installation, you’ll need to open the Settings menu. To do this, right-click the Windows Start menu and select the Settings option.

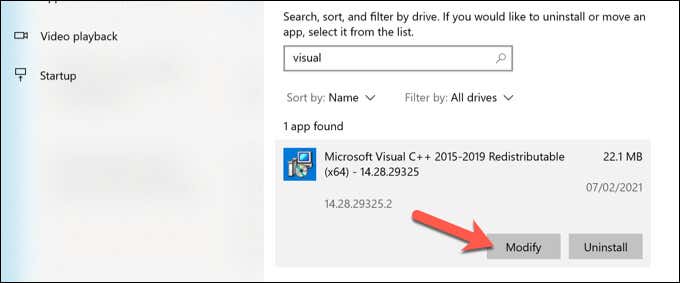
- In the Settings menu, select Apps > Apps & features. On the left, you’ll see a list of installed apps. Scroll through the list or use the search bar until you find the Microsoft Visual C++ 2015-2019 Redistributable option listed. If it’s missing, proceed to the next section.
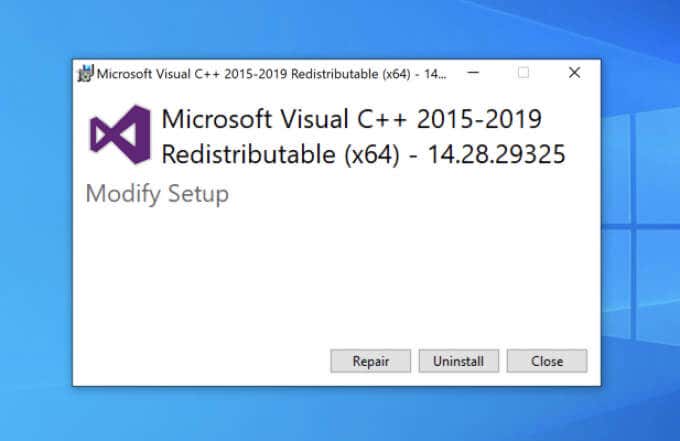
- If the Microsoft Visual C++ 2015-2019 Redistributable option is listed, however, select it, then select the Modify option.
- In the Microsoft Visual C++ 2015-2019 Redistributable window that opens, select the Repair option.
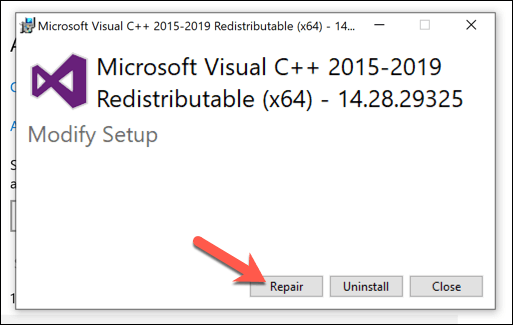
- Allow the process to complete, then restart your PC. If you still see a “vcruntime140.dll is missing” error, you’ll need to remove the Microsoft Visual C++ runtime entirely and reinstall it. To do this, select Uninstall > Uninstall in the Settings > Apps > Apps & features menu.
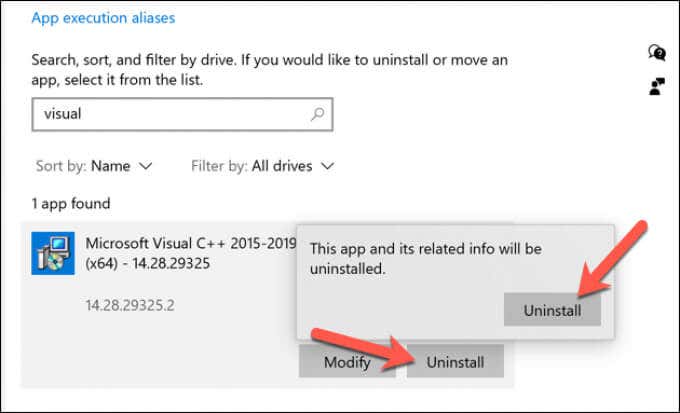
- In the Microsoft Visual C++ 2015-2019 Redistributable window that opens, select the Uninstall option and allow the process to complete. Once it’s finished, restart your PC and continue to the next section.

Installing or Reinstalling a Microsoft Visual C++ Installation
Without the Microsoft Visual C++ runtime library installed, software that relies on it won’t work, so you’ll need to install it. You’ll also need to do this if you’ve removed a corrupted installation previously.
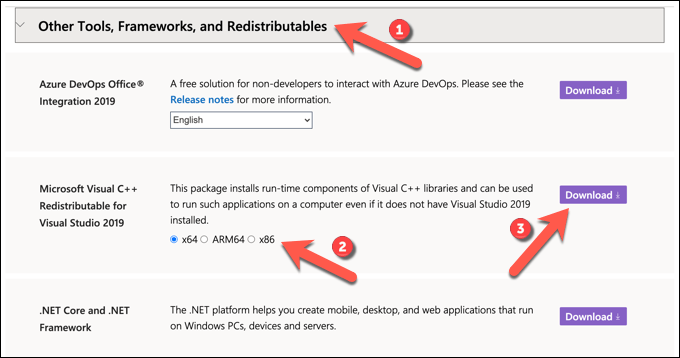
- First, head to the Visual Studio website to download the latest version of the software runtime library. Scroll down towards the bottom of the page, then select the Other Tools, Frameworks, and Redistributables category to view the available options. From there, select the correct CPU architecture for your PC (eg. x64 for 64-bit PCs, x86 for 32-bit PCs, or ARM64 for ARM-based devices), then select the Download button.
- Run the installer file (eg. VC_redist.x64.exe) once the download is complete. In the installer window, accept the license terms by selecting the checkbox provided, then select the Install button to proceed.
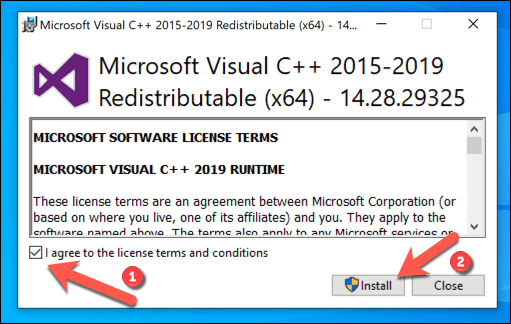
- Allow the installer a few moments to complete. If it installs without any issues, select the Close button to close the window, then restart your PC.
This should, for most users, resolve the “vcruntime140.dll is missing” error on Windows 10 PCs. However, if the software you’re running requires an older version of the Visual C++ runtime (before 2015), you’ll need to download and install the older version instead.
You may also be able to fix the issue by removing and reinstalling software that has an older version of the Visual C++ runtime installer included. This is common in larger software bundles, such as games, that require multiple runtime libraries to work correctly.
By reinstalling software that’s coupled with an older Visual C++ runtime installer, the specific version of that library required to run the software should automatically reinstall itself and resolve any lingering issues.
Running Windows Update
The Microsoft Visual C++ runtime receives security updates through Windows Update, just like other major Windows services. If you’re having trouble with a “vcruntime140.dll is missing” error, it might be worth checking for any recent updates using the Windows Update service.
While this is unlikely to fix a broken installation, installing new updates could repair your installation automatically. You can check for new system updates in the Settings menu.
- To access this, right-click the Start menu, then select the Settings option.
- In the Settings menu, select the Update & Security option, then select Windows Update in the next menu.
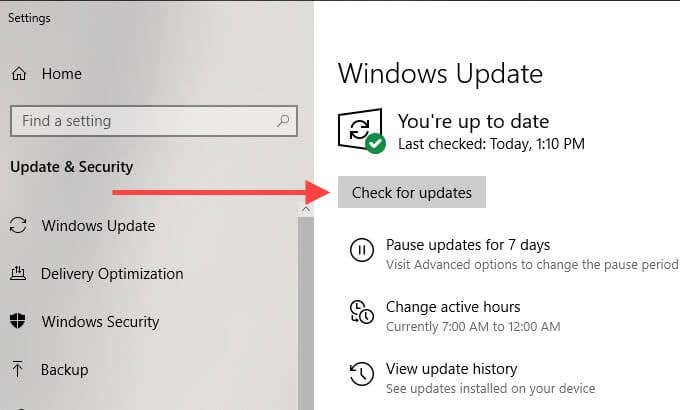
- Select the Check for Updates option to search for new updates. If there are updates pending, select the Restart now option instead.
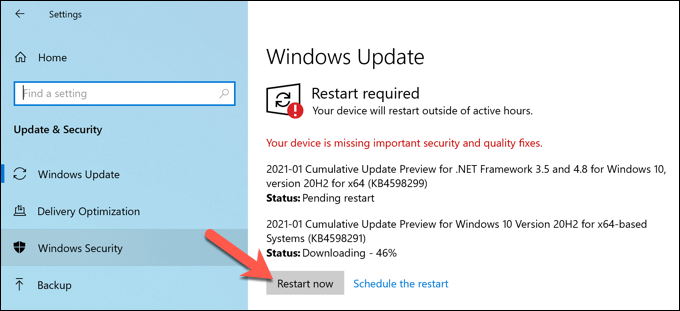
Windows will check for updates and install any that are currently pending. Once installed, you’ll need to restart your PC to ensure that they’ve been correctly applied. You should then check your software to see if the missing runtime issue is resolved.
Downloading DLL Files Online
If very specific error messages like “vcruntime140.dll is missing” start to appear, you might be tempted to source the file online to fix it. Various DLL download sites exist, allowing you to quickly download the missing file to resolve the issue.
We would recommend avoiding sites like these, however. DLL files are crucial elements of the Windows operating system that allow software to interact with more restricted Windows components. Unless you absolutely trust the source, it’s usually a better idea to remove and reinstall the entire Visual C++ runtime library instead.
This should resolve the issue for most users, but if you’re still having issues, you could source the file from another PC in your network as a last resort.
Keeping Windows 10 Maintained
The steps above should help you to fix a “vcruntime140.dll is missing” error on your Windows 10 PC. In most cases, repairing the installation or reinstalling the Visual C++ redistributable should fix the issue, but you may also need to look at removing and reinstalling any affected software.
A missing DLL file is usually a sign of a PC that’s having some issues, which is why it’s important to keep up with regular PC maintenance. You can do this by keeping Windows updated to ensure you have the latest bug fixes, as well as running regular malware scans to remove malware that could leave your PC at risk.