Ошибка van 9001 в валорант, связана с переходом на новую версию виндовс, а точнее на windows 11. А дело в том, что в версии valorant для виндовс 11 требуется обязательная работа TPM и Secure BooT.
- TPM или Trusted Platform Module — это модуль или эмуляция. которая предназначена для безопасного хранения ключей шифрования.
- Secure Boot — это протокол, который проверяет цифровую подпись драйверов и операционной системы.
Как видно по описанию, два новых «модуля» отвечают за безопасность и без них невозможно игра на виндовс 2011 и именно из-за этого вы видите ошибку van 9011. И как не сложно догадаться, для решения проблемы необходимо включить данные модули.
Ошибка van 9001 — решение
Перед гайдом на включение данных опция я хочу отметить, что если вы не использовали обходных путей и устанавливали windows 11 согласно рекомендациям системы — то оба пункта у вас будут. Так же Secure Boot может некорректно работать со взломанной виндовс. В таком случае вам прийдётся вернуть настройки назад и отказаться от валоранта, либо же купить виндовс или ждать каких-то изменений.
Что же, приступим. Для внесения изменений вам необходимо открыть BIOS. Главная сложность состоит в том, что у каждого производителя материнских плат BIOS разный и мы можем указать лишь на то, какие пункты вам важны и что нужно включить, а искать вам придётся самостоятельно. Но не переживайте, простое блуждание по меню не навредит вам, а вот глупое включение разных опций — вполне может.
Начнем с того как попасть в BIOS.
1. Вам необходимо нажать на кнопку перезагрузки компьютера и при появление чёрного экрана с текстом начать нажимать одну из следующих кнопок в зависимости от вашего типа ПК.
- Del (Delete) – самая распространенная клавиша, используемая практически на всех стационарных компьютерах;
- На ноутбуках фирмы Acer используют для входа в БИОС – Del, F2, Ctrl+Alt+Esc;
- для устройств Asus – Del, F2, F9;
- для устройств Dell – F2, Fn+F1;
- для устройств HP – Esc, F10, F1;
- для устройств Lenovo – F1, F2, Novo. Esc+F1+Del;
- для устройств Samsung – F2, F10;
- для устройств Sony – F1, F2, Esc.
Чаще всего на экране загрузки пк отображается кнопка, которую вам необходимо нажимать.
2. Если вы всё сделали правильно, то перед вами появится экран с большим количеством различных настроек. В зависимости от модели ПК он может выглядеть абсолютно по разному, но в любом случае он содержит одни и те же разделы.
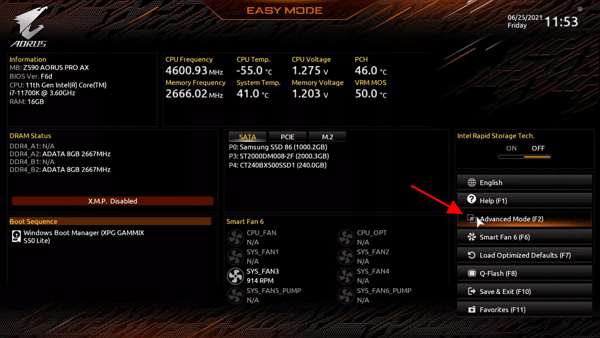
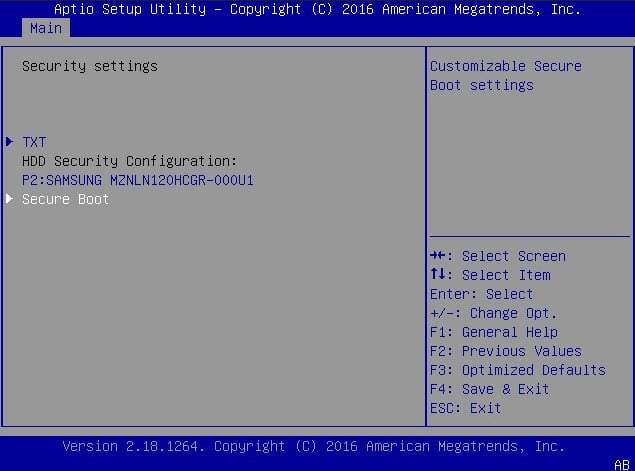
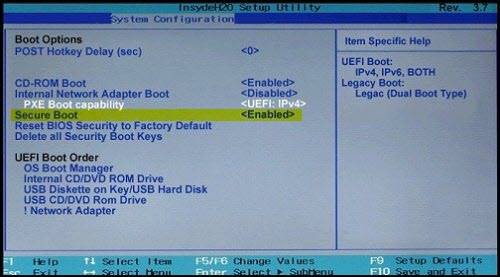
3. Сначала подключаем Secure Boot. Для этого включаем расширенный мод (Advenced mode (чаще всего эта клавиша F7, но можно найти кнопку на экране)) и выбираем пункт Boot Options. После этого находим пункт Secure Boot и устанавливаем для него значение Включено (Enabled).
4. Возвращаемся на стартовый экран BIOS, но в расширенный режим и выбираем пункт Settings, а уже в нём подпункт Miscellaneous (иногда достаточно просто Settings). Там вы найдёте пункт под название: PTT (в случае intel) или же AMD fTPM configuration (в случае процессоров AMD). Включаем данный пункт, сохраняем и перезапускаем ПК.
Если вы всё сделали верно, то после перезапуска ПК вы навсегда попрощаетесь с ошибкой van 9001 на windows 11 и сможете комфортно играть в валорант.
В последнее время ошибка VAN 9001 в Valorant стала одной из самых популярных. Это связано с возросшими требованиями к операционной системе Windows 11. Проблема появляется только в указанной версии системы, так как связана с ее особенностями. Хорошая новость в том, что у ошибки с кодом 9001 есть вполне понятное и точное описание, а также исправление. Сейчас мы поделимся секретами сбоя.
Почему появляется ошибка VAN 9001 в Valorant?
Есть 2 основные причины, которые вызывают появление ошибки с кодом VAN 9001 в Valorant на Windows 11:
- Отключенный Secure Boot. Windows 11 при установке еще требует активировать безопасную загрузку. В целях обеспечения безопасности, данное условие является обязательным. Valorant просто не будет запускаться, если фукнция выключена.
- Выключенный TPM 2.0. Ситуация с аналогична предыдущей функции. Функция необходима для проверки платформенных модулей. Кстати, AMD эту опцию называет fTPM, а Intel – PTT. Речь об одной и той же технологии. Ее поддерживают все современные процессоры, но на устаревших ПК технология может отсутствовать.
Если что-то из перечисленного выключено, Vanguard во время проверки обнаружит проблему и отобразит ошбику 9001. Однако некоторые версии Windows после обновления могут отключать Secure Boot автоматически, в частности речь идет о KB5006050. При чем деактивация может происходить даже в фоне, после того, как включили опцию вручную.
Как исправить ошибку с кодом 9001 в Valorant?
Перечисленные выше настройки нужно включить и ошибка 9001 в Valorant будет исправлена. Только мы желаем вам предостеречь, так как внесение параметров требуется проводить через BIOS или UEFI. С данными меню нужно работать с особой осторожностью, чтобы не нанести существенный вред Windows и даже самому компьютеру. Просто следуйте инструкциям.
Включить Secure Boot
В подавляющем большинстве случаев проблему провоцирует именно данный модуль, особенно в некоторых версиях Windows 11. Следует попробовать запустить функцию вручную.
Инструкция по исправлению ошибки:
- Перезагружаем компьютер.
- В момент пуска важно увидеть сообщение или распознать правильный момент для входа в BIOS (UEFI). Обычно на экране с названием производителя материнской платы нужно нажать клавиши Del, F9, F2 или подобные. Чаще всего есть подсказки.
- Скорее всего нужная нам опция находится в разделе Boot, заходим в него.
- Находим пункт Secure Boot и задаем состояние Enabled.
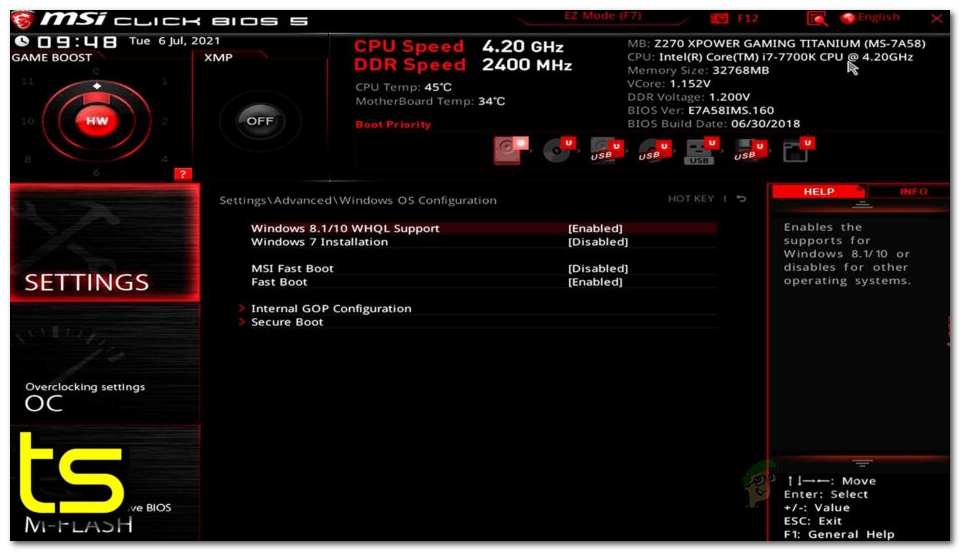
Совет! На некоторых версиях BIOS, как на MSI, нужно искать в разделе Advanced — Windows OS Configuration.
Активировать TPM
Чтобы в холостую не пытаться включить то, что уже активно, следует проверить функцию. Первым делом предлагаем нажать сочетанием Win + R и в строку ввести tpm.msc. В новой вкладке будет вариант «Управление TPM», здесь смотрим, каково состояние модуля. Если он уже активен, можно переходить дальше. Если отключен, заходим в BIOS и активируем.
Как включить TPM:
- По аналогии с предыдущей инструкцией входим в BIOS.
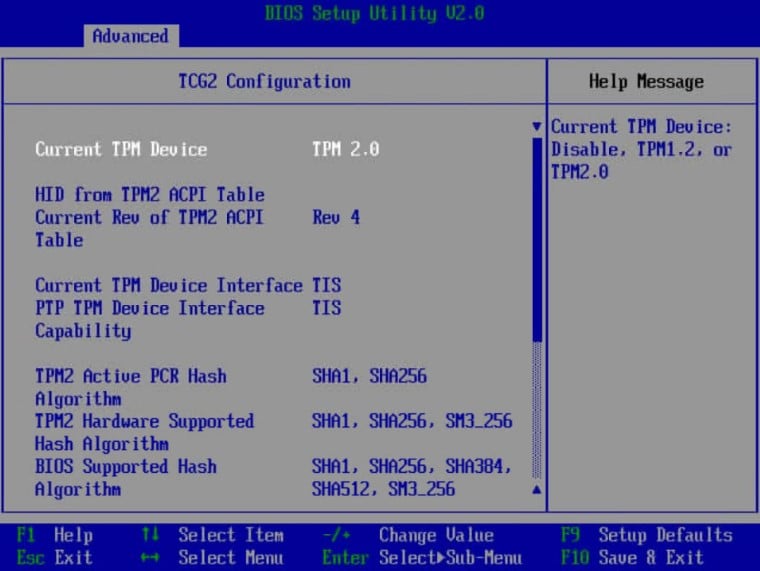
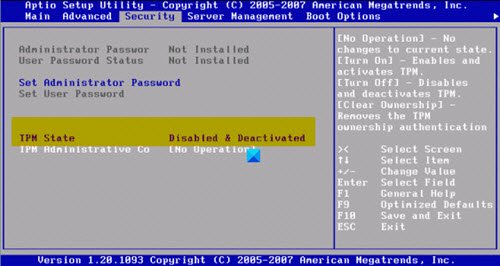
- На вкладке Security (чаще всего) ищем TPM или fTPM, PTT, в зависимости от производителя материнской платы.
- Устанавливаем значение Available.
Сброс ключей BIOS
Если вы уже убедились, что обе технологии активны в вашем BIOS, но Valorant все равно выдает ошибку VAN 9001, значит эта процедура для вас. Скорее всего система сама выключает безопасную загрузку, без спроса, а Vanguard видит это и появляется сбой. Решением будет сброс к заводским ключам.
Что нужно сделать:
- Входим в BIOS после перезагрузки системы.
- Идем во вкладку Secure (иногда Boot или Advanced). Обычно нам нужно то же самое место, где располагалась безопасная загрузка.
- Сбрасываем ключи к заводскому состоянию. Пункт должен называться с включением слов Factory, Key, Reset или подобным образом. Возможно, вам дополнительно нужно будет развернуть пункт Key Managemet.
После запуска системы нужно проверить, сработала ли процедура. Для этого в строку выполнить вводим msinfo32, а в разделе «Безопасное состояние загрузки» — «Включено». При подобных параметрах больше не должно появляться сообщения об ошибке VAN 9001 в Valorant.
В Valorant, как известно, теперь реализованы TPM и Secure Boot. И всё бы хорошо, но у пользователей предварительных сборок Windows 11 с игрой давеча возникли проблемы. А именно ошибка VAN 9001, которая как раз и гласит, что данной сборке Valorant нужны TPM и Secure Boot, иначе ничего не получится и игра работать не будет.
Отсюда вопрос, что делать, когда в Valorant возникла ошибка VAN 9001
Ответ, собственно, в описании ошибки и содержится: надо включить TPM и Secure Boot. Однако делается это в BIOS-е компа, потому делать это надо грамотно и аккуратно (и если раньше сталкиваться с этим не приходилось, то лучше обратиться за помощью к специалисту — так будет проще и дешевле).
Уточним на всякий случай, TPM (он же Trusted Platform Module или «Доверенный платформенный модуль«) предусмотрен практически во всех более-менее новых ПК, потому с ним проблем быть не должно. За исключением ситуации, когда комп точно не новый и Windows 11 на нём установлена в обход проверок (да, такое тоже возможно).
Кроме того, Trusted Platform Module на разных ПК Intel и AMD обозначается по-разному: компьютерах с AMD TPM называется fTPM, а на компьютерах с Intel — PTT. Это если очень вкратце. Теперь, как включить TPM и Secure Boot для Valorant на компе с AMD/Intel
Значит, делается это следующим образом:
#1 — проверяем и включаем TPM 2.0:
- жмем Win+R с клавиатуры, в строке «Выполнить» пишем tpm.msc и кликаем OK;
- в открывшемся окне «Управление TPM на локальном компьютере» смотрим раздел «Состояние«;
- если он не только отображается, но там еще и написано «Модуль TPM включен«, значит, можно переходить к п.#2 этого поста;
- в противном же случае, т.е. когда видим надпись, «Не удается найти совместимый доверенный платформенный модуль«, то:
-
- перезагружаем комп и открываем меню загрузки системы (клавиши F1, F2, F10, F11 или DEL в зависимости от модели ПК);
- в меню загрузки переходим во вкладку «Security» (или Advanced);
- находим раздел «TPM» и устанавливаем значение «Available» для параметра fTPM или PTT;
- сохраняем настройки (Save), снова перезагружаем комп и проверяем состояние TPM (см. выше).
Не пропустите: В VALORANT ЧЕРНЫЙ ЭКРАН ПОСЛЕ ЗАПУСКА: ЧТО МОЖНО СДЕЛАТЬ
#2 — включаем Secure Boot:
Только успешно разобравшись с TPM, идем дальше. Алгоритм действий аналогичный:
- еще раз перезагружаем комп и снова заходим в меню загрузки;
- переходим в раздел «Bios Setup» и оттуда — во вкладку «Advanced«;
- находим раздел «Boot Options«, затем параметр «Secure Boot» и устанавливаем для него значение»Enabled«;
- сохраняем настройки (Save) и теперь устанавливаем для параметра Secure Boot значение «Standard» (вместо Custom);
- и сохраняем настройки (Save).
Выходим из BIOS, дожидаемся загрузки Windows и запускаем Valorant. Теперь игра должна запуститься нормально и ошибка VAN 9001 больше мешать не будет.
Видео
Valorant не работает на Windows 11, если не включены TPM 2.0 и Secure Boot, — это новый слой защиты от читеров
По умолчанию Windows 11 просит, чтобы на материнской плате вашего PC был модуль безопасности TPM 2.0. Он предназначается для защиты данных и, похоже, приведёт к новому уровню борьбы с читерами в видеоиграх: если у вас не включён TPM, игра может просто отказаться запускаться.
Как пишет Anti-Cheat Police Department, как минимум одна игра с таким требованием уже есть: античит Vanguard от Riot Games не даёт играть в Valorant на Windows 11, если в системе не работают TPM 2.0 и Secure Boot — вместе они препятствуют запуску подозрительных программ при включении компьютера.
Valorant не работает на Windows 11, если не включены TPM 2.0 и Secure Boot, — это новый слой защиты от читеров
Ошибка, которая возникает при попытке запустить Valorant на Windows 11 без TPM 2.0 и Secure Boot. Кто-то рассказывает, что ограничение обходится программным эмулятором, а кто-то жалуется, что Vanguard выдаёт это предупреждение, даже когда указанные системы защиты включены. Возможно, оба случая связаны с тем, что Windows 11 ещё не доросла до официального релиза.
Вокруг Vanguard уже поднимался небольшой скандал: пользователи считали, что античит требует слишком глубокого доступа к процессам в операционной системе. Riot Games настаивала, что это необходимо для отлова самых хитрых читов: если у них будет доступ к ядру ОС, а у античита нет, то Vanguard не сможет бороться с хаками.
Видимо, требование TPM 2.0 и Secure Boot на Windows 11 возникает примерно из тех же соображений: таким образом Vanguard убеждается, что в памяти нет посторонних программ, у которых уровень доступа выше, чем у античита. И так как технология безопасности TPM 2.0 — это отдельный чип на материнской плате, гипотетически обмануть защиту становится намного сложнее, чисто программные трюки не срабатывают, а баны по железу оказываются надёжнее.
Некоторые считают, что обязательное наличие TPM 2.0 приведёт к ужесточению DRM во многих его проявлениях, не только как античитов в видеоиграх. «Всё будет вертеться вокруг фактора доверия к вашему PC. Представьте, что хотите посмотреть любимый сериал на Netflix в 4K, но фактор доверия у вашего железа низкий. Очень жаль, вам придётся довольствоваться стримом в 720p», — пишет группа обеспокоенных «белых» хакеров.
Они считают, что TPM 2.0 нужен не пользователям, а корпорациям, чтобы наконец закрутить гайки на исторически свободном рынке программного обеспечения для PC. Что-то похожее уже случилось с консолями и телефонами — мобильные приложения могут не запускаться, если на устройстве обнаружен «рут».
В ближайшие месяцы повсеместного введения «факторов доверия» не ожидается, так как очень многие компьютеры продолжат работать на Windows 10 — у этой ОС столь жёсткой привязки к TPM 2.0 нет. Но что будет лет через пять, когда официальная поддержка Windows 10 окончится?
Microsoft предусматривает способы установки Windows 11 на PC, у которых нет TPM 2.0. Однако программы, где есть соответствующая защита, всё равно будут видеть состояние чипа и, если так устроена их логика, не станут запускаться, пока вы не повысите «фактор доверия».
Valorant будет применять Windows 11 TPM 2.0
Плохие или хорошие новости, в зависимости от вашего мнения, исходят от RIOT для их игры Valorant. Похоже, что Riot решила внедрить функцию Windows 11 TPM 2.0 в Valorant, работающую в Windows 11, и ходят слухи, что она станет стандартом де-факто и перейдет на Valorant в целом, независимо от того, в какой системе он работает.
Кроме того, ходят слухи, что другие разработчики также говорят о реализации требований TPM 2.0, чтобы они могли использовать расширенные функции безопасности Windows 11 для предотвращения взлома и других читов в своих играх.
Это интересный момент, с одной стороны, конечно, расширенные функции, которые предотвратят мошенничество и взлом, — это здорово. С другой стороны, отказ в доступе ко многим компьютерам, не поддерживающим TPM 2.0, и их удаление из игры может привести к безвозвратной потере клиентов и, как следствие, к потере денег. Конечно, это риск, и я не совсем уверен, что отчуждение геймеров — хороший выбор для долгосрочного дохода, особенно когда вы сможете установить Windows 11 на неподдерживаемый ПК, как заявляет Microsoft.
Мы все увидим, как это решение Riot отразится на их бизнесе, поскольку я сам не являюсь крупным игроком Valorant, на меня это решение не сильно повлияло, но будет интересно посмотреть, действительно ли другие пойдут с этой тенденцией или они решат подождать некоторое время, пока не будет обновлено гораздо больше ПК.
С другой стороны, если ваш компьютер испытывает проблемы, связанные с системой, которые необходимо исправить, существует решение в один клик, известное как Ресторо вы можете проверить, чтобы решить их.
Эта программа — полезный инструмент, который может восстановить поврежденные реестры и оптимизировать общую производительность вашего ПК. Помимо этого, он также очищает ваш компьютер от любых ненужных или поврежденных файлов, что помогает вам удалить любые нежелательные файлы из вашей системы. По сути, это решение, которое доступно вам всего одним щелчком мыши. Его легко использовать, поскольку он удобен в использовании. Полный набор инструкций по загрузке и использованию см. В приведенных ниже инструкциях.
Выполните полное сканирование системы, используя Ресторо. Для этого следуйте приведенным ниже инструкциям.
- Скачать и установить Ресторо с официального сайта.
- После завершения процесса установки запустите Ресторо выполнить полное сканирование системы.
- После завершения сканирования нажмите «Начать ремонт»Кнопка.
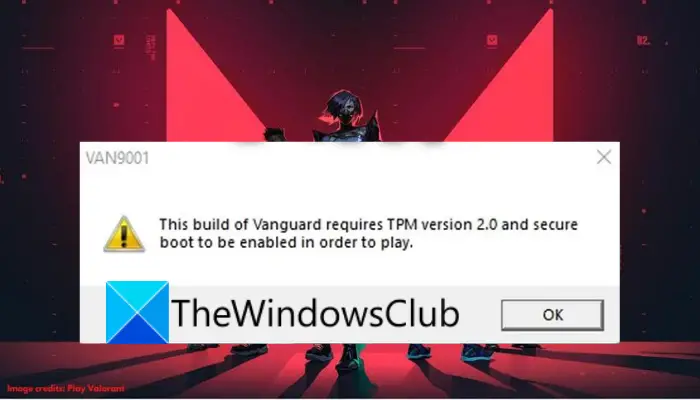
Here is a complete guide on how you can fix the error VAN9001 on Valorant in Windows 11/10. Valorant is a free and popular first-person hero shooter by Riot Games. It is loved by millions of gaming enthusiasts across the globe. While you are likely to have a good experience playing it, it is not uncommon to run down different error codes. One such error code is VAN9001. A lot of users have reported of being experiencing the VAN9001 error code when trying to launch the Valorant game. When triggered, the users experience the following error message:
VAN9001, This build of Vanguard requires TPM version 2.0 and secure boot to be enabled in order to play.
If you are one of those who are facing the same error, we got you covered. You can learn various fixes that will enable you to fix the error.
What causes the error VAN9001 on VALORANT?
Windows 11 has some built-in security requirements including enabled Secure Boot and TPM 2.0. Now, Valorant is also enforcing the same security requirements to make sure you are on a trusted platform. You are required to have TPM 2.0 and secure boot enabled on your BIOS configuration to open the game. So, when you are on the latest Windows 11, Valorant’s anti-cheat system called Vanguard will check for the competitive integrity of the game using the TPM module.
Apparently, some Windows update (KB5006050) makes tweaks to your BIOS settings and disables the secure boot option. So, users might think that they have secure boot enabled while in fact, a Windows update has turned it off in the background. This affects Valorant and you are likely to encounter the VAN9001 error when trying to open the game. The same goes for TPM. In case it is disabled, you will encounter the same error when launching the game.
Do note that to enable secure boot, you need to have UEFI. In case your hard drive is partitioned in MBR, you can convert MBR to GPT before you go ahead with enabling secure boot.
Now, let us have a look at the solutions that will help you resolve the error.
Does Valorant need Secure Boot?
Yes, Valorant needs the secure boot requirement to run without any error. As reported by many users, the error VAN9001 is triggered in case you don’t have secure boot and TPM 2.0 enabled. So, make sure you have both the requirements turned on before trying to play the game.
How do I check my TPM in Windows 11/10?
To check whether your PC has a Trusted Platform Module (TPM) chip, you can check it through TPM Management or on your BIOS or UEFI. Other than that, you can do so using the Security Node in Device Manager. You can also WMIC command in the Command Prompt to check if you have a TPM chip.
Here are the methods that you can try to fix error VAN9001 on Valorant in Windows 11/10:
- Enable Secure Boot and TPM.
- Edit Group Policy.
- Restore Factory Keys.
- Delete Valorant Cache and Temporary Files.
Let us explain the above methods in detail!
1] Enable Secure Boot and TPM
When you encounter this error, the first thing you should do is make sure that secure boot and TPM are enabled from the BIOS settings page. There have been instances where some Windows updates have turned off secure boot and TPM in the BIOS configuration. Some users have reported being experiencing the problem after installing Windows update KB5006050. Now, if the scenario applies, you should be able to fix the issue simply by enabling secure boot and TPM in BIOS configuration.
The process of enabling secure boot and TPM may differ for individuals based on your motherboard manufacturer. Also, do remember that you will be required to enable UEFI mode to be able to enable secure boot.
Secure Boot is usually enabled in almost all system that supports it, but sometimes, an update or a third party can disable it without your knowledge. So, let us start by enabling Secure Boot as mentioned in the error code itself.
Here is the step-by-step procedure to enable Secure Boot on your Windows PC:
- First of all, press Windows + I hotkey to launch the Settings app and then go to the System > Recovery section and tap on the Restart button associated with the Advanced startup option.
- Now, on the advanced startup screen, click on the Troubleshoot option and then select Advanced options.
- Next, click on the UEFI Firmware settings option and press the Restart button.
- You can now go to the advanced, security, or boot settings page (depending upon your motherboard) and then enable the Secure boot option.
- Look for Secure Boot, it will be under Security / Boot / Authentication Tab (It depends on the OEM).
- Now, Enable Secure Boot and save changes, but make sure to not exit
After enabling Secure Boot, we need to enable TPM or Trusted Platform Module.
- So, while you are in the BIOS you can navigate to the advanced, security, or boot settings page and make sure the TPM or TPM State option is enabled.
- When done, restart Windows and then try playing VALORANT and see if the error in hand is now fixed.
In case you have TPM and secure boot enabled on your BIOS and still, receive the same error, there might be some other underlying issue that is causing the error. Hence, move on to the next potential fix the get rid of the error.
See: Fix VALORANT connection error codes VAN 135, 68, 81.
2] Edit Group Policy
As per some users, the error can also be fixed by enabling the Require additional authentication at Startup policy in Group Policy Editor. You can also try the same and see if it enables you to fix the error or not.
Here are the steps to make a Group Policy tweak to get rid of error VAN 9001 on Valorant:
- Firstly, press the Windows + R key to evoke the Run dialog box and then enter gpedit.msc to launch Group Policy Editor.
- Now, simply move to the Computer Configuration > Administrative Templates section.
- After that, click on Windows Components and then expand the BitLocker Drive Encryption option present under it.
- Under the BitLocker Drive Encryption drop-down, you will find the Operating System Drives option; simply double-click on it.
- You will now see various policies at the right-side panel. From available policies, double-click the Require additional authentication at startup policy.
- In the next dialog window, select the Enabled option and also ensure the Allow BitLocker without a compatible TPM (requires a password or a startup key on a USB flash drive) is selected.
- Finally, click on the Apply > OK button to save changes.
After enforcing the above policy, restart your PC and then launch VALORANT. Hopefully, you won’t see the error VAN 9001 anymore.
Read: VALORANT: This game is not available on your Operating System.
3] Restore Factory Keys
In case the above methods fail to fix the error for you, you can try restoring your secure boot keys in your BIOS configurations to check whether or not the issue is gone. You should be able to find the option to restore keys under the Secure Boot option in your BIOS configuration. On newer motherboards or BIOS versions, the option might be hidden under the Key Management list. After resetting the keys, apply and save changes and then reboot your system. On the next startup, try playing VALORANT and see if the error is now fixed.
Read: Error VAN9003, This build of Vanguard requires secure boot to be enabled in order to play
4] Delete Valorant Cache and Temporary Files
You may also see the error code in question if Valorant game cache files are corrupted. In that case, we need to flush them and allow the game to create new ones. To do the same, follow the prescribed steps.
- Hit Win + R, type “AppData”.
- Go to Local > Valorant > Saved.
- Next, select the Crashes folder and press the Delete button to clear it.
- After that, open the webcache folder, and delete the GPUCache folder.
- Then, delete the Cache folder.
Finally, restart Valorant and see if the issue persists.
See: How to fix Valorant Vanguard Not initialized error?
How do I fix my Van 1067?
To fix the error Van 1067 on Valorant, make sure you have enabled secure boot and TPM 2.0. Other than that, you can select Windows UEFI in BIOS, reset Secure Boot Keys in BIOS, disable CSM, or reset BIOS/UEFI settings to fix the error.
Read: Fix VALORANT DirectX Runtime error.
Can I play Valorant on Windows 11 without TPM?
No, you cannot play Valorant on Windows 11 without TPM. More specifically, you must have TPM 2.0 to play Valorant on your computer. However, if it displays an error, you need to enable TPM and Secure Boot. But this has not been the case for most users, they have enabled the feature but still were not able to play the game. You should check the solutions mentioned in this article to get rid of the issue.
Read Next:
- Fix VALORANT Vanguard error codes 128, 57
- Fix VALORANT connection error codes VAN 135, 68, 81.
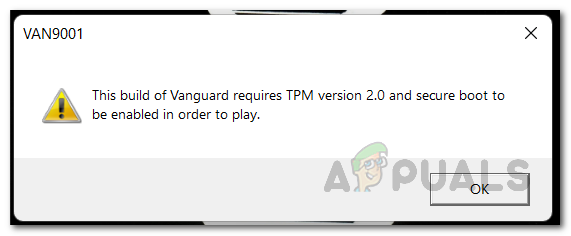
Multiple users have been experiencing the “This build of vanguard requires tpm version 2.0 and secure boot to be enabled in order to play” error message which is represented by the error code VAN9001 while trying to open up Valorant. The error message is specific to Windows 11 which is due to the fact that Windows 11 requires you to have TPM 2.0 and Secure Boot enabled on your BIOS. The reason you experience the issue in question is obvious from the error message itself. Fortunately, there is a really easy fix to the problem here so don’t worry as we will take you through the process in this article.
As it turns out, Valorant is enforcing the TPM 2.0 and secure boot requirements of Windows 11 in order to ensure a trusted platform. Thus, if you are running Windows 11 on your system, the Vanguard anticheat system will be using the TPM module to further ensure the competitive integrity of the game. In addition to that, a Windows update i.e. KB5006050 apparently changes some BIOS settings on your computer which as a result turns off secure boot. Therefore, often users think they have enabled secure boot from their BIOS configuration without knowing that a Windows update has actually disabled it in the background. When this happens, Valorant is not able to start as the Vanguard anticheat application requires secure boot to be enabled.
In addition to that, TPM may have been disabled in which case you will have to enable that. To resolve this problem, you will have to make sure that both Secure Boot and TPM are enabled in your BIOS. In some cases, if your hard drive is partitioned in MBR, your BIOS will be set to CMS while you need to have UEFI in order to enable secure boot. In such a scenario, you will have to convert your MBR hard drive to GPT before being able to enable secure boot. If you enable secure boot without converting your partition table, you might experience issues where your computer will not boot up. In such a scenario, you will have to reset your CMOS battery and then start over. With that said, we can finally get started with showing you the solutions available to resolve the problem in question. So, without further delay, let us get right into it.
Enable Secure Boot
As it turns out, the first thing that you should do when you encounter the error message in question is to make sure that secure boot is enabled from the BIOS. There has been a recent Windows update KB5006050 which apparently disabled secure boot in the BIOS configuration. Now, knowing this, users may try to simply uninstall the Windows update via the Control Panel, however, that does not work as the update is installed automatically again on a restart. The fix here would be to simply head to your BIOS configuration and then enable Secure Boot from there. Secure boot is essentially a security feature that protects your computer from malware and virus infections. It does that by looking for any changes in the boot loader or important system files by validating the digital signatures of the files.
The process of enabling secure boot on your BIOS may vary a little depending on your motherboard manufacturer. However, the changes are usually very slight as the main procedure remains the same.
Before we begin, it is important to note that you need to enable UEFI mode in order to enable Secure Boot. In case you aren’t using UEFI mode, it is likely that your hard drive is also not partitioned in GPT but rather MBR. If that is the case, you might experience issues booting up after enabling Windows UEFI mode. In case you are on CMS, we would recommend switching to UEFI mode and then exiting out of your BIOS configuration while saving the changes. Perform a restart and then get into BIOS config again to enable secure boot. The option for changing to UEFI mode can be usually found under Advanced > Windows OS Configuration. It is usually referred to as BIOS UEFI/CSM Mode while on older BIOS versions, it may be labelled as Windows 10 WHQL Support. Make sure to perform a reboot after enabling this before you enable secure boot.
To enable secure boot on your computer, follow the instructions down below:
- First of all, go ahead and restart your computer.
- As your computer is restarting, press the respective key for getting into BIOS setup. This can vary depending on the motherboard’s manufacturer. However, usually the keys are DELETE, F9, F2 etc.
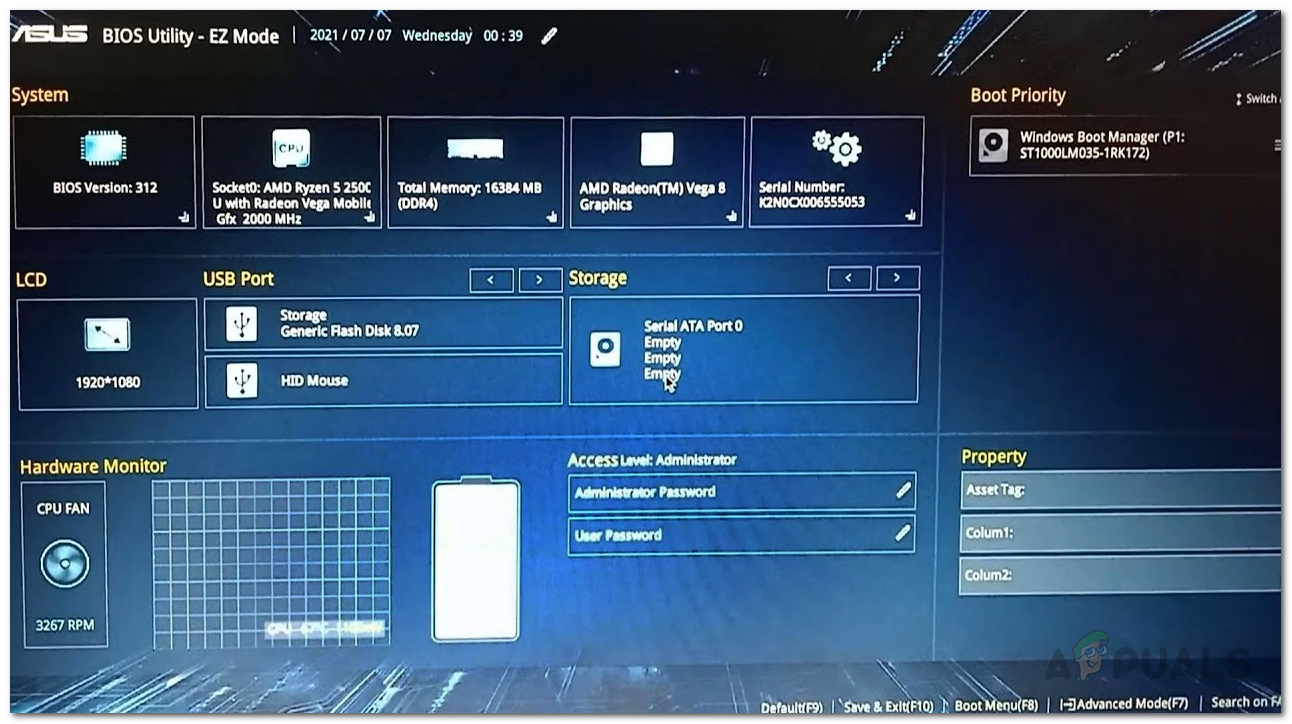
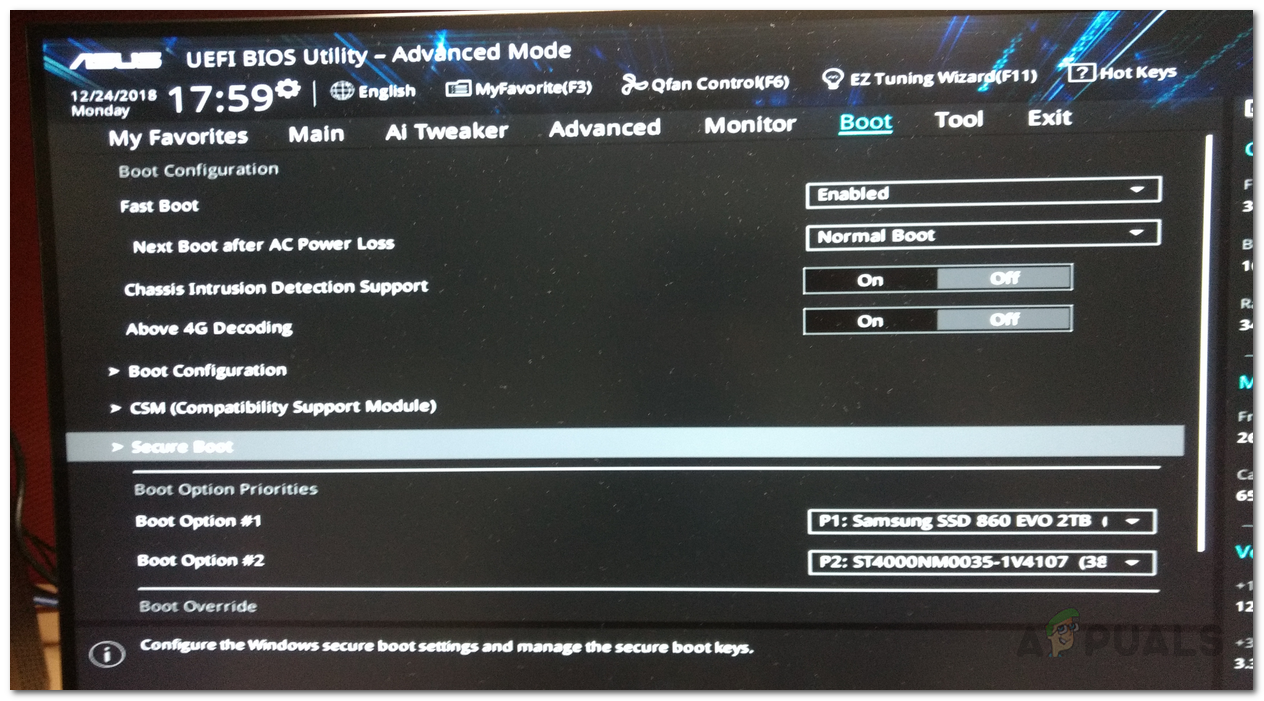
- Once you are in BIOS config, make sure you are not in EZ Mode. This especially applies to ASUS motherboards as it takes you to EZ Mode by default. Tap the F7 key on your keyboard to switch to Advanced Mode.
ASUS EZ Mode - Now, on some motherboards, the Secure Boot option can be found under the Boot tab. For example, on ASUS motherboards, you will find the Secure Boot option under the Boot tab.
Accessing Secure Boot Option on ASUS Motherboards - However, on other motherboards like MSI, the Secure Boot option may be located under Advanced > Windows OS Configuration.
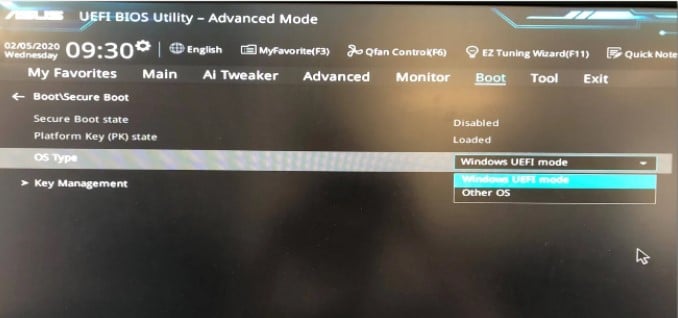
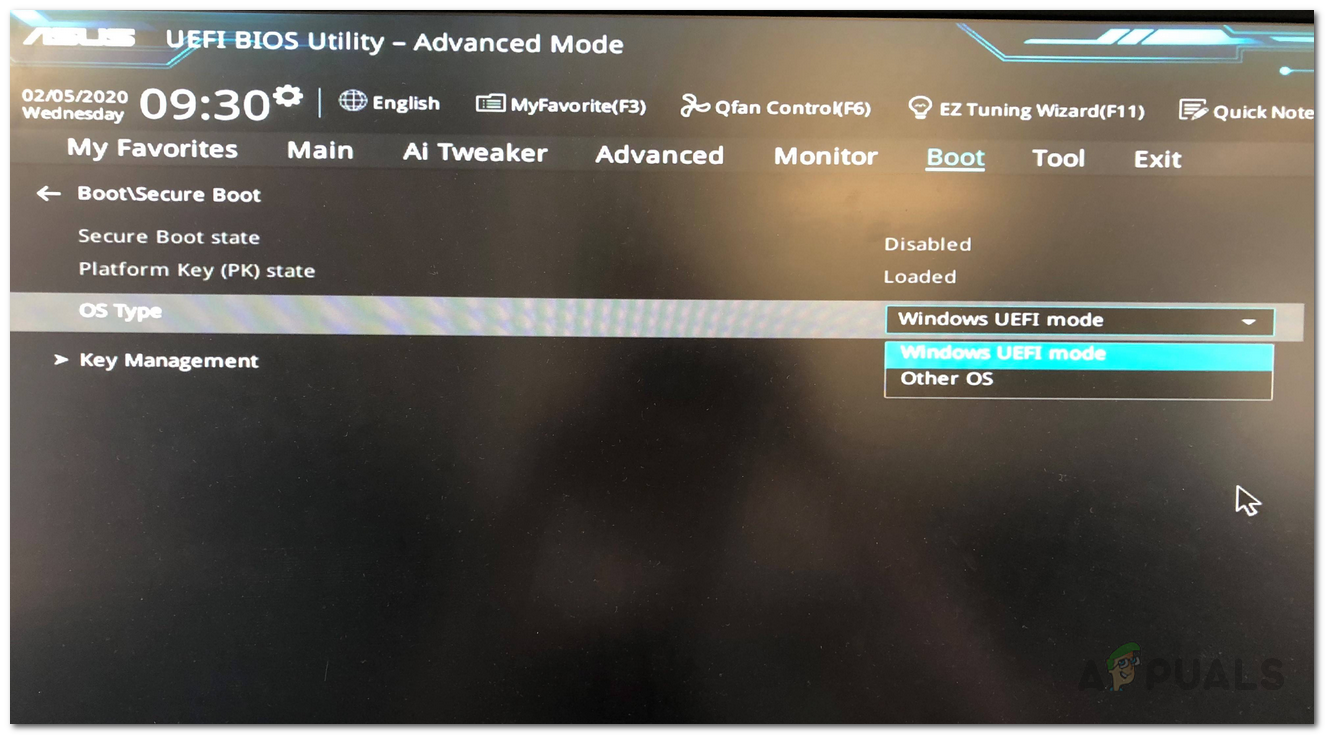
Enabling Secure Boot on MSI Motherboards - Once you have located the option, make sure it is set to Windows UEFI instead of Other OS and Secure Boot is Enabled.
Secure Boot on ASUS Motherboards - You may not have these options depending on your motherboard again. Instead, you might have Standard or Custom options. Keep it on standard and perform a reboot.
- After your computer starts up, login into your account and open up Valorant to see if the error message is still there.
Enable TPM
In addition to TPM, you will have to also make sure that TPM is enabled in your BIOS configuration in order to play Valorant. This is important as the Vanguard anticheat system enforces TPM on Windows 11 machines for keeping the competitive integrity of the game. If you have bypassed Windows 11 requirements, and you don’t have a TPM module on your computer, then, unfortunately there is no workaround for you just yet and you will have to go back to Windows 10 if you wish to keep playing Valorant.
The TPM option can usually be found under the Security tab on your BIOS configuration. If you are using an AMD processor, TPM will be known as fTPM for you. Do not worry about the slight change in name as it is basically the same thing. Once you have enabled TPM, perform a restart to see if the error message still appears.
Restore Factory Keys
In some cases, users experience the error message in question even when they have Secure Boot and TPM enabled in their BIOS configuration. In such a scenario, you will have to restore your secure boot keys in your BIOS config and then see if the issue has been resolved. As it turns out, secure boot uses public and private keys that are used to digitally sign and verify the authenticity of the code. This method can resolve the issue for you especially if you are using a laptop.
The option to restore secure keys is located right under the Secure Boot option in your BIOS configuration. It may be hidden under the Key Management list on newer motherboards and BIOS versions. Once you have reset the keys, save the changes and perform a restart. Check if the problem is still there after your computer boots up.
Kamil Anwar
Kamil is a certified MCITP, CCNA (W), CCNA (S) and a former British Computer Society Member with over 9 years of experience Configuring, Deploying and Managing Switches, Firewalls and Domain Controllers also an old-school still active on FreeNode.
