Search code, repositories, users, issues, pull requests…
Provide feedback
Saved searches
Use saved searches to filter your results more quickly
Sign up
To get started with Vagrant, download the appropriate installer or
package for your platform from our
Vagrant downloads page. Install the package with the standard procedures for
your operating system.
The installer automatically adds vagrant to your system path
so that it is available in terminals. If it is not found,
log out and back into your system; this is a common issue for Windows.
Rubygem installation is unsupported Vagrant 1.0.x has the option to
be installed as a RubyGem.
However, this installation method is no longer supported. If you have an old version
of Vagrant installed via Rubygems, remove it prior to installing newer
versions of Vagrant.
If you are new to Vagrant, the next step to set up a development environment is to install
a box.
Hypervisors often do not allow you to bring up virtual machines if you have more than one hypervisor in use.
Below are a couple of examples to allow you
to use Vagrant and VirtualBox if another hypervisor is present.
Linux, VirtualBox, and KVM
If you encounter the following error message, it is because another hypervisor, like KVM, is in use.
There was an error while executing `VBoxManage`, a CLI used by Vagrant for controlling VirtualBox. The command and stderr is shown below.

Command: ["startvm", <ID of the VM>, "--type", "headless"]

Stderr: VBoxManage: error: VT-x is being used by another hypervisor (VERR_VMX_IN_VMX_ROOT_MODE).
VBoxManage: error: VirtualBox can't operate in VMX root mode. Please disable the KVM kernel extension, recompile your kernel and reboot
(VERR_VMX_IN_VMX_ROOT_MODE)
VBoxManage: error: Details: code NS_ERROR_FAILURE (0x80004005), component ConsoleWrap, interface IConsole
You must add the additional hypervisors to the deny list in order for VirtualBox to run correctly.
First, find out the name of the hypervisor.
$ lsmod | grep kvm
kvm_intel             204800  6
kvm                   593920  1 kvm_intel
irqbypass              16384  1 kvm
Use the blacklist command to add the hypervisor to your denylist.
$ echo 'blacklist kvm-intel' >> /etc/modprobe.d/blacklist.conf
Restart your machine and try the vagrant command again.
Windows, VirtualBox, and Hyper-V
If you encounter an issue with Windows, you will get a blue screen if you attempt to bring up
a VirtualBox VM with Hyper-V enabled.
If you wish to use VirtualBox on Windows, you must ensure that Hyper-V is not enabled
on Windows. You can turn off the feature with the following Powershell command for Windows 10.
Disable-WindowsOptionalFeature -Online -FeatureName Microsoft-Hyper-V-All
For Windows 11, you can use an elevated Powershell.
bcdedit /set hypervisorlaunchtype off
You can also disable Hyper-V in the Windows system settings.
- Right click on the Windows button and select ‘Apps and Features’.
- Select Turn Windows Features on or off.
- Unselect Hyper-V and click OK.
You might have to reboot your machine for the changes to take effect. More information
about Hyper-V can be read here.

Vagrant работает с виртуальными машинами, а значит для виртуализации ему необходим какой-либо»провайдер». И для нашего примера подойдет VirtualBox.
Установка VirtualBox 5 на Windows 10
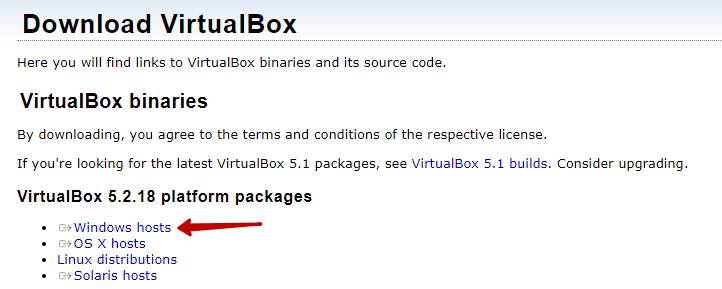
Для начала качаем VirtualBox с официального сайта последнюю версию (на текущий момент 5.2.18). Для этого после перехода по ссылке на страницу загрузки кликаем по ссылке Windows hosts:
Загруженный файл VirtualBox-5.2.18-124319-Win.exe запускаем для установки VirtualBox. Сам процесс установки сводится к нажатию нескольких кнопок «Next» и ожиданию завершения процесса. После запуска установщика появится следующее окно:

Здесь нажимаем Next.
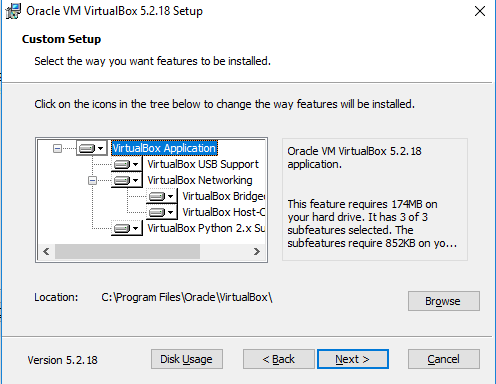
На следующем этапе выбираем все компоненты для установки (выбраны по умолчанию) и нажимаем Next:
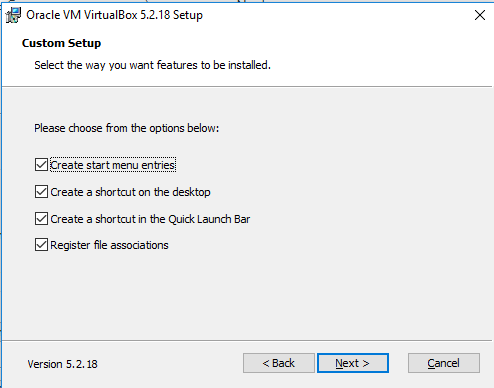
На следующем этапе указываем дополнительные настройки (если нужно) или оставляем все по умолчанию и нажимаем кнопку Next:
Наследующем этапе подтверждаем установку виртуального адаптера (то есть нажимаем Yes):

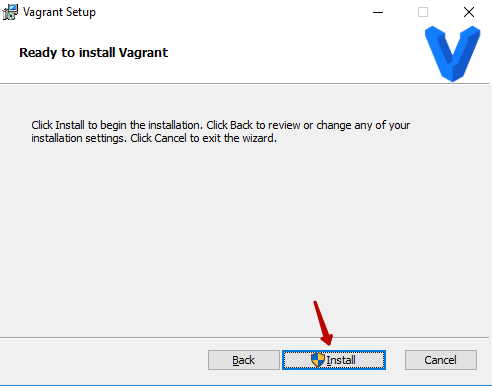
И на завершающем этапе нажимаем кнопку «Install»:

В процессе установки, если включен контроль учетных записей,может появится следующее окно подтверждения действия. В нем нажимаем «Да». После чего начнется процесс непосредственной установки.
Так же в процессе установки VirtualBox 5 на Windows 10 появится диалоговое окно с подтверждением установки дополнительного программного обеспечения:
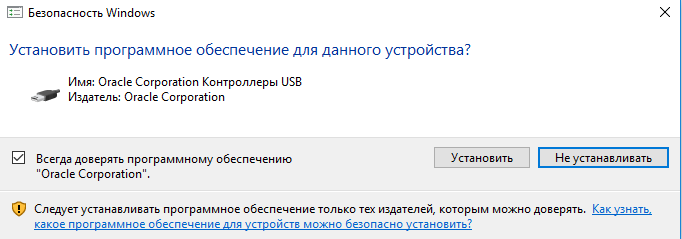
Здесь мы нажимаем кнопку «Установить».
И после завершения установки появляется диалоговое окно:
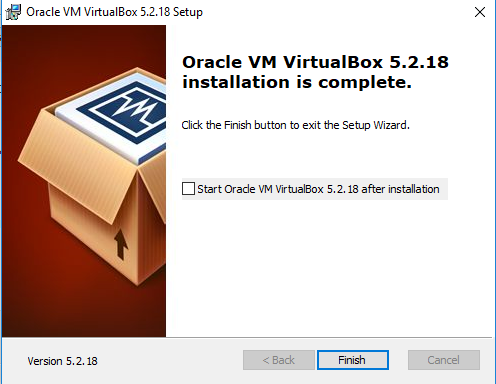
На этом процесс установки VirtualBox на Windows 10 завершен.
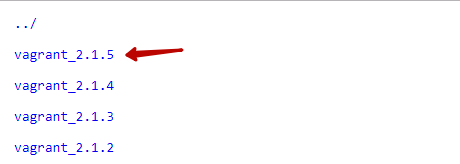
Для установки Vagrant необходимо скачать пакет с файлами для установки,который доступен по ссылке. В появившемся окне выбираем последнюю версию установщика (на момент написания статьи 2.1.5):
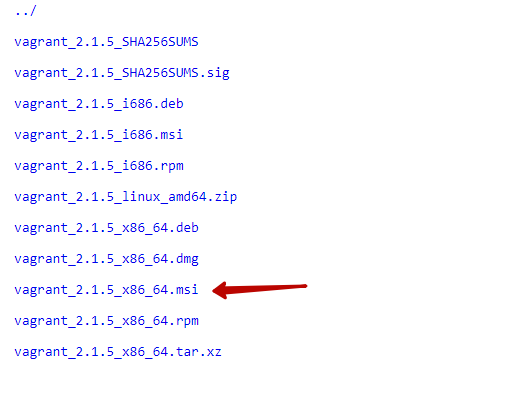
И выбираем файл с расширением .msi для установки на Windows:
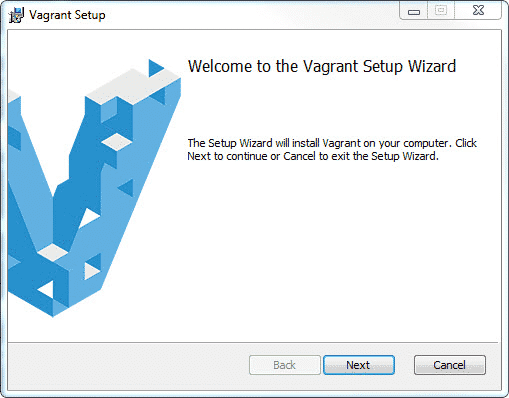
После скачивания запускаем файл vagrant_2.1.5_x86_64.msi. В результате появится диалоговое окно с приветствием:

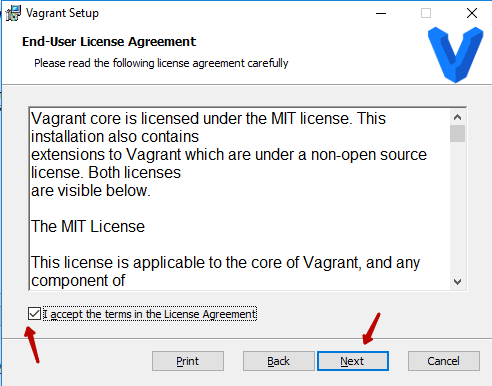
На следующем этапе соглашаемся с правилами пользования (устанавливаем галочку в поле «I acept…») и нажимаем Next:
На следующем этапе указываем каталог, в который будет установлена программа. Можно оставлять путь по умолчанию, только обязательно запоминаем, куда устанавливаем (можно скопировать путь):

И в следующем окне нажимаем кнопку «Install»:
Ожидаем окончания установки:

После чего появится окно с результатами завершения установки:

После завершения установки Vagrant на Windows 10 появится окно с просьбой о перезагрузке компьютера:
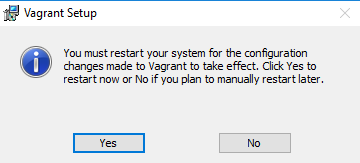
Здесь нажимаем «Yes» и ожидаем перезагрузки компьютера. Если необходимо вручную завершить работу других программ (или сохранить изменения в важных документах), то нажимаем кнопку «No» и потом перезагружаем компьютер вручную.

Внесение изменений в переменные среды
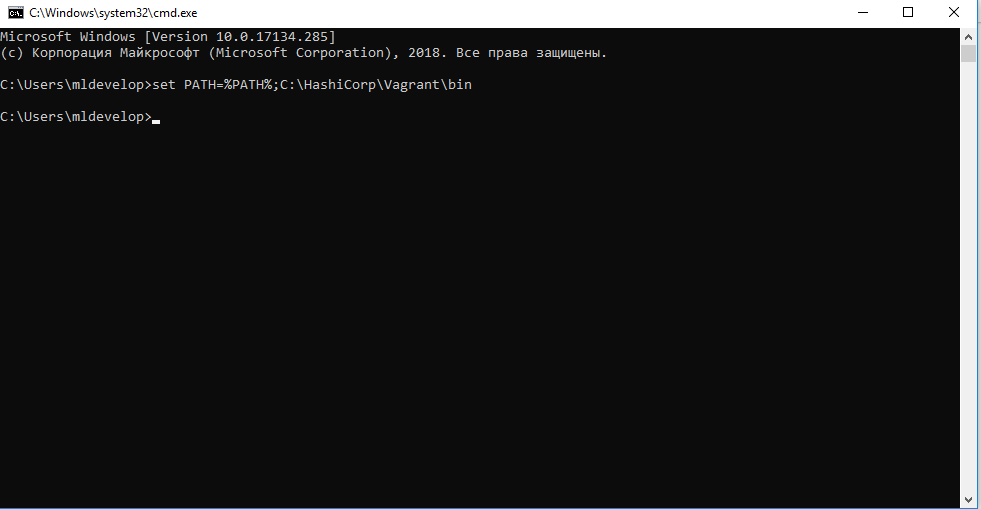
После перезагрузки компьютера обязательно необходимо добавить переменную vagrant в системные переменные. Это нужно для того, чтобы в командной строке можно было вызывать Vagrant при помощи одной команды: vagrant.
Изменения в переменные среды мы будем вносить при помощи командной строки, а конкретно в переменную PATH мы будем добавлять путь до каталога, куда установлен Vagrant (в нашем случаем это: C:\HashiCorp\Vagrant\bin).
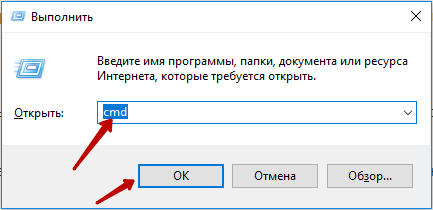
Вызываем командную строку следующим образом:
1. нажимаем на клавиатуре клавиши Ctrl+R для вызова окна «Выполнить».
2. В появившемся окне набираем команду: cmd
3. Нажимаем кнопку ОК:
В итоге должны получить следующее:

В окне командной строки добавляем следующую команду:
set PATH=%PATH%;C:\HashiCorp\Vagrant\bin
и нажимаем клавишу Enter:
И теперь для проверки того, удалось ли нам прописать путь к Vagrant в переменные среду, в этом же окне командной строки набираем команду:
vagrant -v
и нажимаем клавишу Enter:

И при помощи данной команды мы получим информацию о версии установленного Vagrant. Если все получилось так, как и в статье, значит все сделали верно.
На этом процесс установки и настройки Vagrant и VirtualBox на Windows 10 завершен.
Создание виртуальной машины в Vagrant на Windows 10
Для создания виртуальной машины для начала создадим отдельный каталог, например, VagrantVM:
В командной строке откроем этот каталог. Для этого будем использовать команду cd. В нашем случае каталог располагается по следующему пути:
C:\VM’s\VagrantVM
Значит в командной строке выполняем следующую команду:
cd C:\VM's\VagrantVM
В результате получим следующее:

Для примера будем использовать сборку ubuntu/trusty64. Чтобы ее запустить на виртуальной машине, нужно сначала инициализировать бокс с этой сборкой. Для этого в командной строке выполняем команду:
vagrant init ubuntu/trusty64
В результате получим следующее сообщение:

Теперь запустим проинициализированный бокс:
vagrant up
После запуска данной команды начнется запуск загрузки и настройки виртуальной машины. После завершения этой операции в VirtualBox появится новая виртуальная машина:

Работать с этой виртуальной машиной можно через SSH. Для этого нам потребуется программа PuTTY, которую можно скачать отсюда (процесс установки описывать не будем, он достаточно прост).
Так же можно с виртуальными машинами Vagrant работать и из командной строки. В том же окне командной строки выполняем команду:
vagrant ssh
В результате появится запрос на ввод пароля:

Пароль по умолчанию: vagrant. Имя пользователя: vagrant. Потому вводим здесь пароль: vagrant. И нажимаем клавишу Enter.
В результате после ввода пароля окно получаем следующее:

то есть попадаем в оболочку Ubuntu. Здесь можно непосредственно работать с виртуальной машиной при помощи командной строки.
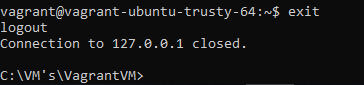
Чтобы вернуться из этого режима в нормальный режим командной строки Windows, выполняем команду:
exit
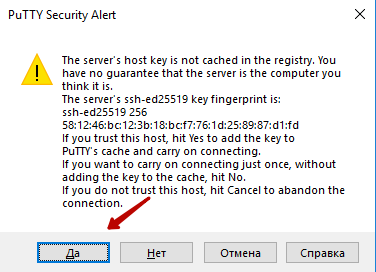
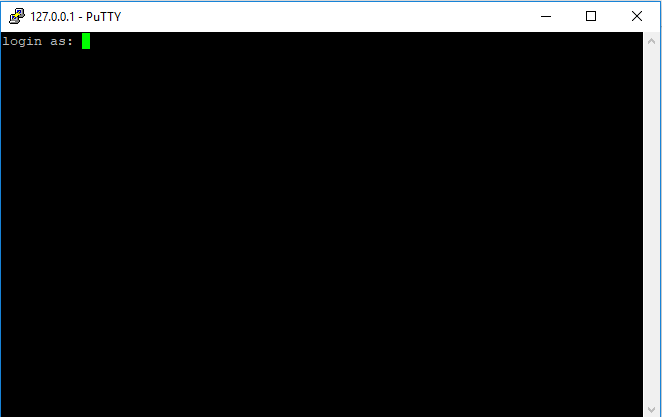
Для работы с виртуальной машиной через программу PuTTY, указываем следующие параметры для соединения с виртуальной машиной:
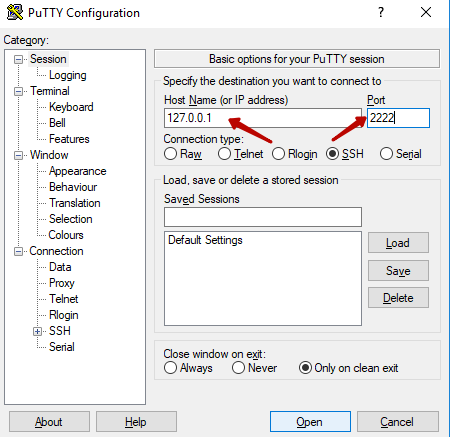
И нажимаем кнопку Open. В появившемся диалоговом окне нажимаем Да:
В результате получаем следующее:
Здесь необходимо ввести логин и пароль (как мы ранее определились, по умолчанию vagrant/vagrant):
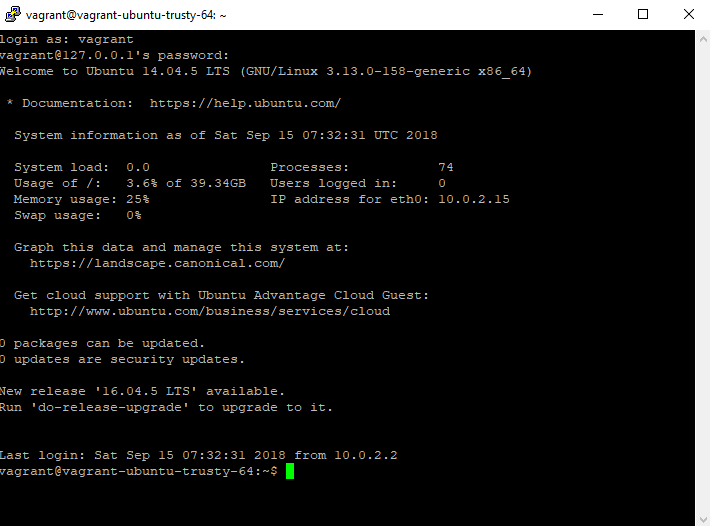
***Примечание: при вводе пароля символы не будут отображаться (никак, даже звездочками).
Чтобы завершить работу запущенного бокса, в окне командной строки выполняем команду:
vagrant halt
***Если окно командной строки ранее было закрыто, то необходимо снова его запустить и открыть при помощи команду cd каталог, в котором находится наша виртуальная машина.
На этом закончим данную статью. В следующих статьях подробнее разберем, как на виртуальной машине Vagrant можно настроить веб-сервер.

In this article, I will show you how to install and use Vagrant on Windows 10. First, we will install the required tools and then we will up and run an Ubuntu desktop vagrant box with vagrant commands.
Required Tools
- Virtualbox
- Vagrant
- Git
What does Vagrant do?
– Create and destroy VMs
– Starts, stops, restarts VMs
– Access to VMs
– Networking and WM settings
– Orchestrates “provisioning” for on-demand setup
Steps to Up and Run Ubuntu Desktop (GUI Mode) via Vagrant
1- Install Git for Windows
Download URL: https://git-scm.com/download/win
Then during installation steps, select below settings:
- “Use Git from the Windows Command Prompt” with this option you will be able to use Git from both Git Bash and the Windows Command Prompt.
- “Checkout as-is, commit Unix-style line endings”
And finish the installation.
2- Install VirtualBox
For the sake of compatibility and in order to eliminate the version problems please install VirtualBox 5.1.14r112924 (Qt5.6.2) version.
Downlod Link: http://download.virtualbox.org/virtualbox/5.1.4/VirtualBox-5.1.4-110228-Win.exe
Installation of VirtualBox is pretty straight-forward. Just click the .exe file and click next -> next -> next to finish installation.
Also, download Oracle VM VirtualBox Extension Pack.
Download Link: http://download.virtualbox.org/virtualbox/5.1.4/Oracle_VM_VirtualBox_Extension_Pack-5.1.4.vbox-extpack
Then, open VirtualBox and click File -> Preferences -> Extensions click the below icon
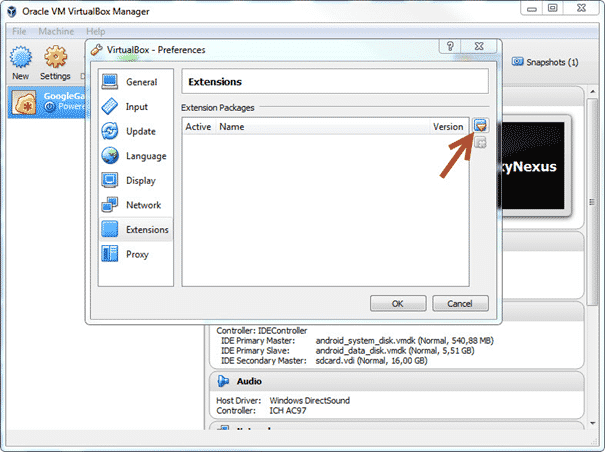
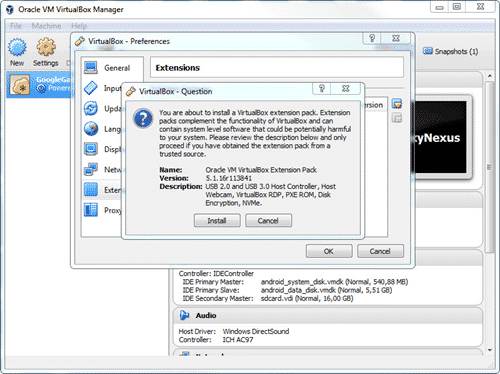
And select the extension pack and then click “Install” -> “I Agree” -> “Yes”
3- Install Vagrant
In order to eliminate compatibility issues, it is better to install Vagrant 1.9.2 version.
Vagrant Download Link: https://releases.hashicorp.com/vagrant/1.9.2/vagrant_1.9.2.msi
Install the Vagrant it is very easy to install and then restart your machine.
After these setting you should do below settings to run Vagrant without any problem:
1) Enable VT-X (Intel Virtualization Technology) in your computer bios settings.
2) Disable Hyper-V on program and features page in the control panel.
Download and Run Ubuntu Desktop (GUI) Vagrant Box on Windows 10
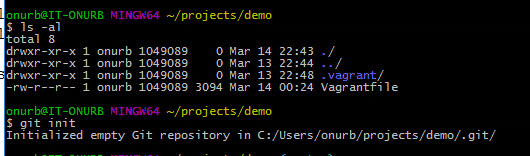
Open Git Bash and type “pwd” it should show your user directory as shown below:
/c/Users/onurb
Then, create a folder as “project” by using “mkdir projects” command.
Then, go to that folder with “cd projects”
Then create a folder for Ubuntu by using “mkdir ubuntu1404-desktop” command.
and go to that folder with “cd ubuntu1404-desktop” command.
After these steps run below commands sequentially:
vagrant init box-cutter/ubuntu1404-desktop
vagrant up –provider virtualbox
Then, Vagrant download and then run the box.
Vagrant Box Link: https://atlas.hashicorp.com/box-cutter/boxes/ubuntu1404-desktop/versions/2.0.26
After these settings whenever you will run “vagrant up” command, Vagrant will run and open the Ubuntu in GUI mode as shown below:

Also, you can use any ready Vagrant box from below page.
https://atlas.hashicorp.com/boxes/search
Most Common Vagrant Commands
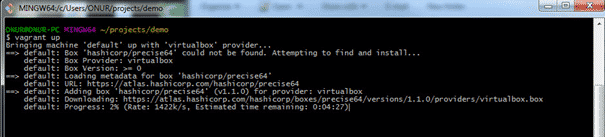
I will also summarise Vagrant commands with images. This time I will use “hashicorp/precise64” Linux box.
vagrant init: (initialize)
vagrant up: download image and do rest of the settings and power-up the box
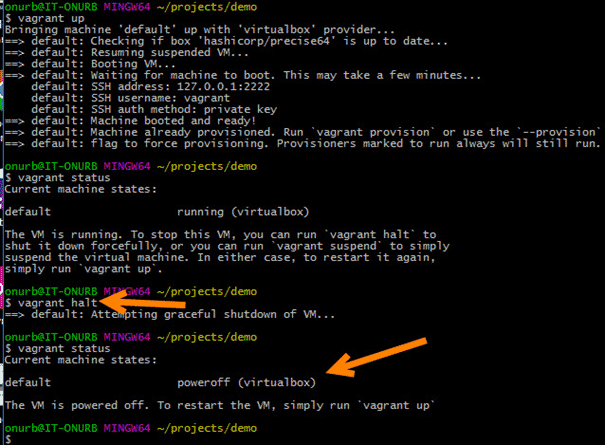
vagrant status: Shows status
vagrant suspend: Saves the box’s current state
vagrant halt: shutdown the box (Power-off)
vagrant destroy: shutdown and delete the box
Vagrant init (Initialize)

Vagrant up (Run the VM)
Vagrant suspend (Save the VM’s State)

Vagrant halt (Shut down the VM)
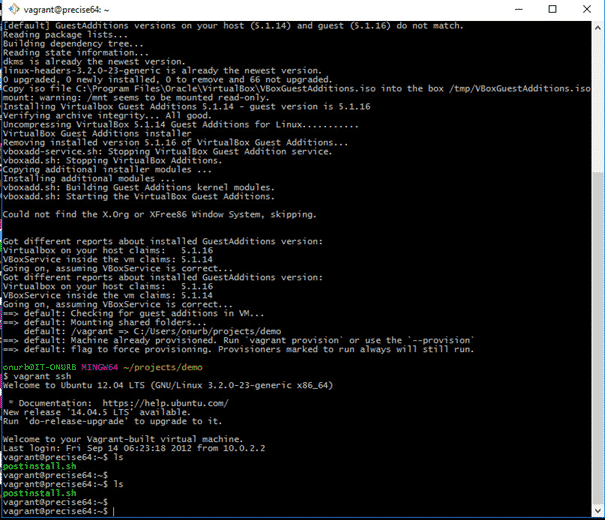
Vagrant ssh (Connecting non-gui Linux OS)
Vagrant version (Get Version Information)

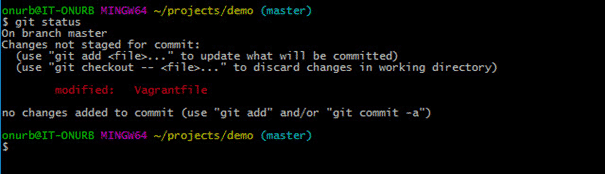
Version Control of Vagrant by Using Git
You can edit VagrantFile and commit the modifications in a git repo by using below commands.
git version: get version information
git init: initialize the repo
git add: adding files to git repo
git commit -m “comment”: committing a file with a comment

git log –oneline: showing log history one line

git status: showing status of modifications
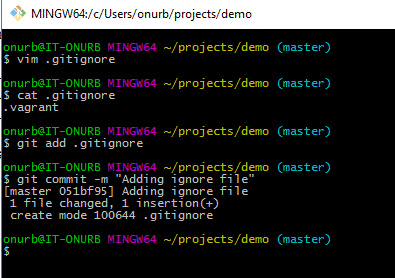
git ignore: Ignores the file types and do not hold them in the repo.
Create a .gitignore file and add “.vagrant” in it.

Add and Commit it into repo:
QUIZ TIME 

Question 1:
How do you start a virtual machine with Vagrant?
vagrant up
Question 2:
A vagrant box must exist on the local system before the vagrant up command can be called.
No
Question 3:
How does Vagrant allow for keeping files synchronised between the host and the guest?
shared folders
Question 4:
How do we stop our vagrant-managed virtual machine from running?
vagrant suspend (save the state)
vagrant halt (shutdown)
vagrant destroy (shutdown and delete)
Question 5:
The vagrant status command tells us the current state of the vagrant-managed virtual machine for our project.
true
In this article, we learnt how to install, use, up and run a Vagrant Box in windows 10. I hope this helps you in your test environment needs.
Thanks.
-Onur

Onur Baskirt is a Software Engineering Leader with international experience in world-class companies. Now, he is a Software Engineering Lead at Emirates Airlines in Dubai.

Windows 10 + Vagrant + WSL2 + Ansible
So, wether you are setting your homelab up for learning purposes, or your homeserver if you have the more advanced knowledge, or even on production in a company, you may want to automatize the process of creating, configuring and deleting Virtual Machines (VM’s) for multiple purposes.
What is Vagrant?
You may use any of the most popular virtualization software out there like VirtualBox, VMware, Hyper-V, KVM, AWS, Docker, etc… but creating Virtual Machines the manual way can be a hustle and bustle as it usually requires to download an ISO File for the target OS that you are going to install into and then wait for the installation process which can take a while to complete. Once you have one Virtual Machine up and working most of these software programs allo you to replicate the configuration so that you can create multiple other machines in a matter of seconds.
But what if you could have a Virtual Machine up and running with all the configurations needed already done in just a matter of seconds? And not only that, but allows you to move that virtual machine to another computer by just sending a text file. That is Vagrant, a software that allows creation and management of portable virtual machines.
So how does Vagrant work? Vagrant uses “Provisioners” and “Providers” as building blocks to manage the development environments. Provisioners are tools that allow users to customize the configuration of virtual environments. Examples of the most used Provisioners used in Vagrant are Puppet and Ansible, being the latter the one we are covering in this post later on.
Providers are the services that Vagrant uses to set up and create virtual environments. Vagrant comes with native support of VirtualBox, Hyper-V, and Docker virtualization, while VMware and AWS are supported via plugins.
What we are covering in this post is using Vagrant and Ansible in Windows 10 using Windows Subsystem for Linux in it’s second version (WSL2). This newer version of WSL launches a full virtual machine of Linux (in the Windows Store you can choose to install Ubuntu, Debian, Kali, Suse, etc…), so since it is a full Linux OS that is running everything should work just like in a Linux partition right? Well, not quite… WSL2 directories runs on it’s own network adapter usually called vEthernet (WSL), so accesing resources from either side (Windows 10 to WSL2 filesystem and folders as well as from WSL2 to Windows 10 filesystem and folders) makes use of the ethernet adapter all the time, and everything goes through the firewall and here is when things get complicated when you try to set things up for the first time (not anymore since I am giving all the steps needed to circumvent all the probles that may arise during installation and first use of Vagrant).
Installation
Now, let’s get our hands dirty doing what we love the most: the terminal. For Vagrant to work with WSL2 and Windows 10 we need to install the same version of Vagrant in both Windows 10 and WSL2.
For The Windows installation you may go to the downloads page of Vagrant and download the binary for the OS version you are using 32-bit or 64-bit. Nowadays is more likely that you are using the 64-bit, but if you are not sure what you are using type uname -i in the WSL terminal and it will print what OS you are using.
Once it is donwloaded and installed open your WSL terminal and, assuming you are using Debian or a Debian derived OS like Ubuntu, type the following commands:
curl -fsSL https://apt.releases.hashicorp.com/gpg | sudo apt-key add -
sudo apt-add-repository "deb [arch=amd64] https://apt.releases.hashicorp.com $(lsb_release -cs) main"
sudo apt-get update && sudo apt-get install vagrant
In the downloads page you may find the commads needed for
yum,dnfobrewif you are using CentOS/RHEL, Fedora or Homebrew respectively.
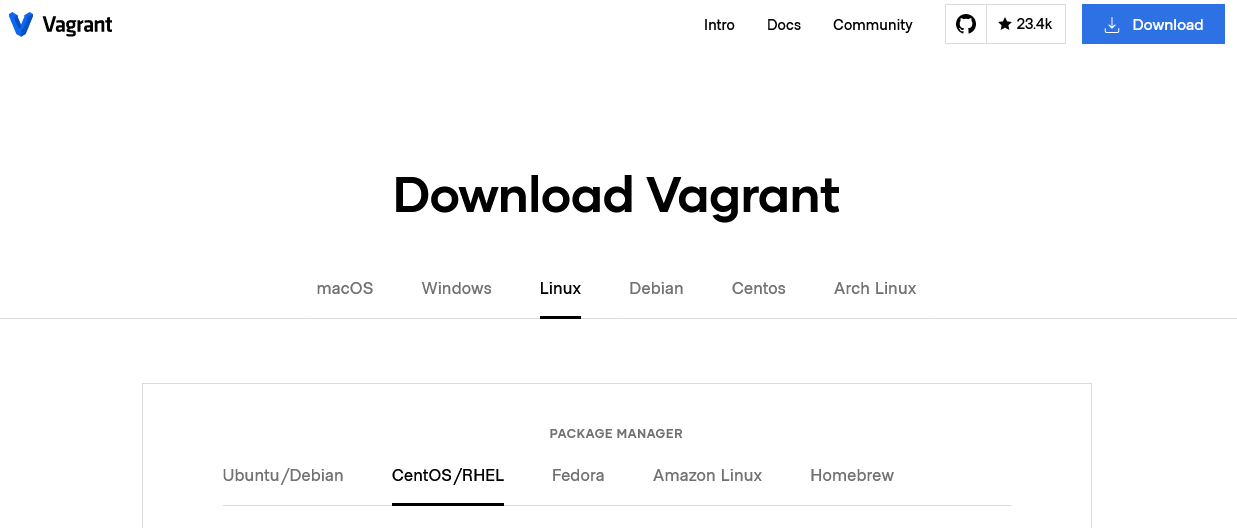
Image: Other installation methods.
Once installation finishes make sure that the installed version matches with the one in Windows 10 (at the time of writing this article the last version of Vagrant is 2.2.19):
$ vagrant --version
Vagrant 2.2.19
Now we can install VirtualBox (if not already installed) or update it to the latest version which at the time of writing this article it is version 6.1. You should take note of the installation directory because it will be needed later on (default is “C:\Program Files\Oracle\VirtualBox”).
Configuration
Next thing we need is to enable the access of Vagrant to the Windows 10 installation of your Provider, in our case we will use the default one (and most supported by Vagrant) which is VirtualBox. This is done by exporting a couple of variables in the WSL2 terminal.
The first variable VAGRANT_WSL_ENABLE_WINDOWS_ACCESS will enable the use of an external provider instead of using a VirtualBox installed inside WSL2 and will use therefore the one installed in the host OS.
The second variable will be adding the VirtualBox install folder location to the PATH of the WSL2 user. So in order to export these variables you could edit the file ~/.bashrc with your favourite text editor or add them to the end of the file with these commands and then restart the shell (logout and login works):
echo 'export VAGRANT_WSL_ENABLE_WINDOWS_ACCESS="1"' >> ~/.bashrc
echo 'export PATH="$PATH:/mnt/c/Program Files/Oracle/VirtualBox"' >> ~/.bashrc
As I mentioned before I’m using the default install location, you may need to adjust the command with your own path to VirtualBox location.
We are not done just yet, but we are getting there to launch our first Virtual Machine and connecting through ssh to it. If you try to launch a Virtual Machine with Vagrant you will be met with errors that can look like these:
default: Warning: Connection refused. Retrying...
default: Warning: Connection refused. Retrying...
default: Warning: Connection refused. Retrying...
default: Warning: Connection refused. Retrying...
default: Warning: Connection refused. Retrying...
default: Warning: Connection refused. Retrying...
To fix this, the community has created a plugin. You can find the source code here, thanks Karandash8. To install it just run:
vagrant plugin install virtualbox_WSL2
At this point you could launch a Vagrant VM but the process would get stuck at default: SSH auth method: private key:
$ vagrant up
Bringing machine 'default' up with 'virtualbox' provider...
==> default: Checking if box 'centos/7' version '2004.01' is up to date...
==> default: Clearing any previously set forwarded ports...
==> default: Clearing any previously set network interfaces...
==> default: Preparing network interfaces based on configuration...
    default: Adapter 1: nat
==> default: Forwarding ports...
    default: 22 (guest) => 2222 (host) (adapter 1)
    default: 22 (guest) => 2222 (host) (adapter 1)
==> default: Booting VM...
==> default: Waiting for machine to boot. This may take a few minutes...
    default: SSH address: 172.25.64.1:2222
    default: SSH username: vagrant
    default: SSH auth method: private key
To fix this we need to disable the firewall of the vEthernet (WSL) interface. To do that we will open the Windows Firewall either searching for firewall on Windows 10 Start Menu or typing:
You will have to disable vEthernet (WSL) for the three profiles domain, private and public as shown in the pictures below:
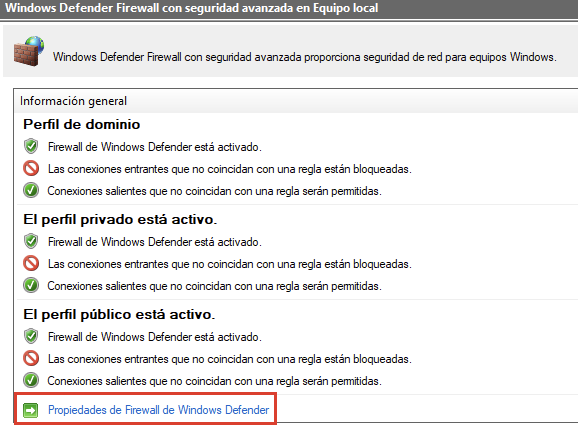
Go to firewall properties
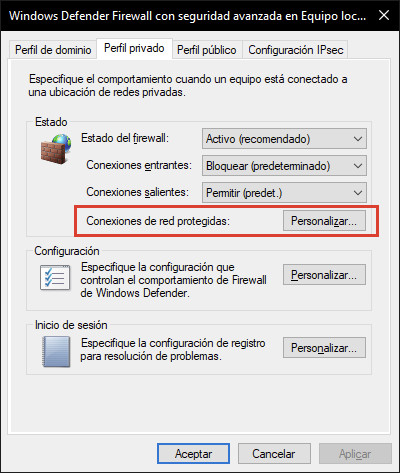
For each of the three profiles click on customize
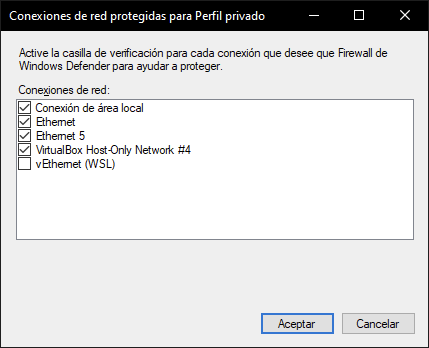
Untick vEthernet (WSL)
You may have to follow these steps every time you reboot your computer as in my case Windows 10 seems to reset that config.
Last steps
The last thing you should do fixes a problem that could happen to you when creating and running multiple VMs with ansible, if you ever come across this message:
Failed to open/create the internal network 'HostInterfaceNetworking-VirtualBox Host-Only Ethernet Adapter'
Apparently it is easy to fix as pointed out here:
- Open Windows Network Connections.
- Right click on VirtualBox Host only adapter.
- Choose properties.
- Check “VirtualBox NDIS6 Bridged Networking driver”.
- Disable and Enable the adapter.

Checking and uncheking this option and disabling and enabling the adapter seems to fix the problem.
There are other fixes that than be tried if none of the above does the trick, you can read more about them here.
Running Vagrant with Ansible
Yes! You made it here! You can finally launch your first Virtual Machine. First go to Discover Vagrant Boxes and choose the image that you wish. For this example I will choose centos/7.
Create a folder for the project, cd to it and run:
This command will create a Vagrantfile that you will need to edit to match your preferences. In this example the first thing we are going to do is to disable the shared folders option that Vagrant has activated by default for every VM that you create, so for every Vagrantfile you will have to disable it by adding this line config.vm.synced_folder ".", "/vagrant", disabled: true:
# -*- mode: ruby -*-
# vi: set ft=ruby :

Vagrant.configure("2") do |config|

  config.vm.box = "centos/7"
  config.vm.synced_folder ".", "/vagrant", disabled: true

end
Otherwise it will give an error, and we don’t need the shared folder just now.
At this point you could type vagrant up, Vagrant will download the image and run it automatically. Once booted you can type vagrant ssh to ssh into it.
Adding Ansible support is rather easy, the Vagrantfile should look like this once we remove all the text clutter:
# -*- mode: ruby -*-
# vi: set ft=ruby :

Vagrant.configure("2") do |config|

  config.vm.box = "centos/7"
  config.vm.synced_folder ".", "/vagrant", disabled: true
  config.vm.provision "ansible" do |ansible|
    ansible.playbook = "playbook.yml"
  end
end
You can now create a playbook.yml file in the same directory to play with the machine. I will paste the example I followed that user Geerlingguy created in his Ansible 101 series of videos:
---
- hosts: all
  become: yes
  tasks:
    - name: Ensure NTP is installed
      yum:
        name: ntp
        state: present
    - name: Ensure NTP is running
      service:
        name: ntpd
        state: started
        enabled: yes
This will check wether the NTP service is installed or not and if it is running or not. If you have your machine already up and running you can apply the playbook with the following command:
A normal output would look like this:
$ vagrant provision
==> default: Running provisioner: ansible...
    default: Running ansible-playbook...

PLAY [all] *********************************************************************

TASK [Gathering Facts] *********************************************************
ok: [default]

TASK [Ensure NTP is installed] *************************************************

ok: [default]

TASK [Ensure NTP is running] ***************************************************
changed: [default]

PLAY RECAP *********************************************************************
default                    : ok=3    changed=1    unreachable=0    failed=0    skipped=0    rescued=0    ignored=0
You can see a changed=1 in the text, that means NTP service was not running. If we run the same command again we should see changed=0:
$ vagrant provision
==> default: Running provisioner: ansible...
    default: Running ansible-playbook...


PLAY [all] *********************************************************************

TASK [Gathering Facts] *********************************************************

ok: [default]


TASK [Ensure NTP is installed] *************************************************
ok: [default]


TASK [Ensure NTP is running] ***************************************************

ok: [default]

PLAY RECAP *********************************************************************
default                    : ok=3    changed=0    unreachable=0    failed=0    skipped=0    rescued=0    ignored=0
Wrapping up
As you can see using Vagrant with WSL2 on Windows 10 is not quite as straightforward as it would be in a Linux computer or a Linux partition, but heck if it is supposed to work why not try to make it work? For me it took some good Googling around trying everything that users mentioned, it was a lot of reading, but in this post I think I have summarized very well what it needs to make it work. At least with Vagrant version 2.2.19, who knows if a future update breaks everything, but so far I’m not thinking of updating it.
If it works, don’t touch it
Information taken from multiple sources from the internet