Find out everything there’s to know
by Kazim Ali Alvi
Kazim has always been fond of technology, be it scrolling through the settings on his iPhone, Android device, or Windows. And at times, unscrewing the device to take… read more
Updated on
- The UXDService, linked to the NVIDIA graphics driver, often prevents the PC from shutting down and has to be terminated abruptly.
- The problem arises due to corrupt system files or running a bugged version of the driver.
- To fix things, shut down anyway, update the driver, or perform a system restore, amongst other solutions.
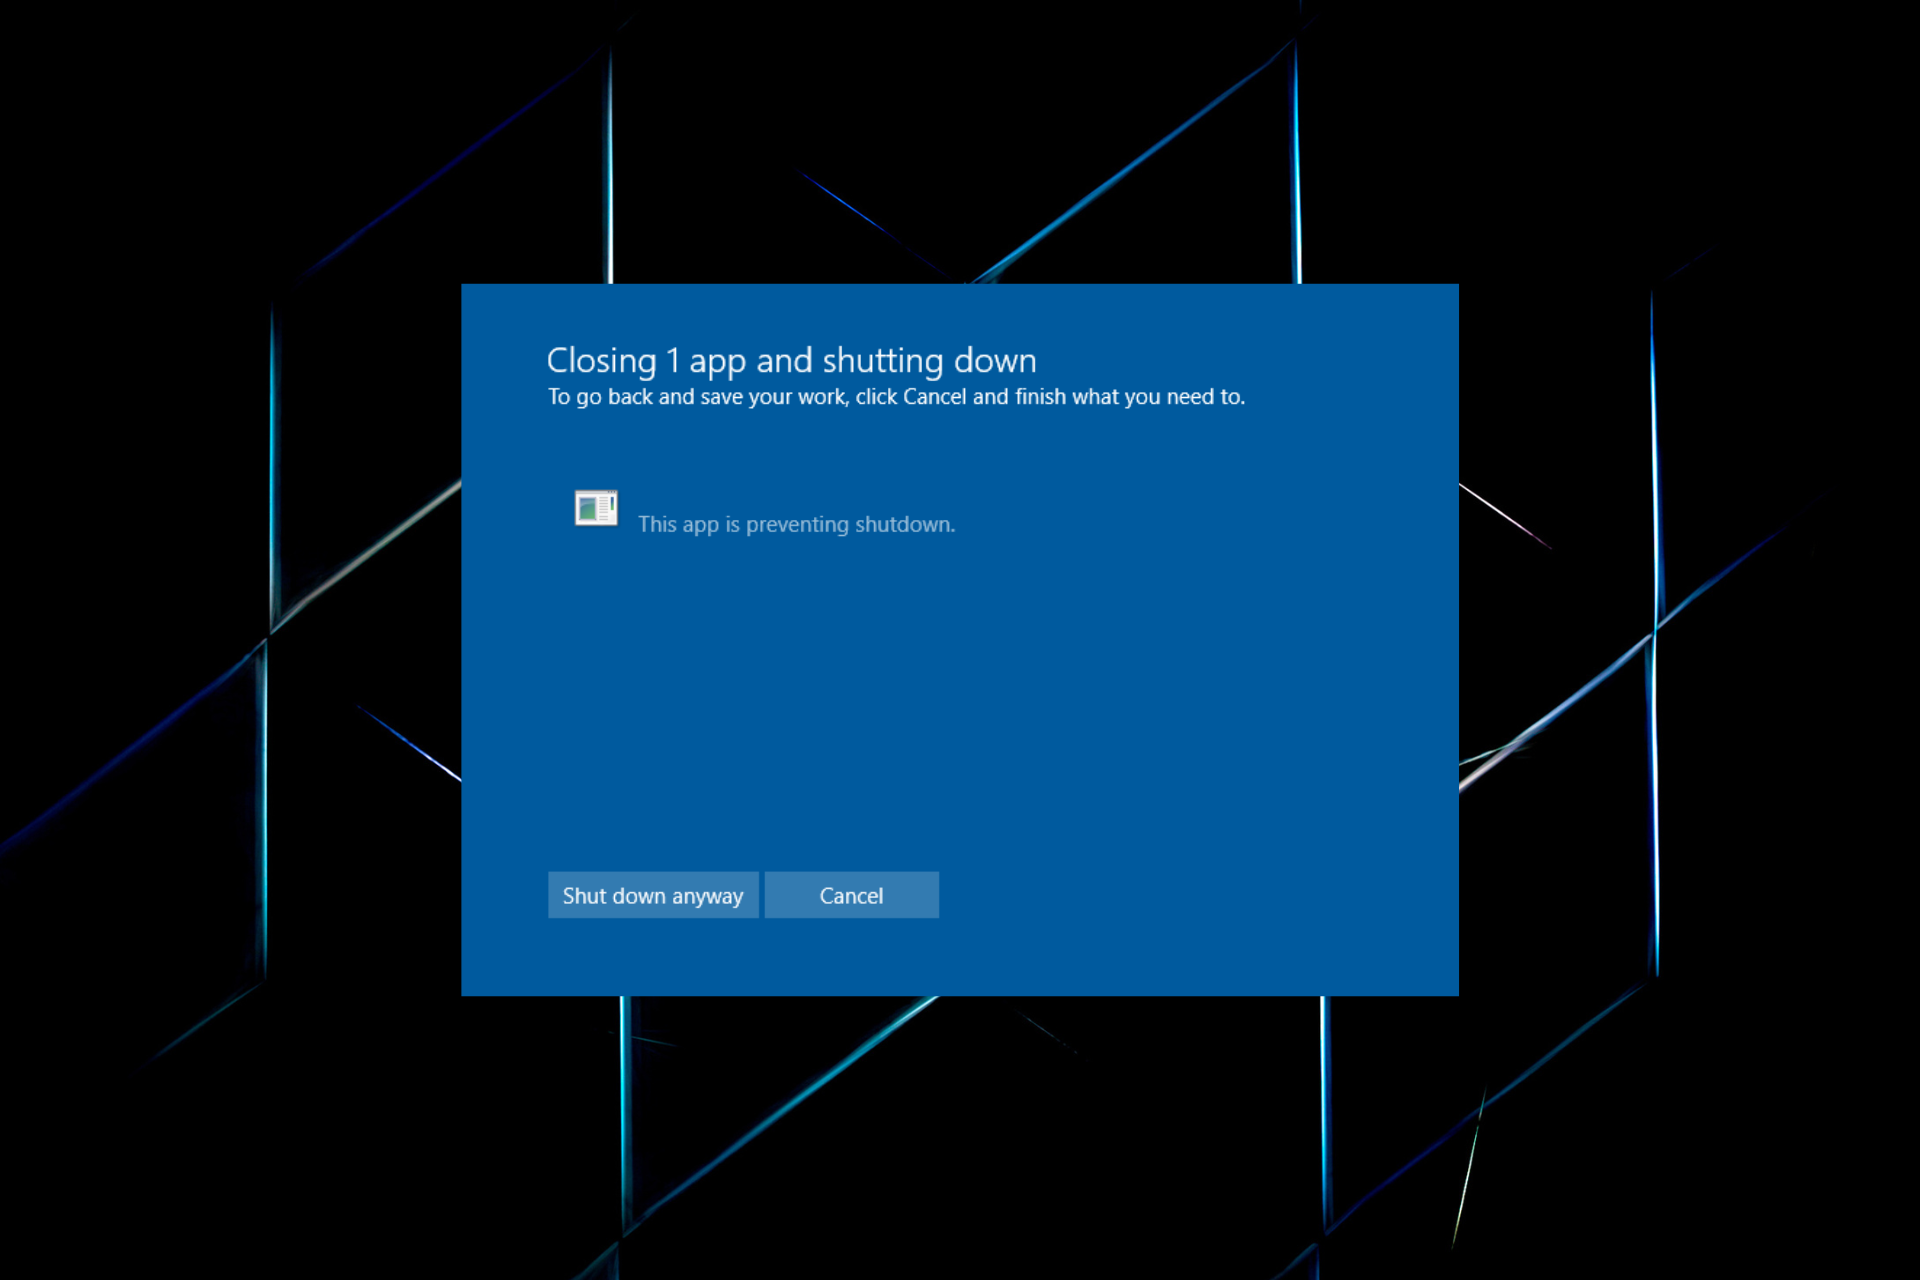
Hundreds of services and processes run on the PC, some built-in while others from third-party programs and drivers. And ideally, they shouldn’t lead to problems, especially shutdown issues. But that’s not always the case, and many reported that uxdservice is preventing shutdown.
Here, when users try to shut down the computer, a popup appears telling them the UXDService running in the background needs to be closed first. And while Windows does that automatically, it takes some time. So, let’s find out how you can get things up and running.
What is UXDService Windows 10?
The UXDService is linked to the NVIDIA graphics drivers, and users with the NVIDIA adapter installed would have it on the PC. As per available information, the process poses no harm and is completely safe to run, but the resulting shutdown issues are a cause of concern.
Here are a few reasons users get the UXDService error in Windows:
- Corrupt system files: For such issues with the PC, it’s often the corrupt system files to blame. These result in several problems and, in some cases, even lead to a BSOD.
- Buggy driver update: In case the problem appeared after updating the NVIDIA drivers, it’s likely a bug in the latest version that’s triggering the message.
- Misconfigured power settings: The power settings on the PC need to be properly configured for the shutdown to go through seamlessly. But third-party apps or even inadvertent changes could lead to misconfigurations here.
How do I fix UXDService errors?
Before we head to the slightly complex solutions, here are a few quick ones to try:
How we test, review and rate?
We have worked for the past 6 months on building a new review system on how we produce content. Using it, we have subsequently redone most of our articles to provide actual hands-on expertise on the guides we made.
For more details you can read how we test, review, and rate at WindowsReport.
- Click on the Shut down anyway button to proceed.
- Check for available Windows updates and install any pending ones.
- Before turning off the computer, check whether uxdservice appears in the Task Manager, and terminate the process.
If none work, move to the fixes listed next.
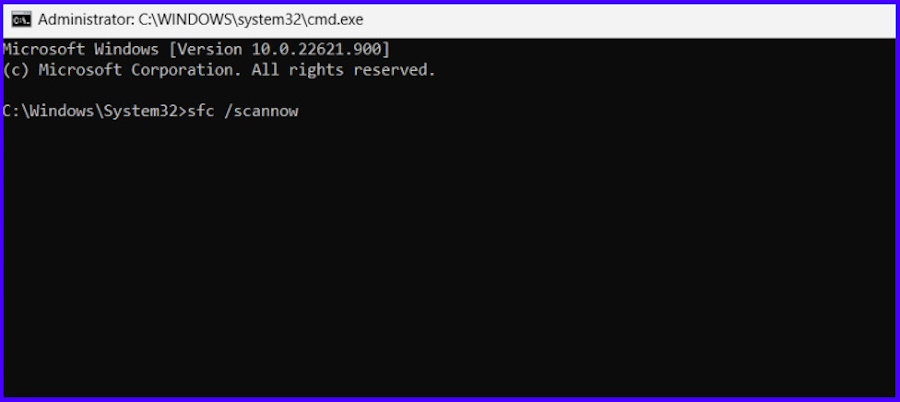
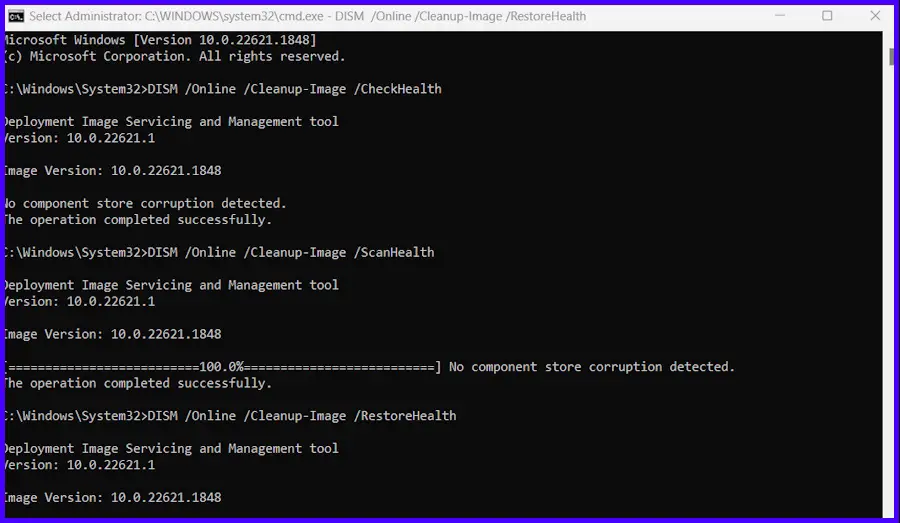
1. Repair the corrupt system files
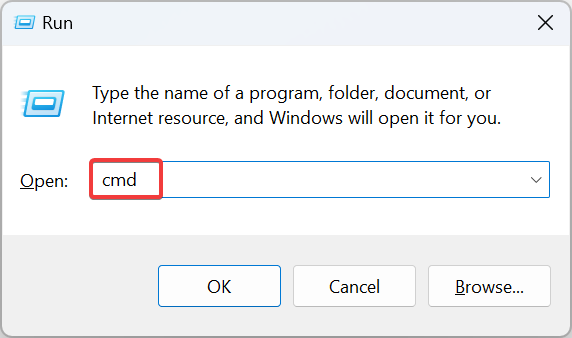
- Press Windows + R to open Run, type cmd, and hit Ctrl + Shift + Enter.

- Click Yes in the UAC prompt.
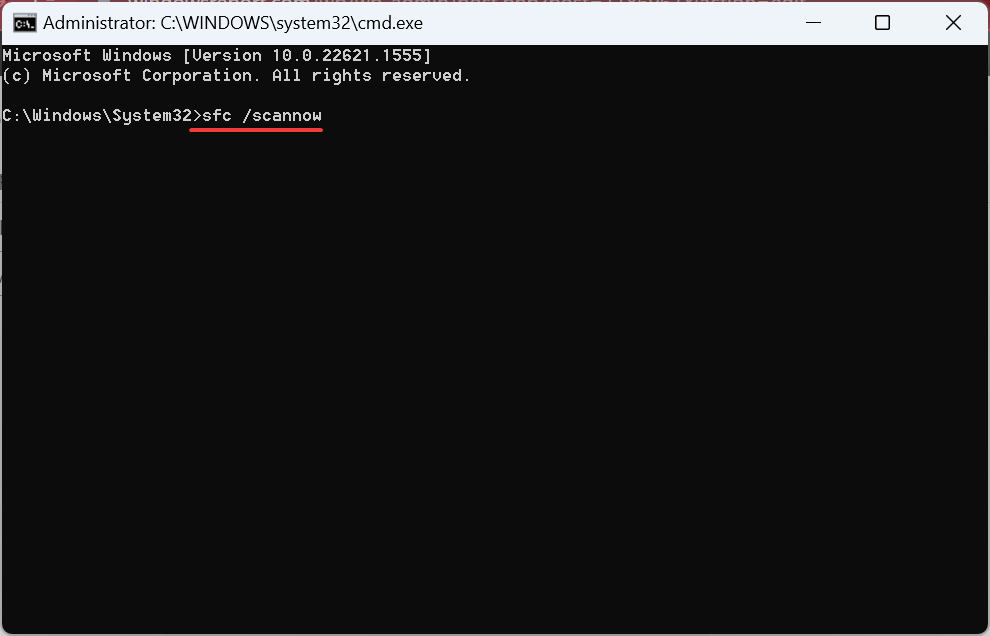
- Paste the following three commands individually and hit Enter after each to run the DISM tool:
DISM /Online /Cleanup-Image /CheckHealthDISM /Online /Cleanup-Image /ScanHealthDISM /Online /Cleanup-Image /RestoreHealth - Now, execute this command for the SFC scan:
sfc /scannow
- Finally, restart the computer for the changes to come into effect.
When faced with the UXDService app error, your primary approach should be to repair the corrupt system files. For this, it’s best to run the DISM tool and SFC scan to get things up and running.
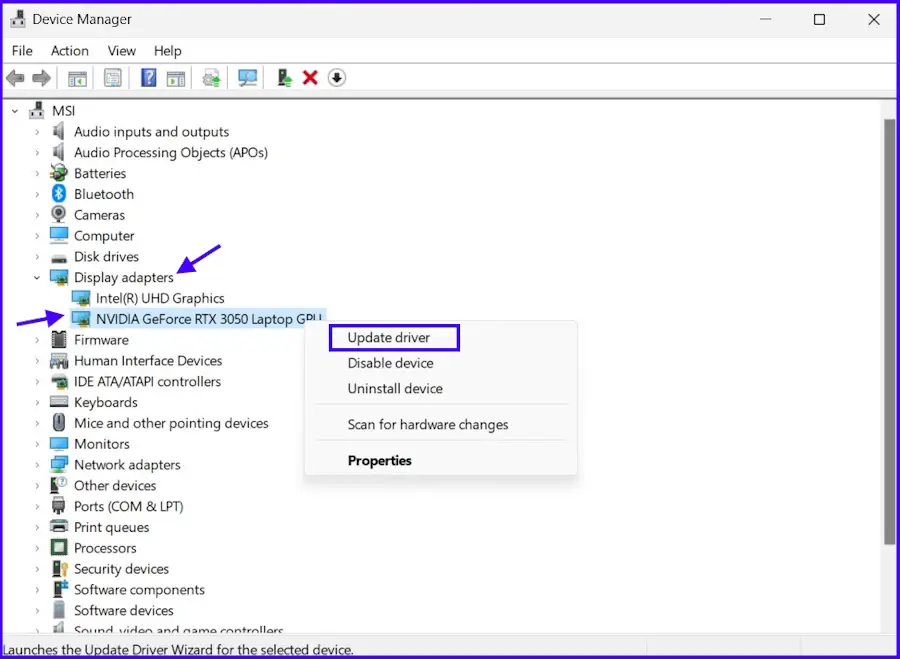
2. Update the graphics driver
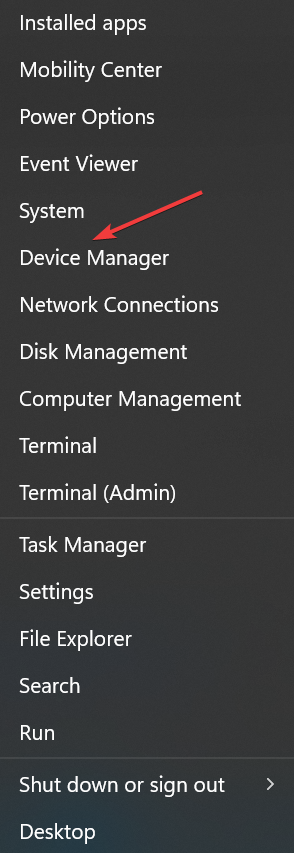
- Press Windows + X to open the Power User menu, and select Device Manager from the list.

- Expand the Display adapters entry, right-click on the NVIDIA graphics adapter, and select Update driver.

- Select Search automatically for drivers and wait for Windows to install the best available driver.

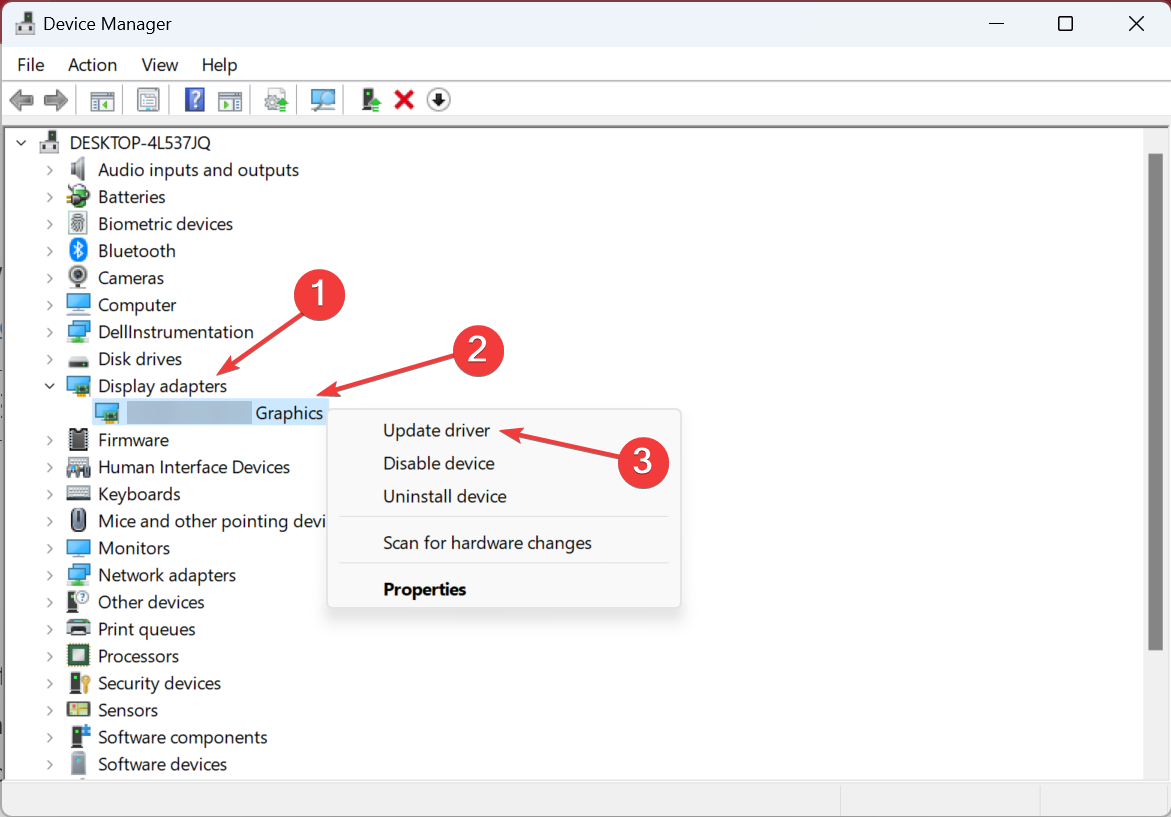
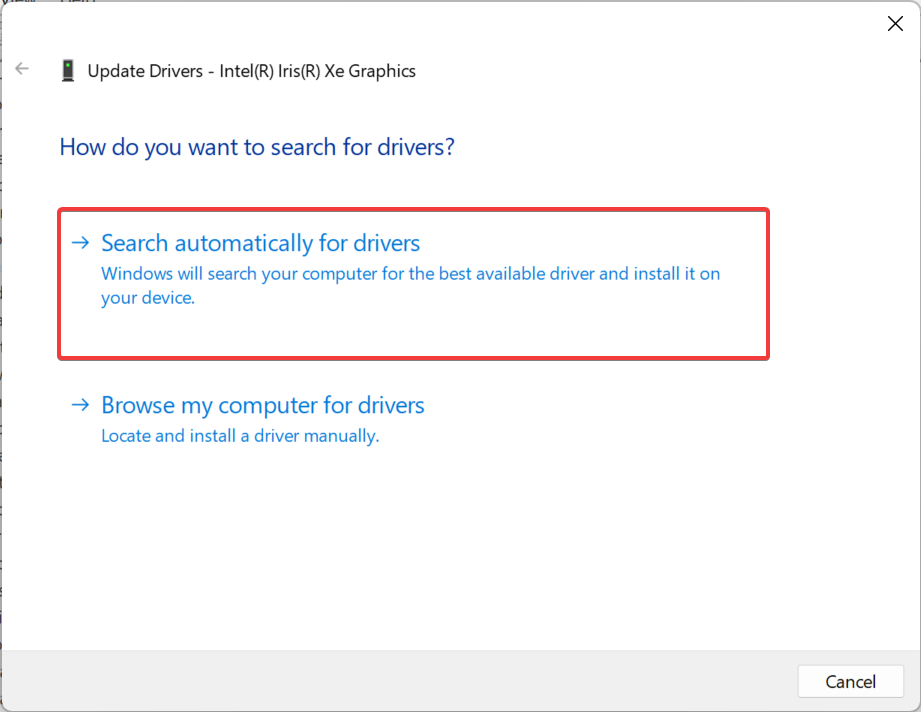
Often, it’s an outdated driver that triggers issues leading to UXDService preventing shutdown. And in this case, an ideal approach should be to update the graphics driver. If a better version can’t be found locally, you can always manually install the latest driver from NVIDIA’s website.
Besides manually installing your driver versions, you can use dedicated software like Outbyte Driver Updater to automatically get the latest updates for your outdated or missing drivers.
⇒ Get Outbyte Driver Updater
3. Roll-back graphics driver update
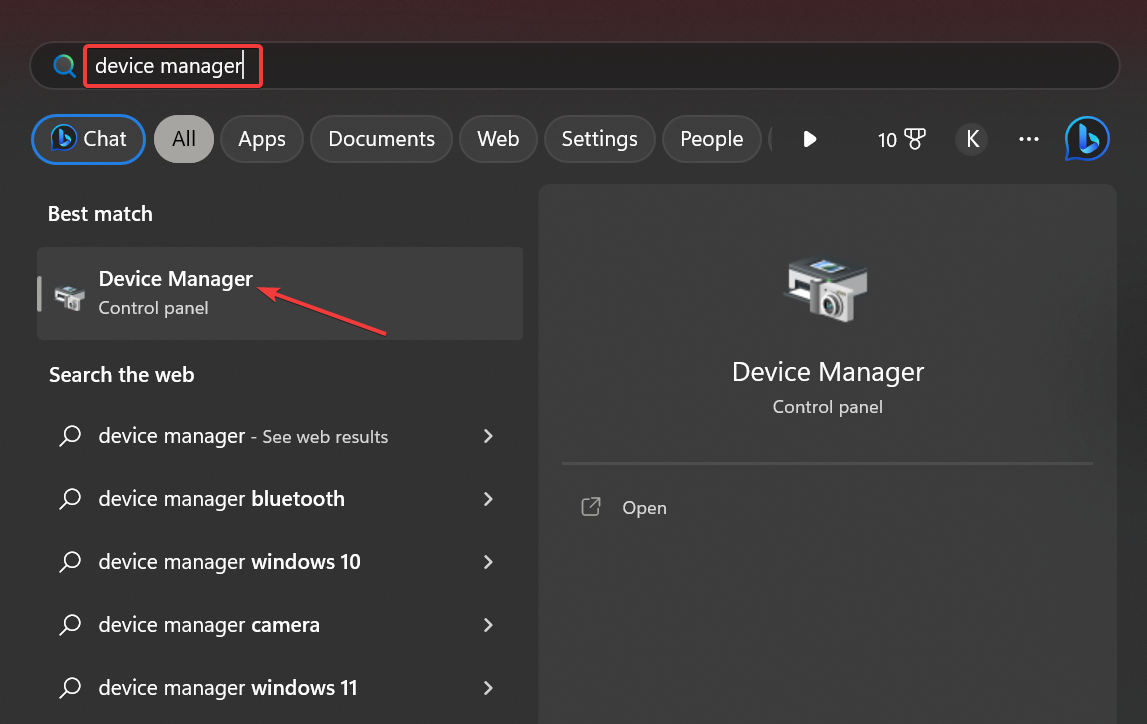
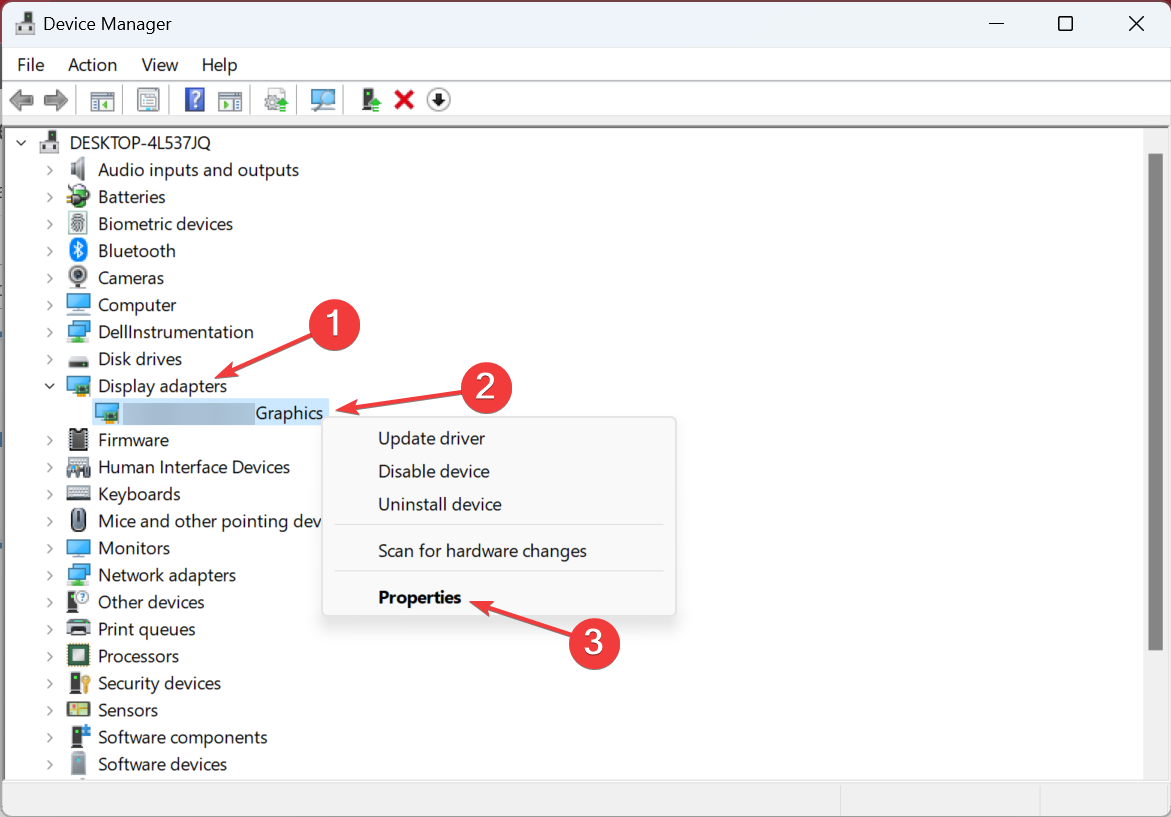
- Press Windows + S to open Search, type Device Manager in the text field, and click on the relevant search result.

- Double-click the Display adapters entry, right-click on the NVIDIA adapter, and choose Properties.
- Navigate to the Drivers tab, and click on Roll Back Driver.

- Select a reason for rolling back or enter one in the text field, and click on Yes to continue.

- Once done, restart the computer for the changes to apply.
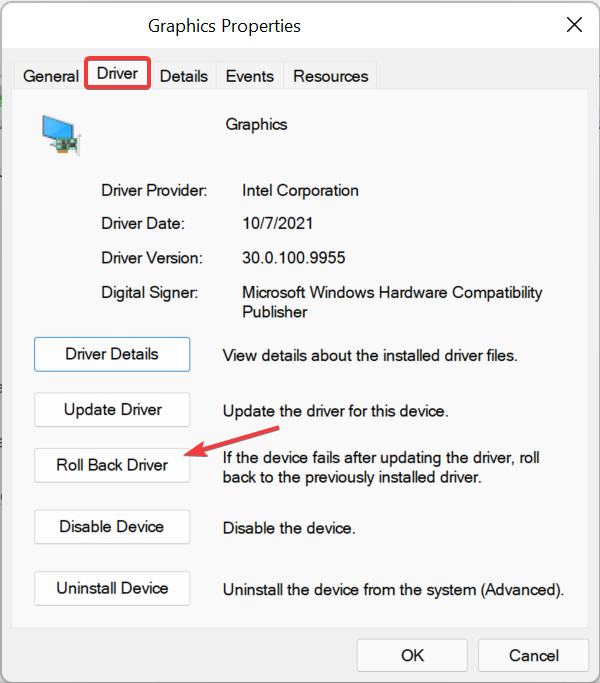
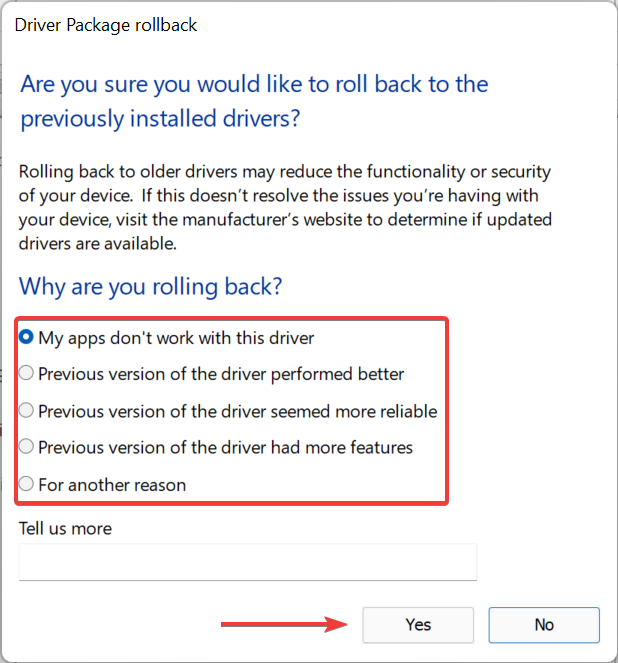
For many users getting the UXDService error shutdown, it was a bug in the latest NVIDIA driver that led to the issue. So, roll back to the previous driver version, then disable automatic updates, and wait for a new version with a patch to be released.
- Fix: Set Time Zone Automatically Defaults to Wrong Time Zone
- 0X8007013 Install Error: How to Quickly Fix it
- Fix: Internet Keeps Disconnecting When Playing Games on Windows 11
- Fix: Monitor is Stuck at 60Hz on Windows 11
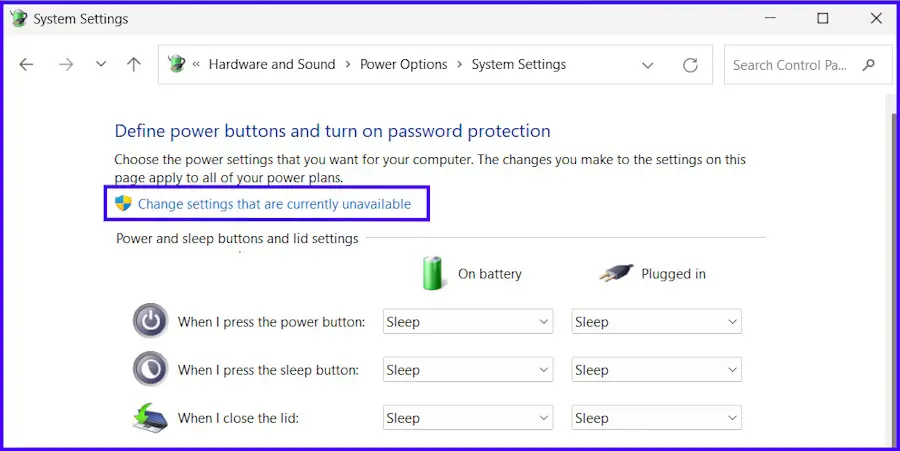
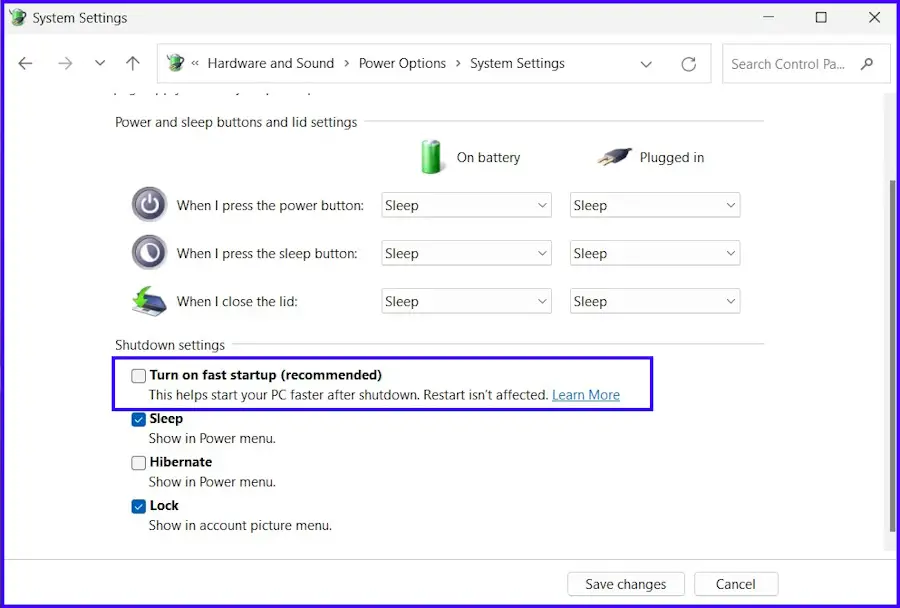
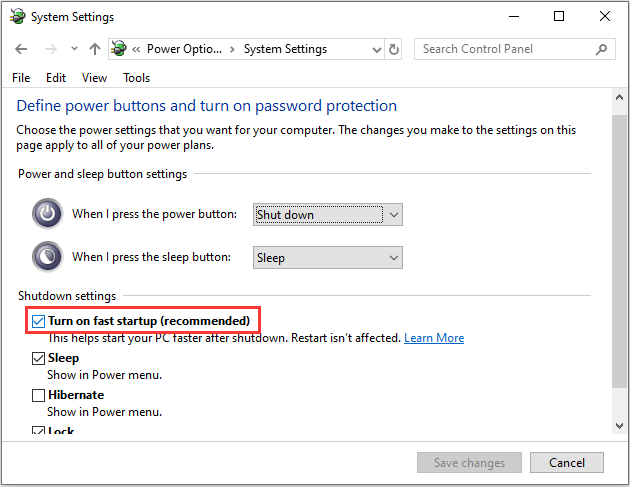
4. Disable fast startup
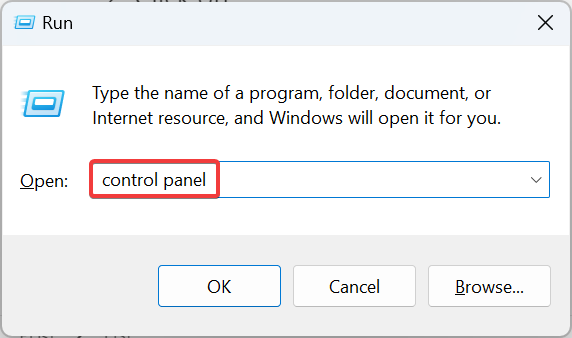
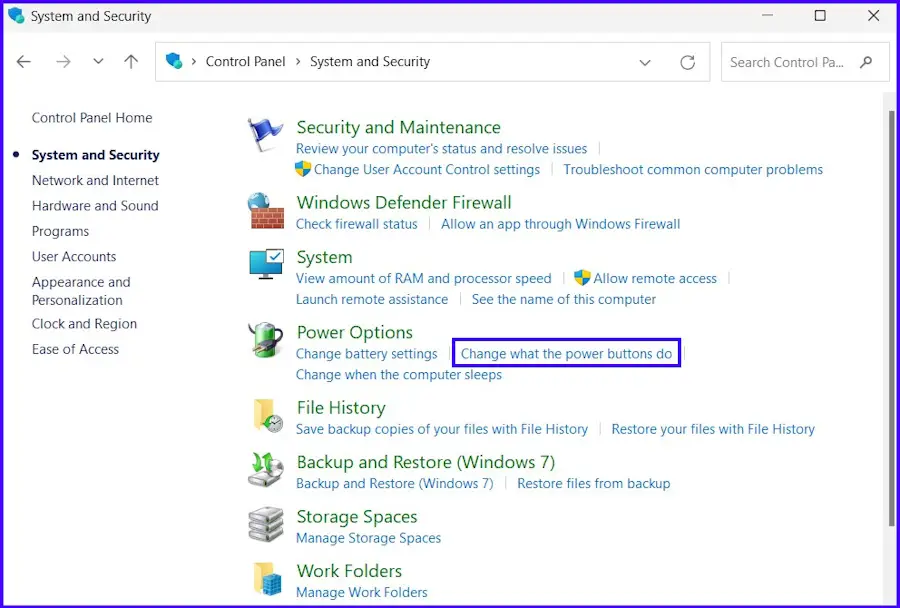
- Press Windows + R to open Run, type control panel in the text field, and hit Enter.
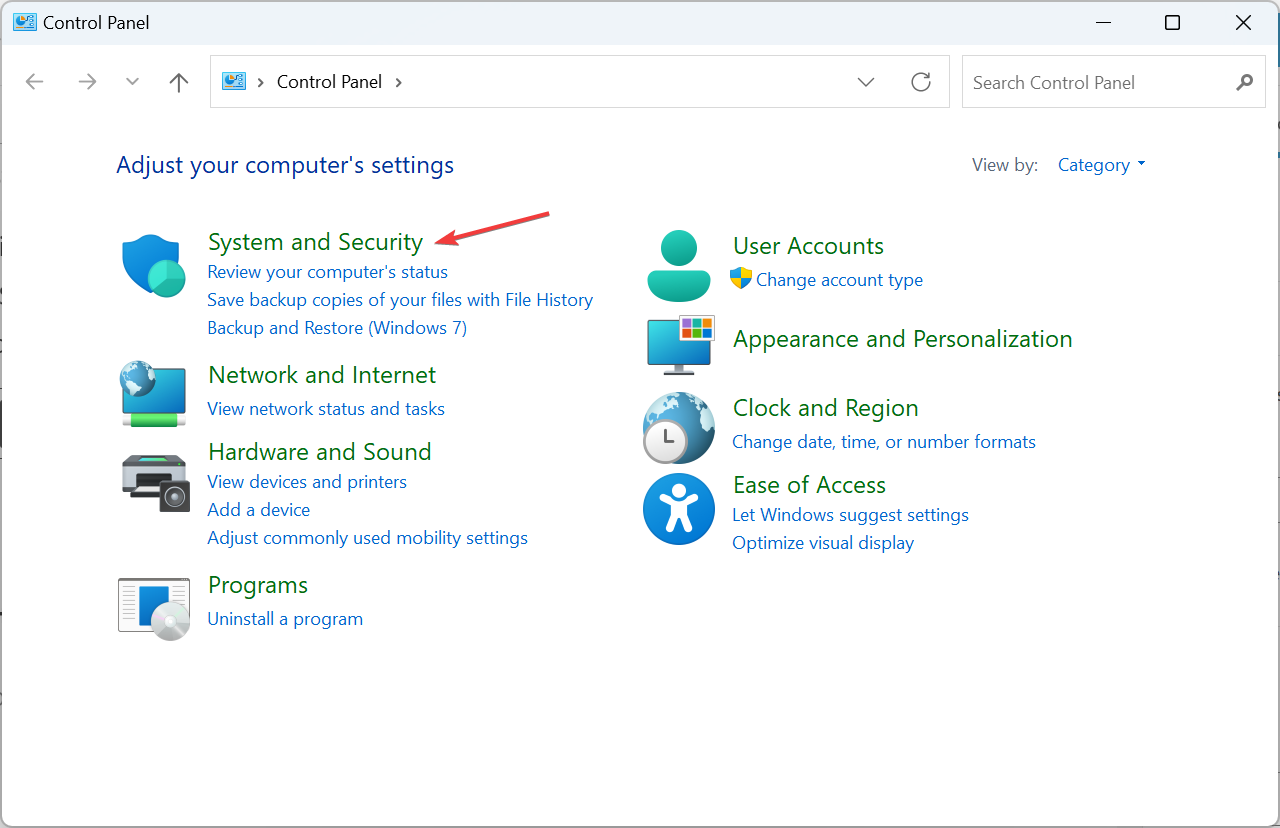
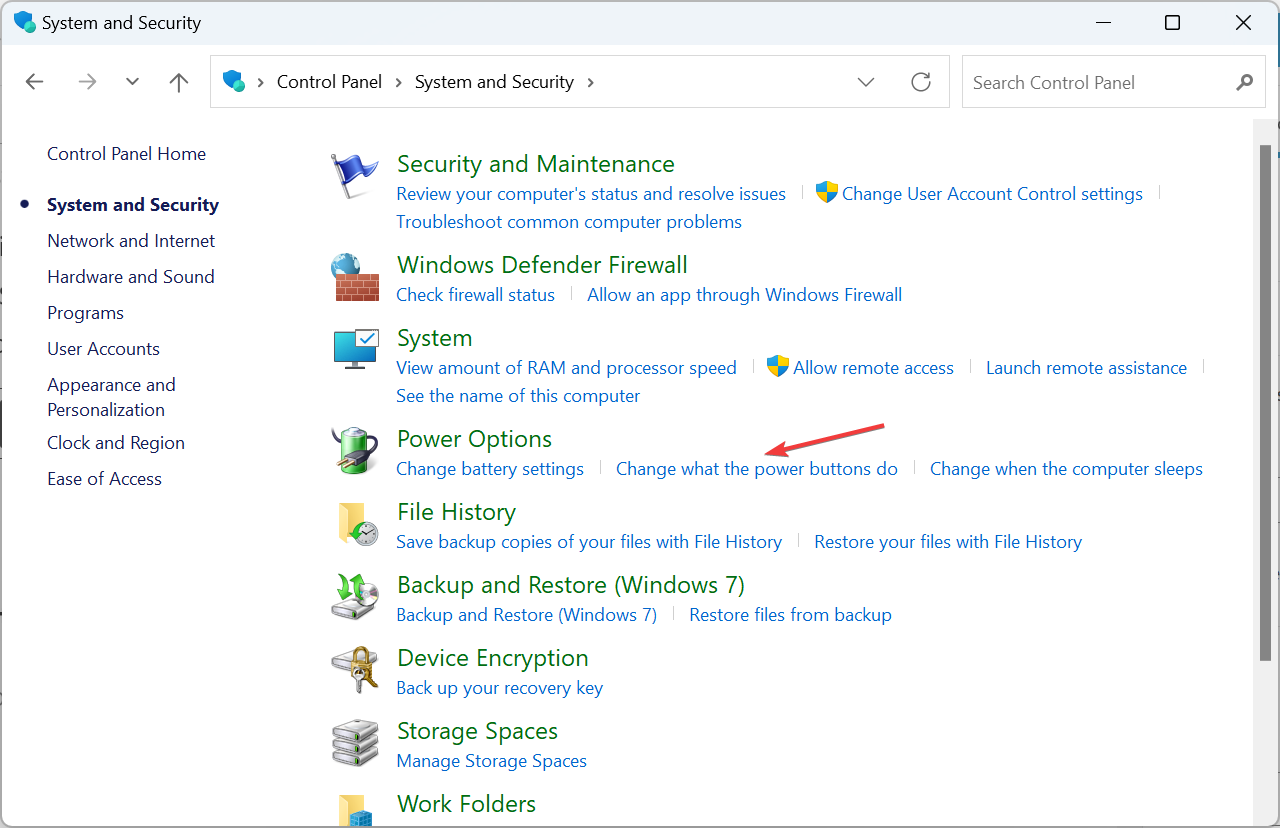
- Click on System and Security.

- Click Change what the power buttons do under Power options.
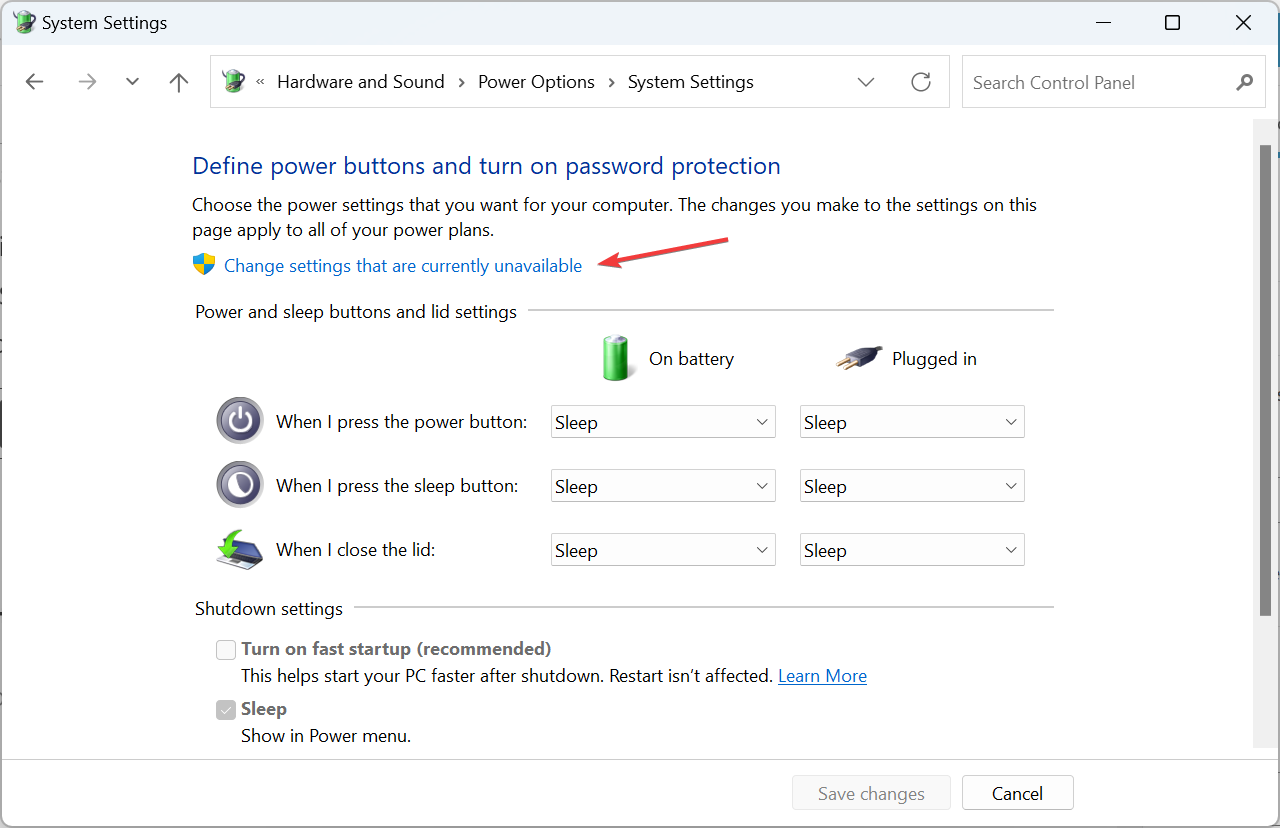
- Now, click on Change settings that are currently unavailable.
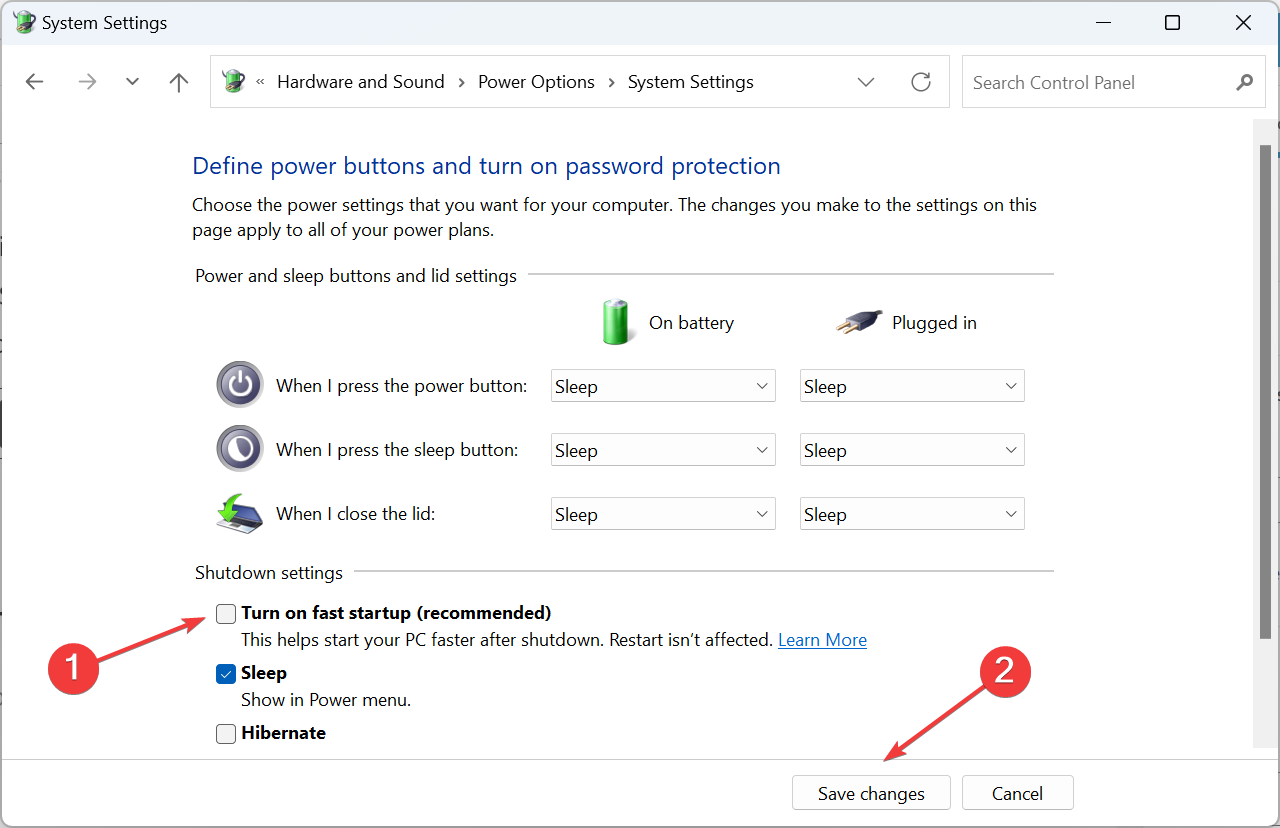
- Untick the checkbox for Turn on fast startup, and click on Save changes.
Some users also found Fast Startup, a built-in feature to turn on the PC faster a shutdown, being responsible for UXDService preventing shutdown in Windows 10, and disabling it did the trick.
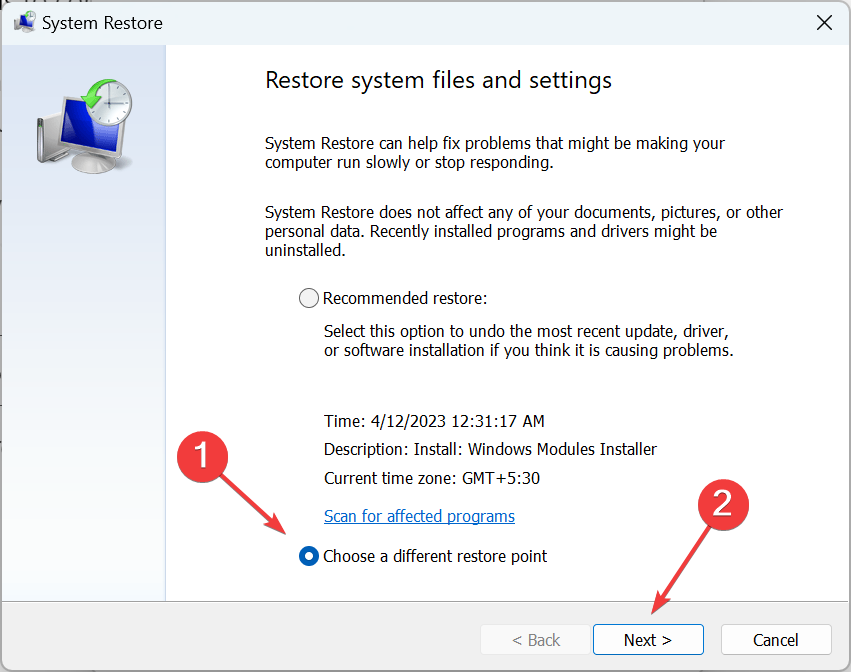
5. Perform a system restore
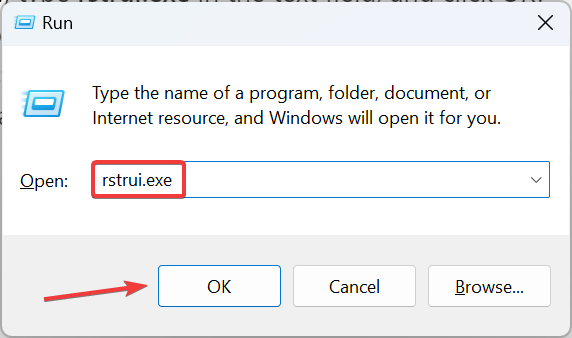
- Press Windows + R to open Run, type rstrui.exe in the text field, and click OK.
- Select Choose a different restore point and click Next to proceed.

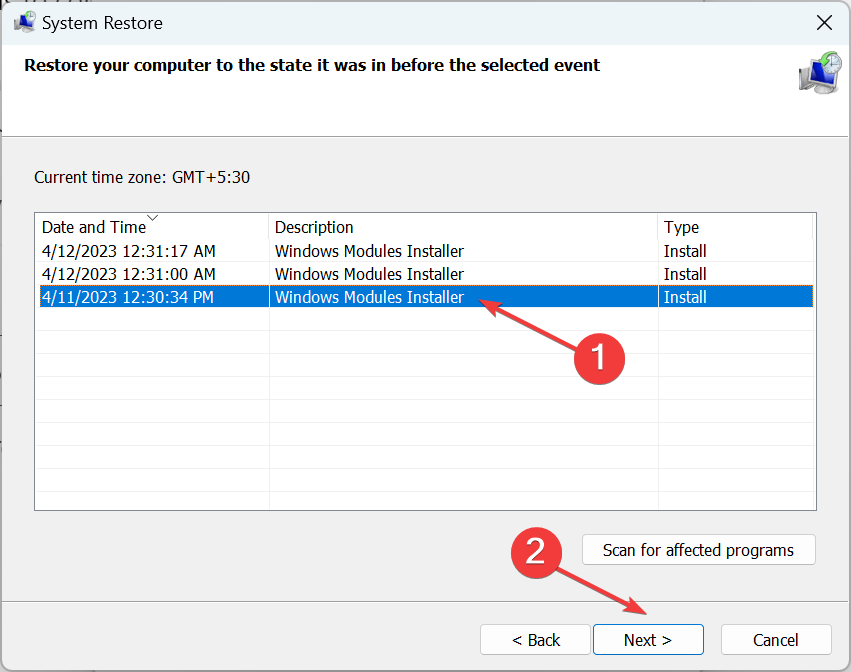
- Pick a restore point from the list and click Next.
- Now, verify the restore details, then click on Finish, and wait for the process to complete.
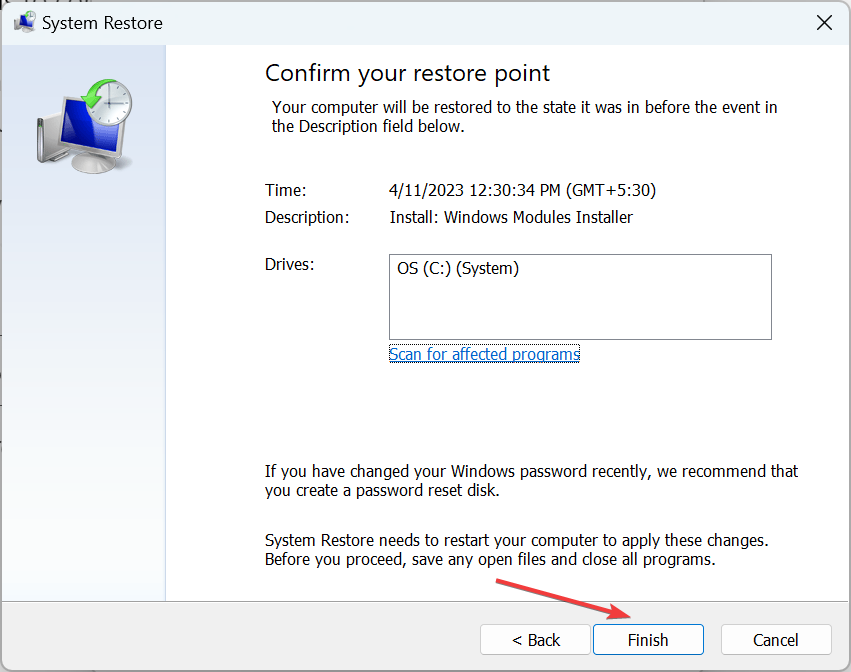
That’s it! After the system restore, the UXDService shutdown error should be fixed for good in case a recent system change causes it. And the best part, you don’t lose any files in the process, though some recent apps might be removed.
Before you leave, check how to set up a shutdown timer and create a shutdown key in Windows.
For any queries or to share which solution worked for you, drop a comment below.
![]()
Uxdservice — это сервис, предназначенный для управления и поддержания интерфейса пользовательского опыта в операционной системе Windows 10. Он является частью операционной системы и отвечает за отображение и активацию различных элементов интерфейса, таких как кнопки, панели инструментов, меню и др.
Основная задача Uxdservice заключается в обеспечении пользовательского опыта, который был разработан и спроектирован командой Microsoft. Он гарантирует правильное отображение интерфейса и позволяет пользователям взаимодействовать с операционной системой удобным и интуитивно понятным способом.
Uxdservice работает в фоновом режиме и активируется при запуске операционной системы. Он контролирует все элементы интерфейса и отвечает за их обновление и отображение. Сервис регулярно обновляется и совершенствуется для обеспечения удобного и эффективного пользовательского опыта на Windows 10.
Важно отметить, что Uxdservice работает только на операционной системе Windows 10 и является неотъемлемой частью интерфейса. Он позволяет пользователям взаимодействовать с компьютером, запускать программы, работать с файлами и многими другими функциями, что делает его незаменимым компонентом операционной системы Windows 10.
Содержание
- Что такое Uxdservice?
- Основные принципы работы
- Установка и настройка на Windows 10
Что такое Uxdservice?
Uxdservice использует различные способы, чтобы собирать информацию о взаимодействии пользователя, включая запись данных о нажатиях клавиш, использовании мыши, действий с файлами и программами, а также сетевой активности. Эта информация позволяет разработчикам получить представление о том, как пользователи используют операционную систему и выявить потенциальные проблемы или улучшения, которые могут быть сделаны.
Важно отметить, что Uxdservice собирает данные только в анонимной форме и не связывает их с конкретным пользователем или компьютером. Это делается для защиты конфиденциальности и безопасности пользователей.
Наконец, пользователи имеют возможность отключить Uxdservice, если они не хотят, чтобы их данные были собраны и использованы. Для этого нужно зайти в настройки операционной системы и отключить соответствующую опцию.
| Преимущества Uxdservice: | Недостатки Uxdservice: |
|---|---|
| Позволяет улучшить пользовательский опыт | Может потреблять ресурсы компьютера |
| Помогает выявить и исправить проблемы операционной системы | Некоторые пользователи могут считать это нарушением приватности |
| Собирает данные только в анонимной форме |
Основные принципы работы
Uxdservice работает в режиме фоновой службы и выполняет свои функции в области сбора данных о работе операционной системы. Также она отвечает за отправку этих данных на серверы Microsoft, где они используются для анализа и дальнейшего улучшения работы операционной системы.
Uxdservice работает на операционной системе Windows 10 по умолчанию и запускается автоматически при включении компьютера. Это обеспечивает постоянный сбор данных о работе компьютера и операционной системы, что позволяет Microsoft более эффективно улучшать работу Windows 10 в целом.
Для работы Uxdservice требуются некоторые системные ресурсы компьютера, включая процессорное время и оперативную память. Однако эти ресурсы обычно не заметны для пользователя и не влияют на общую производительность компьютера.
Важно отметить, что Uxdservice анонимизирует данные, собранные о работе компьютера, перед отправкой на серверы Microsoft. Это означает, что данные не могут быть идентифицированы с конкретным пользователем и не содержат личной информации. Microsoft строго соблюдает политику конфиденциальности и обязуется использовать эти данные только для анализа и улучшения работы операционной системы.
Таким образом, основными принципами работы Uxdservice являются: сбор данных о работе операционной системы, отправка этих данных на серверы Microsoft, анонимизация данных для обеспечения конфиденциальности пользователей и использование данных для анализа и улучшения работы операционной системы Windows 10.
Установка и настройка на Windows 10
Для установки и настройки утилиты Uxdservice на операционной системе Windows 10 следуйте простым шагам ниже:
- Перейдите на официальный веб-сайт разработчика и скачайте исполняемый файл установки Uxdservice.
- Как только файл загружен, запустите его, следуя инструкциям мастера установки.
- После установки Uxdservice автоматически запустится при каждом запуске Windows 10. Если этого не произошло, вручную запустите программу из меню Пуск.
После установки Uxdservice на Windows 10 вы можете настроить параметры программы согласно вашим потребностям. Для этого выполните следующие шаги:
- Откройте программу Uxdservice, щелкнув на ярлык на рабочем столе или в меню Пуск.
- В окне программы найдите пункт «Настройки» и выберите его.
- В разделе «Настройки» вы сможете изменить различные параметры, такие как язык интерфейса, автозапуск при старте Windows 10, уведомления и многое другое.
- После внесения необходимых изменений сохраните настройки и перезапустите программу для применения новых параметров.
Теперь у вас установлена и настроена утилита Uxdservice на операционной системе Windows 10. Вы можете использовать ее для оптимизации и улучшения пользовательского интерфейса вашего компьютера.
Microsoft Windows runs hundreds of programs at a time. Some of these programs are built-in, while others are third-party programs. Ideally, all these programs running alongside shouldn’t lead to any issues. But there are exceptions with issues like the “UXDService Preventing Shutdown.”
With the “UXDService Preventing Shutdown” error, users get a pop-up while trying to shut down their Windows computer, telling them the UXDService is running in the background and needs to be closed first.
While Windows eventually closes it automatically, it takes time. It may even take five to ten minutes to shut down your PC. So, in the following guide, we have discussed the UXDService and a few workarounds to resolve it.
Read Next: How Do I Change Outlook To Classic View
Well, the UXDService is an issue that first appeared in 2020. It not only blocks the restart or shutdown constantly, but it does appear every time until it’s fixed.
The fix is also tricky, as it does not appear in the Task Manager under the “Processes” tab.
Usually, the UXDService issues are linked to the NVIDIA graphics drivers and adapters. According to available information, this particular issue poses no threat to your computer but delays shutdown or restart significantly, which may be of concern.
The following causes are responsible for the UXDService issues on Windows computers in most cases. Take a look.
- The corrupted system files are one of the primary causes of the UXDService error.
- Buggy driver update can also result in the UXDService error. If the problem has started appearing after the NVIDIA driver update, you should check it out.
- While it may not be the primary cause, misconfigured Power settings can also cause the issue. The shutdown process on your computer should have gone through seamlessly, but third-party apps or even inadvertent changes are causing a stir.
Fix the “UXDService Preventing Shutdown” Issue
Technically, closing all running programs is recommended before initiating a Windows shutdown or restart. So, try closing all the programs before initiating the shutdown or restart, and if the UXDService error still appears, follow the troubleshooting tips below.
1. Disable Fast Startup
Fast Startup can cause a lot of problems, as it involves saving system information in a file, which can get damaged easily or cause stability issues on your computer.
Fast Startup is also known for causing the UXDService error. So, try turning off the feature. Here are the steps.
- Press the Win + R keys to launch the RUN dialogue box.
- Type Control Panel in the box and hit Enter.
- Select System and Security in the “Control panel” window.
- Click Change What The Power Buttons Do under “Power Options.”
- After that, click the Change Settings that are Currently Unavailable option.
- Uncheck the Turn on Fast Startup box.
- Click Save Changes.
After that, close the window. Now, you should be able to shut down or restart your computer seamlessly if Fast Startup was indeed the cause.
2. Run Power Troubleshooter (Only for Windows 10)
Misconfigured Power Settings or a power-related bug can often prevent Windows from shutting down or restarting. So, the built-in power troubleshooter can be helpful here, but it will only work on Windows 10, as Windows 11 doesn’t have this option.
- Press the Win + I keys to launch Windows Settings.
- Navigate to Update & Security and select Troubleshoot.
- Scroll down, locate Power, and click Run the Troubleshooter button.
The troubleshooter utility will immediately start detecting issues with the power settings on your PC. If any issues are detected, click Apply to fix them. Restart your computer afterward to check if the UXDService issue is fixed.
3. Run SFC & DISM Scans
Corrupted or missing system files can also be concerning as they can cause multiple issues, including the UXDService error. So, you should, at least, once run the SFC and DISM scans.
SFC or System File Checker is a built-in tool for replacing and fixing damaged, lost, or changed system files. Here are the steps to run it.
- Press the Win + R keys to launch the RUN dialogue box.
- Type cmd in the box and hit Ctrl + Shift + Enter to launch Command Prompt with administrator rights.
- Type the following command in the Command Prompt window and hit Enter to execute.
sfc /scannow
If the SFC scan fails to repair the corrupted system files, you need to run th DISM scan. The DISM scan repairs the system image. Here are the steps.
- Press the Win + R keys to launch the RUN dialogue box.
- Type cmd in the box and hit Ctrl + Shift + Enter to launch Command Prompt with administrator rights.
- Type the following commands in the Command Prompt window and hit Enter to execute after each one.
DISM /Online /Cleanup-Image /CheckHealth
DISM /Online /Cleanup-Image /ScanHealth
DISM /Online /Cleanup-Image /RestoreHealth
After executing the DISM commands, run the SFC Scan again and restart the computer afterward.
4. Update NVIDIA Graphics Driver
In most cases, the UXDService error is related to the NVIDIA graphics driver. So, if none of the solutions are working, try updating your NVIDIA driver to fix the issue.
- Press the Win + R keys to launch the RUN dialogue box.
- Type devmgmt.msc in the box and hit Enter to launch Device Manager.
- Locate and expand the Display Adapters option and right-click your NVIDIA Graphics Card.
- Select the Update Driver option from the drop menu.
- Click the Search Automatically for Updated Software option on the popped-up box.
After that, the process will continue automatically. However, if this method doesn’t work, we recommend directly updating your NVIDIA graphics driver from NVIDIA’s website.
5. Roll-back Graphics Driver Update
While updating the NVIDIA graphics driver is one of the best ways to resolve the UXDService error, it can also have an adverse effect.
Several users have reported they started getting the UXDService error only after updating the graphics driver. So, if the same thing has happened to you, you need to roll back the graphics driver update.
- Press the Win + R keys to launch the RUN dialogue box.
- Type devmgmt.msc in the box and hit Enter to launch Device Manager.
- Locate and expand the Display Adapters option and right-click your NVIDIA Graphics Card.
- Select Properties from the drop menu.
- Navigate to the Driver tab and click the Roll Back Driver option.

- You have to choose a reason for rolling back the driver or enter a reason in the text field.
- After that, click Yes to continue.
Lastly, restart your computer to apply the changes. If the latest NVIDIA graphics driver was indeed the cause of the error, rolling back, the driver should ease the issue, and you need to wait for the next version of the graphics driver.
6. Run Windows System Restore
If the UXDServicve error is persistent and none of the previous methods have worked, you need to perform a System Restore.
It’s a reliable and effective method, and it works. System Restore reverts your system to an older state. While Windows automatically creates system restore points before major system changes, it helps if you have manually created one. Most of the time, the auto system restore point is not the user’s primary choice.
If you still want to give it a try, check or article to successfully conduct a System Restore.
Summing Up
So, we believe you got the answer to “What is UXDService.” The UXDService issue is not your typical error.
You can still run your computer seamlessly, and work on stuff, play games. The problem will occur when you are trying to shut down or restart the computer. However, the fixes are pretty simple; we have listed them in our post.
So, check them out and drop a comment below if you have further questions.
ИксУСТАНОВИТЬ НАЖМИТЕ НА СКАЧАТЬ ФАЙЛ
Fortect — это инструмент восстановления системы, который может сканировать всю вашу систему на наличие поврежденных или отсутствующих файлов операционной системы и автоматически заменять их рабочими версиями из вашего репозитория. Увеличьте производительность вашего ПК за три простых шага:
- Скачайте и установите Фортектна твоем компьютере
-
Запустите инструмент иНачать сканирование
-
Щелкните правой кнопкой мыши наИсправитьи исправим это за несколько минут
- 0читатели уже скачали Fortect в этом месяце
На ПК запускаются сотни служб и процессов, некоторые из которых встроены, а другие — из сторонних программ и драйверов. И в идеале они не должны вызывать проблем, особенно проблем с выключением. Но это не всегда так, и многие сообщают, что uxdservice предотвращает завершение работы.
Здесь, когда пользователи пытаются выключить компьютер, появляется всплывающее окно, сообщающее им, что сначала необходимо закрыть UXDService, работающий в фоновом режиме. И хотя Windows делает это автоматически, это занимает некоторое время. Итак, давайте выясним, как можно добиться успеха.
UXDService привязан к графическим драйверам NVIDIA, и пользователи с установленным адаптером NVIDIA будут иметь его на ПК. Судя по доступной информации, процесс не представляет никакого вреда и его запуск полностью безопасен, однако возникающие в результате проблемы с завершением работы вызывают беспокойство.
Вот несколько причин, по которым пользователи получают ошибку UXDService в Windows:
- Поврежденные системные файлы: В таких проблемах ПК часто виноваты поврежденные системные файлы. Это приводит к различным проблемам, а в некоторых случаях даже к BSOD.
- Ошибка обновления драйвера: Если проблема возникла после обновления драйверов NVIDIA, скорее всего, сообщение вызвано ошибкой в последней версии.
- Неправильно настроены параметры питания: Параметры электропитания ПК должны быть настроены правильно, чтобы выключение прошло гладко. Но сторонние приложения или даже случайные изменения могут привести к ошибкам конфигурации.
Как исправить ошибки UXDService?
Прежде чем мы перейдем к немного сложным решениям, вот несколько быстрых, которые стоит попробовать:
- Нажать навсе равно закрытькнопку, чтобы продолжить.
- Проверьте наличие доступных обновлений Windows и установите ожидающие.
- Прежде чем выключить компьютер, проверьте,UXD-сервиспоявляется в диспетчере задач и завершает процесс.
Если ни одно из них не помогло, перейдите к исправлениям, перечисленным ниже.
1. Восстановите поврежденные системные файлы.
- Нажмите Windows + R, чтобы открыть «Выполнить», введитеcmdи нажмите Ctrl + Shift + Enter.
- НажмитеАгапо подсказке UAC.
- Вставьте следующие три команды по отдельности и нажмите Enter после каждой, чтобы запустить инструмент DISM:
DISM /Online /Cleanup-Image /CheckHealthDISM /Online /Cleanup-Image /ScanHealthDISM /Online /Cleanup-Image /RestoreHealth - Теперь запустите эту команду для сканирования SFC:
sfc /scannow - Наконец, перезагрузите компьютер, чтобы изменения вступили в силу.

При возникновении ошибки приложения UXDService основное внимание должно быть сосредоточено на восстановлении поврежденных системных файлов. Для этого лучше запустить инструмент DISM и сканирование SFC, чтобы все заработало.
2. Обновите графический драйвер.
- Нажмите Windows + X, чтобы открыть меню опытного пользователя, и выберитеАдминистратор устройствасписка.
- РазвернутьВидеоадаптерызапись, щелкните правой кнопкой мыши графический адаптер NVIDIA и выберитеОбновить драйвер.
- ВыбиратьАвтоматический поиск драйверови подождите, пока Windows установит лучший доступный драйвер.


Часто именно устаревший драйвер вызывает проблемы, которые приводят к тому, что UXDService предотвращает завершение работы. И в этом случае идеальным подходом должно быть обновление графического драйвера. Если вы не можете найти лучшую версию локально, вы всегда можете вручную установить последнюю версию драйвера с сайта.веб-сайт NVIDIA.
Помимо установки версий драйверов вручную, вы можете использовать специальное программное обеспечение, такое как DriverFix, для автоматического получения последних обновлений для устаревших или отсутствующих драйверов.
⇒ Получить DriverFix
3. Откат обновления графического драйвера
- Нажмите Windows + S, чтобы открыть поиск, введитеАдминистратор устройствав текстовом поле и щелкните соответствующий результат поиска.
- Дважды щелкните поВидеоадаптерывход, щелкните правой кнопкой мыши адаптер NVIDIA и выберитеХарактеристики.
- Перейдите на вкладку «Драйверы» и нажмитеРезервное копирование драйвера.
- Выберите причину отката или введите ее в текстовое поле и нажмитеАгаПродолжать.
- Как только это будет сделано, перезагрузите компьютер, чтобы изменения вступили в силу.


Для многих пользователей, получивших ошибку завершения работы UXDService, причиной проблемы была ошибка в последней версии драйвера NVIDIA. Поэтому откатитесь на предыдущую версию драйвера, затем отключите автоматическое обновление и дождитесь выхода новой версии с патчем.
- wtsapi32.dll отсутствует – как исправить или скачать заново
- Wbengine.exe: что это такое и как исправить ошибки
- Это устройство не запускается (код 10): 5 способов исправить
- Решение: переустановите драйверы для этого устройства (код 18).
- D3dx9_41.dll не найден: 4 способа исправить
4. Отключите быстрый запуск
- Нажмите Windows + R, чтобы открыть «Выполнить», введитепанель управленияв текстовом поле и нажмите Enter.
- Нажмите наСистема безопасности.
- НажмитеИзмените действие кнопок питанияв параметрах электропитания.
- Теперь нажмитеИзменить настройки, которые в данный момент недоступны.
- Снимите флажок, чтобыАктивировать быстрый запуски нажмите «Сохранить изменения».


Некоторые пользователи также обнаружили быстрый запуск, встроенную функцию, позволяющую включать компьютер быстрее, чем его выключение, отвечая за то, чтобы UXDService предотвращал завершение работы в Windows 10, и ее отключение сработало.
5. Выполните восстановление системы
- Нажмите Windows + R, чтобы открыть «Выполнить», введитеrstrui.exeв текстовом поле и нажмите «ОК».
- ВыбиратьВыберите другую точку восстановленияи нажмите «Далее», чтобы продолжить.
- Выберите точку восстановления из списка и нажмитеСледующий.
- Теперь проверьте детали восстановления и нажмитеЗаканчиватьи дождитесь завершения процесса.


Вот и все! После восстановления системы ошибка завершения работы UXDService должна быть исправлена навсегда, если она вызвана недавним изменением системы. И что самое приятное, при этом вы не потеряете ни одного файла, хотя некоторые недавние приложения могут быть удалены.
Прежде чем уйти, узнайте, как установить таймер сна и создать клавишу выключения в Windows.
Если у вас есть какие-либо вопросы или вы хотите поделиться тем, какое решение вам помогло, оставьте комментарий ниже.
Вы все еще испытываете проблемы?
СПОНСОРИРОВАННЫЙ
Если приведенные выше предложения не решили вашу проблему, на вашем компьютере могут возникнуть более серьезные проблемы. Облака Windows. Мы предлагаем выбрать универсальное решение, напримерУкреплятьэффективно решать проблемы. После установки просто нажмите на кнопкуПосмотреть и исправитькнопку, а затем нажмитеНачать ремонт.
-
Home
-
News
- What Is UXDServices and How to Fix UXDServices Issue?
By Daisy | Follow |
Last Updated
Sometimes, you may encounter the “UXDService preventing shutdown” issue. You may wonder what it is and how to get rid of the issue. Now, you can read this post from MiniTool to get the answers. Keep on your reading.
What Is UXDService?
What is UXDService? It is an issue that blocks a restart or shutdown. It consistently does this every time. It appeared in 2020. It does not appear in Task manager as a Processes or a Service. Here is a user’s feedback:
When shutting down my pc, windows tells me that it’s waiting for a program called “uxdservice” to shut down. It took like 5 minutes to finally shut down, and my windows is on an SSD. When I googled what uxdservice is, just a bunch of results about viruses popped up. What is uxdservice.exe and should I be worried?from reddit.com
Thus, how to fix the “UXDService preventing shutdown” issue. The next part is about the solutions to the problem.
How to Fix UXDService Preventing Shutdown?
Solution 1: Update Nvidia Driver
Since UXDService is related to the Nvidia driver, you can try to update the Nvidia driver to fix the issue. There are the detailed steps:
Step 1: Press the Windows key + R key to open the Run box, then type devmgmt.msc and click OK to open Device Manager.
Step 2: Then expand Display adapters and right-click your Nvidia Graphic Card and select Enable.

Step 3: Right-click your Nvidia Graphic Card again and select Update driver.
Step 4: Select Search automatically for updated driver software and let it finish the process.
If the above steps can’t fix your issue, you should continue.
Step 5: Select Update driver again, but this time select Browse my computer for driver software on the next screen.
Step 6: Then select Let me pick from a list of device drivers on my computer.
Step 7: At last, select the compatible driver from the list for your Nvidia Graphic Card and click Next.
Solution 2: Turn off Fast Startup
Then, you can also try to turn off fast startup. Here is how to do it:
Step 1: Navigate to Power Options.
Step 2: Click Choose what the power buttons do. Then you should click Change settings that are currently unavailable.
Step 3: At the bottom of the window and you will see Turn on fast startup (recommended). Just uncheck the box to turn off Fast Startup Windows 10. Then click Save changes.
Solution 3: Run Windows Power Troubleshooter
Then, you can try using Windows Power troubleshooter, which is a built-in tool to fix UXDService issues. Here’s how to use it:
Step 1: Press Windows + I to open Windows Settings.
Step 2: Go to Update & Security > Troubleshoot.
Step 3: Scroll down to choose Power and click the Run the troubleshooter button.
This tool will start detecting problems with the power settings on your computer. Once any problems are found, click Apply fix to fix them. Then, restart your device to check if the UXDService issue is fixed.
Solution 4: Run SFC
SFC (System File Checker) is a Windows built-in tool used for replacing damaged, lost, or changed system files with good system files. Running this tool can fix some system errors. To do that, you just need to open Command Prompt and then type sfc/scannow and press the Enter key. Then, you can check if the UXDService error has been fixed.
Also see: Quickly Fix – SFC Scannow Not Working (Focus on 2 Cases)
Final Words
What is UXDService? How to fix the UXDService preventing shutdown issue? I think now you have got the answers.
About The Author

Position: Columnist
Having been an editor at MiniTool since graduating college as an English major, Daisy specializes in writing about data backups, disk cloning, and file syncing as well as general computer knowledge and issues. In her free time, Daisy enjoys running and going with friends to the amusement park.