One subject that comes up very often is the ability to run Windows on an M1-based Mac. Even though many people swear by macOS, Bootcamp and Windows on a Mac still seems to be a widely used option. As these M1-based devices are using a different architecture: ARM, they are not compatible with Mac’s previous and most-used architecture for Windows-based computers: x86. That means that in order to run Windows on an M1 device, you basically have two options: Use an ARM-based version of Windows or emulate an x86-64 based machine and run a regular Windows version. For this article, I will get Windows 11 for ARM running on an M1 MacBook Air by using UTM.
YouTube Video
If you are interested, I also created a YouTube video from this blogpost. If you prefer classic text, you can just follow the rest of this article:
Introduction
As mentioned above, there are two options to get Windows running on an Apple M1-based device. The first involves virtualization, as we can’t (yet) run Windows natively on an M1-based machine. The second involves emulation, where we will translate instructions between the running operating system (Windows in this case) and the hardware. Both methods have their advantages and disadvantages. Emulation offers maximum compatibility as it doesn’t require software written for ARM specifically but it’s pretty slow. Virtualization is fast(er) but requires software written for the hardware platform it is running on.
Both of these methods can be accomplished with UTM (https://github.com/utmapp/UTM). UTM offers QEMU-based virtaluzation and emulation with a handy GUI for both IOS and macOS. As it’s using QEMU under the hood, it is capable of emulating different processor architectures (like x86-64) but it can do virtualization for the same as the host’s architecture as well.
After a quick test, on which I plan to create a more detailed article in the future, using emulation seems to cause a lot of overhead and turns out to be too slow to be usable currently.
Leaving only virtualization as a real option. The downside for this approach is that there is no official way, currently, to get a license for an ARM-based version of Windows. Microsoft decided that this is only available for sale for system builders. Another negative is that there are very little applications compiled for running on an ARM-based Windows version. Fortunately it is possible to run most 32-bit based Windows applications on the ARM-version of Windows, which are available for most applications out there.
For this article, I’ll be using a 2020 M1-based MacBook Air but this should work in the same way for an iMac, Mac Mini, MacBook Pro and even for the recently announced M1 Max and M1 Pro devices.
Getting Windows for ARM on your M1 device
Step 1) Create a Windows 11 for ARM ISO
The first thing we need is installation media for the ARM-based version of Windows 11. If you are part of the Windows Insider program, there is a version available for download, using a VHDX file. Unfortunately, I didn’t manage to get this to work properly and my VM was always stuck during the first boot in a “Getting Started” screen.
Since this didn’t work, I decided to use the UUP Dump method. UUP stands for Unified Update Platform. This is basically a deployment method that Microsoft introduced a few years ago that allows for a sort of incremental updates on parts of Windows, rather than re-deploying everything completely every time. The UUP Dump site allows you to generate a script that will download these UUPs from Microsoft and will combine them in a working ISO file.
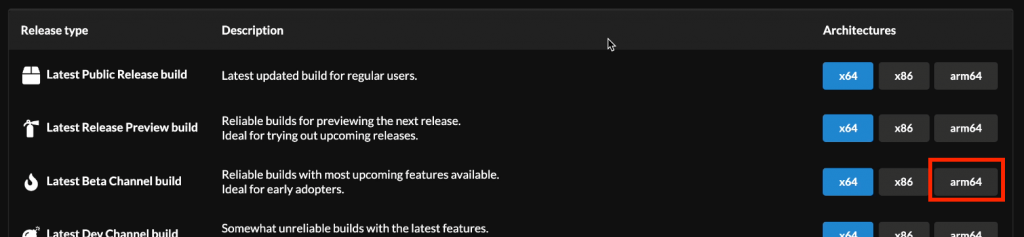
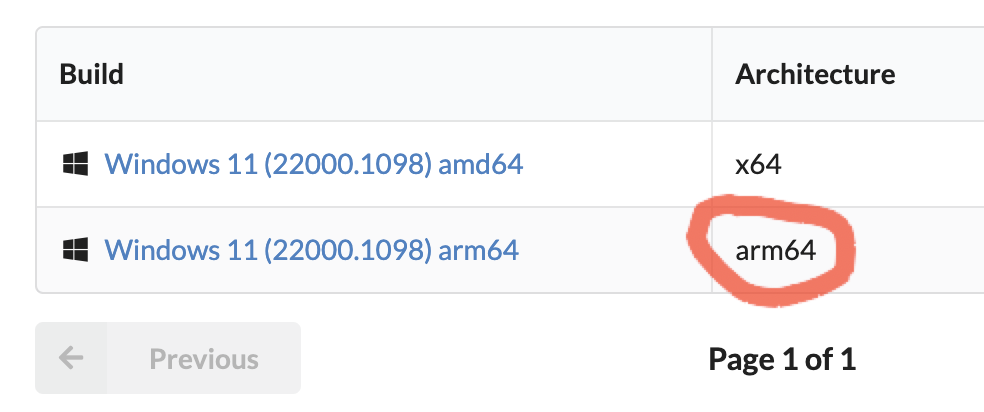
To get this all together, first navigate to the website of UUP dump: https://uupdump.net/. Over there, choose the arm64 version of the latest beta channel build:
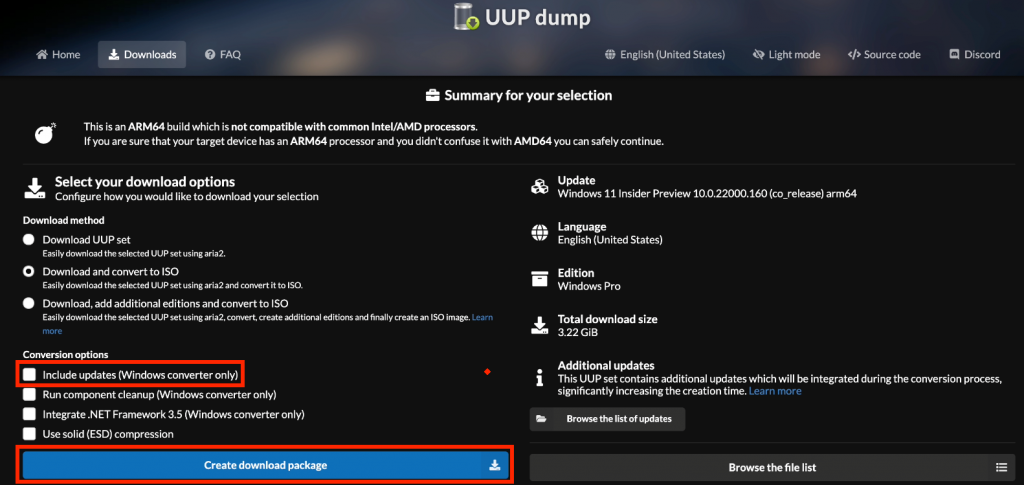
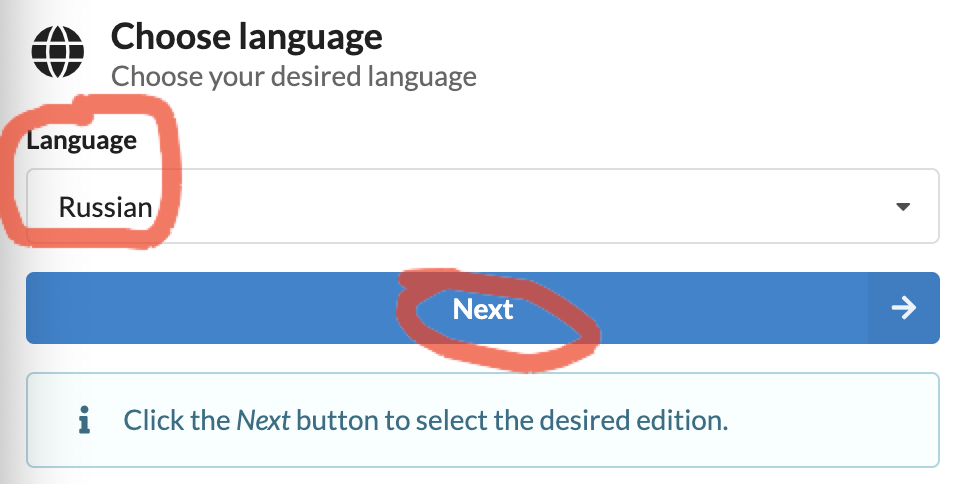
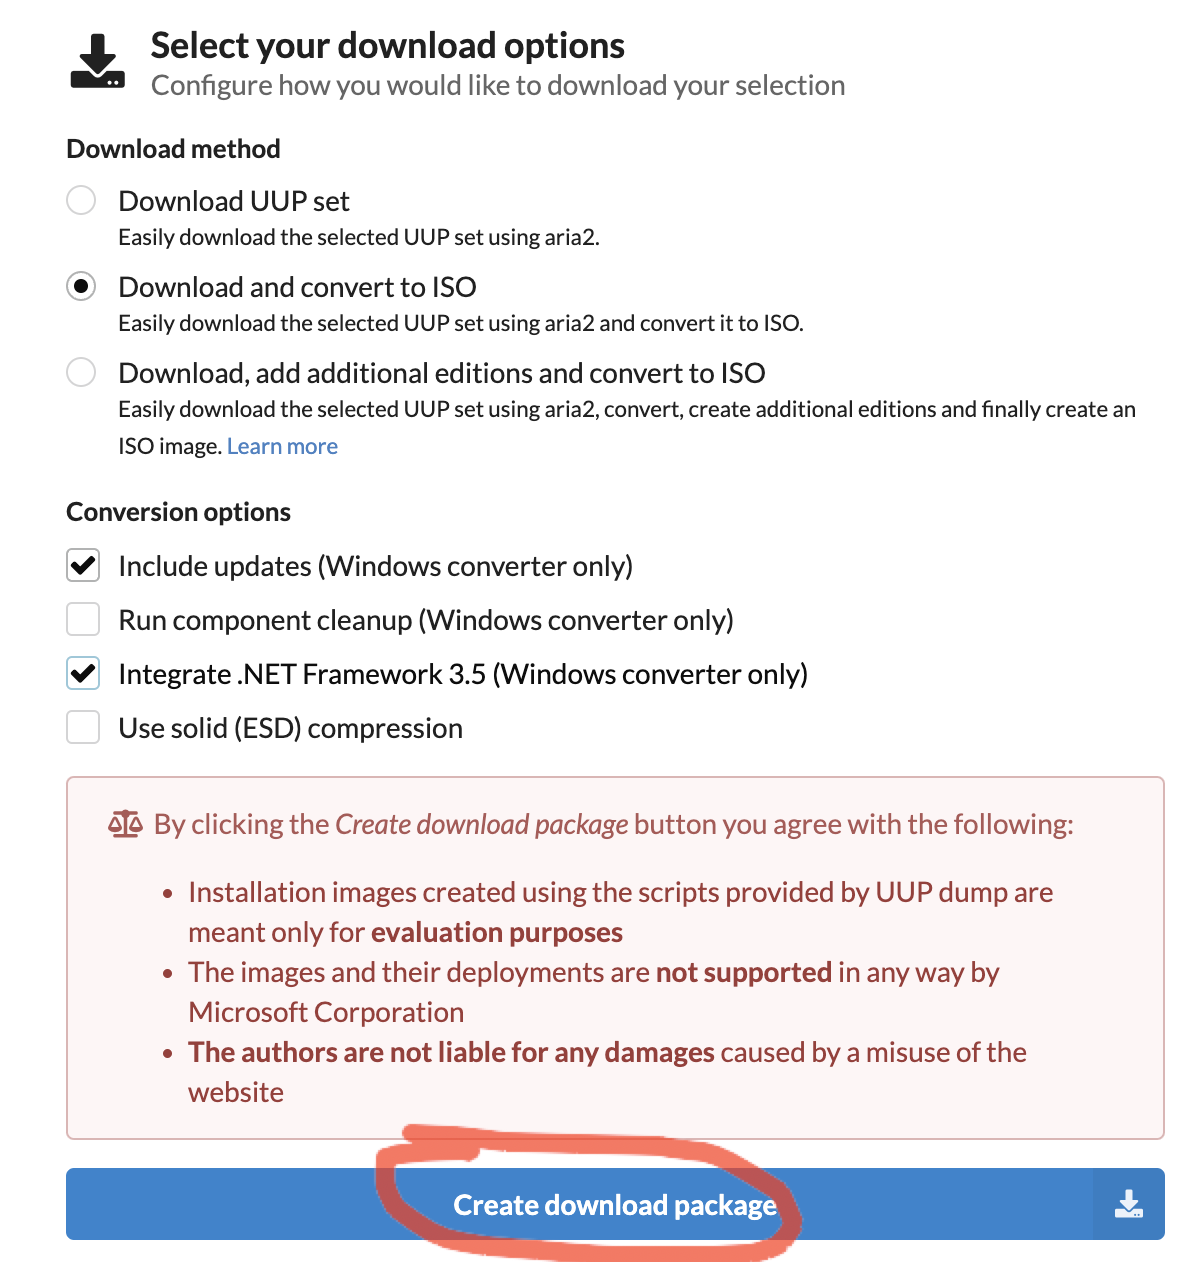
On the next page, choose the Windows 11 version. At the time of writing this article, this was 10.0.22000.160.

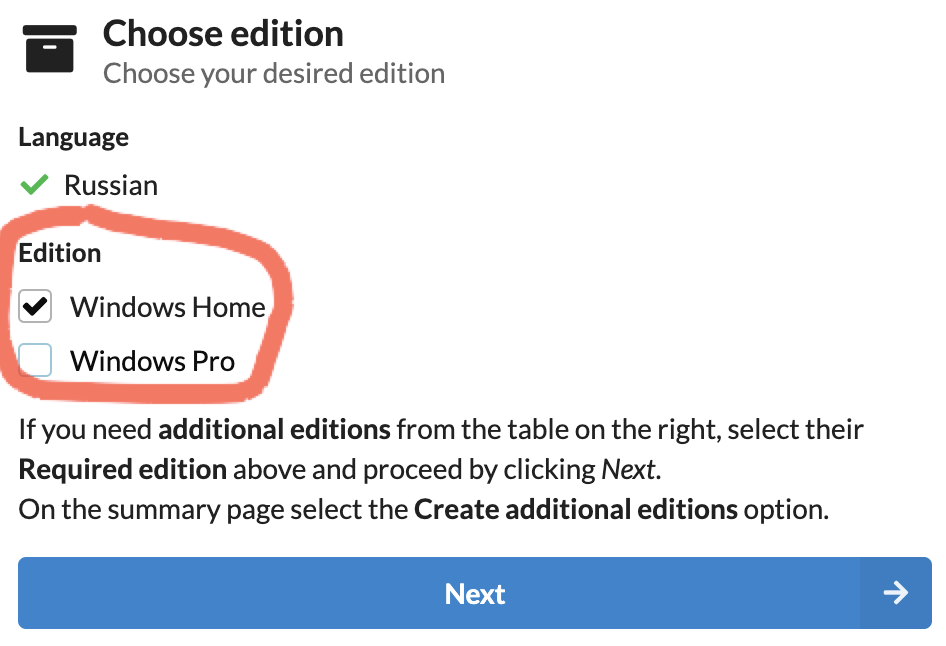
Next, I unchecked “Include updates” but this is not strictly necessary. Then click “Create download package”:
As you will see, this downloads a zip-file with a few scripts in it. The uup_download_macos.sh script is the one which we will need to run:

Before we can run the script, we need to install a few tools on our Mac first. The easiest method to do this, is by using Homebrew. Start by navigating to the Homebrew website (https://brew.sh/) and copy the command listed under “Install Homebrew”:

Open up a terminal window, paste the command in it and press enter. If asked, enter your user’s password:
jensd@jensds-MacBook-Air ~ % /bin/bash -c "$(curl -fsSL https://raw.githubusercontent.com/Homebrew/install/HEAD/install.sh)"
==> Checking for sudo access (which may request your password).
Password:
==> This script will install:
/opt/homebrew/bin/brew
/opt/homebrew/share/doc/homebrew
/opt/homebrew/share/man/man1/brew.1
/opt/homebrew/share/zsh/site-functions/_brew
/opt/homebrew/etc/bash_completion.d/brew
/opt/homebrew
==> The following new directories will be created:
/opt/homebrew/Cellar
/opt/homebrew/Caskroom
...
==> Next steps:
- Run these two commands in your terminal to add Homebrew to your PATH:
    echo 'eval "$(/opt/homebrew/bin/brew shellenv)"' >> /Users/jensd/.zprofile
    eval "$(/opt/homebrew/bin/brew shellenv)"
- Run `brew help` to get started
- Further documentation:
    https://docs.brew.sh
jensd@jensds-MacBook-Air ~ %
At this point, Homebrew is installed on your Mac but you need to add it to your PATH, as suggested in the last output of the previous command:
jensd@jensds-MacBook-Air ~ % echo 'eval "$(/opt/homebrew/bin/brew shellenv)"' >> /Users/jensd/.zprofile
jensd@jensds-MacBook-Air ~ % eval "$(/opt/homebrew/bin/brew shellenv)"
jensd@jensds-MacBook-Air ~ %
Now that is taken care of, we can install the required tools, using Homebrew, to be able to run the UUP dump script:
jensd@jensds-MacBook-Air ~ % brew tap sidneys/homebrew
==> Tapping sidneys/homebrew
...
Tapped 8 casks and 22 formulae (42 files, 157.3KB).

jensd@jensds-MacBook-Air ~ % brew install aria2 cabextract wimlib cdrtools sidneys/homebrew/chntpw
==> Downloading https://ghcr.io/v2/homebrew/core/ca-certificates/manifests/2021-09-30-1
######################################################################## 100.0%
...
x86_64cpuid.s:273:10: error: invalid operand
 cmpq $0,%rax
         ^
x86_64cpuid.s:274:9: error: unknown token in expression
 cmoveq %rcx,%rax
        ^
x86_64cpuid.s:274:9: error: invalid operand
 cmoveq %rcx,%rax
        ^
make[1]: *** [x86_64cpuid.o] Error 1
make: *** [build_crypto] Error 1

Do not report this issue to Homebrew/brew or Homebrew/core!

These open issues may also help:
Mac M1 chntpw not building (Openssl 1.0 requirement not satisfied) https://github.com/sidneys/homebrew-homebrew/issues/2
As you notice, the chntpw tool cannot be installed as it throws an error. The OpenSSL requirement is the issue but the error message also points us to the solution, which is to build OpenSSL ourselves. More details can be found on the Github link that is shared above. In essence, this is what needs to be executed:
jensd@jensds-MacBook-Air ~ % curl -LO https://gist.github.com/minacle/e9dedb8c17025a23a453f8f30eced3da/raw/908b944b3fe2e9f348fbe8b8800daebd87b5966c/openssl@1.0.rb
curl -LO https://gist.github.com/minacle/e9dedb8c17025a23a453f8f30eced3da/raw/908b944b3fe2e9f348fbe8b8800daebd87b5966c/chntpw.rb
brew install --formula --build-from-source ./openssl@1.0.rb
brew install --formula --build-from-source ./chntpw.rb
rm ./openssl@1.0.rb ./chntpw.rb
...
patching file Makefile
==> make
🍺  /opt/homebrew/Cellar/chntpw/0.99.6: 5 files, 296.3KB, built in 2 seconds
Removing: /Users/jensd/Library/Caches/Homebrew/chntpw--patch--dbf09ccee4eaf401e2680554990ee924bb0ad1dd7661a3c97d67bf796089fbbe.patch... (211B)
jensd@jensds-MacBook-Air ~ %
So far that were quite a lot of steps… But finally we are ready to execute the script which we got from the UUP Dump website. First navigate to the directory where you downloaded and extracted the files, then execute the macOS version of the script:
jensd@jensds-MacBook-Air ~ % cd Downloads
jensd@jensds-MacBook-Air Downloads % cd 22000.160_arm64_en-us_professional_fdb8a3c7_convert
jensd@jensds-MacBook-Air 22000.160_arm64_en-us_professional_fdb8a3c7_convert % bash uup_download_macos.sh
Retrieving aria2 script...

10/22 11:46:10 [NOTICE] Downloading 1 item(s)
[#8c33b1 0B/0B CN:1 DL:0B]
...
 99.63% done, estimate finish Fri Oct 22 11:51:38 2021
 99.86% done, estimate finish Fri Oct 22 11:51:38 2021
Total translation table size: 2048
Total rockridge attributes bytes: 0
Total directory bytes: 0
Path table size(bytes): 10
Max brk space used 0
2198094 extents written (4293 MB)
Done.
jensd@jensds-MacBook-Air 22000.160_arm64_en-us_professional_fdb8a3c7_convert %
As a result, you should end up with an ISO file in the directory from where you executed the script:
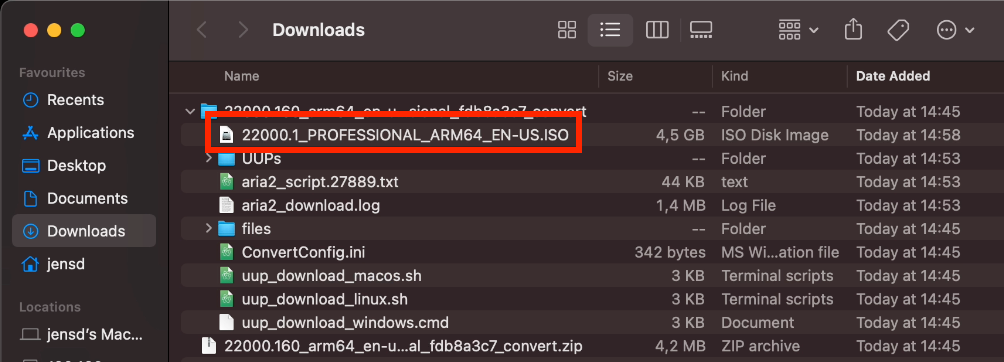
You can move this file to wherever you want, as long as you remember where for the next steps.
Step 2) Downlad and install UTM
Now that we have the ISO which we will use to get Windows installed, we need a way to create a virtual machine in which we can run the installer. There are several options available for this. The more known ones like Parallels or VMWare Fusion for example. Unfortunately these are not free but they should work as well. Instead, I will go for UTM.
UTM, as mentioned in the beginning, offers QEMU-based virtaluzation and emulation for both IOS and macOS. I tried to find what the UTM abbreviation stands for but was not able to find it.
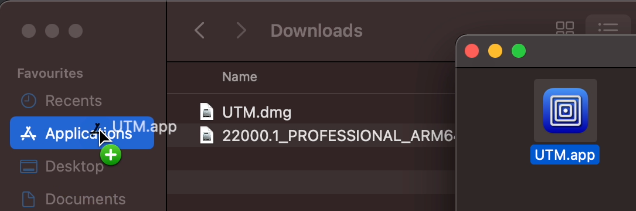
You can download UTM from Github using: https://github.com/utmapp/UTM/releases/latest/download/UTM.dmg
Once downloaded, simply open the .dmg file by double clicking on it and move UTM.app to your Applications folder using Finder:
Then start UTM, simply by launching it as any other application on your Mac.
Step 3) Create a VM for your Windows 11 ARM installation
At this point we have both the ISO file for installing Windows and we have our hypervisor, UTM, ready. Now we need to create a new virtual machine with UTM for use with the next step.
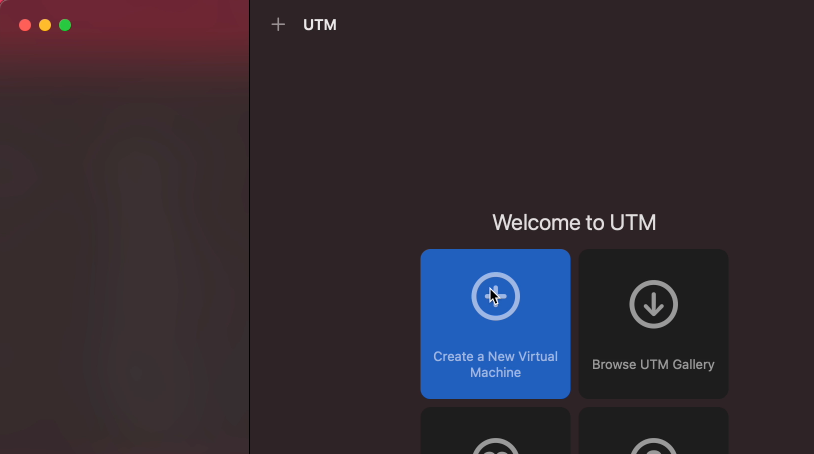
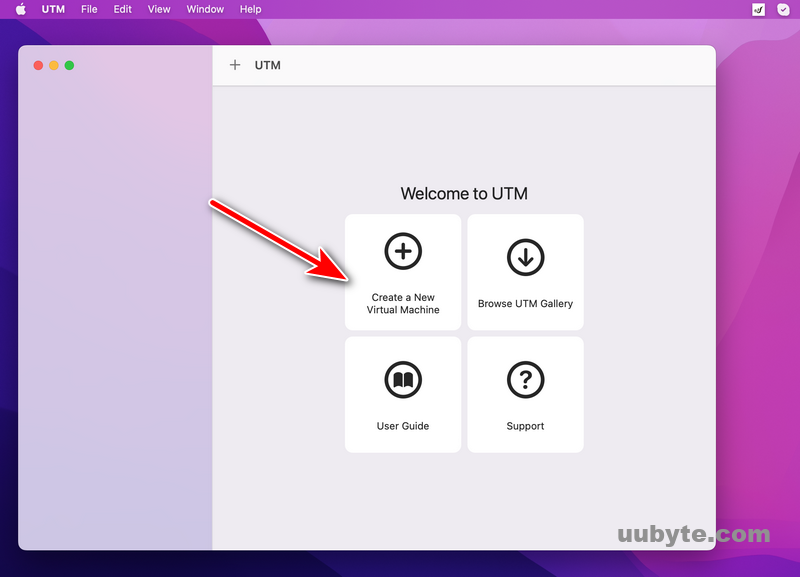
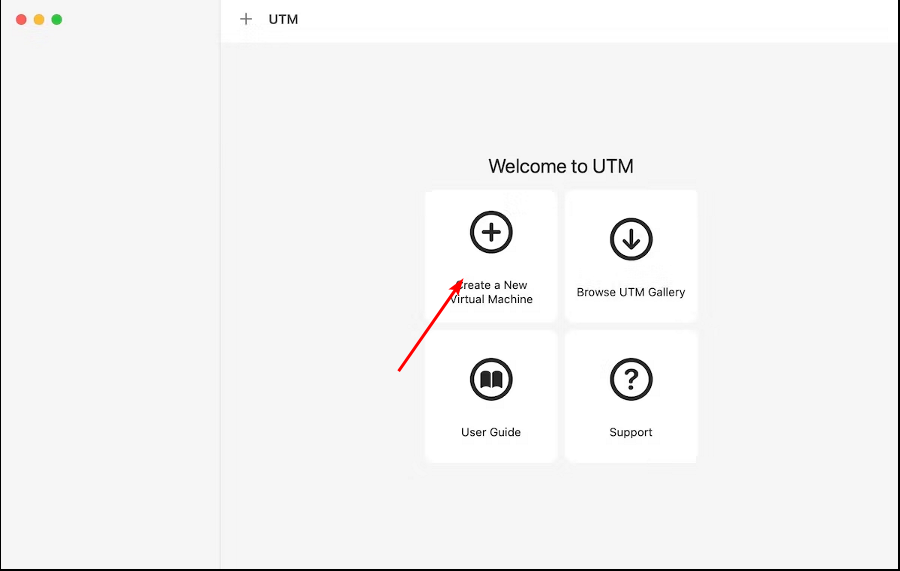
Start UTM and click on “Create a New Virtual Machine”:
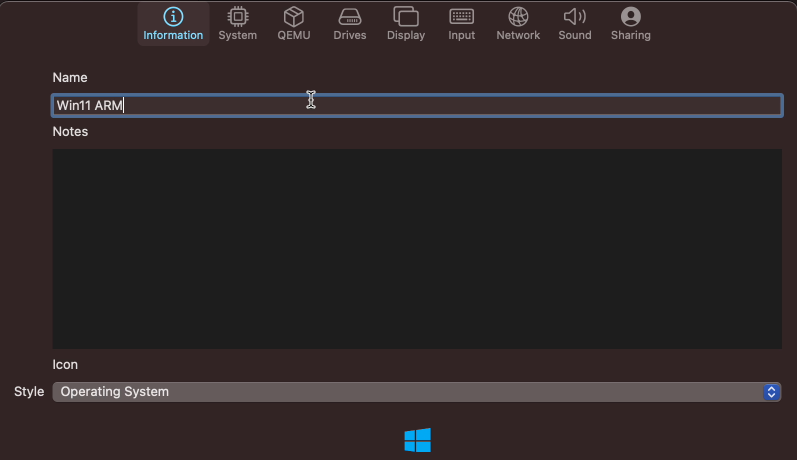
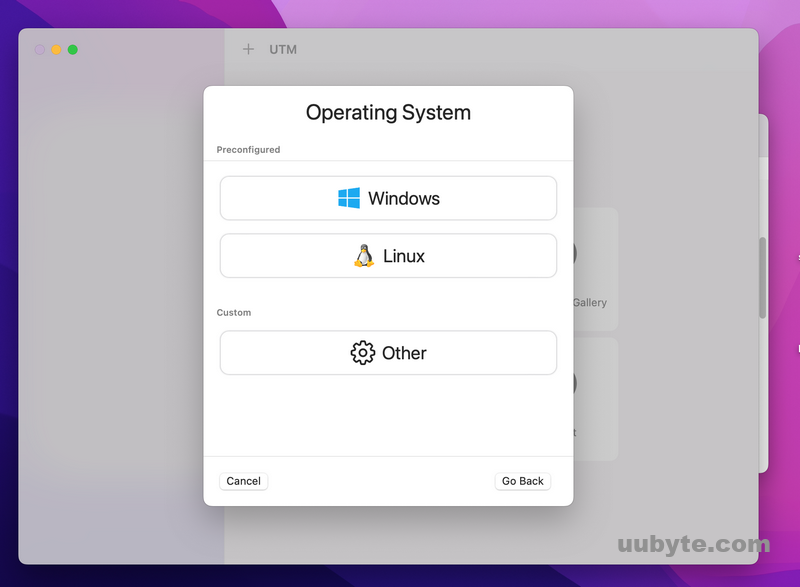
In the first tab: Information, choose a name for your VM and optionally choose a matching icon:
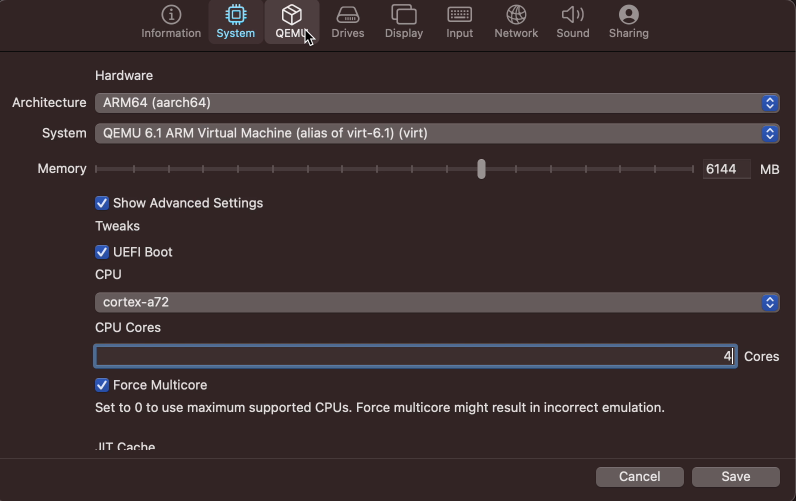
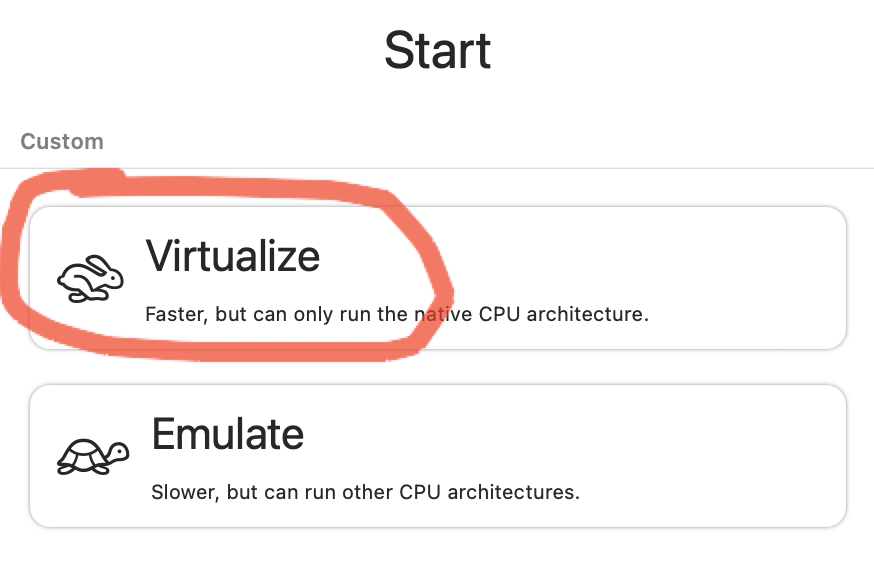
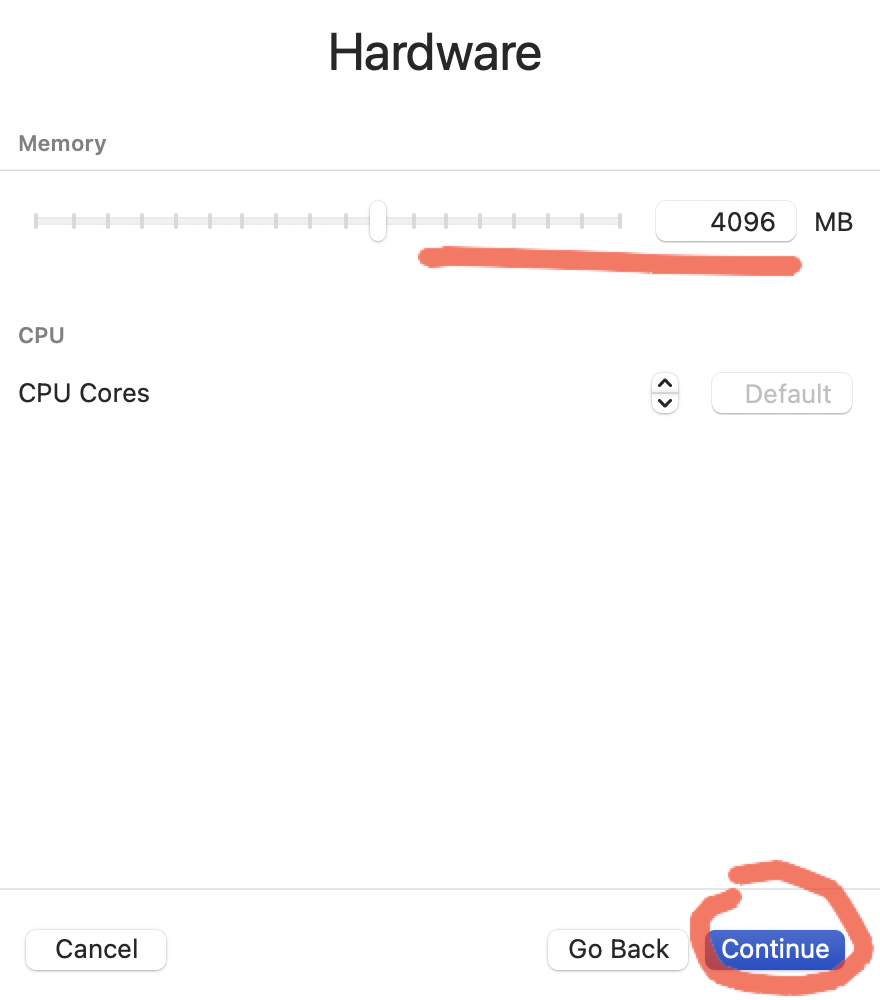
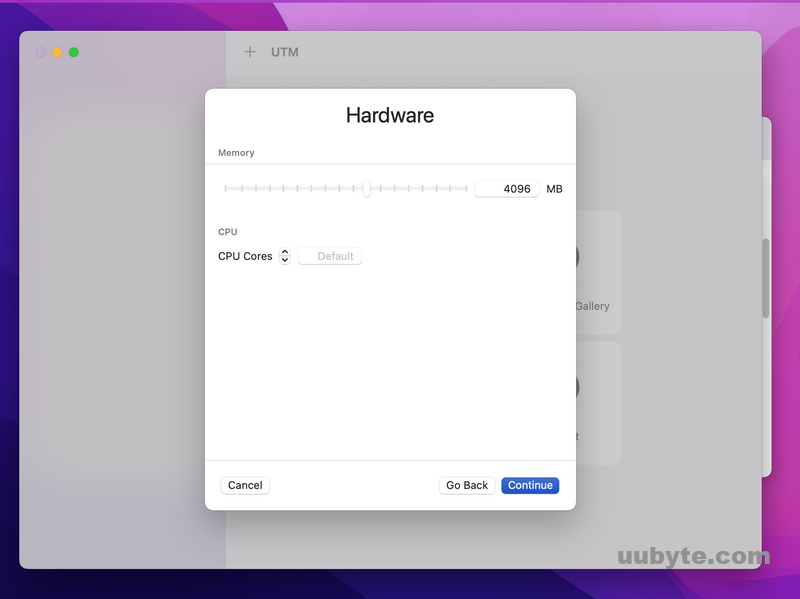
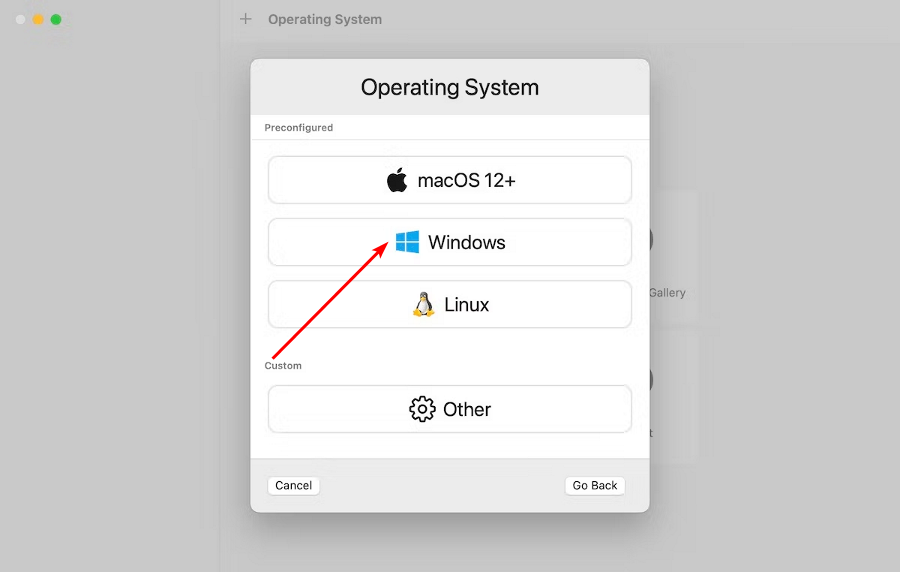
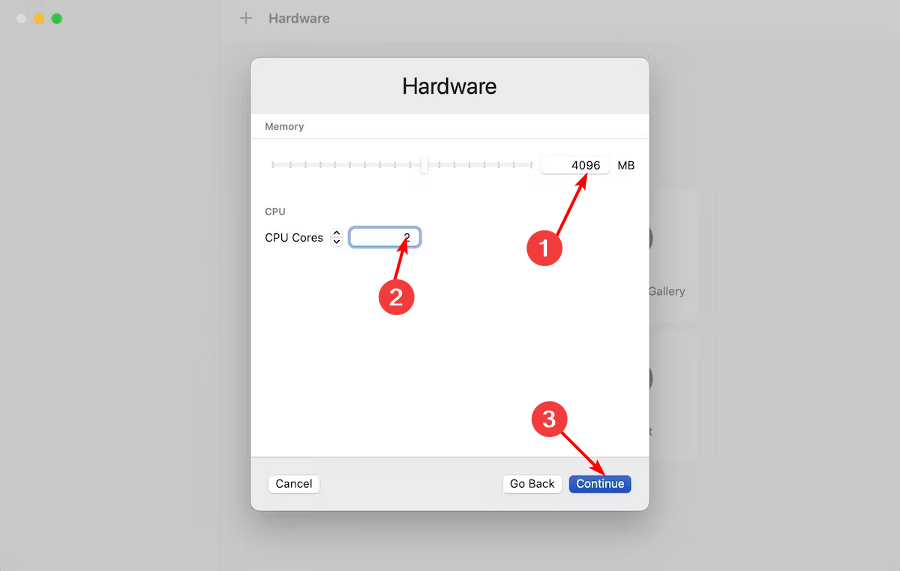
Navigate to the second tab: Sytem and select ARM64 (aarch64) as architecture. This matches the architecture of the M1-chip so we will not use emulation. Change the memory slider to have at least 4GB. I did notice that slightly more is really better (I took 6GB here for example). Optionally, click “Show Advanced Settings” and set a number of CPU cores (I chose 4 here) and enable “Force Multicore”:
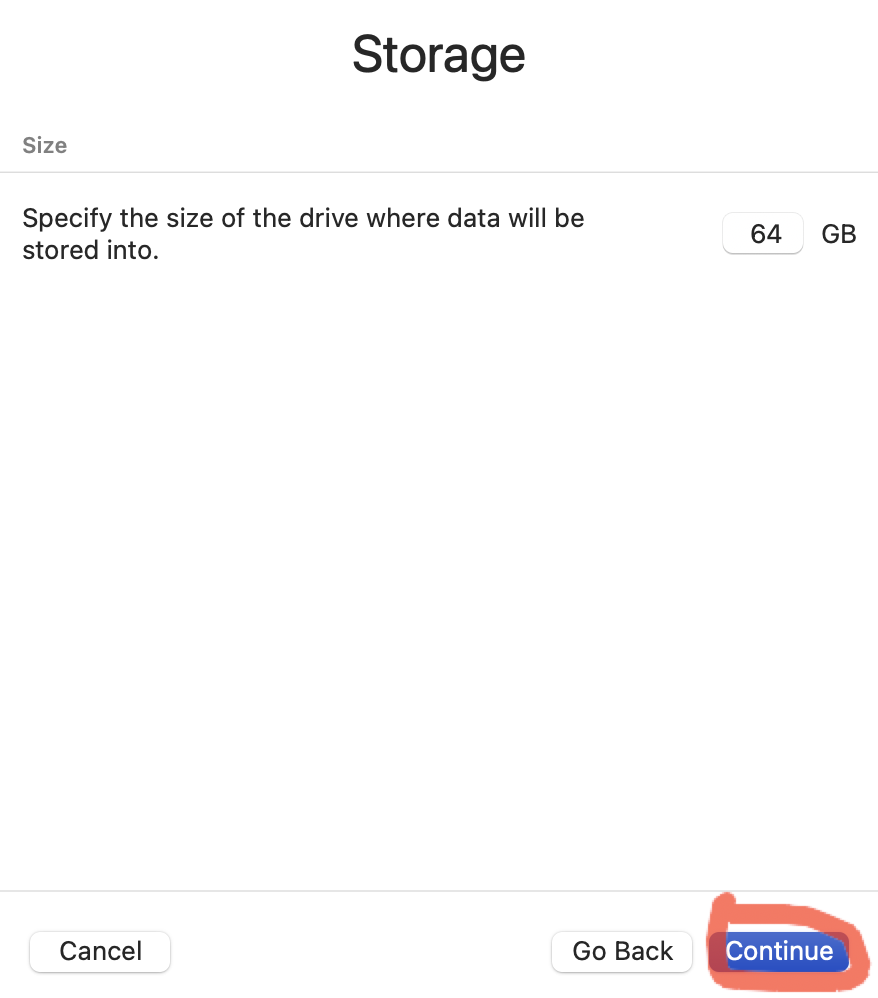
Now navigate to the Drives tab, click “New Drive” and change the interface to NVMe and give a size of at least 55GB. Then click “New Drive” again, check the removable option and choose “None (Advanced)” as interface:
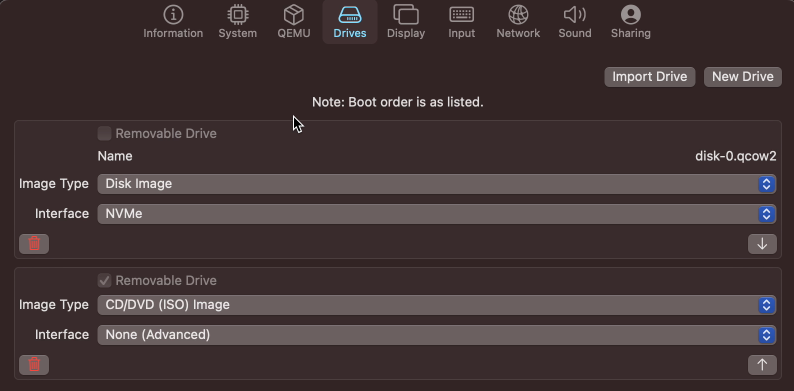
Selecting None as interface is needed due to an issue/bug in QEMU. I’ve opened this on the UTM Github page but so far a workaround is still needed. Type None allows to specify the required parameters to give an interface for our virtual CD/DVD drive.
To do so, navigate to the QEMU tab and scroll all the way down in the list, until you reach the last line saying New…, then add two lines as follows:
-device
usb-storage,drive=drive1,removable=true,bootindex=1,bus=usb-bus.0
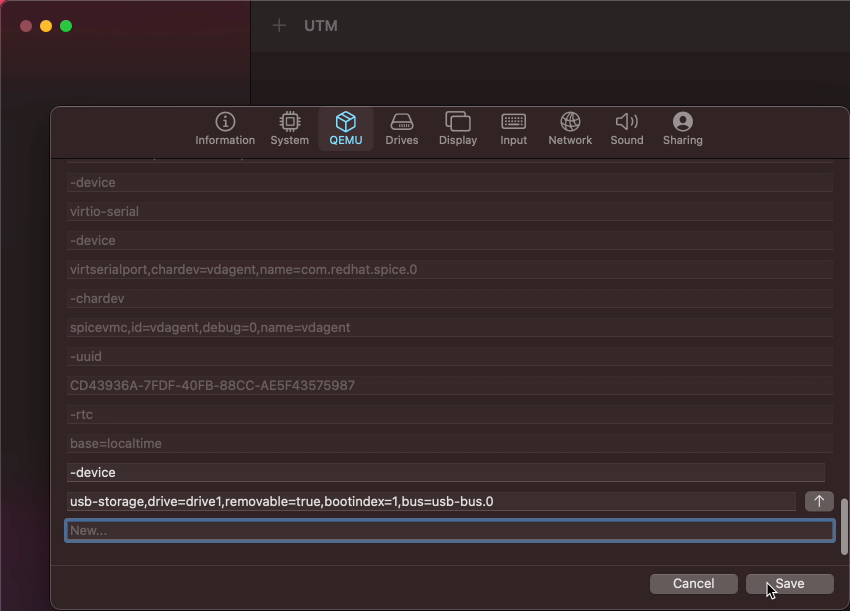
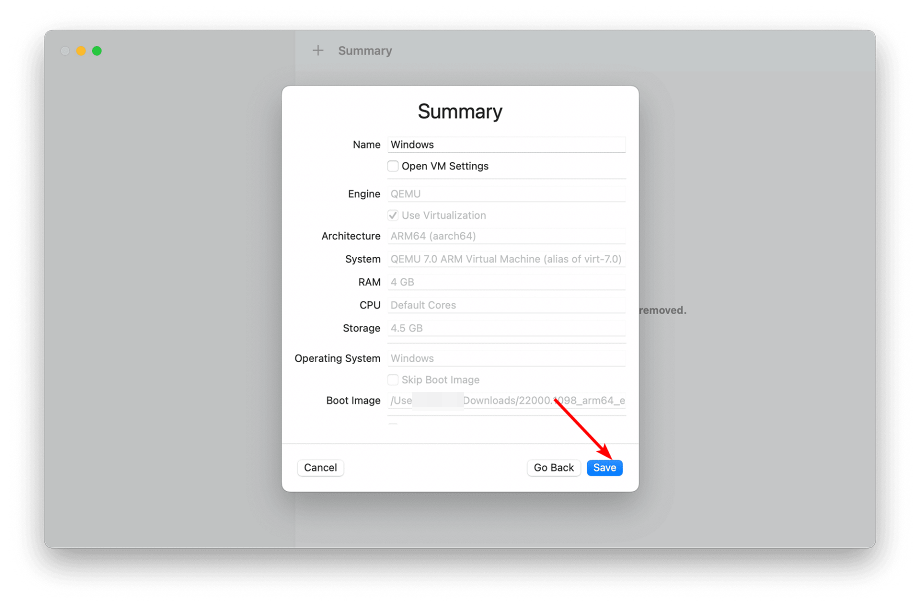
After all these steps, click Save to create the new VM in UTM.
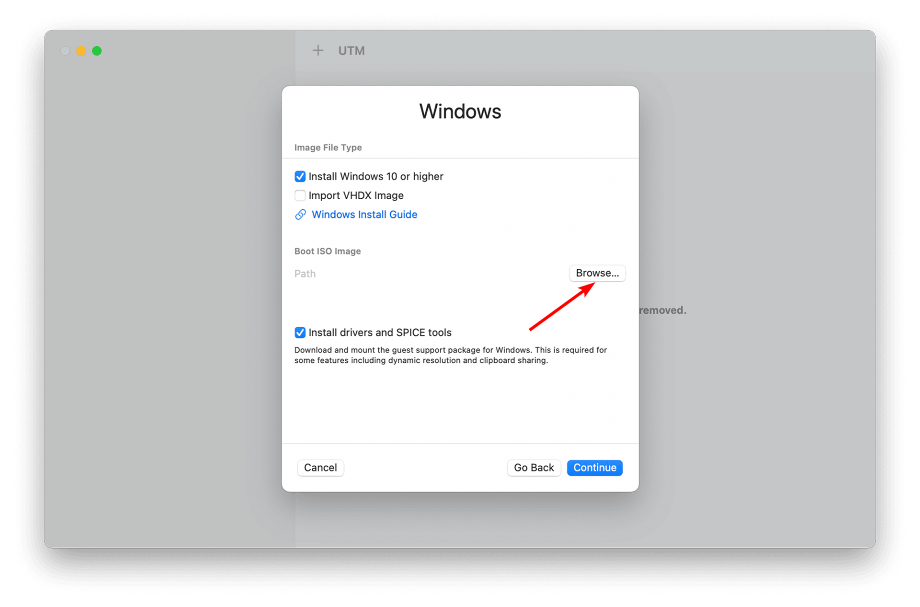
Only thing which is left, is to mount the Windows 11 ARM installation ISO, which we created in the first step to the VM. To do so, select the VM you just created from the list and on the CD/DVD dropdown, choose Browse:
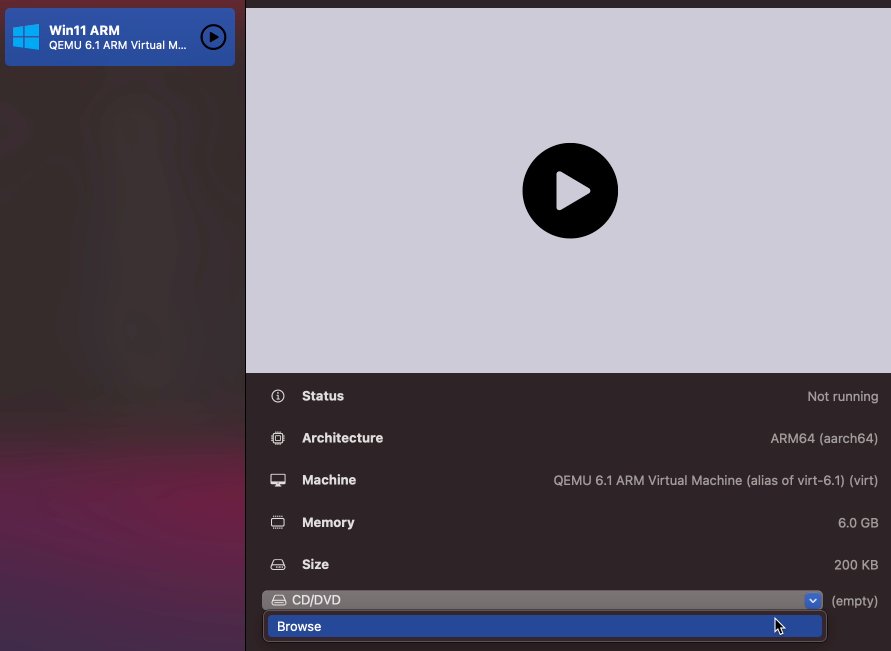
Then navigate to your Downloads folder (or other location where you move the ISO file afterwards) and select the ISO which got created in step 1:

Step 4) Install Windows 11 ARM on your M1-based device
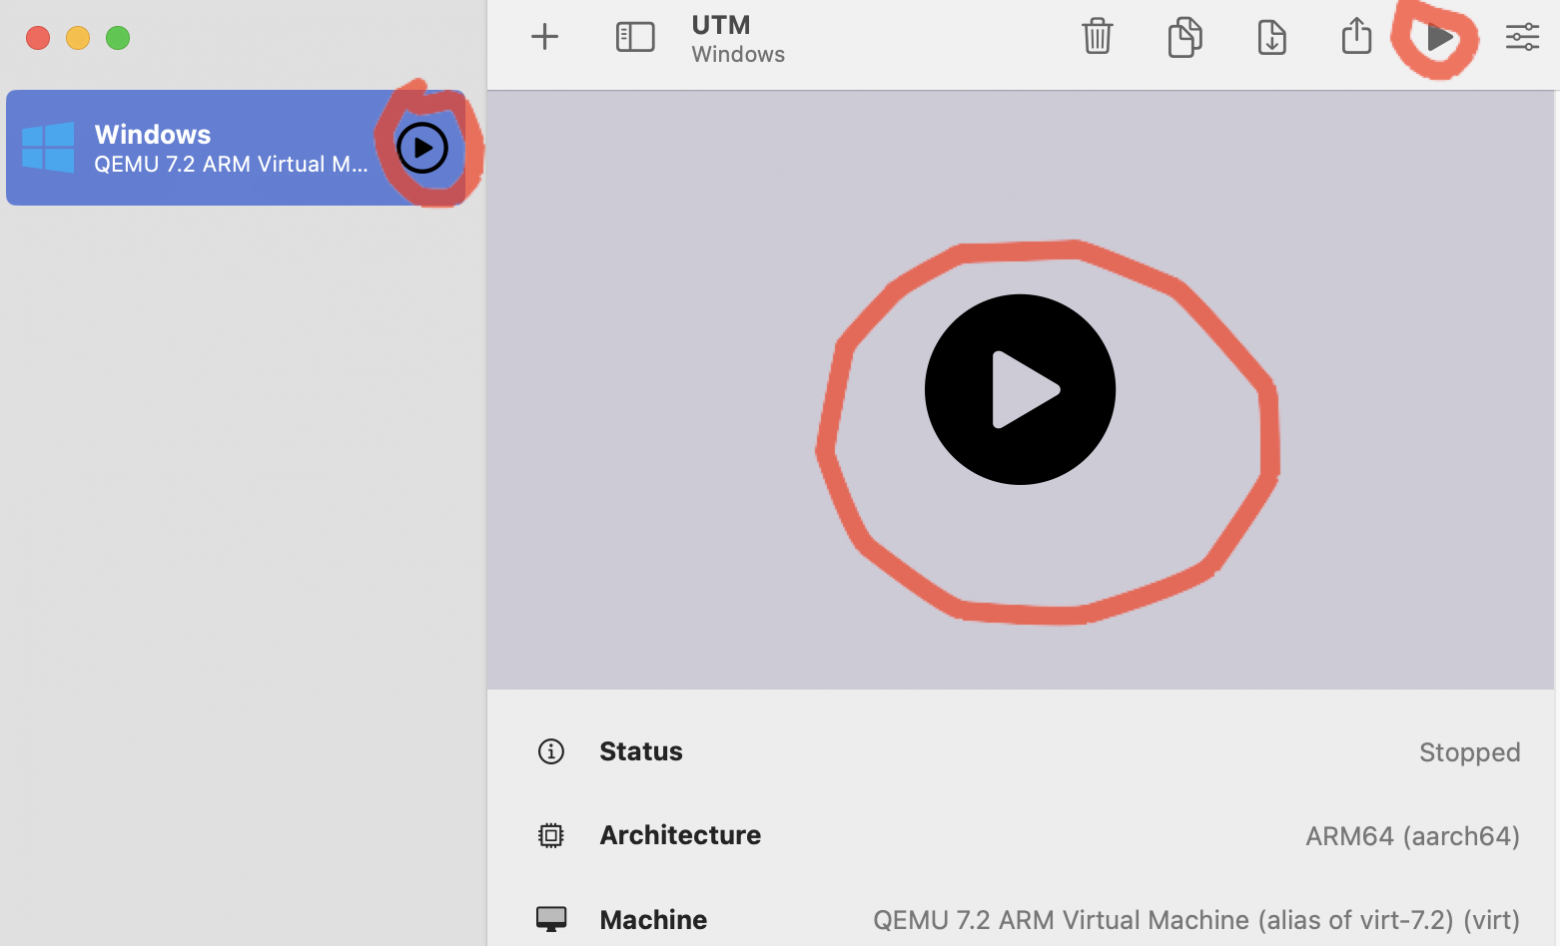
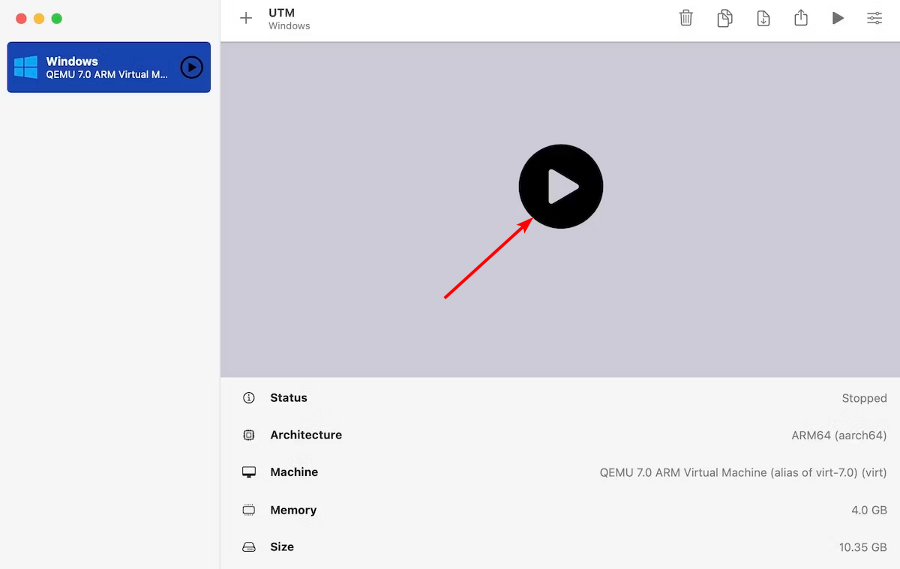
Now that we have our VM created, let’s get it started and run through the Windows 11 installation.
Start the VM by clicking on the large play icon (see previous two images). The VM will boot and you should see a large UTM logo.
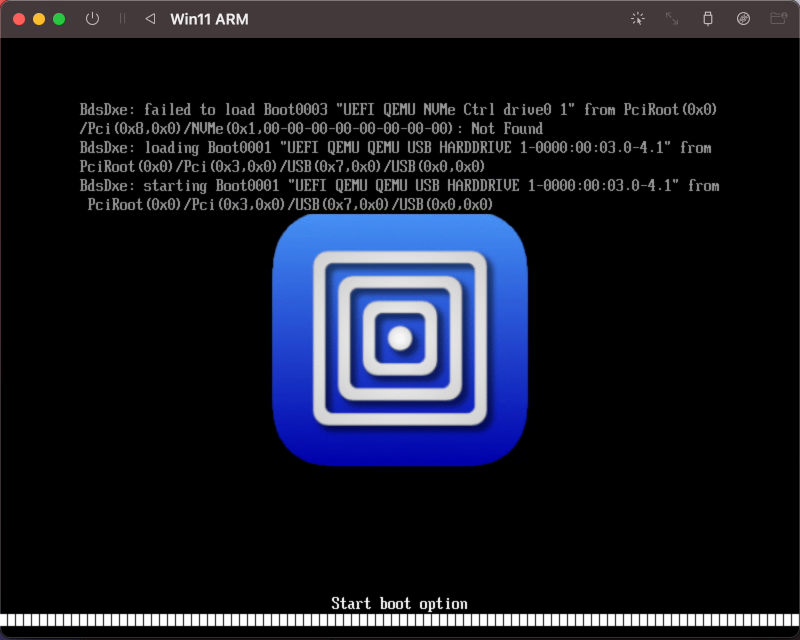
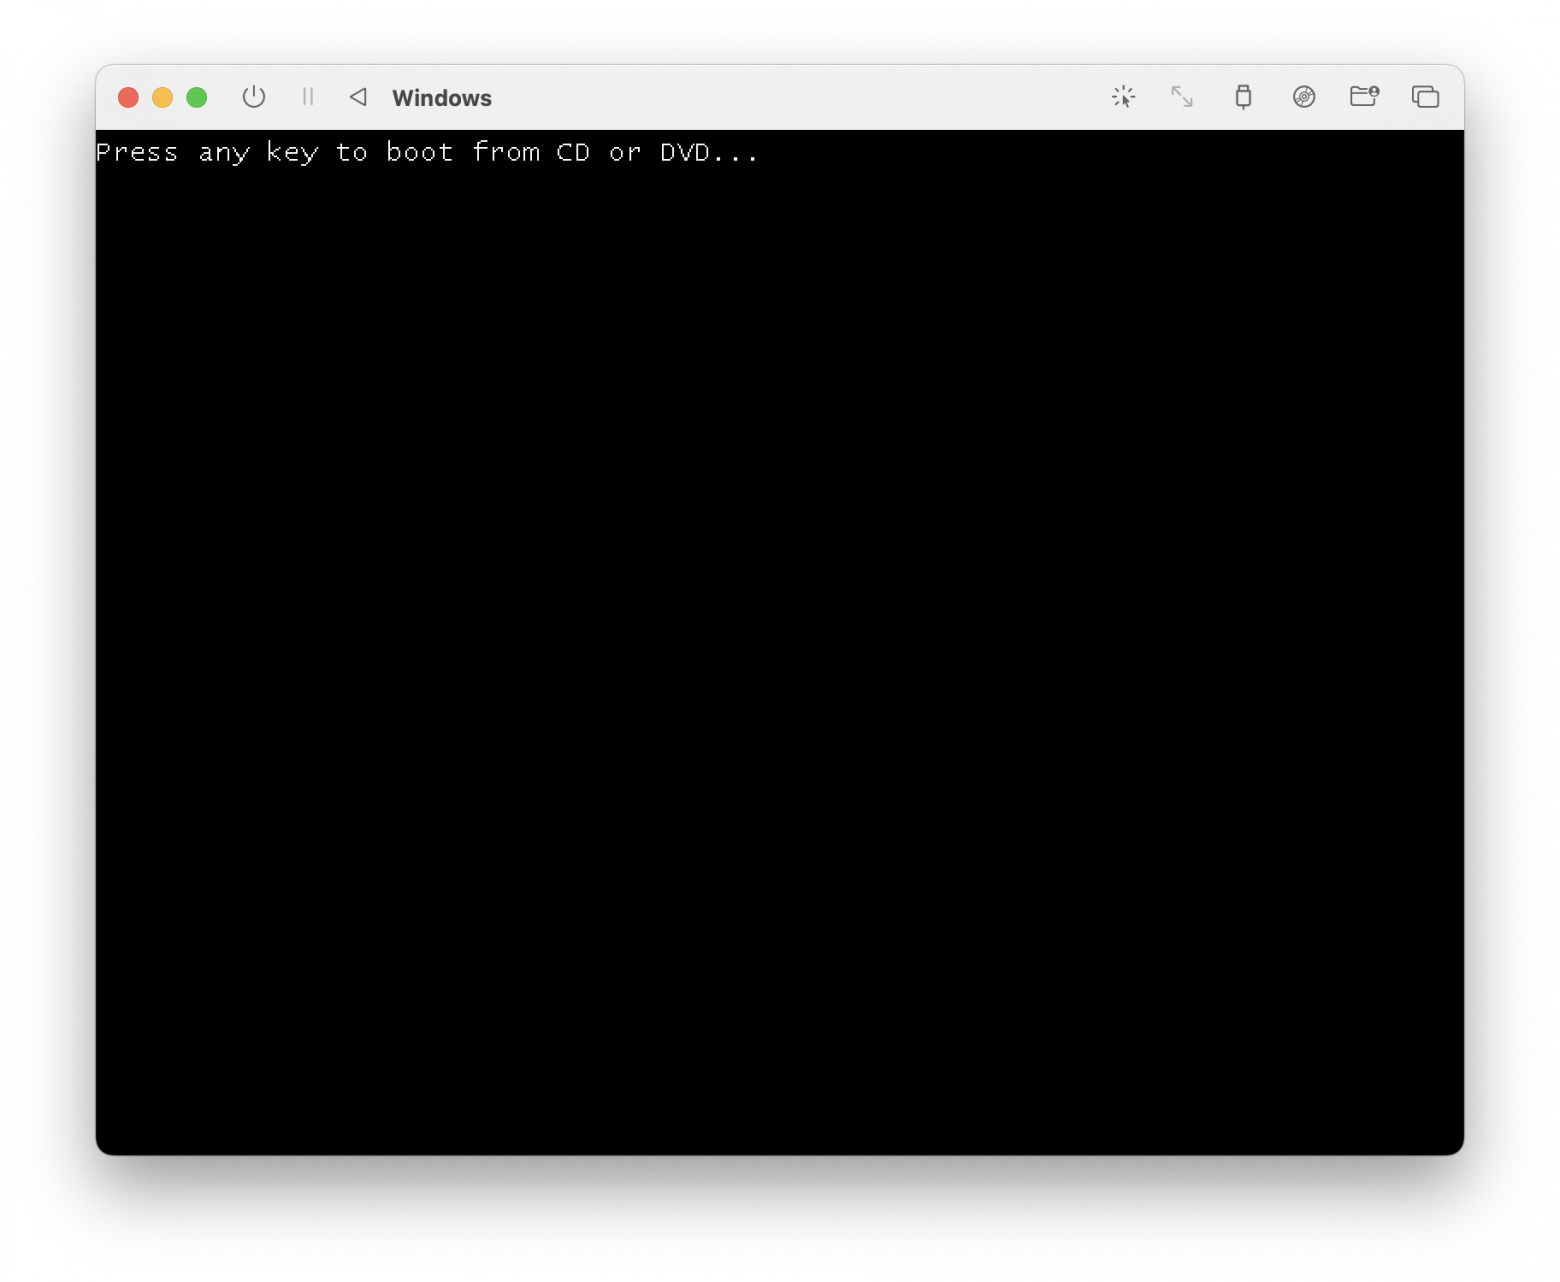
Make sure you click in the VM immediately as it will ask to press a key to boot from the ISO:

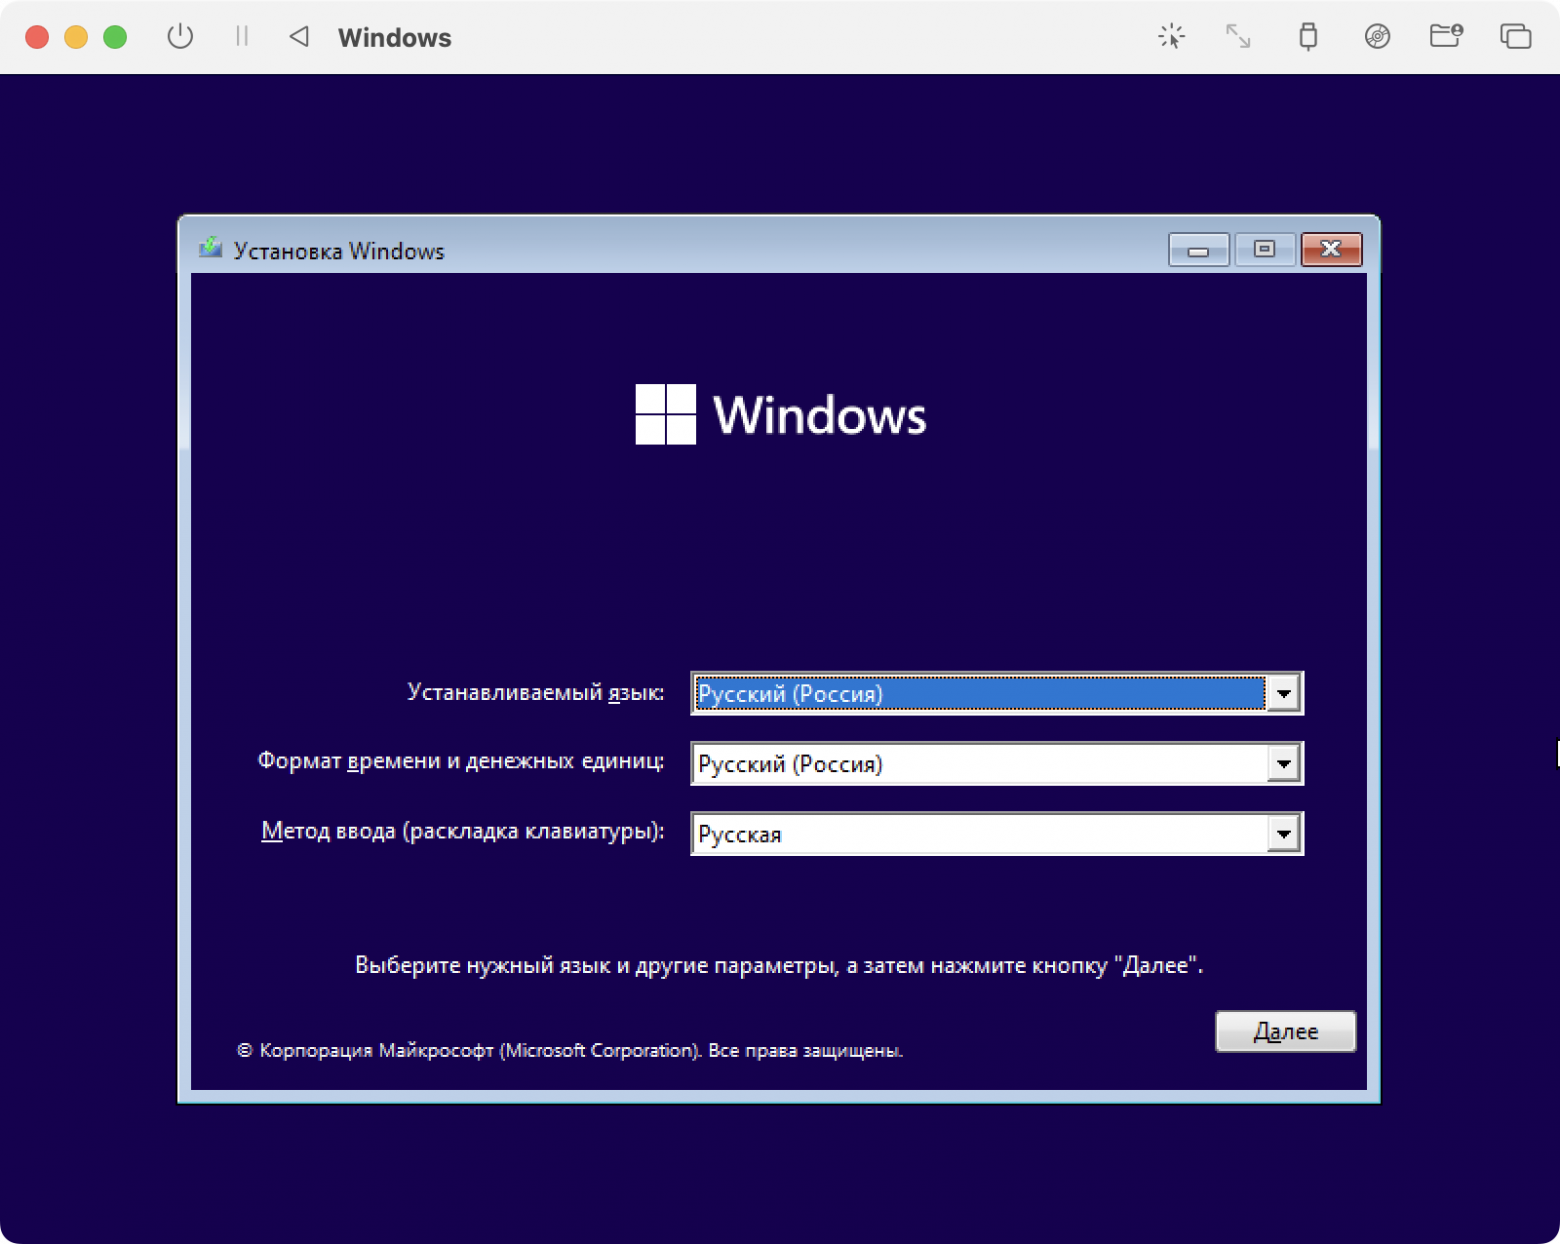
After pressing any key, the installer will start from the ISO and if all goes well, you should be able to see the standard Windows 11 installer, where you can select a language, locale and keyboard settings:
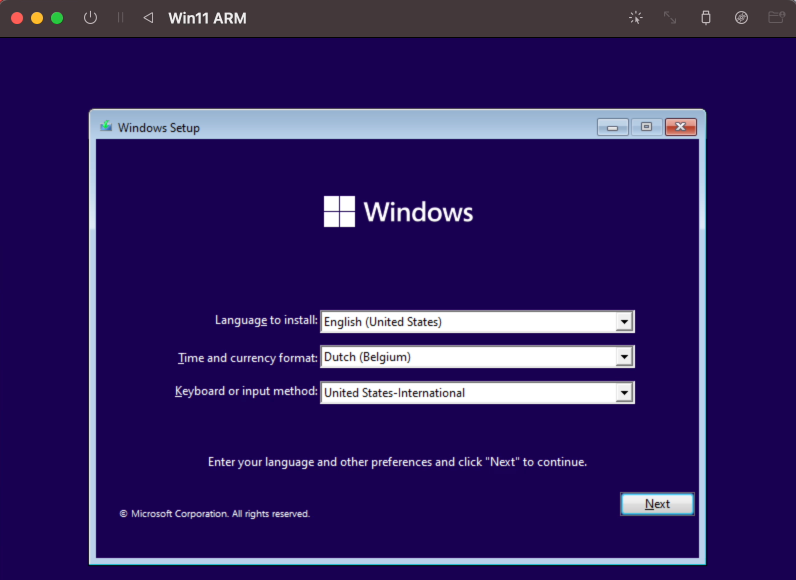
Set these as desired and click Next.
In the next screen, we need to do some modifications before we can click “Install Now”. Windows 11 has some strict requirements for the hardware it is allowed to run on. As our Macbook, and the VM, does not have Secure Boot nor TPM, we need to work around that by adding some keys in the register.
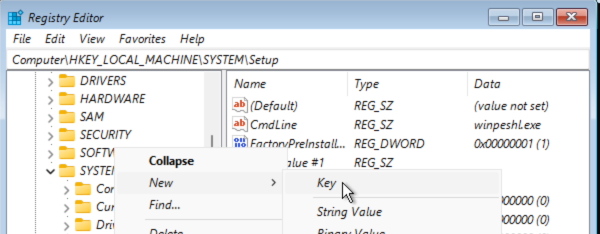
So on the screen where you seen Install Now, press Shift + F10. It might be that you need to use Fn+F10, depending on how you configured your function keys. This should bring up a command prompt where we can open regedit:

In the registry editor, navigate to: Computer\HKEY_LOCAL_MACHINE\SYSTEM\Setup and add a new key there called LabConfig. To do this, right click on Setup and choose New > Key:
Give it the name LabConfig and in the key, right click and choose New – DWORD (32-bit) Value:
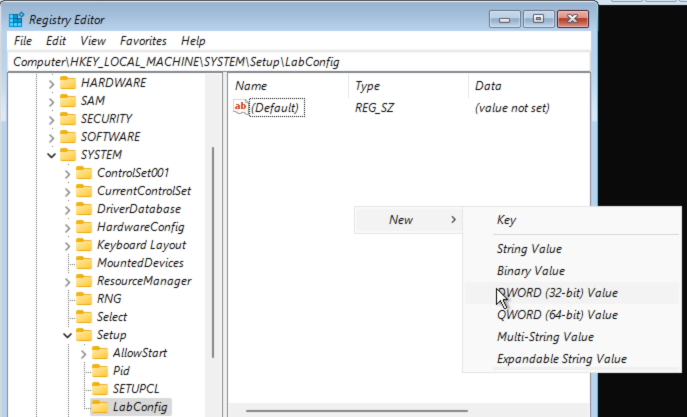
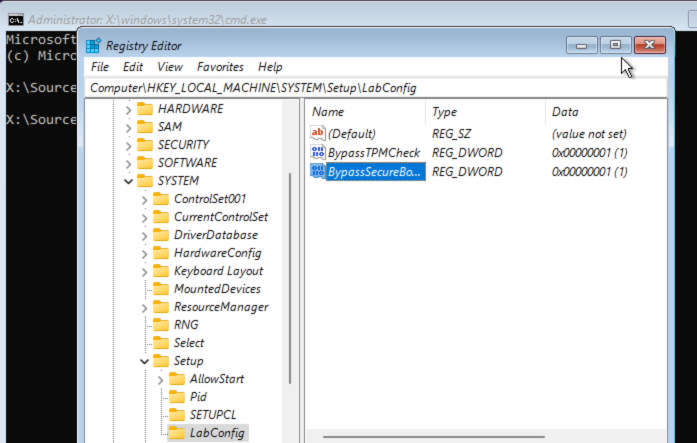
Give the name BypassTPMCheck to this DWORD. Repeat these steps a second time but nowgive the name BypassSecureBootCheck. Then double-click on each of these two DWORDs and change the value to 1. As a result, you should get the following:
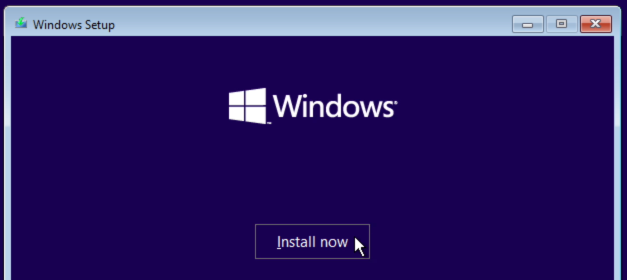
Now that’s done, we can close the Registry Editor and the command prompt we opened and continue with the install by clicking “Install Now”:
In the next screens, choose: “I don’t have a product key”, accept the license and choose for: “Custom: Install Windows only (advanced)”. You should end up with the “Where do you want to install Windows?” dialog:
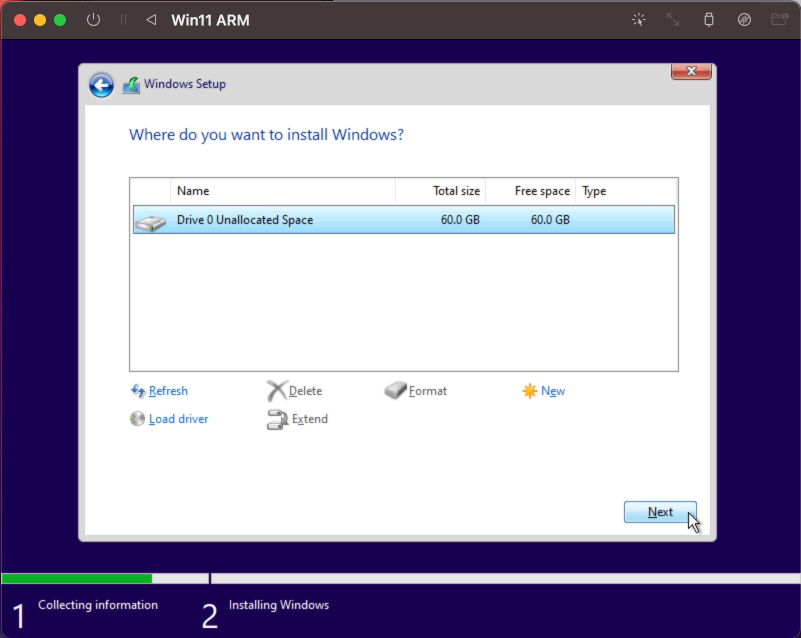
Here you can simply click next and let the installer create the necessary volumes on the virtual drive which we added in UTM. After that, Windows should copy the files to the drive and continue the installation:
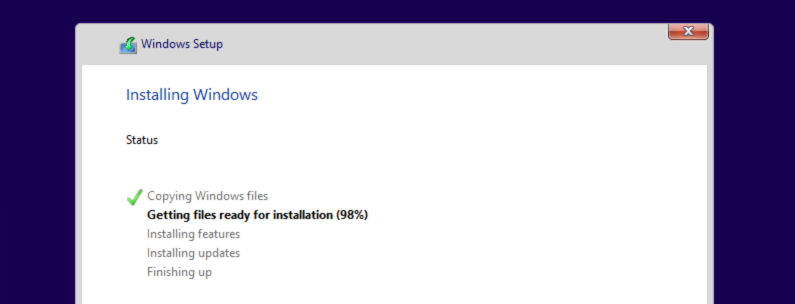
In case you run into an issues during the “Getting files read for installation” and the installer ends with an error like 0x800701B1 (Windows cannot install required files. Make sure all files required for installation are available.), Restart the VM and give it another try. This issue is the main reason for the custom QEMU-parameters for the USB-connected virtual CD/DVD drive. They seem to help but the issue still shows in some cases. Two tries at max. should do it normally.
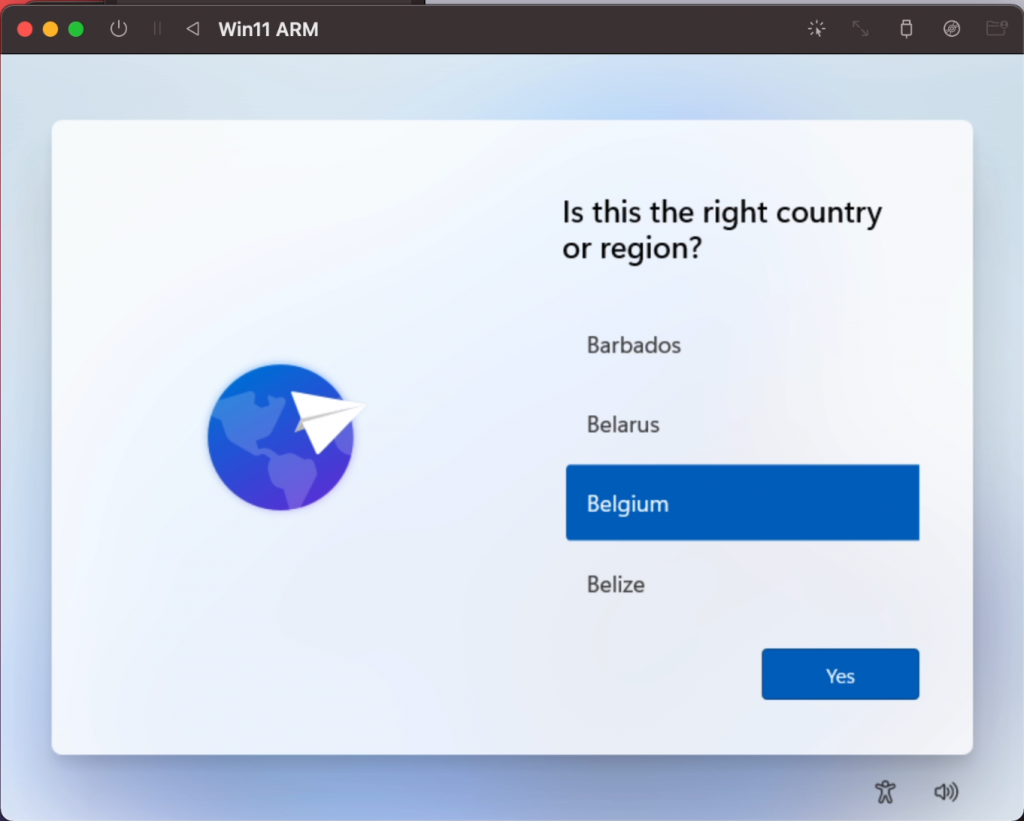
Once this all completes, the VM will reboot and you should be greeted with the following dialog where you need to answer the questions regarding location, keyboard layout, username, password and privacy settings:
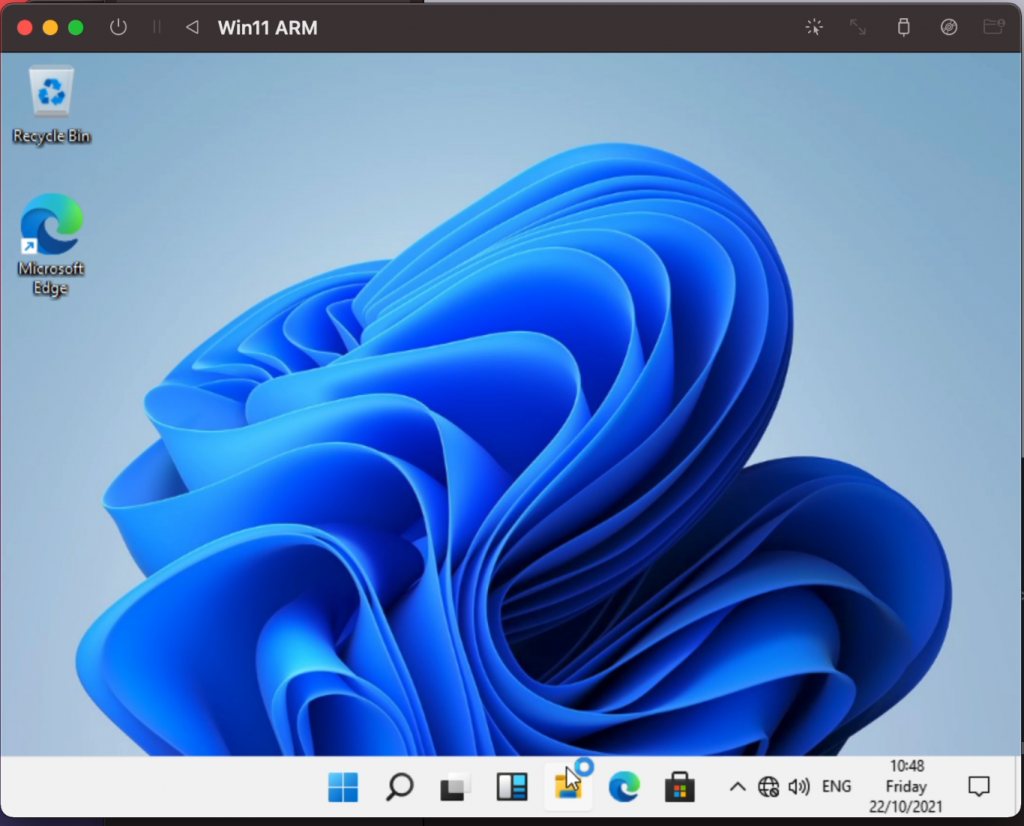
After completing the questions, the installation is getting finalized:

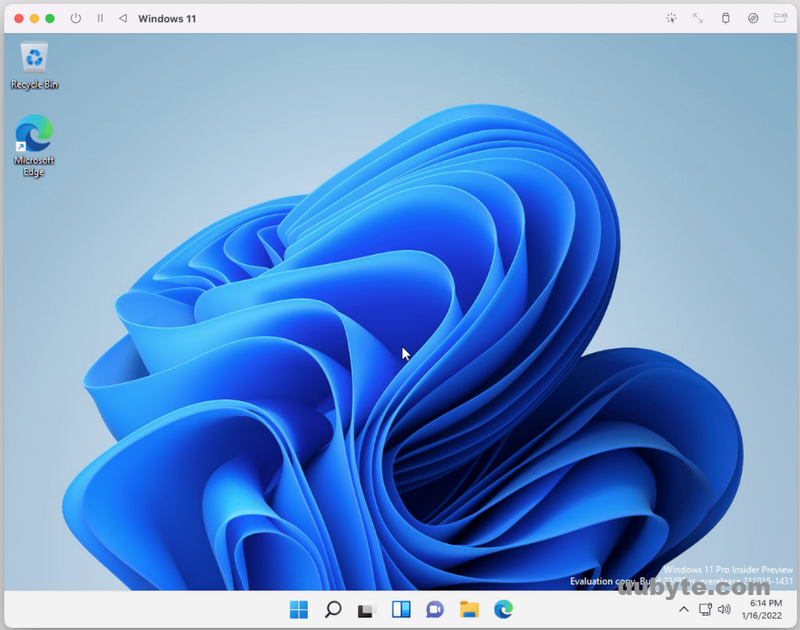
and you should end up with your fresh Windows 11 ARM desktop:
Step 5) Perform some post-installation tasks
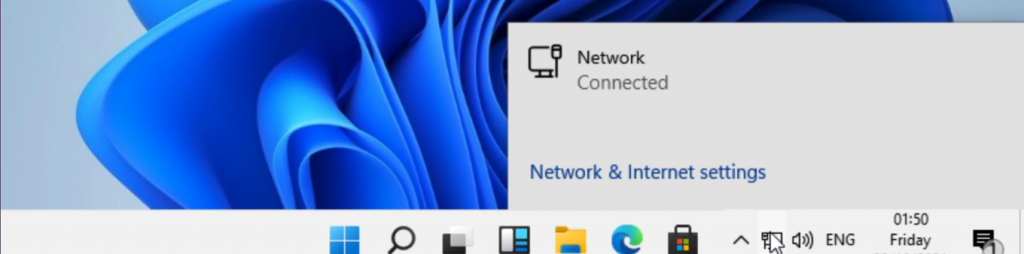
In the previous steps, we managed to get a working Windows 11 installation on the M1-based device. But if you work a bit with it, you will notice that the system is not working very optimal yet. There is no network/internet connectivity and the resolution is stuck at 800×600.
Both these issues can be resolved by installing the SPICE Guest Tools and QEMU Drivers. These can be downloaded from the Support section on UTMs website:
Open your browser on macOS, navigate to https://mac.getutm.app/support/ and download the guest tools and drivers:

Then in UTM, go to your VM in the list, select it and change the ISO for the virtual CD/DVD drive to the downloaded ISO:
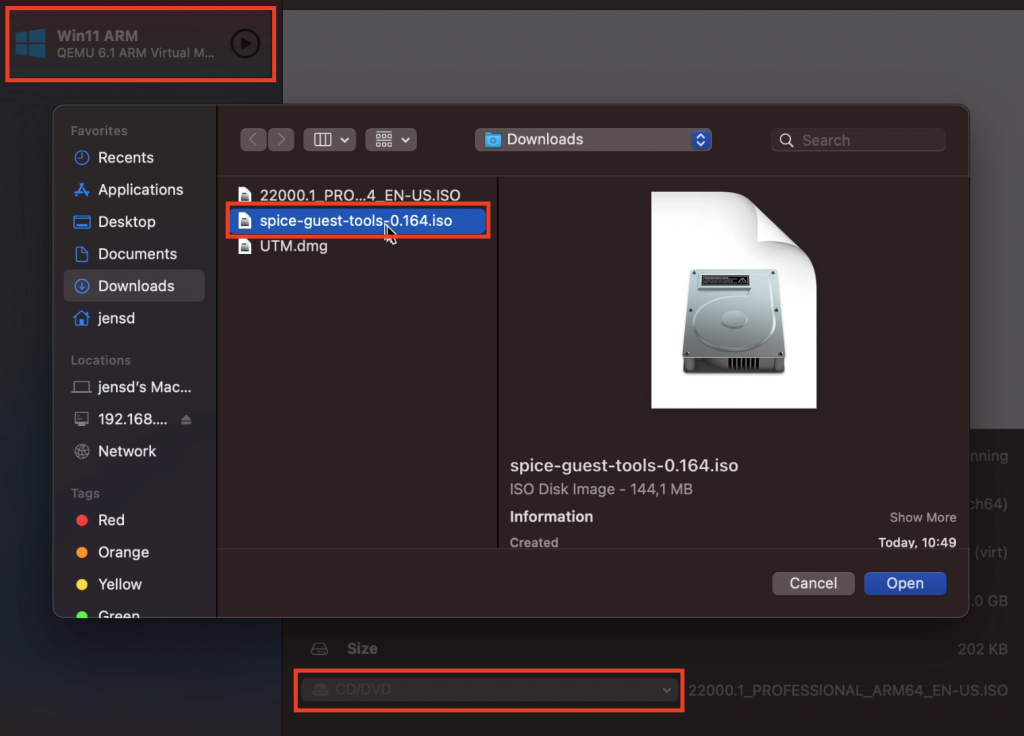
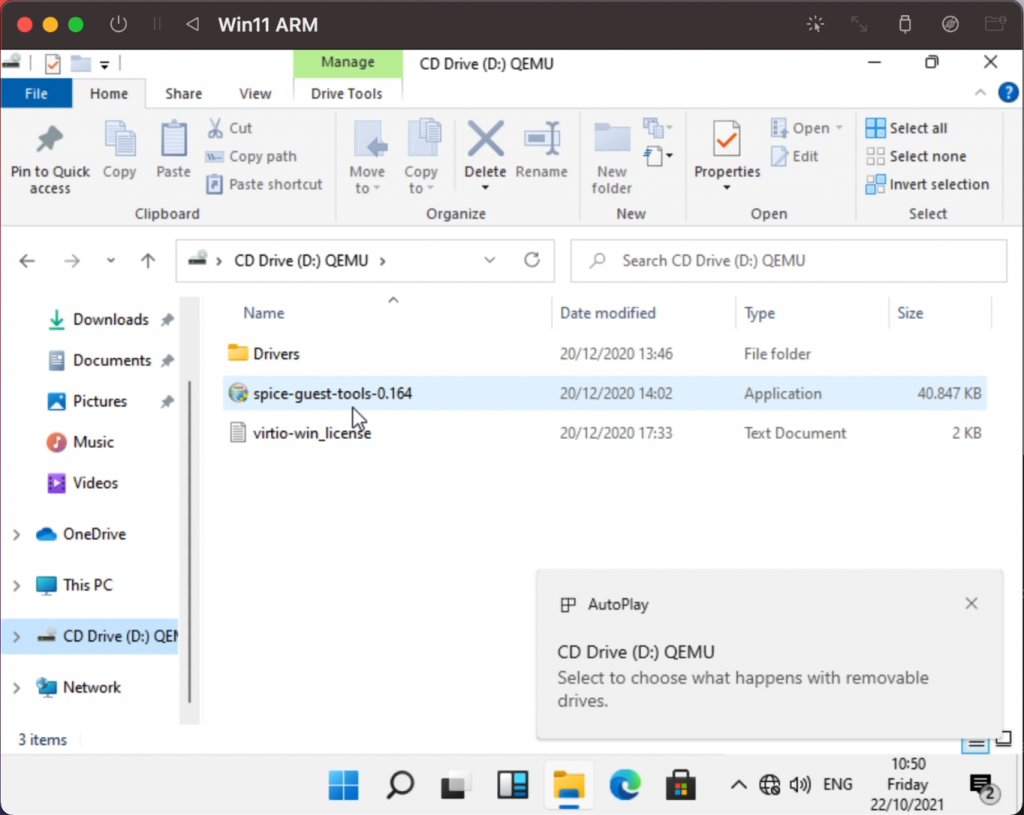
Then in your Windows 11 VM, navigate to the CD/DVD drive and run spice-guest-tools.0.164 (or the version you downloaded):
After that, you will notice that the network adapter will be available and connected:
After this step you can also change the resolution and size of the VM. To do so, right click on the desktop and choose “Display settings”. You will see that you have an additional virtual display now. Here you need to scroll down and choose to “Show only on 1”:
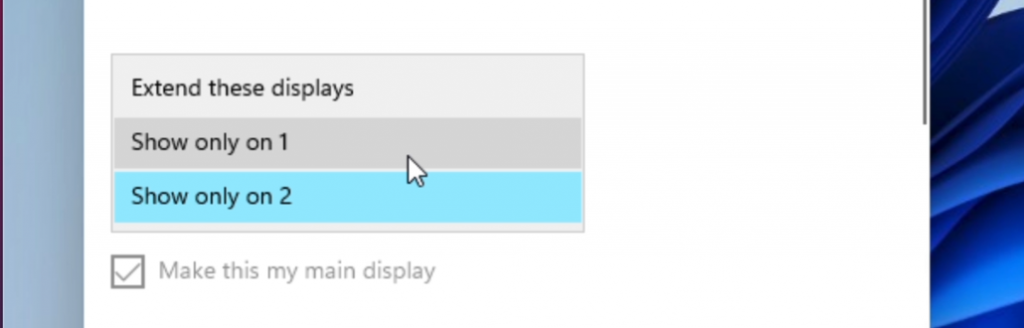
The display will flicker and you should end up with a better resolution already. When asked, choose to keep the changes. If desired, you can change the resolution to a higher value but you might notice that there can be issues with the mouse pointer being misaligned.
Best to do at this stage is a reboot. If you don’t manage with the mouse, just press Alt+F4 and reboot.
Step 6) Profit!
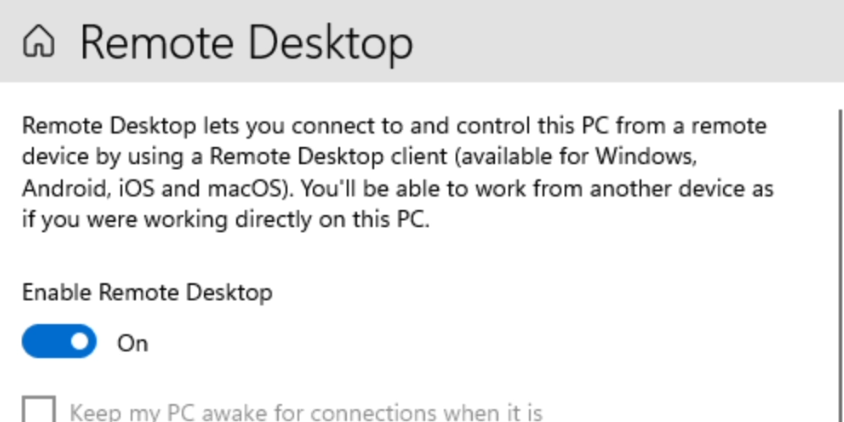
Using the VM directly might not give you the expected feeling. It feels a bit bulky/laggy although the performance really isn’t that bad. To my idea it works a lot better if you enable remote desktop and connect to it with Microsoft Remote Desktop from macOS instead.
First enable remote access on your VM:
Find the IP-address that your VM received. You can do so by opening a command prompt and run “ipconfig” or use the Settings dialogs:
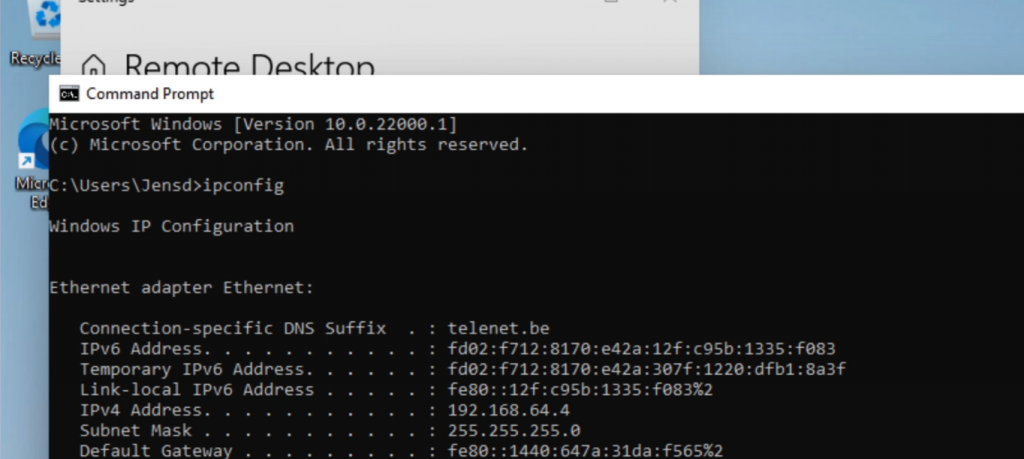
On macOS, install Microsoft Remote Desktop, you can find it in the App Store and add a PC with the IP-address which you found (192.168.64.4 in my case):

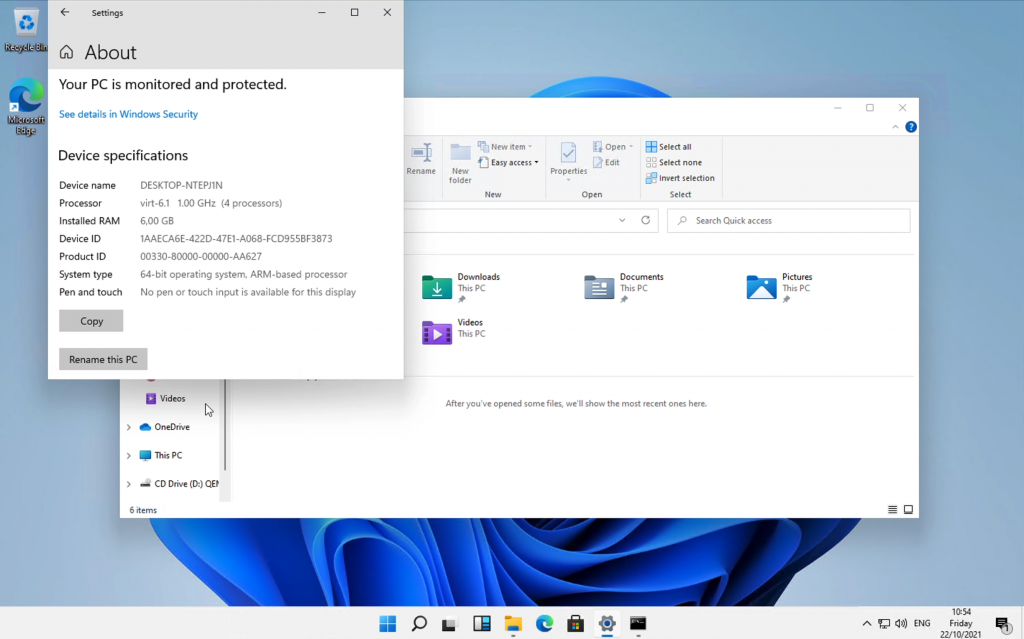
Connect to the VM’s IP address using Microsoft Remote Desktop and enter your Windows username and password. This will give you a good looking fullscreen Windows 11 experience:
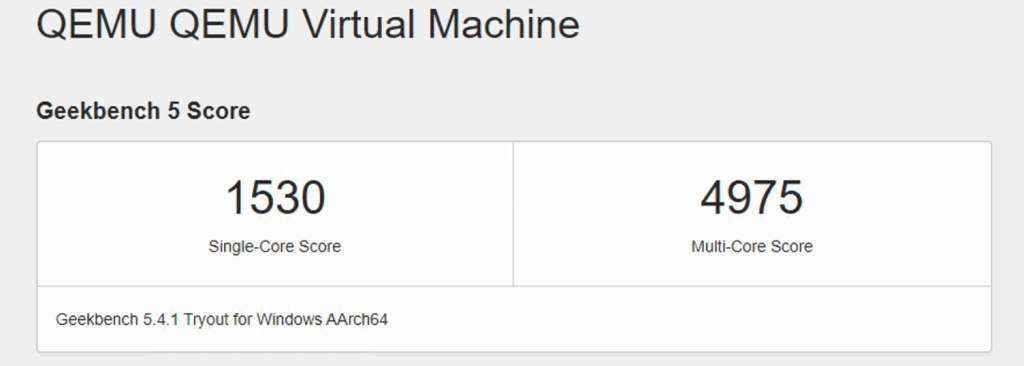
Looking briefly at the performance, with the 4 cores reserved for the VM and 6GB of RAM, the scores I managed to get from some basic benchmarks are really above expectation.
I’ll probably do another post going a bit deeper in performance but this is what I saw for Geekbench 5 for example, which is able to test on AArch64 native:
Browserbench gave a nice result as well:
As you can see, a machine with these scores is not a punishment to work with for sure.
Although it takes quite some steps and time, this process should allow you to get a Windows 11 ARM-based VM on your M1 based device.
Уровень сложности
Простой
Время на прочтение
2 мин
Количество просмотров 54K

В статье описана инструкция по установке Windows внутри MacOS.
На текущий момент автору статьи известно только два рабочих варианта:
-
Parallels Desktop — всё работает из коробки, но платно;
-
UTM — требует минимальных усилий, бесплатно;
В данной статье будет рассмотрен вариант установки через UTM.
Необходимо:
Установить brew
Необходимо в терминале выполнить команду:
/bin/bash -c "$(curl -fsSL https://raw.githubusercontent.com/Homebrew/install/HEAD/install.sh)"
Детальная инструкция по установке есть на официальном сайте.
Установить инструменты разработчика xcode
Необходимо в терминале выполнить команду:
xcode-select --install
Установить UTM
Необходимо в терминале выполнить команду:
brew install utm
Установить qemu
Необходимо в терминале выполнить команду:
brew install qemu
Скачиваем дамп Windows
Выбираем версию Windows:
-
Windows 10
-
Windows 11
Скачиваем подходящую версию дампа с архитектурой arm64:
Выбираем язык:
Выбираем выпуск:
Скачиваем package:
Распаковываем архив, для этого два раза кликаем по нему:

В терминале необходимо перейти в скачанную папку.
И выполнить в ней команды:
brew install aria2
brew tap sidneys/homebrew
brew install cabextract wimlib cdrtools sidneys/homebrew/chntpw
sh uup_download_macos.sh
Ждём окончания загрузки, после этого в папке будет создан новый ISO-файл.
Устанавливаем образ Windows ч.1
Запускаем ранее установленную программу UTM и выбираем:


Выбираем количество ресурсов, больше — быстрее будет работать.
Выбираем размер выделяемого дискового пространства
Выбираем папку, которая будет общей для систем


Запускаем Windows!
Выйдет вот такое окно и нужно успеть нажать какую-нибудь клавишу! Если не успели, то можно перезапустить виртуальную машину.
Необходимо набрать команду:
exit

Выбираем Boot Manager
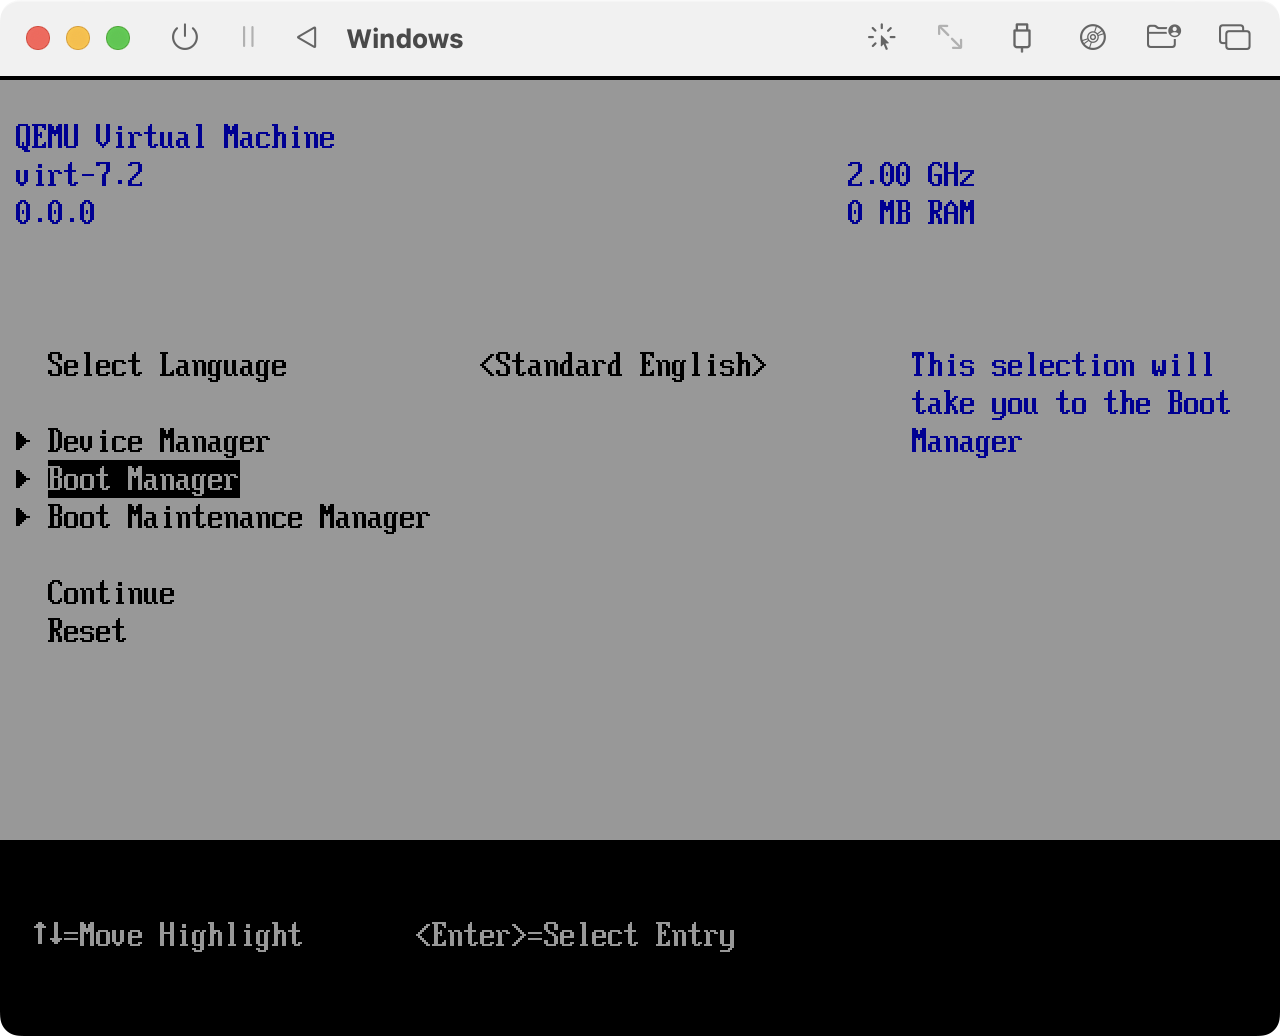
Выбираем первый пункт:


Устанавливаем образ Windows ч.2
Далее следует стандартная процедура установки windows
На выходе мы получаем вот такой результат.
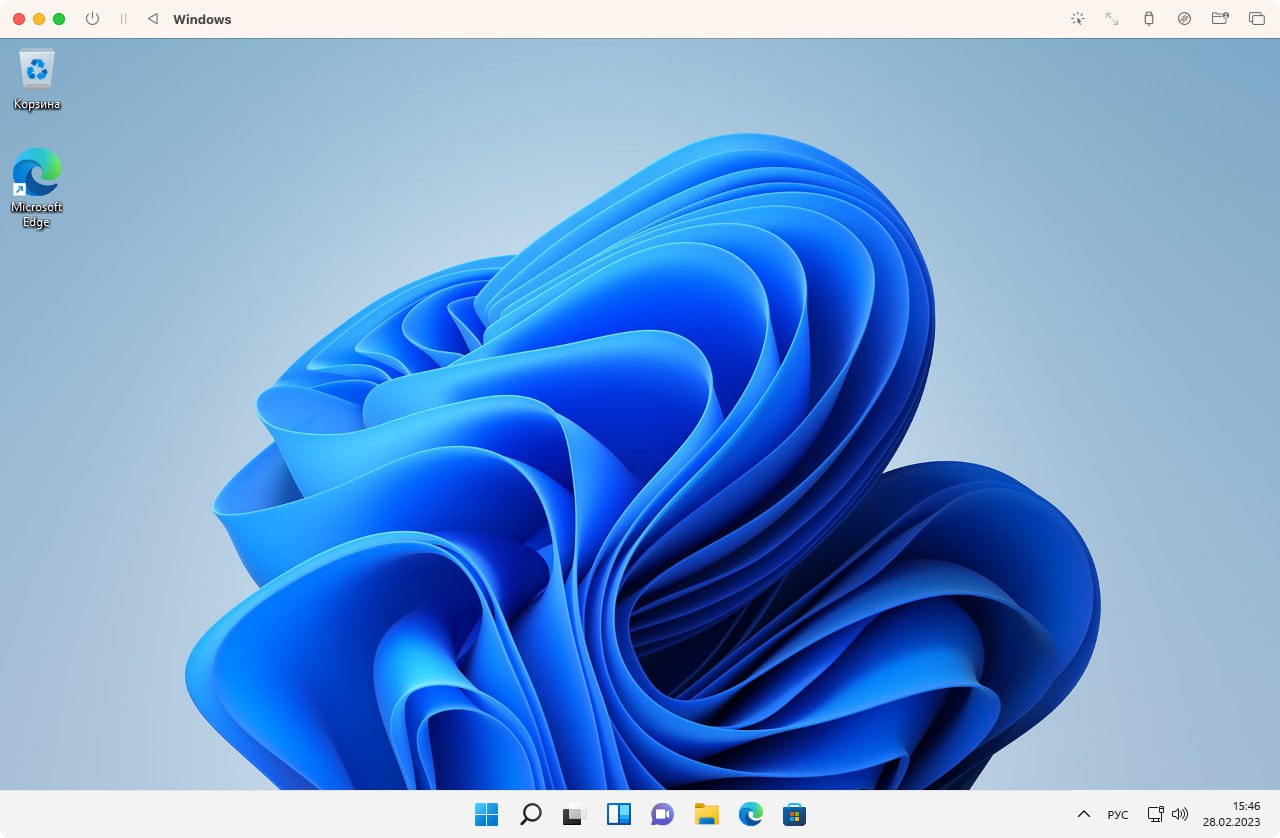
Table of Contents
1
Today, we’re going to focus on a topic that many tech enthusiasts have been curious about: How to install Windows 11 on a Mac using UTM. If you’re a Mac user who wants to take advantage of the exciting features and capabilities offered by Microsoft’s latest operating system, Windows 11, then this guide is for you.
In this blog post, we will provide you with a comprehensive, step-by-step guide on how to install Windows 11 on your Mac using UTM. From downloading the necessary files to configuring the virtual machine, we’ll cover everything you need to know to get started with Windows 11 on your Apple device. So, let’s dive in and explore the world of virtualization and cross-platform capabilities!

Can You Install Windows 11 Directly on a Mac?
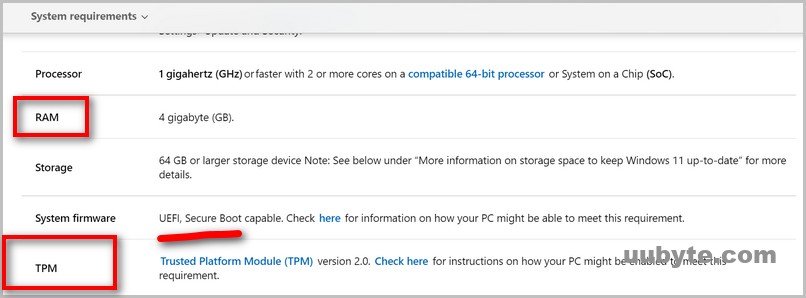
No. According to the system requirements of Windows 11, Mac is not eligible to install Windows 11 because Apple don’t ship TPM chip with all Macs. This means you can’t install Windows 11 natively both Intel and Apple Silicon Mac even with Bootcamp app.
Currently, the only way to install and run Windows 11 on a Mac is through a virtual machine, such as UTM, Parallels Desktop or VMware Fusion.
Introduction to Virtual Machine Technology
Virtual Machine (VM) technology has revolutionized the way we utilize computing resources by enabling multiple operating systems to run concurrently on a single physical machine. In this introduction, we will explore the fundamentals of virtualization, its benefits, and how it has transformed the way businesses and individuals operate in today’s digital landscape.
At its core, virtualization is the process of creating a virtual environment that emulates the functionality of a physical computer system. This environment, known as a virtual machine, allows users to run multiple operating systems and applications on a single piece of hardware. VM technology is made possible through the use of virtualization software, also known as a hypervisor, which manages the distribution of system resources like CPU, memory, storage, and networking among the virtual machines.
The adoption of virtual machine technology offers numerous advantages, including:
Resource Efficiency: VMs enable better utilization of hardware resources by running multiple virtual machines on a single physical machine, reducing the need for additional hardware and lowering costs.
Flexibility: VMs allow users to run various operating systems and applications simultaneously, catering to diverse needs and workloads.
Scalability: Virtualization makes it easy to scale computing resources up or down, depending on the requirements, without the need for physical hardware adjustments.
Isolation and Security: Each virtual machine operates in a separate environment, ensuring that issues or vulnerabilities in one VM do not affect others. This isolation is particularly valuable for testing, development, and deploying secure systems.
Simplified Backup and Recovery: VMs can be easily backed up and restored, ensuring rapid disaster recovery and reducing downtime.
Virtual machine technology has become an essential component in modern IT infrastructure, providing a versatile and efficient platform for businesses and individuals to maximize their computing resources. As virtualization continues to evolve, its impact on the computing landscape will only continue to grow, driving innovation and optimization across various industries.
What is UTM
UTM is a powerful and free virtualization tool that enables Mac users to run different operating systems on their machines, without the need for dual-booting or partitioning. UTM is built on top of QEMU, a well-known and widely used open-source processor emulator and virtualization solution. By creating a virtual environment within macOS, UTM allows you to run Windows 11 seamlessly, side-by-side with your favorite Mac apps.
Why Choosing it over Parallels Desktop
Here are some reasons why you might choose UTM over the premium Parallels Desktop app, the most popular virtual machine app for Mac:
Cost: UTM is an open-source software, which means it is available for free. In contrast, Parallels Desktop is a commercial product that requires a paid subscription or a one-time purchase. If you’re on a tight budget or prefer not to spend money on virtualization software, UTM is a more cost-effective choice.
Open-source community: As an open-source project, UTM benefits from contributions by developers worldwide, fostering a collaborative environment for continuous improvements and updates. This also means that the source code is publicly available, allowing users to audit it for security or customize it to their specific needs.
Compatibility: UTM supports a wide range of guest operating systems, including Windows, Linux, and other Unix-based systems. While Parallels Desktop is primarily designed for running Windows on macOS, UTM offers more flexibility in terms of the operating systems you can run.
Lightweight solution: UTM is a relatively lightweight virtualization tool compared to Parallels Desktop, which makes it suitable for users who prefer a simpler interface and minimal resource usage.
Installing Windows on a Mac using UTM involves several steps, including downloading the necessary files, setting up a virtual machine, and installing Windows 11 within the virtual environment. Follow the steps outlined below to get started:
Step 1: Visit the UTM official website (https://getutm.app/) and download the latest version of UTM for macOS. Once downloaded, install UTM by dragging the application into the Applications folder.
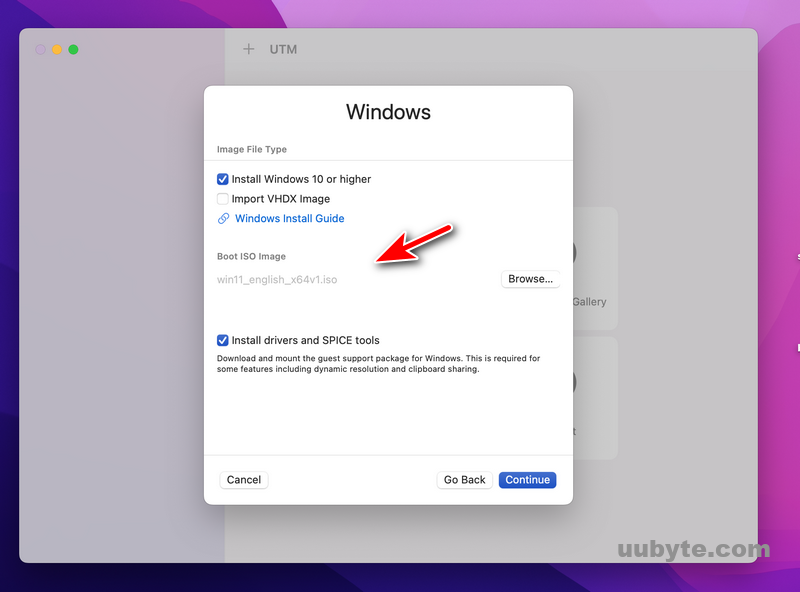
Step 2: Obtain Windows 11 ISO: Download the Windows 11 ISO file from Microsoft’s official website or from other legitimate sources. Ensure that you download the appropriate edition and architecture (64-bit) for your needs.
Step 3: Open the UTM application on your Mac. Click the «+» button in the top-left corner to create a new virtual machine.
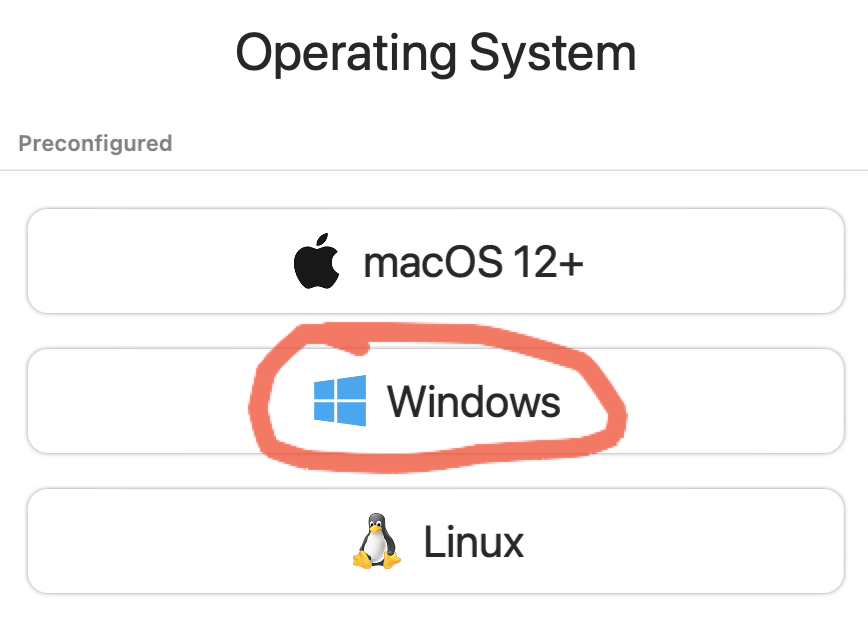
Step 4: Give your virtual machine a name and select «Microsoft» as the OS Family and «Windows 11» as the OS Version.
Step 5: Import Windows 11 ISO into UTM app.
Step 6: Under the System tab, allocate the desired amount of RAM and CPU cores to the virtual machine based on your Mac’s hardware resources. For a smooth experience, it’s recommended to allocate at least 4 GB of RAM and 2 CPU cores.
Step 7: Click on the Drives tab and add a new drive by clicking the «+» button. Change the drive type to «CD/DVD,» and then click the «Path» button to locate and select the Windows 11 ISO file you downloaded earlier. Additionally, add another drive for storage with the type «Disk Image» and set its size according to your requirements (a minimum of 64 GB is recommended for Windows 11).
Step 8: Click the «Save» button to save your virtual machine configuration. Then, click the «Start» button to boot up the virtual machine using the Windows 11 ISO.

Step 9: Within the virtual machine, follow the on-screen instructions to create a Windows bootable USB and install Windows 11 within it. You may need to create and format a partition during the installation process, using the allocated disk space you set earlier.

Step 10: After Windows 11 has been installed, restart the virtual machine. Now, you should be able to boot into Windows 11 within your UTM virtual machine on your Mac.
Remember that the performance of Windows 11 within UTM may not be as fast as running it natively or using other virtualization software like Parallels Desktop. However, UTM allows you to experience Windows 11 on your Mac without any additional costs.
Frequently Asked Questions
Here are some frequently asked questions (FAQs) related to installing Windows 11 on a Mac using UTM:
Can I run Windows 11 on an older Mac using UTM?
Yes, you can run Windows 11 on an older Mac using UTM, provided your Mac meets the minimum system requirements for Windows 11 and has enough resources to allocate to the virtual machine. Keep in mind that performance may not be optimal on older hardware.
Is it legal to install Windows 11 on a Mac?
Yes, it is legal to install Windows 11 on a Mac using virtualization software like UTM or Apple’s Boot Camp Assistant. However, ensure that you obtain a legitimate copy of Windows 11 and follow Microsoft’s licensing guidelines.
Can I use UTM to install other operating systems on my Mac?
Yes, UTM supports various guest operating systems, including different versions of Windows, Linux distributions, and other Unix-based systems. You can create multiple virtual machines with different operating systems based on your requirements.
How does the performance of Windows 11 on UTM compare to other virtualization solutions like Parallels Desktop?
UTM may not provide the same level of performance as commercial virtualization solutions like Parallels Desktop. However, UTM is a free, open-source option that allows you to run Windows 11 on your Mac without additional costs. If performance is critical for your use case, you might consider a commercial solution like Parallels Desktop.
Can I use Windows applications on my Mac using UTM?
Yes, once you have installed Windows 11 on a virtual machine using UTM, you can install and use Windows applications within the virtual environment. However, the performance of these applications may vary depending on your Mac’s hardware resources and the virtual machine’s allocated resources.
Can I access files on my Mac from the Windows 11 virtual machine?
Yes, you can access files on your Mac from the Windows 11 virtual machine by setting up shared folders between the host and guest operating systems. This can be done by configuring the virtual machine settings in UTM and using file sharing options within Windows 11.
How can I transfer files between macOS and the Windows 11 virtual machine?
You can transfer files between macOS and the Windows 11 virtual machine using shared folders, as mentioned above, or by using external storage devices like USB drives, which can be connected to the virtual machine through UTM’s settings.
Video Tutorial: How to Install Windows 11 in UTM (M1 Mac)
Summary
Installing Windows 11 on a Mac with UTM offers an accessible and cost-effective solution for users who want to experience the features and capabilities of Microsoft’s latest operating system on their Apple devices. By leveraging the power of virtualization technology, UTM enables seamless integration of Windows 11 within macOS, providing flexibility and convenience without the need for dual-booting or partitioning. Although UTM might not deliver the same level of performance as commercial virtualization solutions like Parallels Desktop, it remains an appealing option for users who prefer a free, open-source alternative.
Following the steps outlined in this guide, you can easily set up and run Windows 11 on your Mac, allowing you to enjoy a broader range of applications and explore the benefits of both operating systems. As virtualization technology continues to evolve, the potential for running multiple operating systems on a single device will only expand, further enhancing productivity, versatility, and cross-platform capabilities for users across the globe.
Here’s a free and faster way to get Windows 11 on your Mac
by Alexandru Poloboc
With an overpowering desire to always get to the bottom of things and uncover the truth, Alex spent most of his time working as a news reporter, anchor,… read more
Updated on
- Tired of running Windows 11 on your Apple M1 through Parallels and want a free and faster experience?
- The UTM virtual machine is the tool to look out for, and it seems users are more than pleased with their results.
- Windows 11 runs smoothly, and absolutely everything works fine, so here’s a guide on how to do so yourself in case you want to have a go.
Ever since Windows 11 was revealed to the world, and even before, we’ve been talking about running it on Apple PCs with the help of Virtual Machines (VM). Users have gotten used to installing it using Parallels, on Apple M1 devices, and the OS even received exclusive x64 Windows on ARM emulation.
We’ve seen the OS installed on all sorts of devices, from smartphones to NUCs, so it should come as no surprise. However, the question is how well Windows 11 runs on an Apple M1 device through a UTM VM. Let’s find out, shall we?
Can you install Windows 11 on M1 Mac?
Even though Windows 11 doesn’t run badly at all when you emulate it through Parallels, the answer to the question above will surely please you even more. Yes, you can install Windows 11 on an M1 Mac.
While this may sound like great news in face view, it doesn’t exclude the stringent system requirements that your device should meet to run the OS. This also applies to Mac users. One of the most important features required is TPM.
Microsoft does not officially support the hardware, so some issues may arise when installing Windows 11 on the device. However, if the computer meets the minimum requirements for the operating system, then it should be able to run Windows 11 without any problems.
How we test, review and rate?
We have worked for the past 6 months on building a new review system on how we produce content. Using it, we have subsequently redone most of our articles to provide actual hands-on expertise on the guides we made.
For more details you can read how we test, review, and rate at WindowsReport.
Also, judging from the first few trials, the attempts were all met with success, and the OS performance was an unexpected bonus.
A recent Reddit post that caught our attention, discussing the same subject, further explains just how efficient Windows 11 seems to be on these Apple M1 chips if you use the right VM for the job.
Everything is snappy and fast, including heavier programs like Microsoft Teams. Sound and video also work perfectly.
How can I run Windows 11 for free on M1 or M2 Mac?
Before you get to installing Windows 11 on your Mac, ensure your device meets the following requirements:
- Make sure your computer meets the minimum requirements for running Windows 11.
- Check for compatibility issues with any hardware or software installed on your Mac.
- Ensure you have enough space in your hard drive, preferably 100GB or more.
Once you’ve fulfilled these requirements, proceed to the next step.
- Navigate to your browser and download the UTM application.
- Wait for the program to complete download and launch it.
- Click on the + sign to Create a New Virtual Machine.

- You will need the Windows 11 ISO files so ensure you download them beforehand.
- Select Windows as the operating system you wish to virtualize.

- Click on Browse and select the Windows 11 ISO image, then hit Next.

- You’ll be required to set the amount of RAM and cores for your OS. We recommend selecting anything from 8GB upwards for a smoother performance. The amount will depend on how heavy your activities are. Once set, click on Continue.
- Confirm everything is correct from the Summary page, then click Save.
- A play button will appear on the next screen, so click on it to boot your device.

- Once it boots up, you’ll be taken through the usual Windows setup, so follow the on-screen instructions to complete the setup.
- Fix: Can’t Disable Background Blur on Windows 11
- How to Type Accents on Windows 11
- How to Disable the Insert Your Security Key Into the USB Port popup
Is the UTM virtualizer app good for Mac M1?
One of the greatest reasons why UTM is the better choice is that it is free. Of course, there exists the paid version for $10 on the Mac Store, but they are basically the same thing. The only difference is that with the free version, you’ll have to keep checking for updates and download them manually.
Another winning feature is that it is open-source, which means developers are at liberty to tweak some of its settings to meet their needs. Needless to say, this is a great option for those who also need to run Windows on their Mac for work or otherwise.
Options like Bootcamp have since become limited to Intel processors making them less available. Apple is slowly or rather quickly moving to ensure that their Macs run exclusively on Apple silicon processors: M1 and M2.
Parallels, however, requires you to get money out of your pocket. Depending on the version you chose to upgrade to, you can easily part with up to $100 for the Pro version.
Yes, in case you haven’t catched it yet, the VM we mentioned in this article, which is UTM, is free. This seems to be a great choice for making good use of the Redmond tech giant’s latest OS on an incompatible device.
Windows 11 and macOS have many similarities, so there’s no reason why you should limit yourself to only one when you can have both.
Have you tried installing Windows 11 using UTM? Share your experience with us in the comments section below.
![]()
Большинство пользователей используют Windows 11 на Apple M1 через Parallels. Однако недавно некоторые пользователи пытались запустить Windows 11 на виртуальной машине UTM на Apple Mac M1. Они обнаружили, что Windows 11 ARM работает удивительно быстро в виртуальной машине UTM на Apple Mac M1. В этой статье объясняется, как установить и запустить Windows 11 на виртуальной машине UTM на Apple Mac M1.
Требования Windows 11:
Архитектура: ARM64
Оперативная память: 8GB
Диск: 20 ГиБ
Дисплей: VGA
Инструменты SPICE: установлены
Скачать Подготовка
УТМ для Mac
Windows для ARM
Гостевые инструменты SPICE

- Откройте мастер создания ВМ, запустив UTM и нажав кнопку «+».
- Выберите «Виртуализация».
- Выберите «Окно».
- Нажмите «Обзор» и выберите загруженный Windows VHDX. Нажмите кнопку «Далее».
- Выберите количество ядер ОЗУ и ЦП, чтобы предоставить доступ к виртуальной машине. Нажмите кнопку «Далее».
- Если на виртуальной машине есть каталог, который нужно смонтировать, вы можете выбрать его здесь. Вы также можете пропустить этот шаг и выбрать каталог на панели инструментов окна виртуальной машины позже. После установки инструментов SPICE общий каталог будет доступен (см. ниже). Нажмите кнопку «Далее».
- Нажмите «Сохранить», чтобы создать виртуальную машину, затем нажмите кнопку «Выполнить», чтобы запустить виртуальную машину.
- Следуйте инструкциям установщика Windows. Если у вас возникли проблемы с мышью, вы можете отправить данные, вводимые мышью, непосредственно с помощью кнопки захвата мыши на панели инструментов. Нажмите Control + Option одновременно, чтобы выйти из режима захвата мыши. Однако иногда из-за проблем с драйвером вы можете войти в режим захвата и выйти из него, и курсор мыши снова работает нормально.
- Завершите установку и войдите в систему, чтобы продолжить установку гостевых инструментов. После того, как ISO-образ будет смонтирован на диске D:, откройте проводник Windows и перейдите к диску D:. Запустите spice-guest-tools-xxx.exe, он должен установить все драйверы, а также агент QEMU, агент SPICE (для копирования/вставки и динамического разрешения) и общие каталоги.