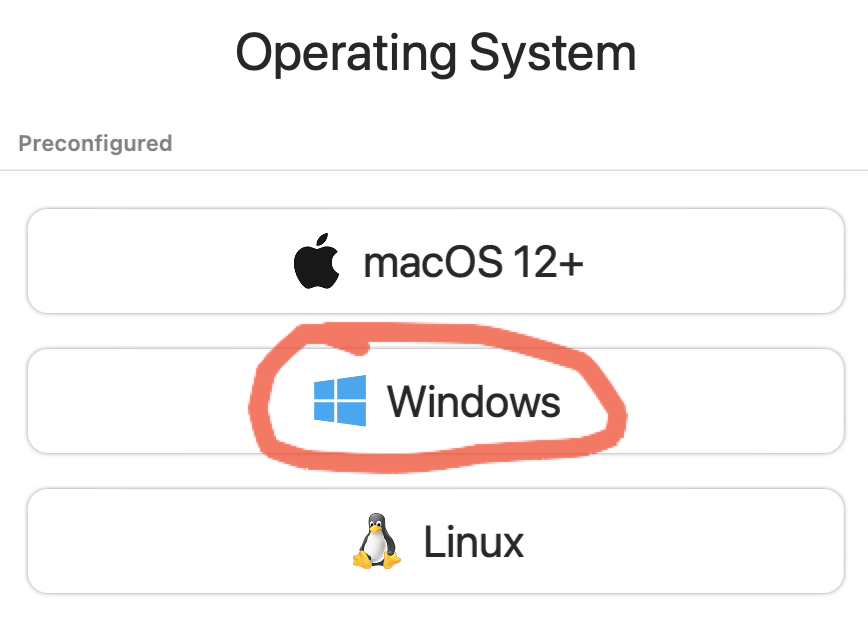
- Installation
- Windows 10 and higher
- Windows XP and higher
- Download
- SPICE WebDAV
In order to use all the features of UTM, you should install the Windows Guest Tools in the virtual machine guest. The tools support Windows XP or higher on x86_64 (excluding Windows XP), i386, and arm64 builds.
Installation
Windows 10 and higher
If the guest tools ISO is mounted on a second CD drive, then it can be installed automatically during Windows Setup.
- In the UTM new virtual machine wizard, make sure to select “Windows”
- Check “Install Windows 10 or higher”
- Check “Install drivers and SPICE tools”
Once the wizard completes, the Windows Guest Tools will download automatically and it will be mounted to the newly created virtual machine. Wait until the download completes and start the virtual machine. After finishing the installation, all drivers and the guest tools will be installed.
Windows XP and higher
If you are running an older version of Windows or if you have already completed Windows Setup, you can install the guest tools manually.
iOS
- Open the action menu and select “Install Windows Guest Tools…”
- Wait for the tools to finish downloading and it should be automatically mounted on the last removable drive.
- Start the virtual machine.
macOS
- Start the virtual machine.
- On the toolbar click the CD icon and select “Install Windows Guest Tools…”
- Wait for the tools to finish downloading and it should be automatically mounted on the last removable drive.
- Once Windows starts up and you are logged in, open “My Computer” and find the CD drive labeled “UTM”.
- Launch
spice-guest-tools-xxx.exewherexxxis the version number. - Follow the setup wizard to install the guest tools.
Download
You can manually download the guest tools ISO here.
SPICE WebDAV
If QEMU SPICE WebDAV directory sharing is enabled, you can access it from “My Computer” as a network drive.
If you do not see the network drive, run C:\Program File\SPICE webdavd\map-drive.bat.
UTM Windows 10 ARM Step by Step
What you will get from following this tutorial
Windows 10 for ARM running slowly in UTM, with limited software compatibility and possibilities compared to regular Windows 10 running in UTM.
The satisfaction of seeing the latest and most technologically advanced Windows running on your device.
What you will not get from following this tutorial
Half a day of your life back.
Windows games in UTM.
Windows software development on iPhone/iPad. (the simulation is too slow)
Special Thanks
- Contributors to the UTM Virtual Machines project
- RedHat and other contributors to QEMU
- FedoraPeople for maintaining VirtIO drivers for Windows
- Microsoft for working on Windows on ARM
- AdGuard for offering a simple way to create WoA ISO images
- The various maintainers of the Tianocore EDK2 UEFI firmware
- Members of the UTM community for troubleshooting and tips
- kitsunemimi.pw for figuring most of this out in August 2020
Requirements
26 GB of free storage space (<1 GB for UTM, 15 GB for the VM, 10 GB temporarily for the install media, <1 GB for tools).
iPhone / iPad
One of the following devices running iOS 13 or later:
- iPhone 7 Plus
- iPhone 8 Plus
- iPhone X or later
- iPad Pro 10.5″
- iPad Pro 12.9″ (2017 or later)
- iPad Pro 11″ or later
- iPad Air (2019 or later)
- iPad mini (5th generation or later) (2019 or later)
- iPad (8th generation or later) (2020 or later)
You will only have good performance if you have a 2020 model or later.
The models recommended for iOS were determined by these technical requirements:
CPU with two «high performance» cores at 2 GHz or faster and some CPU cores left over
3 GB RAM or more
Mac with macOS Big Sur or later
M1 Mac or later
Quad Core Intel Mac with 2 GHz or faster and 4 GB RAM or more
Downloads
Get the latest version of these downloaded to your device:
- UTM app (latest at time of writing is 2.0.23) https://github.com/utmapp/UTM/releases
- UTM Virtual Machine template Windows_10_for_ARM.utm.zip (caveat: future UTM versions may be incompatible, instructions on how to recreate the configuration are given at the end)
- EFI BIOS is included in the template above. You can download it separately here: All EFI firmware downloads. This EFI is compiled from Tianocore «EDK2», but the logo has been replaced and the default resolution increased.
- Windows 10 for ARM build from the Windows Insider Program (see Educational section) (at time of writing it’s 21322). There are two options:
- Official download https://www.microsoft.com/en-us/software-download/windowsinsiderpreviewARM64
- Benefits: pre-installed, known to work, no PC neededDrawbacks: decreased performance due to VMDK file format, updated less frequently
- Unofficial «UUP» file download https://uup.rg-adguard.net/index.phpSelect type: «Windows (Insider version)» Select version: first entry with «[arm64]» at the end; Select language: whatever you like; Select edition: «Windows 10 Professional» Select type download: «Download ISO compiler in OneClick! (run downloaded CMD-file)»Benefits: updated more frequently, faster thanks to UTM file formatDrawbacks: existing Windows PC (or VM) needed to make ISO file (check Educational section)
- In case the above isn’t available: check another UUP website, like https://www.uupdump.net. Might require additional software «aria2» for downloading.
- Goodies ISO file. TODO compile an ISO including the drivers, REG files and Chromium.
- Alternatively, get the latest VirtIO drivers for Windows https://fedorapeople.org/groups/virt/virtio-win/direct-downloads/stable-virtio/virtio-win.iso
Educational section
If you are unable to create a Windows for ARM ISO yourself, here is a link to a ready made ISO of version 21322. https://mega.nz/file/x8kGWaSA#ZX8vLD8N7z-RXt4ve9q7KrJT2-tAnnbhziUbv_ZOTZk
Please note that, in order to legally be allowed to use a Windows Insider Preview image, you need to be a member of the Microsoft Insider Program: https://www.microsoft.com/en-us/software-download/windowsinsiderpreviewARM64
Additionally, the Windows Insider Preview is only intended for testing purposes, and problems are to be expected. Microsoft Support is not available. Windows Insider Preview needs to be activated with a legit Windows 10 key to keep using all features.
Preparation
Download UTM app, UTM template and Windows as well as Goodies/VirtIO drivers.
Note: the UTM template includes a new virtual hard disk that can grow up to 128 GB in size. Windows on ARM uses less than 15 GB once installed.
If you want to recreate the UTM template yourself, please see the section at the end «Creating the UTM template for Windows 10 on ARM».
iOS specific preparation:
Place the Windows and VirtIO files in your On my iPhone / On my iPad folder in Files. Place the UTM template in the UTM folder in the On my iPhone / On my iPad folder.
Go to Settings app, UTM, and turn on the switch next to «Disable screen dimming when idle».
macOS specific preparation:
Double click the UTM template, it will be copied to the correct folder automatically. Place the Windows and VirtIO files in your Downloads folder.
Installing «Windows on ARM» in UTM
After completing the preparation (above), start UTM. Select the Windows 10 on ARM virtual machine, then tap the CD/DVD button at the bottom. Choose «Browse» and browse to the Windows file. You should now see the Windows file listed next to the CD/DVD button. This means the Windows virtual CD is now inserted into the VM and we can begin the installation:
- Tap Play to start the VM.
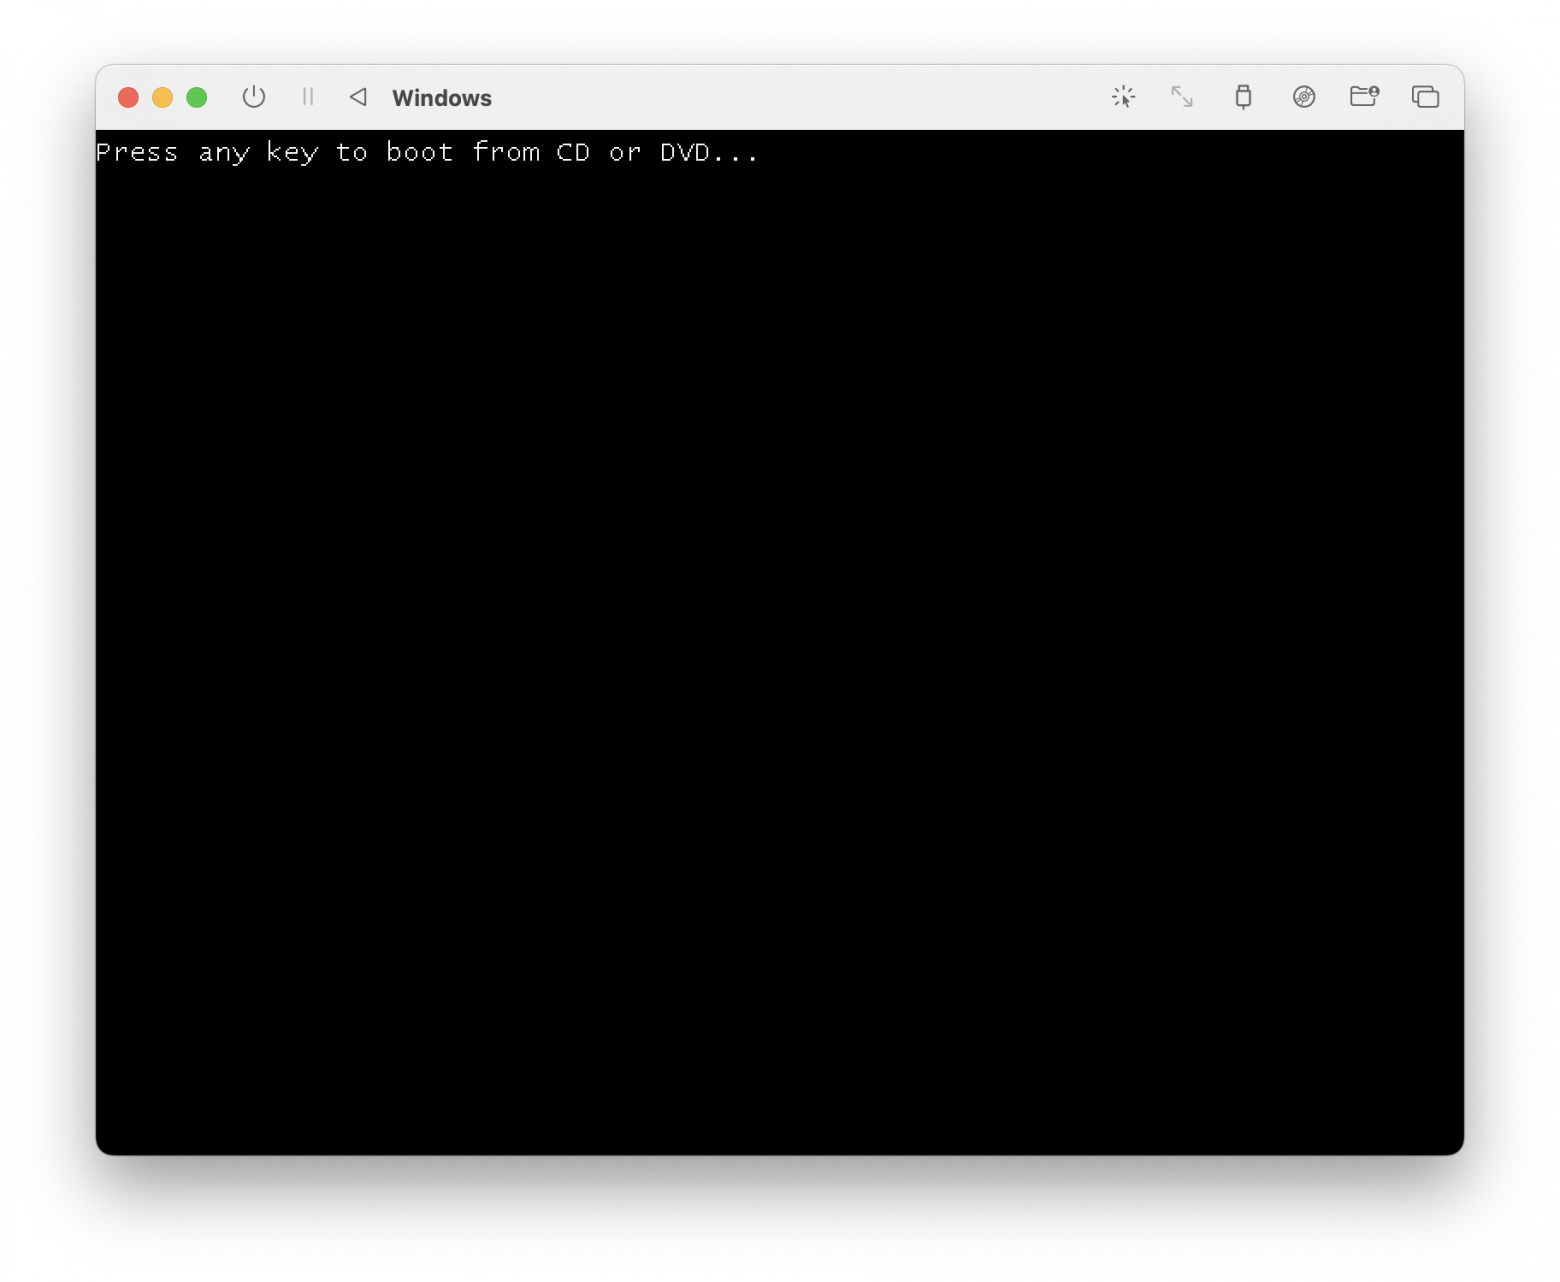
- Wait until the text «Press any key to boot from CD/DVD…» appears on the screen, then press a key on the keyboard.
The text will disappear and the Windows loading animation will appear. It will take up to ten minutes to load next interactive screen. - A window with an «Install Now» button appears, tap it. It will take up to five minutes until the next step.
- License information appears. Tap the square next to the Agree and tap Next. It will take up to one minute until the next step.
- You are asked to choose between Upgrade or Custom Install. Tap on Custom. It will take up to one minute until the next step.
- An error message informs you that disk drivers are missing.
- Tap the CD/DVD (circle with lines and circles inside) button in the UTM toolbar, then tap the CD/DVD drive and tap «Change». Browse to the Goodies/VirtIO file. Tap Done.
- In the Windows Setup error message, tap «Browse». Then, tap CD, viostor, arm64. Tap OK.
- Tap Refresh.
- Again, tap the CD/DVD button in the UTM toolbar, then tap the CD/DVD drive and tap «Change». Browse to the Windows file. Tap Done.
- Tap Refresh once more.
- Tap Next to begin the Windows installation. It will take up to two hours until the next interactive step. Keep in mind that UTM must be running and the screen must be on at all times. The VM will restart at least once, but just let it do its thing until you get to a blue screen with a Language selection.
Setting up «Windows on ARM» in UTM
This part can be pretty tricky and seems intimidating. But let’s try to make it as painless as possible. Unfortunately, because we haven’t installed network drivers yet, we can’t complete the normal Windows 10 setup. Don’t worry, the necessary steps are clearly explained and won’t take very long.
- Skip OOBE:
- CRTL SHIFT F3 to enter audit mode (reboots VM once, takes a while when logging in to Administrator)
- Cancel Sysprep Window
- TODO make .bat that applies REG files
- or Regedit manually https://www.youtube.com/watch?v=lhoMdp9qb6Q
- Create User and set as Admin
- Reboot
- Install remaining drivers
- Right click INF, install.
- Reboot at the end.
- Install Software
Chrome for ARM
https://chromium.woolyss.com/#windows-on-arm
Creating the Windows 10 on ARM UTM Template / .utm file
Create a new VM.
Information:
Change the name to Windows 10 on ARM. You can choose the icon style «Operating System» and change it to the Windows logo for bonus points.
System:
- Architecture: ARM64 (Aarch64)
- System: virt-5.2
- Memory: 1024 MB (or more, depending on your device. 1024 is the minimum for Windows 10)
- Show Advanced Settings: On
- CPU: cortex-a57
- CPU Cores: 4 Cores
- Force Multicore: On
- JIT Cache: 512 MB (optional, but speeds up the virtual system)
- QEMU Machine Properties: «highmem=off,virtualization=on»
- Boot Order: CD/DVD
QEMU: we will come back to this section after we have finished all other sections. Please keep reading.
Drives:
- Import Drive «QEMU_EFI-AARCH64-XXX-UTM-logo.fd».
Image Type: BIOS - Create Drive
Removable: Off
Interface: VirtIO
Size: at least 20 GB - Create Drive
Removable: On
Interface: USB - Tap on the removable drive you just created. Change its Interface to None (Advanced).The reason why we’re doing this is to then manually connect the drive to a USB 2 port on the VM. By default, UTM connects the drive to a USB 3 port, and Windows 10 installer seems to forget that that one exists halfway through the install — no good!
Display:
- Type: Full Graphics
- Emulated Display Card: ramfb (not virtio-ramfb!)
QEMU: (after finishing Drives section)
Scroll all the way down and add the following lines.
-device usb-ehci,id=ehci
-device usb-storage,removable=true,bus=ehci.0,drive=drive2
Double check that further up (greyed out section), there is a line similar to this:
-drive if=none,media=cdrom,id=drive2
If the number in «drive2» is different for you, change the «2» at the end of the second line above to this number.
Back
УТМ — универсальный транспортный модуль, представленный в виде сложного программного обеспечения. Необходим для отправки сведений на сервер Единой государственной автоматизированной информационной системы (ЕГАИС) о перемещениях и сбыте спиртных напитков посредством файлов формата XML. Чтобы обеспечить корректное функционирование модуля, нужно правильно его установить. При инсталляции ПО на Windows десятой версии важно учитывать ряд нюансов. В частности, требуется установка дополнительных драйверов. Рассмотрим подробно, как установить УТМ ЕГАИС на Windows 10, и разберем, по каким причинам возникают проблемы с запуском модуля.
Подберем и настроим УТМ для работы в ЕГАИС. Консультации 24 часа!
Оставьте заявку и получите консультацию в течение 5 минут.
Как установить УТМ ЕГАИС на Windows 10: подробная инструкция
Установка сервиса для работы с алкогольной продукцией возможна при наличии активного аппаратного ключа и электронной подписи. Проходит инсталляция в несколько этапов, перед началом которой проверяют компьютер на соответствие техническим характеристикам и загружают необходимые драйверы.
Системные требования
Чтобы сервис по работе с алкогольной продукцией функционировал корректно, компьютер должен отвечать следующим системным требованиям:
- Объем оперативной памяти: не менее 2 Гб.
- Частота работы процессора: 1,9 ГГц и выше.
- Объем HDD: от 50 Гб.
- Общесистемное ПО: Java 8 и выше.
Для бесперебойной передачи данных в ЕГАИС необходимо постоянное соединение с интернетом от 10 Мбит/с.
Загрузка драйверов
На первом этапе скачайте драйверы. Если используете токен JaCarta, то нужны дистрибутивы ГОСТ и PKI. Они доступны на сайте производителя аппаратных ключей в разделе «Центр загрузок». Прямые ссылки для скачивания драйверов — ГОСТ и PKI.
Если используете токен Рутокен, перейдите на сайт разработчика и скачайте последнюю версию дистрибутивов в разделе «Драйверы для ЕГАИС». В загруженных архивах находятся не только драйверы, но и инструкции по их инсталляции. Соблюдайте описанный алгоритм, чтобы правильно установить утилиты на ПК.
Завершив инсталляцию дистрибутивов, перезагрузите компьютер и установите аппаратный ключ с ГОСТ и RSA-сертификатом в порт USB. Дождитесь появления сообщения о распознавании операционной системой подключенного оборудования. Проверьте наличие и актуальность сертификатов на токены. Инструкция для Рутокен:
- Откройте панель управления программы Rutoken.
- Перейдите во вкладку «Сертификаты».
- В окне должна отобразиться информация о сертификате соответствия ГОСТ с данными организации или частного предпринимателя и сертификате с идентификационным номером ФСРАР с выводом сроков действия.
Для проверки сертификатов на токенах JaCarta используют следующую инструкцию:
- Откройте «Единый клиент» от разработчика аппаратных ключей.
- В программе выберите режим администратора.
- В окне с информацией о токене перейдите во вкладку PKI, где должна отобразиться информация о RSA-сертификате и сроке действия.
Чтобы удостовериться в наличии и актуальности сертификата соответствия Госстандарта, зайдите во вкладку «ГОСТ».
Мы готовы помочь!
Задайте свой вопрос специалисту в конце статьи. Отвечаем быстро и по существу. К комментариям
Загрузка и установка модуля
Перед загрузкой и установкой модуля извлеките другие аппаратные ключи, USB-устройства и диски. Перезагрузите компьютер и действуйте согласно инструкции:
- В меню «Пуск» найдите значок Internet Explorer и запустите интернет-обозреватель. Из предложенного списка команд выберите «Запуск от имени администратора».
- В поисковой строке браузера укажите адрес egais.ru, нажмите Enter.
- На главной странице государственной системы нажмите «Вход в личный кабинет».
- Откроется вкладка, где активируйте опцию «Ознакомиться с условиями и проверить их выполнение».
- Откроется страница для проверки выполнения условий доступа к ЛК и загрузки модуля. Активируйте опцию «Начать проверку».
- Если появится сообщение «Браузер не поддерживается», обновите Internet Explorer до последней версии. Если выводится уведомление об отсутствии установленной программной компоненты, скачайте и инсталлируйте ФСРАР Крипто 3 по предложенной ссылке. По завершении процесса закройте браузер и вновь запустите Internet Explorer. При появлении сообщения об отсутствии аппаратного ключа извлеките криптоустройство и вновь установите в USB-интерфейс.
- После завершения проверки активируйте опцию «Перейти в ЛК».
- В форме задайте PIN-код криптоключа. Идентификатор выдает Удостоверяющий центр.
- Указав PIN, кликните «Показать сертификат» и щелкните по выданному документу.
- Произойдет автоматический редирект в личный кабинет. В меню справа выберите «Транспортный модуль» и среди представленного списка щелкните по ссылке «Скачать установщик УТМ для Windows».
- Внизу страницы появится всплывающее окно, где нажмите «Выполнить».
- На компьютер загрузится программа-установщик.
- Перейдите в папку Downloads. Найдите скачанный дистрибутив и запустите от имени администратора. Начнется установка ПО. По окончании инсталляции в окне потребуется указать пароль «11111111» и сертификат, задать PIN «0987654321» и выбрать организацию. На этом установка будет завершена.
По окончании инсталляции на рабочем столе и в системном трее появится ярлык программы. При нажатии на него правой кнопкой мыши открывается меню, где доступны основные команды: «Запуск», «Прекращение работы», «Переход на домашнюю страницу» и др.
Запуск модуля на Windows 10 возможен не только из главного меню программы, но и через вкладку «Службы» на ПК. Сервис для работы с алкогольной продукцией запускается не сразу — через 5-10 минут.
Для проверки работы откройте в браузере следующий запрос: https://localhost:8080. На загруженной странице должны отобразиться сведения об установленном сервисе.
Настройка транспортного модуля
После установки проводят настройку сервиса по работе с алкогольной продукцией. Для этого выполняют следующее:
- Перейдите в раздел «Администрирование». Выберите сначала «Настройки номенклатуры», далее «Настройки обмена с ЕГАИС». Отметьте галочкой окошко «Алкоголь».
- В графе «Дата начала работы с ЕГАИС» укажите период начала формирования журнала регистрации розничного сбыта алкоголя (по умолчанию 1 января текущего года).
- В графе «Дата начала реализации спиртосодержащей продукции в единой государственной системе» укажите дату, когда планируете начать запрашивать идентификационные метки для сбыта алкоголя в рознице.
- В поле «Организации» укажите требуемые реквизиты юридического лица.
Дополнительно требуется синхронизировать работу сервиса с бухгалтерской программой. В последней выбирают опцию «Создать» и указывают в форме сведения об УТМ, формат обмена данными.
Подберем 2D-сканер для работы с ЕГАИС за 5 минут! Доставка по всей России.
Оставьте заявку и получите консультацию в течение 5 минут.
Как исправить ошибки при установке УТМ ЕГАИС на Windows 10
Нередко во время установки сервиса для работы с алкогольной продукцией пользователи сталкиваются с ошибками. Чтобы избежать их, нужно перед началом процесса инсталляции выполнить следующее:
- Отключить контроль учетной записи. Для этого в меню «Пуск» выберите «Панель управления». Во вкладке кликните на «Учетные записи пользователей», перейдите в «Изменение параметров учетных записей». Найдите пункт «Использовать контроль учетных записей для защиты ПК» и уберите напротив него галочку. Сохраните изменения и перезагрузите компьютер.
- Отключить брандмауэр операционной системы. Для этого перейдите в «Панель управления» из меню «Пуск». В разделе «Администрирование» выберите «Службы» и остановите работу брандмауэра.
- Отключите антивирус. Перейдите в настройки защитного софта и на время остановите его работу.
Если в процессе установки возникает ошибка ERROR es.programador.transport.h.e — значит, сервис по учету алкогольной продукции не видит токен. Убедитесь, что криптоключ распознан ОС — на устройстве должен гореть индикатор. В противном случае, извлеките токен из USB-разъема и подключите повторно.
Если возникает ошибка ERROR CKR_FUNCTION_FAILED — значит, указан неверный PIN токена. Перейдите в личный кабинет и вновь задайте значение идентификатора криптоключа.
Почему не запускается УТМ ЕГАИС на Windows 10
Если после установки не запускается УТМ ЕГАИС на Windows 10, в первую очередь проверьте порт 8080 — убедитесь, что он не используется другими программами. Сначала вызовите командную строку. Для этого на клавиатуре нажмите сочетание Win+R. В открывшейся форме укажите запрос cmd и нажмите Enter. В командной строке задайте запрос netstat -a -b. Появится список, где найдите строку 127.0.0.1:8080 — напротив отобразится, какой софт использует порт. Если он занят другой программой, перенастройте ее или отключите.
Если ЕГАИС не запускается на Windows 10 при наличии свободного порта, значит, причина состоит в блокировке модуля антивирусной программой. Перейдите в настройки защитного ПО. Измените параметры подключения модуля на следующие: 127.0.0.1.
Не запускается ЕГАИС на Windows 10 — когда нужна переустановка УТМ
Встроенная в операционную систему программа защиты нередко становится причиной проблем с запуском транспортного модуля. Решение кроется в проведении ряда настроек в Windows 10 и переустановке УТМ. Сначала добавьте модуль в список разрешенных служб в ОС. Для этого выполните следующие шаги:
- Откройте меню «Пуск» и в строке поиска укажите запрос «Центр безопасности ОС».
- Откроется окно, где выберите пункт «Защита от вирусов и угроз» и перейдите в раздел «Исключения».
- На открывшейся странице активируйте опцию «Добавить исключение» и укажите путь к папке с модулем. Он по умолчанию инсталлируется в корневую папку C:\UTM.
- Сохраните внесенные изменения.
Выполнив настройки ОС, приступайте к переустановке УТМ. Процесс проходит в несколько шагов:
- Перейдите в раздел с программными компонентами сервиса и найдите каталог transportDB. Скопируйте его на рабочий стол или съемный носитель.
- Откройте панель управления, выберите сначала «Программы и компоненты», далее — «Удаление и изменение программы».
- Найдите в представленном списке «ФСРАР УТМ» и удалите компонент. Перезагрузите ПК.
- На сайте ЕГАИС скачайте последнюю версию дистрибутива и выполните установку.
- Перейдите на локальный диск С, найдите UTM и скопируйте в каталог transport всю папку transportDB.
Теперь запустите УТМ и проверьте корректность его работы.
Изготовим ЭЦП для ЕГАИС. Поможем установить и настроить в день подачи заявки!
Оставьте заявку и получите консультацию в течение 5 минут.
Оцените, насколько полезна была информация в статье?
Наш каталог продукции
У нас Вы найдете широкий ассортимент товаров в сегментах
кассового, торгового, весового, банковского и офисного оборудования.
Посмотреть весь каталог
In 2020, Apple introduced Mac computers with Apple silicon, with the first chip being the Apple M1.
This was a major change, and it affected many third party applications to the point where they simply don’t run on the M1 Mac.
One application that doesn’t run on M1 Macs is VirtualBox. Prior to the M1 Mac, we could use VirtualBox to install Windows on our Mac. VirtualBox is a free virtualisation application that enables you to install virtual machines (with other operating systems) on your Mac.
Fortunately, there’s a free alternative to VirtualBox – UTM.
In this article, I install Windows 10 on an M1 Mac. The key to doing this is to use the UTM virtualisation application instead of VirtualBox.
It also involves installing the Windows 10 on ARM Insider Preview. This requires an account with the Windows Insider Program (you can register for free).
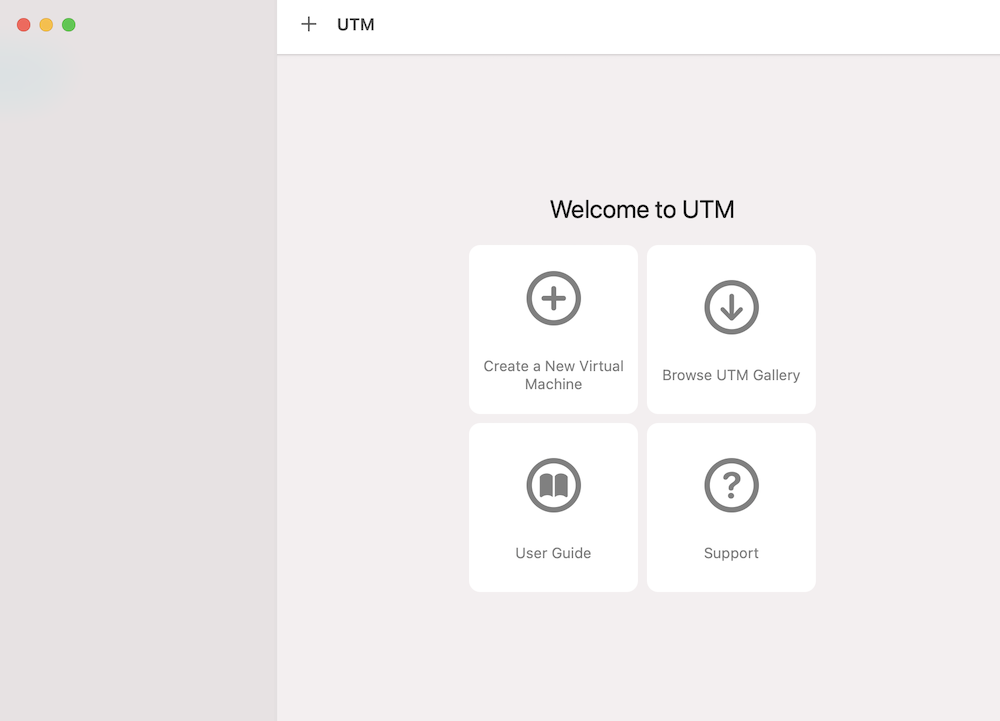
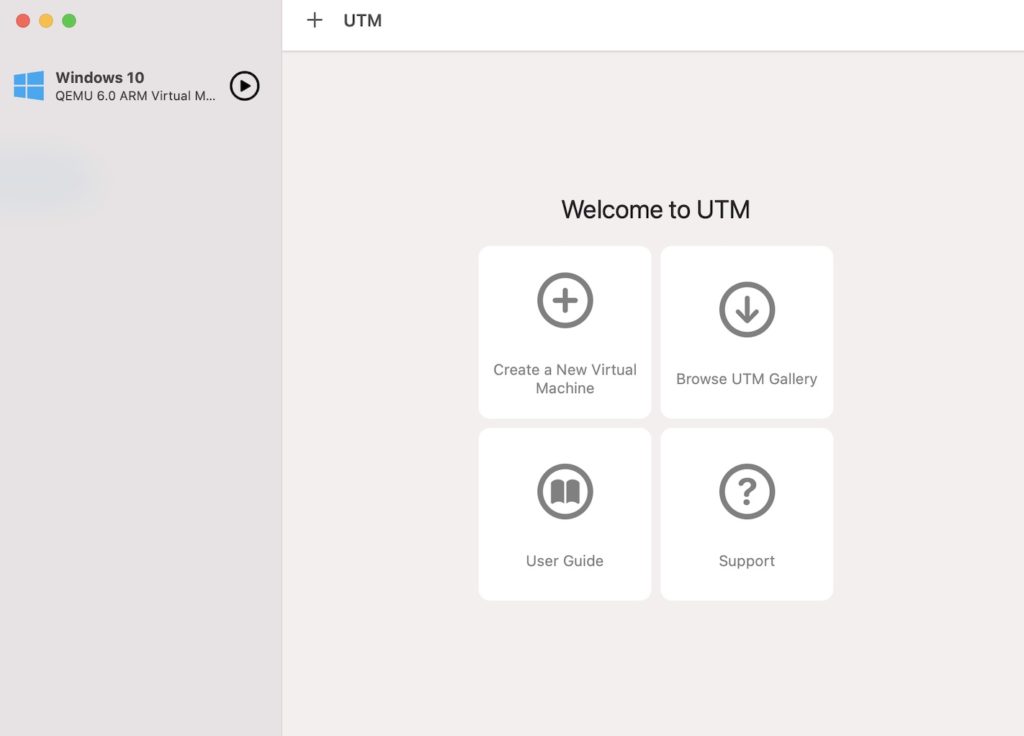
Install UTM
First step is to install UTM (it’s free). UTM employs Apple’s Hypervisor virtualization framework to run ARM64 operating systems on Apple Silicon at near native speeds.
Basically, it enables us to create virtual machines on our M1 Mac. We can use UTM to install other operating systems (such as Windows) on our M1 Mac.
So to install UTM:
- Go to the UTM website and click
Download. - Once downloaded, double click the
UTM.dmgfile to launch it. - Drag the
UTM.appicon to yourApplicationsfolder.
The program is now installed. You can open it just as you can open other applications (e.g. by double clicking on its icon).
Download Windows
- Go to the Windows Insider Preview Downloads page.
- The instructions on the page depend on whether you’re logged in, and whether you’re part of the Windows Insider Program. If you are already logged in and you’re part of the Windows Insider Program, you’re good to go. If you’re not logged in or part of the program, follow the instructions on the page to log in and/or join the Windows Insider Program. Once done, the page will display the download link for the installation file.
- Click the button to download the installation file. In my case this blue button reads Windows 10 Client ARM64 Insider Preview – Build 21354.
It’s quite a large file (mine is 9.74 GB), so it might take a while to download.
Download the SPICE Guest Tools
- Go to the UTM Support page.
- Under the SPICE Guest Tools and QEMU Drivers (Windows) heading, click Download.
We will use this later, when we install Windows.
Convert the VHDX Image to a QCOW2 Image
According to the UTM documentation, sometimes the QEMU handling of VHDX images will result in Windows becoming corrupted. To prevent this, we’re advised to convert the VHDX file to a QCOW2 file, as follows.
The following steps require that Homebrew is installed. You can install it with the command on the Homebrew website.
With Homebrew installed, open a Terminal window and run the following:
brew install qemuIf you get an error that reads “Cannot install in Homebrew on ARM processor in Intel default prefix”, your Homebrew might not be configured for your M1 Mac. In this case, try this fix.
With QEMU now installed, run the following to convert the VHDX file to QCOW2:
qemu-img convert -p -O qcow2 ~/UTM_VM/Windows10_InsiderPreview_Client_ARM64_en-us_21354.VHDX ~/UTM_VM/Windows10_InsiderPreview_Client_ARM64_en-us_21354.qcow2In my case, I’d placed both the Windows file and the SPICE guest tools into a folder called ~/UTM_VM. You can put them elsewhere if you prefer, but be sure to replace ~/UTM_VM with your own path to the file.
Also, you may need to rename the Windows file (for example, replace 21354 with the applicable number on your file).
We can now use the QCOW2 image when creating the virtual machine below. It is recommended you do this with a fresh VHDX from Microsoft in case your image was already corrupted.
Create a Virtual Machine
Now we can go ahead and use UTM to create a virtual machine with which we will install Windows 10.
Open UTM and click Create a New Virtual Machine:
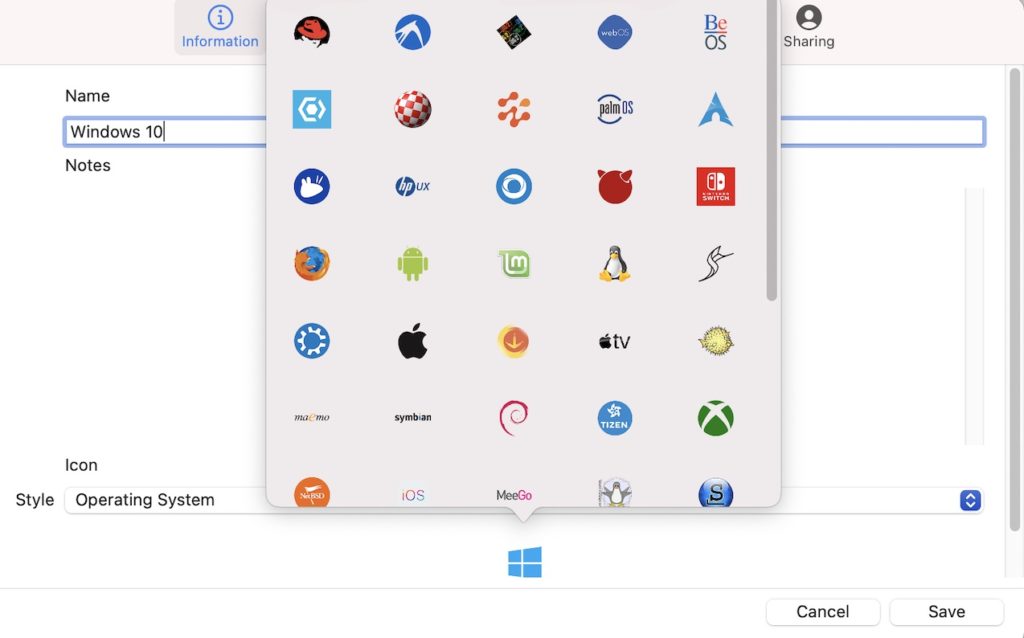
Enter a name for the VM. You can optionally choose an icon by selecting Operating System in the bottom drop down menu. This makes an icon appear below it. If its not the right icon, click it (which brings up a menu of other icons), and select the Windows icon:
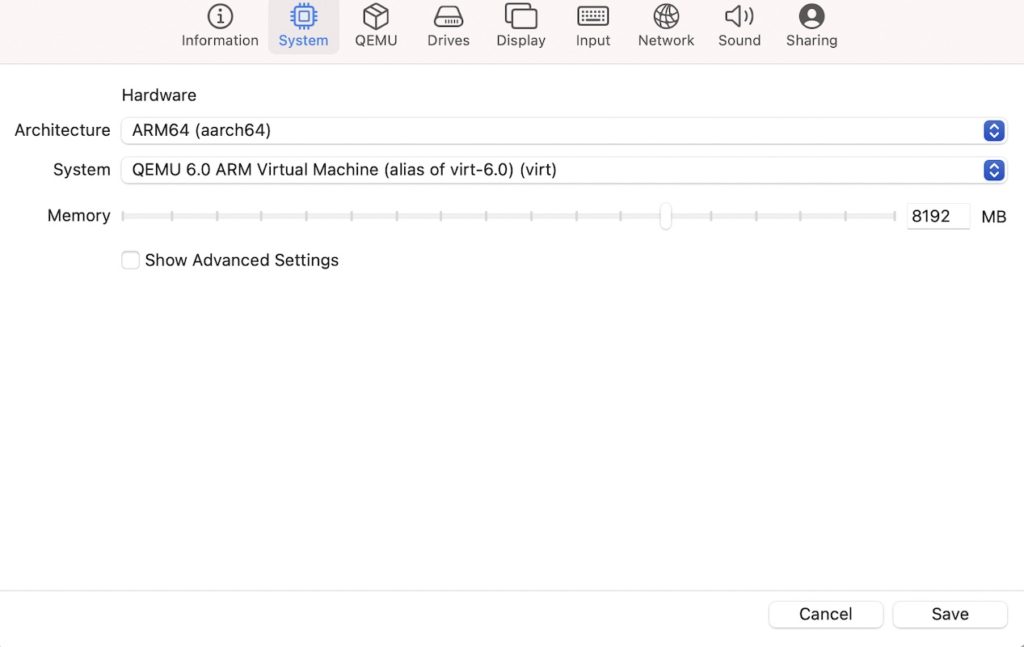
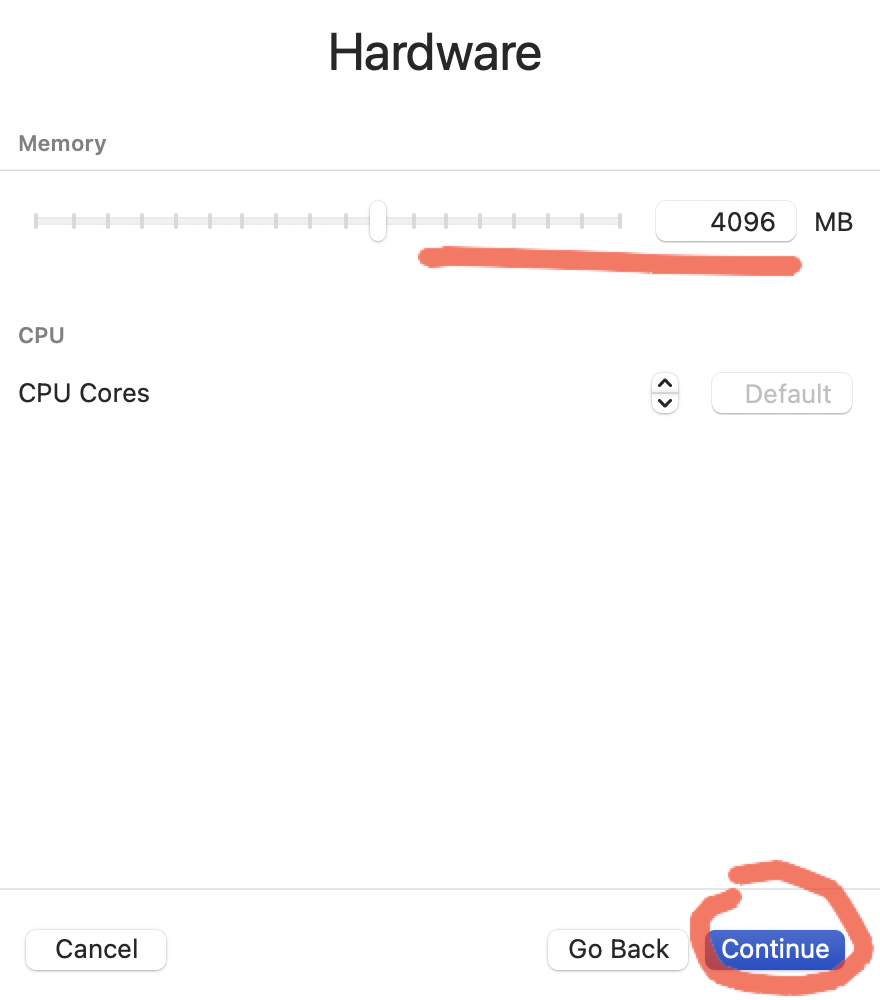
Now click the System button in the top menu and select ARM64 (aarch64) architecture. Also specify the amount of memory. At least half of your computer’s total memory is recommended for performance:
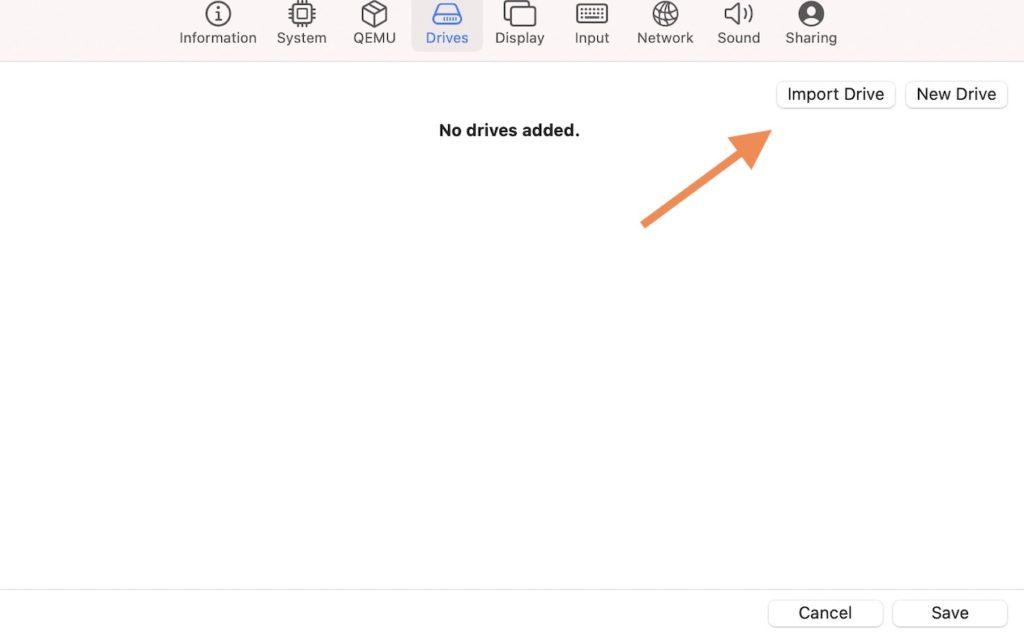
Click Drives from the top and then click Import Drive:
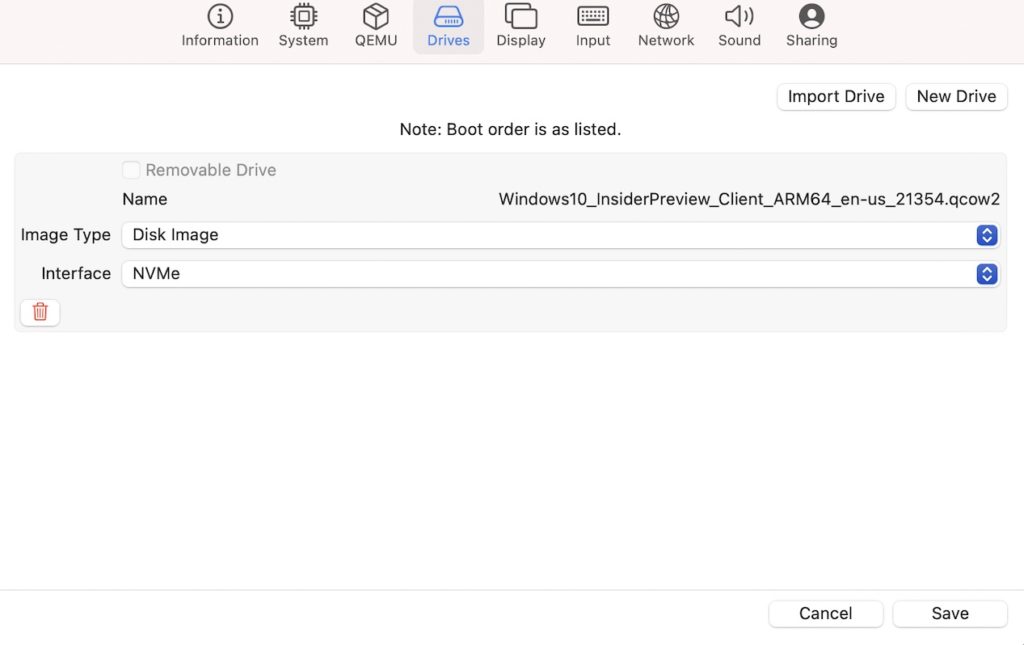
Browse to, and select the Windows 10 QCOW2 that you converted from the VHDX file previously. Once selected, set the interface to NVMe:
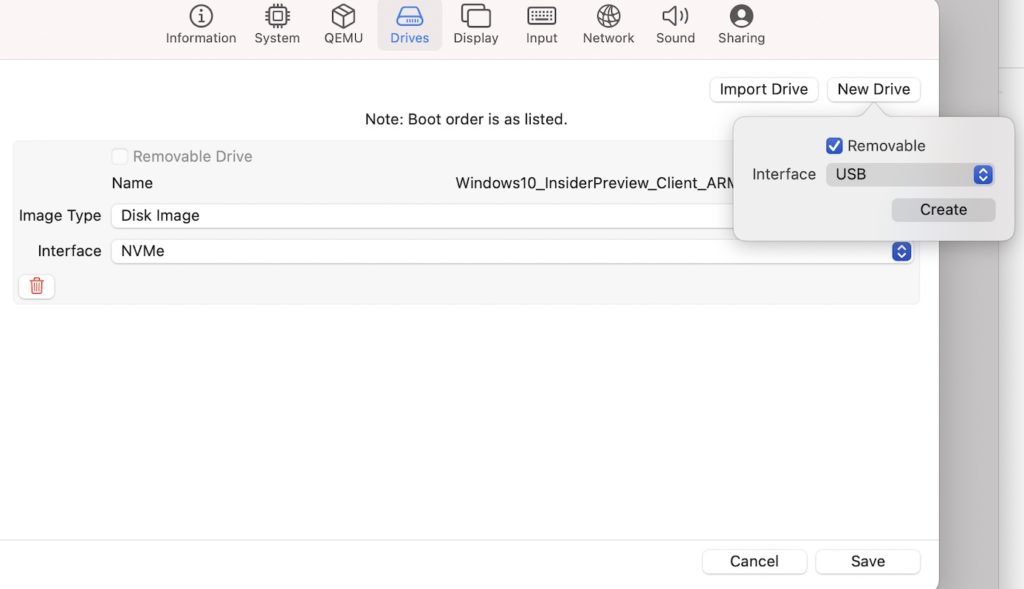
Now click New Drive and check Removable and click Create to add a CD drive:
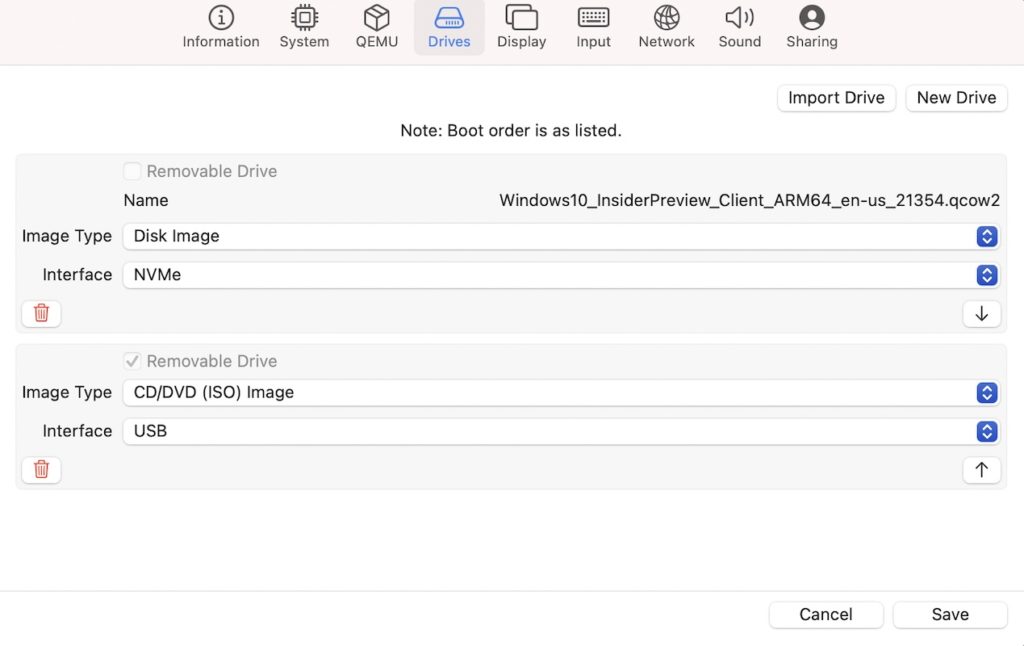
It should now look like the following screenshot. Click Save:
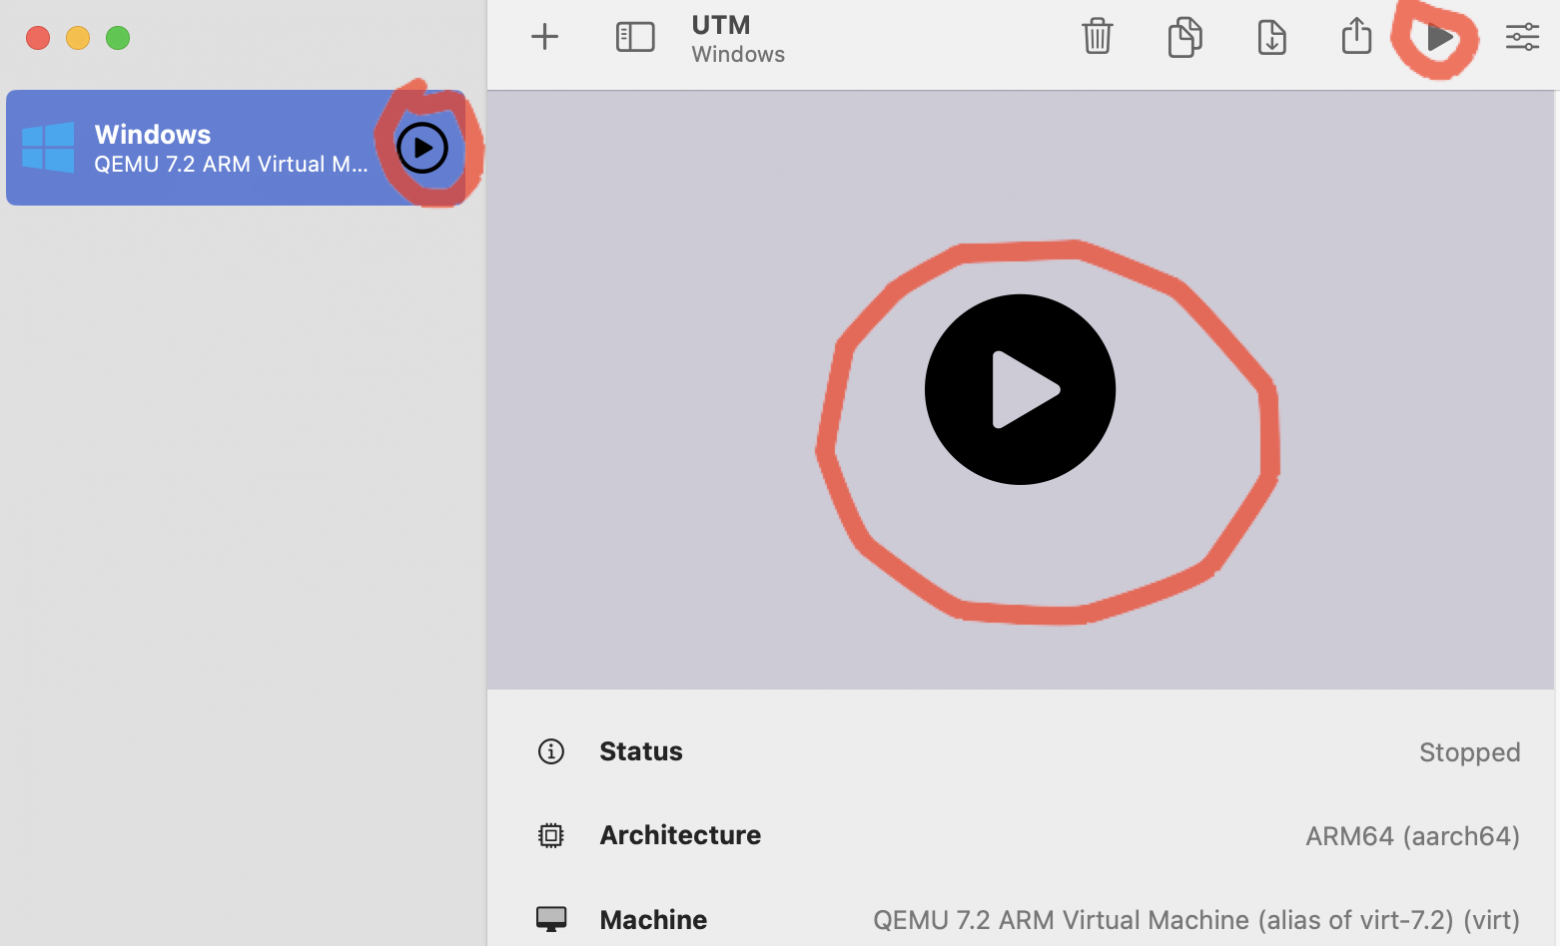
The VM now appears in the sidebar:
Click on the Windows 10 option in the left menu, and then select Browse (at the bottom of the right pane):
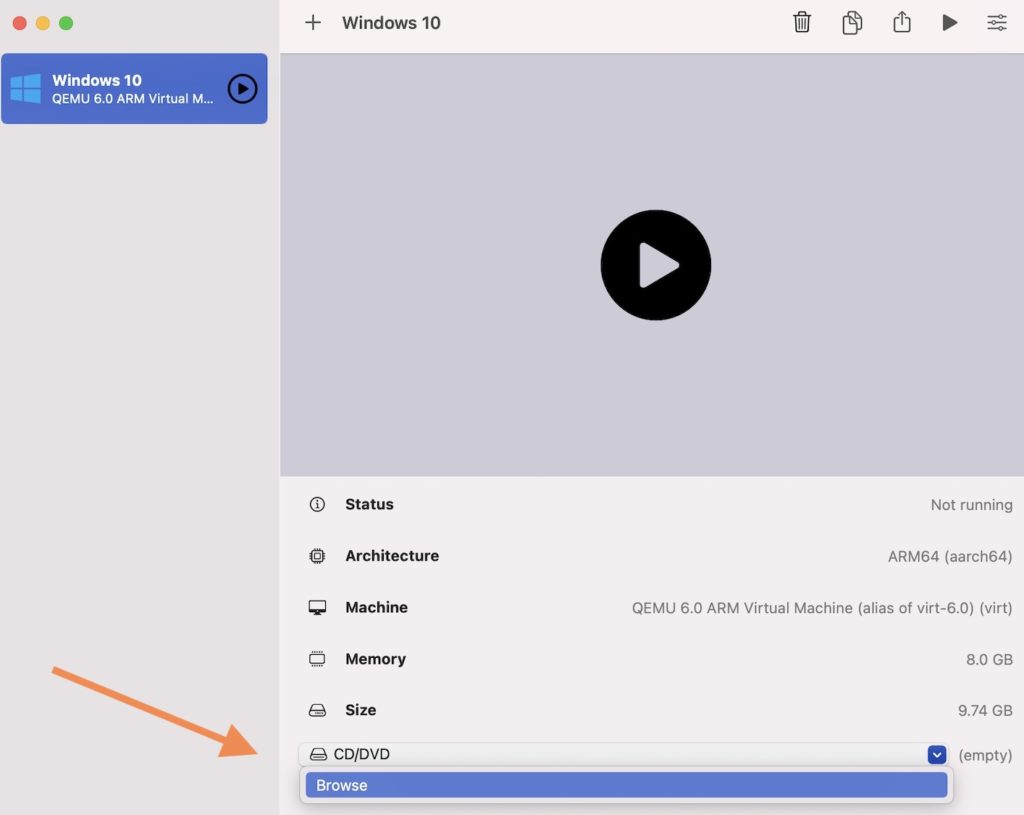
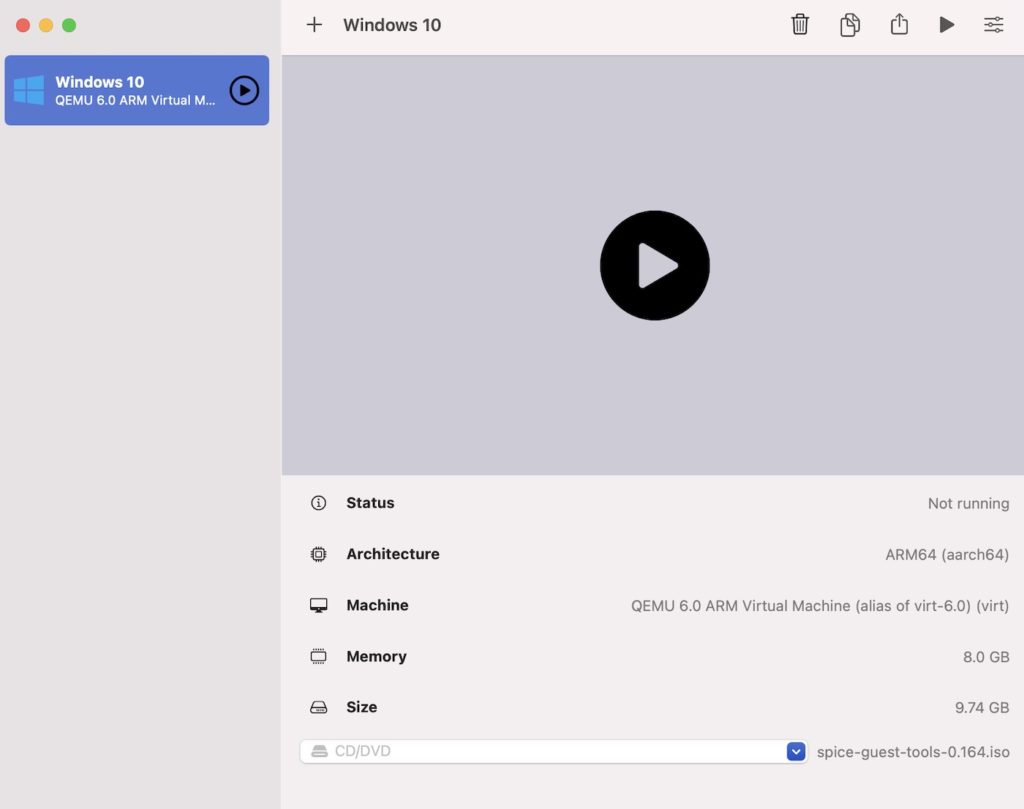
Browse to the SPICE guest tools ISO and click Open:
The name of the file now appears at the bottom of the screen, to the right of the dropdown.
The virtual machine is ready to use. If you need to change/check any of the settings, you can right click on the machine and select Edit.
We’re now all set to install Windows.
Click the big “Play” button in the middle of the screen to start the installation:
This launches a new window that boots up the Windows installation wizard:
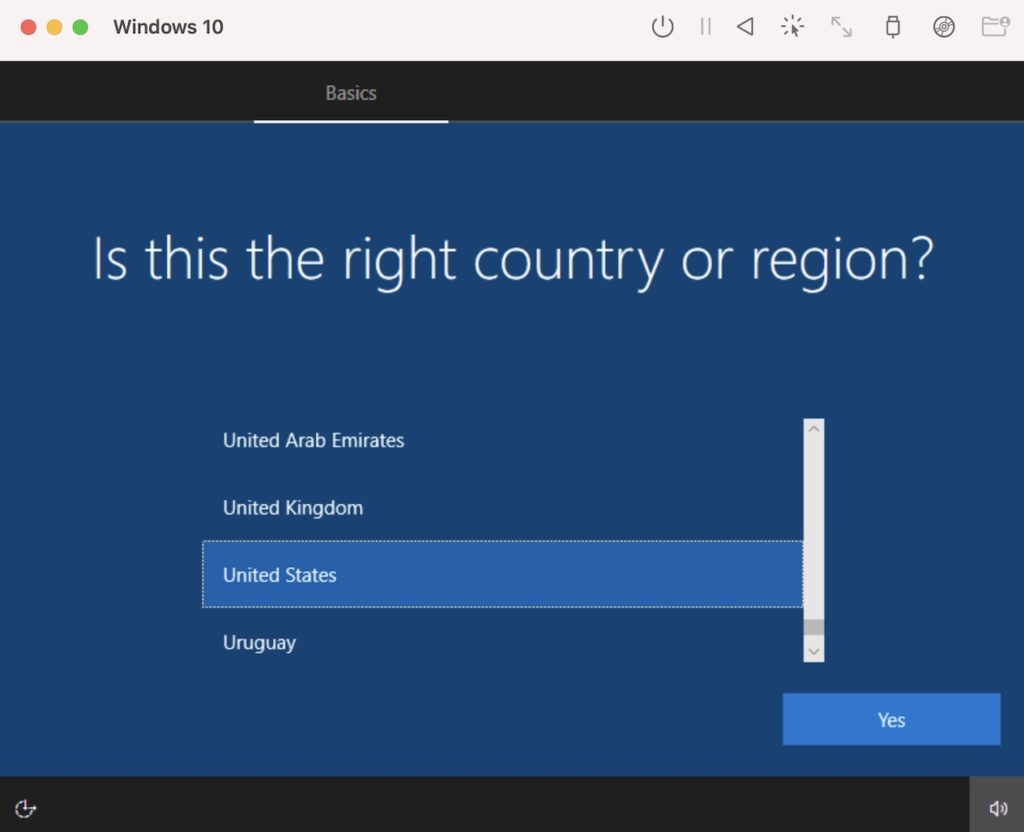
Follow the prompts to install Windows.
If you get a “no bootable device” error, check that you selected ARM64 (aarch64) architecture on your virtual machine. From the UTM main screen, right click on the the virtual machine in the left and select Edit and select the System tab.
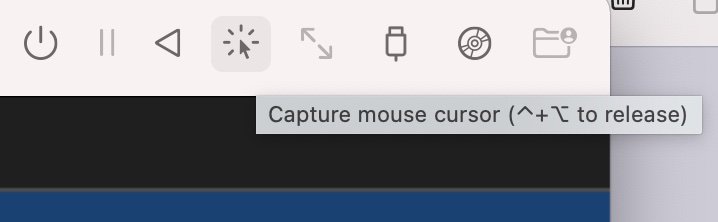
If your cursor suddenly seems to disappear, click the mouse capture button in the toolbar to send mouse input directly. Press Control+Option together to exit mouse capture mode.
When asked to connect to the internet, select I don’t have internet. This is because we won’t have internet until we install the SPICE guest tools (next).
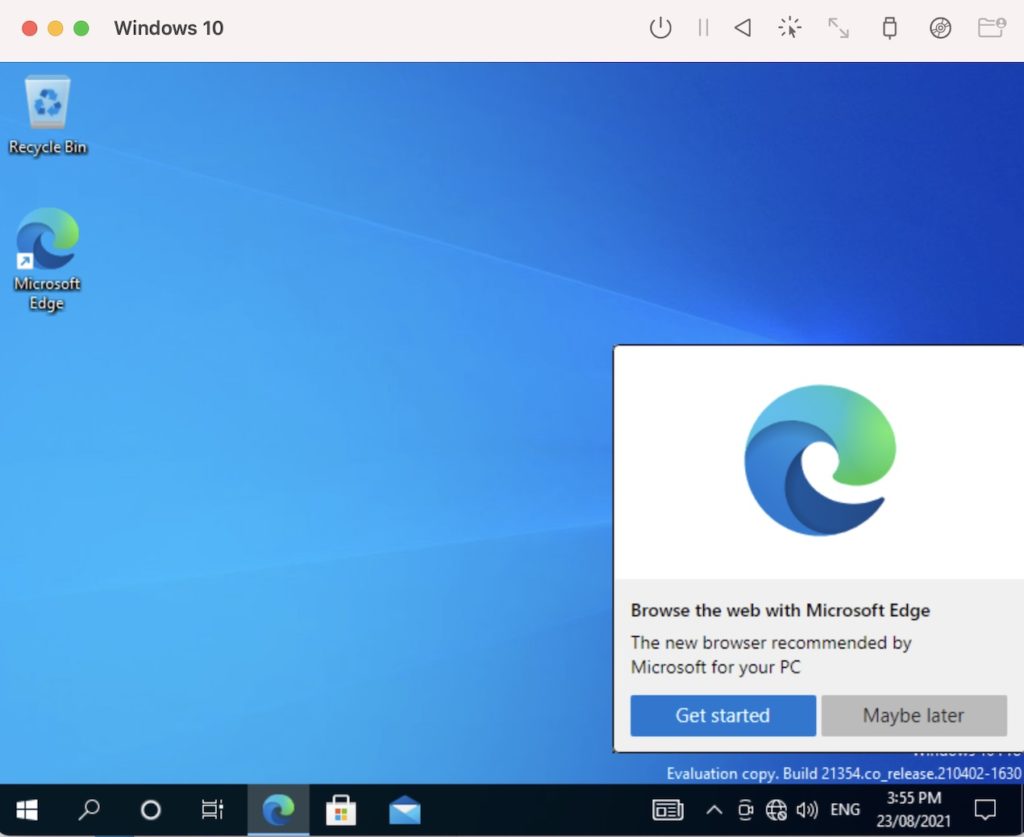
Once the installation is complete, the Windows desktop appears:
Install SPICE Guest Tools
There’s one more thing we need to do – install the SPICE guest tools.
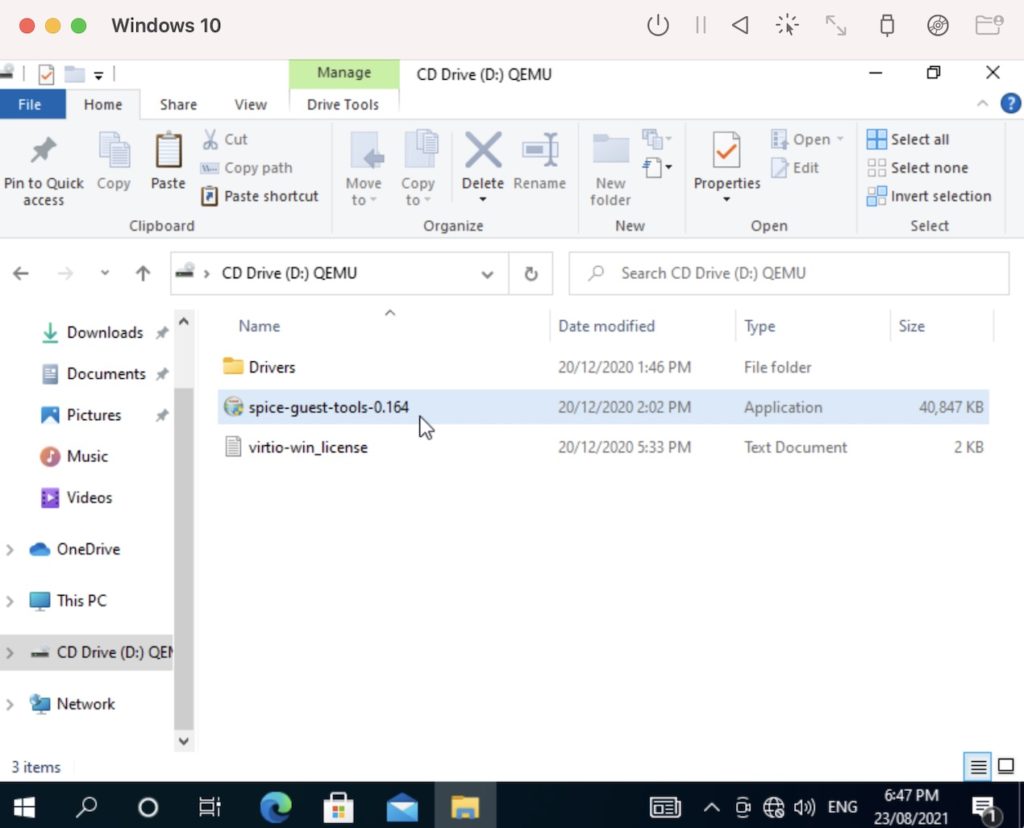
From within our freshly installed Windows machine (i.e. in the guest machine), open the File Explorer and select the D drive. From there, double click the SPICE guest tools executable file (in my case, this is called spice-guest-tools-0.164.exe):
This launches the installation wizard. Follow the prompts to install the SPICE guest tools. This installs various drivers, including one that enables an internet connection.
Windows 10 is now installed on our M1 Mac and ready to use.
Уровень сложности
Простой
Время на прочтение
2 мин
Количество просмотров 54K

В статье описана инструкция по установке Windows внутри MacOS.
На текущий момент автору статьи известно только два рабочих варианта:
-
Parallels Desktop — всё работает из коробки, но платно;
-
UTM — требует минимальных усилий, бесплатно;
В данной статье будет рассмотрен вариант установки через UTM.
Необходимо:
Установить brew
Необходимо в терминале выполнить команду:
/bin/bash -c "$(curl -fsSL https://raw.githubusercontent.com/Homebrew/install/HEAD/install.sh)"
Детальная инструкция по установке есть на официальном сайте.
Установить инструменты разработчика xcode
Необходимо в терминале выполнить команду:
xcode-select --install
Установить UTM
Необходимо в терминале выполнить команду:
brew install utm
Установить qemu
Необходимо в терминале выполнить команду:
brew install qemu
Скачиваем дамп Windows
Выбираем версию Windows:
-
Windows 10
-
Windows 11
Скачиваем подходящую версию дампа с архитектурой arm64:
Выбираем язык:
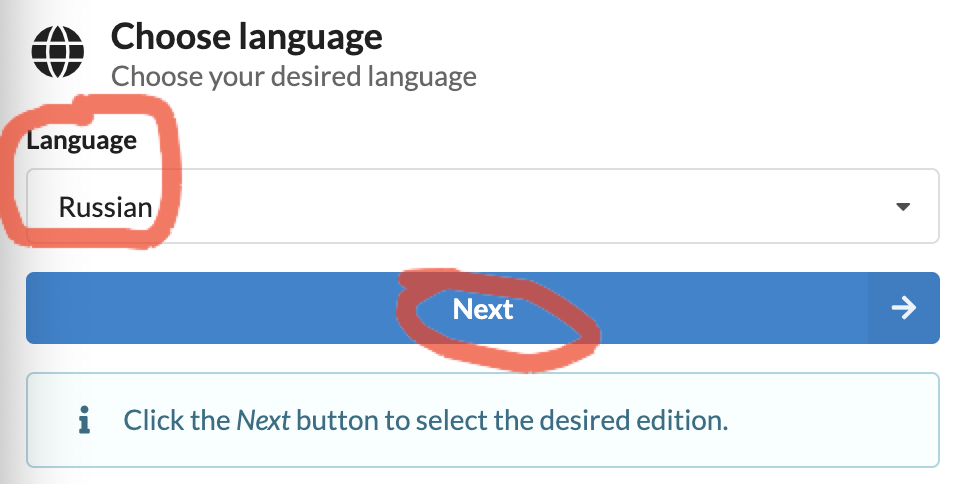
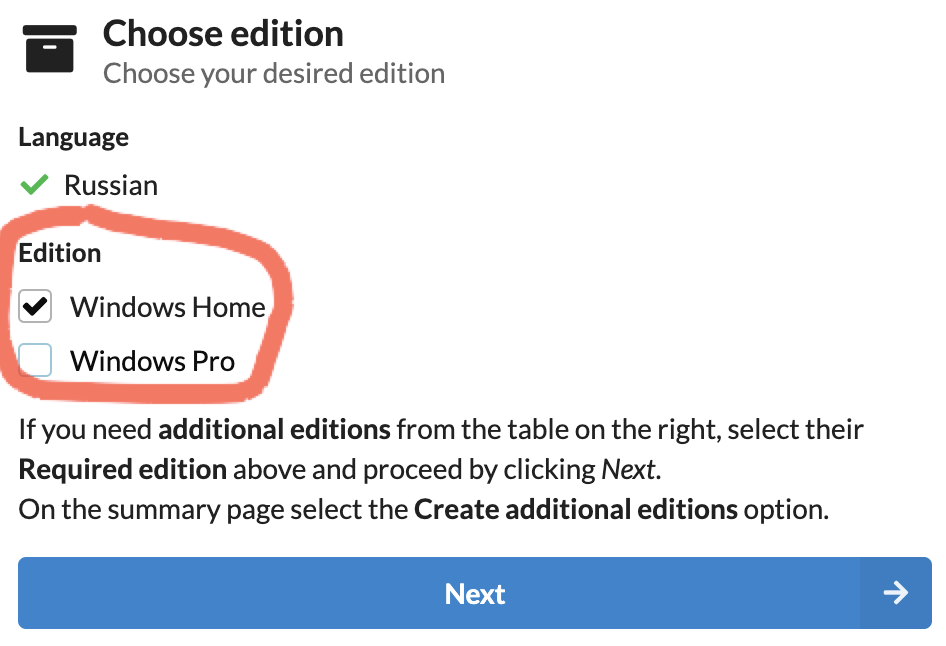
Выбираем выпуск:
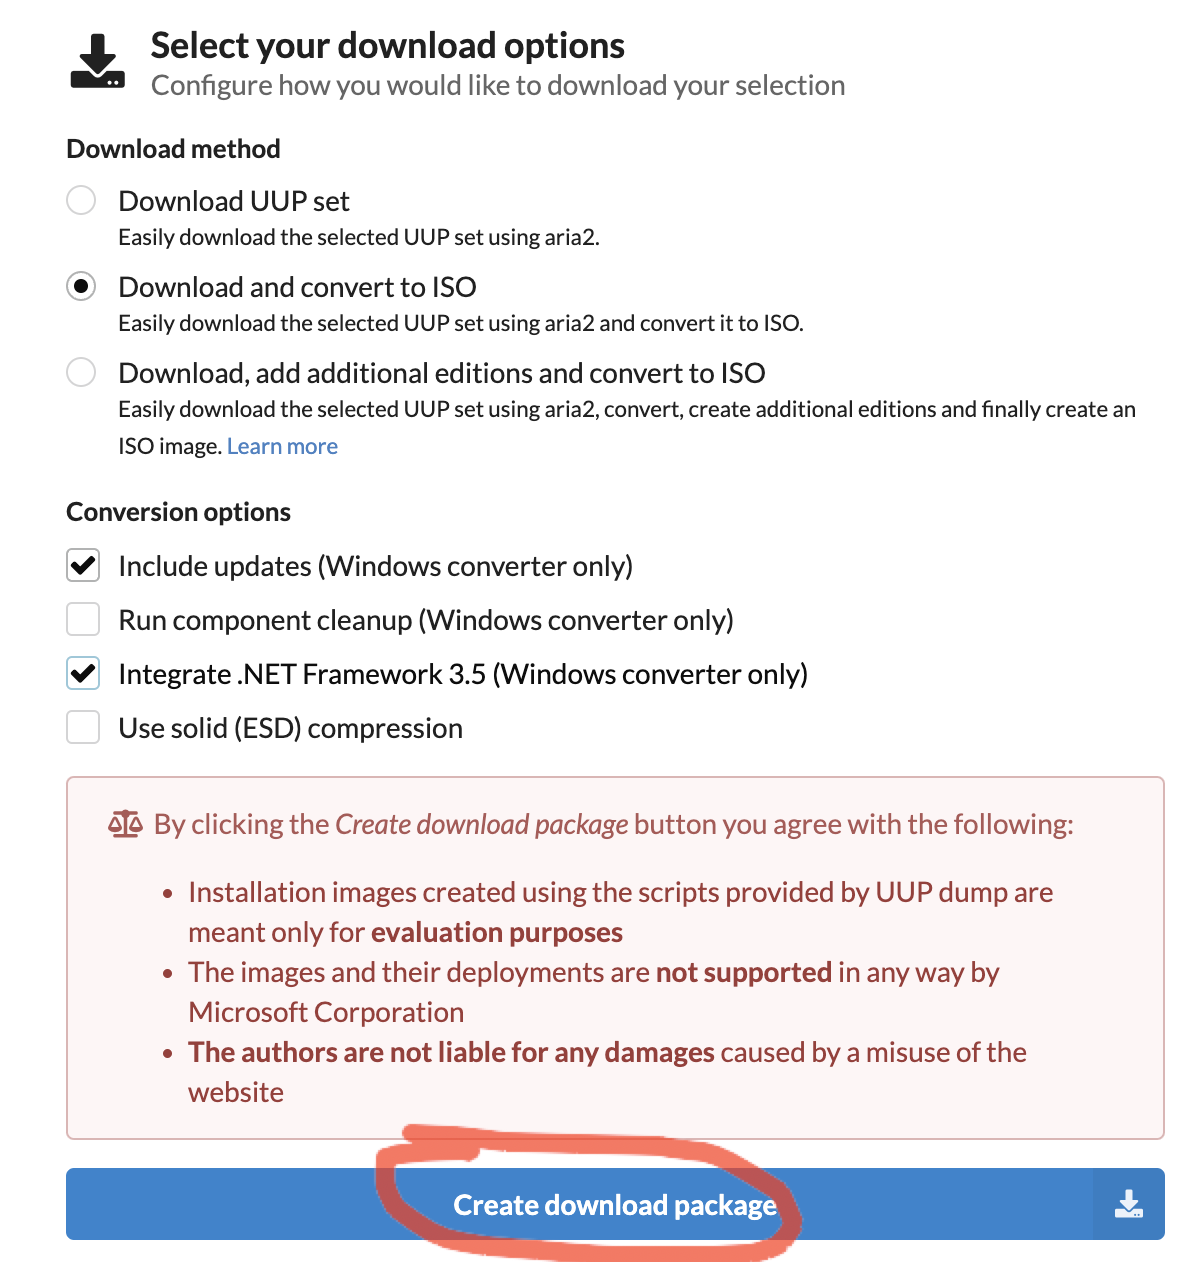
Скачиваем package:
Распаковываем архив, для этого два раза кликаем по нему:

В терминале необходимо перейти в скачанную папку.
И выполнить в ней команды:
brew install aria2
brew tap sidneys/homebrew
brew install cabextract wimlib cdrtools sidneys/homebrew/chntpw
sh uup_download_macos.sh
Ждём окончания загрузки, после этого в папке будет создан новый ISO-файл.
Устанавливаем образ Windows ч.1
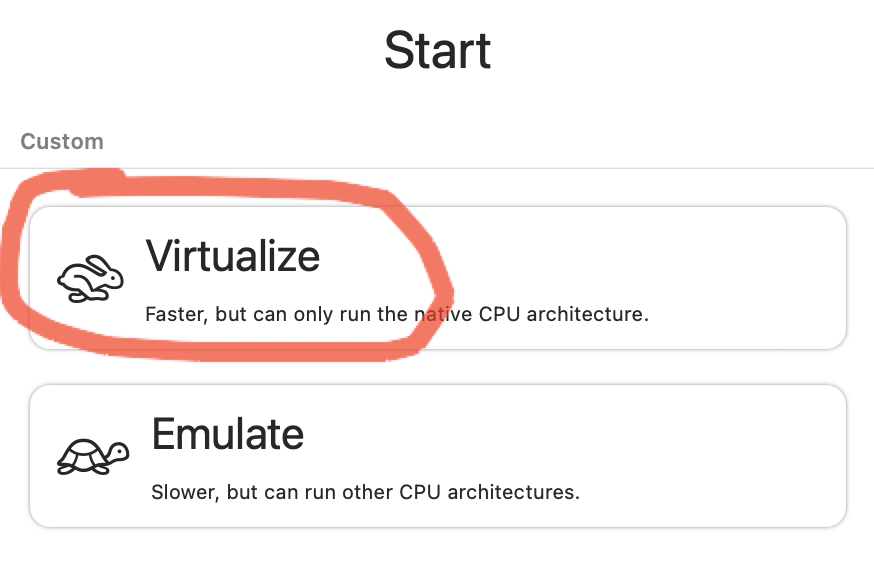
Запускаем ранее установленную программу UTM и выбираем:


Выбираем количество ресурсов, больше — быстрее будет работать.
Выбираем размер выделяемого дискового пространства
Выбираем папку, которая будет общей для систем


Запускаем Windows!
Выйдет вот такое окно и нужно успеть нажать какую-нибудь клавишу! Если не успели, то можно перезапустить виртуальную машину.
Необходимо набрать команду:
exit

Выбираем Boot Manager
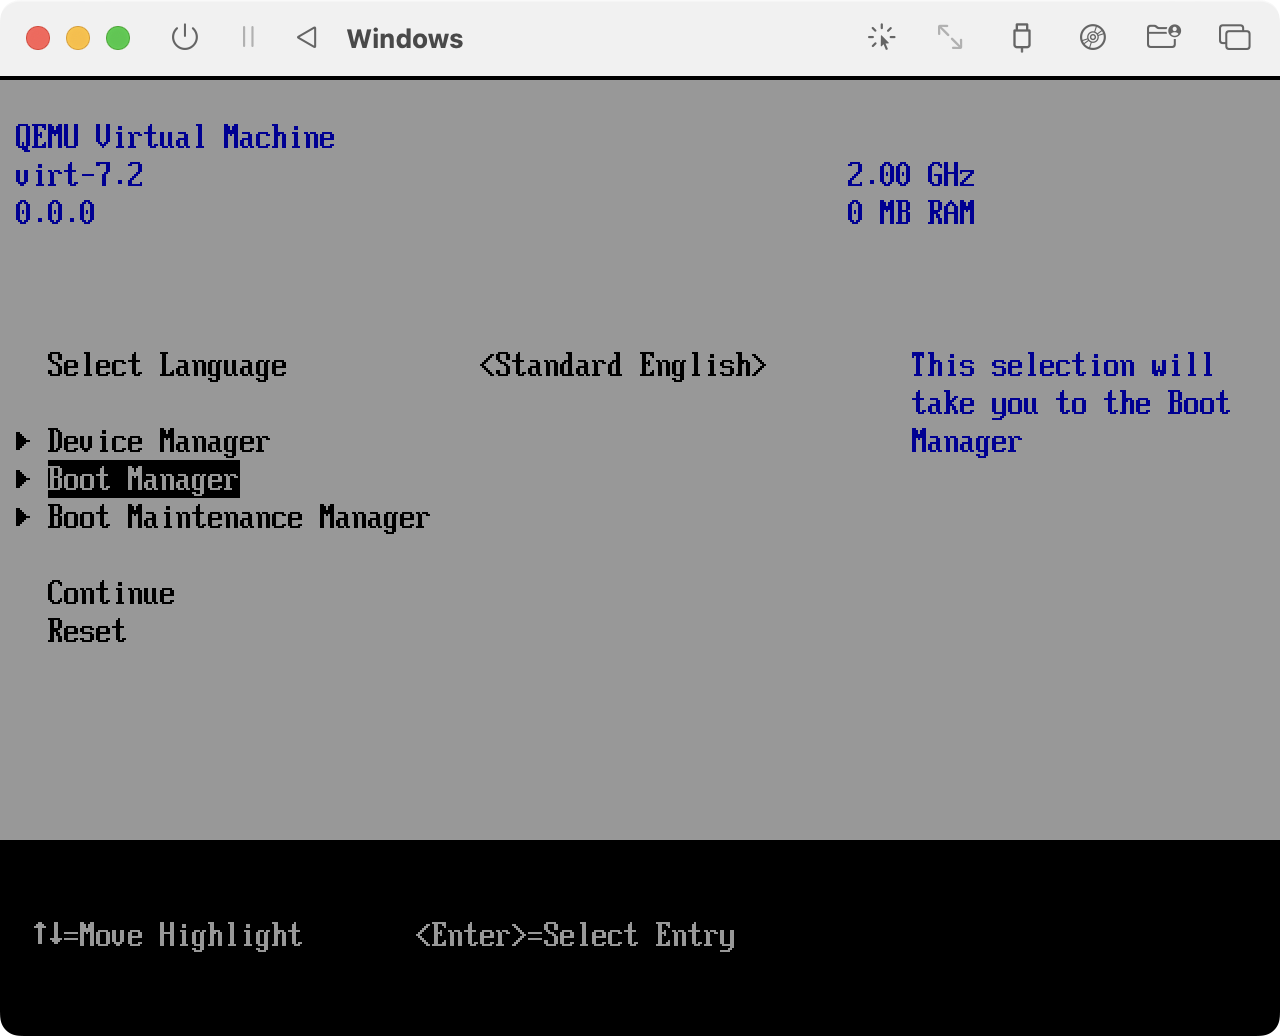
Выбираем первый пункт:


Устанавливаем образ Windows ч.2
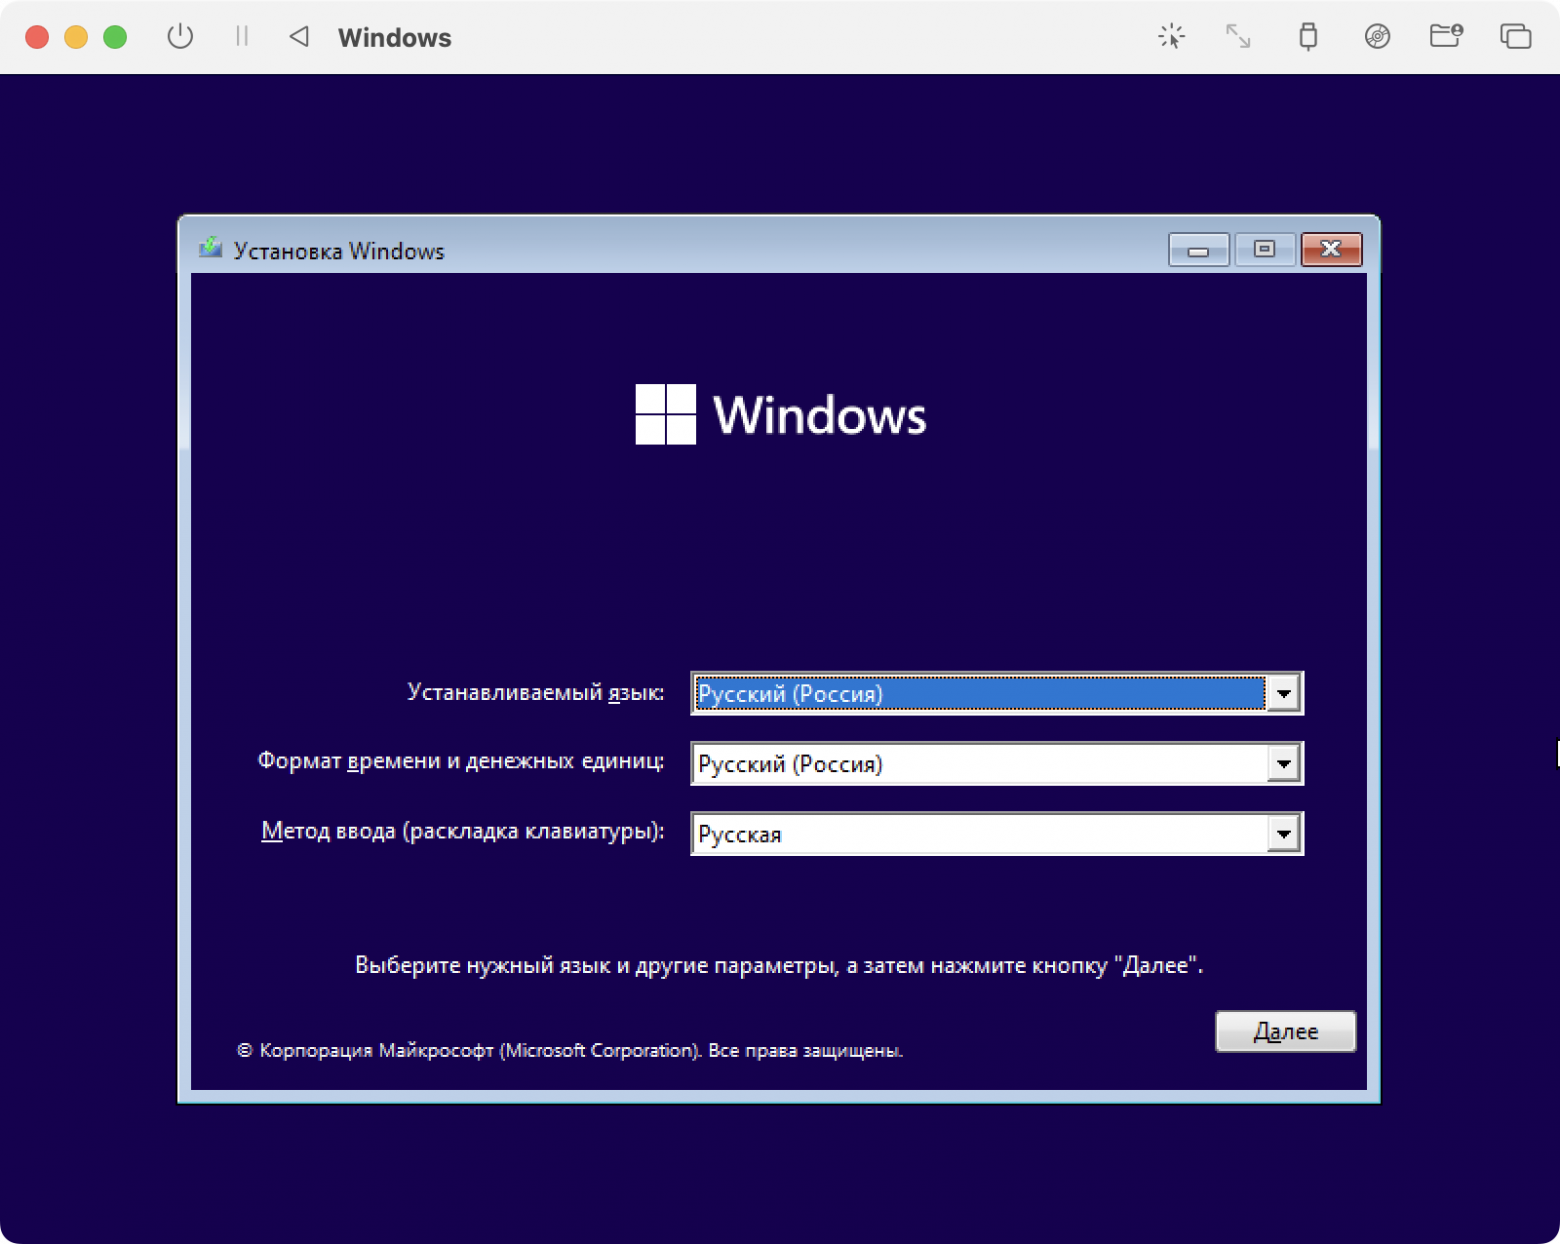
Далее следует стандартная процедура установки windows
На выходе мы получаем вот такой результат.