В некоторых случаях пользователи могут столкнуться с проблемой во время инсталляции операционной системы Windows. Например, программа установки завершает свою работу из-за ошибки, так как не видит раздел с необходимыми файлами. Единственная возможность исправить это – записать образ с помощью специальной программы и выставить правильные настройки.
Если устройство корректно отображается в системе, значит, проблема заключается в заданном разделе. «Командная строка» Виндовс обычно форматирует флешки с разделом MBR, но компьютеры, которые используют UEFI, не смогут установить ОС с такого накопителя. В этом случае необходимо воспользоваться специальными утилитами или программами.
Ниже будет показан процесс правильного создания загрузочного USB-накопителя на примере Rufus.
Подробнее:
Как пользоваться Rufus
Программы для записи образа на флешку
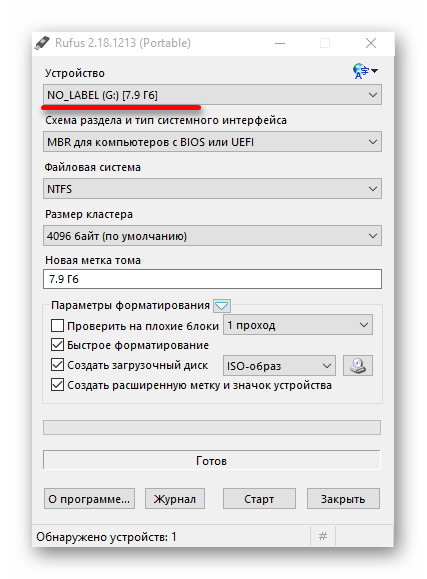
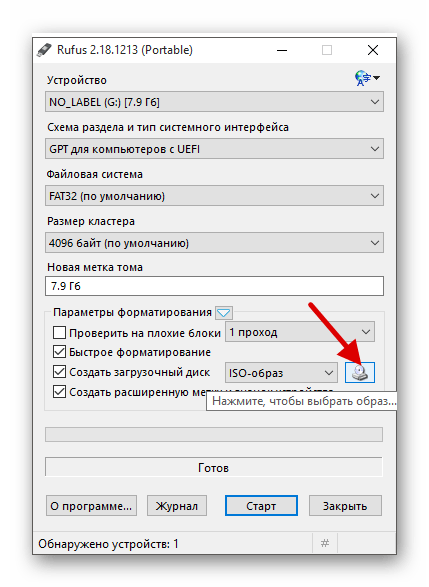
- Запустите Rufus.
- Выберите нужную флешку в разделе «Устройство».
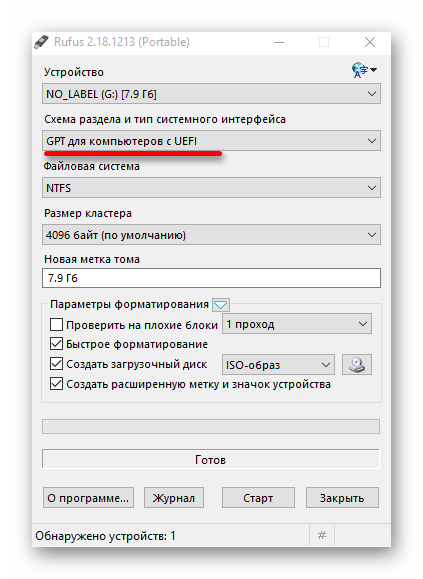
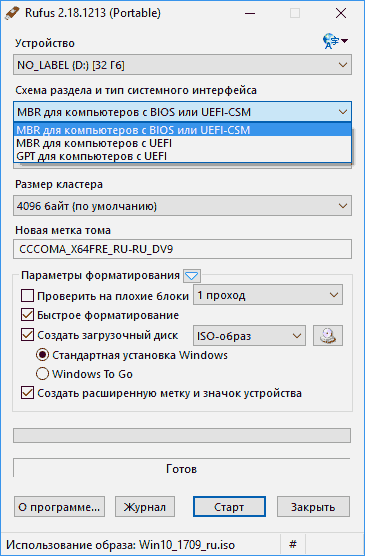
- Далее выберите «GPT для компьютеров с UEFI». С такими настройками флешки инсталляция ОС должна пройти без ошибок.
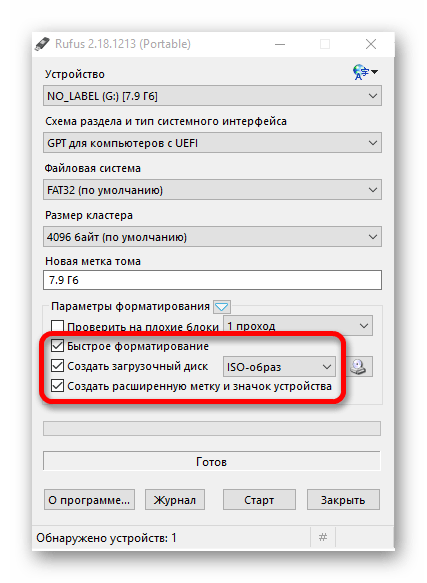
- Файловая система должна быть «FAT32 (по умолчанию)».
- Отметки можете оставить как есть.
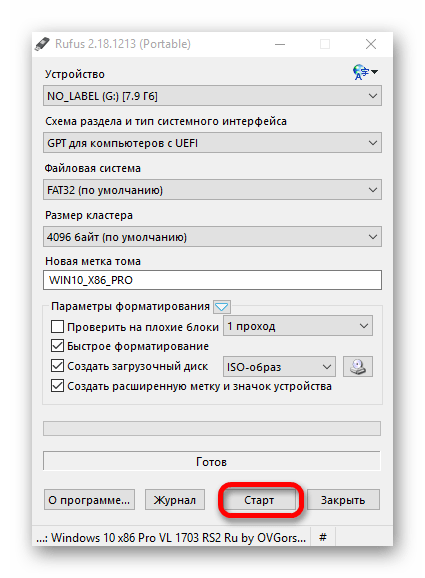
- Напротив «ISO-образ» кликните на специальную иконку с диском и выберите дистрибутив, который планируете записать.
- Начните кнопкой «Старт».
- После окончания попробуйте установить систему.

Теперь вы знаете, что из-за неправильно указанного раздела во время форматирования накопителя, программа установки Windows 10 не видит флешку. Эту проблему можно решить сторонним ПО для записи образа системы на USB-носитель.
Читайте также: Решение проблемы с отображением флешки в Windows 10
Еще статьи по данной теме:
Помогла ли Вам статья?
When creating a USB bootable media, many users are troubled by the Windows 10 media creation tool we can’t find a USB flash drive error. If you are also trying to fix the issue, this post of MiniTool Partition Wizard is what you need.
The media creation tool is a practical utility that can be used to create a bootable USB drive for reinstalling or upgrading Windows 10. However, a lot of users encounter the Windows 10 we can’t find a USB flash drive error in the Setup screen. Here is a true example from the answer.microsoft forum:
I’m trying to make a USB for the windows 10 install. I’m using the Windows 10 media creation tool to create that USB. When I get to the area that says would you like to create the USB or ISO file I select USB. When I click on Next, it tells me that the USB cannot be found. I have tried this on two separate computers and get the same results. In addition, I can navigate using file explorer and see the USB but the creation tool will not find it. Does anybody have any help with this?https://answers.microsoft.com/en-us/windows/forum/windows_10-windows_install-winpc
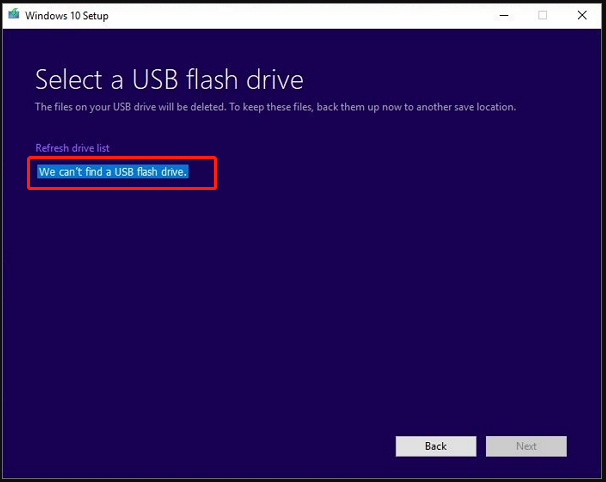
According to user reports, the Windows 10 media creation tool we can’t find a USB flash drive error often appears on the Select a USB flash drive screen. No matter how many times they click on Refresh drive list, the Windows 10 setup not finding USB error still pops up. The strange thing is that the USB flash drive can be seen in the File Explorer or Disk Management.
What causes the Windows media creation tool can’t find USB error? After investigating extensive user reports and references, we find there are some possible causes of the error:
- Incompatible USB flash drive: Many users reported that they encounter the Windows 10 we can’t find a USB flash drive error especially when using a SanDisk USB.
- A corrupted USB flash drive: If there are bad sectors or file system errors on the USB drive, the Windows 10 setup not finding USB can occur.
- Outdated USB drivers: Since the Windows 10 media creation tool is a relatively new utility, you may encounter the media creation tool not recognizing USB issue if associated drivers are outdated.
Based on these possible causes, we explored corresponding solutions. Let’s see how to fix Windows 10 media creation tool we can’t find a USB flash drive.
Here we summarize 5 effective troubleshooting methods that you can try one by one until the Windows 10 setup not finding USB issue is resolved.
Fix 1. Use a Different USB Flash Drive
The simplest and most direct method is to use a different USB flash drive. This is because a lot of users reported that the media creation tool not recognizing USB error appears when using a SanDisk drive. We don’t know the actual reason for the incompatibility, but many users managed to fix the error by using a different USB brand like Kinston, Toshiba, or Lexar. Here you may have a try. Make sure you connect a USB drive that has 8GB free space at least and is formatted to FAT32.
Fix 2. Check Your USB Drive for Errors
If the Windows 10 ISO file happens to be located in the bad sectors or file system errors of the USB drive, you may encounter the Windows media creation tool can’t find USB issue. In this case, you need to check your USB drive for errors. How to check bad sectors and file system errors together?
Here MiniTool Partition Wizard can help you check them with ease. It is an all-in-one partition manager that boasts many powerful features like convert NFTS to FAT, data recovery, migrate OS, disk benchmark, resize partition, etc.
Now, let’s see how to check file system errors and bad sectors using MiniTool Partition Wizard.
MiniTool Partition Wizard FreeClick to Download100%Clean & Safe
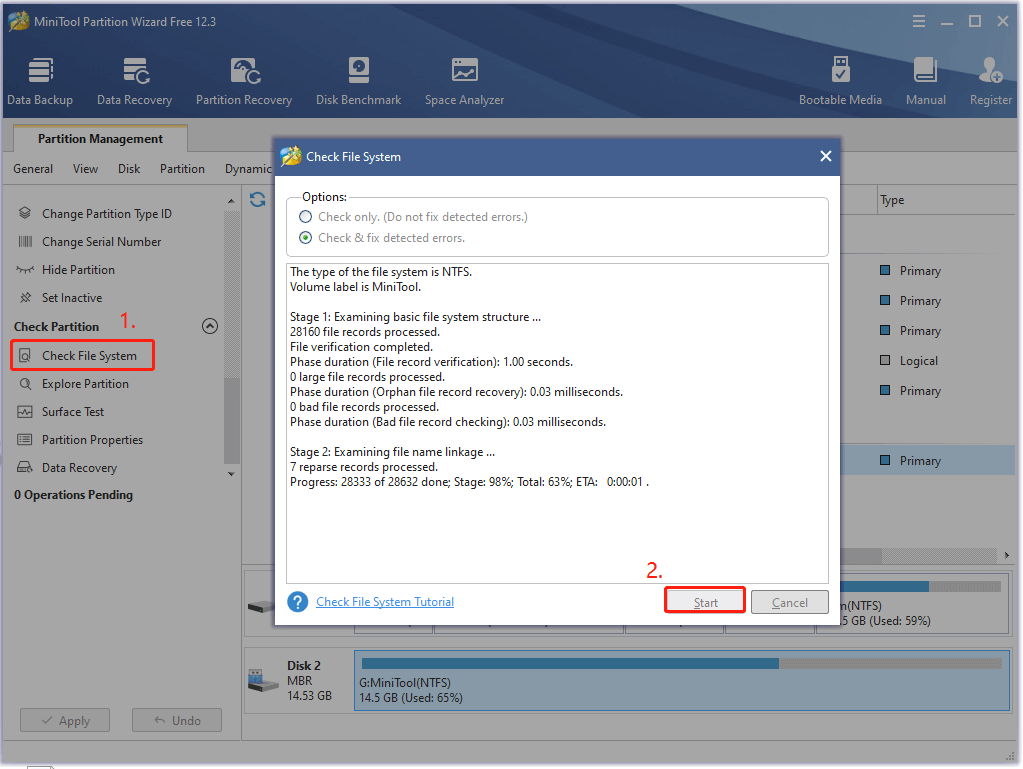
Step 1. Launch MiniTool Partition Wizard to enter its main interface, and then select the USB drive from the disk map and click on Check File System from the left pane.
Step 2. In the pop-up window, select the Check & fix detected errors option and click on Start. After that, this program will automatically scan the USB drive for file system errors and try repairing them.
Step 3. If the Windows 10 setup not finding USB error persists, you can perform a Surface Test to check bad sectors. To do so, select the USB flash drive again and click on Surface Test from the left pane.
Step 4. Click on Start Now to start scanning the USB drive. Once any bad sectors are detected, this program will make the blocks with red color.
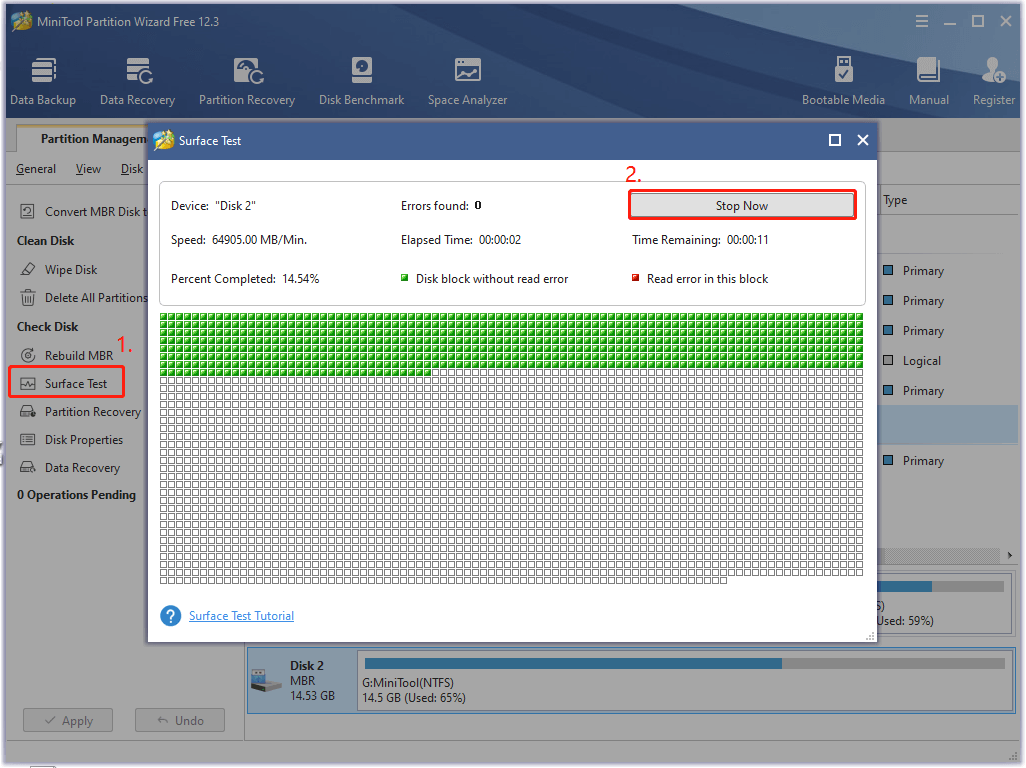
If you find the bad sectors on the USB drive, we recommend you switch to a new USB drive as Windows 10 bootable media.
Fix 3. Update the Related USB Drivers
As mentioned above, the associated USB driver issues are responsible for Windows 10 media creation tool we can’t find a USB flash drive. To resolve the problem, connect the USB to your computer and follow the steps below to update related USB drivers.
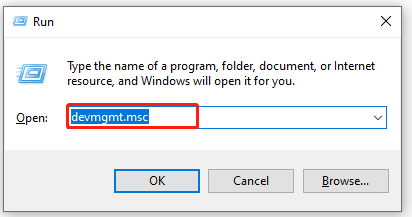
Step 1. Press Win + R keys to open the Run dialog box, and then type devmgmt.msc in the box and hit Enter to open Device Manager.
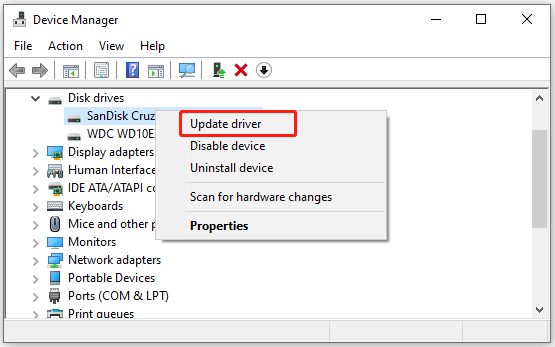
Step 2. Expand the Disk drivers category, and then right-click your USB driver and select Update driver.
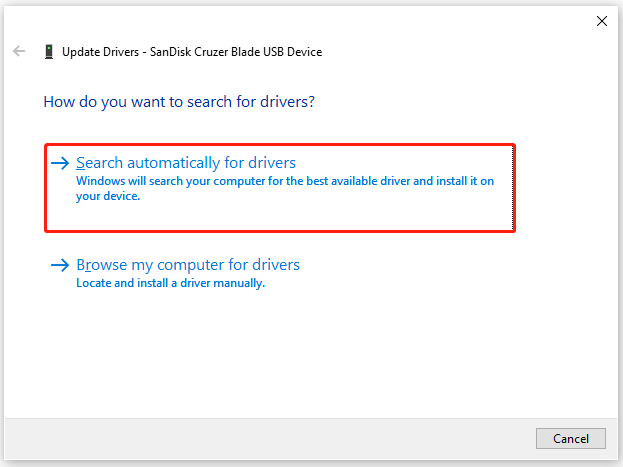
Step 3. In the pop-up window, select the Search automatically for drivers option and follow the on-screen prompts to complete the update.
Tip: Alternatively, you can select Browser my computer for drivers. Then click on Let me pick from a list of available drivers on my computer, and select the available updated USB driver and install it.
Step 4. You need to update the USB root Hub driver as well. Expand the Universal Serial Bus controllers menu, and then right-click the USB root Hub driver and select Update driver.
Step 5. Now, you can update the driver automatically or manually like in Step 3.
Step 6. In addition, make sure the USB Mass Storage Device driver is enabled. If not, right-click the driver and select Enable Device.
After that, you can restart the computer and check if the Windows 10 we can’t find a USB flash drive error is resolved.
Fix 4. Reformat the USB Flash Drive
If all the above methods fail to work, you may have to reformat the USB drive or try using an alternative tool to create a Windows 10 bootable media. This part focuses on how to reformat a USB drive.
When comes to formatting a USB drive, most people may select Disk Management, File Explorer, and Disk Management. But as you know, these Windows utilities have some drawbacks such as can’t format a drive larger than 32GB to FAT32 or formatting takes forever.
To reformat a USB drive quickly and easily, we highly recommend you use MiniTool Partition Wizard. Here’s how:
MiniTool Partition Wizard FreeClick to Download100%Clean & Safe
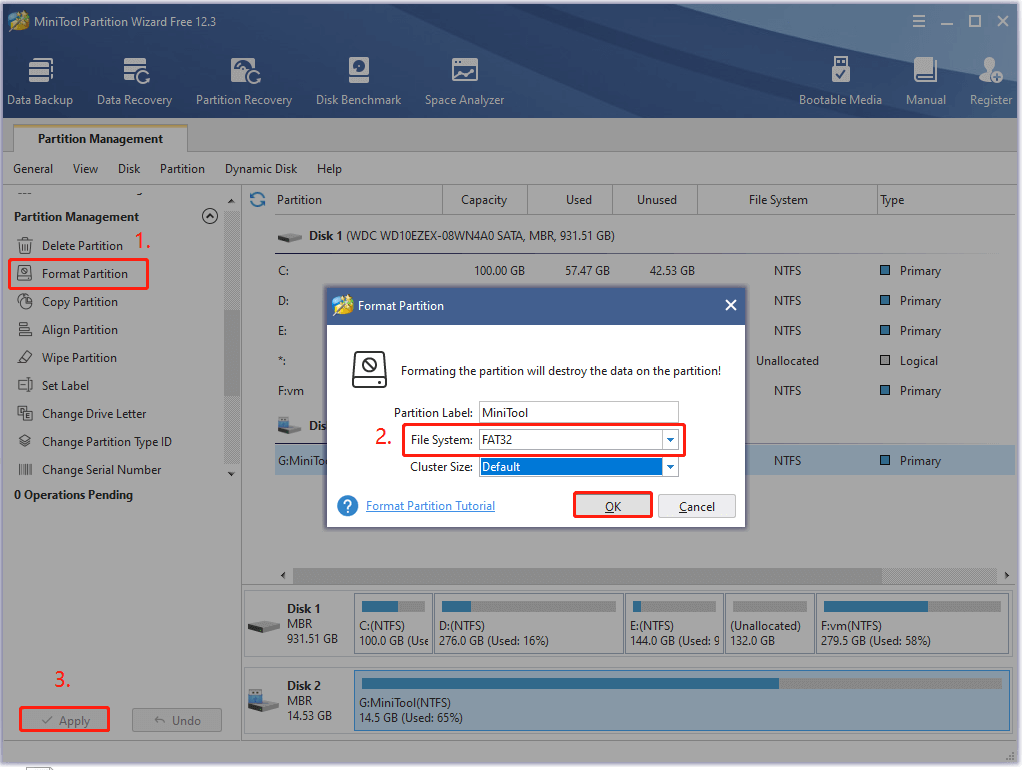
Step 1. In the main interface, select the USB drive that you connected to the computer and click on Format Partition from the left pane.
Step 2. Select FAT32 from the File System drop-down menu, and then you can set its Partition Label and Cluster Size based on your needs. Once done, click on OK to save changes.
Step 3. Click on the Apply button to execute this formatting.
If the Windows 10 setup not finding USB problem still exists, you can proceed with the following method.
Fix 5. Alternative to Create a Windows 10 Bootable USB
In addition, you can download the ISO file of Windows and then use professional software to burn the file to your USB directly. Here is a guide for you.
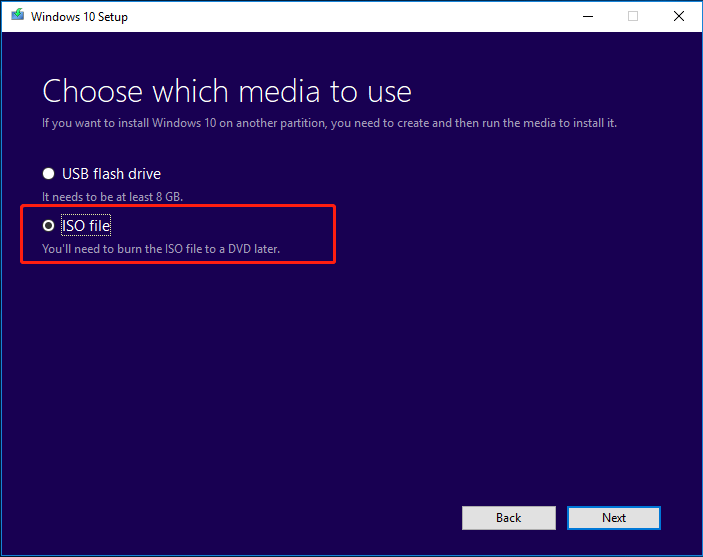
Step 1. In the Choose which media to use page, select ISO file instead and save the file to a location on your computer.
Step 2. To create a bootable USB from the ISO, you need to use a professional ISO burn tool like Rufus. Click here to open the official website of Rufus, then download and install it on your Windows 10 PC.
Step 3. Plug your USB flash drive into your PC and launch Rufus to enter its main interface.
Step 4. Now, the tool will automatically detect the USB drive. Click on Select to choose the ISO file you downloaded, and then you can specify the partition scheme and label. After that, click on START to start creating a bootable USB from the ISO file.
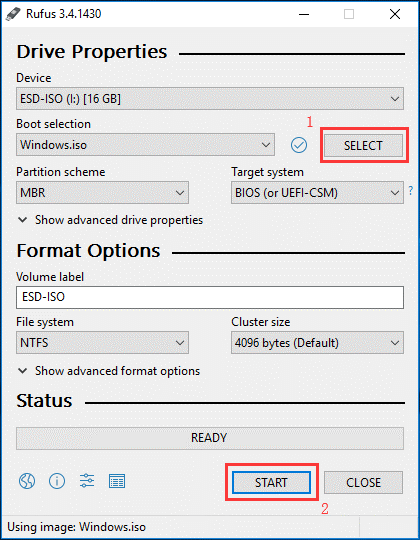
Step 5. Once the ISO file is burned to the USB drive successfully, click on CLOSE to exit the tool.
When creating a USB bootable media, I’m stuck in the Windows 10 media creation tool we can’t find a USB flash drive page. Fortunately, this post helped me fix the error. Perhaps you also need it.Click to Tweet
Bottom Line
How to fix Windows 10 setup not finding USB? The top 5 methods have been elaborated on in this post. Do you have any better ideas on this subject? You can leave your words in the following comment area.
If you encounter any issues while using MiniTool Partition Wizard, please give us feedback. You can contact us by sending an email via [email protected].
Why does my USB flash drive not showing up?
According to a survey, the USB drive not showing up can be caused by various factors, including outdated USB driver, damaged USB drive, wrong file system, and device conflicts.
How to boot my computer from a USB?
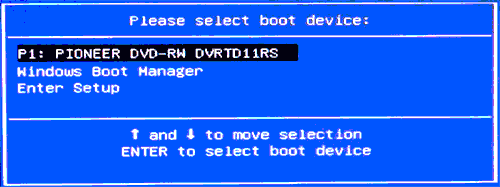
- Insert the bootable USB that you burned Windows 10 ISO file in and press the Power button to start your computer.
- During the initial startup screen, press ESC, F1, F2, Delete, or F10 key to enter BIOS
- Navigate to the Boot tab and put the USB drive to the first boot sequence by using the arrow keys.
- Press the F10 key to save the boot order changes and exit BIOS. Then your Windows 10 computer will restart from the USB.
Does formatting USB delete everything?
Formatting a USB will delete all the data on the drive and set a file system to prepare an available space for the operating system. There are three levels when formatting: low-level formatting, formatting, and high-level formatting. Only the high-level formatting will erase data.
 Руководства по установке Windows с флешки или просто загрузки компьютера с неё включают в себя простые шаги: поставить загрузку с флешки в БИОС (UEFI) или же выбрать загрузочную флешку в Boot Menu, однако в некоторых случаях USB накопитель там не отображается.
В этой инструкции подробно о причинах, по которым БИОС не видит загрузочную флешку или она не показывает в меню загрузки и о том, как это исправить. См. также: Как использовать Boot Menu на компьютере или ноутбуке.
Загрузка Legacy и EFI, Secure Boot
Самая распространенная причина того, что загрузочная флешка не видна в Boot Menu — несоответствие режима загрузки, который поддерживается этой флешкой режиму загрузки, выставленному в БИОС (UEFI).
Большинство современных компьютеров и ноутбуков поддерживают два режима загрузки: EFI и Legacy, при этом часто по умолчанию включен только первый (хотя, бывает и наоборот).
Если записать USB накопитель для Legacy-режима (Windows 7, многие Live CD), а в БИОС включена только загрузка EFI, то такая флешка будет не видна в качестве загрузочной и выбрать её в Boot Menu не получится.
Решения в данной ситуации могут быть следующими:
- Включить поддержку нужного режима загрузки в БИОС.
- Записать флешку иначе для поддержки нужного режима загрузки, если это возможно (для некоторых образов, особенно не самых новых, возможна только загрузка Legacy).
Что касается первого пункта, чаще всего требуется включить именно поддержку Legacy режима загрузки. Обычно это делается на вкладке Boot (загрузка) в БИОС (см. Как зайти в БИОС), а пункт, который нужно включить (установить в режим Enabled) может называться:
- Legacy Support, Legacy Boot
- Compatibility Support Mode (CSM)
- Иногда этот пункт выглядит как выбор ОС в БИОС. Т.е. название пункта — OS, а варианты значений пункта включают в себя Windows 10 или 8 (для EFI загрузки) и Windows 7 или Other OS (для Legacy загрузки).
Дополнительно, при использовании загрузочной флешки, которая поддерживает только Legacy загрузку, следует отключить Secure Boot, см. Как отключить Secure Boot.
По второму пункту: если записываемый на флешку образ поддерживает загрузку и для EFI и для Legacy режима, вы просто можете записать его иначе, не меняя параметров БИОС (однако, для образов, отличных от оригинальных Windows 10, 8.1 и 8 всё равно может требоваться отключение Secure Boot).
Проще всего это сделать с помощью программы бесплатной программы Rufus — она позволяет легко выбрать, для какого типа загрузки следует записать накопитель, основные два варианта — MBR для компьютеров с BIOS или UEFI-CSM (Legacy), GPT для компьютеров с UEFI (EFI загрузка).
Подробнее по программе и где скачать — Создание загрузочной флешки в Rufus.
Примечание: если речь идет об оригинальном образе Windows 10 или 8.1, можно записать его официальным способом, такая флешка будет поддерживать сразу два типа загрузки, см. Загрузочная флешка Windows 10.
Дополнительные причины того, что флешка не отображается в Boot Menu и BIOS
В завершение — ещё некоторые нюансы, которые, по моему опыту, бывают не до конца понятны начинающим пользователям, из-за чего возникают проблемы и невозможность поставить загрузку с флешки в БИОС или выбрать её в Boot Menu.
- В большинстве современных версий BIOS для того, чтобы поставить загрузку с флешки в настройках, её следует предварительно подключить (так, чтобы она определилась компьютером). Если она отключена, то не отображается (подключаем, перезагружаем компьютер, входим в БИОС). Также учитывайте, что «USB-HDD» на некоторых старых материнских платах — это не флешка. Подробнее: Как поставить загрузку с флешки в БИОС.
- Для того, чтобы USB накопитель был виден в Boot Menu, он должен быть загрузочным. Иногда пользователи просто копируют ISO (сам файл образа) на флешку (это не делает ее загрузочной), иногда — так же вручную копируют содержимое образа на накопитель (это работает только для EFI загрузки и только для накопителей FAT32). Возможно, будет полезным: Лучшие программы для создания загрузочной флешки.
Кажется, всё. Если вспомню ещё какие-либо особенности, имеющие отношение к теме, обязательно дополню материал.
Создание загрузочного USB-накопителя является одним из любимых способов обновления Windows 10. Однако при этом, если программа установки Windows 10 удивляет вас ошибкой – Мы не можем найти USB-накопитель , у нас есть некоторые предложения. для вас, чтобы решить это.

Мы не можем найти флешку
Забавная часть любой аппаратной ошибки – это когда вы видите ее прямо там, а компьютер говорит, что ее там нет. То же самое происходит и здесь, поэтому давайте посмотрим на возможные решения.
- Проверьте, доступен ли USB на компьютере.
- Попробуйте другой USB-накопитель
- Проблемы с портом USB 3.0 или портом USB 2.0
- Плохие сектора на USB-накопителе
- Флэш-накопитель USB установлен в качестве основного.
1] Проверьте, доступен ли USB на компьютере
Первым делом проверьте, можете ли вы получить доступ к USB-накопителю с компьютера. Откройте проводник и посмотрите, есть ли в списке USB-накопитель.
2] Попробуйте другой USB-накопитель
Если это работает, и проблема остается той же, попробуйте другой USB-накопитель с еще более значительным объемом памяти. Обязательно проверьте его работу на другом компьютере.
3] Проблемы с портом USB 3.0 или портом USB 2.0
Хотя порты USB 3.0 совместимы с портами USB 2.0, это не означает, что это может быть проблемой. Лучше всего использовать совместимый диск.
4] Неисправные сектора на USB-накопителе
Перед созданием загрузочного USB-накопителя установщик форматирует его. Обычно это быстрый формат, который не проверяет наличие ошибок. Я бы предложил глубоко отформатировать диск, который также проверит наличие поврежденных секторов.
5] Флэш-накопитель USB, выбранный в качестве основного накопителя
Редко, но если по какой-то причине USB-накопитель выбран в качестве основного, он не будет отображаться в списке. Также возможно, что на USB-накопителе есть основной диск. Так вот, как отменить это. Мы будем использовать инструмент DISKPART здесь.
- Откройте окно командной строки от имени администратора.
- Введите diskpart .
- Введите список дисков и нажмите клавишу ВВОД.
- Список дисков отображает все диски на компьютере. Запишите номер диска или букву флэш-накопителя USB.
- В командной строке введите выберите диск , где X – номер диска или буква флэш-накопителя USB, а затем нажмите клавишу ВВОД.
- Введите раздел списка и нажмите клавишу ввода. Если есть разделы, он перечислит их как 0,1,2.
- Число 0 является основным разделом.
- Введите выберите раздел 0 и нажмите Enter.
- Введите удалить раздел и нажмите Enter.
- Аналогичным образом удалите все разделы.
- Затем используйте команду форматирования, чтобы превратить его в стандартный диск.
Одно из этих решений обеспечит появление USB-накопителя в списке.
Дайте нам знать, как это работает для вас.