Zabbix поддерживает встроенное шифрование между частями своей сети мониторинга с помощью PSK-ключей или сертификатов. Давайте рассмотрим настройку PSK ключей для агентов.
Настройка сервера
Во-первых, давайте настроим режим шифрования хоста, который мы хотим использовать.
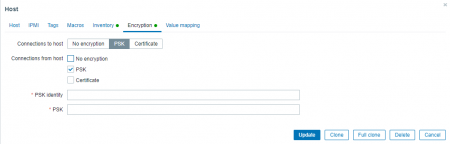
Откройте веб-интерфейс, перейдите в Настройки -> узлы сети, выберите узел, для которого вы хотите настроить PSK, откройте вкладку Шифрование. По умолчанию все соединения не зашифрованы, снимите эту галочку и выберите опцию PSK.
В строке “PSK identity” напишите идентификатор для вашего ключа. После этого создайте ключ с помощью любого генератора паролей на ваш выбор или используйте свой, затем поместите его в строку PSK. Нажмите “обновить”.

Настройка PSK-ключей для агента Ubuntu
Для начала нам нужно создать .psk файл для хранения ключа, который будет доступен учетной записи агента, например, /etc/zabbix/zabbix_agentd.psk, вставьте ваш пароль внутрь файла.
Дайте Zabbix доступ:
sudo chown zabbix:zabbix /etc/zabbix/zabbix_agentd.psk

sudo chmod 400 /etc/zabbix/zabbix_agentd.psk
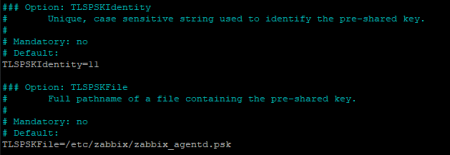
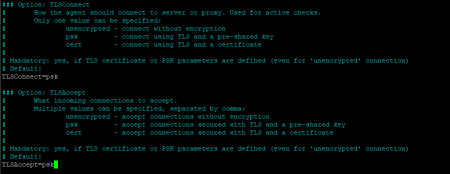
После этого давайте рассмотрим настройку агента. Поправьте файл /etc/zabbix/zabbix_agentd.conf следующим образом: удалите символ # из строк TLSConnect и TLSAccept, укажите их значение =PSK а затем поправьте эти строки в конце файла:
TLSPSKFile=(путь к файлу ключа)
TLSPSKIdentity=(идентификатор вашего ключа)


Перезапустите агент, чтобы изменения вступили в силу.
Настройка PSK для агента Windows
Для Windows версии измените файл C:\\Program Files\\Zabbix Agent\\zabbix_agentd.conf так же, как описано выше для Ubuntu.
Make zabbix_agentd.psk file in the default agent folder with your PSK in it.
Создайте файл zabbix_agentd.psk в папке агента с вашим PSK внутри. Не забудьте перезапустить агент в меню служб.

Проверьте продолжает ли опрос работать.
![]()
Всё отлично.
Заключение
В этом руководстве мы рассмотрели, как настроить авторизацию PSK на агентах Zabbix для Windows и Ubuntu.
191028
Санкт-Петербург
Литейный пр., д. 26, Лит. А
+7 (812) 403-06-99
![]()
700
300
ООО «ИТГЛОБАЛКОМ ЛАБС»
191028
Санкт-Петербург
Литейный пр., д. 26, Лит. А
+7 (812) 403-06-99
![]()
700
300
ООО «ИТГЛОБАЛКОМ ЛАБС»
Если необходимо шифровать соединение между агентом и сервером нам потребуется включить шифрование. Можно использовать шифрование по сертификату или по PSK (ключу Pre-Shared Key). В этом примере я рассмотрю именно PSK, т.к. это на мой взгляд самый удобный способ шифрования: ключ сгенерировать легко и просто, так же можно использовать несколько ключей.
Если у нас Linux или что-то подобное — нам повезло, ставим агента при помощи apt, rpm и прочих удобных штук, агент уже идет со всеми необходимыми библиотеками. Если Windows — придется немного поработать руками. Загружаем агента отсюда: https://www.zabbix.com/download_agents при этом нам нужна версия с поддержкой шифрования (в поле Encryption должно быть написано OpenSSL).
Распаковываем агента в папку, например C:\Zabbix
[Устарело, официальный агент уже слинкован со всеми библиотеками]
Теперь нам нужны библиотеки OpenSSL. Самое лучшее — взять вот отсюда https://support.zabbix.com/browse/ZBXNEXT-3047 уже собранный агент Zabbix. Т.к. у них версии агентов часто довольно старенькие, можно брать последнюю версию — из нее мы и выковыряем библиотеки. Вытаскиваем из архива файлы libcrypto-1_1.dll, libssl-1_1.dll и msvcr120.dll в нашу папку C:\Zabbix
Оригинал: https://www.zabbix.com/documentation/current/ru/manual/encryption/using_pre_shared_keys
For example, a 256-bit (32 bytes) PSK can be generated using the following commands:

    with OpenSSL:

  $ openssl rand -hex 32
  af8ced32dfe8714e548694e2d29e1a14ba6fa13f216cb35c19d0feb1084b0429

    with GnuTLS:

  $ psktool -u psk_identity -p database.psk -s 32
  Generating a random key for user 'psk_identity'
  Key stored to database.psk

  $ cat database.psk
  psk_identity:9b8eafedfaae00cece62e85d5f4792c7d9c9bcc851b23216a1d300311cc4f7cb

Note that “psktool” above generates a database file with a PSK identity and its associated PSK. Zabbix expects just a PSK in the PSK file, so the identity string and colon (':') should be removed from the file.
Полученный ключ сохраняем в файл zabbix_agentd.psk и копируем его в C:\Zabbix
Добавляем в файл zabbix_agentd.conf настройки шифрования:
TLSConnect=psk
TLSAccept=psk
TLSPSKIdentity=PSK001
TLSPSKFile=C:\Zabbix\zabbix_agentd.psk
Установка в качестве службы:
zabbix_agentd.exe --config "C:\Zabbix\conf\zabbix_agentd.conf" --install
Запуск:
net start "Zabbix Agent"
Остановка:
net stop "Zabbix Agent"
Удаление службы:
zabbix_agentd.exe --uninstall
Подсказка
Если в процессе удаления/установки службы возникает сообщение «zabbix_agentd.exe [416]: ERROR: cannot create service [Zabbix Agent]: [0x00000430] The specified service has been marked for deletion.» и сам сервис висит в непонятном статусе — просто закройте все остнастки по управлению службами и повторите попытку
Заходим в настройки хоста (Configuratino → Hosts → ваш_хост) и открываем закладку Encyption. Заполняем поля:
Применяем настройки, запускаем агент и смотрим логи — все должно заработать.
Zabbix — Monitoring Windows using PSK Encryption
Zabbix — Monitoring Windows using PSK Encryption
Would you like to learn how to securely monitor Windows using Zabbix agent and PSK encryption? In this tutorial, we are going to show you how to install and configure the Zabbix agent software on a computer running Windows and how to use the PSK encryption feature to secure the communication between the Zabbix server and the Zabbix agent.
• Zabbix 4.4.0
• Windows version: 2012 R2
Hardware List:
The following section presents the list of equipment used to create this Zabbix tutorial.
Every piece of hardware listed above can be found at Amazon website.
Zabbix Playlist:
On this page, we offer quick access to a list of videos related to Zabbix installation.
Don’t forget to subscribe to our youtube channel named FKIT.
Zabbix Related Tutorial:
On this page, we offer quick access to a list of tutorials related to Zabbix installation.
Tutorial Zabbix — Agent Installation on Windows

In our example, we download the Zabbix file: zabbix_agent-4.4.0-win-amd64-openssl.msi
Double click the Zabbix agent installation file.

Perform the following configuration on the Zabbix agent:

In our example, the Zabbix agent is configured to allow connections from the Zabbix server 192.168.15.10.
The server with the IP address 192.168.15.10 is allowed to request and receive information from the agent.
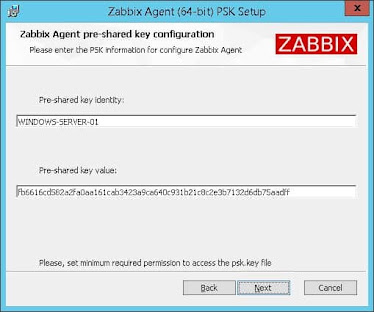
Now, we need to create a PSK key to encrypt the communication.

We created a PSK ID and a PSK key to encrypt the communication.
In our example, we used the PSK identity value: WINDOWS-SERVER-01
In our example, we used the PSK: fb6616cd582a2fa0aa161cab3423a9ca640c931b21c8c2e3b7132d6db75aadff
To create a randomly generated key value, use the following command on the Zabbix server:
Click on the Next button until the installation is finished.

After finishing the Zabbix agent installation, open the Windows service management screen.
Restart the Zabbix agent service.

Congratulations! you have installed the Zabbix agent on a computer running Windows.
Keep in mind that your Windows firewall application needs to accept connections from the Zabbix server.
The Windows firewall should accept network packets on TCP port: 10050
You can now use the Zabbix server dashboard to add this computer to the network monitoring service.
Tutorial Zabbix — Monitor Windows
Now, we need to access the Zabbix server dashboard and add the Windows computer as a Host.
Open your browser and enter the IP address of your web server plus /zabbix.
In our example, the following URL was entered in the Browser:
• http://192.168.15.10/zabbix
On the login screen, use the default username and default password.
• Default Username: Admin
• Default Password: zabbix

After a successful login, you will be sent to the Zabbix Dashboard.

On the dashboard screen, access the Configuration menu and select the Host option.

On the top right of the screen, click on the Create host button.
On the Host configuration screen, you will have to enter the following information:
• Host Name — Enter a Hostname to identify the Windows server.
• Visible Hostname — Repeat the hostname.
• New group — Enter a name to identify a group of similar devices.
• Agent Interface — Enter the IP address of the Windows server.
Here is the original image, before our configuration.

Here is the new image with our configuration.

Next, we need to associate the host with a specific network monitor template.
By default, Zabbix comes with a large variety of monitoring templates.
Access the Templates tab on the top of the screen.
Click on the Add option and select the template named: Template OS Windows by Zabbix agent
Click on the Select button.

Next, we need to encrypt the communication between the Zabbix server and the Windows computer.
Access the Encryption tab on the top of the screen and perform the following configuration:
• Connections to host — PSK
• Connections from host — PSK
• PSK identity — WINDOWS-SERVER-01
• PSK — fb6616cd582a2fa0aa161cab3423a9ca640c931b21c8c2e3b7132d6db75aadff
Click on the Add button to finish the configuration.

After a few minutes, you will be able to see the initial result on the Zabbix Dashboard.
The final result will take at least one hour.
By default, Zabbix will wait 1 hour to discover the number of interfaces available on the Windows computer.
By default, Zabbix will wait 1 hour before collect information from the network interfaces.
In order to test your configuration, access the Monitoring menu and click on the Graphs option.

On the top right of the screen, select the group named ALL.
Select your Windows computer host name.
Select the graph named: CPU UTILIZATION
You should be able to see the graphic of CPU utilization.

Congratulations! You have configured the Zabbix server to monitor a Windows computer using psk encryption.
VirtualCoin CISSP, PMP, CCNP, MCSE, LPIC22020-02-16T13:22:53-03:00
Related Posts
Page load link
Zabbix have inbuilt encryption between parts of its monitoring network with PSK keys or certificates. Let’s look into configuring PSK encryption for the Zabbix agents.
Configuring the server
First, let’s configure the encryption mode of the host we want to use.
Open the web interface, go to Configuration -> Hosts, go to the host you want to configure PSK for, and open the Encryption tab. By default all connections are unencrypted, unmark that checkbox and choose the PSK option.
In the ‘PSK identity’ line write an ID for your key. After that create a key with any password generator of your choosing or use your own, then put it in the PSK line. Click Update.
Configuring PSK keys on the Ubuntu agent
Now we need to make a .psk file for storing the key accessible for the agent user, /etc/zabbix/zabbix_agentd.psk for example, paste your password inside the file.
Give Zabbix acces to it:
sudo chown zabbix:zabbix /etc/zabbix/zabbix_agentd.psk

sudo chmod 400 /etc/zabbix/zabbix_agentd.psk
Delete # symbol from the TLSConnect and TLSAccept lines, change their value to psk, and after that edit these lines to the end of the file:
TLSPSKFile=(path to key file)
TLSPSKIdentity=(ID of your key)
Restart the agent for the changes to take place.
Configuring PSK for the Windows agent
For the Windows version modify C:\\\\Program Files\\\\Zabbix Agent\\\\zabbix_agentd.conf file in the same way as those described earlier in the Ubuntu part.
Make zabbix_agentd.psk file in the default agent folder with your PSK in it.
Don’t forget to restart the agent in the services menu.

Check if it works.
![]()
Conclusion
In this guide, we discovered how to set up PSK authorization on Windows and Ubuntu Zabbix Agents.
Аverage rating : 5
Rated by: 2
1101
CT Amsterdam
The Netherlands, Herikerbergweg 292
+31 20 262-58-98
![]()
700
300
ITGLOBAL.COM NL
1101
CT Amsterdam
The Netherlands, Herikerbergweg 292
+31 20 262-58-98
![]()
700
300
ITGLOBAL.COM NL
![]()
700
300

Всем привет.
Если данные от с zabbix-агентов поступают на zabbix-сервер через интернет и при этом не используется vpn канал, то рекомендуется всегда включать шифрованние передачи данных. Для этого используется наиболее простой вариант шифрования с применением pre-shared ключей.
Для этого в конфигурацию агента zabbix_agent.conf добавляем следующие параметры:
TLSConnect=psk
TLSAccept=unencrypted,psk
TLSPSKFile=/etc/zabbix/zabbix_agentd.psk
TLSPSKIdentity=HOST-PSK
Выполняем генерация PSK-ключа, которую можно выполнить где угодно, а потом перенести файл zabbix_agentd.psk.
host-agent# openssl rand -hex 32 > /etc/zabbix/zabbix_agentd.psk
Перестартовываем агента:
host-agent# service zabbix-agent restart
В свойствах хоста на zabbix-сервере в отдельной вкладке Encryption, настраиваем PSK-ключ нашего хоста.

Обращаю внимание что надо ставить галочки PSK в «Соединения с узла сети» и в «Подключения к узлу сети», т.е. обязательно должно быть выбрано PSK и там, и там.
Теперь можем выполнить проверку PSK-соединения:
— для этого сначала перекинем ключ агента на zabbix-сервер:
host-agent# scp /etc/zabbix/zabbix_agentd.psk server:agent01.psk
— посылаем get-запрос:
server# zabbix_get -s hots-agent -k agent.version —tls-connect=psk —tls-psk-identity=»HOST-PSK» —tls-psk-file=anget01.psk
Для Windows клиентов также есть возможность устанавливать агента со встроенным SSL-шифрованием. Для этого нужно указать «Enable PSK» во время его инсталяции.

На следующем шаге вы укажите PSK Identity получите искомый PSK-ключ.
Вот и все. Успехов.