В современных версиях Windows 11 22H2 и Windows 10 21H2+ появилась возможность установки и управления языковыми пакетами с помощью PowerShell. В предыдущих версиях Windows вы могли установить или удалить языковые пакеты только из графического интерфейса классической панели управления или панели Settings (команда быстрого доступа
ms-settings:regionlanguage
).
В новых версиях Windows был добавлен встроенный PowerShell модуль LanguagePackManagement. С помощью команд из этого модуля вы можете установить дополнительный языковой пакет в Windows и задать предпочтительный язык пользовательского интерфейса Windows.
Модуль LanguagePackManagement пока доступен только в клиентских версиях Windows, но не в Windows Server 2022/2019.
Вы можете вывести список доступных командлетов в модуле:
Get-Command -Module LanguagePackManagement

-
Get-SystemPreferredUILanguage
(
Get-PreferredLanguage
,
Get-SystemLanguage
) – текущий язык системы по умолчанию -
Set-SystemPreferredUILanguage
(
Set-PreferredLanguage
) – задать предпочтительный язык интерфейса Windows -
Get-InstalledLanguage
(
Get-Language
,
Set-SystemLanguage
) – вывести список установленных языковых пакетов и языковых функций -
Install-Language
— установить языковой пакет в Windows -
Uninstall-Language
– удалить языковой пакет
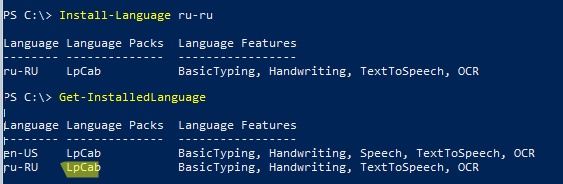
Вывелем список доступных языковых пакетов на компьютере с Windows 10:
Get-InstalledLanguage
В данном примере на компьютере установлен только английский языковой пакет (Language Packs = LpCab). Русский доступен только в качестве языка ввода.
Language Language Packs Language Features
-------- -------------- -----------------
en-US LpCab BasicTyping, Handwriting, Speech, TextToSpeech, OCR
ru-RU None BasicTyping, Handwriting, OCR

Чтобы установить русский языковой пакет, выполните команду:
Install-Language -Language ru-ru
Windows загрузит указанный языковой пакет и дополнительные компоненты с серверов Microsoft и установит их в системе.
Полный список языковых пакетов для Windows
| Тег | Описание |
| ar-SA | Arabic (Saudi Arabia) |
| bn-BD | Bangla (Bangladesh) |
| bn-IN | Bangla (India) |
| cs-CZ | Czech (Czech Republic) |
| da-DK | Danish (Denmark) |
| de-AT | Austrian German |
| de-CH | “Swiss” German |
| de-DE | Standard German |
| el-GR | Modern Greek |
| en-AU | Australian English |
| en-CA | Canadian English |
| en-GB | British English |
| en-IE | Irish English |
| en-IN | Indian English |
| en-NZ | New Zealand English |
| en-US | US English |
| en-ZA | English (South Africa) |
| es-AR | Argentine Spanish |
| es-CL | Chilean Spanish |
| es-CO | Colombian Spanish |
| es-ES | Castilian Spanish (Central-Northern Spain) |
| es-MX | Mexican Spanish |
| es-US | American Spanish |
| fi-FI | Finnish (Finland) |
| fr-BE | Belgian French |
| fr-CA | Canadian French |
| fr-CH | “Swiss” French |
| fr-FR | Standard French (France) |
| he-IL | Hebrew (Israel) |
| hi-IN | Hindi (India) |
| hu-HU | Hungarian (Hungary) |
| id-ID | Indonesian (Indonesia) |
| it-CH | “Swiss” Italian |
| it-IT | Standard Italian (Italy) |
| jp-JP | Japanese (Japan) |
| ko-KR | Korean (Republic of Korea) |
| nl-BE | Belgian Dutch |
| nl-NL | Standard Dutch Netherlands) |
| no-NO | Norwegian (Norway) |
| pl-PL | Polish (Poland) |
| pt-BR | Brazilian Portuguese |
| pt-PT | European Portuguese (Portugal) |
| ro-RO | Romanian (Romania) |
| ru-RU | Russian (Russian Federation) |
| sk-SK | Slovak (Slovakia) |
| sv-SE | Swedish (Sweden) |
| ta-IN | Indian Tamil |
| ta-LK | Sri Lankan Tamil |
| th-TH | Thai (Thailand) |
| tr-TR | Turkish (Turkey) |
| zh-CN | Mainland China, simplified characters |
| zh-HK | Hong Kong, traditional characters |
| zh-TW | Taiwan, traditional characters |
Вы можете использовать дополнительные параметры команды Install-Language:
-
-CopyToSettings
– позволяет сразу назначить данный язык в качестве языка по умолчанию и применить настройки к экрану входа в Windows и для новых пользователей;Ранее вы могли сменить языковые настройки и раскладку клавиатуры на экране входа в систему через панель управления и реестр.
В Windows 11 доступен специальный командлет, который позволяет применить скопировать языковые настройки текущего пользователя и применить его к Welcome Screen и новым пользователям:
Copy-UserInternationalSettingsToSystem -WelcomeScreen $true -NewUser $true -
-ExcludeFeatures
– позволяет исключить дополнительные компоненты языкового пакета (FoD, Features on Demand) из установки. Такие FoD (Features on Demand), как OCR, TextToSpeech или Handwriting.
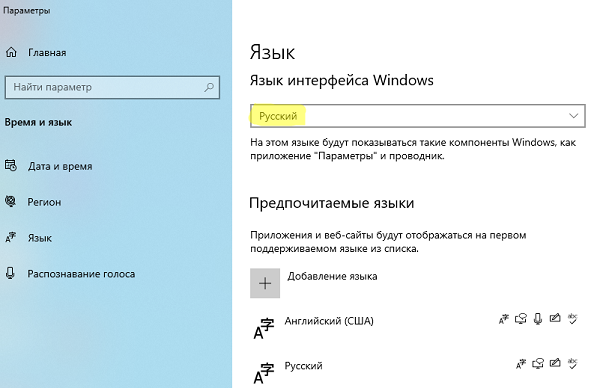
Вывести предпочтительный язык интерфейса Windows:
Get-SystemPreferredUILanguage
В данном случае язык интерфейса английский (
en-us
).

Чтобы задать русский язык в качестве основного языка Windows, нужно выполнить команду:
Set-SystemPreferredUILanguage -Language ru-ru
Чтобы применить новый языковой пакет, нужно перезагрузить Windows. Выполните команду:
Restart-Computer
После перезагрузки язык интерфейса Windows сменится на русский.
Чтобы удалить ненужный языковой пакет в Windows:
Uninstall-Language -Language ru-ru
Если ваш компьютер не подключен к интернету, вы можете установить дополнительные языковые пакеты и компоненты с помощью DISM. Для этого вам нужно скачать ISO образ с Language Pack (https://learn.microsoft.com/en-us/azure/virtual-desktop/windows-11-language-packs), смонтировать ISO образ в Windows и установить языковой пакет и компоненты с помощью команд:
Dism /Online /Add-Package /PackagePath:D:\LanguagesAndOptionalFeatures\Microsoft-Windows-Client-Language-Pack_x64_ru-ru.cab
Dism /Online /Add-Capability /capabilityname:Language.Basic~~~ru-ru~0.0.1.0 /source:D:\LanguagesAndOptionalFeatures
Dism /Online /Add-Capability /capabilityname:Language.Handwriting~~~ru-ru~0.0.1.0 /source:D:\LanguagesAndOptionalFeatures
Dism /Online /Add-Capability /capabilityname:Language.OCR~~~ru-ru~0.0.1.0 /source:D:\LanguagesAndOptionalFeatures
Dism /Online /Add-Capability /capabilityname:Language.Speech~~~ru-ru~0.0.1.0 /source:D:\LanguagesAndOptionalFeatures
Dism /Online /Add-Capability /capabilityname:Language.TextToSpeech~~~ru-ru~0.0.1.0 /source:D:\LanguagesAndOptionalFeatures
In modern versions of Windows 11 22H2 and Windows 10 21H2+, you can use PowerShell to install and manage language packs and language interface language packs (LIPs). In previous builds of Windows, the only way to add or remove language packs was to use the classic Control Panel or Settings user interface (quick URI access command: ms-settings:regionlanguage).
In recent versions of Windows, a built-in PowerShell module LanguagePackManagement has been added. You can use the cmdlets from this module to install an optional Windows language pack and set your preferred language for the Windows user interface.
The LanguagePackManagement module is currently only available in Windows desktop versions and not on Windows Server 2022/2019.
You can view a list of available cmdlets in the module:
Get-Command -Module LanguagePackManagement
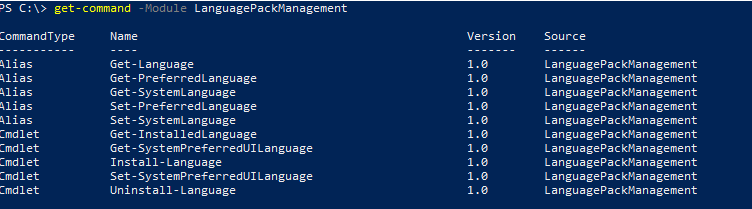
Get-SystemPreferredUILanguage(Get-PreferredLanguage,Get-SystemLanguage) – get the current default UI language in Windows;Set-SystemPreferredUILanguage(Set-PreferredLanguage) – to set a preferred Windows interface language;Get-InstalledLanguage(Get-Language,Set-SystemLanguage) –list installed language packs and features;Install-Language— to install a language pack on Windows;Uninstall-Language– to remove a language pack.
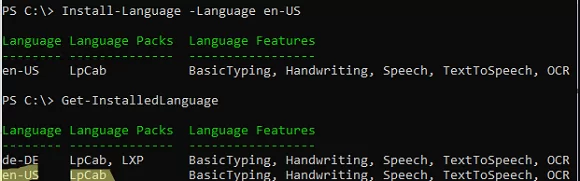
Let’s look at the list of available language packs on a computer running Windows 10:
Get-InstalledLanguage
In this example, only the German language pack is installed on Windows (Language Packs = LpCab). The English language is available as an input language only.
Language Language Packs Language Features
-------- -------------- -----------------
de-DE LpCab BasicTyping, Handwriting, Speech, TextToSpeech, OCR
en-US None BasicTyping, Handwriting, OCR

Run the following command to add the English language pack on Windows:
Install-Language -Language en-US
Windows downloads and installs the specified language pack and additional components from Microsoft servers.
Full list of available language packs for Windows:
| Tag | Description |
| ar-SA | Arabic (Saudi Arabia) |
| bn-BD | Bangla (Bangladesh) |
| bn-IN | Bangla (India) |
| cs-CZ | Czech (Czech Republic) |
| da-DK | Danish (Denmark) |
| de-AT | Austrian German |
| de-CH | “Swiss” German |
| de-DE | Standard German |
| el-GR | Modern Greek |
| en-AU | Australian English |
| en-CA | Canadian English |
| en-GB | British English |
| en-IE | Irish English |
| en-IN | Indian English |
| en-NZ | New Zealand English |
| en-US | US English |
| en-ZA | English (South Africa) |
| es-AR | Argentine Spanish |
| es-CL | Chilean Spanish |
| es-CO | Colombian Spanish |
| es-ES | Castilian Spanish (Central-Northern Spain) |
| es-MX | Mexican Spanish |
| es-US | American Spanish |
| fi-FI | Finnish (Finland) |
| fr-BE | Belgian French |
| fr-CA | Canadian French |
| fr-CH | “Swiss” French |
| fr-FR | Standard French (France) |
| he-IL | Hebrew (Israel) |
| hi-IN | Hindi (India) |
| hu-HU | Hungarian (Hungary) |
| id-ID | Indonesian (Indonesia) |
| it-CH | “Swiss” Italian |
| it-IT | Standard Italian (Italy) |
| jp-JP | Japanese (Japan) |
| ko-KR | Korean (Republic of Korea) |
| nl-BE | Belgian Dutch |
| nl-NL | Standard Dutch Netherlands) |
| no-NO | Norwegian (Norway) |
| pl-PL | Polish (Poland) |
| pt-BR | Brazilian Portuguese |
| pt-PT | European Portuguese (Portugal) |
| ro-RO | Romanian (Romania) |
| fr-fr | Russian (Russian Federation) |
| sk-SK | Slovak (Slovakia) |
| sv-SE | Swedish (Sweden) |
| ta-IN | Indian Tamil |
| ta-LK | Sri Lankan Tamil |
| th-TH | Thai (Thailand) |
| tr-TR | Turkish (Turkey) |
| zh-CN | Mainland China, simplified characters |
| zh-HK | Hong Kong, traditional characters |
| zh-TW | Taiwan, traditional characters |
There are additional options that you can use with the Install-Language command:
-CopyToSettings– lets you set a default language and apply these settings to the Welcome Screen and to new user accounts;In Windows 11, you can copy the current user’s language and keyboard layout settings and apply them to the Welcome screen and to new users:
Copy-UserInternationalSettingsToSystem -WelcomeScreen $true -NewUser $true-ExcludeFeatures– allows to exclude additional language pack components (FoD, Features on Demand) from installation. These may be OCR, TextToSpeech, or Handwriting.
To display the preferred Windows interface language:
Get-SystemPreferredUILanguage
In this case, German (de-DE) is the current interface language in Windows.

Run the following command to set English as your preferred Windows interface language:
Set-SystemPreferredUILanguage -Language en-US
You will need to restart Windows to apply the new language pack.
Restart-Computer
After the restart, the Windows interface language will change to English.
To uninstall a language pack that you do not need:
Uninstall-Language -Language fr-FR
If your computer is disconnected from the Internet, you can install additional language packs and components offline using DISM (https://learn.microsoft.com/en-us/azure/virtual-desktop/windows-11-language-packs), mount the ISO image in Windows, and install a language pack and its components using the commands below:
Dism /Online /Add-Package /PackagePath:"D:\Microsoft-Windows-LanguageFeatures-Basic-fr-fr-Package~31bf3856ad364e35~amd64~~.cab"
 Dism /Online /Add-Package /PackagePath:D:\LanguagesAndOptionalFeatures\Microsoft-Windows-Client-Language-Pack_x64_fr-fr.cab
 Dism /Online /Add-Capability /capabilityname:Language.Basic~~~fr-fr~0.0.1.0 /source:D:\LanguagesAndOptionalFeatures
 Dism /Online /Add-Capability /capabilityname:Language.Handwriting~~~fr-fr~0.0.1.0 /source:D:\LanguagesAndOptionalFeatures
 Dism /Online /Add-Capability /capabilityname:Language.OCR~~~fr-fr~0.0.1.0 /source:D:\LanguagesAndOptionalFeatures
 Dism /Online /Add-Capability /capabilityname:Language.Speech~~~fr-fr~0.0.1.0 /source:D:\LanguagesAndOptionalFeatures
 Dism /Online /Add-Capability /capabilityname:Language.TextToSpeech~~~fr-fr~0.0.1.0 /source:D:\LanguagesAndOptionalFeatures
Search code, repositories, users, issues, pull requests…
Provide feedback
Saved searches
Use saved searches to filter your results more quickly
Sign up
Managing Windows languages and language packs on Windows 10 and Server 2016 can be a bit of a daunting task. This article aims to clarify most issues.
Change Log
01.09.2018: added information on Features on Demand (languages for handwriting, speech, etc.).
27.12.2018: small error correction in the installation directory of language packs (I wrote %SystemDrive% instead of %SystemRoot%). Added clarification that changing the language for Windows Apps, Edge and Internet Explorer concerns the language displayed within the application and not the language of the application itself.
Table of Contents
- An introduction to language packs
- How to obtain a language pack (for offline deployment)
- Windows Server 2016 Language Pack
- Windows 10 version 1803 Language Pack
- Windows 10 version 1803 Features on Demand
- Adding a language pack to Windows
- Complete installation script
- How to change the Windows display language
- Change the display language manually (Windows Server 2016)
- Change the display language manually (Windows 10)
- Change the display language using Microsoft Group Policy
- Change the display language using a Group Policy Preference item
- Using a logon script
- How to change the display language for Windows Apps and Store, Edge and Internet Explorer
- Manually (Windows Server 2016)
- Manually (Windows 10)
- Group Policy Preference
- Using a logon script
- How to prevent users from changing language settings
- How to change the system code page for non unicode programs
An introduction to language packs
A language pack allows you to display Windows in a different language besides English. All windows and menus are displayed in your locale language.
This is not the same as configuring local settings such as keyboard layout, date, time and number formatting. You can configure these locale settings without changing the Windows language. See also some of my other articles:
- Configuring Regional Settings and Windows locales with Group Policy
- Configuring the time zone and code page with Group Policy
As far as I can tell, language packs are available for all editions of Windows 10 and Windows Server 2016. To help you reduce the size of your image, language packs in Windows 10 are split into the following language components and Features On Demand:
- Language (interface) pack
- UI Text (this includes language packs, language interface packs and WinPE language packs which are all available in one download source)
- Features on Demand (additional language packs)
- Basic (spell check, typing)
- Fonts
- Handwriting (for devices with pen inputs)
- Optical character recognition
- Text-to-speech (required for Cortana)
- Speech (required for Cortana)
- Retail Demo experience
Reference: Language Packs in Windows 10 (microsoft.com)
A language (interface) pack, named UI Text in the above list, changes the display language for the following components:
- The operating system (all text in windows and menus)
- Windows apps and Windows Store
- Internet Explorer
- Edge (applies to Windows 10 only since Windows server has no Edge)
- WinPE (included in the same download source, but has to be used in a WinPE image)
Additional language packs, the so-called Features on Demand, are available for example for spelling, handwriting and speech recognition (Cortana) and more. These have to be downloaded separately and are available for Windows 10 only. They are NOT included within the source files of a language pack. More details are provided later on in this section.
Besides language packs for the operating system, Microsoft offer language packs for applications such as Microsoft Office. These have to be downloaded separately. The availability of language packs for third-party software depends on the vendor. Acrobat Reader for example support more than 30 languages. These are not within the scope of this article. In this article I only deal with language packs and the Features on Demand.
Please be aware that the list of available languages can differ for individual components. For example, the available language packs for Windows and for Office do not have to match. The same goes for third-party software. When planning your language strategy you should count with the fact that you will not find all languages for all products.
By default, when you add a language in Windows, only the keyboard layout is added. The actual Windows display language (the language (interface) pack) has to be downloaded separately. The same goes for additional language packs for handwriting, speech and so forth.
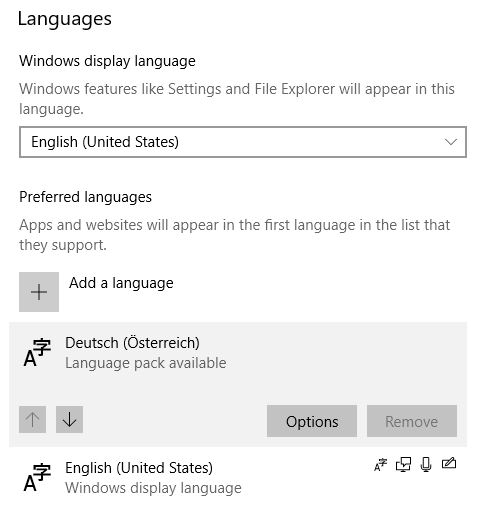
Take a look at the following screenshot. For English and German, the Windows display languages are available (English is currently enabled). For French however, only the keyboard layout is available, not the Windows display language.
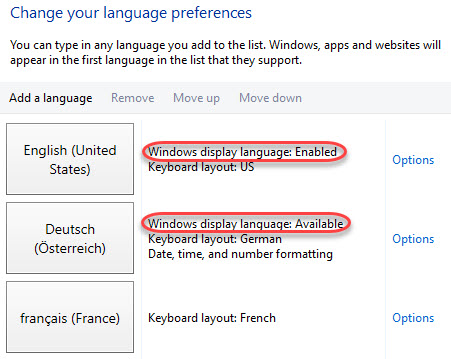
Note: the screenshot above was taken from a Windows Server 2016 version 1607 machine. In Windows 10 version 1803, the menu and windows to manage languages look completely different (see the section Change the display language manually (Windows 10) for more information and screenshots).
Microsoft separates between a language pack (LP) and a language interface pack (LIP). As per Microsoft, a LIP is a «high-quality, localized «skin» for emerging or minority language markets. […] A LIP provides the desktop user with an approximately 80% localized user experience by translating a reduced set of user interface (UI) elements. A LIP […] has a dependency on a base language pack of Windows.
The difference between an LP and a LIP is «the level of localization in comparison to language pack (LP) packages: LIP packages provide the desktop user with the most frequently accessed user interface and basic user assistance support (help files). In addition, a LIP is installed as a language add-on on top of an existing LP with base language dependency (Catalan LIP can only be installed on top of the Spanish or French LP, Welsh LIP can only be installed on top of the English LP). In addition, once a LIP is installed, switching the user interface between the LIP language and the LP base language is possible for users on all versions of Windows.
Also, as per Microsoft; «Windows Server and Windows 10 language packs are not interchangeable. Windows Server language packs cannot be used on Windows 10, and Windows 10 language packs cannot be used on Windows Server.»
In total, there are 38 language packs available for Windows 10 and Windows Server 2016. In comparison, for Windows Server 2012 R2, only 18 language packs are available.
In total, there are 72 language interface packs (LIPs) available for Windows 10. LIPs are not supported on Windows Server. So keep this in mind when you have both notebooks/desktops and for example Microsoft Remote Desktop Services or Citrix Virtual Apps and Desktops (previously known as XenApp or XenDesktop) in your organization. You may not be able to install the same languages on all your workers!
A language pack is installed in the directory %SystemRoot%\System32\%Language-ID%, so for example C:\Windows\System32\es-ES. The size of a language pack is about 50 MB. In case you want to install all 38 language packs, you increase the size of you image with about 2 GB. Language interface packs only use up around 10 MB of space. Features on Demand are between 5 and 70 MB in size. Most of them are around 10 to 20 MB though.
For a complete list of available LPs and LIPs for Windows Server 2012 R2, Windows 10 and Windows Server 2016 see the Microsoft article Available Language Packs for Windows.
How to obtain a language pack
There are four ways how to get a language (interface) pack and the Features on Demand:
- For offline use:
- OEMs and system builders with Microsoft Software License Terms can download language packs and LIPs from the Microsoft OEM site or the OEM Partner Center.
- IT professionals can download language packs from the Microsoft Volume Licensing Site.
- IT professionals can download language packs from Visual Studio Subscriptions (previously MSDN).
- Manually:
- After Windows is installed, end users can download and install additional language packs in Settings > Time & language > Region and language > Add a language (under Options).
Reference: Where to get language packs and LIPs (microsoft.com)
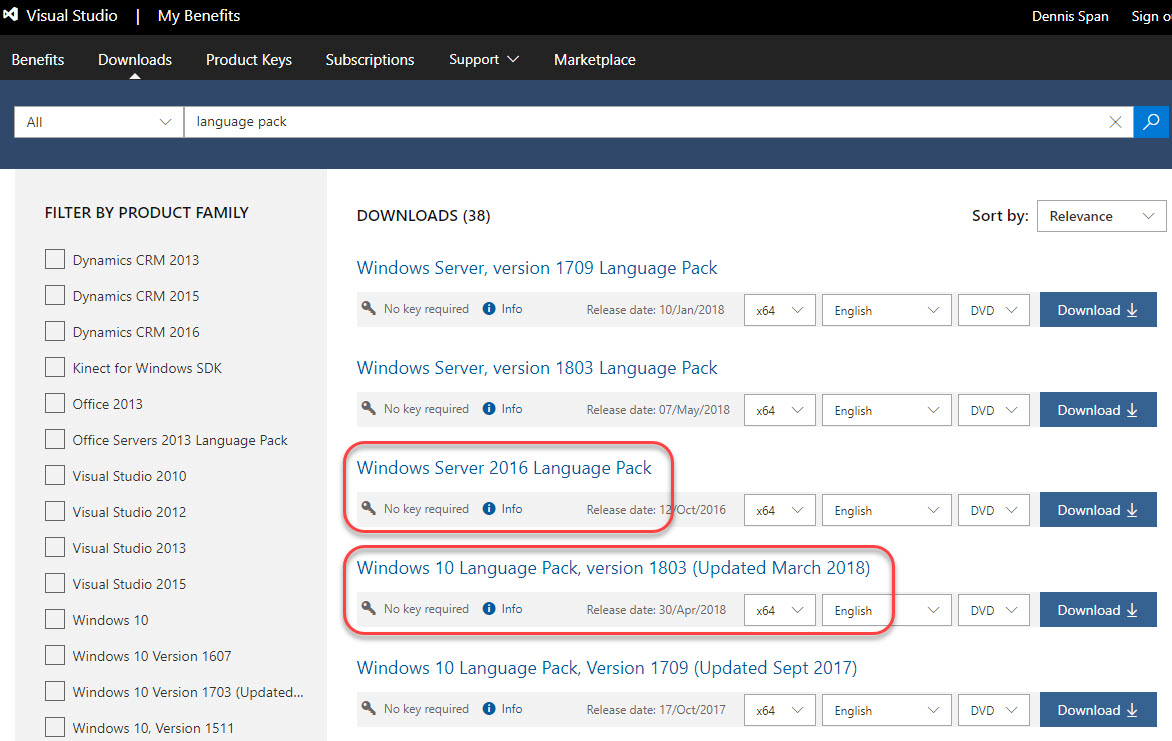
IT professionals require the offline installation sources to be able to deploy the language packs using the software deployment tool of their choice (e.g. MDT, SCCM, Citrix App Layering). To download the language packs I used my Visual Studio Subscription (MSDN). Select one of the links below for more details:
- Windows Server 2016 Language Pack
- Windows 10 version 1803 Language Pack
- Windows 10 version 1803 Features on Demand
Windows Server 2016 Language Pack
The download for Windows Server 2016 Language Pack is a single ISO file (about 2,6 GB in size) that contains all 38 languages. On the Microsoft Volume License Site or on the Microsoft Visual Studio Subscription website, search for language pack and you will find all language packs for all supported operating systems.
To extract the ISO file, use your favorite file archiving tool (e.g. 7-ZIP).
The ISO file for Windows Server 2016 contains two root folders:
- langpacks
- Windows Preinstallation Environment
The folder langpacks contains the language packs that need to be installed on Windows. The language files in the folder Windows Preinstallation Environment are used to localize your WinPE image. Within the folder langpacks, each language has its own subfolder.
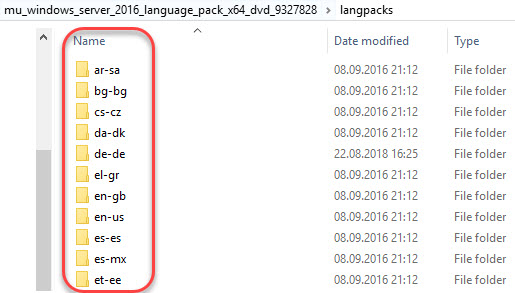
These subfolders contain the source files we need for the unattended installation (deployment) of the language packs. The file name for each language pack is:
x64fre_Server_%language%_lp.cab
For example: x64fre_Server_de-de_lp.cab
Note: for past operating systems the name of a language pack file was lp.cab. This name is no longer used for Windows 10 and Windows Server 2016, except for the WinPE language packs.
Windows 10 version 1803 Language Pack
The language pack for Windows 10 is also a single ISO file, but much larger (more than 7 GB) compared to the one for Windows Server 2016. The reason for this is that the download for Windows 10 includes more source files. Besides the 38 language packs (LPs) also included in the ISO file for Windows Server 2016, the Windows 10 ISO file also includes 72 language interface packs (LIPs) and includes both 32-bit and 64-bit source files.
On the Microsoft Volume License Site or on the Microsoft Visual Studio Subscription website, search for language pack and you will find all language packs for all supported operating systems.
To extract the ISO file, use your favorite file archiving tool (e.g. 7-ZIP).
The folder structure for the Windows 10 language packs is slightly different compared to the one for Windows Server 2016:
- arm64
- Windows Preinstallation Environment
- x64
- x86
Each architecture has its own langpacks folder containing both the language packs and language interface packs. The file name for each language pack is:
Microsoft-Windows-Client-Language-Pack_%architecture%_%language%.cab
For example: Microsoft-Windows-Client-Language-Pack_x64_de-de.cab
The file name for each language interface pack is:
Microsoft-Windows-Client-Language-Interface-Pack_%architecture%_%language%.cab
For example: Microsoft-Windows-Client-Language-Interface-Pack_x64_ca-es.cab
Note: for past operating systems the name of a language pack file was lp.cab. This name is no longer used for Windows 10 and Windows Server 2016, except for the WinPE language packs.
Windows 10 version 1803 Features on Demand
The Features on Demand consists of two ISO files (between 3,5 and 4,5 GB in size). You can download either the 32-bit or 64-bit source files. For each version of Windows 10, the download consists of two parts (one ISO file per part). The languages for handwriting, speech, etc. are included in Part 1.
On the Microsoft Volume License Site or on the Microsoft Visual Studio Subscription website, search for features on demand and you will find the available downloads for all Windows 10 versions.
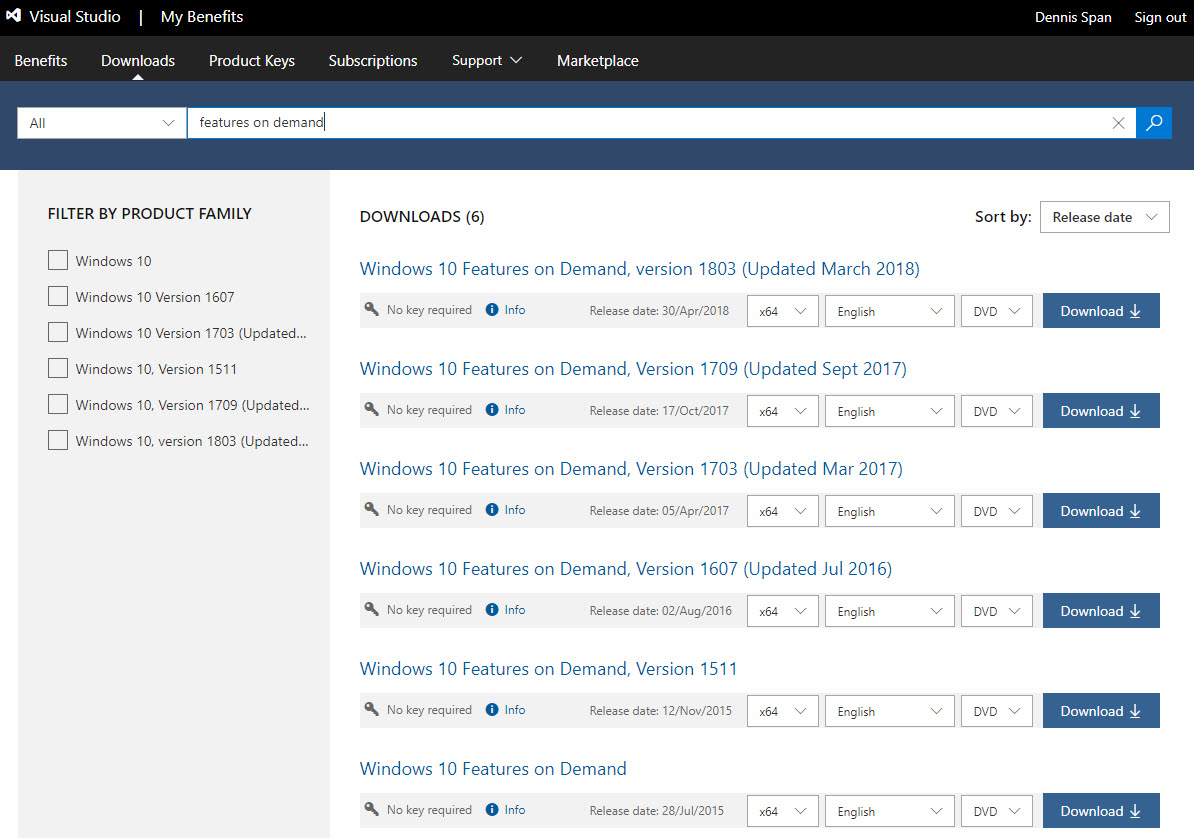
To obtain the language files you only need to download Part 1.

To extract the ISO file, use your favorite file archiving tool (e.g. 7-ZIP).
Within the folder structure you find multiple CAB files that represent a Feature on Demand. The name of the CAB files that contain language specific features start with Microsoft-Windows-LanguageFeatures. The following categories exist:
- Microsoft-Windows-LanguageFeatures-Basic…..cab
- Microsoft-Windows-LanguageFeatures-Fonts…..cab
- Microsoft-Windows-LanguageFeatures-Handwriting…..cab
- Microsoft-Windows-LanguageFeatures-OCR…..cab
- Microsoft-Windows-LanguageFeatures-Speech…..cab
- Microsoft-Windows-LanguageFeatures-TextToSpeech…..cab
Select the feature(s) in the language(s) that you require. The next section explains how to install (add) a language pack to the operating system.
Adding a language pack to Windows
There are a couple of different ways how to install a language (interface) pack:
- You can add a language pack to Windows by using the DISM / Add-WindowsPackage tool. Add-WindowsPackage is the PowerShell equivalent of the DISM executable. How to use DISM / Add-WindowsPackage is described in detail in this article. Just keep on reading. I also recommend you to check out the following Microsoft articles on this matter:
- Add and Remove Language Packs on a Running Windows Installation
- Add and Remove Language Packs Offline Using DISM
- To deploy a multilingual version of Windows by using Windows Setup (for example, a corporate image Windows DVD or a set of images available on a corporate network), you can add language resources to the installation program. See Add Multilingual Support to a Windows Distribution. For corporate or network-based deployments, you may also need to update the Windows Preinstallation Environment (Windows PE) that users see when they choose how and where to install Windows to their PC. For more information, see WinPE: Mount and Customize.
- After Windows is installed, end users can download and install additional language packs and LIPs from the Language Control Panel. For more information, see one of the following sections in this article:
- Change the display language manually (Windows Server 2016)
- Change the display language manually (Windows 10)
Reference: Section Add languages to Windows in the article Language Packs (microsoft.com)
My preferred silent installation method is to use DISM or the PowerShell equivalent Add-WindowsPackage (used in the installation script below).
The basic DISM command to install a language pack is:
dism.exe /online /add-package /packagepath:»C:\LP\de-de\x64fre_Server_de-de_lp.cab» /quiet /norestart /logpath:»C:\Logs\MUI-de-de.log»
Also Features on Demand can be installed like that. Take for example the German handwriting package:
dism.exe /online /add-package /packagepath:»C:\LP\de-de\Microsoft-Windows-LanguageFeatures-Handwriting-de-de-Package~31bf3856ad364e35~amd64~~.cab» /quiet /norestart /logpath:»C:\Logs\MUI-de-de_Handwriting.log»
Note: the parameter /online refers to the currently active Windows machine, as opposed to «slip streaming» source files in an offline Windows image file (WIM). The term «online» has nothing to do with being online on the Internet.
On operating systems from Windows 8.1/Windows Server 2012 R2 and newer with PowerShell 5.0 and higher installed, the cmdlet Add-WindowsPackage can be used instead of using DISM.exe:
Add-WindowsPackage -Online -PackagePath «C:\LP\de-de\x64fre_Server_de-de_lp.cab» -LogPath «C:\Logs\MUI-de-de.log» -NoRestart
Please be aware that both DISM and the PowerShell equivalent Add-WindowsPackage always generate a log file. If you do not specify a custom log file and log file location, the default log path C:\Windows\Logs\DISM is used.
In the following section, Complete Installation Script, you find a custom PowerShell script to install language packs including logging and error handling.
Complete installation script
The script below installs the Windows language pack using my installation template, which includes detailed logging and error handling. Also, the functions used in the scripts require my PowerShell Functions Library to be present on the local system. This means that before you can use the script, you need to copy the PowerShell module file DS_PowerShell_Function_Library.psm1 to the local system first.
In order to use this script, please follow these steps:
- Create an installation directory on the local computer or on a file share (UNC path). For example: C:\Temp\Microsoft\Language Pack Spanish.
- Create a subdirectory called Files.
- Download the language pack to the folder Files in the installation directory. Include the subfolder for the language pack. The structure should be Files\%LanguagePackDir%, for example Files\es-es. The CAB file, in this case for the Spanish language, is located in the directory es-es.
- Download and copy the PowerShell module file DS_PowerShell_Function_Library.psm1 to a directory on your local system.
- Copy the complete PowerShell script below to a new PS1 file (e.g. Install_Microsoft_Windows_MUI_Spanish.ps1) and add this file to the root of the installation directory (not in the subdirectory Files).
- Optional: modify the location of the log directory and log file name in lines 43 and 44.
- Enter the correct path to the PowerShell module file in line 60.
- Modify the file name in line 70. In case you want to use a different directory name instead of Files, change it in line 71.
- Execute the PowerShell script as follows:
powershell.exe -executionpolicy bypass -file «C:\Temp\Microsoft\Language Pack Spanish\Install_Microsoft_Windows_MUI_Spanish.ps1»
|
1 2 3 4 5 6 7 8 9 10 11 12 13 14 15 16 17 18 19 20 21 22 23 24 25 26 27 28 29 30 31 32 33 34 35 36 37 38 39 40 41 42 43 44 45 46 47 48 49 50 51 52 53 54 55 56 57 58 59 60 61 62 63 64 65 66 67 68 69 70 71 72 73 74 75 76 77 78 79 80 81 82 83 84 85 86 87 88 89 90 91 92 93 94 95 96 97 98 99 |
#========================================================================== # # Install a Microsoft Language Pack # # AUTHOR: Dennis Span # DATE : 27.08.2018 # # COMMENT: This script installs a Microsoft language pack (MUI) on the local machine # # Note: see the article ‘https://dennisspan.com/powershell-scripting-template-for-sccm-packages/’ for a detailed description how to use this template # # Note: for an overview of all functions in the PowerShell function library ‘DS_PowerShell_Function_Library.psm1’ see: # -Windows functions: https://dennisspan.com/powershell-function-library/powershell-functions-for-windows/ # -Citrix functions: https://dennisspan.com/powershell-function-library/powershell-functions-for-citrix/ # # Change log: # ———— # <DATE> <NAME>: <CHANGE DESCRIPTION> #========================================================================== # Get the script parameters if there are any param ( # The only parameter which is really required is ‘Uninstall’ # If no parameters are present or if the parameter is not # ‘uninstall’, an installation process is triggered [string]$Installationtype ) # define Error handling # note: do not change these values $global:ErrorActionPreference = «Stop» if($verbose){ $global:VerbosePreference = «Continue» } ############################ # Preparation # ############################ # Disable File Security $env:SEE_MASK_NOZONECHECKS = 1 # Custom variables [edit] $BaseLogDir = «C:\Logs» # [edit] add the location of your log directory here $PackageName = «Microsoft Language Pack Spanish» # [edit] enter the display name of the software (e.g. ‘Microsoft Language Pack Spanish’ or ‘Microsoft MUI German’) # Global variables $StartDir = $PSScriptRoot # the directory path of the script currently being executed if (!($Installationtype -eq «Uninstall»)) { $Installationtype = «Install» } $LogDir = (Join-Path $BaseLogDir $PackageName).Replace(» «,«_») $LogFileName = «$($Installationtype)_$($PackageName).log» $LogFile = Join-path $LogDir $LogFileName # Create the log directory if it does not exist if (!(Test-Path $LogDir)) { New-Item -Path $LogDir -ItemType directory | Out-Null } # Create new log file (overwrite existing one) New-Item $LogFile -ItemType «file» -force | Out-Null # Import the Dennis Span PowerShell Function Library Import-Module «C:\Scripts\DS_PowerShell_Function_Library.psm1» DS_WriteLog «I» «START SCRIPT — $Installationtype $PackageName» $LogFile DS_WriteLog «-« «» $LogFile ############################ # Installation # ############################ # Set variables $FileName = «x64fre_Server_es-es_lp.cab» # [edit] enter the name of the installation file (e.g. ‘x64fre_Server_de-de_lp.cab’) $FileSubfolder = «Files» # [edit] enter the name of the subfolder which contains the installation file # Install the language pack (using the log file defined in the variable $LogFile) $Language = $FileName.Substring(14,5) # Retrieve the language code from the Windows Language Pack file name (e.g. ‘de-de’ for Germany/German) $FileSubfolder = «Files\$($Language)» # Add the name of the language folder (e.g. ‘es-es’ or ‘de-de’) to the file subfolder path (the result will be something like ‘Files\es-es’ or ‘Files\de-de’) $FullPath = Join-Path $StartDir $FileSubfolder # Concatenate the two directories $StartDir and $InstallFileFolder $FileFullPath = Join-Path $FullPath $FileName # Concatenate the two directories $StartDir and $InstallFileFolder $LogFileMUI = Join-Path $LogDir «DISM_Log_LanguagePack_$($Language.ToUpper()).log» DS_WriteLog «I» «Install the Windows Language Pack $($Language.ToUpper())» $LogFile DS_WriteLog «I» «-File full path: $($FileFullPath)» $LogFile DS_WriteLog «I» «-DISM log file: $($LogFileMUI)» $LogFile Try { DS_WriteLog «I» «-Command: Add-WindowsPackage -Online -PackagePath ««$FileFullPath»» -LogPath ««$LogFileMUI»» -NoRestart» $LogFile Add-WindowsPackage -Online -PackagePath $FileFullPath -LogPath $LogFileMUI -NoRestart DS_WriteLog «S» «The language pack $($Language.ToUpper()) was installed successfully» $LogFile } Catch { DS_WriteLog «E» «Failed to install the language pack $($Language.ToUpper())» $LogFile Exit 1 } ############################ # Finalize # ############################ # Enable File Security Remove-Item env:\SEE_MASK_NOZONECHECKS DS_WriteLog «-« «» $LogFile DS_WriteLog «I» «End of script» $LogFile |
If you want to go one step further and create an SCCM package as well, please follow the step-by-step explanation in the article Deep dive creating SCCM packages for Citrix.
How to change the Windows display language
The Windows display language is configured per user, not per machine. There are a couple of methods how to change the display language. You can choose one of the following options:
- Change the display language manually (Windows Server 2016)
- Change the display language manually (Windows 10)
- Change the display language using Microsoft Group Policy
- Change the display language using a Group Policy Preference item
Most methods apply to both Windows 10 and Windows Server 2016 unless stated otherwise.
Change the display language manually (Windows Server 2016)
Note: in an enterprise environment, I strongly recommend installing the required language packs unattended during the initial installation. This goes for both client and server operating systems.
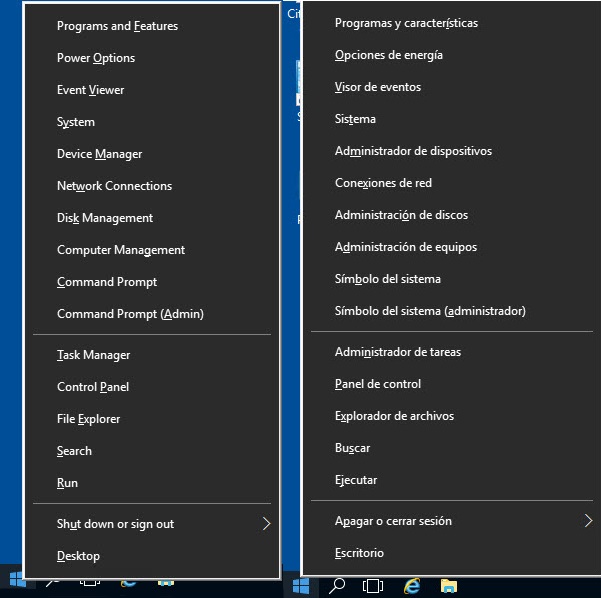
To manually change the Windows display language on a machine with Windows Server 2016 version 1607, go to Control Panel \ Language. In the menu the entry Add a language adds the keyboard layout for a particular language. Under Options you can enable the Windows display language if it has been installed.
Change the display language manually (Windows 10)
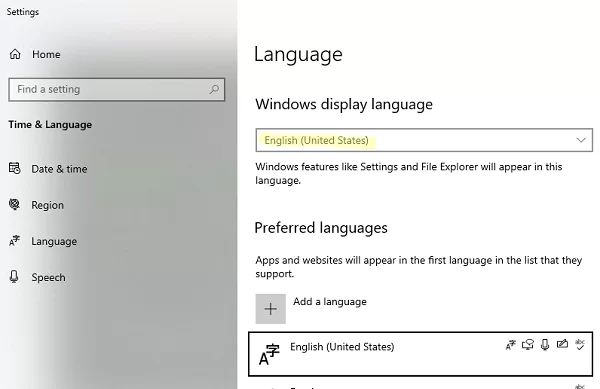
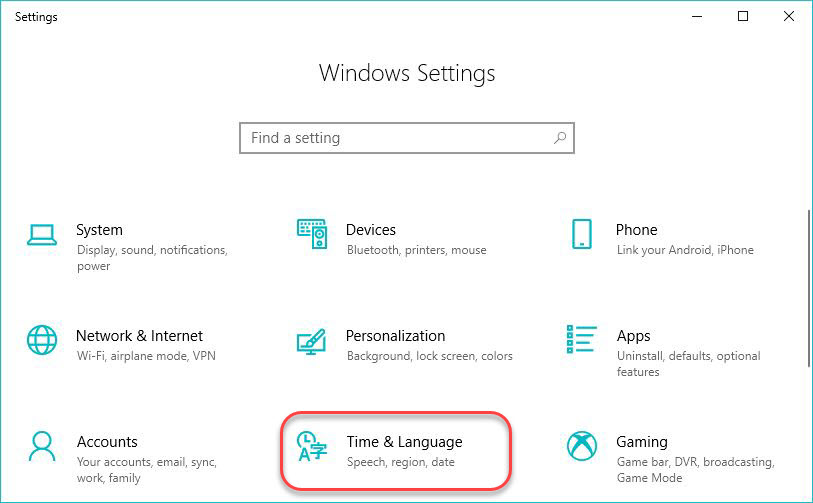
In Windows 10 version 1803, changing languages is handled differently. Go to Settings \ Time & Language.

On the left side select Region & Language.

In this window you can add a language. After adding a language, Windows checks if there is a language pack available for it. In case a language pack is found, you have the option to download and install it. Click the Options button.
Select the Download button beneath the language options to start the download.
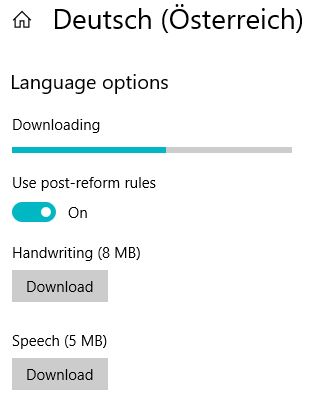
After installing the language pack, Windows will automatically install it.

After installing the language pack, a new popup box is available where you can select the preferred Windows display language. As mentioned before, this is for the current user only.

After changing the Windows display language you have to sign-out (and sign-in again) for the changes to apply.
Change the display language using Microsoft Group Policy
The Windows display language for a specific user or group can be forced by enabling the Group Policy setting Restricts the UI language Windows should use for the selected user in the Group Policy User Configuration \ Policies \ Administrative Templates \ Control Panel \ Regional and Language Options.
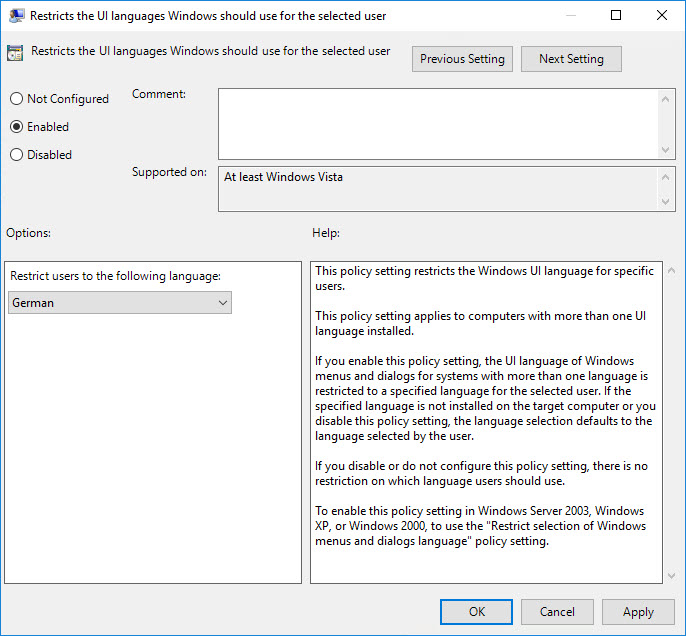
It is important to be aware that this setting prevents a user from selecting a different display language, even if more languages are installed on the local system. In case you want to be less restrictive towards your users, use a Group Policy Preference item instead of a Group Policy item. How to use a Group Policy Preference item is explained in the section below.
Change the display language using a Group Policy Preference item
In case you want users to be able to change their Windows display language, you cannot use a Group Policy setting. As mentioned in the previous paragraph, configuring a Group Policy setting to define the user’s display language results in the user not being able to change the Windows language. The solution is to use a Group Policy Preference item instead.
The preferred Windows display language is stored in the registry value PreferredUILanguages in the registry key HKEY_CURRENT_USER\Control Panel\Desktop. The value PreferredUILanguagesPending is only used to store the language that will be active at next logon in case the user changed it manually and did not sign-out yet.

Changing the language in this multi-string registry value accomplishes the same result as when changing the language manually using the GUI. Of course, for everything to work the language pack has to already be installed on the local system.
This solution applies to both Windows 10 and Windows Server 2016 (and higher).
Using a Group Policy Preference registry item allows an administrator to configure the preferred Windows display language while still allowing a user to change the language manually.

Configuring the option «run one time» ensures that the preference item is not enforced at next logon.
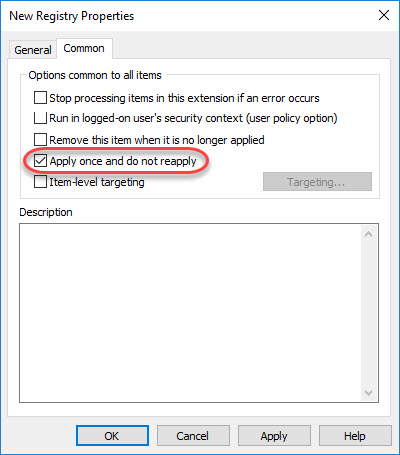
Applying the preference item only once ensures that the display language is never overwritten should the user decide to change it.
Using Item-level Targeting (ILT) you can assign preferred Windows languages to different users based on a number of criteria (see the section Configuring regional settings using Group Policy in my article Configure Regional Settings and Windows locales with Group Policy for an example how to use ILT).
Using a logon script
As explained in the previous paragraph, the setting to configure the Windows display language is a registry value. Therefore, it is possible to use a logon script to configure this setting.
In case you use a PowerShell script I invite you to use my PowerShell Function Library. You can configure the registry value using the function DS_SetRegistryValue.
To prevent a user from having to sign-out in order to apply the language settings, make sure to run your logon script synchronously. This means that your logon script needs to run before the user’s desktop is started (so before the initial explorer.exe process is stared). Enable the Group Policy item Run logon scripts synchronously in the Group Policy Computer or User Configuration \ Policies \ Administrative Templates \ System \ Scripts.
How to change the display language for Windows Apps and Store, Edge and Internet Explorer
As stated in the introduction of this article, the Windows display language is applied to all Windows components including Windows Apps and Store, Edge and Internet Explorer. However, it is possible to use a different language for the Windows Apps and Store, Edge and Internet Explorer.
Note: the language settings I am referring to here is the language used inside a Windows App, Edge or Internet Explorer, not the menu language of the actual application! For example, when the language of Internet Explorer is set to German and you visit Microsoft.com, the content is displayed in German.
This is possible by changing the order of the languages. You can choose one of the following options:
- Manually (Windows Server 2016)
- Manually (Windows 10)
- Group Policy Preference
Most methods apply to both Windows 10 and Windows Server 2016 unless stated otherwise.
Manually (Windows Server 2016)
To manually change the Windows display language for Windows Apps and Store, Edge and Internet Explorer, on a machine with Windows Server 2016 version 1607 installed, go to Control Panel \ Language. In the menu, move the preferred language to the top of the list.
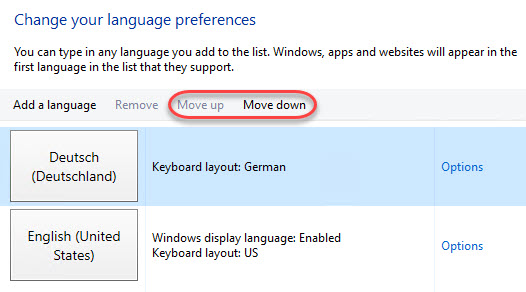
Manually (Windows 10)
In Windows 10 version 1803, changing languages is handled differently. Go to Settings \ Time & Language \ Region and Language. Use the arrows to move the preferred language for Windows Apps and Store, Edge and Internet Explorer to the top of the list.
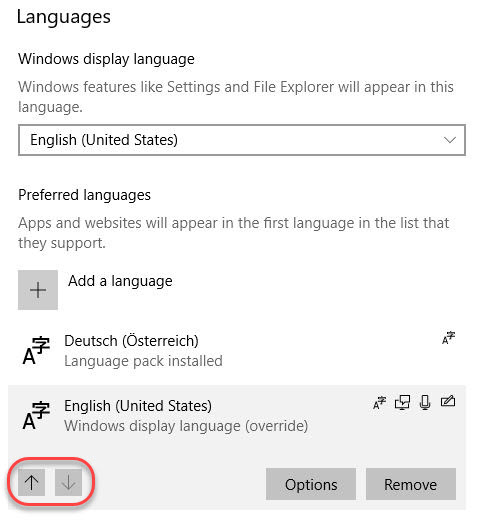
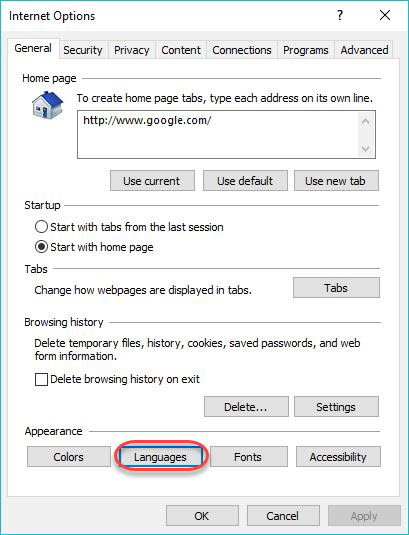
It is also possible to change the display language for Windows Apps and Store, Edge and Internet Explorer from within Internet Explorer. Go to Internet Options and on the tab General go to Languages.
In the window Language Preference, click on the button Set Language Preferences.
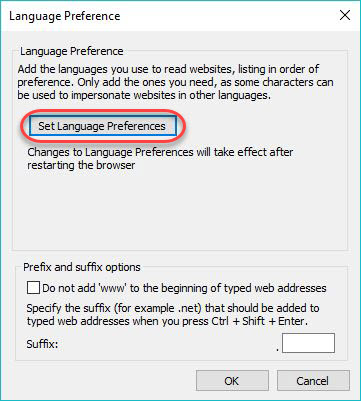
This will lead you to the Region and Language settings page.
Note: those of you who have experience with older operating systems will quickly realize that Microsoft made some significant changes concerning the language configuration in Internet Explorer.
Group Policy Preference
As far as I am aware, there is no Group Policy setting to configure the display language for Windows Apps and Store, Edge and Internet Explorer. But don’t worry; you can use a Group Policy Preference instead.
The preferred Windows display language for Windows Apps and Store, Edge and Internet Explorer is stored in the registry value Languages in the registry key HKEY_CURRENT_USER\Control Panel\International\User Profile.
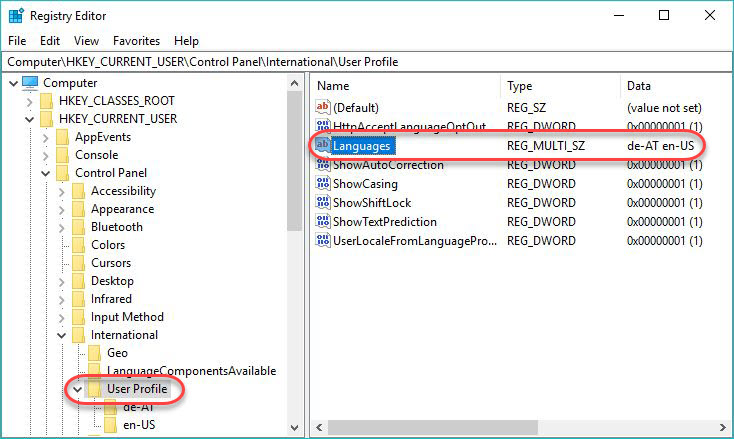
Changing the order of languages in this multi-string registry value accomplishes the same result as when changing the order using the GUI.
This solution applies to both Windows 10 and Windows Server 2016 (and higher).
See the section Change the display language using a Group Policy Preference item in this article for more information how to configure a preference item.
Using a logon script
As explained in the previous paragraph, the setting to configure the display language for Windows Apps and Store, Edge and Internet Explorer is a registry value. Therefore, it is possible to use a logon script to configure this setting.
In case you use a PowerShell script I invite you to use my PowerShell Function Library. You can configure the registry value using the function DS_SetRegistryValue.
To prevent a user from having to sign-out in order to apply the language settings, make sure to run your logon script synchronously. This means that your logon script needs to run before the user’s desktop is started (so before the initial explorer.exe process is stared). To accomplish this, enable the Group Policy item Run logon scripts synchronously in the Group Policy Computer or User Configuration \ Policies \ Administrative Templates \ System \ Scripts.
How to prevent users from changing language settings
By configuring the Windows display language using a Group Policy, you basically prevent a user from changing the language, at least until the next Group Policy refresh cycle (this will likely be every 30 to 90 minutes in most organizations).
In case this is not enough and you want to prevent users from changing language settings in any of the menus, the following policies are available:
- User Configuration \ Policies \ Administrative Templates \ Control Panel \ Regional and Language Options
Setting: Hide the select language group options - User Configuration \ Policies \ Administrative Templates \ Windows Components \ Internet Explorer \ Internet Control Panel
Setting: Disable the general page - User Configuration \ Policies \ Administrative Templates \ Windows Components \ Internet Explorer
Setting: Disable changing language setting
Please be aware that configuring the above settings does not prevent the user from changing these settings programmatically or by using tools such as regedit.exe. After all, language settings are user specific settings and by default, users have permission to change their own user-specific settings.
How to change the system code page for non-unicode programs
A Windows language (interface) pack does not modify the system specific code page for non-Unicode programs. Please see the article Configuring the time zone and code page with Group Policy for detailed information on how to change the system’s code page.
Conclusion
I honestly thought that writing this article would be simpler and less time consuming. There are still some smaller open issues I am working on and I will update this article when I am done. In the mean time, I hope the information in this article was of some help to you.

Dennis Span works as a Lead Sales Engineer at Citrix in Vienna, Austria. He holds multiple certifications such as CCE-V, CCIA and CCEA. In 2017, Dennis became a Citrix Technology Advocate (CTA). In 2019, he became a Citrix Technology Professional (CTP). Besides his interest in virtualization technologies and blogging, he loves spending time with his family as well as snowboarding, playing basketball and rowing. He is fluent in Dutch, English, German and Slovak and speaks some Spanish.
by Matthew Adams
Matthew is a freelancer who has produced a variety of articles on various topics related to technology. His main focus is the Windows OS and all the things… read more
Updated on
Windows 10 is the world’s biggest desktop and laptop platform with many millions of users across the globe. There are now more than 900 million devices with Windows 10 installed on them. Therefore, Win 10 supports most languages for its massive user base. Although most users won’t need to change their default display languages in Win 10, users can still install new Windows 10 language packs if ever required.
How Users can Add & Remove Language Packs in Windows 10
1. How to Add Language Packs
- To add a new language pack, press the Windows key + S keyboard shortcut.
- Enter the keyword ‘language’ in the search box.
- Click Language Settings to open the window shown directly below.

- Click the Add a preferred language button to open a list of language packs users can install.

- Then click the Next button to open the window in the snapshot directly below.
- There users can select, or deselect, additional language pack options as required. The language pack will become the default display language when users select the Set as my display language option.
- Click the Install button to add the language pack to Windows.
- Thereafter, users who select the Set as my display language setting will need to reboot Windows 10 for the changes to take effect.
- Users who do not select the Set as my display language option before installing the language pack can still switch to it by clicking the Windows display language drop-down menu. Select the newly installed language pack on that menu, and then restart Win 10.


2. How to Remove Language Packs
- To remove language packs from Win 10, open the Language tab in Settings again as outlined above.
- Before removing a pack, select an alternative display language to switch to on the drop-down menu.
- Then select a listed language pack to uninstall.

- Thereafter, click the Remove button.
- Users can also uninstall language packs with PowerShell. To do so, enter ‘PowerShell’ in Windows 10’s search utility.
- Click Windows PowerShell to open that utility.
- Then enter this command and press Return: Get-WinUserLanguageList.

- Note down the language tag for the pack you need to uninstall.
- Thereafter, enter the following commands separately in PowerShell:$LangList = Get-WinUserLanguageList
$MarkedLang = $LangList | where LanguageTag -eq “<languagecode>”
$LangList.Remove($MarkedLang)
Set-WinUserLanguageList $LangList -Force - For the second command, replace <languagecode> with the language tag noted down earlier. If the tag was en-US, the command would be entered as shown directly below.


So, that’s how users can install, change, and uninstall language packs in Windows 10. Remember that language packs hog hard drive space, so it’s probably not worth installing lots of them. However, users who need alternative display languages can add new packs and change them as required with the Settings app.
RELATED ARTICLES TO CHECK OUT:
- How to Install Cortana Language Packs in Windows 10
- Here’s how to fix Windows 10 Language Pack error 0x800f0954
- How to fix Windows 10 language pack error 0x800f081e
![]()