Данная статья предназначена для тех, кто искал подробное и понятное руководство о том, как установить Windows Server 2019.
Настоятельно рекомендую никогда не использовать никаких сторонних сборок Windows. Используйте только оригинальные установочные образы. Это поможет вам избежать множества проблем и получить максимальное быстродействие и стабильность.
Рекомендую всегда использовать англоязычные издания Windows Server. Как показывает практика, оригинальные (английские) версии Windows работают стабильнее, к тому же вам будет проще общаться на одном языке с профессионалами в случае возникновения проблем или при желании обменяться опытом.
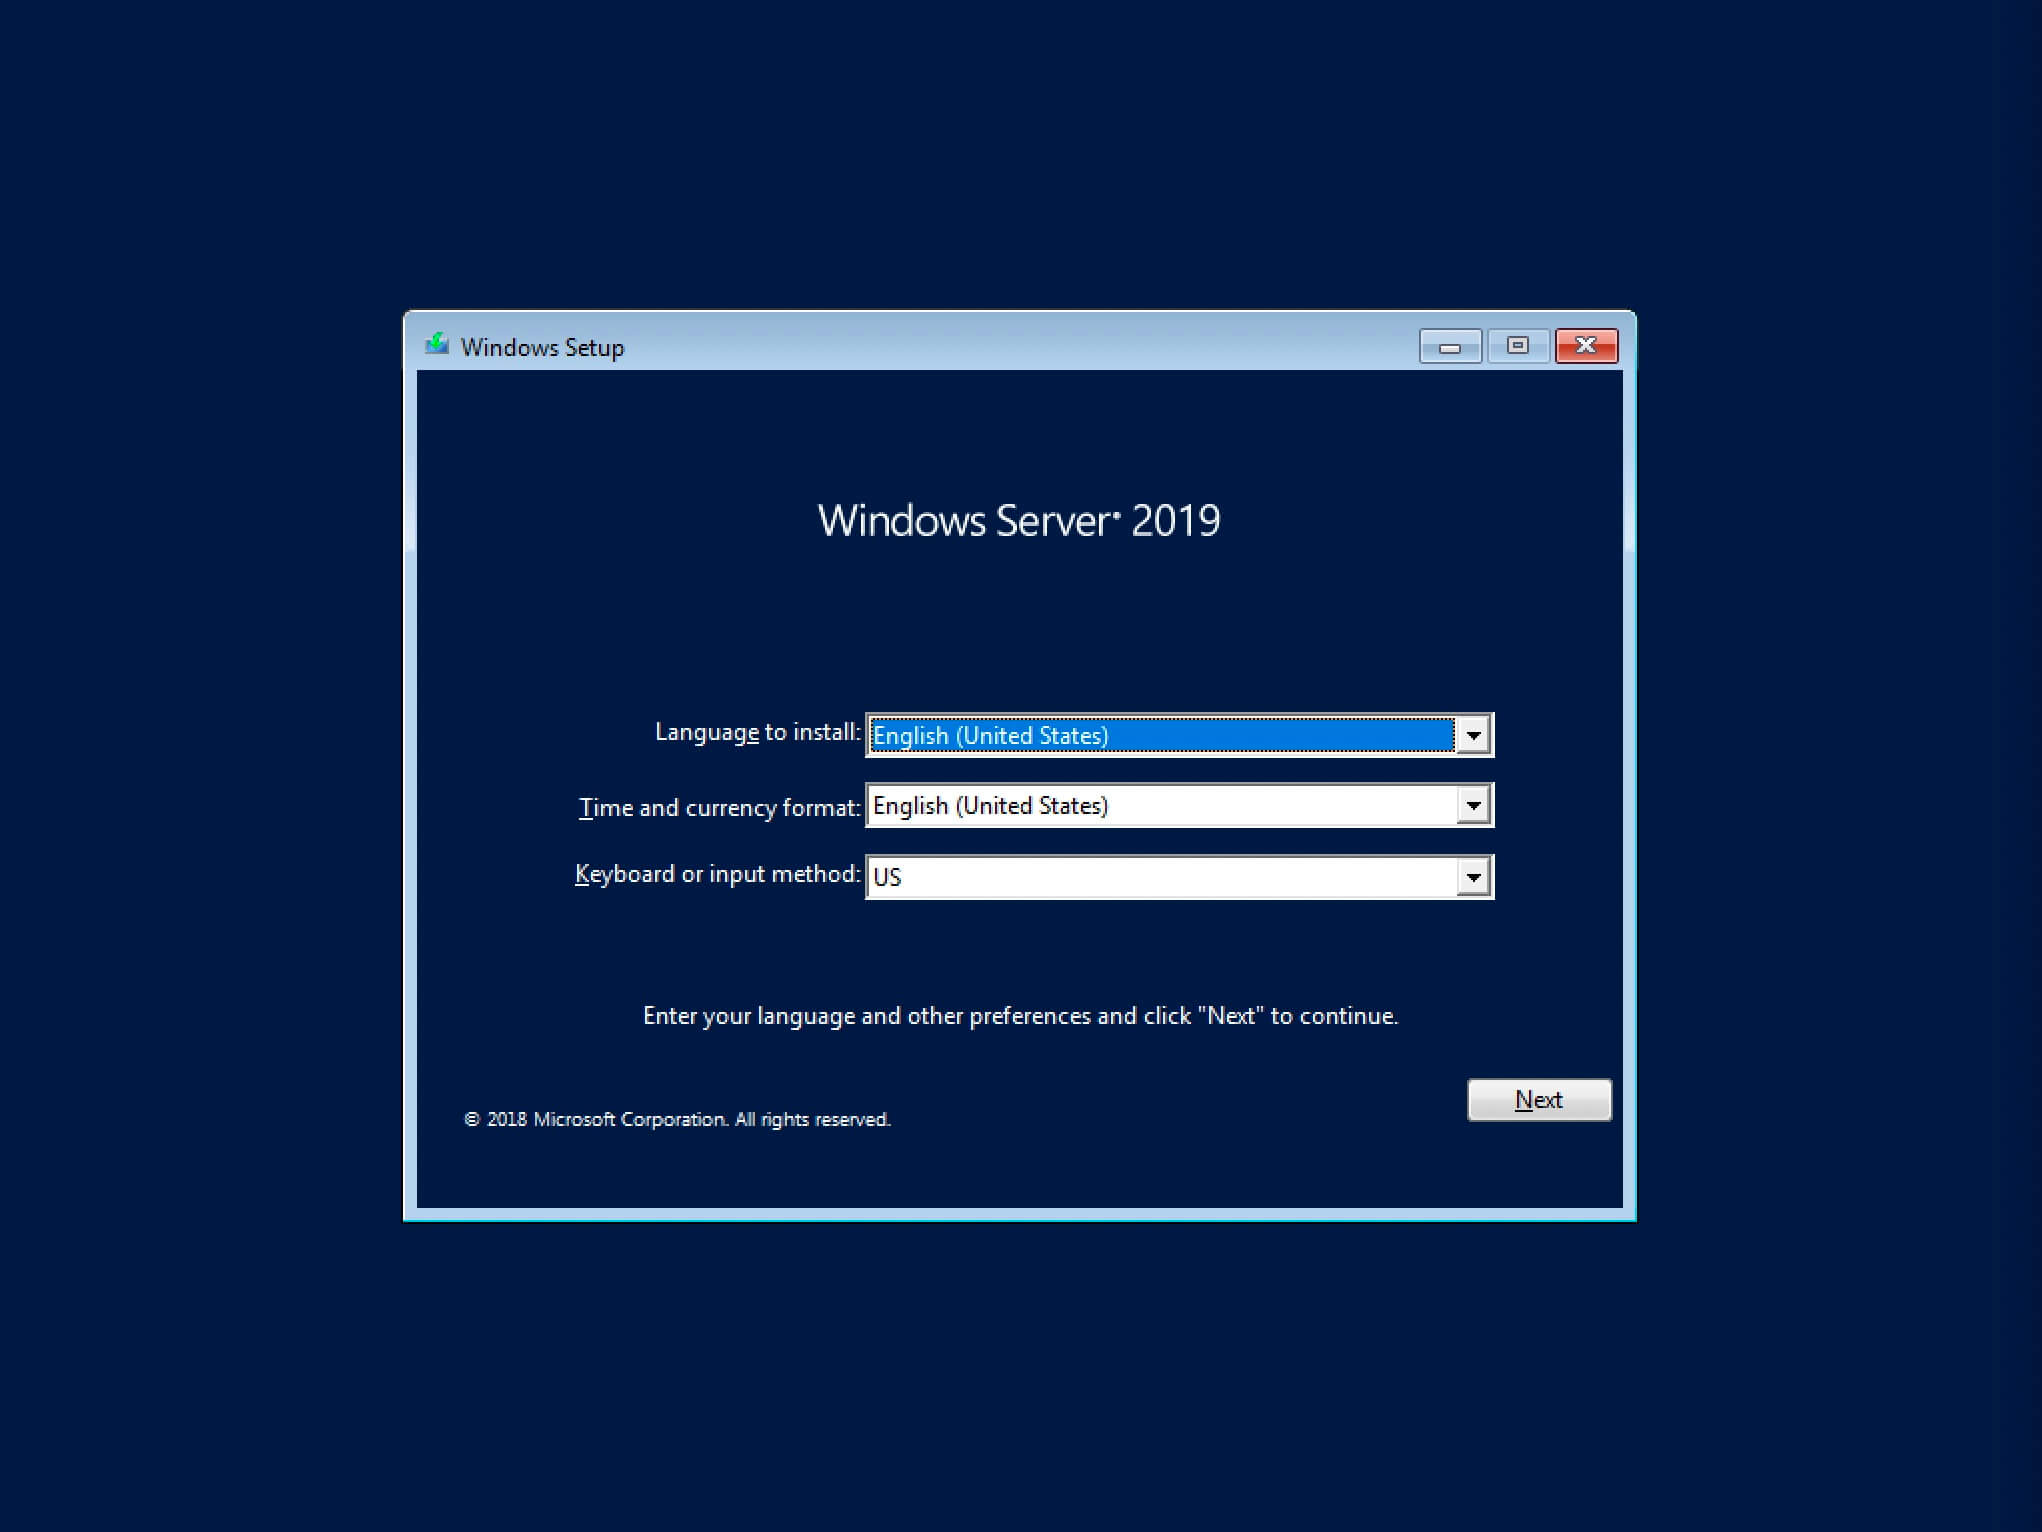
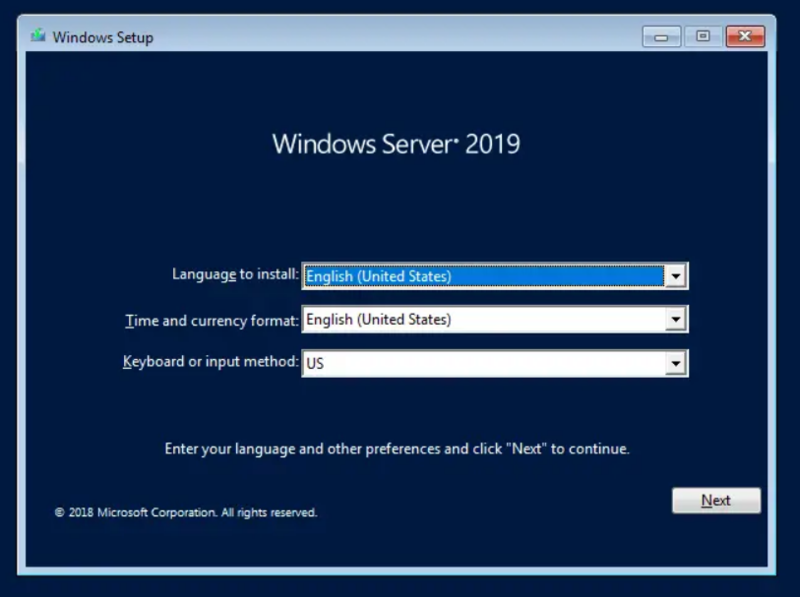
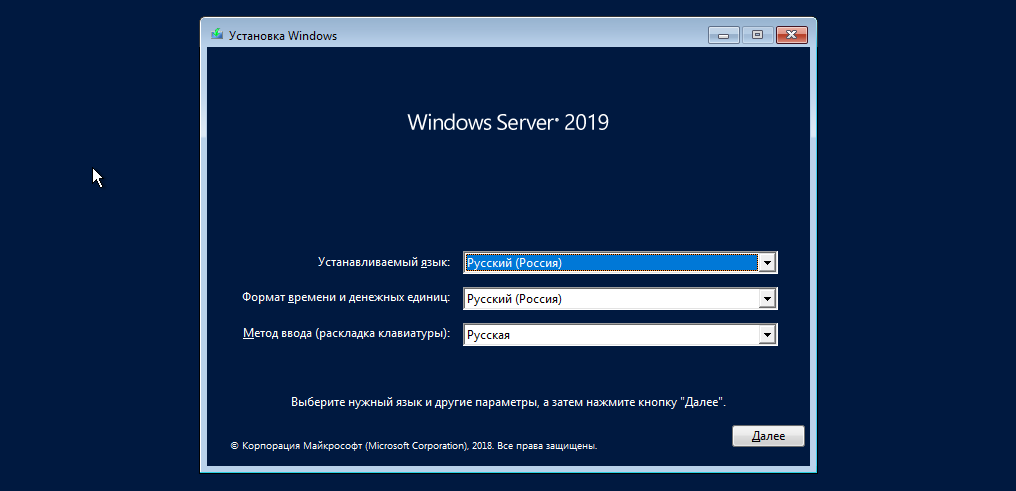
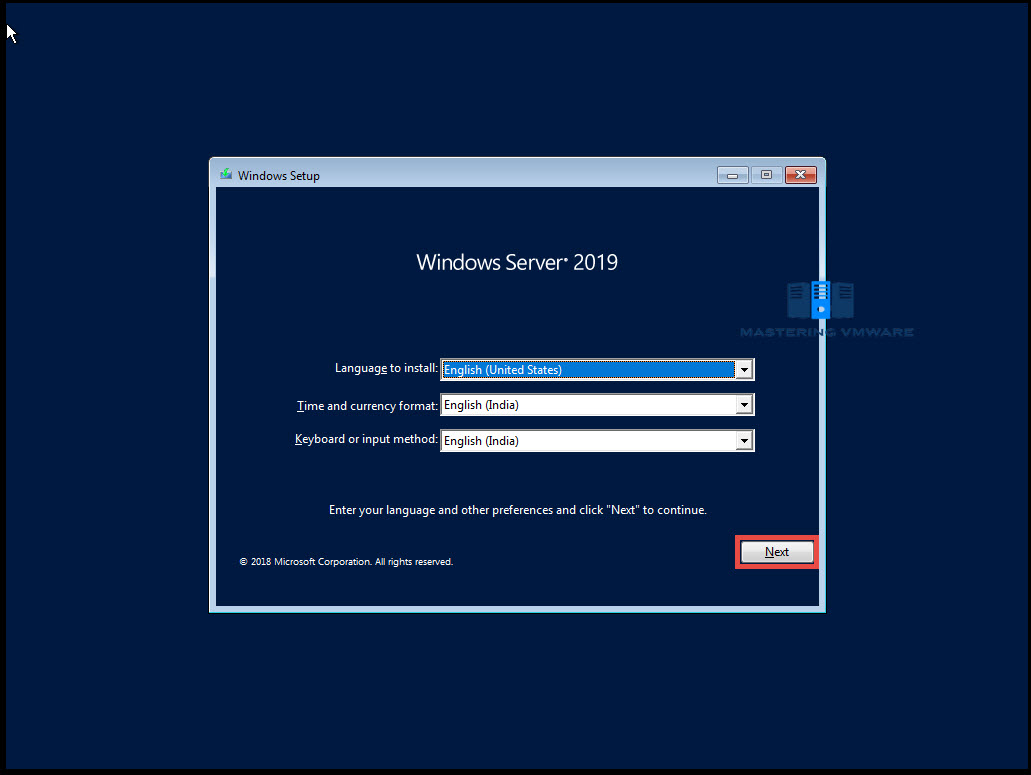
После успешной загрузки с установочной флешки или DVD-диска Windows Server 2019, первым делом необходимо выбрать языковые параметры.
В данном руководстве рассматривается установка Windows Server 2019 на английском языке.
Нажимаем на кнопку “Next”.
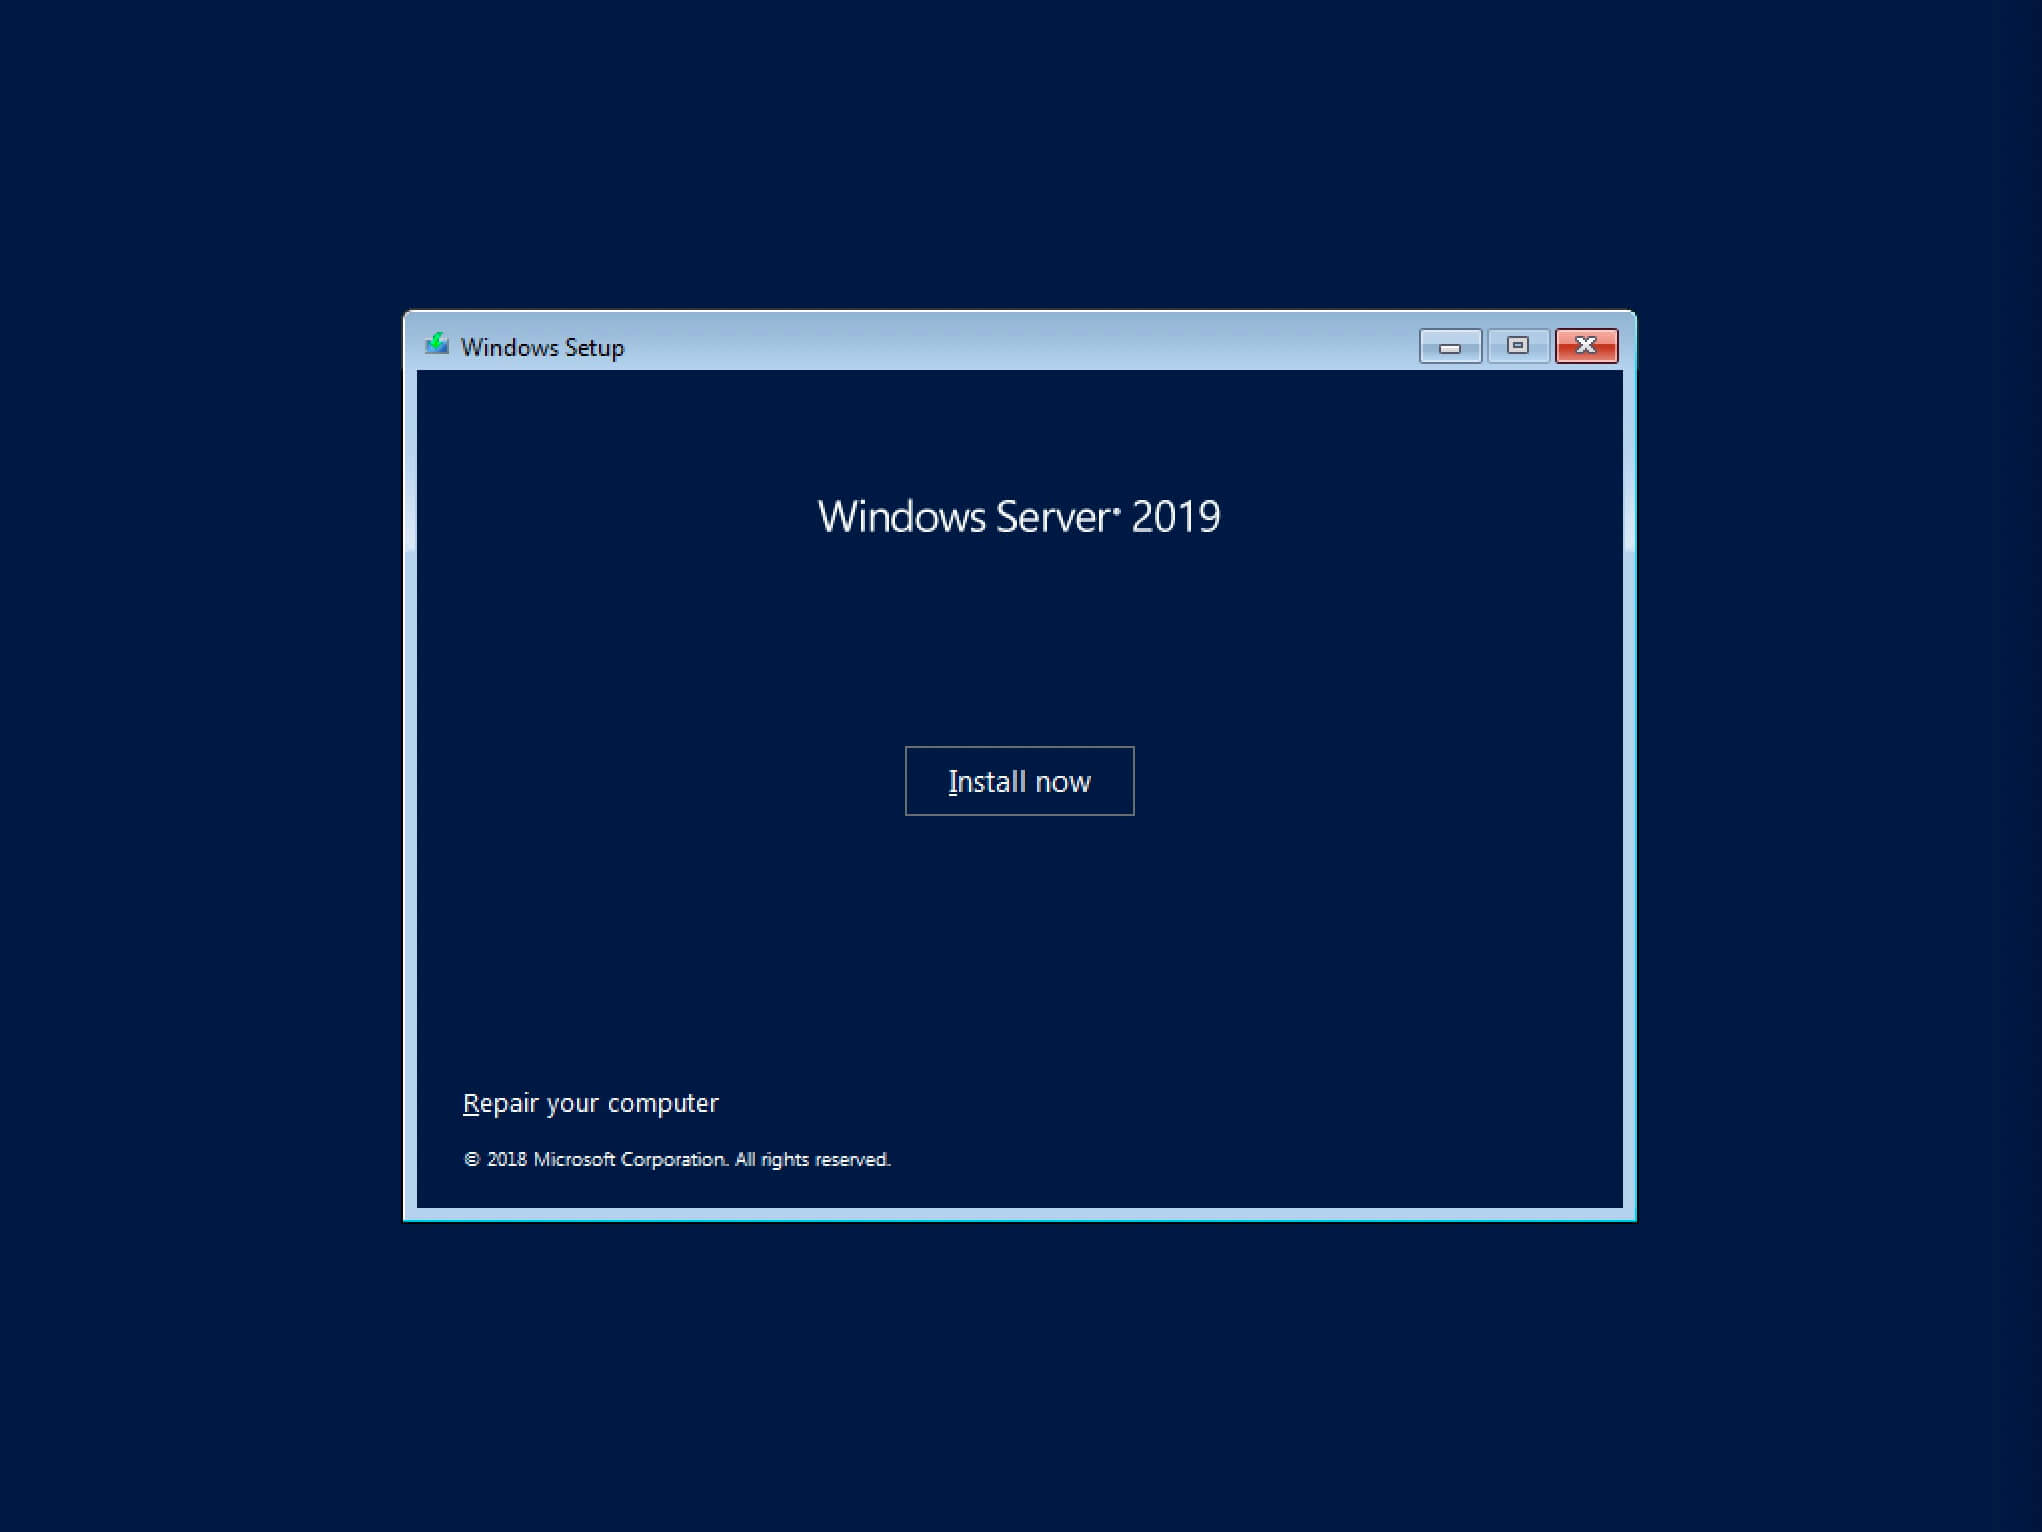
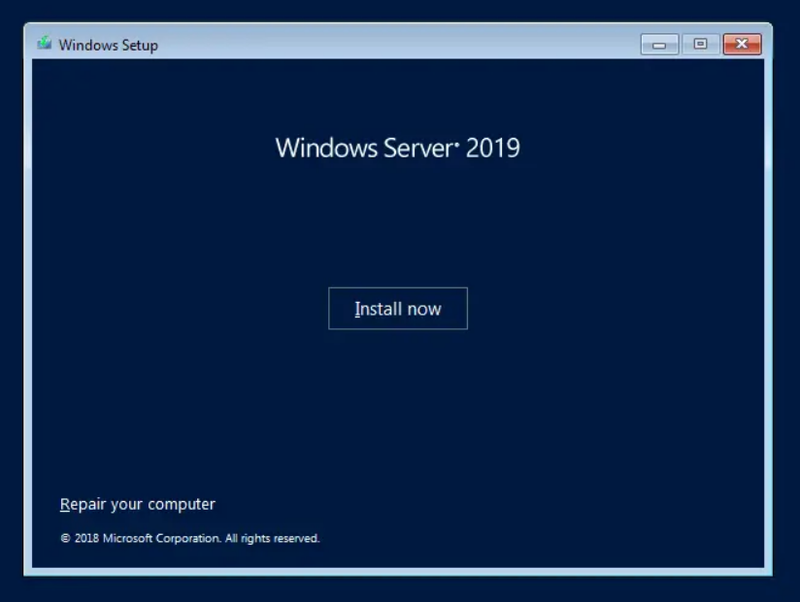
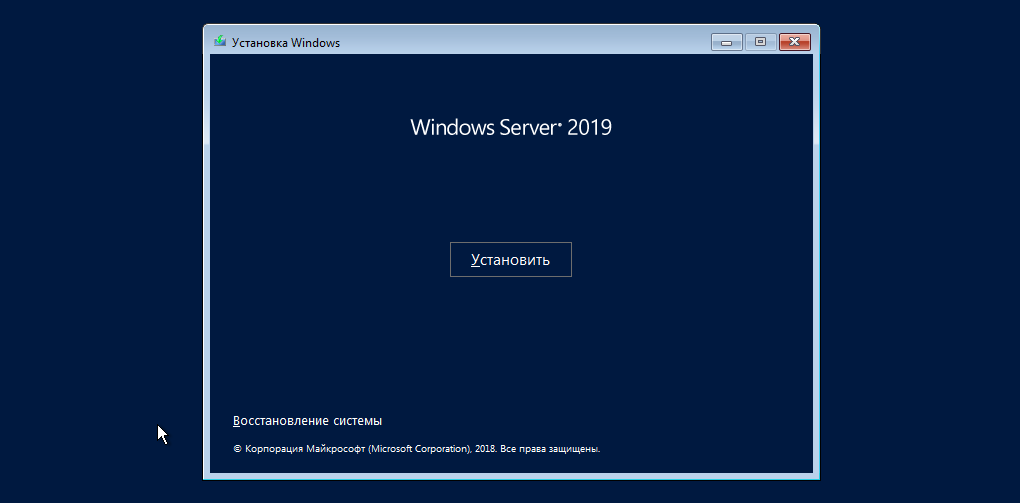
Нажимаем на кнопку “Install now”.
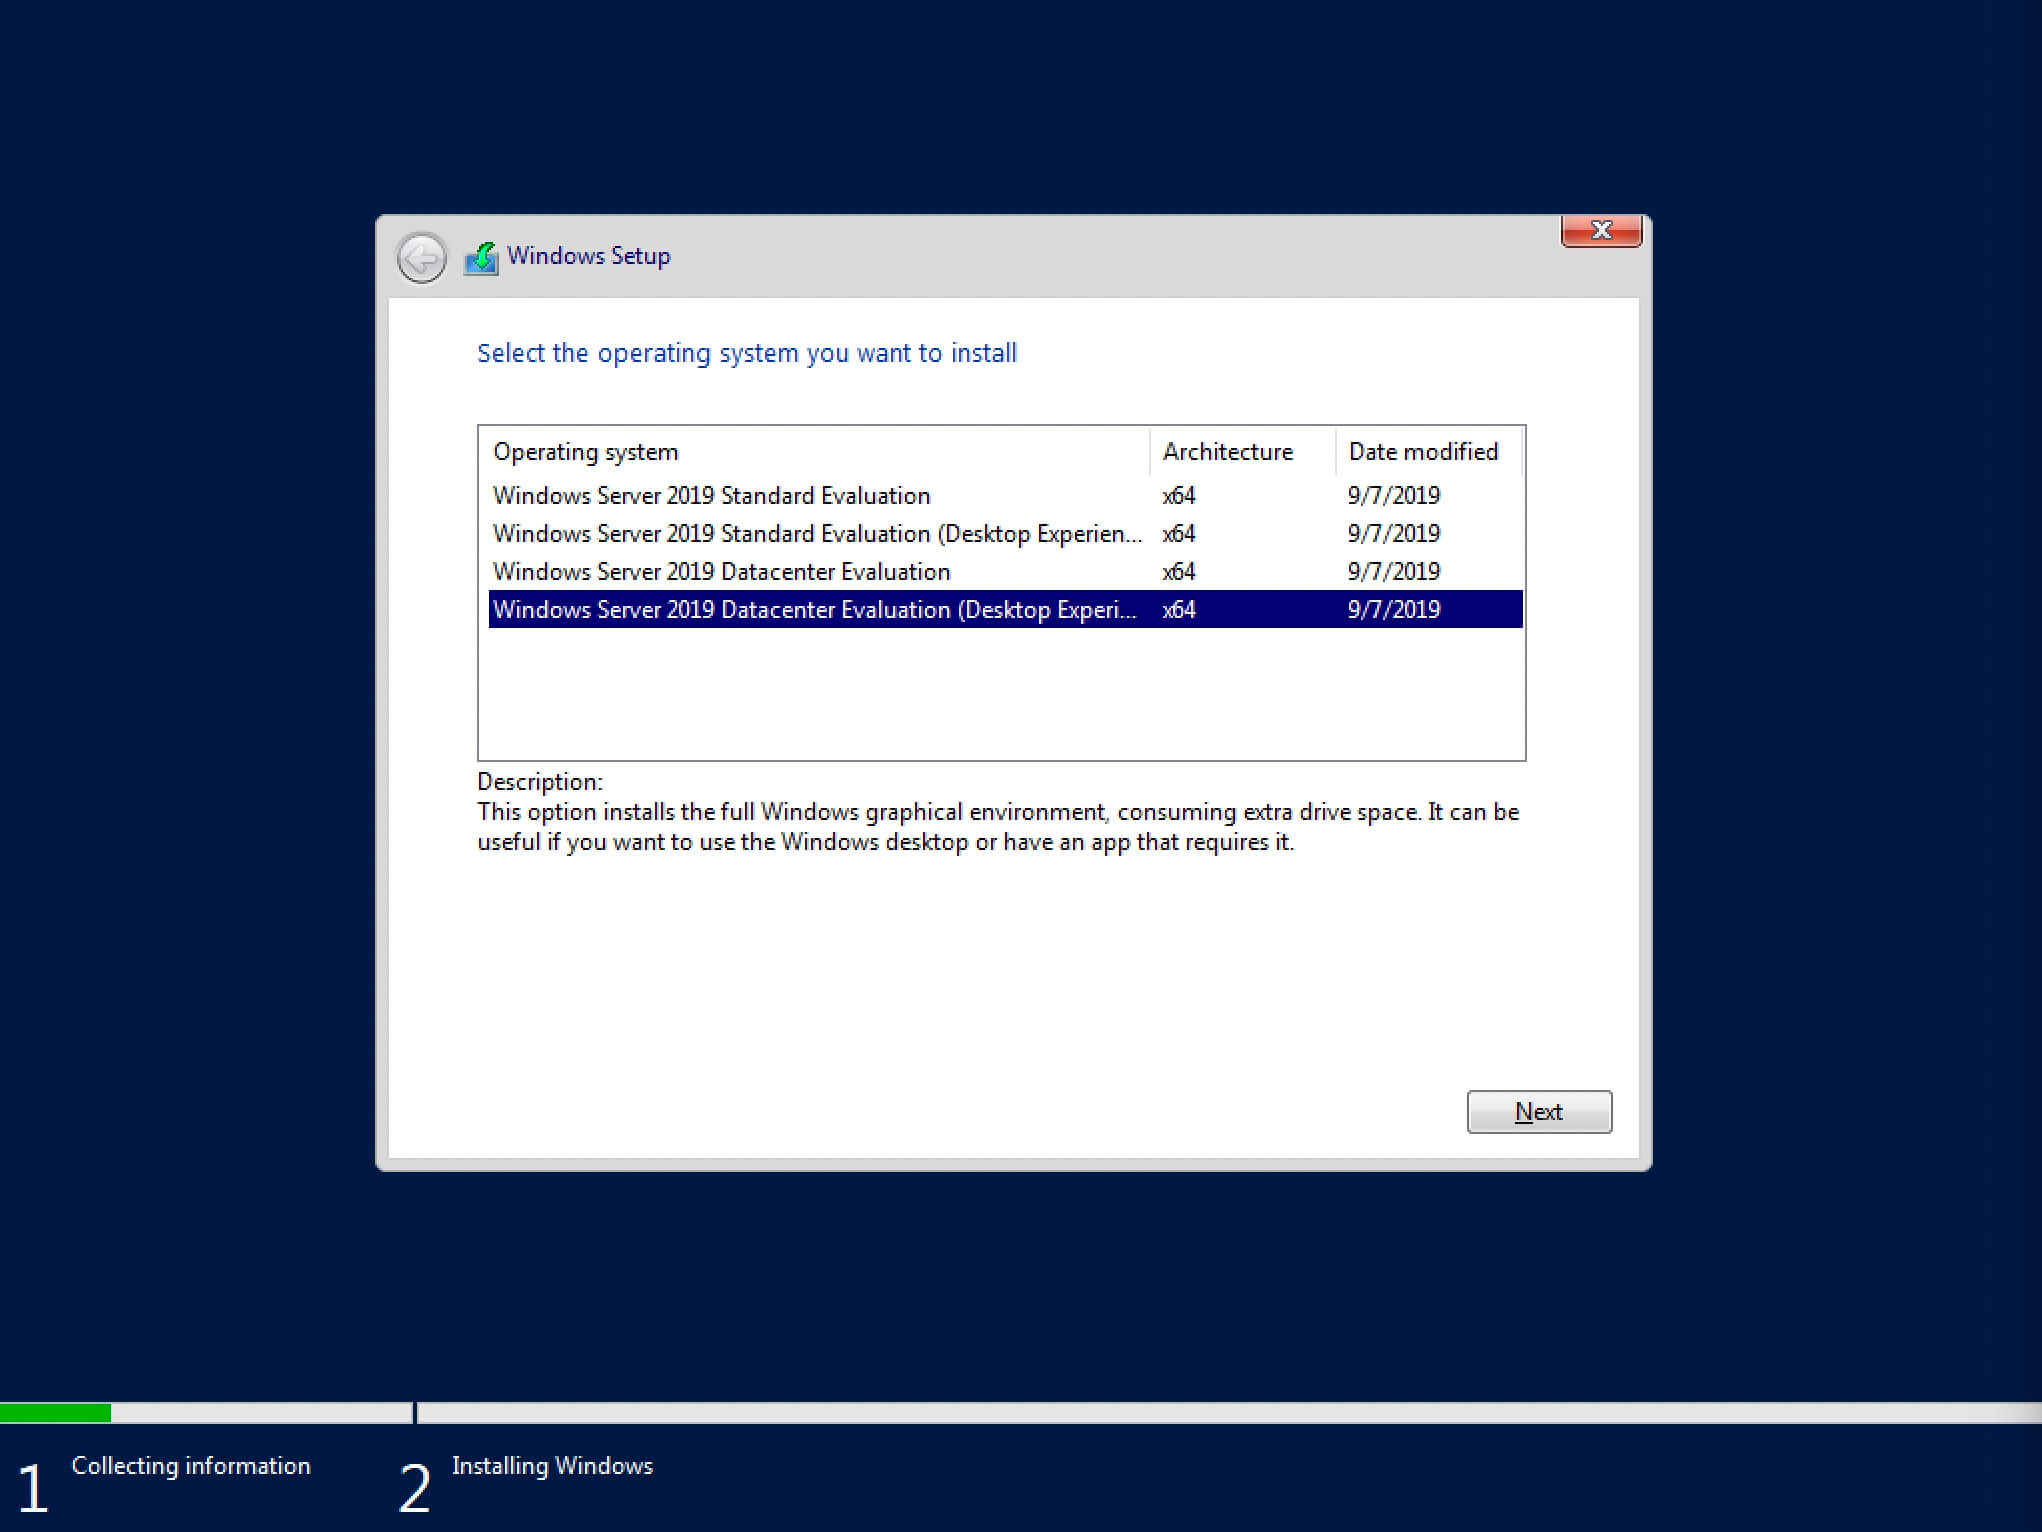
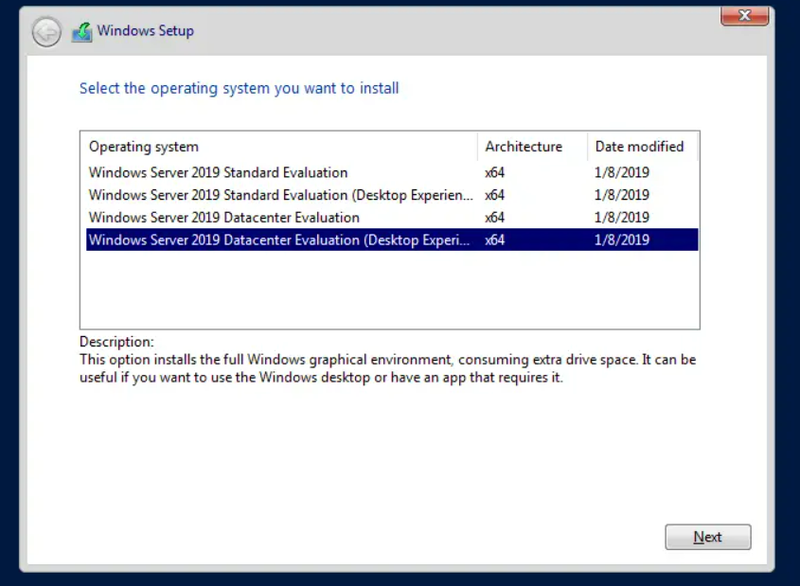
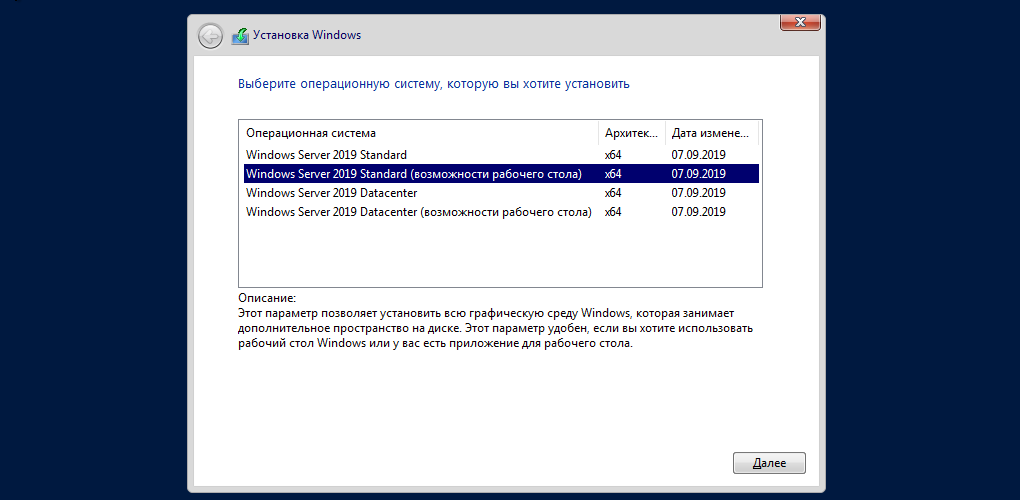
Обратите внимание, если вам необходимо установить Windows Server 2019 в режиме Server Core (без GUI), то вам нужно выбрать “Windows Server 2019 Standard Evaluation” или “Windows Server 2019 Datacenter Evaluation”.
В данном примере рассматривается установка Windows Server 2019 Datacenter Evaluation (Desktop Experience).
Выбираем “Windows Server 2019 Datacenter Evaluation (Desktop Experience)” и нажимаем “Next”.
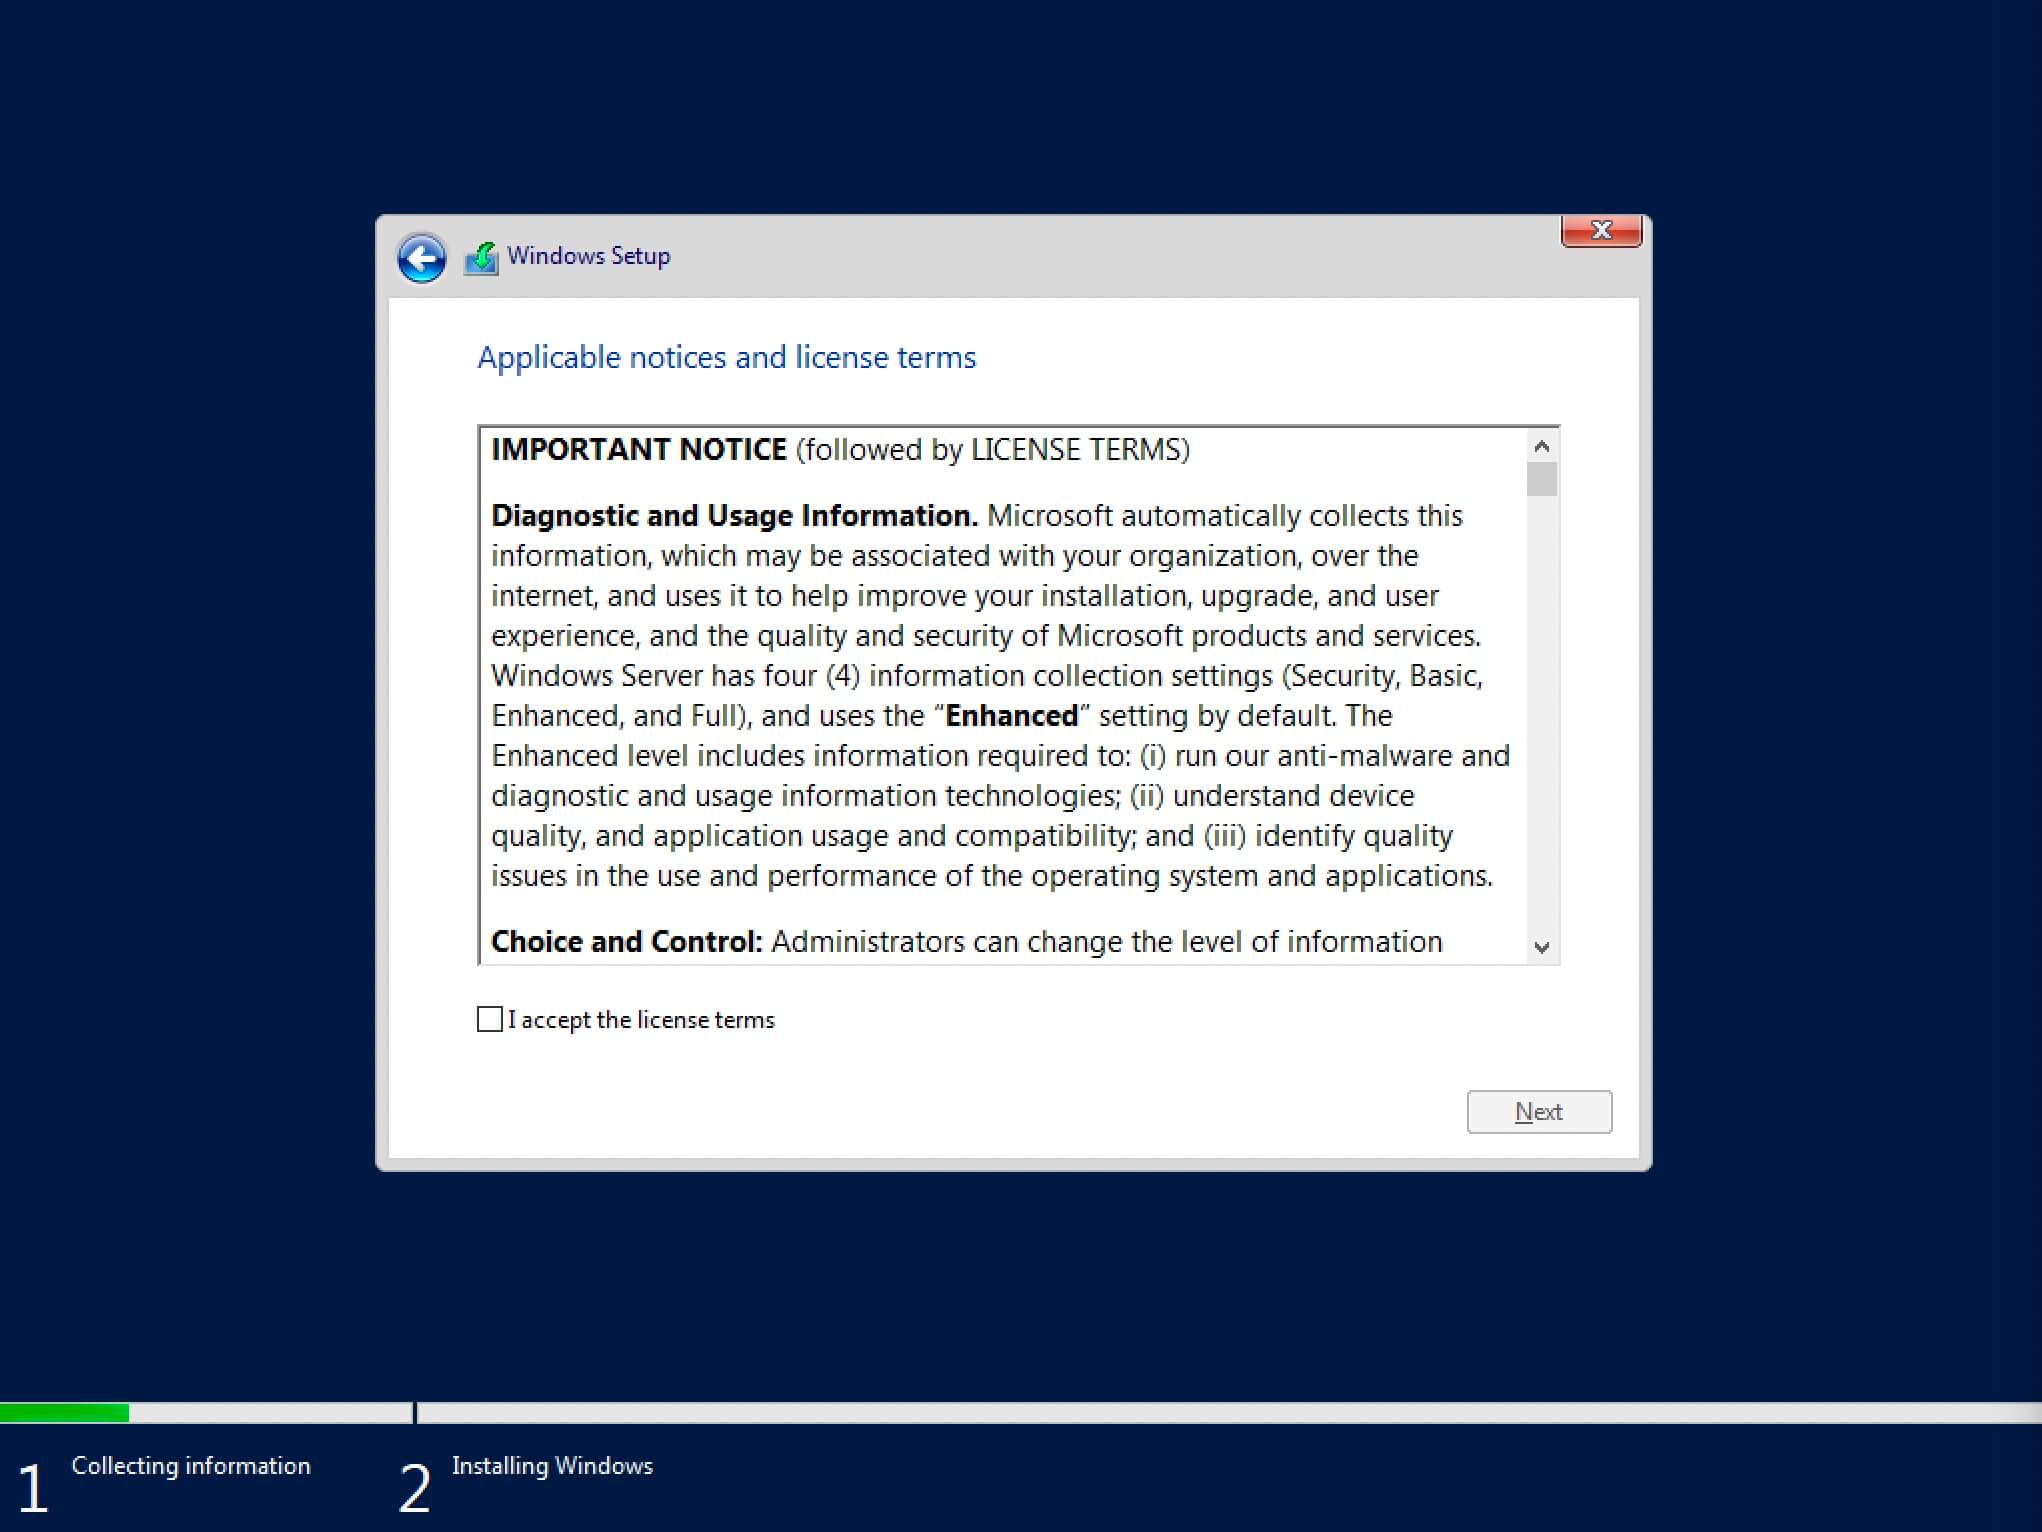
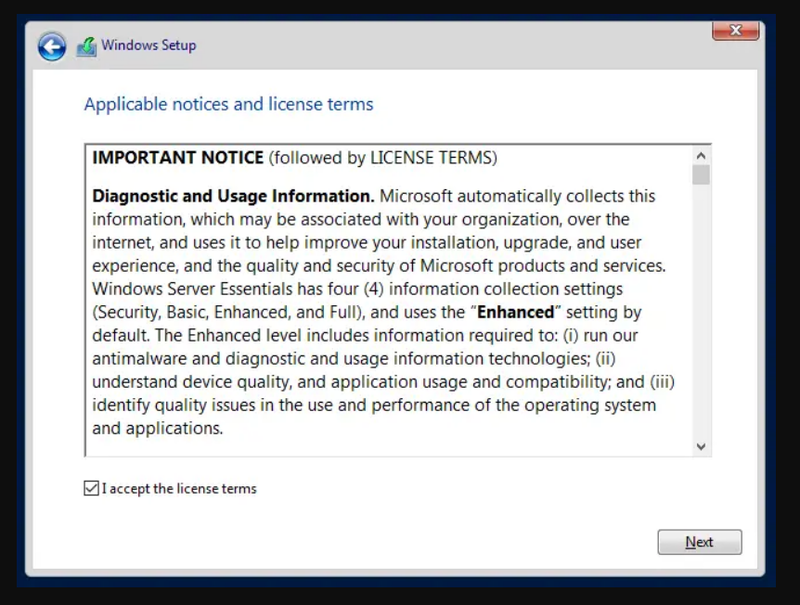
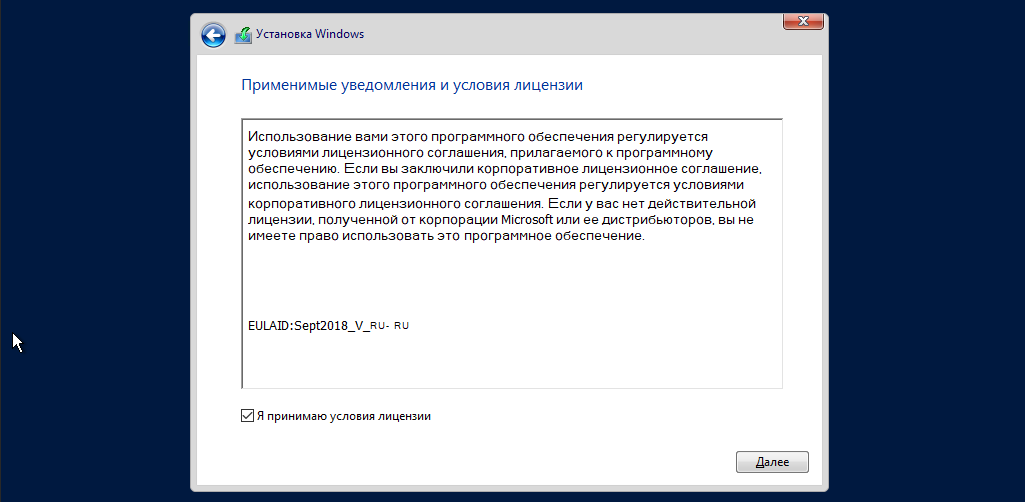
Теперь необходимо принять условия лицензии.
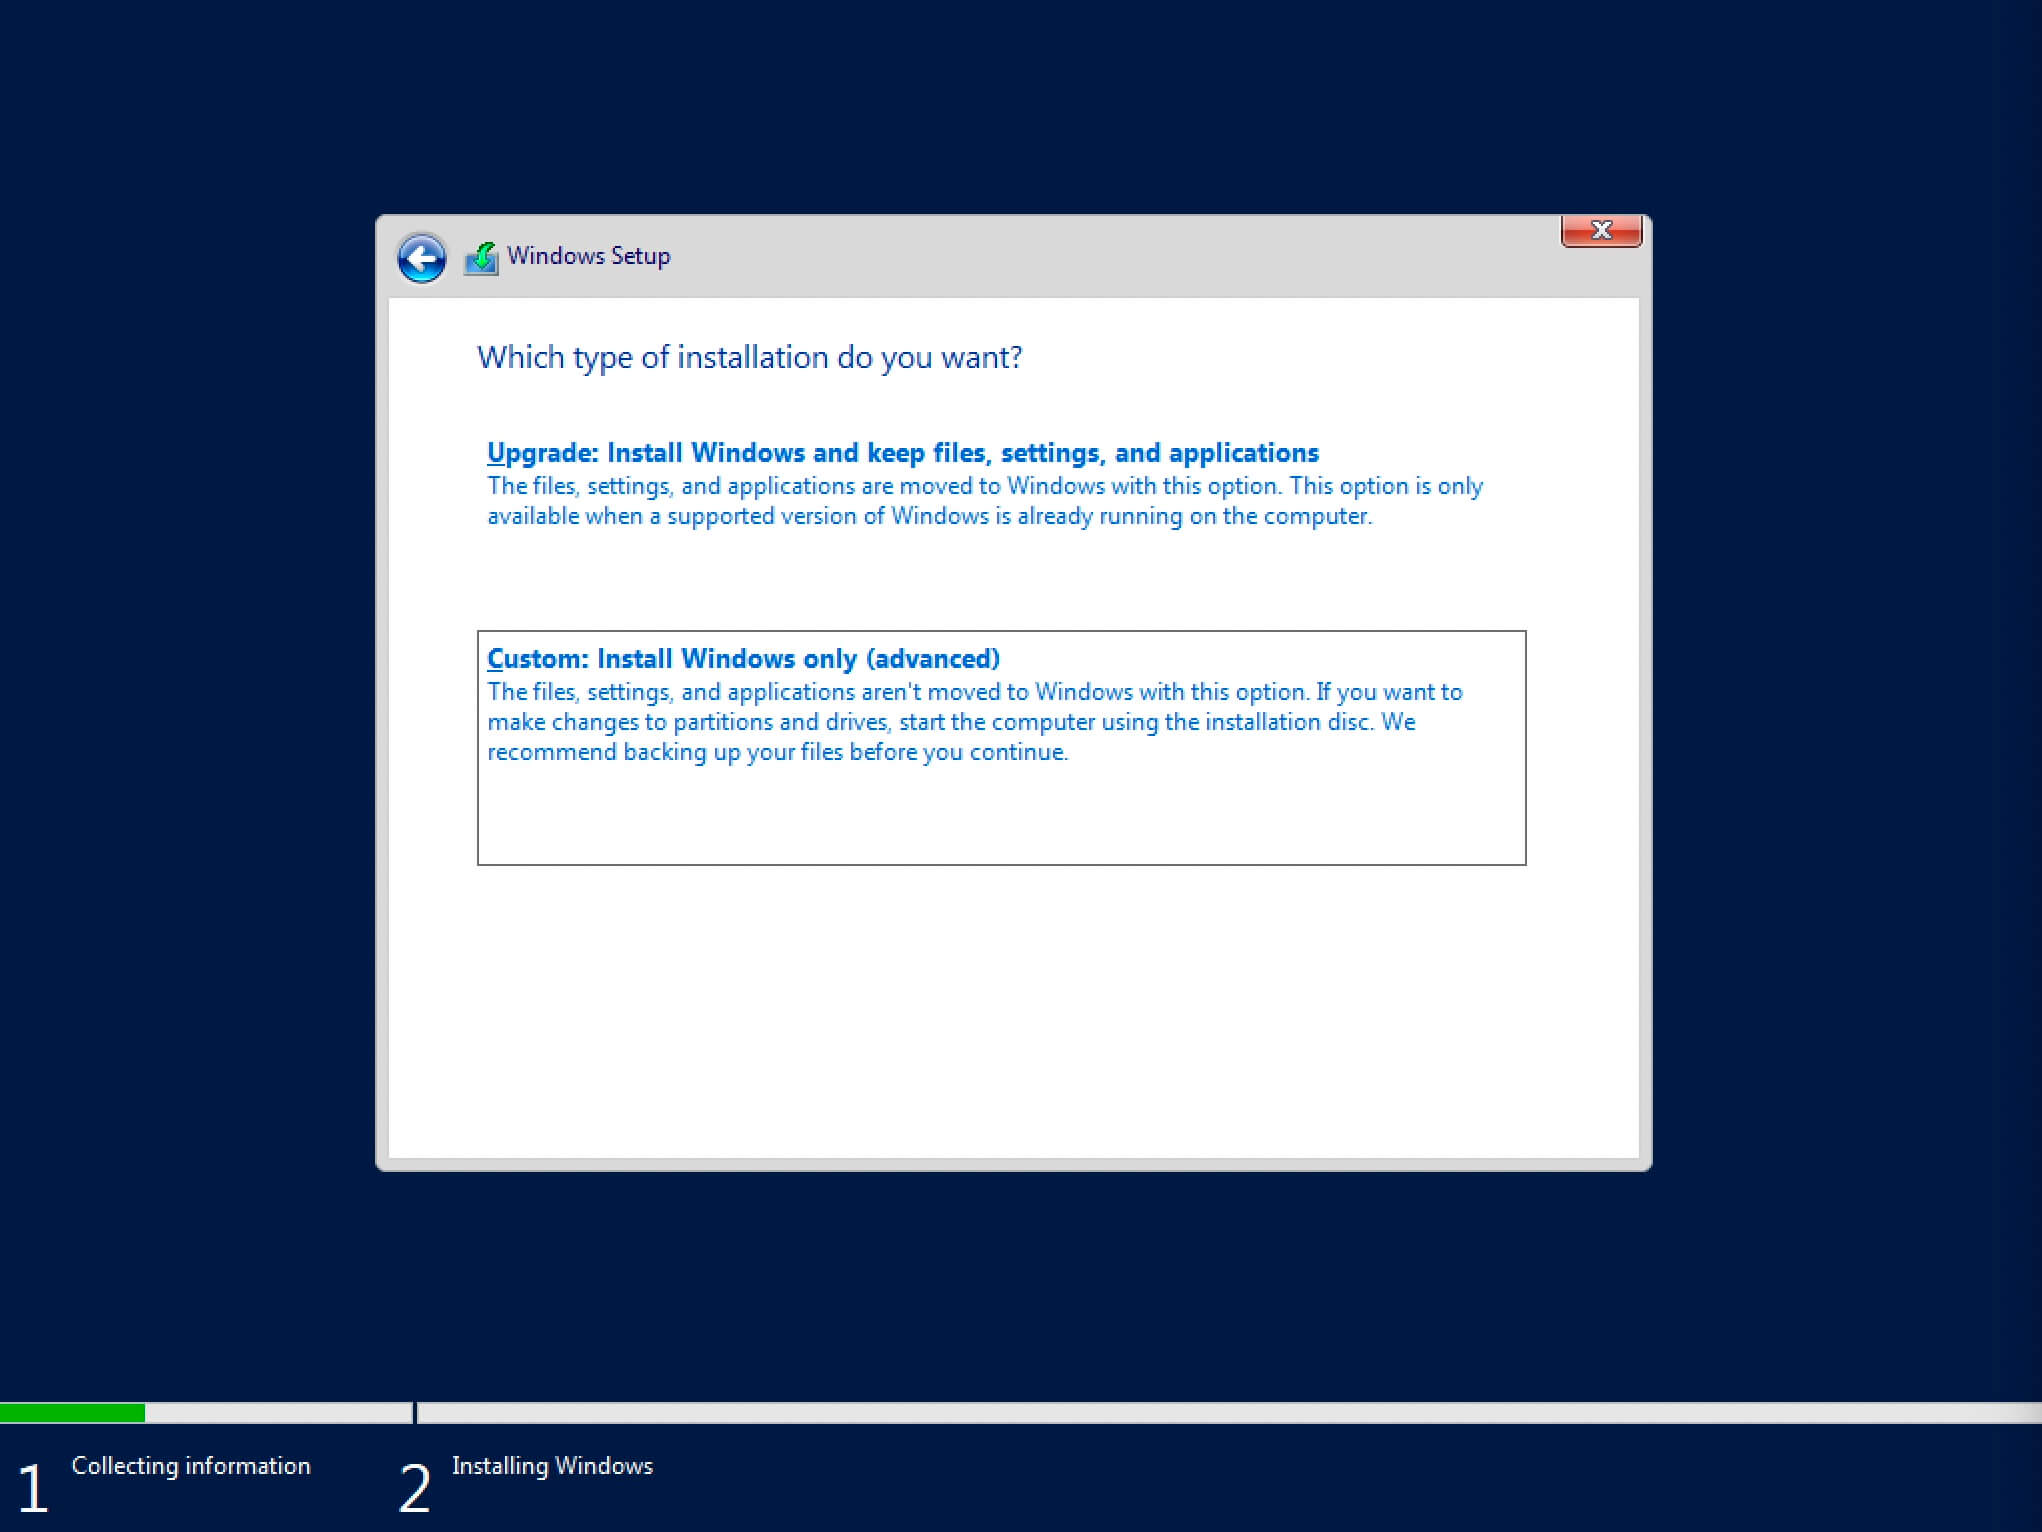
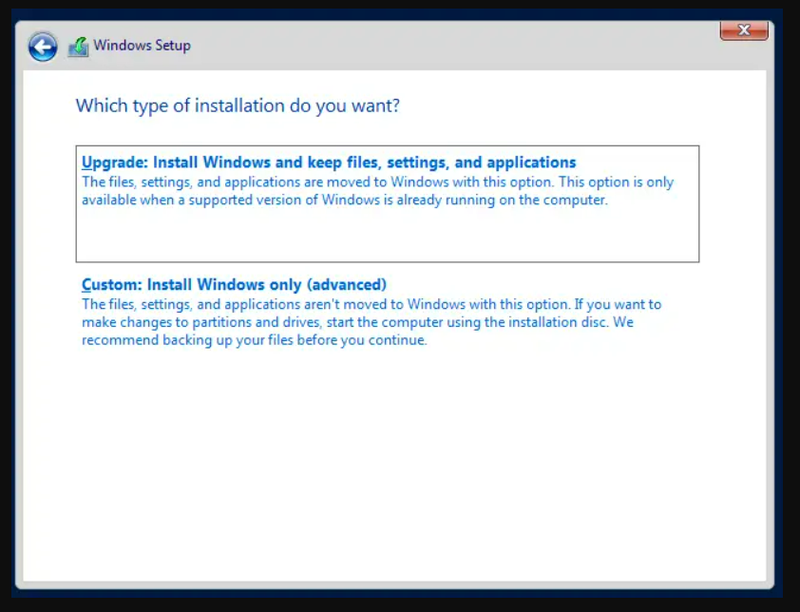
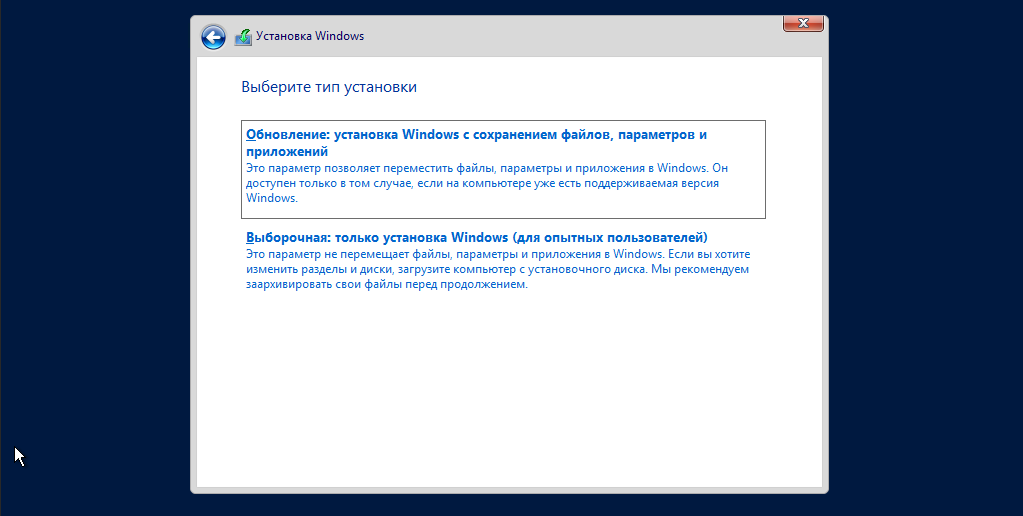
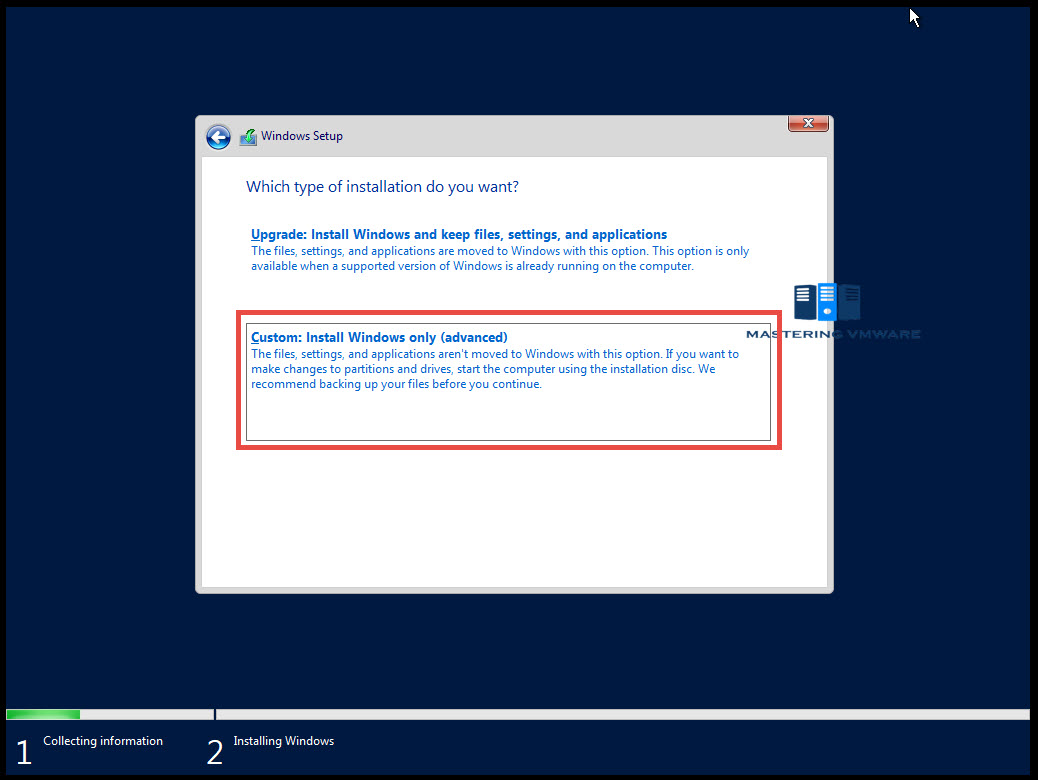
На этом шаге предлагается два варианта установки:
-
“Upgrade”. Это не самый лучший вариант. Как показывает практика, многочисленные программы могут быть не совместимы с новой операционной системой, и после обновления вы не сможете с ними работать, кроме того есть вероятность перетащить проблемы со старой операционной системы в новую, таким, образом потеряв всякую стабильность.
-
“Custom”. Это лучший вариант для установки любой версии операционной системы Windows. Он позволяет начать работу с системой “с чистого листа”, таким образом, после установки вы получите максимальное быстродействие и стабильность. Останется только установить драйвера и привычное для работы программное обеспечение.
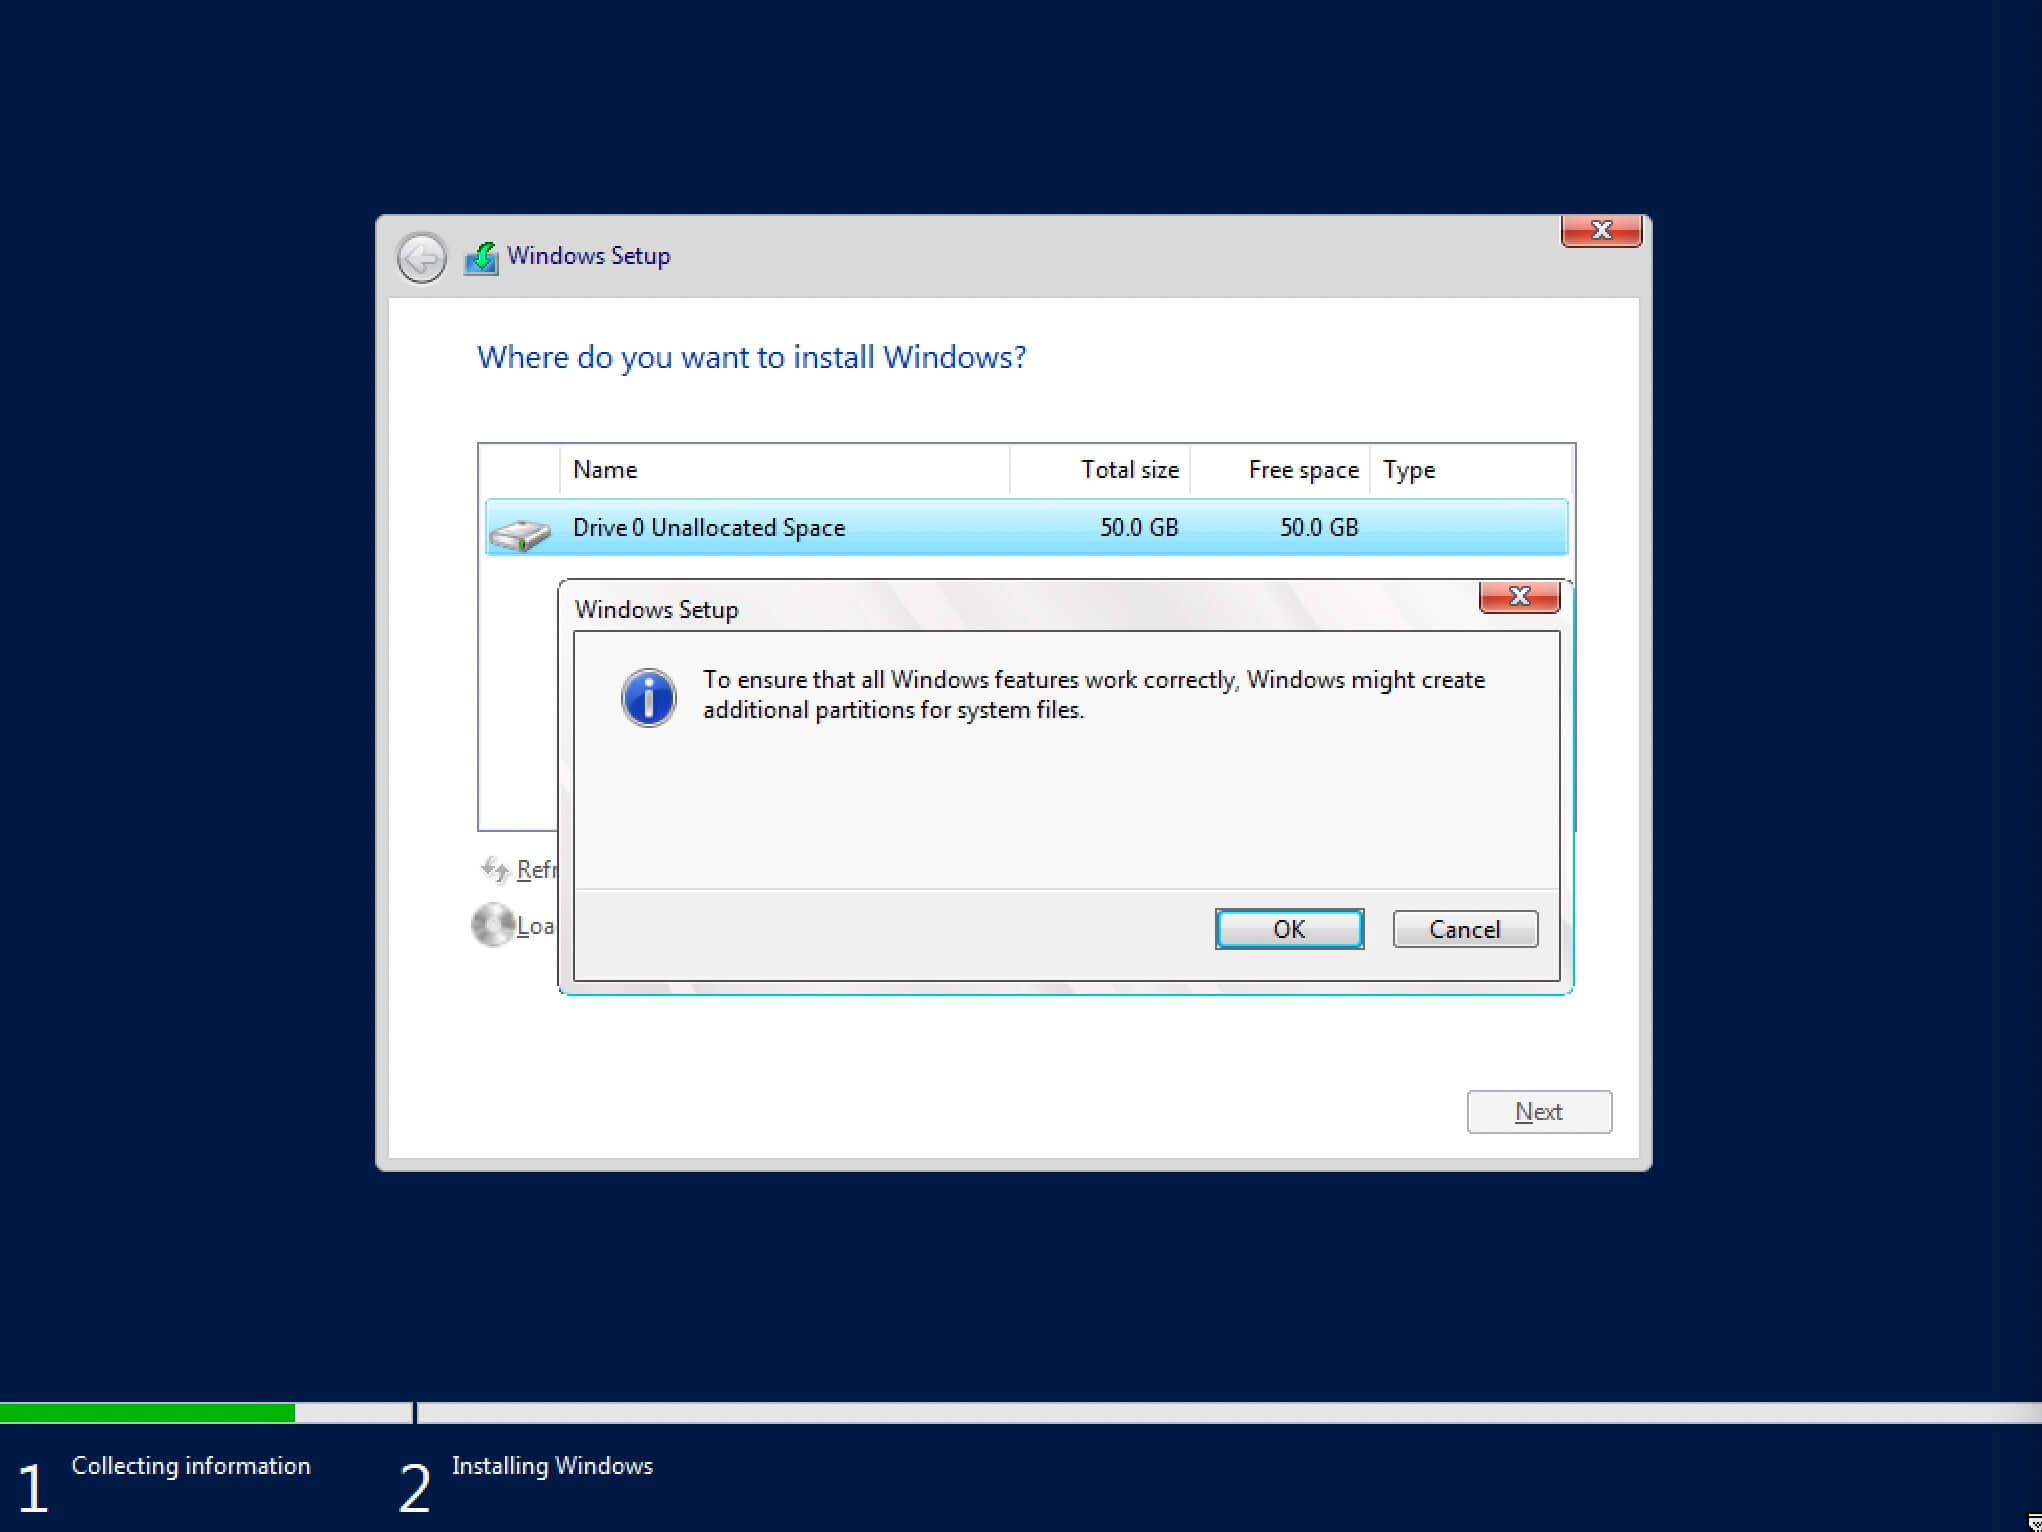
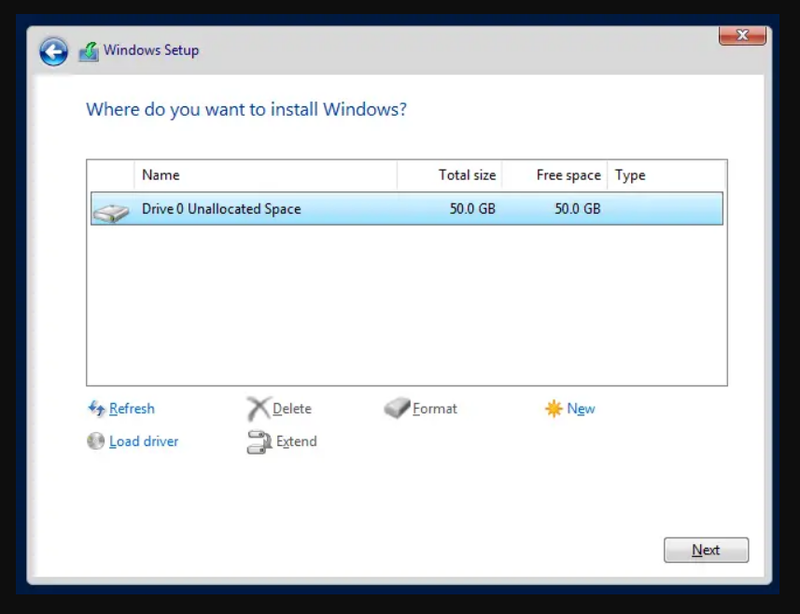
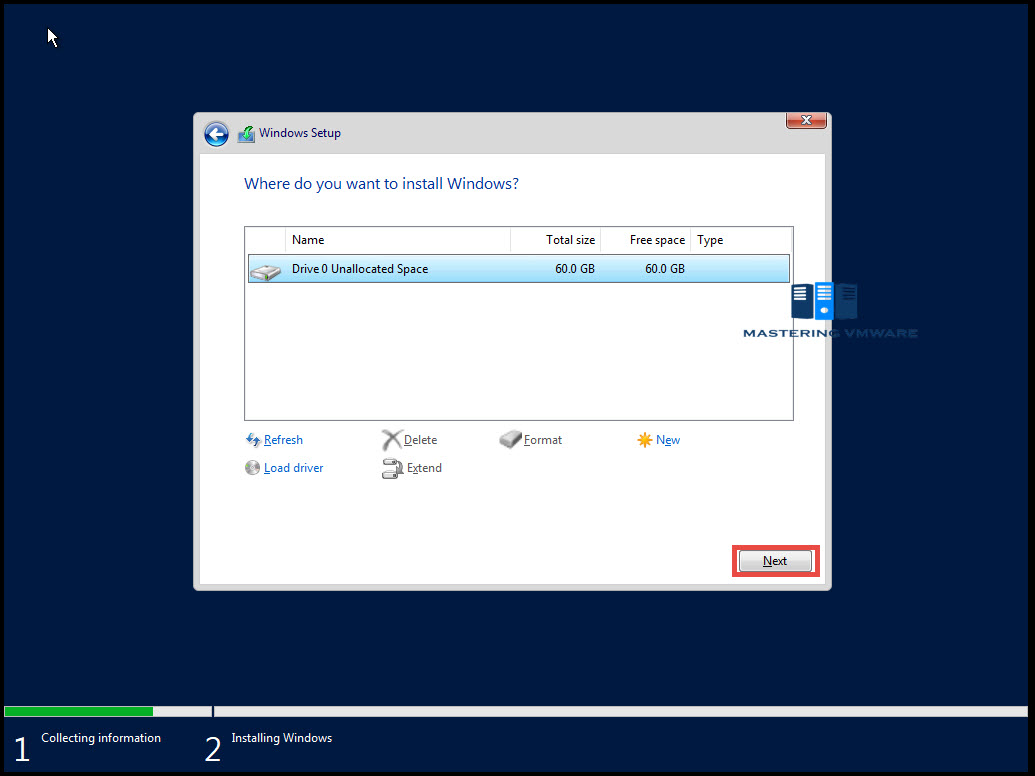
Теперь необходимо выбрать на какой диск будет установлена новая операционная система и выделить место для установки.
В случае если у вас установлено более одного диска или на диске уже имеется несколько разделов, все это будет отображаться на данном этапе. Необходимо соблюдать осторожность и заранее понимать, на какой раздел вы хотите установить операционную систему.
В данном примере установлен один диск объемом 50 GB.
Нажимаем на кнопку “New”.

В данном случае под систему будет выделено все свободное место на диске, поэтому оставляем значение в разделе “Size” по умолчанию.
Нажимаем на кнопку “Apply”.

Операционная система уведомляет о том, что ей может понадобиться создать дополнительные разделы на диске для хранения системных файлов.
Нажимаем на кнопку “OK”.
Таким образом, под операционную систему было выделено все свободное место на диске, но в то же время система зарезервировала для себя небольшой раздел.
Теперь необходимо выбрать раздел, на который предполагается установить операционную систему, и нажать на кнопку “Next”.
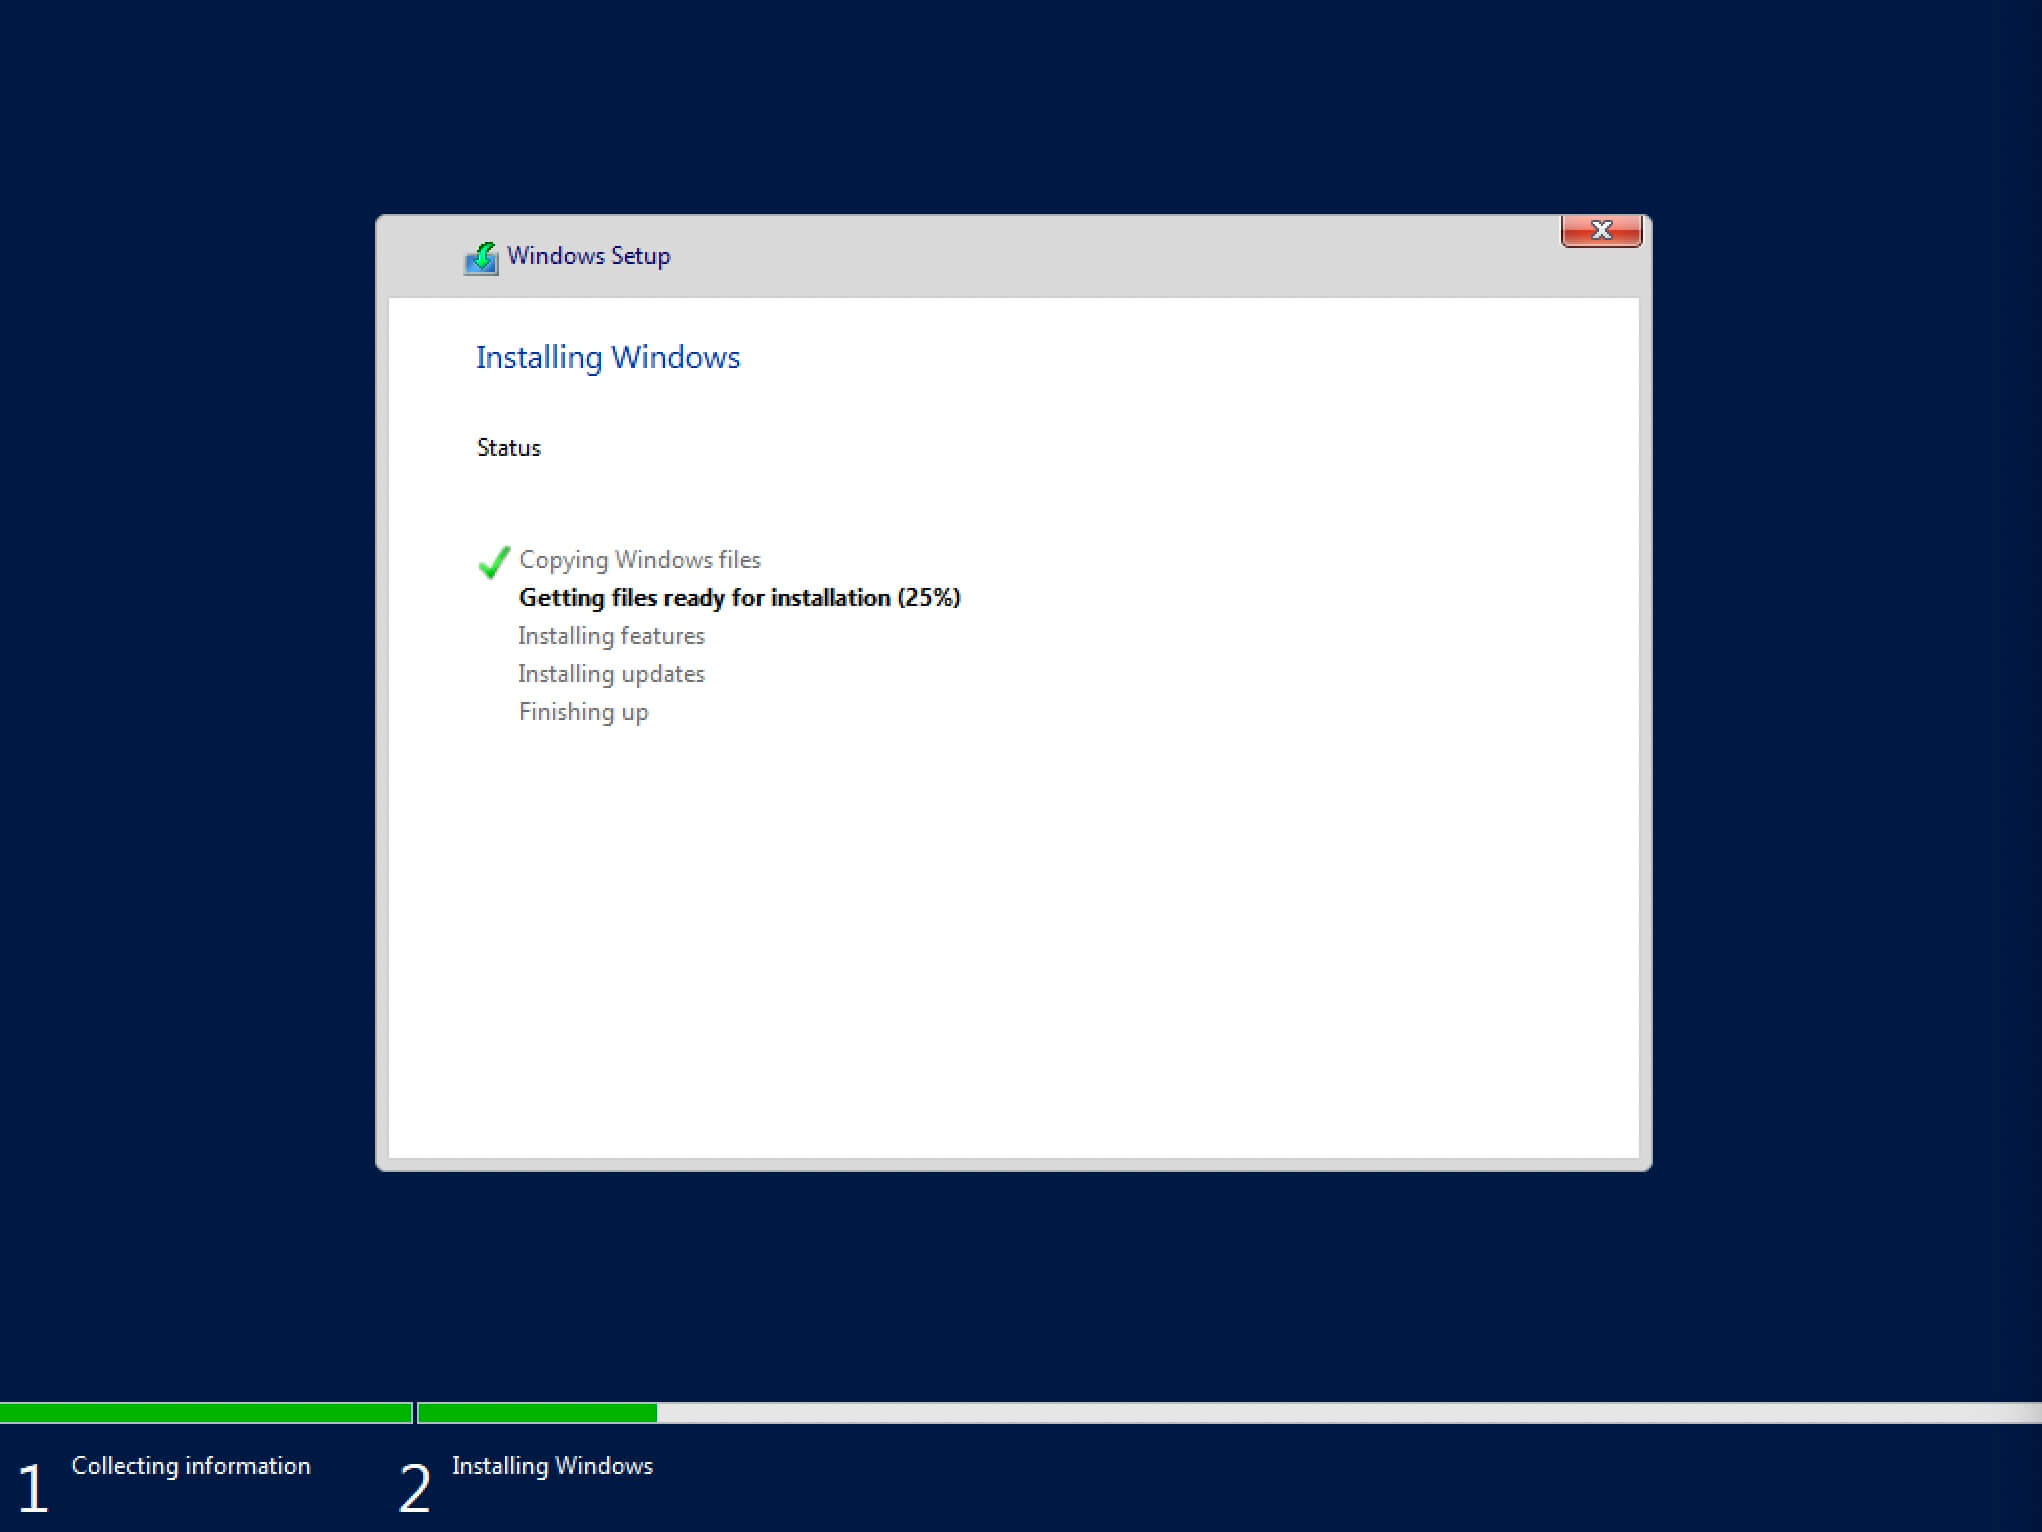
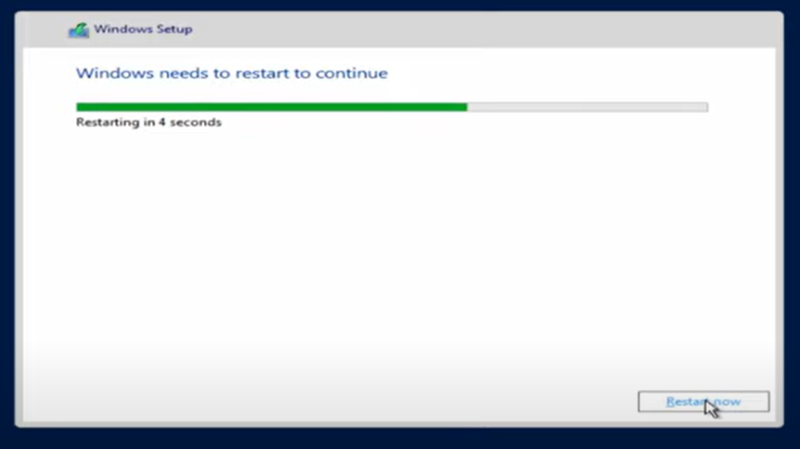
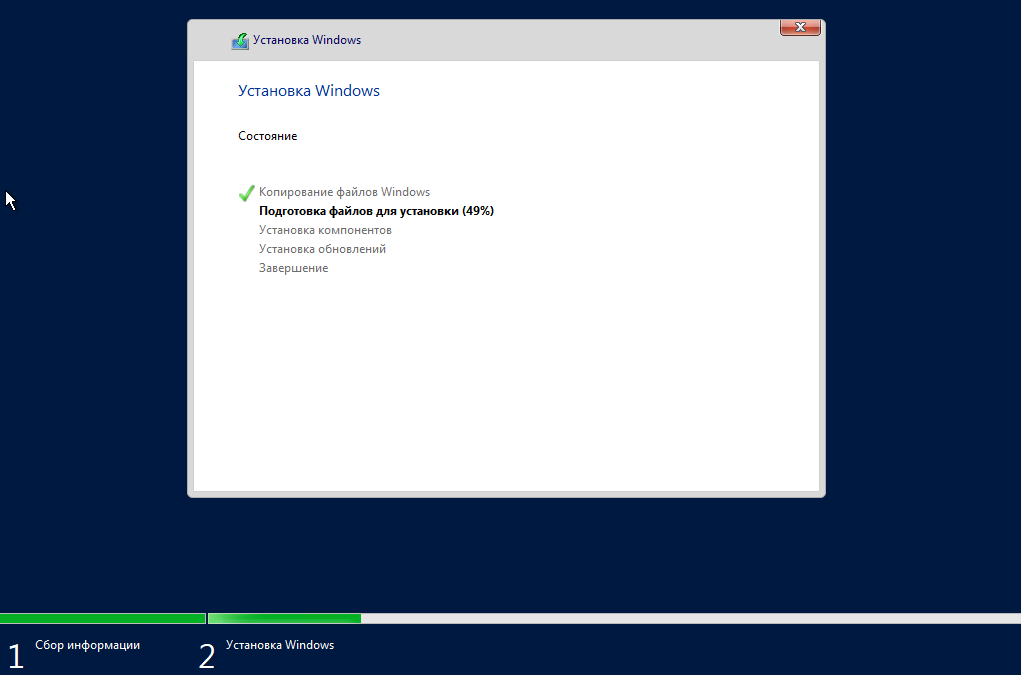
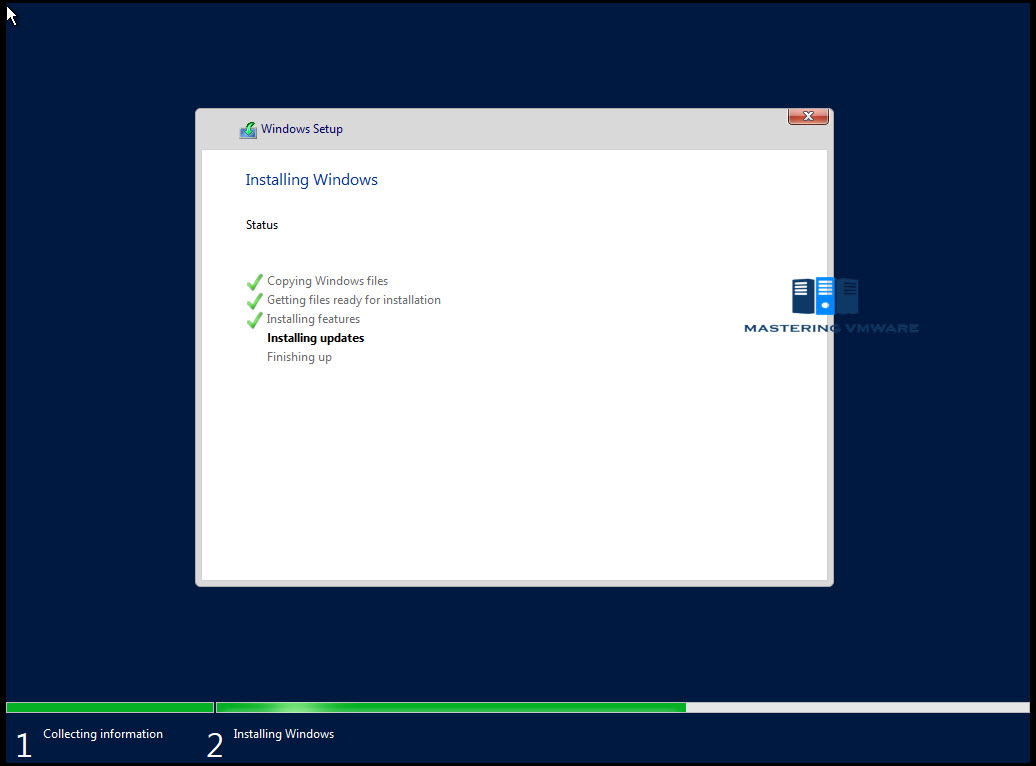
Начался процесс установки операционной системы.
Компьютер автоматически перезагрузится.

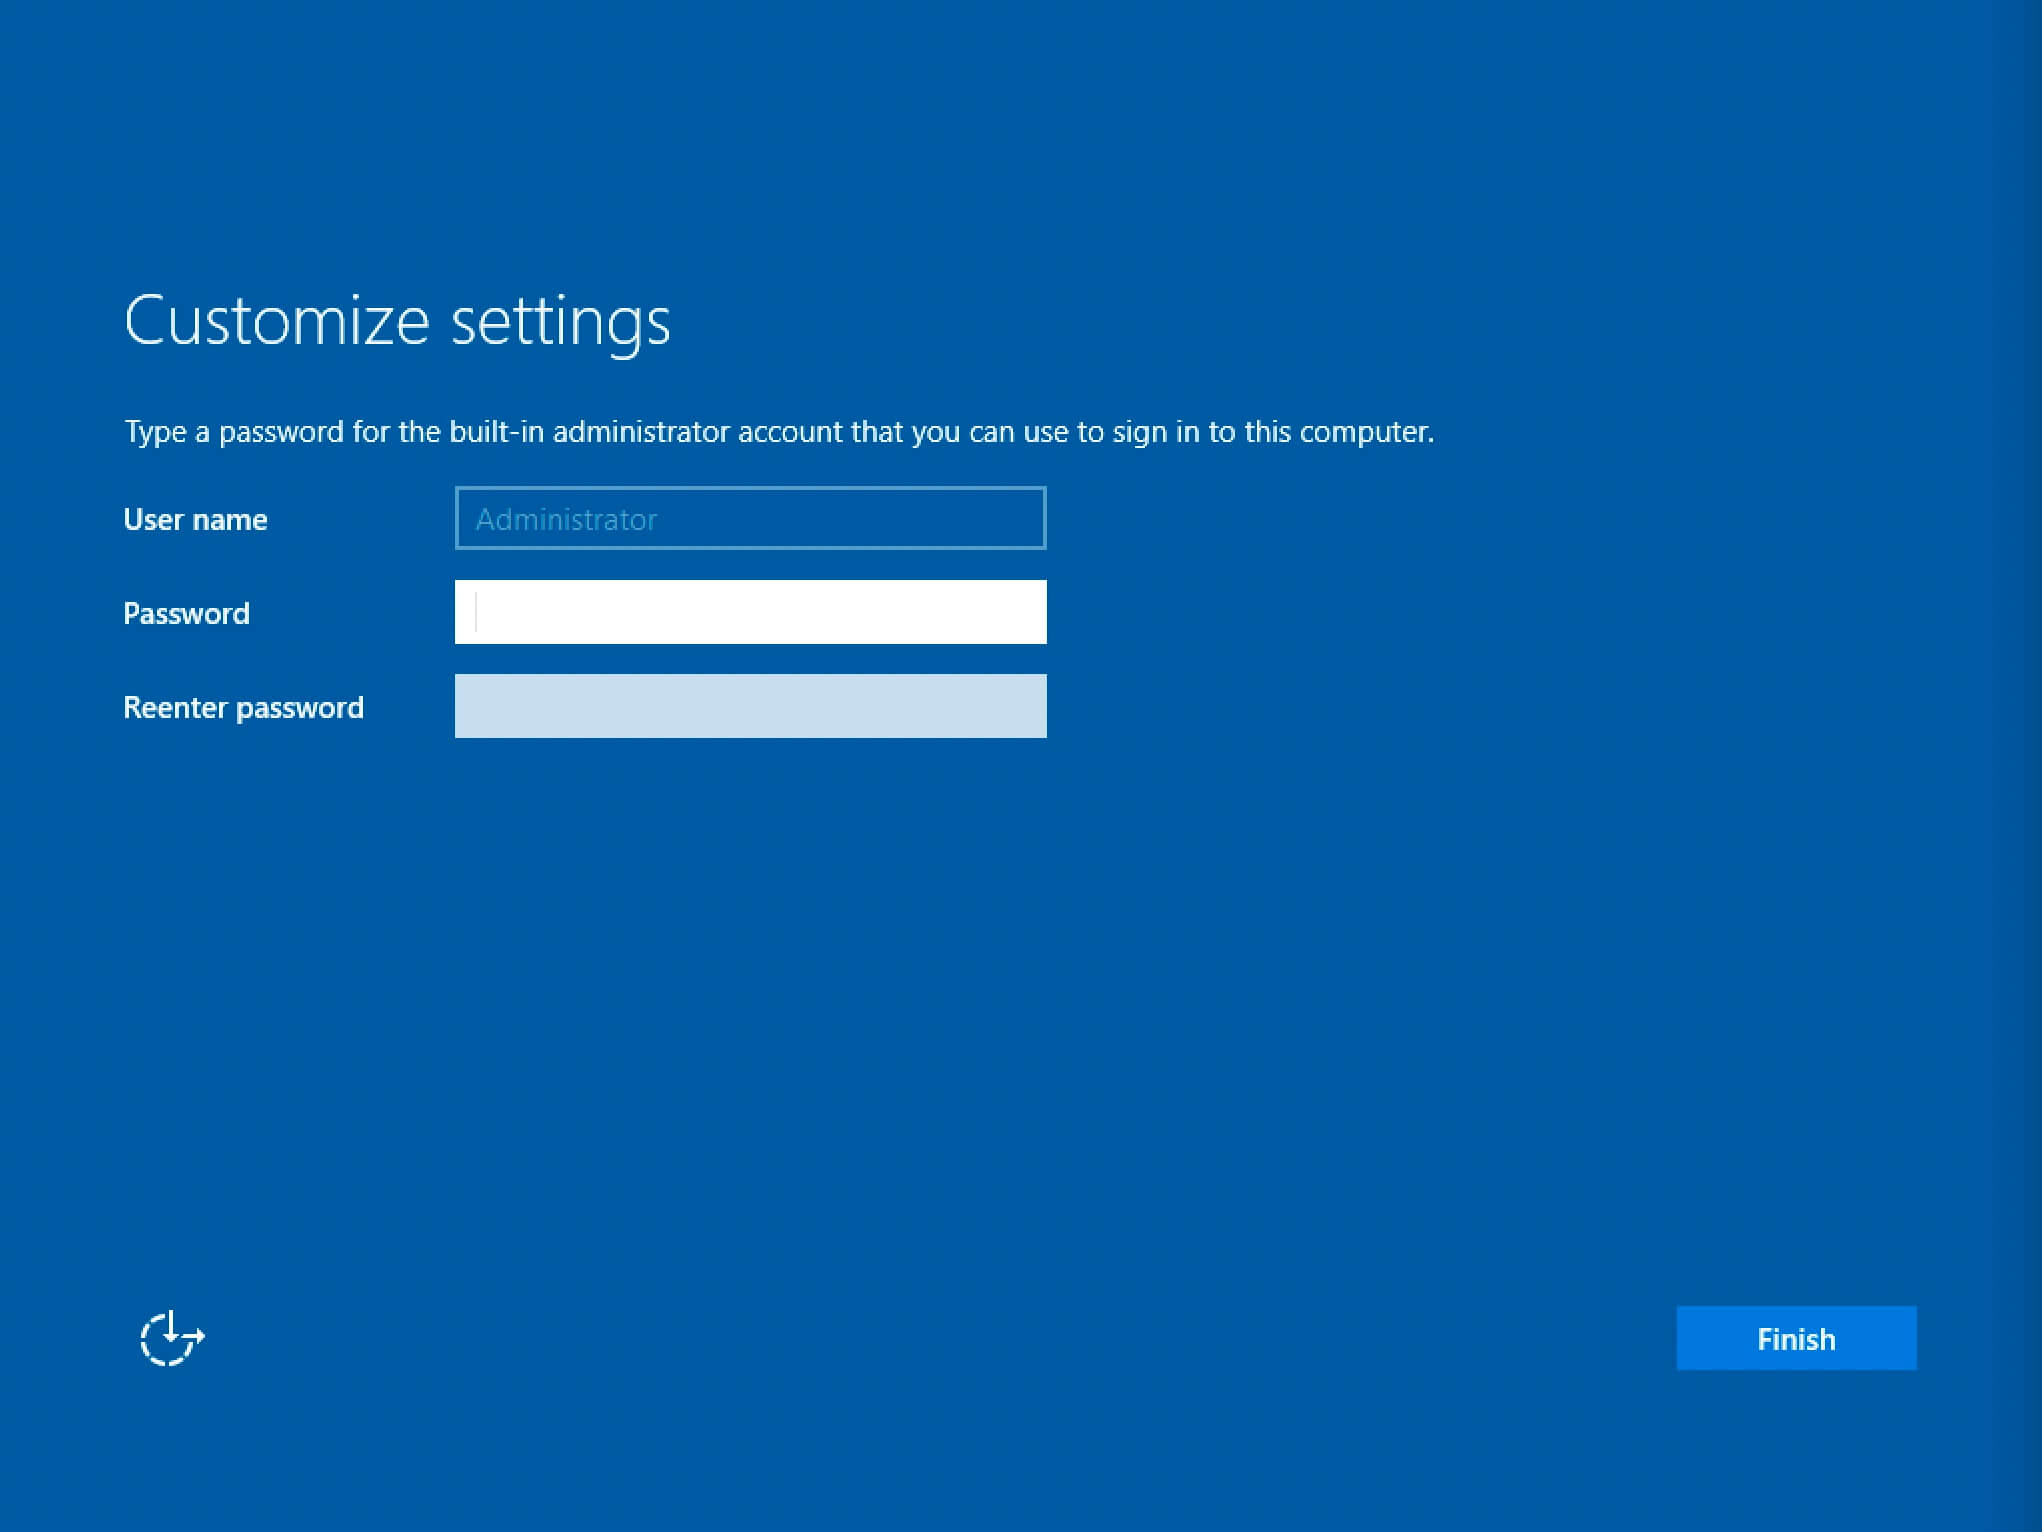
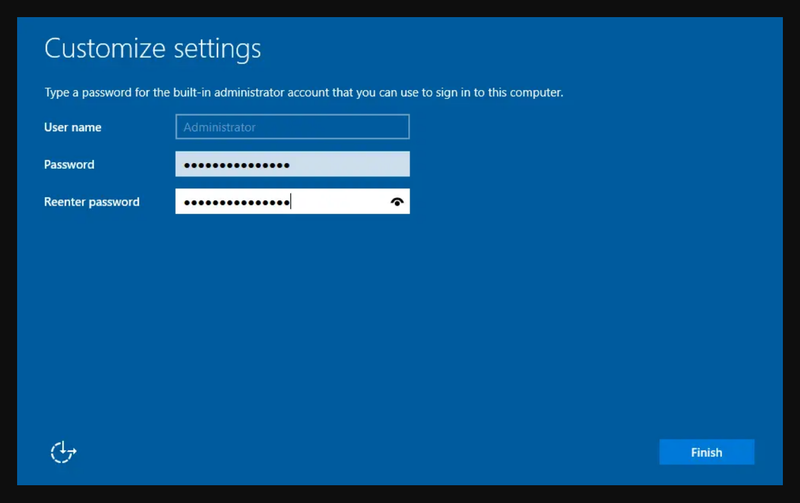
Теперь нужно указать надежный пароль для учетной записи “Administrator”.
Нажимаем на кнопку “Finish”.
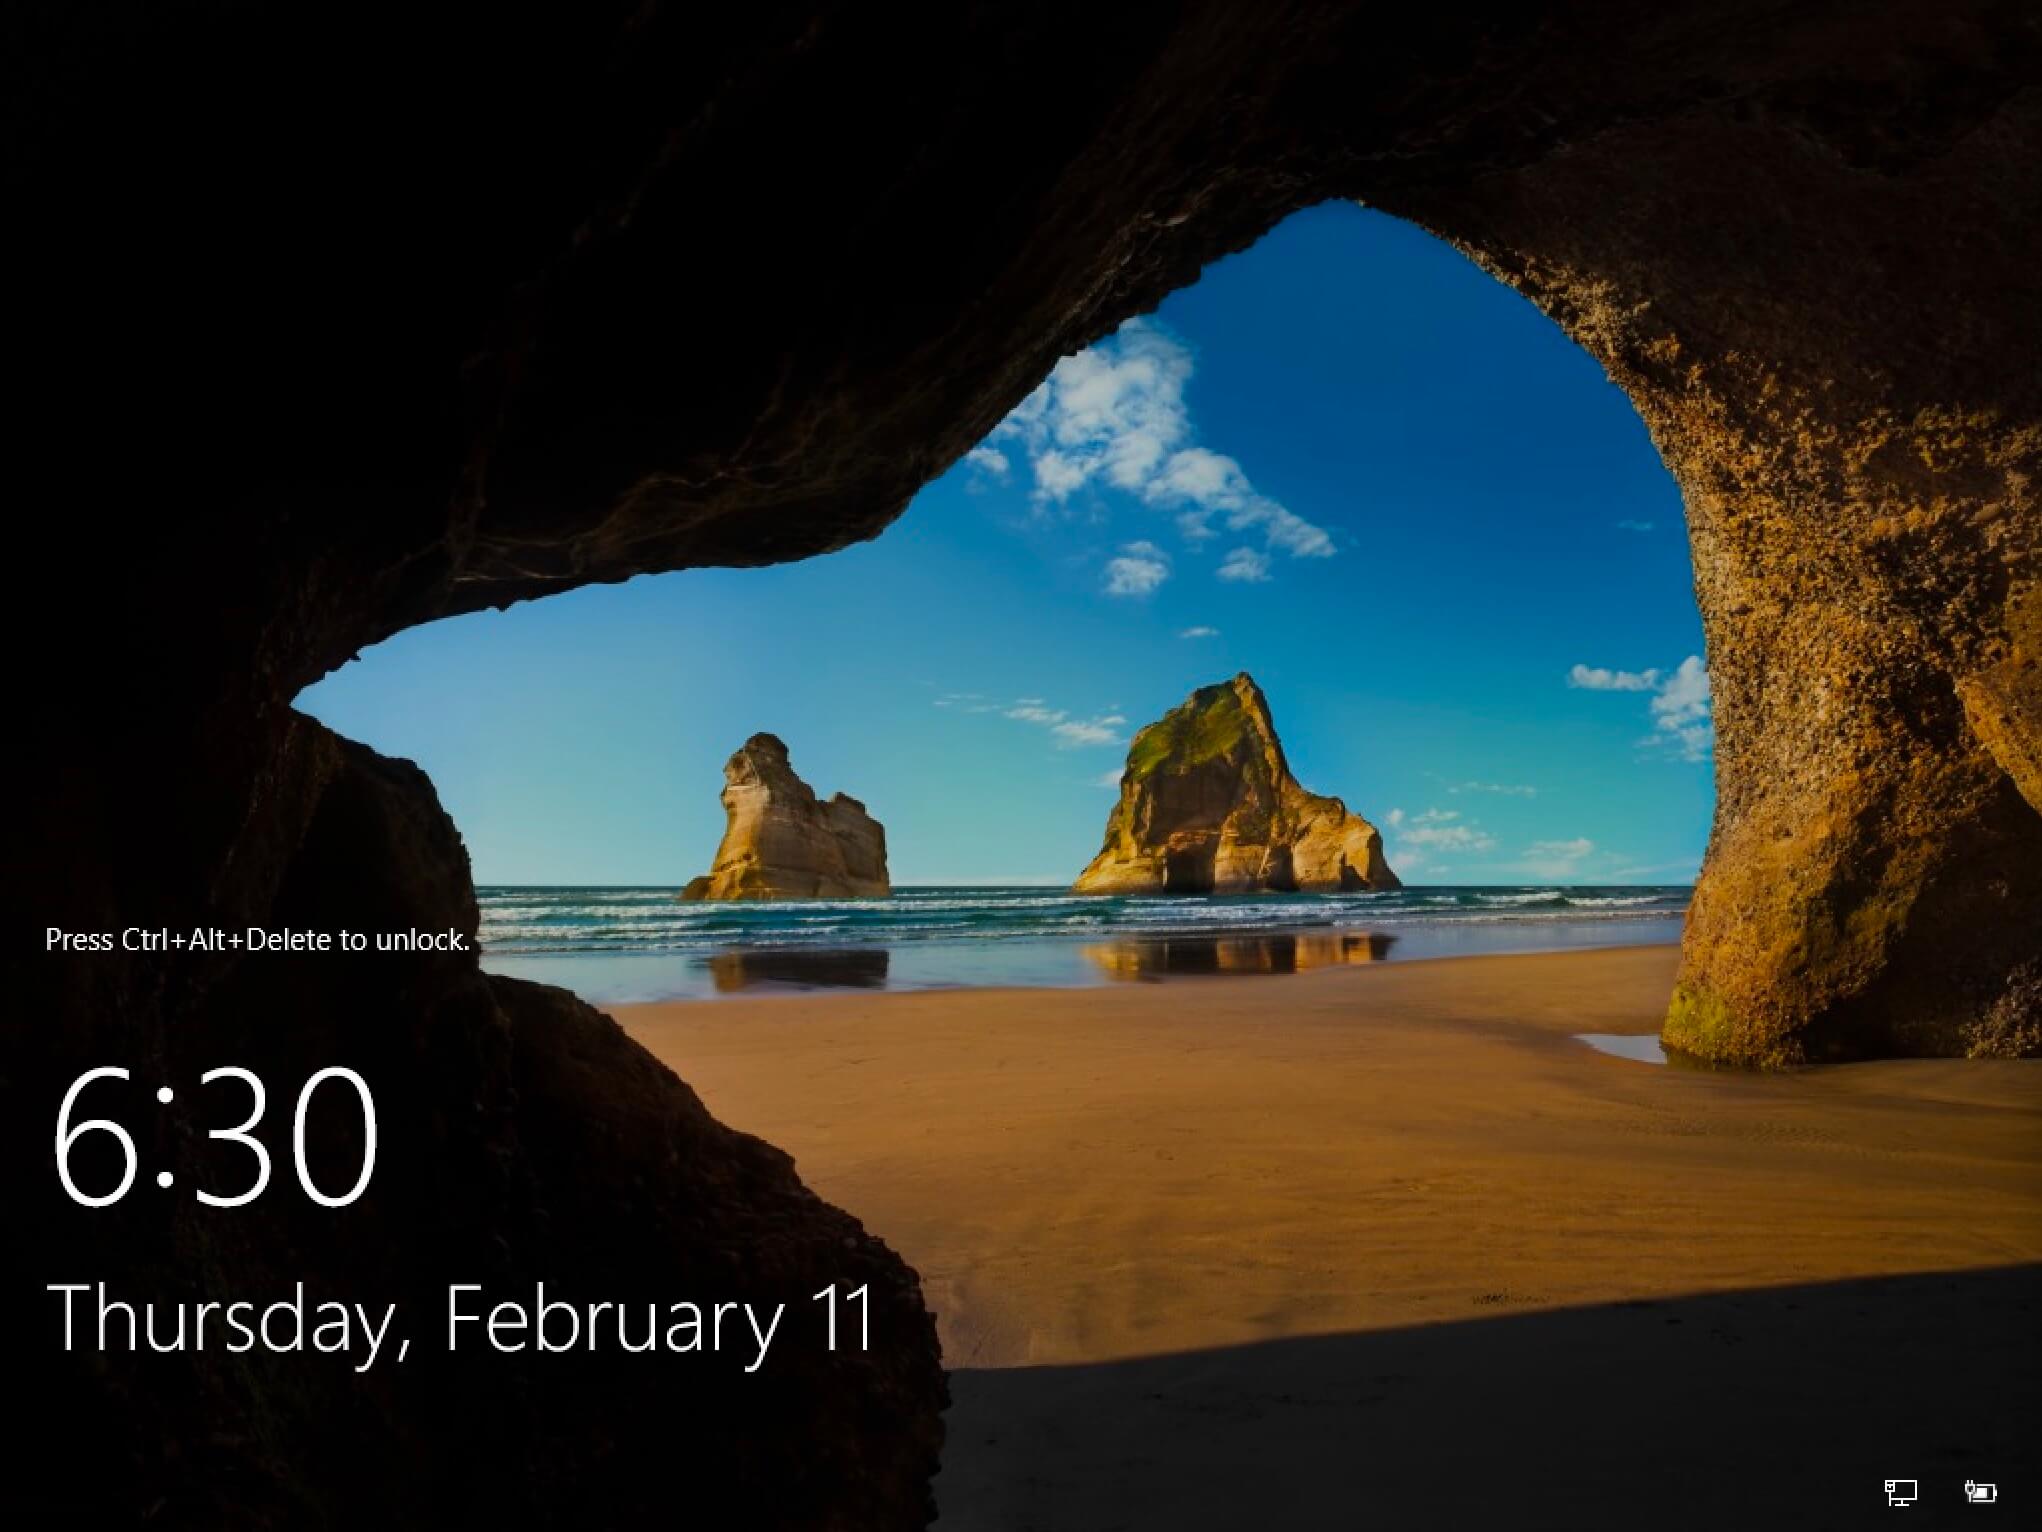
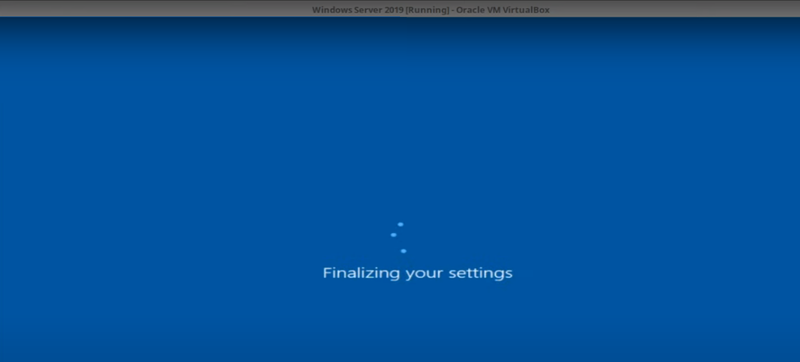
После завершения настроек, вас встретит экран блокировки Windows Server 2019.
Нажимаем “Ctrl+Alt+Delete”.
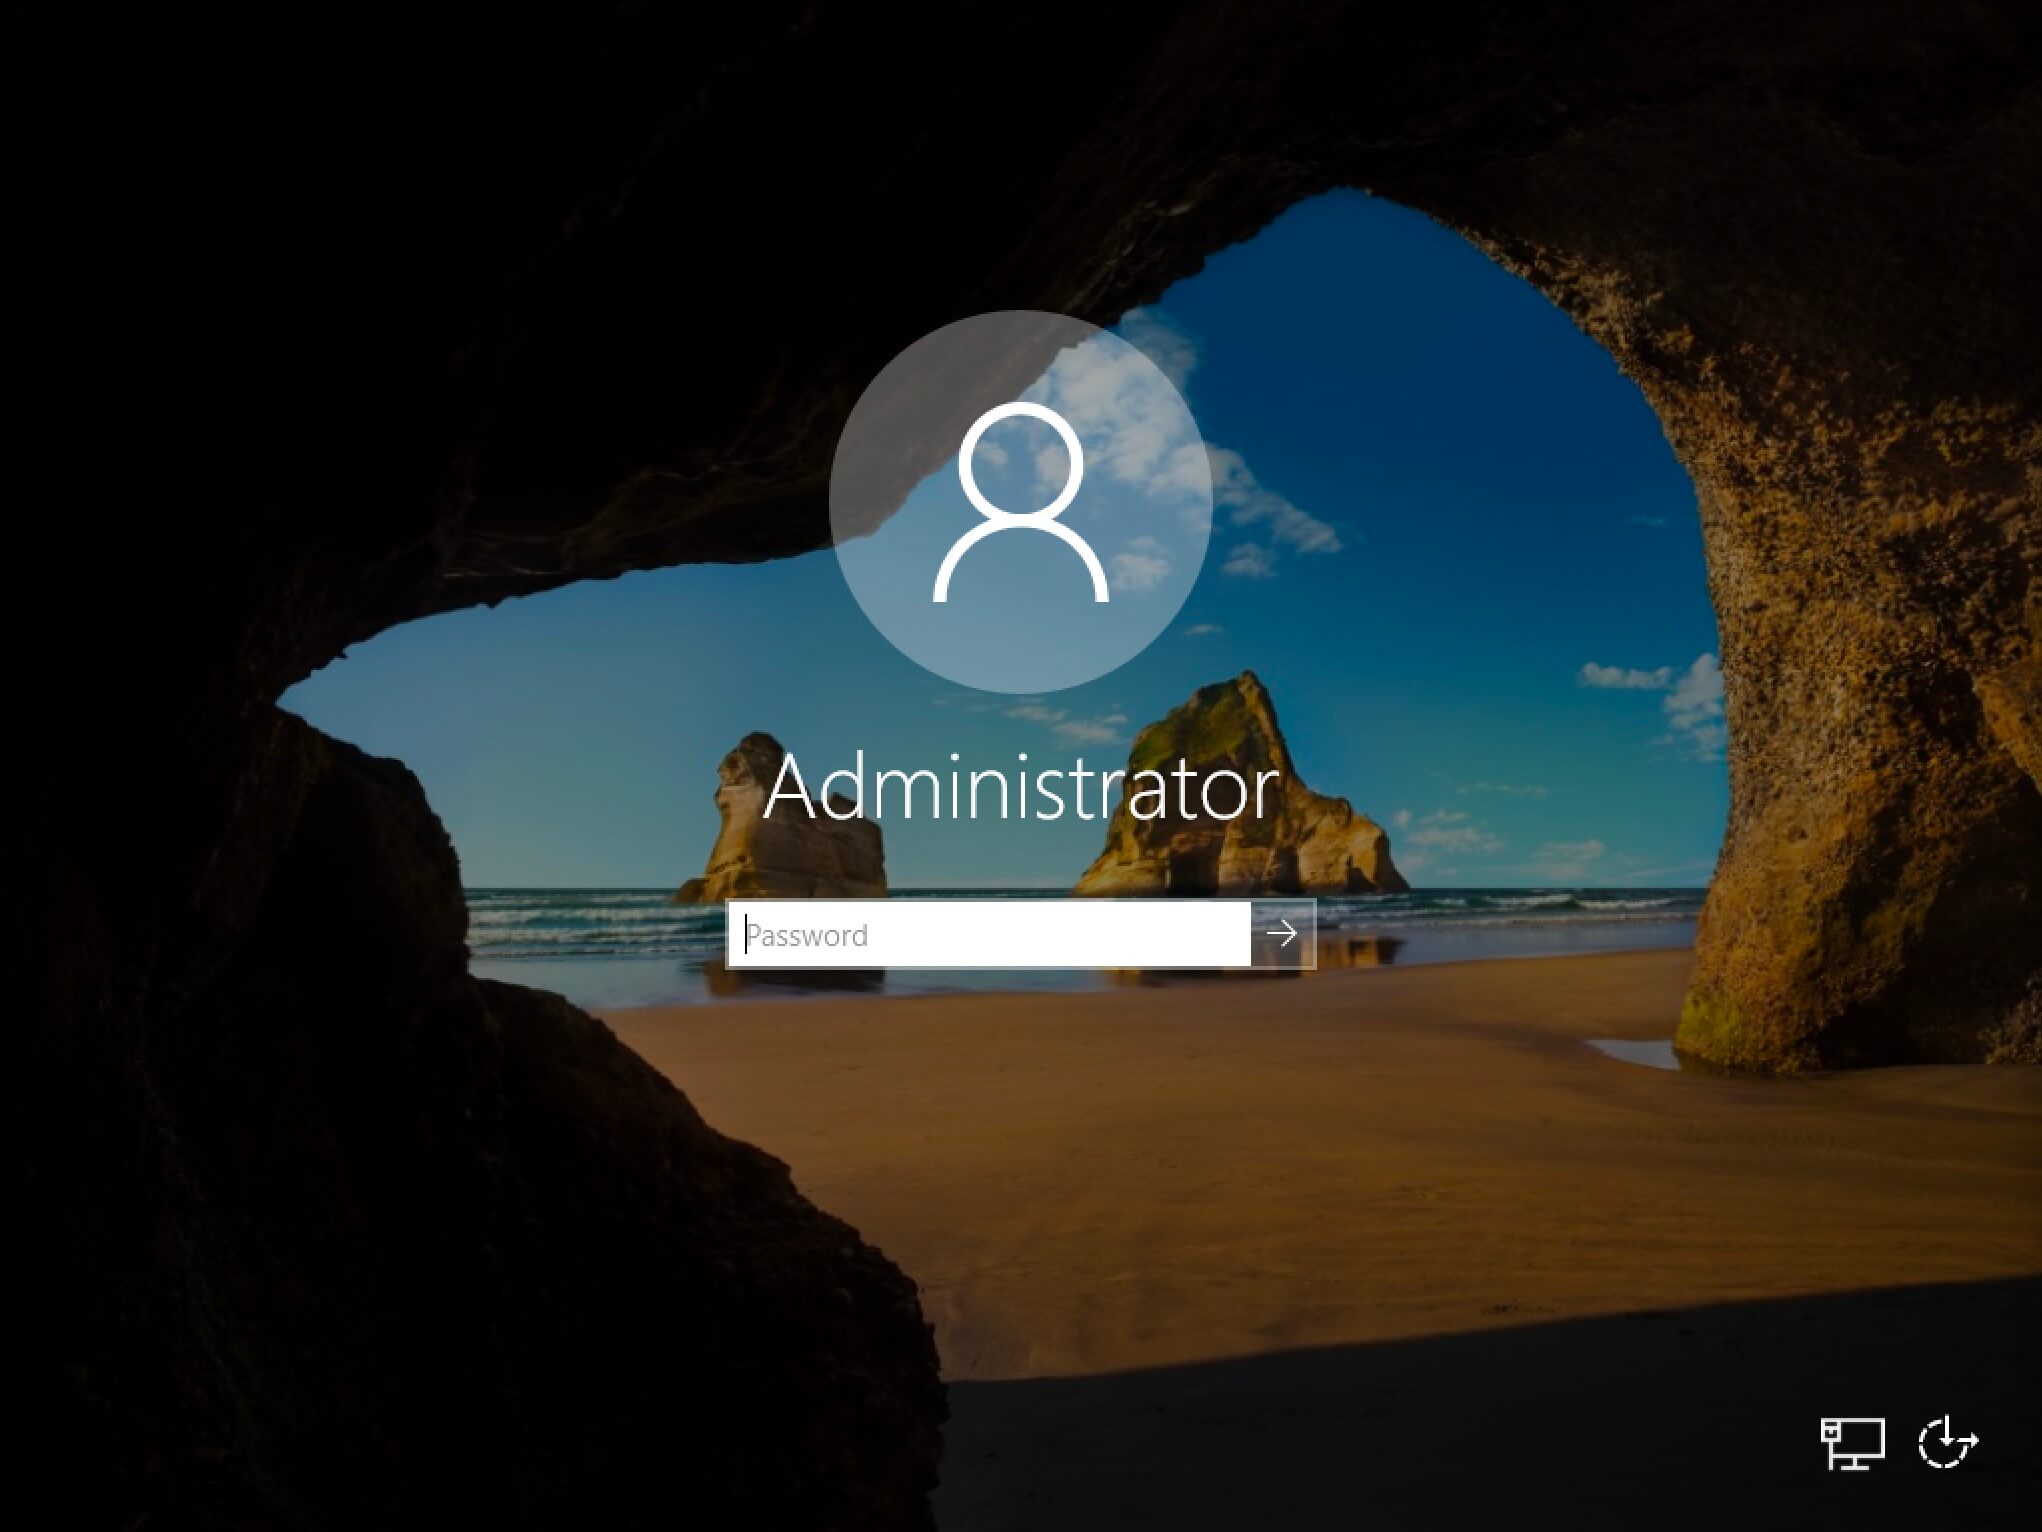
Далее необходимо войти в систему под учетной записью “Administrator”.
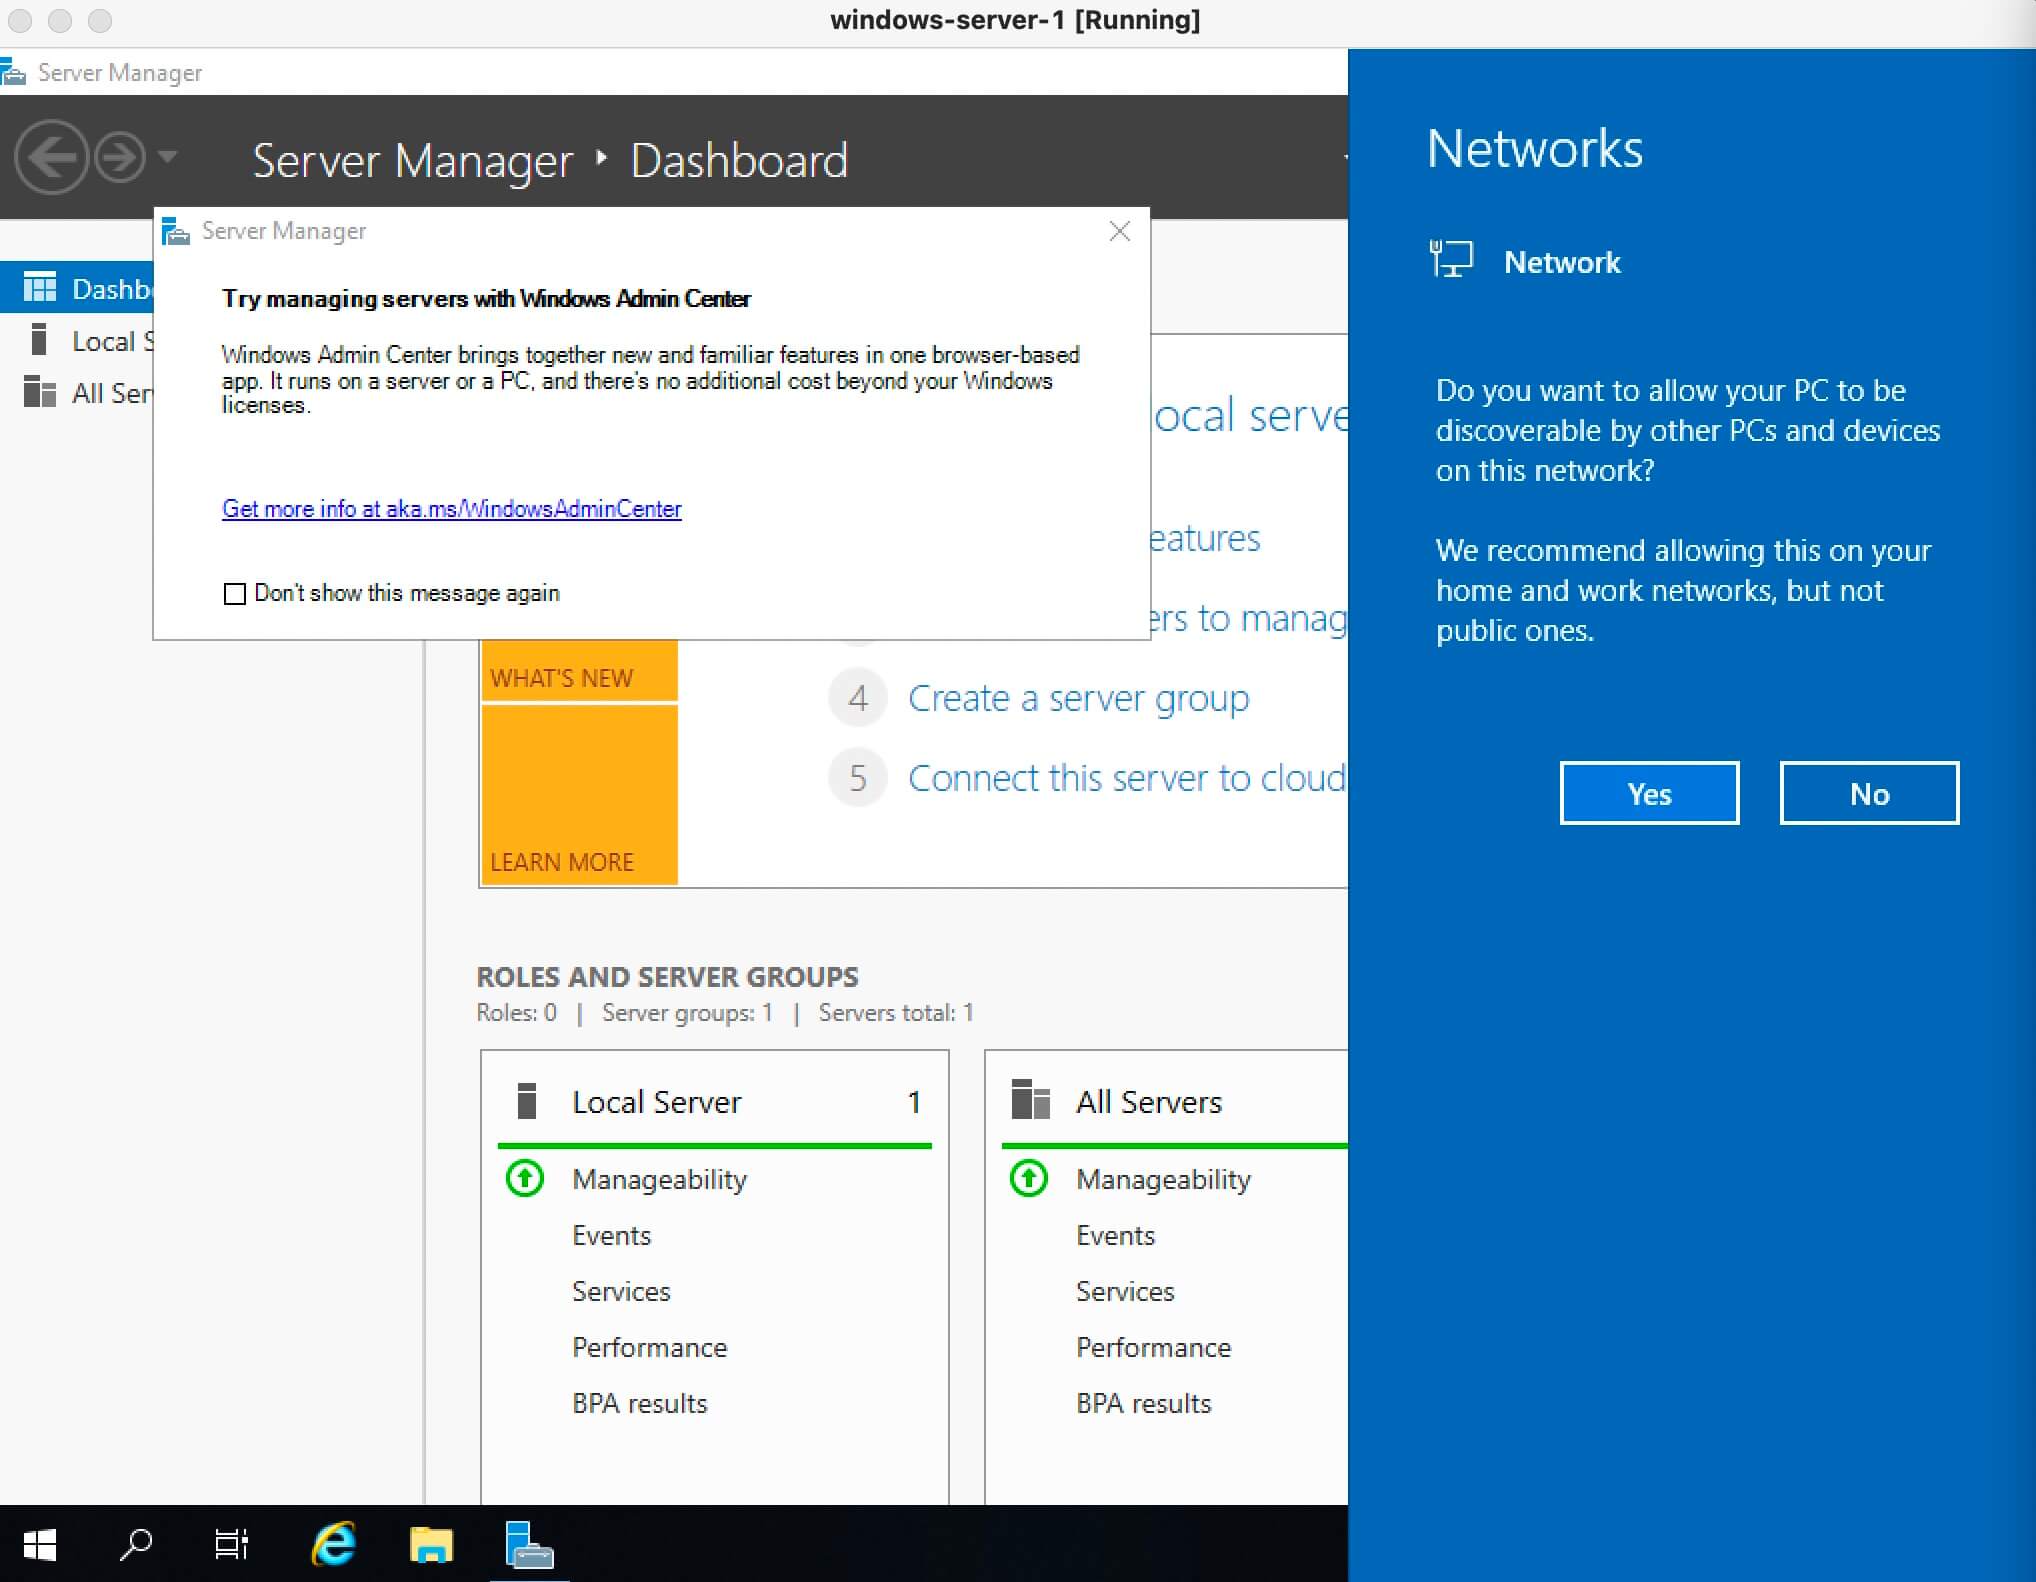
Далее будет возможность включить сетевое обнаружение, чтобы сервер был виден другим компьютерам в сети.
Обратите внимание, сетевое обнаружение не рекомендуется включать в публичных сетях.
Нажимаем на кнопку “Yes”.
Установка Windows Server 2019 завершена.
Join us to say hello to the 9th version of the Windows Server operating system, which Microsoft announced on March 2018. This article will review a visual installation process of Microsoft Windows Server 2019. From the workgroup to the data center, an infrastructure of interconnected applications, networks, and web services may be built with Windows Server. It connects on-premises systems with Azure, giving extra security levels and assisting you in modernizing your infrastructure and applications.
The next version of Microsoft’s server operating system, Windows Server 2019, adds a number of new features along with upgrades and performance enhancements. Built on the solid basis of Windows Server 2016, Windows Server 2019 introduces several advancements in security, application platform, hybrid cloud, and hyper-converged infrastructure (HCI).
The Desktop Experience is a part of Windows Server 2019, a Long-Term Servicing Channel (LTSC) release. Like Windows Server 2016, you can install Server Core or Server with Desktop Experience while configuring the operating system. To reduce the operational expenses associated with reactively managing issues in your Windows Server deployments, you can use the new feature of Windows Server 2019 which is System Insights.
Following this guide, you can install Windows Server 2019 on a physical server, Virtual Environment, or the Cloud. If you prefer installing Windows Server 2019 on a physical server, you must first pull the Windows Server ISO image and burn it to a USB device. Users of VirtualBox, KVM, and VMware need only attach the ISO file during VM creation and carry out the specified installation procedures.
Prerequisites to Install Microsoft Windows Server 2019
To let this tutorial works correctly, provide the options below and move on.
- Server: Buy Dedicated Server to install Windows Server on it, and then follow the below instructions and screenshots to install Windows Server 2019 on the computer you prefer to be your server machine.
- Processor: 1.4 GHz 64-bit processor
- RAM: 512 MB
- Disk Space – At least 32 GB
- Network: Gigabit (10/100/1000baseT) Ethernet adapter
- Optical Storage: DVD drive (if installing the OS from DVD media)
Let’s go through the steps of this guide and learn How to Install Windows Server 2019 smoothly. Just prepare a clean USB to create a bootable USB or DVD medium. Connect the USB to your system and start it.
Step 1. Select Language, Keyboard type, and Time Zone
When loading files is finished, you will see the first blue screen. Select your preferred language, Keyboard layout, and Time zone. Then, click ‘’Next’’.
Step 2. Install Windows Server 2019
On the below screen, click on ”Install Now” to let the installation process get started.
When you see the ”Setup is starting” screen, wait till it ends.
Step 3. Choose the Windows Operating System
At this point in the installation process, select the Windows Server operating system you wish to install and click ‘’Next’’.
Step 4. License Agreement
By selecting the “I accept the license terms” checkbox after reading the license terms, you can begin the installation.
Step 5. Determine Installation Type
When you are asked to choose the type of installation, you must select (Custom: Install Windows only) if this is the first installation of Windows Server 2019 on your Server.
Step 6. Specify where to Install Windows Server 2019
In this part of Installing Windows Server 2019, you need to choose a partition to install Windows Server. Create a new partition for it and specify the size. Also, you can use the entire disk space available by clicking ‘’Next’’.
To consider a separate partition, If the service is going to be used as a full server, it is a good idea to keep the operating system separate from using data. To do this click ‘’New’’ and specify your considered size and click on ‘’Apply’’ and then click ‘’Ok’’.
Step 7. Complete the Installation
Wait for the installation to complete itself.
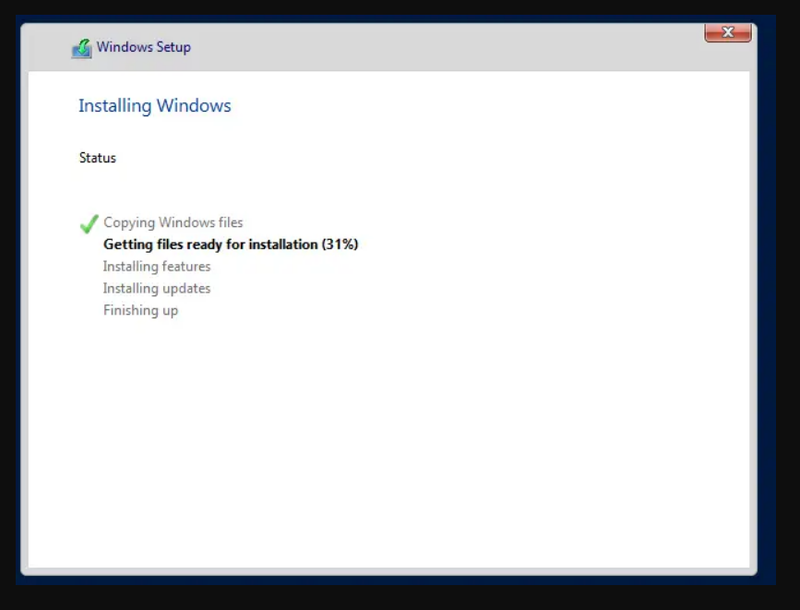
Windows will restart a couple of times and after that, the installation is finished.
Step 8. Specify a Password for the built-in Administrator Account
On the screen below, choose a complex password for the administrator when you are prompted and click ”Finish”.
Step 9. Enter Your Administrator Password
To enter the user profile service, enter your password and wait for applying user settings and the local session manager. Use the Ctrl + Alt + Del key combination to log in as the Administrator user.

Step 10. Windows Server 2019 Settings
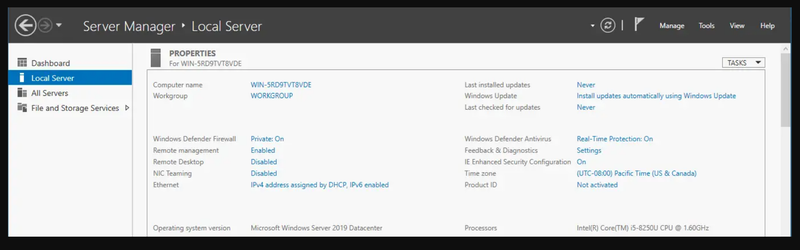
To review Windows Server details, refer to the settings section and customize different fields if you wish.
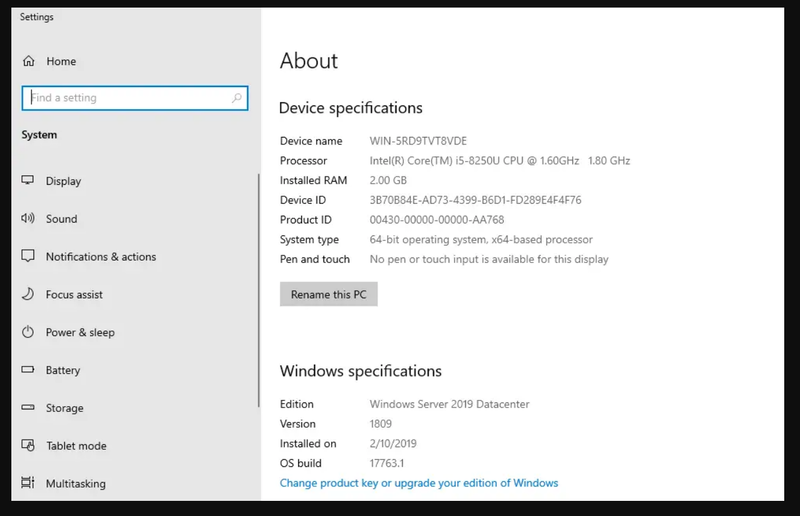
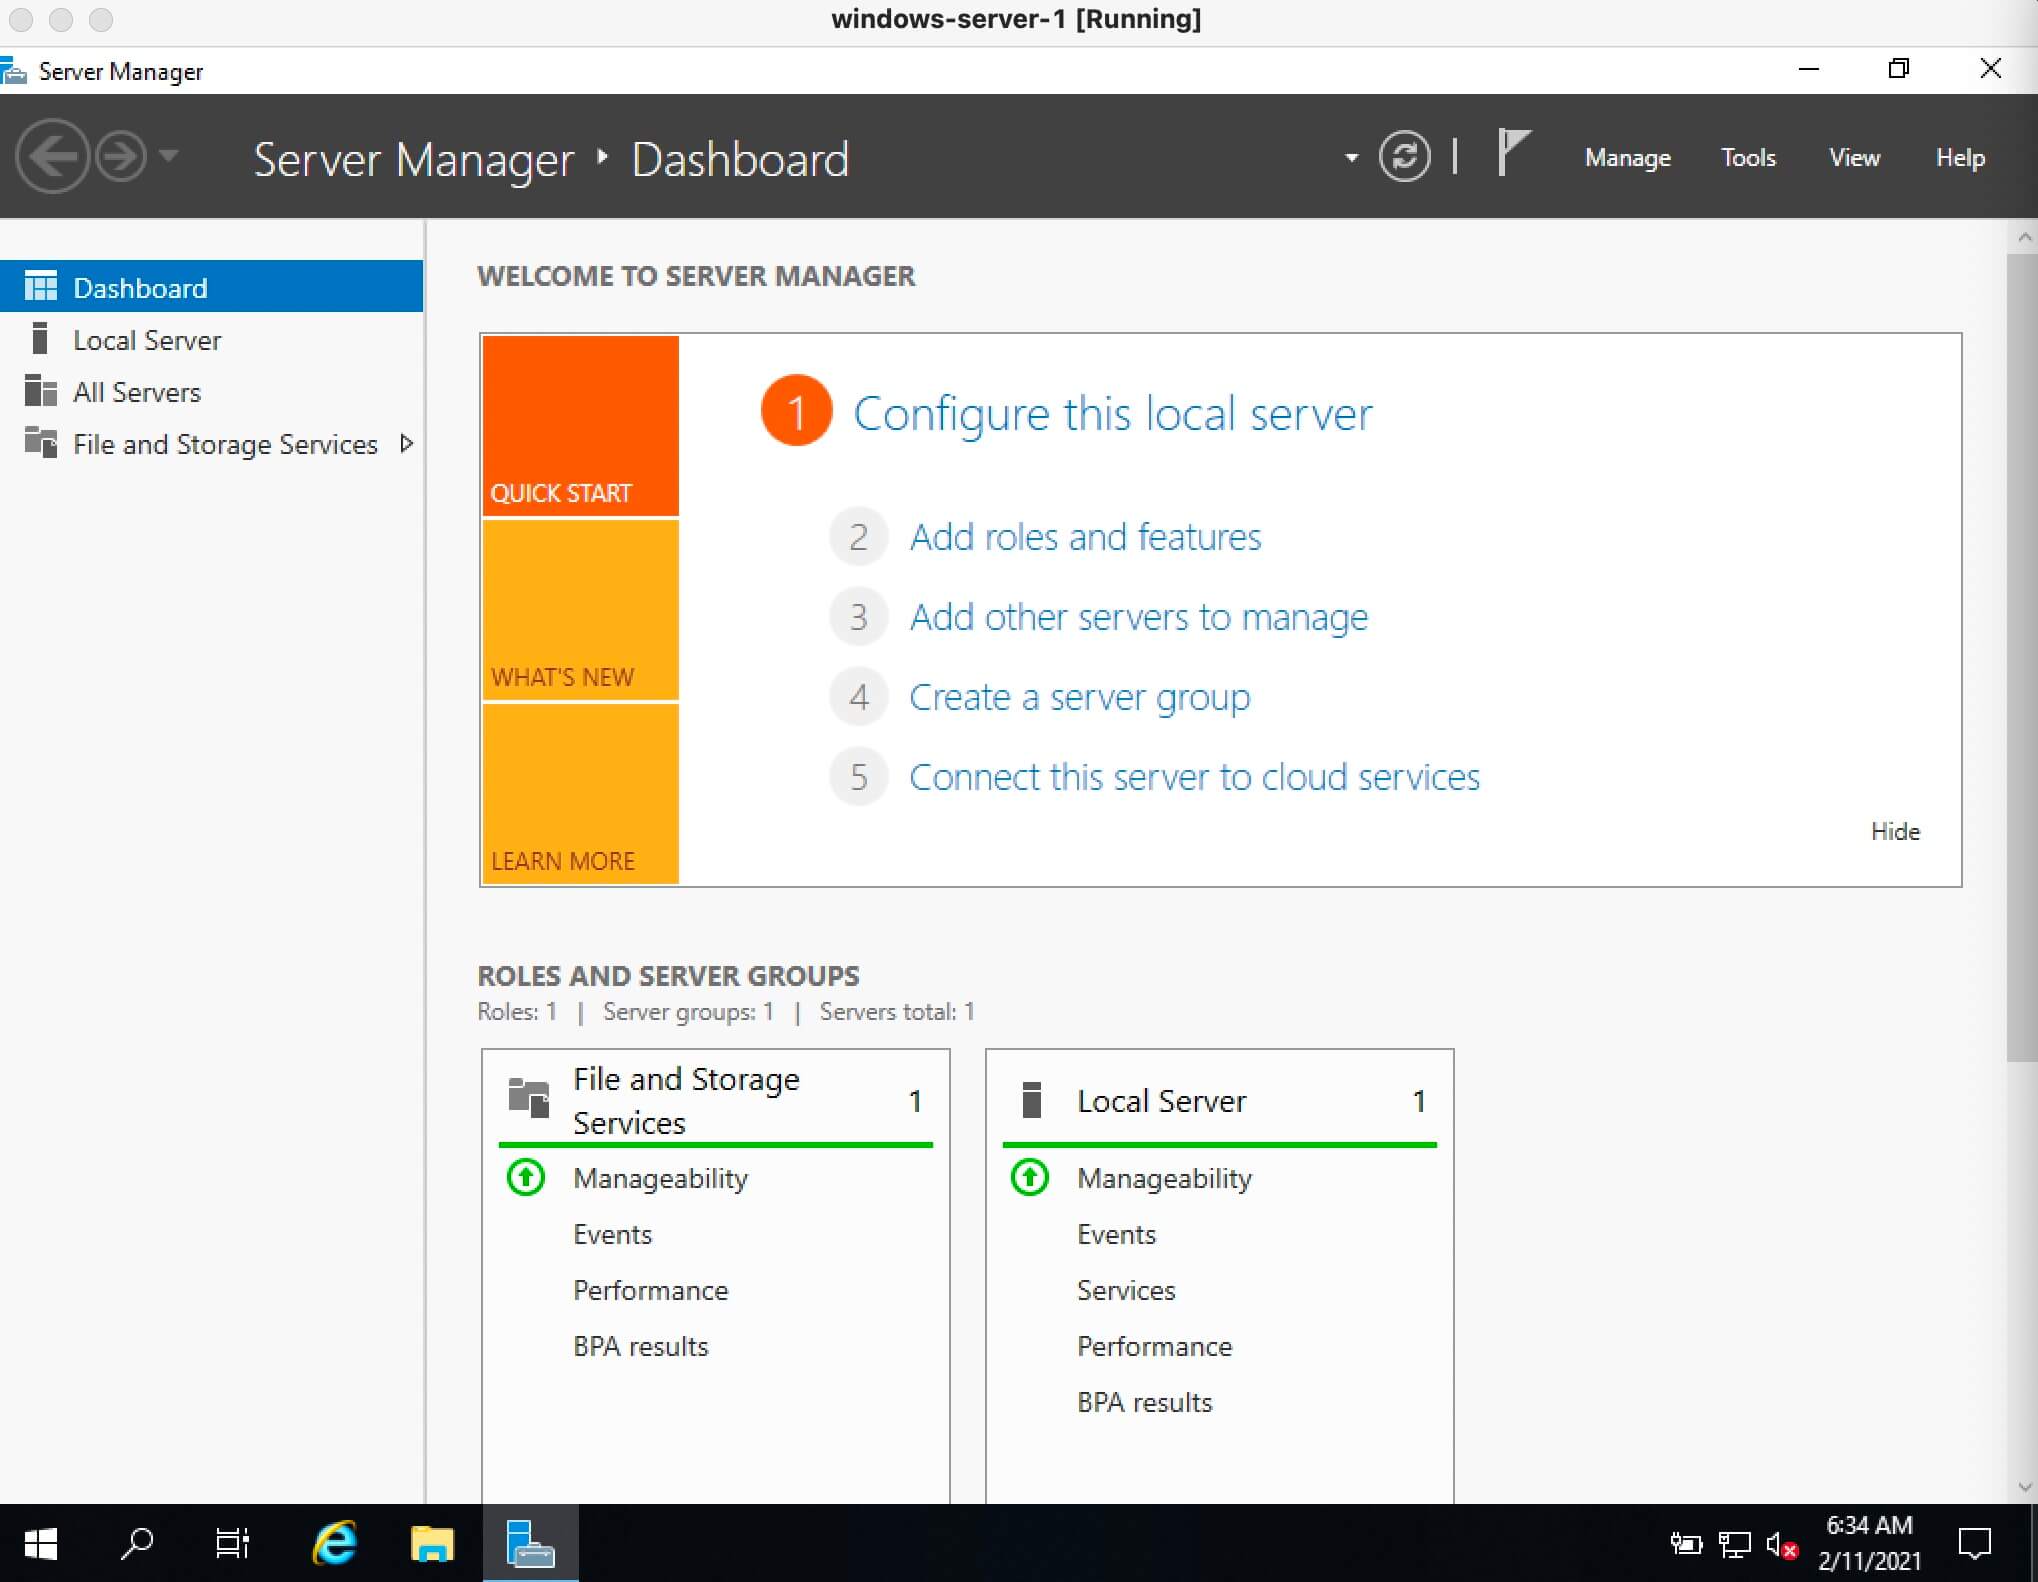
You should also be able to find information about Windows Server 2019 installation in the Server Manager Local Server area.
That’s all. Congratulation. This is the end of installing Windows Server 2019 on your Physical server or Virtual Environment. In the end, you are recommended to get back up in Windows Server 2019.
A Quick Method to Install Microsoft Windows Server 2019
As you know, a Dedicated server is a requirement for installing Windows Server. Since the support team of your provider does not install Windows Server 2019, you need to use virtual machines such as esxi or kvm. if you use any virtualization software, take a snapshot of the final point, as you haven’t yet set any roles or functions (Directory or Certificate Services) for the server.
Installing Windows Server on a PC also requires a virtual machine which seems difficult for many users. So, what is the OperaVPS team’s suggestion? You can easily buy Windows VPS with a pre-installed Windows Server 2019 to not have to do all the required steps of installation and manage the long process of installation.
FAQ
There are four editions available:
Windows Server 2019 Datacenter
Windows Server 2019 Standard
Windows Server 2019 Essentials
Microsoft Hyper-V Server 2019
Microsoft has solved this issue.
Microsoft has released an emergency out-of-band update to address this issue.
Conclusion
In this article, you learned How to Install Microsoft Windows Server 2019. From now on, you will be able to create cloud-native and modernize traditional apps using containers and micro-services using Windows Server 2019.
If you follow the above steps properly then you can smoothly install Windows Server 2019 without any errors but do not hesitate to contact us if you encounter any problems. Our technical support team will try their best to solve your problems.
В этой статье я покажу вам как проходит установка операционной системы Windows Server 2019.
Windows Server 2019 — это платный продукт, поэтому его следует купить или использовать пробную версию, которую можно скачать перейдя по ссылке.
Процесс установки
Вначале вам, как обычно, нужно загрузиться используя установочный образ. После начала установки начнется загрузка файлов, а затем вы увидите экран выбора языка. Выбираем ваш язык и нажимаем кнопку «Далее«:
Следующим шагом нажимаем кнопку «Установить«:
Дальше нужно выбрать архитектуру сервера и уровень вашей лицензии. Если, как у мена, вы видите пункты с возможностями рабочего стола то без этих возможностей — это версия без графического окружения:
Далее нужно принять условия лицензии:
Так как нам нужна обычная установка. То на следующем шаге выбираем «Выборочная: только установка Windows (для опытных пользователей)«:
Далее выбираем диск, на который будем устанавливать операционную систему:
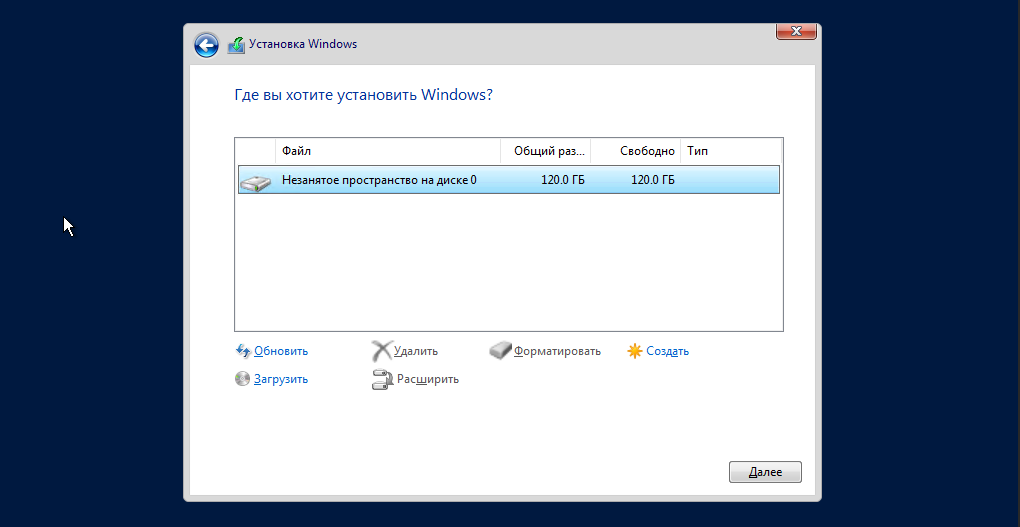
Выше вы можете разбить диск на несколько разделов, но так как у меня будет использоваться только один раздел, то можно просто нажать кнопку «Далее«.
Начнётся установка Windows:
В конце установщик попросит придумать пароль для пользователя «Администратор«. Вот так и закончилась установка Windows Server 2019!
Наконец, можем входить в систему:

После входа в систему видим рабочий стол сервера, который похож на Windows 10:

Другие статьи по Windows на этом сайте можете посмотреть тут. Спасибо за внимание!
Сводка

Имя статьи
Windows Server 2019. Установка
Описание
В этой статье я покажу вам как проходит установка операционной системы Windows Server 2019.
Windows Server 2019 is the latest server edition from the Microsoft. Windows Server 2019 includes the many new features & functionalities from the older versions of windows servers. In this post we will see on How to Install Windows Server 2019 Core Step by Step.
Featured Sponsor 
In the previous post we have already learned about the Windows Server 2019 new features, enhancements & installation. Windows server 2019 core is the simple os which comes only with the command line & does not have any GUI functionality. So to manage & use the windows server 2019 core you must have the command line knowledge or the powershell knowledge.
Windows server 2019 core is the lightest version of windows server which doesn’t consume lot of resources & more secure compared to the GUI version.
So let’s see How to Install windows server 2019 core step by step.
Step 1:
Download the Windows Server 2019 ISO or You can purchase the Windows Server 2019 DVD.
Insert the DVD drive into the server.
Start the server.
You will see this first screen Press any key here to start the installation wizard.

Step 2:
Choose language for your windows server 2019.
Choose Time & currency format for your windows server 2019.
Choose keyboard input for your windows server 2019.
Now you can click Next to continue.
Step 3:
Click on “Install now” to continue the wizard.

Step 4:
Here you will see the list of editions which you can install.
You can choose standard or datacenter based on your requirement.
To install core editions you can choose the normal edition without Desktop Experience.
Click Next to continue.

Step 5:
Read & accept the license agreement.
Click Next to continue.

Step 6:
Here you will see 2 options for installation: Upgrade or Custom.
If you are upgrading your existing windows server than you can choose the Upgrade option.
We are only installing the windows server 2019 core so select custom.
Step 7:
Here you will see the disk which is available in your server.
You can create partitions by selecting disk & click on New button in the box.
If you don’t want to create any partitions than you can click on Next to continue.
Step 8:
Once you click Next you will see that Installation of windows server 2019 core has started.
It will take few minutes to complete according to your environment.
Step 9:
Once the installation has finished you will see server is being rebooted & you will get below screen.
Because this is the core edition so you will only see the command prompt.
First we need to set the local administrator password.
Click Ok to set the local admin password.
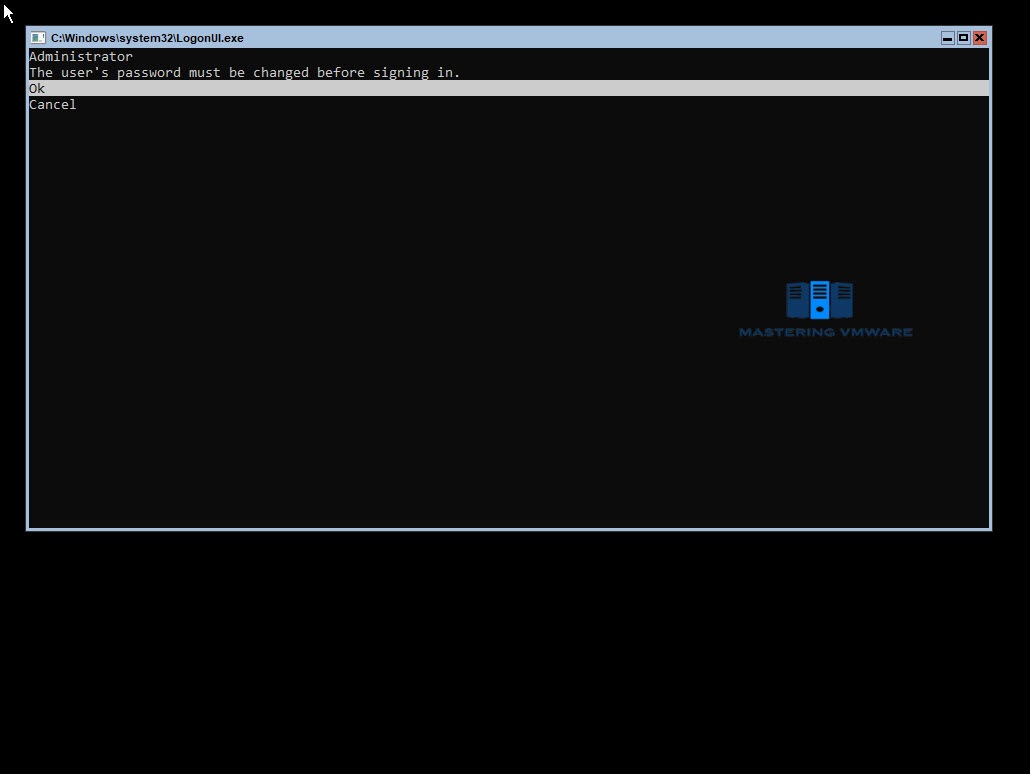
Step 10:
Type the new password & confirm password for the local administrator.
Click Enter to continue.

Step 11:
You will get confirmation that password has been changed successfully.
You can click Enter to continue.

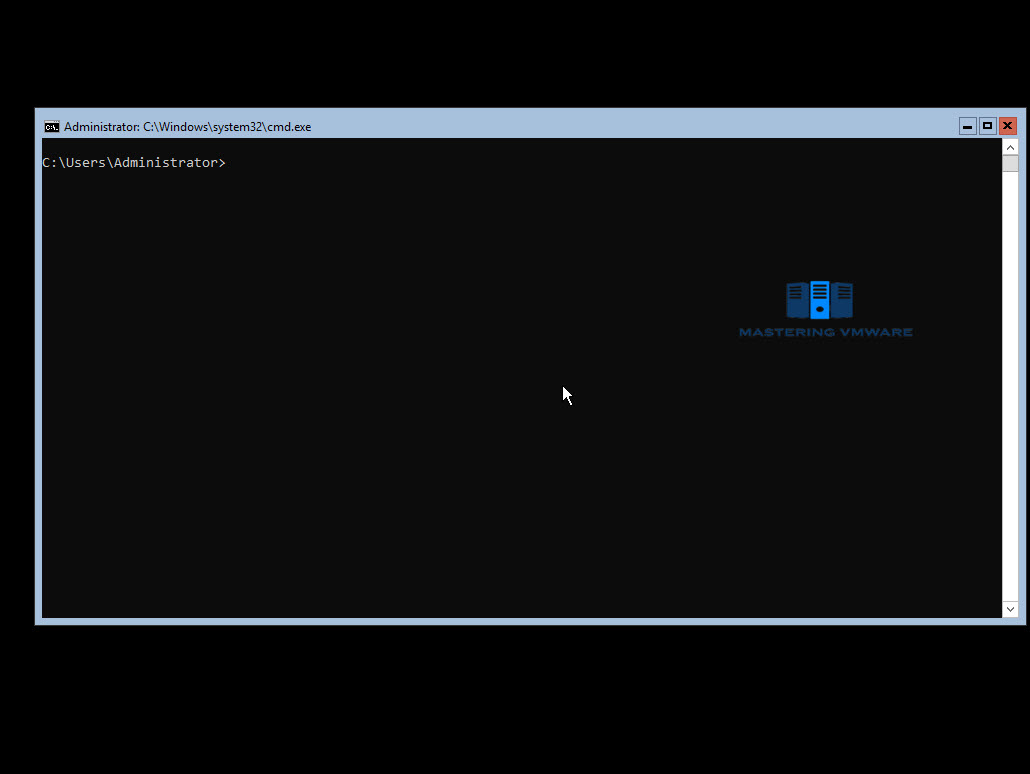
This is how you will see the first screen of Windows Server 2019 core.
You can press “Ctrl-Alt-Del” to unlock the server.

Once you enter administrator password & unlock.
You will see below command line option every time.
That’s it, Using this way you can install windows server 2019 core in your environment. Installation of core edition is similar to the normal installation of windows server.
But management of core edition is completely different, you can manage it using command line, powershell, remote management etc. So if you want to have the light version of windows server 2019 & security is priority you can go ahead with windows server 2019 core.
That’s it for Today Friends. I Hope you liked reading this post & If you find anything more to be added or removed feel free to write it in our comments. If you find it useful You are Feel free to share this on social media to help others & spread knowledge.
If you have any query on any thing you are free to write it in our comments section & we will make sure to provide you the better solution as soon as possible.
Join Our LinkedIn Group to get Fast updates about our posts : Mastering VMware.
Checkout our Facebook Group for discussions & more.
You can also Like & Share our Facebook Page for Latest Updates.

Hi I am Mayur Parmar. Independent Author & Founder of Mastering VMware. I am working in IT industry for more than 4 Years with knowledge of VMware , Microsoft Server’s, Linux Server’s.
With the release of the latest technical preview of Windows Server 2019, we decided to learn how to install and configure Windows Server 2019. The Honolulu project has been officially released as the Windows Admin Center. Microsoft has also released the Honolulu project, which is a new management platform for Windows Server. In this tutorial, we’ll take a look at the Windows Server 2019 installation and configuration and the Henololo project. You can visit the packages available in Eldernode to purchase a Windows VPS server.
Table of Contents
Tutorial install and configure Windows Server 2019
In the first step, you have to download the latest version. In the continuation of this article, join us to learn how to install and configure Windows Server 2019.
Install and Configure Windows Server 2019
Windows Server is one of the server-specific operating systems that users install on their server according to their needs when purchasing a VPS Server or Dedicated Server. Among the different versions of Windows Server, the latest and most recent version is Windows Server 2019, which has better performance than previous versions. It should be noted that this version, despite the time since its introduction by Microsoft, is still not recognized as a completely stable version, and new updates for it are constantly released. Follow us in the continuation of this tutorial.
How to install Windows Server 2019 via ISO file in VMware
To install Windows Server 2019 on VMware, we used the following virtual machine:
– Windows Server 2019 x64 bit
– VMware ESXi version 6.5
In the images below, you can see the Windows Server 2019 installation page, the ISO file of which is in the VMware virtual machine:
On the page above, specify the language and keyboard, and then click Next.
Click Install to begin the installation process.
Select the Windows Server version and click Next.
Confirm the agreement (check I accept the license terms).
Select the drive in which you are installing Windows.
As you can see, the installation process is very simple.
How to install Windows Server 2019 on Hyper-V 2016
With Hyper-V, all you have to do is download the VHDX file and copy it to the datastore where you want to run the Hyper-V virtual machine. Details of the Hyper-V environment are as follows:
– Windows Server 2016 Hyper-V
– Windows Server 2016 is installed on VMware ESXi 6.5.
The process of using the downloaded VHDX file is similar to creating other Hyper-V virtual machines. But here we connect the disk to the downloaded Microsoft Insider file.
In the image above, we specify the name and path of the virtual machine storage.
Then select Generation 2 for the Generation version:
In the image below, we allocate only 2 GB of RAM to this virtual machine.
Note: If you do this in operating environments, be aware that high RAM should be allocated to virtual machines, otherwise you will face many problems when loading high.
Then select the network card configuration for the Hyper-V virtual machine in Windows Server 2019.
In the Connect Virtual Hard Disk section, select Use an existing virtual hard disk. Below is the path to the downloaded VHDX file that is attached to the virtual machine.
On the last page, you will see a summary of the status of the virtual machine that you configured. Click Finish to create this machine.
After turning on Hyper-V, you will see that the technical preview is Server Core.
How to install the Honolulu project on Windows Server 2019
Honolulu is a browser-based local tool that allows you to manage Windows Server without the need for Azure or cloud. Honolulu allows IT administrators access to full control of all server structural features. It is generally suitable for management on private networks that are not connected to the Internet.
Honolulu is a modern evolutionary tool for in-box management tools, such as Server Manager or MMC. In fact, the project complements the System Center and Operations Management Suite but has not been created to replace these products and services.
You can install the Honolulu project locally on the Windows Server 2019 Core version. To do this, we need to run and install the MSI package using CMD.
C:\Users\administrator.CLOUD\Downloads>msiexec /i honolulu_install.msi /qn /L*v log2.txt SME_port=6513 SSL_CERTIFICATE_OPTION=generateNote: Instructions for installing the Honolulu project on the Windows Server 2019 can be found on the official Microsoft page.
msiexec /i <HonoluluInstallerName>.msi /qn /L*v log.txt SME_PORT=6513 SSL_CERTIFICATE_OPTION=generateAs you can see in the above command, we also specify the log file. Using the log file to see the installation status and troubleshooting problems during installation is appropriate. At first, the installation of Honolulu was faulty, but after resetting the server and reinstalling it, the problem was solved.
The Honolulu project and its implementation on Windows Server 2019
At first glance, the Honolulu project on Windows Server 2019 was very appealing to us. Microsoft has done an interesting job of designing and adding charm to it. In addition, the dashboard has an interesting search feature that allows you to easily find different items. You can type the letters in it so that the Honolulu project quickly displays the item you were looking for. Of course, the Search feature still needs improvements, which I hope will be improved in future versions.
Below you can see pictures of the Honolulu project on Windows Server 2019.
*
**
***
****
Conclusion
This article is one of the most complete Windows Server 2019 installation and configuration training references. In this tutorial, we tried to fully teach you how to install Windows Server 2019 via ISO file in VMware and Hyper-V 2016. You were also taught how to install the Honolulu project on Windows Server 2019.