В данной инструкции мы рассмотрим установку Windows Server 2019 на Proxmox.
Нужна помощь? Настройки Windows Server и обслуживание серверов мы осуществляем в рамках услуги ИТ-аутсорсинг. Также возможны разовые проектные работы.
- На ранее подготовленный сервер Proxmox заходим по адресу: https://ip-Proxmox:8006. Вводим учетные данные и входим.
- Далее нажимаем “Загрузить” и выбираем подготовленный образ с Window Server 2019.
- Затем еще раз нажимаем “Загрузить”, происходит процесс загрузки iso-установщика в библиотеку образов Proxmox. Когда образ загружен, можно приступить к созданию виртуальной машины. Нажимаем правой кнопкой мыши на наш сервер и в выпадающем меню выбираем “Создать VM”.
- Далее приступаем непосредственно к настройке параметров виртуальной машины. Выбираем узел, на котором будет размещаться виртуальная машина и вводим её имя, нажимаем “Далее”.
- В данной вкладке выбираем нужный нам образ системы, тип и версию ОС, нажимаем “Далее”.
- В следующей вкладке “Система” оставляем по умолчанию и нажимаем “Далее”. Затем выбираем формат диска виртуальной машины и размер диска, нажимаем “Далее”.
- На следующих 2-х этапах выбираем количество ядер и оперативной памяти, требуемых нашей виртуальной машине, “Далее”. Затем выбираем сетевые настройки, в данном случае выбираем сетевой мост, тем самым сеть на ВМ будет такой же, как на и на самом сервере Proxmox, “Далее”.
- На последнем этапе создания ВМ, проверяем настройки и в подтверждение нажимаем “Далее”.
- Виртуальная машина создана. Выбрав нашу виртуальную машину в просмотре сервера можно просмотреть “Сводку” по ней.
- Перейдем в консоль и запускаем виртуальную машину, при запуске начнется подготовка к установке ОС, далее выбираем нужную редакцию ОС и начинаем установку.
- Установка Windows Server 2019 на Proxmox завершена.

Рисунок 1 — Вызов панели для создания виртуальной машины

Рисунок 2 — Выбор узла и ввод имени виртуальной машины

Рисунок 3 — Выбор ISO-образа для установки на виртуальную машину

Рисунок 4 — Выбор формата и размера диска

Рисунок 5 — Настройка сети виртуальной машины

Рисунок 6 — Подтверждение выбранных настроек

Рисунок 7 — Сводка по созданной виртуальной машине
Не нашли ответа на свой вопрос?
Закажите звонок специалиста!
Закажите звонок специалиста!
Introduction
This is a set of best practices to follow when installing a Windows Server 2019 guest on a Proxmox VE server 6.x.
Install
Prepare
To obtain a good level of performance, we will install the Windows VirtIO Drivers during the Windows installation.
- Create a new VM, select «Microsoft Windows 10/2016/2019» as Guest OS and enable the «Qemu Agent» in the System tab. Continue and mount your Windows Server 2019 ISO in the CDROM drive
- For your virtual hard disk select «SCSI» as bus with «VirtIO SCSI» as controller. Set «Write back» as cache option for best performance (the «No cache» default is safer, but slower) and tick «Discard» to optimally use disk space (TRIM).
- Configure your memory settings as needed, continue and set «VirtIO (paravirtualized)» as network device, finish your VM creation.
- For the VirtIO drivers, upload the driver ISO (use the stable VirtIO ISO, download it from here) to your storage, create a new CDROM drive (use «Add -> CD/DVD drive» in the hardware tab) with Bus «IDE» and number 0. Load the Virtio Drivers ISO in the new virtual CDROM drive.
- Now your ready to start the VM, just follow the Windows installer.
- Note for Older Version of Windows like Windows-2012 (use the stable older version of VirtIO ISO — virtio-win-0.1.189.iso, download it from here)
Launch Windows install
- After starting your VM launch the noVNC console
- Follow the installer steps until you reach the installation type selection where you need to select «Custom (advanced)»
- Now click «Load driver» to install the VirtIO drivers for hard disk and the network.
- Hard disk: Browse to the CD drive where you mounted the VirtIO driver and select folder «vioscsi\2k19\amd64» and confirm. Select the «Red Hat VirtIO SCSI pass-through controller» and click next to install it. Now you should see your drive.
- Network: Repeat the steps from above (click again «Load driver», etc.) and select the folder «NetKVM\2k19\amd64», confirm it and select «Redhat VirtIO Ethernet Adapter» and click next.
- Memory Ballooning: Again, repeat the steps but this time select the «Balloon\2k19\amd64» folder, then the «VirtIO Balloon Driver» and install it by clicking next. With these three drivers you should be good covered to run a fast virtualized Windows Server 2019 system.
- Choose the drive and continue the Windows installer steps.
HINT: There is a video showing the process for a Windows Server 2016 installation which is the same as for Windows Server 2019.
Install Guest Agent and Services
Guest Agent
If you enabled the Qemu Agent option for the VM the mouse pointer will probably be off after the first boot.
To remedy this install the «Qemu Guest Agent». The installer is located on the driver CD under guest-agent\qemu-ga-x86_64.msi.
Drivers and Services
VirtIO guest tools installer
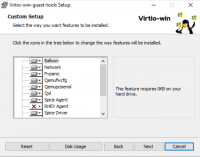
The easiest way to install missing drivers and services is to use the provided MSI installer. It is available on the driver CD since version «virtio-win-0.1.173-2».
Run the «virtio-win-gt-x64.msi» file located directly on the CD. If you do not plan to use SPICE you can deselect the «Qxl» and «Spice» features. Restart the VM after the installer is done.
After all this the RAM usage and IP configuration should be shown correctly in the summary page of the VM.
For more information and configuration about ballooning, see Dynamic Memory Management
Check for missing drivers
- See also: Paravirtualized Block Drivers for Windows
Unknown device in device manager
Make sure to include subfolders
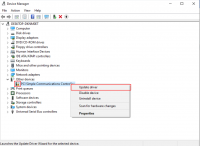
Go to the Device Manager to see if there are any drivers missing.
For any unknown device:
- Right click an select «Update driver».
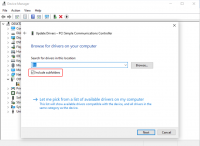
- Select «Browse my computer for driver software».
- Select the Driver CD. Make sure that «Include subfolders» is checked.
- Once a driver has been found you might be prompted with a security warning asking if you «Would like to install this device software». Click «Install».
Installing WSL(g)
To run WSL (Windows Subsystem for Linux) you need to enable Nested Virtualization. Make sure to set your processor to ‘host’; if you already set up your VM and did not select ‘host’ as processor, you can change it in the ‘Hardware’ section of your VM in the web interface.
Follow the official instructions.
If you are using a GPU via PCI(e) passthrough, you might need to add
args: -cpu host,kvm=off
to your config file at /etc/pve/qemu-server/<vm_id>.conf, see the vfio blog
Further information
Disk-Image Format: raw vs qcow2
Raw file format provides slightly better performance while qcow2 offers advanced features such as copy on write and Live_Snapshots.
Since V2.3, qcow2 is the default format.
VirtIO drivers
Make it really easy: Build your ISO with drivers already included:
Windows guests — build ISOs including VirtIO drivers
Latest iso with VirtIO drivers :
https://fedorapeople.org/groups/virt/virtio-win/direct-downloads/latest-virtio/
See also
Windows 2016 guest best practices
Windows 10 guest best practices
Пока уже переходить с Windows Server 2012 R2 на Windows Server 2019, опять переносить все сервисы, лабораторные работы, так сказать повышать свой профессиональный уровень. Но это ведь интересно я ведь вкладываю время в самого себя.
Сегодня я разберу, как на своем домашнем сервере на базе GIGABTYE C246 WU4 (купить такую можно здесь) и дисках подключенных как LVM-Thin
SSD накопитель «SSD накопитель SILICON POWER M-Series SP512GBP34A80M28 512Гб, M.2 2280, PCI-E x4, NVMe» (купить такой же можно здесь) с интерфейсом M2, но так как на моей материнской плате такие разъемы заняты, то понадобится и соответствующий разъем «Адаптер PCI-E M.2 NGFF for SSD Bulk [asia pcie m2 ngff m-key]» (купить такой же можно здесь)
В заметке участвует:
Тестовый полигон на базе Debian 10 + Proxmox 6Скачанный с Microsoft Volume License Services образ (SW_DVD9_Win_Server_STD_CORE_2019_1809.18_64Bit_English_DC_STD_MLF_X22-74330.ISO).Данный образ загружаю через Web-интерфейс в Proxmox 6
Шаг №1: Подключаемся браузером к Proxmox
https://IP&DNS:8006 - user&pass
Шаг №2: Создаю виртуальную машину
https://IP&DNS:8006 – user&pass – (Folder View) – Datacenter – Virtual Machine – Create VM
Node: srv-proxmoxVM ID: 128 (назначается мастером по порядку)Name: srv-s2019aResource Pool: ничего не указываю
Расширенные параметры Advanced не включаю (то есть пока все по дефолту)
И нажимаю Next
Storage: localISO Image: выбираю SW_DVD9_Win_Server_STD_CORE_2019_1809.18_64Bit_English_DC_STD_MLF_X22-74330.ISOType: Microsoft WindowsVersion: 10/2016/2019
Расширенные параметры Advanced не включаю (то есть пока все по дефолту)
И нажимаю Next
Graphic card: DefaultSCSI Controller: VirtIO SCSIQemu Agent: отмечаю галочкой
И нажимаю Next
Bus/Device: VirtIO Block/0Storage: disk1Disk size (GiB): 50Cache: Default (No cache)
Расширенные параметры Advanced не включаю (то есть пока все по дефолту)
И нажимаю Next
Sockets: 1Cores: 4Type: Default (kvm64)
Расширенные параметры Advanced не включаю (то есть пока все по дефолту)
И нажимаю Next
Memory (MiB): 4096
Расширенные параметры Advanced не включаю (то есть пока все по дефолту)
И нажимаю Next
No network device: галочку не ставимBridge: vmbr0Model: VirtIO (paravirtualized)
Расширенные параметры Advanced не включаю (то есть пока все по дефолту)
И нажимаю Next, Finish
Шаг №3: Добавляю в созданную VM еще одно устройство:
https://IP&DNS:8006 – user&pass – VM ID 128 (srv-s2019a) Hardware – Add – CD/DVD Drive –
Bus/Device: IDE/0Storage: localISO Image: virtio-win-0.1.171.iso
И нажимаю Create
Шаг №4: Запускаю созданную виртуальную машину:
https://IP&DNS:8006 – user&pass – VM ID 128 (srv-s2019a) – Start, после переключаюсь на >_ Console дабы видеть процесс инсталляции, происходит загрузка файлов с образа в оперативную память, после
Language to install: English (United States)Time and currency format: English (United States)Keyboard or input method: US
И нажимаю Next
И нажимаю Install Now
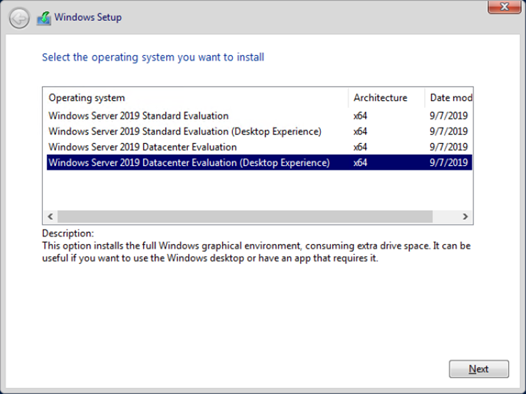
Select the operating system you want to install: выбираю Windows Server 2019 Standard (Desktop Experience)
И нажимаю Next
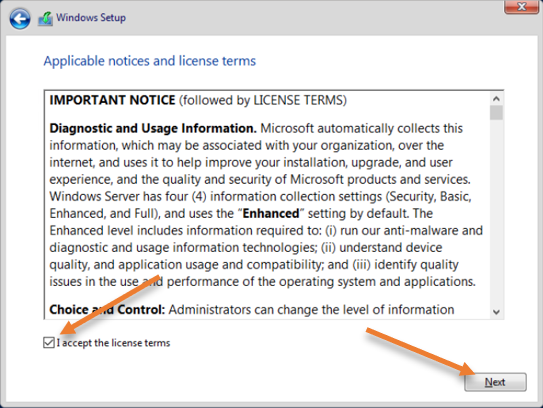
I accept the license terms: отмечаю галочкой
И нажимаю Next
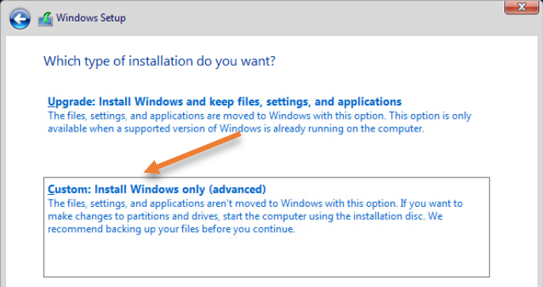
Custom: Install Windows only (advanced): выбираю
Ну а дальше, установщик Windows не видит жесткий диск – это нормально, т.к. я при создании виртуальной машины указал что шина диска это VirtIO и как раз для этого я в контейнер виртуальной машины добавил еще один привод:
Нажимаю Load driver – Browse – выбираю CD Drive (D): virtio-win-0.1.1 (разворачиваю: viostor – 2k19 - amd64) и установщик с учетом подгруженного драйвера успешно увидел жесткий диск данной виртуальной машины:

Нажимаю Next, Next и далее привычная установка Windows. Заострять внимание на дальнейшем нет смысла.
Шаг №5: После того как система Windows Server 2019 Standard установилась, устанавливаем драйвера на устройства которые не опознались установщиком Windows все также с подмонтированного образа virtio-win-0.1.171.iso

Шаг №6: Копируем с подмонтированного образа virtio-win-0.1.171.iso папку Balloon в C:\Program Files\ и запускаем сервис оптимизации использования оперативной памяти:
Win – Windows System – и через правый клик на Command Prompt – More – Run as administrator –
|
C:\Users\Administrator> cd /d «C:\Program Files\Ballon\2k19\amd64” C:\Program Files\Balloon\2k19\am64>blnsvr.exe —i Service Installed Service is starting… Service RUNNING. C:\Program Files\Balloon\2k19\am64>exit |
Также устанавливаю Guest-agent: CD Drive (D: virtio-0.1.171) – guest-agent – qemu-ga-x86_64
После отправляю систему в перезагрузку, авторизуюсь, выключаю и делаю снапшот подготовленной виртуальной машины на будущее использование для отката для новых наработок.
Итого поставленная задача выполнена, с уважением автор блога Олло Александр aka ekzorchik.
The windows server 2019 is the popular version of the Windows server operating system used by many enterprise users worldwide, not only in the on-premises network but also in the cloud.
Our previous blog covered how you can install Proxmox VE on a server using a USB drive. We even spun up multiple firewalls virtual machines in it.
In this blog, we will take a look at the installation of the window server on the Proxmox VE server. After the installation.
Is windows server 2019 compatible with Proxmox?
For the windows server 2019 to work well with Proxmox and get a good performance, you need to use VirtIO drivers during the installation. Once the installation is complete, the Windows Server would work fine as you would install them in any other hypervisors, such as ESXi, the popular hypervisor in the enterprise network.
After you deploy the Window server 2019 in production, the cost associated with running the virtual machine will only be the windows licensing and the hardware cost, as the Proxmox hypervisor software is open source, and it is free for anyone to use. For the enterprise setup, it is recommended to have a Proxmox subscription, which will incur some cost, so in case anything goes wrong, you can always reach out to the support providing peace of mind.
Before you begin, you need to have windows server 2019 iso downloaded.
Note: If you use Windows server 2022, you may follow the article here.
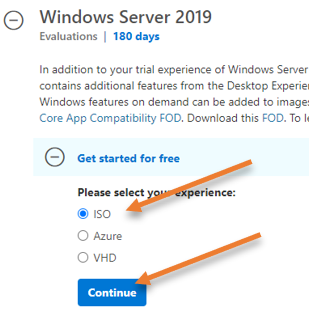
- You can click here to download the windows server.
- In the windows server 2019- choose the ISO file. You will be required to fill in a form.
Post filling up the form, you will be asked to choose the Language of your choice, and click on download.
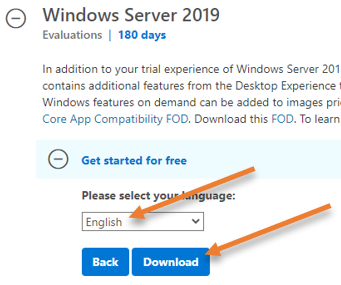
The download will start automatically.
- Proxmox server installed and up and running – follow the article here to learn more about the installation of Proxmox VE on a server.
- VirtIO Drivers -> Click here to download the latest virtio drivers.
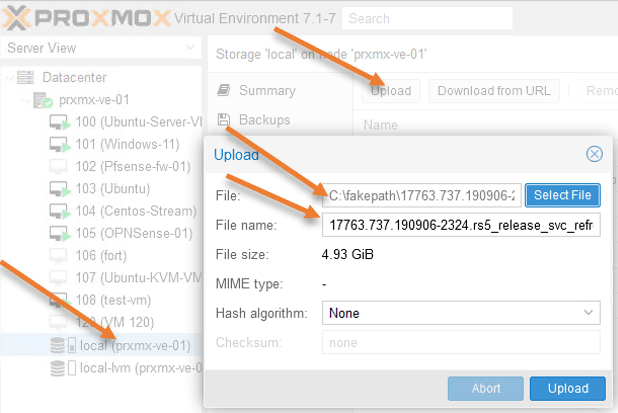
Upload the windows server iso into Proxmox VE.
We already have a windows server iso file. Let’s go ahead and upload it to the Proxmox Server.
Select the Proxmox Server where you are going to install the windows server.
Click on Local file system-> ISO images-> Click upload to upload the windows server iso image.
The upload will take time, depending on the network connectivity between the management system and the Proxmox Server.
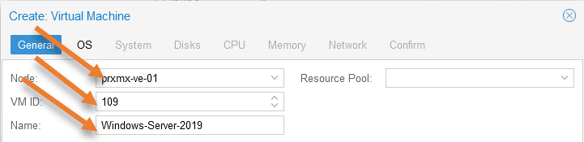
Create a windows server VM.
Login to the Proxmox Server, and click on Create VM on the top right corner.
Node: Choose the Proxmox node where you will install the Windows server operating system.
VM ID: The VM ID will be automatically created by the Proxmox VE server starting from 100, you may leave the default or choose a different ID.
Name: Provide a name for the virtual machine.
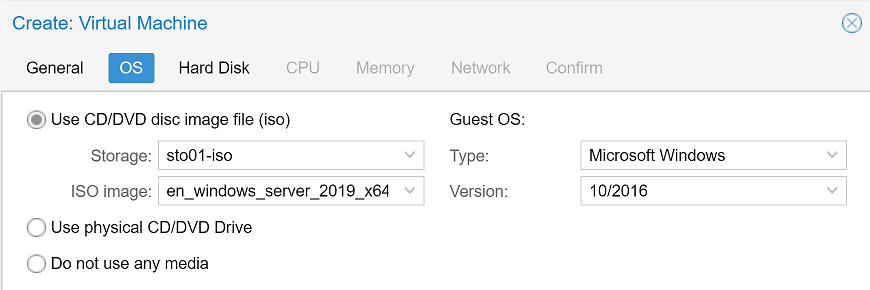
Choose the OS.
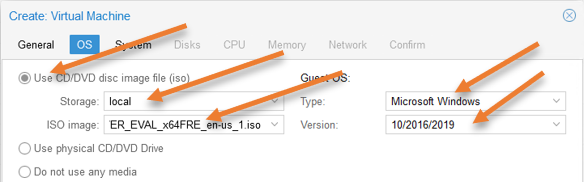
In the OS configuration, choose Use CD/DVD image file and select the Windows server disk image file we uploaded in the ISO image.
Guest OS:
Type: Microsoft windows
Version: You can see that Proxmox supports almost all the versions of windows servers. We are going to choose 10/2016/2019 as we will install windows server 2019.
Leave everything default on the System configuration and click on Next.
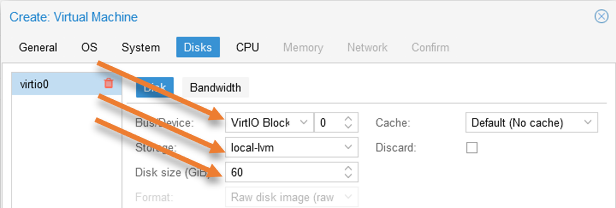
Windows Server virtual disk configuration.
In the disk configuration;
Bus/Device: Choose VirtIO Block.
Disk Size: By default, Proxmox would choose 32GB of storage, the absolute minimum recommendation from Microsoft. So I am choosing 60GB of storage for my Virtual machine.
Click on Next.
CPU configuration.
I am choosing 2 CPUs for my Windows Server. Hence under cores, pick 2 and click on Next.

Memory configuration.
2GB of default memory is acceptable; however, I am choosing 4GB of Ram based on my requirement. So you may decide based on your need. And click on Next.

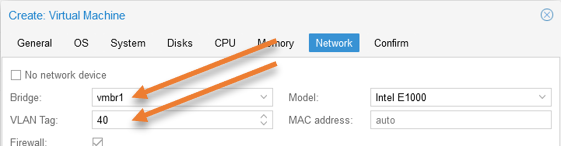
Network configuration.
Every Proxmox network setup would be different. In my setup, vmbr0 is the management network for the Proxmox Server, and the vmbr1 with VLAN 40 is for the VM traffic. The interface that connects to the Proxmox Server is configured as a trunk allowing VLAN 40. You can learn more about the VLAN tagging configuration in Proxmox Server here.
If you are using multiple interfaces and planning to use them as a bond, you may check the article here to learn more.
In your setup, you may not be using VLAN, so based on your configuration, make a choice.
Bridge: Choose the bridge interface for the VM traffic.
VLAN tag: You may specify the VLAN tagging here if you are using VLAN tagging.
Firewall: If you are not using any firewall as a VM in your Proxmox, you may leave the default firewall option checked.
Click on Next.
You will get a summary of the configuration. Ensure the Start after created option is unchecked because we need to add virtio driver iso to the windows server VM.
Click on Finish.
Attach the VirtIO driver.
You can now see the window server virtual machine added into the Proxmox Server, and you may choose the virtual machine and click on Hardware-> Add-> CD/DVD Drive.

In the pop-up, choose Use CD/DVD disk image file.
Storage: Local
ISO image: Choose the iso image we uploaded and click on Create.
Start the windows server installation in Proxmox.
Select the virtual machine-> Console
Click on Start to start the virtual machine.
You will get a message that reads, press any key to boot from cd/DVD
You may press any key.
The windows server installation screen appears with loading files. After a few seconds, the windows server installation wizard will appear.
Choose the Language, time, and Keyboard layout and click on Next.
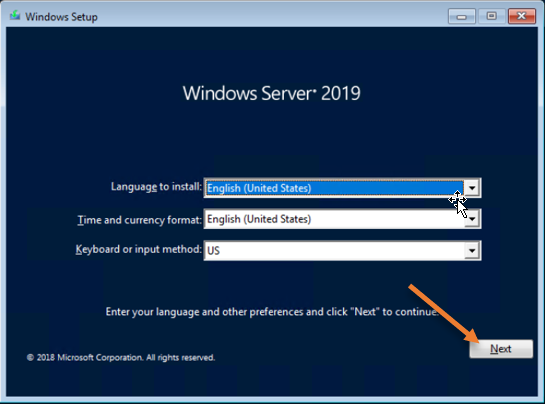
Click on Install Now.
Choose the operating system version and click on Next.
Here you need to choose what version of the Server you would want. Whether it is CLI-based or GUI-based, you may choose the version without Desktop experience if you want only CLI access.
If you want GUI access, you would need to choose Desktop experience.
Accept the license agreement.
Choose the Custom install option.
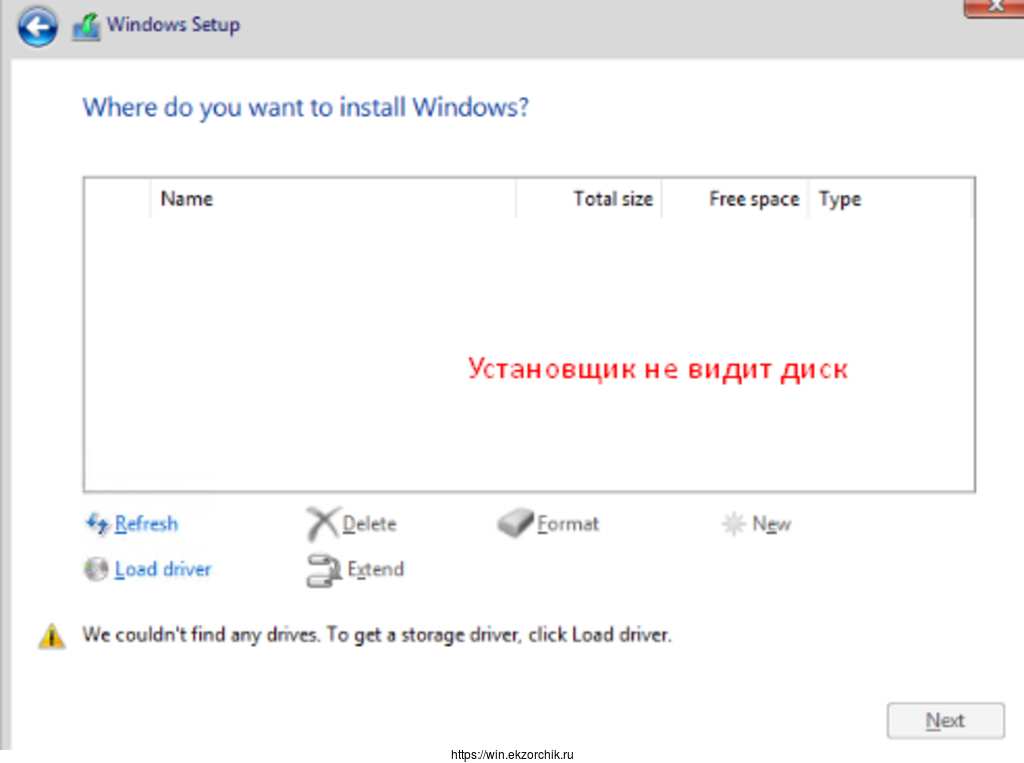
Configure the virtual hard disk in the windows server installation wizard.
As you can see, there is no virtual hard disk for the windows server to install the operating system even though we defined it under Proxmox.
That’s because windows don’t have a driver to detect the virtual hard disk in the Proxmox.
Click on Load driver.
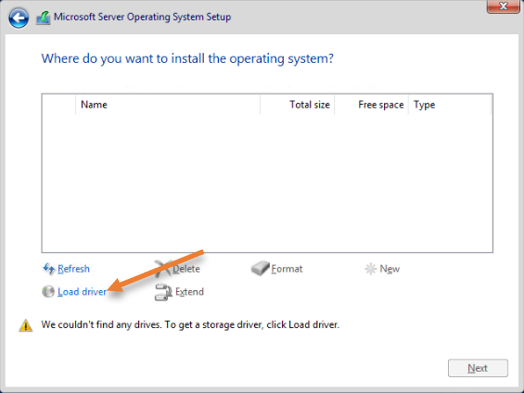
In the pop-up, click on OK.
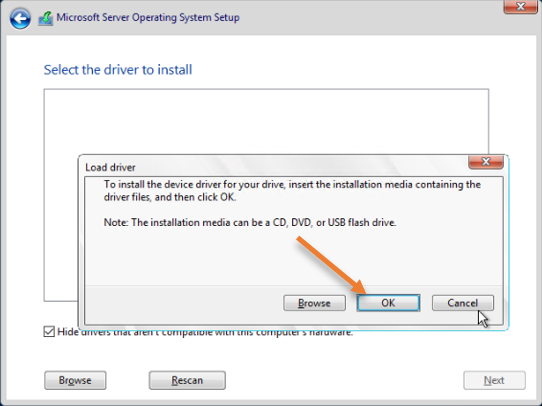
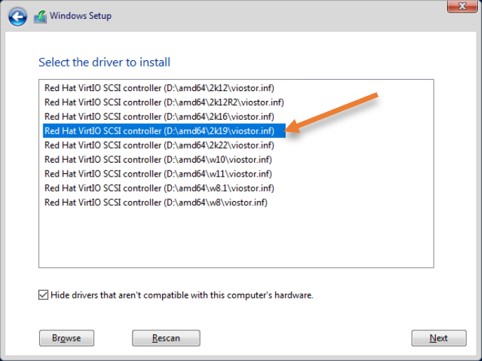
After a few seconds, you will get an option to select the driver to install.
From the list, choose the 2019 windows server driver. If you are using 2016, you may select that version instead and click on Next.
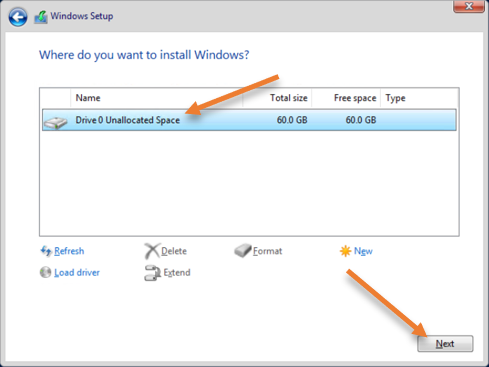
You can now see the hard disk we allocated in the Proxmox Server, choose the hard disk and click on Next.
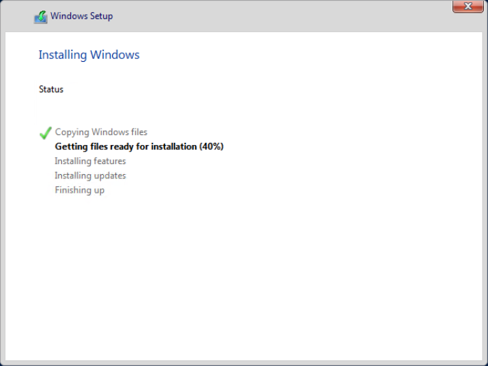
The installation will begin, and the process will take some time to finish.
Set the password for the Administrator.
After the installation is finished, the VM will reboot a couple of times, and once done. It will ask you to set the administrator password.
Once you set the admin password, you may click on finish.
If you have selected the CLI version, you will get a CLI prompt to change the password.

Log in to the windows server.
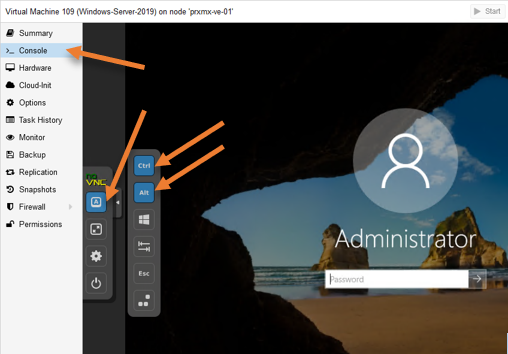
You will be taken to the windows logon screen, where it will ask you to press ctrl+alt+del, if you are using a Windows PC and when you press that, it will take you to windows PC settings.
So in Console, you may click on the A icon and select Ctrl and Alt from the submenu. While it is selected, you may click on Delete on your keyboard.
You will get a prompt to enter the password now. You cannot enter the password until you unselect Ctrl and Alt buttons in the VLC.
Unselect them and enter the password, and it should let you log in.
Install the KVM guest agent.
Finally, we need to install the KVM guest agent on the windows machine.
Open windows explorer and virtual CD/DVD drive -> Guest Agent -> Double click on the qemu-ga-x86_64 to install the guest agent driver.
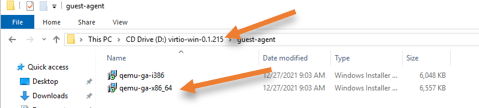
Once the installation of the guest agent is finished, you may go ahead and reboot the Windows Server.
And there you have it. We have now successfully installed windows server 2019 on the Proxmox VE server.
You can now configure an IP address and enable RDP on the VM to access from outside Proxmox network.
This post is about creating a template for Windows Server 2019 on Proxmox, selecting some default settings and deploying a first VM from that template.
Warning:
This article is not meant for enterprise use. Looking back at this I also think, DefProf didn’t work with the Administrator user.
Base configuration
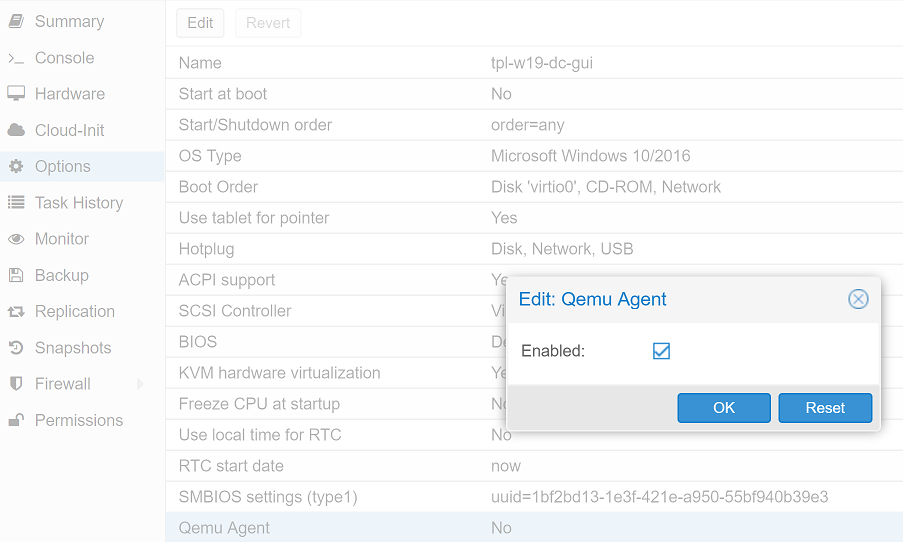
To create a new VM on Proxmox we first need to select a name. As this will be a Windows Server 2019 Datacenter template with desktop experience, I will call it tpl-w19-dc-gui.
We will use a little more than the minimum system requirements for Windows Server 2019:
- 2 CPU cores
- 1 GB RAM (you might wish to set this a little higher as the configuration below can get really slow)
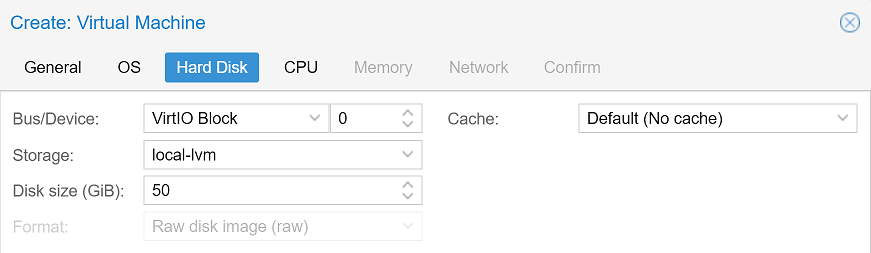
- 50 GB disk space
As our first disc image file we will select the installation ISO for Windows Server 2019 datacenter. Selecting Windows 10/2016 as Guest OS is fine for now.
In the next step we select the VirtIO Block as our VMs harddisk device to get a better performance — which requires the VirtIO drivers, which we will install in the next step.
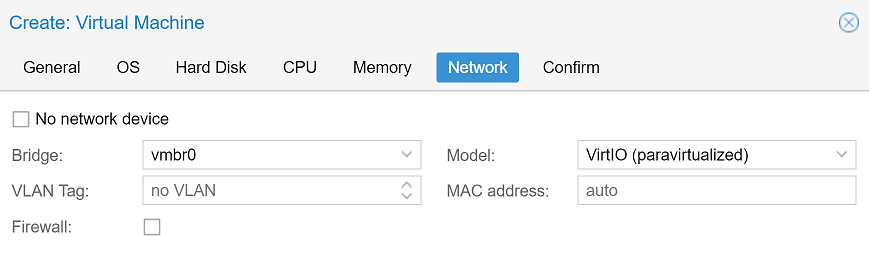
We can now set our CPU cores to 2 and the RAM to 1 GB. For the network device we will change the model to VirtIO (paravirtualized).
The configuration of the VM is now nearly finished. The last step is to activate the QEMU Guest Agent:
VirtIO drivers
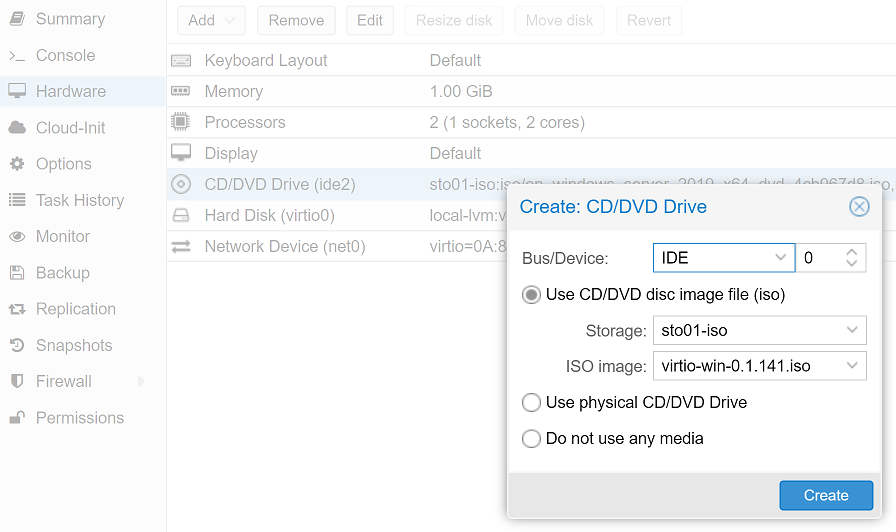
To get the VirtIO devices working and some more performance in the OS we need the corresponding drivers (disk, network adapter and balloon driver). The VirtIO bundle also contains the QEMU Guest Agent which allows better integration of the guest OS with QEMU/Proxmox. The VirtIO-win Repository contains a dynamic link to the current stable release of VirtIO. At time of creation of this post the current version was VirtIO-win 0.1.141 which will be used from here on.
To install the OS to our VirtIO harddisk, the corresponding driver needs to be available. Therefore we just add another DVD drive with the VirtIO ISO.
Windows installation
The VM is now prepared and can be started. The installation process will start automatically. Select the desired locale settings and click Install now. Insert your product key (you will have to insert it again after every deployment, but you need an activated version for some settings). You could use KeePasses Auto-Type function to insert the key through the console automatically.
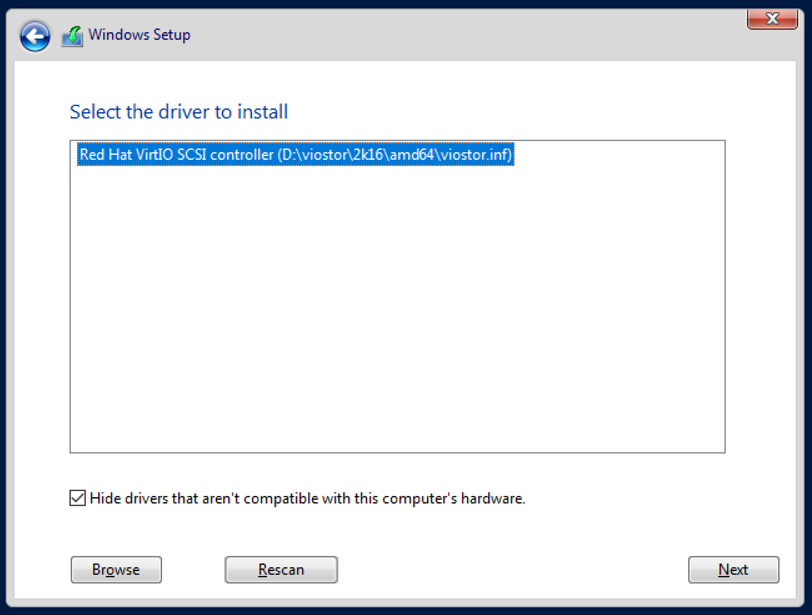
Select your version of Windows Server 2019. For this post I’ll go with Windows Server 2019 Datacenter (Desktop Experience). Select the custom installation option. There will be no drives displayed as we are missing the required drivers. We can load them from our VirtIO ISO using the Load driver option. Select the correct driver using Browse. The storage driver is located at <CD-Drive>:/viostor/2k16/amd64 — yes, you need to select this exact folder.
Click Next and the hard disk will appear. Next again and let Windows take care of the installation process. To set a strong default password, you can use KeePasses Auto-Type again.
Driver and Guest Agent installation
When the installation has finished, we can login with the previously set password. Now the other VirtIO drivers need to be installed. Open up the device manager and select Update driver for each device with an exclamation mark. Browse for the VirtIO CD-drive and let Windows search and install the right drivers each time.
At time of writing the guest agents on the VirtIO ISO are not up-to-date enough for Windows Server 2019. The latest version of QEMU Guest Agent can be found in the VirtIO-win Repository as above. Download and install from there.
Windows Updates
This is the point where you should start searching for and installing Windows Updates. You should check this process multiple times during the customization and again at the end. If you want to override some of the default Update policies, you can do so with local GPOs at Computer Configuration / Administrative Templates / Windows Components / Windows Update.
Customization and default settings
There are a few things you might want to change in your template, some of which could also be set via domain GPO. Here are some ideas:
- Enable RDP:
- Inside the Server Manager select
Local Server. SelectRemote desktopand set it toAllow remote desktop connections to this computer.
- Inside the Server Manager select
- Enable Telnet Client:
- Inside the Server Manager select
Local Server. Scroll down toRoles and Features, click onTasks > Add roles and features. Install the featureTelnet Client.
- Inside the Server Manager select
- Disable IE Enhanced Security Configuration:
- Inside the Server Manager select
Local Server. On the right hand side selectIE Enhanced Security Configuration.
- Inside the Server Manager select
- Disable Server Manager:
- Inside the Server Manager go to
Manage > Server Manager Properties. SelectDo not start Server Manager automatically at logon.
- Inside the Server Manager go to
- Set Windows Explorer to display file extensions.
You can find more recommendations on default Windows Server settings on Google, most simple settings for Windows Server 2016 work on 2019 just fine.
Now is the time to install some often needed tools. Here are some ideas:
- Install Windows Admin Center from http://aka.ms/WACDownload
- Install Chocolatey
choco install 7zipchoco install notepadpluspluschoco install sysinternals
- …
Final steps
To keep all those custom settings the default profile needs to be changed as our current user will be deleted. We can use a tool called DefProf for that. Create a new temporary user if you have been using the Administrator till now and use that one to run defprof Administrator. If you were using a different user, switch to the Administrator and run defprof <username>.
Check Windows Updates again, then clear the event logs using wevtutil el | Foreach-Object {wevtutil cl "$_"}.
Run C:\Windows\System32\Sysprep\sysprep.exe, select Enter System Out-of-Box Experience (OOBE), Generalize and Shutdown.

When the system has shut down
- remove the second CD drive,
- reset the other one to
Do not use any media, - right click the VM in Proxmox and select
Convert to template.
Deploying
To deploy the first VM from the template, just right click it and select Clone. When the cloning process has finished, boot the system. You will be asked for your license key and the new Administrator password, that’s it.
When the system is finally up, just issue these last commands, install Windows Updates and reboot the System.
Rename-Computer <hostname>choco upgrade all -y
You can do the last steps completely via Windows Admin Console, by the way.
Links
- https://wiki.archlinux.org/index.php/QEMU#Preparing_a_Windows_guest
- https://docs.microsoft.com/de-de/windows-server/manage/windows-admin-center/overview