Introduction
This is a set of best practices to follow when installing a Windows Server 2016 guest on a Proxmox VE server 6.x.
Install
Prepare
To obtain a good level of performance, we will install the Windows VirtIO Drivers during the Windows installation.
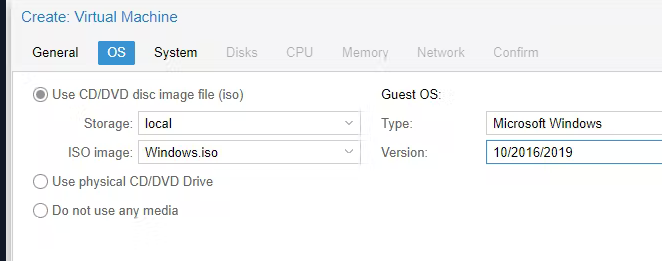
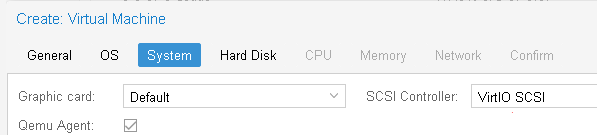
- Create a new VM, select «Microsoft Windows 10/2016/2019» as Guest OS and enable the «Qemu Agent» in the System tab. Continue and mount your Windows Server 2016 ISO in the CDROM drive
- For your virtual hard disk select «SCSI» as bus with «VirtIO SCSI» as controller. Set «Write back» as cache option for best performance (the «No cache» default is safer, but slower) and tick «Discard» to optimally use disk space (TRIM).
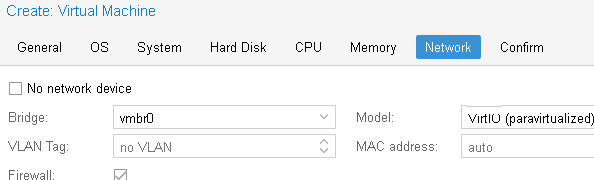
- Configure your memory settings as needed, continue and set «VirtIO (paravirtualized)» as network device, finish your VM creation.
- For the VirtIO drivers, upload the driver ISO (use the stable VirtIO ISO, download it from here) to your storage, create a new CDROM drive (use «Add -> CD/DVD drive» in the hardware tab) with Bus «IDE» and number 0. Load the Virtio Drivers ISO in the new virtual CDROM drive.
- Now your ready to start the VM, just follow the Windows installer.
- Note for Older Version of Windows like Windows-2012 (use the stable older version of VirtIO ISO — virtio-win-0.1.189.iso, download it from here)
Launch Windows install
- After starting your VM launch the noVNC console
- Follow the installer steps until you reach the installation type selection where you need to select «Custom (advanced)»
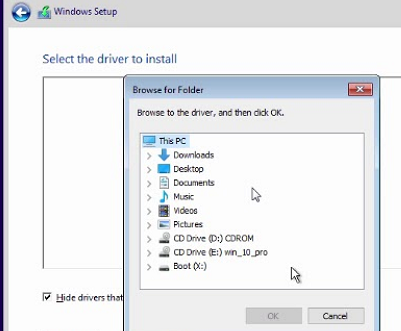
- Now click «Load driver» to install the VirtIO drivers for hard disk and the network.
- Hard disk: Browse to the CD drive where you mounted the VirtIO driver and select folder «vioscsi\2k16\amd64» and confirm. Select the «Red Hat VirtIO SCSI pass-through controller» and click next to install it. Now you should see your drive.
- Network: Repeat the steps from above (click again «Load driver», etc.) and select the folder «NetKVM\2k16\amd64», confirm it and select «Redhat VirtIO Ethernet Adapter» and click next.
- Memory Ballooning: Again, repeat the steps but this time select the «Balloon\2k16\amd64» folder, then the «VirtIO Balloon Driver» and install it by clicking next. With these three drivers you should be good covered to run a fast virtualized Windows Server 2016 system.
- Choose the drive and continue the Windows installer steps.
HINT: There is a video showing the process for a Windows Server 2016 installation which is the same as for Windows Server 2016.
Install Guest Agent and Services
Guest Agent
If you enabled the Qemu Agent option for the VM the mouse pointer will probably be off after the first boot.
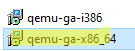
To remedy this install the «Qemu Guest Agent». The installer is located on the driver CD under guest-agent\qemu-ga-x86_64.msi.
Drivers and Services
VirtIO guest tools installer
The easiest way to install missing drivers and services is to use the provided MSI installer. It is available on the driver CD since version «virtio-win-0.1.173-2».
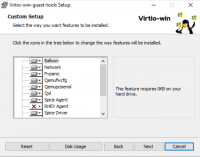
Run the «virtio-win-gt-x64.msi» file located directly on the CD. If you do not plan to use SPICE you can deselect the «Qxl» and «Spice» features. Restart the VM after the installer is done.
After all this the RAM usage and IP configuration should be shown correctly in the summary page of the VM.
For more information and configuration about ballooning, see Dynamic Memory Management
Check for missing drivers
- See also: Paravirtualized Block Drivers for Windows
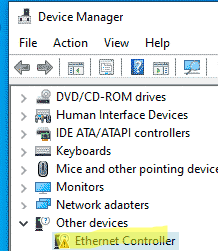
Unknown device in device manager
Make sure to include subfolders
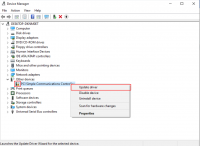
Go to the Device Manager to see if there are any drivers missing.
For any unknown device:
- Right click an select «Update driver».
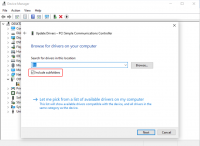
- Select «Browse my computer for driver software».
- Select the Driver CD. Make sure that «Include subfolders» is checked.
- Once a driver has been found you might be prompted with a security warning asking if you «Would like to install this device software». Click «Install».
Installing WSL(g)
To run WSL (Windows Subsystem for Linux) you need to enable Nested Virtualization. Make sure to set your processor to ‘host’; if you already set up your VM and did not select ‘host’ as processor, you can change it in the ‘Hardware’ section of your VM in the web interface.
Follow the official instructions.
If you are using a GPU via PCI(e) passthrough, you might need to add
args: -cpu host,kvm=off
to your config file at /etc/pve/qemu-server/<vm_id>.conf, see the vfio blog
Further information
Disk-Image Format: raw vs qcow2
Raw file format provides slightly better performance while qcow2 offers advanced features such as copy on write and Live_Snapshots.
Since V2.3, qcow2 is the default format.
VirtIO drivers
Make it really easy: Build your ISO with drivers already included:
Windows guests — build ISOs including VirtIO drivers
Latest iso with VirtIO drivers :
https://fedorapeople.org/groups/virt/virtio-win/direct-downloads/latest-virtio/
See also
Windows 2012 guest best practices
Windows 10 guest best practices
stage drivers locally
# display available drives
Get-PSDrive

# create local driver directory
mkdir c:\drivers

# copy drivers from media to local directory
Copy-Item D:\vioscsi\2k16\ -Destination C:\drivers\vioscsi\2k16 -Recurse
Copy-Item D:\NetKVM\2k16\ -Destination C:\drivers\NetKVM\2k16 -Recurse
Copy-Item D:\Balloon\2k16\ -Destination C:\drivers\Balloon\2k16 -Recurse
Copy-Item D:\vioserial\2k16\ -Destination C:\drivers\vioserial\2k16 -Recurse
Copy-Item D:\guest-agent\ -Destination C:\drivers\guest-agent -Recurse
implement drivers
# go to local directory with drivers
Set-Location C:\drivers

# install drivers
pnputil -i -a C:\Drivers\NetKVM\2k16\amd64\*.inf
pnputil -i -a C:\Drivers\Balloon\2k16\amd64\*.inf
pnputil -i -a C:\Drivers\vioserial\2k16\amd64\*.inf

# set up guest agent
Set-Location C:\drivers\guest-agent
.\qemu-ga-x64.msi

Copy-Item C:\drivers\Balloon\2k16\amd64 -Destination 'C:\Program Files\Balloon' -Recurse

Set-Location 'C:\Program Files\Balloon'
blnsvr.exe -i
Enable remote powershell sessions
on the win2k16 core server
# view current list of trusted hosts
Get-Item wsman:\localhost\client\trustedhosts

# add remote computer that will be connecting to core server
Set-Item wsman:\localhost\client\trustedhosts -Value <hostname or ip>
on the computer wanting to connect to the win2k16 core server
# enable psremoting if not in a domain
Enable-PSRemoting

# view current list of trusted hosts
Get-Item wsman:\localhost\client\trustedhosts

# add remote core server that you want to connect to
Set-Item wsman:\localhost\client\trustedhosts -Value <hostname or ip>
launch pssession from computer to server core
Enter-PSSession -ComputerName <server core ip or hostname> -Credential <server core username>
Citations
- YouTube — Install Windows 2016 on Proxmox VE
- MSDN Microsoft — Powershell Core about_remote_troubleshooting
- TechNet Microsoft — Windows Server — Windows Powershell Access Denied when trying to set Trusted hosts for PSRemoting
Skip to content

Alice AUSTIN
15 Comments
Container, KVM, Linux, lxc, opensource, proxmox, proxmoxve, qemu, SCSI, server, virtio, Virtual, virtualization, VM, Windows 2016, zfs
The video demonstrates step by step a Windows 2016 server installation on Proxmox VE.
source
windows server
- ASA Techies – Our New CCNA (200-301) Online Training Program!
- UBUNTU update 20.10

Alice AUSTIN
Alice AUSTIN is studying Cisco Systems Engineering. He has passion with both hardware and software and writes articles and reviews for many IT websites.
You May Also Like
Leave a Reply
В данной инструкции мы рассмотрим установку Windows Server 2019 на Proxmox.
Нужна помощь? Настройки Windows Server и обслуживание серверов мы осуществляем в рамках услуги ИТ-аутсорсинг. Также возможны разовые проектные работы.
- На ранее подготовленный сервер Proxmox заходим по адресу: https://ip-Proxmox:8006. Вводим учетные данные и входим.
- Далее нажимаем “Загрузить” и выбираем подготовленный образ с Window Server 2019.
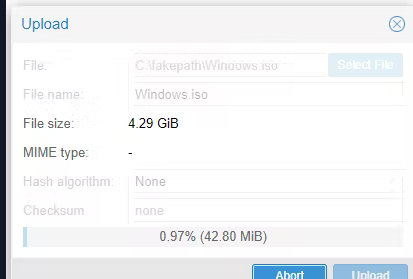
- Затем еще раз нажимаем “Загрузить”, происходит процесс загрузки iso-установщика в библиотеку образов Proxmox. Когда образ загружен, можно приступить к созданию виртуальной машины. Нажимаем правой кнопкой мыши на наш сервер и в выпадающем меню выбираем “Создать VM”.
- Далее приступаем непосредственно к настройке параметров виртуальной машины. Выбираем узел, на котором будет размещаться виртуальная машина и вводим её имя, нажимаем “Далее”.
- В данной вкладке выбираем нужный нам образ системы, тип и версию ОС, нажимаем “Далее”.
- В следующей вкладке “Система” оставляем по умолчанию и нажимаем “Далее”. Затем выбираем формат диска виртуальной машины и размер диска, нажимаем “Далее”.
- На следующих 2-х этапах выбираем количество ядер и оперативной памяти, требуемых нашей виртуальной машине, “Далее”. Затем выбираем сетевые настройки, в данном случае выбираем сетевой мост, тем самым сеть на ВМ будет такой же, как на и на самом сервере Proxmox, “Далее”.
- На последнем этапе создания ВМ, проверяем настройки и в подтверждение нажимаем “Далее”.
- Виртуальная машина создана. Выбрав нашу виртуальную машину в просмотре сервера можно просмотреть “Сводку” по ней.
- Перейдем в консоль и запускаем виртуальную машину, при запуске начнется подготовка к установке ОС, далее выбираем нужную редакцию ОС и начинаем установку.
- Установка Windows Server 2019 на Proxmox завершена.

Рисунок 1 — Вызов панели для создания виртуальной машины

Рисунок 2 — Выбор узла и ввод имени виртуальной машины

Рисунок 3 — Выбор ISO-образа для установки на виртуальную машину

Рисунок 4 — Выбор формата и размера диска

Рисунок 5 — Настройка сети виртуальной машины

Рисунок 6 — Подтверждение выбранных настроек

Рисунок 7 — Сводка по созданной виртуальной машине
Не нашли ответа на свой вопрос?
Закажите звонок специалиста!
Закажите звонок специалиста!
В этом статье мы покажем, как развернуть виртуальную машину и устанавливать на нее Windows 10/11 на гипервизоре Proxmox Virtual Environment.
Сначала вам нужно:
- Скачать Windows Media Creation Tool (https://www.microsoft.com/en-us/software-download/windows10) и создать ISO файл с установочным образом Windows;
- Также скачайте ISO образ с драйверами VirtIO для WIndows (https://fedorapeople.org/groups/virt/virtio-win/direct-downloads/stable-virtio/virtio-win.iso). Это набор паравиртуализированных драйверов для KVM/Linux, который обеспечит более высокую производительность виртуальных устройств, чем встроенные эмулированные драйвера
Загрузите оба iso файла в хранилище PVE.
Теперь нужно создать новую виртуальную машину Proxmox для развертывания гостевой Windows.
- Откройте веб интерфейс управления Proxmox VE (WAC) и нажмите кнопку Create VM;
- Укажите имя ВМ;
- Затем перейдите на вкладку OS и ваш установочный ISO образ Windows 10, который вы загрузили ранее. Proxmox должен автоматически определить тип ОС в образе и указать тип гостевой ОС виртуальной машины (Microsoft Windows version 10/2016/2019);

- Перейдите на вкладку System и включите опцию Qemu Agent и выберите тип контроллера дисков VirtIO SCSI;

- Затем перейдите на кладку Hard Disk и настройте параметры диска виртуальной машины (Bus/Device: SCSI (по умолчанию используется IDE), Storage: выберите хранилище ProxMox где будет хранится виртуальный диск, укажите размер виртуального диска (не менее 25 Гб). Здесь можно выбрать один из двух типов виртуальный дисков raw (лучшая производительностью) или qcow2 (расширенный функционал и поддержка снапшотов). Также вы можете пробросить физический диск или USB флешку в виртуальную машину Proxmox VE. Здесь можно включить опцию кэширования Write back ->Discard. Это увеличит быстродействие, но есть некоторые риски потери данных;
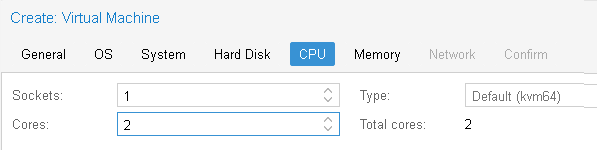
- На вкладке CPU и Memory укажите количество ядер виртуальной машины вы хотите выделить (не менее 2 vCPu типа kvm64) и размер оперативной памяти (не менее 2Гб);

- Перейдите на вкладку network. Выберите тип виртуальной карты VirtIO (paravirtualized) вместо Intel E1000. Отключите опцию Firewall, если вы будете использовать встроенный Windows Defender Firewall в гостевой ОС;

- Проверьте настройки и нажмите Finish чтобы создать ВМ;
- После того, как вы создали новую виртуальную машину в Proxmox для Windows, откройте ее настройки и добавьте еще один CD/DVD привод. Подключите в него ISO файл с VirtIO драйверами;
- Запустите ВМ, нажав Start. Нажмите кнопку Console чтобы открыть экран виртуальной машины;
- Установка Windows должна запуститься автоматически;
- Windows Setup не сможет найти диски вашей ВМ. Поэтому вам нужно загрузить VirtIO драйвера контроллера;
- Нажмите кнопку Load Driver и укажите путь к каталогу \amd64\w10\ на диске с драйверами VirtIO;

- Установите драйвер Red Hat VirtIO SCSI pass-throught controller (NetKVM\w10\amd6\vioscsi.inf);
- После установки драйвера установщик Windows увидит ваш диск, и вы сможете продолжить установку;
- После окончания установки Windows 10 в виртуальную машину, нужно установить драйвера VirtIO для сетевой карты и других устройств. Для этого откройте диспетчер устройств Windows (devmgmt.msc). Найдите в списке неизвестные устройства. Щелкните по устройству и выберите Update Driver -> Browse my computer for driver software и укажите путь к диску с драйверами VirtIO. Вам нужно установить как минимум следующие драйвера Redhat VirtIO Ethernet Adapter (\NetKVM\w10\amd64), VirtIO Balloon Driver (\Balloon\w10\amd64) Подробнее это описано в статье Установка драйверов KVM VirtIO в виртуальной машине Windows;

- После установки всех драйверов установите VirtIO Агент (\guest-agent\quemu-ga-x86_64.msi)

- Запустите установку virtio-win-gt-x64.msi из корня диска. Укажите драйвера и службы, которые нужно установить дополнительно.
На этом настройка виртуальной машины Windows 10 на Proxmox закончена. Вы можете продолжить настройку параметров Windows в гостевой ОС (имя компьютера, параметры сетевого подключения, установить необходимые программы, добавить в домен Active Directory и т.д.)