Installing Windows though QEMU-KVM on servers without KVM or IPMI
Credits : https://blog.rodney.io/2016/06/installing-windows-though-qemu-kvm-on-servers-without-kvm-or-ipmi
Windows Server 2019 (ENG): http://mirror.hetzner.de/bootimages/windows/SW_DVD9_Win_Server_STD_CORE_2019_1809.11_64Bit_English_DC_STD_MLF_X22-51041.ISO
Windows Server 2016 (ENG): http://mirror.hetzner.de/bootimages/windows/SW_DVD9_Win_Server_STD_CORE_2016_64Bit_English_-4_DC_STD_MLF_X21-70526.ISO
Windows Server 2012 R2 (ENG): http://mirror.hetzner.de/bootimages/windows/SW_DVD9_Windows_Svr_Std_and_DataCtr_2012_R2_64Bit_English_-4_MLF_X19-82891.ISO
This tutorial is loosely based on this one. It uses the same portable QEMU-KVM binaries but has more information as well as additional steps that I needed to take when I used this method of installing an OS
Introduction
This Tutorial aims to provide you with a step-by-step guide to install Windows from an ISO on a server that does not feature KVM (iDRAC, iLO, etc.) but has a rescue system available.
TL;DR
mount -t tmpfs -o size=6000m tmpfs /mnt && \
  wget -O /mnt/windows.iso http://mirror.hetzner.de/bootimages/windows/SW_DVD9_Win_Server_STD_CORE_2016_64Bit_English_-4_DC_STD_MLF_X21-70526.ISO && \
  wget -qO- /tmp https://cdn.rodney.io/content/blog/files/vkvm.tar.gz | tar xvz -C /tmp && \
  /tmp/qemu-system-x86_64 -net nic -net user,hostfwd=tcp::3389-:3389 -m 2048M -localtime -enable-kvm -cpu host,+nx -M pc -smp 2 -vga std -usbdevice tablet -k fr -cdrom /mnt/windows.iso -hda /dev/sda -boot once=d -vnc :1
Prerequisites
- A Windows ISO
- A Server with a Linux-based «Rescue System» available
- Enough RAM to store the ISO OR a secondary hard drive
- A SSH and VNC Client
- Basic knowledge about advanced Windows settings
Part 1 — Getting the rescue system ready
First you want to boot into the rescue system, in case of Hetzner and Webtropia its as easy as pressing a button in the web interface. You’ll get a root password to login into the rescue system.
Now create a RAM disk for the Windows ISO:
mount -t tmpfs -o size=6000m tmpfs /mnt
My ISO is about 4.8 GB big and fits compfortably into the 32 GB RAM my server has, if you don’t have enough RAM but a second hard drive available you can use that instead.
Now download the Windows ISO, in my case it sits on a FTP(s) server that require sauthentication so I download it like this:
curl -u 'user:pw' -k --ftp-ssl 'ftp://host//ISOs/en_windows_server_2012_r2_with_update_3_x64_dvd_6052708-MAY.2016.iso' -o /mnt/windows.iso
If your host offers a repository with ISOs (such as Hetzner) you can also use wget to download the ISO:
wget -O /mnt/windows.iso http://mirror.hetzner.de/bootimages/windows/SW_DVD9_Win_Server_STD_CORE_2016_64Bit_English_-4_DC_STD_MLF_X21-70526.ISO
After that finishes it’s time to download the portable QEMU-KVM version:
wget -qO- /tmp https://cdn.rodney.io/content/blog/files/vkvm.tar.gz | tar xvz -C /tmp
If your server has a main hard drive > 2TB and boots through UEFI you can use the UEFI BIOS for QEMU:
wget -qO- /tmp https://cdn.rodney.io/content/blog/files/uefi.tar.gz | tar xvz -C /tmp
However none of the servers I tested so far used UEFI to boot despite having harddrives over 2 TB.
Part 2 — Installing Windows
Now you can start QEMU-KVM and start the installation:
/tmp/qemu-system-x86_64 -net nic -net user,hostfwd=tcp::3389-:3389 -m 2048M -localtime -enable-kvm -cpu host,+nx -M pc -smp 2 -vga std -usbdevice tablet -k fr -cdrom /mnt/windows.iso -hda /dev/sda -boot once=d -vnc :1
Or for UEFI systems:
/tmp/qemu-system-x86_64 -bios /tmp/uefi.bin -net nic -net user,hostfwd=tcp::3389-:3389 -m 2048M -localtime -enable-kvm -cpu host,+nx -M pc -smp 2 -vga std -usbdevice tablet -k fr -cdrom /mnt/windows.iso -hda /dev/sda -boot once=d -vnc :1
Once you’ve started the VM you can connect to your-ip:1 using VNC and go through the graphical installer.
After installing Windows it will boot and allow you to create a User etc. Windows is now installed but not quite ready yet.
Part 3 — Configuring Windows
Basic (required) configuration
- Enable RDP
- Disable Firewall
You can now test the RDP connection by connecting to your-ip, the QEMU switches we used forward that port. The second step is required because Windows will recognize the real network connection of the server as a new network on startup and block RDP by default. By disabling it RDP will stay available, you can enable the firewall again after logging in and allowing RDP through the firewall on the new network.
If your server uses a NIC that is supported by Windows without any additional drivers (i.e. Intel NICs) and your provider uses DHCP you’re now done, shut down the VM and disable the rescue system, then reboot. This was the case with my Hetzner box.
My Webtropia box uses a Realtek NIC and static IP configuration and required further configuration:
Additional drivers
Find out what NIC your server uses using the rescue system, you can use one of the following commands to find out:
$ lspci | egrep -i --color 'network|ethernet'
$ lshw -class network
In my case the result was RTL8111/8168/8411 PCI Express Gigabit Ethernet Controller. I just searched for the driver and downloaded it from the Realtek website and installed it through the grapical installer. I got an error that the NIC wasn’t installed but you can just ignore that. Windows will load and install the driver after booting.
Static Network configuration
In my case I got the following information from my provider:
IP Address:     37.XXX.XXX.183
Gateway:        37.XXX.XXX.129
Netmask:        255.255.255.192 (/26)
I cannot set those within the VM since the network adapter is not connected yet. So in order to set this configuration after the server reboots into windows I have to create a startup script that sets those values on the new NIC. This can be done with a simple batch script:
netsh interface ipv4 set address name="REAL INTERFACE NAME HERE - E.G : Ethernet" static 37.XXX.XXX.183 255.255.255.192 37.XXX.XXX.129
** You need to use your real interface’s name instead of «REAL INTERFACE NAME HERE — E.G : Ethernet». You can list them with netsh interface show interface. **
Order of parameters is IP, Netmask, Gateway.
This is anticipating that the new network connection will be called «Ethernet 2» which is the default on an english windows installation, you might have to adjust this based on your locale.
This single line can now be saved as C:\startup.bat and added as a startup script in gpedit.msc under «Computer Configuration»->»Windows Settings»->»Scripts (Startup/Shutdown)».
You can now reboot.
Part 4 — Finishing Touches
After rebooting and (hopefully) getting into your new machine you will be asked wether or not the new network is private or public, I choose public. After that you can configure your firewall to allow RDP and re-enable it again.
Finally remove the startup script (if any) and add DNS servers to your static configuration (if any).
You have now finished the installation, congratulations!
Part 5 — Troubleshooting, Tips and Tricks
If you server doesn’t boot you can use QEMU-KVM to boot the installation on your disk, this allows you to troubleshoot and avoid reinstalling windows again if you made a mistake.
TL;DR
mount -t tmpfs -o size=6000m tmpfs /mnt && \
  wget -qO- /tmp https://cdn.rodney.io/content/blog/files/vkvm.tar.gz | tar xvz -C /tmp && \
  /tmp/qemu-system-x86_64 -net nic -net user,hostfwd=tcp::3389-:3389 -m 2048M -localtime -enable-kvm -cpu host,+nx -M pc -smp 2 -vga std -usbdevice tablet -k fr -hda /dev/sda -boot c -vnc :1
Download the portable QEMU again and start your VM from disk like this:
/tmp/qemu-system-x86_64 -net nic -net user,hostfwd=tcp::3389-:3389 -m 2048M -localtime -enable-kvm -cpu host,+nx -M pc -smp 2 -vga std -usbdevice tablet -k fr -hda /dev/sda -boot c -vnc :1
Or with UEFI:
/tmp/qemu-system-x86_64 -bios /tmp/uefi.bin -net nic -net user,hostfwd=tcp::3389-:3389 -m 2048M -localtime -enable-kvm -cpu host,+nx -M pc -smp 2 -vga std -usbdevice tablet -k fr -cdrom /mnt/win8-64.iso -hda /dev/sda -boot c -vnc :1
Freelancing is a fantastic thing. If you are a freelancer or looking to become a freelancer, brace yourself to all sorts of amazing stuff.
Yeah, I mean it!
This detailed guide on How to Install Windows on a Hetzner dedicated server will help you to understand the need for a dedicated server as a freelancer. Also, this guide will help you to Install Windows on your Hetzner dedicated server.
Table of Contents
Why I needed a Hetzner Dedicated Server?
Okay, first things first.
Now you may wonder why I needed a dedicated server in the first place. I’m not a huge tech guy. And I’m not in sever management business at all.
Yet, I needed to Install Windows on a Hetzner server.
Like I told you in the beginning, brace yourself to do amazing (Sometimes crazier stuff) if you are a freelancer. Installing Windows on a Hetzner dedicated server is something I crazy I did. And I’m happy I did that.
Speed Matters
Freelance work or telecommute work success depends on many factors. By experiences, I know faster you deliver your work, the happier the clients are, and longer they stay with you as paying clients.
I got this client several years back, how is a realtor. My job is to update his website with all the listings.
He provides all the photos, videos that should upload to his business website. At the same time, he needed to upload those videos to YouTube, Facebook, and Vimeo.
Sounds easy, right?
Yes, all the designated duties are relatively straightforward. Almost anyone can do these.
My poor Internet speed
Like I told you earlier, speed matters. The biggest issue I had and I’m still having it is my network’s speed.
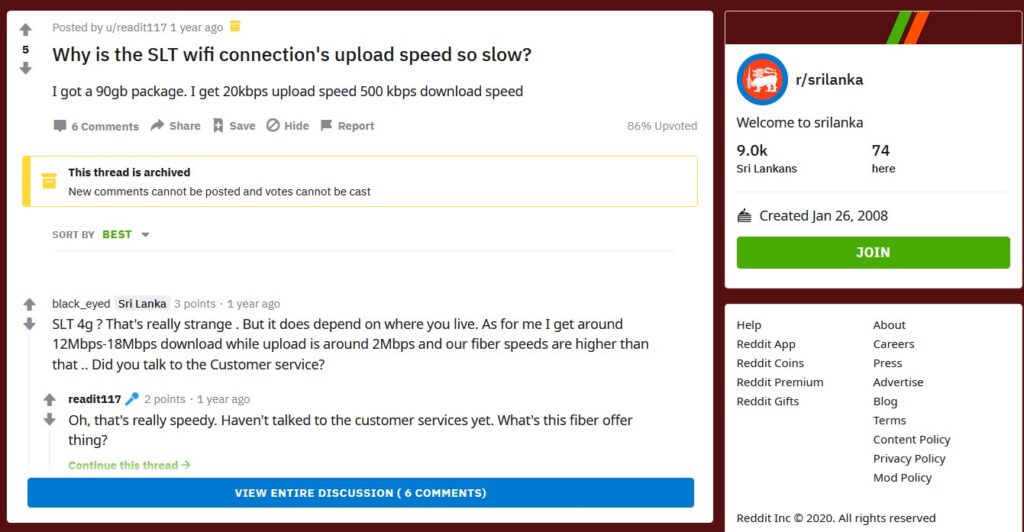
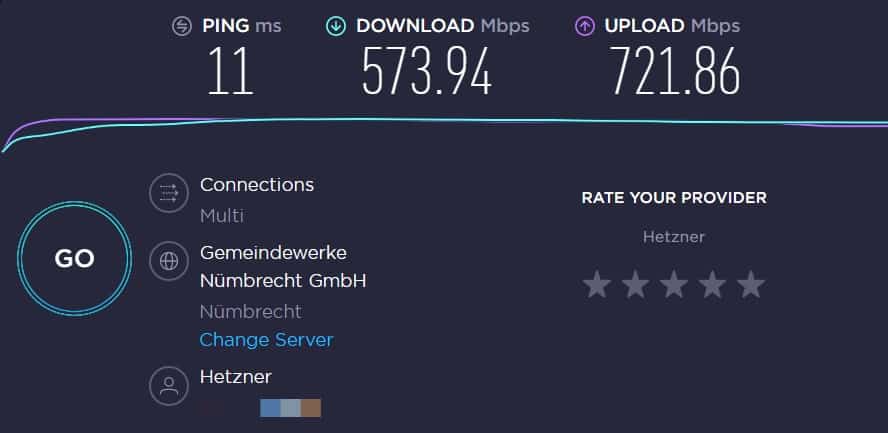
Even my ISP’s downlink is somewhat faster. Still, the Uplink is shi**. Yeah, I mean it. Take a look at this screenshot I took from Reddit. This proves what I just said.
My client shares all the images and videos via Dropbox. And the video files are as bigger as 2GB or higher, and Images are in their highest resolution. They were averagely sized around 20MB.
All I had to do is download those files, do some minor edits and upload them to their designated platforms.
Technically, I had no issues downloading content. Even though the files are enormous, still I was able to download the files in less than an hour. (I know, it is still a considerable time to spare).
The real nightmare is uploading these files to social platforms. Sometimes I had to wait hours till a single video file uploaded to YouTube. And I have to upload all the files to Facebook and Vimeo.
And not to mention that it took several minutes to upload a single image as well.
Yup, I know I could’ve re-sized the images and make them smaller in size while keeping their original quality.
But, the problem is, my client, Insisted on keeping the photo sizes as they were. I tried to convince him. Yet, he needed these massive files uploaded to his website, untouched!
After a couple of attempts to convince him, it was clear he is not going to change. And honoring the client’s requirement is one of the critical elements for freelance success. So I stick with my client’s plan.
I was going to lose the client as I failed to upload the provided content in time.
My client’s business is time-sensitive. Whenever he is scheduled for a listing, it is vital that the property listing is ready on his website, and all the social channels are preloaded with those property videos.
If anything failed in the process, it is highly likely that my client is going to lose hundreds of thousands of money. That is the last thing anyone needs.
So I had to improvise.
I searched everywhere for a solution
Yes, I can not afford to lose a decently paying client for a super easy job. Can I?
So, I reached out to almost all the people I know who might have a single clue to help me get away with this situation. None of them had a proper solution.
I switched my ISP several times. It didn’t work.
All the ISP’s were having the same issue. Even the fastest network in Sri Lanka took forever to upload a video file. I was helpless, and I was going to tell my client that I can’t adhere to the deadline because of my poor Internet connection.
A miracle happened
I’m still wondering how this happened. But I’m happy it happened.
One day morning, I saw an advertisement on Facebook. It was about Dedicated servers and Virtual Private Servers (VPS). As I remember, the ad was from DigitalOcean.
The very thing that caught my eyes was the server speed. I was looking on the internet about those uploading speeds. But never checked for the dedicated servers.
Yet, I’m seeing an advertisement from a company that provides faster, dedicated servers. Pretty amazing, eh! I checked DitigitalOcean’s website, and I was unable to understand how that works.
To me, that was a dead-end! Yet, it gave me the idea to look for a dedicated server.
So, I checked for faster, dedicated servers. I checked it almost everywhere. Not just on Google. I spent more time on forums reading user reviews, comments, etc
So I found that Hetzner is a highly reputed service provider. I found most of that information from LowEndTalk. Then I decided to move forward with a Hetzner Dedicated sever.
What is Hetzner?
If you are wondering what Hetzner is, then Hetzner Online GmbH is a German company, which is specialized in almost all kinds of hosting related activities. It was founded by Martin Hetner back in 1997.
If you check on their website, they provide a vast range of dedicated servers at affordable prices. Depending on your requirement, you can choose the perfect dedicated server for you.
Hetzner Server Auction
But, what really interested me was their Server Auction.
Hetzner Server Auction is the best place I found to buy a powerful dedicated server for the most affordable prices on the internet.
As I’m aware, servers on this auction are not brand-new.
These servers have previously been used, and they placed in this auction. But, the truth is that even though these servers are previously used, they still way better than you can imagine.
Because I’ve been using the same server for almost 2 years now and it is as good as new. And that thing is a beast.
How to buy a dedicated server from Hetzner auction?
As I told you, Hetzner has a massive line of dedicated servers. Their auction is filled with lots of powerful servers.
Depending on your requirement, you can find a cheap dedicated server from Hetzner server auction.
You can find the Hetzner Server auction here.
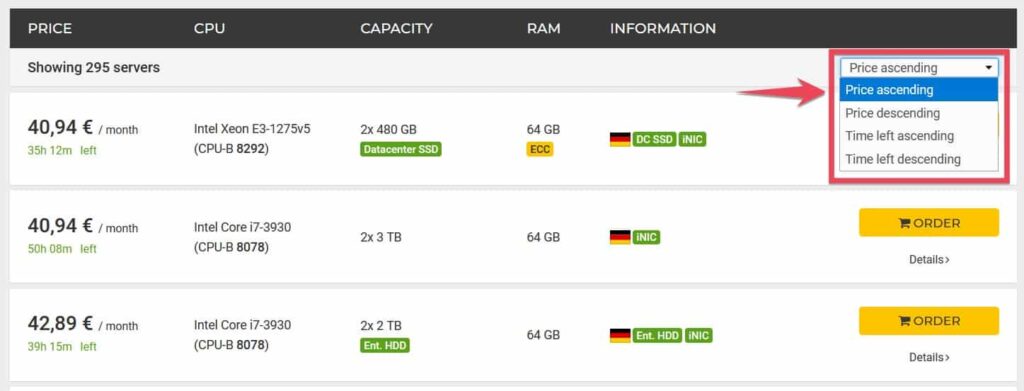
Finding the best-dedicated server is easier than ever. You can filter the available dedicated servers based on several factors.
This is what my usual filter when I needed to buy a long-lasting, powerful dedicated server from Hetzner sever auction.
What I usually filter is,
At least 32GB of RAM (Higher the better) and CPU Benchmark is minimum 8000 (Higher the better)
That means, with that filter on, I can find a powerful dedicated server within a matter of seconds. And it is optional that you can go for a dedicated server with SSD.
As you know, SSD is lightning fast. If you are purchasing the server for lots of data processing o maybe for data transferring, you should go for an SSD as they have the highest input-output speed.
Dedicated servers with SSD are comparatively expensive. So, choose wisely!. And you can always filter dedicated servers based on the price, when their server action ends, etc
I usually go for the lowest price. 🙂
You can check the details about any server listed there by clicking on ‘details.’
There you will see the necessary information about the dedicated server.
Once you find your desired dedicated server, you can click on the ‘Order’ button and purchase your dedicated server, just like that.
Here’s what you missed about Hetzner Dedicated Server
None of these servers come with Windows pre Installed. Windows is an optional feature, and you can request to Install Windows on your newly purchased server.
But there’s a catch!!
If you need Windows on your server, then you will have to pay for Hetzner. Just click on ‘Optional Features’ and hover over your desired Windows Server edition.
You will see that Windows Server 2016 Standard Edition will cost you almost $30/month
And for Windows Server 2016 Data Center edition, you will have to pay whopping (around) $200/month.
All those payments are monthly recurring. That means you will have to pay for your Windows Installation every month. Regardless of how much you pay for the server.
That’s a huge burden!
This is why I prepared this guide on How to Install Windows on Hetzner Dedicated Server. I’m sure you don’t want to pay Hetzner a recurring fee for Windows alone.
So, just order your desired dedicated server without Windows.
This guide on How to Install Windows on Hetzner Dedicated Server will show you exactly how I managed to Install Windows Server 2016 Data Center Edition. That is without paying a monthly recurring fee to Hetzner.
Once you order your dedicated server, Hetzner will get back to you with your login information.
After you have all the login information (or before that), you need the following things.
Windows License key
It is not a must that you should install a Windows Server Data Center edition on your dedicated computer. But, if you Install a Data Center Edition, you will be able to do lost of Server-side modifications to your dedicated server.
Therefore I’m recommending you install Windows Server 2016 Data Center edition on your newly purchased dedicated server from Hetzner.
So the screenshots, instructions you will find in this guide on How to Install Windows on Hetzner Dedicated Server will be showing you information on Windows Server 2016 Data Center.
But, fear not.
The exact same method can be applied to Install any other edition of Windows on Hetzzner Dedicated Server, as far as I know.
And I know, you probably be asking right now that purchasing a Windows Server 2016 Data Center will cost you a fortune!
If you are on a budget, you can always install an evaluation copy of Windows Server 2016. It is free and valid for 180 days.
Since it is an evaluation copy, it might have server-side limitations. If those limitations aren’t a problem, you should go for an evaluation copy!
This is what I did, I purchased a Windows Server 2016 Data Center license key from eBay!
See, for less than $5, you can buy a license key from eBay.
I’m using such a key purchased from eBay, and still, everything works perfectly fine.
KVM over IP open
I know it might look a bit ‘Geeky.’ But, fear not. I’m not a geek, and I overcame all the jargon!
KVM literally stands for Keyboard, Video, and Mouse.
See, all these are pretty familiar words. Only the abbreviation is not usual! Hetzner supports KVM over IP.
And with KVM over IP, you can remotely access your server.
So, you can ask Hetzner to open a KVM for you, when you are going to Install Windows on your dedicated server.
Install JAVA on your PC
To run KVM on your PC, you need JAVA. So, it is an excellent practice to Install Java on your PC/Laptop before reaching out to Hetzner.
You can download Java here.
It will save you time.
The Process: Install Windows on Hetzner Dedicated Server
As you have a license key, now you are ready to start the process.
But, before that, you will have to find a ‘downloadable copy’ of the Windows edition that you are going to install on your dedicated server.
From this link, you can download Server evaluation copies directly from Microsoft.
If you purchase a key from eBay, the seller usually sends a link to download the desired copy of the Windows server.
Keep the link safe because we are going to need it in the next step.
Log into your Hetzner Account
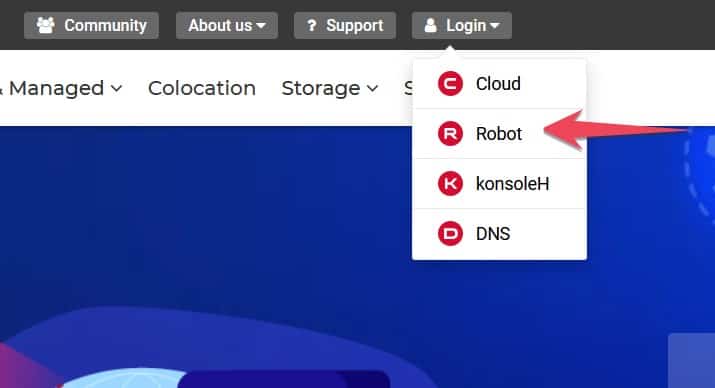
First, log into your Hetzner account. Once you are on the Hetzner homepage, click on login.
There click on Robot.
Enter your client number and password. (Hetzner email you these as soon as your dedicated server is ready)
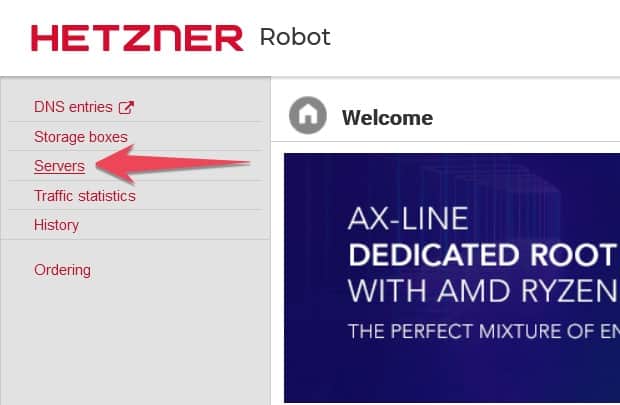
And log into your Hetzner Robot. There on your left, click on Servers
If you have purchased multiple servers from Hetzner, all will be shown under servers. Click on the desired server you want to Install Windows.
Once clicked on the server name, it will open a new menu with several tabs. There’s a tab called ‘Support’ and click on it.
Then it will open Hetznr Support.
There will be different tabs for different support needs.
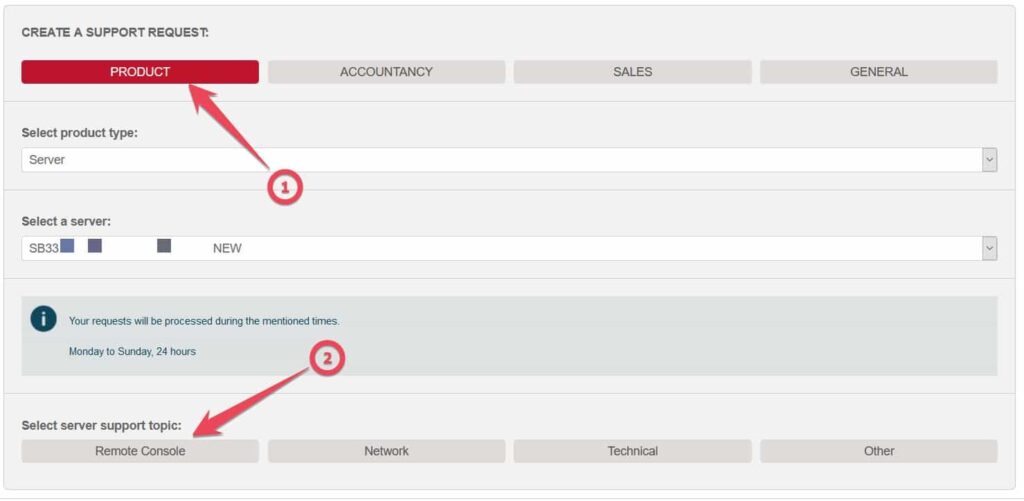
Since we need support with a ‘Product,’ click on the Product tab first. Then we need remote access to our server. So, click on ‘Remote Console’ second
Once you click on ‘Remote Console,’ it will open another section.
There you can select when you need the remote console and how long you need KVM to be opened for you.
If I have time, I usually request the KVM/Remote Console as soon as possible. And the duration as 3hrs. (It is the maximum duration)
And in the comment section, I write this simple message to Hetzner team.
‘Dear Hetzner Team,
Please get me a Remote console open for 3 hrs.
And make sure to plug in a bootable USB to my server, mounted with below image, You can place the link to your Windows server download here.
Thank You.’
Once all set, click on send request and wait for Hetzner to get back to you.
Usually, Hetzner will get back to you within half an hour.
Accessing KVM over IP
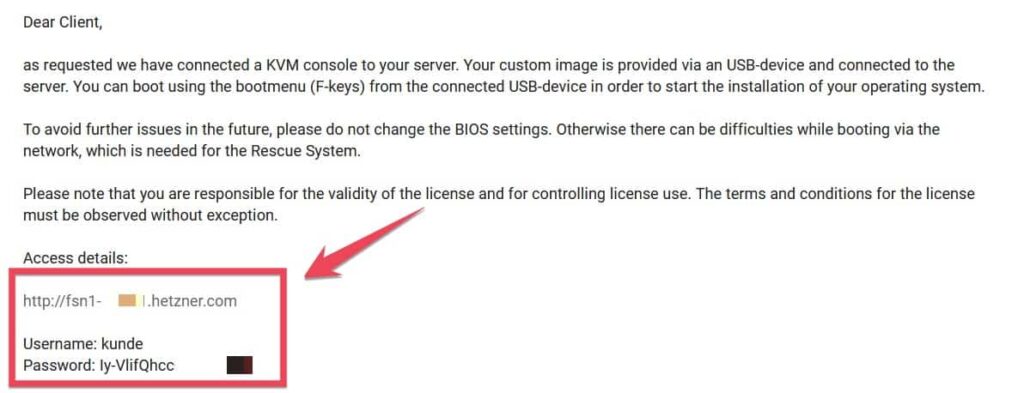
You will receive an email like this.
Then open your browser. Copy-paste the login URL from the email.
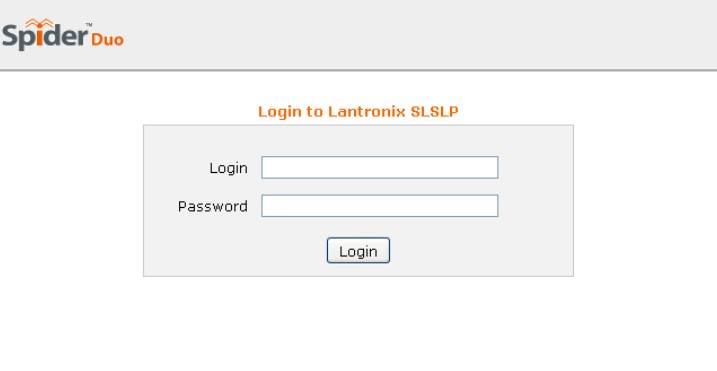
It will open a page similar to this, where you can enter your Username and the password provided by Hetzner.
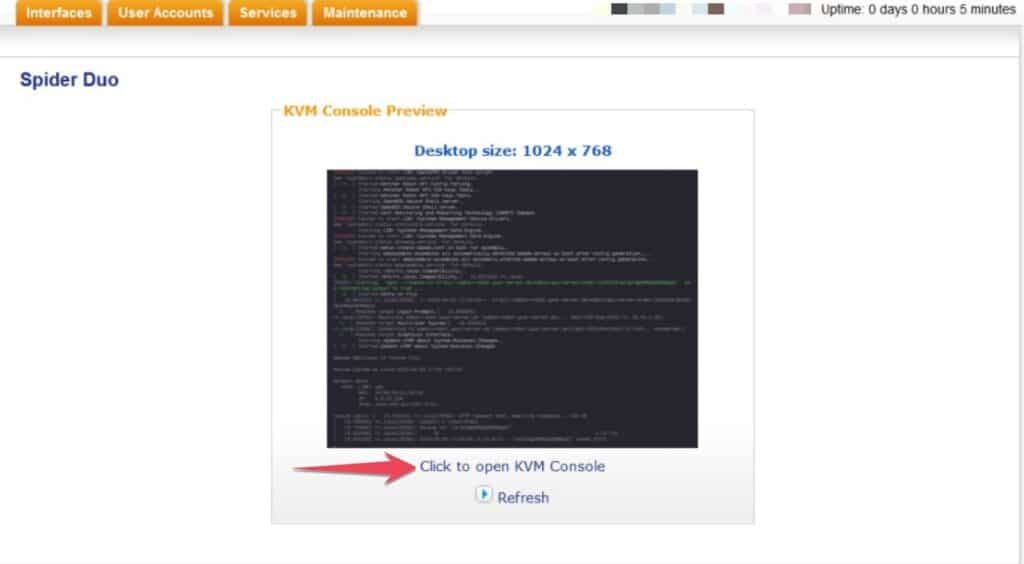
Once logged in, you will find it like this. And make sure to click on ‘Click to open KVM console.’
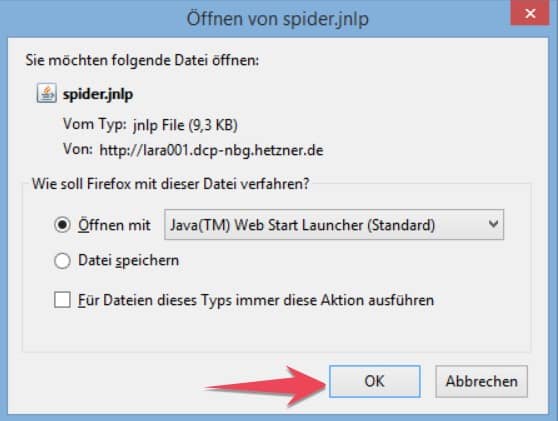
Once click on it, it will download a file. Make sure to run it.
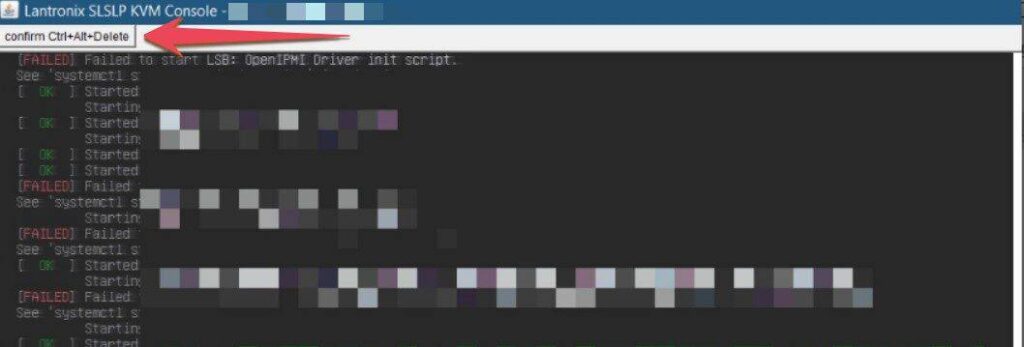
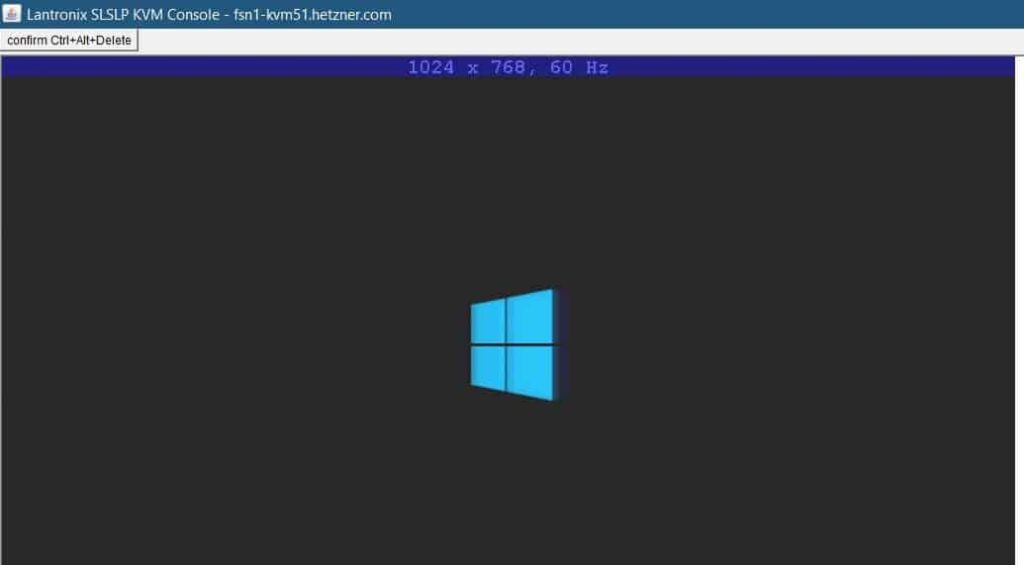
Then your KVM console will start the session. Your KVM will look like this.
As you need to restart the server to start the installation, click on Ctrl+Alt+Del.
This will restart your dedicated server.
Let’s Install Windows Server 2016 Data Center on your Dedicated Server
Now you have completed all the hard stuff.
The rest is easy. It will be super easy if you have ever installed Windows on your PC.
Because the process is the same.
First, you will see the initialization of Windows Installation.
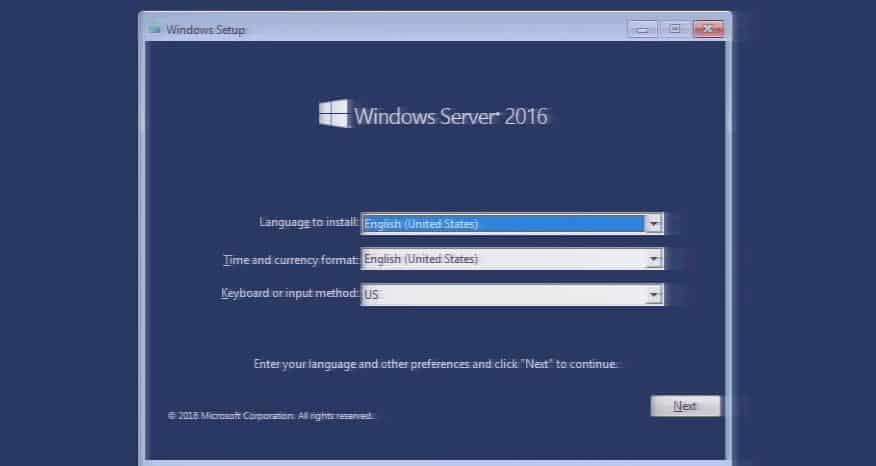
Then you will have to select your language, Time and keyboard.
Super easy, right!
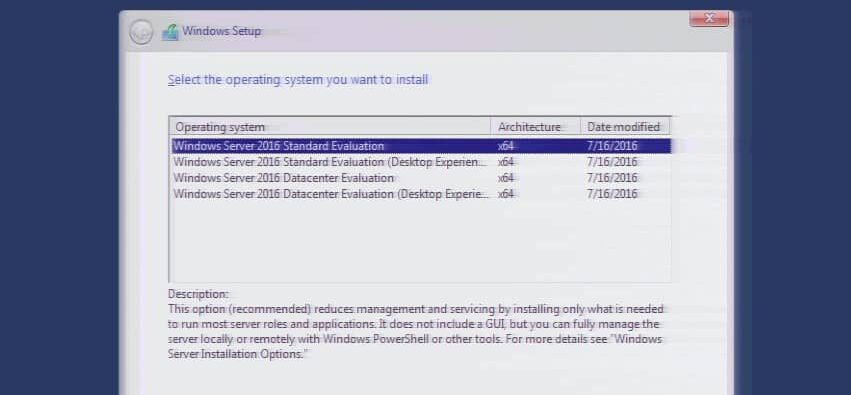
This step is important.
Always select ‘Desktop Experience.’
If not, your server will not have the familiar Windows user interface.
If you didn’t select Desktop Experience, you would be able to work with your dedicated server via command lines.
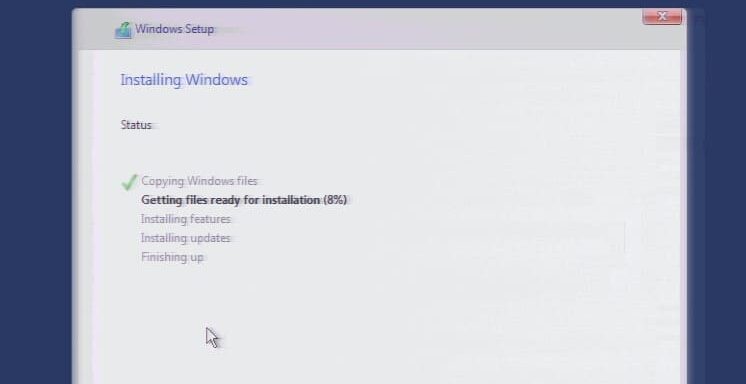
After all is done, Windows will start the installation. All you have to do is wait until the installation completes.
Once the installation completed, you will be able to log in to your dedicated server.
But, do not close your KVM connection, until you do this one last thing.
Enabling Remote Desktop Access to your Hetzner Server
Yes, the last, but the essential step you should do is, enable Remote Desktop access on your dedicated server.
If not, you will not be able to access your dedicated server via RDP from your local computer.
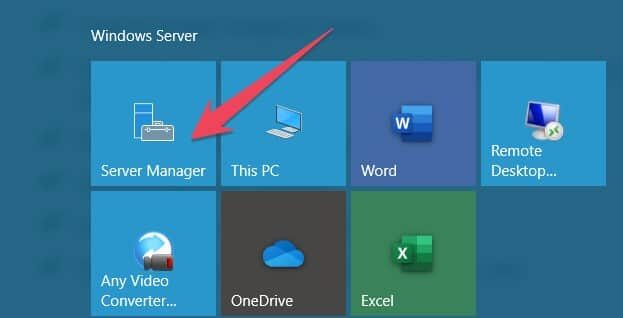
To enable RDP, you should go to ‘Server Manager’ first.
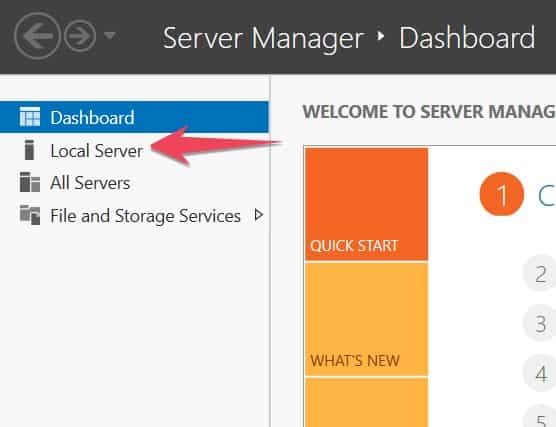
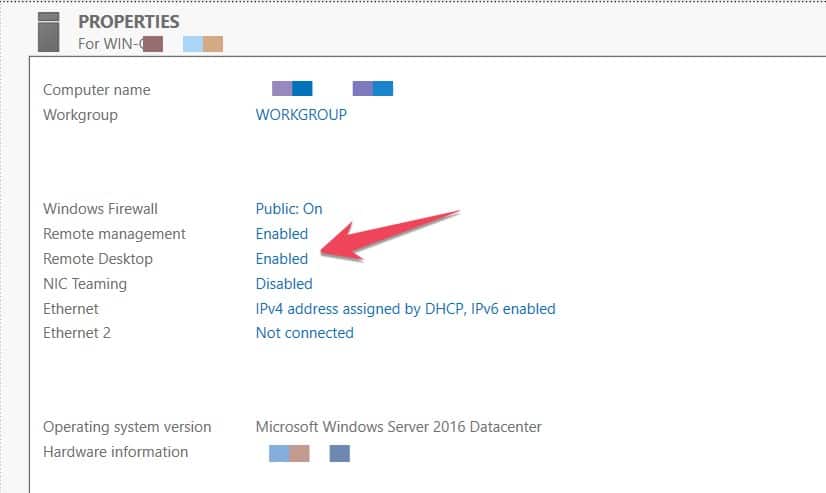
On your server manager dashboard, click on local server.
It will open the local server properties.
On this window, go to option called ‘Remote Desktop’/
It should be disabled by default. You have to enable this feature.
That’s all.
You have successfully Installed Windows on your Hetzner Dedicated server and enabled Remote Desktop access.
Now you can close your KVM connection.
To confirm it actually configured correctly, you can access your dedicated server via RDP from your local PC.
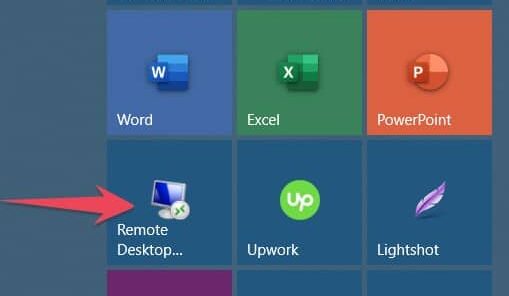
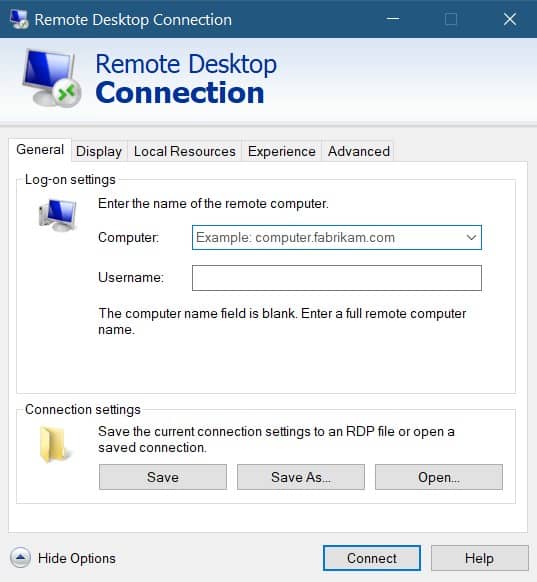
Open Remote Desktop Connection on your PC
Once you open your Remote Desktop connection, you will have to enter your computer, Username, and in the final step, you will have to add your password to access your Hetzner dedicated server.
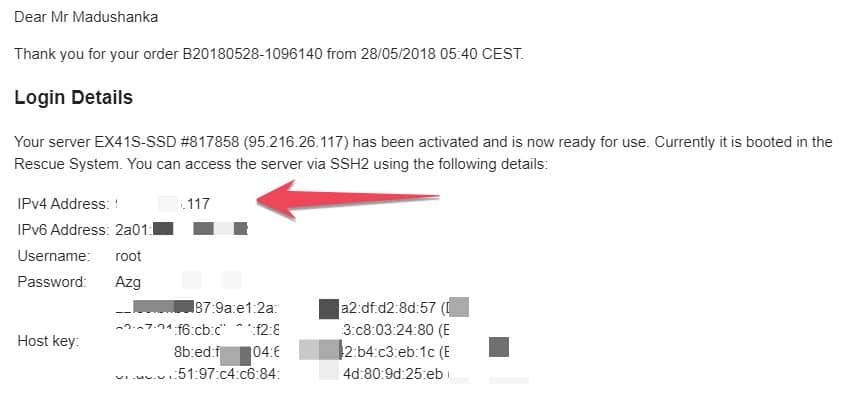
Your computer name would be the IP address of your Dedicated Server. You can find this information from the initial emails sent by Hetzner.
And your Username would be the one you defined when Installing Windows on your dedicated server. Most of the time, your username would be ‘Administrator,’ unless you have changed it when Installing Windows on your server.
And finally, your password would be the one you defined when Installing Windows on your server.
Once all the information correctly entered, click on connect. If that connects to your Dedicated Server, then you have successfully completed the process. This guide on How to Install Windows on Hetzner Dedicated Server was created to help you throughout this whole process.
Hetzner Dedicated Server Speed
After configuring Windows on my Hetzner dedicated server, it solved the most significant issue I had.
Amazingly, Hetzner has Uplink almost 800 Mbps and downlink of approximately 600 Mbps. But, I’ve seen these values go as high as 1000 Mbps.
Literally, this sever is 100 times faster than my usual connection. Maybe even more!!
Because of this lightning-fast connection speed, I managed to do all my client requirements within 30 minutes. The client was happy, and that’s what I wanted.
And the good news is my client still with me. Even assigned more duties as we build trust.
To date, this client has paid me a little over $10,000. Yes, that’s whopping 10K from a single client. This is the real beauty of freelancing.
If I didn’t sign up for a Dedicated Server, I might have lost the client way before. And it could’ve cost me thousands of dollars.
But my quest to find How to Install Windows on a Hetzner Dedicated server, returned me the best possible outcome.
FAQs: How to Install Windows on Hetzner Dedicated Server
Who needs a dedicated server?
Well, most of the time, a usual Internet user doesn’t need a dedicated server at all. In my case, I needed a dedicated server as I was struggling with my upload and download speed. To keep a decently paying client, I had to make a move. And I’m happy about it. If you are having the same issues as me, then moving to a dedicated server might be the best possible option you have. But, these are not the usual scenarios that one needs a dedicated server.
How to install windows on OVH dedicated server?
As per the OVH guide, they support KVM over IP. That means what I did with Hetzner is possible with OVH as well. You better submit a support ticket to OVH and confirm this beforehand.
What can I do with a dedicated server?
A lot can do with a dedicated server. Starting from Website hosting, you can use your dedicated server as a storage device for your needs. In simple words, a Dedicated server is another computer located somewhere else. So, whatever you could do with your PC, can do with a dedicated server. But, that is not limited to do the usual computer activities. A Dedicated server can be used to perform lots of ‘Geeky’ stuff. Such as use it as a Minecraft server, Set up Voice-over IP (VoIP), etc
What is the difference between VPS and dedicated servers?
VPS stands for Virtual Private Server, and the name itself self-explanatory. If you use a Dedicated Server, all the resources that the server has belonged to you. These resources are not shared with anyone but you. So, with a dedicated server, Sky is not the limit. All the RAM, CPU power, Graphic Power are yours. Cool, right?But, in the case of a VPS, you will be given shared resources. The truth is, VPSs are created by virtually partitioning dedicated servers. So, a VPS has limited RAM, Processing power, and Graphic power.
Conclusion: How to Install Windows on Hetzner Dedicated Server
If you are a freelancer, be prepared to do crazier things to get the job done. Always think out of the box. That’s where you find solutions to your burning problems.
This guide on how to Install Windows on Hetzner dedicated server was prepared to guide you in the process. For me, it was not easy to figure out everything at once. It took me days to figure out everything.
If you require such Windows installation on a dedicated server, this guide on how to install Windows on Hetzner dedicated server will surely guide you in the process.
Задача: установить на выделенный сервер Hetzner PX61-NVMe лицензионную ОС Windows Server 2016 Standart.
Для решения нашей задачи ДЦ Hetzner предлагает консоль управления Remote Console (KVM). Он предоставляет доступ к клавиатуре/мыши/монитору через IP и даёт полный контроль сервера на уровне BIOS. KVM может быть полезнен для выявления проблем с сервером, особенно когда нет возможности использовать SSH.
На момент установки KVM предоставляется бесплатно на 3 часа. Этого вполне достаточно для установки ОС.
1. Заказываем консоль из панели Robot
В панели управления Robot на нужном сервере во вкладке Support нужно выбрать пункт «Remote Console (KVM)» и указать желаемое время и продожительность использования.
2. Загружаем образ ISO на Backup Space
К серверу PX61-NVMe прилагается 100 Гб Backup Space. Консоль KVM позволяет подключать внешние ISO-образы с их хранилища download.hetzner.de, но и с Backup Space. Мы воспользуемся этим вариантом и предварительно загрузим соответствующий образ с помощью FTP.
3. Монтируем ISO-образ
После того, как мы получили E-mail с параметрами доступа к консоли KVM, необходимо подмонтировать образ на вкладке «Interfaces» -> «Virtual media».
4. Выбираем загрузочное устройство
В зависимости от модели материнской платы, boot menu может быть вызвано разными комбинациями клавиш. В материнской плате Fujitsu — F12. Подмонтированный ISO-образ в загрузочном меню носит название «PepperC Virtual Disc 1 0.01«.
5. Стандартный процесс установки
Запускается стандартная установка Windows, которая отличается тем, что занимает более продолжительное время (этап копирования установочных файлов Windows Server Standart 2016 Desktop занял ~ 2.5 часа).


Да, но это нужно делать вручную. Для этого можно использовать образы CD / DVD.
Какие версии доступны?
- Windows Server 2012 R2 (DE / EN / RU / языковой пакет)
- Windows Server 2016 (DE / EN / RU / языковой пакет)
(По состоянию на 02.08.2018)
Также могут быть предоставлены другие версии. Пожалуйста, отправьте запрос в службу поддержки, если это необходимо.
Почему на моем сервере неправильное время?
Все хосты виртуальных серверов CX используют UTC в качестве системного времени, поэтому в Windows часто возникают проблемы с системным временем на vServers.
Чтобы решить эту проблему навсегда, необходимо создать запись в реестре Windows, которая сообщает Windows, что аппаратные часы (RTC — эмулируемые хост-системой) — это не местный часовой пояс, а UTC.
В командной строке (cmd.exe) необходимо ввести следующую команду:
reg add "HKEY_LOCAL_MACHINE\System\CurrentControlSet\Control\TimeZoneInformation" /v RealTimeIsUniversal /d 1 /t REG_DWORD /fЗатем необходимо перезапустить Windows.
После перезапуска можно использовать следующую команду, чтобы проверить, успешно ли применена настройка:
reg query "HKEY_LOCAL_MACHINE\System\CurrentControlSet\Control\TimeZoneInformation" /sЕсли изменения были успешно применены, должна быть показана строка с надписью RealTimeIsUniversal и значением 0x1 .
Конфигурация IPv6
По умолчанию Windows использует временные адреса для соединений IPv6. Это может помешать вам использовать вашу сеть / 64. Чтобы иметь возможность использовать сеть IPv6, вы должны по умолчанию отключить использование временных адресов. Все, что вам нужно сделать, это выполнить следующие команды в cmd.exe.
Что нужно учитывать при установке вручную?
Для установки Windows необходимо, чтобы были установлены драйверы VirtIO. Например, драйвер можно смонтировать и установить через ISO-образ (virtio-win-latest […] .iso).
Папки с необходимыми драйверами имеют следующие названия:
- Воздушный шар
- NetKVM
- vioscsi
У каждого из них обычно будет папка с архитектурой (amd64). Его необходимо выбрать для установки драйверов.
Пример инструкции
Смонтировать образ
Чтобы перейти к выбору доступных образов CD / DVD, вы должны выбрать свой сервер в Cloud Console и перейти на вкладку «ISO IMAGES». Затем вы должны выбрать ISO и установить его, щелкнув «MOUNT».
Теперь вы можете запустить сервер и выполнить установку в обычном режиме до момента, когда при установке будет запрошен тип установки. Выберите выборочную установку и продолжите установку. Если вы видите синий экран, выключите и снова включите сервер с помощью переключателя ON / OFF.
Установить драйвер
Теперь приступим к тому моменту, когда установка ищет диск. На этом этапе вы должны переключить образ на последний доступный компакт-диск с драйверами VirtIO.
Впоследствии необходимо установить указанные ниже драйверы.
Каждая из папок обычно имеет подпапку с архитектурой (amd64). Его необходимо выбрать для установки драйверов.
После установки драйвера вам необходимо вернуться к ранее используемому образу Windows.
Теперь вам нужно удалить и отформатировать диски. Наконец, вы можете возобновить установку в обычном режиме.
3,135,761

How To Install Windows Server 2016 2019 2020 On Hetzner Cloud Vps
Welcome to our blog, a haven of knowledge and inspiration where How To Install Windows Server 2016 2019 2020 On Hetzner Cloud Vps takes center stage. We believe that How To Install Windows Server 2016 2019 2020 On Hetzner Cloud Vps is more than just a topic—it’s a catalyst for growth, innovation, and transformation. Through our meticulously crafted articles, in-depth analysis, and thought-provoking discussions, we aim to provide you with a comprehensive understanding of How To Install Windows Server 2016 2019 2020 On Hetzner Cloud Vps and its profound impact on the world around us. An receive server please here on install robot- also the windows automatically- you done- order is conditions- terms on desktop out the carried access- via installation your email the installation add your is server server and finished will 2019 once To on the will your you is corresponding after find order remote

How To Install Windows Server 2016 2019 2020 On Hetzner Cloud Vps
How To Install Windows Server 2016 2019 2020 On Hetzner Cloud Vps
To fix this problem permanently, it is necessary to create an entry in the windows registry, which tells windows that the hardware clock (rtc emulated by the host system) is not the local time zone, but utc. the following command must be entered in the command prompt (cmd.exe):. In this video, i will show you how you can install windows server, 2012, 2016, 2019 and 2022 on hetzner cloud vps and create free windows rdp.🎁claim €20 fre.

How To Install Windows Server 2016 In Aws Ec2 Benisnous
How To Install Windows Server 2016 In Aws Ec2 Benisnous
In this video tutorial i will teach you how to install windows server 2016, 2019, 2020 on hetzner cloud vps how to get free windows rdpget free 2 hetzner c. Installing windows on a dedicated server without a kvm console. Follow these steps to get started: select a location. if you’re in the united states, i recommend selecting their us option. select an os image. i prefer to start with ubuntu, but it doesn’t matter. 20€ voucher for hetzner cloud: hetzner.cloud ?ref=nv4zoryerstvlearn how to install in less than 10 minute windows on hetzner cloud and get the cheape.

How To Install Windows Server 2016 Turbofuture
How To Install Windows Server 2016 Turbofuture
Follow these steps to get started: select a location. if you’re in the united states, i recommend selecting their us option. select an os image. i prefer to start with ubuntu, but it doesn’t matter. 20€ voucher for hetzner cloud: hetzner.cloud ?ref=nv4zoryerstvlearn how to install in less than 10 minute windows on hetzner cloud and get the cheape. To install windows server 2019 on your server, please order the corresponding add on via robot. here, you will also find the terms and conditions. after your order is finished, the installation is carried out on your server automatically. you will receive an email once the installation is done. remote desktop access. Intro install windows 2019 2022 10 on dedicated server hetzner | easy simple way | rdp [ #cdldnl] campdrive 388 subscribers subscribe 18k views 3 years ago.

Windows Server 2019 Installation Step By Step Benisnous
Windows Server 2019 Installation Step By Step Benisnous
To install windows server 2019 on your server, please order the corresponding add on via robot. here, you will also find the terms and conditions. after your order is finished, the installation is carried out on your server automatically. you will receive an email once the installation is done. remote desktop access. Intro install windows 2019 2022 10 on dedicated server hetzner | easy simple way | rdp [ #cdldnl] campdrive 388 subscribers subscribe 18k views 3 years ago.

How To Install Windows Server 2016 On Virtualbox Windows Server 2016
How To Install Windows Server 2016 On Virtualbox Windows Server 2016
How To Install Windows Server 2016, 2019, 2020 On Hetzner Cloud Vps How To Get Free Windows Rdp
How To Install Windows Server 2016, 2019, 2020 On Hetzner Cloud Vps How To Get Free Windows Rdp
in this video tutorial i will teach you how to install windows server 2016, 2019, 2020 on hetzner cloud vps how to get free in this video, i will show you how you can install windows server, 2012, 2016, 2019 and 2022 on hetzner cloud vps and create free this tutorial video provides a detailed step by step guide on how to install the windows operating system on a virtual server in this video i demonstrate step by step how you can install microsoft server 2012,2016,2019 or 2022, on a what is effectively a ru: Установка windows server на hetzner серверы. Более подробный мануал: vova1234 blog notes 426 У how to install windows on hetzner cloud server in 2022 and enable remote desktop i am installing windows 2022 on a hetzner updated on 02 april 2022 if you want me to ברוכים הבאים לערוץ של פיניקס ! ◅תרומות לשיפור הערוץ ובאישור ההורים בלבד : streamlabs yakovhaskal2 tip ◅תרומות סקינים in this video, we will install windows server on hetzner dedicated server using kvm console. hetzner is a german dedicated 20€ voucher for hetzner cloud: hetzner.cloud ?ref=nv4zoryerstv learn how to install in less than 10 minute windows in this video, i’ll show you how to put windows 10 pro or windows 11 pro on hetzner vps cloud. normally, hetzner doesn’t have if you want me to do it for you, contact me via whatsapp 31657323775 updated on 13 aug 2021 all the steps: check
Conclusion
After exploring the topic in depth, it is clear that post offers helpful information concerning How To Install Windows Server 2016 2019 2020 On Hetzner Cloud Vps. From start to finish, the author demonstrates an impressive level of expertise about the subject matter. Especially, the section on X stands out as particularly informative. Thank you for taking the time to this article. If you would like to know more, please do not hesitate to contact me via the comments. I am excited about your feedback. Furthermore, below are a few related posts that might be helpful:
