Introduction
This is a set of best practices to follow when installing a Windows Server 2012(R2) guest on a Proxmox VE server 6.x.
Install
Prepare
To obtain a good level of performance, we will install the Windows VirtIO Drivers during the Windows installation.
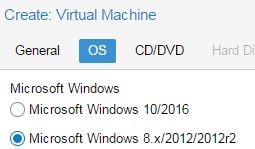
- Create a new VM, select «Microsoft Windows 8.x/2012/2012r2» as Guest OS and enable the «Qemu Agent» in the System tab. Continue and mount your Windows Server 2012 ISO in the CDROM drive
- For your virtual hard disk select «SCSI» as bus with «VirtIO SCSI» as controller. Set «Write back» as cache option for best performance (the «No cache» default is safer, but slower) and tick «Discard» to optimally use disk space (TRIM).
- Configure your memory settings as needed, continue and set «VirtIO (paravirtualized)» as network device, finish your VM creation.
- For the VirtIO drivers, upload the driver ISO (use the stable VirtIO ISO, download it from here) to your storage, create a new CDROM drive (use «Add -> CD/DVD drive» in the hardware tab) with Bus «IDE» and number 0. Load the Virtio Drivers ISO in the new virtual CDROM drive.
- Now your ready to start the VM, just follow the Windows installer.
- Note for Older Version of Windows like Windows-2012 (use the stable older version of VirtIO ISO — virtio-win-0.1.189.iso, download it from here)
Launch Windows install
- After starting your VM launch the noVNC console
- Follow the installer steps until you reach the installation type selection where you need to select «Custom (advanced)»
- Now click «Load driver» to install the VirtIO drivers for hard disk and the network.
- Hard disk: Browse to the CD drive where you mounted the VirtIO driver and select folder «vioscsi\2k12\amd64» and confirm. Select the «Red Hat VirtIO SCSI pass-through controller» and click next to install it. Now you should see your drive.
- Network: Repeat the steps from above (click again «Load driver», etc.) and select the folder «NetKVM\2k12\amd64», confirm it and select «Redhat VirtIO Ethernet Adapter» and click next.
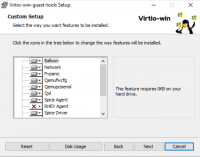
- Memory Ballooning: Again, repeat the steps but this time select the «Balloon\2k12\amd64» folder, then the «VirtIO Balloon Driver» and install it by clicking next. With these three drivers you should be good covered to run a fast virtualized Windows Server 2012 system.
- Choose the drive and continue the Windows installer steps.
HINT: There is a video showing the process for a Windows Server 2016 installation which is the same as for Windows Server 2012.
Install Guest Agent and Services
Guest Agent
If you enabled the Qemu Agent option for the VM the mouse pointer will probably be off after the first boot.
To remedy this install the «Qemu Guest Agent». The installer is located on the driver CD under guest-agent\qemu-ga-x86_64.msi.
Drivers and Services
VirtIO guest tools installer
The easiest way to install missing drivers and services is to use the provided MSI installer. It is available on the driver CD since version «virtio-win-0.1.173-2».
Run the «virtio-win-gt-x64.msi» file located directly on the CD. If you do not plan to use SPICE you can deselect the «Qxl» and «Spice» features. Restart the VM after the installer is done.
After all this the RAM usage and IP configuration should be shown correctly in the summary page of the VM.
For more information and configuration about ballooning, see Dynamic Memory Management
Check for missing drivers
- See also: Paravirtualized Block Drivers for Windows
Unknown device in device manager
Make sure to include subfolders
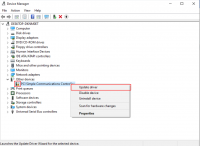
Go to the Device Manager to see if there are any drivers missing.
For any unknown device:
- Right click an select «Update driver».
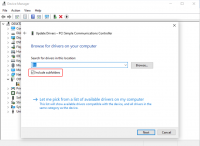
- Select «Browse my computer for driver software».
- Select the Driver CD. Make sure that «Include subfolders» is checked.
- Once a driver has been found you might be prompted with a security warning asking if you «Would like to install this device software». Click «Install».
Installing WSL(g)
To run WSL (Windows Subsystem for Linux) you need to enable Nested Virtualization. Make sure to set your processor to ‘host’; if you already set up your VM and did not select ‘host’ as processor, you can change it in the ‘Hardware’ section of your VM in the web interface.
Follow the official instructions.
If you are using a GPU via PCI(e) passthrough, you might need to add
args: -cpu host,kvm=off
to your config file at /etc/pve/qemu-server/<vm_id>.conf, see the vfio blog
Further Information
RAW vs QCOW2
The RAW file format provides slightly better performance WHILE qcow2 offers advanced features such as copy on write and Live_Snapshots independent of the backing storage.
Since Proxmox VE version 2.3, qcow2 is the default format.
VirtIO Drivers
Make it really easy:Build your ISO with drivers already included:
Windows guests — build ISOs including VirtIO drivers
Latest ISO file with VirtIO drivers:
https://fedorapeople.org/groups/virt/virtio-win/direct-downloads/latest-virtio/
See also
Windows 2003 guest best practices
Windows 2008 guest best practices
Windows Server 2012 R2 является популярной операционной системой для создания и управления серверами. В данной статье мы расскажем вам, как установить эту операционную систему на Proxmox – виртуализационную платформу с открытым исходным кодом. Процесс установки включает несколько шагов, которые мы подробно рассмотрим.
Прежде чем начать, убедитесь, что на вашем сервере установлен Proxmox VE. Если вы его еще не установили, можете скачать и установить его с официального сайта Proxmox. После установки Proxmox, вам потребуется файл ISO образа Windows Server 2012 R2.
Шаг 1: Войдите в веб-интерфейс Proxmox с помощью браузера на вашем компьютере. Введите IP-адрес вашего сервера и учетные данные администратора, чтобы войти в систему.
Шаг 2: Перейдите к виртуальным машинам и создайте новую виртуальную машину. Укажите ей имя, выберите тип операционной системы «Windows» и установите необходимое количество памяти и объем диска для виртуальной машины.
Шаг 3: Выберите созданную вами виртуальную машину и нажмите «Установить». Затем выберите опцию «Установить ОС из локального или сетевого источника», а затем выберите «ISO образ» и найдите файл ISO образа Windows Server 2012 R2 на вашем компьютере.
Шаг 4: Настройте параметры виртуальной машины, такие как количество ядер процессора и тип сетевого адаптера. После завершения настройки, нажмите «Завершить» и виртуальная машина будет готова к установке Windows Server 2012 R2.
Шаг 5: Запустите виртуальную машину и следуйте инструкциям на экране для установки Windows Server 2012 R2. После завершения установки, ваш сервер будет готов к использованию с операционной системой Windows Server 2012 R2.
Следуя этой инструкции, вы сможете успешно установить Windows Server 2012 R2 на Proxmox и использовать его для своих серверных потребностей.
Содержание
- Подготовительные шаги для установки
- Создание виртуальной машины в Proxmox
- Установка операционной системы
- Настройка Windows Server 2012 R2
- Завершение установки и настройки
Подготовительные шаги для установки
Перед установкой Windows Server 2012 R2 на Proxmox необходимо выполнить несколько подготовительных шагов:
- Убедитесь, что ваш сервер соответствует требованиям для установки Windows Server 2012 R2. Проверьте наличие необходимого аппаратного обеспечения, такого как процессор, оперативная память и диск.
- Создайте новую виртуальную машину в Proxmox. Укажите необходимые настройки, такие как имя виртуальной машины, количество памяти и размер диска.
- Загрузите образ установочного диска Windows Server 2012 R2. Для этого воспользуйтесь ISO-образом операционной системы.
- Настройте виртуальный CD/DVD-привод в Proxmox, чтобы использовать загруженный образ установочного диска.
- Запустите виртуальную машину и выполните установку Windows Server 2012 R2 по шагам мастера установки. При необходимости, используйте дополнительные настройки, такие как указание пользовательского имени и пароля, выбор типа установки и разделов на диске.
- Дождитесь завершения установки и перезагрузки виртуальной машины. После этого Windows Server 2012 R2 будет готов к использованию.
Следуя этим подготовительным шагам, вы сможете установить Windows Server 2012 R2 на Proxmox без проблем и начать использовать операционную систему для вашего сервера.
Создание виртуальной машины в Proxmox
Шаг 1: Войдите в веб-интерфейс Proxmox.
Откройте веб-браузер и введите IP-адрес сервера Proxmox, сопровождаемый портом 8006 (например, https://192.168.1.100:8006). Введите свои учетные данные для входа.
Шаг 2: Создайте новую виртуальную машину.
На левой панели кликните правой кнопкой мыши на узле сервера и выберите «Create VM» (Создать виртуальную машину).
Шаг 3: Настройте параметры виртуальной машины.
Введите имя для виртуальной машины и выберите тип операционной системы, которую вы хотите установить. Вы можете выбрать «ISO» (образ диска), если будете использовать ISO-образ установочного диска Windows Server 2012 R2.
Шаг 4: Укажите ресурсы.
Определите количество памяти, ядра процессора и дисковое пространство, которое будет выделено виртуальной машине.
Шаг 5: Настройте сетевое подключение.
Выберите сетевую модель для виртуальной машины, а также назначьте IP-адрес и маршрут по умолчанию.
Шаг 6: Установите операционную систему.
Загрузите ISO-образ диска или выберите шагу 3 параметр «Template» (Шаблон), если операционная система уже установлена.
Шаг 7: Завершите настройку.
Проверьте все настройки и нажмите «Finish» (Завершить), чтобы создать виртуальную машину.
Теперь у вас есть виртуальная машина в Proxmox, готовая к установке Windows Server 2012 R2.
Установка операционной системы
1. Загрузите образ Windows Server 2012 R2 с официального сайта Microsoft или используйте другие источники для получения образа.
2. Загрузите файл образа операционной системы на сервер Proxmox.
3. Войдите в интерфейс Proxmox и выберите раздел «Local» в левой панели, затем нажмите «Content» и выберите загруженный вами файл образа операционной системы.
4. Настройте параметры виртуальной машины, которая будет использоваться для установки операционной системы. Укажите требуемое количество выделенной оперативной памяти, дисковое пространство и другие настройки, затем сохраните изменения.
5. Запустите виртуальную машину и выберите загруженный вами образ операционной системы как источник загрузки.
6. Перейдите к установке Windows Server 2012 R2, следуя инструкциям на экране. Выберите требуемый язык и региональные настройки, затем укажите диск для установки операционной системы.
7. Дождитесь завершения установки операционной системы. После завершения установки выполните все необходимые настройки и настройте безопасность в соответствии со своими требованиями.
8. Перезагрузите виртуальную машину после завершения настроек и установки операционной системы.
Теперь операционная система Windows Server 2012 R2 установлена и готова к использованию на сервере Proxmox.
Настройка Windows Server 2012 R2
После установки Windows Server 2012 R2 на Proxmox необходимо выполнить некоторые настройки, чтобы сервер был готов к использованию. В этом разделе мы рассмотрим основные шаги по настройке операционной системы.
- Установите все доступные обновления. Для этого откройте «Центр обновления» и выполните проверку на наличие обновлений. Установите все обновления, включая критические исправления безопасности.
- Настройте сетевые параметры. Откройте «Панель управления» и выберите «Сеть и интернет» -> «Центр управления сетями и общим доступом». Здесь вы можете настроить IP-адрес, маску подсети, шлюз и DNS-серверы.
- Настройте службу удаленного рабочего стола (Remote Desktop Services). Откройте «Панель управления» и выберите «Система» -> «Удаленный доступ к компьютеру». Включите удаленный доступ и настройте параметры соединения.
- Настройте службу удаленного управления сервером (Server Manager). Откройте «Server Manager» и выберите «Локальные серверы». Здесь вы можете настроить удаленное управление, активировать удаленное управление PowerShell и добавить другие серверы для управления.
- Создайте пользователей и группы. Откройте «Панель управления» и выберите «Учетные записи пользователей» -> «Управление учетными записями». Здесь вы можете создать новых пользователей, назначить им разрешения и добавить их в группы.
После завершения настройки, ваш сервер Windows Server 2012 R2 будет готов к использованию. Вы можете продолжить с установкой и настройкой приложений, установкой дополнительных служб и выполнением других задач в соответствии с вашими требованиями.
Завершение установки и настройки
1. После завершения установки Windows Server 2012 R2 на Proxmox, перезагрузите виртуальную машину. Во время загрузки сервера удаленного рабочего стола введите учетные данные администратора.
2. При первом входе в операционную систему будет предложено изменить пароль администратора. Установите новый пароль и сохраните его в надежном месте.
3. После входа в систему, выполните все необходимые обновления операционной системы через Windows Update. Установите все рекомендуемые и критические обновления для повышения безопасности и стабильности сервера.
4. В настройках операционной системы включите удаленный рабочий стол, чтобы иметь возможность удаленного доступа к серверу. Для этого откройте Панель управления, выберите «Система и безопасность», затем «Система» и в левой части окна выберите «Включение или выключение удаленных соединений». Отметьте пункт «Разреши графические источники из любых устройств».
5. После завершения установки и настройки операционной системы, установите все необходимые драйверы для обеспечения правильной работы аппаратной части сервера. Обратитесь к официальным сайтам производителей компонентов или используйте программу для автоматической установки драйверов.
6. При необходимости настройте брандмауэр операционной системы, чтобы ограничить доступ к серверу и установить правила безопасности.
7. Наконец, рекомендуется создать резервную копию системы и регулярно обновлять ее, чтобы в случае сбоя или ошибки можно было быстро восстановить сервер.
In Pentest Home Lab — 0x0 — Building a virtual corporate domain, we talked about why you would want to build your own AD pentest lab, where you can build it, and the pros and cons of each option.
In Pentest Home Lab — 0x1 — Building Your AD Lab on AWS, we walked through setting up a fully functional home lab in AWS.
Table of Contents
- What are we going to build?
- Example server specs
- Let’s talk about network placement
- Installing the hypervisor (Proxmox VE)
- Getting Windows server software
- Obtaining evaluation version of Windows server
- Downloading Windows 10 ISO
- Transfering ISOs to Proxmox
- VM #1: Creating our Server 2012r2 template
- Configuring a Proxmox VM (Windows server 2012r2)
- Installing Windows Server 2012r2
- Converting a VM to a template in Proxmox
- VM #2: Creating your 2012r2 domain controller
- Creating a new VM by cloning your template
- Promoting your first server to a DC
- You now have an Active Directory Domain — Add some users
- Add at least one admin user to your domain admins group
- VM #3: Creating your second 2012r2 server
- Configuring DNS
- Adding host to the domain
- Adding domain users to the remote desktop group
- VM #4: Creating our Windows 10 Template
- VMs #5 & #6: Creating two Windows 10 VMs from the template
What are we going to build?
At the end of this post, you will have a fully functional AD environment running on ProxmoxVE that you can use to make yourself a better penetration tester. I’m not going to assume you are familiar with ProxmoxVE or setting up Active Directory, so some of this might be review.
You will configure at least 2 virtual machines, most likely more:
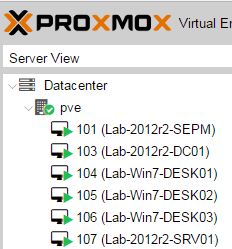
You will create a Windows 2012r2 domain, promote one server to be a DC, and add additional hosts to the domain:

You will create at least 2 users and 1 administrator account:
To get started, you really only need a Domain Controller and a Workstation. To be able to test out more stuff, you’ll probably end up wanting at least two workstations (User 1’s workstation and User 2’s workstation), and at least one more non DC server.
Example server specs
I’m including my server specs just as a reference point. I’ve found it really helpful in the past when people have done the same:
2013 configuration
CPU: AMD FX-Series 8-Core (Circa 2013)
SSD: 512 GB SSD
Memory: 16GB DDR3
CPU: AMD FX-Series 8-Core (Circa 2013)
SSD: 1TB SSD (Samsung 850 EVO 1TB 2.5-Inch SATA III Internal)
Memory: 32GB DDR3
If you are building on consumer hardware like I did, I suggest just going right to 1TB of SSD and 32GB of RAM. I know it isn’t cheap, but with only 500GB SSD and 16GB RAM I ran up against those limits pretty quickly.
In Pentest Home Lab — 0x0 — Building a virtual corporate domain, I touch on a few other options as well, for instance: Rather than using consumer hardware and an expensive 1Tb SSD, you can buy used enterprise grade stuff on ebay, which often comes with tons of storage and memory. This is what my friend @mikehacksthings does, who is also the one who introduced me to ProxmoxVE.
Of course, there are many ways to do this, so here are more great resources that talk about some of the different hardware options:
Let’s talk about network placement
You can get really fancy and run your lab in a restricted subnet, or you can just keep it simple and run it on the same flat network you use for everything else on your home network. You do not need to separate your lab from your home network. In other words, don’t let network architecture stop you from setting up your lab. I’ve made that mistake before.
If you have a firewall or a router at home you can absolutely place your hypervisor on its own network and control access between your lab and your home network. This is what I am doing now. I have my home network somewhere on 192.168 and I have my lab on 10.0.0.0/24
Another note: I suggest that you use bridged mode for all virtual machines. You can do almost everything you want to do with NAT, but that means you won’t be able to run tools against your lab unless they are being run from other virtual machines in the lab’s private network.
Installing the hypervisor (Proxmox VE)
If you have a favorite hypervisor and don’t want to try Proxmox VE, you can just skip this section.
1) Download the ISO
- https://www.proxmox.com/en/downloads
- I went with Proxmox VE 4.4
2) Transfer ISO to CD/DVD or USB
3) Boot your physical server into the install ISO
4) Select Install Proxmox VE

5) Select I agree
6) Pick harddisk and select Next
7) Select Country, Time zone, and Keyboard Layout and select Next
 Select a password and enter your email address (I have not gotten any email from them)
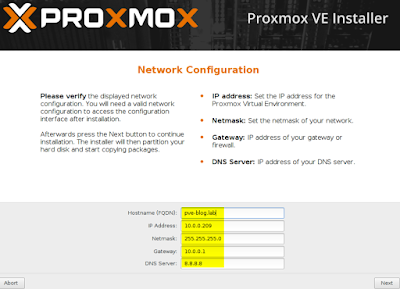
9) Configure management network interface and select Next
10) Select Next. This will begin the install
11) Click Reboot
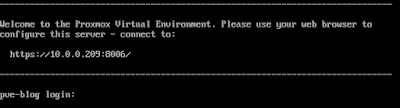
12) At the console, you should see something like this:
13) Log into the console and update the OS:
- apt-get update && apt-get -y upgrade
14) You are ready to log in and start building virtual machines
15) Navigate to the IP you gave your PVE (https://IP:8006)
![]()
16) Log in to web interface with username: root (and the password you specified at install)

17) SSH to the server — just to make sure you can
Troubleshooting tip: I was initially unable to reach my newly installed proxmox. It turns out that the default bridge was set up for eth0, but I was cabled into eth1. My eth1 is a better NIC, so rather than change the cable, I modified /etc/network/interfaces and switched the bridge from eth0 to eth1:

Getting Windows server software
If you are going to build on premises, you will need to get your hands on the following software:
- Required — Windows Server (2012 or 2016)
- Optional — Windows 7 (or 8 or 10)
In terms of getting the software, there are a few options:
- Download evaluation versions, which are good for 180 days
- See if your workplace has a key/iso that can be used in a lab environment
- I think if you are a student you can get the OS’s for free
For this post, I’ll walk through the proccess of obtaining an Evaluation License. If you already have licensed copies of windows you can skip the next section:
Obtaining an evaluation license for Windows server
For my last AWS walk though, I built the AD lab on Windows Server 2016. For this post, to change it up, I’m going to use Windows Server 2012r2. If you want to use Server 2016, almost all of the steps should be the same.
1) Go here: https://www.microsoft.com/en-us/evalcenter/
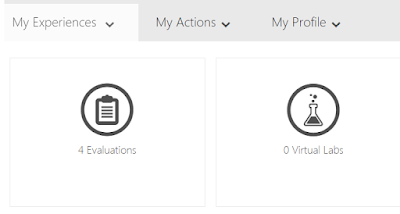
2) Click the Evaluations square
3) Sign in with your Microsoft account. An old Hotmail account and/or a current outlook.com account should work
4) Click the Evaluations square again
5) Select the product you would like to evaluate (Windows Server 2012r2)

6) Select Register to continue

7) Enter your info

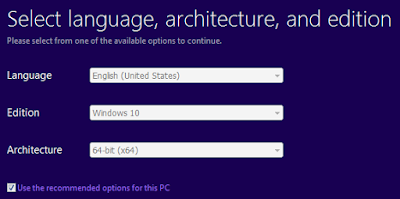
Select ISO
9) Select 64 bit and your language
10) Select Download
Downloading Windows 10 ISO
I’ll walk through downloading the windows 10 ISO, but as I mentioned earlier, you can skip windows 10 and use Windows7/8 instead.
1) Click this link: https://www.microsoft.com/en-us/software-download/windows10
2) Click Download tool now
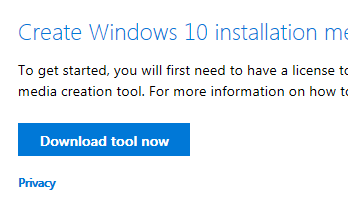
3) Run the tool
4) Click Accept

5) Click Create installation media

6) Click Next
7) Stick with defaults and click Next
Click ISO file
9) Save the ISO (The default filename is windows.iso. I suggest renaming it to Win10Eval.iso or something)
Transfering ISOs to Proxmox
You can either configure a network share for proxmox, or just drop ISO’s in the right directory. The easiest way to do it is to SCP your ISO’s to /var/lib/vz/template/iso/
VM #1: Creating our Server 2012r2 Template
For our first VM, let’s go with Windows Server 2012r2. We will configure the VM, install the OS, convert our VM to a template, and then use that template to deploy two VMs for our lab.
Configuring a Promox VM (Windows Server 2012r2)
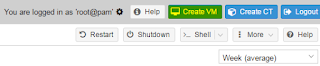
1) Log into the proxmox web interface
2) At the top right, click Create VM
3) General: Enter ID and Name and click next

4) OS: Select your OS (Microsoft Windows 8.x/Server 2012r2) and click next
5) Storage: Select local, and then your transferred ISOs should show up in that list. Select the correct windows server 2012 ISO and click next

6) Hard Disk: Click next
7) CPU: Click next
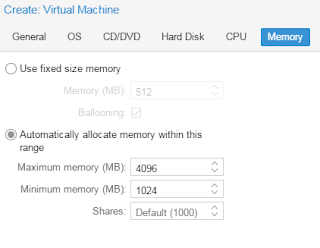
Memory: I liked to select Automatically allocate memory within this range, and for Windows I tell it to stay between 1 and 4GB. You can certainly tweak these based on how much RAM you have. 9) Click next
10) Network: Keep defaults (Bridged mode), and click next
11) Click finish
12) In the right side column, find and right click the newly created instance. Click start
13) One column over, click Console
At this point, we are just installing Windows Server 2012r2 as we would normally. I’m going to keep it simple with some bulleted instructions and some commentary, but if you are looking for a similar post that has some nice looking pictures to go with these steps, check out the following series (Parts 1-3): https://www.psattack.com/articles/20160718/setting-up-an-active-directory-lab-part-1/
Time/Sanity Saving Tip: I used to spend hours updating all of my virtual machines before I would make a snapshot or template, but eventually I realized that it was mostly a waste of time. Sure, there are a few times where you do want to test your tools against a fully patched box. But, if this is your first pentest lab, I suggest learning from my hours of wasted time and skipping the patches until you need them. This applies to both the servers and the desktops.
Installing Windows Server 2012r2
1) If using local virtualization (not cloud based), give it 24-32GB of HD space and 1-2GB of RAM. 2) Attach the ISO, boot up the virtual machine, and use this as a guide:
3) Accept Default settings and click Next
4) Click Install Now
5) Select Windows Server 2012 R2 Standard (server with a GUI)
6)Accept the license terms and click Next
7) Select Custom — New Installation
Highlight Drive0 unallocated space
9) Click Next
10) Create an admin password. Use something you don’t mind other people seeing, as you might share stuff from this lab one day 
11) Use the proxmox shortcut icon to enter Ctrl+Alt+Delete, and log in:

12) On the right hand popup: Do you want to to find PCs, devices, etc. on the network: Yes
13) Do anything else you need to do on this VM before you convert it to a template. For instance, if you are not using a Eval license, you will want to run sysprep on the VM before you turn it into a template.
Converting a VM to a template in Proxmox
1) Shut down and power off your VM
2) On the left hand bar, right click on your Windows2012r2 VM and select Convert to template
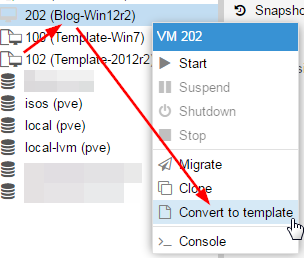
3) Click Yes at the confirmation page. Note: It will take a few minutes for the template to show up. You might see it more quickly if you refresh the proxmox page.

4) That’s it. You are ready to launch VMs from the template by right clicking on the template and selecting clone

VM #2 — Creating your 2012r2 Domain Controller
Creating a new VM by cloning your template
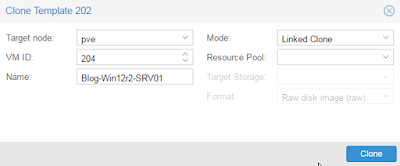
1) On the first tab of the Clone wizard, you will be asked if you would like to create a linked clone or a full clone. Linked clones are great, but that means you can never get rid of your template, so just be mindful of that. I don’t like using linked clones when cloning one live VM into another, because it is hard to keep track. But with templates, I use them, because it is easier for me to make sure I never touch my templates. This is another reason why a 1TB drive is really nice.
2) Right click on your template and select Clone
3) Name the first clone in the wizard (This will be your DC), and click clone

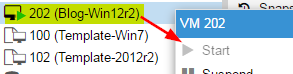
4) Start DC01
5) Assign a static IP. This is especially important for your DC. It doesn’t matter if you chose NAT or bridged mode, but in either case, you will want a static IP in that range for your DC.
- Right click on network icon on bottom right and click Network and Sharing
- Click Ethernet
- Properties
- IPv4
- Properties
6) This is not required, but this is a good time to change your hostname as well:
- Click the folder on the launch bar
- Right click This PC on the left side
- Properties, Change settings
- Change
- Change the computer name
- Reboot
Promoting your first server to a DC
1) Take a snapshot just in case you mess up :). Trust me, do it!
- To take a snapshot in Proxmox, Select your VM, switch from Console to Snapshot on the second left most bar, and click Take Snapshot.
2) In the Server Manager, at the top right click manage, add roles and features
3) Next, Next, Next
4) Select Active Directory Domain Services
5) Select Add Features
6) Select DNS Server
7) Select Add Features
Next, Next, Next, Next
9) Select Restart the destination server automatically if required
10) Yes, Install, Close
11) In server manager, you will see a yellow caution triangle. Click it,
12) Click promote this server to a domain controller
13) Add new forest
14) Name your domain: you can do lab.local for now, or you can make room for more domains in the future with something like lab.proxmox.local.
15) Click Next
16) Create and record the DSRM password
17) Click Next (ignore warning), Next, Next, Next, Install
18) You will see: You are about to be signed out.
19) Click close (or just hang tight)
You now have an Active Directory Domain — Add some users
I’m going to walk you through adding a bunch of users, and how to make one of those users a domain administrator. I am not going to cover setting up OU’s in this post. If you are interested doing that now, take a look at this awesome post from Jared Haight: Setting up an Active Directory Lab — Part 3
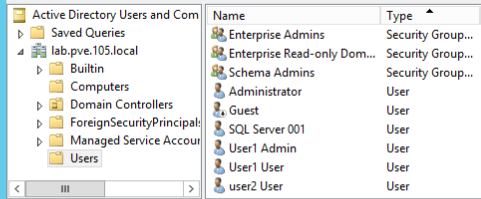
- Within server manager, which should have just popped up, click tools at the top right and select active directory users and computers
- Double click on your domain to expand it
- Right click on users and add new user
- Name your users however you want, but I like to keep it simple:
- First: User
- Last: 1
- Login name: user1
- Next
- Enter an easy to remember/crack password
- Uncheck user must change at next login
- Check password never expires
- Next
- Finish
- Repeat for user2
- Then I suggest adding some user accounts that you will use as admins. You can go with user1-admin, or even just a simple admin1, admin2
Add at least one admin user to your domain admins group
- Within Active Directory Users and Computers, Double click Domain Admins
- Click Members
- Click Add
- Start typing a username of your admin user and click check names
- Click OK
- Click OK
VM #3: Creating your second 2012r2 server
This VM is optional, but the beauty of using a hypervisor on dedicated hardware is that you most likely have memory and storage space to spare.
1) Repeat steps 1 and 2 on VM2, but this time name it something like SRV01:
2) Start the server and add it to the domain
Configuring DNS
To add any machine to the domain, the one thing you NEED to do is set the domain controller as the primary DNS server.
1) RDP to server
2) Right click on the networking icon at the bottom left and click Open Network and Sharing Center
3) Select Ethernet Adapter
4) Change the primary DNS server to be the IP address of your DC
Adding host to the domain
While this process is fairly straightforward, I feel like it never works the first time for me. If you run into issues, read the notes right after these steps for ideas.
1) Select the folder icon in the task bar
2) Right click This PC
3) Click Properties
4) Under Computer name, domain, and workgroup settings, click Change settings
5) Click Change
6) Give your machine a better hostname: Workstation01
7) Switch from Workgroup to Domain and specify the domain. For example, aws.local
Click OK
9) Enter Domain Admin credentials. Go ahead and use Admin1’s credentials.
10) Once your machine has been added, click OK twice
11) Close the window, and go ahead and Restart Now
12) Repeat this for all servers
Having trouble adding your host to the domain? Here are some troubleshooting tips:
1) Can you ping the IP address of your DC from your other server(s)?
2) Can you resolve the hostname of your DC from your other server(s)?
3) Can you navigate to \\IP_ADDRESS_OF_DC from your other server(s)?
Here are things to look for:
Network Config Settings
— Did you give your DC the right subnet mask when you configured the static IP?
— Did you configure the primary DNS server properly on your non-DC host?
Are you typing in the right domain name when attempting to add your host?
Adding domain users to the remote desktop group
You might not ever even need to RDP to your hosts because the proxmox console is pretty good. I still like to do this anyway though.
1) Select the folder icon in the task bar
2) Right click This PC
3) Click Properties
4) On the left, click Remote Settings, and enter the domain administrator credentials
5) In the Remote Desktop section of the window, click Select Users…
6) Click Add…
7) Type Domain users and click Check Names
 Click OK, OK, OK
You should now be able to RDP to this host with any of your domain users (User1, User2, Admin1)
1) Select the folder icon in the task bar
2) Right click This PC
3) Click Properties
4) On the left, click Remote Settings, and enter the domain administrator credentials
5) In the Remote Desktop section of the window, click Select Users…
6) Click Add…
7) Type Domain users and click Check Names
Click OK, OK, OK
You should now be able to RDP to this host with any of your domain users (User1, User2, Admin1)
VM #4: Creating our Windows 10 Template
Everything you need to configure a Windows 10 VM and add it to the domain should is shown above in one way or another. Here is the high level approach:
1) Create the Windows10 VM
2) Install Windows10 using the ISO we downloaded earlier
3) Configure the OS with any custom configurations or software before turning it into a template
4) Turn VM#4, this VM, into a template
VM #5 & #6: Creating two Windows 10 VMs from the template
1) Clone the template to be one Windows10 VM at minimum, but feel free to use 2 or 3 VMs
2) Configure DNS to point to domain controller
3) Configure host name
4) Add VM to the domain
5) Enable file and printer sharing
6) Add domain users to the Remote Desktop group
Wrap Up
You did it! You should now have 1 DC, and 1-3 additional hosts set up in ProxmoxVE. You are now ready to try all sorts of stuff, like CrackMapExec, Empire, Metasploit, Mimikatz, Kerberoasting, and more. My next posts will walk through running these tools against your active directory pentest lab.
Are there any specific tools or techniques related to penetration active directory you would like me to cover? If so, leave a comment! If I know how to do it, I’ll cover it. If I don’t, I’ll try to learn it and then I’ll cover it!
На чтение 3 мин Опубликовано Обновлено
Proxmox — это виртуализационная платформа с открытым исходным кодом, способная запускать различные операционные системы виртуально на одном хосте. В данной статье мы рассмотрим подробную инструкцию по установке операционной системы Windows Server 2012 R2 на Proxmox.
Перед тем как мы приступим к установке, важно удостовериться, что у вас есть компьютер с достаточными техническими характеристиками, такими как процессор 64-бит, поддержка виртуализации и достаточный объем оперативной памяти и свободного места на жестком диске. Кроме того, вам потребуется образ установочного диска для Windows Server 2012 R2.
Шаг 1: Создание новой виртуальной машины в Proxmox.
Откройте интерфейс Proxmox и выберите опцию «Создать новую виртуальную машину». Задайте имя виртуальной машины, выберите тип операционной системы «Microsoft Windows» и версию «Windows Server 2012 R2». Установите желаемые ресурсы, такие как количество процессоров, объем оперативной памяти и размер жесткого диска. Нажмите «Создать» для завершения этого шага.
Шаг 2: Установка операционной системы Windows Server 2012 R2.
Выберите виртуальную машину из списка и нажмите на кнопку «Запустить». Затем, загрузите образ установочного диска для Windows Server 2012 R2. Следуйте инструкциям по установке операционной системы, выберите язык и регион, задайте пароль администратора и выполните другие необходимые настройки. После завершения установки, перезагрузите виртуальную машину.
Шаг 3: Настройка сети и доступа к виртуальной машине.
После перезагрузки, настройте сетевые параметры виртуальной машины в соответствии с вашей сетевой инфраструктурой. Установите IP-адрес и другие необходимые настройки сети. После завершения настройки сети, у вас будет возможность удаленно подключаться к виртуальной машине через Remote Desktop Protocol (RDP) или другие доступные способы.
Теперь вы можете использовать установленную операционную систему Windows Server 2012 R2 на вашей виртуальной машине в Proxmox. Удачной работы!
Подготовка сервера к установке
Перед началом установки Windows Server 2012 R2 на Proxmox необходимо выполнить несколько подготовительных действий. В этом разделе мы рассмотрим все этапы подготовки сервера к установке операционной системы.
1. Загрузка образа Windows Server 2012 R2
Первым шагом необходимо загрузить образ операционной системы Windows Server 2012 R2. Вы можете скачать его с официального сайта Microsoft или использовать другие источники.
2. Создание виртуальной машины
Для установки Windows Server 2012 R2 на Proxmox необходимо создать виртуальную машину. Для этого вам понадобится имя виртуальной машины, объем оперативной памяти, объем жесткого диска и количество процессоров, которые вы хотите выделить для виртуальной машины.
3. Установка образа операционной системы
После создания виртуальной машины необходимо указать путь к загруженному образу операционной системы Windows Server 2012 R2. Выберите этот образ в качестве источника для установки виртуальной машины.
4. Настройка сети
Настройте сетевые настройки виртуальной машины. Вы можете выбрать один из нескольких режимов работы сети, включая мостовой режим и NAT-режим.
5. Другие настройки
Если вы хотите, вы можете настроить другие параметры виртуальной машины, включая размер жесткого диска, использование опций виртуализации и т. д.
После выполнения всех этих шагов ваш сервер будет полностью готов к установке операционной системы Windows Server 2012 R2. Следующий этап — установка самой системы.

Contents
- 1 How To Make Vm Windows Server 2012 R2 On Proxmox 4 X
- 2 How To Make Vm Windows Server 2012 R2 On Proxmox 4.x
- 2.1 Conclusion
- 2.1.1 Related image with how to make vm windows server 2012 r2 on proxmox 4 x
- 2.1.2 Related image with how to make vm windows server 2012 r2 on proxmox 4 x
- 2.1 Conclusion
Discover the Latest Technological Advancements and Trends: Join us on a thrilling journey through the fascinating world of technology. From breakthrough innovations to emerging trends, our How To Make Vm Windows Server 2012 R2 On Proxmox 4 X articles provide valuable insights and keep you informed about the ever-evolving tech landscape. 6 000 nama sebelumnya r2 4-x proxmox ago 1209 windows years 2012 server server abe subscribe 8- subscribers how berkode wisnu on 2012 views vm server make 7-5k to 204 windows windows
How To Make Vm Windows Server 2012 R2 On Proxmox 4 X Youtube
How To Make Vm Windows Server 2012 R2 On Proxmox 4 X Youtube
Create a new vm, select «microsoft windows 8.x 2012 2012r2» as guest os and enable the «qemu agent» in the system tab. continue and mount your windows server 2012 iso in the cdrom drive for your virtual hard disk select «scsi» as bus with «virtio scsi» as controller. 0:00 12:09 how to make vm windows server 2012 r2 on proxmox 4.x abe wisnu 204 subscribers subscribe 7.5k views 6 years ago windows server 2012, sebelumnya berkode nama windows server 8,.

La Idea Es Montar Un Windows Server 2008 R2 Con Active Directory Y
La Idea Es Montar Un Windows Server 2008 R2 Con Active Directory Y
Log on to your proxmox ve server, and click the create vm button in the top right corner. this will launch the vm creation wizard. on the general tab, enter a name for your new vm, and click next. if you’re running a proxmox cluster, you can choose a specific node for your vm. proxmox create virtual machine wizard general tab. 1 introduction 2 physical to virtual (p2v) 2.1 clonezilla live cds 2.2 vmware converter 2.2.1 prepare windows 2.2.2 prepare location to save local image 2.2.3 vmware vcenter settings 2.2.3.1 prepare the vm on proxmox ve 2.2.3.2 move the image to the proxmox ve server 2.2.3.3 converting to qcow2 2.2.3.4 final steps 2.2.3.5 alternative methods. Hello! i’m trying to setup windows server 2012 r2 with proxmox. everything has worked fine and setup fine but the network in windows is showing up as «no internet access». i assume there are some wrong settings somewhere. in proxmox, the network device is vmbr0, model: intel e1000 it was valleriani thread oct 7, 2020. To create a vm in proxmox ve, click create vm at the top of the screen. this will bring up the following pop up window. give your vm a name and then click the next button. on the os tab, choose your iso image to install your os. note: in our example, we will be using ubuntu 18.04 lts. once you have chosen your operating system, click next.
How To Make Vm Windows Server 2012 R2 On Proxmox 4.x
How To Make Vm Windows Server 2012 R2 On Proxmox 4.x
windows server 2012, sebelumnya berkode nama windows server 8, adalah versi windows server sekarang. windows server the process of launching a windows virtual machine on proxmox is a bit more involved when compared to launching a linux vm, in this video, we’ll show you how to setup your first virtual machine with proxmox! proxmox is a great solution for setting up your proxmox #windowsserver2022 #virtualization ==hardware parts that i recommend== computer electronics repair tool kit how to create windows server 2022 virtual machine on proxmox the windows server 2022 is the latest version of the server server2022 #proxmox #virtualmachine full steps can be found at i12bretro.github.io tutorials 0840 01. log into the learn how to install, configure, sysprep, and clone to template a windows server 2022 virtual machine and see how to install the here is the video is explain step by step details installing os : server 2008 r2 proxmox ve for more videos subscribe us!!! in this video i will show how easy it is to install proxmox on a pc and install an operating system as a virtual machine in the this video guide walks you through installing a windows vm on proxmox, and prepping it for a being a template. many thanks to all my patrons on patreon onemarcfifty !!! please visit my channel page: do you need to virtualize windows 10 with proxmox? join me as we install and configure windows 10 on proxmox ve
Conclusion
Taking everything into consideration, it is clear that article delivers useful information regarding How To Make Vm Windows Server 2012 R2 On Proxmox 4 X. Throughout the article, the author demonstrates an impressive level of expertise on the topic. In particular, the discussion of X stands out as a key takeaway. Thank you for the post. If you have any questions, please do not hesitate to reach out through social media. I am excited about your feedback. Furthermore, below are some related posts that you may find helpful: