Пользуемся SteamOS и Windows одновременно.
Будем исходить из того, что у вас на руках Steam Deck, который вы уже включили и настроили (а также, при необходимости, заменили SSD).
Подготовка. Готовим раздел для Windows.
Там же вы найдете ссылку на программу Rufus, с помощью которой и запишем образ на флешку.
Выключаем Steam Deck и вставляем флешку.
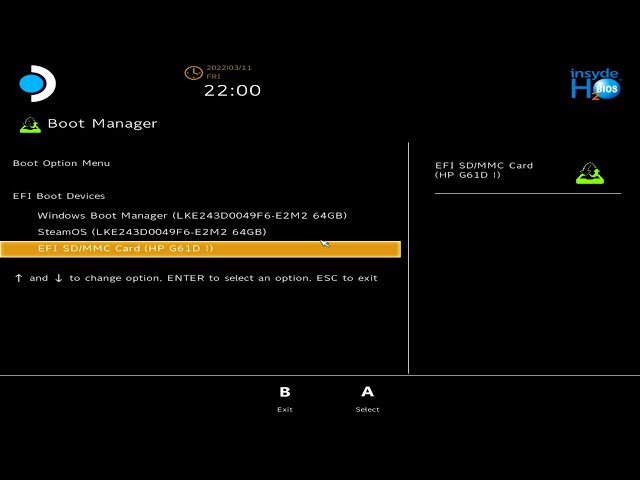
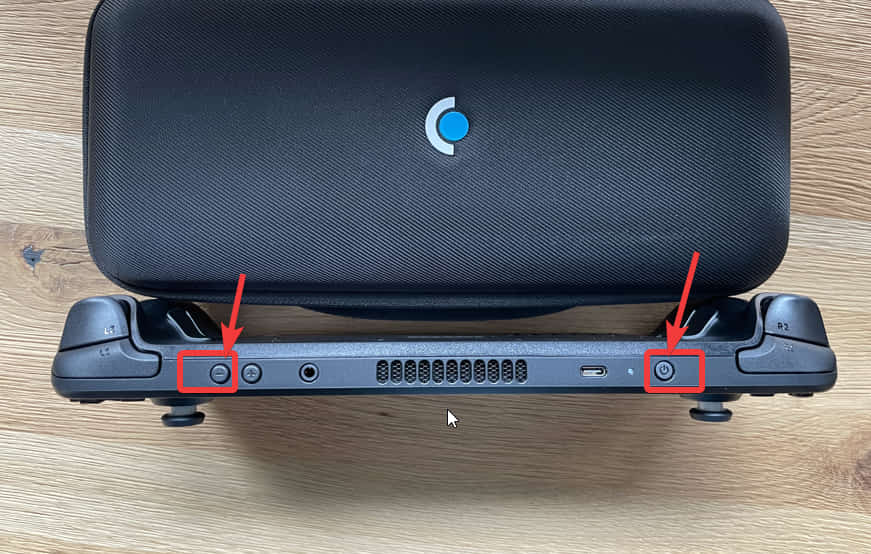
Нам нужно зайти в Boot Manager — это можно сделать, зажав кнопку питания и кнопку уменьшения громкости одновременно. Когда услышите звуковой сигнал (примерно через секунду), отпускаете кнопку питания, но продолжаете держать кнопку уменьшения громкости.
Попадаете в такое меню и выбираете свою флешку:
Далее попадаем на рабочий стол.
Нажимаем пуск -> System -> KDE Partition Manager:
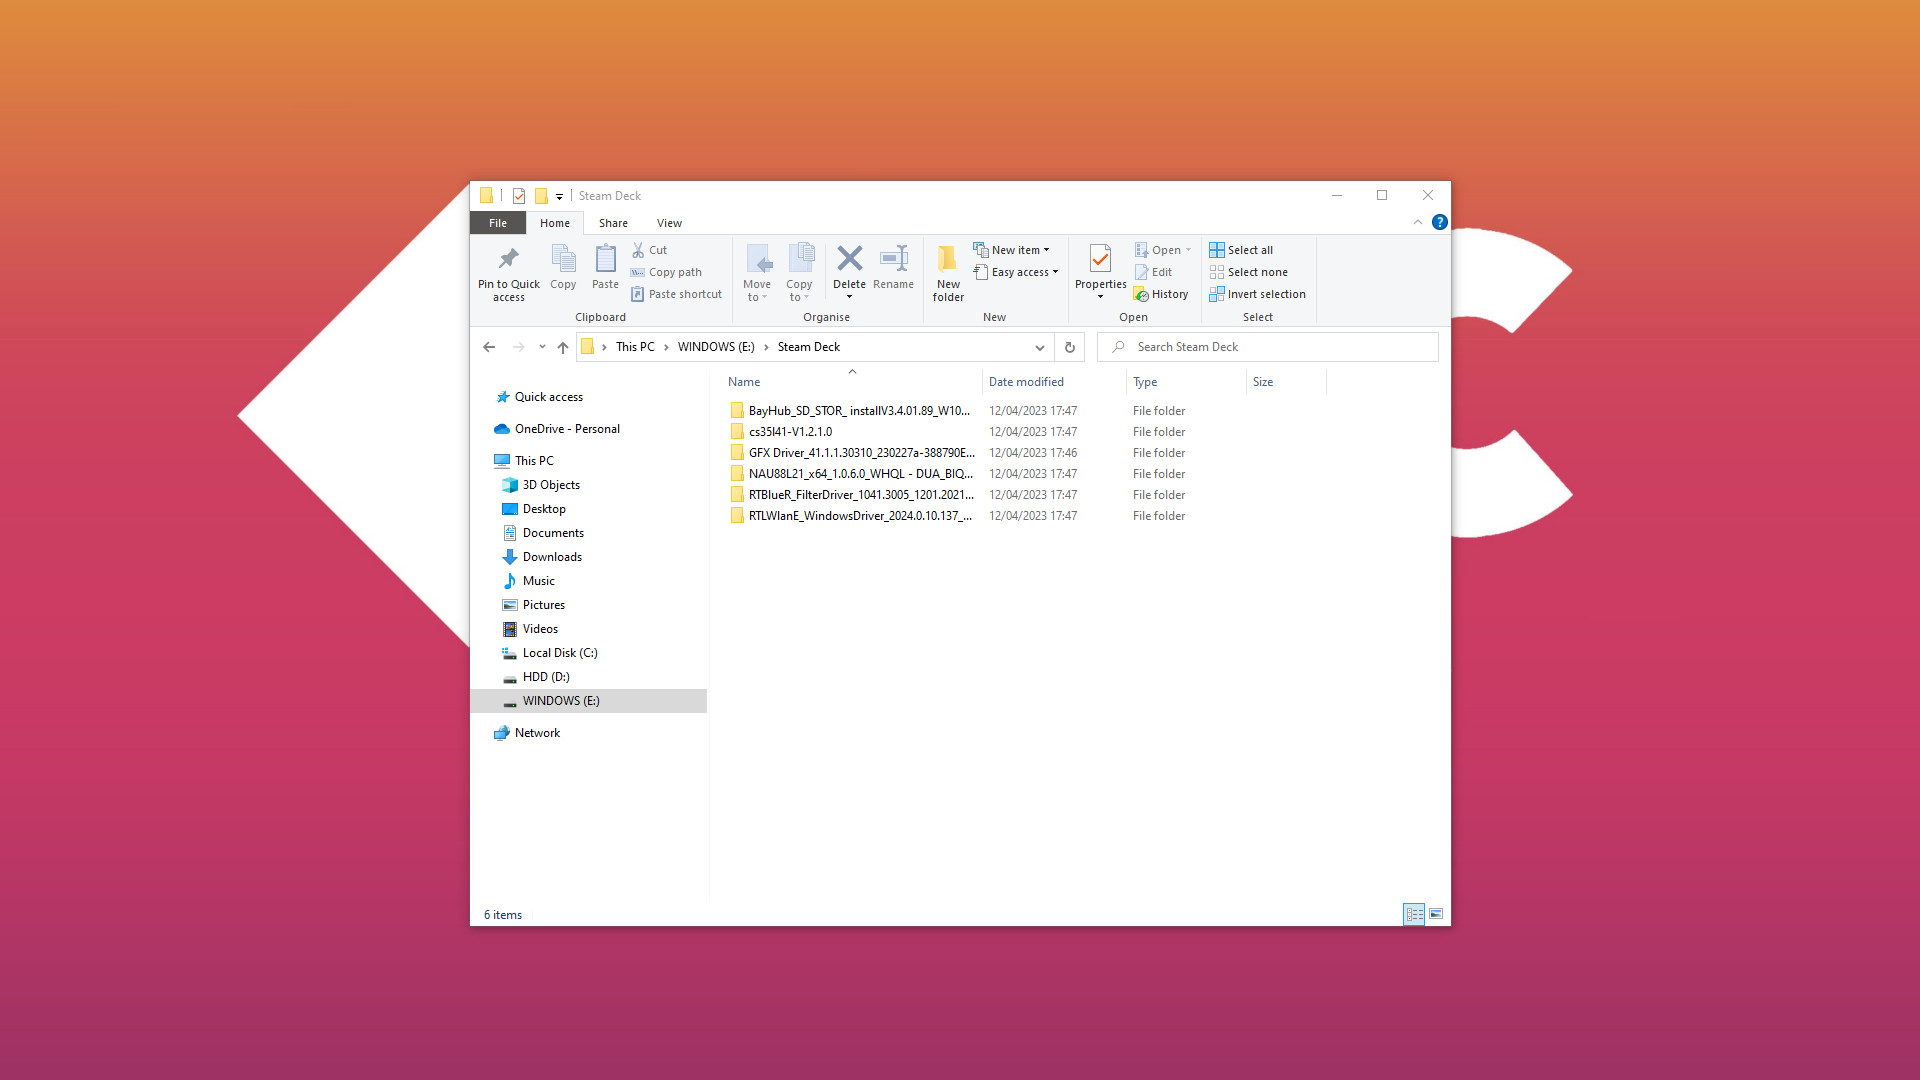
Слева выбираем наш SSD, который будем делить на 2 системы, затем, в открывшемся списке справа листаем в самый низ и находим строчку, где будет написан объем, соответствующий нашему SSD
Нажимаем на эту строчку правой кнопкой и в открывшемся окне выбираем Resize/Move:
Далее ползунком сверху регулируем сколько места мы отрежем под Windows.
Size — останется на SteamOS.
Free space after — будет у Windows.
Нажимаем ОК. В самом низу списка теперь появляется строчка, с отрезанным нами, местом. Нажимаем на неё правой кнопкой мыши и в контекстном меню нажимаем «New», чтобы создать новый том.
Выбираем файловую систему — NTFS и нажимаем ОК.
Чтобы подтвердить все изменения, в левом верхнем углу нажимаем «Apply» и ещё раз соглашаемся во всплывающем окне.
Установка и настройка Windows.
На этом этапе рекомендую вам подключить к Steam Deck клавиатуру и мышь через хаб, чтобы упростить настройку системы.
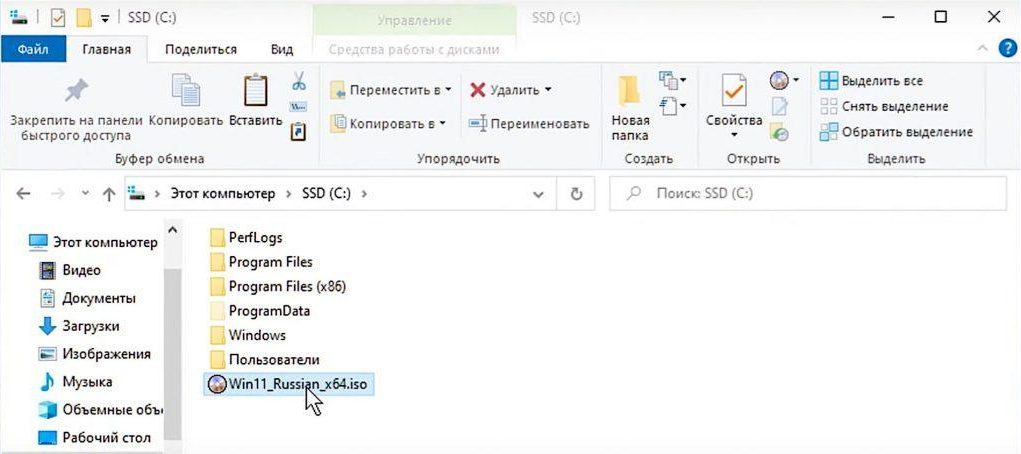
Записываем на флешку образ Windows (я брал оригинальный образ Windows 11 с сайта Microsoft). Вставляем флешку в Steam Deck.
Заходим в Boot Manager также, как делали раньше, выбираем флешку.
Установщик у вас запустится в книжной ориентации, не бойтесь, всё по плану.
Как и при любой установке нажимаем «далее».
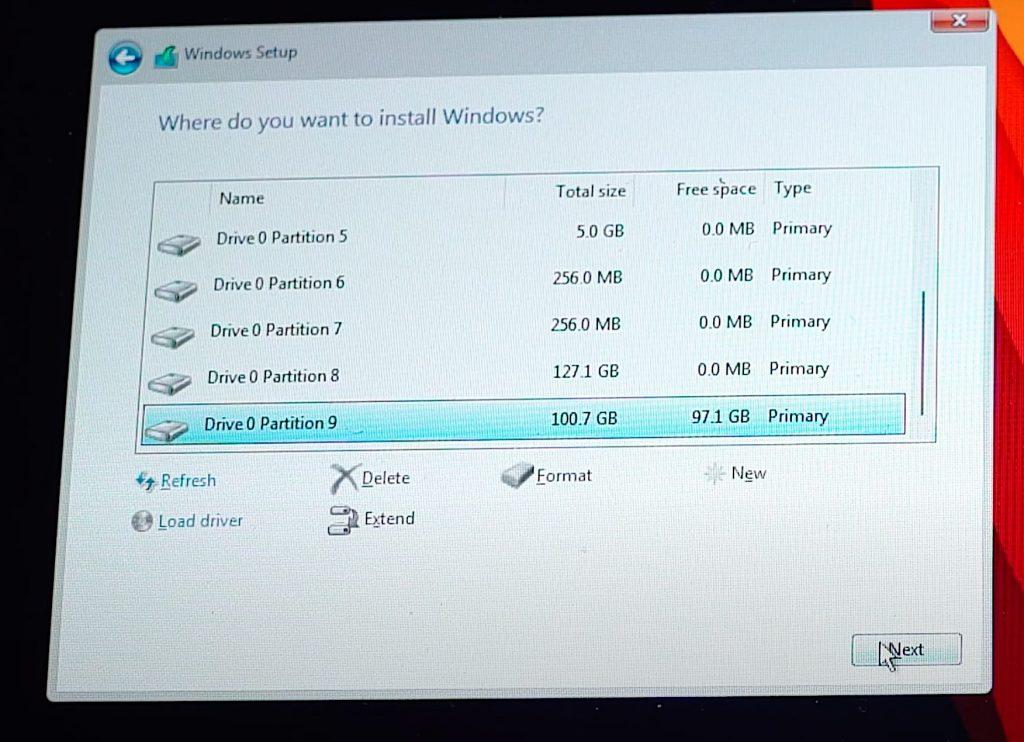
В списке разделов, находим нужный, с отрезанным нами, местом:
Ждём окончания установки:
Дальше делаем первоначальную настройку системы (выбираем раскладку, входим в учетную запись и т.д.):
Как только нас пускают на рабочий стол, выбираем альбомную ориентацию:
Ну вот и всё. Ничего сложного.
Теперь у нас 2 рабочие системы на Steam Deck, которые переключаются через Boot Manager (заходить в него, думаю уже приноровились). По умолчанию, после перезагрузки, всегда будет стоять Windows, поставить SteamOS основной системой пока нельзя.
P.S.: есть возможность сделать кастомный загрузчик, видео, как его сделать, да и в целом, там вся эта инструкция в видео формате, если вам так удобнее, прикреплю ниже, но у меня почему-то не получилось, хотя делал всё по инструкция, загрузчик появился, но Windows всё равно брала вверх и запускалась первой, поэтому не стал добавлять это в пост, да и через Boot Manager менять системы не трудно, но может я что-то делал не так и вам повезет.
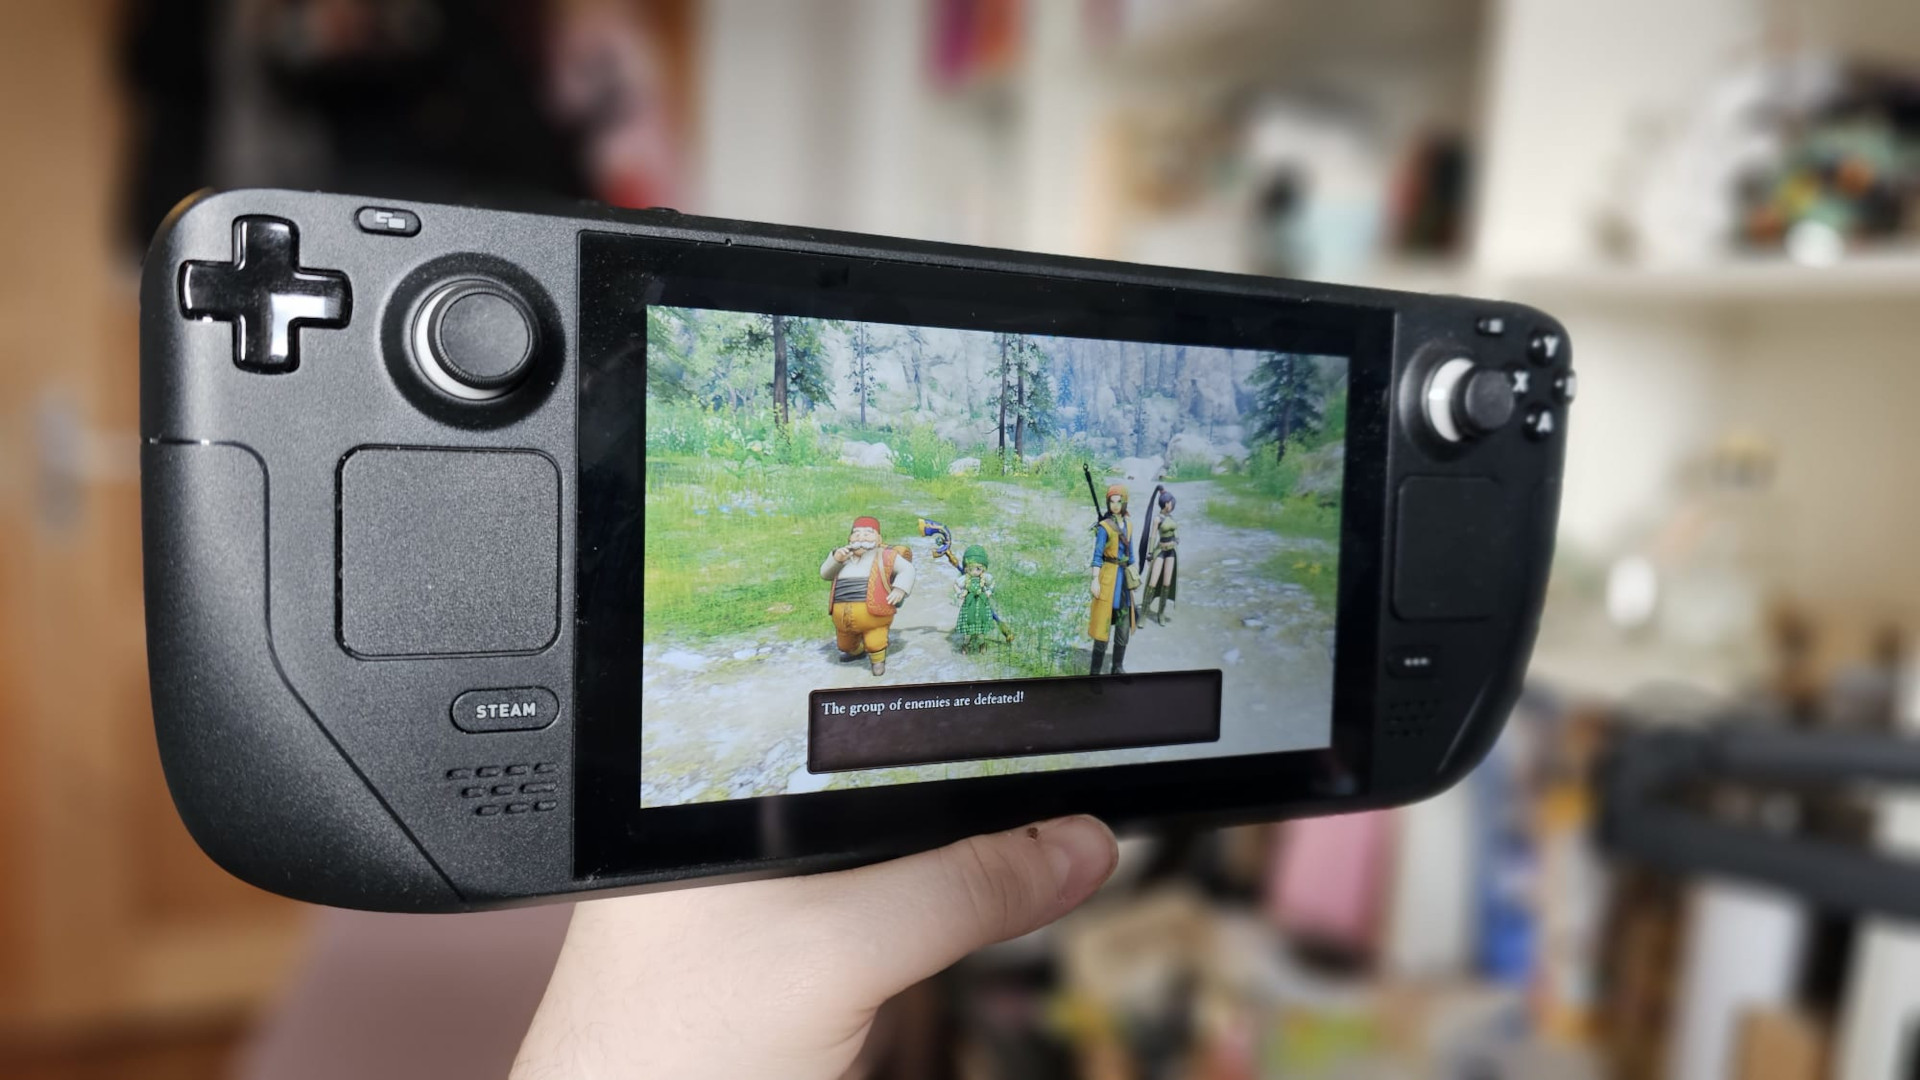
The Steam Deck from Valve runs on a customized version of Arch Linux known as SteamOS v3.3. Valve mentioned that they plan to employ a rolling update technique for Deck’s system software even though SteamOS was originally created for Steam devices using Debian Linux. Having said that, we should keep in mind that, as demonstrated in this article, you can also install Windows on the Deck.
Steam Deck can emulate a variety of consoles, arcade devices, and even MS-DOS games, and this shouldn’t come as a surprise. It’s also important to note that there are several legitimate emulators you may use to install and run your games.
With Valve’s SteamOS recovery image, you may switch back to SteamOS if you decide you don’t want to replace it with Windows. You may easily switch between the operating systems each time your device boots up if you install Windows on a USB drive or SD card.

How to dual boot on the Steam Deck

Windows must be installed on a USB drive or micro SD card if you want to dual-boot Windows and SteamOS. This is not possible out of the box with the built-in storage. Using an external USB-C drive is an option if you only require Windows while your SteamDeck is stationary and preferably hooked into a powered dock at home. The most practical option if you want mobile access to Windows is an SD card.
This is how you can use a SteamDeck to start Windows from an SD card:
1. Download the Media Creation Tool for Windows 10 from the official Microsoft website and obtain the Windows 10 installation files.
2. Get the Rufus app and set it up.
3. Launch Rufus.
4. Choose the appropriate SD Card or USB stick under the Device option.
5. Select the Windows 10 installation file from the Boot selection menu.
6. Choose MBR in the Partition scheme section, then click Start.
7. Place a USB stick or SD card in your SteamDeck once the image is completely installed via Rufus
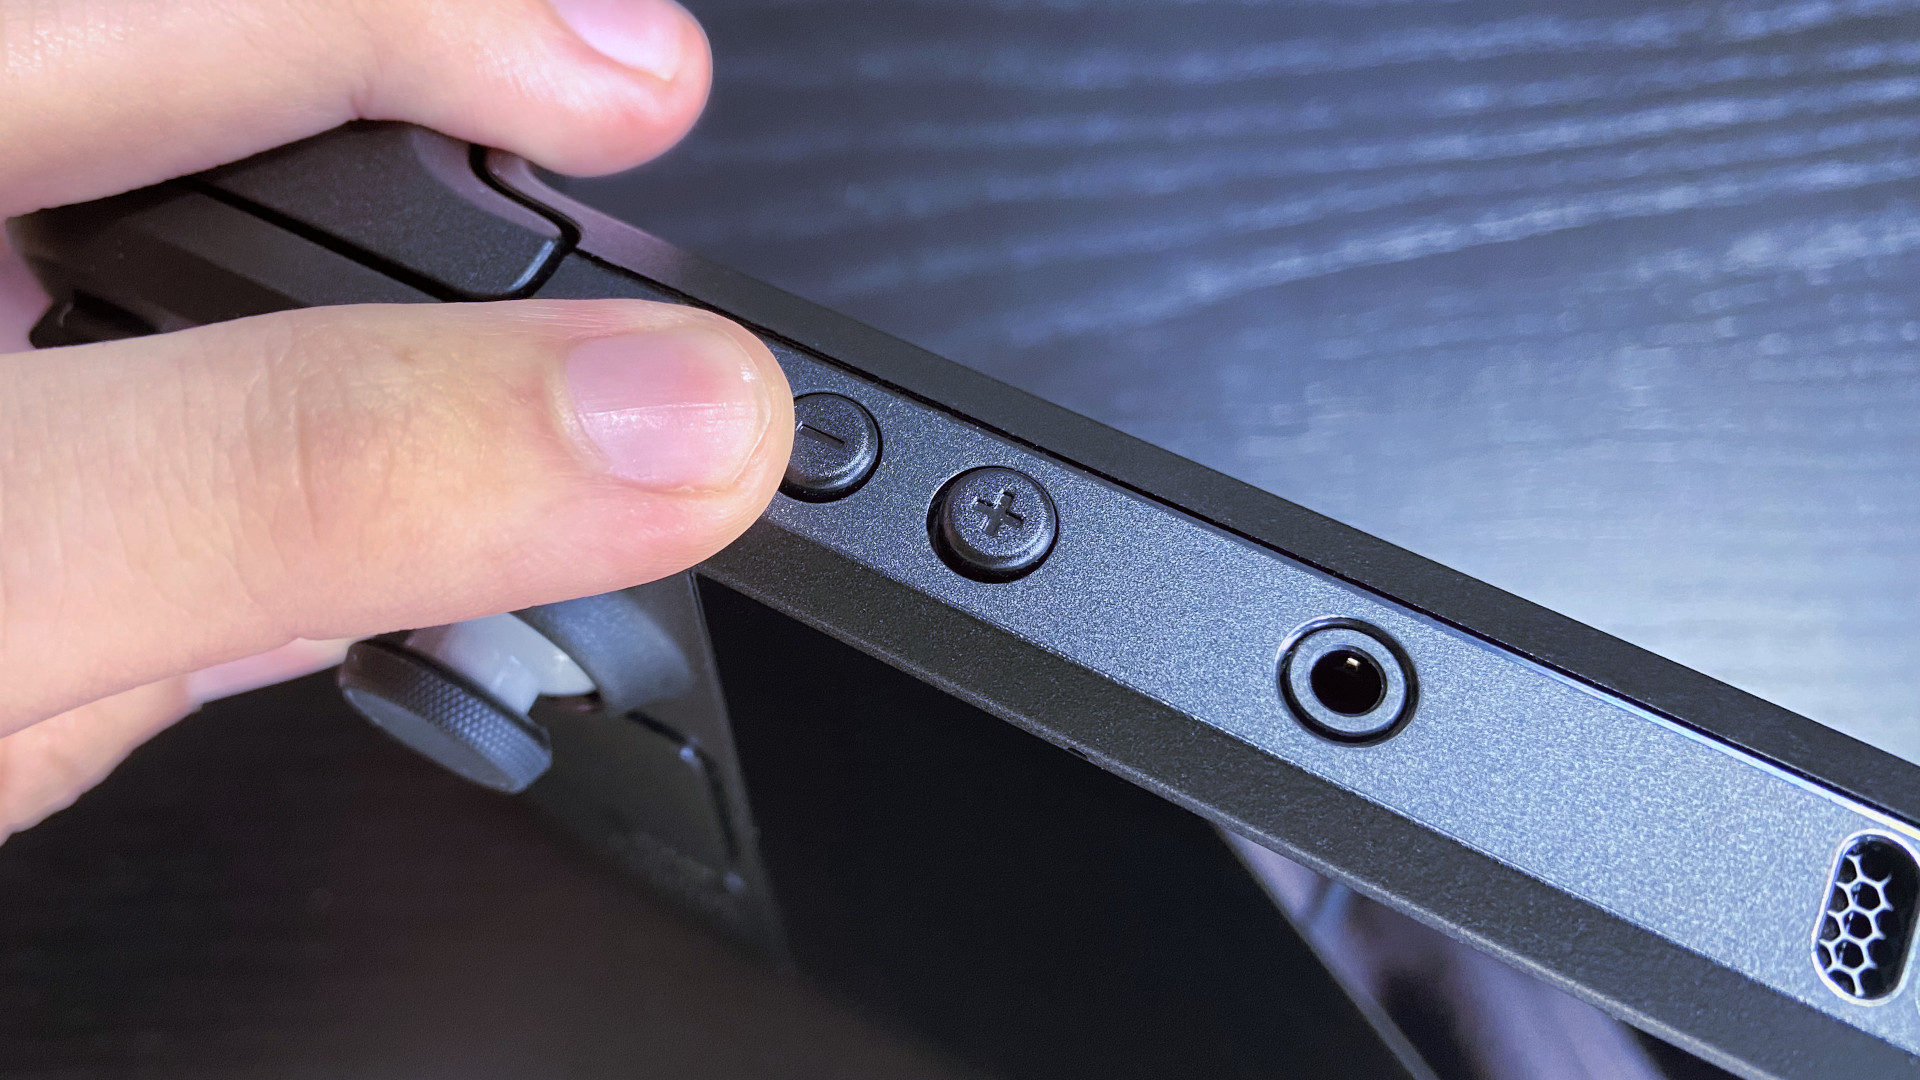
8. To begin, press the Power and Volume buttons simultaneously.
9. Choose Boot Manager, then press Enter after selecting the bootable device.
10. Once this is complete, Windows 10 will be installed on your device and you will need to go through the setup procedure. There really isn’t anything new because we follow the same straightforward procedure each time we install Windows 10 on one of our computers or laptops.
How to boot from USB?
Ensure that the Deck is off, then press the Power button while holding the Volume Down button. Once the boot screen appears, release the Volume Down button and hit the Volume Up button to launch Steam’s Boot Manager. The system will handle the rest if you do a good job creating the image or media you desire to boot from. Keep in mind that you may dual-boot Windows using your trusted USB drive and an SD card using Steam Deck.
FAQ section: Steam Deck dual boot questions answered
Q1: Can I use the internal storage of the Steam Deck for dual booting?
A1: No, currently it is not possible to use the internal storage of the Steam Deck for dual booting. You need to use an external USB drive or a micro SD card to install Windows alongside SteamOS on your Steam Deck.
Q2: Is it difficult to switch between Windows and SteamOS on the Steam Deck?
A2: Switching between Windows and SteamOS on the SteamDeck is quite simple. You can easily choose the desired operating system during the boot process. Just follow the instructions provided in the article, and you’ll be able to seamlessly switch between the two operating systems.
Q3: Can I use a USB-C drive to install Windows on my Steam Deck?
A3: Yes, you can use a USB-C drive to install Windows on your SteamDeck, but this option is more suitable if you plan to use Windows only while your SteamDeck is stationary and connected to a powered dock.
Q4: Will dual booting my Steam Deck void my warranty?
A4: Dual booting your SteamDeck with Windows and SteamOS should not void your warranty, as long as you follow the instructions provided in the article and don’t modify any hardware components. However, it’s always a good idea to check with Valve or the manufacturer for specific warranty information.
Q5: If I decide to remove Windows, can I revert back to SteamOS easily?
A5: Yes, if you decide you no longer want Windows on your SteamDeck, you can use Valve’s SteamOS recovery image to restore your device back to its original state. This will remove Windows and restore your console to running SteamOS exclusively.
Q6: Do I need a specific SD card or USB drive to install Windows on my Steam Deck?
A6: You can use any compatible SD card or USB drive to install Windows on your SteamDeck. However, it’s recommended to use a high-quality, high-speed SD card or USB drive for optimal performance.
Q7: Can I still access my Steam library and installed games if I dual boot my Steam Deck?
A7: Yes, you can still access your Steam library and installed games on your handheld when dual booting with Windows and SteamOS. Once booted into SteamOS, your Steam library and games will be available as usual.
By including this FAQ section, we have provided additional information and addressed common concerns about dual booting a SteamDeck with Windows and SteamOS. We hope this will help users make an informed decision about whether or not to dual-boot their SteamDeck and offer a better understanding of the process involved.
Edited by Dinesh Renthlei
Thank You!
GIF
❯
(Image credit: Ben Wilson | Windows Central)
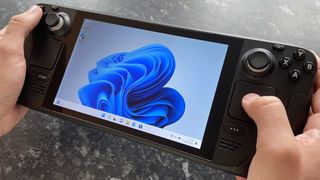
Valve’s portable PC gaming handheld has proved to be a roaring success, but the Steam Deck has a notable limitation. It’s totally reliant on its Linux-based SteamOS operating system, which excludes specific titles from true compatibility, primarily due to reliance on anti-cheat hooks designed for Windows. Dual booting is still not an official option, but that doesn’t mean you can’t boot into Windows on your Steam Deck.
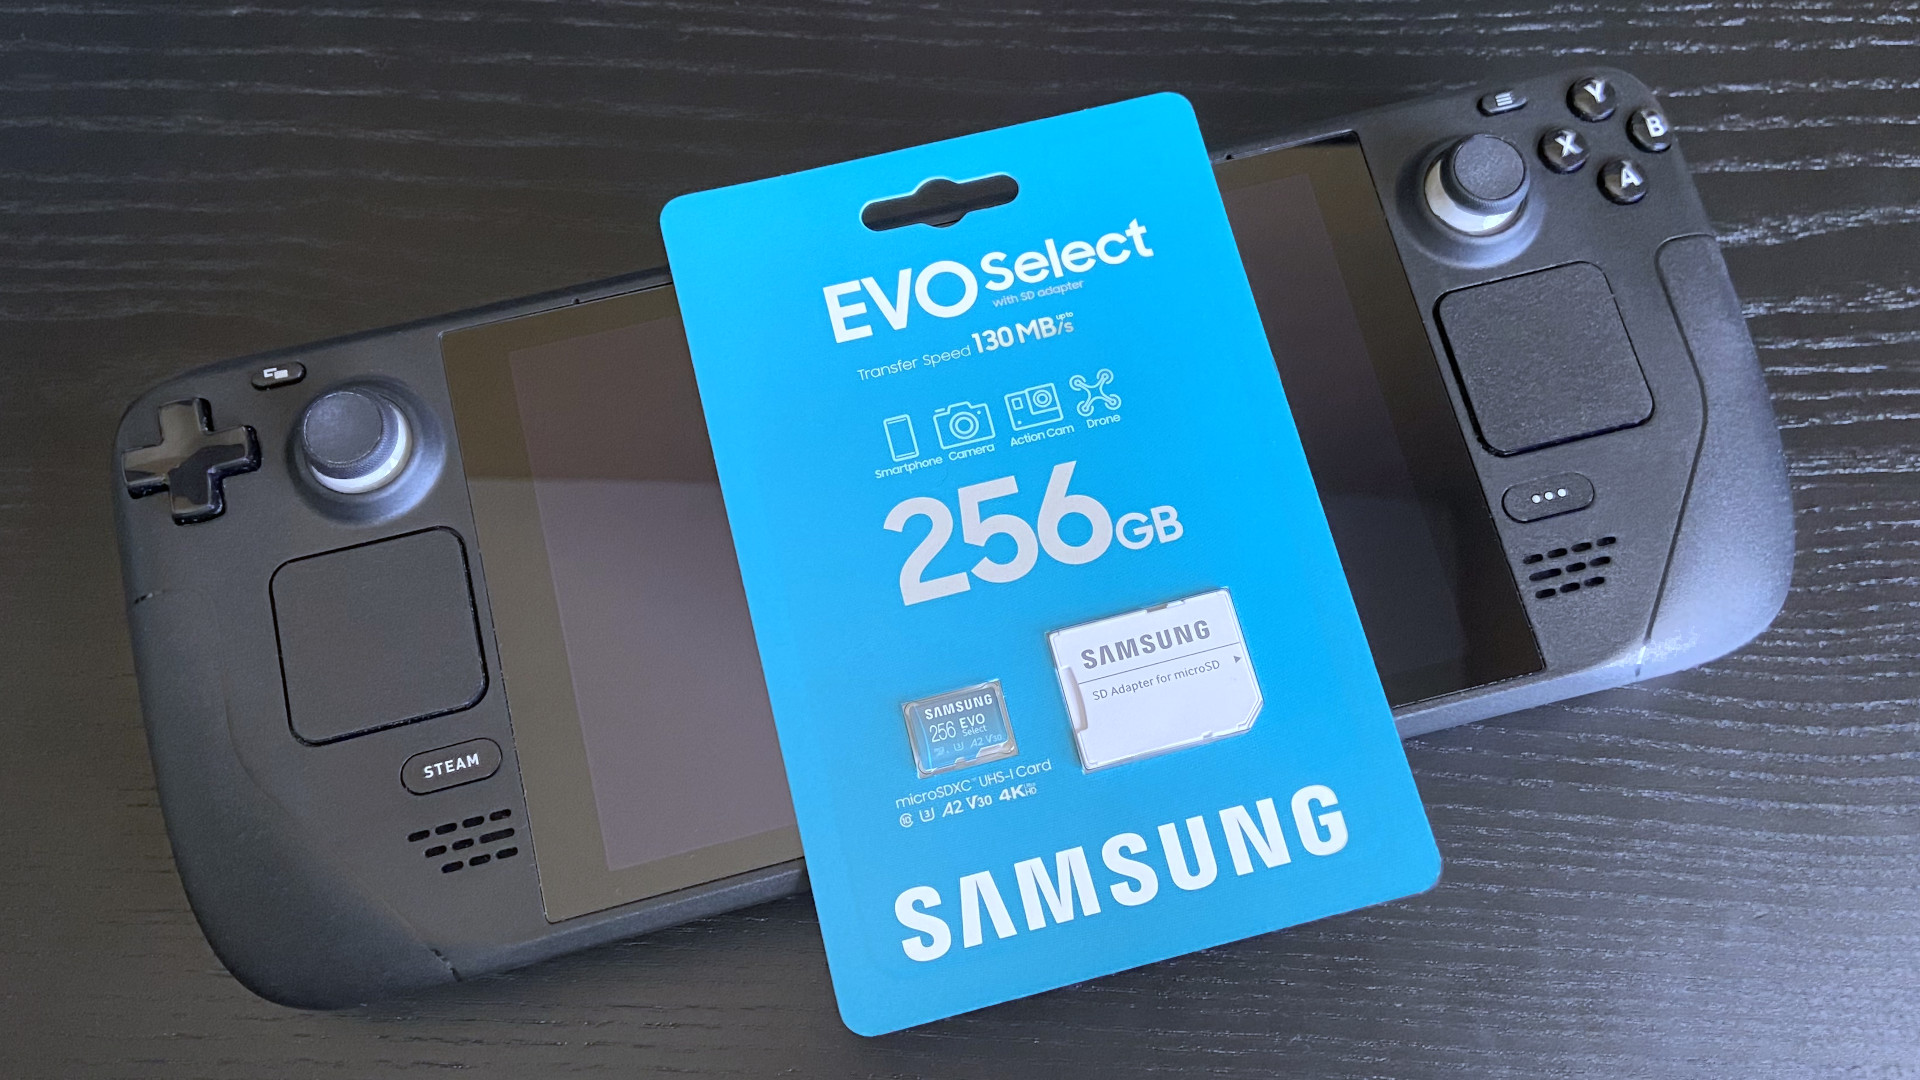
Installing Windows on an external storage device is easier than you might think. All you need is one of the best SD cards for Steam Deck and some patience. I’ve been tinkering with my 256GB model for a while, and my Samsung EVO Select card has proved more than capable of running my copy of Windows 11, so I can show you exactly how to set everything up.
Which version of Windows should I install on my Steam Deck?
Windows 11 is the preferred option for the Steam Deck since Valve routinely updates its list of drivers. Previously, Windows 10 was the stable choice, but improvements to firmware on the handheld meant that either is now viable. For this guide, I’ll be using Windows 11 Home (64-bit.)
How to prepare your SD card in Windows
Installing Windows 11 to an external storage device like a micro SD card is a much safer method for the integrity of your Steam Deck’s internal drive. If you toggle an upcoming option, it won’t affect the default SteamOS installation either. Although there is no official dual-boot solution, you can still switch to Windows when you power up the console by holding the volume down and power buttons together and accessing the standard boot menu.
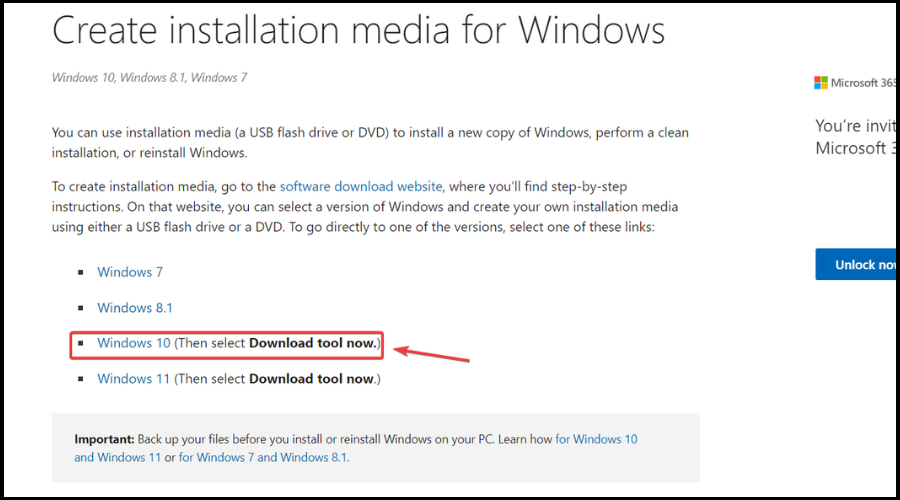
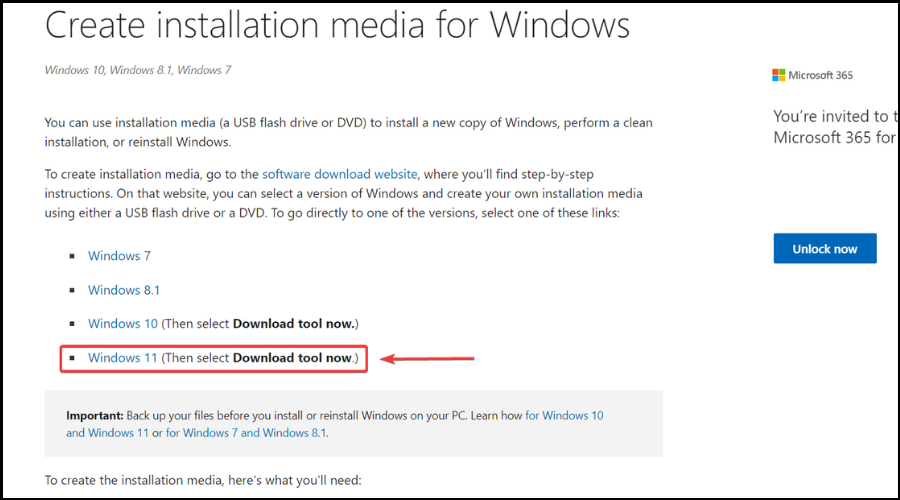
- Navigate to the official Windows 11 download page.
- Under the ‘Create Windows 11 Installation Media‘ section, click Download.
- Find mediacreationtool in your downloads directly and launch the app.
- Select the correct language for your region.
- Ensure Windows 11 is selected in the ‘Edition‘ drop-down box.
- Click ‘Next‘ and select the ‘ISO file‘ radio button.
- Choose a suitable download location for your Windows.iso and exit the app when finished.

- Navigate to the official Rufus download page.
- Under the ‘Download‘ section, click on the ‘Last updated‘ version.
- Find Rufus in your downloads directly and launch the app.
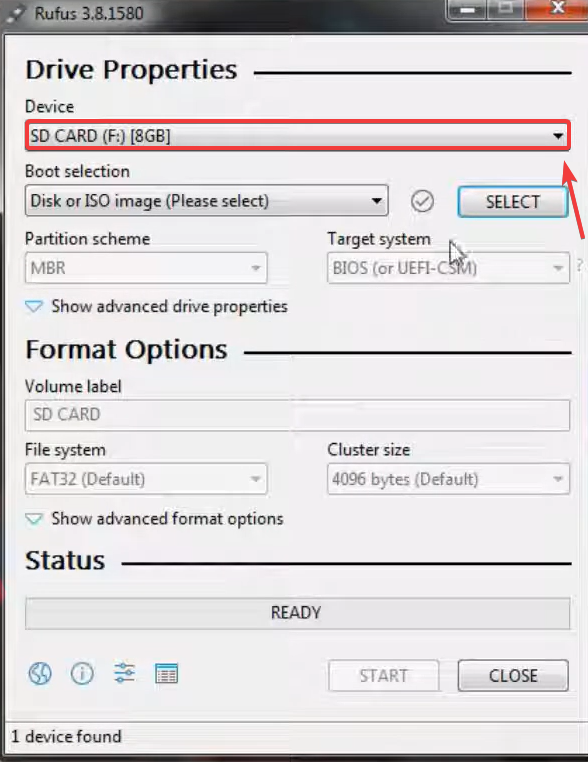
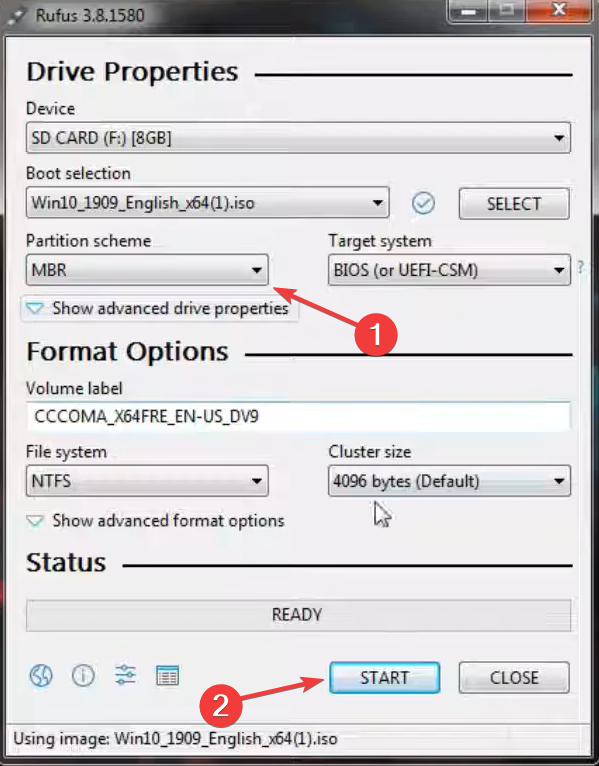
- Under the ‘Device‘ section, select your microSD card*.
- For ‘Boot selection,’ choose ‘Disk or ISO image.’
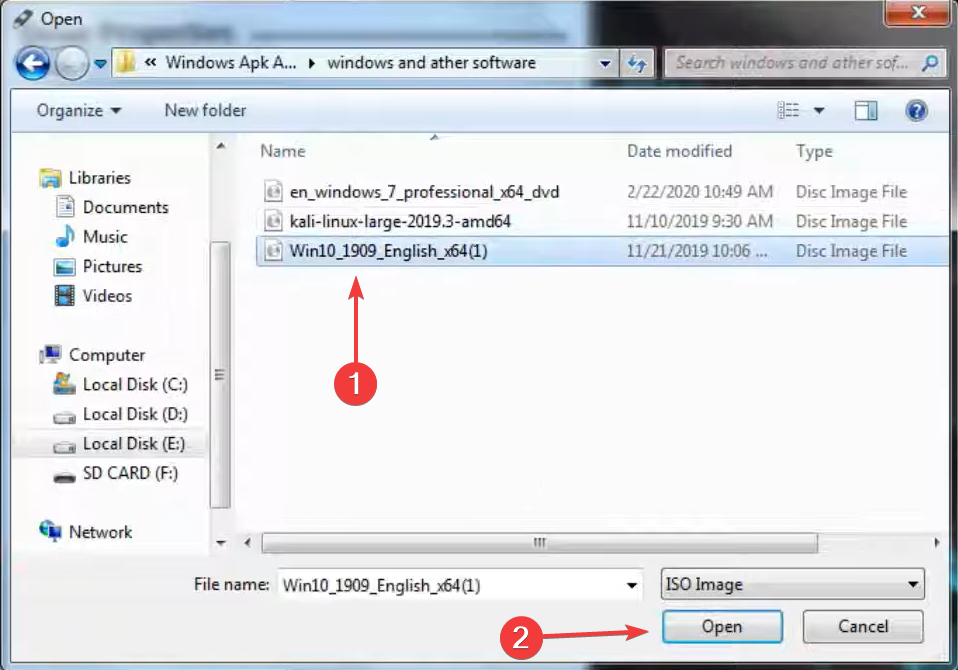
- Click the ‘SELECT‘ button, find your ‘Windows.iso,’ and click ‘Open.’
- For the ‘Image option‘ drop-down menu, choose ‘Windows To Go.’
Important: It’s critical that you follow this step carefully and choose ‘Windows To Go.’ This is what allows us to run Windows 11 directly from external storage rather than creating a boot drive to install elsewhere.
* If your device doesn’t appear, click ‘Show advanced drive properties‘ and check ‘List USB Hard Drives,’ but be careful. This is extremely risky if you select the wrong drive. If your SD card isn’t on the list, it is more likely a defective unit or a type of formatting error. Drives on this advanced list are not intended to be used with Rufus.
- Leave the remaining options in Rufus alone and click ‘START.’
- For ‘Version selection,’ select your matching edition and press ‘OK.’
- On the ‘Windows User Experience‘ popup, select the following:
- ✔ Prevent Windows To Go from accessing internal disks
- ✔ Remove requirement for an online Microsoft account
- ⬜ Create a local account with username: __
- ✔ Set regional options to the same values as this user’s
- ✔ Disable data collection (Skip privacy questions)
Important: The second-most vital option to check is ‘Prevent Windows To Go from accessing internal disks.’ This keeps the integrity of your Steam Deck and SteamOS intact by keeping Windows 11 isolated to your SD card. The larger the card, the more space you’ll have for games.
- Rufus will warn that all data on your card will be destroyed, press ‘OK.’
- Wait for the ‘Status‘ bar to show green* with a ‘READY‘ message.
* This part can take a long time, depending on your device. Creating a Windows To Go drive is a generally lengthy process, taking almost 34 minutes for my Samsung EVO Select 256GB micro SD card to finish. Be patient, and don’t interrupt the process or close Rufus while it’s working.
- Close Rufus and navigate to your newly created drive in File Explorer.
- Create a new folder with a name you’ll remember, like ‘Steam Deck.’
- Navigate to the official Windows Resources download page.
- Download all the driver archives* and unpack them to your new folder.
* We’ll need these drivers when Windows completes its initial installation. Although most functionality is intact with generic offerings from Microsoft, it’s important to use the packages provided by Valve to ensure compatibility. Be sure to download both audio drivers and consider saving the Windows Resources page to your bookmarks.
How to boot and install Windows on Steam Deck
Now that you have a micro SD card set up as a portable edition of Windows, you can safely remove it from your computer. Turn off your Steam Deck by holding the power button and selecting ‘Shutdown‘ from the menu before inserting the SD card.
You’ll be accessing a hidden ‘Boot Manager‘ screen to use Windows instead of SteamOS with this method every time, at least until Valve adds proper dual-boot support. The Steam Deck touchscreen should work fine during the setup process, or you could connect a mouse via USB-C or with the official docking station or an alternative like the JSAUX Steam Deck dock.
- Hold the volume down and power buttons until you hear a chime.
- In the ‘Boot Manager,’ select ‘EFI SD/MMC Card‘ and press the A button.
- You’ll see a ‘Getting ready‘ message on the screen in portrait mode.
- On the ‘Let’s connect you to a network‘ screen, press ‘I don’t have internet.’
- You’ll be prompted to connect again, so press ‘Continue with limited setup.’
Although the Steam Deck can detect Wi-Fi networks and connect during the setup stage, the default drivers aren’t as capable as the ones provided by Valve. Connecting to a wireless access point now would extend the whole process since your download speeds can be significantly reduced with Microsoft’s drivers. You have better drivers on your SD card, so don’t worry about skipping this.
- Enter a username when asked, ‘Who’s going to use this device?‘
- The password field can be left blank, pressing ‘Next‘ to continue.
If you prefer to add a password, you can. However, booting into Windows on your Steam Deck will naturally be slightly slower since you’ll need to enter a password every time. If you only plan to use this SD card to play games otherwise unavailable on SteamOS, I recommend leaving the password blank. Still, a secure password is recommended if you’re storing sensitive files in Windows.
- Navigate to the folder you created containing drivers in the C: drive.
- Install each driver by following Valve’s instructions:
- APU driver
- Run setup.exe to install.
- Wi-Fi driver
- Run install.bat to install.
- Bluetooth driver
- Run installdriver.cmd to install.
- SD Card reader driver
- Run setup.exe to install.
- Audio drivers
- Right-click* cs35l41.inf and select Install.
- Right-click NAU88L21.inf and select Install.
* The default Windows touchscreen drivers should allow you to access the right-click menu by tapping and holding for a moment; then, the context menu will appear. Both audio drivers use .inf files, whose icons resemble a sheet of paper with a cogwheel, rather than a traditional .exe or even .bat file. If you can’t see ‘Install‘ on the right-click context menu, first press ‘Show More Options.’
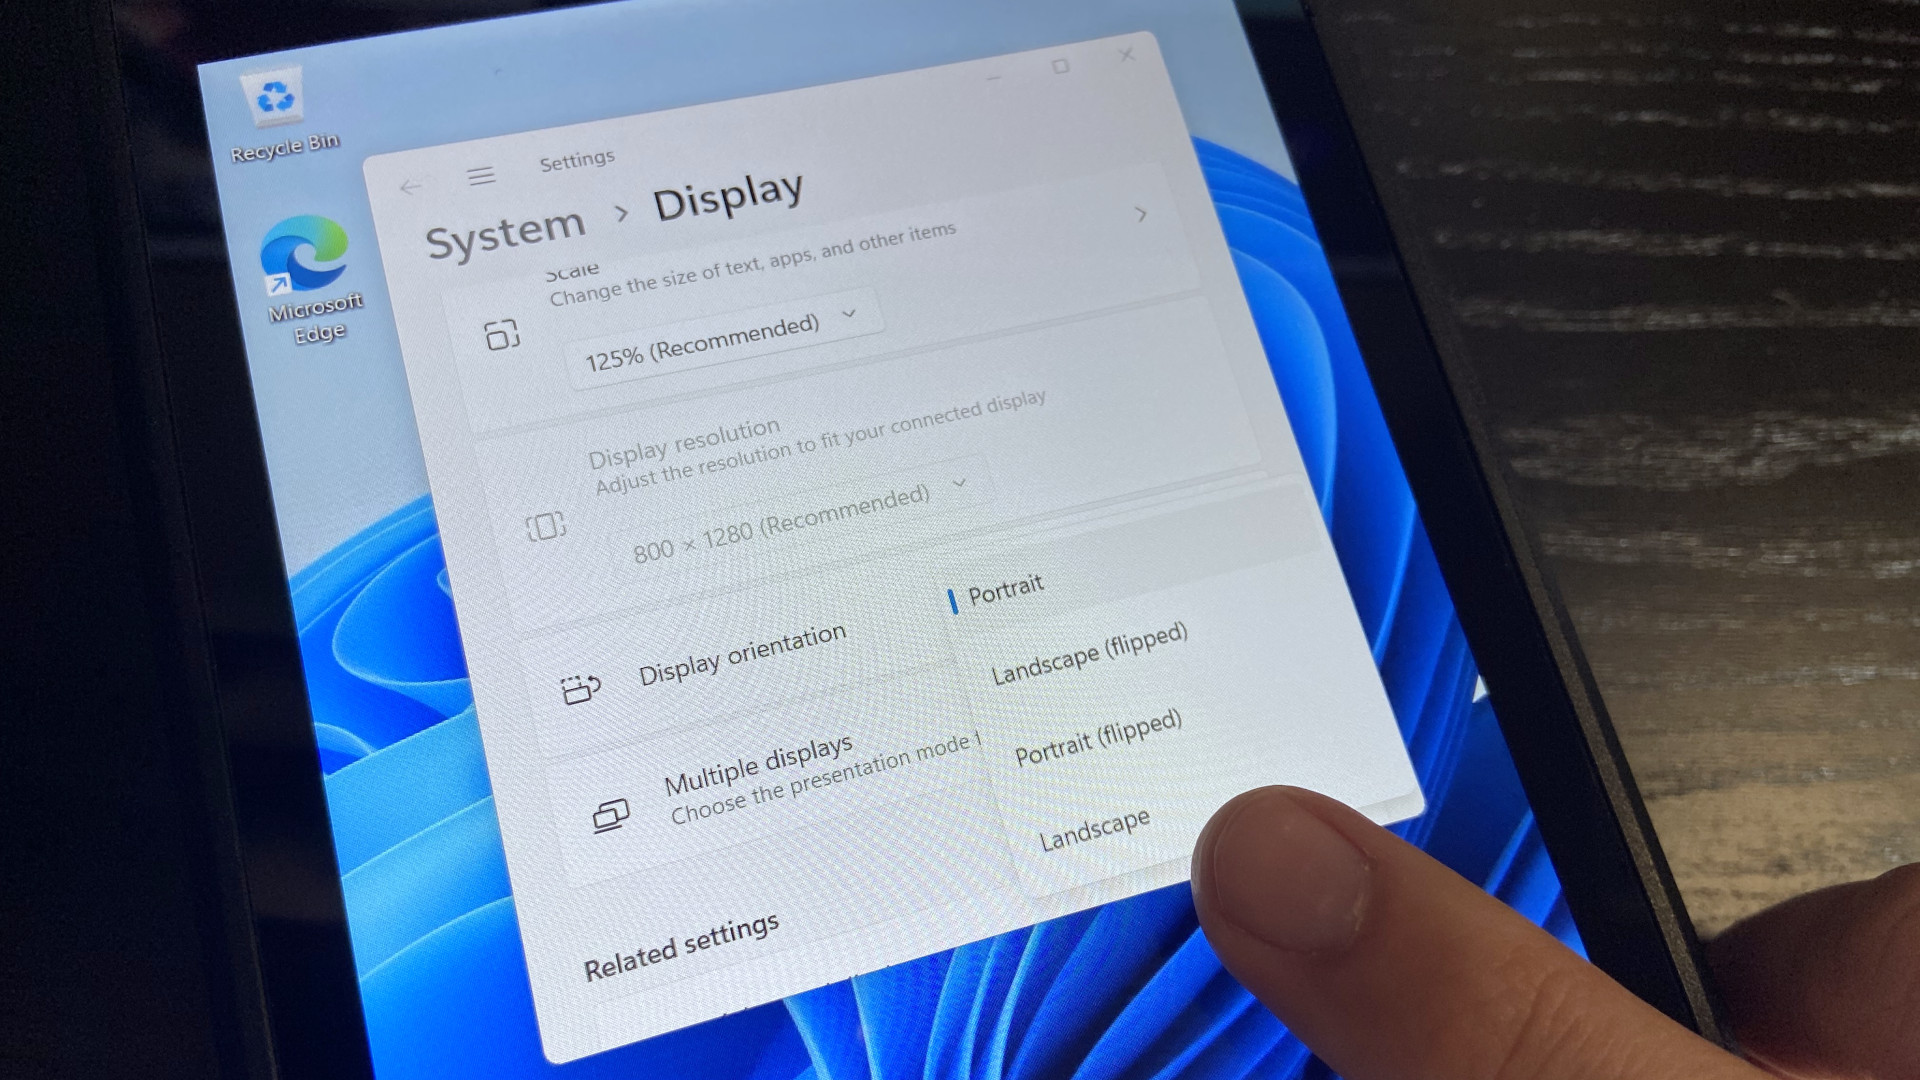
- Right-click the Windows desktop and select ‘Display settings.’
- Find ‘Display orientation‘ to select ‘Landscape‘ from the drop-down menu.
- Shut down Windows from the Start menu as you usually would.
- Again, hold volume down and power until you hear a chime.
- In ‘Boot Manager,’ select ‘EFI SD/MMC Card‘ again.
- Connect to your Wi-Fi network* in Windows.
* If you’re unfamiliar with Windows 11, follow our straightforward guide on how to connect to a Wi-Fi network. Tapping the networking icon in the system tray on the right side of the Start menu next to the clock is usually the fastest way to access a list of nearby networks.

Congratulations, now you can boot into Windows on your Steam Deck! What you install and play is up to you, but downloading the official Steam desktop client is the most obvious recommendation. Besides accessing your usual library, you’ll benefit from launching games through Steam’s Big Picture mode to use the full range of Steam Deck controls.
A few extra tools will make Windows easier to use on Steam Deck, but otherwise, you’re free to use any application or game that isn’t currently compatible with the Linux-based SteamOS. Bear in mind that the Steam Deck wasn’t designed for Windows, but Valve’s commitment to updating its collection of drivers keeps your options open. Either way, proceed with caution since this is still considered experimental territory.
Installing Windows 11 on the internal Steam Deck SSD
Installing Windows 11 to an SD Card on the Steam Deck is fine and dandy, but there are some downsides. Even with the fastest SD card that Steam Deck supports, many games, particularly 3D ones with high world streaming speed requirements, may run into problems. The internal SSD on the Steam Deck is much faster and may offer a smoother experience than running some games from the SD card. The downside of course is that in order to do this, you will have to completely wipe Steam OS from the system. It’s relatively easy to go back to Steam OS though, if you want to. Valve has a guide on how to recover Steam OS on the Steam Deck here.
In any case, if you fancy turning your Steam Deck into a full Windeck, the steps are quite similar to the above with a few exceptions.
- As above, navigate to the official Windows 11 download page.
- Under the ‘Create Windows 11 Installation Media‘ section and select Download.
- Find mediacreationtool in your downloads, and launch the app.
- Select Windows 11 from the ‘Edition‘ drop-down box.
- Click ‘Next‘ then select the ‘ISO file‘ button.
- Choose an easy-to-find location for your Windows.iso and exit the app when finished.
The next part, as before, is preparing an SD card or a USB-C flash drive with at least 64GB memory as a Windows boot device. The primary difference between these steps and the regular steps is now, we don’t want to select Windows To Go, but instead, we want to set up a standard Windows 11 installation.
- Head to the official Rufus download page.
- Under the ‘Download‘ section, select the ‘Last updated‘ version.
- Find Rufus in your files, and launch the app.
- Select ‘List USB hard drives‘ if your device doesn’t show up.
- In the ‘Device‘ section, select your microSD card or external USB storage device.
- For ‘Boot selection,’ choose ‘Disk or ISO image.’
- Click the ‘SELECT‘ button, find your ‘Windows.iso‘ that you downloaded earlier, and click ‘Open.’
- For the ‘Image option‘, make sure that ‘Standard Windows Installation‘ is selected.
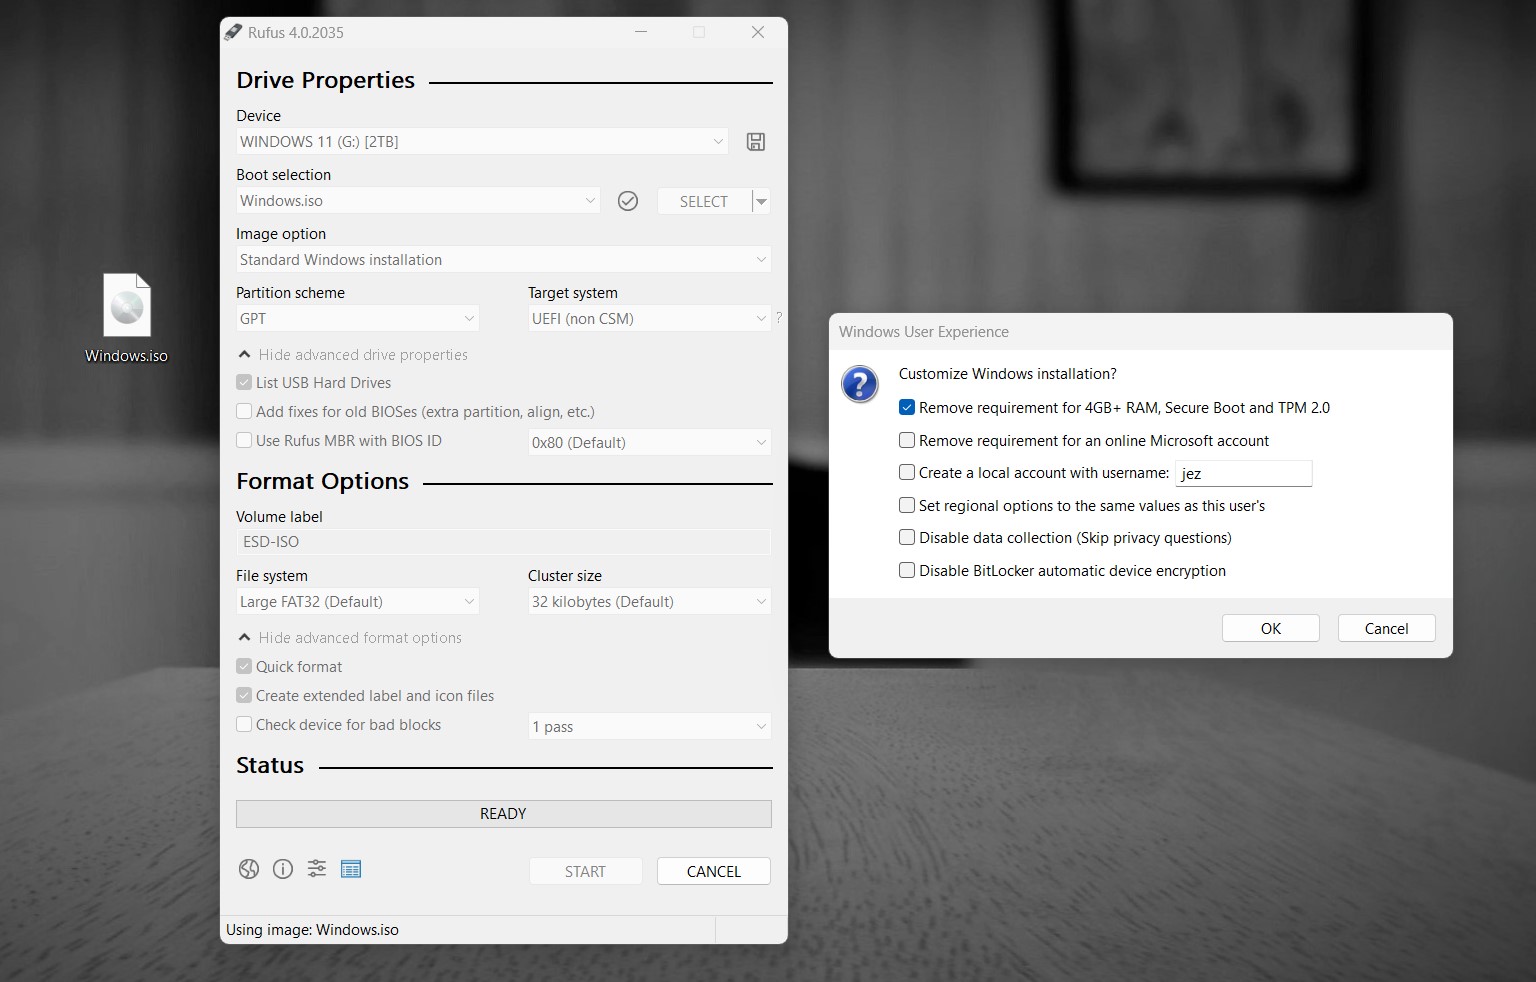
- Leave all the other options alone, and click ‘START.‘
- Next, a «customize Windows installation box» will pop up. You must select ‘Remove requirement for 4GB RAM, Secure Boot, and TPM 2.0‘, since the Steam Deck doesn’t support these features. The other options can be customized to your preferences.
- For ‘Version selection,’ select your preferred edition (usually Windows 10 Home) and press ‘OK.’
- It will give you a warning about destroying data on the HDD, just hit okay. Now it’s ready to set up your device as a Windows 11 boot option.
Next, we want to prepare your shiny new Windows 11 boot device with some data for the Steam Deck. Out of the box, the Steam Deck will be missing drivers for running its hardware properly. Below is some details on what you need to bring over with your boot device.
- Exit Rufus and find your newly created boot device in File Explorer.
- Create a new folder in the root directory, with a name you’ll remember, like ‘Steam Deck Drivers.’
- Head to the official Steam Deck Windows Resources download page.
- Download all the driver archives* and unpack them to your new folder.
- You should also consider grabbing the Steam Deck Tools from ayufan which will enable gamepad support and FPS limiting to improve battery life. You’ll also need the RTSS dependency for this, which you might as well grab too. Put them all into your boot device folder.
- Navigate back up to the part of our guide on how to boot Windows on Steam Deck, and continue the steps there.
Note: As a reminder, if you want to go back to Steam OS at any time, consider Valve’s official Steam recovery guide. Also, I strongly recommend reading the below sections on must-have tools and tips and tricks for running Windows 11 on the Deck.
Must-have tools for running Windows on Steam Deck
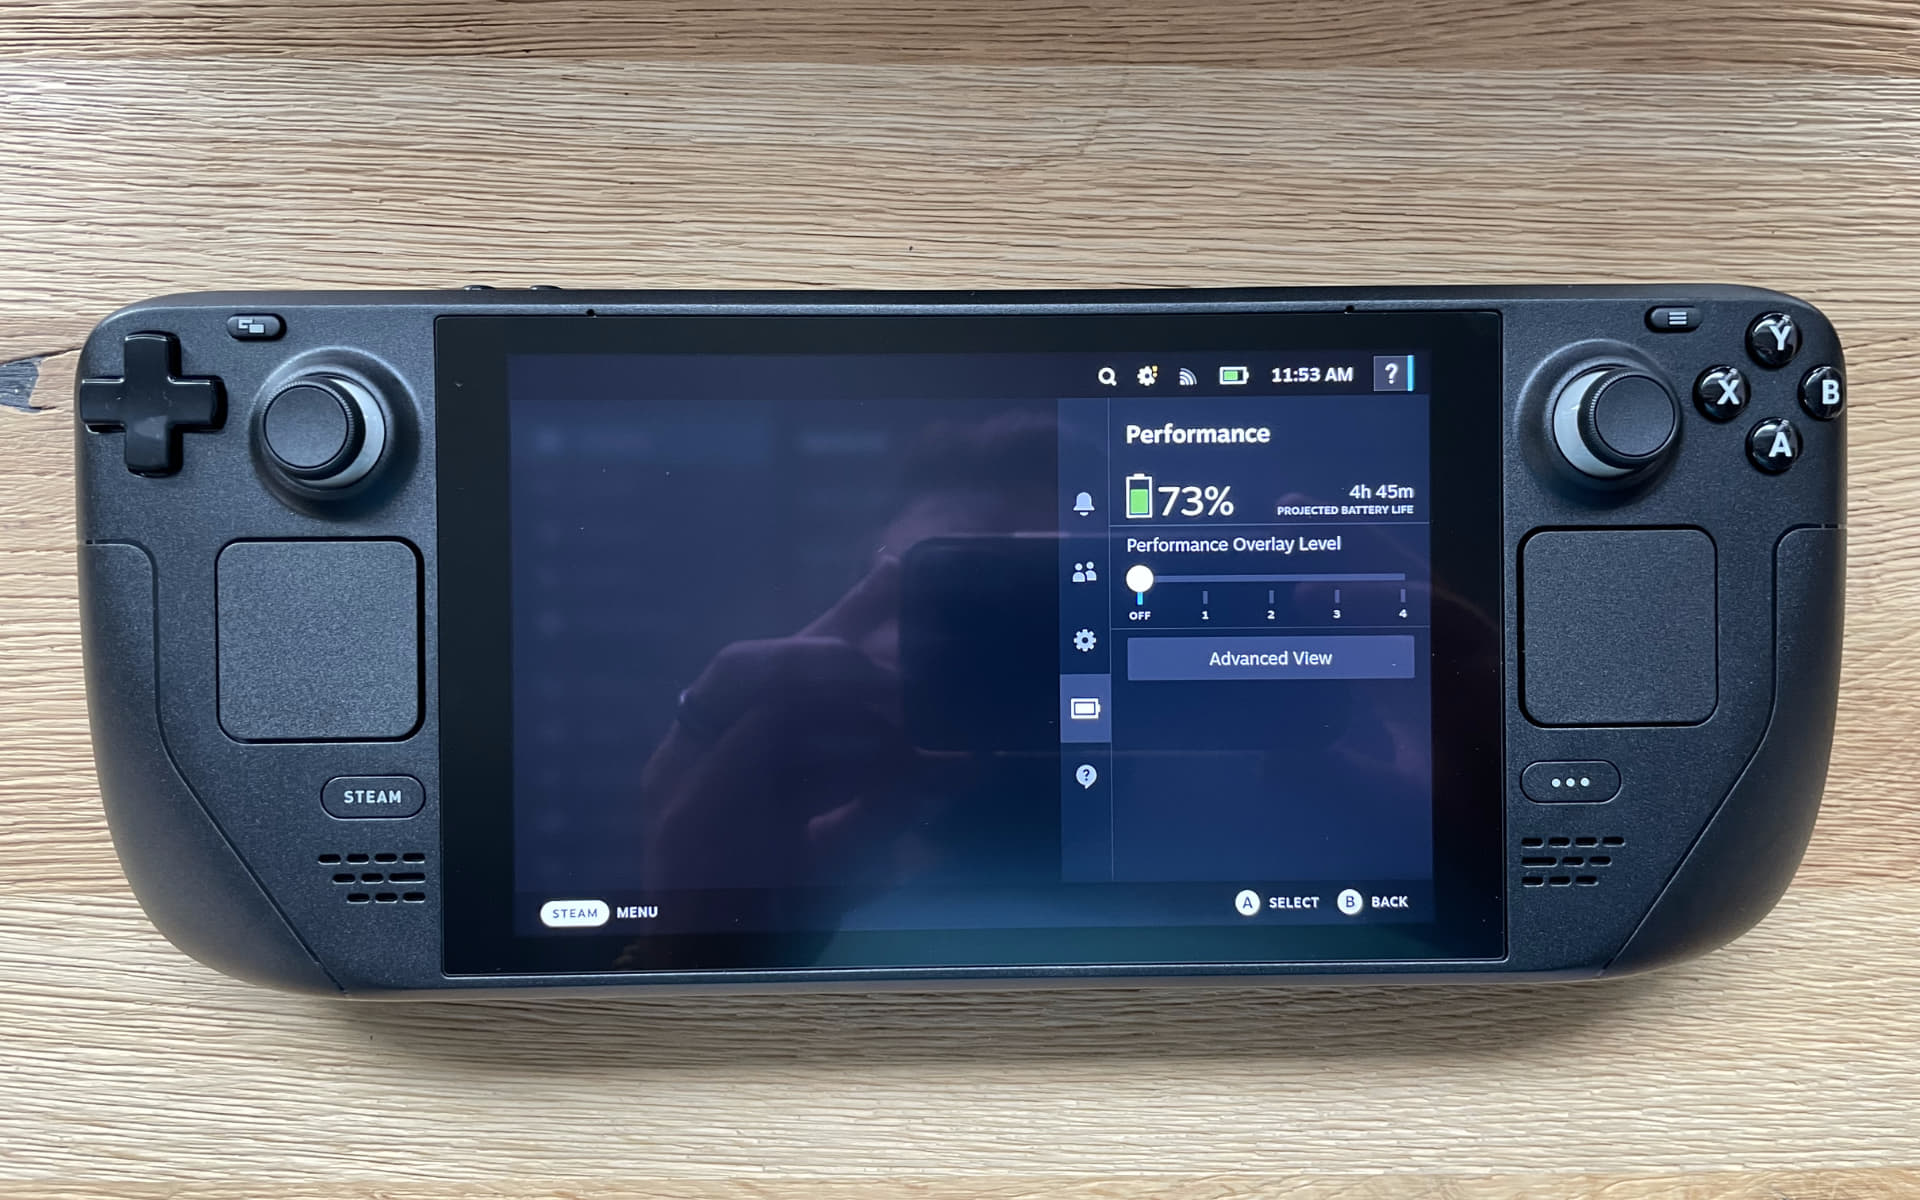
Switching to Windows on Steam Deck has its share of benefits. Still, there are a few downsides, including the lack of a proper performance overlay and questionable controller compatibility in some of the best PC games designed for Windows. Luckily, the PC gaming community already has a handful of ready-made solutions to some roadblocks you might discover while running Windows.
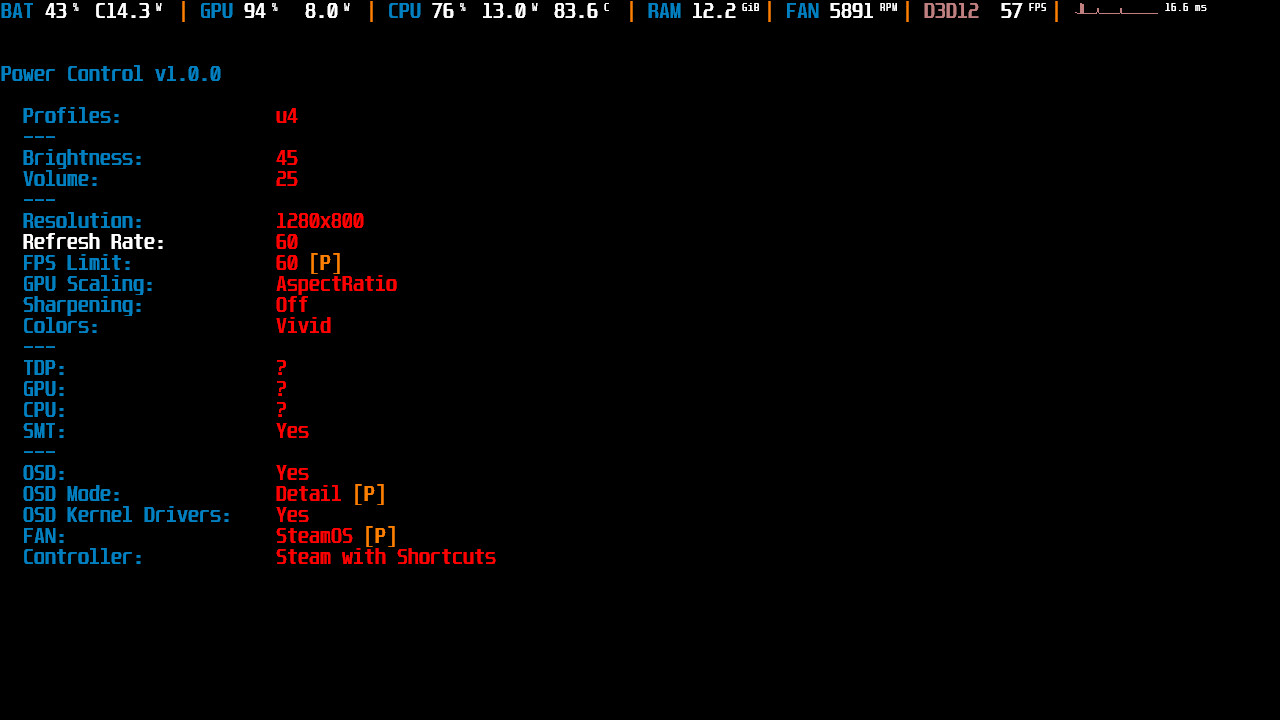
Headlined by Kamil Trzciński, also known as ayufan, the open-source (Windows) Steam Deck Tools project includes a collection of valuable extras to bring your external Windows drive almost on par with its native SteamOS. It contains an alternative to Valve’s performance overlay to show stats like battery life, power consumption, component usage and temperatures, and more.
Steam Deck Tools is particularly useful if you plan to play games from PC Game Pass since it enables full gamepad support with some helpful extra hotkeys. Power and fan control apps are also included, which can extend battery life by throttling the internal components for less demanding games. Highly recommended.
You can download the latest version from GitHub and see a complete list of applications and conditions for running the tools.
Once you’ve run Steam Deck tools, some will have red icons initially. That’s because you also need to download a RTSS dependency. Right-click on the icons and click on «RTSS not running» to instantly go to the download page to install it from your Steam Deck, or download the RTSS statistics server here.
If you’re planning to use your Steam Deck for Xbox Game Pass for PC titles, once you’ve installed RTSS, you can right-click on the monitor-looking icon and go to settings to change the default gamepad to X360. This will remove your ability to use the triggers as right and left click for browsing the OS, but the Steam Deck touchpads work just as well for that anyway.
Consider donating to ayufan for his work on this project.
UWPHook
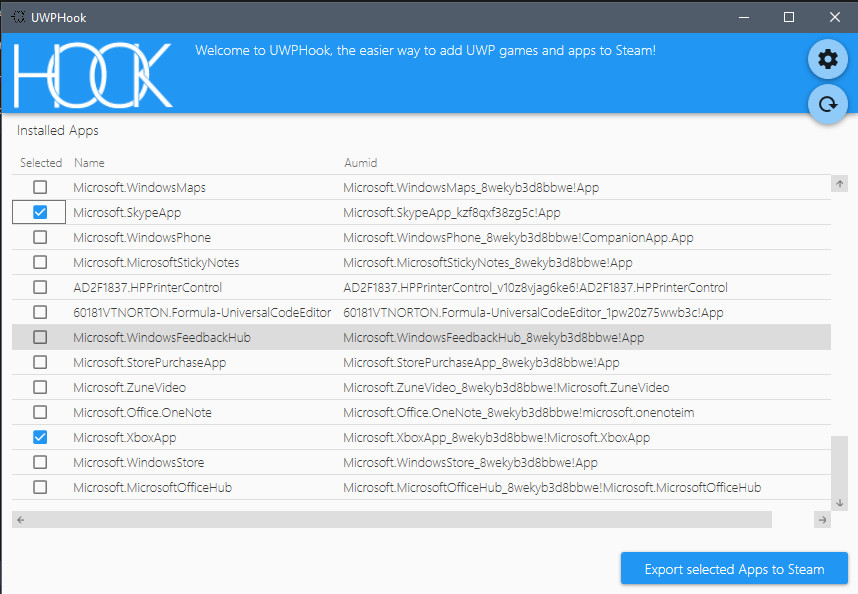
It might seem minor, but UWPHook offers the invaluable ability to add games from the Microsoft or Xbox Store to the desktop Steam app. If you install any UWP games, you can find them in UWPHook and export them to Steam.
Controller support isn’t guaranteed, but developer Brian Lima reports some users found success with the desktop mode if Big Picture mode doesn’t do the trick. Alternatively, the official UWPHook Reddit community is a good place for troubleshooting.
Download the latest version from the official UWPHook GitHub page and check out the latest bug fixes.
Steam Deck on Windows: Tips and Tricks
Since Steam Deck on Windows is only sort of semi-supported, some of the features require work arounds or more intimate knowledge of Windows to fix and improve. Over time, we’ll list some important tricks here you need to know as you get stuck in.
Settings you need to absolutely change using Steam Deck on Windows 11
There’s a range of settings that, by default, make using the Steam Deck on Windows 11 quite annoying. Thankfully, they’re easy to change and configure.
- Always show touch keyboard: By default, the touch keyboard on Steam Deck won’t open automatically when you tap on a text field, as you might expect. To fix this, use a mouse or your touchpad with triggers to go to Start Menu > Settings > Personalization > Taskbar > System Tray Icons > Touch Keyboard, and set it to show «Always.» This will add a touch keyboard icon to your system tray, so you can bring it up whenever you need it.
- Enable touch keyboard when tapping text fields: To make it so the touch keyboard always shows up when entering text fields, go to Start Menu > Settings > Time and Language > Typing > Touch Keyboard > Show the Touch Keyboard when there’s no keyboard attached. This should fix the behavior of the touch keyboard not showing up automatically.
- If you’re playing on PC Game Pass for Windows 10 or 11: Sometimes, a range of issues can stop PC Game Pass from working correctly on Windows 11. We have a full guide here to troubleshoot issues with the PC Game Pass app, from games not launching, to save sync problems, and more.
Fix slow download speeds on Steam Deck with Windows
One annoying thing about Windows on Steam Deck out of the gate is slow download speeds, in some circumstances. This can be caused by a low-quality SD card, which may have bottle necks for read/write speeds, however, it can also be caused by the RealTek Wi-Fi card drivers preventing 5 GHz Wi-Fi connections. Thankfully, it’s relatively easy to fix.
- Right click on the Start Menu and open the Device Manager.
- Select Network Adapter.
- Right click on the top menu item, titled Realtek 8822CE Wireless Lan etc., and select Properties.
- Select the Advanced tab.
- Here, select the Concurrent Operation Preference option, and set the value to «No Preference.»
- Next, go to Wireless Mode and set the value to IEEE 802.11a/n/c.
Reconnect to your home Wi-Fi as usual, and now it should try to attach to the 5 GHz band instead. You can check whether or not it worked by going to your Network & Internet properties in the Windows 11 settings menu. At the top, it should say either «Properties, public network, 5 GHz.»
At a basic level, 5 GHz is faster than 2.4 GHz, but the signal strength is often less penetrative in some environments. 2.4 GHz may work better if you’re far away from your router, otherwise 5 GHz is almost always best.
More resources
For more helpful articles, coverage, and answers to common questions about Steam Deck and Windows 11, visit the following resources:
- Steam Deck on Windows Central
- Windows 11 on Windows Central
All the latest news, reviews, and guides for Windows and Xbox diehards.
Ben is the channel editor for all things tech-related at Windows Central. That includes PCs, the components inside, and any accessory you can connect to a Windows desktop or Xbox console. Not restricted to one platform, he also has a keen interest in Valve’s Steam Deck handheld and the Linux-based operating system inside. Fueling this career with coffee since 2021, you can usually find him behind one screen or another. Find him on Mastodon @trzomb@mastodon.online to ask questions or share opinions.
With contributions from
- Jez CordenCo-Managing Editor
You can run Steam OS and a Windows OS at the same time
by Alexandru Poloboc
With an overpowering desire to always get to the bottom of things and uncover the truth, Alex spent most of his time working as a news reporter, anchor,… read more
Updated on
- Remember that you can run two operating systems at the same time on the Steam Deck.
- Steam OS can be run together with Windows 10 or Windows 11 if you know what do to.
- Simply follow the steps in the guide below and you will be done in absolutely no time.
It goes without saying that everyone has a different taste when it comes to pretty much everything, so an operating system should be pretty much along those lines.
Some of us are more accustomed to working on Linux, some on Mac, while the wide majority prefer Microsoft’s Windows OS.
Even when it comes to the Steam Deck, which comes with its own Steam OS, some users might feel that installing Windows would be more appropriate for their needs.
Today, we’re going to show you how to dual boot Windows 10 or Windows 11 on our Steam Deck, just in case you decide that’s what you want to do.
When it comes to Valve’s new gaming rig, we can also provide information on how to change Steam Deck’s resolution, or what are the best Steam Deck verified games.
Can I install Windows 11 on Steam Deck?
Yes, you can install Microsoft’s latest operating system on your brand new Steam Deck if you decide that the default OS isn’t for you.
In fact, we’ve shown you how to install Windows 11 on the Steam Deck back when we were still discussing compatibility between the handheld PC and operating system.
After a lot of time spent on the Trusted Compatibility Module (TPM) and with AMD to ensure Windows 11 compatibility, Valve is confident it has built a flawlessly Windows 11-compatible system.
Remember that, to install Windows 11 on your Steam Deck, you will need to download the OS and put it on a USB flash drive.
What OS does Steam Deck use?
Valve’s new device, the Steam Deck runs on a modified Arch Linux operating system that is called SteamOS v3.3.
How we test, review and rate?
We have worked for the past 6 months on building a new review system on how we produce content. Using it, we have subsequently redone most of our articles to provide actual hands-on expertise on the guides we made.
For more details you can read how we test, review, and rate at WindowsReport.
The SteamOS had been initially developed for Steam devices using Debian Linux, but Valve stated that they wanted to use a rolling upgrade approach for the Deck’s system software.
That being said, remember that you can also install Windows on Steam Deck, as we are about to show you in today’s guide.
Can the Steam Deck emulate?
Even though it should come as no surprise, yes, Steam Deck can emulate a lot of consoles, arcade machines, and even MS-DOS games.
Also worth mentioning is the fact that there are plenty of legal emulators available to install and play your game backups.
Now, however, let’s take a look at how to perform this Windows on Steam Deck boot directly from your device’s USB.
How do I dual boot Windows on Steam Deck?
1. Dual boot Windows 10 on Steam Deck
In order to install Windows 10 on your Steam Deck, you need an USB flash drive or an SD card containing the installation media, as well as the third-party Rufus app.
You can download the installation media for Windows 10 using your PC from the Microsoft official website. This ensures a safe and clean installation.
1. Go to the official Microsoft website and download the Media Creation Tool for Windows 10.
2. Download and install Rufus.
3. Run the Rufus app.
4. Under Device, select the SD Card/USB stick you want to use.
5. Navigate to Boot selection and choose the Windows 10 installation file.
6. In the Partition scheme section, select MBR, then press Start.
7. Insert the SD Card/USB Stick in your Steam Deck.
8. Press the Volume and Power buttons at the same time to start.
9. Select Boot Manager, then highlight the bootable device and press Enter.
10. Windows 10 will now be installed on your Steam Deck and you will have to go through the setup process after this is done.
It’s the same, simple process we go through every time we install Windows 10 on one of our PCs or laptops, so there’s really nothing new.
- How to Unzip Files on Windows 11
- How to Make a Program Available to All Users on Windows 11
- How to Download & Install Microsoft LifeCam Drivers on Windows 11
2. Dual boot Windows 11 on your Steam Deck
- Go to the official website and download the Media Creation Tool for Windows 11.

- Download and install the Rufus software.
- Run the Rufus app.
- Under Device, select the SD Card/USB stick you want to use.

- Under Boot selection, choose the Windows 11 installation file.
- Under Partition scheme, select MBR, then press Start.
- Insert the SD Card/USB Stick in your Steam Deck, then press the Volume up button and Power to start.
- Select Boot Manager, then highlight the bootable device and press Enter.
How do I boot from USB to Steam Deck?
As we said, booting directly from a USB stick to your brand new Steam Deck device can be done easily by going through the following steps.
First, make sure that the Steam Deck is powered off, then hold the Volume down button and press the Power button.
You should only continue to hold the volume down button until the Steam Deck boot screen appears, at which point you will launch Steam’s Boot Manager.
From there, the system will do the rest of the work, provided you did a good job at creating the image or media you want to boot from it.
So the next time you want to use the Steam Deck to dual boot Windows 10, or to dual boot Windows 11, this guide contains all the information you need.
Remember that you can use Steam Deck to dual boot Windows from both an SD card, or your trusty USB stick.
There you have it folks, all you need to know about how to actually install Windows on your new handheld Steam Deck gaming rig.
![]()
Windows и SteamOS на одном SSD
1. Для установки понадобится USB-флешка на 8 или больше гигабайт, USB-C Hub с несколькими USB-портами с одной стороны и USB-C с другой для подключения периферии. Также настольный ПК с Windows. Лучше скачать все файлы заранее, чтобы потом в спешке их не искать.
2. Загружаем основной образ Windows и программу для разметки SSD, чтобы выделить место под Windows. Когда все файлы готовы, подключаем флешку к компьютеру.
3. Запускаем программу Rufus, выбираем образ GParted и нажимаем «Старт», подтверждаем всё, о чем спрашивают.

4. Полностью выключаем Steam Deck, берем USB-C Hub, подключаем мышку и флешку, зажимаем кнопку громкости + и кнопку включения до звукового сигнала. Заходим в Boot Manager и выбираем нашу флешку. Здесь ничего не трогаем, просто ждем. Появится окно, выбираем второй пункт.
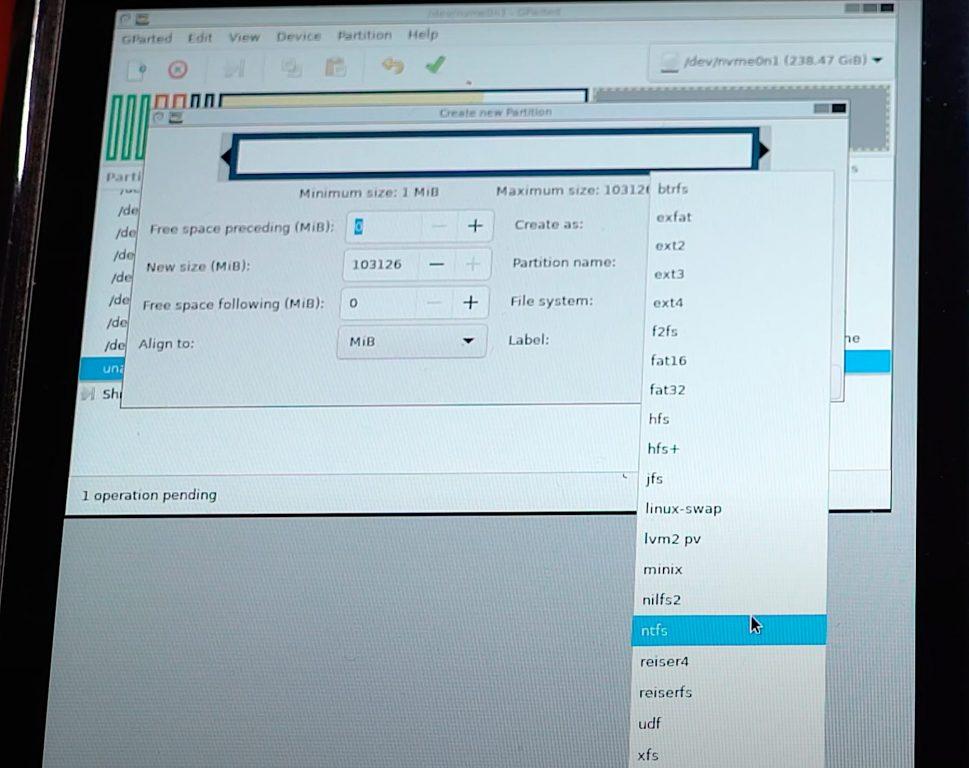
5. Откроется консольное окно, вводим: 33, Enter, 0, Enter и ждем. Загрузится программа для разметки жесткого диска. Выбираем нужный нам диск в верхнем правом углу, далее ищем раздел Home – он самый большой, и отделяем место для SteamOS. Остаток будет для Windows. Далее нажимаем неразмеченную область и форматируем ее в NTFS.
6. Процесс завершился, переходим снова к настольному ПК. Нам нужно записать образ Windows. Все то же самое – нажимаем «Старт», соглашаемся. Ждем записи Windows на флешку.
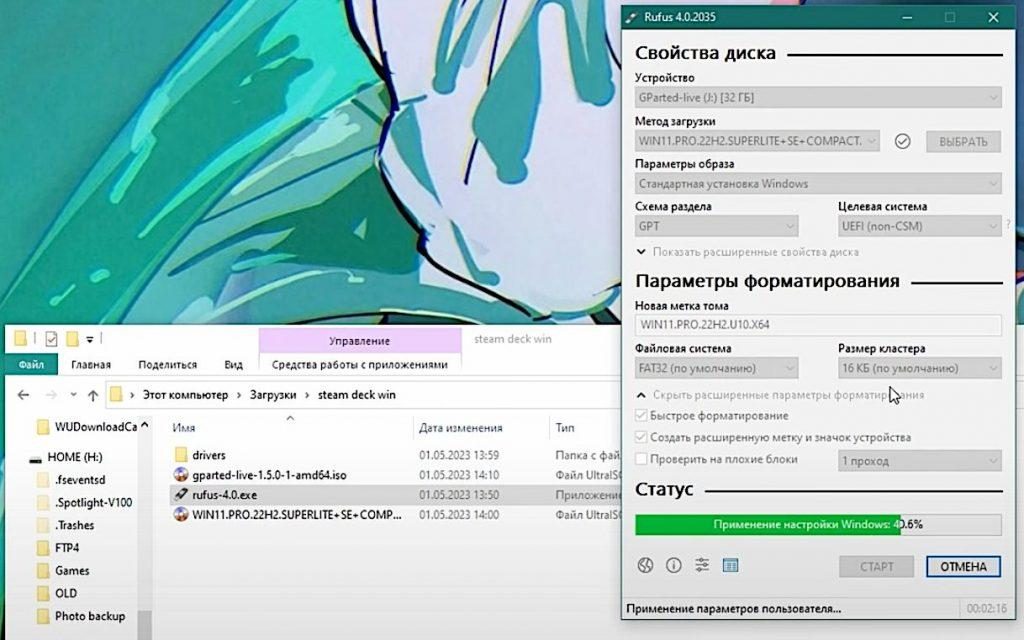
7. Переходим в Boot Manager таким же образом, зажимаем кнопку громкости плюс и кнопку включения. В Boot Manager выбираем уже флешку с Windows. Ждем загрузки установщика Windows, нажимаем «Далее», выбираем предпоследнюю версию, это обязательно. Выбираем «Custom» и наш раздел, который мы выделили под Windows. Дожидаемся установки.
8. Загружаем программу WinDeckHelper, копируем ее на флешку, чтобы перенести на Steam Deck. Открываем файловый менеджер, запускаем WinDeckHelper от имени администратора, выделяем галочки во всех трех вкладках, нажимаем «Старт» и дожидаемся установки.
1. Подключаем флешку или картридер с картой памяти к компьютеру.
2. Открываем «Этот компьютер» и находим нашу флешку или накопитель. Если на вашей карте памяти есть какие-либо данные, перенесите все важные данные на компьютер, потому что все будет удалено.
3. Скачиваем Rufus для установки Windows 11 на карту памяти.
4. Вам понадобится образ Windows 11. Выбираем образ Windows 11 x64.
5. Запускаем Rufus от имени администратора, выбираем нашу флешку из списка, остальные подключенные флешки или карты отключаем.
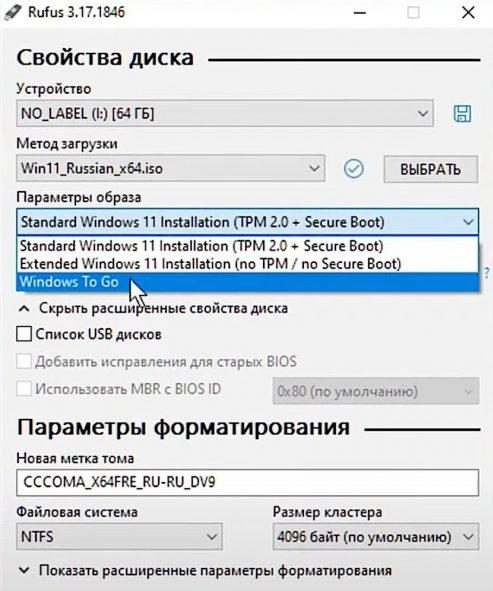
6. Выбираем образ Windows 11 и параметры образа – выбираем «Windows to Go».
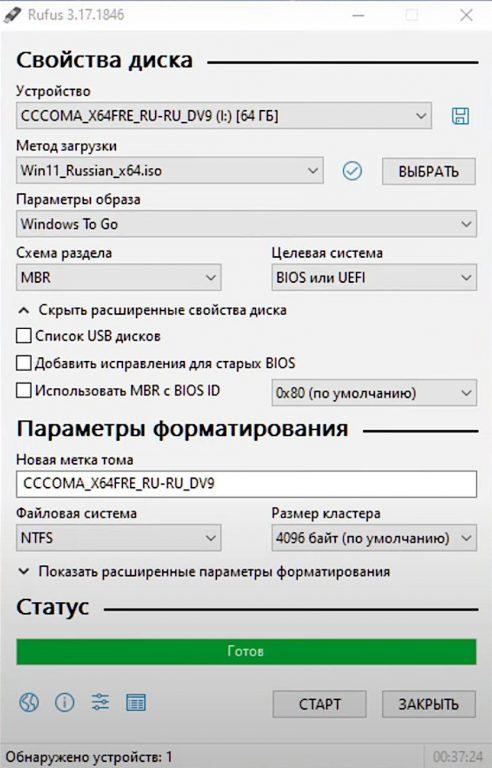
7. Выбираем схему разделов MBR. Если вы будете создавать для системы с UEFI на GPT-диске, выбирайте GPT. Для более старых систем выбираем MBR.
8. После выбора схемы разделов, чтобы мы могли загружаться с помощью этой карты памяти на других компьютерах и ноутбуках, выбираем MBR.
9. Выбираем файловую систему – автоматически выбирается NTFS и нажимаем «Старт».
10. Выбираем версию Windows, которую хотим установить. Выбираем Windows 11 Pro (или любую другую редакцию по своему усмотрению).
11. Появится предупреждение «Внимание: все данные на диске будут уничтожены». Соглашаемся с этим и нажимаем «ОК».
12. Установка Windows на карту памяти займет некоторое время.
13. Включаем компьютер и нажимаем клавишу F2 или Del, чтобы войти в BIOS.
14. Во вкладке Boot первым загрузочным устройством выбираем USB, SD. Если его нет в списке, переходим к USB-устройству с наивысшим приоритетом и ищем свою карту памяти. После выбора карты памяти возвращаемся в последний пункт Exit и сохраняем настройки. Соглашаемся.
15. Проверяем загрузку с флешки или карты памяти. Если возникает черный экран и ничего не загружается, подождите немного.
16. Продолжаем установку операционной системы Windows 11.
17. Следуем инструкциям по установке: выбираем страну или регион, раскладку клавиатуры, пропускаем настройки клавиатуры, проверяем наличие обновлений, вводим имя пользователя, создаем пароль (по желанию) и выбираем параметры конфиденциальности.
Установка плагинов
1. Нажмите на кнопку «Steam», перейдите в самый низ, в режим разработчика и включите его.
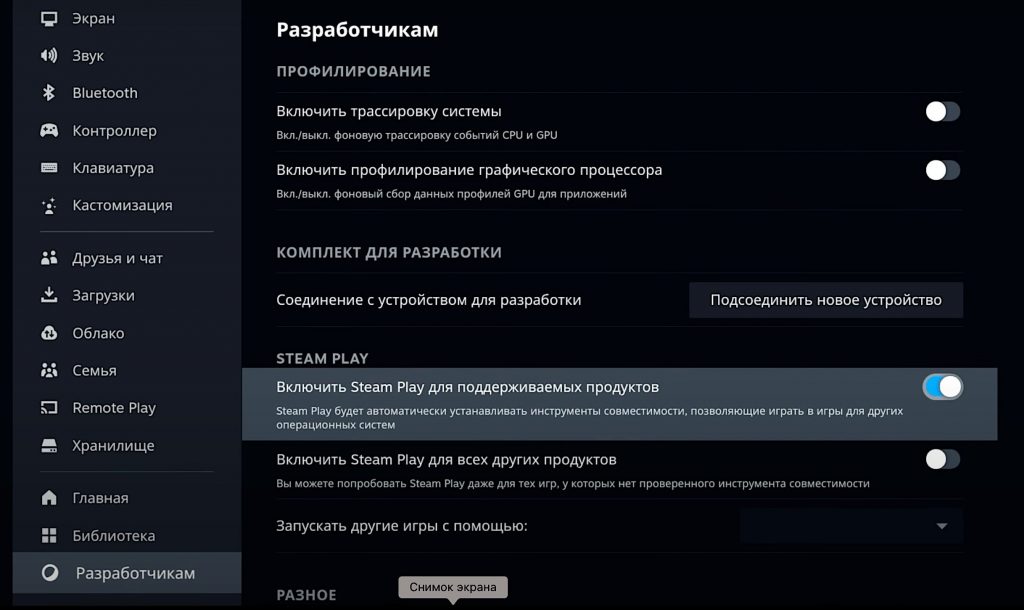
2. Возвращаемся в меню. Нажмите на три точки и перейдите в режим рабочего стола.
3. Запустите браузер и введите в поисковой строке Decky Loader. Это программа, которая позволяет устанавливать сторонние плагины не выходя из игрового режима, что очень удобно и практично.
4. Перейдите по первой ссылке, прокрутите немного вниз и найдите большую яркую картинку для скачивания плагина. Нажмите на неё, и плагин будет скачан. Обратите внимание, что этот плагин не запустится автоматически. Вам нужно выйти, зайти в папку «Загрузки» и запустить его из терминала.
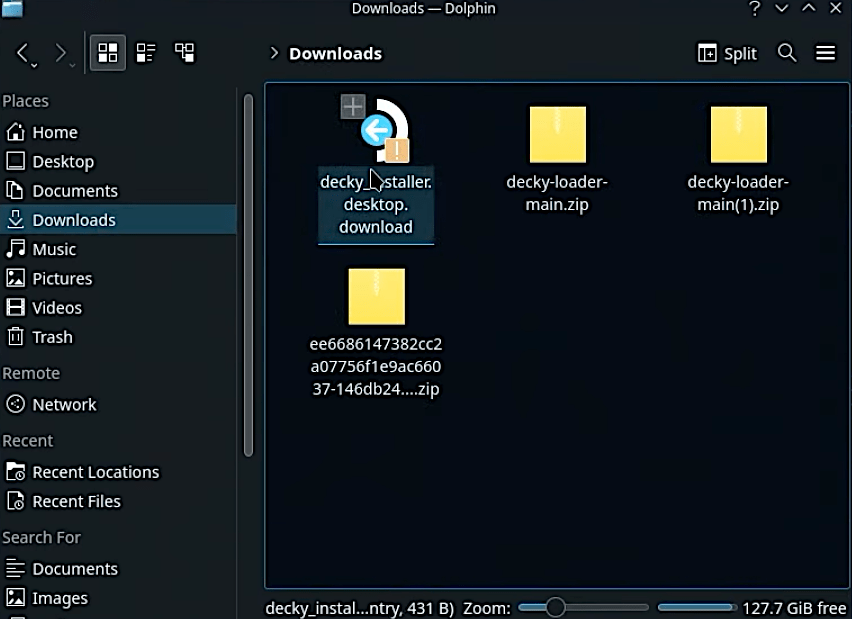
5. Нажмите правой кнопкой мыши на файле «Loader» в папке «Загрузки» и выберите «Запустить Loader из терминала». Согласитесь с предложенными настройками, и плагин быстро установится.
6. После установки просто вернитесь в игровой режим, нажмите «OK», закройте окно и нажмите на ярлык «Return to Game».
7. В игровом режиме нажмите на три точки, и внизу появится значок вилки розетки. Сначала нажмите на шестеренку, чтобы проверить актуальную версию обновления. Вы также можете выбрать стабильную версию для избежания глюков и других проблем.
8. Сверните все окна, затем снова нажмите на три точки справа и перейдите в «розетку». Там вы найдете магазин, откуда можете скачать все, что вам нужно. Обратите внимание, что для запуска плагинов вам нужно будет зайти в папку «Загрузки» и запустить их из терминала.
9. Существуют различные плагины, которые могут быть полезными, например, плагин CSS Loader, который изменяет интерфейс консоли, включая тему, курсоры, значки и отображение клавиатуры. Другие плагины включают Vibrant Deck для настройки отображения, ProtonDB для показа оптимизации игр, Animation Changer для настройки анимации при включении консоли и DeckMTP, позволяющий передавать файлы между декой и компьютером через USB. Не забудьте проверить их функциональность перед использованием.

Оптимизация для игровых процессов
1. Обновите систему и драйверы: Убедитесь, что ваша система и драйверы на Steam Deck обновлены до последних версий. Это поможет улучшить стабильность работы и производительность устройства.
2. Настройте разрешение и графику: Steam Deck имеет встроенный дисплей высокого разрешения, и вы можете настроить его под свои предпочтения. Однако учтите, что более высокое разрешение может потребовать больше вычислительных ресурсов, поэтому установите оптимальное сочетание качества графики и производительности.
3. Оптимизируйте настройки игр: Многие игры имеют настройки графики, которые можно изменять для достижения лучшей производительности. Уменьшите настройки теней, антиалиасинга или уровень детализации, если заметите снижение производительности. Это поможет игре работать более плавно на Steam Deck.
4. Освободите место на устройстве: Steam Deck поставляется с определенным объемом встроенной памяти, поэтому освободите место, удалив ненужные файлы или игры. Также можно использовать внешние накопители для расширения памяти и предотвращения ограничений по объему данных.
5. Используйте режим энергосбережения: В настройках Steam Deck вы можете выбрать режим энергосбережения, который позволяет продлить время работы устройства, уменьшив производительность. Это полезно в ситуациях, когда вы хотите играть дольше, но не нуждаетесь в максимальной мощности.
6. Оптимизируйте сетевые настройки: Если вы планируете играть в многопользовательские игры на Steam Deck, убедитесь, что ваше подключение к Интернету стабильно. Рекомендуется использовать беспроводные сети с высокой пропускной способностью или подключение к проводной сети для минимизации задержек и обеспечения более плавного геймплея.
7. Используйте Steam Big Picture Mode: Steam Deck имеет поддержку Steam Big Picture Mode, который обеспечивает удобное управление в играх с помощью геймпада. Это может значительно улучшить игровой опыт на портативной консоли.
8. Подключите внешние устройства: Если вы предпочитаете играть с клавиатурой и мышью, или предпочитаете использовать геймпад другой марки, вы можете подключить их к Steam Deck через порты USB или Bluetooth. Это поможет вам настроить контроллеры под свои предпочтения и повысить комфорт игры.
9. Используйте функцию сохранения в облаке: Steam Deck поддерживает функцию сохранения в облаке, что позволяет вам переносить сохраненные игры с одного устройства на другое. Это полезно, если вы хотите продолжить игру на другом компьютере или консоли.
10. Исследуйте Steam Deck Community: Valve предоставляет платформу Steam Deck Community, где пользователи могут делиться опытом, советами и рекомендациями. Исследуйте эту платформу, чтобы узнать о новых оптимизациях, играх и других полезных сведениях, связанных с использованием Steam Deck.
Настройки Hogwarts:
1. Заходим в «производительность» – нажимаем три точки.
2. Отключаем производительность, чтобы пока данный параметр не мешал, а частоту кадров выставляем до 60. Можно поставить ограничение до 40, чтобы экономить заряд аккумулятора, но для наглядности оставляем до 60.
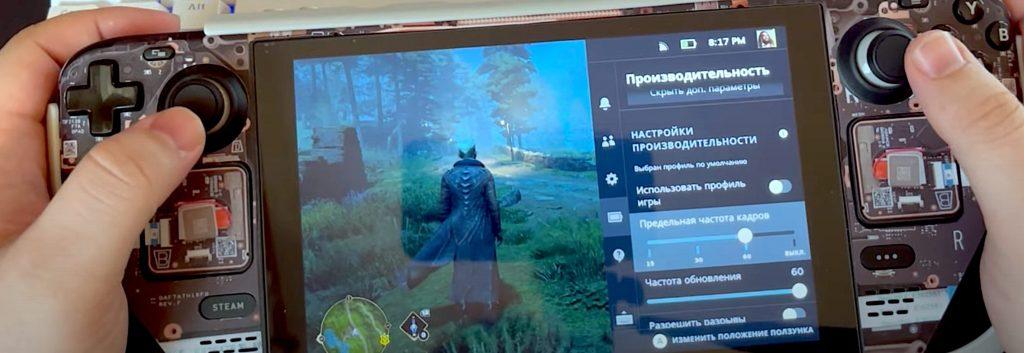
3. TDP никогда не включаем, иначе игра начинает очень сильно лагать, если мы играем без сети.
4. Фиксированную частоту графического процессора также выключаем.
5. Тип масштабирования – включаем режим FSR на максимум.
6. Чтобы добиться 40 fps, заходим в настройки самой игры. Выбираем графику, выставляем низкое разрешение.
7. Включим производительность, посмотрим детализацию – 40 fps стабильно.
Настройки God of War
1. Для увеличения fps заходим в настройки экрана (не в настройки графики).
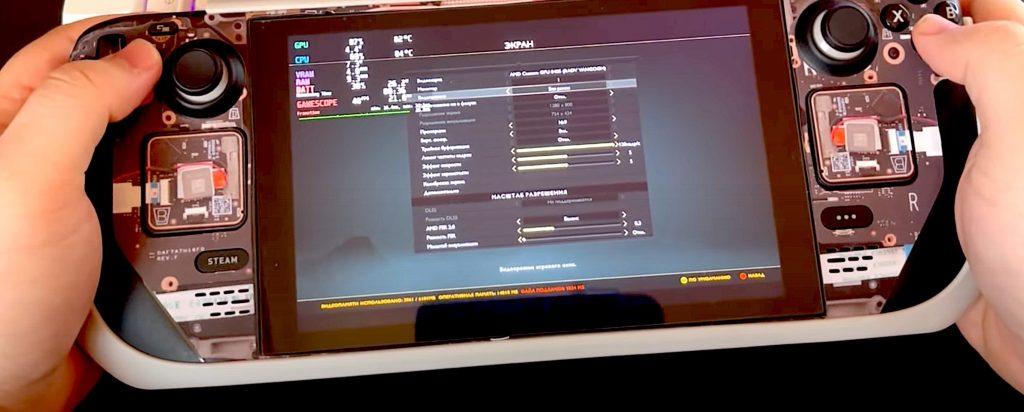
2. Устанавливаем лимит частоты до 60 кадров.
3. Отключаем тройную буферизацию и вертикальную синхронизацию. Калибровку экрана дополнительно делать не нужно.
Post Views: 266