Table of Contents
- Installing Microsoft Windows 95 in DOSBox-X
- Overview
- Windows CD-ROM editions this guide applies to
- External links
- DOSBox-X config file
- General installation Notes
- Dynamic vs Normal core
- Turbo mode
- Creating a Harddisk image
- Installation Method
- Requirements
- Starting the installation
- Copying the contents of the CD-ROM
- Running SETUP.EXE
- Booting Windows 95 after installation
- Steps to take after installation
- Mounting CD or Diskette images
- Enabling networking
- Enabling NE2000 in your DOSBox-X config file
- Setting up NE2000 networking in Windows 95
- Emulated video adapter and video mode
- VESA driver
- Emulated sound card
- Enabling General MIDI
- Enabling printing
- Print to PostScript
- Epson emulation
- 3dfx Voodoo
- Glide pass-through
- Hard Disk Read-ahead optimization
- Host Folder mounts
- Known limitations
- Outstanding issues
Overview
This guide will give a general description of installing Windows 95 in DOSBox-X, in addition to addressing some common issues.
Windows CD-ROM editions this guide applies to
-
Windows 95 (RTM; Original release) — Retail Full
-
Windows 95 (RTM; Original release) — OEM Full
-
Windows 95 OSR1 (aka 95A) — OEM Full
-
Windows 95 OSR2 (aka 95B) — OEM Full
-
Windows 95 OSR2.1 (aka 95B) — OEM Full
-
Windows 95 OSR2.5 (aka 95C) — OEM Full
|
Note |
This guide is meant for the Windows 95 CD-ROM editions. The Windows 95 diskette edition can also be used starting with DOSBox-X 0.83.19, but requires a lot of tedious disk swapping and is therefore not recommended. |
|
Note |
Windows 95 Upgrade editions have additional requirements and are not covered by this guide. |
If you don’t know which Windows 9x version to install, we recommend that you install Windows 98SE.
If you want to stick with Windows 95, we recommend to use Windows 95 OSR2 or later.
External links
DOSBox-X config file
You first need to create a DOSBox-X config file.
[sdl]
autolock=true
[dosbox]
title=Windows 95
memsize=64
vmemsize=8
vesa modelist width limit=0
vesa modelist height limit=0
[dos]
# Set 'ver=7.1' if using Win95 OSR2 (95B) or later
ver=7.0
hard drive data rate limit=0
floppy drive data rate limit=0
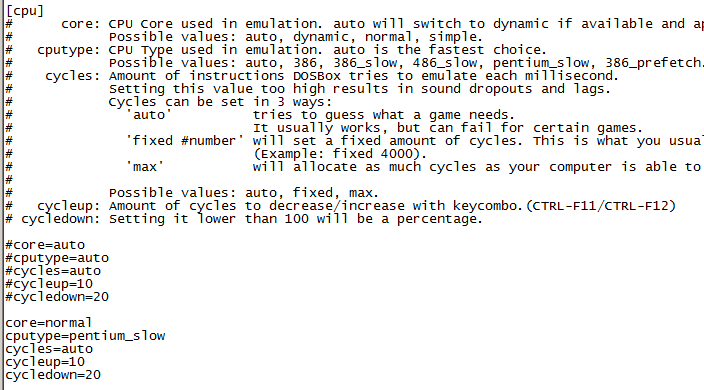
[cpu]
cputype=pentium_mmx
core=normal
[sblaster]
sbtype=sb16vibra
[fdc, primary]
int13fakev86io=true
[ide, primary]
int13fakeio=true
int13fakev86io=true
[ide, secondary]
int13fakeio=true
int13fakev86io=true
cd-rom insertion delay=4000
[render]
scaler=none
[autoexec]Copy the above config and save it as win95.conf
|
Note |
If using Windows 95 OSR2 (or later) with FAT32 volumes, be sure to change the DOS version to 7.1 (ver=7.1 or from the DOSBox-X prompt: ver set 7.1) or else you will get errors mounting the FAT32 volume.
|
|
Note |
You can increase the allocated RAM up to the Windows 95 maximum of 480MB by setting memsize=480.Larger values may be possible with tweaks but are not covered here. |
General installation Notes
-
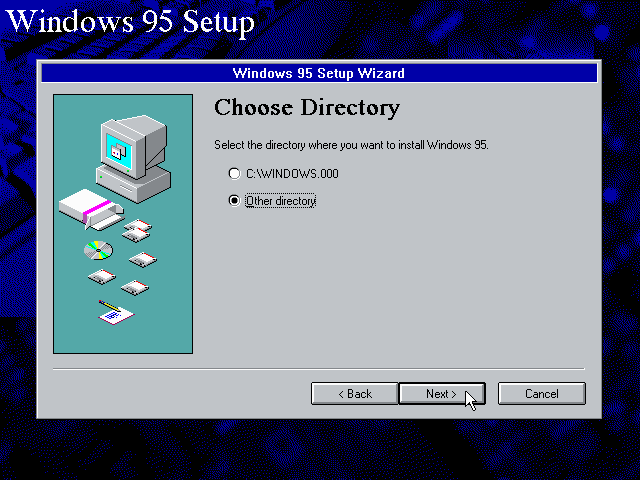
If you get a prompt stating that C:\WINDOWS already exists, ignore it, and continue the installation.
-
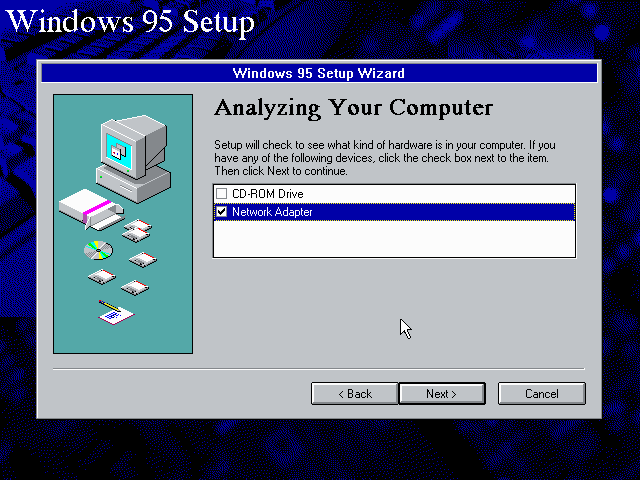
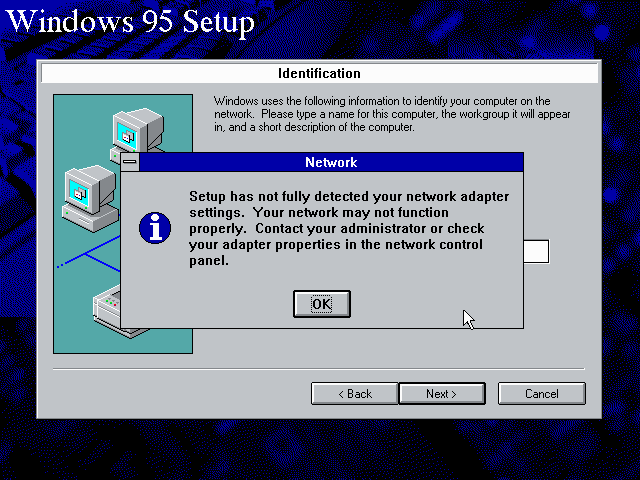
During the installation you may be asked if you have a CD-ROM, Network card or sound card that you want it to scan for. If you have NE2000 enabled in your DOSBox-X config file, you may want to check the Network adapter check box. Your DOSBox-X CD-ROM and Sound Card will be detected regardless if you check its box or not.
-
In case you installed Windows 95 OSR2.5 you may have noticed that you did not get IE4 and the Active Desktop features. This is because this is an optional installation. On the CD, simply run \WIN95\IE4SETUP.EXE to install it. While there is no real advantage to either feature, installing it does bring some new and updated libraries such as MSVCRT.DLL and COMCTL32.DLL that some programs need.
Dynamic vs Normal core
Starting with DOSBox-X 0.83.10 the dynamic_x86 core, which should perform much better, has been sufficiently enhanced that it can now be used for most use-cases with Windows 95.
However, for now we still recommend that you do the installation of Windows 95 using core=normal until issue #2215 is resolved.
But after the installation is finished you should be able to change to core=dynamic_x86.
Should you run into problems such as application crashes or a Windows 95 blue-screen that cannot be reproduced with core=normal, please report the problem on the DOSBox-X Git issues page.
One known issue is that opening a DOS window in Windows 95 will cause a crash when not using core=normal.
Turbo mode
Some parts of the installation, but also starting Windows 95 can take a considerable amount of time.
You may be able to speed this up considerably (depending on the host CPU) by using the DOSBox-X Turbo mode, which can be enabled from the drop-down menu bar by selecting «CPU» followed by «Turbo (Fast Forward)».
This turbo mode is not like the old Turbo button on retro PCs, but functions more like a fast-forward, and therefore should not be used when interacting with the guest OS.
By default, the moment you press a key on the keyboard, turbo mode will disengage.
|
Warning |
Using the mouse not disengage turbo mode, and double-clicks will be almost impossible to achieve as long as turbo mode is active. |
You may also want to enable turbo mode by default to allow Windows 95 to startup quicker by merging the following settings into your DOSBox-X config file.
|
Note |
This will cause some audio distortion on Windows 95 startup, if you have the Windows startup sound enabled. |
Creating a Harddisk image
|
Note |
In addition to the below DOSBox-X command line utility, starting with DOSBox-X 0.83.9 it is possible to create harddisk images from the DOSBox-X menu. Go to the «DOS» menu and select «Create blank disk image…». This option allows for various common harddisk types to be created, for less common types you need to use the command line utility. |
|
Note |
When creating your HDD image with IMGMAKE, instead of specifying a custom size, you can choose a pre-defined template. The pre-defined HDD templates can be seen by running IMGMAKE without arguments.
|
-
Diskette (floppy) images are always created as FAT12.
-
If your reported DOS version is 7.0 or lower, then harddisk images up to 2GB will use FAT16 by default.
-
If your reported DOS version is 7.1 or higher, then harddisk images up to 512MB will use FAT16 by default.
-
Larger size harddisk images will use FAT32 by default (larger than 2GB can only be created as FAT32).
Alternatively, you can use the -fat option to instruct IMGMAKE to create a certain FAT type (assuming that is possible for the harddisk size).
|
Note |
Only Windows 95 OSR2 or later supports FAT32, for older Windows 95 releases you can only use FAT16 up to 2GB. |
First you need to start DOSBox-X from the command-line, using your newly created win95.conf.
This assumes that dosbox-x is in your path and win95.conf is in your current directory.
dosbox-x -conf win95.confThen in DOSBox-X you need to create a new harddisk image file with IMGMAKE.
This example uses an 2GB hard disk image with a single FAT16 formatted partition.
This is the maximum size for FAT16 and supported by all Windows 95 releases.
IMGMAKE hdd.img -t hd_2gig -fat 16Or if you’re using Windows 95 OSR2 or later, you can create a FAT32 volume.
Technically the FAT32 filesystem is capable of supporting partitions up to 2TB, but the generic IDE driver in Windows 95 cannot handle volumes greater than 32GB.
Larger partition sizes may be possible with 3rd party drivers but are not covered here.
In later Windows versions, starting with Windows 2000, Microsoft won’t let you format a volume bigger than 32GB with FAT32 using its built-in formatting tool, this was presumably to push migrations to NTFS and later exFAT.
IMGMAKE hdd.img -t hd_8gigOr if you want to create a larger disk, you can create a custom type.
This is an example of a 16GB (16*1024=16384 MB) disk, which due to its size, will be formatted as FAT32.
IMGMAKE hdd.img -t hd -size 16384Installation Method
Other installation methods are possible than the one described below.
This method is however considered to be the quickest one with the least number of steps.
Requirements
-
DOSBox-X 0.83.10 or later, these instructions will NOT work with other DOSBox forks.
-
Windows 95 CD-ROM image (named «Win95.iso» in the example below).
Getting this image file is outside the scope of this guide.
Starting the installation
This assumes you have already started DOSBox-X with the win95.conf config file and created your harddisk image.
First mount the harddisk image you created earlier:
|
Note |
If you get an error saying that «This operation requires DOS version 7.10 or higher», than you’re trying to mount a FAT32 volume, and have not set your reported DOS version in your DOSBox-X config to 7.1. FAT32 volumes are only supported if your installing Windows 95 OSR2 or later. |
You will also need to mount the Windows 95 CD-ROM. There are a few ways of doing so, but this guide assumes you have a ISO image.
If you have a copy of the Windows 95 CD-ROM as an ISO (or a cue/bin pair), you can mount it as follows:
Copying the contents of the CD-ROM
While not strictly necessary, as it is possible to run SETUP.EXE directly from the CD-ROM (if you have the CD-ROM automatically mounted in your [autoexec] section of the config file).
It is recommended to copy the installation files (contents of the WIN95 directory on the CD-ROM) to your HDD image, as it will prevent Windows 95 from asking for the CD-ROM when it needs additional files later.
XCOPY D:\WIN95 C:\WIN95 /I /EThe files in the above example are copied to the C:\WIN95 directory.
|
Note |
You may want to use «C:\WINDOWS\OPTIONS\CABS» instead, as that is the directory that OEM installs normally use. But if you do, be aware that the installer will complain that C:\WINDOWS already exists. When you get the warning below, select «Other directory» and click «Next >» to continue. On the screen afterwards, change the directory to «C:\WINDOWS» and continue the installation. |
Running SETUP.EXE
You can now run SETUP.EXE.
Now run through the installation process.
The actual steps will not be covered in this guide but are pretty self-explanatory and detailed guides on the Windows 95 install process can be found online such as YouTube.
When the installer reboots DOSBox-X, and you’re back at the DOSBox-X Z:\ prompt, type EXIT.
Now edit your win98.conf config file.
At the end of the file, in the [autoexec] section, add the following two lines:
IMGMOUNT C hdd.img
BOOT C:
Save the config file, and at the command-prompt of your host PC you can type the below command to continue with the next phase of the installation process.
This is also the command you use, after the installation is finished, to start Windows 95 in DOSBox-X.
dosbox-x -conf win95.confBooting Windows 95 after installation
After the installation is finished, you can start Windows 95 from the command-prompt of your host PC, with the following command:
dosbox-x -conf win95.confYou can optionally create a shortcut on your desktop to start Windows 95 directly.
Steps to take after installation
Once Windows 95 is installed, here is some additional software you may want to install or update:
-
Install Microsoft .NET framework version 1.0 and 1.1 (includes Visual C++ 2003 runtime)
-
Install Unofficial Windows 95 OSR2 Service Pack 1.05
-
Install/Update to Microsoft Internet Explorer 5.5SP2 (rarely needed)
-
Install Microsoft WinG 1.0 (needed by just a few games, and those games typically include it)
-
Install Microsoft DCOM 4.71.1015.0 (DCOM95.EXE)
-
Install/Update to Microsoft DirectX 8.0a
-
Install/Update to Microsoft Windows Media Player 6.4
-
Install Adobe Acrobat Reader 5.05
-
Install/Update to Adobe Flash Player 8.0.24.0
-
Install Apple QuickTime 5.0.5
-
Install the 3dfx Voodoo 3.01.00 reference drivers
Mounting CD or Diskette images
DOSBox-X supports mounting CD and diskette (floppy) images, and making those available to an OS booted in DOSBox-X.
But only if the image files are specified before starting real DOS or Windows 9x.
The option to load image files from the menu bar becomes unavailable the moment you boot DOS or Win9x in DOSBox-X.
This is a known limitation that hopefully will be resolved in the near future.
For now, you can work around it, by specifying multiple image files with the IMGMOUNT command as such:
IMGMOUNT A disk1.img disk2.img disk3.img
IMGMOUNT D cd1.iso cd2.iso cd3.iso
You can then swap between disk images with the swap option from the menu.
Enabling networking
To enable networking, you first need to enable NE2000 adapter emulation in your win95.conf config file and select an appropriate back-end for the NE2000 emulation.
Enabling NE2000 in your DOSBox-X config file
Starting with DOSBox-X 0.83.12 there are two different back-ends to the NE2000 adapter emulation.
The default is backend=auto, which implies backend=slirp if SLIRP support is available, otherwise backend=pcap is implied if PCAP support is available.
backend=pcap
The PCAP back-end uses something called «Promiscuous mode».
This has the advantage that DOSBox-X can support various legacy network protocols, such as IPX and NetBIOS Frames (aka NetBEUI) in addition to TCP/IP.
This mode not only allows communication between DOSBox-X instances on the same network, but also with legacy PCs on the same network.
However, for this to work DOSBox-X needs to have very low-level access to your real network adapter.
In some cases, this is not possible, such as:
-
Network Adapter or Driver not supporting Promiscuous mode (most wireless adapters fall into this category).
-
Your Ethernet switch not allowing multiple MAC addresses on a single port or doing any kind of MAC address whitelisting.
-
Sandboxed versions of DOSBox-X (e.g., Flatpak) not allowing the required low-level access.
To enable NE2000 emulation with the pcap back-end, add the following to your win95.conf config file:
[ne2000]
ne2000=true
nicirq=10
backend=pcap

[ethernet, pcap]
realnic=list
The list value for realnic= will need to be replaced by a value representing your actual network adapter.
See Guide: Setting up networking in DOSBox-X for more information.
backend=slirp
Unlike the PCAP back-end, the SLIRP back-end does not require Promiscuous mode.
As such it will work with wireless adapters, and it will work in most sandboxed environments.
But obviously, it has its own limitations.
-
It is not supported in all platforms, such as Windows Visual Studio builds.
-
It only supports the TCP/IP protocol (other protocols must be TCP/IP encapsulated).
-
It is effectively behind a NAT (Network Address Translation) gateway, meaning that you can communicate outbound, but no systems on the LAN can instantiate a new connection to it. Which means that two DOSBox-X instances on the same LAN using
backend=slirpcannot communicate with each other.
To enable NE2000 emulation with the SLIRP back-end, add the following to your win95.conf config file:
[ne2000]
ne2000=true
nicirq=10
backend=slirp
Setting up NE2000 networking in Windows 95
Detection during installation
Windows 95 setup wizard will ask if you want to detect additional hardware during installation.
The exact options presented may vary depending on the Windows 95 edition.
You can tick the «Network adapter» checkbox, and it should continue and find the emulated NE2000 adapter.
It will however, not give you the possibility to set the resources at this point, and you will need to do so in device manager afterwards.

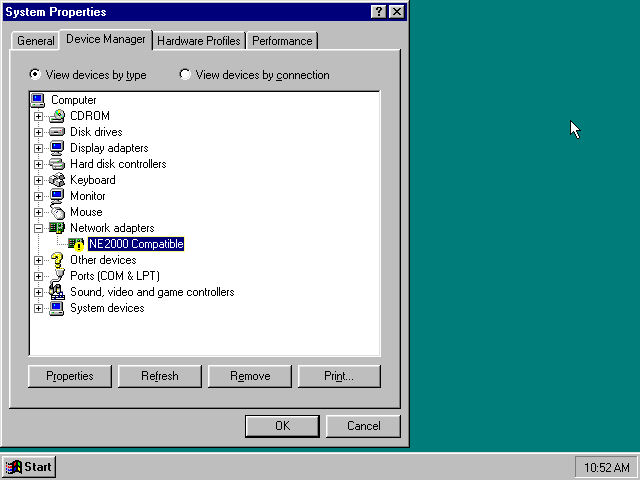
Once the Windows 95 installation is finished, right-click on «My Computer» on the desktop and select «Properties».
Now in the «System Properties» dialogue, select the «Device Manager» tab.

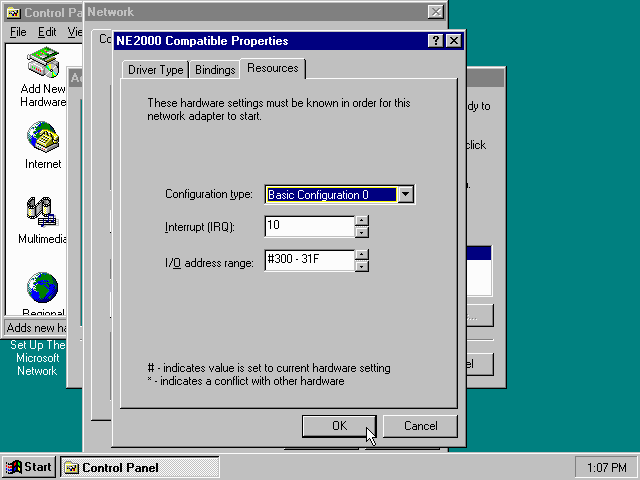
Highlight the «NE2000 Compatible» entry and click on the «Properties» tab and then click the «Set Configuration Manually» button.
Now you need to highlight the «Interrupt Request» entry and click the «Change Setting…» button. You can now change the IRQ to 10 to match the nicirq= value in your DOSBox-X config file.
Next, highlight the «Input/Output Range» entry, and again click the «Change Setting…» button. Now change the value to «0300 — 031F».
Once you’re finished adjusting the resources, click the «OK» button, and Windows 95 will prompt you to shut down to apply the settings, after which you need to restart Windows 95 in DOSBox-X.
|
Note |
By default, Windows 95 only enables Novell’s IPX/SPX protocol. Most Windows 95 applications expect TCP/IP which you will need to manually enable in the Network settings. |
NE2000 Detection after installation
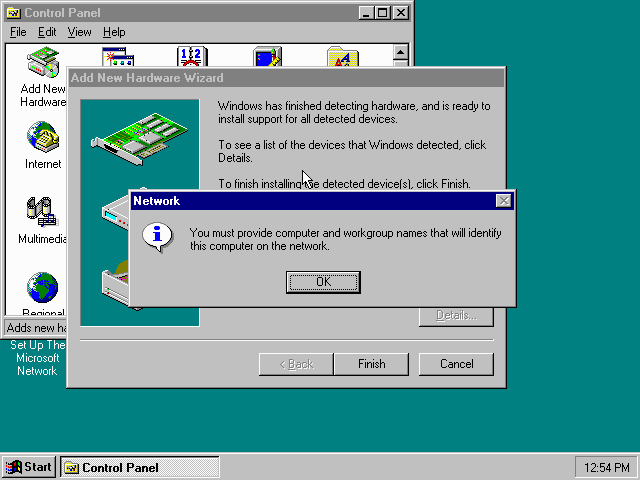
If you enabled NE2000 support in your DOSBox-X config file after Windows 95 installation, go to «Start», «Settings» and «Control Panel» and double-click on «Add New Hardware».
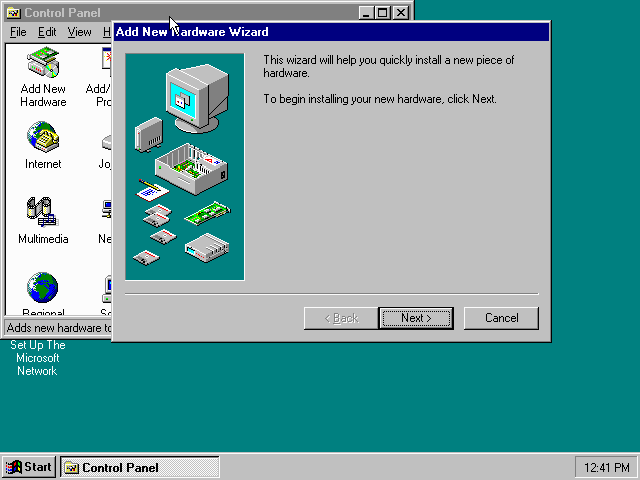
In the «Add New Hardware Wizard» dialogue, click the «Next >» button to continue.

Now select «Yes (Recommended)» and click the «Next >» button to continue.
It will ask for another confirmation.
Again, simply click the «Next >» button.
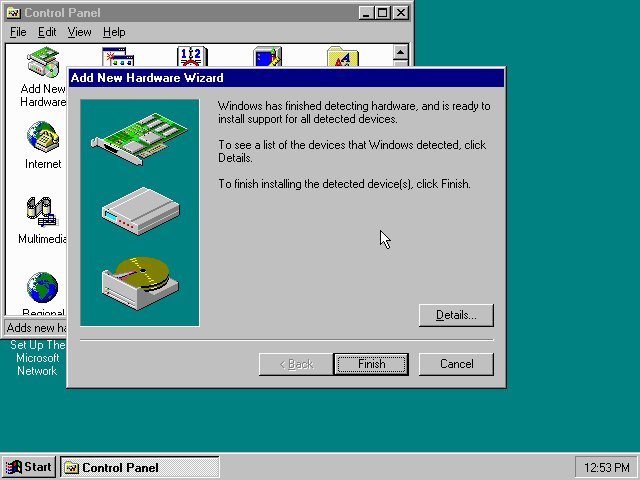
If it detected new hardware, you should get this dialogue.
You can click the «Details…» button to see what it found, after which you can click on «Finish».
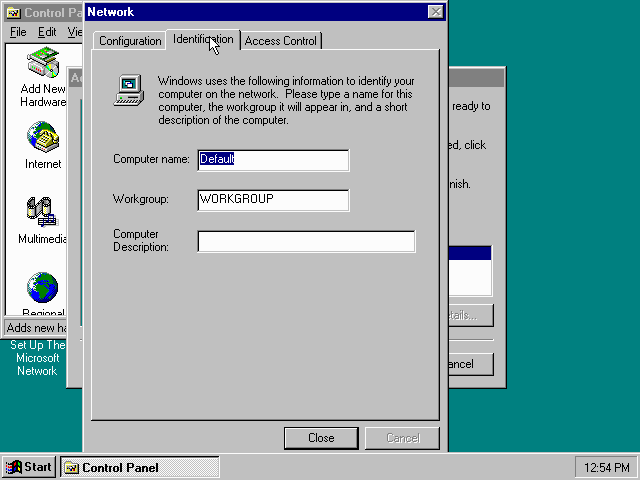
It will now want you to provide some details, click on «OK».

You must at a minimum enter a value in the «Workgroup» field.
If you don’t know what to type, just type «WORKGROUP».
You may also want to provide a more descriptive «Computer Name».
Don’t close the dialogue just yet though, click on the «Configuration» tab instead.
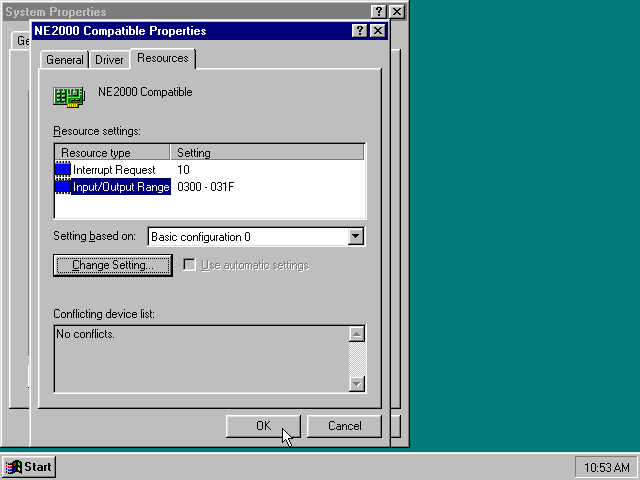
Highlight the «NE2000 Compatible» entry and click the «Properties» button.
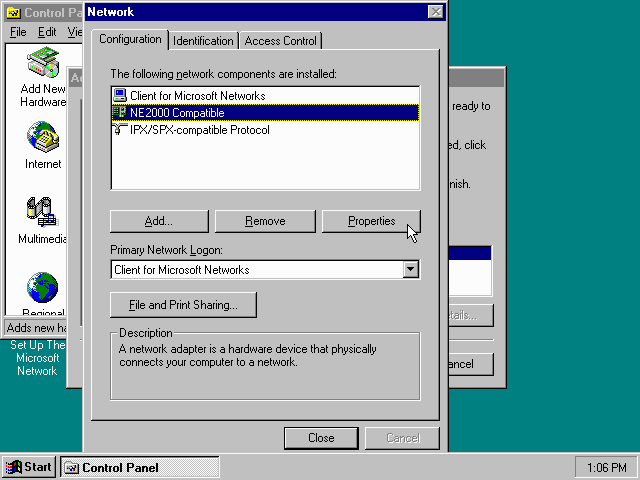
On the «NE2000 Compatible Properties» dialogue, select the «Resources» tab, and adjust the IRQ to 10 to match the nicirq= value in your DOSBox-X config file.
Then click «OK» to finish.
Lastly, while you’re in the Network settings dialogue, you may also want to add the TCP/IP protocol, which is not enabled by default on Windows 95.
On the Configuration tab, click on «Add», then select «Protocol» and click again «Add…»
You will now be presented with the «Select Network Protocol» dialogue.
Select manufacturer: «Microsoft», and for Network Protocols: «TCP/IP», and click the «OK» button.
|
Note |
In the Network settings, you can optionally remove the «IPX/SPX-compatible Protocol» that was automatically installed, as few Windows programs need it. |
|
Note |
By default, TCP/IP will try to get its network configuration over DHCP, which should work in most cases. If you need to manually specify the settings, highlight «TCP/IP», and click the «Properties» button. |
Once you’re finished, Click OK to close the Network settings window, and the TCP/IP driver will be installed, and Windows will prompt you to restart your computer.
Confirm, and Windows 95 will reboot.
After the reboot you should have working TCP/IP networking.
Emulated video adapter and video mode
The default video adapter that DOSBox-X emulates is the S3 Trio64, which is the best emulated video adapter that DOSBox-X offers, with the widest range of resolutions and colour depths.
There is a newer S3 video driver for Win95, version 2.11.03, dated June 12, 1996.
This update adds some additional video modes. But it does not add support for 8MB video RAM, or wide-screen video modes.
The available video modes with the updated S3 Trio64 driver are:
-
4-bit colour (16): 640×480
-
8-bit colour (256): 640×480, 800×600, 1024×768, 1152×864, 1280×1024 and 1600×1200
-
16-bit colour (65536): 640×480, 800×600, 1024×768 and 1280×1024
-
24-bit colour (16.7M): 640×480
-
32-bit colour (16.7M + alpha): 640×480, 800×600 and 1024×768
A few enhancements have been made to the emulated S3 Trio64, compared to a real S3 Trio64:
-
No real S3 Trio64 was ever produced with more than 4MB video memory, under DOSBox-X you can optionally configure 8MB.
-
The real cards never supported wide-screen resolutions, wide-screen VESA modes can optionally be enabled in DOSBox-X.
However, these enhancements cannot be used in Windows 95 with the S3 video driver due to driver limitations.
As such you will be limited to the above video modes with this driver.
|
Note |
If you use an older S3 driver you may experience graphical problems (green tint) in 32-bit colour mode. These problems may not be completely solved by upgrading to the latest driver. The only known solution for now if you used an older driver is to re-install Win95 and use the 2.11.03 driver instead. |
VESA driver
First add the following lines to your DOSBox-X config file in the section:
allow high definition vesa modes=true
allow unusual vesa modes=true
allow low resolution vesa modes=false
Download and extract the latest VBEMP driver package and install the driver from the 032MB directory.
With these settings modes up to 1920×1080 in 32bit colour, or 1920×1440 in 16bit colour are possible.
|
Note |
Using the VBEMP driver does have a negative graphics performance impact, which when measured in WinBench96 Graphics WinMark, can be a reduction of up to 59%. |
Emulated sound card
The emulated sound card used in this guide is the SB16 Vibra, instead of the default SB16.
This is simply because the SB16 Vibra is an ISA PnP card, and therefore automatically detected by Windows.
There is no other real advantage of using the emulated SB16 Vibra over the SB16.
|
Note |
One often heard complaint of the real SB16 Vibra is its CQM synthesis, which was used as a low-cost replacement of the OPL3 chip found on earlier cards. However, DOSBox-X does not really emulate the CQM, instead it uses the same OPL3 emulation as for the regular SB16 model. Therefore, the CQM sound quality issues with the real SB16 Vibra do not apply to DOSBox-X. |
An optional driver update to 4.38.14 is available on the VOGONS Vintage Driver Library (ignore that the download claims it is for Windows 98, the update is for both Windows 95 and 98).
|
Warning |
There have been reports from some users that with sound enabled, that Windows 9x games crash. If you encounter similar issues, try to set sbtype=none and see if the game works.
|
Enabling General MIDI
If you have a working DOSBox-X General MIDI setup, either emulated or real, you can use that in Windows 95.
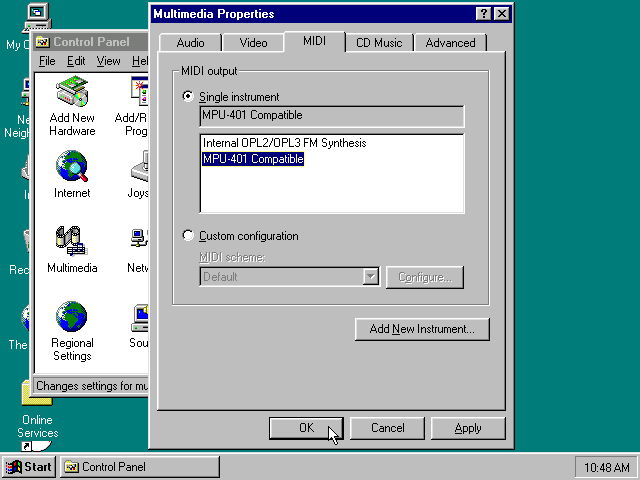
Go to «Start», «Settings» and open «Control Panel», and then double-click on «Multimedia».
Now on the «MIDI» tab, change the «Single instrument» option to «MPU-401 Compatible», and click OK to close the window.
Enabling printing
Print to PostScript
For the best print quality, you will want to print to a PostScript printer in Windows 95.
First, set up your DOSBox-X config to print to a file as such:
[dosbox]
captures=capture
[parallel]
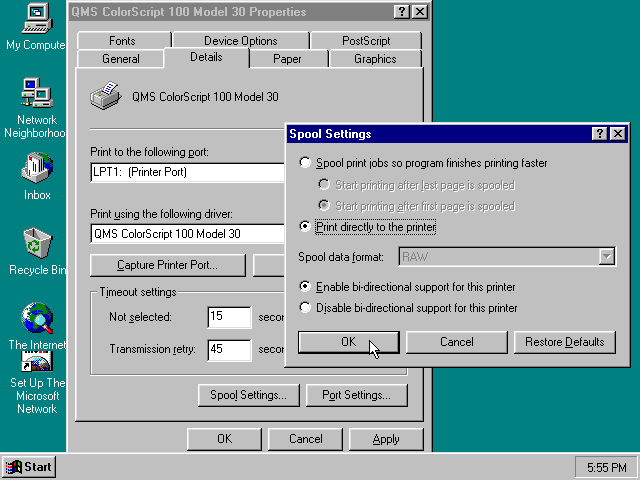
parallel1=file timeout=2000Next in Windows 95, select any PostScript printer such as the «QMS ColorScript 100 Model 30», during printer setup connected to LPT1.
Once the printer is installed, open the printers properties, and on the «Details» tab click on the «Spool Settings…» button.
In the «Spool Settings», you must select «Print directly to the printer» and click OK.

|
Warning |
Failing to change the spool setting, when printing to a file, will result in corrupted PostScript files! |
|
Note |
If two files end up being generated instead of just one for a printjob, you will want to revert the above spool setting. And perhaps try changing the spool setting to «Start printing after last page is spooled». |
When you print, a .prt file in your captures= directory will be created, which despite the extension, is actually a PostScript file.
On Linux and macOS, PostScript files are natively supported and can be viewed and printed.
On a Windows host, it is necessary to install a separate PostScript viewer such as GSview.
Epson emulation
As an alternative, you can use the integrated Epson printer emulation, but the output quality will be significantly less compared to PostScript.
First, set up your DOSBox-X config to emulate an Epson printer as such:
[parallel]
parallel1=printer
[printer]
printer=true
printoutput=ps
multipage=true
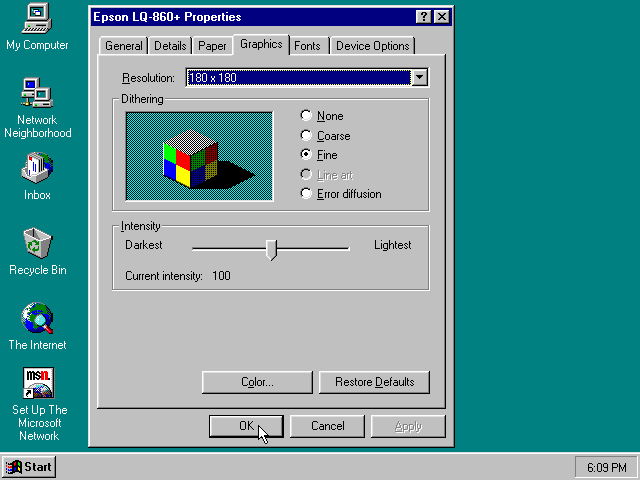
timeout=2000Next in Windows 95, select any Epson dot-matrix printer, such as the «Epson LQ-860+» option during printer setup connected to LPT1
|
Warning |
Make sure that you do not configure the Epson printer driver for a graphics resolution other than 180×180, or the output will be corrupted. |

When you print, a PostScript file with the .ps extension will be created in your current working directory.
The emulated Epson printer settings can be adjusted as documented on the above linked wiki printing guide.
3dfx Voodoo
The emulated 3dfx Voodoo PCI device is enabled by default in DOSBox-X, but Windows 95 lacks drivers for it by default.
As such a «PCI Multimedia Video Device» will show in Device Manager with a yellow exclamation mark.
A driver package is available here (v3.01.00) to enable support.
If for some reason you do not want 3dfx Voodoo emulation, it can be disabled by adding the following lines to your DOSBox-X config:
[voodoo]
voodoo_card=false
Glide pass-through
Starting with DOSBox-X 0.83.10 it is possible to use glide pass-through with Windows 95.
There are however a few points you need to be aware of.
-
The DOSBox-X and glide-wrapper installed on the host need to be the same architecture.
So, if you’re using a 64bit DOSBox-X, you need to use a 64-bit glide-wrapper. -
The Linux SDL2 DOSBox-X does not work with OpenGlide, this is a limitation of OpenGlide (see OpenGlide issue #20).
The work-around is to use the SDL1 DOSBox-X instead.
You need to set the following DOSBox-X config option:
You will also need a specially patched GLIDE2X.DLL which you can place in either the C:\Windows\System directory of Windows 95, or in the game directory.
But be aware that some games come with their own GLIDE2X.DLL, which typically gets installed in the game directory.
If so, you will have to remove this DLL file for glide pass-through to work.
Hard Disk Read-ahead optimization
In «System Properties», select the «Performance» tab, and click the «File System…» button.
A separate «File System Properties» window will open.
On the «Hard Disk» tab you can specify the Read-ahead optimization.
Based on benchmark results (WinBench 96), it seems that setting this to «None» gives the best performance in combination with DOSBox-X, although the difference is marginal.
This is no doubt because the host system is better at caching then the Windows 98 cache function.
Host Folder mounts
Starting with DOSBox-X 2022.08.0, there is optional support to dynamically convert a host folder mount to an emulated FAT harddisk for use when you need to boot a guest OS, such as Windows 95.
This can be accomplished in one of two ways. Either when you issue the boot command, you add the option -convertfat. e.g. boot c: -convertfat.
Or by setting the following option in your DOSBox-X config file:
[sdl]
convertdrivefat = true
When you now boot from a real image file, it will attempt to convert ALL folder mounts at the time of booting to emulated FAT Harddisks.
|
Note |
You cannot boot from such an emulated FAT harddisk. You will still need some other bootable image file to actually boot a guest OS. |
|
Note |
This conversion is dynamic, effectively creating an emulated FAT harddisk out of a folder mount. This converted FAT harddisk is not automatically stored permanently. You can however, store it as a permanent image file that you can later mount with IMGMOUNT, using the «Drive» > «drive letter» > «Save to disk image» option from the menus.Please see the «Creating harddisk images from folder mounts» section in the Guide: Managing image files in DOSBox-X for more information. |
|
Note |
There is currently no support for creating emulated CD-ROM or Floppy drives out of folder mounts with this method. Any CD-ROM or Floppy folder mounts will also be converted to harddisk folder mounts, and may not actually work for the intended purpose. |
One thing to note, is that there is no way to specify the FAT type to use for the conversion.
The FAT type will be automatically selected based on the aggregate size of files in the folder, plus 250MiB (this can be adjusted with the convert fat free space option in the DOSBox-X config file).
If the total space of files + 250MiB does not exceed 2GiB, it will convert it into a FAT16 disk. Otherwise, it will become a FAT32, which in turn will require a guest OS with FAT32 support.
Alternatively, you can also make the emulated FAT drive read-only by using the -convertfatro option with the boot command. Or by setting convert fat free space=0 option in the DOSBox-X config file.
Known limitations
-
If you intend at any point to use a Floppy or CD during your usage of Windows 95, you must attach a floppy and/or CD image before starting Windows 95.
You can load a different CD or Floppy image, once you booted Windows 95, but if a floppy or CD is not present when starting Windows 95 the drive is simply missing, and you cannot add it without rebooting the guest OS. -
When mounting a CD-ROM image using
imgmount, before booting Windows 95, you may have to specify the IDE device to attach it to for it to work properly in Windows 95. e.g.imgmount d game_cd.iso -ide 2mto make the CD-ROM drive appear as the master device on the secondary IDE controller.
Outstanding issues
-
Resolve «Drive A is using MS-DOS compatibility mode file system»
Installing Microsoft Windows 95 in DOSBox-X

Table of Contents
- Installing Microsoft Windows 95 in DOSBox-X
- Overview
- Windows CD-ROM editions this guide applies to
- External links
- DOSBox-X config file
- General installation Notes
- Dynamic vs Normal core
- Turbo mode
- Creating a Harddisk image
-
Installation Method
- Requirements
- Starting the installation
- Copying the contents of the CD-ROM
- Running SETUP.EXE
- Booting Windows 95 after installation
- Steps to take after installation
- Mounting CD or Diskette images
-
Enabling networking
- Enabling NE2000 in your DOSBox-X config file
- Setting up NE2000 networking in Windows 95
-
Emulated video adapter and video mode
- VESA driver
- Emulated sound card
- Enabling General MIDI
-
Enabling printing
- Print to PostScript
- Epson emulation
-
3dfx Voodoo
- Glide pass-through
- Hard Disk Read-ahead optimization
- Host Folder mounts
- Known limitations
- Outstanding issues
Overview
This guide will give a general description of installing Windows 95 in DOSBox-X, in addition to addressing some common issues.
Windows CD-ROM editions this guide applies to
-
Windows 95 (RTM; Original release) — Retail Full
-
Windows 95 (RTM; Original release) — OEM Full
-
Windows 95 OSR1 (aka 95A) — OEM Full
-
Windows 95 OSR2 (aka 95B) — OEM Full
-
Windows 95 OSR2.1 (aka 95B) — OEM Full
-
Windows 95 OSR2.5 (aka 95C) — OEM Full
|
Note |
This guide is meant for the Windows 95 CD-ROM editions. The Windows 95 diskette edition can also be used starting with DOSBox-X 0.83.19, but requires a lot of tedious disk swapping and is therefore not recommended. |
|
Note |
Windows 95 Upgrade editions have additional requirements and are not covered by this guide. |
If you don’t know which Windows 9x version to install, we recommend that you install Windows 98SE.
If you want to stick with Windows 95, we recommend to use Windows 95 OSR2 or later.
DOSBox-X config file
You first need to create a DOSBox-X config file.
[sdl]
autolock=true

[dosbox]
title=Windows 95
memsize=64


vmemsize=8
vesa modelist width limit=0
vesa modelist height limit=0

[dos]
# Set 'ver=7.1' if using Win95 OSR2 (95B) or later
ver=7.0
hard drive data rate limit=0
floppy drive data rate limit=0

[cpu]
cputype=pentium_mmx
core=normal

[sblaster]
sbtype=sb16vibra

[fdc, primary]
int13fakev86io=true

[ide, primary]
int13fakeio=true
int13fakev86io=true

[ide, secondary]
int13fakeio=true
int13fakev86io=true
cd-rom insertion delay=4000

[render]
scaler=none

[autoexec]
Copy the above config and save it as win95.conf
|
Note |
If using Windows 95 OSR2 (or later) with FAT32 volumes, be sure to change the DOS version to 7.1 (ver=7.1 or from the DOSBox-X prompt: ver set 7.1) or else you will get errors mounting the FAT32 volume.
|
|
Note |
You can increase the allocated RAM up to the Windows 95 maximum of 480MB by setting memsize=480.Larger values may be possible with tweaks but are not covered here. |
General installation Notes
-
If you get a prompt stating that C:\WINDOWS already exists, ignore it, and continue the installation.
-
During the installation you may be asked if you have a CD-ROM, Network card or sound card that you want it to scan for. If you have NE2000 enabled in your DOSBox-X config file, you may want to check the Network adapter check box. Your DOSBox-X CD-ROM and Sound Card will be detected regardless if you check its box or not.
-
In case you installed Windows 95 OSR2.5 you may have noticed that you did not get IE4 and the Active Desktop features. This is because this is an optional installation. On the CD, simply run \WIN95\IE4SETUP.EXE to install it. While there is no real advantage to either feature, installing it does bring some new and updated libraries such as MSVCRT.DLL and COMCTL32.DLL that some programs need.
Dynamic vs Normal core
Starting with DOSBox-X 0.83.10 the dynamic_x86 core, which should perform much better, has been sufficiently enhanced that it can now be used for most use-cases with Windows 95.
However, for now we still recommend that you do the installation of Windows 95 using core=normal until issue #2215 is resolved.
But after the installation is finished you should be able to change to core=dynamic_x86.
Should you run into problems such as application crashes or a Windows 95 blue-screen that cannot be reproduced with core=normal, please report the problem on the DOSBox-X Git issues page.
One known issue is that opening a DOS window in Windows 95 will cause a crash when not using core=normal.
Turbo mode
Some parts of the installation, but also starting Windows 95 can take a considerable amount of time.
You may be able to speed this up considerably (depending on the host CPU) by using the DOSBox-X Turbo mode, which can be enabled from the drop-down menu bar by selecting «CPU» followed by «Turbo (Fast Forward)».
This turbo mode is not like the old Turbo button on retro PCs, but functions more like a fast-forward, and therefore should not be used when interacting with the guest OS.
By default, the moment you press a key on the keyboard, turbo mode will disengage.
|
Warning |
Using the mouse not disengage turbo mode, and double-clicks will be almost impossible to achieve as long as turbo mode is active. |
You may also want to enable turbo mode by default to allow Windows 95 to startup quicker by merging the following settings into your DOSBox-X config file.
|
Note |
This will cause some audio distortion on Windows 95 startup, if you have the Windows startup sound enabled. |
Creating a Harddisk image
|
Note |
In addition to the below DOSBox-X command line utility, starting with DOSBox-X 0.83.9 it is possible to create harddisk images from the DOSBox-X menu. Go to the «DOS» menu and select «Create blank disk image…». This option allows for various common harddisk types to be created, for less common types you need to use the command line utility. |
|
Note |
When creating your HDD image with IMGMAKE, instead of specifying a custom size, you can choose a pre-defined template. The pre-defined HDD templates can be seen by running IMGMAKE without arguments.
|
-
Diskette (floppy) images are always created as FAT12.
-
If your reported DOS version is 7.0 or lower, then harddisk images up to 2GB will use FAT16 by default.
-
If your reported DOS version is 7.1 or higher, then harddisk images up to 512MB will use FAT16 by default.
-
Larger size harddisk images will use FAT32 by default (larger than 2GB can only be created as FAT32).
Alternatively, you can use the -fat option to instruct IMGMAKE to create a certain FAT type (assuming that is possible for the harddisk size).
|
Note |
Only Windows 95 OSR2 or later supports FAT32, for older Windows 95 releases you can only use FAT16 up to 2GB. |
First you need to start DOSBox-X from the command-line, using your newly created win95.conf.
This assumes that dosbox-x is in your path and win95.conf is in your current directory.
dosbox-x -conf win95.conf
Then in DOSBox-X you need to create a new harddisk image file with IMGMAKE.
This example uses an 2GB hard disk image with a single FAT16 formatted partition.
This is the maximum size for FAT16 and supported by all Windows 95 releases.
IMGMAKE hdd.img -t hd_2gig -fat 16
Or if you’re using Windows 95 OSR2 or later, you can create a FAT32 volume.
Technically the FAT32 filesystem is capable of supporting partitions up to 2TB, but the generic IDE driver in Windows 95 cannot handle volumes greater than 32GB.
Larger partition sizes may be possible with 3rd party drivers but are not covered here.
In later Windows versions, starting with Windows 2000, Microsoft won’t let you format a volume bigger than 32GB with FAT32 using its built-in formatting tool, this was presumably to push migrations to NTFS and later exFAT.
IMGMAKE hdd.img -t hd_8gig
Or if you want to create a larger disk, you can create a custom type.
This is an example of a 16GB (16*1024=16384 MB) disk, which due to its size, will be formatted as FAT32.
IMGMAKE hdd.img -t hd -size 16384
Installation Method
Other installation methods are possible than the one described below.
This method is however considered to be the quickest one with the least number of steps.
Requirements
-
DOSBox-X 0.83.10 or later, these instructions will NOT work with other DOSBox forks.
-
Windows 95 CD-ROM image (named «Win95.iso» in the example below).
Getting this image file is outside the scope of this guide.
Starting the installation
This assumes you have already started DOSBox-X with the win95.conf config file and created your harddisk image.
First mount the harddisk image you created earlier:
|
Note |
If you get an error saying that «This operation requires DOS version 7.10 or higher», than you’re trying to mount a FAT32 volume, and have not set your reported DOS version in your DOSBox-X config to 7.1. FAT32 volumes are only supported if your installing Windows 95 OSR2 or later. |
You will also need to mount the Windows 95 CD-ROM. There are a few ways of doing so, but this guide assumes you have a ISO image.
If you have a copy of the Windows 95 CD-ROM as an ISO (or a cue/bin pair), you can mount it as follows:
Copying the contents of the CD-ROM
While not strictly necessary, as it is possible to run SETUP.EXE directly from the CD-ROM (if you have the CD-ROM automatically mounted in your [autoexec] section of the config file).
It is recommended to copy the installation files (contents of the WIN95 directory on the CD-ROM) to your HDD image, as it will prevent Windows 95 from asking for the CD-ROM when it needs additional files later.
XCOPY D:\WIN95 C:\WIN95 /I /E
The files in the above example are copied to the C:\WIN95 directory.
|
Note |
You may want to use «C:\WINDOWS\OPTIONS\CABS» instead, as that is the directory that OEM installs normally use. But if you do, be aware that the installer will complain that C:\WINDOWS already exists. When you get the warning below, select «Other directory» and click «Next >» to continue. On the screen afterwards, change the directory to «C:\WINDOWS» and continue the installation. |

Running SETUP.EXE
You can now run SETUP.EXE.
Now run through the installation process.
The actual steps will not be covered in this guide but are pretty self-explanatory and detailed guides on the Windows 95 install process can be found online such as YouTube.
When the installer reboots DOSBox-X, and you’re back at the DOSBox-X Z:\ prompt, type EXIT.
Now edit your win98.conf config file.
At the end of the file, in the [autoexec] section, add the following two lines:
IMGMOUNT C hdd.img
BOOT C:
Save the config file, and at the command-prompt of your host PC you can type the below command to continue with the next phase of the installation process.
This is also the command you use, after the installation is finished, to start Windows 95 in DOSBox-X.
dosbox-x -conf win95.conf
Booting Windows 95 after installation
After the installation is finished, you can start Windows 95 from the command-prompt of your host PC, with the following command:
dosbox-x -conf win95.conf
You can optionally create a shortcut on your desktop to start Windows 95 directly.
Steps to take after installation
Once Windows 95 is installed, here is some additional software you may want to install or update:
-
Install Microsoft .NET framework version 1.0 and 1.1 (includes Visual C++ 2003 runtime)
-
Install Unofficial Windows 95 OSR2 Service Pack 1.05
-
Install/Update to Microsoft Internet Explorer 5.5SP2 (rarely needed)
-
Install Microsoft WinG 1.0 (needed by just a few games, and those games typically include it)
-
Install Microsoft DCOM 4.71.1015.0 (DCOM95.EXE)
-
Install/Update to Microsoft DirectX 8.0a
-
Install/Update to Microsoft Windows Media Player 6.4
-
Install Adobe Acrobat Reader 5.05
-
Install/Update to Adobe Flash Player 8.0.24.0
-
Install Apple QuickTime 5.0.5
-
Install the 3dfx Voodoo 3.01.00 reference drivers
Mounting CD or Diskette images
DOSBox-X supports mounting CD and diskette (floppy) images, and making those available to an OS booted in DOSBox-X.
But only if the image files are specified before starting real DOS or Windows 9x.
The option to load image files from the menu bar becomes unavailable the moment you boot DOS or Win9x in DOSBox-X.
This is a known limitation that hopefully will be resolved in the near future.
For now, you can work around it, by specifying multiple image files with the IMGMOUNT command as such:
IMGMOUNT A disk1.img disk2.img disk3.img
IMGMOUNT D cd1.iso cd2.iso cd3.iso
You can then swap between disk images with the swap option from the menu.
Enabling networking
To enable networking, you first need to enable NE2000 adapter emulation in your win95.conf config file and select an appropriate back-end for the NE2000 emulation.
Enabling NE2000 in your DOSBox-X config file
Starting with DOSBox-X 0.83.12 there are two different back-ends to the NE2000 adapter emulation.
The default is backend=auto, which implies backend=slirp if SLIRP support is available, otherwise backend=pcap is implied if PCAP support is available.
backend=pcap
The PCAP back-end uses something called «Promiscuous mode».
This has the advantage that DOSBox-X can support various legacy network protocols, such as IPX and NetBIOS Frames (aka NetBEUI) in addition to TCP/IP.
This mode not only allows communication between DOSBox-X instances on the same network, but also with legacy PCs on the same network.
However, for this to work DOSBox-X needs to have very low-level access to your real network adapter.
In some cases, this is not possible, such as:
-
Network Adapter or Driver not supporting Promiscuous mode (most wireless adapters fall into this category).
-
Your Ethernet switch not allowing multiple MAC addresses on a single port or doing any kind of MAC address whitelisting.
-
Sandboxed versions of DOSBox-X (e.g., Flatpak) not allowing the required low-level access.
To enable NE2000 emulation with the pcap back-end, add the following to your win95.conf config file:
[ne2000]
ne2000=true
nicirq=10
backend=pcap

[ethernet, pcap]
realnic=list
The list value for realnic= will need to be replaced by a value representing your actual network adapter.
See Guide: Setting up networking in DOSBox-X for more information.
backend=slirp
Unlike the PCAP back-end, the SLIRP back-end does not require Promiscuous mode.
As such it will work with wireless adapters, and it will work in most sandboxed environments.
But obviously, it has its own limitations.
-
It is not supported in all platforms, such as Windows Visual Studio builds.
-
It only supports the TCP/IP protocol (other protocols must be TCP/IP encapsulated).
-
It is effectively behind a NAT (Network Address Translation) gateway, meaning that you can communicate outbound, but no systems on the LAN can instantiate a new connection to it. Which means that two DOSBox-X instances on the same LAN using
backend=slirpcannot communicate with each other.
To enable NE2000 emulation with the SLIRP back-end, add the following to your win95.conf config file:
[ne2000]
ne2000=true
nicirq=10
backend=slirp
Setting up NE2000 networking in Windows 95
Detection during installation
Windows 95 setup wizard will ask if you want to detect additional hardware during installation.
The exact options presented may vary depending on the Windows 95 edition.
You can tick the «Network adapter» checkbox, and it should continue and find the emulated NE2000 adapter.

It will however, not give you the possibility to set the resources at this point, and you will need to do so in device manager afterwards.
Once the Windows 95 installation is finished, right-click on «My Computer» on the desktop and select «Properties».
Now in the «System Properties» dialogue, select the «Device Manager» tab.
Highlight the «NE2000 Compatible» entry and click on the «Properties» tab and then click the «Set Configuration Manually» button.

Now you need to highlight the «Interrupt Request» entry and click the «Change Setting…» button. You can now change the IRQ to 10 to match the nicirq= value in your DOSBox-X config file.
Next, highlight the «Input/Output Range» entry, and again click the «Change Setting…» button. Now change the value to «0300 — 031F».
Once you’re finished adjusting the resources, click the «OK» button, and Windows 95 will prompt you to shut down to apply the settings, after which you need to restart Windows 95 in DOSBox-X.
|
Note |
By default, Windows 95 only enables Novell’s IPX/SPX protocol. Most Windows 95 applications expect TCP/IP which you will need to manually enable in the Network settings. |
NE2000 Detection after installation
If you enabled NE2000 support in your DOSBox-X config file after Windows 95 installation, go to «Start», «Settings» and «Control Panel» and double-click on «Add New Hardware».

In the «Add New Hardware Wizard» dialogue, click the «Next >» button to continue.

Now select «Yes (Recommended)» and click the «Next >» button to continue.
It will ask for another confirmation.
Again, simply click the «Next >» button.
If it detected new hardware, you should get this dialogue.
You can click the «Details…» button to see what it found, after which you can click on «Finish».

It will now want you to provide some details, click on «OK».
You must at a minimum enter a value in the «Workgroup» field.
If you don’t know what to type, just type «WORKGROUP».
You may also want to provide a more descriptive «Computer Name».
Don’t close the dialogue just yet though, click on the «Configuration» tab instead.

Highlight the «NE2000 Compatible» entry and click the «Properties» button.

On the «NE2000 Compatible Properties» dialogue, select the «Resources» tab, and adjust the IRQ to 10 to match the nicirq= value in your DOSBox-X config file.
Then click «OK» to finish.

Lastly, while you’re in the Network settings dialogue, you may also want to add the TCP/IP protocol, which is not enabled by default on Windows 95.
On the Configuration tab, click on «Add», then select «Protocol» and click again «Add…»
You will now be presented with the «Select Network Protocol» dialogue.
Select manufacturer: «Microsoft», and for Network Protocols: «TCP/IP», and click the «OK» button.
|
Note |
In the Network settings, you can optionally remove the «IPX/SPX-compatible Protocol» that was automatically installed, as few Windows programs need it. |
|
Note |
By default, TCP/IP will try to get its network configuration over DHCP, which should work in most cases. If you need to manually specify the settings, highlight «TCP/IP», and click the «Properties» button. |
Once you’re finished, Click OK to close the Network settings window, and the TCP/IP driver will be installed, and Windows will prompt you to restart your computer.
Confirm, and Windows 95 will reboot.
After the reboot you should have working TCP/IP networking.
Emulated video adapter and video mode
The default video adapter that DOSBox-X emulates is the S3 Trio64, which is the best emulated video adapter that DOSBox-X offers, with the widest range of resolutions and colour depths.
There is a newer S3 video driver for Win95, version 2.11.03, dated June 12, 1996.
This update adds some additional video modes. But it does not add support for 8MB video RAM, or wide-screen video modes.
The available video modes with the updated S3 Trio64 driver are:
-
4-bit colour (16): 640×480
-
8-bit colour (256): 640×480, 800×600, 1024×768, 1152×864, 1280×1024 and 1600×1200
-
16-bit colour (65536): 640×480, 800×600, 1024×768 and 1280×1024
-
24-bit colour (16.7M): 640×480
-
32-bit colour (16.7M + alpha): 640×480, 800×600 and 1024×768
A few enhancements have been made to the emulated S3 Trio64, compared to a real S3 Trio64:
-
No real S3 Trio64 was ever produced with more than 4MB video memory, under DOSBox-X you can optionally configure 8MB.
-
The real cards never supported wide-screen resolutions, wide-screen VESA modes can optionally be enabled in DOSBox-X.
However, these enhancements cannot be used in Windows 95 with the S3 video driver due to driver limitations.
As such you will be limited to the above video modes with this driver.
|
Note |
If you use an older S3 driver you may experience graphical problems (green tint) in 32-bit colour mode. These problems may not be completely solved by upgrading to the latest driver. The only known solution for now if you used an older driver is to re-install Win95 and use the 2.11.03 driver instead. |
VESA driver
First add the following lines to your DOSBox-X config file in the section:
allow high definition vesa modes=true
allow unusual vesa modes=true
allow low resolution vesa modes=false
Download and extract the latest VBEMP driver package and install the driver from the 032MB directory.
With these settings modes up to 1920×1080 in 32bit colour, or 1920×1440 in 16bit colour are possible.
|
Note |
Using the VBEMP driver does have a negative graphics performance impact, which when measured in WinBench96 Graphics WinMark, can be a reduction of up to 59%. |
Emulated sound card
The emulated sound card used in this guide is the SB16 Vibra, instead of the default SB16.
This is simply because the SB16 Vibra is an ISA PnP card, and therefore automatically detected by Windows.
There is no other real advantage of using the emulated SB16 Vibra over the SB16.
|
Note |
One often heard complaint of the real SB16 Vibra is its CQM synthesis, which was used as a low-cost replacement of the OPL3 chip found on earlier cards. However, DOSBox-X does not really emulate the CQM, instead it uses the same OPL3 emulation as for the regular SB16 model. Therefore, the CQM sound quality issues with the real SB16 Vibra do not apply to DOSBox-X. |
An optional driver update to 4.38.14 is available on the VOGONS Vintage Driver Library (ignore that the download claims it is for Windows 98, the update is for both Windows 95 and 98).
|
Warning |
There have been reports from some users that with sound enabled, that Windows 9x games crash. If you encounter similar issues, try to set sbtype=none and see if the game works.
|
Enabling General MIDI
If you have a working DOSBox-X General MIDI setup, either emulated or real, you can use that in Windows 95.
Go to «Start», «Settings» and open «Control Panel», and then double-click on «Multimedia».
Now on the «MIDI» tab, change the «Single instrument» option to «MPU-401 Compatible», and click OK to close the window.

Enabling printing
Print to PostScript
For the best print quality, you will want to print to a PostScript printer in Windows 95.
First, set up your DOSBox-X config to print to a file as such:
[dosbox]
captures=capture

[parallel]
parallel1=file timeout=2000
Next in Windows 95, select any PostScript printer such as the «QMS ColorScript 100 Model 30», during printer setup connected to LPT1.
Once the printer is installed, open the printers properties, and on the «Details» tab click on the «Spool Settings…» button.
In the «Spool Settings», you must select «Print directly to the printer» and click OK.
|
Warning |
Failing to change the spool setting, when printing to a file, will result in corrupted PostScript files! |
|
Note |
If two files end up being generated instead of just one for a printjob, you will want to revert the above spool setting. And perhaps try changing the spool setting to «Start printing after last page is spooled». |
When you print, a .prt file in your captures= directory will be created, which despite the extension, is actually a PostScript file.
On Linux and macOS, PostScript files are natively supported and can be viewed and printed.
On a Windows host, it is necessary to install a separate PostScript viewer such as GSview.
Epson emulation
As an alternative, you can use the integrated Epson printer emulation, but the output quality will be significantly less compared to PostScript.
First, set up your DOSBox-X config to emulate an Epson printer as such:
[parallel]
parallel1=printer

[printer]
printer=true
printoutput=ps
multipage=true
timeout=2000
Next in Windows 95, select any Epson dot-matrix printer, such as the «Epson LQ-860+» option during printer setup connected to LPT1
|
Warning |
Make sure that you do not configure the Epson printer driver for a graphics resolution other than 180×180, or the output will be corrupted. |
When you print, a PostScript file with the .ps extension will be created in your current working directory.
The emulated Epson printer settings can be adjusted as documented on the above linked wiki printing guide.
3dfx Voodoo
The emulated 3dfx Voodoo PCI device is enabled by default in DOSBox-X, but Windows 95 lacks drivers for it by default.
As such a «PCI Multimedia Video Device» will show in Device Manager with a yellow exclamation mark.
A driver package is available here (v3.01.00) to enable support.
If for some reason you do not want 3dfx Voodoo emulation, it can be disabled by adding the following lines to your DOSBox-X config:
[voodoo]
voodoo_card=false
Glide pass-through
Starting with DOSBox-X 0.83.10 it is possible to use glide pass-through with Windows 95.
There are however a few points you need to be aware of.
-
The DOSBox-X and glide-wrapper installed on the host need to be the same architecture.
So, if you’re using a 64bit DOSBox-X, you need to use a 64-bit glide-wrapper. -
The Linux SDL2 DOSBox-X does not work with OpenGlide, this is a limitation of OpenGlide (see OpenGlide issue #20).
The work-around is to use the SDL1 DOSBox-X instead.
You need to set the following DOSBox-X config option:
You will also need a specially patched GLIDE2X.DLL which you can place in either the C:\Windows\System directory of Windows 95, or in the game directory.
But be aware that some games come with their own GLIDE2X.DLL, which typically gets installed in the game directory.
If so, you will have to remove this DLL file for glide pass-through to work.
Hard Disk Read-ahead optimization
In «System Properties», select the «Performance» tab, and click the «File System…» button.
A separate «File System Properties» window will open.
On the «Hard Disk» tab you can specify the Read-ahead optimization.
Based on benchmark results (WinBench 96), it seems that setting this to «None» gives the best performance in combination with DOSBox-X, although the difference is marginal.
This is no doubt because the host system is better at caching then the Windows 98 cache function.
Host Folder mounts
Starting with DOSBox-X 2022.08.0, there is optional support to dynamically convert a host folder mount to an emulated FAT harddisk for use when you need to boot a guest OS, such as Windows 95.
This can be accomplished in one of two ways. Either when you issue the boot command, you add the option -convertfat. e.g. boot c: -convertfat.
Or by setting the following option in your DOSBox-X config file:
[sdl]
convertdrivefat = true
When you now boot from a real image file, it will attempt to convert ALL folder mounts at the time of booting to emulated FAT Harddisks.
|
Note |
You cannot boot from such an emulated FAT harddisk. You will still need some other bootable image file to actually boot a guest OS. |
|
Note |
This conversion is dynamic, effectively creating an emulated FAT harddisk out of a folder mount. This converted FAT harddisk is not automatically stored permanently. You can however, store it as a permanent image file that you can later mount with IMGMOUNT, using the «Drive» > «drive letter» > «Save to disk image» option from the menus.Please see the «Creating harddisk images from folder mounts» section in the Guide: Managing image files in DOSBox-X for more information. |
|
Note |
There is currently no support for creating emulated CD-ROM or Floppy drives out of folder mounts with this method. Any CD-ROM or Floppy folder mounts will also be converted to harddisk folder mounts, and may not actually work for the intended purpose. |
One thing to note, is that there is no way to specify the FAT type to use for the conversion.
The FAT type will be automatically selected based on the aggregate size of files in the folder, plus 250MiB (this can be adjusted with the convert fat free space option in the DOSBox-X config file).
If the total space of files + 250MiB does not exceed 2GiB, it will convert it into a FAT16 disk. Otherwise, it will become a FAT32, which in turn will require a guest OS with FAT32 support.
Alternatively, you can also make the emulated FAT drive read-only by using the -convertfatro option with the boot command. Or by setting convert fat free space=0 option in the DOSBox-X config file.
Known limitations
-
If you intend at any point to use a Floppy or CD during your usage of Windows 95, you must attach a floppy and/or CD image before starting Windows 95.
You can load a different CD or Floppy image, once you booted Windows 95, but if a floppy or CD is not present when starting Windows 95 the drive is simply missing, and you cannot add it without rebooting the guest OS. -
When mounting a CD-ROM image using
imgmount, before booting Windows 95, you may have to specify the IDE device to attach it to for it to work properly in Windows 95. e.g.imgmount d game_cd.iso -ide 2mto make the CD-ROM drive appear as the master device on the secondary IDE controller.
Outstanding issues
-
Resolve «Drive A is using MS-DOS compatibility mode file system»
╔════════════════════════════════════════════════════════╗
║ Join on Discord give Feedback and Request Abandonware/Oldies or Delisted games ║
╚════════════════════════════════════════════════════════╝
I installed Windows 95 in DosBox-X by following a guide: http://dosbox95.darktraveler.com/guide%20select.html
NOTE: THIS IS NOT A VIABLE SUBSTITUTE FOR VIRTUAL MACHINES.
It’s pretty cool going back in time once in a while.
To transfer files to Win95 you’ll need WinImage (DL Page) Installed or Portable, DosBox-x has to be closed for it to work.
Open WinImage;
Inside WinBox 95 OSR 2.5 folder drag Win95.img into the WinImage window;
Pick a directory where you want to drop the files and drag them into the WinImage window.
comment
Reviews
Reviewer:
m4j0rt0m
—
favoritefavoritefavoritefavoritefavorite —
September 16, 2023
Subject:
How to fix «Windows protection error» and Windows hanging when launching MS-DOS Prompt
If you run into «Windows protection error», you can read about that here: https://github.com/JHRobotics/patcher9x
In order to fix it, you need to patch your system with patcher9x. Here’s how:
1)Download the latest patcher9x-*-boot.ima from https://github.com/JHRobotics/patcher9x/releases
2)Rename it as patcher9x.ima
3)Copy it into DosBox-X’s root folder
4)Open dosbox-x.conf with a text editor, go to the end and change [autoexec] section from:
{
[autoexec]
# Lines in this section will be run at startup.
# You can put your MOUNT lines here.
IMGMOUNT 0 622C.IMG -T FLOPPY -FS NONE
IMGMOUNT 2 WIN95.IMG -SIZE 512,63,64,520 -T HDD -FS NONE
boot -l c:
}
to:
{
[autoexec]
# Lines in this section will be run at startup.
# You can put your MOUNT lines here.
IMGMOUNT 0 PATCHER9X.IMA -T FLOPPY -FS NONE
IMGMOUNT 2 WIN95.IMG -SIZE 512,63,64,520 -T HDD -FS NONE
boot -l a:
}
5)Run dosbox-x.exe and press enter
6)Run «patch9x», press enter, type ‘2’ and press enter, wait, then type ‘y’ and press enter twice
7)Once you see «A:\>_», you can close DosBox-X
8)Restore the original content of the [autoexec] section in dosbox-x.conf
9)Run dosbox-x.exe, now it should work just fine
**********************************************************
If Windows hangs when launching MS-DOS Prompt:
In dosbox-x.conf, change «core=dynamic» to «core=normal»
Reviewer:
mmmjjjttt
—
favoritefavoritefavoritefavoritefavorite —
June 8, 2023
Subject:
Better than anything I’ve seen yet
I’ve run a few dozen programs on this without any problems. Definitely the easiest way to run those old Win95 CDs.
Reviewer:
LividBunny
—
—
June 4, 2023
Subject:
I feel it should be addressed.
This was just a curiosity of mine, was bored, saw a guide, wanted to try and have a look at the older windows systems.
As mentioned on the post «THIS IS NOT A VIABLE SOLUTION FOR VIRTUAL MACHINES.» aka Not good as a VM.
It’s nice that people like this though.
If you’re interested in using the latest DosBox-X version.
Download it from here: https://dosbox-x.com/
!!DO NOT REPLACE «dosbox-x,conf» FILE!!
Reviewer:
gingerbeardman
—
favoritefavoritefavoritefavorite —
May 7, 2023
Subject:
Missing mouse pointer workaround
Habo Cabo’s tip of changing the colour depth to 16-bit High Color also makes the mouse pointer appear for me. By default it was invisible.
Reviewer:
Bergwacht
—
favoritefavoritefavorite —
April 10, 2023
Subject:
this does nothing
WINDOWS PROTECTION ERROR
Reviewer:
S@sh@
—
favoritefavoritefavoritefavoritefavorite —
March 12, 2023
Subject:
Nice for retro gaming
Thank You very much! Works smooth and fast. Better for emulating o/s and playing games of late nineties than vmware or virtualbox. It even already has cd support, don’t need to install addition drivers or something. I’m really happy.
Reviewer:
arthur2012
—
—
October 17, 2022
Subject:
Actual Color Workaround (for the most part)
Open Display Properties. After that, go to the Appearance tab and change the scheme to any Scheme that is not Windows Standard, then change back to Windows Standard and apply
However, this doesn’t work for some people, so switch to 16-bit colors if you still have that funky color
Reviewer:
Habo Cabo
—
—
May 3, 2022
Subject:
Color Workaround
The funky colors only occur with the default 32-bit True Color palette. Right-click on the desktop, select Properties, select Settings, choose the 16-bit High Color palette.
It’s nice to play with ’95 in DosBox, thanks LB.
Reviewer:
iogamesplayer
—
favoritefavoritefavorite —
April 29, 2022
Subject:
Nice!
A full complete installation of Dosbox X and Windows 95.
The only problem is: Everything is ugly and blue…
Any way to fix that?
Looking at how OS had marvelled over these three decades starting from the 90s somehow makes me reminiscent the good old days of Win 3.1, Win95 and Win98. I certainly missed playing my first ever computer games such as Prince of Persia, Mario, and Doom.
And so embark my journey to relive those memories again in the modern machine. To do that, I selected DosBox, which is an emulator that fully emulates those legacy machines. Like many others, I started off to search for related tutorials and what-not on Google, only to found that most of them are either too fragmented or requires me to piece up the tidbits.
To save time, I had decided to write up this tutorial just so you wouldn’t had the same experience that I did.
So, you will need:
- DosBox
- MS-DOS Boot Disc
- Windows 95 Installation Disc
- Hard disk image that host your Win95 partition
1. Preparing the Files
This is what the fresh installation of DOSBox would contains.

Download a copy of DOS boot disk — 622C.IMG from http://www.rloe.com/randytheracer/622c.zip. For unknown reason I could’t boot when using the DOS 6.22 boot disk from http://www.allbootdisks.com/download/iso.html.
Just like any VM, I know that I will need hard disk image to host the Windows 95 OS. Many tutorials covers the steps to build your own hard disk image, requiring somewhat technical understanding. To avoid these complications, I simply choose a blank pre-formatted FAT16 .img from https://sites.google.com/site/dotalshoff/games/dosbox.
Don’t be surprise with the capacity as the file is compressed and barely reaches 200 KB even for 1GB. This is because they are empty disk image. For me personally, 1GB is more than enough. DosBox requires the hard disk image to be flatten out in size instead of dynamically growing like many VM implementations nowadays. Upon extraction you will get the full blown size of the selected disk size.
Lastly, I then downloaded Win95 Installation Disc (win95_en.iso) from http://www.downloadfreeos.blogspot.tw/2013/06/windows-95.html. The version I chose was Windows 95 (4.00.950).
Having downloaded all of them, I then moved them to DosBox folder.

2. Copy Windows95 Installation Files to the Blank Hard Disk Image
Launch DosBox
Since the blank image I downloaded is already formatted as FAT16, I don’t have to format it again. The following just to verify that.
Mount the empty hard disk image (hdd-1gb.img) by typing
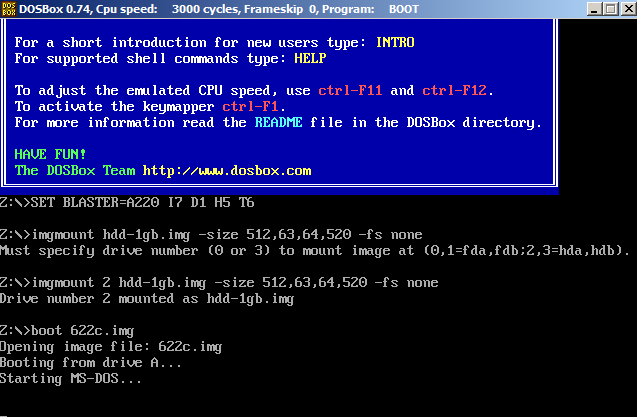
imgmount 2 hdd-1gb.img -size 512,63,64,520 -fs none

Note that I did not specify the drive name such as c or d since there I assume there is still no file system (FAT16, FAT32, NTFS) on it. Instead, I use 2 which will mount it on native system hda. (0-1 will mount to fda and fdb (floppy disk a, b) and 2-3 will mount to hda and hdb).
In addition, it is also necessary to specify the exact disk geometry (i.e. sectors, cylinders) to let the file system utility that we’ll use next (fdisk) know where the disk ends. If you grab the pre-formatted hard disk image from https://sites.google.com/site/dotalshoff/games/dosbox, simply replace the value matching the ones you downloaded. For instance, I will enter 512,63,64,520 since I’m downloading the 1GB image.
256MB image: 512,63,16,520
512MB image: 512,63,32,520
520MB image: 512,63,16,1023
1GB image: 512,63,64,520
2GB image: 512,63,64,1023
After mounting the disk I then boot into MS-DOS 6.22 by typing
boot 622c.img
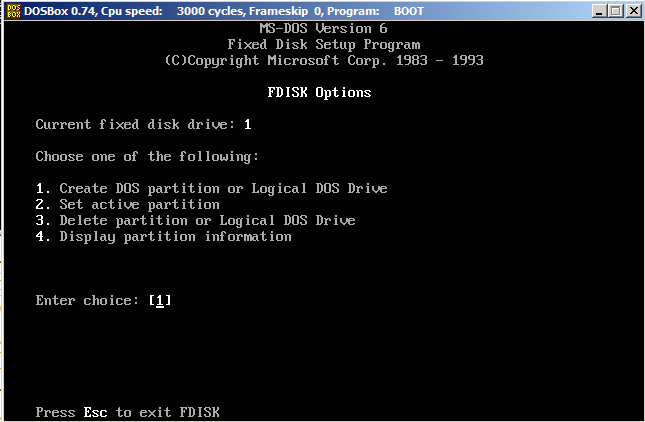
Verify that the disk is already formatted using fdisk.


Restart DosBox and mount the image as drive c by typing:
imgmount c hdd-1gb.img

Extract the contents of the Windows 95 installation disc (win95_en.iso) using WinRAR.

After that mount it as drive d by typing:
mount d .\win95_en
. implies current directory of DOSBox.

Make a new directory called WIN95 in C:/ which is your empty hard disk image. We will later copy the entire content of folder WIN95 from Windows 95 installation disk here.
c:
mkdir WIN95
copy D:\WIN95\*.*
3. Installing Windows 95
After that, start the installation by:
c:
cd WIN95
setup /is
(* /is flag prevent ScanDisk from running)
Follow the wizard and it will ask for a CD-Key at some point. I use the following:
12095-OEM-0004226-12233
* More CD-Key can be found here.
After finishing the installation the system will restart, i.e. DOSBox will quit. You’ll have to relaunch it again.
To boot from the hard disk image, simply type the following:
imgmount 2 hdd-1gb.img -size 512,63,64,520 -fs none
boot -l c
Note: Some tutorials make some mistake in this step by typing the following:
imgmount c hdd-1gb.img
boot hdd-1gb.img
This will result in Invalid System Disk.

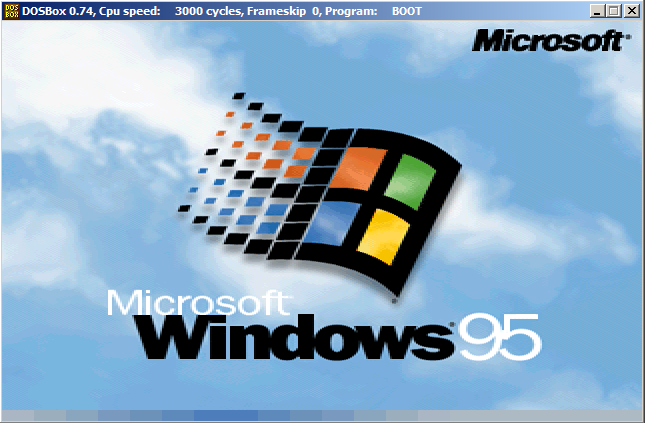
… and voila! The nostalgic boot screen of Windows 95!
Post Setup
Instead of typing these every time you launch DosBox, you may add them in the [AutoExec] section in DosBox configuration file. You can edit it by:

To prevent graphical glitch, lower the CPU speed in the configuration file:
FAQ
Q: I cannot enter backspace \ . It is mapped to right bracket ].
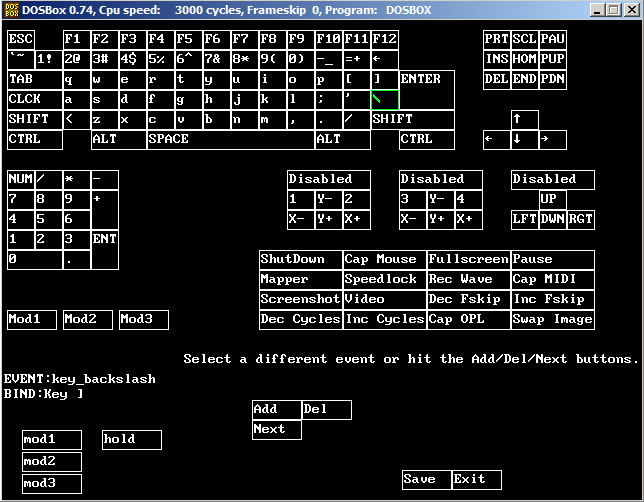
A: Start DOSBox with the switch -startmapper. (Reference: http://www.dosbox.com/wiki/Keymapper). To do so, right click at the DOSBox shortcut found on your Desktop and add the switch in the Shortcut Tab.

The next time you start you will see the Keymapper. Click on the \ and the ‘Add’ button, then press your Backspace key. Delete the binding for [ and ] to avoid conflict.
Resource Links
DOSBox Hard Disk Image (preformatted as FAT16 and available in 256M, 512M, 1G and 2G image)
Windows 95 Installation Disk / Setup Files
Windows OS Product Codes and CD Keys
References
На чтение 8 мин. Просмотров 9.7k. Опубликовано

Windows 95 от Microsoft была огромным скачком от Windows 3.1. Это был первый выпуск Windows с меню «Пуск», панелью задач и типичным интерфейсом рабочего стола Windows, который мы до сих пор используем. Windows 95 не будет работать на современном оборудовании ПК, но вы все равно можете установить ее на виртуальную машину и пережить те славные дни.
Это может быть полезно, если вы хотите играть в старую игру, которая не работает в режиме совместимости с Windows 10, хотя Windows 98 может быть более идеальной для игр эпохи Windows 9x. Или вы можете просто сделать это для небольшого ностальгии. Мы не будем винить тебя.
Содержание
- Что вам нужно
- Шаг первый: создайте свою виртуальную машину
- Шаг второй: подготовьте свой виртуальный диск C:
- Шаг третий: Запустите установщик Windows 95
Что вам нужно
Для этого вам понадобятся две вещи: ISO-файл Windows 95 и образ загрузочного диска Windows 95. В отличие от современных операционных систем, установочный диск Windows 95 не является загрузочным. Вы должны сначала загрузиться в среду MS-DOS с загрузочного диска Windows 95, который в то время был бы гибким, чтобы начать установку.
Если у вас есть старый компакт-диск с Windows 95, вы можете вставить его в свой компьютер и создать из него ISO-файл. Хотя ISO-файлы Windows 95 доступны в Интернете, имейте в виду, что Windows 95 все еще находится под авторским правом Microsoft и не может быть законно загружена из Интернета. Так что начинай копаться в своих старых ящиках.
Получив ISO-файл Windows 95, вы можете загрузить образ загрузочной дискеты с AllBootDisks. Возможно, вам просто нужно загрузить файл «Windows95a.img». Windows 95b (также известная как Windows 95 OSR2) была доступна только OEM-производителям (производителям оригинального оборудования), поэтому любой диск Windows 95, который у вас есть, будет либо в оригинальной версии Windows 95 (также известной как Windows 95 RTM), либо в Windows 95a. выпуск (также известный как Windows 95 OSR1), который поставляется с установленным пакетом обновления 1.
Шаг первый: создайте свою виртуальную машину
Мы будем делать это в VirtualBox, который полностью бесплатен и доступен в Windows, macOS и Linux. Вы можете сделать это в других программах виртуальных машин, таких как VMware, но процесс настройки программного обеспечения виртуальной машины будет немного другим.
Установив VirtualBox, нажмите кнопку «Создать», чтобы создать новую виртуальную машину.

Введите любое имя и выберите «Windows 95» в поле «Версия». Если вы назовете его «Windows 95», VirtualBox автоматически выберет правильную версию Windows.

Выберите, какой объем оперативной памяти вы хотите открыть для своей виртуальной машины. VirtualBox рекомендует 64 МБ, а официальный блог Microsoft The Old New Thing утверждает, что Windows 95 не загрузится, если у нее более 480 МБ памяти. Вы можете разделить разницу и безопасно использовать 256 МБ, что будет более чем достаточно для старых приложений Windows 95.

Продолжайте работу с мастером, пока вам не предложат создать виртуальный жесткий диск. VirtualBox автоматически предложит 2,0 ГБ, и вы, вероятно, не захотите это делать. Розничные версии Windows 95 поддерживают только файловую систему FAT16, что означает, что они не могут использовать диски размером более 2 ГБ.
Windows 95b (также известная как OSR2), выпущенная только для производителей устройств и никогда не продаваемая в розницу, поддерживает FAT32. Таким образом, если бы вы использовали эту версию Windows 95, теоретически вы могли бы использовать до 32 ГБ пространства.

Не загружайте машину сразу после ее создания. Во-первых, вам нужно изменить несколько настроек. Щелкните правой кнопкой мыши свою виртуальную машину Windows 95 и выберите «Настройки».

Выберите категорию «Система», перейдите на вкладку «Ускорение» и снимите флажок «Включить аппаратную виртуализацию VT-x/AMD-V».
Если вы оставите эту опцию включенной, вы сможете установить Windows 95, но при загрузке она просто покажет черный экран.

Затем щелкните категорию «Storage» и выберите виртуальный диск под контроллером гибких дисков. Нажмите кнопку с дискетой справа от дисковода и выберите «Выбрать файл виртуальной дискеты» в меню. Перейдите к загрузочному файлу .img и выберите его.

Наконец, щелкните Пустой дисковод под контроллером IDE, щелкните значок диска справа от Оптического привода и нажмите «Выбрать файл виртуальной оптической папки». Перейдите к ISO-файлу Windows 95 и выберите его.
Нажмите «ОК», чтобы сохранить настройки после завершения.

Шаг второй: подготовьте свой виртуальный диск C:
Теперь вы можете просто дважды щелкнуть виртуальную машину Windows 95 в своей библиотеке, чтобы загрузить ее. Он загрузится в командной строке DOS.
Обратите внимание, что виртуальная машина захватит вашу клавиатуру и мышь, как только вы щелкнете внутри нее, но вы можете нажать клавишу хоста – по умолчанию это правая клавиша Ctrl на клавиатуре – чтобы освободить ваш ввод и нормально использовать рабочий стол вашего ПК. Ключ отображается в правом нижнем углу окна виртуальной машины.

Во-первых, вам нужно будет разделить виртуальный диск, который вы создали. Введите в командной строке следующую команду и нажмите Enter:
FDISK
Этот процесс очень прост. Вы начнете с пустого диска, поэтому вам просто нужно создать раздел DOS. Это опция по умолчанию, которая равна «1». Вам просто нужно принять параметры по умолчанию, чтобы пройти процесс fdisk.

Вы можете просто нажать «Enter» три раза после запуска fdisk, чтобы создать раздел DOS, создать основной раздел и согласиться с тем, что вы хотите использовать максимальный размер диска и сделать этот раздел активным.

Вам будет сказано, что вы должны перезагрузить виртуальную машину, прежде чем продолжить. Для этого нажмите Ввод> Клавиатура> Вставить Ctrl-Alt-Del в VirtualBox. Нажмите правую клавишу Ctrl, чтобы сначала освободить мышь, если это необходимо.

Теперь вам нужно отформатировать новый раздел, который будет доступен на виртуальной машине как диск C :. Чтобы отформатировать его, введите следующую команду в приглашении A: \> и нажмите Enter:
формат c:
Введите Y и нажмите Enter, чтобы согласиться с процессом форматирования при появлении запроса. Затем вам будет предложено ввести метку для диска. Вы можете вводить все что угодно или вообще ничего. После этого нажмите «Enter», чтобы завершить процесс.
Шаг третий: Запустите установщик Windows 95
Теперь вам нужно скопировать файлы из ISO-файла Windows 95 на ваш диск C :. Теоретически, вы должны просто иметь возможность запустить программу установки с самого дисковода для установки Windows 95. Однако это приводит к ошибкам, так как диск не монтируется после перезагрузки установщика, и установщик не может найти необходимые файлы драйверов. Вместо этого мы обнаружили, что гораздо проще просто скопировать файлы на диск C: и запустить программу установки оттуда.
Сначала выясните, к какой букве был подключен ваш дисковод. Это отображается при загрузке вашей виртуальной машины. На нашей виртуальной машине это диск R :. Если вы забыли и не видите его на своем экране, вы всегда можете перезапустить виртуальную машину еще раз с помощью клавиши Ctrl + Alt + Delete в меню клавиатуры, чтобы просмотреть эту информацию.
Выполните следующую команду, чтобы скопировать файлы с диска Windows 95 на диск C:, заменив R: любой буквой, соответствующей вашему виртуальному диску.
xcopy R: \ C: \ INSTALL \/S

Когда процесс завершится, вы можете переключиться на диск C: и запустить программу установки из программы INSTALL, например:
с
cd INSTALL
Настройка
Нажмите Enter еще раз, чтобы продолжить при появлении запроса.

Появится графическая программа установки Windows 95. С этого момента вы можете делать все графически, не вмешиваясь в подсказку DOS.

Фактический процесс установки прост. На большинстве экранов вы можете принять параметры по умолчанию и ускорить процесс. Однако перед завершением процесса установки вам будет предложено ввести ключ продукта Windows 95. Разные выпуски Windows 95 требуют разных ключей продукта, поэтому убедитесь, что вы используете правильный ключ.

Когда вы дойдете до экрана «Анализ вашего компьютера», обязательно проверьте опции «Сетевой адаптер» и «Звуковая карта, MIDI или карта видеозахвата», чтобы убедиться, что все оборудование виртуальной машины правильно определено и настроено.

Когда вас попросят создать загрузочный диск, вы можете выбрать «Нет, я не хочу загрузочный диск», чтобы продолжить. Это не 1995 год, и вы, в конце концов, не устанавливаете его на настоящий ПК.

Фактический процесс установки будет чрезвычайно быстрым на современном оборудовании, даже на виртуальной машине.

В конце процесса установки Windows предложит вам перезагрузиться и предложит вам удалить дискету с вашего компьютера. Для этого нажмите «Устройства»> «Дисковод гибких дисков»> «Извлечь диск из виртуального диска». Нажмите «ОК», чтобы перезагрузить компьютер и продолжить после этого.

Процесс установки продолжит настройку вашего оборудования.Вам будет сказано, что вы должны указать название рабочей группы, чтобы продолжить, но вы можете ввести здесь все, что вам нравится.

Наконец, вам будет предложено указать часовой пояс и настроить принтер. Вы можете просто нажать «Отмена» в окне мастера установки принтера, чтобы пропустить настройку принтера при его появлении.

Наконец, ваш компьютер перезагрузится, и вам будет предложено создать пароль. Затем вам будет представлен рабочий стол Windows 95. Вы закончили – теперь у вас есть виртуальная машина Windows 95.

Чтобы действительно вернуться в 90-е годы, откройте проводник Windows из меню «Пуск» Windows 95 и перейдите в папку C: \ Install \ Funstuff \ Videos. Вы найдете музыкальные клипы для Buddy Holly («Weezer») Weezer и Good Times («Goodtime») Эди Брикелл, которые были включены в диск Windows 95. Также есть трейлер фильма к фильму Роб Рой , который также был выпущен в 1995 году.
Видео в папке «Highperf» имеет более высокое качество, чем видео в основной папке «Видео», поэтому обязательно посмотрите их – ваш современный ПК справится с ними!
