Generally, one computer only runs one operating system. In some cases, users might need two operating systems on one computer, and it is more common when users are using Mac computers.
On Mac computers, the built-in Boot Camp has long been an official way to allow users to partition the hard drive and then install Windows. Even so, many people are still looking for alternative ways to install Windows 10 on Mac without Boot Camp. Because the Boot Camp doesn’t work seamlessly in many cases, it is tedious, error-prone, and it slows down installation productivity.
Thankfully, there are numerous third-party tools that help users install Windows systems without Boot Camp. Here in this article, we will introduce how can Mac users apply a tool called EaseUS OS2Go to install Windows. Moreover, virtual machines such as VMware and VirtualBox are also perfect choices to run Windows on macOS.
Preparations
Before starting to install Windows 10 on your Mac, you should prepare the following things:
- A USB stick with at least 64 GB or larger.
- A copy of a Windows 10 ISO image file or a Windows computer.
- A valid Windows 10 license that can legally and properly activate Windows.
- Download the Boot Camp Drivers.
If you prefer not to use Boot Camp, then the easiest method is to create a portable Windows USB so that you can use it on the Mac computer. There are plenty of third-party tools that can help users to create a portable Windows USB, one of such tools is EaseUS OS2Go. All you need is to prepare a larger enough USB drive, then leave the rest to EaseUS OS2Go.
Procedure 1. Create Windows Portable USB
First, you need to download and install EaseUS OS2Go on your computer. Then follow the detailed guide below to create a Windows portable USB.
Step 1. Install EaseUS OS2Go on your Windows computer, it will display your system drive’s used space. Plug in a USB drive that is larger than the system drive used space. Choose the target USB drive and click Next to continue.

Step 2. EaseUS OS2Go will notify you that the following operation would delete all data on your drive. Make sure that you have backed up all the important data. Click the Continue button to proceed.

Step 3. Adjust disk layout. The default disk layout on the target drive will be exactly the same as the resource drive. You could also edit the layout according to your needs. Tick the option there if you’re using a Solid State Drive as the Windows bootable drive. Next, click Proceed.

Step 4. Then EaseUS OS2Go will start to create the portable USB drive. It usually takes a while depending on your OS and Network condition. When the progress reaches 100%, the USB drive should be bootable now.

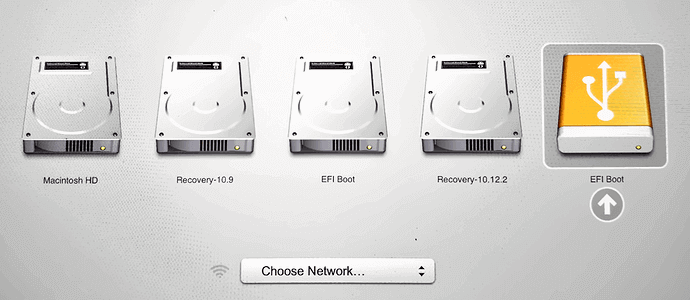
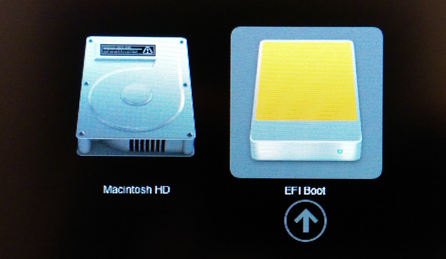
Step 5. Insert the portable Windows USB and start your Mac. Press the Option/Alt key. Choose the yellow EFI Boot icon to boot from the USB drive. Then follow the onscreen instruction to boot your Mac.
Procedure 2. Partition Mac Drives
If you still want to install Windows on your Mac, you can first create a bootable Windows USB with ISO files, then you need to partition the Mac drive and boot the Mac from the USB. Here are the detailed steps of these two procedures. As the Windows OS should be installed on a separated partition, it is an essential step to partition your drive. On Mac computers, you can apply the Disk Utility.
Step 1. Open Disk Utility, select your local drive (SSD or HDD) on the left and click Partition.
Step 2. Click on the small «+», then select the size of the partition, it should be at least 30 GB. You can name it anything as you want, and make sure the format is set to MS-DOS (FAT), then click Apply. Now you can see there are two separated partitions.
Procedure 3. Boot Your Mac from Bootable USB Drive
Now it’s the last step, boot your Mac from the created bootable USB drive.
Step 1. Insert the USB drive into your Mac.
Step 2. Restart the Mac and holding the Option key to enter the installing page.
Step 3. Choose EFI Boot, and the Mac should be boot from USB properly. Follow the Windows setup wizard to install the Windows OS on the created partition. The installing process will take some time, please wait patiently. During the process, the Mac will automatically restart several times.
Step 4. If you have created a portable USB with an activated Windows computer, just wait until the booting process finishes. If you have created the portable USB with Windows ISO files, then you need to activate the Windows system. Enter your Windows product key. If you lost the key, you can click the do it later button.
Step 5. You may find the keyboard or the mouse is not working under the Windows system, that’s because the bootable USB drive only contains basic drivers. You need to download and install Windows support drivers.
Step 6. Download and launch Boot Camp on your Mac, navigate to the USB drive in File Explorer, then go to WindowsSupport > BootCamp. Double-click the setup.exe.
Step 7. Follow the setup wizard, wait until it tells you to reboot the Mac to finish the installation. Now your Mac computer has dual systems.
If you want to switch from Windows system to macOS or vice versa, restart your Mac and holding the Option key to enter the booting page, choose the corresponding drive, you can switch from Windows and macOS.
![]()
Conclusion
It does seem a little bit complicated to install the Windows OS on a Mac computer. However, with EaseUS OS2GO, you have finished the most difficult part — creating a bootable USB. Then you could follow our step-by-step guide to finish the next procedures.
Installing Windows on a Mac should be a piece of cake with Bootcamp, but that
rarely is the case. In fact, I would personally say that Boot Camp Assistant
is one of the worst apps that comes with OS X and unlike the rest, it doesn’t
work seamlessly.
A few of its drawbacks:
- It only supports a drive with a single partition.
- It often throws very obscure error messages with limited detail.
- It re-downloads 1.6 GB Windows drivers every single time it runs. These are
placed under/Library/Application Support/BootCamp/WindowsSupport.dmgand
deleted and re-downloaded each time Boot Camp Assistant starts processing.
This post did take a lot of work to complie and I did bone my hard drive a
few times while trying certain ideas, so please throw out a thanks if it
helped you out 
Disclaimer: This guide below contains procedures which can potentially
destroy your partitions and data. I accept no responsibility for such loss so
please proceed at your own risk.
Update (2016-07-20): I have updated this post with further improvements
relating to downloading of Boot Camp drivers and ensuring that a Hybrid MBR is
not used (which would cause issues when installing Windows).
What You Will Need
- An 8 GB or larger USB stick
- A copy of the Windows 10 ISO
- A valid Windows 10 license
- A downloaded copy of unetbootin
Downloading Boot Camp Drivers
- Start Boot Camp Assistant
- Select Action / Download Windows Support Software
- Choose your Downloads directory, enter your password and then click
Save
This will be the only step that we will use Boot Camp Assistant for.
Creating a Bootable USB Windows 10 Installer
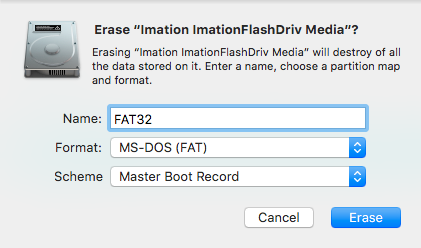
Formatting Your USB Stick
Attach your USB stick and start Disk Utility, select your USB drive in the
left panel under External, click Erase and set the options as follows
(exactly) and click Erase:
Name: FAT32
Format: MS-DOS (FAT)
Scheme: Master Boot Record
Turning Your USB Stick into a Windows Installer
Open unetbootin, enter your password, set the options as follows and
click OK:
Diskimage: checked, set to ISO and browse to your Windows 10 ISO
Type: USB Drive
Drive: Your USB drive (you should only see one entry here)

If you see more than one drive listed, you may confirm which is your USB drive
by opening the Terminal and typing:
You’ll see your USB drive in the output and it should look something like this:
/dev/disk2 (external, physical):
   #:                       TYPE NAME                    SIZE       IDENTIFIER
   0:     FDisk_partition_scheme                        *16.0 GB    disk2
   1:                 DOS_FAT_32 FAT32                   16.0 GB    disk2s1
Once you have kicked off unetbootin, grab a snack while the Windows ISO is
copied to the USB stick. This process takes around 15 minutes to complete.
Finishing Up
When this has completed, you may right click on the USB stick in Finder,
select Rename “FAT32” and rename it as you like (I’ll call mine
“WINDOWS 10”).
Finally, copy the WindowsSupport in your Downloads directory to
the Windows 10 USB stick so it’s easy to get to after our installation.
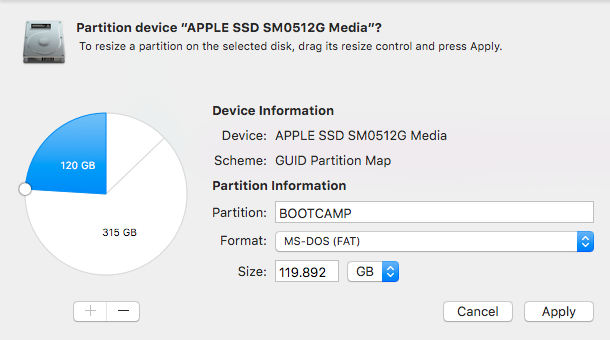
Partitioning Your Drive
In Disk Utility, select your internal hard drive on the left panel, and
click on Partition.
Click the + button and create a new partition of your desired size for your
Windows installation and name it as you wish (I’ll call mine “BOOTCAMP”). Ensure that the Format is set to MS-DOS (FAT) and click on Apply.
Ensuring that a Hybrid MBR is not used
Huge thanks to Rod’s post from the superuser post titled
Windows detects GPT disk as MBR in EFI boot.
Once you add a FAT32 partition with either Boot Camp Assistant or Disk Utility,
your disk is converted into a hybrid GPT / MBR disk which is actually not
supported by newer versions of Windows. In this step, we revert this
additional change made by Disk Utility by switching back to a pure GPT
partition table.
-
Dowload the latest version of
GPT fdisk
by browsing to the version, then gdisk-binaries and clicking the file
with the *.pkg extension (e.g. gdisk-1.0.1.pkg). -
Install GPT fdisk by running the installer you downloaded
-
Open a Terminal and check the state of your MBR
If your MBR partition is set to hybrid, please continue with step 4,
otherwise if it is set to protective, you may skip the rest of this
section. Simply type q and hit return to exit GPT fdisk. -
Type p to view the existing partition table and verify you’re working
on the correct disk -
Type x to enter the expert menu
-
Type n to create a fresh protective MBR
-
Type w to save your changes and confirm the change when asked
-
Type q to exit GPT fdisk
-
Run GPT fdisk to show your disk layout:
1sudo gdisk -l /dev/disk0Your partition table should look something like this:
 1
 2
 3
 4
 5
 6
 7
 8
 9
10
11
GPT fdisk (gdisk) version 1.0.1 Warning: Devices opened with shared lock will not have their partition table automatically reloaded! Partition table scan: MBR: protective BSD: not present APM: not present GPT: present Found valid GPT with protective MBR; using GPT.
Disconnecting All Devices From USB Ports
This step is critical as I have had rather serious problems during Windows
installation when certain external drives are connected.
Unplug everything from your Mac except your keyboard (if wired) and your
bootable Windows USB stick (which we prepared earlier).
If your Mac contains multiple physical drives, you will need to disconnect
all disks except the one which you intend to install Windows on or you may
encounter the following error:
Windows could not prepare the computer to boot into the next phase of installation. To install Windows, restart the installation.
Booting From the USB Stick
Ensure that the USB stick containing the Windows installer is inserted and
then restart your Mac while holding down the option (alt) key.
You should now be presented with a list of bootable drives. Select the USB
drive (usually titled “EFI Boot”) to begin installing Windows.
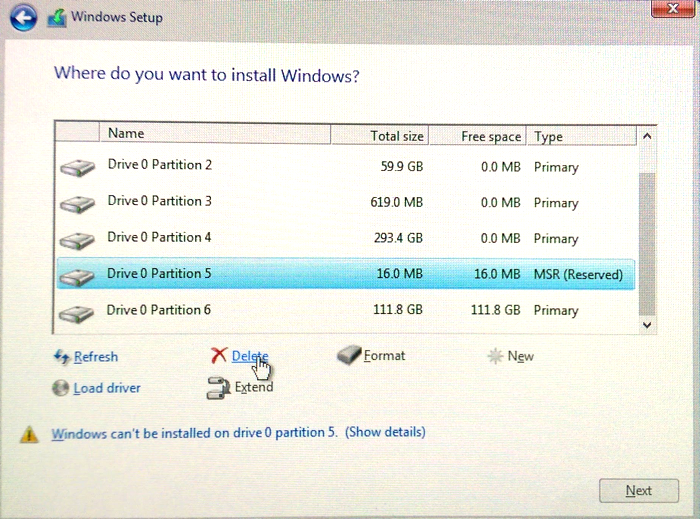
Correcting Your Windows Hard Disk Partition
When you are asked Where do you want to install Windows?, select the
Windows partition created earlier (which I called “BOOTCAMP”) and click
Delete.
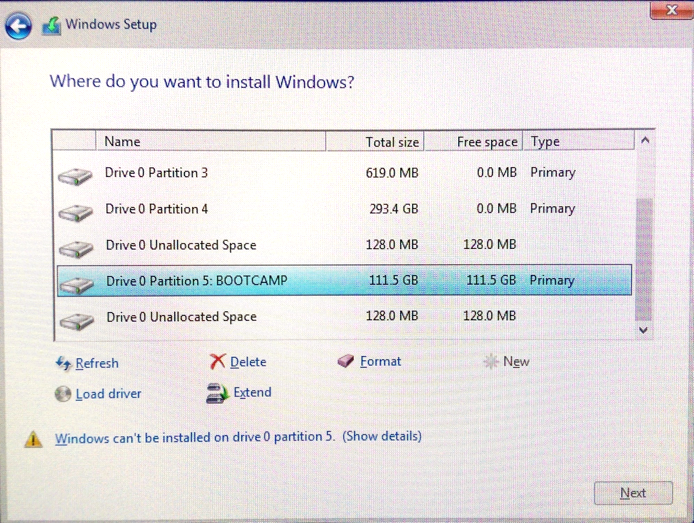
Next, select the chunk of Unallocated Space and click on New to create
a proper Windows NTFS partition.
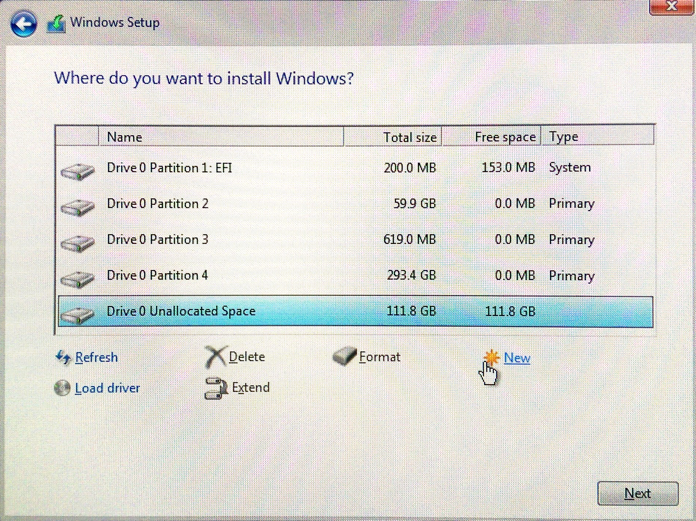
Note: OS X only supports creation of FAT filesystems, so this is why we need
to re-create the partition ourselves during install.
Completing the Installation
Allow the installer to complete and boot into Windows.
Installing Boot Camp Support Software
Once Windows is up and running, install the Boot Camp Support software running
WindowsSupport/BootCamp/Setup.exe on your USB stick.
Note: The installer takes a little while to show up, so please be patient.
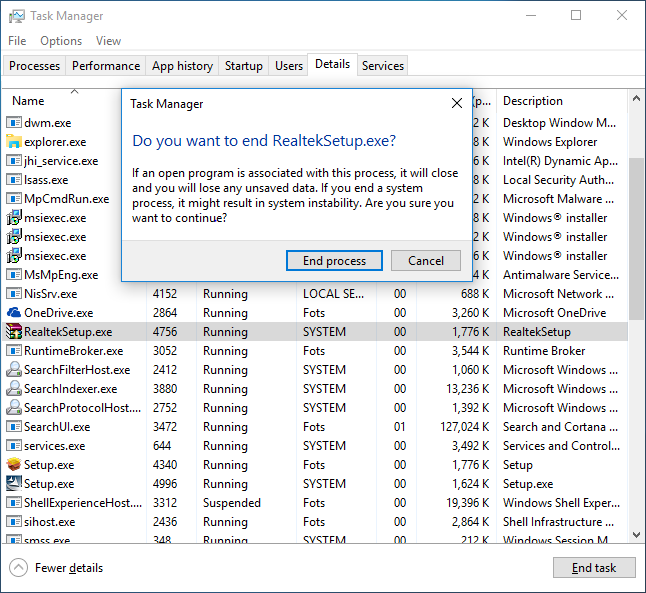
You may encounter a known issue whereby the Boot Camp Support Software
installer locks up while installing Realtek audio.
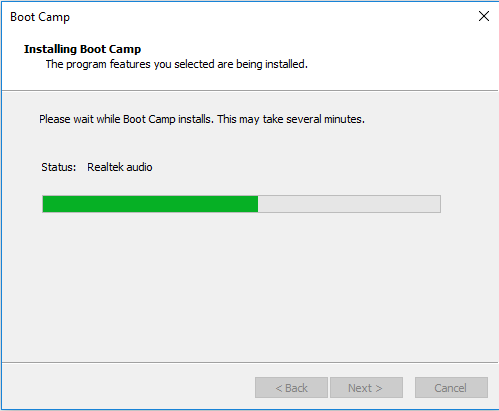
If this occurs, you will need to open Task Manager and kill the
RealtekSetup.exe process.
After the installer has completed, answer No when prompted to reboot
and install the Realtek drivers manually by running
%USERPROFILE%\AppData\Local\Temp\RarSFX0\BootCamp\Drivers\RealTek\RealtekSetup.exe.
If you can’t find this file, check any other directories starting with
RARSFX under %USERPROFILE%\AppData\Local\Temp.
Once complete, reboot Windows.
What You Will Need to Configure Windows
- The latest version of SharpKeys
- The flipflop-windows-sheel binary (see README for a download link)
Configuring Windows
Mapping Your Mac Keyboard
Install and run SharpKeys and then configure the following mappings to
correct your Mac keyboard so that it behaves like a regular Windows keyboard:
Function: F13 -> Special: PrtSc
Special: Left Alt => Special: Left Windows
Special: Left Windows => Special: Left Alt
Special: Right Alt => Special: Right Windows
Special: Right Windows => Special: Right Alt
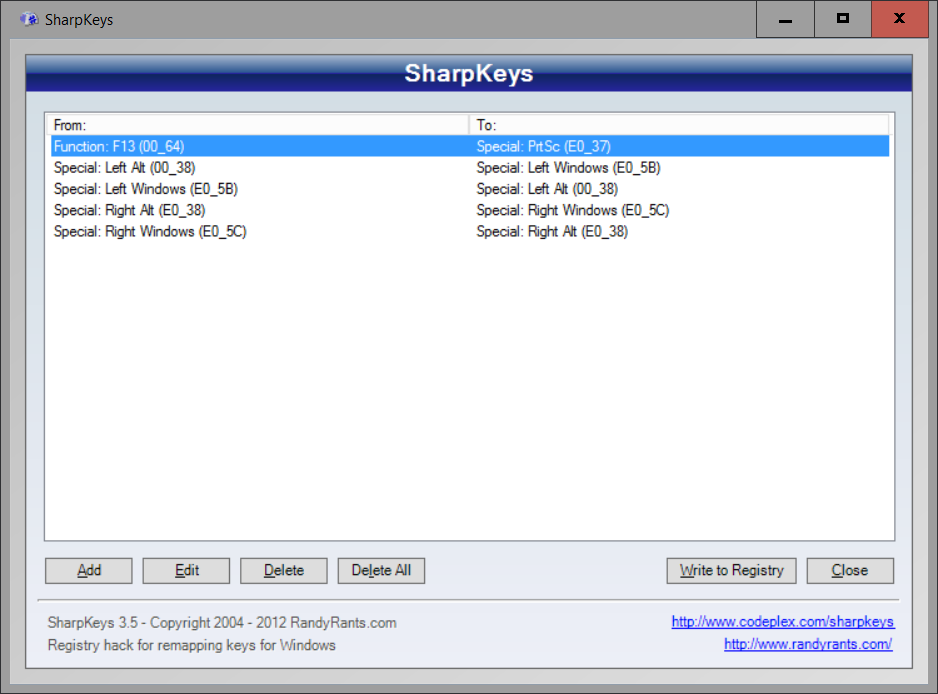
Note: for F13, you’ll need to select Press a key and click F13 on your
keyboard.
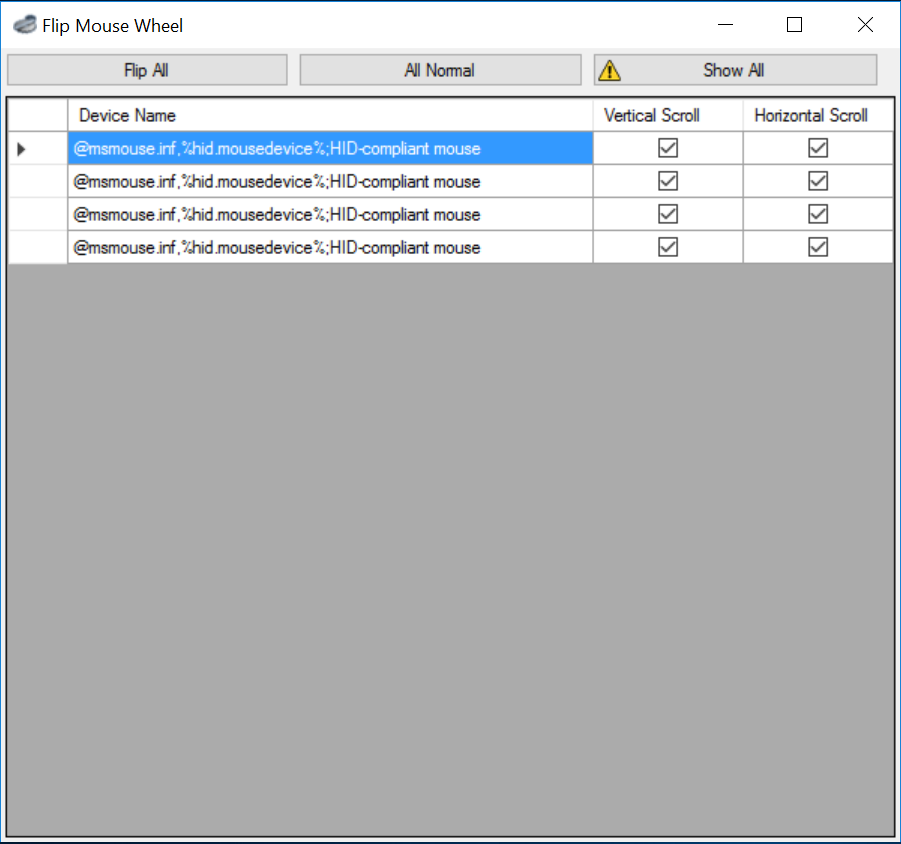
Switching to Natural Scrolling
If you wish to flip scrolling direction to match that on OS X, run
FlipWheel.exe and then click on Flip All.
Enabling Num Lock on Boot
Paste the following into a file named Enable NumLock on Boot.reg then
import this into the registry to enable NumLock when Windows boots up
(it doesn’t by default).
Windows Registry Editor Version 5.00

[HKEY_USERS\.DEFAULT\Control Panel\Keyboard]
"InitialKeyboardIndicators"="80000002"
Completing Configuration
That’s it, give your machine one last reboot and you’ll have a fully working
Windows 10 installation.
Note: I have found Apple’s Magic Mouse to be extremely unreliable using
the Boot Camp drivers from Apple. As such, I recommend purchasing a Logitech
(or similar) mouse for use in Windows. I have no trouble plugging the
wireless receiver for my Logitech mouse into one of the USB ports of my wired
Apple Keyboard and it’s so tiny that you can’t see it at all.
Cleaning up a Windows Installation
Removing the Windows Partitions
If you decide to remove Windows, you may find that Disk Utility doesn’t allow
you to delete the two partitions that have been created by the Windows
installer.
This happens due to the fact that the first small partition created is of a
type called Microsoft Reserved which OS X’s Disk Utility doesn’t support.
The safest way to delete these partitions is through the Windows installer. So
simply boot from your USB stick as we did before and when you reach the
Where do you want to install Windows? question, you may delete your
“BOOTCAMP” partition and the small 16 MB partition of type MSR (Reserved)
just above the BOOTCAMP partition.
Once done, simply quit the installer by clicking the X in the top right corner
of each Window and reboot back into OS X.
Removing the Boot Entry
Even though we have removed the Windows partition, a boot entry will still be
present when holding down option (alt) during boot.
You may remove these items by running the following in your Terminal:
|
|
Время на прочтение
4 мин
Количество просмотров 39K
Предисловие
Столкнувшись с проблемой не работающего звука при установке Windows на свой MacBook 11го года обнаружил, что материала по данной теме в русскоязычном сегменте интернета крайне мало, можно сказать что его нет вообще. Эта статья написана в помощь всем столкнувшимся с такой же проблемой, и преследует цель описать весь процесс решения проблемы от и до. Здесь описывается способ решения проблемы на примере MacBook, но он так же подойдет и для стационарных iMac.
Здесь не будут описаны способы создания гибридного диска и dual-boot macOS и Windows на одном SSD. Предполагается, что в системе существует либо один физический диск на который будет установлена Windows, либо два физических диска с разными таблицами разделов — GPT для macOS и MBR для Windows.
Пациент — MacBook Pro 13 early 2011 с двумя SSD на борту. Для чистоты опыта второй диск с macOS пока убрал совсем. Потом его можно будет без проблем вернуть и запускать обе ОС через бут меню.


Почему и для чего нужна такая установка?
Начисто отказывается работать звук. Ни вход ни выход, драйвера скачанные специально для моей модули ноута ситуацию не меняют. На значке звука в винде висит красный крестик, штатные средства устранения ошибок проблему так же не решают.
Вдобавок не работал у меня штатный дисковод для «родной» установки винды через Boot Camp, вместо него стоял второй жесткий диск. Помогла бы штатная установка «как было задумано Apple» с использованием дисковода и лицензионного диска винды — без понятия. Скорее всего нет, так как после подкидывания USB дисковода с записанным на болванку образом установщик даже не стартовал.
В чем было дело?
Вся суть беды со звуком заключается в том, что система. запущенная в режиме EFI отказывается взаимодействовать с звуковыми устройствами наглухо. Штатное бут-меню при этом видит только EFI загрузчики.
Но на наше счастье — на маках можно запускать в режиме совместимости Legacy системы — что нам и нужно, ведь в обход EFI все работает.
Что нужно сделать?
Далее опишу шаги, которые привели меня к успешной установке и запуску windows 10 на моем старом маке. Если кратко, мы берем дамп жесткого диска от виртуальной машины, где windows наполовину установлена в режиме Legacy и восстанавливаем этот дамп на физическом жестком мака, где продолжаем установку.
1. Имея на руках только лишь мак сделать то что нам нужно будет чуть сложнее, но способ оставлю внизу статьи в пояснении. У меня есть возможность использования второй машины, поэтому использую свой стационарный пк с выведенным наружу SATA портом.

2. Для начала нужно скачать мой архив, в который я собрал все необходимые проги и образы. Архив лучше сразу распаковать на флешку, софт из него нам еще понадобится в установленной винде. Ссылка на архив в конце статьи. Содержимое на скрине ниже.

3. Снимаем жесткий диск с мака и подключаем его к ПК. C помощью PartitionWizard удаляем все разделы на этом диске и инициализируем диск в MBR — это важно для того, чтобы система запускалась именно в легаси режиме.

4. Прогой vhd2disk переносим образ виртуального диска из архива в формате .vhd на диск нашего мака. Физические диски в этой проге имеют отображение вида //PhisicalDriveX, где Х это цифра. Узнать какая цифра какому диску соответствует можно в диспетчере задач.

5. По завершению переноса образа еще раз убеждаемся что диск инициализирован в MBR в проге PartitionWizard. Если все правильно, на этом этапе на нашем диске должно быть два раздела и куча пустого места.
6. Расширяем последний раздел до конца диска. Жмем «применить» как в третьем шаге(забыл поместить картинку на скрин).
7. Выключаем ПК, отсоединяем от него диск. Отключаем питание от мака(либо отсоединяем аккумулятор в случае макбука) и устанавливаем диск обратно в мак. Ждем 30 секунд после чего подключаем питание обратно.

8. Запускаем мак, удерживая нажатой кнопку Option(она же alt). В бут меню появился диск с виндой! Выбираем его и завершаем установку системы. Мак может на этом этапе перезагрузиться пару раз, чтобы продолжить установку нужно будет снова подержать alt и выбрать диск с Windows, если этого не делать мак попытается найти EFI системы и если не обнаружит таких выдаст ошибку.

Пока что к интернету не подключаемся — автоматическое обновление винды может поломать нам всю установку. После завершения установки уже не будет видно страшного красного крестика на значке звука, но пока звук работать не будет — нет драйверов. Так же на этом этапе нужно подключить проводную мышку, так как правая кнопка мыши через тачпад без драйверов работать не будет.

9. Подключаем мак к интернету проводом. Устанавливаем 7zip из архива. Без него следующая софтина будет вылетать. Запускаем brigadier из архива от имени администратора, и ждем пока он скачает нужную нам версию драйверов.
10. Драйвера скачались в ту же папку из которой мы запустили brigadier. Нажимаем правой кнопкой мыши по setup.exe — исправление проблем с совместимостью. Штатная утилита виндовс сама определит что установщик должен работать в режиме совместимости с win7 и применит эти параметры. Сохраняем параметры совместимости. Запускаем setup.exe от имени администратора.
11. После установки драйверов на предложение перезагрузится отвечаем «да» и при включении снова удерживаем Option,выбрав в бут меню наш диск с Windows.

-
Все работает. Звук, вайфай, тачпад и клавиатура в порядке. По желанию можно установить Trackpad++ из архива, этот софт добавляет привычные пользователями macOS жесты тачпада вроде перетягивания тремя пальцами, и что более важно делает приятной и юзабельной возможность скроллинга тачпадом.
Подкинул второй диск с установленной macOS. В бут меню видно обе системы, все грузится и функционирует должным образом.


Приложение к инструкции
Если по какой-то причине у вас нет возможности отсоединить жесткий диск мака(например при установке на стационарный iMac) , качаем архив на флешку, создаем загрузочную флешку с любой Windows Portable, запускаемся с нее и делаем далее по инструкции. В этом случае brigadier запускаем до установки ОС и скачиваем драйвера через него на флешку, чтобы потом запустить из установленной винды.
Так же если у вас нет возможности подключить проводом мак к интернету, либо ваша версия Windows Portable не смогла определить сетевую карту — скачиваем на флешку с архивом нужный вам пакет драйверов отсюда.
Послесловие
Желательно отключить обновления Windows и Apple Software Upgrade. Есть риск что обновление все сломает, так как мы работаем со старым железом.
VirusTotal
brigadier
vhd2dsk
trackpad++
Все программы взяты с репозиториев их разработчиков и никак не модифицировались.
Ссылка на архив
MEGA
Как самому сделать такой дамп Legacy системы расскажу в следующей статье, если эта вызовет интерес у публики.
I love my old MacBook Pro. It does everything I want for a portable coding, writing and occasional editing device. I’ve had it since 2011 and it’s still going strong.
Apple however doesn’t want to suport it anymore. I’m stuck with macOS High Sierra, without an option to upgrade without shadowy patches. Even if I could keep up with Mojave and beyond, the hardware might just not be fast enough anymore to give me an enjoyable experience.
So I thought, perhaps I’ll put in a new hard drive that I had in another old laptop and install Windows 10 on it. Apple’s recommended way is to do all this from macOS, using their own Bootcamp setup. However, being the hacker that I am, I thought perhaps I’ll try the “Windows Only” experience.
I did this in two live streams the other night, and continued the process over the following days – and now I’ve got a (more or less working) Windows 10 installation on my MacBook Pro (early 2011 Edition). I thought I’d take some notes on how I did this step by step, and give you my opinions if this was an adventure worth undertaking.
What we need
For this experiemnt, we need the following ingredients:
- a new hard disk, preferrably an SSD
- a bootable Windows Installation Disk ur USB Sick (can be created with the Windows Media Creation Tool)
- a Mac with an Ethernet Port
- and a wired Internet Ethernet Connection (I’ll tell you why later on)
I started by swapping out an old hard disk from another laptop I had lying around, so see if this experiment would work in principle. I didn’t want to touch my current installation of High Sierra. In case my Windows 10 Folly wasn’t going to be successful, I would have something to go back to in a jiffy.
The old hard disk came from a Samsung Q330 laptop, on which I had CentOS 7 installed. To my complete surprise, CentOS 7 booted just fine on the Mac hardware. Even those awkward “special” keys worked out of the box, such as volume, display and keyboard dimming. I was very impressed, and felt almost sorry to overwrite CentOS with Windows. But hey, that’s the experiment. It’s just good to know that I have another OS to try some day.
Booting from CD or USB
With a (more or less) fresh hard disk in place in my Mac, my first hurdle was to figure out how to make the Mac boot from anything other than the internal hard drive. On PC hardware, I’d usually go into the BIOS and tweak the boot sequence, making sure that the CD drive comes before the hard disk. On a Mac, we have no user accessible BIOS.
Thanks to Steve Davies though, who was watching the stream, he found out that by holding the C key while booting, Macs will indeed boot from CD. It worked great! Windows gave me the message to “press any key to boot from CD”, which starts the installation process.
If you’re booting into a USB stick instead of a DVD, hold down the ALT/OPTION key while you’re starting up your Mac instead. I’ve not been able to try this myself, but apparently that’s how it’s done. Good to know for next time.
And speaking of booting differently, holding down CMD+ALT+R will start the Mac in Internet Recovery Mode. That’s handy if you ever want to go back to macOS, but don’t have access to any installation media. Thought I’d mention it, in case one of us needs to do this.
Installing Windows – always fun!
Aside from one random hiccup that made the installer freeze the first time, Windows finished the installation without further hitches the second time around. There were a few more privacy related questions than I had remembered from all my years with Windows installations, but once properly answered, we had the regular blue Windows desktop looking at us.
The bigger problem was that none of the Mac specific hardware was working properly. You’d think with something so open and supportive as Windows would simply include the necessary and openly available drivers for Apple hardware in its inventory. But no: Windows simply tries its best to find a generic driver for things like the trackpad, keyboard, graphics card and so forth. Some of these things work, but they’re not optimised.
That’s where the Bootcamp drivers come in handy. Bootcamp is Apple’s way of supporting their own hardware on Windows. It once was a big selling feature for converting users who came from Windows. It lets you boot the Mac into Windows mode (from macOS), and go back to macOS at any time with a simple restart (from Windows). There’s a lot of trickery going on under the hood, most of which I didn’t need for my project, but the Bootcamp Drivers do support the hardware we need under Windows.
The trick is to get ahold of them without involving macOS.
Enter Brigadier
The wonderful Tim Sutton wrote a script that allows us to download the Bootcamp drivers for a specific Mac from the command line under Windows. It’s specifically designed to extract the drivers we need, without having to start the Apple-made installer from macOS.
Alternatively we can do a search on Apple’s Support Website and may end up finding something like this link to Bootcamp v5.1.5769, but when I tried installing that, the tool told me that it’s just not made for my MacBook model. Apple’s website isn’t exactly forthcoming on how to obtain versions of their software for vintage hardware.
With Tim’s Brigadier script, you download one small file, run it from the Windows command line, specify what model Mac you’d like drivers for, and it does the rest. Specifying no parameters will download the driver version that were intended for the Mac you’re using. It’s all explained on his GitHub Repository.
After downloading the latest brigadier.exe file from the Github Repository’s Releases section, we need to open a Command Line Prompt with Admin privileges. That’s done by searching for “cmd” in Windows, then right-clicking on the Command Prompt App that comes up and selecting “Run as Adminstator”.
Next we’ll navigate to the folder that contains the Brigadier.exe file and simply run it with “brigadier”. Calling brigadier –help will bring up a list of additional parameters we can specify. Over the next few minutes, we’ll see a list similar to this one:
 brigadier

 Using Mac model: MacBookPro8,1.
 Model supported in package distribution file at http://swcdn.apple.com/content/downloads/05/56/031-02368/a0h5nceqb9kjzzs3eus566vngukimq9j86/031-02368.English.dist.
 Distribution 031-02368 supports the following models: MacBook2,1, MacBook3,1, MacBook4,1, MacBook5,1, MacBook5,2, MacBook5,3, MacBook6,1, MacBook7,1, MacBookAir1,1, MacBookAir2,1, MacBookAir3,1, MacBookAir3,2, MacBookPro2,1, MacBookPro2,2, MacBookPro3,1, MacBookPro4,1, MacBookPro5,1, MacBookPro5,2, MacBookPro5,3, MacBookPro5,4, MacBookPro5,5, MacBookPro6,1, MacBookPro6,2, MacBookPro7,1, MacBookPro8,1, MacBookPro8,2, MacBookPro8,3, MacPro1,1, MacPro2,1, MacPro3,1, MacPro4,1, MacPro5,1, Macmini2,1, Macmini3,1, Macmini4,1, iMac5,1, iMac6,1, iMac7,1, iMac8,1, iMac9,1, iMac11,1, iMac11,2, iMac11,3, iMac12,1, iMac12,2.
 Model supported in package distribution file at http://swcdn.apple.com/content/downloads/53/19/031-0787/e59hg9xe761b8zzeyrffkjo2i2zuogqd9g/031-0787.English.dist.
 Distribution 031-0787 supports the following models: MacBookAir4,1, MacBookAir4,2, MacBookAir5,1, MacBookAir5,2, MacBookPro6,1, MacBookPro6,2, MacBookPro8,1, MacBookPro8,2, MacBookPro8,3, MacBookPro9,1, MacBookPro9,2, MacPro4,1, MacPro5,1, Macmini5,1, Macmini5,2, Macmini5,3, Macmini6,1, Macmini6,2, iMac11,3, iMac12,1, iMac12,2, iMac13,1, iMac13,2, iMac13,3.
 Model supported in package distribution file at http://swcdn.apple.com/content/downloads/41/25/031-11269/hpi4khg5mrvy75pcamao1thdrwm3qetgk0/BootCampESD.dst/031-11269.English.dist.
 Distribution 031-11269 supports the following models: MacBook2,1, MacBook3,1, MacBook4,1, MacBook5,1, MacBook5,2, MacBook5,3, MacBook6,1, MacBook7,1, MacBookAir1,1, MacBookAir2,1, MacBookAir3,1, MacBookAir3,2, MacBookPro2,1, MacBookPro2,2, MacBookPro3,1, MacBookPro4,1, MacBookPro5,1, MacBookPro5,2, MacBookPro5,3, MacBookPro5,4, MacBookPro5,5, MacBookPro6,1, MacBookPro6,2, MacBookPro7,1, MacBookPro8,1, MacBookPro8,2, MacBookPro8,3, MacPro1,1, MacPro2,1, MacPro3,1, MacPro4,1, MacPro5,1, Macmini2,1, Macmini3,1, Macmini4,1, iMac5,1, iMac6,1, iMac7,1, iMac8,1, iMac9,1, iMac11,1, iMac11,2, iMac11,3, iMac12,1, iMac12,2.
 There is more than one ESD product available for this model:
 031-02368: PostDate 2014-05-14 19:32:12
 031-0787: PostDate 2014-02-11 21:35:32
 031-11269: PostDate 2015-02-09 18:42:38
 Selecting 031-11269 as it's the most recently posted.
 Final output path C:\Users\versluis\Desktop\BootCamp-031-11269 already exists, removing it…
 Making directory C:\Users\versluis\Desktop\BootCamp-031-11269..
 Fetching Boot Camp product at URL http://swcdn.apple.com/content/downloads/41/25/031-11269/hpi4khg5mrvy75pcamao1thdrwm3qetgk0/BootCampESD.pkg.
What’s happened here is that Brigadier contacts Apple’s website and then downloads the correct Bootcamp installer and all drivers for the current Mac. In my case, that’s a “MacBookPro8,1”, which is Apple’s unique hardware identifier for my particular model. This probably won’t give me the latest Bootcamp installer package, but it will give me the ones that were last intended by Apple for my hardware.
Apple do maintain a list of MacBook models here though, so if you’d like to try another version for a later hardware, feel free to do so. You can call Brigadier like this (replacing the specifier with your desired one).
brigadier -m MacBookPro12,1
Once finished, we’ll find a folder called BootCamp in the same directory in which we ran Brigadier, appended by the specific release (like BootCamp-031-0069).
Installing macOS Drivers in Windows
Our BootCamp directory will have a subdirectory, in which we find a Setup.exe file, as well as another subdirectory with various other .exe files that will install single components. We can either run the former, which will install all drivers we need for the whole system, or we can install individual drivers at our leisure. The former method will create a small task bar utility for conveinient configuration options, like trackpad and keyboard preferences.
Sadly though, this utility was written for Windows 7, and hence it won’t install without a hitch on WIndows 10. Later versions of BootCamp are probably working fine with Windows 10 on newer hardware, but I always got an error message when I tried to run those on my hardware. Thankfully Windows allowed me to install this utility in Compatibility Mode (using right-click – Properties – Compatibility Mode on the Setup.exe file).
After a restart, most of my hardware was now working fine.
What’s Windows 10 like on a MacBook Pro 2011?
The big question I had was: how would my old hardware perform with Windows 10? Not so much in regards to speed, but rather in terms of usability. Would I be able to connect to the internet, get an adequate display resolution, would the trackpad work, and would the keyboard acknowledge the addtional function keys, including volume and backlight?
Well here’s where things got tricky. The observant reader will have probably figured out that in order to download the relevant BootCamp drivers to make all this Brigadier magic happen, one must first be connected to the internet. Alternatively, one must download all this on a separate Windows computer and transfer the files via USB stick. That was the first hurdle! Let me explain:
My macBook did not recognise a wireless driver after Windows installed. The only thing it knew was my Ethernet port, and thankfully I had a wired connection at hand. This was my luck, because the Mac did not recognise my USB stick without at least one quick connection to the Microsoft servers. Keep that in mind when you undertake such an adventure.
You may have better luck that I had of course. The one thing that worked super reliably for me here was my integrated DVD drive, the one I hadn’t used for a while. Had I not had a wired connection, and the USB stick wasn’t recognised, burning the Birgadier drivers onto a disk would have saved the day here.
Trackpad Issues
Once my Bootcamp bits and bobs were installed, I had some trouble getting used to how the trackpad was responding under Windows. I’ve always loved how responsive the hardware was, let alone gesture support. Even if the latter wasn’t going to be available, two-finger tapping and scrolling is a must to navigate anything. Well… this thing just behaves different under Windows.
There are some options to adjust In the Bootcamp helper tool, accessible via the taskbar (bottom right).
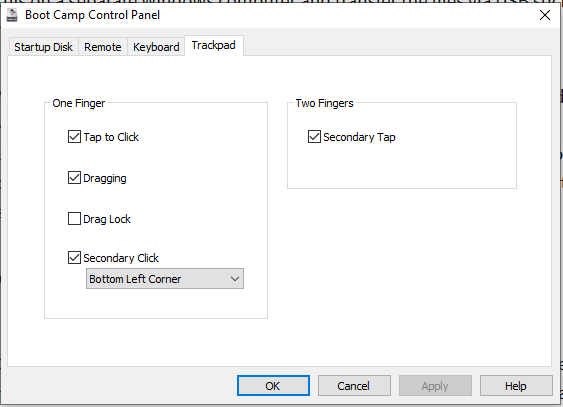
Although support for tap-to-click is there, clicking and dragging at the same time is awkward to say the least. This was working flawlessly under macOS. The Windows implantation is just plain clunky. We have an option to specify which “area” of the trackpad shall be used to acknowledge with which finger you’re click-holding (lower left of lower right), and I’ve tried them bot, but neither option is optimal. You have to awkwardly make sure where your finger is when you mark a portion of text, or you have to drag with the same finger you’re currently clicking with. Terrible is probably a good word to describe the user experience.
On a positive note, right-clicking works just by tapping with two fingers, just like I was used to it from macOS.
Keyboard issues
Most keys work fine out of the box, aside from the way the # key is mapped on the macOS keyboard. Mine has a UK layout, and Mac users are used to pressing ALT+3 to bring this symbol up (no matter if you call it pound or hash). Under Windows, it appears to be next to the return key, on the backslash button. Double-quotes are now on SHIFT+2, and the @ sign is now on the SHIFT+’ (single-quote) button.
All this sounds like it should be rectifiable with a different keyboard layout other than the UK version I was using, but I’ve not tried it yet. It’s not a major issue for me – I’m working across so many keyboards and layouts, and I’m used to typing on keys that have different symbols on them. Before I forget, the CMD key acts as the Windows key, and CMD and CTRL are what they say they are. Remember the implications for copying and pasting 😉
The bigger problem are those “special keys” with which we can control the Mac hardware. Display backlight, keyboard backlight and volume. The Mac drivers should take care of those, and the good news is that most of them work fine! Volume keys and keyboard backlight behaves just like it does under macOS. Hurra!
The Display Brightness however does not. Both of keys lower the brightness, until the display is eventually switched off. There’s no way to increase the brightness with keys. It can still be done from the Windows sidebar, but you may not be able to posotion your cursor there once the display is pitch black. Just be careful, and only adjust the brightness up from the Windows settings instead.
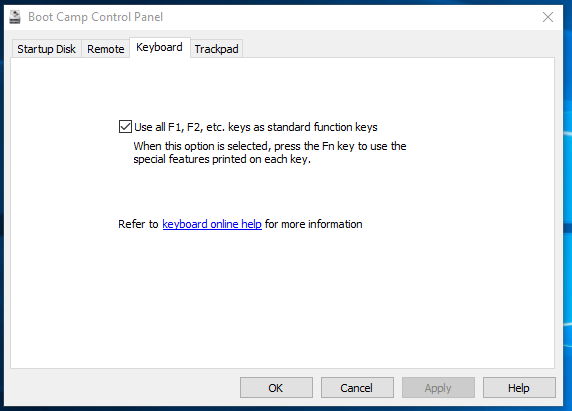
To make sure you don’t accidentally press any of those keys, enable the FN button in the BootCamp Control Panel. This means that the upper row of keys acts as regular F1-F12 keys, and you’ll need to press Fn in addition to utilise the special options.
In other good news, the Audio, WiFi and Display drivers appear to be working fine. I could run my native 1280×800 display in exactly that resolution, and things looked just fine. The speakers were working too, and eventually so did the USB ports (for transferring data that is).
The only thing I haven’t tested is the Thunderbolt Port, so I’m not sure if I can connect an external display, like the 27″ screen I have.
So what’s the verdict?
Do I recommend running Windows 10 on a MacBook Pro from 2011? It’s a tough call. I should mention that although it’s an 8 year old machine, I do have the 2.8 GHz Intel i7 processor and 16GB of RAM. Considering how slick the performance under High Sierra was, I had expected something at least similar if not better under Windows 10.
Sadly it just didn’t feel like an upgrade, more like a severe downgrade.
Overall system performance felt sluggish. Letters that I typed only appeared half a second later on the screen, sometimes in a series of several that were stored in the keyboard buffer. The trackpad implementation is terrible, and gone are the days of two-finger scrolling through a web page elegantly. Especially for typing, I sorely missed the excellent type correction tools I was so used to from macOS. Even in Firefox, which has its own implementation of correction tools, it felt just cheap and nasty.
Granted, the hardware drivers were originally made for Windows 7, and I’m using them under Windows 10, so perhaps better performance could be achieved if Apple had been kind enough to provide an adequate version. But why would they? Apple hardware goes out of style 12 months after they introduce it, and it’s not necessarily Microsoft’s responsibility to make sure that exotic vintage hardware works on their OS. I appreciate that.
At a push, navigating with a regular mouse might improve the user experience just a little bit, but this being a laptop and all, a surface on which to use one may just not always be feasible. An SSD instead of an old spinning drive does certainly improve things, and believe me I’ve tried. I’ve invested $30 into a new one specifically for this purpose – but it still wasn’t something I could see myself using.
Although you can probably get by, I didn’t feel that running Windows 10 on my MacBook was an improvement over High Sierra. Quite the opposite. It feels like a downgrade across the board. After several weeks of testing, I decided to put my old SSD back in and keep using it as it was intended to be used.
One day I may try to run CentOS on it, but until that day comes, I have a larger choice of apps available under macOS, however outdated they may be.
The 2011 iMac was one of the best Apple computers to be released in its class. It featured a compelling design, a beefy processor that still holds up today; and it could be repaired and upgraded easily.
Apple stopped supporting the 2011 iMac after Mac OS 10.13 High Sierra, however, it still gets regular security updates. This causes compatibility issues as some of the new software and features don’t support High Sierra. You might need to download old software or buy a new Mac to use the new stuff, OR you can install Windows. The 2011 iMac gets a crazy power boost with Windows 10 that extends the life of your iMac extensively.
(If you have a Mac with an M1 chip, learn how to install Windows 11 here)
Many have tried; Many have failed.

Many issues arise when installing Windows 10 on this computer. Some of the most common problems include; lack of sound, random reboots, driver issues, and BSOD errors.
These are some of the most common BSOD errors that people encounter.
- Page Fault In
- Nonpaged Area
- igdkmd64.sys
- atikmpag.sys error.
- Kernel Security Check Failure
These issues happen when Windows is installed in EFI boot mode. For Windows to correctly work with this Mac, it has to be installed in legacy mode (Master boot record). Nevertheless, there is a proven way to get Windows running correctly with all drivers working. Read more to find out!
What you’ll need
- 16GB flash drive
- A fresh copy of Windows 10/8.1 iso (You can download a copy of Windows from here
- Rufus app (download here)
- Tuxera app (download here)
- Refit (download here)
- Bootcamp drivers
1) Open the disk utility app and partition the hard drive
This process will not use Bootcamp assistance.
- Once Disk Utility is opened, partition your hard drive and format it in MS-DOS.
- It’s important to format it in MS-DOS as the system will create it in MBR (Master Boot Record), which is needed to successfully boot Windows. NOTE: Mac OS will create a hybrid GPT/MBR partition.
- If the partition is formatted in GPT; Windows will install, but you will face all those issues and BSOD errors. However, if the setup installation is meant to target an MBR partition and the partition was formatted in GPT, Windows installation will say ”Windows cannot be installed to this disk. The selected disk is not of the GPT partition style”.
- If you’re confused don’t worry. In simple terms; the flash drive and the partition you made with disk utility have to both be in the same partition style. Either MBR or GPT. In our case, MBR is our target.
2) Use any Windows computer and install Rufus
If you don’t have a Windows computer, install parallels and run it in a virtual environment.
- Rufus is crucial for this process because it allows you to create a Windows bootable flash drive in either MBR or UEFI.
3) Open the Rufus app and select the Windows 10 iso
- Make sure to change the partition scheme to MBR (This is very important).
- Double-check that the flash drive is connected to Rufus.
- Click start and let Rufus create a bootable disk.
4) Format partition with Tuxera
Open the Tuxera app that you downloaded earlier. Tuxera might prompt you to restart after installation.
- Once Tuxera is opened, locate the partitioned drive that you created earlier with disk utility.
- Format the partition as NTFS (It’s important to use Tuxera for the NTFS format)
5) Copy Windows 10 installation folders to the partition
Once the partition is formatted, insert the flash drive that contains Windows 10 installation folders.
- Copy the contents from that flash drive to the newly formatted NTFS partition that was created with Tuxera.
6) Install Refit
Download and install Refit from here. If you don’t see the Refit menu on boot, use this command on terminal to bless it.
cd /efi/refit ./enable.sh
7) Restart Mac
Restart your Mac and hold down the option key (Alt key). You might want to use a wired keyboard as a Bluetooth one might not be recognized.
 Navigate through Refit and click on Windows
 Navigate through Refit and click on Windows
Once the Refit menu shows, navigate toward the internal hard drive partition that has Windows installation files (Make sure the flash drive is also connected. It might or might not work without it.)
9) Start Windows installation
Windows installation will start and you will have successfully booted in MBR mode
10) Follow setup instructions
Follow Windows 10 instructions and install as usual. You can also safely format the partition that has Windows files in it while doing the installation. Just make sure the flash drive is connected.
11) Keep an eye on reboots
Windows installation might restart your computer a couple of times. Make sure you’re there to click the option/ALT button, or else it will boot to Mac OS.
12) Install Bootcamp drivers
Once Windows is installed, do a quick Google search and install Bootcamp drivers. Windows 10 will also automatically detect and install drivers for you.
This is a guaranteed method that works. But just in case it doesn’t, there’s another solution.
Guaranteed solution! Install Windows with a DVD CD
If the steps above are too confusing or will take too much of your time. Windows can be installed in MBR mode through a bootable DVD (MBR is on by default when using a CD). To do this, open the Bootcamp app on Mac OS and follow the instructions. Create a bootable CD from the Windows 11 ISO and the rest should be straightforward.
But for those that want to use a USB to install Windows 11 in MBR, the tutorial above should suffice.
Why install Windows on a Mac?

- Access to current software (especially if your Mac is no longer supported by Apple)
- Windows is the best operating system for gaming
- Apple makes amazing hardware. Windows 10 really shines with some of these old Macs.

Kenyon Ndezi is a recent graduate, writer, creator of kenyonndez.com; and the founder of Neonbuild.com, which is a company focused on building apps for small businesses and individuals. Follow along and get inspired!