Introduction
Following the release of Windows 10, Apple has also updated their Windows 10 support via BootCamp v6. See here: https://support.apple.com/en-us/HT204990
Essentially BootCamp allows Windows to be installed on another partition (called the BootCamp partition) on the same Mac hard drive (or SSD); this allows the user to easily dual boot the Mac between MacOS and Windows. While BootCamp 6 is great for those people who are lucky enough to buy or own any Mac later than 2012, it is not so useful for people like me who are still using older desktop such as the 24″ iMac 2007.
For the iMac 2007, the BootCamp support stops at version 4. Apple officially supports Windows 7 32bit running on a bootcamp partition. Many people have installed Windows 7 32bit onto the iMac 2007 and many people have also successfully upgraded this to Windows 8.1 32bit. Apple says the iMac only can run up to Windows 7 32-bit. So running anything beyond this means you are on your own when it comes to having issues. Unfortunately a 32bit OS cannot take full advantage of the 4GB of ram and a 64bit OS is required.
iMac 2007 – 8 year-old technology that is just as good in year 2015
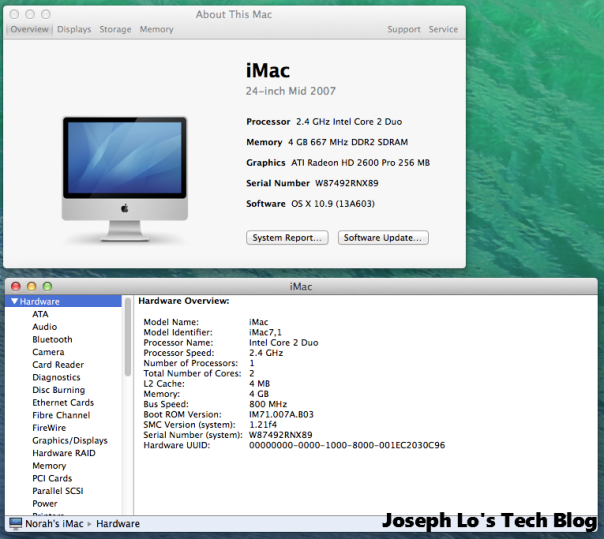
This is the iMac 2007 spec just in case anyone is not aware:
- 2.4GHz Intel Core 2 Duo
- Max 4GB DDR2 SDRAM PC2-5300
- 1920 x 1200 TFT screen
- ATI Radeon 2600 Pro with 256MB GDDR3 memory (The 20″ iMac with 2.0Ghz Core 2 Duo has a slightly slower ATI Radeon HD 2400 XT with 128MB of GDDR3 memory)
MacOS reported the hardware as follows:
The 24″ iMac 2007 is an 8 year old desktop and most people would deem this as a dinosaur in today’s context. I think the iMac 2007 is a reliable machine and still looks gorgeous by today’s standard and it will be great to be able to extend its life for a few more years. Windows 8.1 and Windows 10 is known to run well on older hardware. In fact Windows 10 with its “Compact OS” feature have an even smaller footprint than Windows 8.1. Wouldn’t it be great if we can install Windows 10 on the iMac to make it even more useful? And while we are at it, why not make this a 64bit install too. These days it does not make a lot of sense to use a 32bit OS unless we are dealing with really really old hardware with 2GB ram or less.
I have had Yosemite installed on my 24″ iMac but find that it has been giving me random reboot from time to time. It is completely random and very frustrating. A quick search on Google suggest that I am not alone in this. It is unfortunate that a supposedly stable OS based on the Mach kernel can be so sentimental at times. So in the meantime I have downgraded to Maverick to enjoy a more stable environment. So this article is written with the main aim to dual boot Maverick and Windows 10 64bit. El Capitan has just been released and I will be trying that in place of Maverick.
If the install is not successful, well at least I have tried and failed. But I am pleased to say that all seems to go well. I am happy with the result. The iMac is no speed demon but if you are not into gaming, I think Windows 10 performance on the iMac 2007 is pretty snappy. Here is how I did it.
Disclaimer
This tutorial is made with MacOS Maverick in mind and given this, I am not sure if this tutorial will work with Yosemite or the upcoming El Capitan. However, I really don’t see any reason why not. This tutorial assume that you have some basic knowledge of how to work on a command prompt, etc. It is also assumed that your MAC is physically connected to your Windows PC via Ethernet or wireless because we need to share files at a certain point. Please note that you will be taking your own risk to do this install and please do a backup first before you do anything.
I have not used Boot Camp Assistant throughout this tutorial because I have not found that it is necessary to do so. Before I discovered this method, I was mucking around with editing Boot Camp Assistant and installing Windows 7 first and then installing Windows 10 over the partition. The process is lengthy and simply just too tedious for me.
Step 1 – Creating a Bootable Windows 10 64bit DVD
It is assumed that Maverick is already installed on the Mac and that you have a PC with Windows handy. We need to create a bootable DVD using Windows. It is possible to do the same on the Mac but I think it is a lot easier to do this on a Windows box.
Windows 10 64bit ISO can be downloaded by running the Microsoft Media Creation Tool on a Windows 7/8/8.1 machine. More information is located here. http://www.microsoft.com/en-us/software-download/windows10. In a nutshell, you just run the Media Creation Tool and it will download the ISO for you. Don’t use it to create a bootable USB because we don’t need a bootable USB for this tutorial. Don’t burn this to a bootable DVD either…at least not yet. We will need to post-processed the Windows 10 ISO before doing so.
Now that you have downloaded the Windows 10 64bit ISO and saved this somewhere, we need to tweak/remaster the ISO using Microsoft’s OSCDIMG tool. You can find more info about the OSCDIMG tool here – https://technet.microsoft.com/en-us/library/cc749036(WS.10).aspx. Download this tool to a temporary folder.
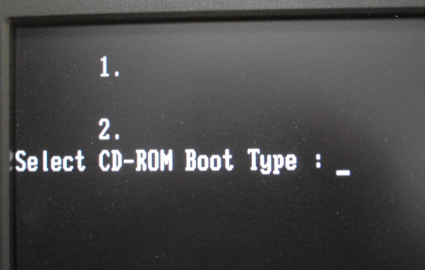
Why is this necessary? Well…if you don’t remaster the Windows 10 ISO at this stage, chances are that you won’t get pass the “Select CD-ROM Boot Type” issue. This error will pop up when you try to boot the iMac from the stock Windows 10 DVD and this looks like this:
The trouble with the above error is that the keyboard is being locked out and you can’t press any key. So we need to customize the install DVD. This sounds very complex but is actually very simple. The way to remaster the Windows 10 64bit ISO is this:
- Create a temporary folder say C:\WIN1064 with the intent to hold the content to this ISO. Try to keep the name short and without spaces. It is easier to deal with short names in a command line later.
- On Windows, double click the Windows 10 64bit ISO to mount this ISO (or you can use any other software you prefer, such as 7-ZIP). Copy all the content and dump the whole lot to C:\WIN1064 folder. Remember to preserve all the sub-folders and the like.
- Move the OSCDIMG.exe file you have downloaded earlier to another temporary folder such as C:\TEMP folder.
- Start a windows command prompt with Administration rights. Change the directory to C:\TEMP folder.
- Issue this command “c:\temp\oscdimg.exe -n -m -b”c:\WIN1064\boot\etfsboot.com” “c:\WIN1064” “c:\temp\win1064.iso”.
This will create a remastered ISO of Windows 10 64bit located in the folder C:\temp. Now use a CD writing software such as InfraRecorder to burn this ISO to a DVD. If all things go smoothly, you should now have a bootable Windows 10 64bit remastered DVD. We are now done with the PC and can now shift our attention to the Mac.
Step 2 – Finding out iMac’s graphics display engine
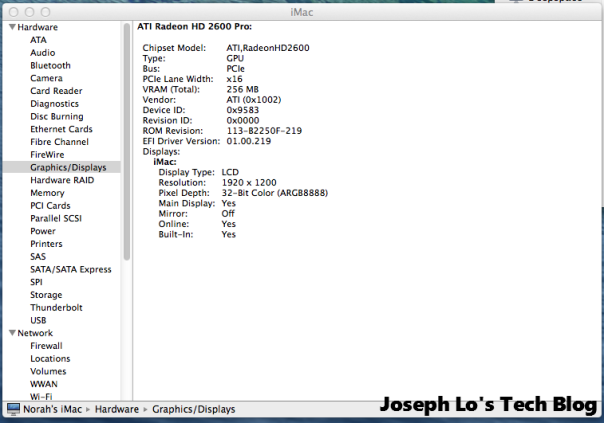
Boot the iMac. We need to do some data gathering on the kind of graphics hardware the iMac has.
The above info tells us that the GPU is an ATI Radeon 2600 Pro with 256MB ram. This is a very important piece of info.
Step 3 – Partitioning the iMac
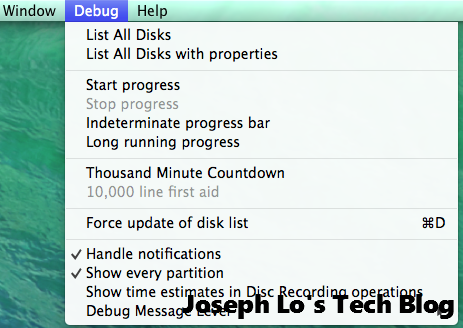
We need to be aware of the ways OSX manage the drive partitions. There are some partitions which are intended to be hidden from view. The Mac Disk Utility is capable of viewing these partitions but we need to first tweak its settings. This is what we need to do. First make sure that disk utility is not open. Quit Disk Utility if have to. Open a terminal and type in this command in one line.
defaults write com.apple.DiskUtility DUDebugMenuEnabled 1
The terminal window will look somewhat like this:
To disable this function, just start Terminal again and key in this line.
defaults write com.apple.DiskUtility DUDebugMenuEnabled 0
Now start Disk Utility and make sure that the “Show every partition” setting is enabled as follows:
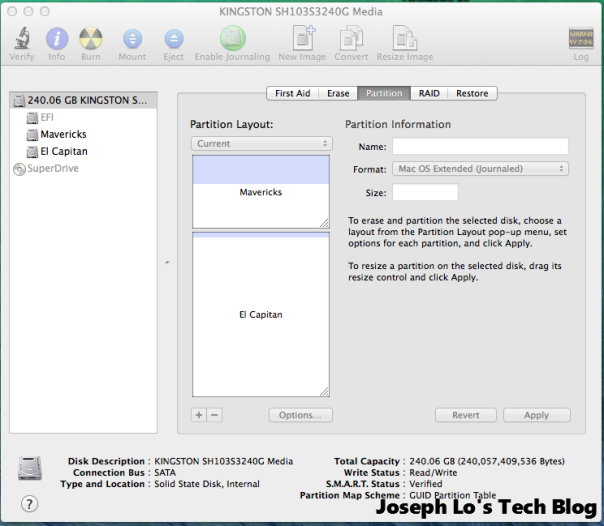
I have previously replaced the hard drive to my iMac 2007 with a new 240GB Kingston HyperX SSD. My main OSX Maverick partition is 75GB (for now) and I have the remaining 165GB partition intended for El Capitan in future.
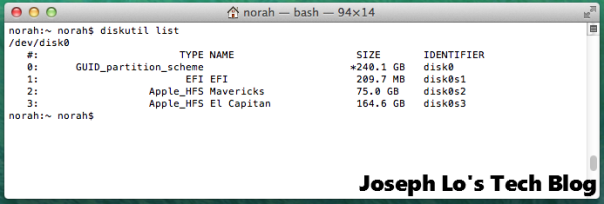
The above is how my partitions look like before prepping the system for windows 10. It can also be observed that there is a hidden EFI partition that is otherwise not visible. It is important to note that I have a very simple partitioning scheme on my iMac. So if you have a complicated setup, then this tutorial may or may not work for you. Ideally I would like to reserve at least 128GB for Windows 10 but I will use 100GB for now. Usually I will create a Windows OS partition + a Data partition on my PC boxes but I decided that I am going to just keep things simple for now. So the OS + Data go onto one big partition at this stage. I have most of my data stored on a NAS anyway so this is not a problem for me.
Now we need to create a partition suitable for Windows 10. There are 2 ways to partition a drive: via MBR (Master Boot Record) or via GPT (GUID Partition Table). Wikipedia has more information here:
- https://en.wikipedia.org/wiki/GUID_Partition_Table
- https://en.wikipedia.org/wiki/Master_boot_record
To put it simply, MBR is a legacy standard that was introduced since the early IBM PC DOS days. MBR is limited to a maximum of 4 primary partitions. To create more partition, we will have to resort to more creative ways such as setting the 4th partition as the extended partition so that we can create logical drives (sub-partitions) within the extended partition. It is a limited system. The GPT scheme is the way forward.
Just a note here: Windows 7 can only be installed on a MBR partition but it’s data drivers can be located on GPT partitions. Windows 8.1 64 bit can be installed to a GPT but the system must support UEFI.
On the Mac, launch Terminal and type “diskutil list” to list all the partitions visible to MacOS.
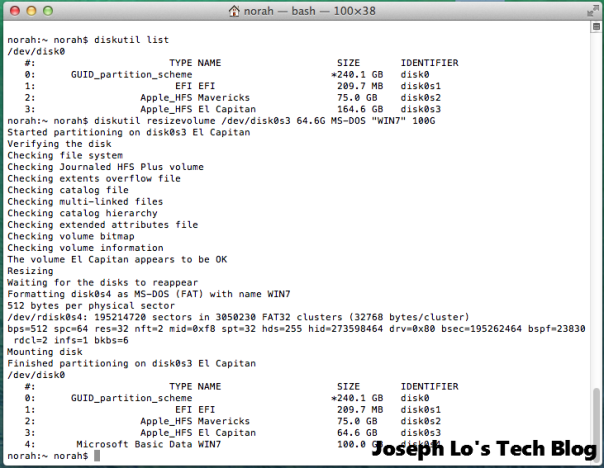
What I did next is to resize my El Capitan partition to 64.6GB and make way for a new 100GB partition for Windows 10.
The command line to do this is
diskutil resizevolume /dev/disk0s3 64.6G MS-DOS “WIN7” 100G
Obviously the partition name and disk size will be different between different users.
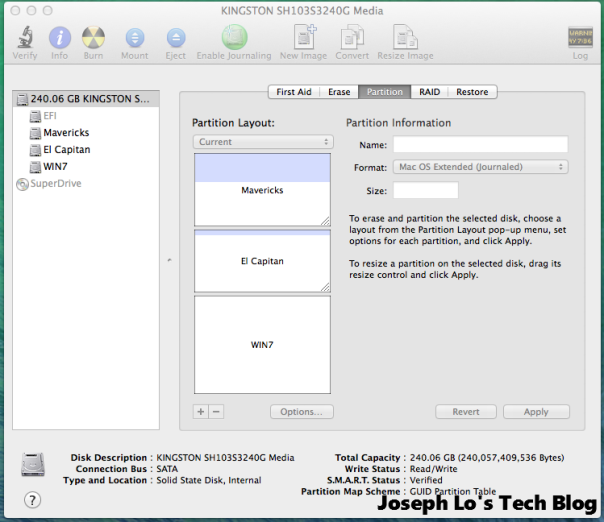
Graphically, Disk Utility will show something like this:
Now that we have created a new Win7 partition, we can proceed to install Windows 10.
Step 4 – Installing Windows 10
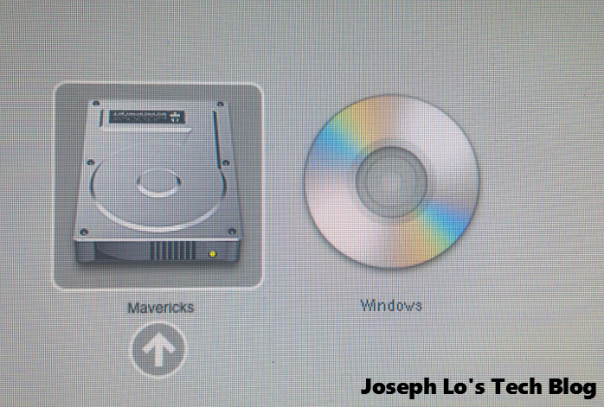
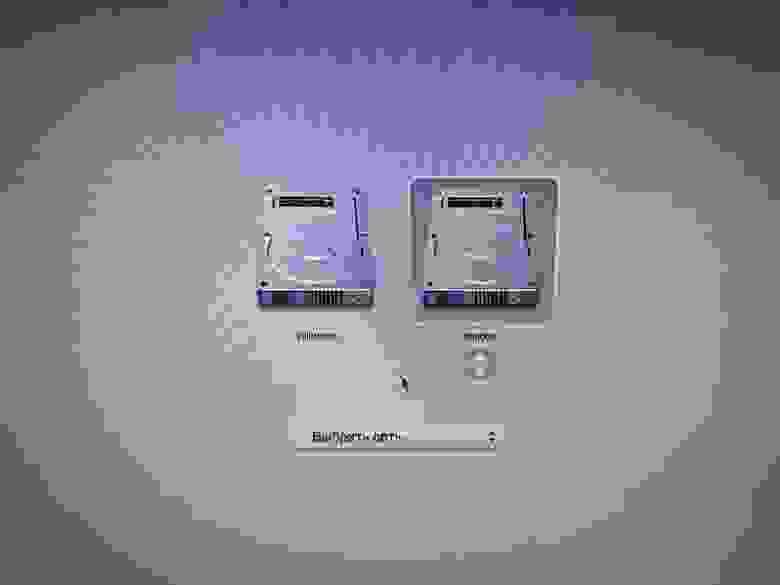
Insert the Windows 10 64bit boot DVD into the iMac and reboot the Mac. Once the famous Mac boot tone is heard, press the Option key. We should now see a Windows DVD icon next to the Maverick one like so.
This will allow us to select whether we are going to boot from the SSD or to boot from the DVD. Select the Windows DVD. Windows 10 will now boot and we should now see the Windows 10 logo on the screen. Be aware that the boot process takes a long time so while it may appear that the system has hung, it is not. It is just very slow. After about a minute or 2 later, we will now see the first setup screen.
Follow the prompt until we are at this screen where Windows prompt us whether we should do an Upgrade Install or a Custom Install. Select Custom: Install Windows Only (Advanced).
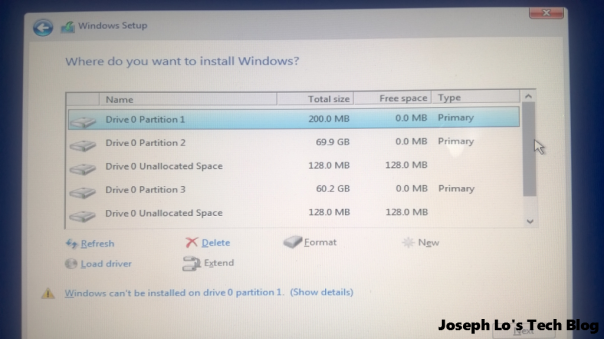
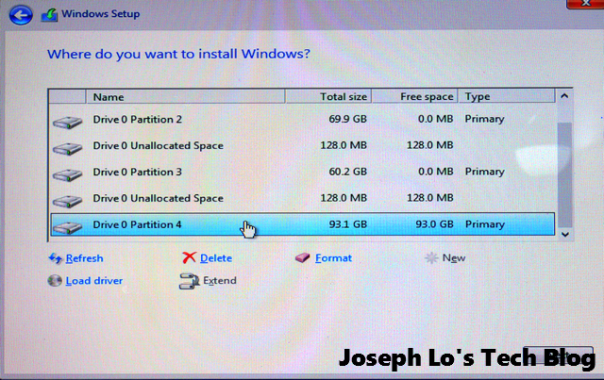
This will quickly bring us to the Windows partition screen.
Some quick observations:
- There are now 4 primary partitions:
- Disk0 Partition 1 which is the Mac EFI partition (200MB).
- Disk0 Partition 2 which is the Mac Maverick partition (69.9GB).
- Disk0 partition 3 which is the Mac El Capitan partition (60.2GB).
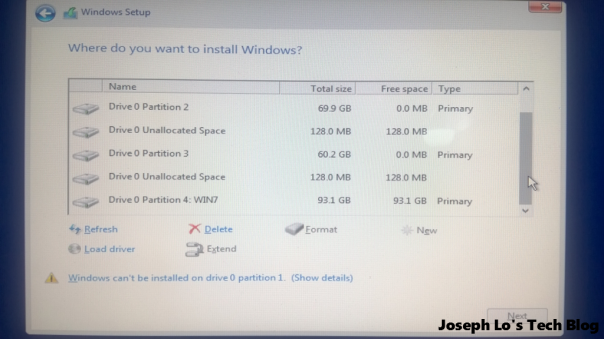
- Disk0 partition 4 which is the newly created windows partition (93.1GB)
- Windows also created a boot partition which is 128MB.
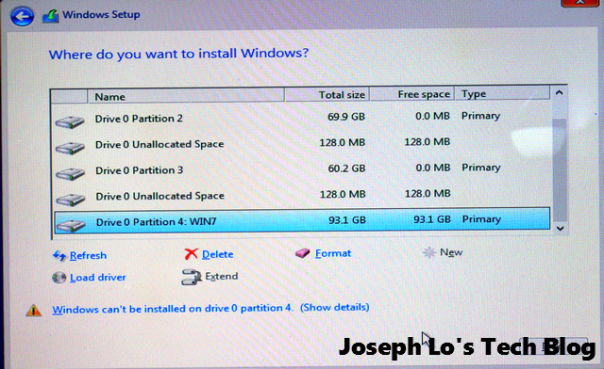
We wanted to install Windows 10 on Disk0 Partition 4 but Windows will state the following error message “Windows can’t be installed on Drive 0 Partition 4.”
Ignore this and while this partition is selected, click “Format” and format the partition. When the format is done, the error message will go away and Windows 10 can proceed to installing normally.
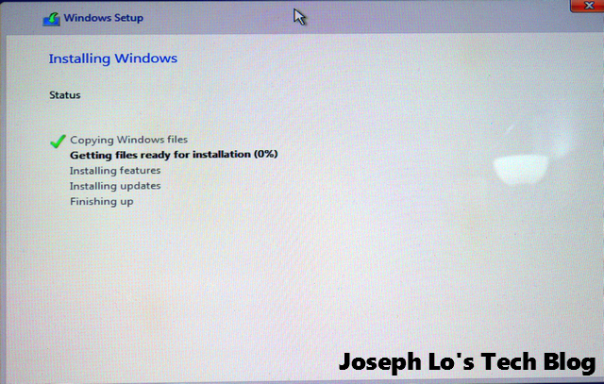
From hereon, the installation is typical of any Windows 10 PC install.
At some stage of the installation, Windows 10 will automatically reboot. This is fine. No need to press the Option key as it is smart enough to know that it should boot from its own windows partition. In fact, I observed that Windows 10 rebooted twice in total before it shows the screen prompting for a product key. Enter the product key accordingly.
Next it will ask if we should customize the settings or use express settings. I select custom settings and I highly recommended that this be selected. See here for more information of what to enable and what to disable. http://www.howtogeek.com/224352/what%E2%80%99s-the-difference-between-windows-10%E2%80%99s-express-or-custom-setup/
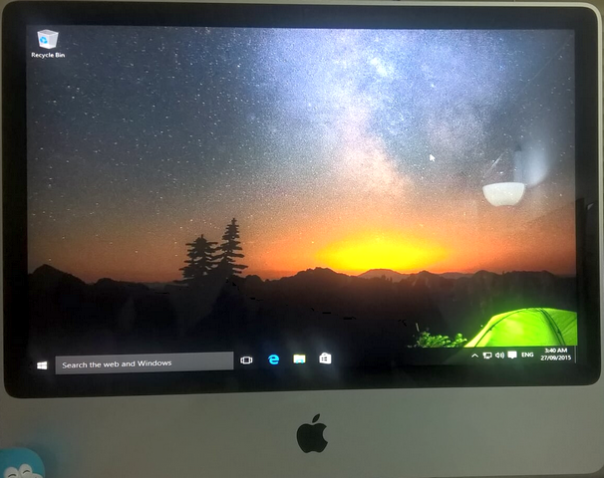
Once this is done, Windows 10 will again reboot and proceed with the install. Follow the prompt accordingly as Windows prompt for login account, etc. When the install is finished, Windows 10 will boot to a desktop. This is how it looks on my Mac.
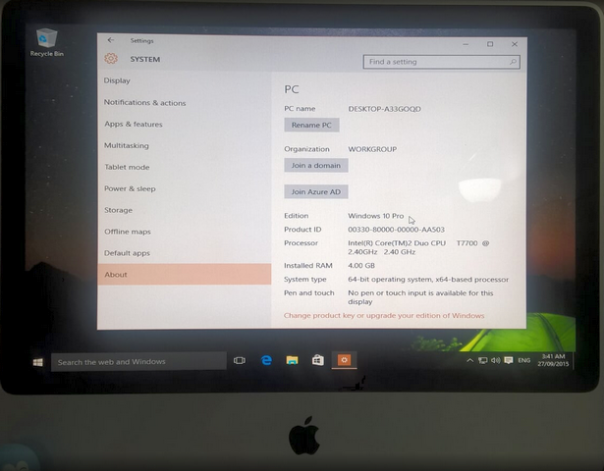
Peeking under the hoot shows this:
Viola! We have now successfully installed Windows 10 64bit on an 8 year old Mac.
Step 5 – Windows Drivers
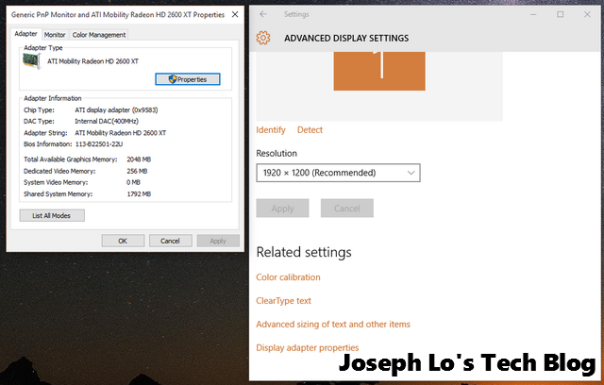
The first observation with Windows 10 on the iMac is that the screen resolution is not the optimum 1920 x 1200. If we leave Windows 10 running for about 5 mins after its first boot, it will automatically change the screen resolution to the correct 1920 x 1200. Unfortunately, Windows 10 will in the process select the wrong graphics driver.
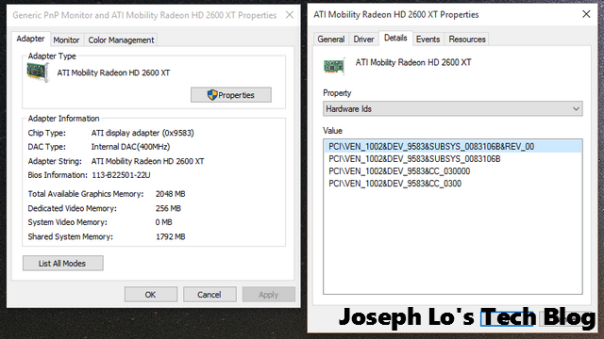
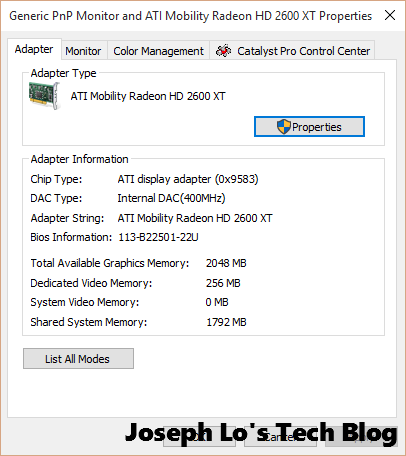
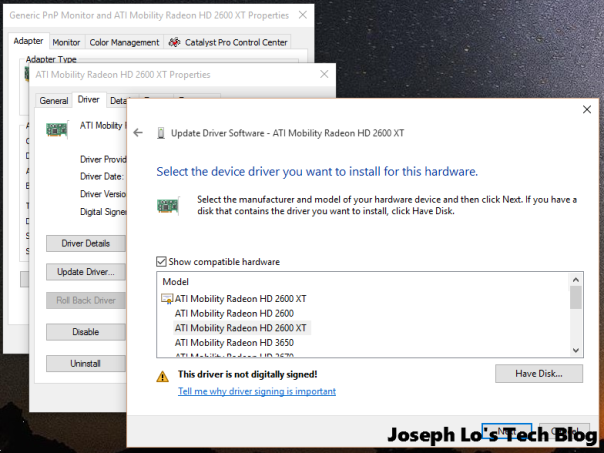
The above screenshot shows that Windows 10 has detected the display card as an ATI Mobility Radeon HD 2600 XT. The iMac 2007 has an ATI Radeon 2600 Pro with 256MB GDDR3 memory. Why is this significant? Because with the incorrect driver, Windows 10 will hard crash from time to time and this can be reproduced each time easily when we drive the card hard such as playing a youtube video for instance. This gets so bad that it is almost impossible to use the iMac for any length of time.
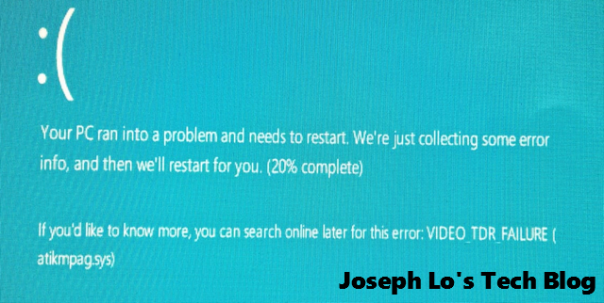
The blue screen of death looks like the following:
A closer look will find that it is the ATI driver that is causing the crash. Hint: look at the atikmpag.sys error above. This is in fact the hardest part in this tutorial to deal with. It takes several trials and errors to hit the right note and even with this tutorial, I don’t expect it will be a smooth sailing for everyone.
Step 6 – Display Card Hardware IDs
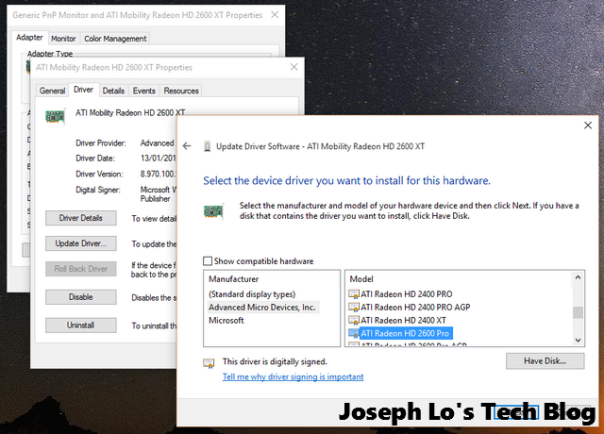
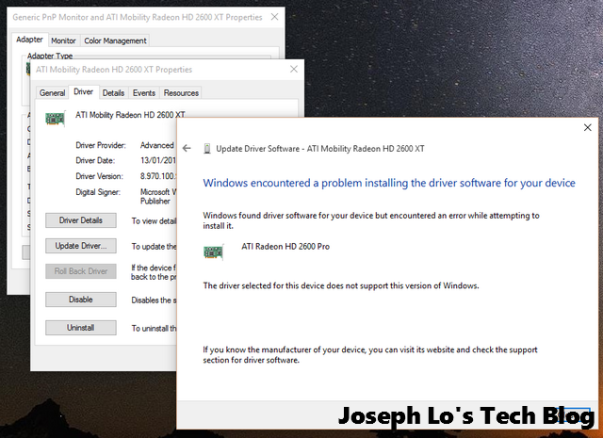
I have tried to force Windows 10 to use the correct display driver that comes as part of the OS but I don’t have much success with this approach. The closest device driver that come with Windows 10 for the ATI Radeon 2600 Pro is the ATI Radeon HD2600 Pro.
However, Windows 10 will not install this driver and will throw the following error:
We don’t have any other options other than to modify the video driver.
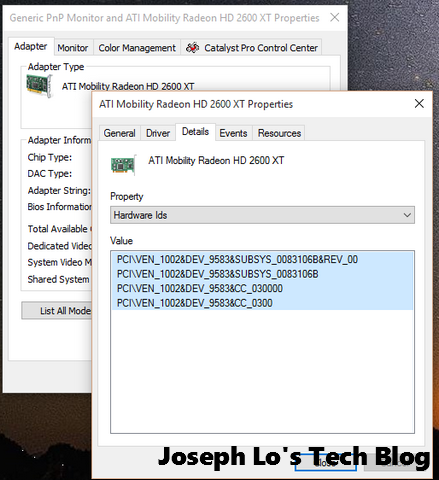
But first we need to gather some forensic data from Windows 10 on the iMac. Go to Display driver properties, hit the “properties” button. This will open up another windows. Navigate to the “Details” tab and in the dropdown menu, select “Hardware Ids” as shown below.
Microsoft has some good info what exactly are “Hardware Ids”. See here. https://msdn.microsoft.com/en-us/library/windows/hardware/ff546152%28v=vs.85%29.aspx?f=255&MSPPError=-2147217396. In a nutshell, a hardware ID is an identification string defined by a manufacturer so that Windows can use this information and pair the hardware device to a device driver INF file. So in our case, there is a mismatch between the physical hardware and the device driver and hence the crash.
We can see that there are 4 hardware Ids as reported by Windows 10. These hardware IDs resemble one another, sort of in a way. There are clearly some patterns here:
- The first string is the longest and contain the most amount of information. The other strings appear to be a subset of the first string.
- The second string is almost identical to the first except that the string truncated the revision number at the end. The fourth string is also almost identical to the third except missing 2 x zeros at the end.
So what we need to do now is to select these 4 hardware IDs by highlighting these 4 lines and right click the mouse to copy. Copy and paste these lines into a temporary text file so that we can get to these later.
We now need to install the latest video driver.
Step 7 – Installing the latest Video Driver
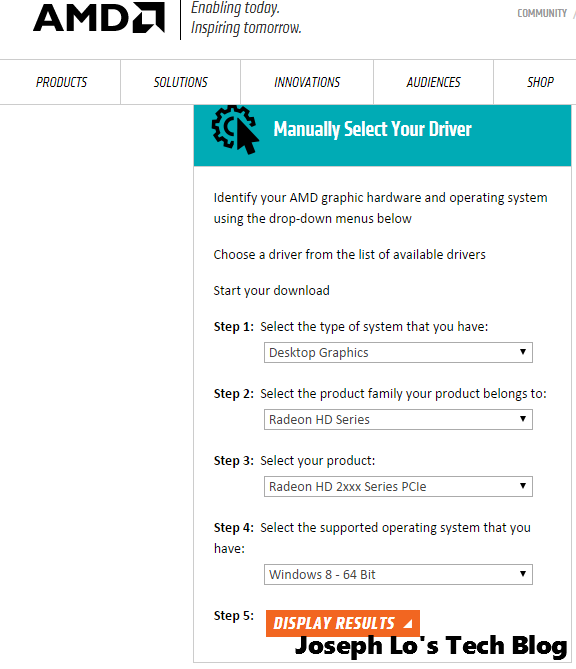
This tutorial is using Windows 10 64 bit so we obviously will only use 64 bit drivers. Browse to AMD’s website: http://support.amd.com/en-us/download
The display card is an old card and is considered a legacy device.
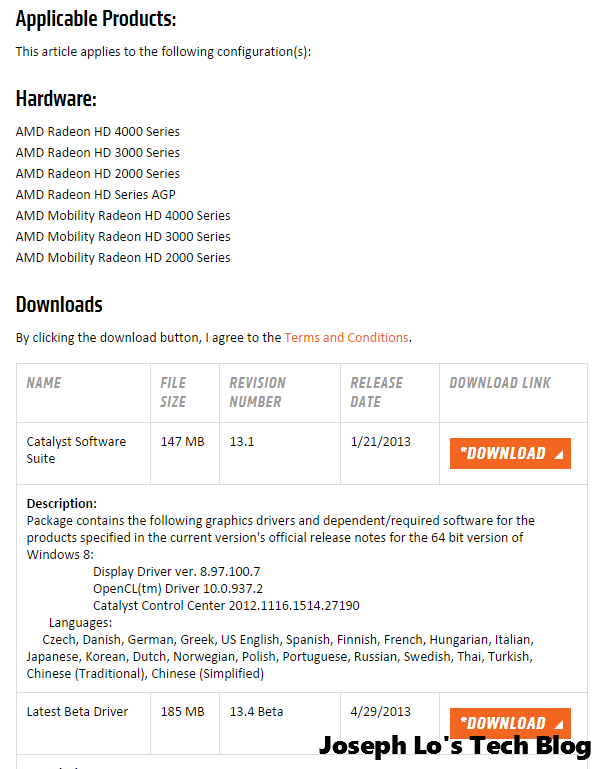
AMD has yet to update their older device drivers to Windows 10 64bit so drivers compatible with Windows 8 64bit is the next best thing. Click “Display Results” and we will see:
Download the catalyst software suite v13.1 from the above link.
Before we install this, we need to disable Windows 10 64 bit’s driver signature enforcement. This is unique only to 64 bit OS and this step is not required for 32 bit Windows.
Here is a helpful guide how to disable Windows 10’s driver signature enforcement.
http://www.howtogeek.com/167723/how-to-disable-driver-signature-verification-on-64-bit-windows-8.1-so-that-you-can-install-unsigned-drivers/
So the steps to do this are:
- Select “Restart” from the Power options menu and hold down the Shift key and click restart
- Once computer is booted, select Troubleshoot option -> Advanced Options -> Startup Settings. There will be a startup button there. Hit the startup button and the iMac will reboot.
- After the iMac is rebooted, a list of startup settings will then show up. Press the F7 key (or the “7” number key) to disable driver signature enforcement.
- The iMac will once again reboot.
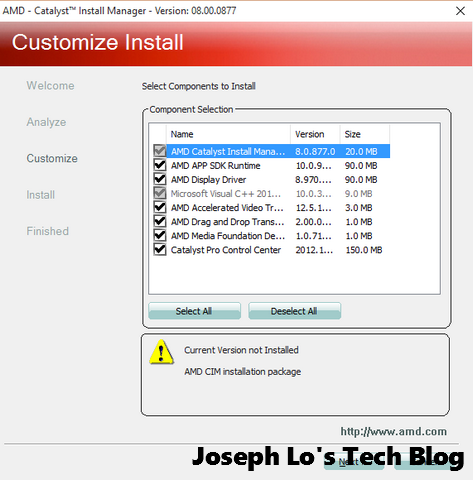
Now install the AMD Catalyst Software. I select Custom Install so at least I have a slight knowledge of what components will be installed to Windows.
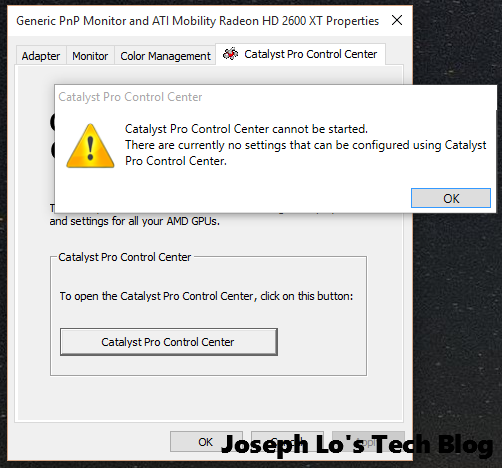
When the install is finished, navigating to the video device driver properties window will now show a new “Catalyst Pro Control Center” tab. See the following screenshot:
But clicking this will show an error like so:
Now we have to patch the video driver.
Step 8 – Patching the Video Driver
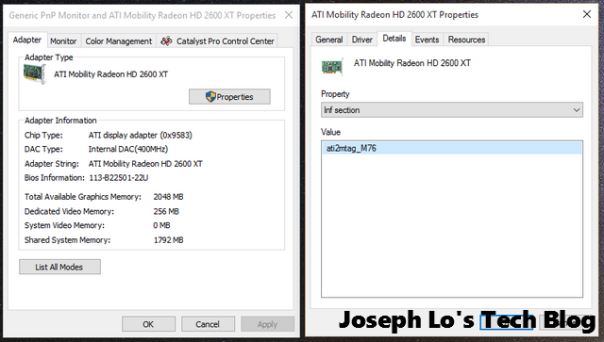
- Go to Display Driver Properties -> Properties -> Detail -> INF Section. Observe the string that is being shown. On my iMac this is “ati2mtag_M76”.
2. Use Windows Explorer to navigate to this directory: “c:\AMD\Support\13-1-legacy_vista_win7_win8_64_dd_ccc\Packages\Drivers\Display\W86A_INF” as shown here.
The files are generally named like so:
- C7 series with names such as C7160540, etc
- C8 series with names such as C8160540, etc
- CH series with names such as CH160540, etc.
There is a significance to how these files are named. The CH ones are device drivers for Windows Vista. The C7 ones are for Windows 7 and C8 ones are for Windows 8. We are going to patch the C8 drivers. So before we do any damage to these files, let us back these up to another folder. Quite an important step in case we make a unrecoverable error here.
There are 3 off C8 series files. These are:
- C8160540.cat
- C8160540.inf
- C8160540.msi
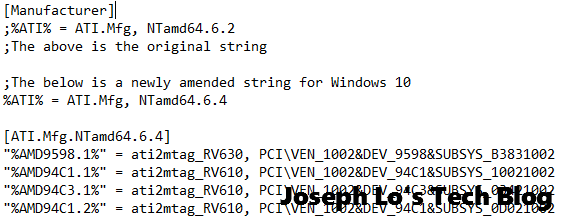
Peeking inside the C8160540.inf file, we will see all the definitions of video drivers. If we look closer, we will find strings such as
[Manufacturer]
%ATI% = ATI.Mfg, NTamd64.6.2
The notable part in the above string is the last digits “6.2“. This is the “version strings” that identify the version of Windows NT. The Windows NT version strings are as follows:
- NT 5.0 = Windows 2000
- NT 5.1 = Windows XP
- NT 6.0 = Windows Vista
- NT 6.1 = Windows 7
- NT 6.2 = Windows 8
- NT 6.3 = Windows 8.1
- NT 6.4 = Windows 10
So what we will do is to change the above string to:
%ATI% = ATI.Mfg, NTamd64.6.4
So that Windows 10 can recognize this as a valid device driver. I edited this [Manufacturer] section as follows:
[Manufacturer]
;%ATI% = ATI.Mfg, NTamd64.6.2
;The above is the original string

;The below is a newly amended string for Windows 10
%ATI% = ATI.Mfg, NTamd64.6.4
Now we know from Windows 10 that the INF section is relevant to the video driver is:
"ati2mtag_M76".
Next we are going to change the section identifier from
[ATI.Mfg.NTamd64.6.2]
to
[ATI.Mfg.NTamd64.6.4]
The amended section now looks like this:
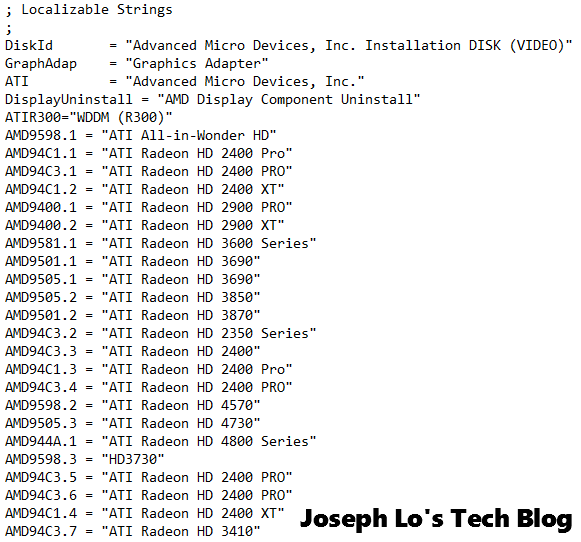
Next we are going to scroll all the way down in this INF file. The goal is to find a “localizable” string that reads something like “ATI Radeon HD 2600 Pro” or something similar. This section looks something like the following:
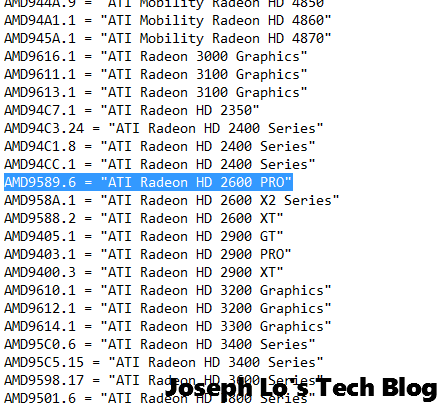
Scrolling towards the end of the file, we will come to this line, which is what we want:
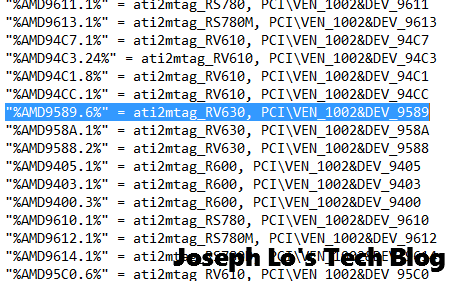
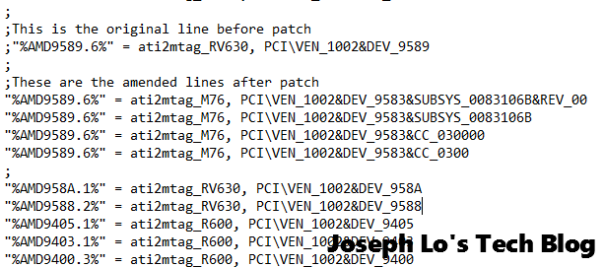
Note that this string has an identifier “AMD9589.6”. Now do a search for this string and we will quickly come to this line:
Now amend this line to read as follows:
Now go to Display Properties and update the driver. When it prompt for a driver, click the “Have Disk” button and point to the folder c:\AMD\Support\13-1-legacy_vista_win7_win8_64_dd_ccc\Packages\Drivers\Display\W86A_INF” folder.
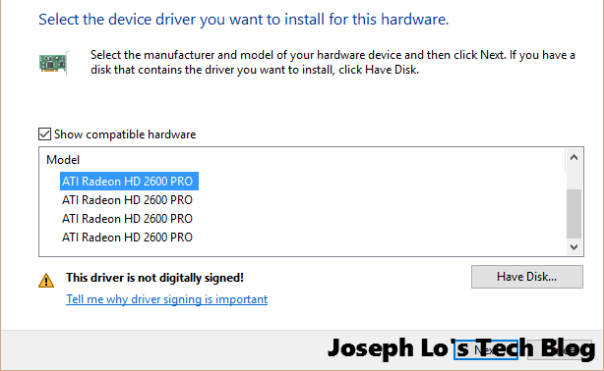
Select the file C8160540.INF. Windows 10 will display several compatible drivers like so:
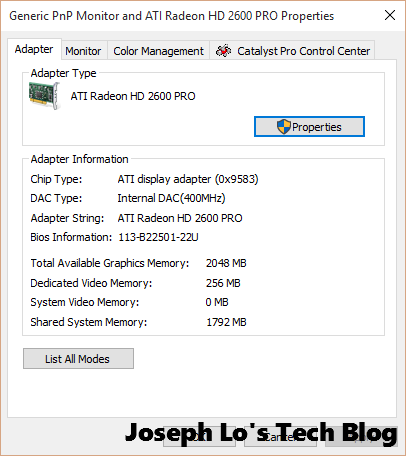
Theoretically all 4 drivers should be the same so choose the first one to see if this works. Windows 10 will complain about unsigned drivers. Ignore this and proceed. Windows will go blank for a few times while the new driver is loaded. This is normal. Display Properties will now show the following:
We are now done!!
This sounds complicated but it is really not. To recap, we only need to do these:
- Find out from Windows Properties what is the “INF Section” string. In my case it is “ati2mtag_M76”
- Amend the C8XXXX.inf to change the NT version string from 6.2 to 6.4
- From within the C8XXXX.inf file, scroll down near to the end of the file to locate the localizable string “ATI Radeon HD 2600 PRO”. In my case my line reads: AMD9589.6 = “ATI Radeon HD 2600 PRO”
- Take note of the first part of this string and search for this string “AMD9589.6” within the file. We will be able to locate this line which in my case reads: “%AMD9589.6%” = ati2mtag_RV630, PCI\VEN_1002&DEV_9589
- Amend the above lines. Refer earlier texts for more info.
- Update the driver in Device Properties and viola we are done.
To verify if this works, load a youtube video and see if this cause the iMac to crash. In my case, Windows 10 appear to be stable. Fingers crossed. Note that AMD’s Catalyst Pro Control Center will not work immediately after the device driver is installed. We need to do a reboot first. Catalyst Pro will work after the reboot.
Step 9 – What works and what don’t
What worked out of the box:
- Sound
- Wifi
- Networking
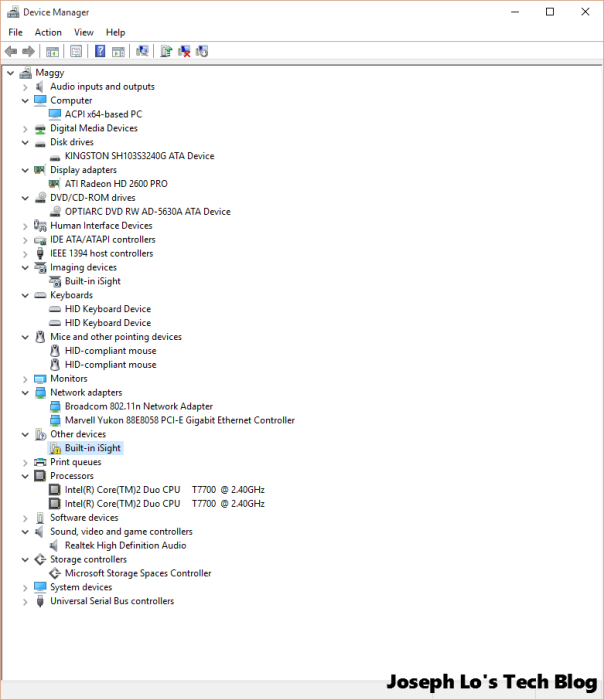
In fact almost everything works. See the following device manager screenshot:
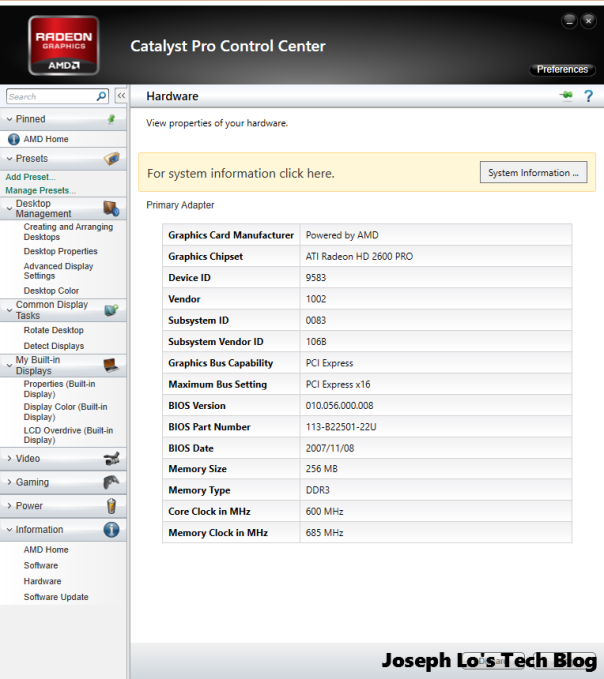
Catalyst Pro reported the video hardware as follows:
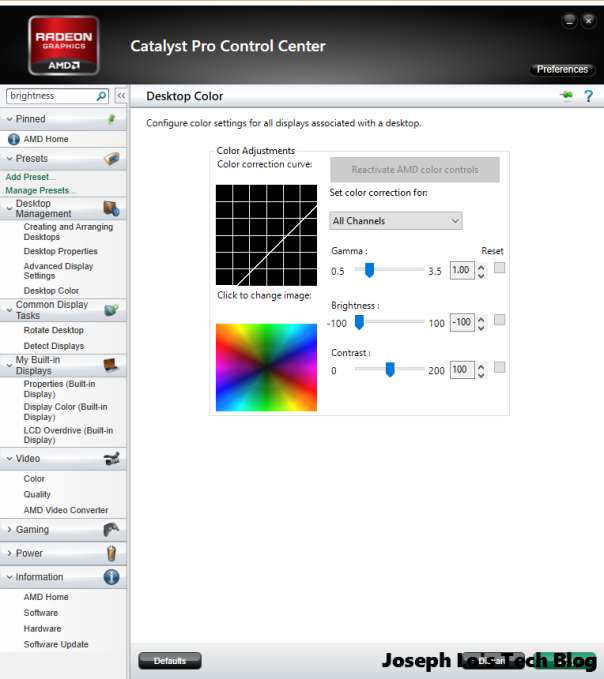
One of the first thing I did after Catalyst Pro is up and running is to change the screen brightness. The iMac’s screen is so bright that it actually hurts my eyes. I tune the setting all the way down. I overdid the settings by tuning the brightness all the way down to -100. I think -50 works well for me.
What don’t work (or buggy)
- Webcam
- Bluetooth
- Some keys in the Apple Keyboard.
I actually managed to install the Bluetooth driver and Bluetooth can be detected. But I am unable to turn on and off Bluetooth as desired so I consider this functionality is still broken. The webcam is still broken because none of the drivers worked. I have tried drivers from Bootcamp v4 and v5 and nothing is working.
Edit: 2015.12.09
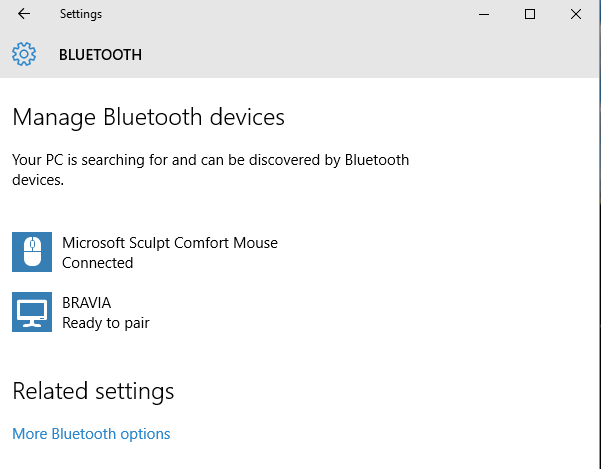
I have just bought a Microsoft Sculpture Comfort Mouse for Aud $28 (good price in my opinion) and the bluetooth moyse works right out of the box with the iMac running Windows 10. Here’s the proof 🙂 However, there is still no way for me to simply turn on and off bluetooth. So while this works, it is not working 100%.
Step 10 and Beyond
The next milestone to achieve is to get the webcam and Bluetooth working. The odds are against me on this one but we will see how this progresses. Check back on this blog to see how I go.
Conclusion
Windows 10 has now been installed on my iMac for the past weeks and so far it has been stable. No crashes so far. Fingers crossed. I don’t find the iMac lagging in anyway and the experience of using Windows 10 on this aging iMac is not much different to my main desktop i5-4670 3.4GHz with 16GB ram. Windows 10 on the iMac is a good match and I would recommend this. Hope this tutorial is useful in anyway. Happy “windowing”…..
Credits and References
I cannot achieve the above without the following guides. Thanks to all the authors and contributors:
- http://www.intowindows.com/how-to-install-windows-8-1-on-mac-without-boot-camp/
- http://www.intowindows.com/how-to-create-windows-8-1-bootable-usb-on-mac/
- https://www.reddit.com/r/apple/comments/1x7p25/installing_a_64bit_version_of_windows_on/
- http://www.123myit.com/2014/02/create-bootable-windows-7-8-usb-mac/
- http://forums.macrumors.com/threads/tutorial-how-to-enable-usb-install-on-mavericks-for-unsupported-bootcamps.1680652/
- https://discussions.apple.com/thread/6095828?start=0&tstart=0
- http://www.gopulls.com/blog/2009.08.26/install-windows-7-x64-on-a-mac-beat-the-select-cd-rom-boot-type-error/
- http://www.iruberleet.org/2011/10/12/fixing-select-cd-rom-boot-type-when-installing-64bit-windows/
- http://www.nizzoli.net/post/39218060119/windows-8-on-a-mid-2007-macmini
- http://www.tomshardware.com/faq/id-2335392/manually-installing-latest-amd-catalyst-drivers-windows-vista.html
- http://www.tech-recipes.com/rx/9839/how-to-manually-partition-boot-camp-your-mac-for-windows-7/
- http://blog.thedeltaflyer.com/2013/01/dual-booting-windows-8-and-mountain-lion-natively-using-efi/
- http://twocanoes.com/support/winclone/installing-windows-via-boot-camp-on-a-large-(2.2-tb-or-larger)-drive-in-lion-(10.7)-and-later
Время на прочтение
4 мин
Количество просмотров 39K
Предисловие
Столкнувшись с проблемой не работающего звука при установке Windows на свой MacBook 11го года обнаружил, что материала по данной теме в русскоязычном сегменте интернета крайне мало, можно сказать что его нет вообще. Эта статья написана в помощь всем столкнувшимся с такой же проблемой, и преследует цель описать весь процесс решения проблемы от и до. Здесь описывается способ решения проблемы на примере MacBook, но он так же подойдет и для стационарных iMac.
Здесь не будут описаны способы создания гибридного диска и dual-boot macOS и Windows на одном SSD. Предполагается, что в системе существует либо один физический диск на который будет установлена Windows, либо два физических диска с разными таблицами разделов — GPT для macOS и MBR для Windows.
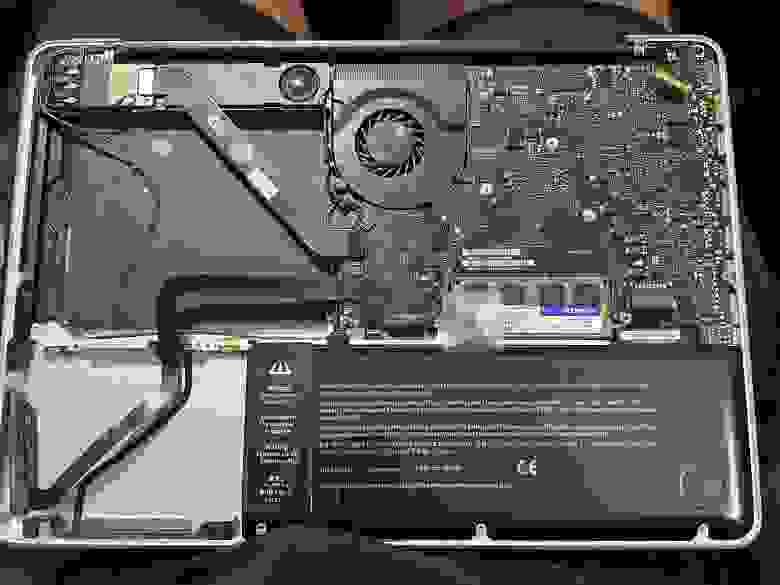
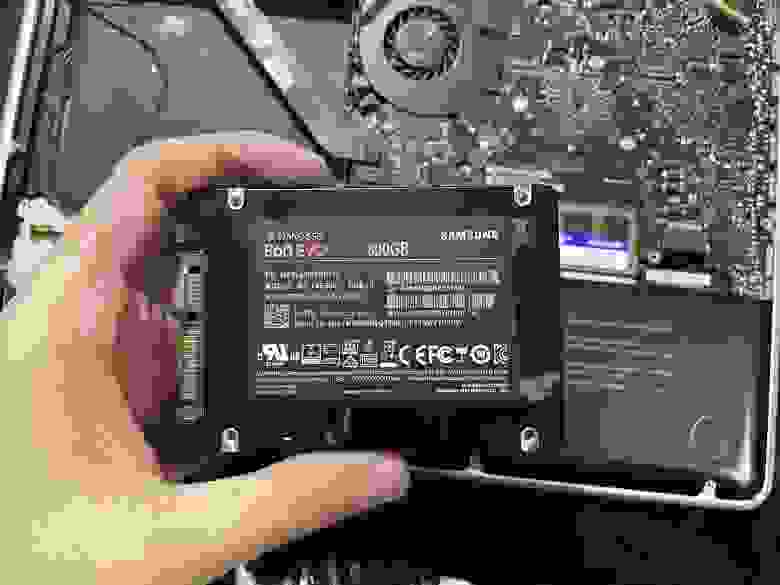
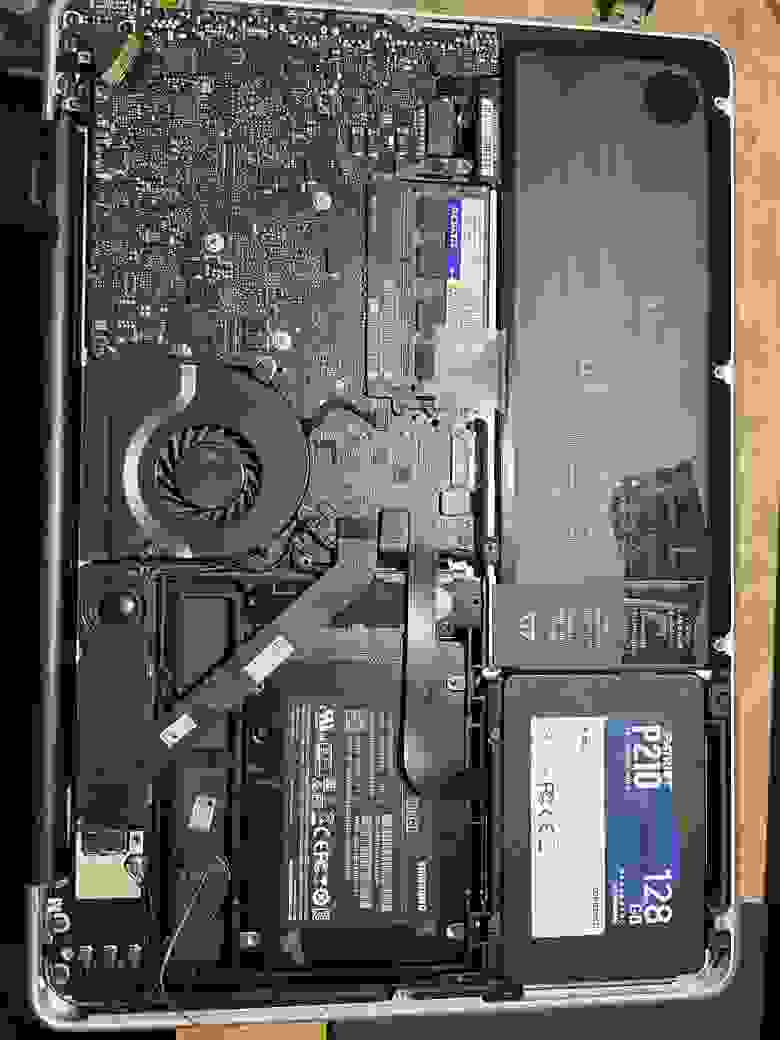
Пациент — MacBook Pro 13 early 2011 с двумя SSD на борту. Для чистоты опыта второй диск с macOS пока убрал совсем. Потом его можно будет без проблем вернуть и запускать обе ОС через бут меню.
Почему и для чего нужна такая установка?
Начисто отказывается работать звук. Ни вход ни выход, драйвера скачанные специально для моей модули ноута ситуацию не меняют. На значке звука в винде висит красный крестик, штатные средства устранения ошибок проблему так же не решают.
Вдобавок не работал у меня штатный дисковод для «родной» установки винды через Boot Camp, вместо него стоял второй жесткий диск. Помогла бы штатная установка «как было задумано Apple» с использованием дисковода и лицензионного диска винды — без понятия. Скорее всего нет, так как после подкидывания USB дисковода с записанным на болванку образом установщик даже не стартовал.
В чем было дело?
Вся суть беды со звуком заключается в том, что система. запущенная в режиме EFI отказывается взаимодействовать с звуковыми устройствами наглухо. Штатное бут-меню при этом видит только EFI загрузчики.
Но на наше счастье — на маках можно запускать в режиме совместимости Legacy системы — что нам и нужно, ведь в обход EFI все работает.
Что нужно сделать?
Далее опишу шаги, которые привели меня к успешной установке и запуску windows 10 на моем старом маке. Если кратко, мы берем дамп жесткого диска от виртуальной машины, где windows наполовину установлена в режиме Legacy и восстанавливаем этот дамп на физическом жестком мака, где продолжаем установку.
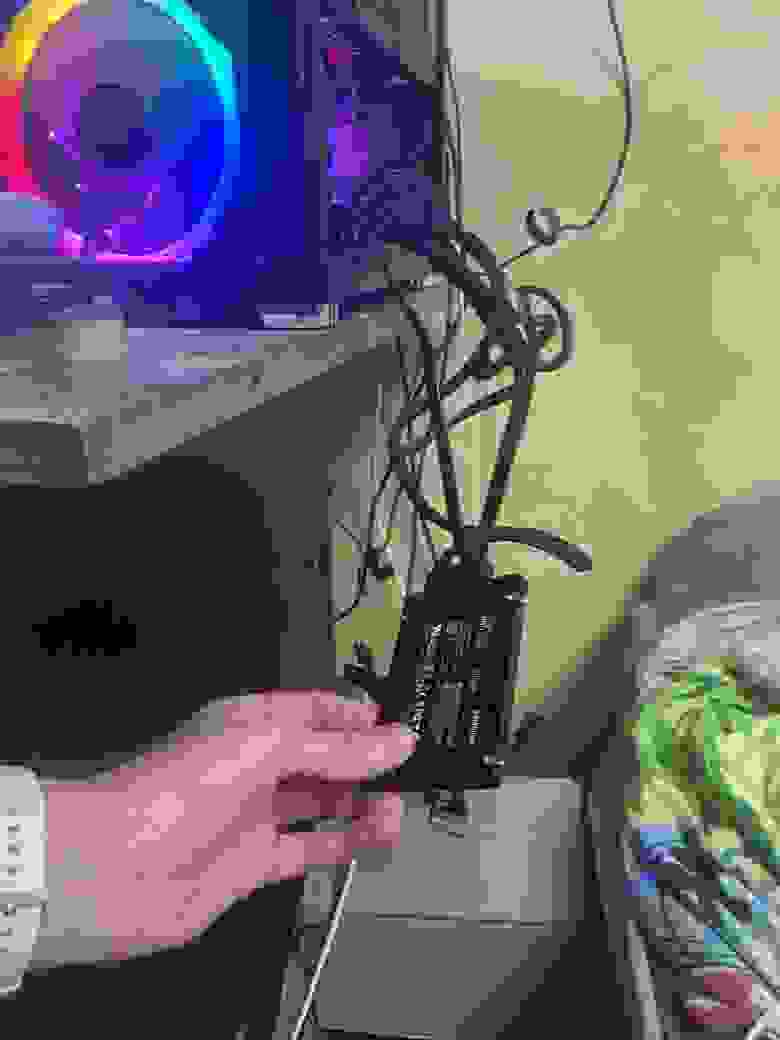
1. Имея на руках только лишь мак сделать то что нам нужно будет чуть сложнее, но способ оставлю внизу статьи в пояснении. У меня есть возможность использования второй машины, поэтому использую свой стационарный пк с выведенным наружу SATA портом.
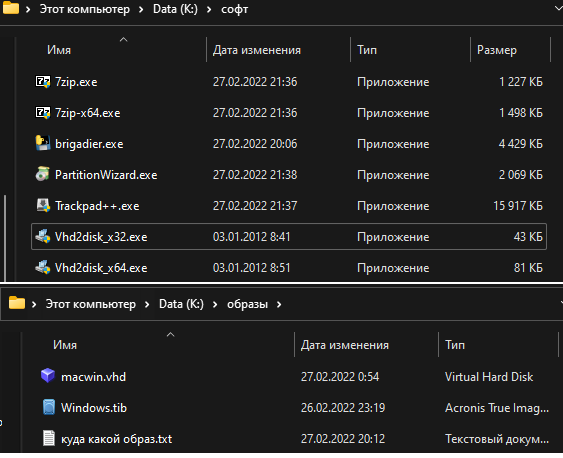
2. Для начала нужно скачать мой архив, в который я собрал все необходимые проги и образы. Архив лучше сразу распаковать на флешку, софт из него нам еще понадобится в установленной винде. Ссылка на архив в конце статьи. Содержимое на скрине ниже.
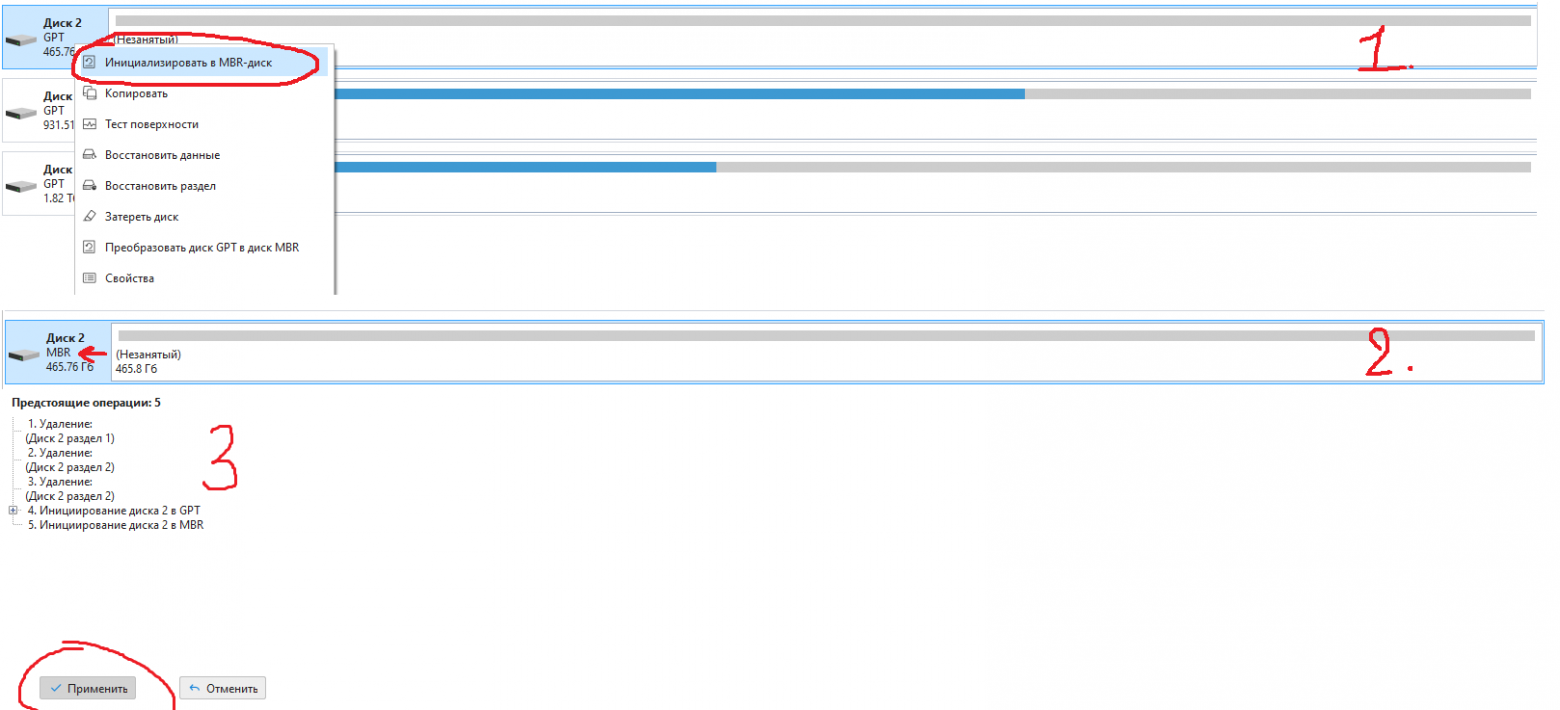
3. Снимаем жесткий диск с мака и подключаем его к ПК. C помощью PartitionWizard удаляем все разделы на этом диске и инициализируем диск в MBR — это важно для того, чтобы система запускалась именно в легаси режиме.
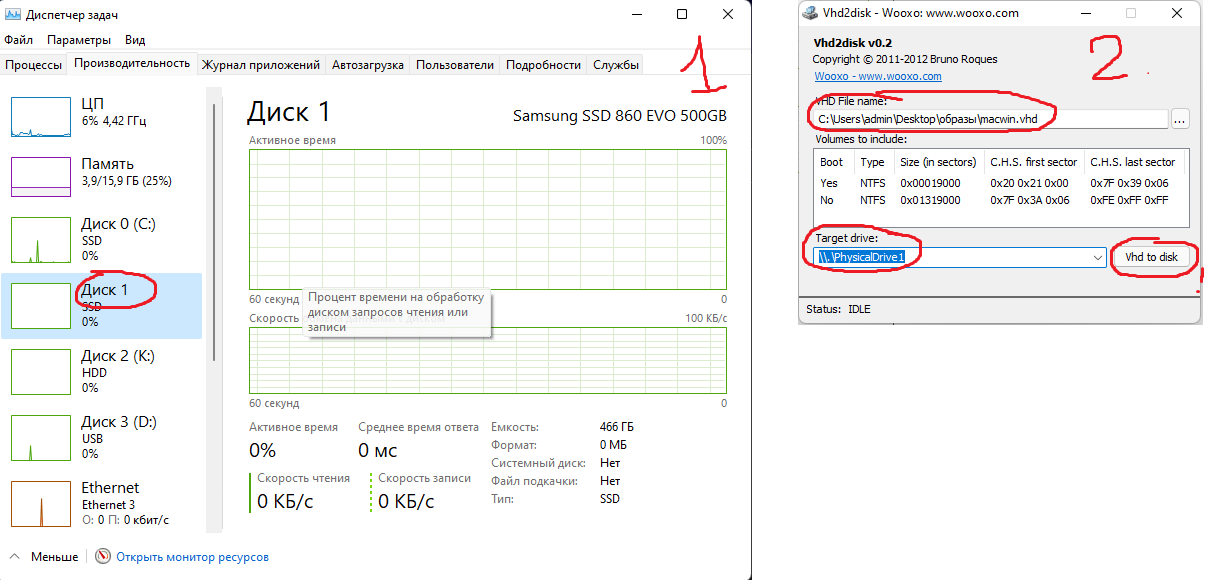
4. Прогой vhd2disk переносим образ виртуального диска из архива в формате .vhd на диск нашего мака. Физические диски в этой проге имеют отображение вида //PhisicalDriveX, где Х это цифра. Узнать какая цифра какому диску соответствует можно в диспетчере задач.
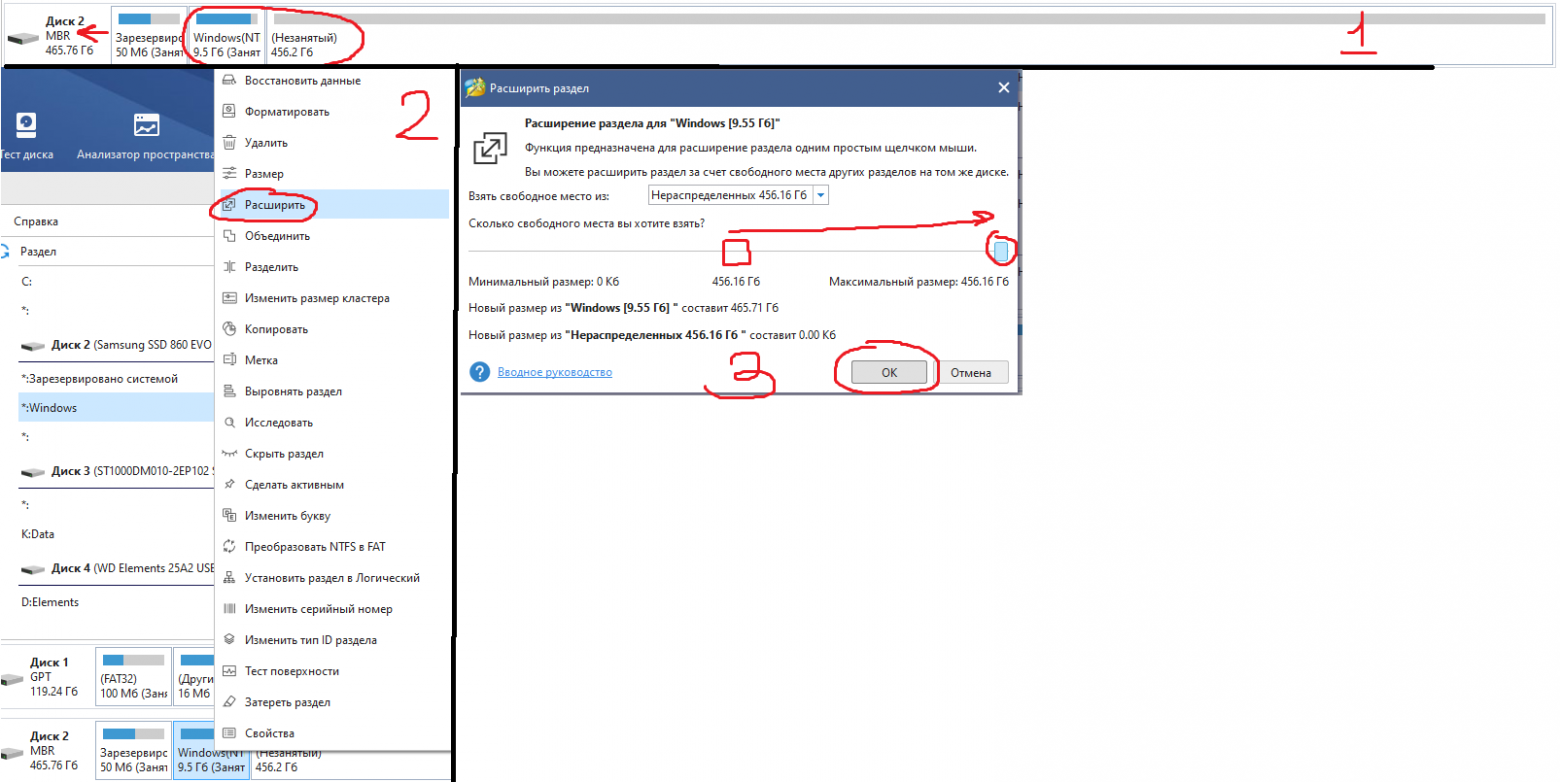
5. По завершению переноса образа еще раз убеждаемся что диск инициализирован в MBR в проге PartitionWizard. Если все правильно, на этом этапе на нашем диске должно быть два раздела и куча пустого места.
6. Расширяем последний раздел до конца диска. Жмем «применить» как в третьем шаге(забыл поместить картинку на скрин).
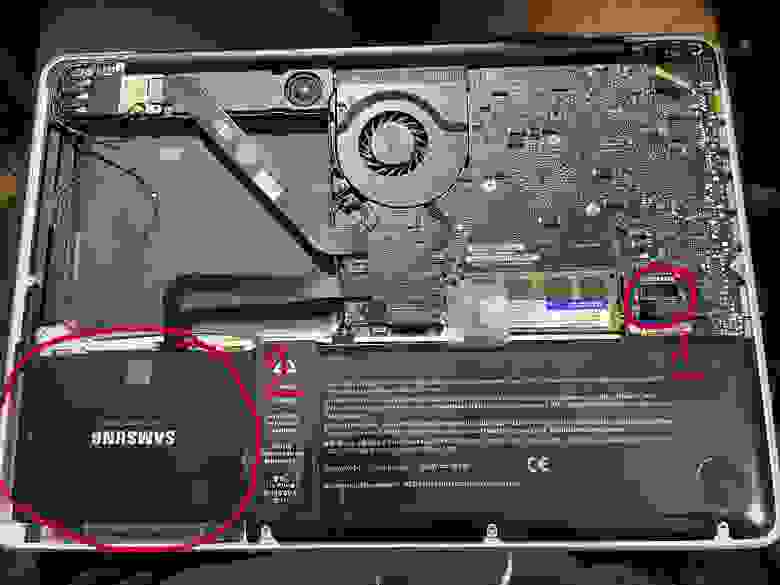
7. Выключаем ПК, отсоединяем от него диск. Отключаем питание от мака(либо отсоединяем аккумулятор в случае макбука) и устанавливаем диск обратно в мак. Ждем 30 секунд после чего подключаем питание обратно.
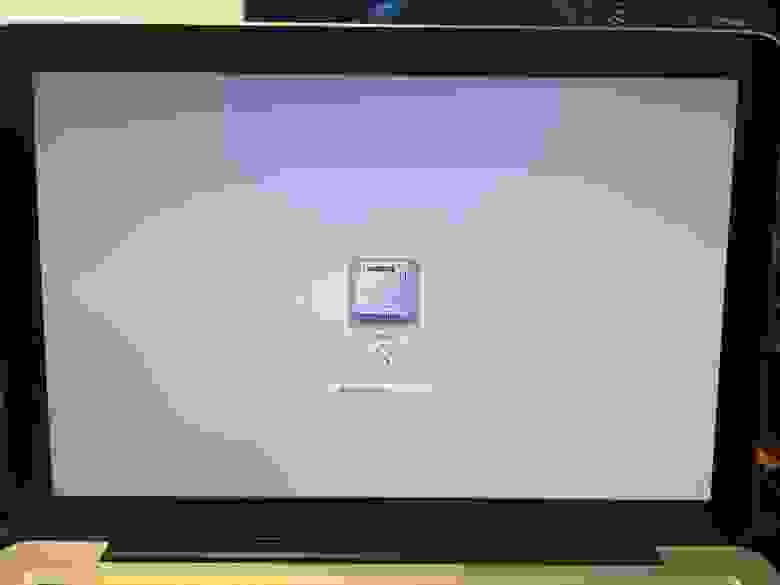
8. Запускаем мак, удерживая нажатой кнопку Option(она же alt). В бут меню появился диск с виндой! Выбираем его и завершаем установку системы. Мак может на этом этапе перезагрузиться пару раз, чтобы продолжить установку нужно будет снова подержать alt и выбрать диск с Windows, если этого не делать мак попытается найти EFI системы и если не обнаружит таких выдаст ошибку.
Пока что к интернету не подключаемся — автоматическое обновление винды может поломать нам всю установку. После завершения установки уже не будет видно страшного красного крестика на значке звука, но пока звук работать не будет — нет драйверов. Так же на этом этапе нужно подключить проводную мышку, так как правая кнопка мыши через тачпад без драйверов работать не будет.
9. Подключаем мак к интернету проводом. Устанавливаем 7zip из архива. Без него следующая софтина будет вылетать. Запускаем brigadier из архива от имени администратора, и ждем пока он скачает нужную нам версию драйверов.
10. Драйвера скачались в ту же папку из которой мы запустили brigadier. Нажимаем правой кнопкой мыши по setup.exe — исправление проблем с совместимостью. Штатная утилита виндовс сама определит что установщик должен работать в режиме совместимости с win7 и применит эти параметры. Сохраняем параметры совместимости. Запускаем setup.exe от имени администратора.
11. После установки драйверов на предложение перезагрузится отвечаем «да» и при включении снова удерживаем Option,выбрав в бут меню наш диск с Windows.
-
Все работает. Звук, вайфай, тачпад и клавиатура в порядке. По желанию можно установить Trackpad++ из архива, этот софт добавляет привычные пользователями macOS жесты тачпада вроде перетягивания тремя пальцами, и что более важно делает приятной и юзабельной возможность скроллинга тачпадом.
Подкинул второй диск с установленной macOS. В бут меню видно обе системы, все грузится и функционирует должным образом.
Приложение к инструкции
Если по какой-то причине у вас нет возможности отсоединить жесткий диск мака(например при установке на стационарный iMac) , качаем архив на флешку, создаем загрузочную флешку с любой Windows Portable, запускаемся с нее и делаем далее по инструкции. В этом случае brigadier запускаем до установки ОС и скачиваем драйвера через него на флешку, чтобы потом запустить из установленной винды.
Так же если у вас нет возможности подключить проводом мак к интернету, либо ваша версия Windows Portable не смогла определить сетевую карту — скачиваем на флешку с архивом нужный вам пакет драйверов отсюда.
Послесловие
Желательно отключить обновления Windows и Apple Software Upgrade. Есть риск что обновление все сломает, так как мы работаем со старым железом.
VirusTotal
brigadier
vhd2dsk
trackpad++
Все программы взяты с репозиториев их разработчиков и никак не модифицировались.
Ссылка на архив
MEGA
Как самому сделать такой дамп Legacy системы расскажу в следующей статье, если эта вызовет интерес у публики.
Простой способ установки Windows 10 на новые Mac компьютеры и на устаревшие, не поддерживаемые модели компьютеров Apple. Установку Windows 10 на Mac можно осуществить как с помощью Boot Camp и так и без него. Основная задача программы это подготовка диска вашего Mac к последующей установке Windows и установка драйверов устройств после установки ОС. Оба действия можно выполнить в ручном режиме, не прибегая к помощи утилиты Boot Camp. Хотя поиск драйверов в этом случае займет больше времени. Проще разделить диск вашего Мака в ручном режиме, а установку драйверов выполнить из директории Boot Camp.
Все подробности можно увидеть в видео!
Скачать Boot Camp 5.1.5621
https://support.apple.com/kb/dl1720?locale=ru_RU
Скачать установочный диск Windows 10 можно
https://www.microsoft.com/ru-ru/software-download/windows10ISO
Возможно видео будет полезно тем кто ищет информацию по темам:
- Windows 10 на старых моделях Mac — Как установить Windows 10 на ваш Mac
- Почему не ставится Windows на MacBook
- Проблемы при установке Windows на MAC
11th Nov 2018
As title says it I was given the task to resurrect an iMac and put it back in business! 🙂
Unlike Microsoft, Apple are very picky on how you gonna use your computer and are unpleasantly pushy on dragging you to buy more of their stuff. Simply said as some of you may already know you can not use old, but quite descent hardware wise Mac with Apple’s latest OS due to firmware restrictions. Luckily you can still make some use of it with Windows or Linux.
The iMac in question had a faulty hard drive, which luckily was not too difficult to replace. But as usual the troubles came soon after! 🙂
With a freshly burned DVD with Windows 10 x64 a thought I will be quickly in the game, but NO – got stuck with a black screen and a message to pick the boot type and irresponsive keyboard! It turns out though the computer is 64 bit architecture its EFI is 32 bit and you have no chance to boot it from Windows 10 installation media…
Thanks to good and clever people online help is available! I read this post, downloaded the exe file provided and it all went well!
As the steps I took are slightly different I wanted to have a note of it.
First of course you will need the Windows 10 x64 image file, which you can download from Microsoft. Under Windows 10 with right click on the file select “Mount”.
Just to make life organised create a folder with a name of your choice, in my case it was “NewISO”.
Run Command Prompt as administrator and navigate to where you have the OSCDIMG.EXE file saved /or just type the full path to it/.
Then run the command:
oscdimg -n -m -bf:\boot\etfsboot.com f:\ c:\NewISO\win10_efi32.iso
where f is the drive letter where the image file is mounted.
After this you will have e 64 bit Windows 10 image file with 32 bit EFI, do not worry about the warning message related to NT 3.5, just burn it on DVD or USB stick and use it.
Final words – I do not quite know how this program, which is a Microsoft genuine tool, manages to change the boot loader. I would advice you to download it from the post link above or at least make sure you use the same version, which is 2.54, as this may have something to do with the success of the procedure and a newer one may just put back 64 bit EFI again. I will be glad if someone more knowledgeable explains it in detail.
This entry was posted on Sun, Nov 11th, 2018 at 9:16 am and tagged with Apple, boot, EFI, iMac, install, windows and posted in Mac OS X, Windows. You can follow any responses to this entry through the RSS 2.0 feed.
I was delighted to find out, that I could successfully install windows 10 onto my older 24 inch mid 2007 iMac with 4 GB RAM.
Steps involved:
1. I installed a new 3 TB superfast internal hard drive
2. El Capitan was successfully downloaded and installed on to this 2007 iMac.
3. The most recent version of bootcamp which came with El Capitan, was then installed and the hard drive partitioned equally between the Mac and Windows interface.
4. Using a Windows 7 Pro upgrade disk, was able to get Windows 7 Pro installed on the Windows partition. Because it was a new install with an upgrade disk, had to call Microsoft to help with the activation process and they reset my code.
5. Once Windows 7 Pro was activated and running properly, was able to successfully download and install Windows 10 Pro on to the iMac system. The windows 10 installation stalled a couple of times while gathering updates, and this was defeated by turning off the Windows update service via the command window (net stop wuauserv).
Windows 10 is now running flawlessly, the iMac is been set up so it boots via boot camp directly into Windows running on top of my older macintosh hardware. If I can get a couple of years out of the system, I will be happy.
Now I plan on doing the same with my wife’s 20 inch 2006 iMac.
Cheers
Alan Hoffman from Maple Bay, Vancouver island, Canada

