A Virtual Private Network (VPN) is used to securely create a tunnel for data between your local computer to a remote server. On Windows Server 2019, you can configure a VPN to provide network access to connected clients and allow connected devices to communicate securely.
This guide explains how to set up a fresh Windows Server 2019 as an L2TP over IPSec, or a PPTP VPN, using the routing and remote access feature. Layer 2 Tunneling Protocol (L2TP) with IPSec offers robust encryption for connections to the server. On the other hand, the Point to Point Tunneling Protocol (PPTP) is simple to deploy but not as secure.
To set up the VPN server, we shall use the built-in Routing and Remote access feature, which offers a graphic interface to configure remote networking features such as Dial-up, LAN routing, NAT, and VPN.
Requirements
-
Deploy a Windows Server 2019 Instance on Vultr
-
Remotely connect to the server and log in as an Administrator
Create a New VPN User
For the VPN service to work well, it must authenticate with a valid user account to the server. So, you need to create a new user on the server.
Click Tools under server manager and select Computer Management from the drop-down list to create a new user.
Once the computer management window pops up, expand Local Users and Groups from the left pane and right-click Users to select New User on the sub-menu.

Under the New User dialog box, enter a username, full name, and password for the VPN user, then click create and close the window.

The new user will now be listed on the list of active server users, right-click on the new user and select properties.
Under the user properties window, navigate to the Dial-in tab and click Allow access under Network Access Permission. Click OK for changes to take effect.

Install the Routing and Remote Access Features
Procedure 1: Through Server Manager
From the Windows start menu, open Server Manager, click Manage, then select Add Roles and Features from the drop-down list.
From the open window, click next and select Role-based or feature based installation, then select your server from the pool. Select Remote Access, Remote Access Administration from the list of server roles.

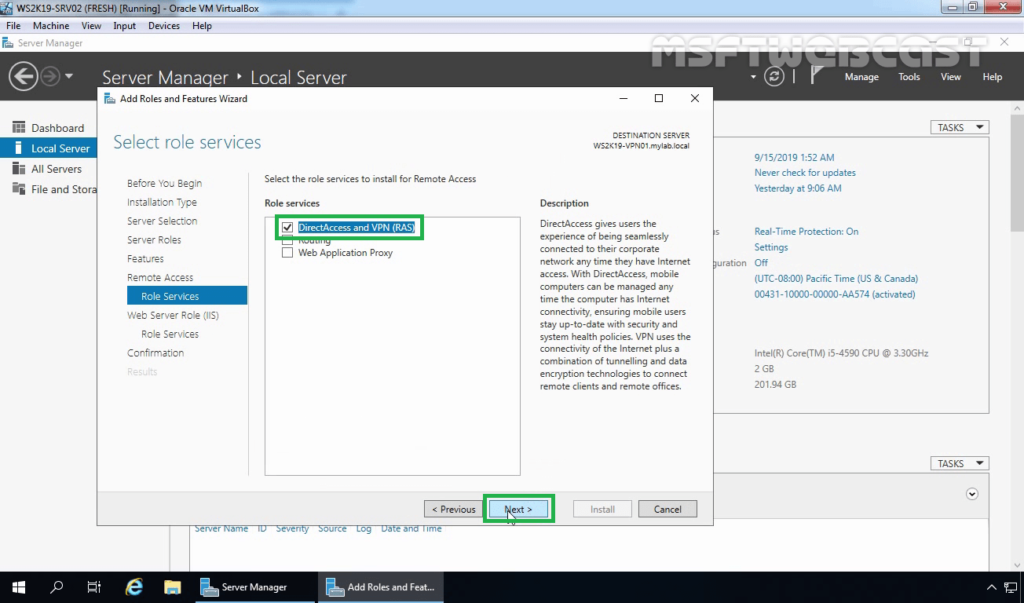
Next, select DirectAccess and VPN (RAS) and Routing from the features list, then click to Install IIS, which is required for remote access to work well.

Procedure 2: Using Windows PowerShell
You can also install Remote Access from Windows Powershell.
From the Windows start menu, open an Administrative Powershell, then install Remote access by pasting the following code to the console.
Install-WindowsFeature RemoteAccess

Install-WindowsFeature DirectAccess-VPN -IncludeManagementTools

Install-WindowsFeature Routing -IncludeManagementTools


Your output should be similar to:


PS C:\Users\Administrator> Install-WindowsFeature RemoteAccess

>> Install-WindowsFeature DirectAccess-VPN -IncludeManagementTools

>> Install-WindowsFeature Routing -IncludeManagementTools


Success Restart Needed Exit Code      Feature Result

------- -------------- ---------      --------------

True    No             Success        {Remote Access}

True    No             Success        {RAS Connection Manager Administration Kit...

True    No             Success        {Routing}
Configure Routing and Remote Access
Open Server Manager and click Tools on the top toolbar. From the drop-down list, select Remote Access Management.

In the open Routing and Remote Access window, right click on your server name just below Server status, then select Configure and Enable Routing and Remote Access from the drop-down menu.
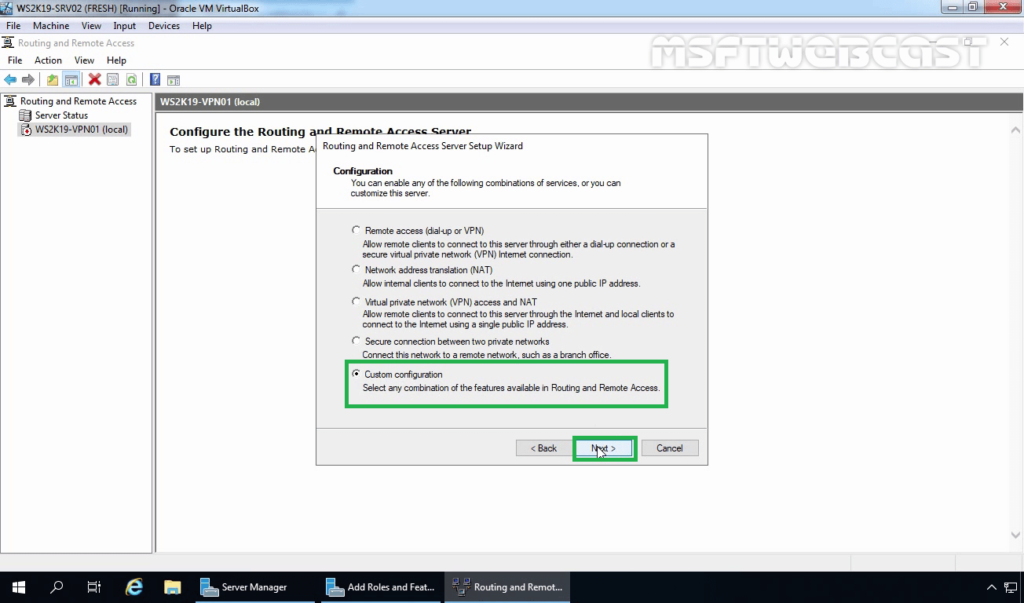
Now, select Custom configuration to configure remote access manually.

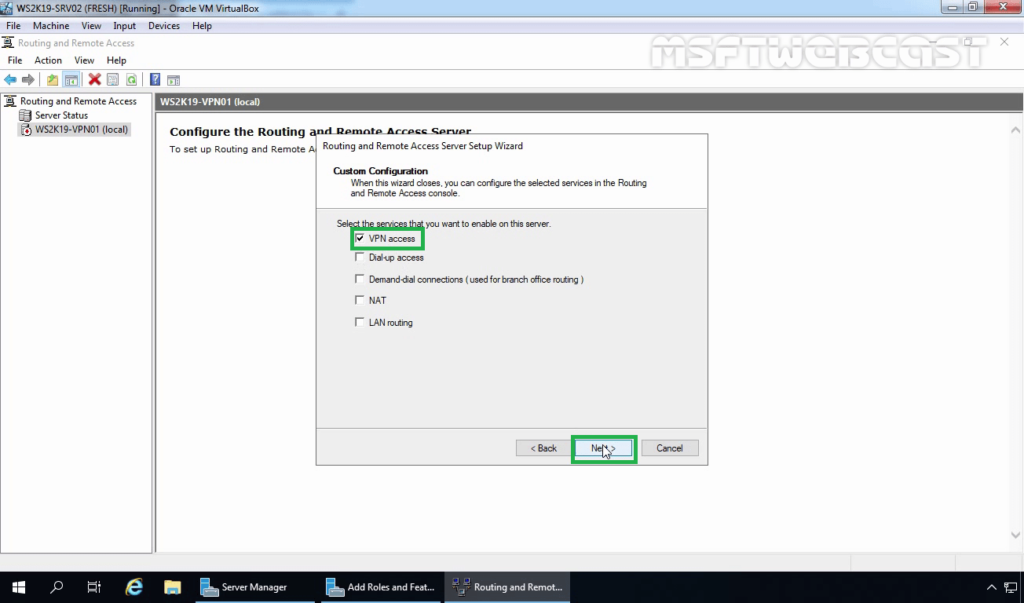
Select VPN Access and NAT as services you want to enable on your server, click next to finish the configuration, and start the service.

Setup a PPTP VPN
Now that Remote Access is running, you can set up your PPTP VPN. To get started, you must assign connected clients** static IP Addresses to avoid possible connection issues. To do this, right-click on your server under the Routing and Remote Access window and select Properties from the drop-down list.

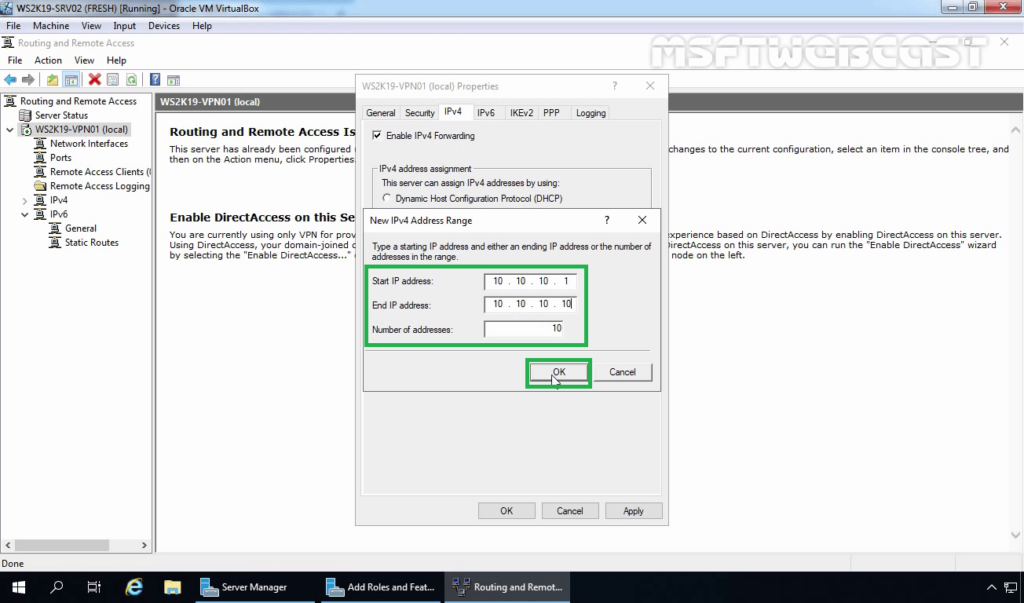
Click IPV4 in the Open Window, then select Static address pool. Now, click Add to craft a new IP Address range from the open pop-up window. In this guide, we use the range 10.0.0.1 to 10.0.0.50, and the server will automatically calculate the number of available addresses.

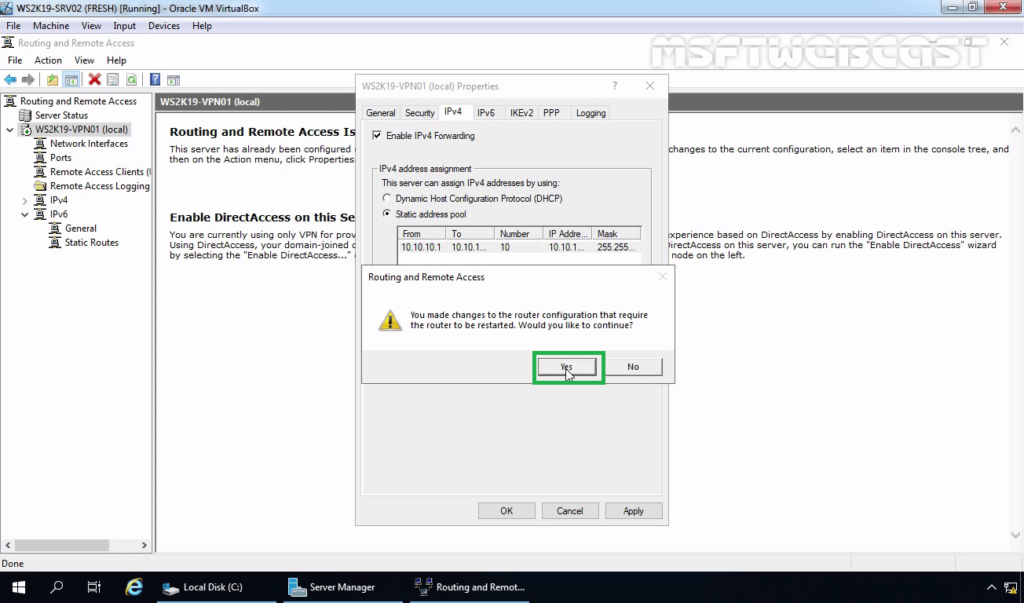
Click OK to save your static IP Address configuration. You will be prompted to restart Routing and Remote Access for changes to apply; simply click OK.
Configure NAT and enable PPTP
We need to configure Network Address Translation (NAT) for connected clients to use the Internet. On the left pane of the same routing and remote access window, expand the IPv4 options under your server. Right-click on NAT and select New Interface.

Under the open dialog window, select Public interface and enable NAT on the interface.
Next, navigate to Services and Ports and click VPN Gateway (PPTP) from the drop-down list.

Click Edit to set a Private address for the VPN service, change the current address 0.0.0.0 to 127.0.0.1, and click OK to save.

Finally, click OK to save all changes, then right-click on your server from the left pane and click Restart under the All Tasks sub-menu.

This will restart routing and remote access services making your server ready for incoming VPN connections.
Configure Windows Firewall to accept Incoming PPTP VPN Connections
Click Tools from the Windows server manager and select Windows Defender Firewall with Advanced Security from the drop-down list.
Under the open Windows Defender Firewall with Advanced Security window, select Inbound Rules on the left pane, then click New Rule on the right pane.

In the open new Inbound rule wizard, click Predefined and select Routing and Remote Access from the list.

Under predefined rules, choose Routing and Remote Access (PPTP-In), click next to allow the connection, then finish for the new Firewall rule to be applied and test your new PPTP VPN server.

Test your PPTP VPN
Using your personal computer (PC) or Smartphone, go to Networks, Add a new VPN and select PPTP as the VPN type. Then, enter the VPN username and password created earlier to connect.
In this guide, we cover and test the PPTP VPN on a Windows 10 PC. To get started, click the start menu and search for Control Panel, then, click Network and Internet.
Under Network and Internet, open the Network and Sharing Center and click Set up a new connection or network.

Under the open window, select Connect to a workplace and click Use my Internet connection (VPN).
Then, enter your server’s public IP Address (Check your Vultr server dashboard), assign the connection a name, and click create.

Now, on the left pane, click Change adapter settings, then right click your created VPN interface and select Properties.

Under the pop-up, click Security, then choose Point to Point Tunneling Protocol (PPTP) under Type of VPN.
Finally, under Allow these protocols, select CHAP and MS-CHAP v2, then click OK to apply changes.

Your new VPN is configured successfully. Click the network connection icon on the taskbar, select your VPN on the list and click Connect to enter the VPN username and password created earlier to establish a connection to your new PPTP VPN server.

Setup L2TP with IPSEC
Open server manager, click Tools, and open Remote Access Management, then right-click your server on the left pane to select Properties from the drop-down list.
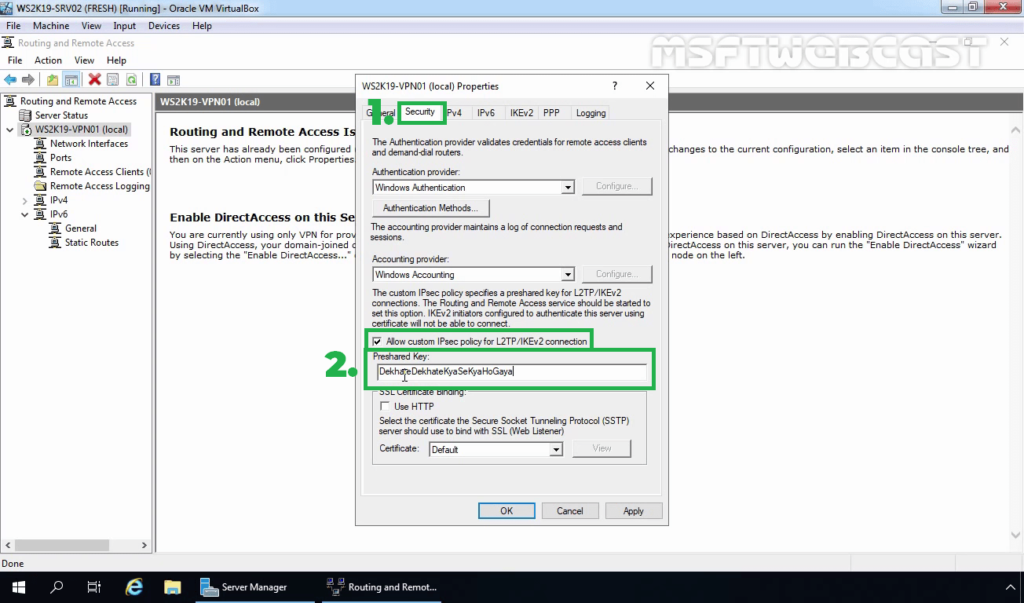
Under server properties, navigate to the Security tab, and click Allow custom IPSec policy for L2TP/IKEv2 connection to enter your new pre-shared key.
In this guide, we use 12345678, choose something stronger, then navigate to IPV4 to set a static address pool and click OK to apply changes.

Keep note of the pre-shared key (PSK) since it will be required for every user establishing a connection to the VPN server.
From the left pane, expand the IPV4 sub-menu and right-click on NAT, then select New Interface. If you set PPTP earlier, click NAT and edit the existing interface you already created.
Navigate to the Services and Ports tab and select VPN Gateway [L2TP/IPSec], then click edit to change the private address from 0.0.0.0 to 127.0.0.1. Click OK to save changes and restart remote access from the left pane under All Tasks.
This will restart Routing and Remote Access, then save the applied L2TP configurations.
Allow L2TP Connections through Windows Firewall
Open Windows Defender with Firewall, select inbound rules and add a new rule. Select Predefined and from the list, choose Routing and remote access.
Under Predefined rules, select Routing and Remote Access [L2TP-In] and click next.

Finally, allow the connection and click Finish to apply the new Firewall rule.
Connect and Test Your L2TP VPN server
In this guide, we test the new L2TP with IPSec VPN on a mac. To get started, open System Preferencesand click Network.
Under the Network Preferences window, click the + sign and select VPN under the Interface dialog box. Then, choose L2TP with IPSec as the VPN Type and assign your connection a name.

Click create, then enter your public server IP Address (server address) and username (Account name). Next, click Authentication Settings to enter your account password and Pre-shared key (Shared secret) created earlier.

Next, click Advanced and select Send all Traffic over VPN Connection, then click Apply, and finally click Connect to establish a connection with your new L2TP VPN server.

Conclusion
You have set up a VPN on your Windows server 2019 instance; you can choose to create both PPTP and L2TP VPNs with different users connecting through your server without any limitations.
For every connected device, they will be able to access the Internet through your server and interact with other connected computers.
![]()
How to Setup L2TP VPN on Windows Server 2019
-
View Larger Image


Introduction
In this blog article we are going to discuss about How to setup L2TP VPN over IPSec on Windows Server 2019 using Routing and Remote Access Service server role. A VPN is short form of virtual private network, which gives us a privacy, anonymity and security over public internet. A VPN service masks our ISP IP so your online actions are virtually untraceable. A VPN can also be used to connect computers to isolated remote computer networks that is usually inaccessible, by using the Internet or another intermediate network.
Microsoft servers provided with RRAS server roles for implementing such remote access services. The full form of RRAS is Routing and Remote Access Service. It is a suite of network services in the Windows Server family that enables a server to perform the services of a conventional router.It is also a Windows proprietary server role, that supports remote user or site to site connectivity by using virtual private network or dial-up connections. So using RRAS we can convert a regular Windows Server as VPN server. Microsoft RRAS server and VPN client supports PPTP, L2TP, IPSec, SSTP and IKEv2 based VPN connections. Using RRAS as VPN remote users can connect to their company organisation networks internally and securely over public internet.
L2TP ( Layer 2 Tunneling Protocol )
L2TP or Layer 2 Tunnelling Protocol is a tunnelling protocol which originated by the merger of Microsoft (PPTP) and Cisco L2F. By default L2TP does not provide strong encryption or authentication by itself. So we use another protocol called IPsec in conjunction with L2TP. IPsec stands for Internet Protocol security. The IPsec protocol provides very strong encryption to data exchanged between the VPN server and with the VPN client machine.
When setting up a more secure VPN tunnels we commonly use L2TP along with IPsec. L2TP/IPsec together supports either computer certificates or a Pre-shared key as the authentication method. The Ports need to Open is UDP ports 500, 4500, 50 and 1701.
System Configuration We Used.
Used Windows server 2019 which is covert as a VPN SSTP server.
Used Windows 10 client PC for connecting to Windows VPN server 2019.
Another thing is we are settings up this L2TP VPN on windows server 2019 which only have one Network interface. So this blog article can be implemented on Most of VPS ( Virtual Private Server) provided by Hosting Providers or with the Cloud Windows VMs.
Additionally we are using the Pre-shared key as the authentication method when enabling L2TP/IPsec.
Here I have divided the whole steps in to different parts. Lets get started. Even though we are performing the install on Windows server 2019, you can refer this article for Windows server 2016 and windows server 2012.
Part:1 Install Remote Access Server role on Windows Server 2019
Log into the Windows Server 2019 > Click Windows Start Icon >> Click Server Manager.

Click Add Roles And Features

Click Next

Choose the Installation Type as ” Role based or feature based installation and click Next.

From Server selection, choose “select a server from the server pool” and click Next.

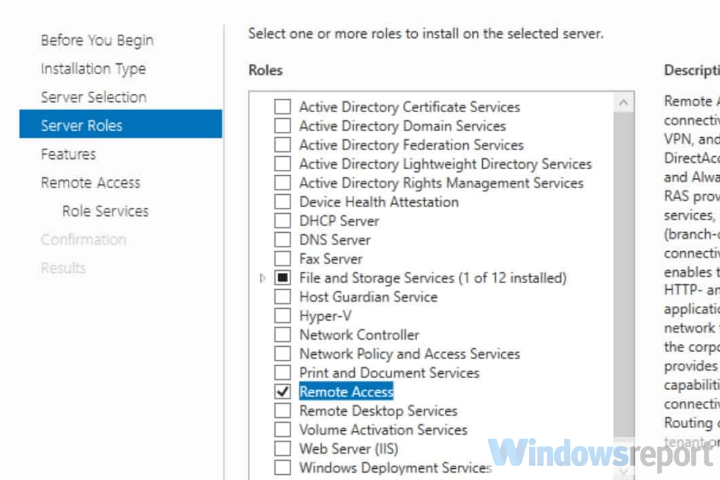
From Server Role choose ” Remote Access” and click Next.

Leave Features section as it is and click Next.

Click Next on Remote Access section.

Under Role Services choose “Direct Access and VPN (RAS) and Routing and click Next. A popup window will appear for confirming the features that need to be installed for Direct Access and VPN. Confirm it by clicking “Add Features”.


Under Web Server Role (IIS) Section click Next.

Under IIS Role services section leave the default one and Click Next.

Under Final Confirmation section click Install.

The Remote Access server role install will start automatically and normally it will get completed with in few Minutes. Once the installation succeeded click close.

Part:2 Create Additional Loopback Network Adaptor On Windows Server 2019
Its for skipping the error while running Configuring Remote Access Wizard and the error will be like below.
Less than two network interfaces were detected on this machine. For standard VPN server configuration at least two network interfaces need to be installed. Please use custom configuration path instead.
Under Server Manager click Tools >> Computer Management.

From Computer Management window Click Device Manager >> Click VM name from Right side.

Under Actions tab >> Click “Add legacy Hardware”

A add Hardware wizard will open and click Next.

Choose option ” Install the hardware that I manually select from a list ” and click Next.

Choose “Network Adaptors” and click Next.

Choose “Microsoft” as Manufacturer and ” Microsoft KM-TEST Loopback Adaptor ” as Model. Click Next.

Confirm the Install by clicking Next.

Once the install got completed close the install wizard by clicking Finish.

Now, we can confirm the new network adaptor install from the Computer Management panel itself. For that click Device Manager >> Click VM name >> Expand Network Adaptors, there we can see the newly added LoopBack Network adaptor available.

Part:3 Configuring Remote Access Service VPN on Windows Server 2019
From Server Manager Choose Remote Access >> Right click the Server name >> Choose Remote Access Management.

Under “Direct Access And VPN” Click “Run the Remote Access Setup Wizard”

The Configure remote Access wizard will open Click “Deploy VPN only”

In the Routing and Remote Access Console , right click server name and choose ” configure and Enable routing and remote access ” option.

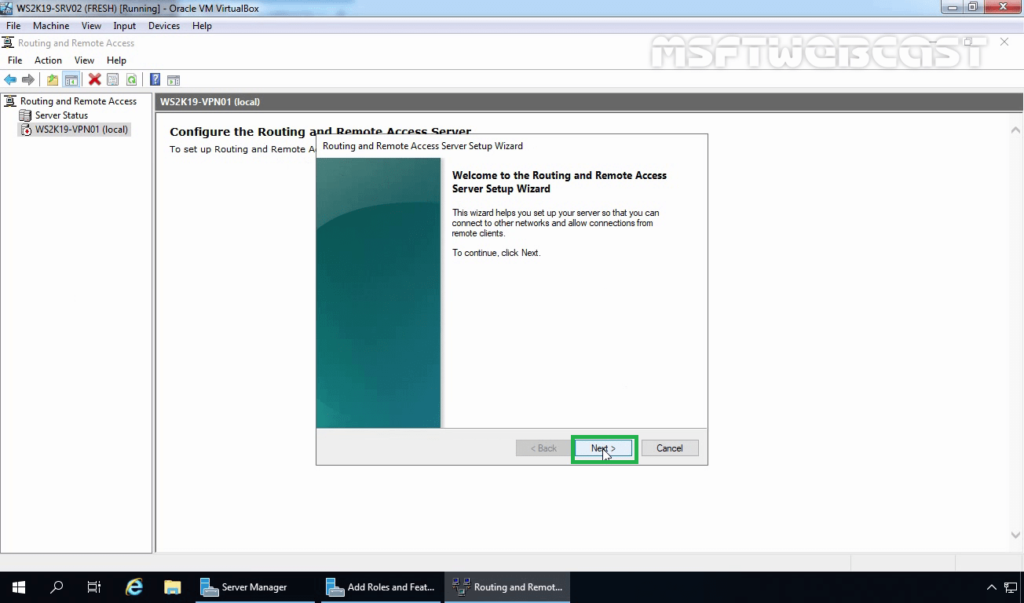
Click Next on Routing and Remote access server setup wizard.

Choose Virtual private network( VPN) access and NAT option. Click Next.

In the select Network Interface section, choose the network adaptor where our public IP configured and click Next.

In the IP address Assigned section, choose ” from a specified range of address” and Click Next. Here we are trying to define the private IP address that server give to remote VPN click PC after successful connection.

Click New button.

Give the starting and ending private IP range in the corresponding fields. Click Ok. We are giving IPs starting from 192.168.3.150 to 192.168.3.160.

Now we will see the assigned range and click Next.

In the Do you want to setup this server to work with a radius server question section, select “No, use Routing and Remote Access to authenticate connection requests” and Click next.

Click Finish on Completing the Routing and Remote Access server setup wizard.

Click Ok.

This completes the configuration of Routing and Remote Access Server. Now we can see a green up arrow next to server hostname and which shows the Routing and Remote access server service started successfully.

Part:4 Enabling L2TP/IPsec VPN on Windows Server 2019
Here as we said earlier we enable L2TP/IPsec using Pre-Shared Key through Routing and Remote Access Properties.
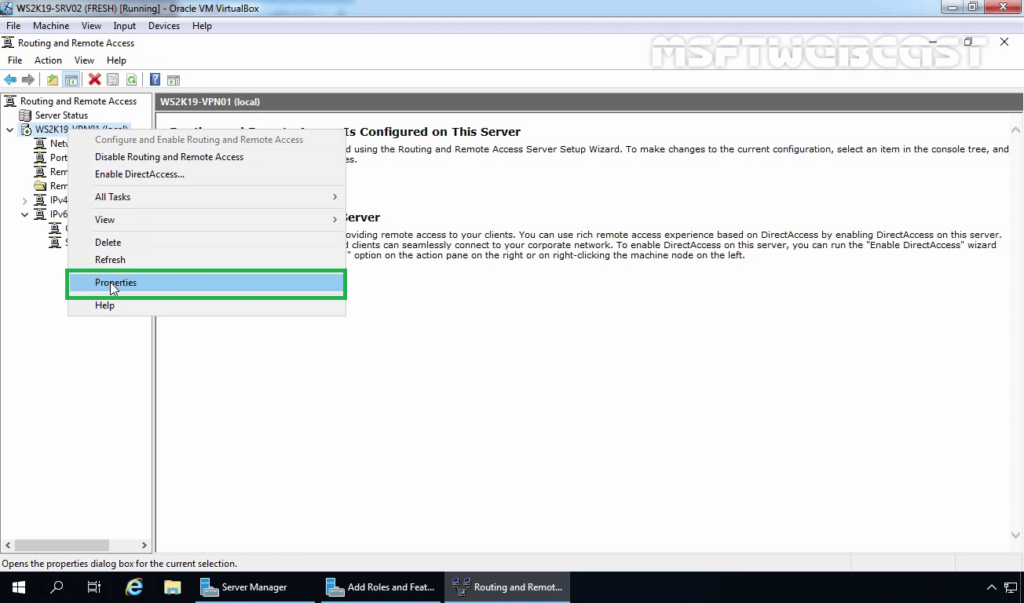
In Routing and Remote Access Manager >> right click Server name and choose Properties.

Under Security Tab , Enable “Allow custom IPsec policy for L2TP/IKEv2 Connection”. In the preshared key box give any key. Make sure a its complex one. Click Apply and OK.
Also note down this key because we need to share this key with the vpn client users. Then only the VPN remote client connections over L2TP/IPsec will be successful.

Confirm the restart of routing and remote access service by clicking Yes.


Part:5 Allow Remote Access to our VPN server through Public Network Adaptor.
For maintain the access to the VPN server over remote desktop we need to allow the remote access port over our public network adaptor itself through routing and remote access properties section. Otherwise we will loss the access to the server through remote desktop because we only have one Network interface available on server for both VPN traffic and for the remote access.
In the Routing and Remote Access Manager , Expand Server name >> Expand IPv4 >> Choose NAT >> Right Click Our Public Network Adaptor and choose Properties.

Select ” Remote Access” , A pop up window will appear, in the Private Address filed give our server public IP address and click OK. After that click Apply and OK.
If you have different RDP port, you need to create a new allow rule by clicking add option.


Part:6 Allow VPN remote access for the Users.
In this part we are giving a existing user on VPN server for remote access. Then only if we give the logins of these server users to remote VPN clients, they can successfully connect to server through VPN.
Go to the Computer Management Section >> Expand Local users and Groups >> Choose Users >> Right click a user where we wish to give VPN access and choose properties.

Under “Dial- In” tab >> Choose “Allow Access”. Click Apply and Ok.

Part:7 Allow VPN ports on Windows Firewall.
In this part we are allowing the ports used by the VPN server for communication on windows firewall. Otherwise the remote VPN clients won’t be able to communicate with the VPN server.
Now issue below power shell commands to allow ports in windows firewall.
Now if we look at the windows firewall inbound section , we can see the ports are allowed.


This Completes the L2TP/IPsec VPN server setup on Windows server 2019. Now Lets Proceed with the Remote VPN Client Windows 10 PC setup and Try to Establish a VPN server connection.
Step:8 Test L2TP/IPsec VPN configuration.
For that , lets add VPN connection. For that open Network and Internet settings.

Under VPN >> Click Add a VPN connection.

Choose VPN Provider as Windows built in
In Connection Name field , give any Name
In Server name or Address field give VPN Server IP
Select VPN type as L2TP/IPsec with Preshared Key
In the Preshared Key box give our same Preshared key used in the server at the Part:4
Type of sign in info as Username and Password
Gave our VPN username and password. Click Save.

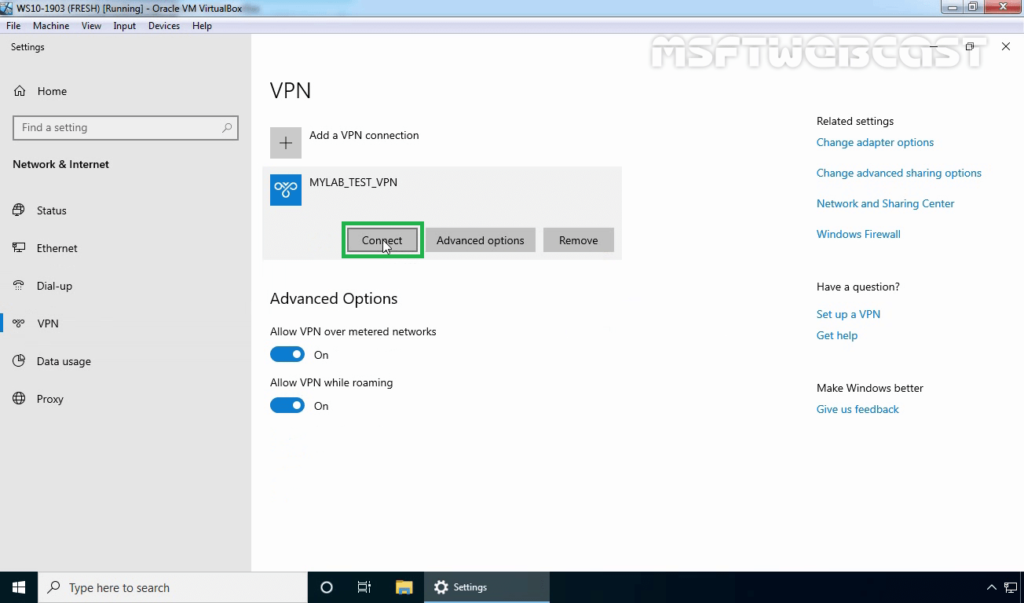
Click connect for our saved VPN client settings.

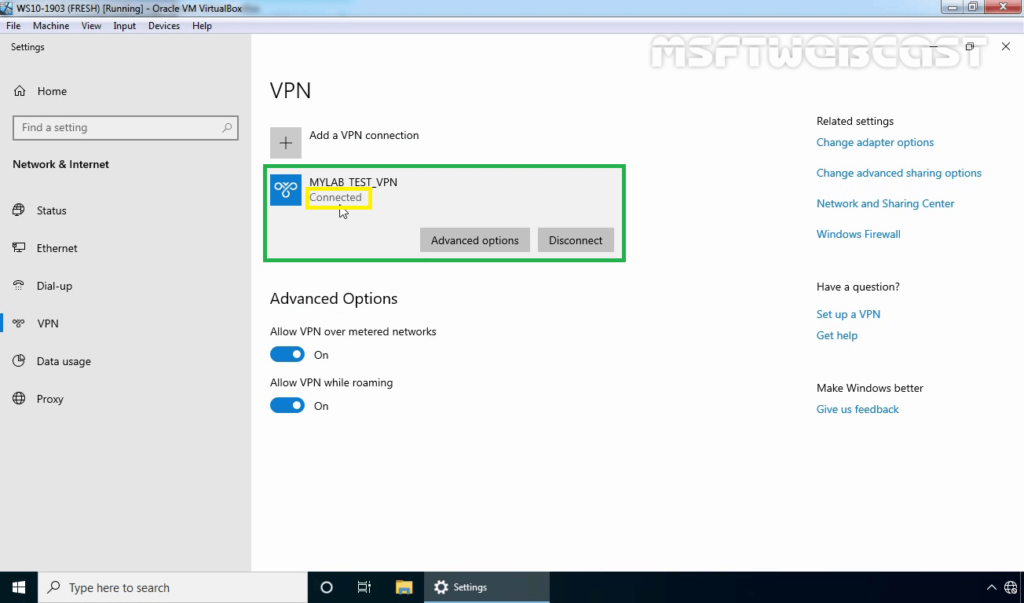
Now we will see the VPN status as connected.

Two other ways to confirm the VPN connection is successful is go back to VPN server 2019 and Open Routing and Remote Access Manager >> From there Expand our server name >> Choose Remote Access client, and in the right side we can see a active connection.

Another option to confirm the successful VPN connection is , open a browser in Windows 10 PC and search the what is my IP and it will show the public ISP IP as VPN server IP. Which means all the internet traffic from client side is routing through our VPN server.

This Concludes the settings up L2TP/IPsec VPN on Windows server 2019. I hope this blog article is informative. Leave your thoughts in the comment box.
Share This Story, Choose Your Platform!
Related Posts
Page load link
Go to Top
Skip to content
На чтение 3 мин. Просмотров 4k. Опубликовано
Использование VPN на вашем Windows Server имеет много преимуществ для всех сторон, и это позволяет пользователям в небольшой среде доступ к удаленным клиентам или брандмауэрам к Windows Server. Мы постарались объяснить, как установить и настроить виртуальную частную сеть на Windows Server 2019.
Содержание
- Шаги по установке VPN на Windows Server 2019
- Шаг 1 – Начните с установки Удаленного доступа через Диспетчер серверов
- Шаг 2 – Перейти к установке и настройке VPN
- Шаг 3 – Настройка VPN-доступа
Шаги по установке VPN на Windows Server 2019
Шаг 1 – Начните с установки Удаленного доступа через Диспетчер серверов
Чтобы установить VPN-сервер в небольшой среде, нам нужно начать с установки удаленного доступа. Вы можете использовать либо Диспетчер серверов, либо Power Shell для установки и настройки удаленного доступа.
Вот шаги:
- Откройте Диспетчер серверов .
- Выберите Управление> Мастер добавления ролей и компонентов .
-
Установите флажок « Удаленный доступ » и нажмите «Далее».

- В разделе «Службы ролей» установите флажок « DirectAccess и VPN (RAS) » и нажмите Далее .
- Наконец, нажмите Установить . Это может занять некоторое время, и это требует перезагрузки сервера.

- ЧИТАЙТЕ ТАКЖЕ: 5 лучших программ резервного копирования для серверов Windows [СПИСОК 2019]
Шаг 2 – Перейти к установке и настройке VPN
После установки Remote Access для Windows Server 2019 мы можем безопасно установить и настроить VPN-сервер. Это делается с помощью специального мастера.
Выполните следующие действия для установки и настройки VPN-сервера на Windows Server 2019:
-
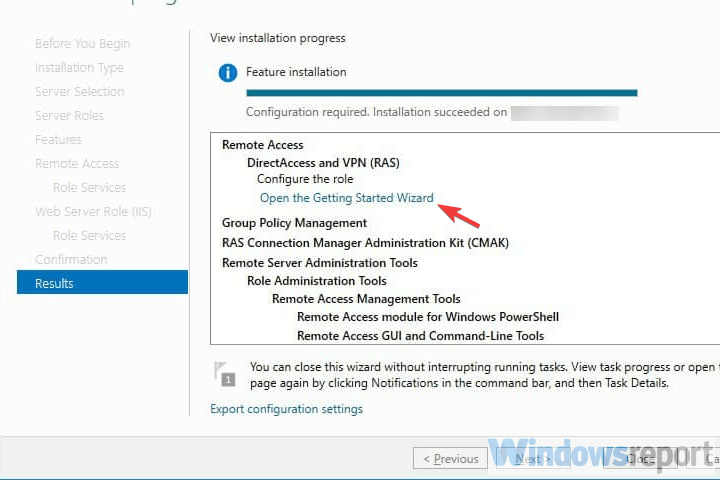
Нажмите « Открыть мастер начала работы».
- Выберите « Развернуть только VPN ».
- В консоли управления маршрутизацией и удаленным доступом щелкните правой кнопкой мыши имя сервера и выберите Настроить и включить маршрутизацию и удаленный доступ в контекстном меню.
- Выберите « Пользовательская конфигурация » и нажмите «Далее».
- Выберите VPN-доступ и, наконец, запустите службу.

Шаг 3 – Настройка VPN-доступа
Наконец, остается только настроить пользователя VPN и доступ к сети. Для этого необходимо открыть порты брандмауэра и перенаправить их на сервер Windows.
- ЧИТАЙТЕ ТАКЖЕ: как запустить FTP-сервер в Windows 10, 8.1
Это порты, которые вам нужно открыть на основе протоколов:
- Для PPTP : 1723 TCP и протокол 47 GRE (также известный как PPTP Pass-through).
- Для L2TP через IPSEC : 1701 TCP и 500 UDP
- Для SSTP : 443 TCP
Если у вас нет DHCP-сервера, вы всегда можете установить статический пул IPv4-адресов. Это можно сделать, выполнив следующие действия:
- Во-первых, убедитесь, что у всех пользователей включен удаленный доступ.
- Откройте Свойства вашего VPN-сервера.
-
Нажмите на вкладку IPv4 и включите « Статический пул адресов».
- Нажмите «Добавить» и добавьте тот же статический IP-адрес из той же подсети Сервера, чтобы пользователи могли получить к нему доступ.

Это оно. Если у вас есть какие-либо вопросы или предложения, не стесняйтесь спрашивать нас в разделе комментариев ниже.
In this article, we will learn the steps on How to Setup L2TP/IPsec VPN with a Pre-Shared key on Windows Server 2019.
What is a VPN?
A Virtual Private Network (VPN) is a secure network tunnel that allows you to connect to your private network from internet locations. So, you can access and use your internal resources based on assign permission.
Layer 2 Tunneling Protocol (L2TP):
L2TP is the industry standard when setting up secure VPN tunnels. L2TP supports either computer certificates or a Pre-shared key as the authentication method for IPsec. L2TP/IPsec VPN connections provide data confidentiality, data integrity, and data authentication.
Understanding the SSTP Test Lab:
- WS2K19-DC01: Domain Controller and DNS.
- WS2K19-VPN01: Member Server.
- WS10-CLI01: Windows 10 Client Machine.
Step:1 Install Remote Access Server role on Windows Server 2019:
1. The first step is the installation of the Remote Access Server role. Open Server Manager Console and start role and feature installation wizard. Select the Remote Access Server role.

2. On select role services, select DirectAccess and VPN (RAS) role service. Click Next and finish the installation.
3. When the installation finished, click on close.
Step:2 Configure L2TP/IPsec VPN on Windows Server 2019:
4. On Member Server, Open Server Manager. Click on Tools and select Routing and Remote Access Console.
5. Right-click on the Server name and select Configure and Enable Routing and Remote Access.

6. On Welcome screen, click Next.
7. On the Configuration page, select the Custom configuration radio button. Click Next.
8. On select the service page, select VPN Access. Click Next.
9. After clicking on the Finish, it will ask you to start the service. Click on Start service.
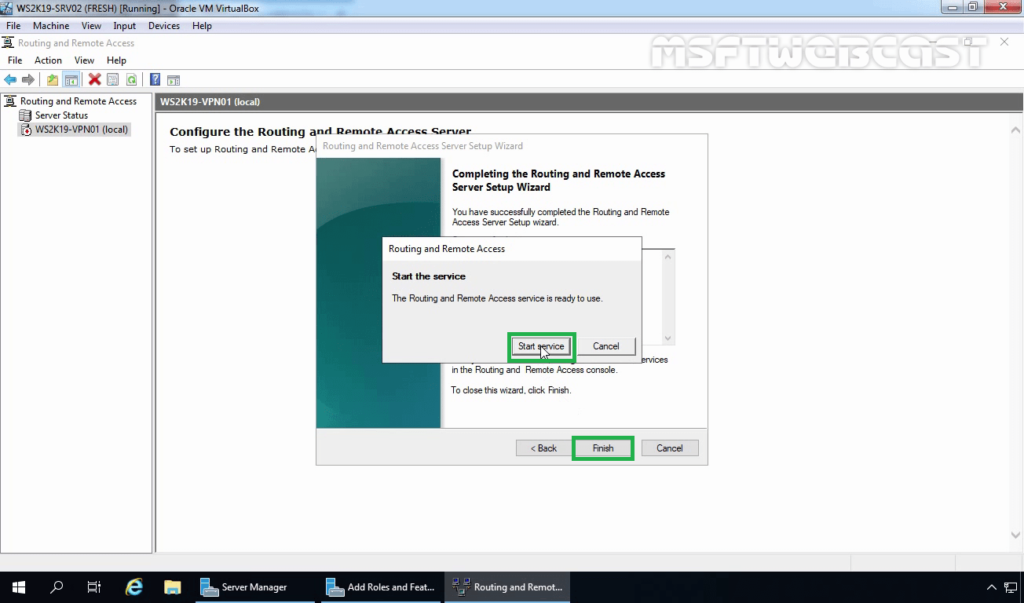
10. Now you will see a green up arrow beside your server name.
Step:3 Configure Pre-Shared Key for IPsec Authentication.
To configure the Pre-shared Key for L2TP/IPsec VPN, we need to set up specific settings in the VPN server’s properties section.
11. Right-click on the server name and click on Properties.
12. On the Security tab, select the checkbox Allow Custom IPsec Policy for L2TP/IKEv2 Connection. Specify a strong Pre-Shared Key for L2TP/IPsec VPN connection.
13. Click on IPv4 Tab. Select the Static Address Pool radio button. Click on Add button.
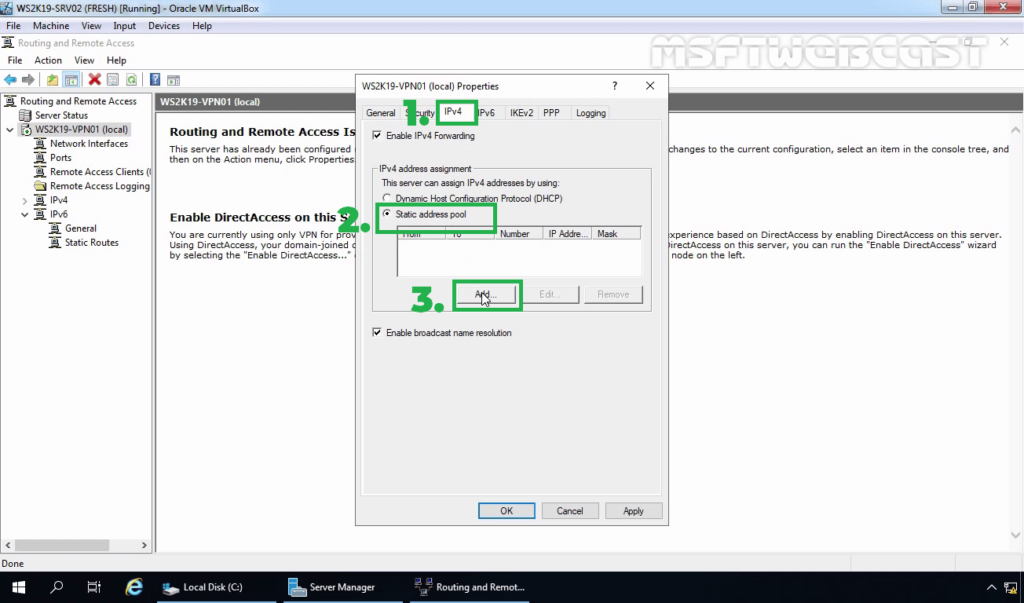
14. Specify the IP address range. Click on OK.
15. Click on Apply to save the changes to the VPN server. It will ask to restart the Routing and Remote Access service. Click on yes to do so.
Step:4 Create AD User and allow dial-in access:
16. On Domain Controller, Open Active Directory Users and Computers snap-ins. Create AD users name Test User1 and Test User2.
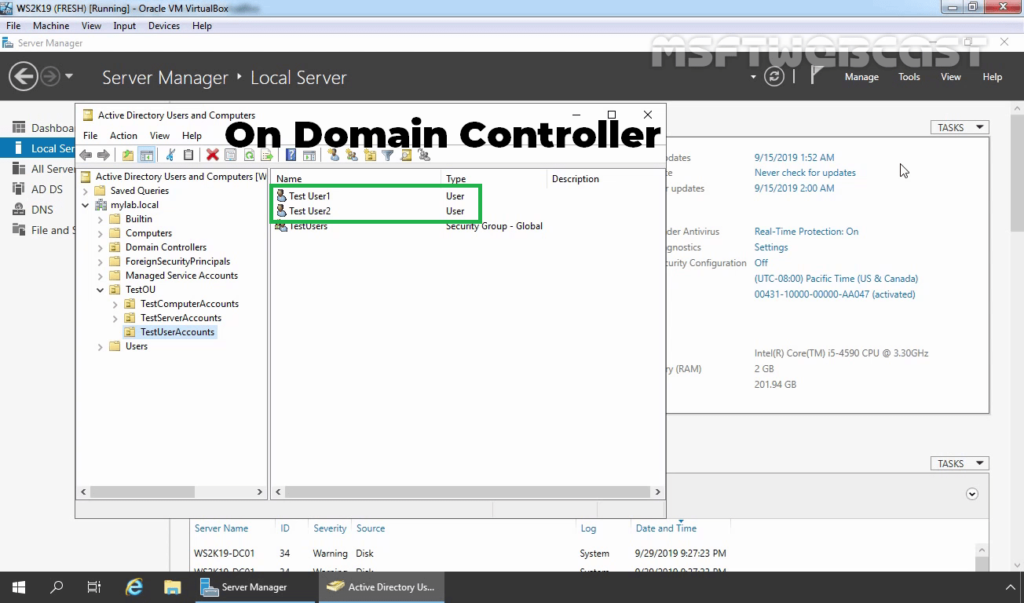
17. Enable dial-in access for selected VPN users by opening the user properties and selecting Allow access on the tab Dial-in.
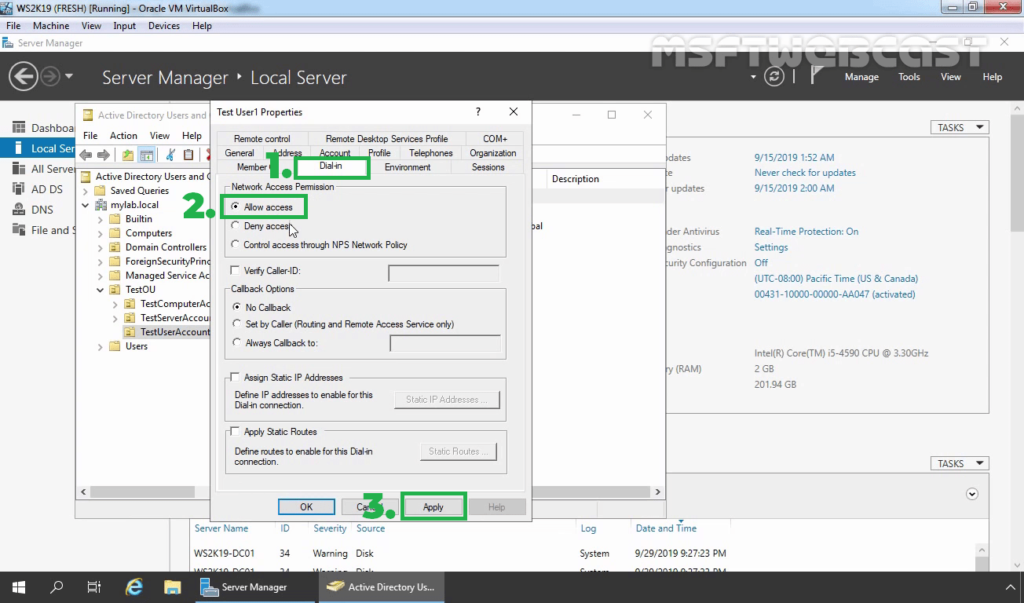
Note: If you want, you can configure Network Policy Server to allow VPN users to connect to the VPN server running on Windows Server 2019.
Step:5 Setup a VPN Connection for L2TP/IPsec VPN:
On Windows 10 client machine, we need to create a new VPN connection.
18. Right-click on the Start button and select Network Connections.
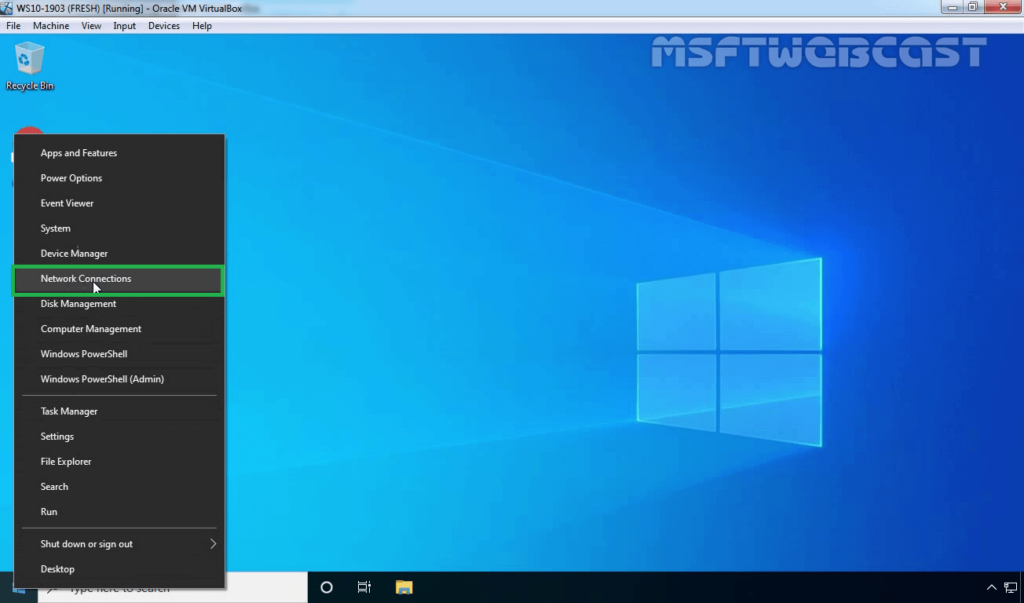
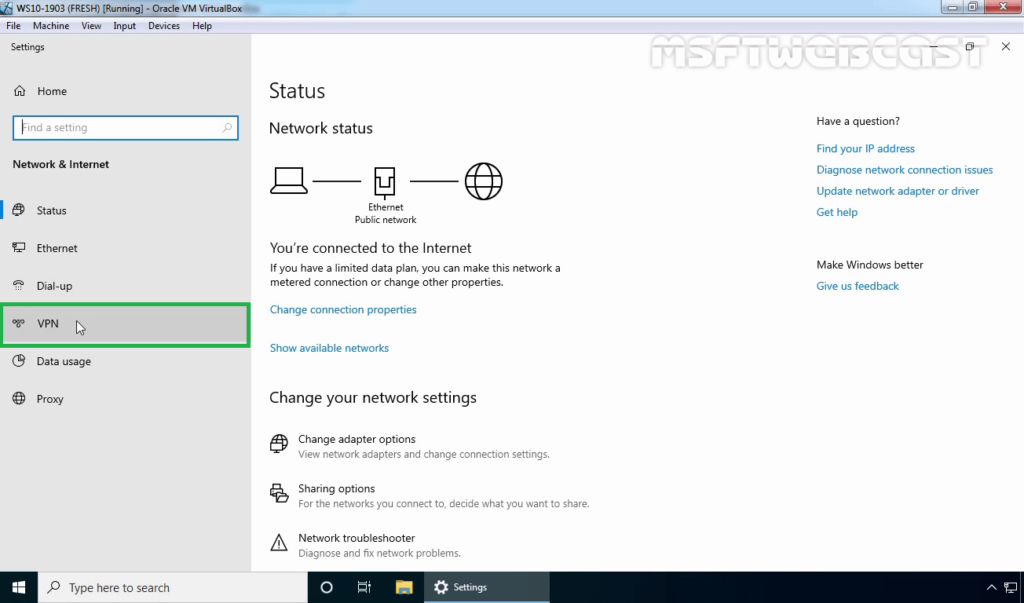
19. On left-pane, click on VPN.
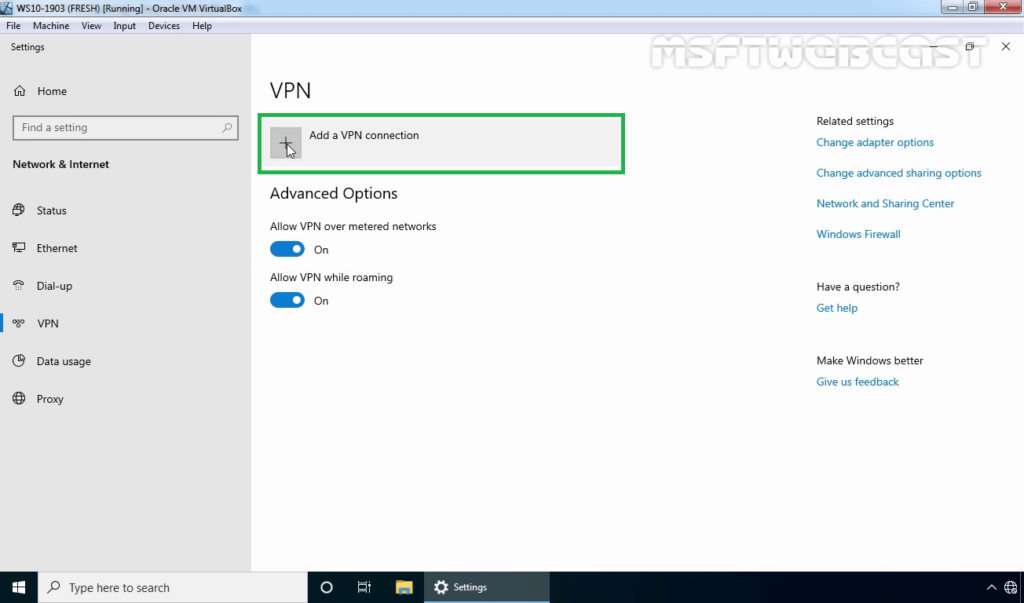
20. Click on add a new VPN connection.
21. Specify the required information for the VPN connection.
- VPN Provider: Windows (Built-in)
- Connection Name: Name of your choice
- Server Name or IP Address: Public IP Address of VPN server
- VPN Type: L2TP/IPsec with Pre-shared key
- Pre-Shared Key: Specify the key which we had assign on VPN Server.
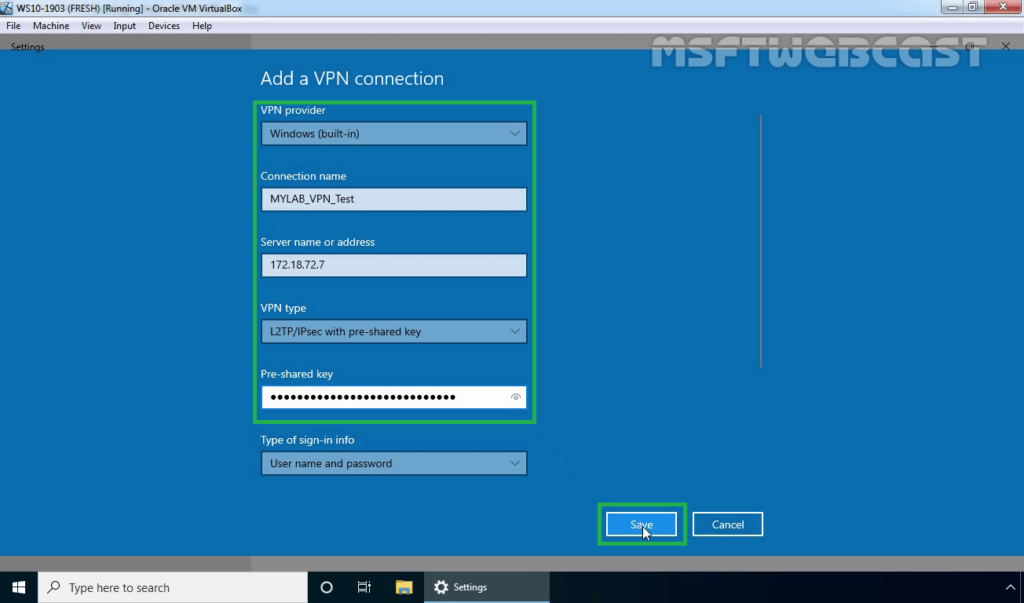
22. Click on Save.
Step:6 Test L2TP/IPsec VPN Connection:
23. Click on VPN connection and select Connect.
24. Specify a username and password to connect the VPN server. Click OK to connect.
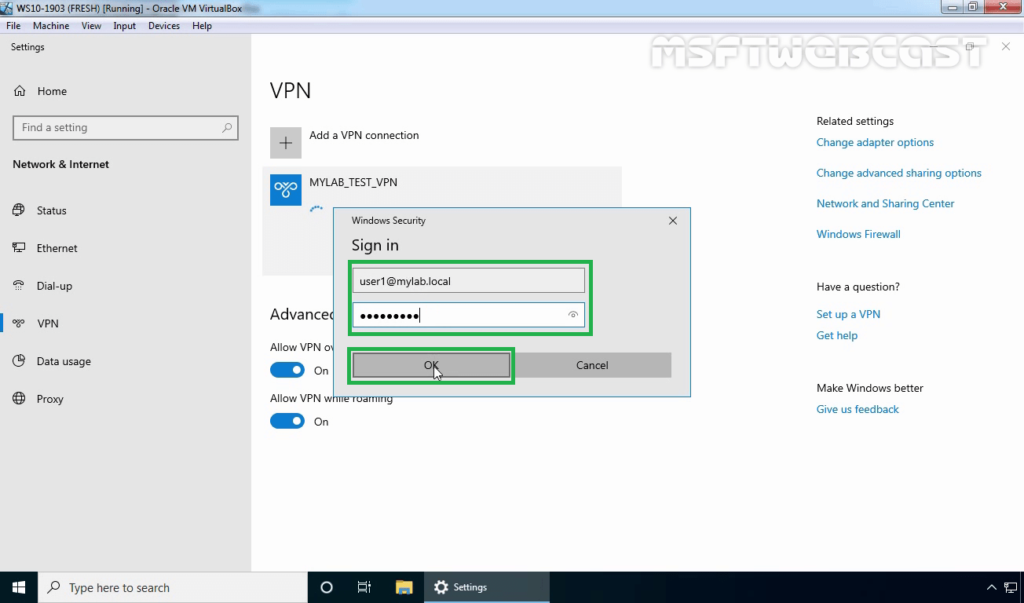
25. Verify the VPN connection is successfully connected with the VPN server using the L2TP/IPsec protocol.
Step:7 Monitor L2TP/IPsec VPN Connection:
On Windows 10 Client Machine:
26. Press Windows Key and R key together. At Run menu type ncpa.cpl and press enter to open Network Connection console.
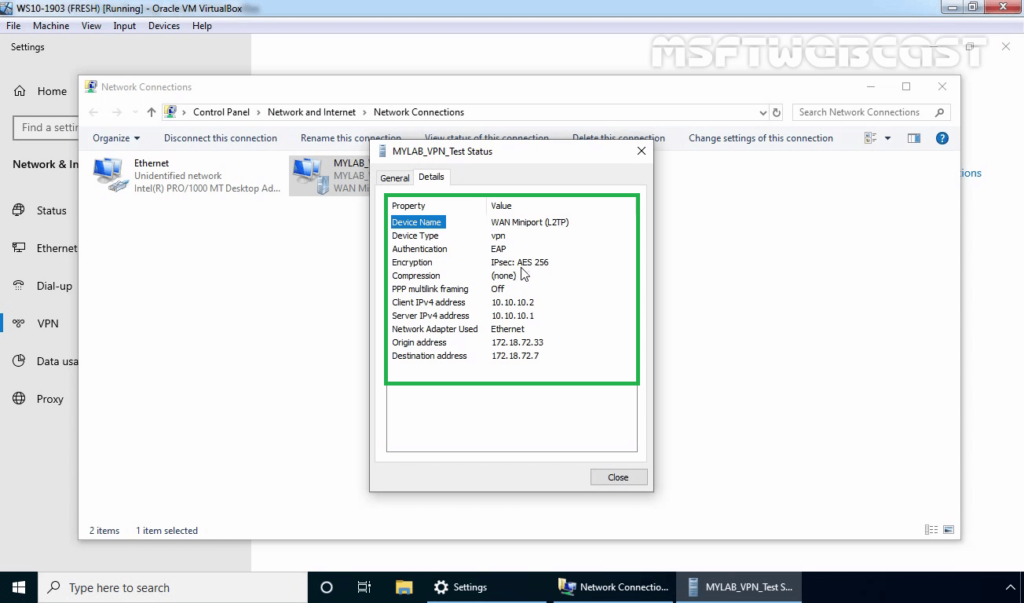
27. Right-click on VPN connection and click on the Status button.
28. Click on details to see information about VPN connection like Authentication Method, Encryption Mod, etc.
On VPN Server:
29. Press Windows Key and R key together. At Run menu type wf.msc and press enter to open Windows Defender Firewall and Advanced Security console.
30. Expand Monitoring, Expand Security Associations. Expand and Click on Main Mode.
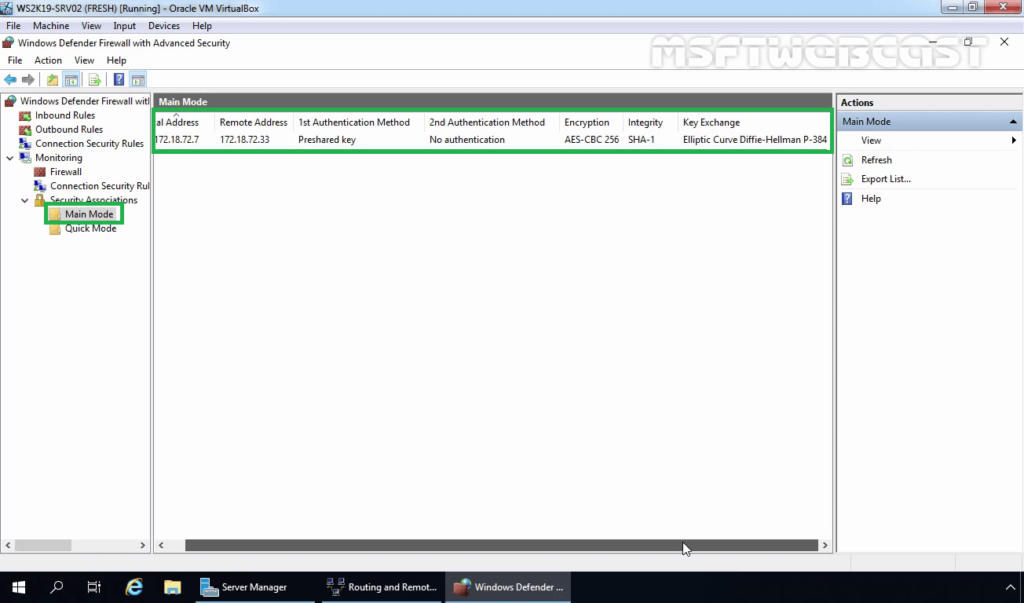
You can verify the authentication method and Encryption Standard for IPsec main mode connection.
- Authentication Method: Pre-Shared Key.
- Encryption Standard: AES-CBC 256 Bit
- Integrity Algorithm: SHA-1
- Key-Exchange Mode: Elliptic Curve Diffie-Hellman P-384.
31. Also, check Quick Mode Tunnel Information.
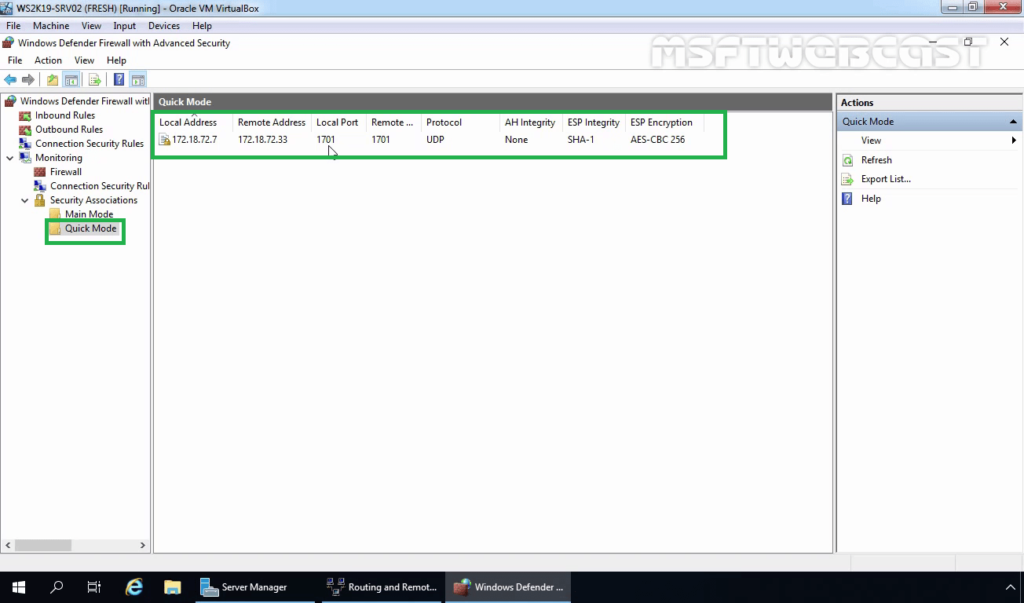
- Local Address: Local IP Address of VPN Server.
- Remote Address: VPN Client IP Address.
- Local Port: UDP 1701
- Remote Port: UDP 1701
- ESP Integrity Mode: SHA-1
- ESP Encryption Mode: AES -CBC 256 Bit
In this post, we have learned the steps to setup L2TP/IPsec VPN with a Pre-shared key on Windows Server 2019 and Windows 10.
Thank you for reading. Have a nice day.
Post Views: 4,900
Have a private connection on Windows Server 2019 using top VPN software
by Aleksandar Ognjanovic
Aleksandar’s main passion is technology. With a solid writing background, he is determined to bring the bleeding edge to the common user. With a keen eye, he always… read more
Updated on
- Windows Server 2019 supports VPN connections. But you have to go through a bit of trouble to set it up and allow VPN access.
- Discover three easy steps for setting up a VPN on Windows Server 2019 without too complicated processes.
- You don’t have to install any software tools since you can use the server’s built-in settings.
- In any case, you should rely on privacy software for more advanced technologies and security.

Using a VPN on a Windows Server has a lot of advantages.
It allows users in a small environment to access remote clients or firewalls to Windows Server.
If you’re here to discover the exact steps for installing a VPN on Windows Server 2019, here’s everything you need to know.
Does Windows Server have a built-in VPN?
Affirmative, you can set up a VPN on Windows Server using the right protocols. Plus, there are certain versions that allow this operation
More exactly, it’s possible to use a VPN connection on a Windows Server 2019 and get increased privacy for your server.
How we test, review and rate?
We have worked for the past 6 months on building a new review system on how we produce content. Using it, we have subsequently redone most of our articles to provide actual hands-on expertise on the guides we made.
For more details you can read how we test, review, and rate at WindowsReport.
In order to set up a VPN connection on this Windows Server edition, you have to use L2TP or PPTP VPN protocols.
How can I set up a VPN on Windows Server 2019?
1. Install Remote Access using Server Manager
- Open Server Manager
- Go to Manage > Add Roles and Features Wizard
- Check the Remote Access box and click Next
- At Role Services, check the DirectAccess and VPN (RAS) box and click Next
- Click Install
- Once setup is over, you might have to restart the server
An alternative solution is to install and configure Remote Access using PowerShell.
2. Set up the VPN
- Click on the Open the Getting Started Wizard
- Choose Deploy VPN only
- In the Routing and Remote Access Management Console, right-click on the Server name
- Select Configure and Enable Routing and Remote Access from the context menu
- Choose Custom configuration and click Next
- Select VPN access
- Start the VPN service
You shouldn’t stumble upon any issues at this stage if you use the dedicated wizard.
Setting up a VPN on a Windows Server implies technical knowledge, so you have to learn how to configure it on your PC.
In a few words, you need to initially create a new VPN user and then set up routing and remote access features.
Here you have the required setup names and technologies you can use for securing your Windows Server:
- Windows Server 2019 VPN setup L2TP
- Windows Server 2019 VPN Ikev2 setup
- Windows Server 2019 SSTP VPN setup
- Windows Server 2019 PPTP VPN setup
- setup IPSec VPN Windows Server 2019
In conclusion, you can install a VPN on your Windows Server 2019 in three easy steps: setting up Remote Manager using Server Manager or PowerShell, installing the VPN, and managing VPN access permissions.
In case you need a fresh OS install, simply download Windows Server 2019 right away! Plus, join our VPN Troubleshooting Hub for additional guides.
If you experienced any technical difficulties, please let us know by dropping a comment in the section below.
![]()