Visual Basic 6 (VB6) — это старая, но все еще популярная среда разработки, которая используется для создания приложений под операционные системы Windows. Но установка VB6 на Windows 10 может столкнуться с определенными трудностями, так как эта версия ОС несовместима с некоторыми компонентами VB6.
В этой статье мы расскажем вам, как установить VB6 на Windows 10 без проблем.
Первым шагом при установке VB6 на Windows 10 является запуск установочного файла VB6. Однако, просто запустить установку не получится, так как Windows 10 не будет поддерживать ее стандартными средствами. Поэтому необходимо применить некоторые манипуляции.
Примечание: перед установкой VB6 на Windows 10 рекомендуется создать точку восстановления системы в случае возникновения проблем.
Данный процесс требует изменения совместимости установочного файла VB6. Это можно сделать, щелкнув правой кнопкой мыши на файле, выбрав «Свойства», затем «Совместимость» и установив флажок «Запуск этой программы в режиме совместимости». Выберите Windows XP (Service Pack 3) в качестве совместимой операционной системы и нажмите «ОК».
Теперь вы можете запустить файл установки VB6 и следовать инструкции по установке, выбирая настройки по умолчанию или настраивая их по своему усмотрению. После завершения установки вам может потребоваться выполнить несколько дополнительных шагов, чтобы VB6 работал корректно в Windows 10.
Содержание
- Установка VB6 на Windows 10: пошаговая инструкция
- Проверка системных требований
- Установка и настройка VB6 на Windows 10
Установка VB6 на Windows 10: пошаговая инструкция
Шаг 1: Загрузка установочного файла VB6
- Перейдите на официальный сайт Microsoft и найдите страницу загрузки VB6.
- Нажмите на ссылку для скачивания установочного файла.
- Сохраните файл на вашем компьютере.
Шаг 2: Запуск установки
- Откройте папку, в которой вы сохранили установочный файл VB6.
- Щелкните правой кнопкой мыши по установочному файлу и выберите «Запуск от имени администратора».
- Подтвердите запрос на разрешение от пользователя управления учетными данными.
Шаг 3: Установка VB6
- В появившемся окне нажмите на кнопку «Next» для перехода к следующему шагу.
- Ознакомьтесь с лицензионным соглашением и нажмите на кнопку «Agree» для принятия условий соглашения.
- Выберите путь установки VB6 и нажмите на кнопку «Next».
- Настройте опции установки, если необходимо, и нажмите на кнопку «Next».
- Выберите компоненты, которые требуется установить, и нажмите на кнопку «Next».
- Нажмите на кнопку «Install» для начала установки.
- Дождитесь завершения процесса установки.
Шаг 4: Завершение установки
- После завершения установки нажмите на кнопку «Finish».
- Перезагрузите компьютер для завершения установки.
Поздравляем! Вы успешно установили VB6 на Windows 10. Теперь вы можете начать использовать Visual Basic 6 для разработки приложений.
Проверка системных требований
Перед установкой Visual Basic 6 на Windows 10 необходимо убедиться, что ваш компьютер соответствует минимальным системным требованиям. Вот список требований:
| Требование | Минимальные характеристики |
|---|---|
| Операционная система | Windows 10 |
| Процессор | 1 ГГц или быстрее, с поддержкой SSE2 |
| Оперативная память | 1 ГБ (32-битная версия) или 2 ГБ (64-битная версия) |
| Место на жестком диске | 5 ГБ свободного места |
| Видеокарта | Дисплей с разрешением 800×600 или выше |
Убедитесь, что ваш компьютер соответствует этим требованиям перед установкой Visual Basic 6 на Windows 10. В противном случае, у вас может возникнуть проблемы или неудачная установка программы.
Установка и настройка VB6 на Windows 10
Вот пошаговая инструкция, которая поможет вам установить и настроить VB6 на вашем компьютере с Windows 10.
Шаг 1: Загрузка и установка VB6
1. Перейдите на официальный сайт Microsoft и найдите раздел загрузок.
2. Введите «Visual Basic 6» в поисковую строку и найдите установочные файлы VB6.
3. Скачайте необходимые файлы и запустите установщик VB6.
4. Следуйте инструкциям установщика и выберите каталог, в который будет установлена VB6.
5. Дождитесь завершения процесса установки.
Шаг 2: Установка служебных пакетов
1. После установки VB6, у вас могут возникнуть проблемы с запуском созданных программ. Это связано с отсутствием некоторых служебных компонентов.
2. Идите на официальный сайт Microsoft и загрузите следующие пакеты: Visual Studio 6.0 Service Pack 6 (SP6) и Visual Basic 6.0 Common Controls.
3. Сохраните и запустите загруженные файлы, и следуйте инструкциям.
Шаг 3: Настройка среды VB6
1. После установки служебных пакетов, откройте VB6 на вашем компьютере.
2. В верхнем меню выберите «Инструменты» > «Параметры».
3. Во вкладке «Общие» установите путь к каталогу, где установлена VB6. Укажите путь в поле «Путь установки».
4. Во вкладке «Сборка» выберите «Режим компиляции по умолчанию» как «Компилировать в исполняемый файл (.exe)».
5. Нажмите «ОК», чтобы сохранить настройки и закрыть окно параметров.
Теперь вы успешно установили и настроили VB6 на Windows 10! Вы готовы начать создавать свои Windows-приложения с помощью этой старой, но всё ещё эффективной IDE.
XINSTALL BY CLICKING THE DOWNLOAD FILE
This software will repair common computer errors, protect you from file loss, malware, hardware failure and optimize your PC for maximum performance. Fix PC issues and remove viruses now in 3 easy steps:
- Download Restoro PC Repair Tool that comes with Patented Technologies (patent available here).
- Click Start Scan to find Windows issues that could be causing PC problems.
- Click Repair All to fix issues affecting your computer’s security and performance
- Restoro has been downloaded by 0 readers this month.
Visual Basic 6 (VB6) was one of the easiest programming languages to learn back in the day. It was released in 1998 and is now replaced by Visual Basic .NET (VB.NET). Even though it is outdated by several years, the programs created and compiled with VB6 can still work with the latest Windows operating systems which is why you can still find people attempting to install VB6 on Windows 10.
If you’re trying to install VB6 on newer operating systems starting from Windows 8 onward, especially with 64-bit architecture, you are sure to encounter installation problems. These range from not being able to continue the install without first installing discontinued versions of Java to the setup process hanging and crashing.
In this article, we’ll show you how to successfully install Visual Basic 6 (VB6) in Windows 10 64-bit.
Bypass Update Microsoft Virtual Machine for Java Requirement
A computer should always maintain the latest version of Java and it’s pointless having the discontinued Microsoft Virtual Machine for Java on the computer just to install Visual Basic 6. The problem is, the VB6 setup does not allow you to continue with the installation if you untick the “Update Microsoft Virtual Machine for Java” checkbox as it grays out the Next button.

The solution is to bypass the VB6 setup by either tricking it into thinking Microsoft Java is already installed or by telling it not to install Java in the first place. Then you can reach the next phase of the installation.
There are two ways in which you can do this which we’ll list below, you only need to use one of them.
Trick VB6 setup into thinking Microsoft Virtual Machine for Java is Installed
The VB6 installer checks if the file msjava.dll exists in the SysWOW64 folder for 64-bit systems or System32 for 32-bit systems. Placing the file into the right folder will let the VB6 install continue.
a) For the quickest and easiest way of doing this, you can download the msjava.dll file from the link below and copy it to the required directory.
Download MSJava.dll
If you’re unsure about the architecture of your Windows operating system, simply try to copy msjava.dll to the C:\Windows\SysWOW64 folder. If it doesn’t exist, you have a 32-bit system and should copy the file to the C:\Windows\System32 folder instead.
b) Alternatively, the same DLL file is also present on the installation disc. You can extract it if you have an archiver such as 7-Zip installed on your system. Go to the IE4 folder located on the install CD, right click on MSJAVX86.exe, go to 7-Zip and select “Open archive“.
In 7-Zip, double click on javabase.cab which will open it. Look for msjava.dll in the list, drag it onto the Desktop and then copy it to SysWOW64 or System32. Copying to the Desktop first will avoid any access denied error when trying to copy the file directly from 7-Zip.

After copying msjava.dll to either the System32 or SysWOW64 folder, you can launch the Visual Basic 6 setup.exe file to start the installation. It now doesn’t prompt you to update Microsoft Virtual Machine for Java.
Tell VB6 setup Not To Install Microsoft Virtual Machine for Java
If you have the VB6 setup files on your hard drive, it’s possible to edit the settings file for the installer and tell it not to ask for Microsoft Virtual Machine for Java. This will ignore the requirement and continue the install process.
a) The simplest option here is to download the SETUPWIZ.INI file from the link below. As the name implies, this is the setup wizard configuration file. Make sure to download the correct INI for your version of Visual Studio.
Download SETUPWIZ.INI (For Visual Studio 6 Enterprise)
Download SETUPWIZ.INI (For Visual Studio 6 Professional)
Place the INI file in the main installation files folder overwriting the current file. Then start the installation and it won’t ask to install Java.
b) If you want to edit the file manually, go to the main folder and open the SETUPWIZ.INI file with Notepad. Look for the line “VmPath=ie4\msjavx86.exe”.
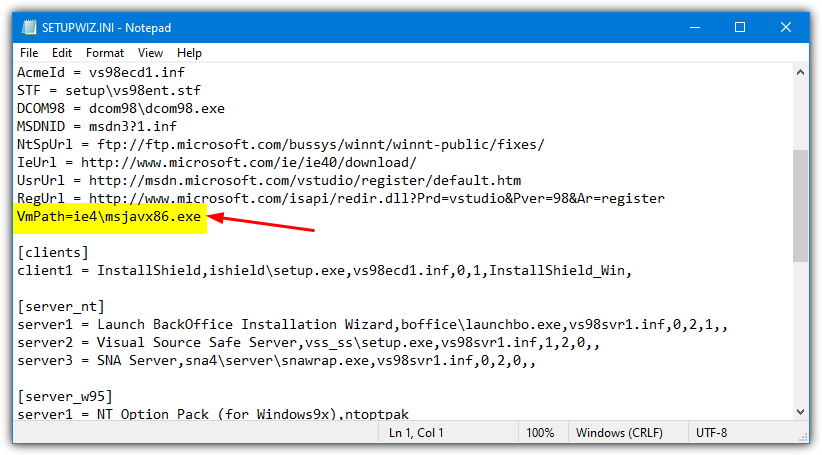
Simply delete the whole line or everything after the “=” sign and save the file. The install can be continued but you must also follow the next steps as well or the installation will not complete successfully.
Change VB6 Setup Options To Prevent The Install From Hanging Or Failing
While fixing the above issue gets round the first hurdle of installing Visual Basic 6 on Windows 10, there are some other things that will cause the install to fail.
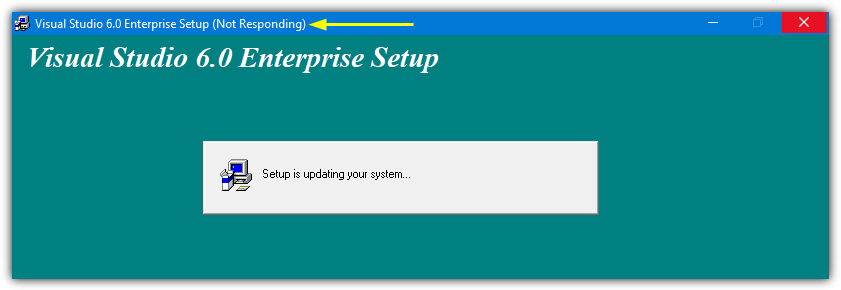
First of all, you will likely experience the “Setup is updating your system…” progress getting stuck and doing nothing else. After a few seconds, the installer becomes unresponsive and then hangs. Looking in Task Manager will show high CPU usage for ACMSETUP.EXE and the setup window has to be closed manually.
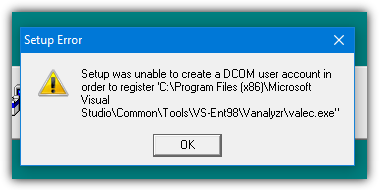
If you fix that, another error that appears will be a “Setup was unable to create a DCOM user account in order to register…valec.exe” message box.
With the default install options, the VB6 installer will likely produce another error message which is “javasign.dll was unable to register itself in the system registry”.
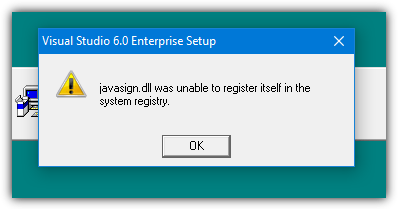
These last two error messages will cause the install to halt with a message saying the setup could not be completed. Since the Visual Basic 6 installer is over 20 years old, there are unsurprisingly some components that will not install properly in Windows 10 which causes the failures. Excluding those components from the install process will allow VB6 to install without errors.
You can use either method below to turn off the options during setup that cause the install to fail.
Disable the Setup Components Automatically
This method is the easiest and requires no manual changes to the setup options during install. We found that the install process is handled by an STF file in the Setup folder on the disc. The optional components are pre-enabled in this file so we found the offenders and disabled them by default.
1. Download the correct file according to the version of Visual Studio you are using. Click on the link below then right click on the grey Download button and select “Save link as” in your browser. This stops the file opening in a browser tab as a text file.
Download VS98ENT.STF (For Visual Studio 6 Enterprise)
Download VS98PRO.STF (For Visual Studio 6 Professional)
2. Make sure that the VB6 install files are on your hard drive as you need to replace the original STF file. You can do that by simply copying all the files from the CD to a folder on your drive. This won’t work if you are trying to install from CD.
3. Go to the SETUP folder and copy the VS98***.STF you downloaded above replacing the file already there.
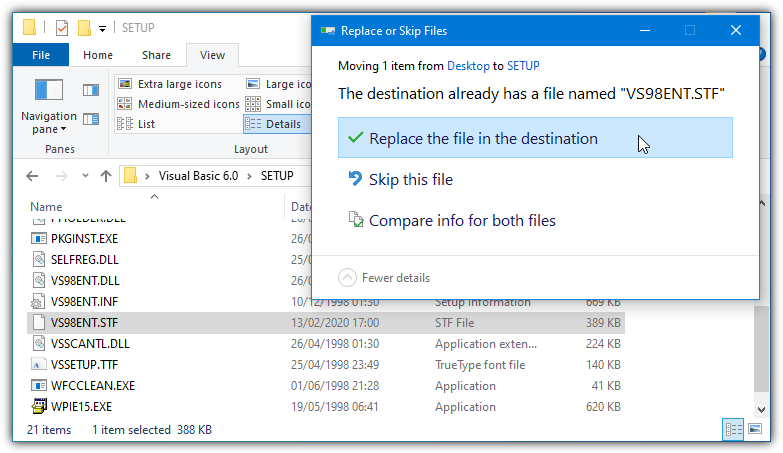
4. Run the installer and go through the setup steps as usual. When you reach the component selection window, nothing has to be changed because the edited STF already did it.
Any other options that you want to enable or disable can be changed although you must make sure “Microsoft Visual InterDev 6.0”, “ADO and RDS”, and “Visual Studio Analyzer” remain disabled.
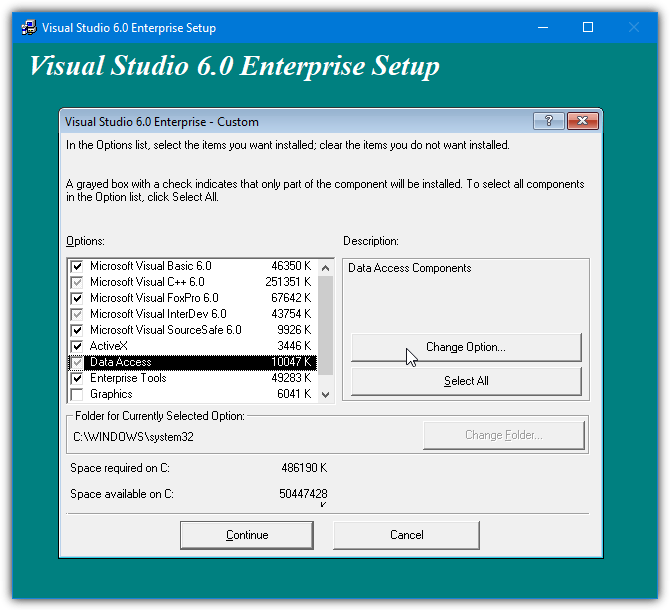
Disable the VB6 Setup Components Manually
This method is useful if you are installing from CD or the automatic option above doesn’t work.
1. During the setup, make sure the Custom install option is selected.
2. Continue the install until you’re asked to choose the components from the list. Highlight Data Access and click the “Change Option…” button to the right, then click “Change Option..” for a second time.
3. Now you’ll get another list of components that belong to the ADO, RDS, and OLE DB Providers. Simply uncheck the first ADO and RDS option.
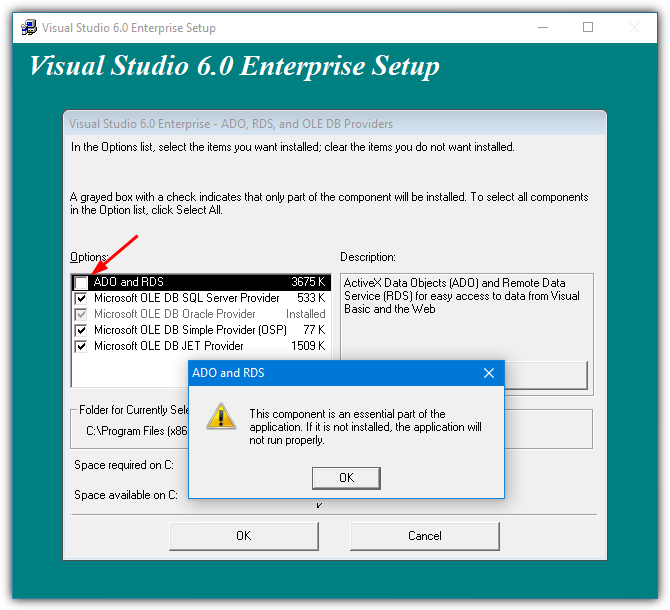
A warning will popup that this component is an essential part of the application and it will not run properly if not installed. Click OK to acknowledge the warning and then click OK two more times to get back to the main install options window.
This will stop the installer hanging and crashing at the updating your system window.
3. Highlight Enterprise Tools and click the “Change Option…” button. At the bottom, uncheck Visual Studio Analyzer and click OK. This option is not in Visual Studio Professional so those users can ignore it.
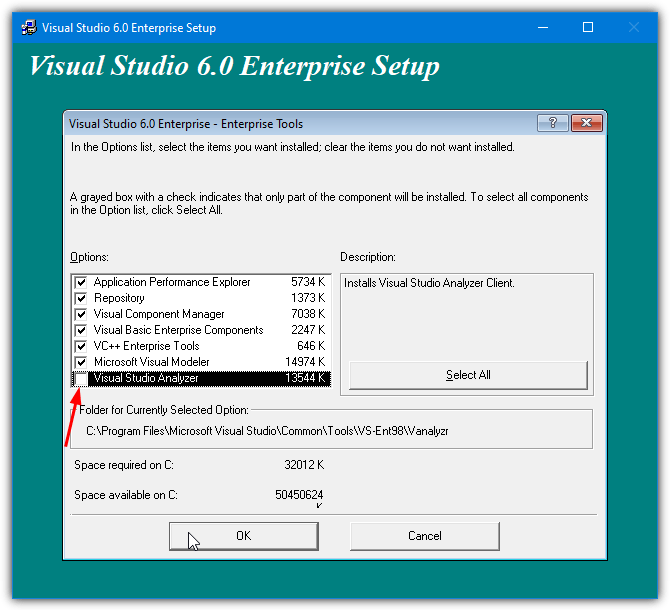
Disabling the Visual Studio Analyzer will stop the DCOM user account error.
4. Uncheck Microsoft Visual InterDev 6.0 box in the main install options window. This will stop the javasign.dll error from appearing during install.
You can, of course, enable or disable other options in this window depending on personal preference. But make sure the components mentioned here are not enabled or the install won’t finish properly. Continue with the install and you should be able to reach the end with no major errors after a reboot.
Run Visual Basic In Compatibility Mode
After the install is complete, Visual Basic 6 should start. If you get an error on the New Project screen, an optional step to help is running VB6 in compatibility mode. In Explorer, navigate to C:\Program Files (x86)\Microsoft Visual Studio\VB98, right click on VB6.exe and select Properties.
In the Compatibility tab, check the “Run this program in compatibility mode for:” box and click OK. The default option of Windows XP (Service Pack 2) should be fine but you can experiment with Windows Vista or 98/Me if you wish.
Visual Basic 6 (VB6) был одним из самых простых языков программирования для изучения. Он был выпущен в 1998 году и теперь заменен Visual Basic .NET (VB.NET). Несмотря на то, что VB6 устарел, программы, созданные и скомпилированные с помощью VB6, по-прежнему могут работать с новейшими операционными системами Windows, поэтому вы все еще можете найти людей, пытающихся установить VB6 на Windows 10. Один из примеров – это случай с разгромом ФБР на высоком уровне. Вредоносная программа RAT, называемая BlackShades, способная много чего делать на удаленном компьютере, и создается с помощью VB6.

Если вы пытаетесь установить VB6 в более новых операционных системах, начиная с Windows 8 и выше, особенно с 64-разрядной архитектурой, вы обязательно столкнетесь с проблемами при установке. Одной из проблем является установщик установки, который просит вас обновить виртуальную машину Microsoft для Java, которая была прекращена в 2003 году. Это ужасно плохая идея – установить устаревшую Java, поскольку могут существовать уязвимости, которые могут поставить под угрозу безопасность вашей системы. ,
Кроме того, если вы пытаетесь установить VB6 в Windows 8 и выше с 64-разрядной версией, вы также можете столкнуться с проблемами при установке VB6, которая не может завершить установку и зависает наПрограмма установки обновляет вашу систему«.
В этой статье мы покажем вам, как успешно установить Visual Basic 6 (VB6) в 64-разрядной версии Windows 10.
Обойти обновление Microsoft Virtual Machine для Java
Компьютер должен всегда поддерживать последнюю версию Java и бессмысленно иметь на компьютере прекращенную Microsoft Virtual Machine для Java только для установки Visual Basic 6. Проблема в том, что установка VB6 не позволяет продолжить установку, если вы Снимите флажок «Обновить виртуальную машину Microsoft для Java», поскольку она не отображает кнопку «Далее».

Решение состоит в том, чтобы заставить установку VB6 думать, что Microsoft Virtual Machine для Java уже существует в системе, поэтому установщик автоматически пропускает этот шаг. В основном программа установки VB6 проверяет, существует ли файл MSJAVA.DLL в папке System32 для 32-разрядных операционных систем или в SysWOW64 для 64-разрядных операционных систем. Можно создать нулевой байтовый поддельный файл MSJAVA.DLL и поместить его в System32 или SysWOW64 в зависимости от архитектуры Windows, но это не работает в Windows 10.
Если у вас есть 7-Zip архиватор (если у вас его нет, вы можете скачать 7-Zip отсюда), перейдите в папку IE4, расположенную в установочных файлах VB6, щелкните правой кнопкой мыши на MSJAVX86.exe, перейдите к 7-Zip и Выбрать «Открыть архив«.

В 7-Zip дважды щелкните файл javabase.cab, чтобы открыть другой список файлов. Найдите в списке файл msjava.dll, извлеките и скопируйте его в C: Windows System32 , если вы используете 32-разрядную версию Windows, или C: Windows SysWOW64 , если вы используете 64-разрядную версию Windows. , Если вы не можете выполнить описанные выше действия или не хотите устанавливать дополнительные программы, такие как 7-Zip, вы можете скачать файл MSJAVA.DLL по ссылке ниже и скопировать его в каталог, упомянутый выше.
Скачать MSJAVA.DLL
После копирования MSJAVA.DLL в папку System32 или SysWOW64 можно запустить файл setup.exe Visual Basic 6, чтобы начать установку. Вы заметите, что он больше не запрашивает обновление виртуальной машины Microsoft для Java. Если вы не уверены в архитектуре вашей операционной системы Windows, общее правило заключается в том, чтобы скопировать файл MSJAVA.DLL в папку SysWOW64, если он существует, а если его нет, то скопируйте его в System32.
Предотвратите застревание программы «Установка обновляет вашу систему…»
Если вы будете использовать параметры установки по умолчанию, скорее всего, вы столкнетесь с застреванием программы «Установка обновляет вашу систему», особенно в 64-битной операционной системе Windows.

Если вы посмотрите на диспетчер задач, вы заметите, что процесс ACMSETUP.EXE использует много ресурсов ЦП, но прогресса нет даже после ожидания в течение нескольких часов. Вы можете прервать зависший процесс, который останавливает установку, и возникшая проблема заключается в том, что вы не найдете ярлыки Visual Basic 6 в меню «Пуск», и в «Программы и компоненты» не будет записи для удаления программы. Тем не менее, вы все равно можете запустить Visual Basic 6 непосредственно из папки программы.
Поскольку установщик Visual Basic 6 был создан еще в 1998 году, есть некоторые компоненты, которые не будут установлены должным образом в текущей операционной системе Windows, что приводит к зависанию или зависанию установки. Проведя дальнейшее расследование, мы нашли виновника, и вам просто нужно исключить конкретный элемент из установки, чтобы решить проблему.
Во время настройки параметров вам предлагается выбрать 3 варианта: Пользовательский, Продукты или Серверные приложения. Обязательно выберите изготовленный на заказ и нажмите Далее.

Когда вы дойдете до установочной части, которая попросит вас выбрать компоненты из списка, выберите «Доступ к даннымИ нажмите кнопку «Изменить параметр».

Затем вы получите еще один список компонентов только с 5 пунктами. Выберите первый вариант «Поставщики ADO, RDS и OLE DBИ нажмите кнопку «Изменить параметр».

Теперь вы получите еще один список компонентов, принадлежащих поставщикам ADO, RDS и OLE DB. Просто снимите галочку с первого вариантаADO и RDSИ нажмите ОК.

Вы должны получить предупреждение, что этот компонент является неотъемлемой частью приложения, и приложение не будет работать должным образом, если оно не установлено. Вы можете проигнорировать это всплывающее предупреждение, нажав OK и продолжив установку. Настройка установки VB6 теперь должна успешно завершиться без проблем.

Skip to content
VB6 installs just fine on Windows 7, Windows 8 and even Windows 10 with a few caveats.
Just follow instructions bellow to make VisualBasic 6 IDE (VisualStudio) works on your system.
Here is how to install VB6 on Windows 7/8/10
- Before proceeding with the installation process below, create a zero-byte file in
C:\WindowscalledMSJAVA.DLL. The setup process will look for this file, and if it doesn’t find it, will force an installation of old, old Java, and require a reboot. By creating the zero-byte file, the installation of moldy Java is bypassed, and no reboot will be required. - Turn off UAC.
- Insert Visual Studio 6 CD.
- Exit from the Autorun setup.
- Browse to the root folder of the VS6 CD.
- Right-click
SETUP.EXE, selectRun As Administrator. - On this and other Program Compatibility Assistant warnings, click Run Program.
- Click Next.
- Click “I accept agreement”, then Next.
- Enter name and company information, click Next.
- Select Custom Setup, click Next.
- Click Continue, then Ok.
- Setup will “think to itself” for about 2 minutes. Processing can be verified by starting Task Manager, and checking the CPU usage of ACMSETUP.EXE.
- On the options list, select the following:
- Microsoft Visual Basic 6.0
- ActiveX
- Data Access
- Graphics
- All other options should be unchecked.
- Click Continue, setup will continue.
- Finally, a successful completion dialog will appear, at which click Ok. At this point, Visual Basic 6 is installed.
- If you do not have the MSDN CD, clear the checkbox on the next dialog, and click next. You’ll be warned of the lack of MSDN, but just click Yes to accept.
- Click Next to skip the installation of Installshield. This is a really old version you don’t want anyway.
- Click Next again to skip the installation of BackOffice, VSS, and SNA Server. Not needed!
- On the next dialog, clear the checkbox for “Register Now”, and click Finish.
- The wizard will exit, and you’re done. You can find VB6 under Start, All Programs, Microsoft Visual Studio 6. Enjoy!
- Turn On UAC again
What to do after VB6 installation on Windows 7/8/10
You might notice after successfully installing VB6 on Windows 7 that working in the IDE is a bit, well, sluggish. For example, resizing objects on a form is a real pain.
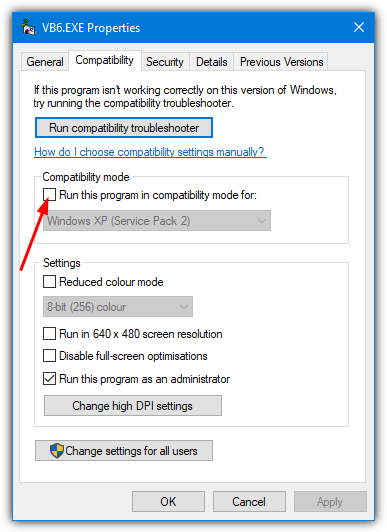
- After installing VB6, you’ll want to change the compatibility settings for the IDE executable.
- Using Windows Explorer, browse the location where you installed VB6. By default, the path is
C:\Program Files\Microsoft Visual Studio\VB98\ - Right click the VB6.exe program file, and select properties from the context menu.
- Click on the Compatibility tab.
- Place a check in each of these checkboxes:
- Run this program in compatibility mode for Windows XP (Service Pack 3)
- Disable Visual Themes
- Disable Desktop Composition
- Disable display scaling on high DPI settings
- If you have UAC turned on, it is probably advisable to check the ‘Run this program as an Administrator’ box
After changing these settings, fire up the IDE, and things should be back to normal, and the IDE is no longer sluggish.
I made this script a while ago because I was having trouble with the installers and fixes I found around the internet. It incorporates all the tricks and tips that I found around the internet into one powershell script.
To run the script you will need to following:
- VB6 Installer
- Service Pack 6
- Mouse Wheel Fix (Optional, set
-SkipMouseWheelswitch to skip.)
Each of the above should be placed in its own folder. If you save (and then dot-source) the script in a folder that contains these three folders it’ll auto-detect everything for you. You can also set your current location in powershell to this folder and copy the script directly to you session and it’ll detect everything as well.
Once the script is dot-sourced or pasted in an elevated powershell instance you can run it by calling Install-VB6.
It also has the following parameters if you want to override any default behaviour:
| Parameter | Type | Usage |
|---|---|---|
Vb6InstallerPath |
String | Path of main VB6 Installer folder |
SP6InstallerPath |
String | Path of Service Pack 6 Installer folder |
SkipMouseWheel |
Switch | Skip installing the Mouse Wheel Fixer folder |
MouseWheelPath |
String | Path of Mouse Wheel fixer. Ignored if -SkipMouseWheel is specified |
Regsvr32Path |
String | Path to regsvr32.exe. Uses ‘%SYSTEMROOT%\SysWoW64\regsvr32.exe’ if not specified |
RegEditPath |
String | Path to regedit.exe. ‘%SYSTEMROOT%\regedit.exe’ if not specified |
OrganizationName |
String | Sets the organization name in the VB6 installer |
Notes:
- The VB6 and SP6 installer don’t like being run from a network drive, so the script will stop if it detects one of the install folders is not on a local drive.
- I’ve only tested this with VB6 Pro, not VB6 Enterprise.
- It doesn’t install MSDN.
Install-VB6.ps1
#Requires -RunAsAdministrator
#Requires -Version 3
<#
.SYNOPSIS
Installs VB6 to the computer.
.DESCRIPTION
Installs VB6 ide with Service Pack 6 and (optional) Mouse Wheel Fix to the local computer.
.PARAMETER Vb6InstallerPath
The path to the VB6 installer folder.
.PARAMETER SP6InstallerPath
The path the the Service Pack 6 installer folder.
.PARAMETER SkipMouseWheel
Skip installing the Mouse Wheel fix.
.PARAMETER MouseWheelPath
The path the Mouse wheel fix folder.
.PARAMETER Regsvr32Path
The path to RegSvr32.exe
.PARAMETER OrganizationName
The organization name
.PARAMETER RegEditPath
The path to regedit.exe
#>
Function Install-VB6{
[CmdletBinding()]
param (
[Parameter(Mandatory=$false)]
[string]$Vb6InstallerPath,
[Parameter(Mandatory=$false)]
[string]$SP6InstallerPath,
[Parameter(Mandatory=$false)]
[switch]$SkipMouseWheel,
[Parameter(Mandatory=$false)]
[string]$MouseWheelPath,
[Parameter(Mandatory=$false)]
[string]$Regsvr32Path,
[Parameter(Mandatory=$false)]
[string]$OrganizationName,
[Parameter(Mandatory=$false)]
[string]$RegEditPath
)
# Tests if the path is a local path. The installer doesn't like network paths.
function Test-LocalDrive{
[CmdletBinding()]
[OutputType([bool])]
param(
[Parameter(Mandatory=$true,
Position=0)]
[string]$Path
)
begin{
$localDrives = Get-WmiObject -Class Win32_logicaldisk -Filter "DriveType<>4" -Property "DeviceID" | Foreach-Object {$_.DeviceID.Replace(":", "")}
}
process{
if(!([bool](Test-Path -Path $Path))){
return $false
}
$item = Get-Item -Path $Path
$drive = $item.PSDrive
if($null -eq $drive){
return $false
}
return ($localDrives -contains $drive.Name)
}
}
function Search-ForFile{
[CmdletBinding()]
[OutputType([System.IO.FileInfo])]
param(
[Parameter(Mandatory=$true,
Position=0)]
[string]$File,
[Parameter(Mandatory=$true,
Position=1)]
[string]$CurrentLocation,
[switch]$IncludeSubDirectory
)
process{
$newPath = $currentLocation
if($IncludeSubDirectory.IsPresent){
$newPath = Join-Path -Path $newPath -ChildPath "*"
}
$newPath = Join-Path -Path $newPath -ChildPath $file
$item = @(Get-Item -Path $newPath)
if($null -eq $item -or $item.Count -eq 0 -or $null -eq $item[0]){
throw ("Could Not find the {0} file." -f $file)
}
return $item[0]
}
}
#region Setting Up File Paths
$currentLocation = $PSScriptRoot
if([System.String]::IsNullOrWhiteSpace($currentLocation)){
$currentLocation = (Get-Location)
}
if([System.String]::IsNullOrWhiteSpace($currentLocation)){
throw "Unable to determine current location"
}
if(!$PSBoundParameters.ContainsKey("Vb6InstallerPath") -or [System.String]::IsNullOrWhiteSpace($Vb6InstallerPath)){
if(!(Test-LocalDrive -Path ($currentLocation))){
Write-Error "The script cannot be ran from a network share."
Write-Host -NoNewLine 'Press any key to continue...';
$null = $Host.UI.RawUI.ReadKey('NoEcho,IncludeKeyDown');
return
}
$installerInfo = Search-ForFile -File "SETUP.EXE" -CurrentLocation $currentLocation -IncludeSubDirectory
$installFolder = $installerInfo.DirectoryName
}
else {
if(!(Test-LocalDrive -Path ($Vb6InstallerPath))){
Write-Error "The VB6 Installer Path cannot be a share."
Write-Host -NoNewLine 'Press any key to continue...';
$null = $Host.UI.RawUI.ReadKey('NoEcho,IncludeKeyDown');
return
}
$installFolder = $Vb6InstallerPath
$installerInfo = Search-ForFile -File "SETUP.EXE" -CurrentLocation $installFolder
}
$installer2Info = Search-ForFile -File "ACMSETUP.EXE" -CurrentLocation $installFolder -IncludeSubDirectory
$installLocation = $installerInfo.FullName
$install2Location = $installer2Info.FullName
if(!$PSBoundParameters.ContainsKey("SP6InstallerPath") -or [System.String]::IsNullOrWhiteSpace($SP6InstallerPath)){
if(!(Test-LocalDrive -Path ($currentLocation))){
Write-Error "The script cannot be ran from a network share."
Write-Host -NoNewLine 'Press any key to continue...';
$null = $Host.UI.RawUI.ReadKey('NoEcho,IncludeKeyDown');
return
}
$SP6Info = Search-ForFile -File "setupsp6.exe" -CurrentLocation $currentLocation -IncludeSubDirectory
$SP6Folder = $SP6Info.DirectoryName
}
else {
if(!(Test-LocalDrive -Path ($SP6InstallerPath))){
Write-Error "The SP6 Installer Path cannot be a network share."
Write-Host -NoNewLine 'Press any key to continue...';
$null = $Host.UI.RawUI.ReadKey('NoEcho,IncludeKeyDown');
return
}
$SP6Folder = $SP6InstallerPath
$SP6Info = Search-ForFile -File "setupsp6.exe" -CurrentLocation $SP6Folder
}
$SP6Location = $SP6Info.FullName
if(!$SkipMouseWheel.IsPresent){
if(!$PSBoundParameters.ContainsKey("MouseWheelPath") -or [System.String]::IsNullOrWhiteSpace($MouseWheelPath)){
if(!(Test-LocalDrive -Path ($currentLocation))){
Write-Error "The script cannot be ran from a network share."
Write-Host -NoNewLine 'Press any key to continue...';
$null = $Host.UI.RawUI.ReadKey('NoEcho,IncludeKeyDown');
return
}
$MouseWheelDllInfo = Search-ForFile -File "VB6IDEMouseWheelAddin.dll" -CurrentLocation $currentLocation -IncludeSubDirectory
$MouseWheelRegistryInfo = Search-ForFile -File "VBA Mouse Wheel Fix.reg" -CurrentLocation $currentLocation -IncludeSubDirectory
}
else {
if(!(Test-LocalDrive -Path ($SP6InstallerPath))){
Write-Error "The Mouse Wheel Path cannot be a network share."
Write-Host -NoNewLine 'Press any key to continue...';
$null = $Host.UI.RawUI.ReadKey('NoEcho,IncludeKeyDown');
return
}
$MouseWheelDllInfo = Search-ForFile -File "VB6IDEMouseWheelAddin.dll" -CurrentLocation $MouseWheelPath
$MouseWheelRegistryInfo = Search-ForFile -File "VBA Mouse Wheel Fix.reg" -CurrentLocation $MouseWheelPath
}
$MouseWheelDll = $MouseWheelDllInfo.FullName
$MouseWheelRegistry = $MouseWheelRegistryInfo.FullName
}
if(!$PSBoundParameters.ContainsKey("Regsvr32Path") -or [System.String]::IsNullOrWhiteSpace($Regsvr32Path)){
$regSvrPath = "$($env:systemroot)\SysWoW64\regsvr32.exe"
}
else{
$regSvrPath = $Regsvr32Path
}
if(!$PSBoundParameters.ContainsKey("RegEditPath") -or [System.String]::IsNullOrWhiteSpace($RegEditPath)){
$RegEditPath = "$($env:systemroot)\regedit.exe"
}
#endregion Setting Up File Paths
#region Test Required Installer Paths Exist
if(!([bool](Test-Path -Path $regSvrPath))){
Write-Error ("Unable to find '{0}'.`r`nThe exe must exist." -f $regSvrPath)
Write-Host -NoNewLine 'Press any key to continue...';
$null = $Host.UI.RawUI.ReadKey('NoEcho,IncludeKeyDown');
return
}
if(!([bool](Test-Path -Path $RegEditPath))){
Write-Error ("Unable to find '{0}'.`r`nThe exe must exist." -f $RegEditPath)
Write-Host -NoNewLine 'Press any key to continue...';
$null = $Host.UI.RawUI.ReadKey('NoEcho,IncludeKeyDown');
return
}
if(!$SkipMouseWheel.IsPresent){
if(!([bool](Test-Path -Path $MouseWheelDll))){
Write-Error ("Unable to find '{0}'.`r`nThe 'MouseWheel' Folder must be in the same directory as the install script and the file must exist." -f $MouseWheelDll)
Write-Host -NoNewLine 'Press any key to continue...';
$null = $Host.UI.RawUI.ReadKey('NoEcho,IncludeKeyDown');
return
}
if(!([bool](Test-Path -Path $MouseWheelRegistry))){
Write-Error ("Unable to find '{0}'.`r`nThe 'MouseWheel' Folder must be in the same directory as the install script and the file must exist." -f $MouseWheelRegistry)
Write-Host -NoNewLine 'Press any key to continue...';
$null = $Host.UI.RawUI.ReadKey('NoEcho,IncludeKeyDown');
return
}
}
if(!([bool](Test-Path -Path $installFolder))){
Write-Error ("Unable to find '{0}'.`r`nThe 'Installer' Folder must be in the same directory as the install script." -f $installFolder)
Write-Host -NoNewLine 'Press any key to continue...';
$null = $Host.UI.RawUI.ReadKey('NoEcho,IncludeKeyDown');
return
}
if(!([bool](Test-Path -Path $installLocation))){
Write-Error ("Unable to find '{0}'.`r`nThe 'Installer' Folder must be in the same directory as the install script and the file must exist." -f $installLocation)
Write-Host -NoNewLine 'Press any key to continue...';
$null = $Host.UI.RawUI.ReadKey('NoEcho,IncludeKeyDown');
return
}
if(!([bool](Test-Path -Path $install2Location))){
Write-Error ("Unable to find '{0}'.`r`nThe 'Installer' Folder must be in the same directory as the install script and the file must exist." -f $install2Location)
Write-Host -NoNewLine 'Press any key to continue...';
$null = $Host.UI.RawUI.ReadKey('NoEcho,IncludeKeyDown');
return
}
if(!([bool](Test-Path -Path $SP6Location))){
Write-Error ("Unable to find '{0}'.`r`nThe 'SP6' Folder must be in the same directory as the install script and the file must exist." -f $SP6Location)
Write-Host -NoNewLine 'Press any key to continue...';
$null = $Host.UI.RawUI.ReadKey('NoEcho,IncludeKeyDown');
return
}
#endregion Test Required Installer Paths Exist
#region Installer Compatibility
# The installer doesn't auto-elevate to run as an administrator.
# We are setting the required keys in the registry to force the installers to run as administrator
# Same as running the 'troubleshoot compatibilty' wizard and selecting the exe's to run as admins.
Write-Host "Setting compatibility mode on setup files."
$layersPath = "REGISTRY::HKEY_LOCAL_MACHINE\SOFTWARE\Microsoft\Windows NT\CurrentVersion\AppCompatFlags\Layers"
if(){
New-Item -Path $layersPath -Force | Out-Null
}
$registryPath = Get-Item -LiteralPath $layersPath
if($null -eq $registryPath.GetValue($installLocation, $null)){
New-ItemProperty -Path $layersPath -Name $installLocation -Value "^ WINXPSP3" -PropertyType "String" -Force | Out-Null
}
if($null -eq $registryPath.GetValue($SP6Location, $null)){
New-ItemProperty -Path $layersPath -Name $SP6Location -Value "^ WINXPSP3" -PropertyType "String" -Force | Out-Null
}
#endregion Installer Compatibility
#region Previous Install Cleanup
# Locations and keys where old vb6 installs can live.
Write-Host "Cleaning up previous install."
$itemsToDelete = @(
"C:\Program Files*\Microsoft Visual Studio\Common",
"C:\Program Files*\Microsoft Visual Studio\MSDN",
"C:\Program Files*\Microsoft Visual Studio\MSDN98",
"C:\Program Files*\Microsoft Visual Studio\VB98",
"C:\Program Files*\Microsoft Visual Studio\VC98",
"C:\Program Files*\Microsoft Visual Studio\*.HTM",
"C:\Program Files*\Microsoft Visual Studio\*.TXT",
"C:\Program Files*\Common Files\Microsoft Shared\MSDesigners98",
"C:\Program Files*\Common Files\Microsoft Shared\MSDN",
"C:\Program Files*\Common Files\Microsoft Shared\VS98",
"C:\Program Files*\Common Files\Microsoft Shared\Wizards98",
"REGISTRY::HKEY_LOCAL_MACHINE\Software\Microsoft\DevStudio",
"REGISTRY::HKEY_LOCAL_MACHINE\Software\Microsoft\HTML Help Collections",
"REGISTRY::HKEY_LOCAL_MACHINE\Software\Microsoft\MSVSDG",
"REGISTRY::HKEY_LOCAL_MACHINE\Software\Microsoft\Visual Basic\6.0",
"REGISTRY::HKEY_LOCAL_MACHINE\Software\Microsoft\Visual Component Manager",
"REGISTRY::HKEY_LOCAL_MACHINE\Software\Microsoft\Visual Modeler",
"REGISTRY::HKEY_LOCAL_MACHINE\Software\Microsoft\VisualStudio\6.0",
"REGISTRY::HKEY_LOCAL_MACHINE\Software\Wow6432Node\Microsoft\DevStudio",
"REGISTRY::HKEY_LOCAL_MACHINE\Software\Wow6432Node\Microsoft\HTML Help Collections",
"REGISTRY::HKEY_LOCAL_MACHINE\Software\Wow6432Node\Microsoft\MSVSDG",
"REGISTRY::HKEY_LOCAL_MACHINE\Software\Wow6432Node\Microsoft\Visual Basic\6.0",
"REGISTRY::HKEY_LOCAL_MACHINE\Software\Wow6432Node\Microsoft\Visual Component Manager",
"REGISTRY::HKEY_LOCAL_MACHINE\Software\Wow6432Node\Microsoft\Visual Modeler",
"REGISTRY::HKEY_LOCAL_MACHINE\Software\Wow6432Node\Microsoft\VisualStudio\6.0",
"REGISTRY::HKEY_CURRENT_USER\Software\Microsoft\DevStudio",
"REGISTRY::HKEY_CURRENT_USER\Software\Microsoft\MSVSDG",
"REGISTRY::HKEY_CURRENT_USER\Software\Microsoft\Visual Basic\6.0",
"REGISTRY::HKEY_CURRENT_USER\Software\Microsoft\Visual Modeler",
"REGISTRY::HKEY_CURRENT_USER\Software\Microsoft\VisualFoxPro",
"REGISTRY::HKEY_CURRENT_USER\Software\Microsoft\VisualStudio\6.0"
)
$itemsToDelete | Where-Object { Test-Path -Path $_ } | Remove-Item -Force -Recurse | Out-Null
#endregion Previous Install Cleanup
#region Installer Registry Permissions
# The installer needs to be able to write to 'HKEY_CLASSES_ROOT\RDSServer.DataFactory\Clsid'
# but since the installer isn't built for windows and we have to force it to run as an administrator
# we have to give explicit permissions for your computers Administrators group to write to this key (and all its children)
Write-Host "Setting required permissions for installing user on registry."
$registryPermissionPath = "REGISTRY::HKEY_CLASSES_ROOT\RDSServer.DataFactory\Clsid"
Write-Host "`tSetting Up required information."
$acl = Get-ACL -Path $registryPermissionPath
$oldOwner = [System.Security.Principal.NTAccount]::new($acl.Owner)
$administratorIdentity = [System.Security.Principal.NTAccount]::new("Administrators")
Write-Host "`tGiving the script required permissions."
$import = '[DllImport("ntdll.dll")] public static extern int RtlAdjustPrivilege(ulong a, bool b, bool c, ref bool d);'
$ntdll = Add-Type -Member $import -Name NtDll -PassThru
$privileges = @{ SeTakeOwnership = 9; SeBackup = 17; SeRestore = 18 }
foreach ($i in $privileges.Values) {
$null = $ntdll::RtlAdjustPrivilege($i, 1, 0, [ref]0)
}
Write-Host "`tGettting The registry key."
$regKey = [Microsoft.Win32.Registry]::ClassesRoot.OpenSubKey("RDSServer.DataFactory\Clsid", 'ReadWriteSubTree', 'TakeOwnership')
# We force the Administrators group to be the owner on the key so we can then add required the permissions.
Write-Host "`tSetting Owner."
$acl.SetOwner($administratorIdentity)
$regKey.SetAccessControl($acl)
Write-Host "`tSetting Permission."
$permission = [System.Security.AccessControl.RegistryAccessRule]::new($administratorIdentity, "FullControl", "ContainerInherit", "InheritOnly", "Allow")
$acl.AddAccessRule($permission)
$permission2 = [System.Security.AccessControl.RegistryAccessRule]::new($administratorIdentity, "FullControl", "Allow")
$acl.AddAccessRule($permission2)
$regKey.SetAccessControl($acl)
# Reset the owner to clean-up
Write-Host "`tResetting Owner."
$acl.SetOwner($oldOwner)
$regKey.SetAccessControl($acl)
#endregion Installer Registry Permissions
#region Install
Write-Host "`tStarting Install."
$tempPath = [System.IO.Path]::GetTempPath()
$tempFolder = Join-Path -Path $tempPath -ChildPath ([System.Guid]::NewGuid().ToString("n"))
New-Item -Path $tempFolder -ItemType Directory -Force | Out-Null
$KeyFile = Join-Path -Path $tempFolder -ChildPath ("{0}.dat" -f [System.Guid]::NewGuid().ToString("n"))
$keyFileText = @"
REGEDIT4
[HKEY_LOCAL_MACHINE\SOFTWARE\Microsoft\VisualStudio\6.0\Setup\Microsoft Visual Basic\SetupWizard]
"aspo"=dword:00000000
[HKEY_LOCAL_MACHINE\SOFTWARE\Wow6432Node\Microsoft\VisualStudio\6.0\Setup\Microsoft Visual Basic\SetupWizard]
"aspo"=dword:00000000
"@
$keyFileText | Set-Content -Path $keyFile -Force
& $RegEditPath /S $KeyFile
[string[]]$installerArguments = ("/T", "VB98PRO.stf", "/S", $installFolder, "/n", ($env:USERNAME), "/k", "0000000000", "/b", "1", "/qn1")
if($PSBoundParameters.ContainsKey("OrganizationName") -and ![System.String]::IsNullOrWhiteSpace($OrganizationName)){
$installerArguments += "/o"
$installerArguments += $OrganizationName
}
Start-Process -FilePath $install2Location -wait -NoNewWindow -ArgumentList $installerArguments
Start-Process -FilePath $SP6Location -wait -NoNewWindow -ArgumentList ("/qn1")
Write-Host "Setting Vb6 Compatibility"
$vb6ExeLocations = @(Get-Item -Path "C:\Program Files*\Microsoft Visual Studio\VB98\VB6.EXE" | Select-Object -ExpandProperty FullName)
$registryPath = Get-Item -LiteralPath $layersPath
foreach($vb6ExeLocation in $vb6ExeLocations){
if($null -eq $registryPath.GetValue($vb6ExeLocation, $null)){
New-ItemProperty -Path $layersPath -Name $vb6ExeLocation -Value "^ WINXPSP3" -PropertyType "String" -Force | Out-Null
}
}
if(!$SkipMouseWheel.IsPresent){
Write-Host "Installing Mouse Wheel"
& $regSvrPath /s $MouseWheelDll
& $RegEditPath /S $MouseWheelRegistry
$registryHeaderText = @"
Windows Registry Editor Version 5.00
"@
$registryItemFormat = @"
[{0}\SOFTWARE\Microsoft\Visual Basic\6.0\Addins\VB6IDEMouseWheelAddin.Connect]
"FriendlyName"="MouseWheel Fix"
"LoadBehavior"=dword:00000003
"CommandLineSafe"=dword:00000000
"@
$users = Get-ChildItem -Path "REGISTRY::HKEY_USERS" | Where-Object {$_.Name -notlike "*_Classes"} | Select-Object -ExpandProperty Name
$content = $registryHeaderText
# Install for every user.
foreach($user in $users){
$content += ($registryItemFormat -f $user)
}
$MouseWheelApplyRegistry = Join-Path -Path $tempFolder -ChildPath ("{0}.reg" -f [System.Guid]::NewGuid().ToString("n"))
$content | Set-Content -Path $MouseWheelApplyRegistry -Force
Start-Process $RegEditPath -wait -NoNewWindow -ArgumentList ("/S", $MouseWheelApplyRegistry)
Write-Host "You will still need to enable Mouse Wheel fix in the VB6 IDE." -BackgroundColor Black -ForegroundColor Red
Write-Host "Open a Visual Basic project and go to 'Add-Ins' -> 'Add-In Manager...' " -BackgroundColor Black -ForegroundColor Red
Write-Host "Select 'MouseWheel Fix' and click 'Loaded/Unloaded' and 'Load on Startup'" -BackgroundColor Black -ForegroundColor Red
}
Remove-Item -Path $tempFolder -Force -Recurse | Out-Null
#endregion Install
Write-Host "Install Complete"
Write-Host -NoNewLine 'Press any key to continue...';
$null = $Host.UI.RawUI.ReadKey('NoEcho,IncludeKeyDown');
}