Всем привет, решил написать запись по установки Toyota Techstream на Windows 10 Вот решил я написать более подробно : нам понадобится кабель mini-vci j2534 и скачать файл тут фаил платный, ( я не являюсь тех поддержкой, и вслучае каких-нибудь ошибок я попробую вам помочь но не уверен что получится)так скачали мы файл приступаем мы к установке и запускаем

Далее запускаем

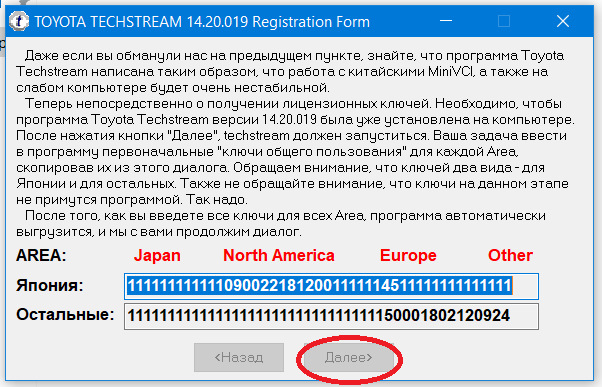
появляется

Выбираем Японию (Japan)


Скопировали вставили и ок


выбираем следующие


После того как вы активируете 4 арии, появиться клавиша далее
после чего появляется файл LicenseKeys

открываем и меняем еще раз ключи на те что в фале
Продолжение в Часть 2(картинок очень много оказалось)

— Установка MVCI драйверов на Windows 64 bita
— Краткий обзор функций Toyota Techstream
— Инструкция по установке Techstream
Установщик MVCI Driver for TOYOTA.msi предназначен для установки драйверов на Windows x32. Для установки драйверов на Windows x64 производим установку драйверов в ручном режиме:
1. Создаем папку на диске С: папку «Temp»
2. Копируем в папку С:Temp наш файл драйвер MVCI Driver for TOYOTA.msi
3. С правами Администратора открываем командную строку и запускаем следующую команду:
msiexec /a «C: tempMVCI Driver for TOYOTA.msi» /qb TARGETDIR=c: temp mvci (УДАЛИТЕ ПРОБЕЛЫ ПОСЛЕ , ГДЕ ОНИ ЕСТЬ)
эта команда извлечет все содержимое из файла-MSI в папку C:Temp/ mvci
4. Удаляем из папки C:Tempmvci файл MVCI Driver for TOYOTA.msi он нам больше не нужен, также его можно удалить и из папки C:/ Temp
5. Заходим в C:Program Files (x86) и создаём там папку XHorse Electronics а в ней ещё одну MVCI Driver for TOYOTA TIS и перемещаем туда все содержимое из папки C:/ Temp/ mvci
6. Подключаем VCI-кабель к USB-порту. Когда начнётся автоматический процесс установки драйверов его нужно отменить.
7. Откройте диспетчер устройств и найдите два неустановленных устройства в списке (с восклицательным знаком в желтом треугольнике). Щелкните правой кнопкой мыши на неустановленное устройство => обновить драйвер => выполнить поиск на этом компьютере => обзор => мой компьютер => укажите путь к C:Program Files (x86)XHorse ElectronicsMVCI Driver for TOYOTA TIS» (“включить вложенные папки” флажок установить). Нажмите на кнопку “Далее” и подождите, пока будут установлены драйверы.
Теперь вы должны увидеть два новых устройства: “Контроллеры USB => USB Serial Converter” и “Порты (COM & LPT) => USB Serial Port (COM №)”.
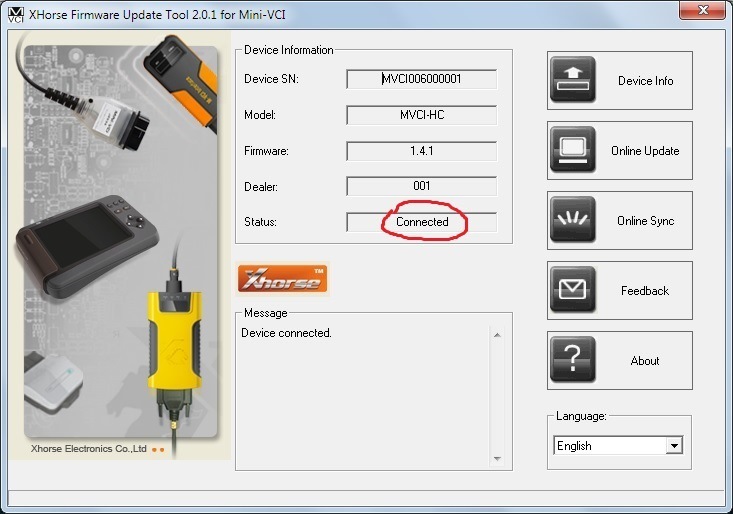
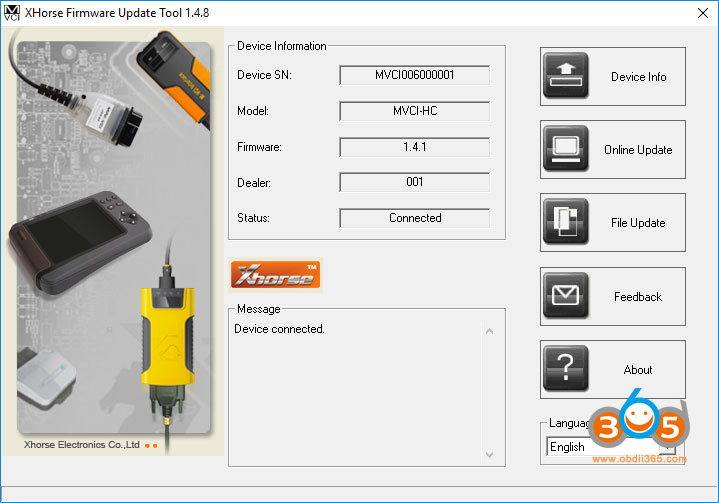
8. Далее заходим по пути «C:/ Program Files (x86)/ XHorse ElectronicsMVCI Driver for TOYOTA TIS» и запускаем файл “FirmwareUpdateTool.exe”
В открывшейся программке нажмите Кнопку “Device Info”. Вы должны увидеть “подключённое устройство” и заполненные графы.
Если вы видите это, значит, ваш прибор Toyota VCI работает под 64-битной версией Windows и может использоваться другими программами, такими как Techstream.
Чтоб программа Techstream увидела Ваше VCI устройстыо под Windows x64, Реестр должен быть изменен.
Внести необходимые изменения в реестр можно скачав и запустив файлы реестра из этого архива.
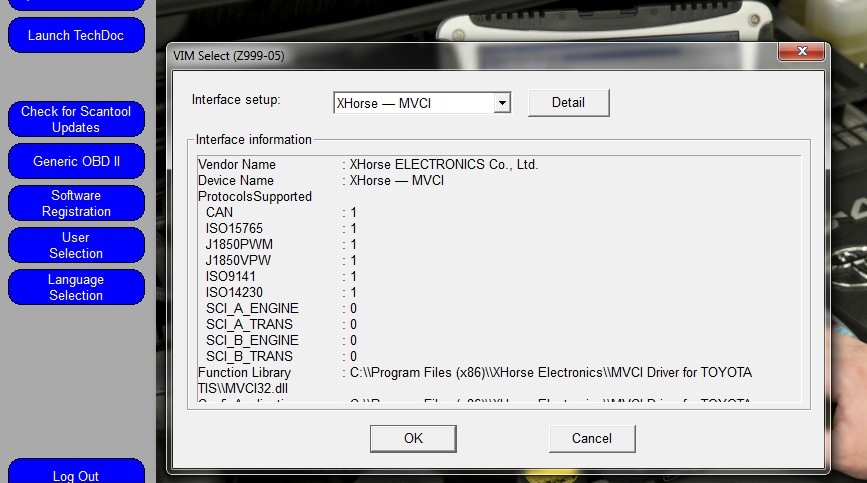
Запустите Techstream. Перейдите на Setup | VIM select откроется меню в нем должно быть “XHorse — MVCI”
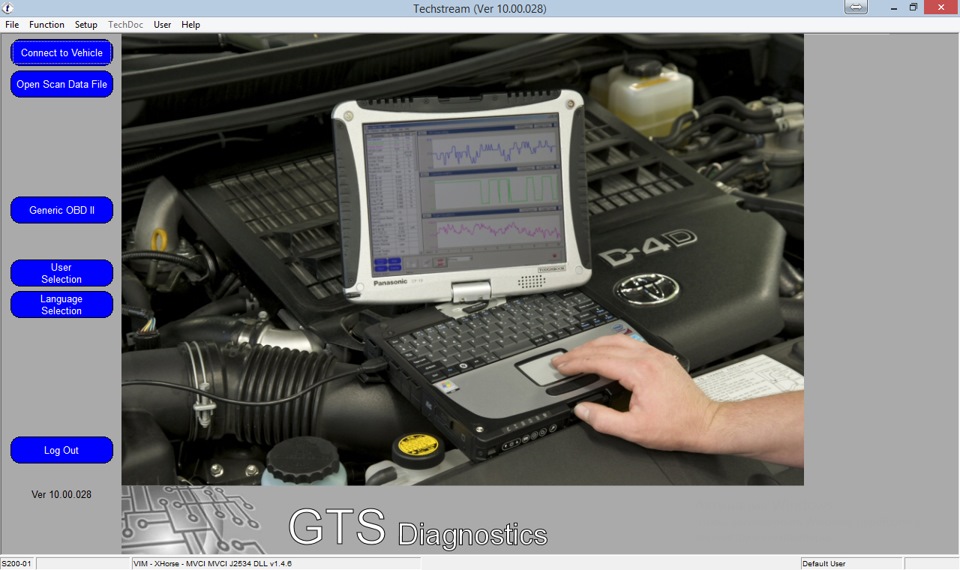
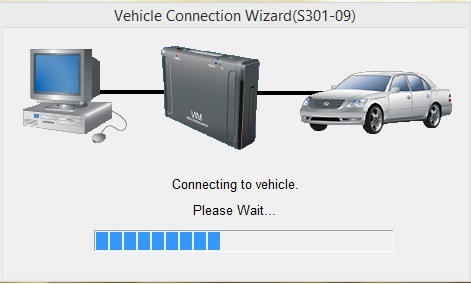
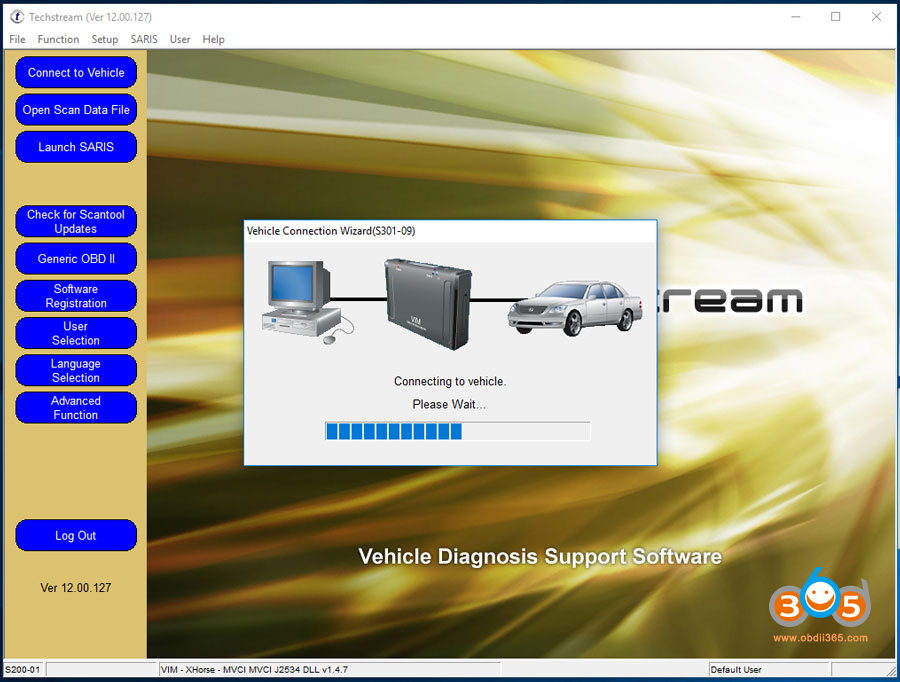
Подключите MVCI кабель в USB интерфейс, запустите программу, затем нажмите кнопку “Connect to Vehicle” в Techstream. Если все работает, то вам будет предложено подтвердить автомобиль/года/модель, и если подключить к авто и завести его, то вы получите доступ к диагностическому интерфейсу.
Запуск и настройка программы:
— при запуске программы у вас появляется окно в котором вам нужно будет выбрать «Area selection» дословный перевод как «выбор области» в нашем случае, для какого рынка машина произведена :
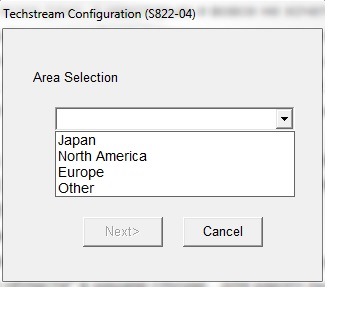
К примеру Европа. Далее выбор языка, Английский, далее забиваем все пустые строки любыми символами.
— запустилось окно программы, теперь нам нужно проверить, изменились ли настройки реестра;
— в самом верху есть кнопки выбираем как на картинке Setup VIM-select :
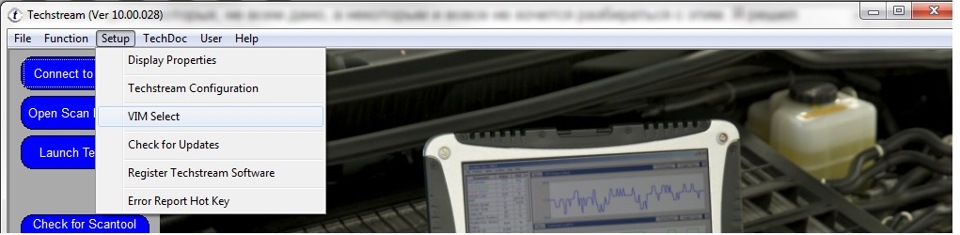
— если вы все правильно сделали и файлы reg вам подошли, то в верхней строчке окна должно быть прописано или должна быть возможность выбора пункта под названием «XHorse — MVCI»:
5) Первое подключение к авто:
— воткните кабель по назначению!)) в порт находящийся слева от руля в низу (маленькая крышка (заглушка))
— подключите кабель в USB порт вашего ноутбука
— проверните ключ в предстартовое положение (когда вся приборка засверкает)
Теперь можем нажать «Connect to Vehicle» — что означает подключить к машине.
Нажимаем на верхнюю левую синенькую кнопку
Если все правильно настроено, то появится картинка с лексусом.
Далее появится окно с выбором опций вашей машины.
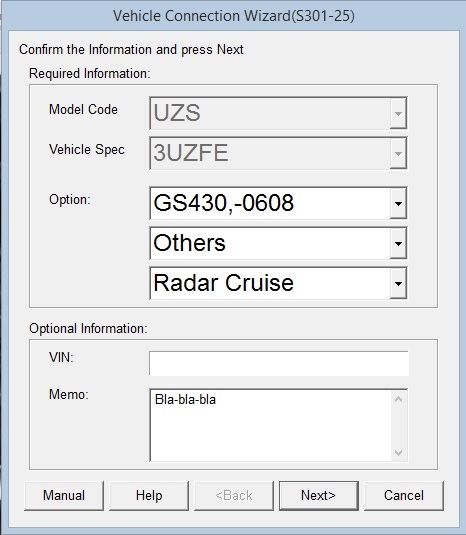
Выберите опции машины
Далее вам откроется список доступных систем для диагностики и настройки. Если у вас довольно современная машина, то список будет внушительным.
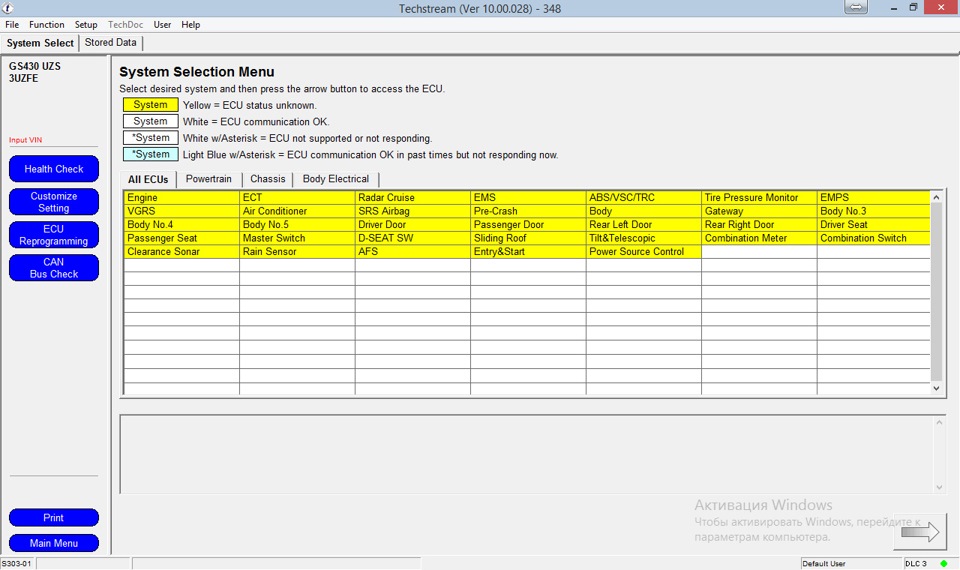
Список систем
Например можно зайти в «Engine» (т.е. Двигатель) и сразу же лицезреть список ошибок («чеков») двигателя.
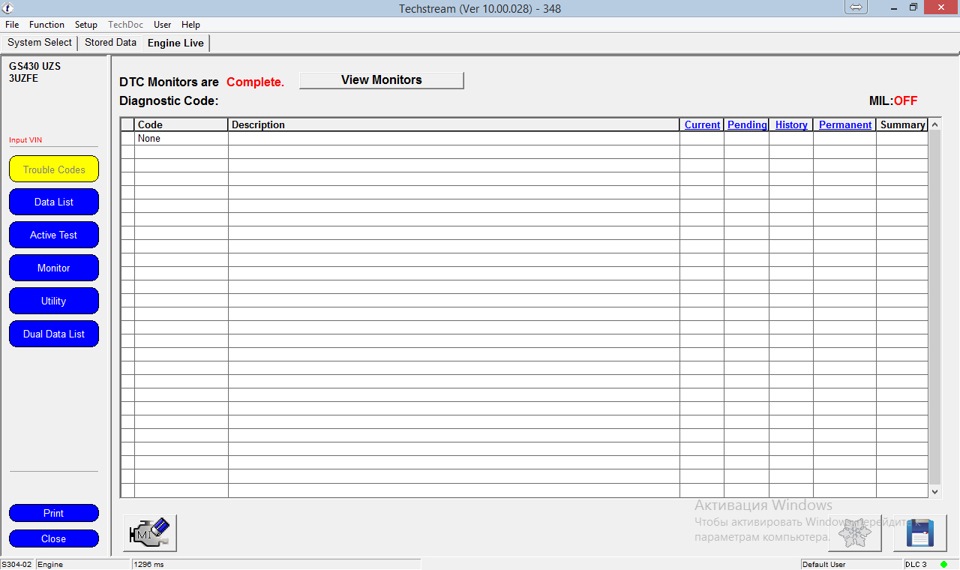
С левой стороны вы можете выбрать различные функции программы по этой системе. Один из интересный элементов — «Active test».
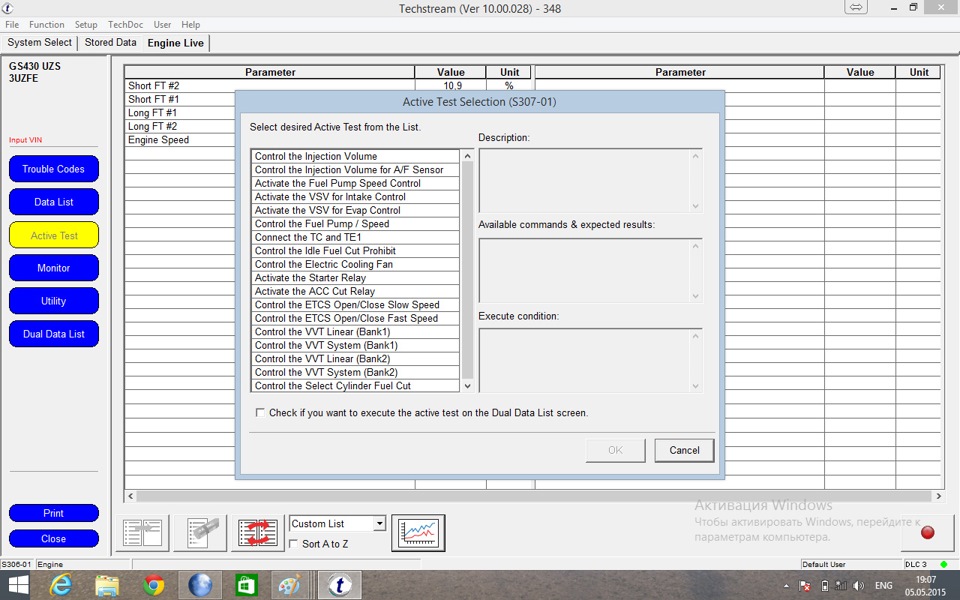
тесты
Так же есть пункт Utilities.
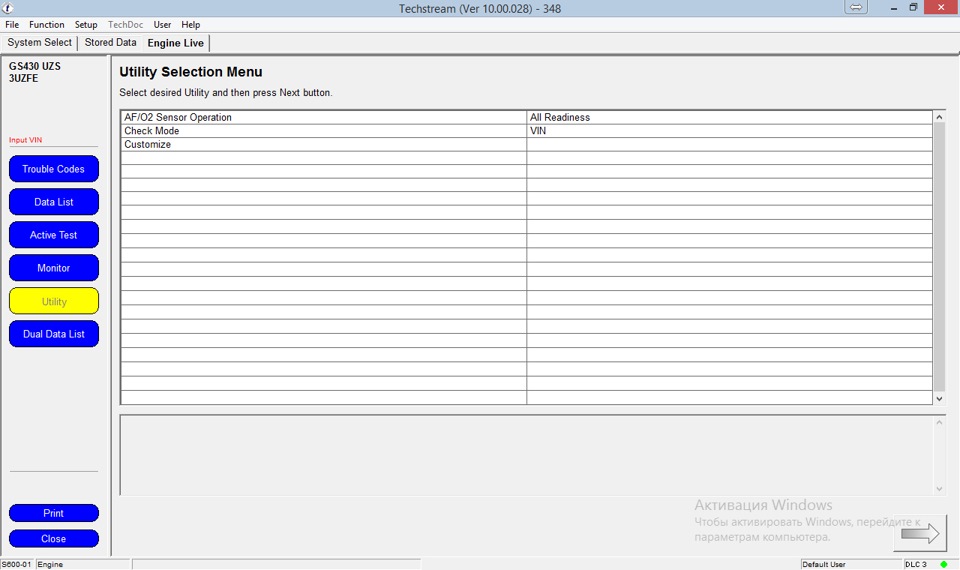
Утилиты
Внутри которого есть более интересный пункт «Customize», пункт в котором как раз настраиваются различные моменты поведения машины.
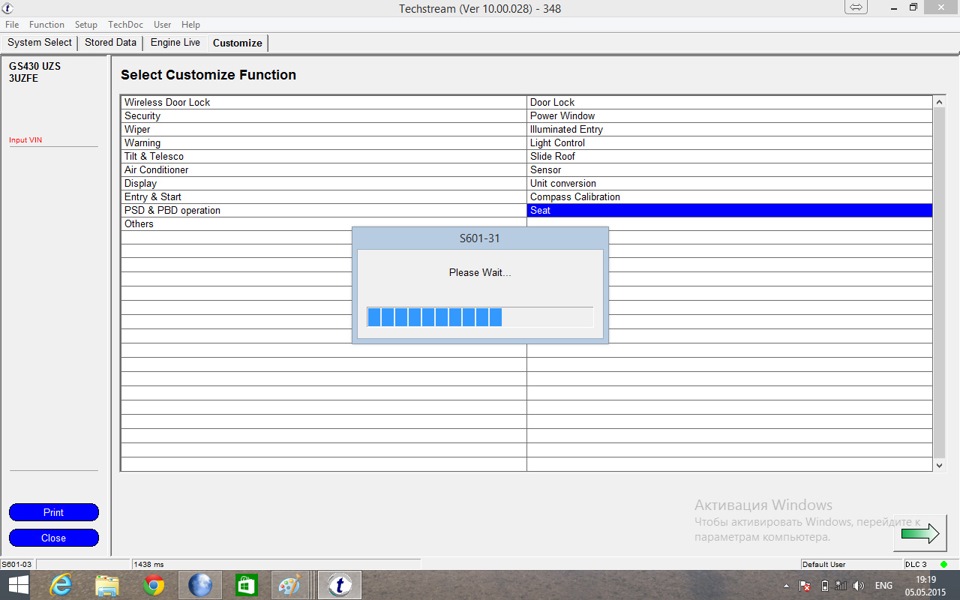
Меню Customize
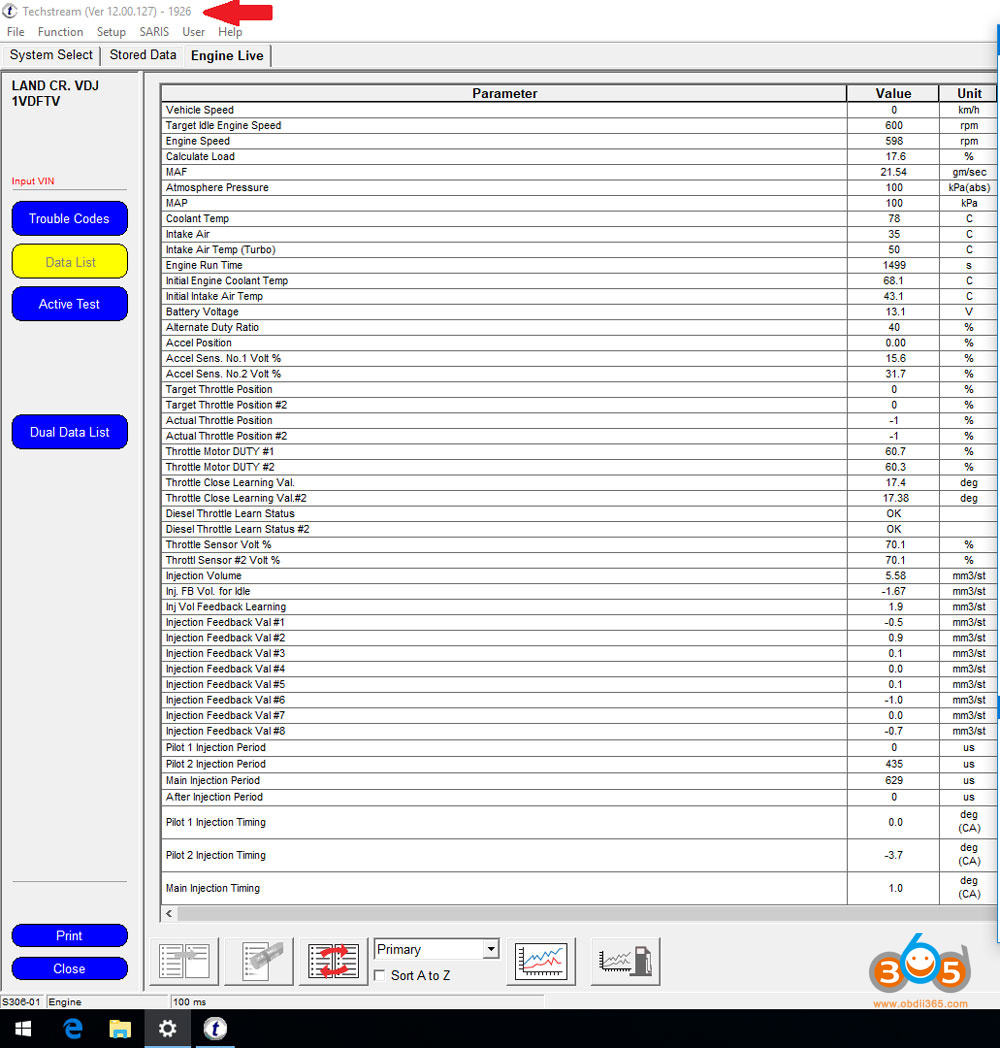
Есть очень важный элемент «Data List». В системе двигателя вы сможете как раз наблюдать за различными показателями двигателя. Выделив некоторые элементы данных вы сможете построить любые графики на ваш вкус.
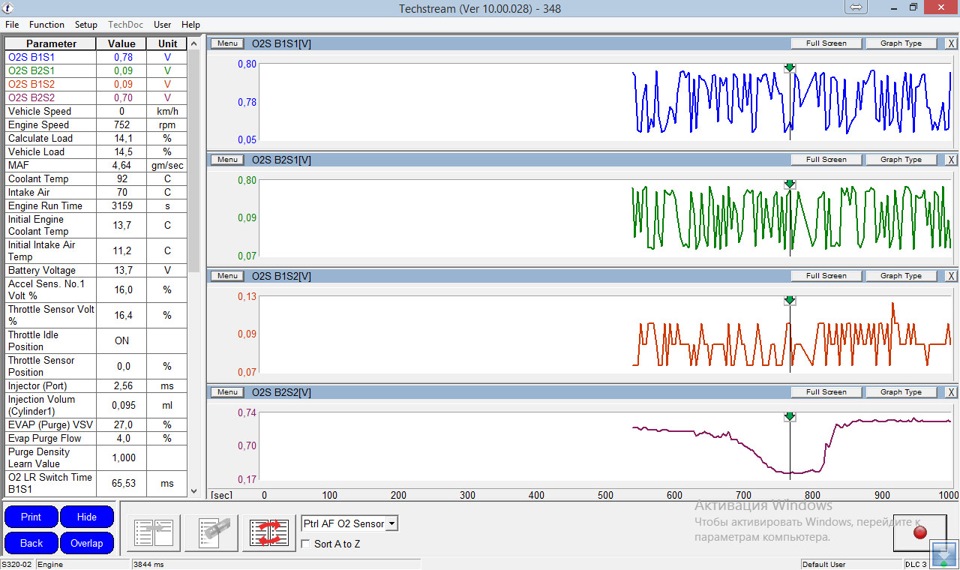
Любые графики
Есть один секрет нормальных графиков. В табличке дата лист выделите только нужные вам элементы для отображения. И только в маленькой табличке выбирайте эти элементы для построения графиков. Иначе Mini VCI не даст вам строить ровные графики, если вы при этом будете отслеживать все ненужные вам данные.
This instruction show you guide on how to install Toyota Techstream 18.00.008 on Windows 10.
Preparations:
2023 Toyota Techstream 18.00.008/17.00.020/16.20.020/ Free Download
Procedures:
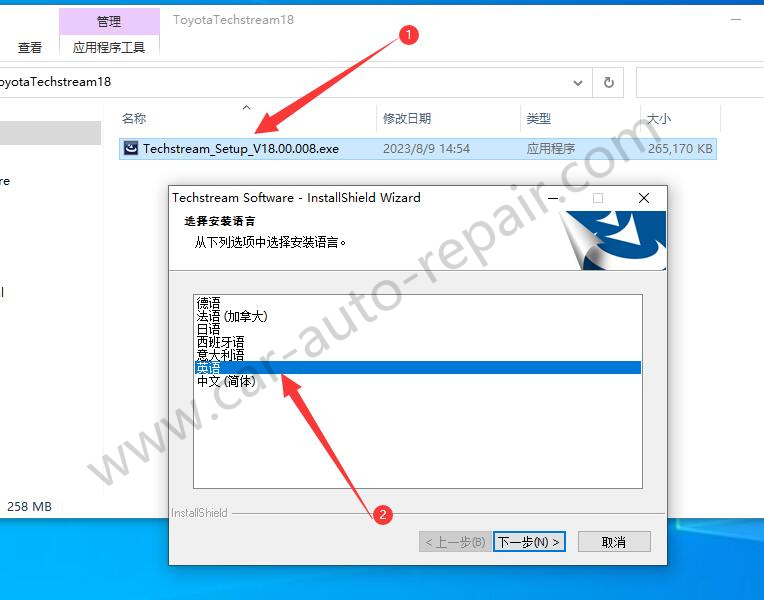
Double click “Techstream_Setup_V18.00.008.exe” to start installation
Then select language you want,and click “Next”
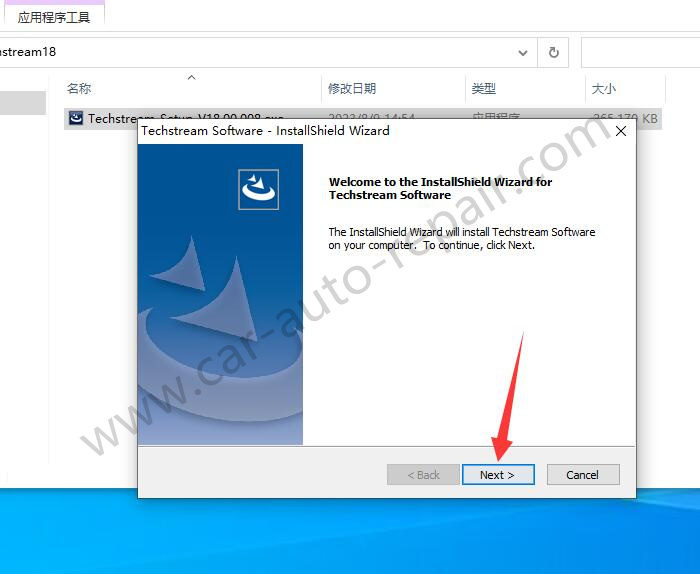
The InstallShield Wizard will install Techstream Software on your computer
Click “Next”
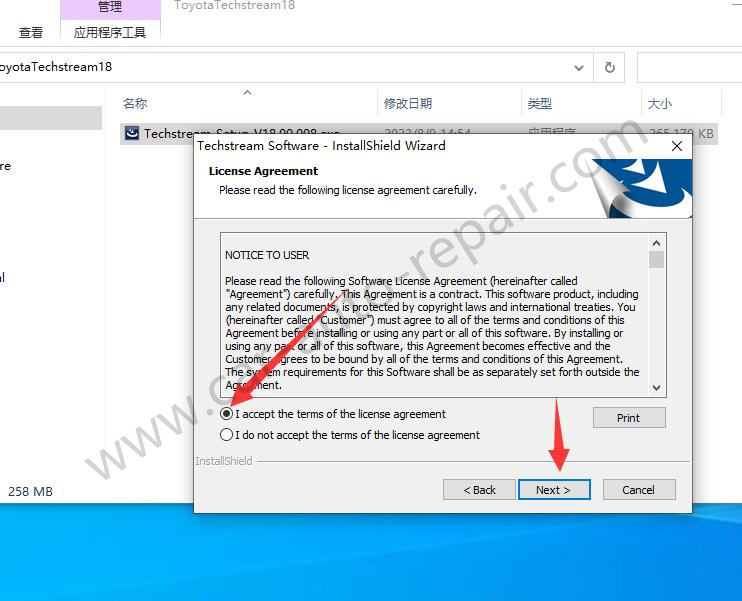
Select “I agree the terms of the license agreement”
And click “Next”
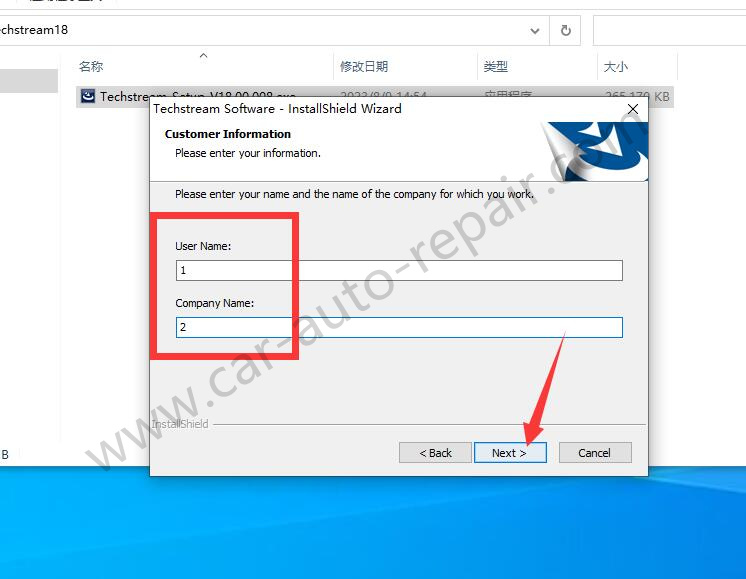
Input any word you want
Then click “Next”
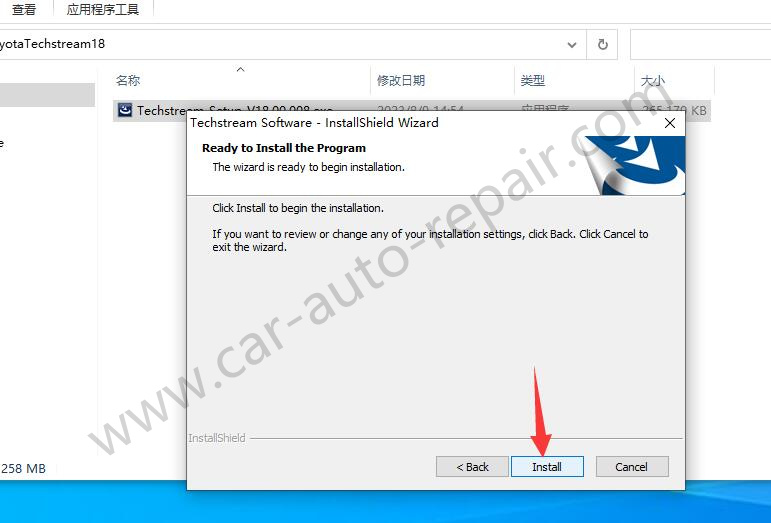
Now click “Install” to begin the installation
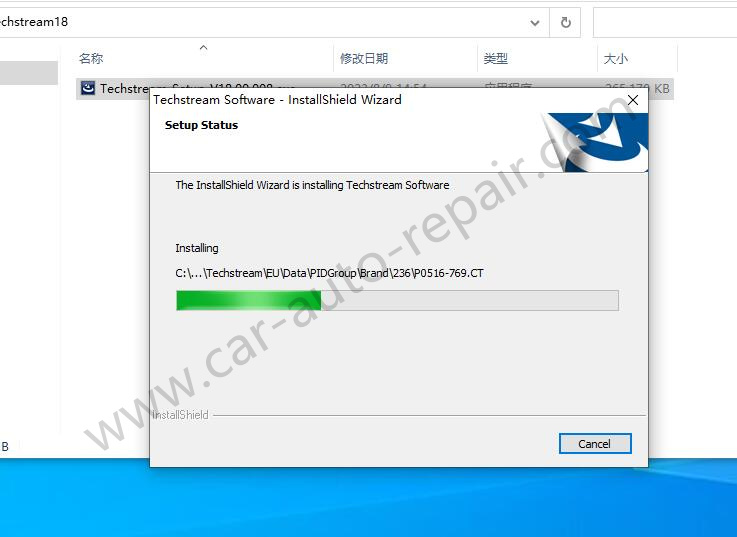
Now wait installation processing finish
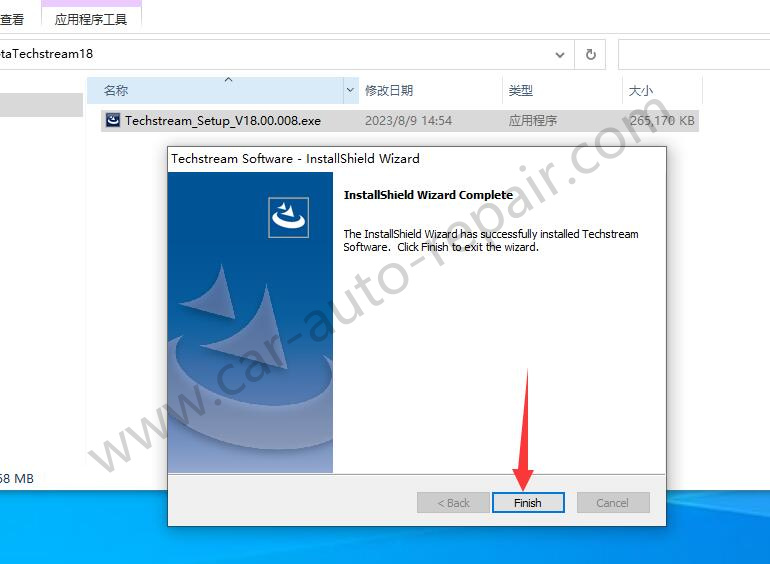
The InstallShield Wizard has successfully installed Techstream softare
Click Finish to exit the wizard
Now extract file “Techstream.rar”
Then copy “Techstream loader.exe” to C:\Program Files (x86)\Toyota Diagnostics\Techstream\bin
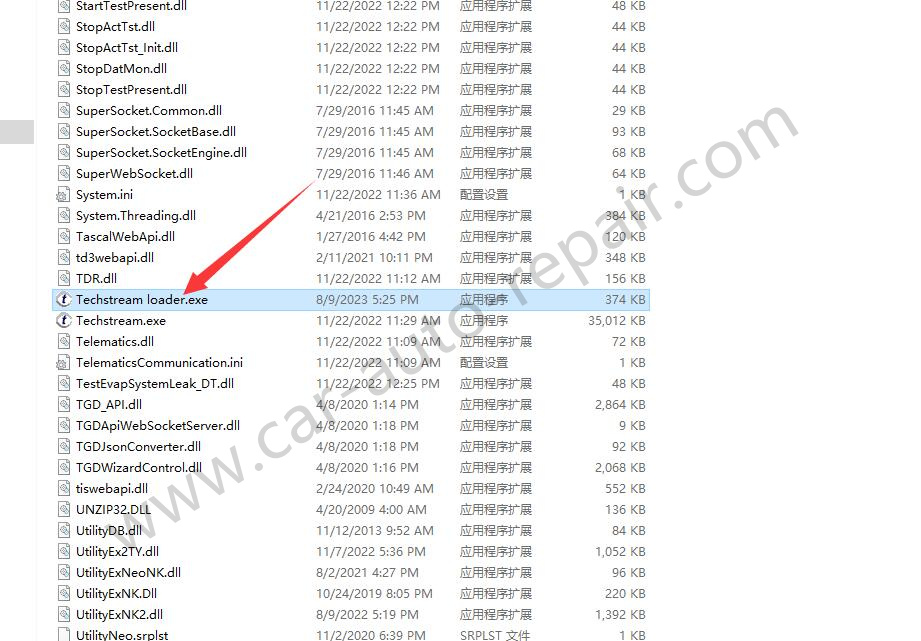
And right click to send it as shortcut to desktop
Now run “Techstream loader” on desktop

It work now!
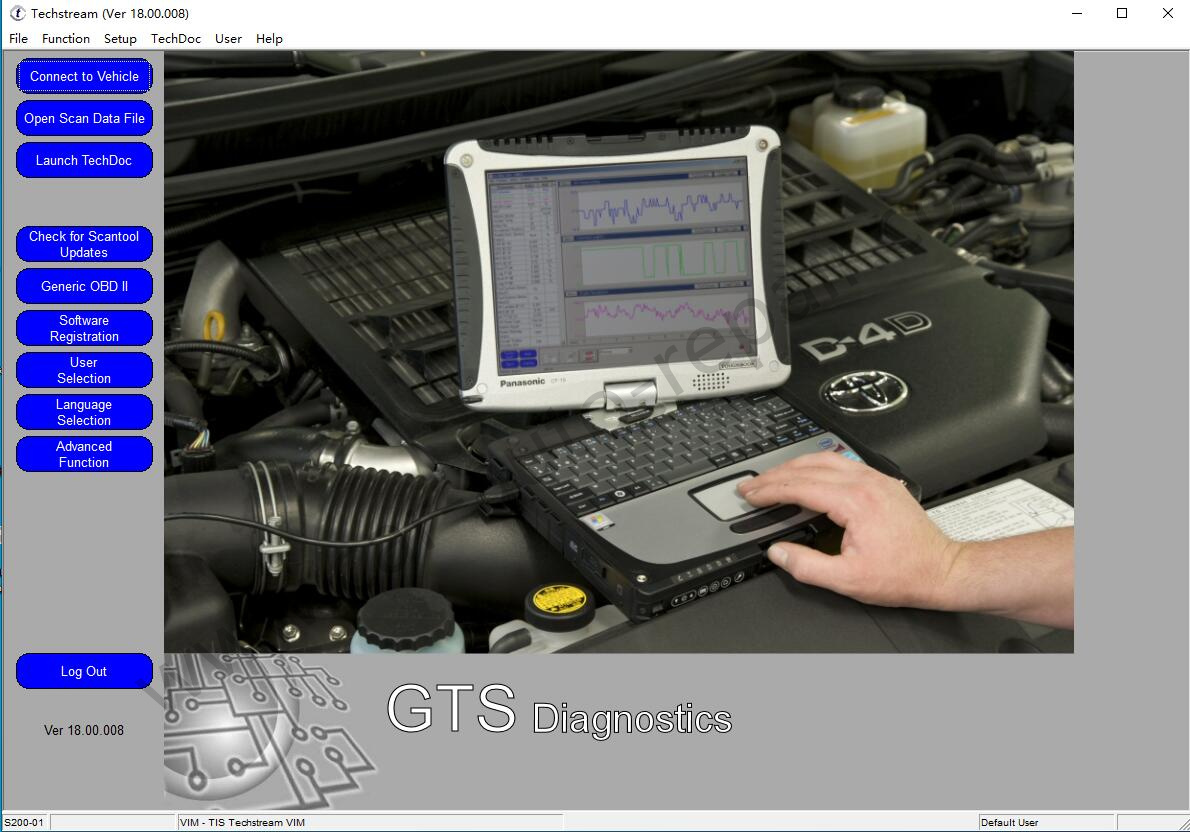
Notice:Please add it to your PC anti-virus software exception list.
(Visited 282 times, 1 visits today)
- Techstream
- Toyota Software Download
Toyota Techstream — это программное обеспечение, которое предназначено для диагностики и программирования автомобилей Toyota. Оно позволяет обнаруживать и исправлять неисправности в электронных системах автомобилей, а также осуществлять программирование различных функций. Программа Techstream является неотъемлемой частью для технических специалистов и автосервисов, работающих с автомобилями Toyota.
Установка и настройка Toyota Techstream на операционную систему Windows 10 довольно проста и требует выполнения нескольких шагов. Важно отметить, что для работы программы требуется наличие драйвера Mini-VCI для связи с автомобилем. Поэтому перед установкой Techstream необходимо установить драйвер Mini-VCI и убедиться, что он правильно работает.
После установки драйвера Mini-VCI можно приступить к установке программы Toyota Techstream. Для этого необходимо скачать последнюю версию программы с официального сайта Toyota. После загрузки файла установщика, запустите его и следуйте инструкциям на экране. Установка программы обычно не вызывает проблем и занимает несколько минут.
После установки программы необходимо настроить подключение к автомобилю. Для этого подключите Mini-VCI к диагностическому разъему автомобиля и запустите программу Toyota Techstream. В программе выберите соответствующий тип связи (USB или Bluetooth) и укажите порт, к которому подключен Mini-VCI. После настройки подключения можно начинать работу с программой Toyota Techstream и проводить диагностику и программирование автомобиля.
Важно помнить, что использование программы Toyota Techstream требует определенных знаний и навыков, поэтому, если вы не являетесь профессиональным автомехаником или техническим специалистом, рекомендуется обратиться к профессионалам для проведения диагностики и программирования вашего автомобиля Toyota.
Toyota Techstream — это мощное программное обеспечение, которое позволяет проводить диагностику и программирование автомобилей Toyota. С помощью Techstream вы сможете обнаружить и исправить неисправности в электронных системах автомобиля, а также осуществить программирование различных функций. Установка и настройка программы на операционную систему Windows 10 не вызывают особых сложностей, но требуют наличия драйвера Mini-VCI. При использовании программы важно иметь необходимые знания и навыки, поэтому в случае отсутствия опыта рекомендуется обращаться к профессионалам.
Содержание
- Toyota Techstream для Windows 10
- Установка программы
- Настройка программы
Toyota Techstream для Windows 10
Для установки Toyota Techstream на операционную систему Windows 10 следуйте следующим шагам:
- Загрузите установочный файл с официального веб-сайта Toyota Techstream.
- Запустите установочный файл и следуйте инструкциям мастера установки.
- Выберите язык установки и принимайте условия лицензионного соглашения.
- Выберите папку для установки программы и нажмите кнопку «Установить».
- Дождитесь окончания установки и нажмите кнопку «Готово».
После установки программы вам может потребоваться настроить связь с автомобилем Toyota. Вот как это сделать:
- Подключите диагностический кабель Techstream к порту диагностики вашего автомобиля.
- Запустите программу Toyota Techstream из меню Пуск.
- Выберите соответствующую модель автомобиля и нажмите кнопку «Подключиться».
- Введите PIN-код, предоставленный автомобилем, если он требуется.
- После успешного подключения вы сможете начать использовать функции программы Toyota Techstream.
Теперь вы можете настраивать и диагностировать свой автомобиль Toyota с помощью программы Toyota Techstream на операционной системе Windows 10. Удачной работы с вашим автомобилем!
Установка программы
Для установки программы Toyota Techstream на операционную систему Windows 10 следуйте инструкциям ниже:
- Скачайте установщик программы с официального сайта Toyota или с доверенного источника.
- Откройте скачанный файл.
- Запустите установщик, следуя инструкциям на экране.
- Выберите путь установки программы и нажмите «Далее».
- Выберите компоненты программы, которые вы хотите установить, и нажмите «Далее».
- Выберите язык установки и нажмите «Далее».
- Подтвердите соглашение с лицензией и нажмите «Далее».
- Выберите папку, в которой будет создан ярлык программы, и нажмите «Далее».
- Нажмите «Установить», чтобы начать процесс установки.
- Дождитесь завершения установки и нажмите «Готово».
После завершения установки программы Toyota Techstream вы сможете запустить ее с помощью созданного ярлыка на рабочем столе или в меню «Пуск». Теперь вы готовы использовать программу Toyota Techstream для диагностики и настройки вашего автомобиля Toyota.
Настройка программы
После установки Toyota Techstream на компьютер, необходимо выполнить некоторые настройки программы для корректной работы.
1. Запустите программу Toyota Techstream, кликнув по ярлыку на рабочем столе или в меню «Пуск».
2. При первом запуске программы откроется окно «Настройки».
3. В разделе «Язык интерфейса» выберите желаемый язык из выпадающего списка.
4. В разделе «Параметры экрана» выставьте необходимые настройки для разрешения и размера окна программы.
5. В разделе «Настройки подключения» выберите тип соединения с автомобилем: через USB или через беспроводное подключение.
6. Если вы выбрали USB-подключение, подключите кабель USB к компьютеру и автомобилю, затем кликните по кнопке «Проверить подключение».
7. Если вы выбрали беспроводное подключение, выберите из списка доступные Wi-Fi сети и подключитесь к нужной.
8. После выполнения всех настроек, нажмите кнопку «Сохранить» для сохранения изменений и закрытия окна настроек.
Теперь программа Toyota Techstream настроена и готова к использованию.
Many people have trouble loading Mini VCI Toyota Techstream software and driver on Windows 10 64bit system. Obdii365.com here shares some approaches to set it up on Win10 64bit.
If one fails, try another.
Method 1:
The guide below comes from a very helpful Australian forum.
It works.
This guide implies:
1) You know what you’re doing around computers and have the basic necessary skills to create directories, copy files, and import registry keys.
2) You download the file linked below (or have a Mini-VCI CD with the contents roughly matching the included files)
Win64 MVCI Driver for TOYOTA TIS
3) Your Techstream version doesn’t matter as far as I can tell, I’m using V12 (search v12 download on our blog).
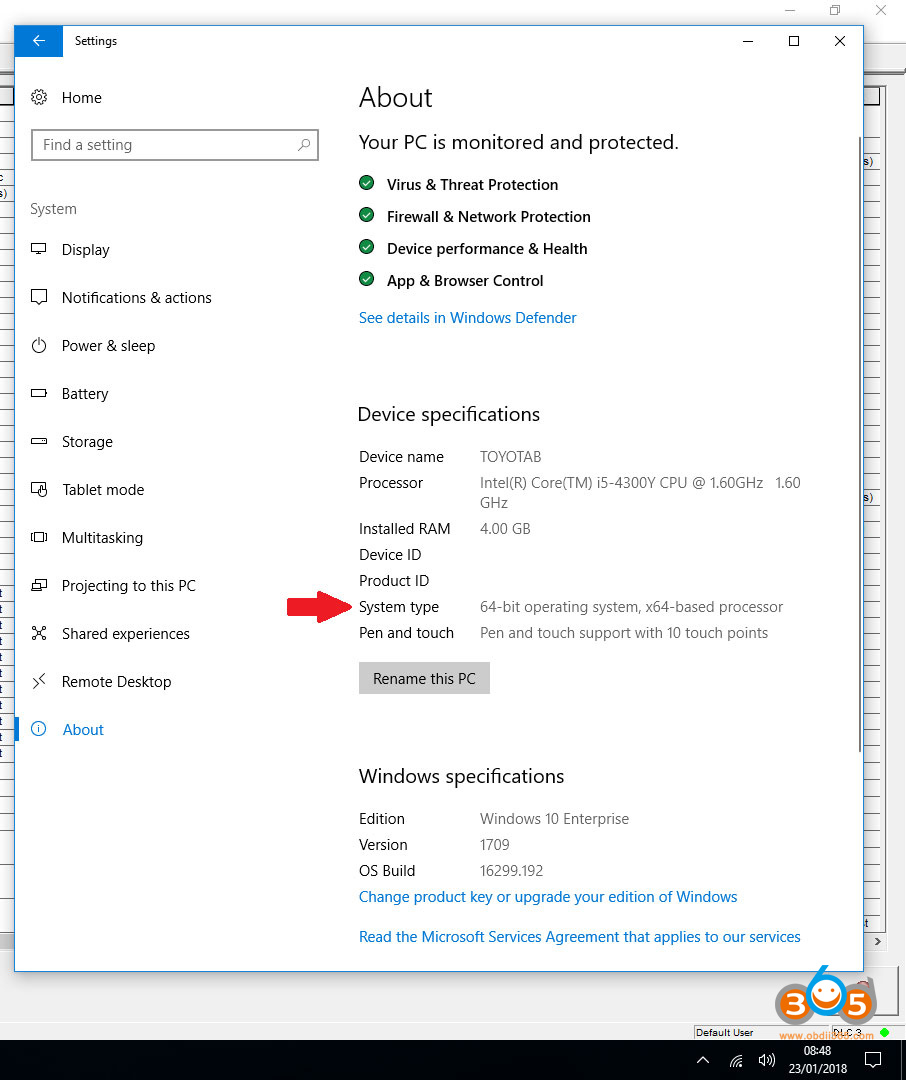
4) Windows 10, 64bit (other 64 bit versions, 7, 8, etc should all work too)
5) Tested on Mini-VCI cable J2534 with firmware 1.4.1 (should also work on newer cables too)
Grab the file above, it contains the necessary Mini-VCI 64 bit files. Make sure you copy and paste the entire link and doesn’t parse the URL correctly.
For your own safety, feel free to verify the file is safe from viruses using https://www.virustotal.com/ or any other of the various online virus testing tools.
When you extract the file it will contain the following contents.
All right, let’s get to it.
1) Create some new folders under your C:\Program Files (x86) folder and copy some files there.
C:\Program Files (x86)\XHorse Electronics
then
C:\Program Files (x86)\XHorse Electronics\MVCI Driver for TOYOTA TIS
2) Copy the files FirmwareUpdateTool and MVCI32.dll from the linked ZIP file to the “MVCI Driver for TOYOTA TIS” folder.
It should look like this
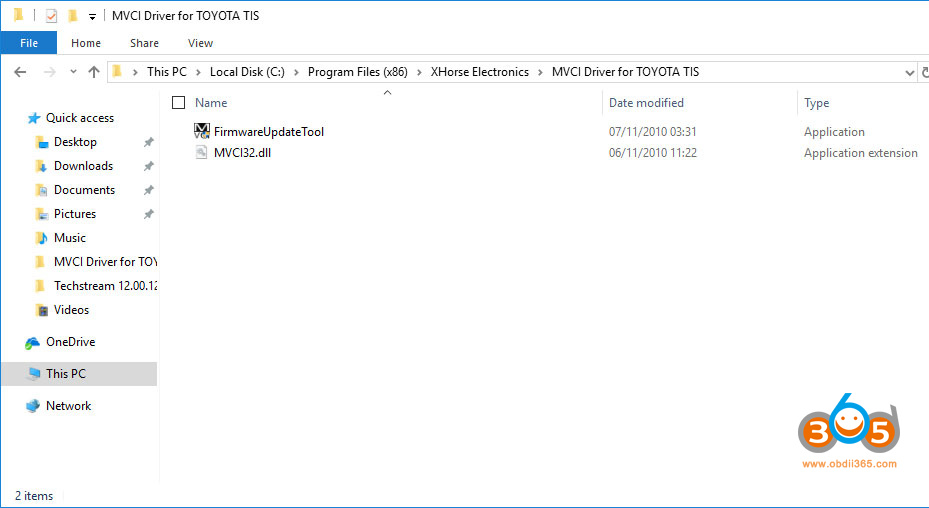
I’ve found that every time I’ve installed the VCI drivers from the MSI file, it never created those folders, and put those two files in there. That’s one of the key steps to getting this working.
If those files aren’t in those folders, then Techstream won’t work with 64bit Windows and the Mini VCI cable. In fact, if you’ve done everything else on your 64bit system, check this first, and if those files aren’t in that folder try doing this step and test Techstream, it may just work.
Now, my version of Windows (Win 10 Creators Update – 1709) detected and loaded the drivers for the Mini VCI cable automatically. I’ve found that these drivers don’t always work, so I manually installed the drivers supplied in the ZIP linked above. To install them and enable them on your devices you do the following:
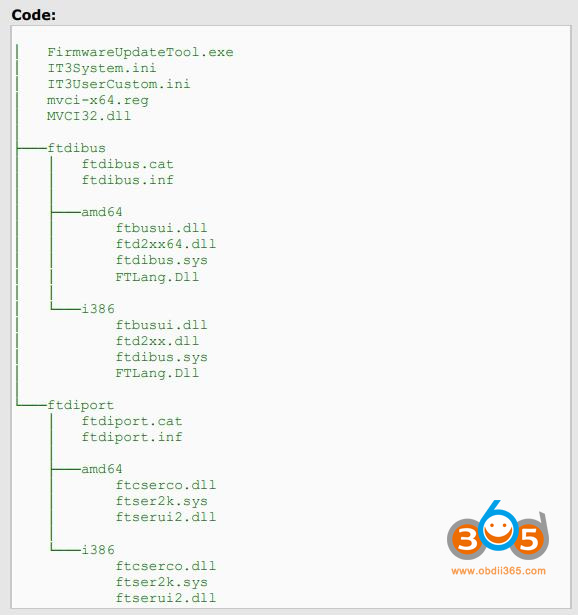
1) Under the ftdibus folder, right click the ftdibus.inf file and click install, and accept any warnings that appear.
2) Under the ftdiport folder, right click the ftdiport.inf file and click install, again accept any warnings that appear.
Get those out of the way before moving onto the next section.
1) Plug in your Mini-VCI cable and wait for windows to recognize it and load the drivers.
2) Open the device manager (Win Key+X then select Device Manager) and open the node “Ports (COM & LPT)” and double click the “USB Serial Port (COM?)” device, and then go to the “Driver” tab.
3) Refer to this image
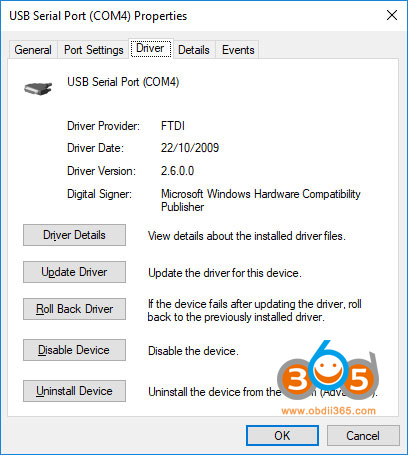
– if the driver version is 2.6.0.0 then you don’t need to change anything, otherwise go to the next step.
4) If the driver version isn’t 2.6.0.0 then click on the “Update Driver” button.
5) Next click “Browse my computer for driver software”
6) Next click “Let me pick from a list of available drivers on my computer”
7) It should list two drivers,

– the one Windows likes (2.12.28.0) and the one installed manually in step 2 which is 2.6.0.0. Select the driver version 2.6.0.0 and click “Next” wait for the drivers to install then close that window. It should now display the driver version as 2.6.0.0 as installed.
Now, it’s time to do the same with the USB Serial Converter device. So keep that MiniVCI cable plugged in.
1) With the device manager open, expand the “Universal Serial Bus controllers” node.
2) Double click the “USB Serial Converter” device and go to the “Driver” tab.
3) Following the same process in the previous section, check for and change if necessary the driver to version 2.6.0.0. It’s the same process, just replace the device name appropriately.
4) Once both the Port and Converter are on 2.6.0.0 you can now go back to the FirmwareUpdateTool.exe file that you copied and open it, once open click the “Device Info” button and it should say it’s connected, and return the firmware version of the cable.
That’s the Mini VCI cable taken care of.
—–
Now, you need to import the mvci-x64.reg file included in the ZIP. Without this imported, Techstream won’t know how to load the necessary files for the MiniVCI cable, namely the MVCI32.dll done in the first section. So simply double click it, and import it when prompted. It’s that easy.
—–
It’s implied you already have Techstream installed and licensed, this guide won’t cover that step (there’s tons of guides out there that cover it if you need it). You may also need the IT3 ini files in the zip for your Techstream. They go in the ENV folder inside the Techstream install folder.
Now, you should be safe to open Techstream and verify operation. So with the MiniVCI cable still plugged in, open Techstream.
1) Go to “Setup” then “VIM Select”. It should open with the Interface setup of “XHorse – MVCI”
2) Refer to this image at the bottom, with the arrow
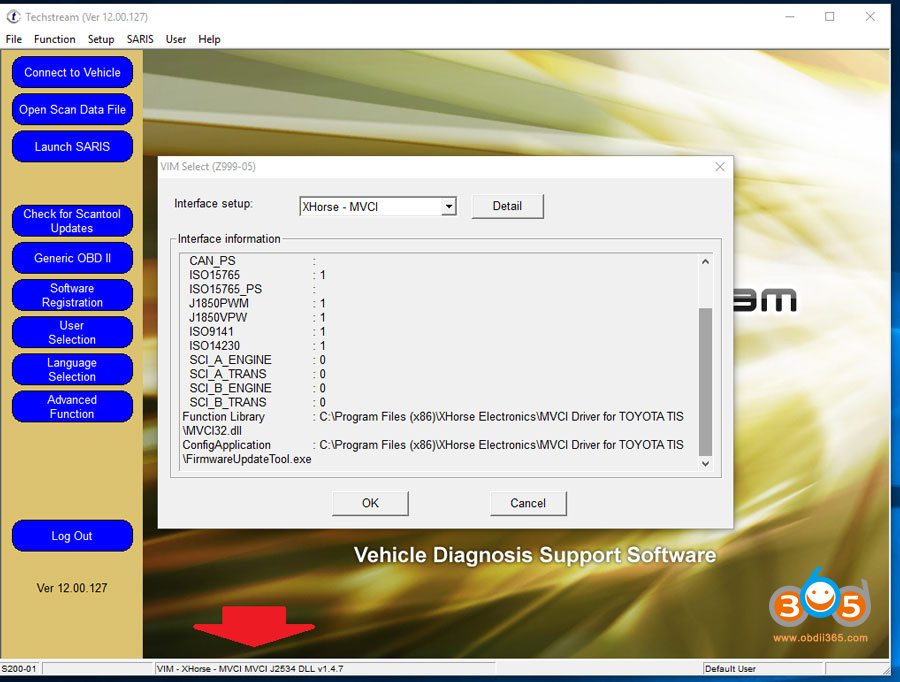
Techstream should show “VIM – Xhorse – MVCI J2534 DLL v1.4.7” (dll version may differ if you used your own files) the key is, if you get this far and it’s not just saying “VIM – Xhorse – MVCI” (which happens when you open Techstream without the MiniVCI cable plugged in) then you should be right to connect to the car. So turn on the ignition and connect.
3) If it has all gone well, then you should be presented with a progress window and if you get this far then Techstream is talking to the MiniVCI cable on your 64bit Windows.
That’s it all done, have fun.
Method 2:
Get the correct driver from FTDI website. The document is to get Windows 10 64-bit computer to recognize the Mini VCI J2534 with 1.4.1 firmware (FT232RQ chip). This is not a comprehensive guide but rather should be used as a supplement to the plethora of driver + Techstream instructions available online. Hopefully, this will help others by reducing the number of hours it takes to get this damn thing to work.
The Mini VCI J2534 (aka MVCI) device is a OBDII to USB “dongle” used to connect laptops to Toyota/Lexus vehicles, often for the purpose of using Techstream. This device utilizes a USB to serial signal converter produced by FTDI (ftdichip.com). The chip is essentially a translator so that the computer can communicate with the vehicle, and vice versa. The MVCI I bought had the 1.4.1 firmware (not the 2.0.4) which has the FTDI chip part# FT232RQ.
1) I first started with a freshly reformatted burner laptop with 64bit Windows 10. Never connected to the internet, disabled auto update of drivers using three methods (1. Device installation settings – > “No, let me choose”, 2. gpedit.msc, and 3.regedit), and uninstalled the preinstalled/bloat anti virus.
2) Connected the MVCI to the laptop and saw an unknown device in the Device Manager. Note that only one unknown device was listed, NOT TWO! Many guides state that there should be two: one unknown/warning within the “Universal Serial Bus controllers” and one in the “Ports (COM & LPT)”. I was beginning to think that my dongle was somehow damaged since I only saw one.
3) The two commonly suggested methods for installing the driver for the FTDI chip is to either extract the driver files into C:\Program Files (x86)\XHorse Electronics\MVCI Driver for TOYOTA TIS or to use the AutoKent program, followed by the registry edit program. I did both extract and AutoKent, and ran the registry edit (mvci-x64.reg).
4) Updated the driver of the unknown device by Device Manager -> Right click -> Update Driver -> Browse my computer for drivers -> Let me pick from a list of available drivers on my computer -> Have Disk -> Browse -> [now navigate to XHorse or Autokent folder]. Neither worked as it now showed a yellow exclamation mark.
5) Download/transfer onto the laptop the 2.12.36.4 driver from (ftdichip.com/drivers/d2xx-drivers/) which is the most recent driver for 64 bit Windows. As soon as I dropped the driver onto the burner laptop, the Device Manager picked it up and auto updated, even though it shouldn’t have. The USB Serial Converter no longer has the yellow exclamation mark and the properties of the Converter shows a Driver Version of 2.12.36.4. The red LED of the dongle is now permanently on! Constant red led = computer understands how to use the dongle.
6) Install techstream.
Probably the two important steps were to 1) disable auto update of drivers and/or disconnect from internet and 2) download the latest FT232RQ driver. I was able to get this same cable to work on a 32bit Win7 machine months ago, but the cable would spontaneously work then not. I wonder if it was because the driver was automatically being replaced.
Anyways, all of that work so I can program a new key. The analog on-off (x5), open-close (x6) method to add immobilizers only works if there are 3 or less keys registered.
Method 3:
I recently purchased a Mini-VCI J2534 cable from obdii365 for future car improvements.
Although the site was listed version 18. I do not need this program, just for information.
I encountered such a problem that in the disk “MVCI Driver for TOYOTA.msi” the driver was only for 32-bit Windows OS, and I have Windows 10, x64 bit installed on my laptop.
I searched for a driver on the Internet for a long time and came across one, where he left a link to the desired driver and thanks to him for that!
Download “Mini-VCI-Setup.exe” and run, the installation is standard. After installation, this cord appeared in the MMCodingWriter settings and connected to the car without any problems.
Keep updating…