You are here:
Home » Windows 10 » How To Reset Or Reinstall Sticky Notes In Windows 10
With Windows 10 Anniversary Update, Microsoft introduced the modern version of the Sticky Notes app to replace the classic Sticky Notes program, which we all have used and familiar with.
The new Sticky Notes app ships with a couple of new features that are not part of the classic Sticky Notes program. In addition to the new features, the advantage of the Sticky Notes app is that we can easily reset and reinstall the app if it doesn’t work as it’s supposed to.
While Windows 10 doesn’t offer a very straight-forward way to reinstall the Sticky Notes app, you can reinstall Sticky Notes in less than five minutes, either using the built-in PowerShell or using a third-party tool such as CCleaner. However, resetting the app is straightforward, as it can be done under Settings.
If the Sticky Notes app is not opening or not working, you can reset and reinstall it by following given below directions.
Because only Windows 10 Anniversary Update (version 1607) and later versions ship with an app version of the Sticky Notes app, this method doesn’t work on versions 1511 and older versions of Windows 10.
Method 1 – reset Sticky Notes app
Method 2 – reinstall Sticky Notes via PowerShell
Method 3 – reinstall Sticky Notes using CCleaner
Method 1
Note that resetting the Sticky Notes app might delete all existing notes.
Step 1: Open Start menu, click the Settings icon to open the Settings app, click System, and then click Apps & features.
Step 2: Click on Sticky Notes entry, click the Advanced options link, and then click Reset button.
Step 3: Click the Reset button again when you see the confirmation dialog to reset the Sticky Notes app.
Method 2
Reinstall the Sticky Notes app via Settings
Step 1: Navigate to Settings > Apps > Apps & features page.
Step 2: Scroll down the page to see the Sticky Notes entry. Click on it to reveal the Uninstall button. Click on the Uninstall button. When you get the confirmation prompt, click the Uninstall button again.
Step 3: Once the Sticky Notes app is removed, open the Store app, search for Microsoft Sticky Notes, and then install the same.
Method 3
Reinstall Sticky Notes app using PowerShell
If you’re not familiar with PowerShell, please follow the directions in Method 2 of 4.
Step 1: Open PowerShell with admin rights. To do so, type PowerShell in Start menu or taskbar search, right-click on the PowerShell entry, and then click Run as administrator option.
Click Yes button if you see the User Account Control prompt to launch PowerShell.
Step 2: At the PowerShell window, type or paste the following code and then press Enter.
Get-AppxPackage Microsoft.MicrosoftStickyNotes | Remove-AppxPackage
Method 4
Another way to reinstall Sticky Notes via the PowerShell
Step 1: Launch the PowerShell as an administrator. Type the following command:
Get-AppxPackage –AllUsers
Executing the above command will list all installed default apps in Windows 10, including the new Sticky Notes app.
Step 3: Now, look for Sticky Notes entry, and once you find it, copy its PackageFullName as shown in the picture below. To copy PackageFullName, select it, and then use Ctrl + C hotkey.
Step 4: Finally, execute the following command to uninstall the Sticky Notes app.
Remove-AppxPackage PackageFullName
In the above command, replace PackageFullName with the actual PackageFullName, which you copied in the previous step.
Step 5: Close PowerShell.
Step 6: Open this page of Store in your browser, click Get the app button to automatically open the Store link in your Store app, click Free/Install button to begin downloading and install Sticky Notes app. That’s it! You just reinstalled the Sticky Notes app in Windows 10.
Method 4
Reinstall Sticky Notes app in Windows 10 using CCleaner
Users who don’t want to use the PowerShell to uninstall the Sticky Notes app can use CCleaner (free) to easily remove the Sticky Notes app. Here is how to do that:
Step 1: Download CCleaner for Windows 10. Run the setup file to get it installed.
Step 2: Once installed, launch CCleaner, click Tools and click Uninstall to view all installed default apps, apps installed from Store as well as traditional desktop applications.
Step 3: Click on Microsoft Sticky Notes entry to select it and then click the Uninstall button. Click the OK button when you see the confirmation dialog to remove the app.
Step 4: Now that Sticky Notes is uninstalled, visit this page of Sticky Notes in your browser, click Get the app button to open the link Store app, and then click Install or Free button to download and automatically install the app. Simple as that!
Learn how to restore deleted Sticky Note notes in Windows.
Problem:
Unable to install «Sticky Notes» application in Windows 10 for all users or machine level. Whenever we install Sticky Notes from «Microsoft Store» or by «Add-AppxPackage» PowerShell command, Application is getting installed for specific User.
Reason:
Installation of Apps from «Microsoft Store» or via «Add-AppxPackage» will get installed in user level.
To install for all users, we need to install with command «Add-AppxProvisionedPackage».
Solution:
Pre-Requisites:
We should have Microsoft Volume Licensing portal access to download «Windows 10 Inbox Apps» iso image. We have to install the application using PowerShell Command «Add-AppxProvisionedPackage» with appxbuldle files but this bundle we cannot download from public Microsoft Download portal.
Steps:
1. Login to Microsoft Volume Licensing portal and search for «Windows 10 Inbox Apps«
2. Download the ISO image depends up of the Windows 10 build and Architecture you using.
The ISO file name will be similar to «SW_DVD9_NTRL_Win_10_1903_32_64_ARM64_MultiLang_App_Update_X22-01657.iso»
3. Mount the ISO image and copy the application files we want to install. We have to copy .Appxbundle and .xml file. In my example, I have to copy below highlighted 2 files.

4. Execute Command «Add-AppxProvisionedPackage -Online -PackagePath «C:\Build\amd64fre\Microsoft.MicrosoftStickyNotes_8wekyb3d8bbwe.appxbundle» –LicensePath «C:\Build\Microsoft.MicrosoftStickyNotes_8wekyb3d8bbwe.xml«

Note: Change the path of .appxbundle and .xml files depends up on where you kept this files.
5. We will get the command output similar as shown in the screenshot. Now the Windows app is installed in machine level and application will be available for all users.
Windows 10 предлагает различные способы организации и упорядочивания рабочего пространства. Одним из таких способов является использование прикрепленных заметок, которые позволяют быстро оставить напоминания или важную информацию на рабочем столе. И если вы хотите автоматизировать этот процесс, то PowerShell — это мощный инструмент, который может помочь вам установить прикрепленные заметки в Windows 10.
PowerShell — это командная строка и среда сценариев, которая поставляется с Windows 10. Она позволяет пользователям автоматизировать различные задачи и выполнять различные операции, включая управление прикрепленными заметками. Используя скрипты PowerShell, вы можете создать, изменять или удалять прикрепленные заметки, а также настраивать их параметры.
В данной статье мы расскажем вам, как установить прикрепленные заметки в Windows 10 с помощью PowerShell, предоставляя вам несколько простых и понятных шагов. Перед началом процесса установки убедитесь, что у вас есть права администратора на компьютере.
Содержание
- Как установить прикрепленные заметки
- Установка Powershell
- Загрузка и установка модуля WindowsPowerShell
- Проверка наличия модуля установки прикрепленных заметок
- Создание прикрепленной заметки
- Получение списка существующих прикрепленных заметок
- Редактирование прикрепленной заметки
- Удаление прикрепленной заметки
Как установить прикрепленные заметки
Windows 10 предлагает удобную функцию прикрепленных заметок, которая позволяет важной информации всегда оставаться на виду на рабочем столе. Однако, иногда может возникнуть необходимость установить эти заметки на новом устройстве или после переустановки операционной системы. В этой статье мы рассмотрим, как установить прикрепленные заметки с помощью Powershell.
Для начала, убедитесь, что на вашем компьютере установлен Powershell. Для этого нажмите Пуск и начните вводить «Powershell» в поисковой строке. Если появится приложение Powershell, значит оно уже установлено. Если нет, вам нужно установить его перед продолжением.
Чтобы установить прикрепленные заметки с помощью Powershell, выполните следующие шаги:
- Откройте Powershell от имени администратора. Для этого щелкните правой кнопкой мыши по значку Powershell в меню Пуск и выберите «Запуск от имени администратора».
- Скопируйте и вставьте следующую команду в окно Powershell и нажмите Enter:
Get-AppxPackage -AllUsers Microsoft.MicrosoftStickyNotes | Foreach {Add-AppxPackage -DisableDevelopmentMode -Register "$($_.InstallLocation)\AppXManifest.xml"} - Подождите, пока команда выполнится. Это может занять некоторое время в зависимости от производительности вашего компьютера.
- По окончании выполнения команды, прикрепленные заметки будут установлены на вашем компьютере.
Теперь вы можете использовать прикрепленные заметки в Windows 10. Они будут отображаться на рабочем столе и всегда оставаться впереди других окон.
В случае, если у вас возникли проблемы при установке прикрепленных заметок с помощью Powershell, вы также можете попробовать переустановить их с помощью Microsoft Store.
Теперь вы знаете, как установить прикрепленные заметки в Windows 10 с помощью Powershell. Наслаждайтесь удобством этой функции и имейте всегда под рукой важные записи!
Для установки Powershell на операционную систему Windows 10 следуйте этим шагам:
- Откройте «Параметры» с помощью сочетания клавиш Win + I.
- Нажмите на панели «Обновление и безопасность».
- Выберите «Для разработчиков» из левого меню.
- Под разделом «Среды разработки» выберите «Режим разработчика».
- Подтвердите изменения, следуя инструкциям на экране.
После завершения этих шагов Powershell будет успешно установлен на ваш компьютер с Windows 10.
Загрузка и установка модуля WindowsPowerShell
Для начала работы с Powershell на компьютере с операционной системой Windows 10 необходимо установить модуль WindowsPowerShell. Этот модуль позволяет выполнять команды и скрипты на языке PowerShell.
Чтобы загрузить и установить модуль WindowsPowerShell, выполните следующие шаги:
- Откройте меню «Пуск» и найдите «Windows PowerShell» в списке программ.
- Щелкните правой кнопкой мыши на «Windows PowerShell» и выберите «Запустить от имени администратора».
- Появится окно PowerShell с префиксом «Administrator».
- В командной строке PowerShell введите команду:
- Нажмите Enter, чтобы выполнить команду.
- Дождитесь завершения установки модуля WindowsPowerShell.
- Введите команду:
- Нажмите Enter, чтобы выполнить команду.
- Теперь модуль WindowsPowerShell успешно установлен и готов к использованию.
Install-Module -Name PowerShellGet -Force -AllowClobber
Set-ExecutionPolicy RemoteSigned -Scope CurrentUser
После установки вы можете начать работу с PowerShell и использовать его для управления и настройки операционной системы Windows 10 с помощью различных команд и сценариев.
Проверка наличия модуля установки прикрепленных заметок
Перед началом использования Powershell для установки прикрепленных заметок в Windows 10, необходимо проверить наличие модуля установки данной функциональности. Для этого выполните следующие шаги:
- Откройте командную строку PowerShell, запустив PowerShell ISE или нажав правой кнопкой мыши на кнопке «Пуск» и выбрав «Windows PowerShell» в контекстном меню.
- В открывшемся окне PowerShell введите следующую команду:
Get-Module. - Нажмите клавишу «Enter», чтобы выполнить команду.
- Обратите внимание на список модулей, отображенных в окне PowerShell. Если среди них есть модуль с именем «Microsoft.PowerShell.SecretManagement», это означает, что модуль установки прикрепленных заметок уже установлен и готов к использованию.
- Если модуля нет в списке, это означает, что модуль установки прикрепленных заметок не установлен, и его необходимо установить перед началом использования.
Для установки модуля установки прикрепленных заметок выполните следующие шаги:
- Откройте командную строку PowerShell с правами администратора.
- В открывшемся окне PowerShell введите следующую команду:
Install-Module -Name Microsoft.PowerShell.SecretManagement -Force. - Нажмите клавишу «Enter», чтобы выполнить команду.
- Дождитесь завершения процесса установки модуля.
- После успешной установки модуля можно приступать к настройке и использованию прикрепленных заметок в Windows 10 с помощью Powershell.
Теперь, когда модуль установки прикрепленных заметок установлен, вы можете использовать PowerShell для создания, удаления и управления прикрепленными заметками в Windows 10.
Создание прикрепленной заметки
Прикрепленные заметки в Windows 10 могут быть очень полезными для организации задач и важной информации. Чтобы создать прикрепленную заметку с помощью Powershell, необходимо выполнить следующие шаги:
- Откройте Powershell, нажав правой кнопкой мыши на кнопке «Пуск» и выбрав «Windows PowerShell».
- Введите команду
Add-Type -TypeDefinition 'using System; using System.Runtime.InteropServices; public class StickyNote { [DllImport("user32.dll")] public static extern int FindWindow(string lpClassName, string lpWindowName); [DllImport("user32.dll")] public static extern int SendMessage(int hWnd, uint Msg, int wParam, int lParam); public static void CreateStickyNote() { int HWND_BOTTOM = 1; int WM_COMMAND = 0x111; int ID_STICKY_NOTE = 0x2A9; int hWnd = FindWindow("Shell_NotesWnd", null); SendMessage(hWnd, WM_COMMAND, ID_STICKY_NOTE, HWND_BOTTOM); } }'для добавления необходимых функций в Powershell. - После этого введите команду
[StickyNote]::CreateStickyNote()для создания прикрепленной заметки.
После выполнения этих шагов в вашей системе будет создана новая прикрепленная заметка, которую вы сможете использовать для записей и важной информации. Прикрепленная заметка будет отображаться на рабочем столе и сохраняться после перезагрузки компьютера.
Получение списка существующих прикрепленных заметок
- Откройте PowerShell, щелкнув правой кнопкой мыши по меню «Пуск» и выбрав «Windows PowerShell» из списка результатов.
- Введите следующую команду в PowerShell:
Get-Item -Path $HOME\AppData\Roaming\Microsoft\StickyNotes\StickyNotes.snt | Format-List -Property * - Нажмите клавишу Enter, чтобы выполнить команду.
После выполнения команды PowerShell выведет информацию о всех заметках, включая их заголовки, содержимое, цвет и позицию на рабочем столе. Каждая заметка будет отображена в виде отдельного блока информации.
Теперь вы можете легко получить список всех прикрепленных заметок в Windows 10 с помощью Powershell и использовать эту информацию по своему усмотрению.
Редактирование прикрепленной заметки
Когда вы устанавливаете прикрепленную заметку с помощью Powershell в Windows 10, вам может потребоваться редактировать ее содержимое в будущем. Вот как это можно сделать:
- Найдите прикрепленную заметку на рабочем столе или в меню «Пуск» и щелкните правой кнопкой мыши.
- Выберите «Редактировать» из контекстного меню, чтобы открыть заметку для редактирования.
- Внесите необходимые изменения в текст заметки.
- После внесения изменений сохраните заметку, закрыв окно редактирования или используя сочетание клавиш Ctrl + S. Ваши изменения будут автоматически сохранены.
- При необходимости вы также можете изменить заголовок заметки, щелкнув на поле заголовка и вводя новое название.
Теперь ваша прикрепленная заметка обновлена с новыми данными и готова к использованию.
Удаление прикрепленной заметки
Для удаления прикрепленной заметки в Windows 10 с помощью Powershell вам понадобится следующий код:
remove-item $notesFilePath
Данный код использует команду remove-item, которая удаляет файл с указанным путем (в данном случае, $notesFilePath — это путь к файлу заметок).
Прежде чем использовать этот код, убедитесь, что вы создали переменную $notesFilePath и присвоили ей путь к файлу заметок. Вам также потребуется запустить Powershell от имени администратора.
После запуска данного кода, выбранная прикрепленная заметка будет удалена.
Обратите внимание, что удаление заметки является окончательным и необратимым действием, поэтому будьте осторожны при использовании данного кода.
- How do I add sticky notes to Windows 10 PowerShell?
- How do I install sticky notes on Windows 10?
- How do I fix a sticky note in Windows 10?
- Why does sticky notes not work on Windows 10?
- Where are Windows 10 sticky notes stored?
- Why are my sticky notes not sticking?
- Is sticky notes available in Windows 10?
- How do I recover a sticky note?
- Where are sticky notes saved?
- Can you change the font on sticky notes Windows 10?
- How do I save a sticky note in Windows?
How do I add sticky notes to Windows 10 PowerShell?
If you have administrator access, you can follow the steps below to install Sticky Notes using PowerShell: Open PowerShell with admin rights. To do so, type Windows PowerShell in the search box to see PowerShell in results, right-click on PowerShell, and then click Run as administrator option.
How do I install sticky notes on Windows 10?
Replies (4)
1)Open the Windows 10 Store app. Type Sticky Notes in the search box and then click the Microsoft Sticky Notes app from the result. Click the Get button. It will begin to download and install the latest version of Sticky Notes app on your computer.
How do I fix a sticky note in Windows 10?
Method 1. Reset Sticky Notes
- Navigate to Windows 10 PC «Settings» -> «System» -> on the left panel «Apps & features»
- Find your «Sticky Notes» app, and click on the «Advanced options»
- On the popup window, click on «Reset»
Why does sticky notes not work on Windows 10?
Open Settings again and click on apps. Under Apps & features, search for Sticky Notes, click on it once, and select Advanced options. … If Reset fails to work, uninstall Sticky Notes. Then download and reinstall it from the Windows Store.
Where are Windows 10 sticky notes stored?
In Windows 10, Sticky Notes are stored in a single file located deep in the user folders. You can manually copy that SQLite database file for safekeeping to any other folder, drive, or cloud storage service to which you have access.
Why are my sticky notes not sticking?
Pulling them upwards or sideways causes the notes to bend, and they then don’t adhere well to flat surfaces. Instead, remove them by slightly lifting the middle of the bottom edge and pulling it towards you, away from the sticky edge in a straight movement.
Is sticky notes available in Windows 10?
On Windows 10, click or tap the Start button, and type «Sticky Notes». Sticky Notes will open where you left them. In the list of notes, tap or double-click a note to open it. … If you do not see Sticky Notes in your list of apps, open the Microsoft Store app and install «Microsoft Sticky Notes».
How do I recover a sticky note?
Your best chance to recover your data is to try navigating to the C:\Users\<UserName>\AppData\Roaming\Microsoft\Sticky Notes directory, right click on StickyNotes. snt, and select Restore Previous Versions. This will pull the file from your latest restore point, if available.
Where are sticky notes saved?
Windows stores your sticky notes in a special appdata folder, which is probably C:\Users\logon\AppData\Roaming\Microsoft\Sticky Notes—with logon being the name with which you log onto your PC. You’ll find only one file in that folder, StickyNotes. snt, which contains all your notes.
Can you change the font on sticky notes Windows 10?
Open the Sticky Notes app. Click on the button with three dots. Click on the settings button. Move the position of the font size slider to change the font size.
How do I save a sticky note in Windows?
How to Sync and Save Your Sticky Notes in Windows 10
- Open Sticky Notes. First, you can open Sticky Notes one of several ways. …
- Alternative Ways to Open Sticky Notes. …
- Sign in and Sync Sticky Notes. …
- Create and Store Sticky Notes. …
- Re-Open Sticky Notes. …
- Delete Sticky Notes. …
- Confirm Deletion. …
- Navigate Sticky Notes.
This article will serve as an informative guide and give you a clear understanding of how to perform silent or interactive installs and uninstalls of the Microsoft Sticky Notes (Microsoft Store App) using the Powershell App Deployment Toolkit. The PowerShell App Deployment Toolkit can be used to replace your WiseScript, VBScript and Batch wrapper scripts with one versatile, re-usable and extensible tool. This tool is an absolute must for Microsoft Endpoint Manager Configuration Manager (MEMCM) / (SCCM) Administrators or anyone who is responsible for packaging and deploying software.
How to Install the Microsoft Sticky Notes (Microsoft Store App) Using the PowerShell App Deployment Toolkit
- Download the Powershell App Deployment Toolkit 3.8.4:
- https://github.com/PSAppDeployToolkit/PSAppDeployToolkit/releases/download/3.8.4/PSAppDeployToolkit_v3.8.4.zip
- Download the zip file to a folder created at (C:\Downloads)
- Open Windows PowerShell by Right-Clicking on Windows PowerShell and selecting Run as Administrator
- Enter the following command to remove the Zone.Identifier:
Unblock-File -Path C:\Downloads\PSAppDeployToolkit_v3.8.4.zip
- Enter the following command to extract the contents of the zip file:
Expand-Archive -Path C:\Downloads\PSAppDeployToolkit_v3.8.4.zip -DestinationPath C:\Downloads\PADT
- Enter the following commands to copy the AppDeployToolkit & Files folder to “C:\Downloads\StickyNotesApp“:
Copy-Item -Path "C:\Downloads\PADT\Toolkit\AppDeployToolkit" -Destination "C:\Downloads\StickyNotesApp\AppDeployToolkit" -RecurseCopy-Item -Path "C:\Downloads\PADT\Toolkit\Files" -Destination "C:\Downloads\StickyNotesApp\Files"
You should now see the AppDeploymentToolkit folder with files & the empty Files folder at “C:\Downloads\StickyNotesApp”
Next we’ll want to download the Microsoft Sticky Notes (Microsoft Store App) & dependency files using PowerShell.
- Copy the PowerShell script below to “C:\Downloads” & name it Get_Store_Downloads.ps1
- Script Reference: https://flexxible.com/automating-msix-packaging-with-powershell/
#Requires -version 3
<#
.SYNOPSIS
Get links to Microsoft Store downloads and optionally download packages
.DESCRIPTION
Downloaded packages can be installed via Add-AppxPackage -Path
.PARAMETER packageFamilyName
A list of package family names to download
.PARAMETER name
A regular expression which will select the family package names for existing AppX package names that match
.PARAMETER packageTypeFilter
The types of package to download
.PARAMETER downloadFolder
The folder to download non-excluded files to. Will be created if does not exist. If not specified, files will not be downloaded
.PARAMETER ring
The release ring to download
.PARAMETER proxy
Proxy server to use
.PARAMETER excludeExtensions
List of file extensions to not download
.PARAMETER excluderegex
If download Links match this regular expression they will not be downloaded
.PARAMETER language
The language for downloading files
.PARAMETER force
Overwrite files which already exist
.PARAMETER all
Interrogate all local AppX packages rather than just those available to the user running the script (requires elevation). Use with -name
.EXAMPLE
Powershell.exe -ExecutionPolicy ByPass "&" '.\Get_Store_Downloads.ps1' -packageFamilyName Microsoft.MicrosoftStickyNotes_8wekyb3d8bbwe -downloadFolder C:\Downloads\StickyNotesApp\Files -excludeRegex 'arm' -force
Downloads the resources from the Microsoft Store for the Microsoft Sticky Notes App, excluding files for arm and arm64 architecture and save the files to C:\Downloads\StickyNotesApp\Files
.NOTES
Modification History:
2022/03/18 @guyrleech Initial public release
2022/03/29 modified by Jason Bergner
#>
<#
Copyright © 2022 Guy Leech
Permission is hereby granted, free of charge, to any person obtaining a copy of this software and associated documentation files (the “Software”), to deal in the Software without restriction,
including without limitation the rights to use, copy, modify, merge, publish, distribute, sublicense, and/or sell copies of the Software, and to permit persons to whom the Software is furnished to do so, subject to the following conditions:
The above copyright notice and this permission notice shall be included in all copies or substantial portions of the Software.
THE SOFTWARE IS PROVIDED “AS IS”, WITHOUT WARRANTY OF ANY KIND, EXPRESS OR IMPLIED, INCLUDING BUT NOT LIMITED TO THE WARRANTIES OF MERCHANTABILITY, FITNESS FOR A PARTICULAR PURPOSE AND NONINFRINGEMENT.
IN NO EVENT SHALL THE AUTHORS OR COPYRIGHT HOLDERS BE LIABLE FOR ANY CLAIM, DAMAGES OR OTHER LIABILITY, WHETHER IN AN ACTION OF CONTRACT, TORT OR OTHERWISE, ARISING FROM, OUT OF OR IN CONNECTION WITH THE SOFTWARE OR THE USE OR OTHER DEALINGS IN THE SOFTWARE.
#>
[CmdletBinding()]
Param
(
[Parameter(Mandatory=$true,ParameterSetName='Family')]
[string[]]$packageFamilyName ,
[Parameter(Mandatory=$true,ParameterSetName='Name')]
[string]$name ,
[Parameter(Mandatory=$false,ParameterSetName='Name')]
[string]$packageTypeFilter = 'All' ,
[string]$downloadFolder ,
[ValidateSet('Slow','Retail','Fast,','RP')]
[string]$ring = 'retail' ,
[string]$proxy ,
[string[]]$excludeExtensions = ('','blockmap','eappx','eappxbundle','emsixbundle') ,
[string]$excludeRegex ,
[string]$language = 'en-US' ,
[switch]$force ,
[Parameter(Mandatory=$false,ParameterSetName='Name')]
[switch]$all
)
[hashtable]$proxyParameters = @{}
if( ! [string]::IsNullOrEmpty( $proxy ) )
{
$proxyServer = New-Object -TypeName 'System.Net.WebProxy'
$proxyServer.Address = [uri]$proxy
$proxyServer.UseDefaultCredentials = $true
[System.Net.WebRequest]::DefaultWebProxy = $proxyServer
$proxyParameters.Add( 'Proxy' , $proxy )
$proxyParameters.Add( 'ProxyUseDefaultCredentials' , $true )
Write-Verbose "Proxy set to $proxy"
}
##https://stackoverflow.com/questions/41897114/unexpected-error-occurred-running-a-simple-unauthorized-rest-query?rq=1
Add-Type -TypeDefinition @'
public class SSLHandler
{
public static System.Net.Security.RemoteCertificateValidationCallback GetSSLHandler()
{
return new System.Net.Security.RemoteCertificateValidationCallback((sender, certificate, chain, policyErrors) => { return true; });
}
}
'@
[System.Net.ServicePointManager]::ServerCertificateValidationCallback = [SSLHandler]::GetSSLHandler()
[Net.ServicePointManager]::SecurityProtocol = [Net.ServicePointManager]::SecurityProtocol -bor [System.Net.SecurityProtocolType]::Tls12
if( $PSCmdlet.ParameterSetName -eq 'Name' )
{
Import-Module -Name AppX -Verbose:$false
[array]$packages = @( Get-AppxPackage -AllUsers:$all -PackageTypeFilter $PackageTypeFilter | Where-Object PackageFamilyName -Match $name )
if( $null -eq $packages -or $packages.Count -eq 0 )
{
Throw "No existing AppX packages found matching $name"
}
$packageFamilyName = $packages | Select-Object -ExpandProperty PackageFamilyName -Unique
}
Write-Verbose -Message "Got $($packageFamilyName.Count) packages"
$webclient = $null
if( -Not [string]::IsNullOrEmpty( $downloadFolder ) )
{
if( -Not ( Test-Path -Path $downloadFolder -ErrorAction SilentlyContinue ) )
{
$null = New-Item -Path $downloadFolder -Force -ItemType Directory -ErrorAction Stop
}
if( -Not ( $webClient = New-Object -TypeName System.Net.WebClient ) )
{
Throw "Failed to create a System.Net.WebClient object"
}
}
[int]$count = 0
ForEach( $package in $packageFamilyName )
{
$count++
[string]$requestBody = "type=PackageFamilyName&url=$package&ring=$ring&lang=$language"
$response = $null
$session = $null
$response = Invoke-WebRequest -URI 'https://store.rg-adguard.net/api/GetFiles' -body $requestBody -Method Post -ContentType 'application/x-www-form-urlencoded' -SessionVariable session @proxyParameters
if( $response -and $response.PSObject.Properties[ 'links' ] -and $response.Links.Count -gt 0 )
{
##Write-Verbose -Message "$count / $($packageFamilyName.Count) : Got $($response.Links.Count) links for $requestBody"
ForEach( $link in ($response.Links | Where-Object href -match '^https?://' ))
{
[string]$extension = [System.IO.Path]::GetExtension( $link.innerText ) -replace '^\.'
if( $extension -in $excludeExtensions )
{
Write-Verbose -Message "Ignoring `"$($link.innerText)`" as extension $extension in exclude list"
}
elseif( -Not [string]::IsNullOrEmpty( $excludeRegex ) -and $link.innerText -match $excludeRegex )
{
Write-Verbose -Message "Ignoring `"$($link.innerText)`" as matches $excludeRegex"
}
else
{
$result = [pscustomobject]@{
'PackageFamilyName' = $package
'File' = $link.innertext
'Link' = $link.href
}
if( -Not [string]::IsNullOrEmpty( $downloadFolder ) )
{
[string]$destinationFile = Join-Path -Path $downloadFolder -ChildPath $link.InnerText
if( ( Test-Path -Path $destinationFile -ErrorAction SilentlyContinue) -and -Not $force )
{
Write-Warning -Message "Not downloading to `"$destinationFile`" as already exists - use -force to overwrite"
}
else
{
try
{
$webclient.DownloadFile( ( $link.href -replace '&' , '&' ) , $destinationFile )
if( $properties = Get-ItemProperty -Path $destinationFile )
{
Add-Member -InputObject $result -NotePropertyMembers @{
'Download' = $properties.FullName
'Size (KB)' = [math]::Round( $properties.Length / 1KB , 1 )
}
}
else
{
Write-Warning -Message "Unable to get file properties for $destinationFile"
}
}
catch
{
Write-Warning -Message "Problem downloading $($link.href) - $_"
}
}
}
$result
}
}
}
else
{
## <img src="../img/stop.png">The server returned an empty list.<br>Either you have not entered the link correctly, or this service does not support generation for this product.</p><script type="text/javascript">
Write-Warning -Message "No data or links returned for $requestBody - $($response.Content -split "`n`r?" , 2 -replace '\<[^\>]+\>' | Select-Object -First 1)"
}
}
- Add the following registry key to suppress the “To Allow this website to provide information personalized for you, will you allow it to put a small file (cookie) on your computer?” popup message
REG ADD "HKCU\SOFTWARE\Microsoft\Windows\CurrentVersion\Internet Settings\Zones\3" /t REG_DWORD /v 1A10 /f /d 0
- Open Windows PowerShell by Right-Clicking on Windows PowerShell and selecting Run as Administrator
- Change the directory to “C:\Downloads”
- PS C:\Downloads>
- Enter the following command to download the installation files:
Powershell.exe -ExecutionPolicy ByPass "&" '.\Get_Store_Downloads.ps1' -packageFamilyName Microsoft.MicrosoftStickyNotes_8wekyb3d8bbwe -downloadFolder C:\Downloads\StickyNotesApp\Files -excludeRegex 'arm' -force
- After the download completes, you should see .appx, .appxbundle & .msixbundle files inside the “C:\Downloads\StickyNotesApp\Files” directory
- Copy the PowerShell script below to “C:\Downloads\StickyNotesApp“ & name it Deploy-StickyNotesApp.ps1
<#
.SYNOPSIS
This script performs the installation or uninstallation of the Microsoft Sticky Notes Microsoft Store App.
# LICENSE #
PowerShell App Deployment Toolkit - Provides a set of functions to perform common application deployment tasks on Windows.
Copyright (C) 2017 - Sean Lillis, Dan Cunningham, Muhammad Mashwani, Aman Motazedian.
This program is free software: you can redistribute it and/or modify it under the terms of the GNU Lesser General Public License as published by the Free Software Foundation, either version 3 of the License, or any later version. This program is distributed in the hope that it will be useful, but WITHOUT ANY WARRANTY; without even the implied warranty of MERCHANTABILITY or FITNESS FOR A PARTICULAR PURPOSE. See the GNU General Public License for more details.
You should have received a copy of the GNU Lesser General Public License along with this program. If not, see <http://www.gnu.org/licenses/>.
.DESCRIPTION
The script is provided as a template to perform an install or uninstall of an application(s).
The script either performs an "Install" deployment type or an "Uninstall" deployment type.
The install deployment type is broken down into 3 main sections/phases: Pre-Install, Install, and Post-Install.
The script dot-sources the AppDeployToolkitMain.ps1 script which contains the logic and functions required to install or uninstall an application.
.PARAMETER DeploymentType
The type of deployment to perform. Default is: Install.
.PARAMETER DeployMode
Specifies whether the installation should be run in Interactive, Silent, or NonInteractive mode. Default is: Interactive. Options: Interactive = Shows dialogs, Silent = No dialogs, NonInteractive = Very silent, i.e. no blocking apps. NonInteractive mode is automatically set if it is detected that the process is not user interactive.
.PARAMETER AllowRebootPassThru
Allows the 3010 return code (requires restart) to be passed back to the parent process (e.g. SCCM) if detected from an installation. If 3010 is passed back to SCCM, a reboot prompt will be triggered.
.PARAMETER TerminalServerMode
Changes to "user install mode" and back to "user execute mode" for installing/uninstalling applications for Remote Destkop Session Hosts/Citrix servers.
.PARAMETER DisableLogging
Disables logging to file for the script. Default is: $false.
.EXAMPLE
PowerShell.exe .\Deploy-StickyNotesApp.ps1 -DeploymentType "Install" -DeployMode "NonInteractive"
.EXAMPLE
PowerShell.exe .\Deploy-StickyNotesApp.ps1 -DeploymentType "Install" -DeployMode "Silent"
.EXAMPLE
PowerShell.exe .\Deploy-StickyNotesApp.ps1 -DeploymentType "Install" -DeployMode "Interactive"
.EXAMPLE
PowerShell.exe .\Deploy-StickyNotesApp.ps1 -DeploymentType "Uninstall" -DeployMode "NonInteractive"
.EXAMPLE
PowerShell.exe .\Deploy-StickyNotesApp.ps1 -DeploymentType "Uninstall" -DeployMode "Silent"
.EXAMPLE
PowerShell.exe .\Deploy-StickyNotesApp.ps1 -DeploymentType "Uninstall" -DeployMode "Interactive"
.NOTES
Toolkit Exit Code Ranges:
60000 - 68999: Reserved for built-in exit codes in Deploy-Application.ps1, Deploy-Application.exe, and AppDeployToolkitMain.ps1
69000 - 69999: Recommended for user customized exit codes in Deploy-Application.ps1
70000 - 79999: Recommended for user customized exit codes in AppDeployToolkitExtensions.ps1
.LINK
http://psappdeploytoolkit.com
#>
[CmdletBinding()]
Param (
[Parameter(Mandatory=$false)]
[ValidateSet('Install','Uninstall','Repair')]
[string]$DeploymentType = 'Install',
[Parameter(Mandatory=$false)]
[ValidateSet('Interactive','Silent','NonInteractive')]
[string]$DeployMode = 'Interactive',
[Parameter(Mandatory=$false)]
[switch]$AllowRebootPassThru = $false,
[Parameter(Mandatory=$false)]
[switch]$TerminalServerMode = $false,
[Parameter(Mandatory=$false)]
[switch]$DisableLogging = $false
)
Try {
## Set the script execution policy for this process
Try { Set-ExecutionPolicy -ExecutionPolicy 'ByPass' -Scope 'Process' -Force -ErrorAction 'Stop' } Catch {}
##*===============================================
##* VARIABLE DECLARATION
##*===============================================
## Variables: Application
[string]$appVendor = ''
[string]$appName = 'Microsoft Sticky Notes Microsoft Store App'
[string]$appVersion = ''
[string]$appArch = ''
[string]$appLang = ''
[string]$appRevision = ''
[string]$appScriptVersion = '1.0.0'
[string]$appScriptDate = 'XX/XX/20XX'
[string]$appScriptAuthor = 'Jason Bergner'
##*===============================================
## Variables: Install Titles (Only set here to override defaults set by the toolkit)
[string]$installName = ''
[string]$installTitle = 'Microsoft Sticky Notes Microsoft Store App'
##* Do not modify section below
#region DoNotModify
## Variables: Exit Code
[int32]$mainExitCode = 0
## Variables: Script
[string]$deployAppScriptFriendlyName = 'Deploy Application'
[version]$deployAppScriptVersion = [version]'3.8.4'
[string]$deployAppScriptDate = '26/01/2021'
[hashtable]$deployAppScriptParameters = $psBoundParameters
## Variables: Environment
If (Test-Path -LiteralPath 'variable:HostInvocation') { $InvocationInfo = $HostInvocation } Else { $InvocationInfo = $MyInvocation }
[string]$scriptDirectory = Split-Path -Path $InvocationInfo.MyCommand.Definition -Parent
## Dot source the required App Deploy Toolkit Functions
Try {
[string]$moduleAppDeployToolkitMain = "$scriptDirectory\AppDeployToolkit\AppDeployToolkitMain.ps1"
If (-not (Test-Path -LiteralPath $moduleAppDeployToolkitMain -PathType 'Leaf')) { Throw "Module does not exist at the specified location [$moduleAppDeployToolkitMain]." }
If ($DisableLogging) { . $moduleAppDeployToolkitMain -DisableLogging } Else { . $moduleAppDeployToolkitMain }
}
Catch {
If ($mainExitCode -eq 0){ [int32]$mainExitCode = 60008 }
Write-Error -Message "Module [$moduleAppDeployToolkitMain] failed to load: `n$($_.Exception.Message)`n `n$($_.InvocationInfo.PositionMessage)" -ErrorAction 'Continue'
## Exit the script, returning the exit code to SCCM
If (Test-Path -LiteralPath 'variable:HostInvocation') { $script:ExitCode = $mainExitCode; Exit } Else { Exit $mainExitCode }
}
#endregion
##* Do not modify section above
##*===============================================
##* END VARIABLE DECLARATION
##*===============================================
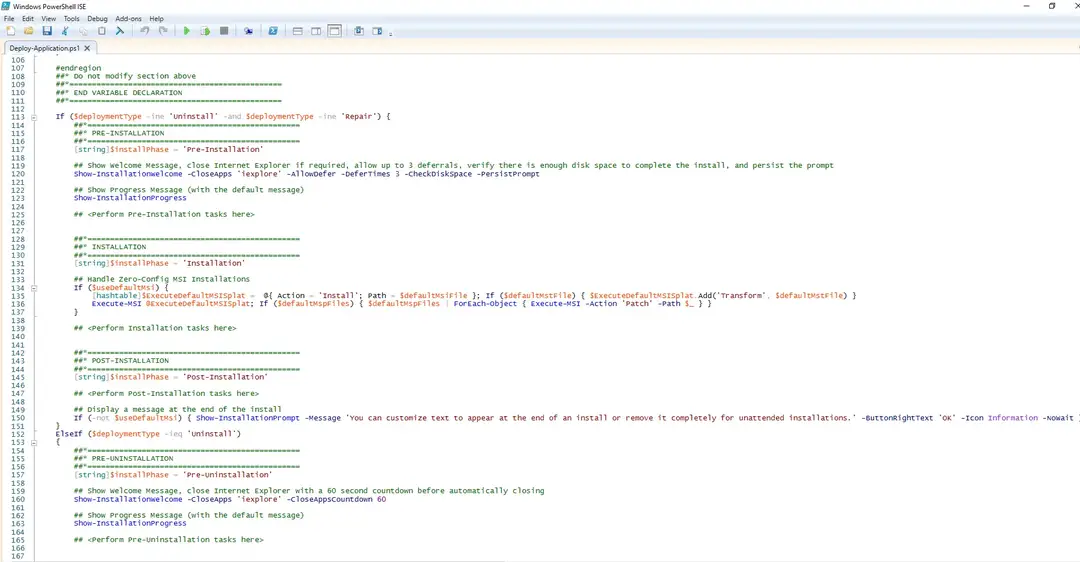
If ($deploymentType -ine 'Uninstall' -and $deploymentType -ine 'Repair') {
##*===============================================
##* PRE-INSTALLATION
##*===============================================
[string]$installPhase = 'Pre-Installation'
## Show Welcome Message, Close Microsoft Sticky Notes With a 60 Second Countdown Before Automatically Closing
Show-InstallationWelcome -CloseApps 'Microsoft.Notes' -CloseAppsCountdown 60
## Show Progress Message (with the default message)
Show-InstallationProgress
## Remove Any Existing Versions of the Microsoft Sticky Notes Microsoft Store App
$AppPackageNames = @(
"Microsoft.MicrosoftStickyNotes"
)
foreach ($AppName in $AppPackageNames) {
Execute-ProcessAsUser -Path "$PSHOME\powershell.exe" -Parameters "-WindowStyle Hidden Get-AppxPackage -Name $AppName | Remove-AppxPackage" -Wait
#Execute-ProcessAsUser -Path "$PSHOME\powershell.exe" -Parameters "-WindowStyle Hidden Get-AppxPackage -AllUsers -Name $AppName | Remove-AppxPackage -AllUsers" -Wait
Execute-ProcessAsUser -Path "$PSHOME\powershell.exe" -Parameters "-WindowStyle Hidden Get-AppXProvisionedPackage -Online | Where-Object DisplayName -eq $AppName | Remove-AppxProvisionedPackage -Online" -Wait
#Execute-ProcessAsUser -Path "$PSHOME\powershell.exe" -Parameters "-WindowStyle Hidden Get-AppXProvisionedPackage -Online | Where-Object DisplayName -eq $AppName | Remove-AppxProvisionedPackage -AllUsers -Online" -Wait
}
##*===============================================
##* INSTALLATION
##*===============================================
[string]$installPhase = 'Installation'
## Install Microsoft Sticky Notes Microsoft Store App Dependencies
$DependencyPath = Get-ChildItem "$dirFiles" -Include *.appx -File -Recurse -ErrorAction SilentlyContinue
ForEach ($Dependency in $DependencyPath) {
Show-InstallationProgress "Installing the Microsoft Sticky Notes Microsoft Store App Dependencies. This may take some time. Please wait..."
Execute-ProcessAsUser -Path "$PSHOME\powershell.exe" -Parameters "-WindowStyle Hidden Add-AppxPackage ""$Dependency""" -Wait
}
## Install Microsoft Sticky Notes Microsoft Store App
$AppPath = Get-ChildItem "$dirFiles" -Include *.appxbundle,*.msixbundle -File -Recurse -ErrorAction SilentlyContinue
ForEach ($App in $AppPath) {
Show-InstallationProgress "Installing the Microsoft Sticky Notes Microsoft Store App. This may take some time. Please wait..."
Execute-ProcessAsUser -Path "$PSHOME\powershell.exe" -Parameters "-WindowStyle Hidden Add-AppxPackage ""$App""" -Wait
}
##*===============================================
##* POST-INSTALLATION
##*===============================================
[string]$installPhase = 'Post-Installation'
}
ElseIf ($deploymentType -ieq 'Uninstall')
{
##*===============================================
##* PRE-UNINSTALLATION
##*===============================================
[string]$installPhase = 'Pre-Uninstallation'
## Show Welcome Message, Close Microsoft Sticky Notes With a 60 Second Countdown Before Automatically Closing
Show-InstallationWelcome -CloseApps 'Microsoft.Notes' -CloseAppsCountdown 60
## Show Progress Message (With a Message to Indicate the Application is Being Uninstalled)
Show-InstallationProgress -StatusMessage "Uninstalling the $installTitle. Please Wait..."
##*===============================================
##* UNINSTALLATION
##*===============================================
[string]$installPhase = 'Uninstallation'
## Uninstall Any Existing Versions of the Microsoft Sticky Notes Microsoft Store App
$AppPackageNames = @(
"Microsoft.MicrosoftStickyNotes"
)
foreach ($AppName in $AppPackageNames) {
#Execute-ProcessAsUser -Path "$PSHOME\powershell.exe" -Parameters "-WindowStyle Hidden Get-AppxPackage -Name $AppName | Remove-AppxPackage" -Wait
Execute-ProcessAsUser -Path "$PSHOME\powershell.exe" -Parameters "-WindowStyle Hidden Get-AppxPackage -AllUsers -Name $AppName | Remove-AppxPackage -AllUsers" -Wait
#Execute-ProcessAsUser -Path "$PSHOME\powershell.exe" -Parameters "-WindowStyle Hidden Get-AppXProvisionedPackage -Online | Where-Object DisplayName -eq $AppName | Remove-AppxProvisionedPackage -Online" -Wait
Execute-ProcessAsUser -Path "$PSHOME\powershell.exe" -Parameters "-WindowStyle Hidden Get-AppXProvisionedPackage -Online | Where-Object DisplayName -eq $AppName | Remove-AppxProvisionedPackage -AllUsers -Online" -Wait
}
## Add Registry Keys to Prevent Windows Apps from Reinstalling
Write-Log -Message "Adding Registry Keys to Prevent Windows Apps from Reinstalling."
[scriptblock]$HKCURegistrySettings = {
Set-RegistryKey -Key 'HKCU\Software\Microsoft\Windows\CurrentVersion\ContentDeliveryManager' -Name 'ContentDeliveryAllowed' -Value 0 -Type DWord -SID $UserProfile.SID
Set-RegistryKey -Key 'HKCU\Software\Microsoft\Windows\CurrentVersion\ContentDeliveryManager' -Name 'FeatureManagementEnabled' -Value 0 -Type DWord -SID $UserProfile.SID
Set-RegistryKey -Key 'HKCU\Software\Microsoft\Windows\CurrentVersion\ContentDeliveryManager' -Name 'OemPreInstalledAppsEnabled' -Value 0 -Type DWord -SID $UserProfile.SID
Set-RegistryKey -Key 'HKCU\Software\Microsoft\Windows\CurrentVersion\ContentDeliveryManager' -Name 'PreInstalledAppsEnabled' -Value 0 -Type DWord -SID $UserProfile.SID
Set-RegistryKey -Key 'HKCU\Software\Microsoft\Windows\CurrentVersion\ContentDeliveryManager' -Name 'PreInstalledAppsEverEnabled' -Value 0 -Type DWord -SID $UserProfile.SID
Set-RegistryKey -Key 'HKCU\Software\Microsoft\Windows\CurrentVersion\ContentDeliveryManager' -Name 'SilentInstalledAppsEnabled' -Value 0 -Type DWord -SID $UserProfile.SID
Set-RegistryKey -Key 'HKCU\Software\Microsoft\Windows\CurrentVersion\ContentDeliveryManager' -Name 'SubscribedContent-314559Enabled' -Value 0 -Type DWord -SID $UserProfile.SID
Set-RegistryKey -Key 'HKCU\Software\Microsoft\Windows\CurrentVersion\ContentDeliveryManager' -Name 'SubscribedContent-338387Enabled' -Value 0 -Type DWord -SID $UserProfile.SID
Set-RegistryKey -Key 'HKCU\Software\Microsoft\Windows\CurrentVersion\ContentDeliveryManager' -Name 'SubscribedContent-338388Enabled' -Value 0 -Type DWord -SID $UserProfile.SID
Set-RegistryKey -Key 'HKCU\Software\Microsoft\Windows\CurrentVersion\ContentDeliveryManager' -Name 'SubscribedContent-338389Enabled' -Value 0 -Type DWord -SID $UserProfile.SID
Set-RegistryKey -Key 'HKCU\Software\Microsoft\Windows\CurrentVersion\ContentDeliveryManager' -Name 'SubscribedContent-338393Enabled' -Value 0 -Type DWord -SID $UserProfile.SID
Set-RegistryKey -Key 'HKCU\Software\Microsoft\Windows\CurrentVersion\ContentDeliveryManager' -Name 'SubscribedContentEnabled' -Value 0 -Type DWord -SID $UserProfile.SID
Set-RegistryKey -Key 'HKCU\Software\Microsoft\Windows\CurrentVersion\ContentDeliveryManager' -Name 'SystemPaneSuggestionsEnabled' -Value 0 -Type DWord -SID $UserProfile.SID
}
Invoke-HKCURegistrySettingsForAllUsers -RegistrySettings $HKCURegistrySettings -ErrorAction SilentlyContinue
## Add Registry Key to Disable Auto-Updating of Microsoft Store Apps
Write-Log -Message "Adding Registry Key to Disable Auto-Updating of Microsoft Store Apps."
Set-RegistryKey -Key 'HKLM\SOFTWARE\Policies\Microsoft\WindowsStore' -Name 'AutoDownload' -Value 2 -Type DWord
# Add Registry Key to Prevent Suggested Applications from Returning
Write-Log -Message "Adding Registry Key to Prevent Suggested Applications from Returning."
Set-RegistryKey -Key 'HKLM\SOFTWARE\Policies\Microsoft\Windows\CloudContent' -Name 'DisableWindowsConsumerFeatures' -Value 1 -Type DWord
##*===============================================
##* POST-UNINSTALLATION
##*===============================================
[string]$installPhase = 'Post-Uninstallation'
}
ElseIf ($deploymentType -ieq 'Repair')
{
##*===============================================
##* PRE-REPAIR
##*===============================================
[string]$installPhase = 'Pre-Repair'
##*===============================================
##* REPAIR
##*===============================================
[string]$installPhase = 'Repair'
##*===============================================
##* POST-REPAIR
##*===============================================
[string]$installPhase = 'Post-Repair'
}
##*===============================================
##* END SCRIPT BODY
##*===============================================
## Call the Exit-Script function to perform final cleanup operations
Exit-Script -ExitCode $mainExitCode
}
Catch {
[int32]$mainExitCode = 60001
[string]$mainErrorMessage = "$(Resolve-Error)"
Write-Log -Message $mainErrorMessage -Severity 3 -Source $deployAppScriptFriendlyName
Show-DialogBox -Text $mainErrorMessage -Icon 'Stop'
Exit-Script -ExitCode $mainExitCode
}
Ok, all the hard work is done and now you can install or uninstall the Microsoft Sticky Notes (Microsoft Store App) using one single PowerShell script. Simply change the DeploymentType parameter to install or uninstall. Logging functionality is built-in automatically and you can view the log files under “C:\Windows\Logs\Software”.
Microsoft Sticky Notes (Microsoft Store App) NonInteractive Install (PowerShell)
NonInteractive means Very Silent, i.e. no blocking apps. This is automatically set if it is detected that the process is not running in the user session and it is not possible for anyone to provide input using a mouse or keyboard.
- Open Windows PowerShell by Right-Clicking on Windows PowerShell and selecting Run as Administrator
- Change the directory to “C:\Downloads\StickyNotesApp”
- PS C:\Downloads\StickyNotesApp>
- Enter the following command:
Powershell.exe -ExecutionPolicy Bypass .\Deploy-StickyNotesApp.ps1 -DeploymentType "Install" -DeployMode "NonInteractive"
Microsoft Sticky Notes (Microsoft Store App) Silent Install (PowerShell)
Silent means no dialogs (progress and balloon tip notifications are suppressed).
- Open Windows PowerShell by Right-Clicking on Windows PowerShell and selecting Run as Administrator
- Change the directory to “C:\Downloads\StickyNotesApp“
- PS C:\Downloads\StickyNotesApp>
- Enter the following command:
Powershell.exe -ExecutionPolicy Bypass .\Deploy-StickyNotesApp.ps1 -DeploymentType "Install" -DeployMode "Silent"
Microsoft Sticky Notes (Microsoft Store App) Interactive Install (PowerShell)
Interactive means the install will show dialogs including progress and balloon tip notifications.
- Open Windows PowerShell by Right-Clicking on Windows PowerShell and selecting Run as Administrator
- Change the directory to “C:\Downloads\StickyNotesApp“
- PS C:\Downloads\StickyNotesApp>
- Enter the following command:
Powershell.exe -ExecutionPolicy Bypass .\Deploy-StickyNotesApp.ps1 -DeploymentType "Install" -DeployMode "Interactive"
How to Uninstall the Microsoft Sticky Notes (Microsoft Store App) Using the PowerShell App Deployment Toolkit
Microsoft Sticky Notes (Microsoft Store App) NonInteractive Uninstall (PowerShell)
NonInteractive means Very Silent, i.e. no blocking apps. This is automatically set if it is detected that the process is not running in the user session and it is not possible for anyone to provide input using a mouse or keyboard.
- Open Windows PowerShell by Right-Clicking on Windows PowerShell and selecting Run as Administrator
- Change the directory to “C:\Downloads\StickyNotesApp“
- PS C:\Downloads\StickyNotesApp>
- Enter the following command:
Powershell.exe -ExecutionPolicy Bypass .\Deploy-StickyNotesApp.ps1 -DeploymentType "Uninstall" -DeployMode "NonInteractive"
Microsoft Sticky Notes (Microsoft Store App) Silent Uninstall (PowerShell)
Silent means no dialogs (progress and balloon tip notifications are suppressed).
- Open Windows PowerShell by Right-Clicking on Windows PowerShell and selecting Run as Administrator
- Change the directory to “C:\Downloads\StickyNotesApp“
- PS C:\Downloads\StickyNotesApp>
- Enter the following command:
Powershell.exe -ExecutionPolicy Bypass .\Deploy-StickyNotesApp.ps1 -DeploymentType "Uninstall" -DeployMode "Silent"
Microsoft Sticky Notes (Microsoft Store App) Interactive Uninstall (PowerShell)
Interactive means the install will show dialogs including progress and balloon tip notifications.
- Open Windows PowerShell by Right-Clicking on Windows PowerShell and selecting Run as Administrator
- Change the directory to “C:\Downloads\StickyNotesApp“
- PS C:\Downloads\StickyNotesApp>
- Enter the following command:
Powershell.exe -ExecutionPolicy Bypass .\Deploy-StickyNotesApp.ps1 -DeploymentType "Uninstall" -DeployMode "Interactive"
Always make sure to test everything in a development environment prior to implementing anything into production. The information in this article is provided “As Is” without warranty of any kind.