В этом кратком руководстве мы опишем процесс установки и настройке VPN-сервера на базе Windows Server. Все действия, описанные в этой статье, были выполнены на Windows Server 2016, но эта инструкция подходит для любой современной серверной операционной системы Windows, начиная с Windows Server 2008 R2 и заканчивая Windows Server 2016.
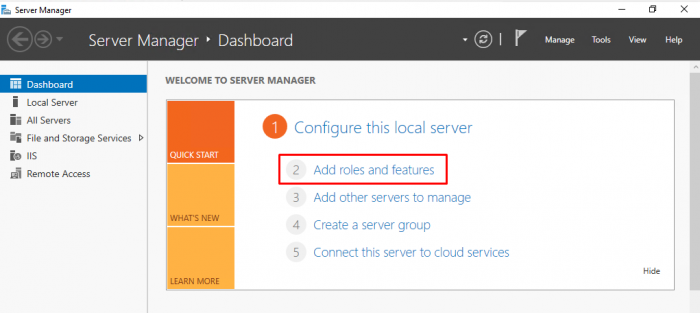
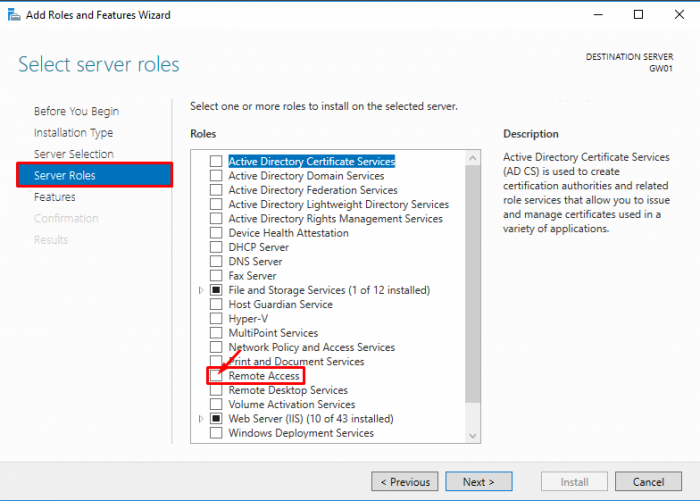
Итак, давайте начнем. Прежде всего нам нужно настроить роль удаленного доступа (Remote Access). Для этого в оснастке Server Manager запустите мастер добавления ролей и выберите роль Remote Access.
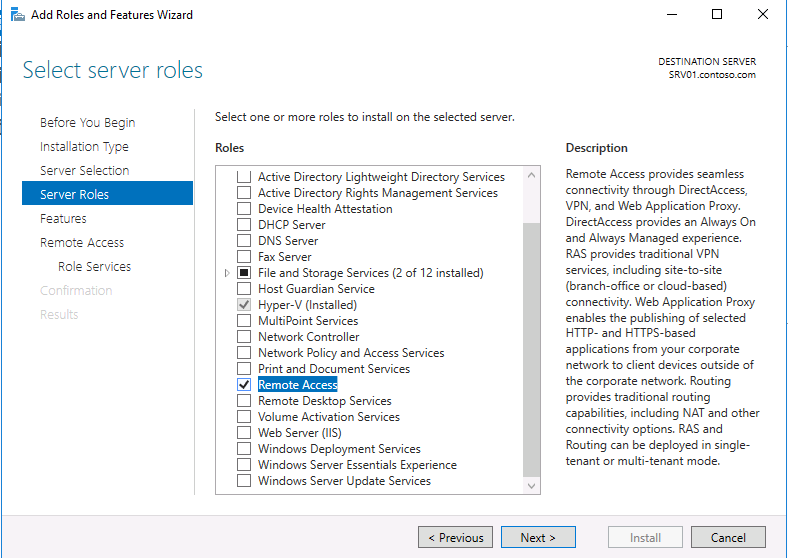
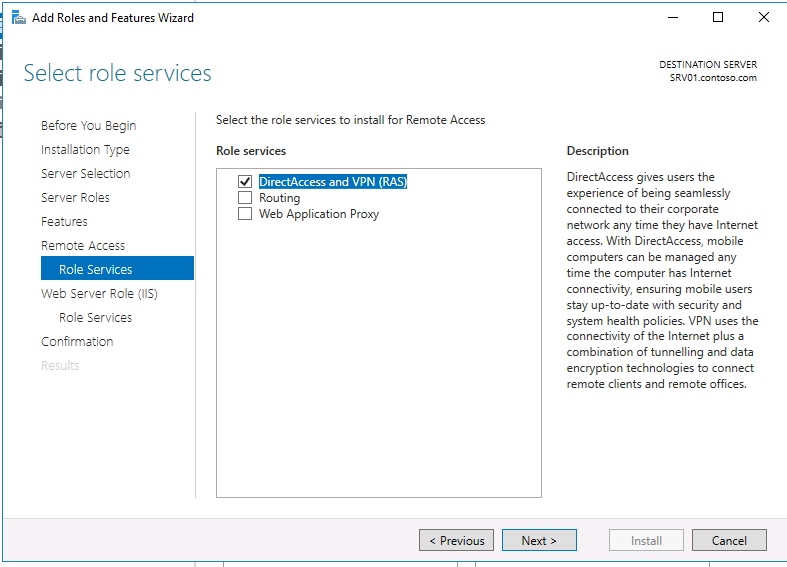
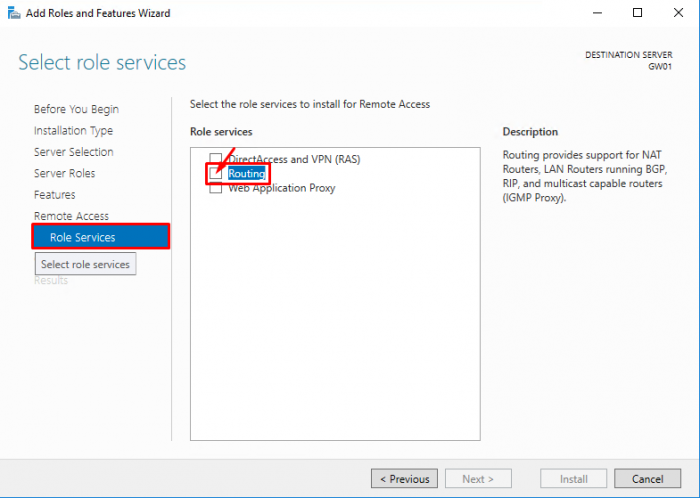
Затем, в списке служб роли выберите опцию «DirectAccess and VPN (RAS)«.
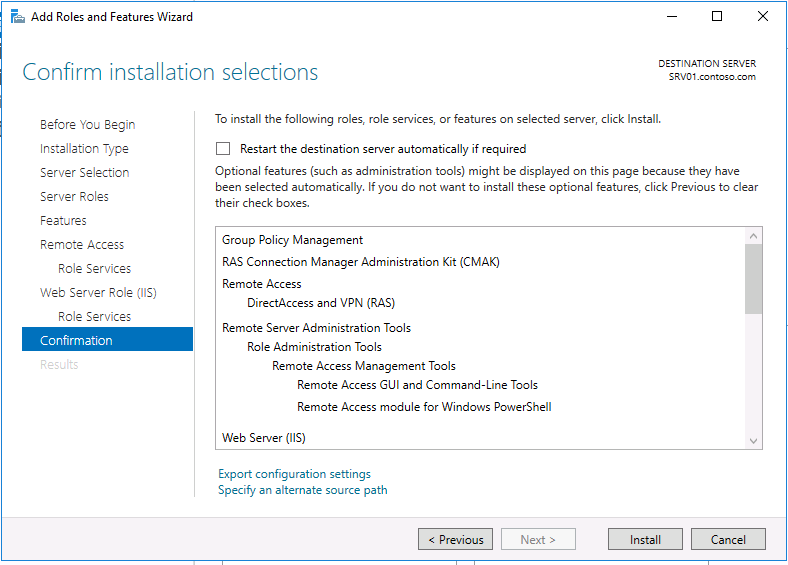
В дополнение к роли удаленного доступа и средствам управления, также автоматически будут установлены веб-сервер IIS и внутренняя база данных Windows (WID). Полный список установленных функций можно просмотреть в окончательном окне мастера, появляющимся перед тем, как вы подтвердите установку.
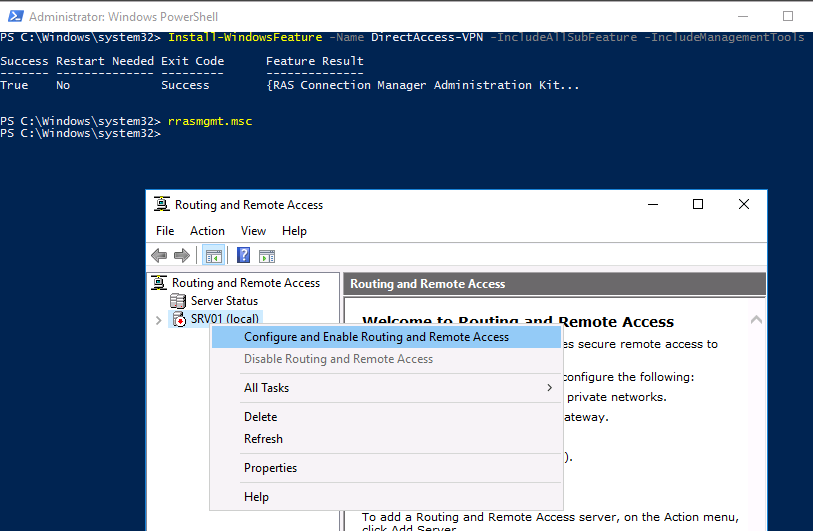
Установить роль Remote Access вместе со всеми необходимыми опциями можно всего одной командой PowerShell:
Install-WindowsFeature -Name DirectAccess-VPN -IncludeAllSubFeature -IncludeManagementTools
После установки роли вам необходимо включить и настроить службу с помощью оснастки «Маршрутизация и удаленный доступ» (Routing and Remote Access) — rrasmgmt.msc.
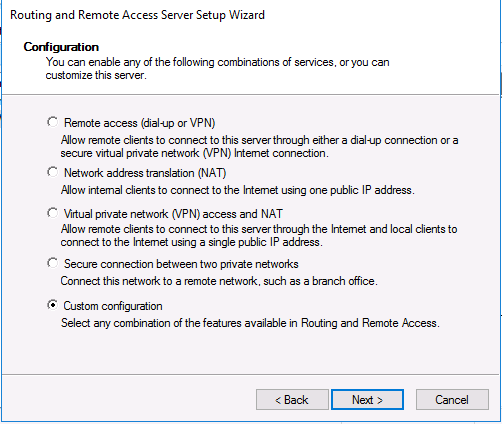
В оснастке RRAS выберите имя сервера, щелкните правой кнопкой мыши и выберите «Настроить и включить маршрутизацию и удаленный доступ» (Configure and Enable Routing and Remote Access) в открывшемся меню.
В мастере настройки выберите пункт Custom configuration.
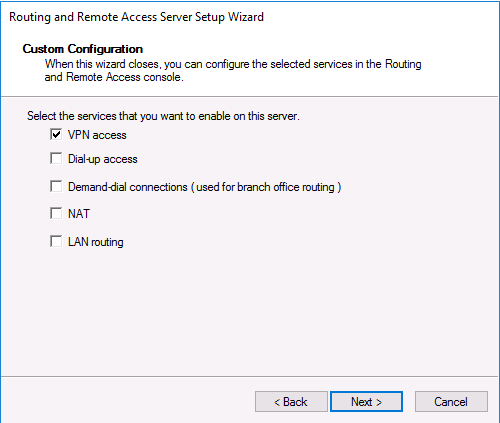
В списке служб выберите опцию VPN access.
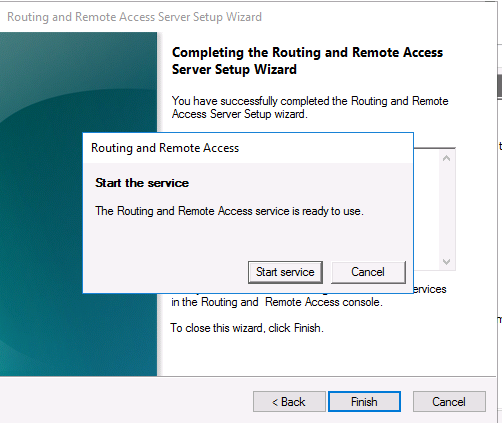
После этого система предложит вам запустить службу Маршрутизации и удаленного доступа.
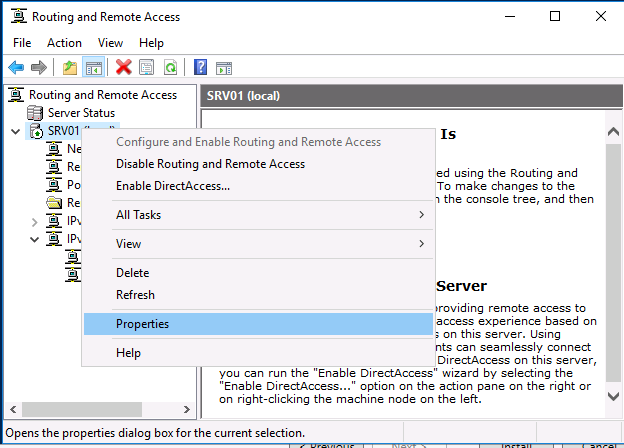
Служба VPN установлена и включена, теперь ее необходимо настроить. Снова откройте меню сервера и выберите пункт «Свойства».
Перейдите на вкладку IPv4. Если у вас нет DHCP-серверов в сети, вам необходимо указать диапазон IP-адресов, которые будут получать клиенты при подключении к VPN-серверу.

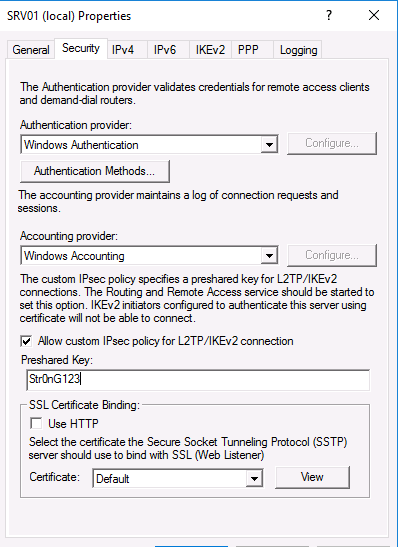
Кроме того, на вкладке Security вы можете настроить параметры безопасности — выбрать тип проверки подлинности, установить предварительный общий ключ для L2TP или выбрать сертификат для SSTP.
И еще пара нужных моментов, которые следует иметь в виду при настройке VPN-сервера.
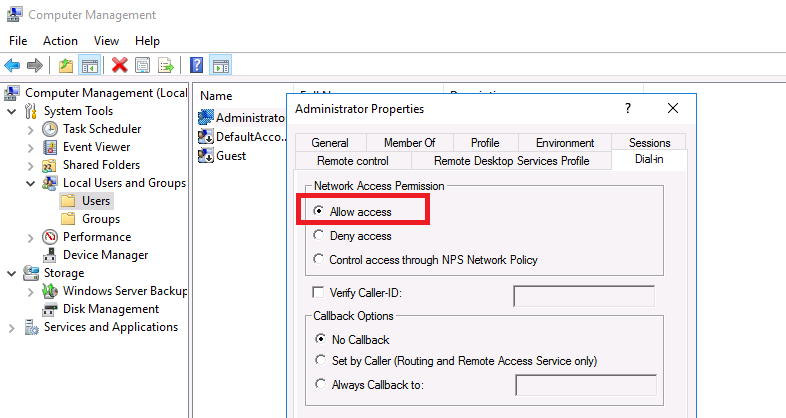
Во-первых, вам нужно указать пользователей, которых будет разрешено подключаться к этому VPN-серверу. Для автономного сервера настройка выполняется локально, в оснастке «Управление компьютером». Чтобы запустить оснастку, вам нужно выполнить команду compmgmt.msc, затем перейдите в раздел «Локальные пользователи и группы». Затем вам нужно выбрать пользователя, открыть его свойства, а на вкладке «Dial-In» отметьте пункт «Разрешить доступ» (Allow access). Если компьютер является членом домена Active Directory, те же настройки можно сделать из оснастки ADUC.
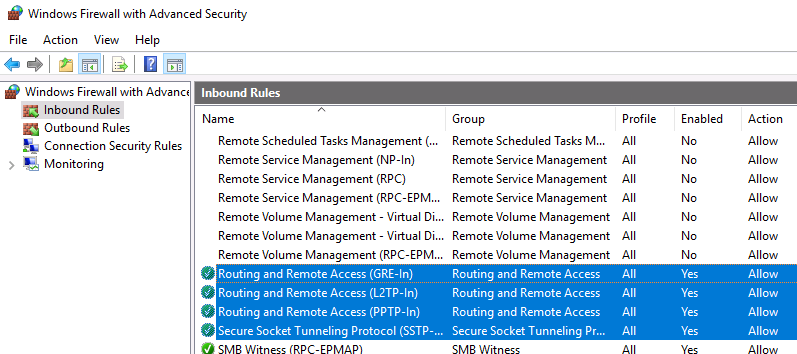
Во-вторых, проверьте, открыты ли все необходимые порты на брандмауэре Windows и межсетевом экране, осуществляющим NAT-трансляцию. Теоретически, когда вы устанавливаете роль RRAS, соответствующие правила автоматически включаются, но на всякий случай проверьте их самостоятельно. Список разрешенных правил для входящего трафика:
- Routing and Remote Access (GRE-In) — протокол 47 (GRE)
- Routing and Remote Access (L2TP-In) – TCP/1701, UDP/500, UDP/4500 и протокол 50 (ESP)
- Routing and Remote Access (PPTP-In) — TCP/1723
- Secure Socket Tunneling protocol (SSTP-in) – TCP/443
Если ваш VPN-сервер находится за NAT, для корректной установки VPN-соединения по протоколу L2TP/ipsec, на стороне клиента необходимо в ветке HKEY_LOCAL_MACHINE\SYSTEM\CurrentControlSet\Services\PolicyAgent создать ключ с именем AssumeUDPEncapsulationContextOnSendRule и значением 2.
На этом все. Теперь, когда у вас имеется настроенный VPN-сервер, вы можете подключиться к нему с помощью VPN-клиента.
Привет, недавно столкнулся с ситуацией — есть выделенный сервер, на сервер установлен Hyper-V, провайдер выдает один белый IP на сервер. Обратились ко мне с вопросом — как можно сделать так, что бы не покупая дополнительные адреса, на создаваемых на сервере виртуальных машинах работал интернет.
В случае, например с VirtualBox вопрос решается подключением виртуальной машины к сети с типом NAT, но как же быть с Hyper-V, в нем нельзя подключить виртуальный свитч к сети NAT.
Ответ очевиден — нужно подключить свитч к внутренней сети, и с него трафик натить через физический порт. Сделать это совсем не сложно.
Ниже я расскажу как можно настроить NAT на Windows Server 2016 через PowerShell, а так же как можно настроить NAT на более старых версиях ОС Windows, через RRAS (к слову и на Windows Server 2016, через RRAS то же можно делать).
Начнем с более предпочтительного и простого способа — через PowerShell, но он для Windows 2016 и Windows 10 (к слову эти же команды должны работать и на более старых версях Windows, при условии, что будет установлен PowerShell 5, но я не проверял, кто проверит, отпишитесь в комментариях).
#Добавляем виртуальный свитч
New-VMSwitch -name NAT -SwitchType Internal
#Добавляем NAT
New-NetNat -Name LocalNat -InternalIPInterfaceAddressPrefix "10.0.0.0/24"
#Назначем адрес виртуальному свитчу
Get-NetAdapter "vEthernet (NAT)" | New-NetIPAddress `
-IPAddress 10.0.0.1 -AddressFamily IPv4 -PrefixLength 24
#Делаем проброс портов
Add-NetNatStaticMapping -NatName NATnetwork -Protocol TCP `
-ExternalIPAddress 0.0.0.0 -InternalIPAddress 10.0.0.2 `
-InternalPort 22 -ExternalPort 50022
#Посмотреть текущие пробросы портов можной командой:
Get-NetNatStaticMapping
#Как и список сетей NAT
Get-NetNat
#Такими командами это хозяйство можно удалить
Remove-NetNatStaticMapping -StaticMappingID 0
Remove-NetNat -Name LocalNat
Теперь опишу способ, как можно сделать NAT, который работает практически на всех версиях винды (на 2003, 2008, 2012 и 2016 соответсвенно), будем делать NAT через RRAS.
Сперва нужно поставить роль RAS, для этого заходим в диспетчер сервера, жмем управление и выбираем — добавить роли и компоненты.

В мастере добавления ролей, в ролях сервера, выбираем Удаленный доступ.

В службах ролей удаленного доступа, выбираем маршрутизация,

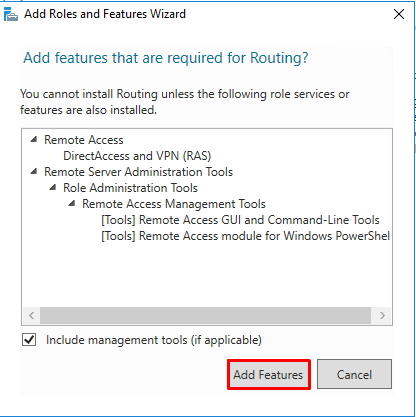
и добавляем необходимые компоненты.

После завершения установки, перезагружаем сервер, возвращаемся в диспетчер сервера и выбираем: средства — маршрутизация и удаленный доступ.

Щелкаем правой кнопкой по нашему серверу и выбираем — настроить маршрутизацию и удаленный доступ.

На втором шаге мастера настройки сервера маршрутизации и удаленного доступа, выбираем — преобразование сетевых адресов (NAT).

Дальше выбираем сетевой интерфейс, который подключен к интернету.

На этом настройка NAT на Windows Server 2016 закончена, вернемся в консоль управления RRAS, развернем наш сервер, перейдем в IPv4, и зайдем в преобразование сетевых адресов.

Здесь можно посмотреть свойства сетевых интерфейсов. Например для внутреннего свойства выглядят так:

А для внешнего так:

Здесь же можно сделать проброс портов, например, сделаю проброс ssh до виртуальной машины. Заходим в службы и порты и жмем добавить,

Здесь указываем понятное имя службы, входящий порт (порт по которому нужно ломиться на сервер), адрес сервера к которому пробрасываем порт, и порт сервера.

Всё порт проброшен. Можно пробовать подключиться.


If you’re looking for an easy remote access solution for your network and you’re using Windows Server, you may want to consider installing the Routing and Remote Access Role included in Windows Server. There are different types of VPNs that you can use, such as PPTP, L2TP and SSTP.
This article will assume that you have an Active Directory Domain already configured within your network to control remote access. If you are not using ADDS yet, check out this article to get it configured. Please keep in mind that you will also need to forward the appropriate ports through your outside firewall to allow clients to connect from the outside.
Have a SonicWALL UTM Device? Consider Using SSL VPN Instead: Article Here
Installing the Routing and Remote Access Role
1. Log into the server with administrative credentials
2. Open Server Manager ![]()
3. On the Dashboard, locate and click Add roles and features
4. Click Next to skip the Before you begin page
5. Choose Role-based or feature-based installation and click Next

6. Make sure that the server you are installing on is selected from the pool. Click Next to continue.

7. Scroll through the list to locate Remote Access and select it. Click Next.

8. You will be greeted with a welcome page for the Remote Access Role. Click Next to continue.

9. Because we’re configuring this server for VPN connectivity, select DirectAccess and VPN (RAS) from the list, then when prompted, click Add Features in the pop up window. Click Next to continue.


10. The Wizard will now guide you through installing the Web Server Role (IIS) as the Remote Access Role has dependencies on IIS to function. Click Next to continue.

11. Leave the default options checked and click Next to continue.

12. Finally check the information provided and click Install to begin installing the Roles.

13. Once the installation is finished, click Close. Additional configuration will be required.

Configure the Remote Access Role
Now that the installation is completed, we will want to actually configure the role.
1. Log into the server with administrative credentials
2. Open Server Manager ![]()
3. In the top right you will see the Action Required flag ![]() , click the icon and click Open the Getting Started Wizard.
, click the icon and click Open the Getting Started Wizard.

Note: When I clicked this in Windows Server 2016 Technical Preview 4, nothing happened. I will continue by opening the Remote Access Management Console.
4. If the getting started wizard does not show up for you, go to Start > All Apps > Windows Administrative Tools > Remote Access Management
5. In the Remote Access Management Console, click DirectAccess and VPN under Configuration, then click Run the Getting Started Wizard

6. In the Configure Remote Access Wizard, choose whether to deploy Direct Access, VPN, or Deploy both DirectAccess and VPN (recommended).

7. Choose the option that describes your network topology best. In most cases, this will be Behind an edge device (with a single network adapter). Then enter the outside host name or public IP Address that clients will use to connect to the server (for example, Remote.MyCompany.com)

8. Finally, click Finish

We’ve completed all of the initial steps to get the server configured. You will need to configure your clients to connect using the built in VPN client in Microsoft Windows. Be sure that you either configure the correct NPS policies to allow access from your clients, or manually allowing users to connect by changing the setting on the Dial In tab within the user object in Active Directory.
Tags: 20122016AccessConfigureDirectDirectAccessHowL2TPmanagerPPTPRemoteRoutingRRASServerSetupSSTPToVPNWindowsWizard
Introduction
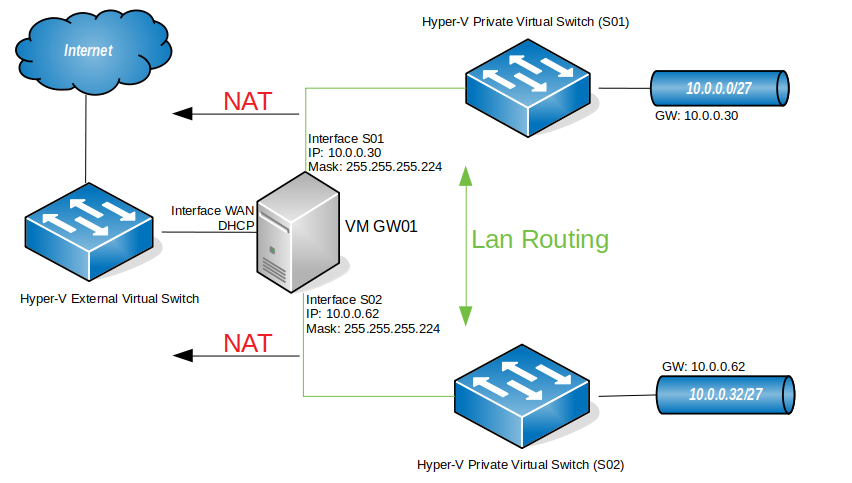
In this article I’m setting up a 3 way router with Windows Server 2016, which will be performing LAN routing between two subnets and NAT for both subnets. This setup will replace the gateway I had in my Hyper-V virtual lab. So, basically, I needed to add a new subnet to my virtual lab (10.0.0.32/27) and I needed both subnets to communicate and both to have internet access. I could have done this by adding a router between both subnets, but for that I would need to add a new virtual machine, which would be consuming additional resources from my Hyper-V server. This way, I’ll have a solution that will grow with the virtual lab. In case I need to add a new subnet to the lab, I just have to add a new interface to the router and all subnets will be automatically routed between each other. Perfect!
My virtual lab
Please note that this is my virtual lab configuration. You will have to configure the router to match your own network config, but, if you are reading this, I assume you already know that. Also, DNS servers are not in place here. After configuring the router, your client PCs will need to have a DNS server configured – usually your internet router – so that they will be able to browse the internet. Again, if you are reading this article I assume you have a basic understanding how these things work.
Let’s start
First things first
You will need a machine with Windows Server 2016 installed, for which you can find a guide here, with three network cards attached to it, as per the diagram above.
Adding the Remote Access role
- Open “Server Manager”. Click on the start button and find “Server Manager”.
- Click on “Add roles and features”.
- Click “Next” until you reach the “Select server roles” window. Check the “Remote Access” box and click “Next”.

- Click “Next” until you reach the “Select role services” window.
- Select “Routing”
- Click on “Add Features”
- Note that “DirectAccess and VPN (RAS)” are selected by default. No need to make any changes. Press “Next”.
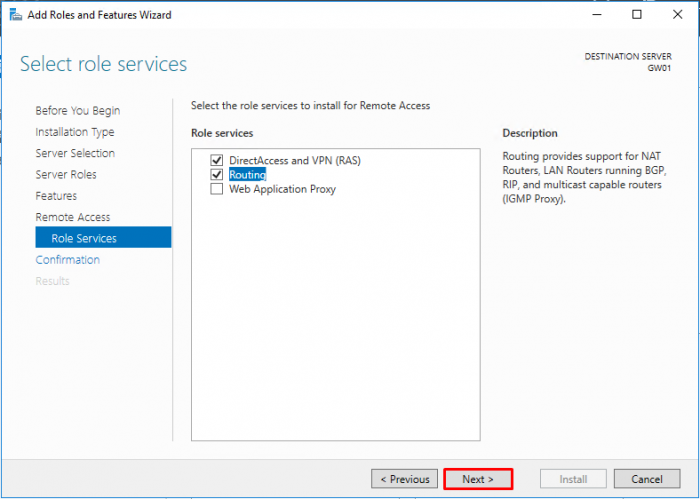
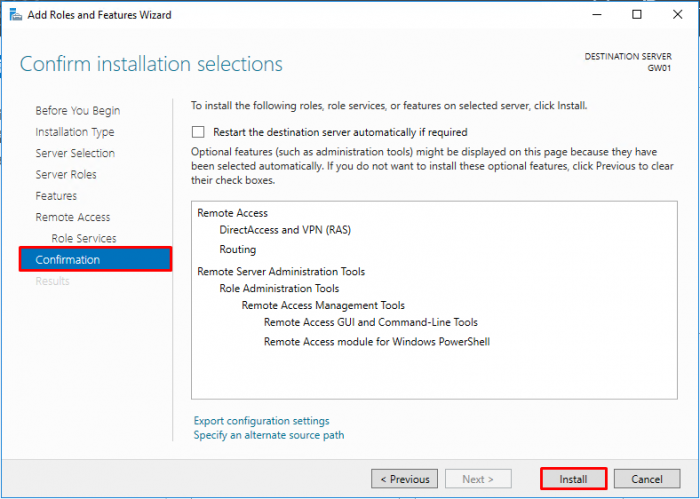
- Click on “Install” on the “Confirmation” window and wait for the role to be installed.
Configuring the Remote Access Role
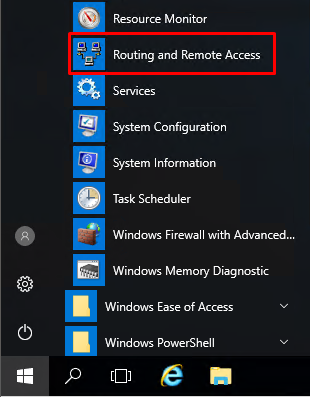
- Press the “Start” button and find the “Routing and Remote Access” console. Open it.
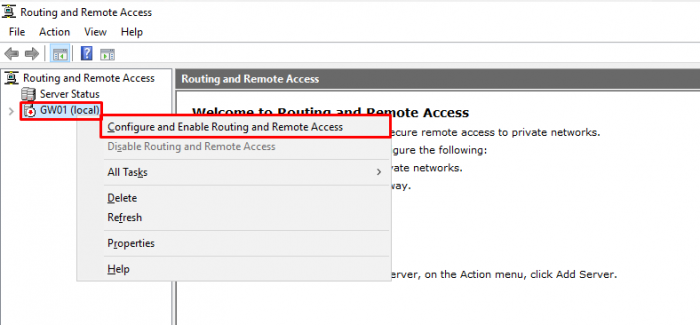
- Right-click on the (local) server and select “Configure and Enable Routing and Remote Access”
- Press “Next” at the welcome window of the “Routing and Remote Access Server Setup Wizard”.
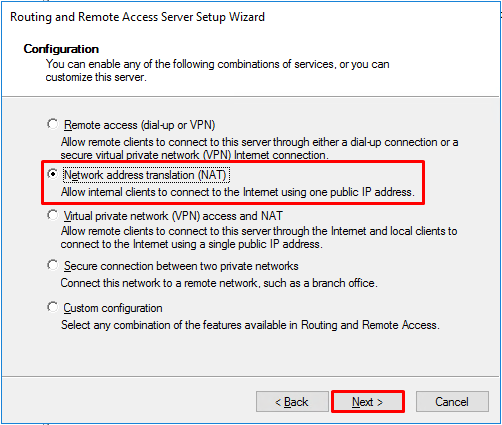
- On the “Configuration” window, select “Network address translation (NAT)” and press “Next”.
- Select the public interface that you are using to connect to the internet. Press “Next”.
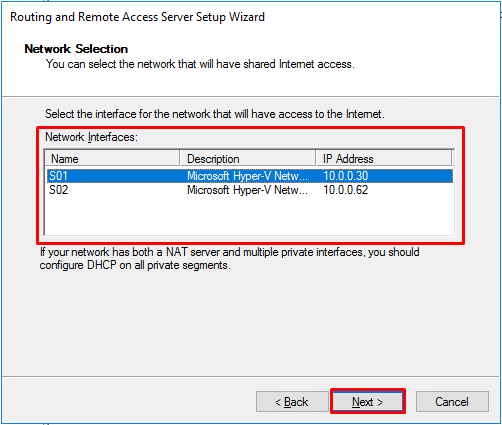
- Select the interface that will have access to internet. Select the first interface and press “Next”. We’ll deal with the second interface later.
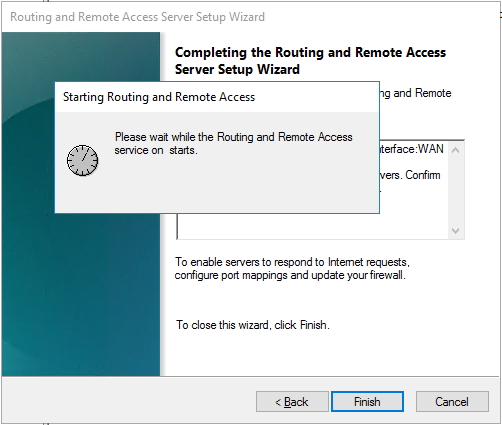
- Click on “Finish” to close the setup wizard. If a pop-up window comes up warning about firewall ports for VPN connections, you can safely ignore this warning as we are not setting up any VPN access. Just press “OK” and wait for the “Routing and Remote” access service to start.
Adding the second NAT interface
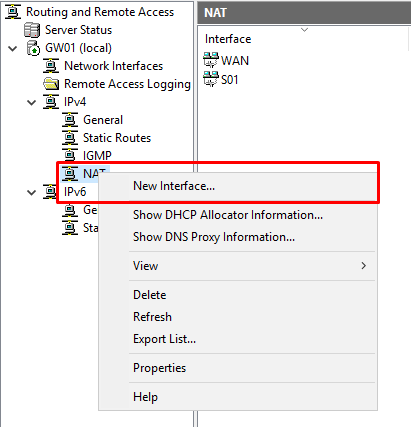
So, during the Routing and Remote Access setup wizard, we’ve configured NAT for one of the subnets, but if we want (and we do!) to provide internet access to another subnet, we must configure NAT for the second (n) interface.
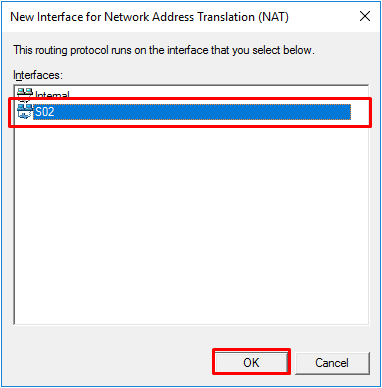
- On the “Routing and Remote Access” console, under IPv4, right-click “NAT” and select “New Interface…”
- Select the interface for the second subnet and press “OK”.
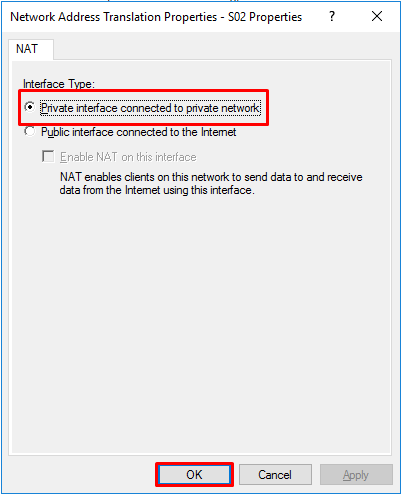
- Select “Private interface connected to private network” and click “OK”
And this ends setting up the server. Now it’s time to test if all is working as it should!
Checking the configuration
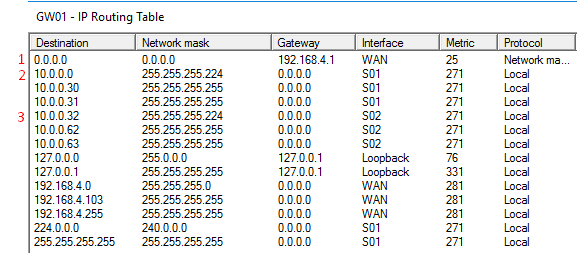
In the “Routing and Remote Access” console, under IPv4, right-click “Static Routes” and choose “Show IP Routing Table…”. A new window, with the known routes to this computer, will pop-up. Analyzing that window (please always remember that this IP Routing table is regarding my setup, which is the one described in the diagram on the top of the page), you will see that we have:
1 – A gateway! All traffic that the router doesn’t know where to direct it, will direct it to the gateway.
2- Traffic for the network (subnet) 10.0.0.0 with a netmask of 255.255.255.224 (/27) will be directed to the interface S01, which is the interface connected to that subnet.
3- Traffic for the network 10.0.0.32 with a netmask of 255.255.255.224 will be directed to the interface S02, which is the interface connected to that subnet.
Testing the LAN Routing and NAT
NOTE: for all to work properly, ideally you should have a DHCP assigning IP addresses on each subnet and also a DNS server for your client computers to be able to resolve names and browse the internet.
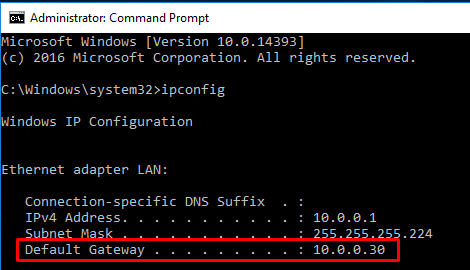
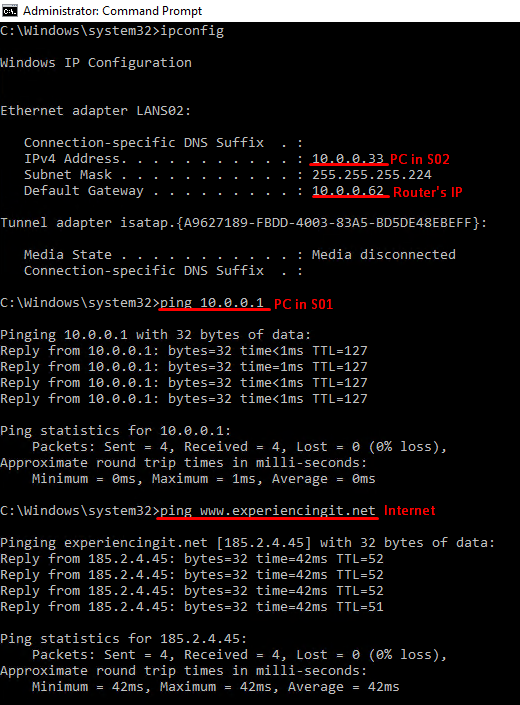
Having said that, from one of the computer clients connected to S01, you should be able to ping S02. This is the IP config I have at one of my servers in S01. You’ll see that the gateway for this subnet is the IP of the router (10.0.0.30).
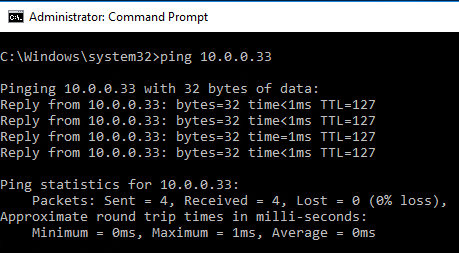
If you ping an IP address in the S02 subnet, this should be the result:
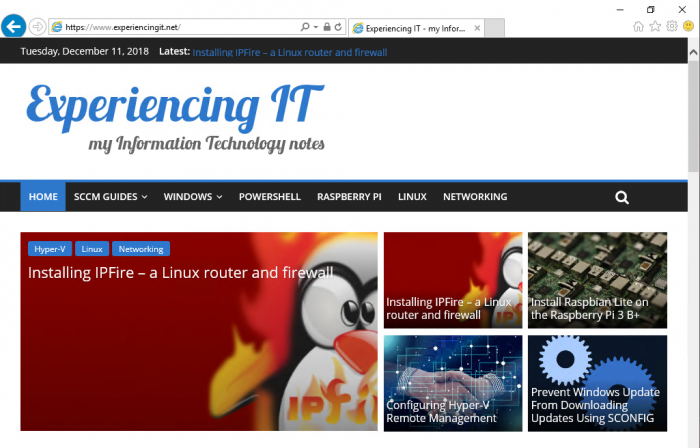
And if you try and browse the internet, voilá!
And the sames goes from a computer on subnet S02:
If you run into any issues, ie, not pinging from one subnet to the other, disable the router firewall and try again. That should do it. Or, instead of disabling the firewall completely, add – or enable – rules to allow traffic between both subnets. In my case, I disabled the firewall completely because this is a lab environment, with no direct connection to the internet.
As always, if you found this article useful, share it with your friends.
If you have any questions or suggestions, please leave your comment.
And… Thank you for reading!
This guide is for those who wants to simulate I virtual enterprise environment, and use a Windows Server as a virtual Gateway. In this example I´m going to use 2 separate VLAN and use the Gateway as a Router and also NAT all communications to the Internet. This way only one server faces the internet, and you could also have a firewall on the server.
SETUP:
1 Server 2016 Core, Name (GW) , Workgroup (but could be domain joined), used as gateway and router.
2 Server 2016 GUI, Name (MGM,MGM2), Workgroup (but could be domain joined), used for verification.
Setup Hyper-V:
On the GW server I need 3 network cards. One connected to an External switch and the other two connected to the same Private switch.
The two Private Switches I configure with VLAN ID.

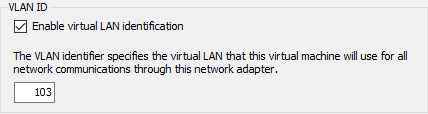
The MGM server has the VLAN 102 and the MGM2 has the VLAN 103 switch connected to them.
Setup GW Server:
Server is installed and fully patched.
On the server we now have three network cards. And I will rename them to External, VLAN 102 and VLAN 103.
First we check what Network cards we have, so logon to the server and start Powershell, and then we check what network adapters we have.
Get-NetAdapter

When looking at the LinkSpeed I see that one connection is at 1 Gbps, so that should be my External network, and the rest the internal. Bydefault the names of the cards is in order of installation, so if you first create the internal ones, they will have the lower number. So if you add them one by one, you will know which adapter is which.
Then we rename the cards, just so it will be easier to see.
Get-NetAdapter -Name "Ethernet" | Rename-NetAdapter -NewName "External"
Get-NetAdapter -Name "Ethernet 2" | Rename-NetAdapter -NewName "VLAN 102"
Get-NetAdapter -Name "Ethernet 3" | Rename-NetAdapter -NewName "VLAN 103"
![]()
And when we check again we see the new names.
Get-NetAdapter

Then we must set a IP-address of the network cards, in this case External gets from a DHCP, so we don´t need to change that one.
So for the VLAN 102
New-NetIPAddress -InterfaceAlias "VLAN 102" -IPAddress 192.168.102.1 -PrefixLength 24 -DefaultGateway 192.168.102.1

And for VLAN 103
New-NetIPAddress -InterfaceAlias "VLAN 103" -IPAddress 192.168.103.1 -PrefixLength 24 -DefaultGateway 192.168.103.1

This is not needed but I always want to enable IMCP, so lets enable that in the windows firewall.
Enable-NetFirewallRule -DisplayName "File and Printer Sharing (Echo Request - ICMPv4-In)"
![]()
Just a quick check that we have internet connectivity
Test-NetConnection

So now on with installing the RRAS. So install the Routing role and restart the server.
Install-WindowsFeature Routing -IncludeManagementTools -Restart
When the server has rebooted, log on to it again and start powershell.
Configuration RRAS:
The next part there is two solutions as I see it, the old way by using he GUI from another server, and another when you using NETSH. If you ever want to use the GUI and see what NAT that is in use and the stats for packages, then I recommend using the GUI. If anyone know a way to be able to use powershell or other ways to configure this and it will show up the same in the GUI let me know. I will now show both ways to configure this.
RRAS GUI:
From the MGM server, set it up on VLAN 102 with a IP and set the default GW to the IP of the GW server IP for VLAN 102. If using MGM2 set up with that IP and use that GW IP. Below I use MGM.If the server is in workgroup make sure that the same Admin account is on both servers with same password for easier management. If in domain, make sure your account has admin rights.
Now. On the MGM server. Install RSAT för RRAS via powershell. Restart not needed.
Install-WindowsFeature RSAT-RemoteAccess -IncludeAllSubFeature

Now start the “Routing and Remote Access” GUI.
In the GUI, right click on top of the tree and choose “Add Server”

Check The following computer and type in the IP-address of the gateway (in this case the MGM server is on VLAN 102 so we choose 192.168.0.1 to connect to the GW), and then click on connect.

Now right click on 192.168.102.1 and choose “Configure and Enable Routing and Remote Access”.

Click Next.

Select NAT and click on Next.

Select our External Network card and click on Next.

Select one of the cards (VLAN) that will be able to access internet, and click Next. In this you can´t add more then one card, but we will add it later.

The next screen will only show up if server is in a workgroup. You can choose if you want the GW to forward all DNS request towards the internet or if you will use a internal DNS and DHCP. In this case just to show how it works, so I will chose to let the GW forward all traffic. In a fully simulated environment, I would have the GW domain joined.

Click Next.

Click Finish and led RRAS be configured.

NB if you have enabled “Windows Firewall Remote Management” in the firewall you will get the following error message. This is not an Issue, because installing the Routing Role in the GW already has enabled the FW rules (at least on core).

Now expand 192.168.102.1 and the IPv4 and then NAT. If NAT does not show up, there is probably a GUI error, and a reboot of the RRAS console or the MGM server will fix that. We see that our VLAN 102 and the External Network is connected in NAT.

To add VLAN 103, right click on NAT and choose “New Interface.”

Select VLAN 103 and click on OK.

Select Private Interface and click on OK.

Now VLAN 103 should be visible under NAT.

Now, we can go on with verification.
RRAS Core:
NB, if you use this way you cant use the GUI from a 2016 server to view anything, it will throw a message that legacy is not supported and powershell must be used.
On the GW server install the install the RomoteAccess, and just because we want an output we add -PassThru
Install-RemoteAccess -VpnType RoutingOnly -PassThru
The next commands is using NETSH so start it by typing in NETSH and enter the NETSH interface. Then type “routing ip nat” to enter that.
![]()
And now add config in netsh. The first row will install the NAT functionality, this will throw a message that it does not find the file specified, but it will stil work. Row 2 will add the External Adapter with mode Full. Row 3 will add the VLAN 102 adapter. Row 4 will add the VLAN 103 adapter
install
add interface "External" mode=full
add interface "VLAN 102"
add interface "VLAN 103"
exit

And the its on to verification.
Verfification:
Now from the MGM server, make sure you have a functional DNS-server setting, or set google as one and the run Test-NetConnection.
Test-NetConnection

And from VLAN 103

So we see that internet access is working from both WLAN, and to test if the Routing works (starts working as soon NAT is in place). From VLAN 102 to VLAN 103, and we add -TraceRoute just to see the route.
Test-NetConnection 192.168.103.33 -TraceRoute

And from VLAN 103 to VLAN 102
Test-NetConnection 192.168.102.33 -TraceRoute

DONE