Overview:
Remote Authentication Dial-In User Service (RADIUS) is a client/server networking protocol that provides centralized authentication, authorization, and accounting (AAA) management for computers that connect and use a network service.
In Windows Server 2019, Network Policy Server is the Microsoft implementation of the RADIUS standard specified by the Internet Engineering Task Force (IETF).
NPS role will install automatically with the installation of Remote Access Service as a prerequisite on Windows Server 2019.
Network Policy Server (NPS) allows you to create and enforce organization-wide network access policies for connection request authentication and authorization.
NPS allows you to centrally configure and manage network access authentication, authorization, and accounting with these three following features:
- RADIUS Server: NPS performs centralized authentication, authorization, and accounting for wireless, remote access dial-up and virtual private network (VPN) connections.
- RADIUS-Proxy: NPS acts as a RADIUS proxy to forward connection requests to a remote NPS or other RADIUS servers for load balancing.
- RADIUS accounting: You can configure NPS to log events to a local log file or to a local or remote instance of Microsoft SQL Server.
In this guide, we will learn the steps to configure the Radius Server on Windows Server 2019. We will configure one NPS as a RADIUS server for VPN connection authentication and authorization.
Test Lab Setup:
Note: For this guide, we will use the virtual test lab created in VirtualBox.
- WS2K19-DC01: Domain Controller and DNS Server.
- WS2K19-RADIUS01: Member Server acts as a RADIUS Server.
- WS2K19-SRV02: Standalone Server acts as a VPN Server.
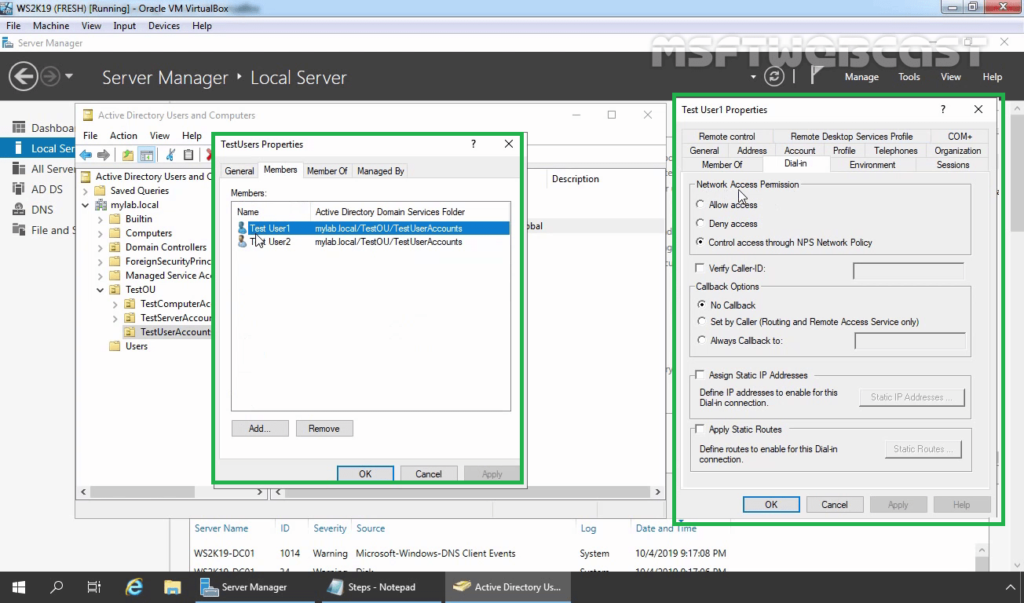
1. At first, we need to create a new security group in the Active Directory domain (for example, TestUsers) in which we will need to add all users that will be allowed to authenticate on VPN Server.
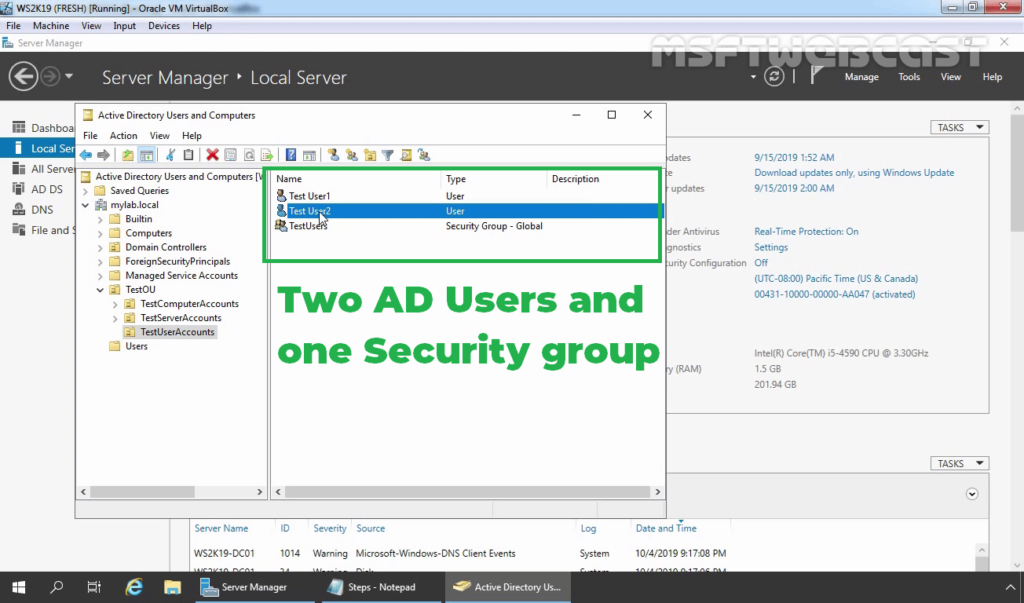
2. Check the users dial-in properties settings.
Install NPS server role on Windows Server 2019:
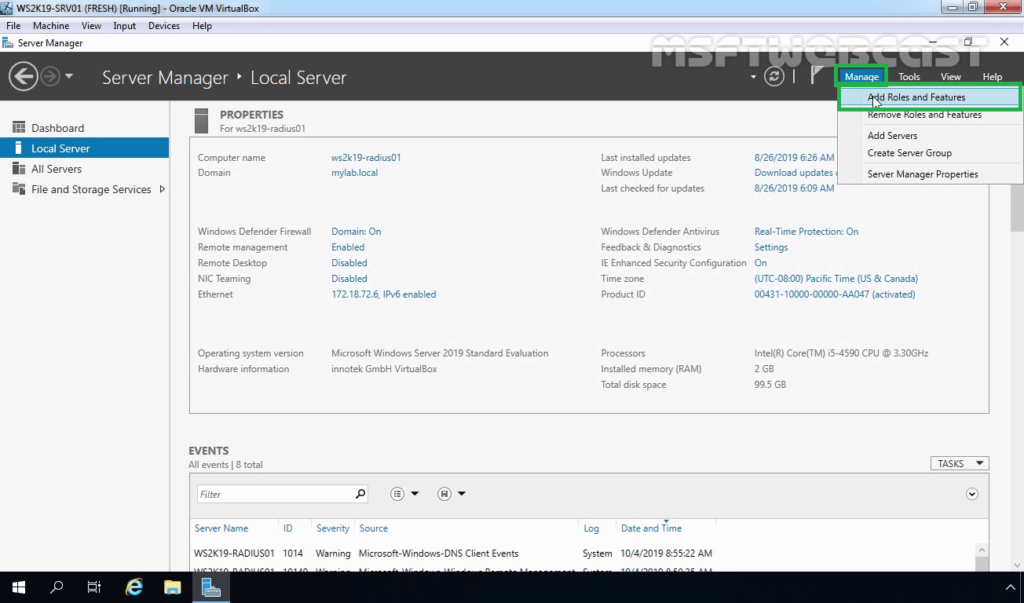
3. Logon to WS2K19-RADIUS01 server with a domain administrator account. Open Server Manager Console.
4. Click on Manage and select Add Role and Features.
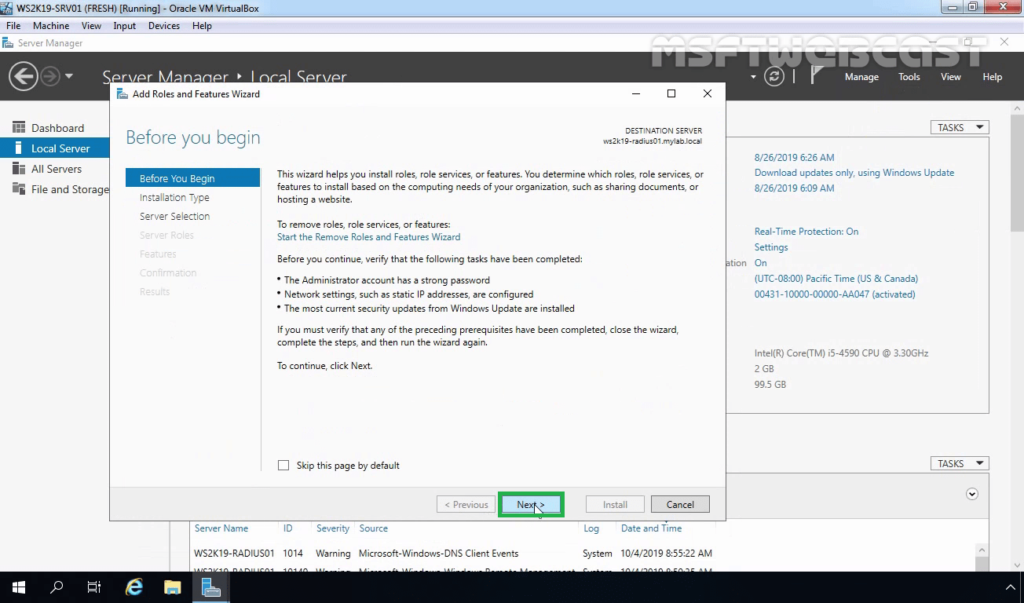
5. On the Before you begin page, click Next.
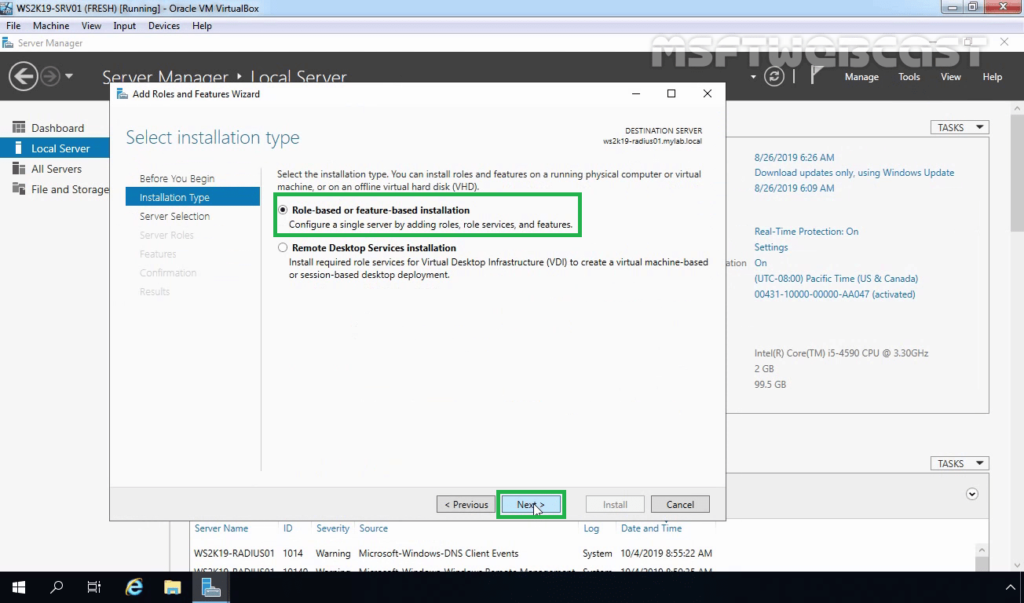
6. Select Role-based or feature-based installation and click Next.
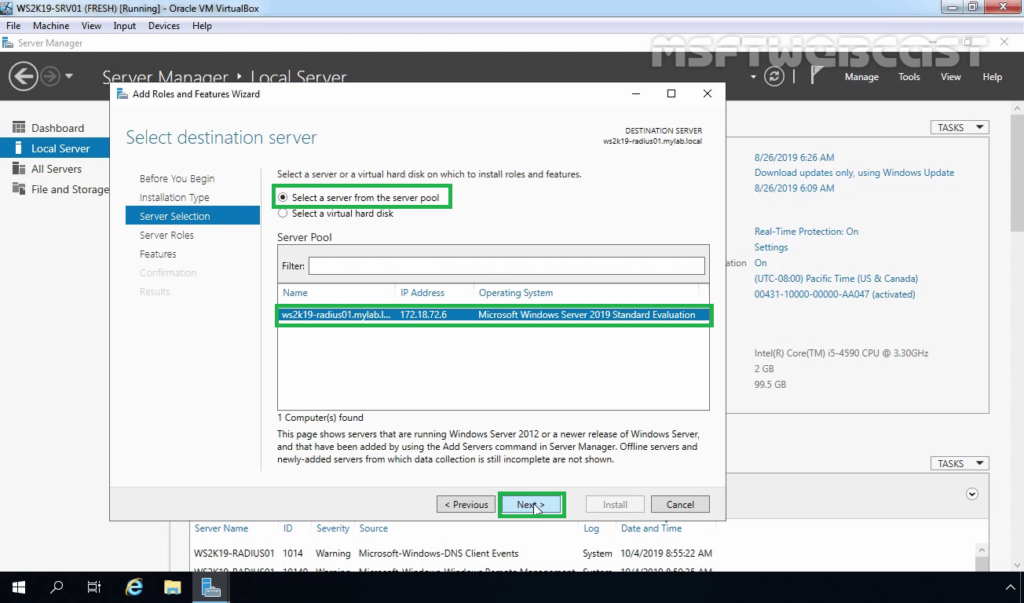
7. Select a server from the server pool on which you want to install the Network Policy and Access Service role, click Next.
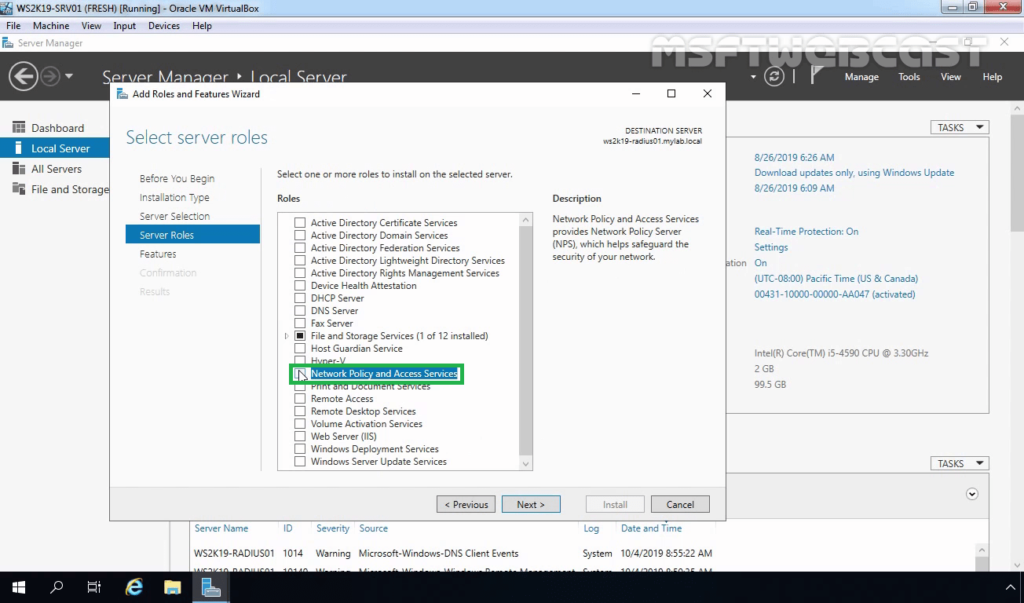
8. On select server roles page, select the Network Policy and Access Services checkbox. Click Next.
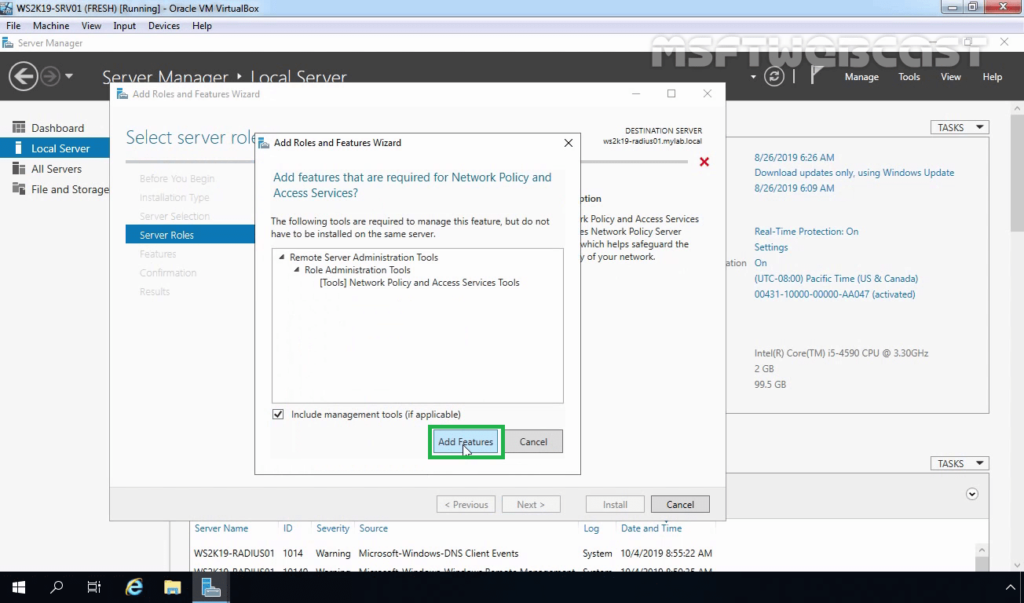
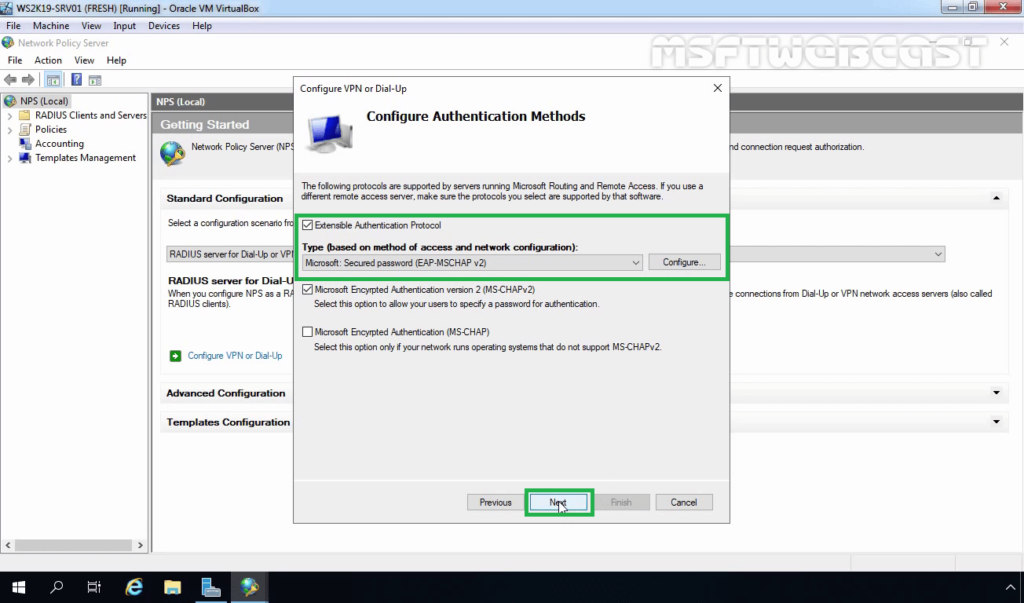
9. Click the Add Features button to add the required feature for NPS. Click Next to continue.
10. On select features, click Next.
11. Read overview information about Network Policy and Access Services and click Next.
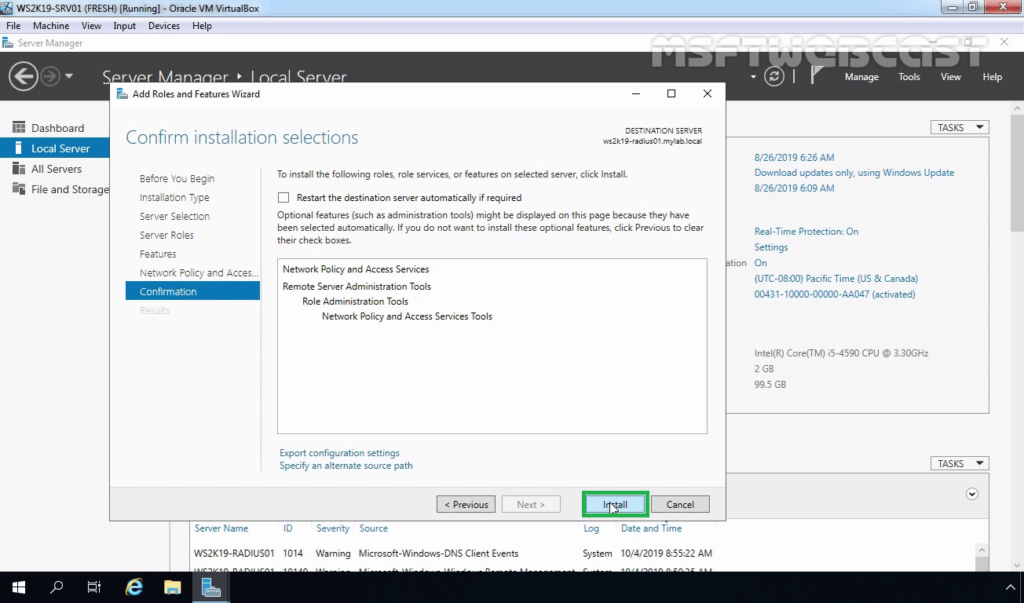
12. Click Install and complete the installation process.
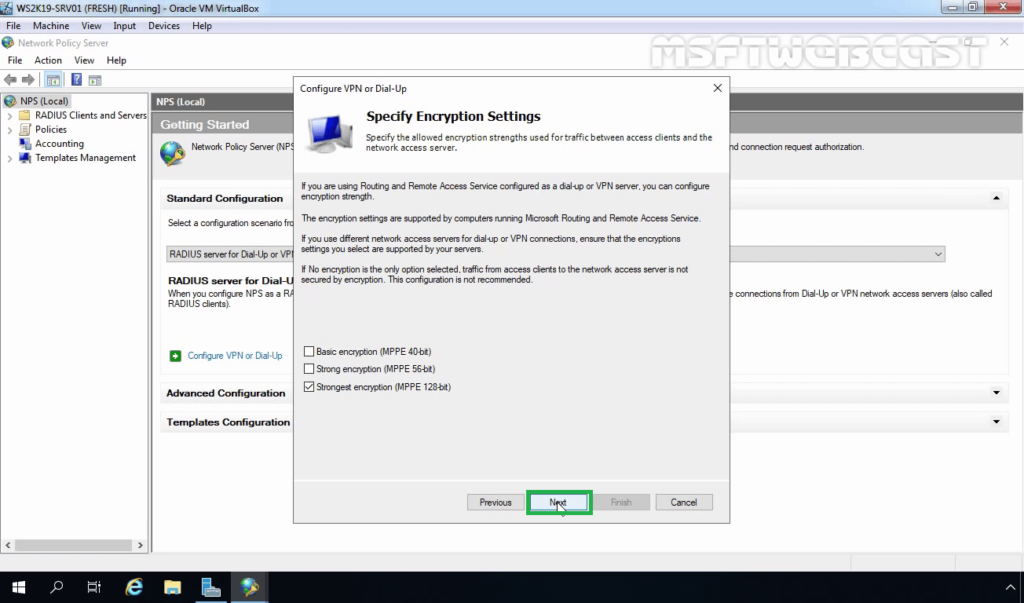
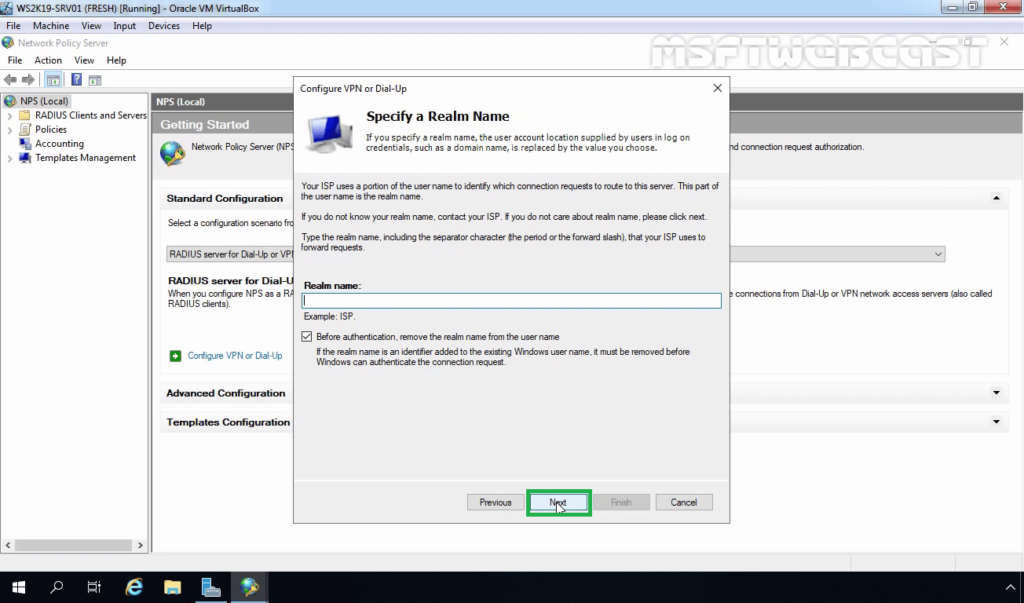
Configure RADIUS Server on Server 2019:
Step:1 Register NPS Server in Active Directory:
13. Click Close to finish the installation.
14. After the Network Policy and Access Services role installation is complete, open the Network Policy Server in the Tools menu.
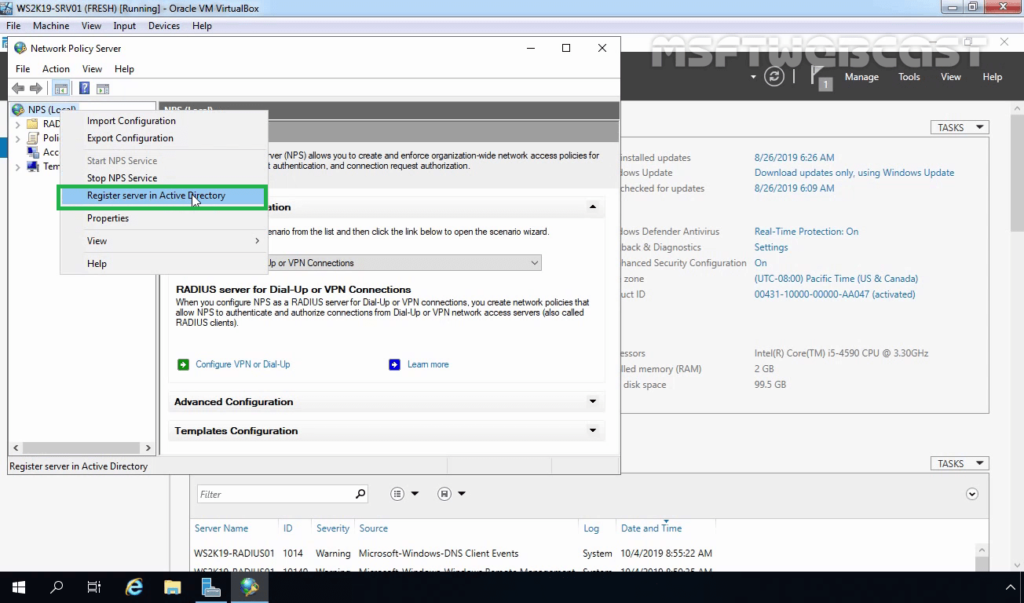
To use the RADIUS server in the Active Directory Domain, we must register it first in the Active Directory.
15. In the NPS management console, right-click on NPS and select Register server in Active Directory.
16. Click OK to confirm the successful registration of the RADIUS server in Active Directory.
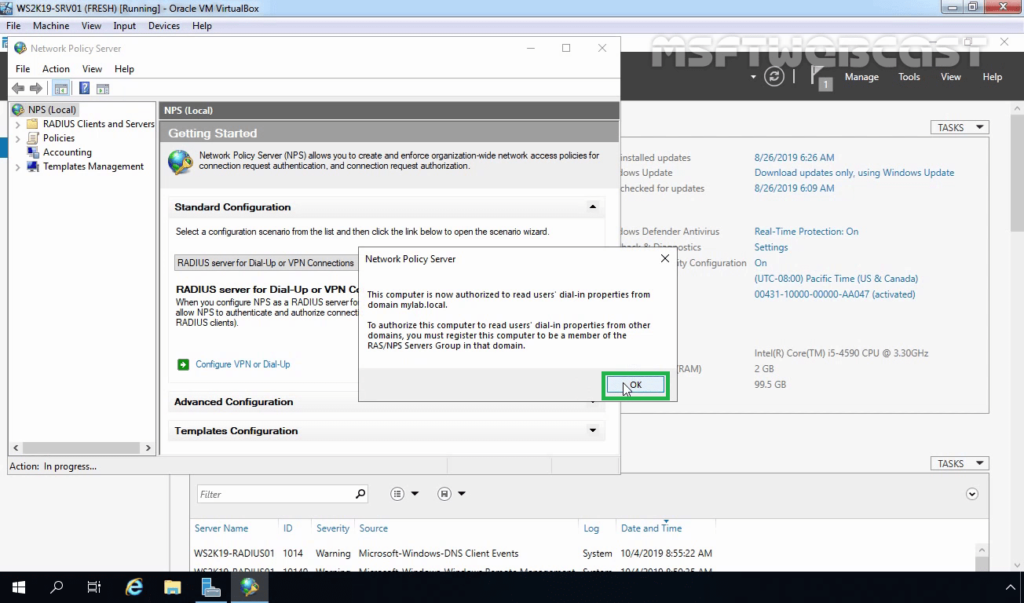
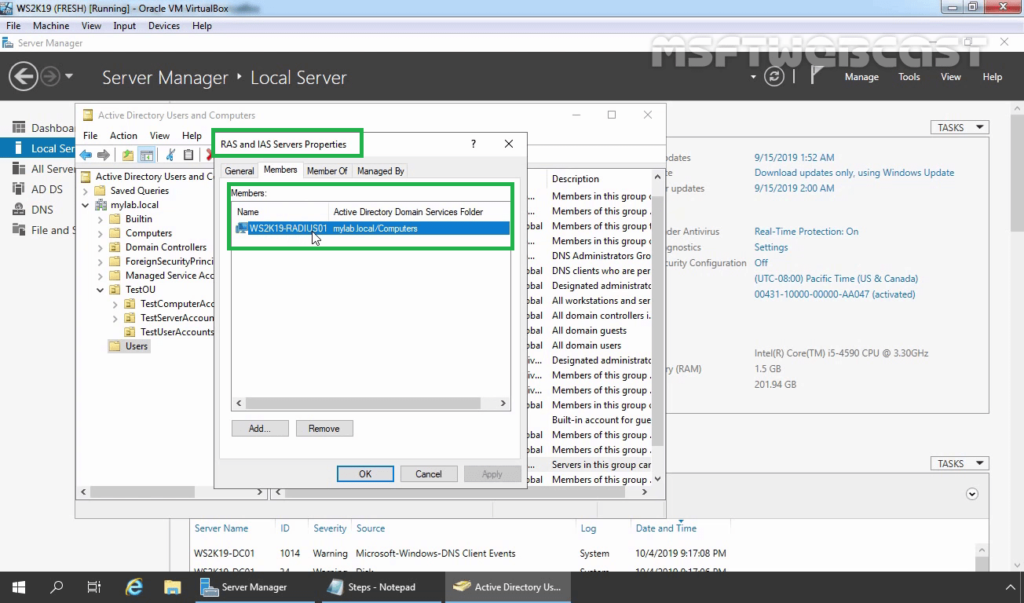
17. Now the RADIUS server has the authority to read the properties of user accounts related to the remote access. The RADIUS server will be added to the built-in domain group RAS and IAS Servers.
Step:2 Add RADIUS Client (VPN) Entry and Create NPS Policies for RADIUS Server:
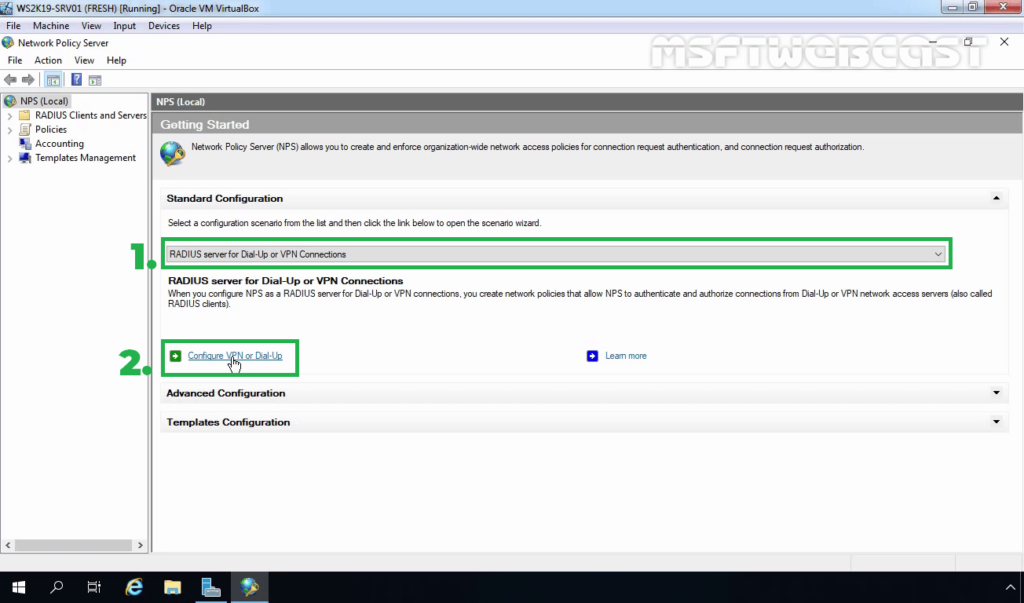
18. Under Getting Started, select RADIUS Server for Dial-Up or VPN Connection from the drop-down menu. Click on Configure VPN or Dial-Up link to add a new RADIUS client.
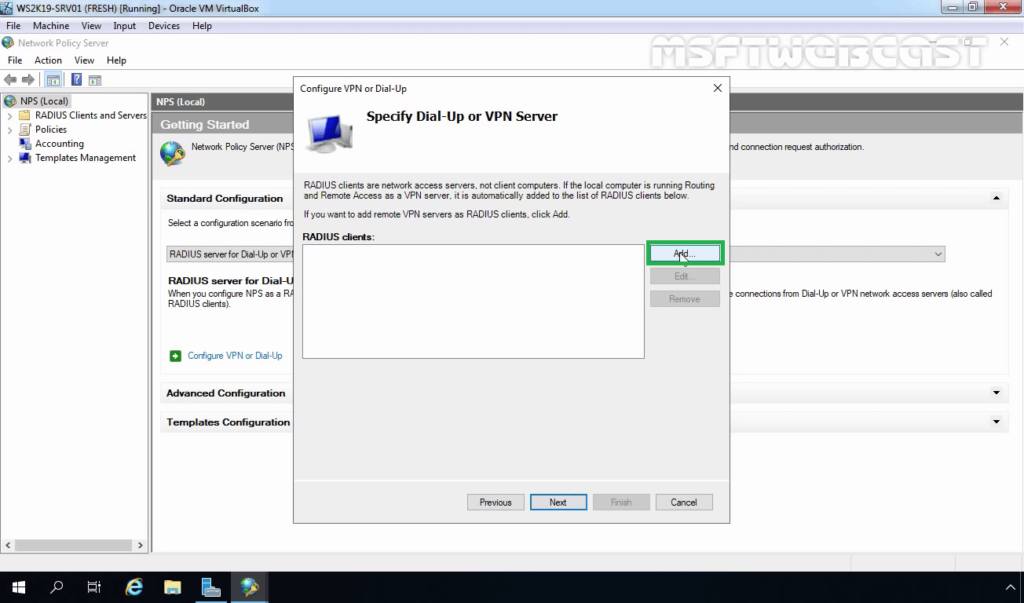
19. Select VPN Connections and specify a meaningful name. Click Next.

20. Click on the Add button to add remote VPN servers as RADIUS clients.
21. On New Radius Client console, specify the details as mentioned below:
- Friendly Name: To identify the RADIUS client.
- Address: IP Address or FQDN of VPN Server.
- Manual Shared Secret: Type the shared secret password and re-enter to confirm the password.
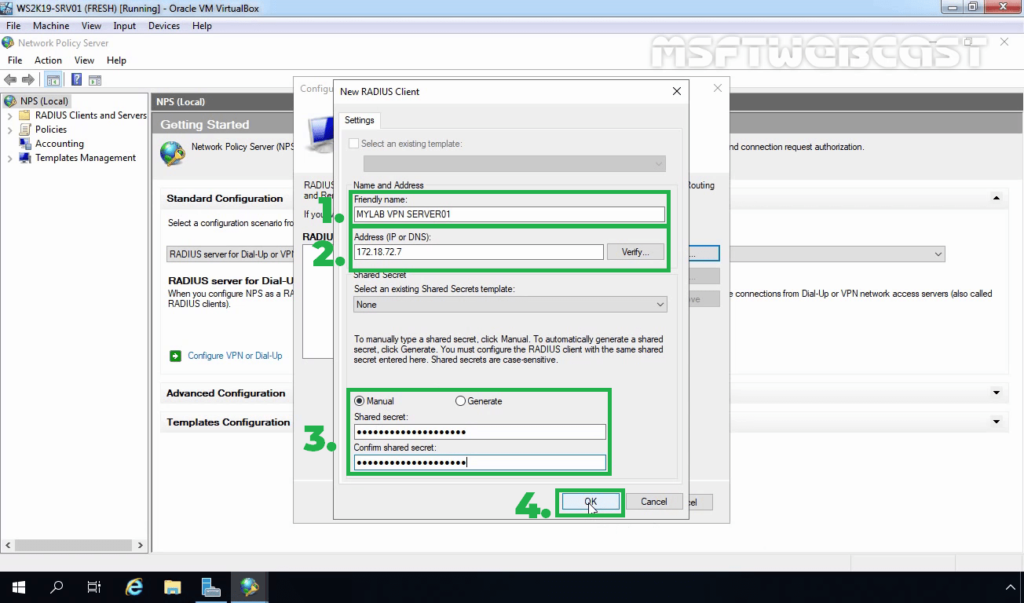
22. Click OK to save the changes.
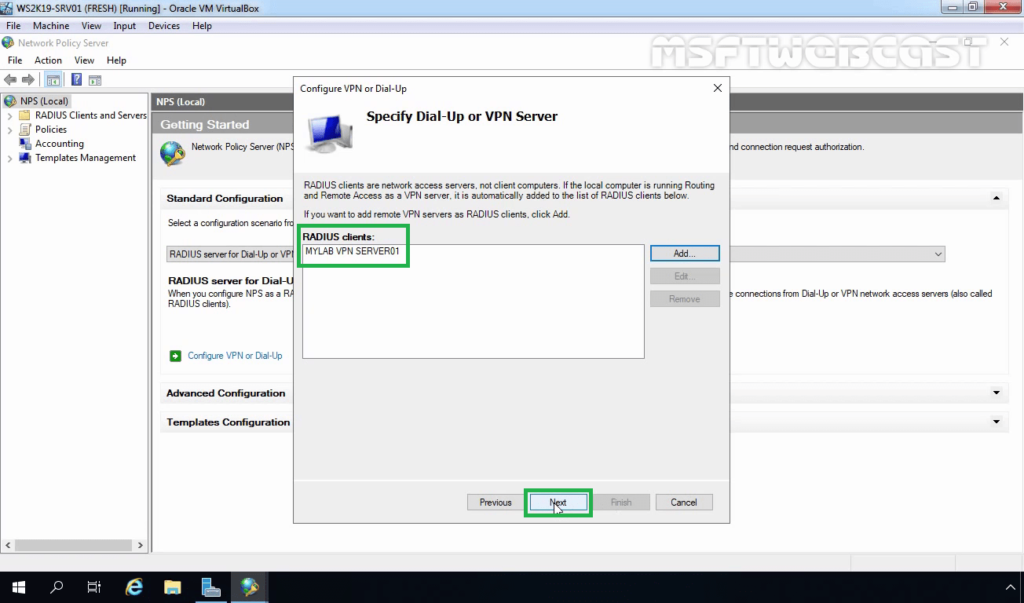
23. Verify Radius client entry and click Next.
24. Select Extensible Authentication Protocol checkbox and from the drop-down menu select Microsoft: Secured password (EAP-MSCHAP v2). Click Next.
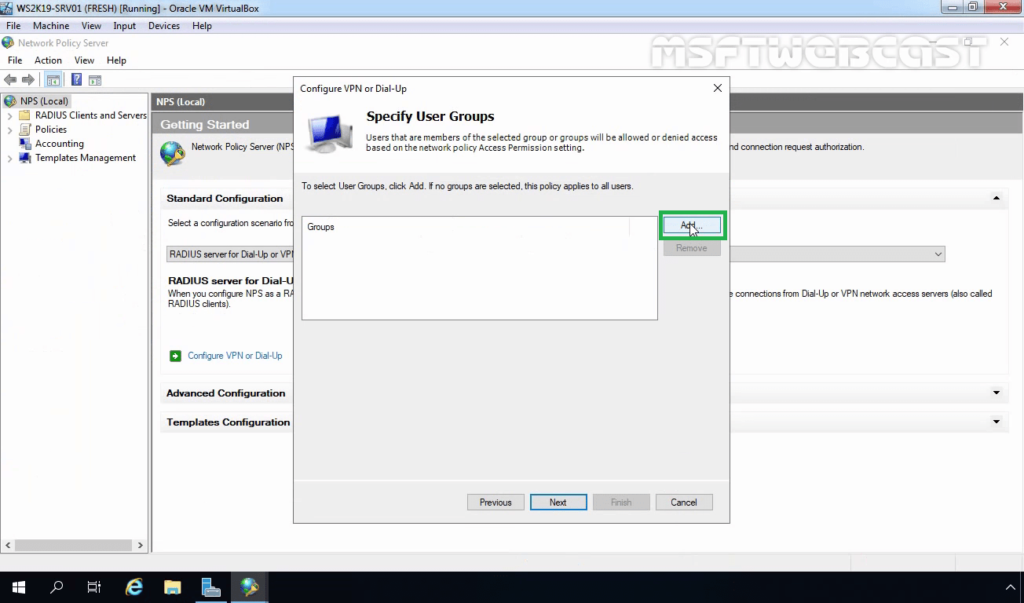
25. Click on Add to specify User Groups as a condition to apply this policy.
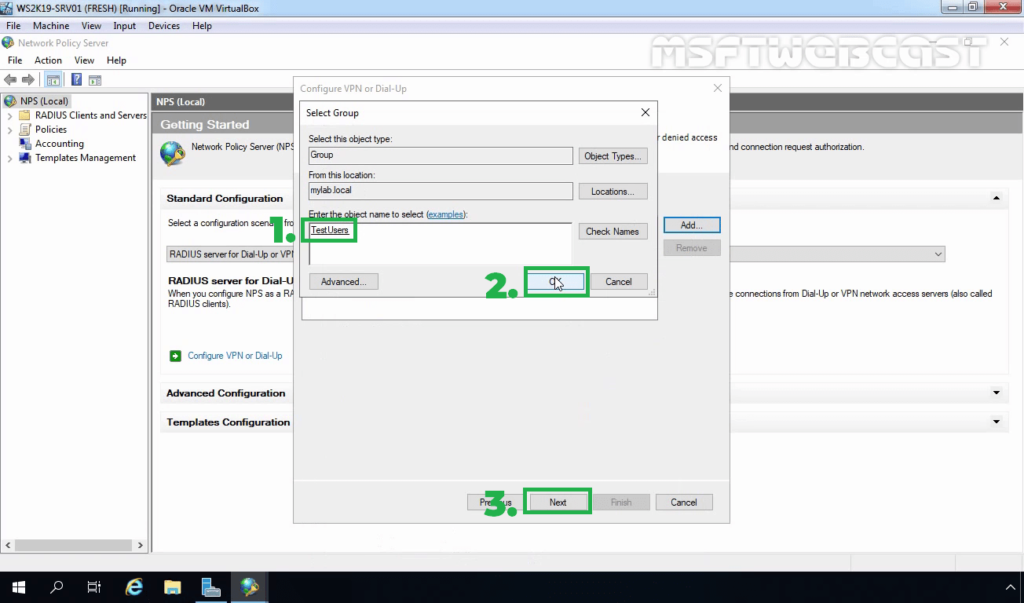
26. Add the security group TestUsers. Click on Next.
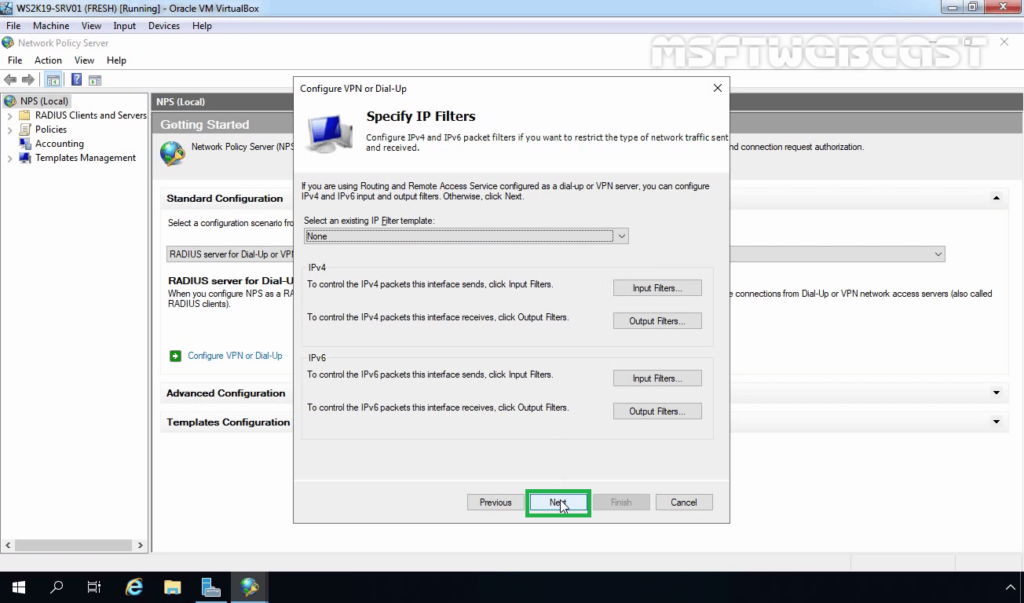
27. On Specify IP Filters console, click Next.
28. Choose the Strongest encryption (128 bit) and click Next.
29. Click Next.
30. Click Finish to add create NPS Policies on the RADIUS Server.
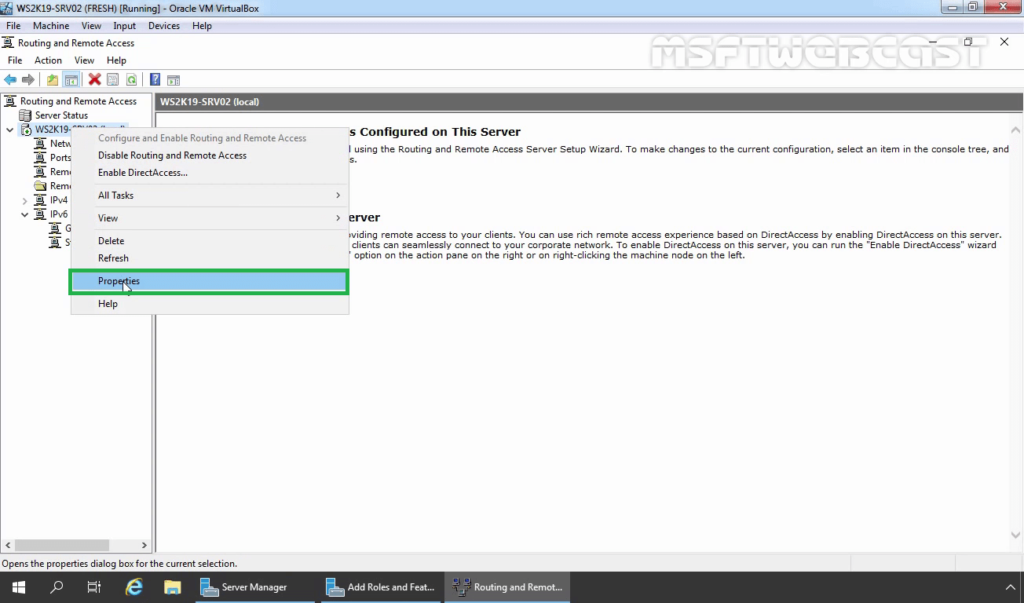
Step:3 Configure RADIUS Server Settings on VPN Server:
After creating the NPS policy, we can proceed to configure our VPN server for authentication on the newly installed RADIUS NPS server.
Already we have configured the VPN server role on Windows Server 2019. You can follow this post for How to Install and Configure the VPN server role on Windows Server 2019.
31. On VPN Server, open Server Manager Console. Click on Tools and select Routing and Remote Access.
32. Right-click on the server name and select Properties.
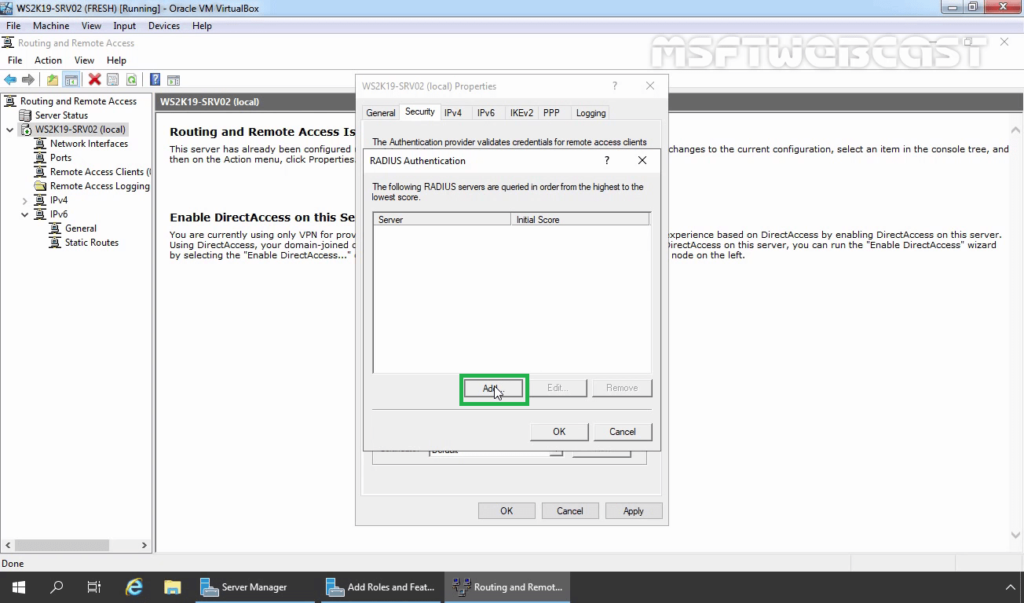
33. Click on Security Tab. Under the Authentication provider, select RADIUS authentication and then click on Configure.
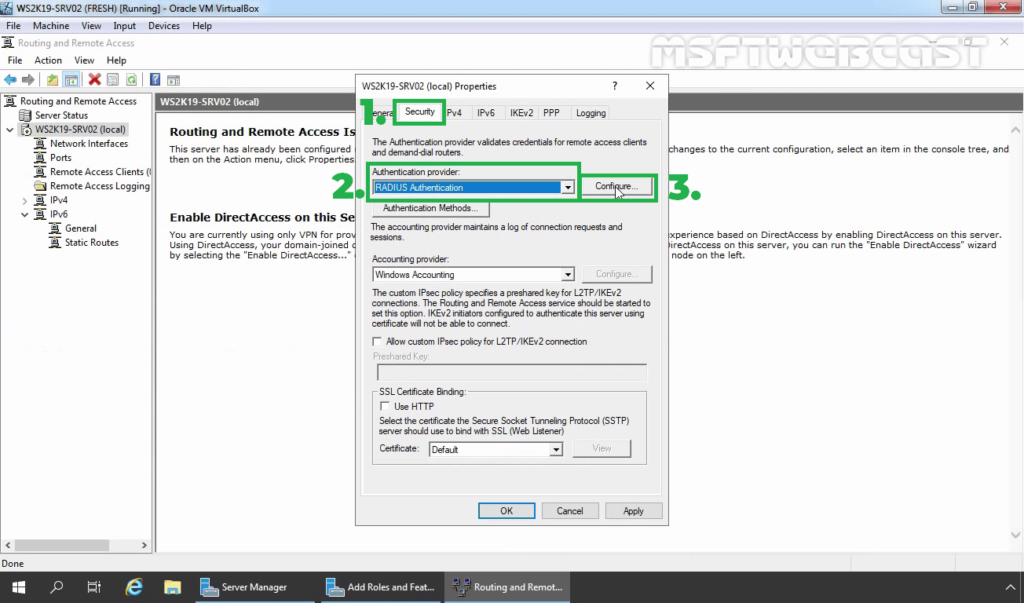
34. Click Add.
35. Specify RADIUS Server IP Address. Click on Change
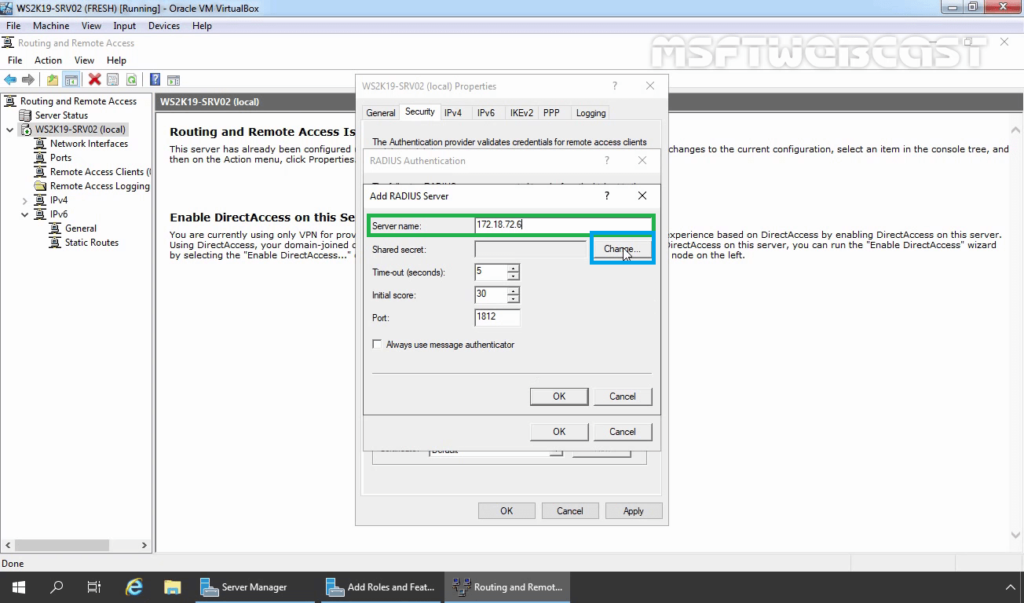
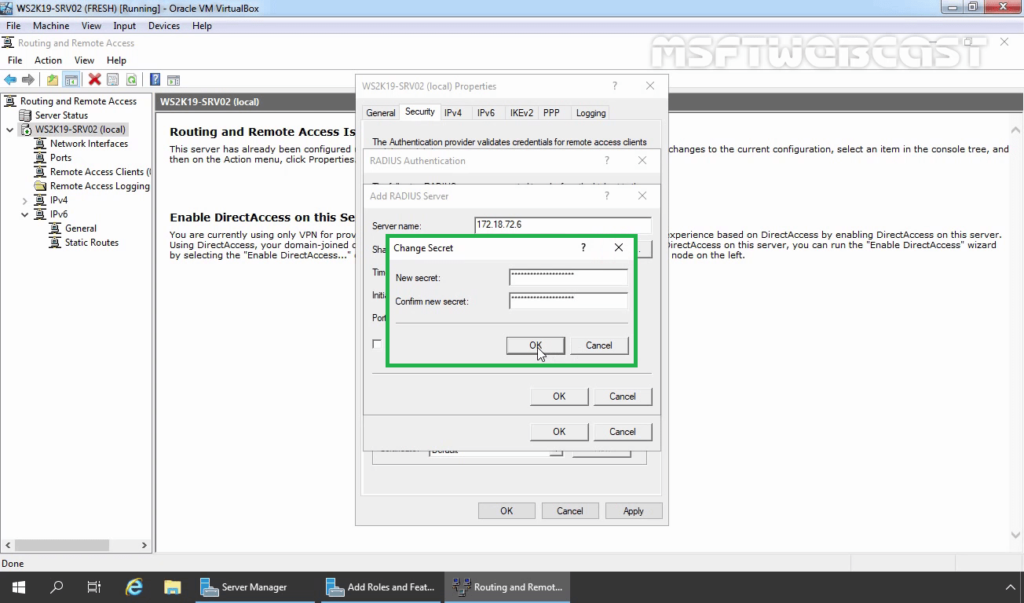
36. Specify Shared Secret password (which we have specified during adding radius client). Click OK.
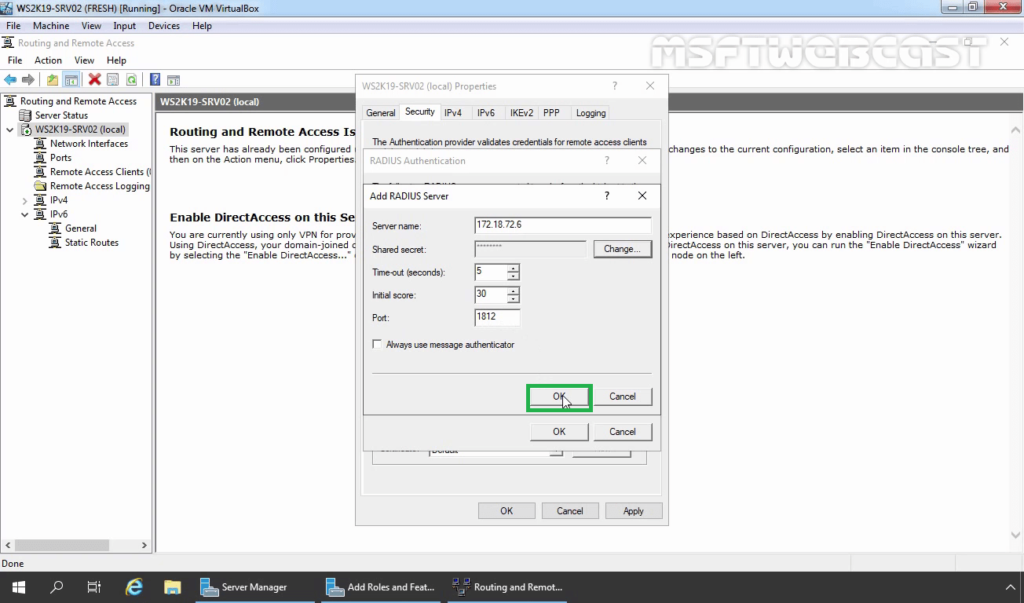
37. Click OK.
38. Click OK.
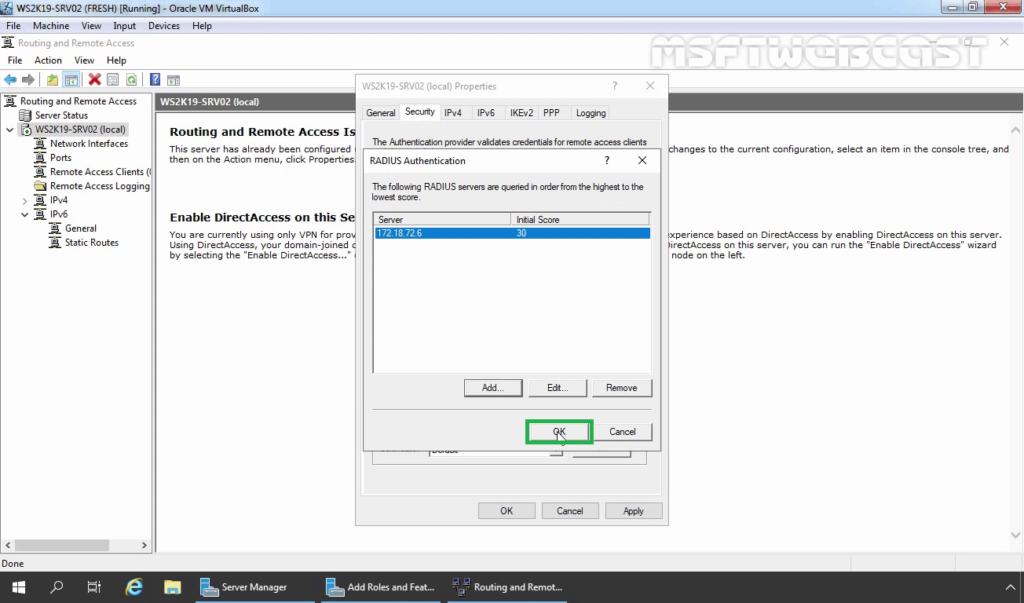
39. Under the Accounting provider, select RADIUS Accounting and then click on Configure.
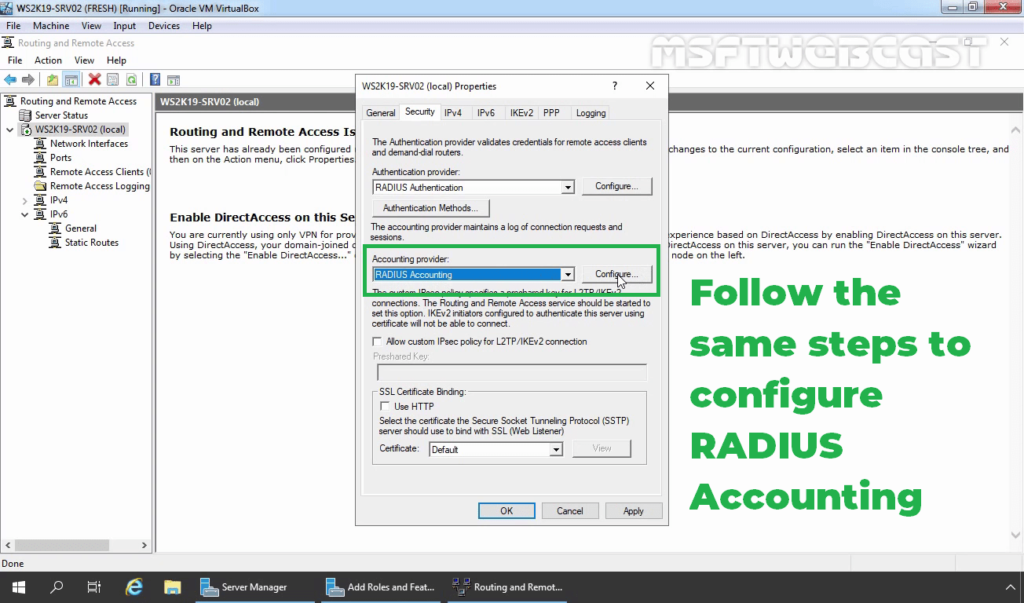
40. Follow the same steps again to specify the RADIUS Server IP Address and Shared Secret password.
41. Click on Apply and OK to save the changes.
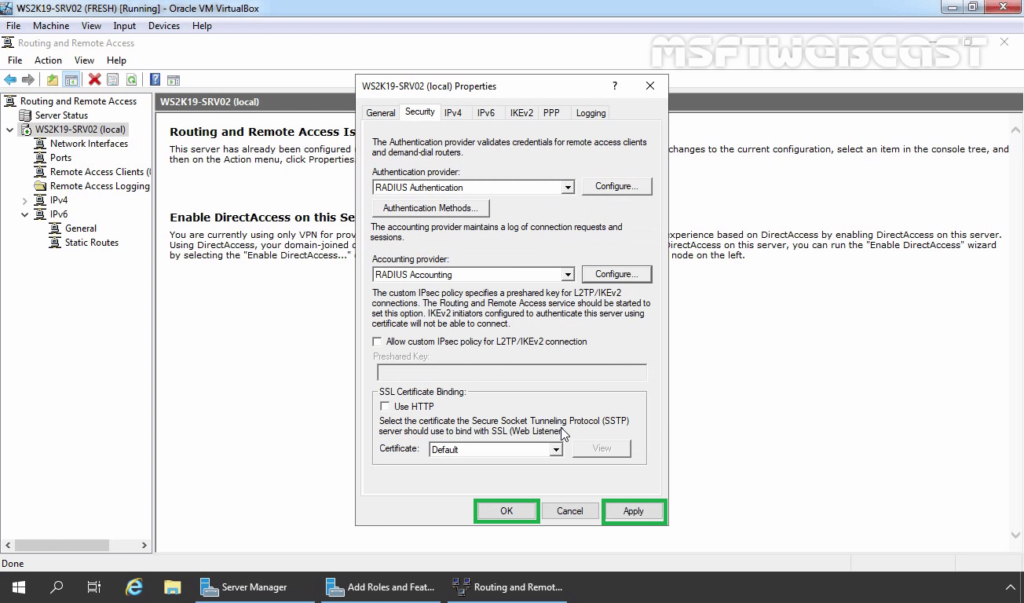
Now our VPN server can use Windows Server 2019 NPS RADIUS server for authentication and accounting without any issue.
That completes the steps on how to configure NPS RADIUS Server for VPN Authentication on Windows Server 2019.
Related Articles:
- How to Install Remote Access Service on Windows Server 2019 Part-1
- How to Install and Configure VPN in Windows Server 2019 Part-2
- Configure NPS for VPN in Windows Server 2019 Part-3
- Configure Port Forwarding and Test VPN Connection on Windows 10 Part-4
Post Views: 5,170
![]()
В данной статье опишу конфигурацию Радиус сервера, для подключения к нему Mikrotik в качестве клиента.
Данная функция полезна, если у вас есть собственный домен на базе Active Directory, и вы не хотите каждый раз заводить VPN пользователей в ручную. Так же с помощью RADIUS сервера, можно настроить аутентификацию непосредственно на сам Mikrotik с помощью доменных учеток или аутентификацию на Wi-Fi
В общем, штука полезная.
Во время написания статьи все указанные настройки проводил на Windows Server 2019, но думаю она так же актуальна и для Windows Server 2016
Первое что нам нужно — сам Windows Server, в данной статье не описываю его установку. Думаю, раз вы дошли до этого материала, то развернуть WinSrv и выполнить базовую настройку Mikrotik вы в состоянии.
К делу.
Переходим к добавлению компонентов
- Диспетчер серверов — Добавить роли и компоненты
- Далее — Установка Ролей и Компонентов — Выбрать целевой сервер — Службы политики сети и доступы — (Копмпоненты) Далее — Установить

После установки переходим к настройке:
- Средства — сервер политики сети
- ПКМ на NPS — Зарегистрировать сервер в Active Directory

- ПКМ на RADIUS-клиенты — Новый документ
- Устанавливаем флаг «Включит этот RADIUS-клиент»
- Понятное имя — Указываем понятное имя
- Адрес (IP или DNS) — указываем IP адрес или DNS имя Mikrotik.
- Общий секрет — Генерируем и сохраняем себе секретный ключ для обмена Mikrotik и RADIUS-сервера. Или используйте свой вариант ключа.

- Развернуть политики — пкм на «Сетевые политики» — Создать новый документ
Задаем имя политики

- Далее — Добавить
- Условие — Группы пользоватей — Добавить группы — Выбираем группу — Доступ разрешен
На самом деле, условий там масса, можете выбрать под свои цели. Самое частое всё таки «группы пользователей», ведь основная задача разгрузить логику добавления пользователей. В соответствии с данным условием — все пользователи, которые являются членами группы openvpn_users будут иметь возможность пользоваться openvpn
Тип Шифрования ms-chap можно отключить, как устарешвий. Оставить только MS_CHAP_V2
Однако есть нюанс, MS_CHAP_V2 работает только с RouterOS начиная с версии 6.43, если у вас версия моложе — или обновляйтесь, или используйте в политике шифрование PAP

- Далее — Тип порта NAS — Асинхронная (модем)

- Далее — Оставляем только Service-Type = Login

- На последнем окошке проверяем что указали правильные параметры и нигде не ошиблись. Клацаем Готово
- Настраиваем Брандмауэр
- Правила для входящих подключений — Предопределенные — Сервер политики сети

- Выбираем правила с портами 1813/udp и 1812/udp

- Далее — Разрешить подключение.
Переходим к настройке Mikrotik
- PPP — Secrets — PPP Authentication & Accounting – Use Radius
/ppp aaa
set use-radius=yes
В терминале

- Переходим в меню Radius и устанавливаем адрес сервера и секретный ключ
/radius
add address=192.168.X.YYY secret=Radius-PASS service=ppp
В терминале

На этом настройка завершена. Теперь для подключения VPN можно использовать доменную учётку.
Другие стати по теме:
- Генерация сертификатов на Mikrotik для OpenVPN
- Настройка OpenVPN Server на Mikrotik RouterOS
- Сборка opvn.conf для клиента Mikrotik
- Howto
- Mikrotik
- Radius
- WindowsSrv
The term “RADIUS server” will probably be mentioned at some point in any conversation regarding wired or wireless authentication. Within a WPA-2 Enterprise network, RADIUS (also referred to as a “AAA server“), performs the crucial tasks of Authentication, Accounting, and Authorization. As you might anticipate, Microsoft has made improvements to its RADIUS server over time to satisfy the demands of its vast customer base for authentication.
Since the release of the Windows 2003 server, Microsoft has proactively updated its RADIUS servers. In our past blogs, we went into great detail on configuring Windows 2008/12/16 servers. In this blog post, we’ll help you set up Windows 2019, the ninth edition of the venerable Windows RADIUS server.
Before configuring the Windows Server 2019, ensure that you meet the following requirements for successfully configuring the Windows 2019 server.
Prerequisites for Windows RADIUS Server 2019:
❖ System Requirements:
- Processor: You need a processor of at least 1.4 GHz clock frequency for x64 processors.
- RAM: The minimum requirement of RAM is 512 MB. But Microsoft recommends using 2GHz for smooth functioning and Servers with a Desktop Experience installation option.
- Disk space: You need a minimum disk space of 32 GB or more, but Microsoft usually recommends using 40 GB or more disk space. Also, the disk space requirements vary with the processor and RAM used in the system.
❖ Active Directory Setup:
You must update the Active Directory environment before adding the domain controller.
❖ Server Core Installation:
Unlike Windows Server 2008, the admin need not select the Full Installation or Server Core Installation option beforehand in Windows Server 2012/16/19.
These features are merged in the 2012/16/19 version to give three optional features which the admin can install or uninstall at will.
❖ Network adapter requirements:
- An Ethernet adapter with a minimum throughput of 1 Gigabit per second.
- An Ethernet adapter that conforms to the PCI Express architectural standard.
❖ Miscellaneous Requirements:
- System and firmware that is based on UEFI 2.3.1c and support secure boot.
- A graphics card and a display with at least Super VGA (1024 x 768) resolution.
- Turn off your antivirus software, as the installation process can be hampered by virus protection software. For instance, checking each file copied locally to your computer might significantly slow the installation.
- Ensure that the Windows Firewall is enabled by default.
- Ensure that all the relevant data and information are appropriately backed up before the configuration.
Overview of Windows RADIUS Server 2019 Configuration:
- Install and set up Windows Server 2019.
- Install Active Directory Domain Services (ADDS) to configure the new domain.
- Install Certificate Authorities (CA) with Active Directory Certificate Services (ADCS).
- Install NPS ( Network Policy Server).
- Configure Certificate Authorities (CA), i.e., Active Directory Certificate Services (ADCS) for Certificates.
- Configure NPS ( Network Policy Server) for the authentication protocol.
- Configure RADIUS.
- Define Network policies for users/devices.
- Configure Access Point.
- Set up zero clients, and select 802.1x authentication.
- Configure Wireless Connection Request.
Configure Windows 2019 RADIUS Server:
Now we will see each step involved in configuring Windows 2019 server in detail:
Install and Configure AD DS:
For configuring ADDS, follow the given instructions:
- Navigate to Windows Server 2019.
- Click Start.
- Click Server Manager.
- Navigate to Role Summary.
- Click Add Roles and Features.
- Select Role-based or Feature-based installation.
- Navigate to the Before You Begin page and click Next.
- Navigate to the Select Server Roles page.
- Select the Active Directory Domain Services.
- Click Next.
- Click Install on the Confirm Installation Selections.
- Navigate to the Installation Results page and click Close.
ADDS is installed.
Install AD CS and NPS :
For configuring ADDS, follow the given instructions:
- Navigate to Server Manager.
- Select Roles and Click Add Roles.
- Click Next on the Before you Begin page.
- Select Active Directory Certificate Services (AD CS) and Network Policy and Access Services.
- Click Next.
- Click Next on Network Policy and Access Services
- Navigate to Role Services and select Network Policy Server.
- Click Next.
- Select Create a self-signed certificate for SSL encryption and click Next.
- Click Next on the Introduction to Active Directory Certificate Services
- Select Certification Authority on the Select Role Services page and click Next.
- Select Enterprise on Specify Setup Page and Click Next.
- Select Root CA on Specify CA Type Page and Click Next.
- Select Create a new private key on the Set Up Private Key Page and Click Next.
- Click Next on Configure Cryptography for CA.
- Enter details on Configure CA Name page and click Next.
- Enter the validity period on the Set Validity Period page and click Next.
- Click Next on Configure Certificate Database page.
- Click Next on the Web Server (IIS) page.
- Click Next on the Select Role Services page.
- Click Install on the Confirm Installation Selection page.
- Click Close.
Now the AD CS (Active Directory Certificate Services), Web Server (IIS), and NPS are installed successfully.

Configure NPS ( Network Policy Server) and RADIUS authentication.
- Click on the Start button and select Administrative tools.
- Click NPS on the Network Policy Server.
- Select Register Server in Active Directory and click OK.
- Click OK.
- On the NPS (Local) page, select RADIUS server for 802.1x Wireless or Wired Connections.
- Click Configure 802.1x.
- Select Secure Wireless connections on the Configure 802.1x page.
- Type Name and click Next.
- Add RADIUS clients on the Configure 802.1x page and click Next.
- Type the following details on the New RADIUS Client page.
- Name
- IP Address
- Shared Secret (Manual)
- Click OK and click Next.
- Select Microsoft Protected EAP (PEAP) on the Configure 802.1x
- Click Configure.
- Select Secured password on the Edit Protected EAP Properties page and click Edit.
- Enter the Number of authentication retries and click OK and click Next.
- Select Groups and click Next.
- Click Next again and click Finish.
- Restart NPS again.
Define Network Policies for users/devices.
You can follow the given steps for Defining the network policies.
- Navigate to the NPS console and click NPS (local).
- Click and expand Policies.
- Select Network Policies.
- Click New.
- Enter a Policy Name.
- Select the Type of Network Access Server to Unspecified while using Netscaler or RCdevs OpenLDAP while using OTP.
- Click Add in Specify Conditions
- Select Windows Groups and click Add.
- Click Add Groups and click OK.
- Select NAS Identifier in the Select Conditions
- Enter a Name and select Next to continue.
- Select Access Granted in Specify Access Permission
- Under Configure Authentication Method, select MS-CHAP v2 for maximum security.
- Click Next.
- Select RADIUS attributes as Standard in Configure Settings.
- Click Add.
- Enter the attribute value in String and click OK.
- Click Next and click Finish.
You can use the Network Policy Wizard to create and add new conditions, constraints, and setting to the network policies.
 Administrators can define and implement a wide range of policies using our Cloud RADIUS, including lookup policies applied at the moment of authentication. For instance, depending on the time of day, you can decide whether to accept or reject people and devices. You may also restrict access to devices running a specific operating system.
Set up Zero Clients, and Select 802.1x Authentication
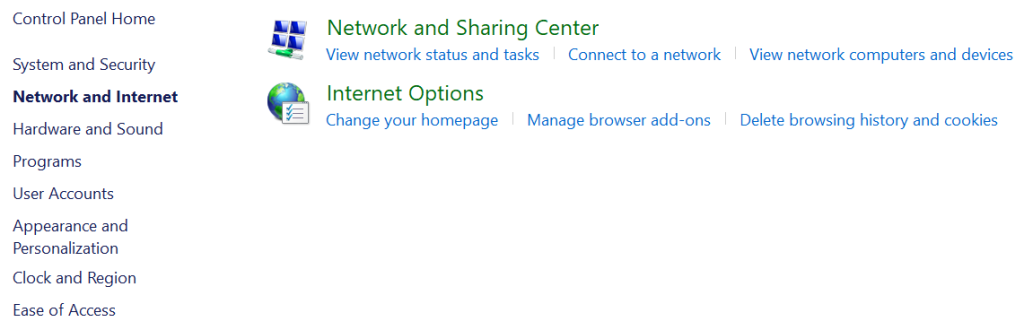
- Navigate to the Control panel and open the Network and Sharing center.
- Click Change adapter settings.
- Select Local Area Connection and click Properties.
- Select Authentication and click Enable IEEE 802.1x authentication.
- Select the desired protocol in the dropdown button.

Configure Wireless Connection Request
- Navigate to the Control panel and open the Network and Sharing center.
- Click Manage Wireless Networks.
- Select Manually Create a network profile.
- Enter your SSID in Network Name and click Next.
- Click Change Connection settings.
- Select Security and click Settings.
- Select the Trusted Root CA and click OK.
- Navigate to Advanced Settings.
- Select Specify Authentication Mode and click OK.
Windows RADIUS Servers are not Cloud Compatible
NPS’s primary drawback is that it is designed to be an on-premise RADIUS solution for Active Directory environments. Cloud integration of NPS also has other significant downsides, even with other Microsoft-owned cloud-based solutions like Azure AD. If you want to use Azure with NPS, you will require a separate authentication server or proxy to achieve cloud authentication. These operations are not only challenging to configure and maintain but time-consuming and relatively expensive.
Furthermore, the traditional RADIUS servers installed on-site are prone to several security issues and vulnerabilities. Windows RADIUS servers have a number of vulnerabilities of their own that hackers frequently take advantage of in zero-day attacks. In addition, they require a lot of time and expertise to set up and maintain.
Due to its physical accessibility, the NPS server’s on-premise presence makes it vulnerable to various physical security threats, from intruders to disasters – or just power outages. Given the costs of maintaining highly-secure physical locations, there’s rarely a circumstance in which on-prem works out to be cheaper than cloud RADIUS.
Cloud RADIUS: Admins’ First Choice

For years, network administrators have relied on Windows Server for network authentication, but due to modern-day technological advancements, it is difficult to ignore its shortcomings.
There are several advantages to moving to the cloud over staying in an on-premises system, and no product exemplifies those benefits more than our revolutionary Cloud RADIUS. You can avoid the shortcoming of on-premise authentication by utilizing a cloud-based NAC like SecureW2’s Cloud RADIUS.
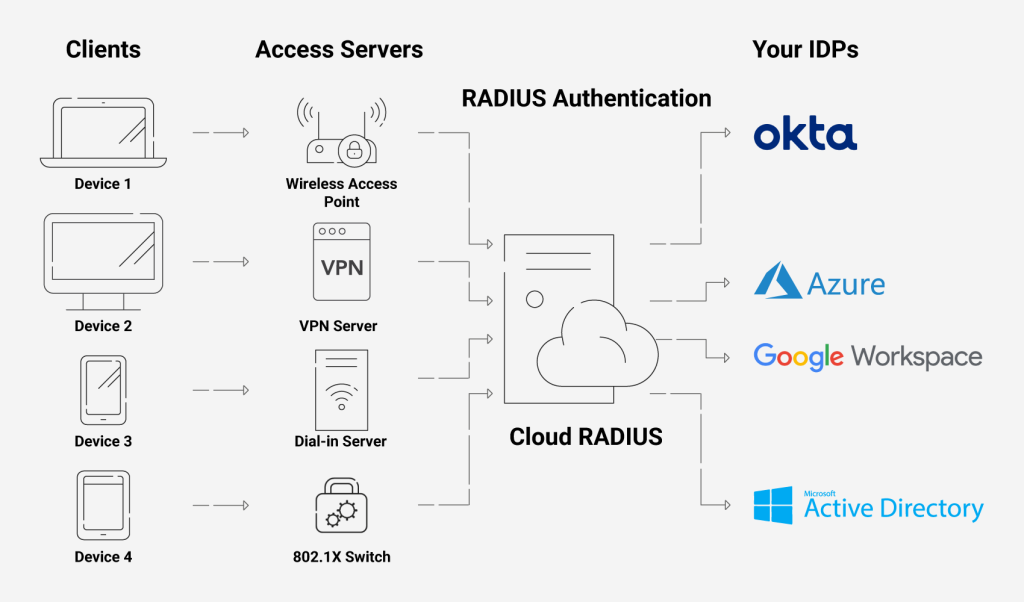
With our Cloud RADIUS, you may restrict or enable access to users depending on various factors, including user/device characteristics, time of day, and more. Additionally, you may use our Cloud RADIUS with any IDP because it is built for vendor neutrality. An industry-unique feature is the ability to enforce policies using real-time user lookups against Azure, Okta, and Google Workspace.
Integrating with Securew2 gives you more customization options through our many innovative features like Azure MFA auth, Intune auto revocation, Windows Hello for Business login, and many more. Besides not needing lengthy setups, Cloud RADIUS is resistant to on-site risks like outages and burglars. It doesn’t need to be installed at each location of your company because it is hosted in the cloud and has built-in redundancy.
If you are interested in taking that first step towards security for your organization, look no further and click here to inquire about pricing.
Одним из существенным преимуществ Windows Server является наличие такой роли как Active Directory. И каждая интеграция этой службы с корпоративной инфраструктурой не только делает удобным общее использование(одна учётная запись), но и безопасным. Стоит отключить учётную запись со стороны Windows Server, у пользователя закроется доступ к: терминальному серверу, 1С, VPN, корпоративному сайту(Bitrix) и даже WiFi.

Что такое Radius сервер
Radius сервер это служба в Windows Server, которая выступает посредником между сетевым оборудованием(и другими клиентами) и Active Directory. Настройки данной службы содержат описание доступов и общие характеристики конкретной службы. В рассматриваемом примере это протокол PPP, под которым будут работать PPTP и L2TP клиенты.
RADIUS — протокол для реализации аутентификации, авторизации и сбора сведений об использованных ресурсах, разработанный для передачи сведений между центральной платформой и оборудованием. Этот протокол применялся для системы тарификации использованных ресурсов конкретным пользователем/абонентом
Как работает Radius сервер в MikroTik
Со стороны маршрутизатора(роутера) MikroTik создается запись, цель которой передать на Radius сервер запрос о легитимности учётной записи для доступа ко внутренним службам, которые обозначены Radius авторизацией. Схематически это выглядит так:

MikroTik в этой схеме выступает как Radius клиент.
Настройка Radius сервера на домене Windows Server 2019
В ходе визуальной инструкции будут продемонстрированы ключевые этапы, а все остальные настройки произведены в режиме “Далее”.
Добавление тестового пользователя в группу доступа VPN

Добавить новую роль на Widnows Server 2019

Выбрать “Служба политики сети и доступа”

Контроль выбора “Сервер политики сети”

Запуск “Сервер политики сети”

Регистрация Radius сервера в Active Directory

Добавление Radius клиента(маршрутизатора MikroTik)

Пароль, указанный в этой настройке будет использоваться при подключении MikroTik
Создание сетевой политики

Определение Radius клиента и группы доступа в Active Directory

Следующие настройки можно оставить без изменений


Обозначить тип удаленного доступа как VPN

Проконтролировать присутствие стандарта PPP

Настройка брандмауэра Windows для работы Radius сервера


Настройка MikroTik Radius, вход для VPN L2Tp клиентов(домен Active Directory)
Со стороны маршрутизатора(роутера) MikroTik нужно произвести две настройки:
Активация использования Radius авторизации
Настройка находится в PPP→Secrets→PPP Authentication&Accounting

/ppp aaa
set use-radius=yes
Добавление записи для авторизации на Radius сервере
Настройка находится в RADIUS

/radius
add address=192.168.X.YYY secret=Radius-PASS service=ppp
Пробное подключение VPN клиента

Не работает MikroTik SSTP при подключении к Radius
Для этого нужно открыть консоль “Сервер сетевых политик” и в свойствах сетевой политики указать значение условия Тип порта NAS = Async (Modem).

Есть вопросы или предложения по настройке RADIUS сервера в MikroTik? Активно предлагай свой вариант настройки! Оставить комментарий →
In this post I will show how to set up a RADIUS server on Windows Server 2019 to provide 802.1X Wireless Connections through wireless access points.
Actually I want to set up a RADIUS server for IEEE 802.11 wireless networks, but its nearly the same as for wired (Ethernet) networks besides the NAS Port Type (type of media used) is IEEE 802.11 wireless instead of wired Ethernet.
IEEE 802.1X is an IEEE Standard for port-based Network Access Control (PNAC). It is part of the IEEE 802.1 group of networking protocols. It provides an authentication mechanism to devices wishing to attach to a LAN or WLAN.
Source: https://en.wikipedia.org/wiki/IEEE_802.1X
https://en.wikipedia.org/wiki/IEEE_802
Microsoft’s implementation of a Remote Authentication Dial-In User Service (RADIUS) server is for Windows Server operating systems later than Windows Server 2003 the Network Policy and Access Services (NPAS) server role.
NPAS replaces the Internet Authentication Service (IAS) from Windows Server 2003.
Source: https://en.wikipedia.org/wiki/Network_Policy_Server
So first I will install the Network Policy and Access Services (NPAS) server role either on a domain controller or member server.
Now as the Network Policy and Access Services (NPAS) server role is installed you will have a new console named Network Policy Server.
Open the Network Policy Server console and select the RADIUS server for 802.1X Wireless or Wired Connections template to configure NPS by using the wizard.
Click on Configure 802.1X to start the wizard.
Select Secure Wireless Connections
Here I need to add all my wlan access points as RADIUS clients.
- Friendly name
- IP address or FQDN
- Shared secret
Use a unique RADIUS shared secret for each wireless AP unless you are planning to configure APs as RADIUS Clients in NPS by group. If you plan to configure APs by group in NPS, the shared secret must be the same for every member of the group. In addition, each shared secret you use should be a random sequence of at least 22 characters that mixes uppercase and lowercase letters, numbers, and punctuation.
Source: https://docs.microsoft.com/en-us/windows-server/networking/core-network-guide/cncg/wireless/e-wireless-access-deployment#to-configure-your-wireless-aps
For authentication I will use the Protected EAP (PEAP) protocol.
Click on Configure to select a certificate to prove the identity of the RADIUS server to the clients. You can use here the default computer certificate from your internal PKI.
The clients needs to trust that certificate, otherwise the user’s wont be able to connect to the wireless network.
It then creates an encrypted TLS tunnel between the client and the authentication server. In most configurations, the keys for this encryption are transported using the server’s public key. The ensuing exchange of authentication information inside the tunnel to authenticate the client is then encrypted and user credentials are safe from eavesdropping.
Simplifying WPA2-Enterprise and 802.1x
Client / Supplicant
In order for a device to participate in the 802.1x authentication, it must have a piece of software called a supplicant installed in the network stack. The supplicant is necessary as it will participate in the initial negotiation of the EAP transaction with the switch or controller and package up the user credentials in a manner compliant with 802.1x. If a client does not have a supplicant, the EAP frames sent from the switch or controller will be ignored and the switch will not be able to authenticate.Fortunately, almost all devices we might expect to connect to a wireless network have a supplicant built-in. SecureW2 provides a 802.1x supplicant for devices that don’t have one natively.
Thankfully, the vast majority of device manufacturers have built-in support for 802.1x. The most common exceptions to this might be consumer gear, such as game consoles, entertainment devices or some printers. Generally speaking, these devices should be less than 10% of the devices on your network and are best treated as the exception rather than the focus.
Switch / Access Point / Controller
The switch or wireless controller plays an important role in the 802.1x transaction by acting as a ‘broker’ in the exchange. Until a successful authentication, the client does not have network connectivity, and the only communication is between the client and the switch in the 802.1x exchange.The switch/controller initiates the exchange by sending an EAPOL-Start packet to the client when the client connects to the network. The client’s responses are forwarded to the correct RADIUS server based on the configuration in the Wireless Security Settings. When the authentication is complete, the switch/controller makes a decision whether to authorize the device for network access based on the user’s status and possibly the attributes contained in the Access_Accept packet sent from the RADIUS server.
Successful mutual PEAP-MS-CHAP v2 authentication has two main parts:
- The client authenticates the NPS. During this phase of mutual authentication, the NPS sends its server certificate to the client computer so that the client can verify the NPS’s identity with the certificate. To successfully authenticate the NPS, the client computer must trust the CA that issued the NPS certificate. The client trusts this CA when the CA’s certificate is present in the Trusted Root Certification Authorities certificate store on the client computer.
- The NPS authenticates the user. After the client successfully authenticates the NPS, the client sends the user’s password-based credentials to the NPS, which verifies the user’s credentials against the user accounts database in Active Directory Domain Services (AD DS).
If the credentials are valid and authentication succeeds, the NPS begins the authorization phase of processing the connection request. If the credentials are not valid and authentication fails, NPS sends an Access Reject message and the connection request is denied.
The behavior requiring the client to validate the server certificate can be disabled, but disabling server certificate validation is not recommended in production environments.
Source: https://docs.microsoft.com/en-us/windows-server/networking/core-network-guide/cncg/wireless/a-deploy-8021x-wireless-access#authentication
The server running NPS performs authorization as follows:
- NPS checks for restrictions in the user or computer account dial-in properties in AD DS. Every user and computer account in Active Directory Users and Computers includes multiple properties, including those found on the Dial-in tab. On this tab, in Network Access Permission, if the value is Allow access, the user or computer is authorized to connect to the network. If the value is Deny access, the user or computer is not authorized to connect to the network. If the value is Control access through NPS Network Policy, NPS evaluates the configured network policies to determine whether the user or computer is authorized to connect to the network.
- NPS then processes its network policies to find a policy that matches the connection request. If a matching policy is found, NPS either grants or denies the connection based on that policy’s configuration.
If both authentication and authorization are successful, and if the matching network policy grants access, NPS grants access to the network, and the user and computer can connect to network resources for which they have permissions.
Source: https://docs.microsoft.com/en-us/windows-server/networking/core-network-guide/cncg/wireless/a-deploy-8021x-wireless-access#authorization
Keep in mind regarding the communication between the NPS server and client as described in both Microsoft articles about authentication and authorization above.
As mentioned further above in the great article from SECUREW2, the client cannot communicate directly with the RADIUS server to authenticate himself and the server, as it does not have network connectivity until a successful authentication. The communication between the client and RADIUS server is established through the access points (switches for wired networks), which will acting as a broker in the exchange between both.
Here I will add all groups which are allowed to access the network through my wlan access points.
For computer authentication you should create a security group which includes all computer accounts they should be able to authenticate against NPS and add it to your network policy (Conditions tab) as windows group. NPS uses then this policy to authorize the connection request.
Further each of those computers needs a computer certificate installed from your internal PKI (CA), which is by default published to the Enterprise NTAuth store.
The computers wlan profile also needs to be configured to enable computer authentication, I will show this further below in the section about configuring a group policy.
Btw. you can also use certificates from a third-party CA, but in that case you need to import the CA certificate into your Enterprise NTAuth store and the computer certificate needs to mapped to the computer account in Active Directory. About how you will find in the following article from Microsoft:
https://docs.microsoft.com/en-us/troubleshoot/windows-server/windows-security/import-third-party-ca-to-enterprise-ntauth-storeThe Enterprise NTAuth store is used by your Active Directory domain to determine which certification authorities to trust for issuing certificates that are used to authenticate and authorize a user or computer.
To check which CAs are stored in the Enterprise NTAuth store, you can use the PKI Tool (PKIVIEW). On your CA server open the tool pkiview.msc, right click on Enterprise PKI and select Manage AD Containers… . Here you will see in the tab NTAuthCertificates which CAs are still trusted.
In the next dialog you can configure traffic control attributes (RADIUS tunnel attributes) to allow and deny traffic to user’s based on their assigned VLANs.
You can change all of theses settings later directly in the NPS console.
Here you can modify the RADIUS clients.
The wizard will create a Connection Request Policy and a Network Policy.
Connection Request Policies
https://docs.microsoft.com/en-us/windows-server/networking/technologies/nps/nps-crp-crpoliciesConnection request policies are sets of conditions and settings that allow network administrators to designate which Remote Authentication Dial-In User Service (RADIUS) servers perform the authentication and authorization of connection requests that the server running Network Policy Server (NPS) receives from RADIUS clients. Connection request policies can be configured to designate which RADIUS servers are used for RADIUS accounting.
By default the wizard will set to process the authentication request locally on the server.
Network Policy
You can also configure Accounting for the NPS server.
Configure Network Policy Server Accounting
https://docs.microsoft.com/en-us/windows-server/networking/technologies/nps/nps-accounting-configure
The wizard created our Network Policy and we do not need to change here anything.
By adding Windows Groups, it doesn’t matter if they were local groups on the server itself or domain groups, NPS will process both of them.
As mentioned further above you can use here the default computer certificate on the NPS server from your internal PKI.
The clients needs to trust that certificate, otherwise the user’s wont be able to connect to the wireless network.
It then creates an encrypted TLS tunnel between the client and the authentication server. In most configurations, the keys for this encryption are transported using the server’s public key. The ensuing exchange of authentication information inside the tunnel to authenticate the client is then encrypted and user credentials are safe from eavesdropping.
Configure your WLAN Access Points
On the wlan access points we have to configure the IP address from the NPS (RADIUS) server, port and shared secret.
The Radius Port for authentication by default is UDP 1812 or 1645.
Further we need to select a security mode our access points will use to authenticate users or devices (computer authentication as mentioned further above). When using a RADIUS server we want that users authenticate themselves by using their username and password for the network, therefore we need to select WPA2 or WPA3-Enterpise, also for computer authentication.
Keep in mind that even in the year 2022 not all devices support WPA3.
You can check the ports in the NPS console by right clicking on NPS(Local) and select properties. Here within the tab Ports, you can see on what ports the NPS server is listening for authentication and if used accounting.
The Radius Port for accounting by default is UDP 1813 or 1646.
Optionally we can also configure Radius Accounting as mentioned.
The RADIUS server also collects a variety of information sent by the NAS that can be used for accounting and for reporting on network activity. The RADIUS client sends information to designated RADIUS servers when the User logs on and logs off. The RADIUS client may send additional usage information on a periodic basis while the session is in progress. The requests sent by the client to the server to record logon/logoff and usage information are generally called accounting requests.
For more information on RADIUS accounting, see RFC 2866.
Source: https://learn.microsoft.com/en-us/windows/win32/nps/ias-radius-authentication-and-accounting
Configure Wireless Network (IEEE 802.11) Policies | Wi-Fi profiles
You can configure group policies in your network to define preferred networks and settings for the WLAN connection to your clients.
To activate default Wireless Network (IEEE 802.11) Policies
https://docs.microsoft.com/en-us/windows-server/networking/core-network-guide/cncg/wireless/e-wireless-access-deployment#to-activate-default-wireless-network-ieee-80211-policies
Computer Configuration -> Policies -> Windows Settings -> Security Settings -> Wireless Network (IEEE 802.11) Policies
Clients should connect automatically to this network when it is in range.
For the network authentication method I have to select Protected EAP (PEAP) as used on the NPS server and for the authentication mode I will use User or Computer authentication.
Even the most common method of authentication with PEAP-MSCHAPv2 is user auth, in which clients are prompted to enter their domain credentials, the Windows NPS server role also supports computer authentication by using the PEAP-MSCHAPv2 protocol.
In order to use computer authentication, you also have to install a computer certificate on the clients and issued from your internal PKI as mentioned further above.
For computer authentication you can configure certificate auto-enrollment for the client computers as shown in my following post: https://blog.matrixpost.net/configure-certificate-auto-enrollment/
In the advanced settings you can enable single sign-on for the wireless network, by checking this your password to logon to your computer will also be passed and used to establish the wireless connection with the access points.
Further if you select Perform immediately before User Logon as show in the figure below, the computer will first try to connect to the wireless access points when the user is entering its password and then subsequently will get logged on to its computer after the wireless connection is established.
In case computer authentication will be performed, the computer already connects at the logon screen to the network, as it doesn’t matter which user will get logged on.
Therefore in both cases the computer can perform a network login against the domain controllers and logon scripts and group policies will be applied to the computer.
If the wireless connection couldn’t be established, the user will get logged on to its computer by using the local cached credentials as usual but without processing the logon scripts and applying the group policies from the domain controller.
At the logon screen you will see the wireless network to which Windows tries to connect after providing your password for the logon.
User vs. Machine Authentication
The most common method of authentication with PEAP-MSCHAPv2 is user auth, in which clients are prompted to enter their domain credentials. It is also possible to configure RADIUS for machine authentication, in which the computers themselves are authenticated against RADIUS, so the user doesn’t need to provide any credentials to gain access. Machine auth is typically accomplished using EAP-TLS, though some RADIUS server options do make it simple to accomplish machine auth using PEAP-MSCHAPv2 (including Windows NPS, as outlined in the example config below).
The following example configuration outlines how to set up Windows NPS as a RADIUS server, with Active Directory acting as a userbase:Add the Network Policy Server (NPS) role to Windows Server.
Add a trusted certificate to NPS.
Add APs as RADIUS clients on the NPS server.
Configure a policy in NPS to support PEAP-MSCHAPv2.
(Optional for machine auth) Deploy PEAP-MSCHAPv2 wireless network settings to domain member computers using Group Policy.Source: https://documentation.meraki.com/MR/Encryption_and_Authentication/Configuring_RADIUS_Authentication_with_WPA2-Enterprise
Create Wi-Fi profiles using the System Center Configuration Manager (SCCM) or Microsoft Intune.
You can also use SCCM or Microsoft Intune to configure Wi-Fi profiles. This topic is well documented from Microsoft in the following articles.
Manage Wi-Fi profiles on local computer by using the netsh command
You can also use the netsh command line tool to manage the Wi-Fi profiles on a local computer.
- netsh wlan show profile -> list profiles located on the local computer
- netsh wlan show profiles interface=”wi-fi” -> list profile for specific interface
- netsh wlan show drivers -> list driver information about the wireless adapter
- netsh wlan show wirelesscapabilities -> list capabilities of the wireless adapter
- netsh wlan show interfaces -> list all wireless interfaces on the local computer
- netsh wlan show profile name=”myAP” key=clear -> will display the security key in plaintext
- netsh wlan set profileparameter name=”myAP” connectionmode=manual -> will disable connect automatically
- netsh wlan set profileparameter name=”myAP” connectionmode=auto -> will enable connect automatically
- netsh wlan delete profile name=”myAP” -> will delete the myAP wlan profile
- netsh wlan delete profile name=* -> will delete all wlan profiles on the local computer
- netsh wlan export profile name=”WiFiNetwork” key=clear folder=”C:\path\” key=clear -> Export a wlan profile
- netsh wlan add profile filename=”C:\path\profileFile.xml” user=all -> Import a wlan profile for all user’s -> user=current only for the current user
- netsh wlan show wlanreport -> will create a wireless adapter report will ->
Analyze the wireless network report
https://support.microsoft.com/en-us/windows/analyze-the-wireless-network-report-76da0daa-1db2-6049-d154-7bb679eb03ed
Troubleshooting
In case something went wrong and your clients won’t connect to the the wireless network, you can investigate several logs to get more details about the problem.
You can search in two locations for logs to investigate the reason why clients can’t connect to the network.
For general configuration problems between the NPS server and the RADIUS clients, you can investigate the Event Viewer.
Custom Views -> Server Roles -> Network Policy and Access Services
For problems regarding authentication from the user’s itself, you should use the Accounting logs. Here you can see the default path from them.
To investigate them I would suggest to use a specific log viewer like the IAS Log Viewer from DeepSoftware LLC. You can use this viewer also to investigate VPN logging from the Windows Routing and Remote Access servers.
IAS Log Viewer
https://www.deepsoftware.com/iasviewer/
IAS_SUCCESS -> the user or computer authenticated successfully against the NPS server, formerly Internet Authentication Service (IAS)
NPAS replaces the Internet Authentication Service (IAS) from Windows Server 2003.
Therefore you will see IAS_SUCCESS messages in the logs from NPS.
Source: https://en.wikipedia.org/wiki/Network_Policy_Server
Reason for rejecting a user. Can be:
Field (26) Reason-Code Number
- 0 = IAS_SUCCESS
- 1 = IAS_INTERNAL_ERROR
- 2 = IAS_ACCESS_DENIED
- 3 = IAS_MALFORMED_REQUEST
- 4 = IAS_GLOBAL_CATALOG_UNAVAILABLE
- 5 = IAS_DOMAIN_UNAVAILABLE
- 6 = IAS_SERVER_UNAVAILABLE
- 7 = IAS_NO_SUCH_DOMAIN
- 8 = IAS_NO_SUCH_USER
- 16 = IAS_AUTH_FAILURE
- 17 = IAS_CHANGE_PASSWORD_FAILURE
- 18 = IAS_UNSUPPORTED_AUTH_TYPE
- 32 = IAS_LOCAL_USERS_ONLY
- 33 = IAS_PASSWORD_MUST_CHANGE
- 34 = IAS_ACCOUNT_DISABLED
- 35 = IAS_ACCOUNT_EXPIRED
- 36 = IAS_ACCOUNT_LOCKED_OUT
- 37 = IAS_INVALID_LOGON_HOURS
- 38 = IAS_ACCOUNT_RESTRICTION
- 48 = IAS_NO_POLICY_MATCH
- 64 = IAS_DIALIN_LOCKED_OUT
- 65 = IAS_DIALIN_DISABLED
- 66 = IAS_INVALID_AUTH_TYPE
- 67 = IAS_INVALID_CALLING_STATION
- 68 = IAS_INVALID_DIALIN_HOURS
- 69 = IAS_INVALID_CALLED_STATION
- 70 = IAS_INVALID_PORT_TYPE
- 71 = IAS_INVALID_RESTRICTION
- 80 = IAS_NO_RECORD
- 96 = IAS_SESSION_TIMEOUT
- 97 = IAS_UNEXPECTED_REQUEST
Source: https://www.radiusreporting.com/IAS-DB-Attribute-Format-Table.html
EAP authentication exchange for wireless clients through the access point and RADIUS server stuck by using a route-based IPSec in pfSense during the SSL handshake and here exactly after the Client Hello
If you ran into that issue, you can read my following post about how to set up a lean Branch Office Network without any Servers and DCs inside by using an IPSec S2S VPN Tunnel connected with the Headquarters Network.