Working with Python in Visual Studio Code, using the Microsoft Python extension, is simple, fun, and productive. The extension makes VS Code an excellent Python editor, and works on any operating system with a variety of Python interpreters. It leverages all of VS Code’s power to provide auto complete and IntelliSense, linting, debugging, and unit testing, along with the ability to easily switch between Python environments, including virtual and conda environments.
This article provides only an overview of the different capabilities of the Python extension for VS Code. For a walkthrough of editing, running, and debugging code, use the button below.
Python Hello World Tutorial
Install Python and the Python extension
The tutorial guides you through installing Python and using the extension. You must install a Python interpreter yourself separately from the extension. For a quick install, use Python from python.org and install the extension from the VS Code Marketplace.
Note: To help get you started with Python development, you can use the Python profile template that includes useful extensions, settings, and Python code snippets.
Once you have a version of Python installed, select it using the Python: Select Interpreter command. If VS Code doesn’t automatically locate the interpreter you’re looking for, refer to Environments — Manually specify an interpreter.
You can configure the Python extension through settings. Learn more in the Python Settings reference.
Windows Subsystem for Linux: If you are on Windows, WSL is a great way to do Python development. You can run Linux distributions on Windows and Python is often already installed. When coupled with the WSL extension, you get full VS Code editing and debugging support while running in the context of WSL. To learn more, go to Developing in WSL or try the Working in WSL tutorial.
Run Python code
To experience Python, create a file (using the File Explorer) named hello.py and paste in the following code:
print("Hello World")
The Python extension then provides shortcuts to run Python code using the currently selected interpreter (Python: Select Interpreter in the Command Palette). To run the active Python file, click the Run Python File in Terminal play button in the top-right side of the editor.
You can also run individual lines or a selection of code with the Python: Run Selection/Line in Python Terminal command (Shift+Enter). If there isn’t a selection, the line with your cursor will be run in the Python Terminal. An identical Run Selection/Line in Python Terminal command is available on the context menu for a selection in the editor. The same terminal will be used every time you run a selection or a line in the terminal/REPL, until that terminal is closed.
The Python extension automatically removes indents based on the first non-empty line of the selection, shifting all other lines left as needed.
The command opens the Python Terminal if necessary; you can also open the interactive REPL environment directly using the Python: Start REPL command that activates a terminal with the currently selected interpreter and then runs the Python REPL.
For a more specific walkthrough and other ways of running code, see the run code tutorial.
Autocomplete and IntelliSense
The Python extension supports code completion and IntelliSense using the currently selected interpreter. IntelliSense is a general term for a number of features, including intelligent code completion (in-context method and variable suggestions) across all your files and for built-in and third-party modules.
IntelliSense quickly shows methods, class members, and documentation as you type. You can also trigger completions at any time with ⌃Space (Windows, Linux Ctrl+Space). Hovering over identifiers will show more information about them.
Enhance completions with AI
GitHub Copilot is an AI-powered code completion tool that helps you write code faster and smarter. You can use the GitHub Copilot extension in VS Code to generate code, or to learn from the code it generates.

GitHub Copilot provides suggestions for languages beyond Python and a wide variety of frameworks, including JavaScript, TypeScript, Ruby, Go, C# and C++.
You can learn more about how to get started with Copilot in the Copilot documentation.
Linting
Linting analyzes your Python code for potential errors, making it easy to navigate to and correct different problems.
The Python extension can apply a number of different linters including Pylint, pycodestyle, Flake8, mypy, pydocstyle, prospector, and pylama. See Linting.
Debugging
No more print statement debugging! VS Code comes with great debugging support for Python, allowing you to set breakpoints, inspect variables, and use the debug console for an in-depth look at how your program is executing step by step. Debug a number of different types of Python applications, including multi-threaded, web, and remote applications.
For more specific information on debugging in Python, such as configuring your launch.json settings and implementing remote debugging, see Debugging. General VS Code debugging information is found in the debugging document.
Additionally, the Django and Flask tutorials provide examples of how to implement debugging in the context of web applications, including debugging Django templates.
Environments
The Python extension automatically detects Python interpreters that are installed in standard locations. It also detects conda environments as well as virtual environments in the workspace folder. See Configuring Python environments.
The current environment is shown on the right side of the VS Code Status Bar:

The Status Bar also indicates if no interpreter is selected:

The selected environment is used for IntelliSense, auto-completions, linting, formatting, and any other language-related feature. It is also activated when you run or debug Python in a terminal, or when you create a new terminal with the Terminal: Create New Terminal command.
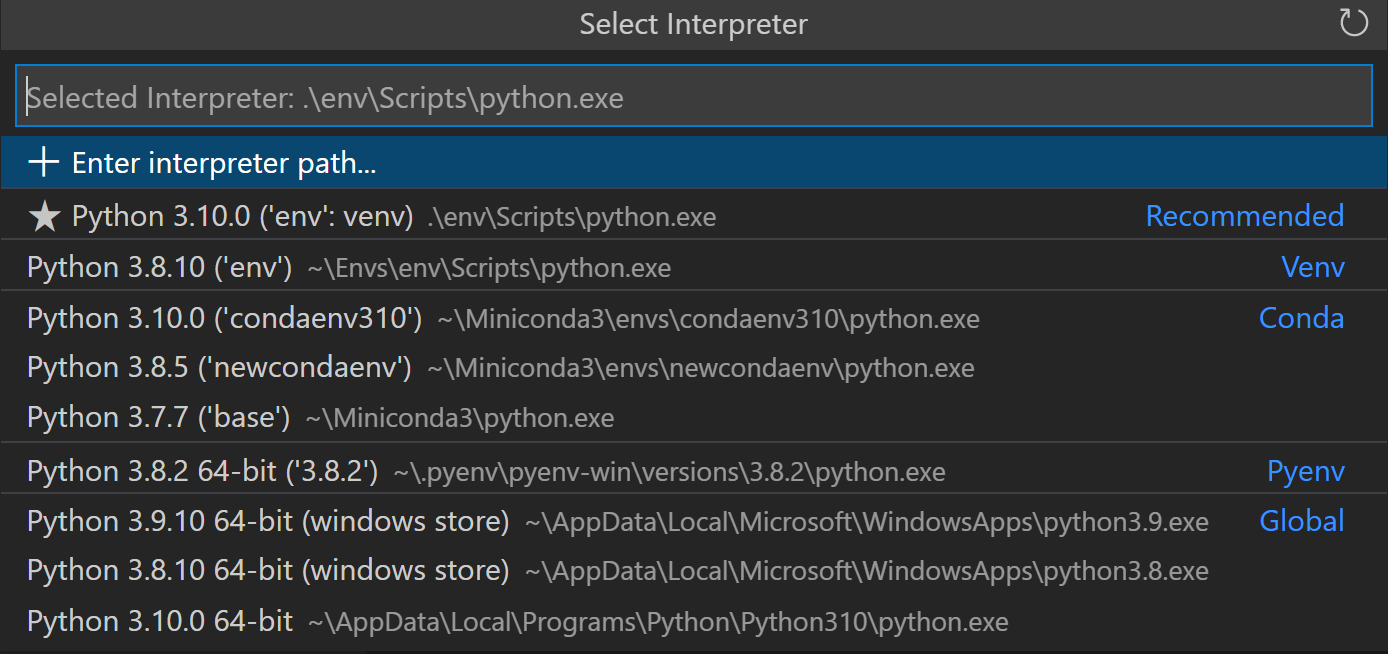
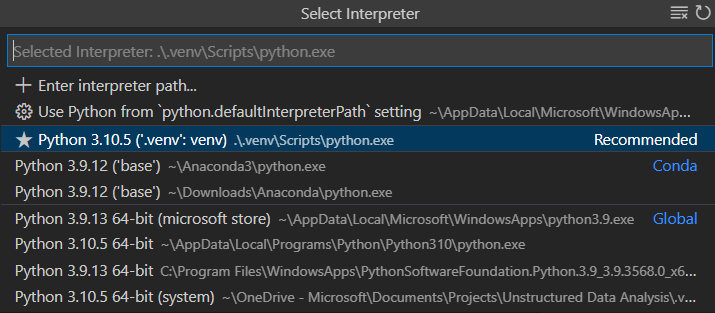
To change the current interpreter, which includes switching to conda or virtual environments, select the interpreter name on the Status Bar or use the Python: Select Interpreter command.
VS Code prompts you with a list of detected environments as well as any you’ve added manually to your user settings (see Configuring Python environments).
Jupyter notebooks
To enable Python support for Jupyter notebook files (.ipynb) in VS Code, you can install the Jupyter extension. The Python and Jupyter extensions work together to give you a great Notebook experience in VS Code, providing you the ability to directly view and modify code cells with IntelliSense support, as well as run and debug them.
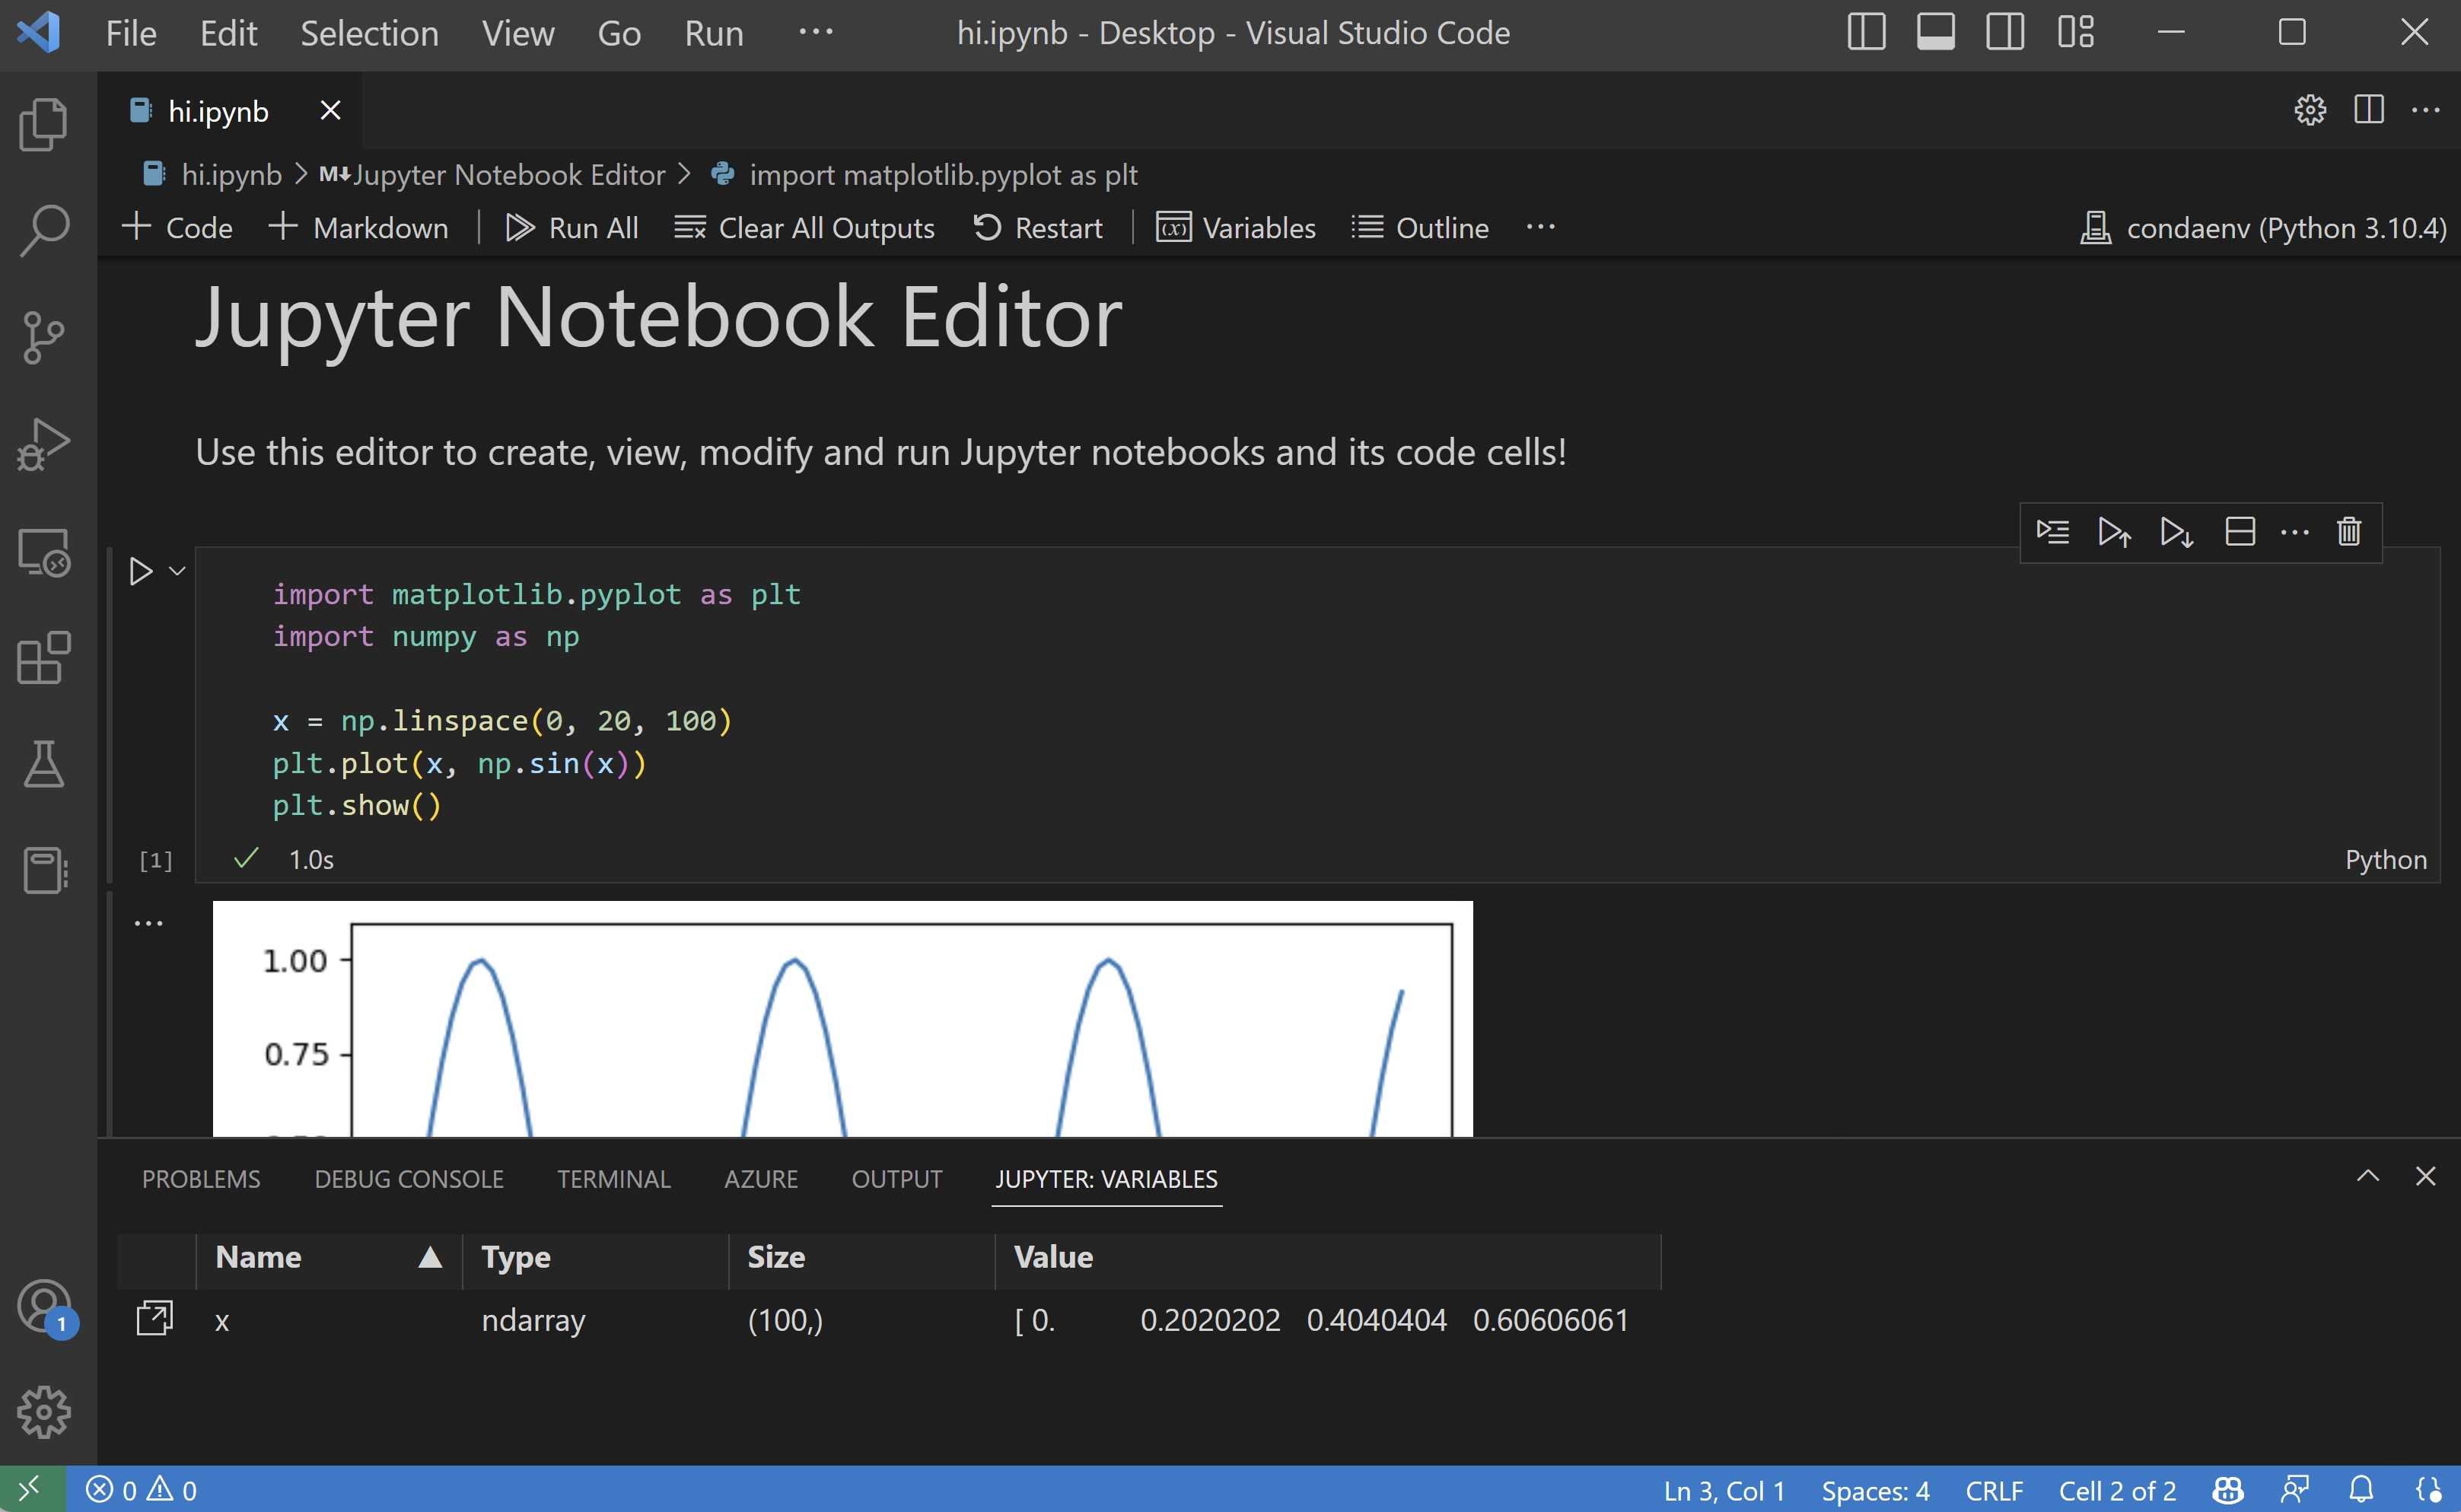
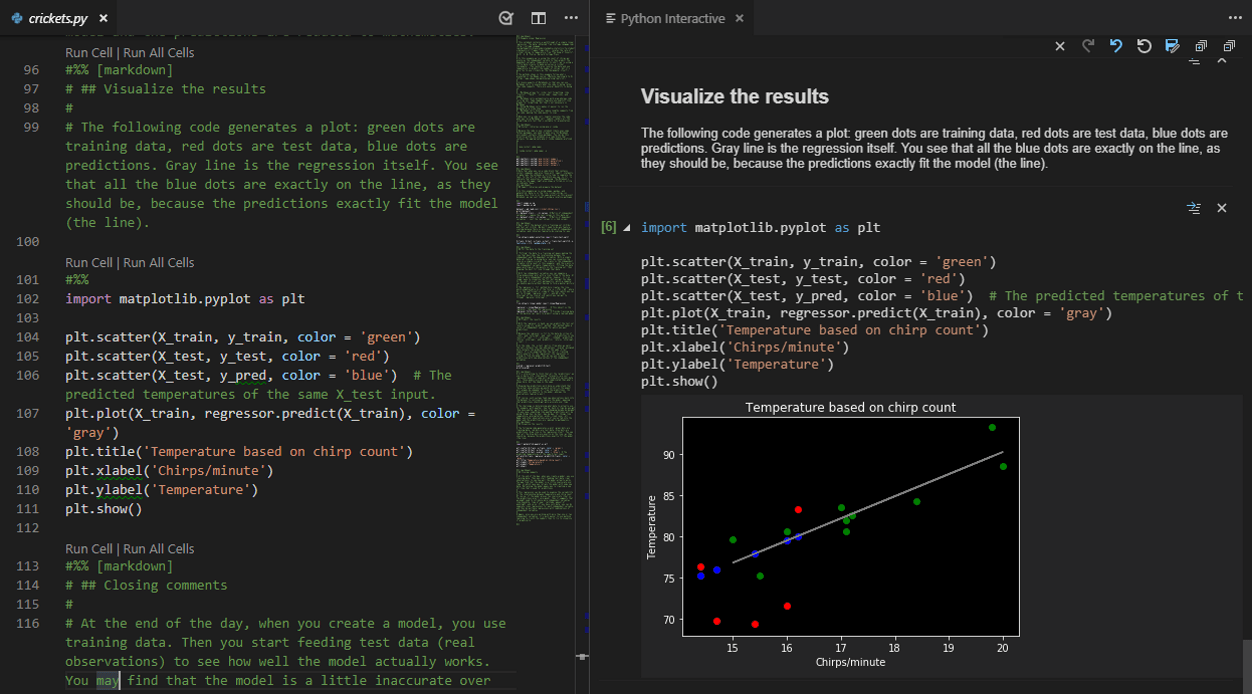
You can also convert and open the notebook as a Python code file through the Jupyter: Export to Python Script command. The notebook’s cells are delimited in the Python file with #%% comments, and the Jupyter extension shows Run Cell or Run Below CodeLens. Selecting either CodeLens starts the Jupyter server and runs the cell(s) in the Python interactive window:
You can also connect to a remote Jupyter server to run your notebooks. For more information, see Jupyter support.
Testing
The Python extension supports testing with Python’s built-in unittest framework and pytest.
In order to run tests, you must enable one of the supported testing frameworks in the settings of your project. Each framework has its own specific settings, such as arguments for identifying the paths and patterns for test discovery.
Once the tests have been discovered, VS Code provides a variety of commands (on the Status Bar, the Command Palette, and elsewhere) to run and debug tests. These commands also allow you to run individual test files and methods
Configuration
The Python extension provides a wide variety of settings for its various features. These are described on their relevant topics, such as Editing code, Linting, Debugging, and Testing. The complete list is found in the Settings reference.
Python profile template
Profiles let you quickly switch your extensions, settings, and UI layout depending on your current project or task. To help you get started with Python development, you can use the Python profile template, which is a curated profile with useful extensions, settings, and snippets. You can use the profile template as is or use it as a starting point to customize further for you own workflows.
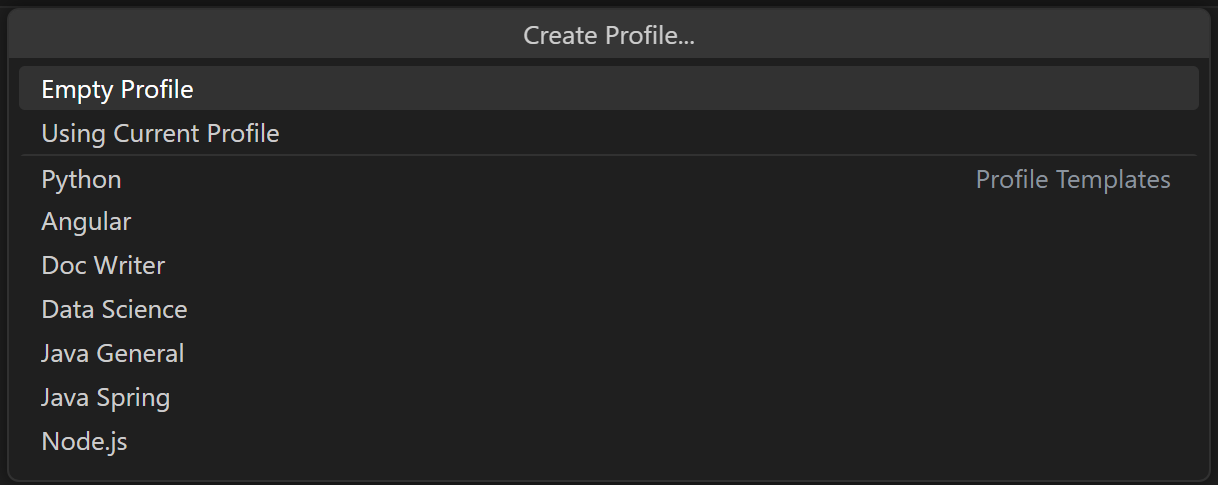
You select a profile template through the Profiles > Create Profile… dropdown:
Once you select a profile template, you can review the settings and extensions, and remove individual items if you don’t want to include them in your new Profile. After creating the new profile based on the template, changes made to settings, extensions, or UI are persisted in your profile.
Other popular Python extensions
The Microsoft Python extension provides all of the features described previously in this article. Additional Python language support can be added to VS Code by installing other popular Python extensions.
- Open the Extensions view (⇧⌘X (Windows, Linux Ctrl+Shift+X)).
- Filter the extension list by typing ‘python’.
The extensions shown above are dynamically queried. Click on an extension tile above to read the description and reviews to decide which extension is best for you. See more in the Marketplace.
Next steps
- Python Hello World tutorial — Get started with Python in VS Code.
- Editing Python — Learn about auto-completion, formatting, and refactoring for Python.
- Basic Editing — Learn about the powerful VS Code editor.
- Code Navigation — Move quickly through your source code.
- Django tutorial
- Flask tutorial
3/22/2023
Содержание:развернуть
- Установка VSCode
-
Windows
-
Linux
-
macOS
- Настройка под Python
-
Установка расширения «Python»
-
Выбор версии интерпретатора Python
- Работа в VS Code
-
Запуск редактора
-
Интерфейс
-
Запуск Python-кода (run)
-
Отладка (debugger)
-
Тестирование (testing)
-
GIT
- ТОП плагинов для VS Code
В 2016-м году компания Microsoft представила миру свой новый редактор программного кода. В отличие от старшей сестры — полноценной IDE Visual Studio — VS Code получился куда более компактным и легковесным решением. Он разработан как кроссплатформенное ПО и может быть успешно установлен в системах Windows, Linux и macOS.
Бесплатность Visual Studio Code абсолютно не мешает ему обладать весьма богатым современным функционалом. VS Code имеет встроенный отладчик, позволяет работать с системами контроля версий, обеспечивает интеллектуальную подсветку синтаксиса, а также поддерживает целый ряд популярных языков программирования.
И хоть, за годы своего существования, VSCode зарекомендовал себя, в основном, как продукт для веб-разработки, в 2018 году появилось расширение «Python«, которое дало программистам многочисленные возможности для редактирования, отладки и тестирования кода на нашем любимом языке.
Установка VSCode
Поистине смешные системные требования Visual Studio Code обязательно порадуют владельцев старых машин.
Для полноценной работы редактору требуется всего лишь 1 ГБ оперативной памяти и процессор с частотой от 1.6 ГГц.
Такое сочетание лёгкости и функциональности действительно подкупает, а отсутствие в VS Code каких-либо «лагов» и «фризов» делают разработку ещё более приятным и увлекательным занятием.
Установка редактора никуда не отходит от данной парадигмы и тоже является весьма простым и понятным процессом.
Windows
Сначала нужно скачать с официального сайта установочный файл небольшого размера, а затем установить сам ВиЭс код, следуя подсказкам от мастера установки.
Linux
На сайте программы можно изучить способы инсталляции редактора на разные Linux-дистрибутивы, но здесь рассмотрим процесс установки для самого популярного из них — Ubuntu.
Установить VSCode можно несколькими способами:
Способ №1: Самый простой способ — воспользоваться менеджером установки «Ubuntu Software».
Способ №2: Скачать дистрибутив с официального сайта и установить его командой:
sudo apt install ./<file>.deb
О других способах установки читайте на странице официальной документации в разделе «Setup«;
macOS
Алгоритм установки редактора внутри яблочной операционной системы также не представляет собой ничего сложного:
- Сначала нужно скачать Visual Studio Code с официального сайта.
- Затем открыть список загрузок браузера и найти там
VSCode-Darwin-Stable.zip. - Нажмите на иконку увеличительного стекла, чтобы открыть архив.
- Перетащите
Visual Studio Code.appв папку приложений, сделав ее доступной на панели запуска. - Щёлкните правой кнопкой мыши по значку и выберите команду «Оставить в Dock«.
Настройка под Python
Установка расширения «Python»
Для начала работы с Python, нужно перейти на вкладку Extensions, что находится на панели слева, либо нажать Ctrl + Shift + X. Сделав это, набираем в строке поиска «Python«.
VS Code поддерживает, как вторую, так и третью версию языка, однако python интерпретатор на свою машину вам придётся поставить самостоятельно.
![]()
Подробнее о том, как установить Python:
Если вы новичок и только начинаете работу с Python или же не имеете каких-то особых указаний на этот счёт, то лучшим выбором станет именно актуальная третья версия.
Вот краткий список основных возможностей расширения «Python»:
- Автодополнение кода.
- Отладка.
- Поддержка сниппетов.
- Написание и проведение тестов.
- Использование менеджера пакетов Conda.
- Возможность создания виртуальных сред.
- Поддержка интерактивных вычисления на Jupyter Notebooks.
Выбор версии интерпретатора Python
После от вас потребуется совершить выбор версии интерпретатора внутри самого редактора (обычно VS code знает, где он расположен). Для этого:
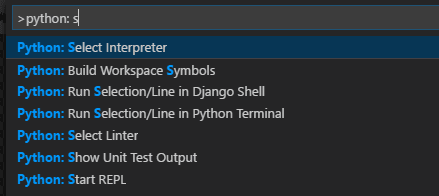
- Откройте командную строку VSCode (Command Palette) комбинацией
Ctrl + Shift + P. - Начинайте печатать «Python: Select Interpreter«;
- После, выберите нужную версию интерпретатора.
Также выбрать версию можно в панели активности в левом нижнем углу:
Если вы хотите использовать pipenv в своем проекте:
- Установите
pipenvкомандойpip install pipenv(илиpip3 install pipenv); - Выполните команду
pipenv install; - Откройте «Command Palette«, напечатайте «Python: Select Interpreter» и из списка выберите нужную версию интерпретатор.
![]()
Подробнее о pipenv:
Работа в VS Code
Запуск редактора
Как и другие современные редакторы и среды разработки, VS Code фиксирует состояние на момент закрытия программы. При следующем запуске, он открывается в том же самом виде, в котором существовал до завершения работы.
Так как VSCode, в первую очередь — редактор, а не полновесная среда разработки, здесь нет особой привязки к проекту. Вы можете сходу создавать, открывать и редактировать нужные вам файлы. Достаточно, после запуска, нажать Open File или New File и можно начинать работу.
Интерфейс
Интерфейс программы разрабатывался в стремлении сделать его как можно более простым и интуитивно понятным. Дизайнеры постарались, как максимизировать пространство для редактора, так и оставить достаточно места для отображения проводника по вашему проекту.
Весь UI VSCode разделился, таким образом, на шесть областей:
- Область редактора — основная область для написания и редактирования вашего кода.
- Боковая панель — здесь содержатся различные представления (например проводник).
- Строка состояния — визуализирует рабочую информацию об открытом в данный момент файле.
- Командная панель — классическая главная панель с вкладками file, edit, go, run и так далее.
- Панель активности — область в крайнем левом углу, где находятся важные вспомогательные вкладки, вроде контроля версий, дебаггера и магазина расширений.
- Мультипанель — панель на которой располагается вывод отладку, информация об ошибках и предупреждениях, а также встроенный в VS Code терминал.
Запуск Python-кода (run)
Выполнить код можно несколькими способами. Самый простой — комбинацией Ctrl + Alt + N.
Также можно вызвать скрипт контекстным меню, выбрав строку «Run Python File in Terminal«.
Или нажав иконку «Run» в правом верхнем углу.
Отладка (debugger)
Возможность полноценной отладки — сильная сторона редактора. Чтобы перейти в режим отладки, нужно установить точку останова и нажать F5.
Вся информация о текущем состоянии будет выводиться на панель дебаггера.
Слева откроется панель дебаггера с информацией о состоянии переменных (Variables), отслеживаемых переменных (Watch) и стеке вызова (Call stack).
Сверху расположена панель инструментов дебаггера.
Рассмотрим команды (слева направо):
- continue (
F5) — перемещает между breakpoint-ами; - step over (
F10) — построчное (пошаговое) перемещение; - step into (
F11) — построчное (пошаговое) перемещение c заходом в каждую вызываемую функцию; - step out (
Shift + F11) — работает противоположноstep into— выходит из вызванной функции, если в данный момент вы находитесь внутри неё. Далее работает какcontinue. - restart (
Ctrl + Shift + F5) — начинаем отладку с начала. - stop (
Shift + F5) — остановка и выход из режима отладки.
Чаще всего для отладки используются continue (
F5) и step over (F10).
С отладкой разобрались 👌.
Тестирование (testing)
С поддержкой тестов у VS Code тоже всё в порядке, однако, по умолчанию тестирование отключено. Для его активации нужна небольшая настройка.
Сначала следует нажать комбинацию клавиш Ctrl + Shift + P и в так называемой палитре команд выбрать Python: Configure Tests.
Редактор предложит вам определить фреймворк (мы выбрали «pytest») и папку, содержащую тесты (мы выбрали «. Root directory»).
Создадим новый файл с тестами (test_app.py) и запустим его, кликнув правой кнопкой мыши на этом файле и выбрав пункт «Run Current Test File«.
Также тесты можно запускать по нажатию на кнопку Run Tests в нижней строке состояния
Чтобы увидеть результаты, необходимо открыть вкладку Output на панели, и в выпадающем меню выбрать пункт PythonTestLog.
Как мы видим, первый тест прошел успешно, а второй провалился.
Для удобства работы с тестами, установим расширение «Python Test Explorer for Visual Studio Code«.
Теперь информацию по тестам можно посмотрев, кликнув на левой панели «иконку с колбой«, предварительно запустив тесты.
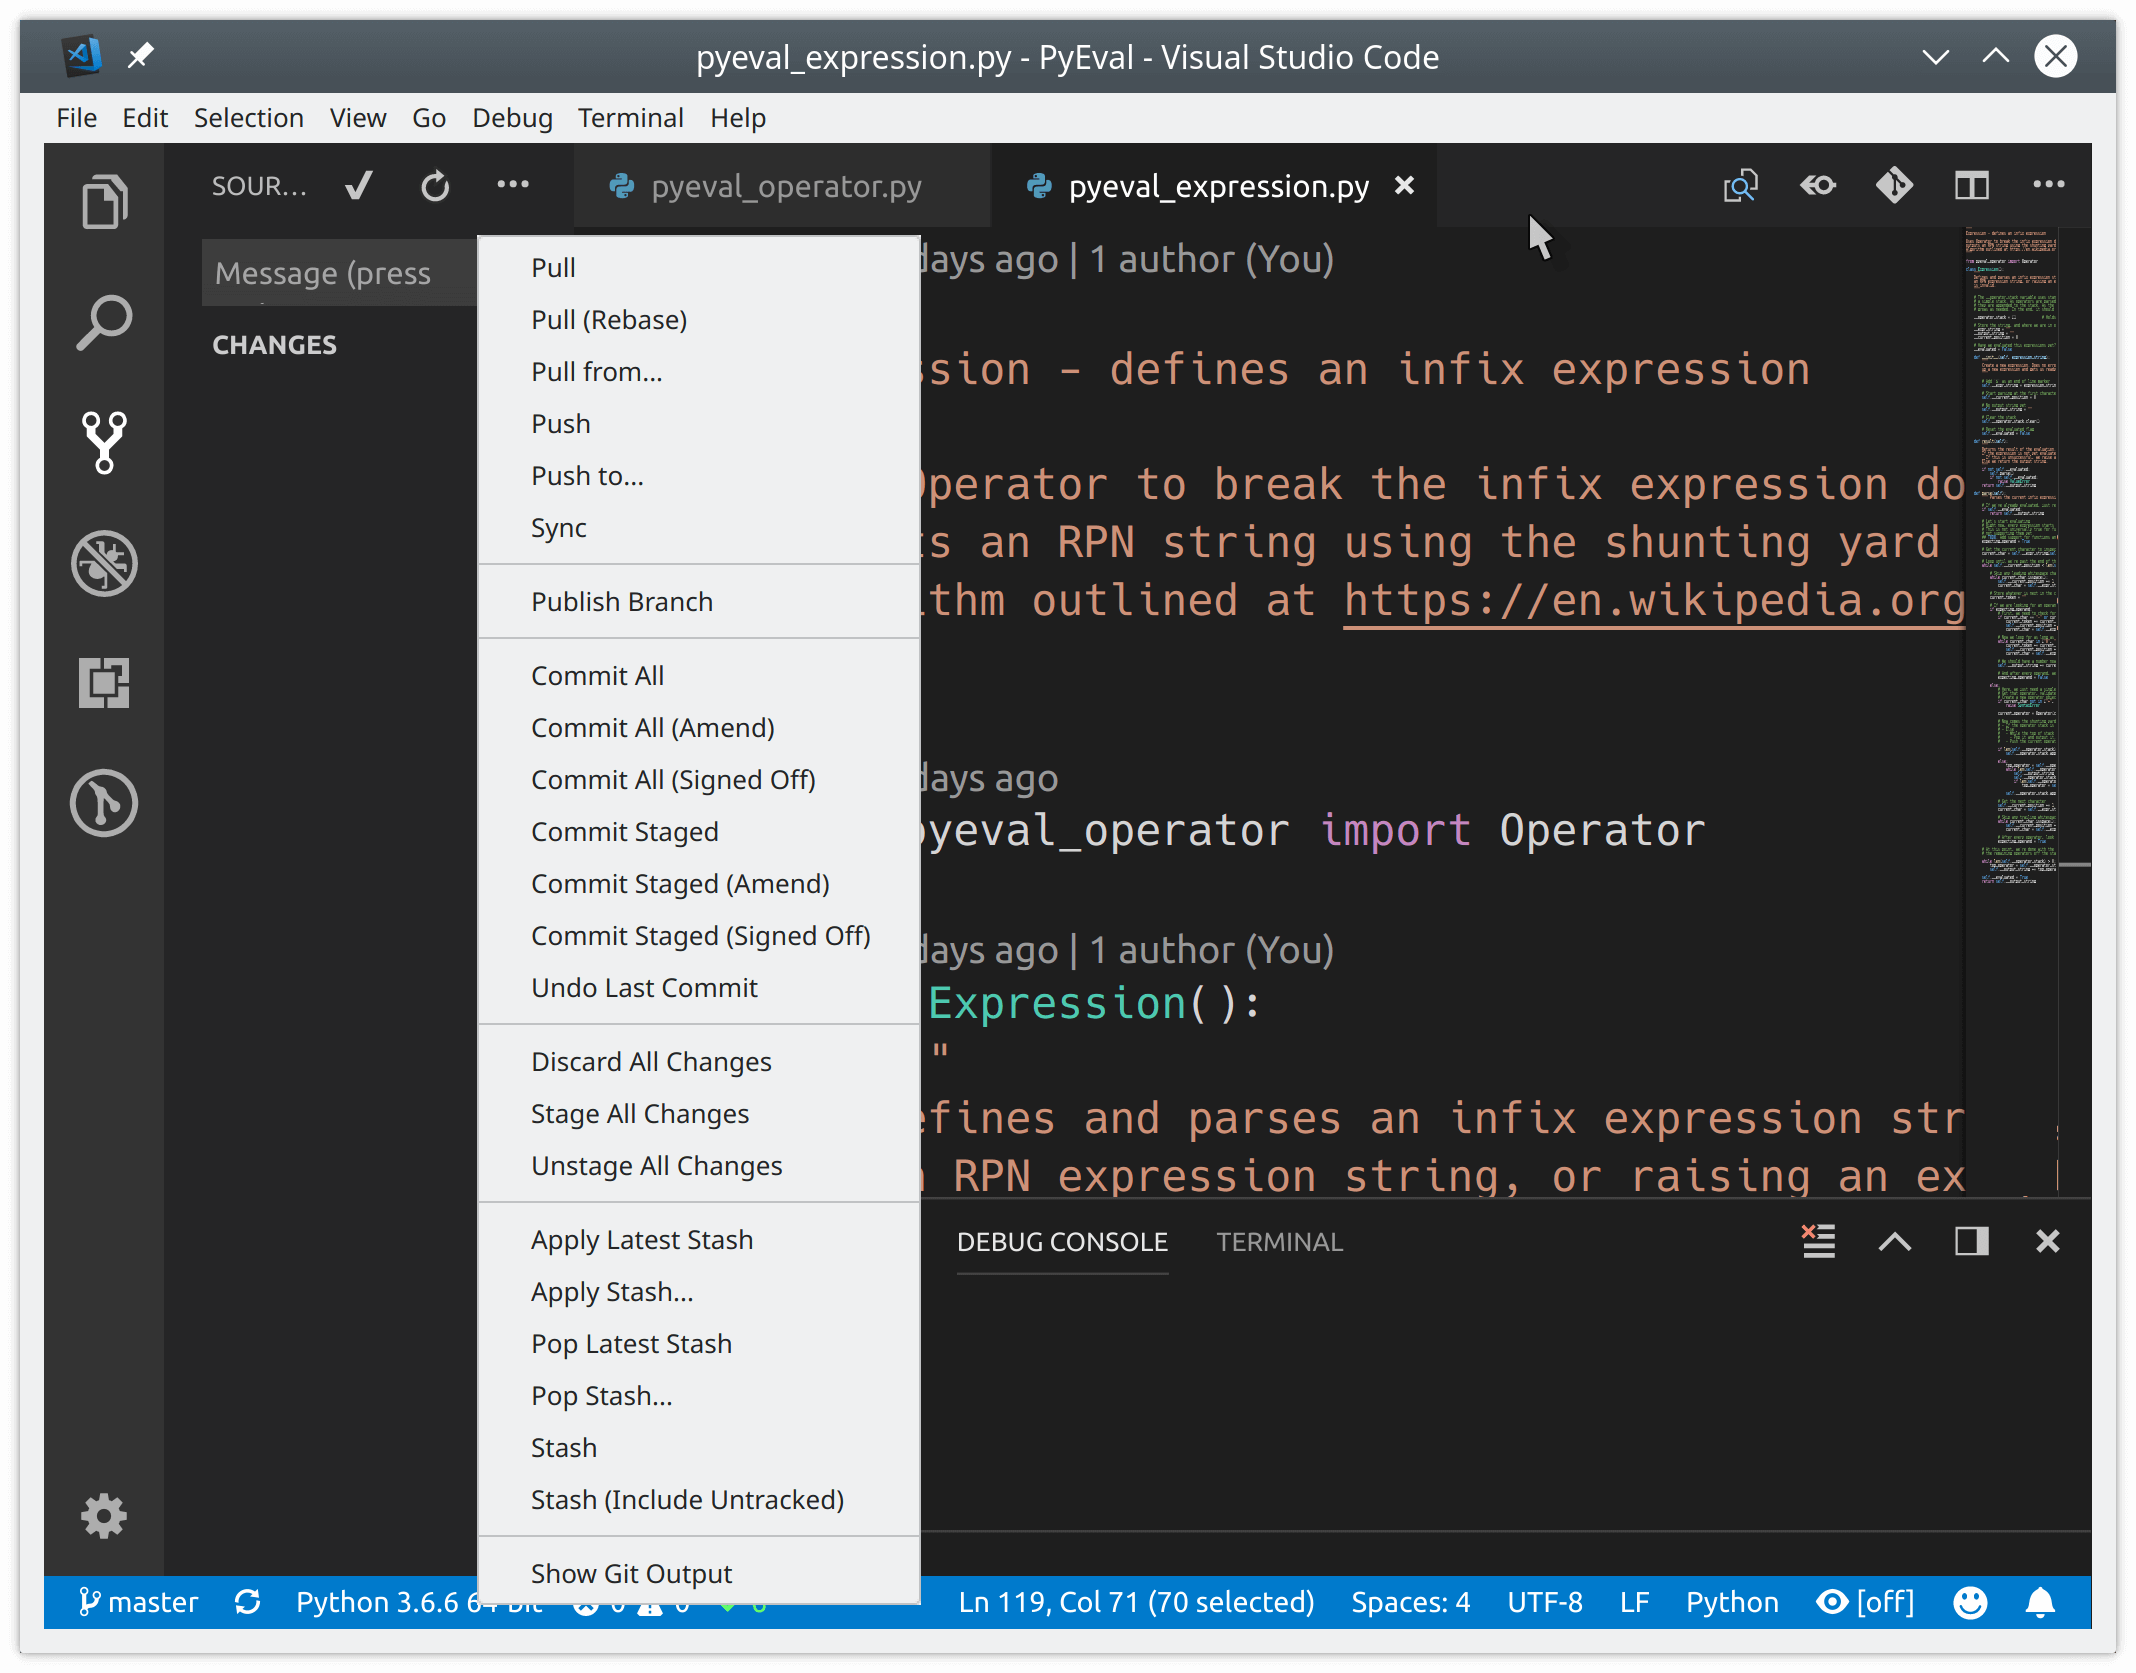
GIT
Для начала работы с системами контроля версий обратимся к вкладке Source Control, что находится на панели активности слева (или Ctrl + Shift + G).
По умолчанию VS Code дружит с Git и GitHub
Поддержку других систем возможно настроить самостоятельно, установив соответствующие расширения.
Чтобы связать проект с github (или gitlab), сперва необходимо скачать на ваш ПК git (если ещё не скачан). VSCode автоматически определит его местоположение, и затем у вас появится возможность синхронизации.
Все основные и необходимые операции для контроля версий будут находиться прямиком внутри редактора: коммитить, пуллить, пушить, создавать бранчи и просматривать изменения вы можете, не выходя из VisualStudioCode.
А для удобного просмотра изменений в git, советую установить расширение «Git Graph«. После его установки, на панели «Source Control» появится новая кнопка, которая отобразит граф состояния (git log).
ТОП плагинов для VS Code
- Python extension for Visual Studio Code — официальное расширение Python от Microsoft.
- TabNine — магией машинного обучения пропитан сей плагин сотворённый для высших целей интеллектуального автозаполнения кода.
- Python Preview — расширение, способствующее более простой и лёгкой отладке в VSCode.
- Indent-Rainbow — плагин выделяет цветом все отступы, чередуя четыре разных цвета на каждом блоке.
- Bracket Pair Colorizer — плагин для лучшей читаемости кода, который разукрашивает соответствующие друг другу скобки в один цвет.
- Better Comments — позволяет создавать более красивые и удобные комментарии к вашему программному коду.
- Python Test Explorer for Visual Studio Code — запуск тестов с помощью TestExplorer UI.
- Debugger for Chrome — добавление отладчика браузера Google Chrome в ваш редактор.
- Path Intellisense — плагин, который автозаполняет имена файлов.
- Python Docstring Generator — плагин для быстрого генерирования docstrings.
- Bookmarks — расширение позволяет создавать закладки в коде и перемещаться по ним с помощью горячих клавиш.
- Error Lens — удобная подсветка ошибок.
- TODO Highlight — подсветка TODO и FIXME в комментариях.
Getting Started with Python in VS Code
In this tutorial, you will learn how to use Python 3 in Visual Studio Code to create, run, and debug a Python «Roll a dice» application, work with virtual environments, use packages, and more! By using the Python extension, you turn VS Code into a great, lightweight Python editor.
To learn more about the Python language, follow any of the programming tutorials listed on python.org within the context of VS Code.
If you are looking for a Data Science focused tutorial with Python, check out our Data Science section.
Prerequisites
To successfully complete this tutorial, you need to first setup your Python development environment. Specifically, this tutorial requires:
- Python 3
- VS Code
- VS Code Python extension (For additional details on installing extensions, see Extension Marketplace)
Install a Python interpreter
Along with the Python extension, you need to install a Python interpreter. Which interpreter you use is dependent on your specific needs, but some guidance is provided below.
Windows
Install Python from python.org. Use the Download Python button that appears first on the page to download the latest version.
Note: If you don’t have admin access, an additional option for installing Python on Windows is to use the Microsoft Store. The Microsoft Store provides installs of supported Python versions.
For additional information about using Python on Windows, see Using Python on Windows at Python.org
macOS
The system install of Python on macOS is not supported. Instead, a package management system like Homebrew is recommended. To install Python using Homebrew on macOS use brew install python3 at the Terminal prompt.
Note: On macOS, make sure the location of your VS Code installation is included in your PATH environment variable. See these setup instructions for more information.
Linux
The built-in Python 3 installation on Linux works well, but to install other Python packages you must install pip with get-pip.py.
Other options
-
Data Science: If your primary purpose for using Python is Data Science, then you might consider a download from Anaconda. Anaconda provides not just a Python interpreter, but many useful libraries and tools for data science.
-
Windows Subsystem for Linux: If you are working on Windows and want a Linux environment for working with Python, the Windows Subsystem for Linux (WSL) is an option for you. If you choose this option, you’ll also want to install the WSL extension. For more information about using WSL with VS Code, see VS Code Remote Development or try the Working in WSL tutorial, which will walk you through setting up WSL, installing Python, and creating a Hello World application running in WSL.
Note: To verify that you’ve installed Python successfully on your machine, run one of the following commands (depending on your operating system):
Linux/macOS: open a Terminal Window and type the following command:
python3 --versionWindows: open a command prompt and run the following command:
py -3 --versionIf the installation was successful, the output window should show the version of Python that you installed.
Alternatively, you can use thepy -0command in the VS Code integrated terminal to view the versions of python installed on your machine. The default interpreter is identified by an asterisk (*).
Start VS Code in a workspace folder
By starting VS Code in a folder, that folder becomes your «workspace».
Using a command prompt or terminal, create an empty folder called «hello», navigate into it, and open VS Code (code) in that folder (.) by entering the following commands:
mkdir hello
cd hello
code .
Note: If you’re using an Anaconda distribution, be sure to use an Anaconda command prompt.
Alternately, you can create a folder through the operating system UI, then use VS Code’s File > Open Folder to open the project folder.
Create a virtual environment
A best practice among Python developers is to use a project-specific virtual environment. Once you activate that environment, any packages you then install are isolated from other environments, including the global interpreter environment, reducing many complications that can arise from conflicting package versions. You can create non-global environments in VS Code using Venv or Anaconda with Python: Create Environment.
Open the Command Palette (⇧⌘P (Windows, Linux Ctrl+Shift+P)), start typing the Python: Create Environment command to search, and then select the command.
The command presents a list of environment types, Venv or Conda. For this example, select Venv.

The command then presents a list of interpreters that can be used for your project. Select the interpreter you installed at the beginning of the tutorial.
After selecting the interpreter, a notification will show the progress of the environment creation and the environment folder (/.venv) will appear in your workspace.

Ensure your new environment is selected by using the Python: Select Interpreter command from the Command Palette.
Note: For additional information about virtual environments, or if you run into an error in the environment creation process, see Environments.
Create a Python source code file
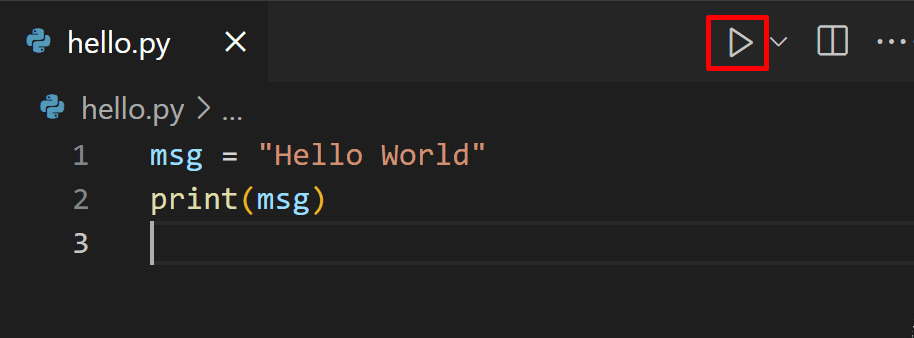
From the File Explorer toolbar, select the New File button on the hello folder:
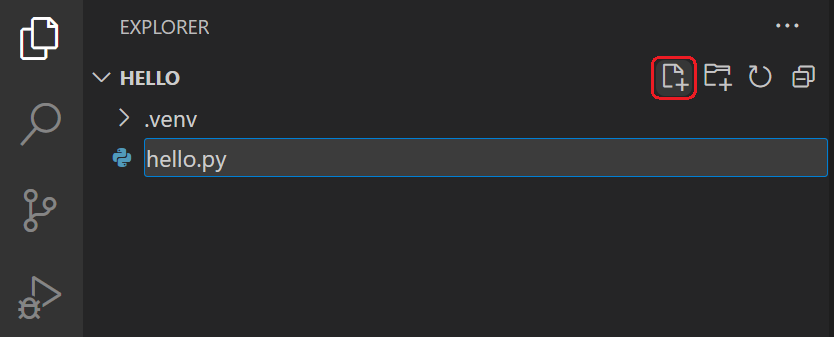
Name the file hello.py, and VS Code will automatically open it in the editor:
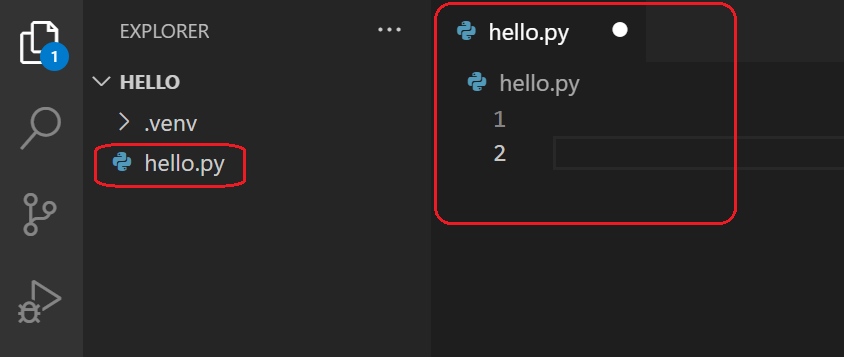
By using the .py file extension, you tell VS Code to interpret this file as a Python program, so that it evaluates the contents with the Python extension and the selected interpreter.
Note: The File Explorer toolbar also allows you to create folders within your workspace to better organize your code. You can use the New folder button to quickly create a folder.
Now that you have a code file in your Workspace, enter the following source code in hello.py:
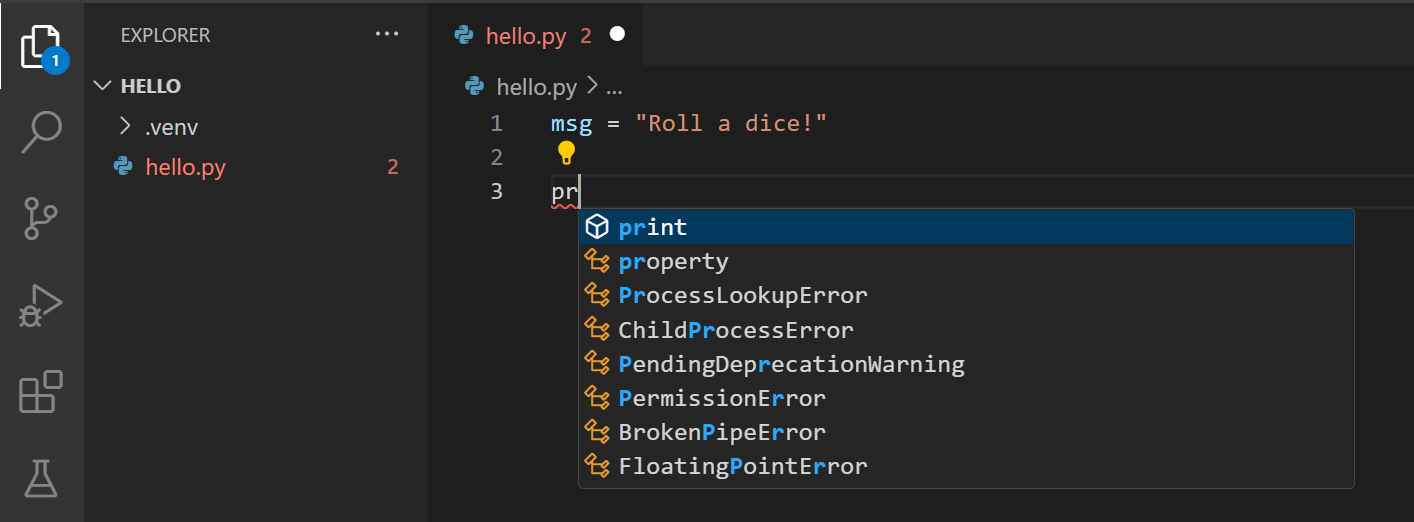
msg = "Roll a dice"
print(msg)
When you start typing print, notice how IntelliSense presents auto-completion options.
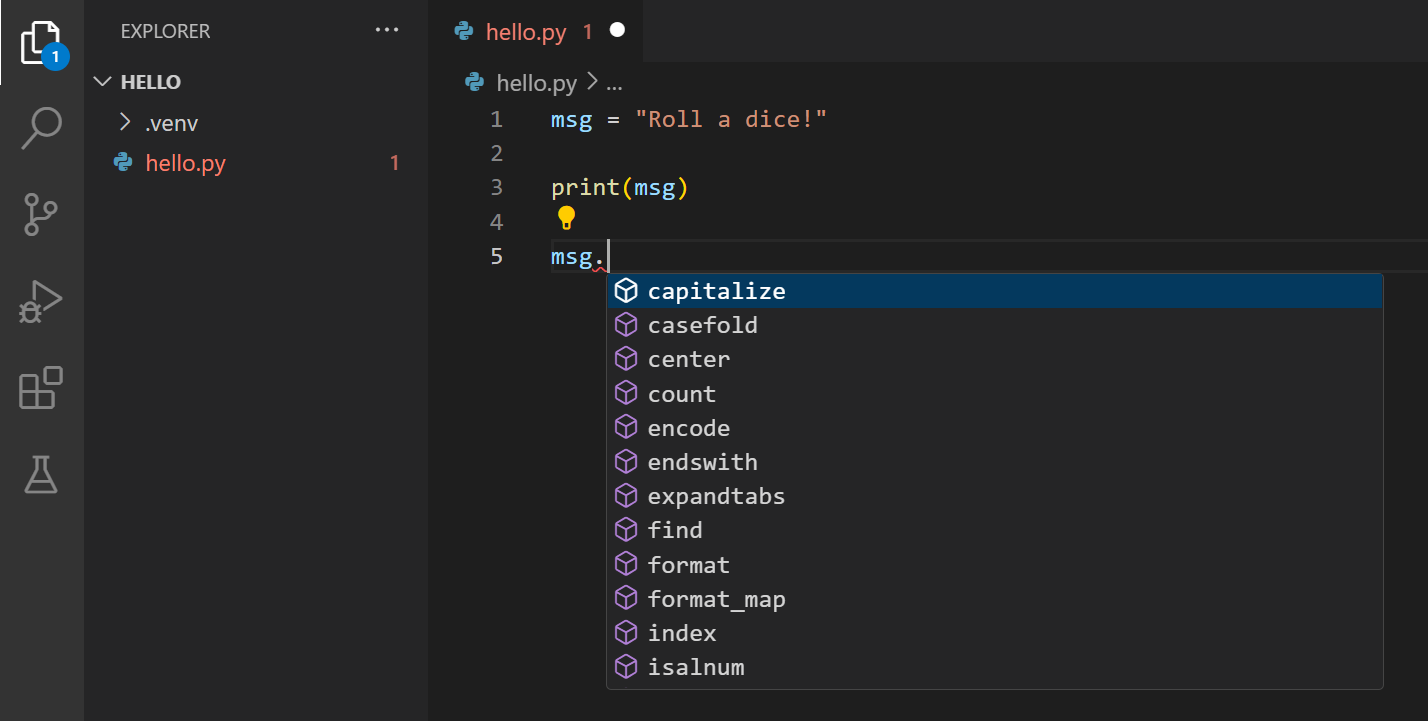
IntelliSense and auto-completions work for standard Python modules as well as other packages you’ve installed into the environment of the selected Python interpreter. It also provides completions for methods available on object types. For example, because the msg variable contains a string, IntelliSense provides string methods when you type msg.:
Finally, save the file (⌘S (Windows, Linux Ctrl+S)). At this point, you’re ready to run your first Python file in VS Code.
For full details on editing, formatting, and refactoring, see Editing code. The Python extension also has full support for Linting.
Run Hello World
Click the Run Python File in Terminal play button in the top-right side of the editor.
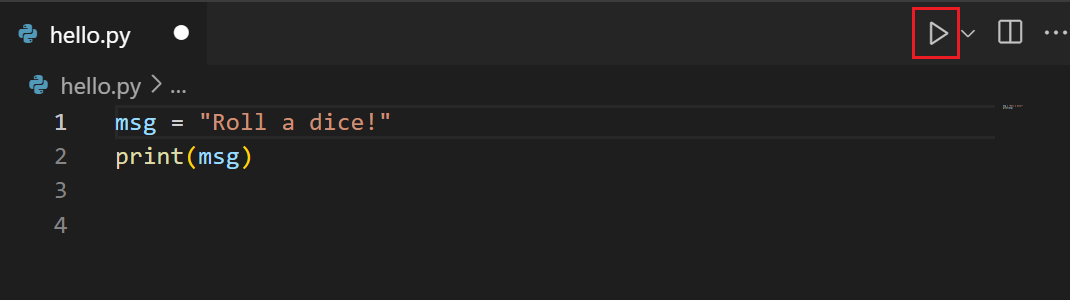
The button opens a terminal panel in which your Python interpreter is automatically activated, then runs python3 hello.py (macOS/Linux) or python hello.py (Windows):

There are three other ways you can run Python code within VS Code:
-
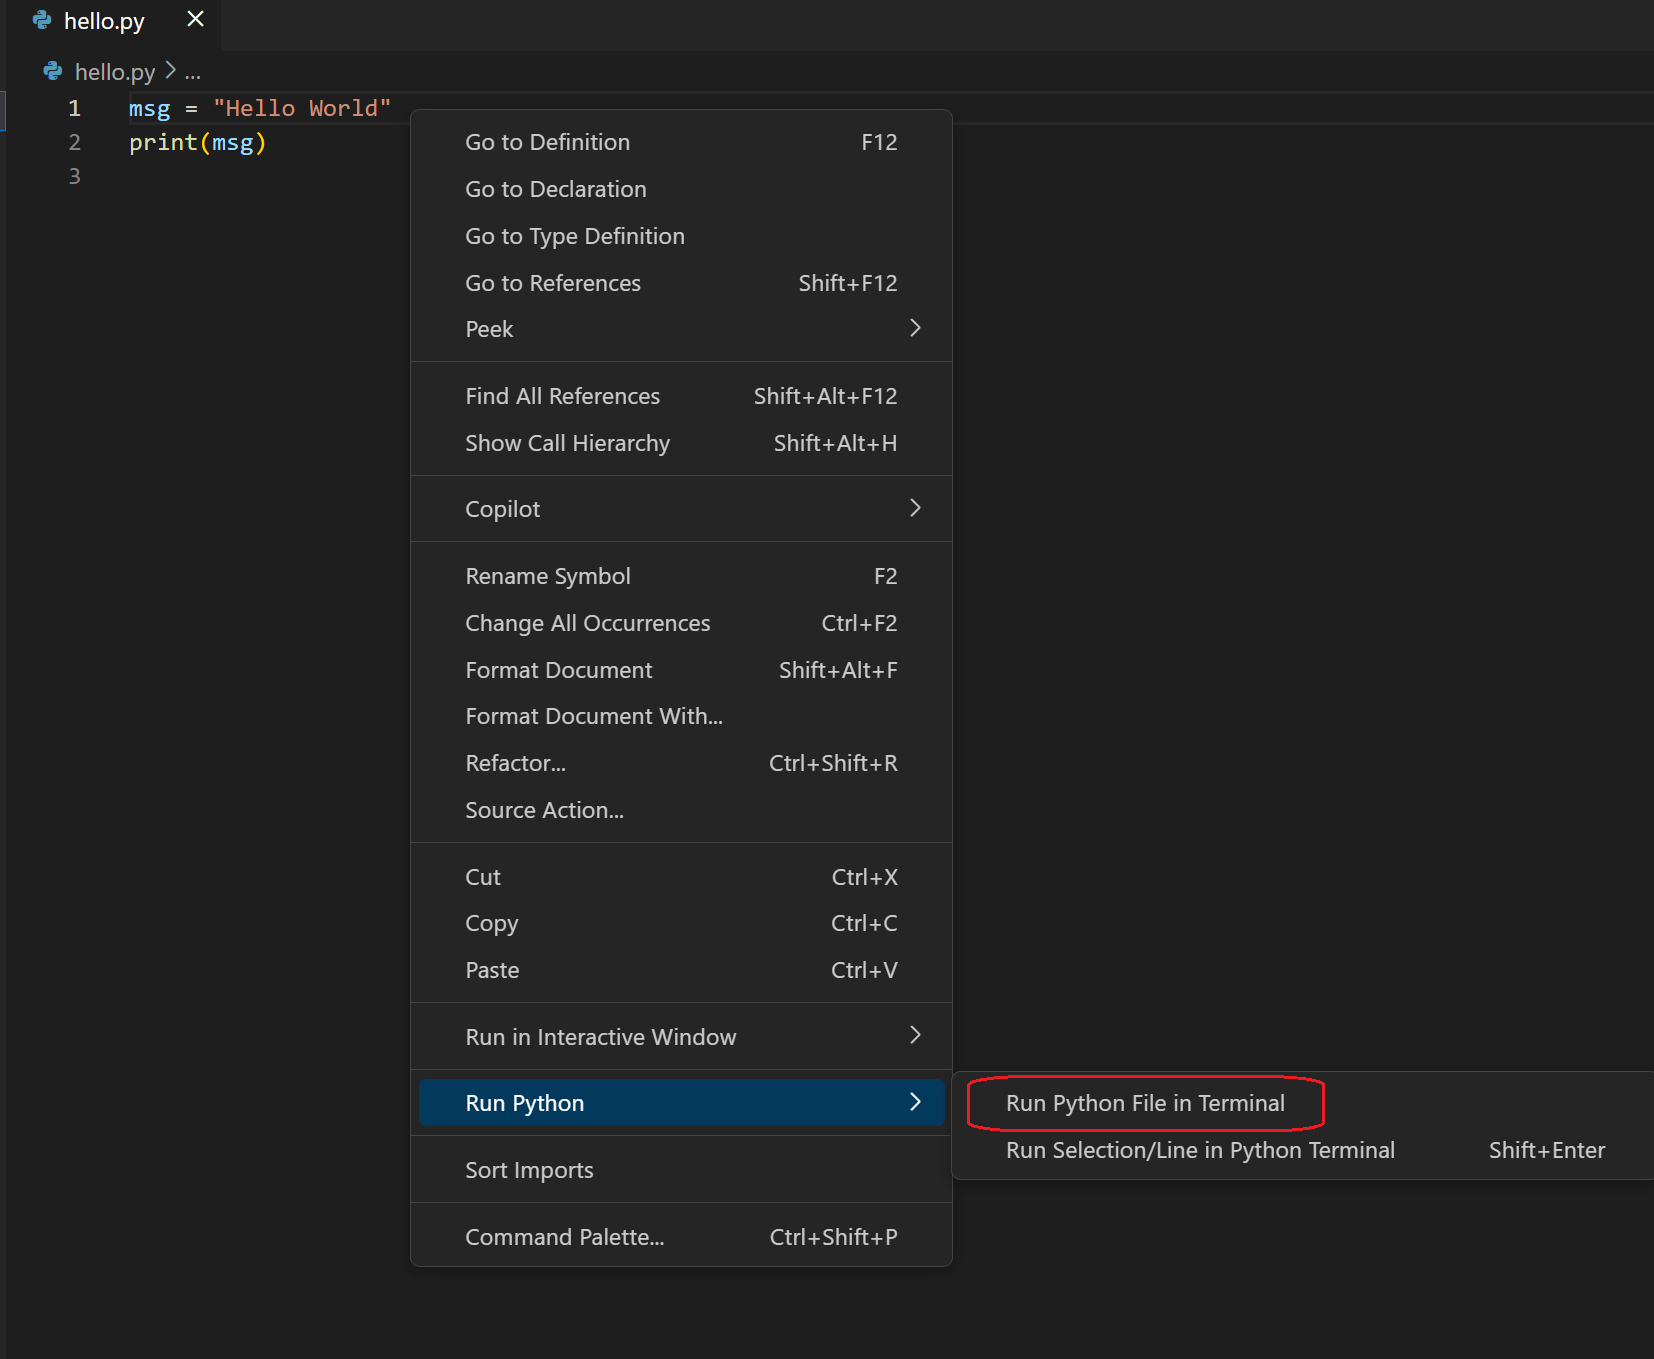
Right-click anywhere in the editor window and select Run > Python File in Terminal (which saves the file automatically):

-
Select one or more lines, then press Shift+Enter or right-click and select Run Selection/Line in Python Terminal. This command is convenient for testing just a part of a file.
-
From the Command Palette (⇧⌘P (Windows, Linux Ctrl+Shift+P)), select the Python: Start REPL command to open a REPL terminal for the currently selected Python interpreter. In the REPL, you can then enter and run lines of code one at a time.
Configure and run the debugger
Let’s now try debugging our Hello World program.
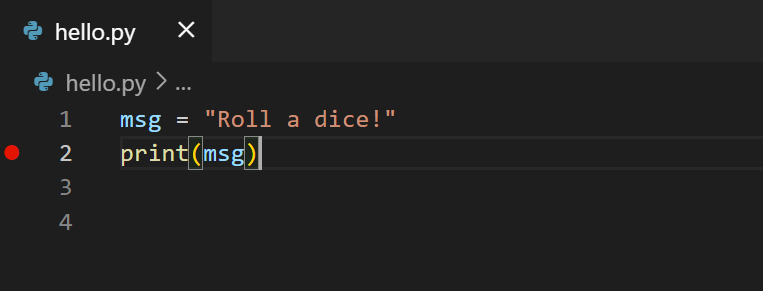
First, set a breakpoint on line 2 of hello.py by placing the cursor on the print call and pressing F9. Alternately, click in the editor’s left gutter, next to the line numbers. When you set a breakpoint, a red circle appears in the gutter.
Next, to initialize the debugger, press F5. Since this is your first time debugging this file, a configuration menu will open from the Command Palette allowing you to select the type of debug configuration you would like for the opened file.

Note: VS Code uses JSON files for all of its various configurations;
launch.jsonis the standard name for a file containing debugging configurations.
Select Python File, which is the configuration that runs the current file shown in the editor using the currently selected Python interpreter.
Start the debugger by clicking on the down-arrow next to the run button on the editor, and selecting Debug Python File in Terminal.

The debugger will stop at the first line of the file breakpoint. The current line is indicated with a yellow arrow in the left margin. If you examine the Local variables window at this point, you will see now defined msg variable appears in the Local pane.
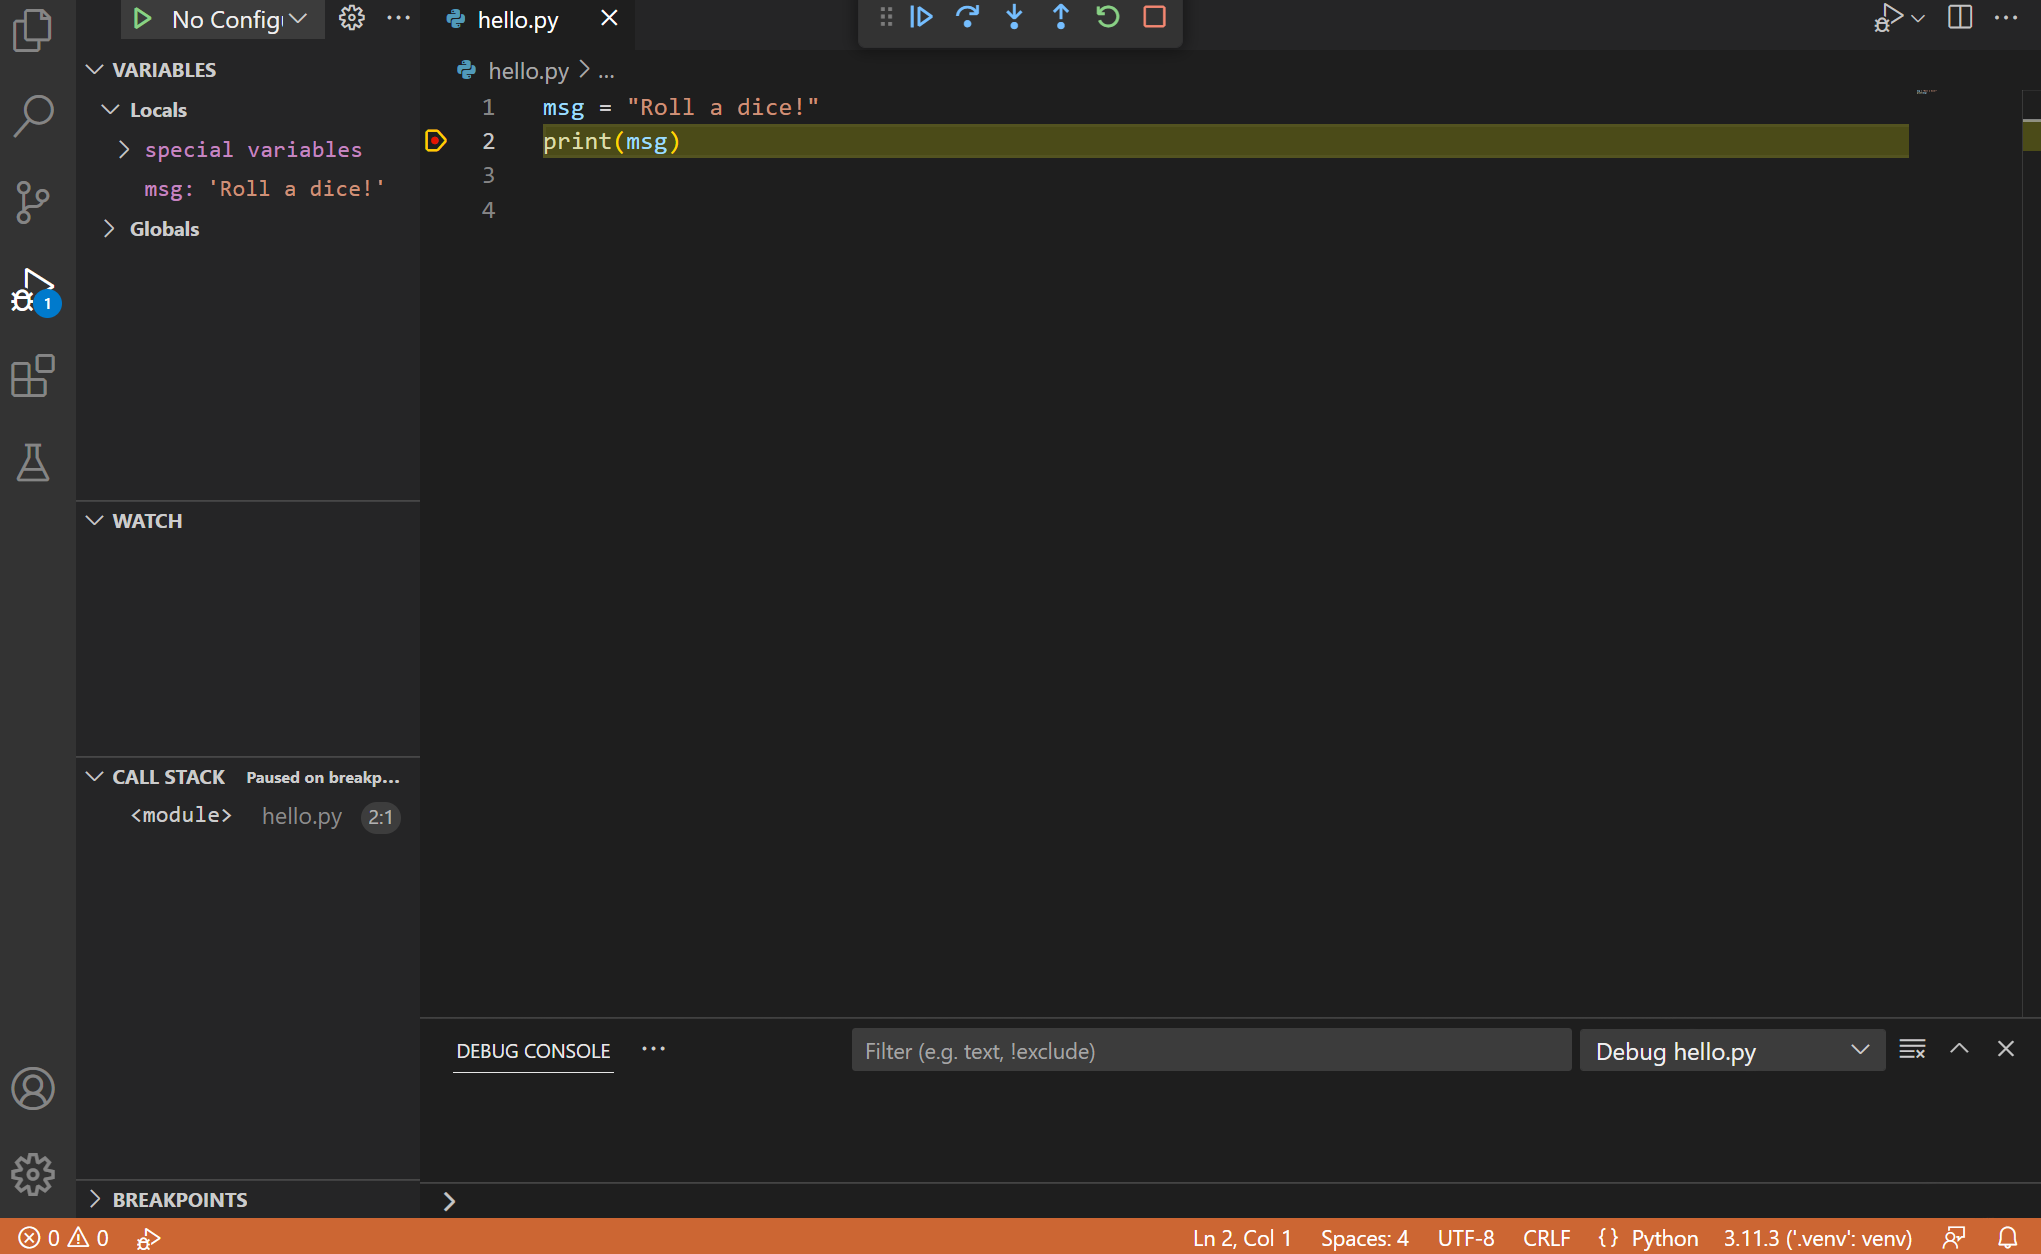
A debug toolbar appears along the top with the following commands from left to right: continue (F5), step over (F10), step into (F11), step out (⇧F11 (Windows, Linux Shift+F11)), restart (⇧⌘F5 (Windows, Linux Ctrl+Shift+F5)), and stop (⇧F5 (Windows, Linux Shift+F5)).

The Status Bar also changes color (orange in many themes) to indicate that you’re in debug mode. The Python Debug Console also appears automatically in the lower right panel to show the commands being run, along with the program output.
To continue running the program, select the continue command on the debug toolbar (F5). The debugger runs the program to the end.
Tip Debugging information can also be seen by hovering over code, such as variables. In the case of
msg, hovering over the variable will display the stringRoll a dice!in a box above the variable.
You can also work with variables in the Debug Console (If you don’t see it, select Debug Console in the lower right area of VS Code, or select it from the … menu.) Then try entering the following lines, one by one, at the > prompt at the bottom of the console:
msg
msg.capitalize()
msg.split()

Select the blue Continue button on the toolbar again (or press F5) to run the program to completion. «Roll a dice!» appears in the Python Debug Console if you switch back to it, and VS Code exits debugging mode once the program is complete.
If you restart the debugger, the debugger again stops on the first breakpoint.
To stop running a program before it’s complete, use the red square stop button on the debug toolbar (⇧F5 (Windows, Linux Shift+F5)), or use the Run > Stop debugging menu command.
For full details, see Debugging configurations, which includes notes on how to use a specific Python interpreter for debugging.
Tip: Use Logpoints instead of print statements: Developers often litter source code with
Install and use packages
Let’s build upon the previous example by using packages.
In Python, packages are how you obtain any number of useful code libraries, typically from PyPI, that provide additional functionality to your program. For this example, you use the numpy package to generate a random number.
Return to the Explorer view (the top-most icon on the left side, which shows files), open hello.py, and paste in the following source code:
import numpy as np

msg = "Roll a dice"
print(msg)

print(np.random.randint(1,9))
Tip: If you enter the above code by hand, you may find that auto-completions change the names after the
askeywords when you press Enter at the end of a line. To avoid this, type a space, then Enter.
Next, run the file in the debugger using the «Python: Current file» configuration as described in the last section.
You should see the message, «ModuleNotFoundError: No module named ‘numpy'». This message indicates that the required package isn’t available in your interpreter. If you’re using an Anaconda distribution or have previously installed the numpy package you may not see this message.
To install the numpy package, stop the debugger and use the Command Palette to run Terminal: Create New Terminal (⌃⇧` (Windows, Linux Ctrl+Shift+`)). This command opens a command prompt for your selected interpreter.
To install the required packages in your virtual environment, enter the following commands as appropriate for your operating system:
-
Install the packages
# Don't use with Anaconda distributions because they include matplotlib already. # macOS python3 -m pip install numpy # Windows (may require elevation) py -m pip install numpy # Linux (Debian) apt-get install python3-tk python3 -m pip install numpy -
Now, rerun the program, with or without the debugger, to view the output!
Next steps
To learn to build web apps with the Django and Flask frameworks, see the following tutorials:
- Use Django in Visual Studio Code
- Use Flask in Visual Studio Code
There is then much more to explore with Python in Visual Studio Code:
- Python profile template — Create a new profile with a curated set of extensions, settings, and snippets
- Editing code — Learn about autocomplete, IntelliSense, formatting, and refactoring for Python.
- Linting — Enable, configure, and apply a variety of Python linters.
- Debugging — Learn to debug Python both locally and remotely.
- Testing — Configure test environments and discover, run, and debug tests.
- Settings reference — Explore the full range of Python-related settings in VS Code.
- Deploy Python to Azure App Service
- Deploy Python to Container Apps
6/12/2023
Суперсет Python и Visual Studio Code в действии! Полное руководство по настройке и началу работы на лучшем языке в лучшем редакторе.

VS Code от Microsoft – легкий и удобный редактор кода, доступный на всех платформах и невероятно гибкий. Это отличный выбор для программирования на Python.
В этой статье мы рассмотрим способы установки и настройки максимально эффективной рабочей среды для разработки.
Статья предназначена для программистов, уже имеющих опыт работы с Python и установивших на свою рабочую машину интерпретатор этого языка программирования (Python 2.7, Python 3.6/3.7, Anaconda или другой дистрибутив).
Установка Python – дело несложное: здесь вы найдете подробное пошаговое руководство для всех популярных ОС. Помните, что в разных операционных системах интерфейс VS Code может немного различаться.
Сразу же отметим, что VS Code не имеет практически ничего общего с его знаменитым тезкой Visual Studio.
Редактор очень легко установить на любую платформу: на официальном сайте есть подробные инструкции для Windows, Mac и Linux.

Продукт ежемесячно обновляется и улучшается. В него из коробки встроена поддержка нескольких языков и удобная модель расширения. Пользовательский интерфейс предельно прост и понятен.

VS Code + Python
С 2018 года есть расширение для Python. Наблюдать за развитием отношений этой пары можно в блоге Microsoft.
Основные возможности редактора:
- Поддержка Python 3.4 и выше, а также Python 2.7
- Автоматическое дополнение кода с помощью IntelliSense
- Линтинг
- Отладка
- Сниппеты
- Модульное тестирование
- Автоматическое использование conda и виртуальных сред
- Редактирование кода в средах Jupyter и Jupyter Notebooks
А вот пара полезных подборок для прокачки Python-скиллов:
- Лучшие книги по Python: эффективно, емко, доходчиво
- Крупнейшая подборка Python-каналов на Youtube
В редакторе есть и полезные фичи, не связанные напрямую с языком:
- Наборы горячих клавиш для Atom, Sublime Text, Emacs, Vim, PyCharm и множества других редакторов
- Настраиваемые темы оформления
- Языковые пакеты для множества языков, включая русский
И еще несколько крутых возможностей для полного счастья:
- GitLens – множество полезных функций Git прямо в редакторе, включая аннотации blame и просмотр репозитория.
- Автосохранение (File — Auto Save) и удобная настройка его задержки.
- Синхронизация параметров редактора между различными устройствами с помощью GitHub.
- Удобная работа с Docker.
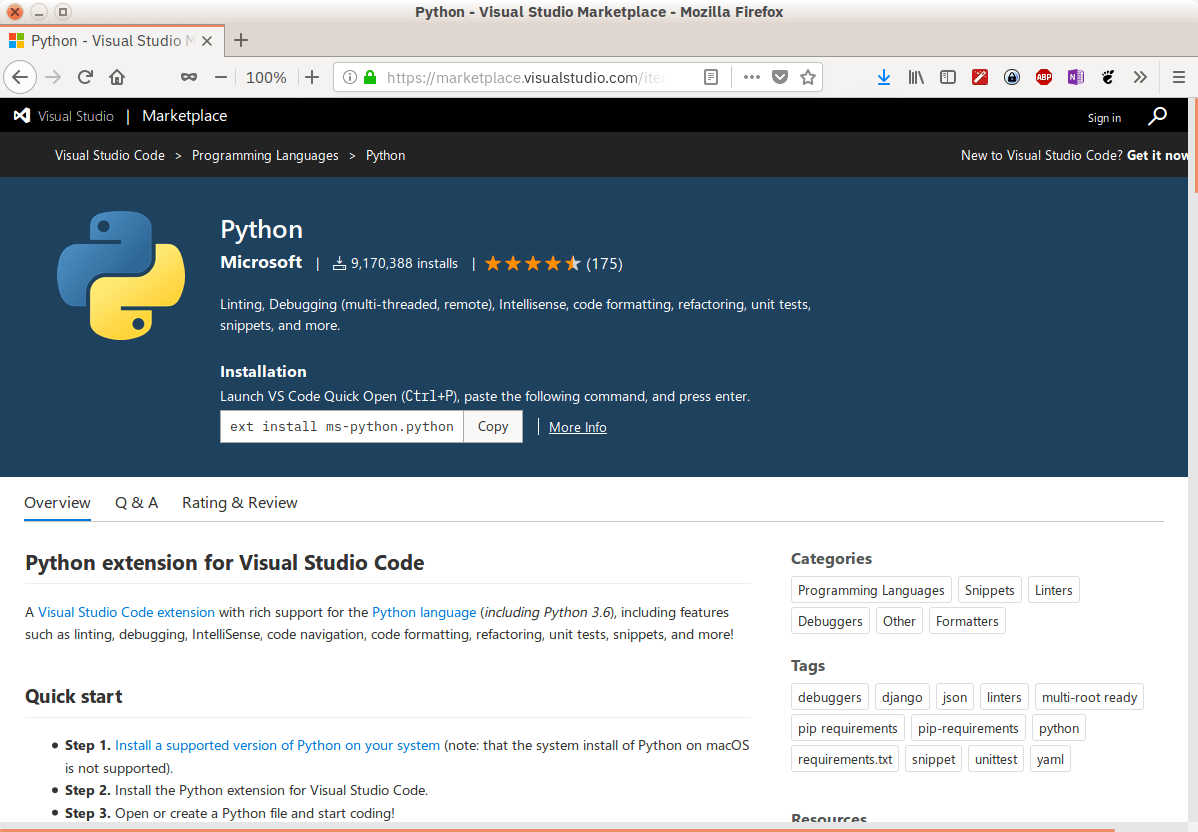
Чтобы найти и установить необходимые расширения и темы, нажмите на иконку Расширения на левой панели. Можно искать по ключевым словам и сортировать результаты поиска.
Найдите расширение Python и установите его, чтобы продолжить настройку редактора.
Файлы конфигурации
В Visual Studio Code вы легко можете настроить все под себя. Здесь есть параметры пользователя, которые являются глобальными, и параметры рабочей области – локальные для конкретных папок или проектов. Локальные настройки сохраняются в виде .json-файлов в папке .vscode.
Новый проект на Python
Чтобы открыть новый файл, нужно зайти в меню Файл и выбрать пункт Создать или нажать горячую комбинацию клавиш Ctrl+N.
Еще в редакторе есть полезная палитра команд, которую можно вызвать сочетанием Ctrl+Shift+P. Для создания нового файла введите в появившемся поле File: New File и нажмите Enter.
Какой бы способ вы ни выбрали, перед вами должно открыться вот такое окно:

Здесь уже можно вводить код вашей программы.
Начинаем кодить
Для демонстрации возможностей редактора напишем «Решето Эратосфена» – известный алгоритм для нахождения простых чисел до некоторого предела. Начнем кодить:
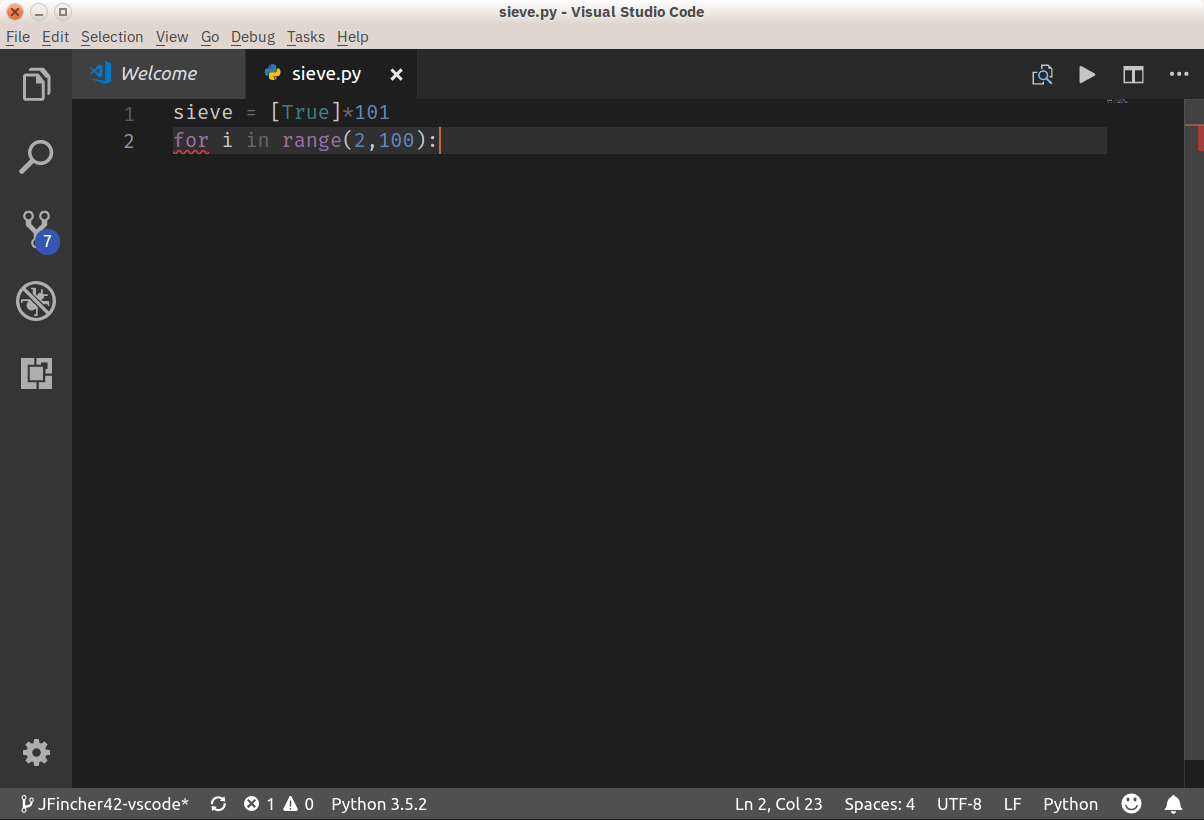
sieve = [True] * 101
for i in range(2, 100):
На экране это будет выглядеть примерно так:

Подождите, что-то не так. Почему-то VS Code не выделяет ключевые слова языка, не дополняет, не форматирует и вообще ничего полезного не делает. Зачем он вообще такой нужен?
Без паники! Просто сейчас редактор не знает, с каким файлом он имеет дело. Смотрите, у него еще нет названия и расширения – только какое-то неопределенное Untitled-1. А в правом нижнем углу написано Plain Text (простой текст).
Установка Python плагина уже произведена, теперь его нужно активировать. Для этого достаточно просто сохранить файл с нужным расширением. Для этого у нас опять же три способа:
- меню: Файл — Сохранить
- горячая комбинация:
Ctrl+S - палитра команд: File: Save File
Дайте файлу имя sieve.py.
Теперь редактор понял, что имеет дело с кодом на Python, и исправился:
Так гораздо лучше! В правом нижнем углу появилась надпись Python, значит все работает правильно.
Если на вашем компьютере установлено несколько интерпретаторов языка (Python 2.7, Python 3.x или Anaconda), вы можете выбирать нужный. Для этого кликните на индикаторе языка (внизу в левой части экрана) или наберите в палитре команд Python: Select Interpreter.
По умолчанию VS Code поддерживает форматирование с использованием pep8, но вы можете выбрать black или yapf, если хотите.
Допишем код алгоритма:
sieve = [True] * 101
for i in range(2, 100):
if sieve[i]:
print(i)
for j in range(i*i, 100, i):
sieve[j] = False
Если вы будете вводить его вручную (без copy-paste), то сможете увидеть IntelliSense редактора в действии.
VS Code автоматически делает отступы перед операторами for и if, добавляет закрывающие скобки и предлагает варианты завершения слов.
Запуск программы
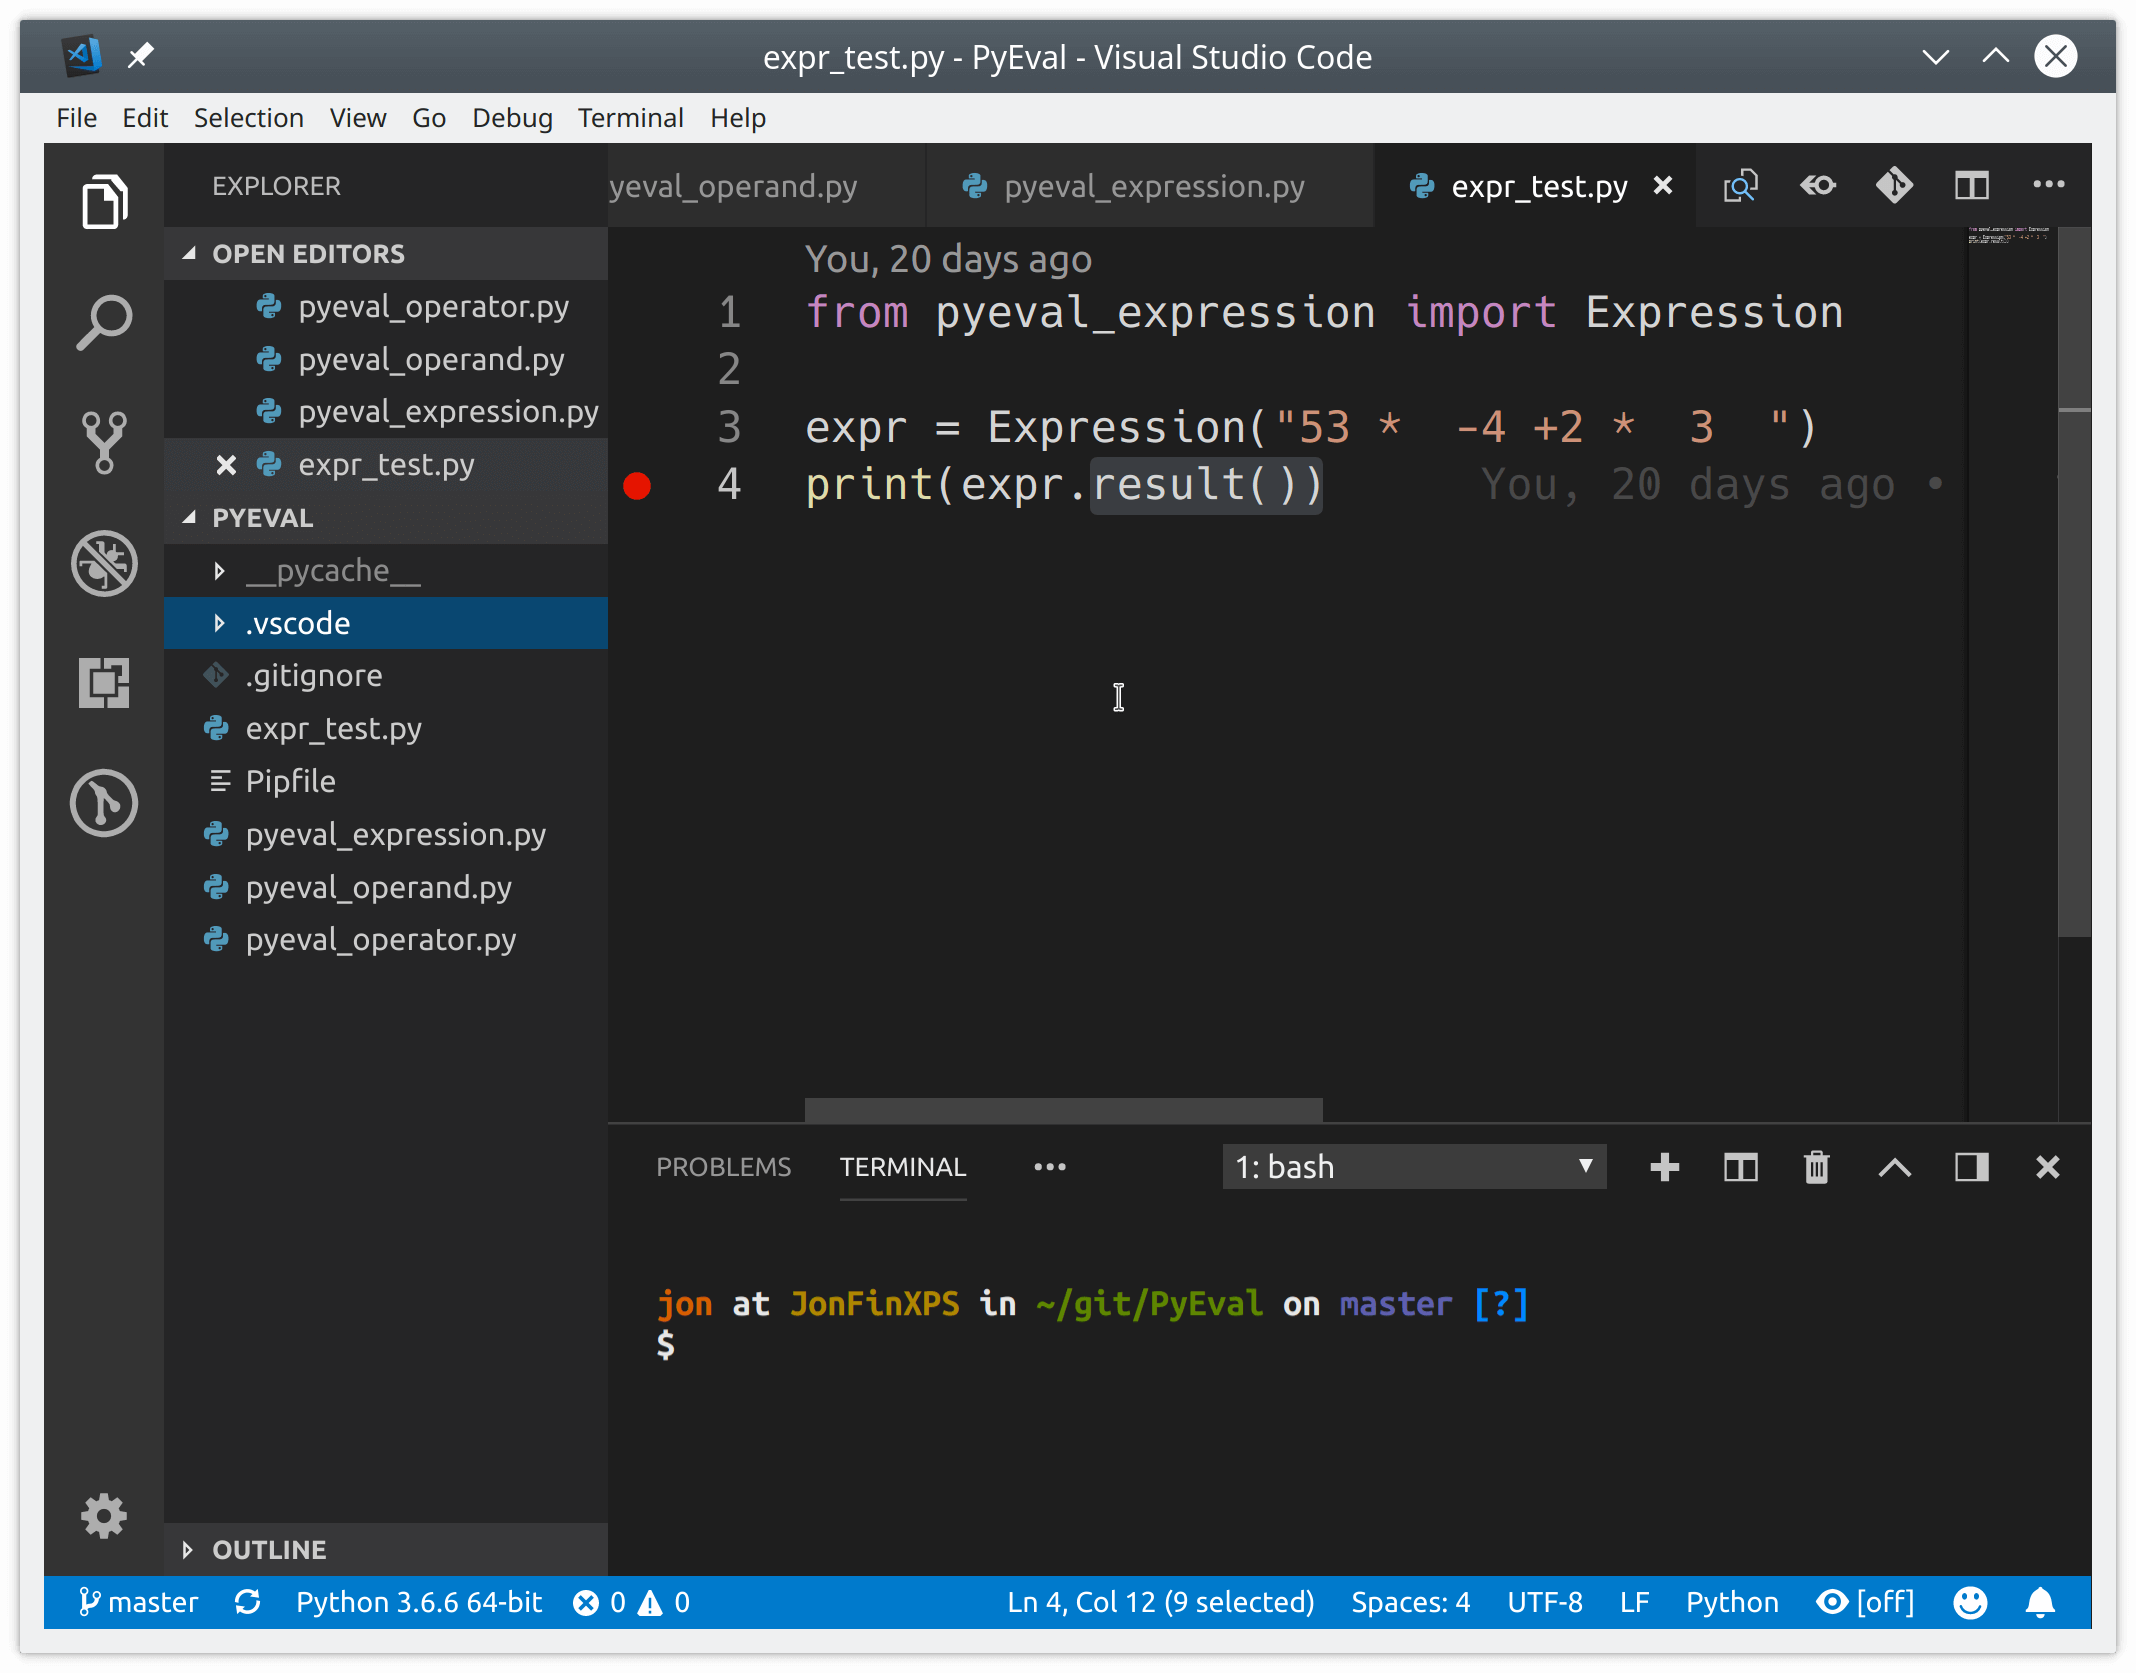
Чтобы запустить готовую программу, нам даже не нужно выходить из редактора! Просто сохраните файл, вызовите правой кнопкой мыши контекстное меню и выберите в нем пункт Выполнить файл в консоли.
Теперь, когда код завершен, его можно запустить. Для этого не нужно выходить из редактора: Visual Studio Code может запускать эту программу непосредственно в Редакторе. Сохраните файл (с помощью Ctrl+S), затем щелкните правой кнопкой мыши в окне редактора и выберите пункт Запустить файл Python в терминале.
В нижней части окна должна появиться панель терминала с результатом работы программы.
Линтинг кода
Возможно, вы уже успели увидеть всплывающее окно с сообщением, что проверка кода недоступна и предложением установить линтер. По умолчанию расширение предлагает PyLint. Также поддерживаются и другие инструменты:
- flake8
- mypy
- pydocstyle
- pep8
- prospector
- pyllama
- bandit
Подробные сведения о настройке каждого из них вы можете найти здесь.
Обратите внимание, что линтер настраивается для конкретной рабочей области, а не глобально.
Редактирование существующего проекта
Итак, мы научились создавать новые файлы. Это здорово, но все же большую часть времени вам придется работать с уже существующими проектами, которые состоят из множества отдельных файлов и папок.
С редактором можно работать прямо из консоли, открывая и создавая файлы простой командой code filename.py.
Посмотрим, на что способен VS Code на примере уже готового проекта. Это библиотека для анализа уравнений, основанная на «алгоритме маневровой станции» (shunting-yard algorithm) Дийкстры. Вы можете клонировать этот репозиторий, чтобы начать работу.
Открыть созданную локально папку в редакторе можно из терминала:
cd /path/to/project
code .
VS Code умеет работать с различными средами: virtualenv, pipenv или conda.
Также вы можете открыть папку прямо из интерфейса редактора:
- меню: Файл — Открыть папку
- горячие клавиши:
Ctrl+K,Ctrl+O - из палитры команд: File: Open Folder
Вот так выглядит открытый проект:
По умолчанию при открытии папки VS Code также открывает файлы, с которыми вы работали в последний раз. Это поведение можно изменить.
Теперь вы можете открывать, редактировать, запускать и отлаживать все файлы проекта, перечисленные в левой панели. Над проводником отображаются все файлы, с которыми вы в данный момент работаете.
Тестирование
Грамотное программирование на Python помимо собственно написания кода включает также его тестирование.
Visual Studio Code умеет автоматически распознавать тесты в unittest, pytest или Nose. В нашем проекте есть модульный тест, который можно использовать для примера.
Чтобы запустить существующие тесты, из любого файла Python вызовите правой кнопкой мыши контекстное меню и выберите пункт Запустить текущий тестовый файл.
Нужно будет указать используемый для тестирования фреймворк, путь поиска и шаблон для имени файлов тестов. Эти настройки сохраняются как параметры рабочей области в локальном файле .vscode/settings.json. Для нашего проекта нужно выбрать unittest, текущую папку и шаблон *_test.py.
Теперь можно запустить все тесты, кликнув на Run Tests в строке состояния или из палитры команд.
Также тесты можно выполнять по отдельности, что позволяет экономить много времени, работая только с неудачными методами.
Результаты тестов отображаются во вкладке Output (раздел Python Test Log выпадающего меню).
Посмотрите также:
- Погружаемся в основы и нюансы тестирования Python-кода
Отладка кода
Несмотря на то, что VS Code – это просто редактор кода, а не полноценная IDE, он позволяет отлаживать код Python прямо в рабочей области. У него есть много функций, которые должны быть у хорошего отладчика:
- Автоматическое отслеживание переменных
- Отслеживание выражений
- Точки прерывания
- Инспекция стека вызовов
Все эти данные можно найти во вкладке Debug левой панели.
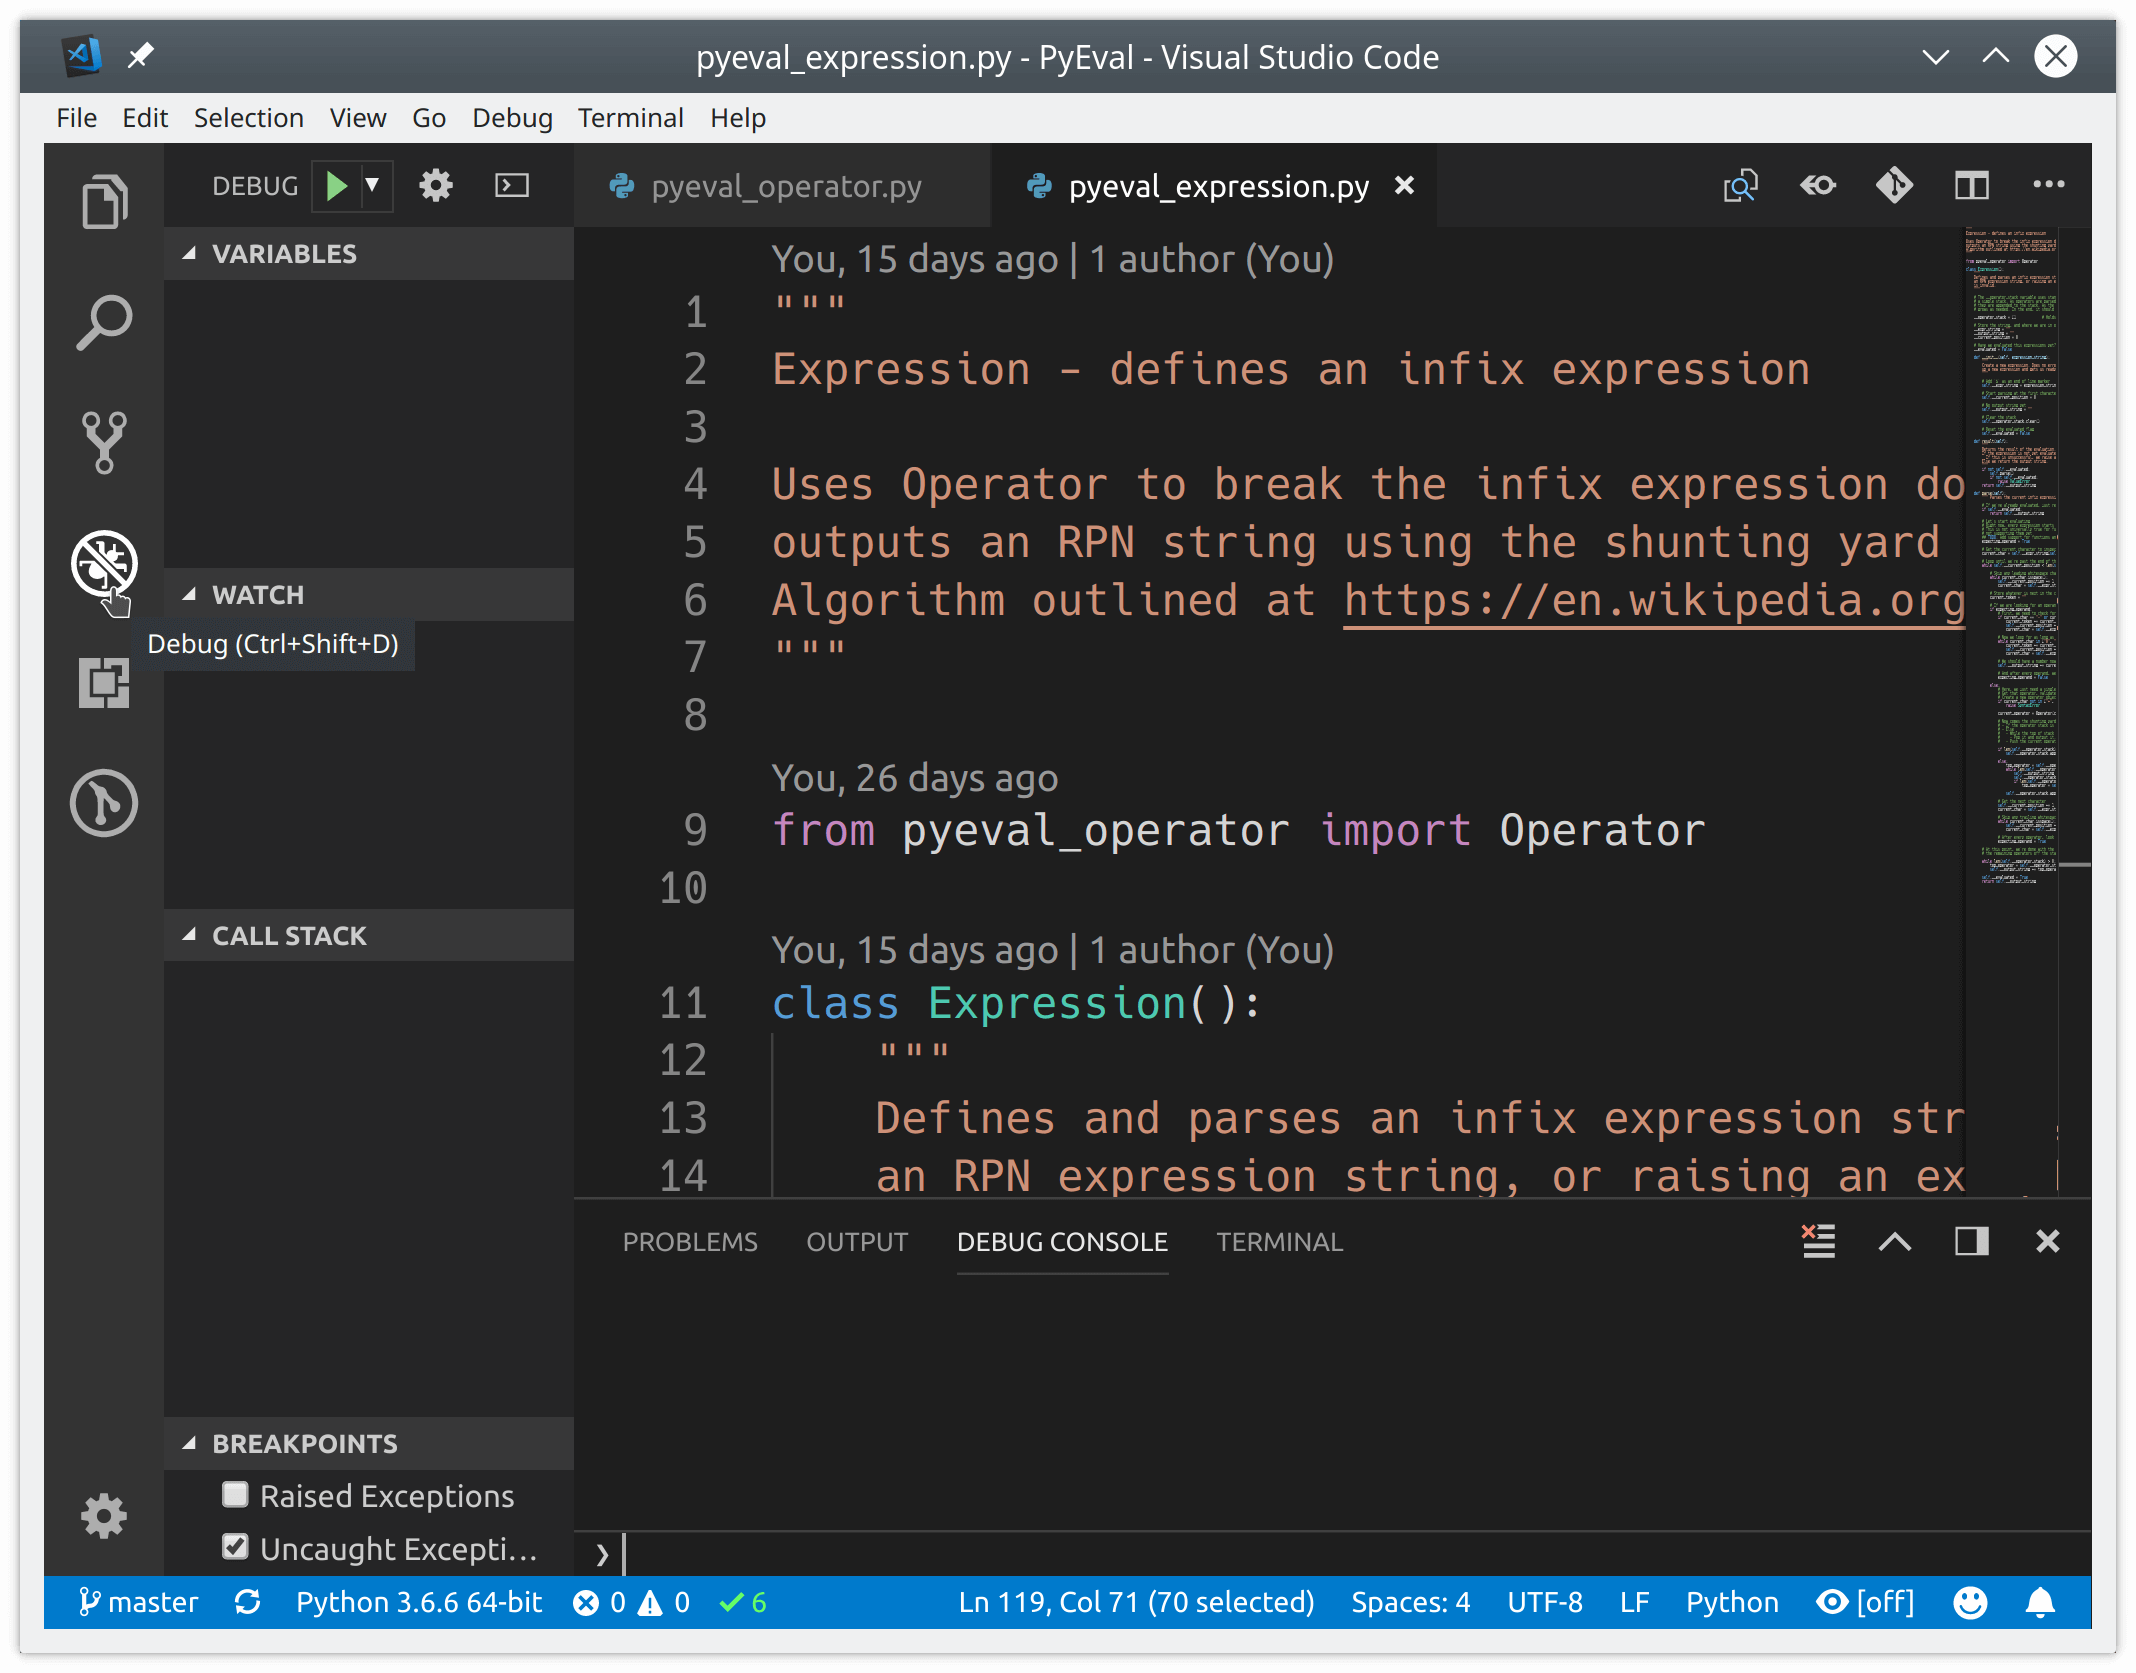
Отладчик может управлять приложениями Python, запущенными во встроенной консоли или внешнем терминале. Он может подключаться к уже запущенным экземплярам Python и даже отлаживать приложения Django и Flask.
Отладить программу на Python так же просто, как запустить отладчик с помощью F5. Используйте F10 и F11 для перехода к следующей функции и для захода в текущую функцию. Shift+F5 – выход из отладчика. Точки останова задаются с помощью клавиши F9 или щелчком мыши в левом поле окна редактора.
Перед началом отладки более сложных проектов, включая приложения Django или Flask, необходимо настроить и выбрать конфигурацию отладки. Сделать это очень просто. Во вкладке Debug найдите раскрывающееся меню Configuration и нажмите Add Configuration:
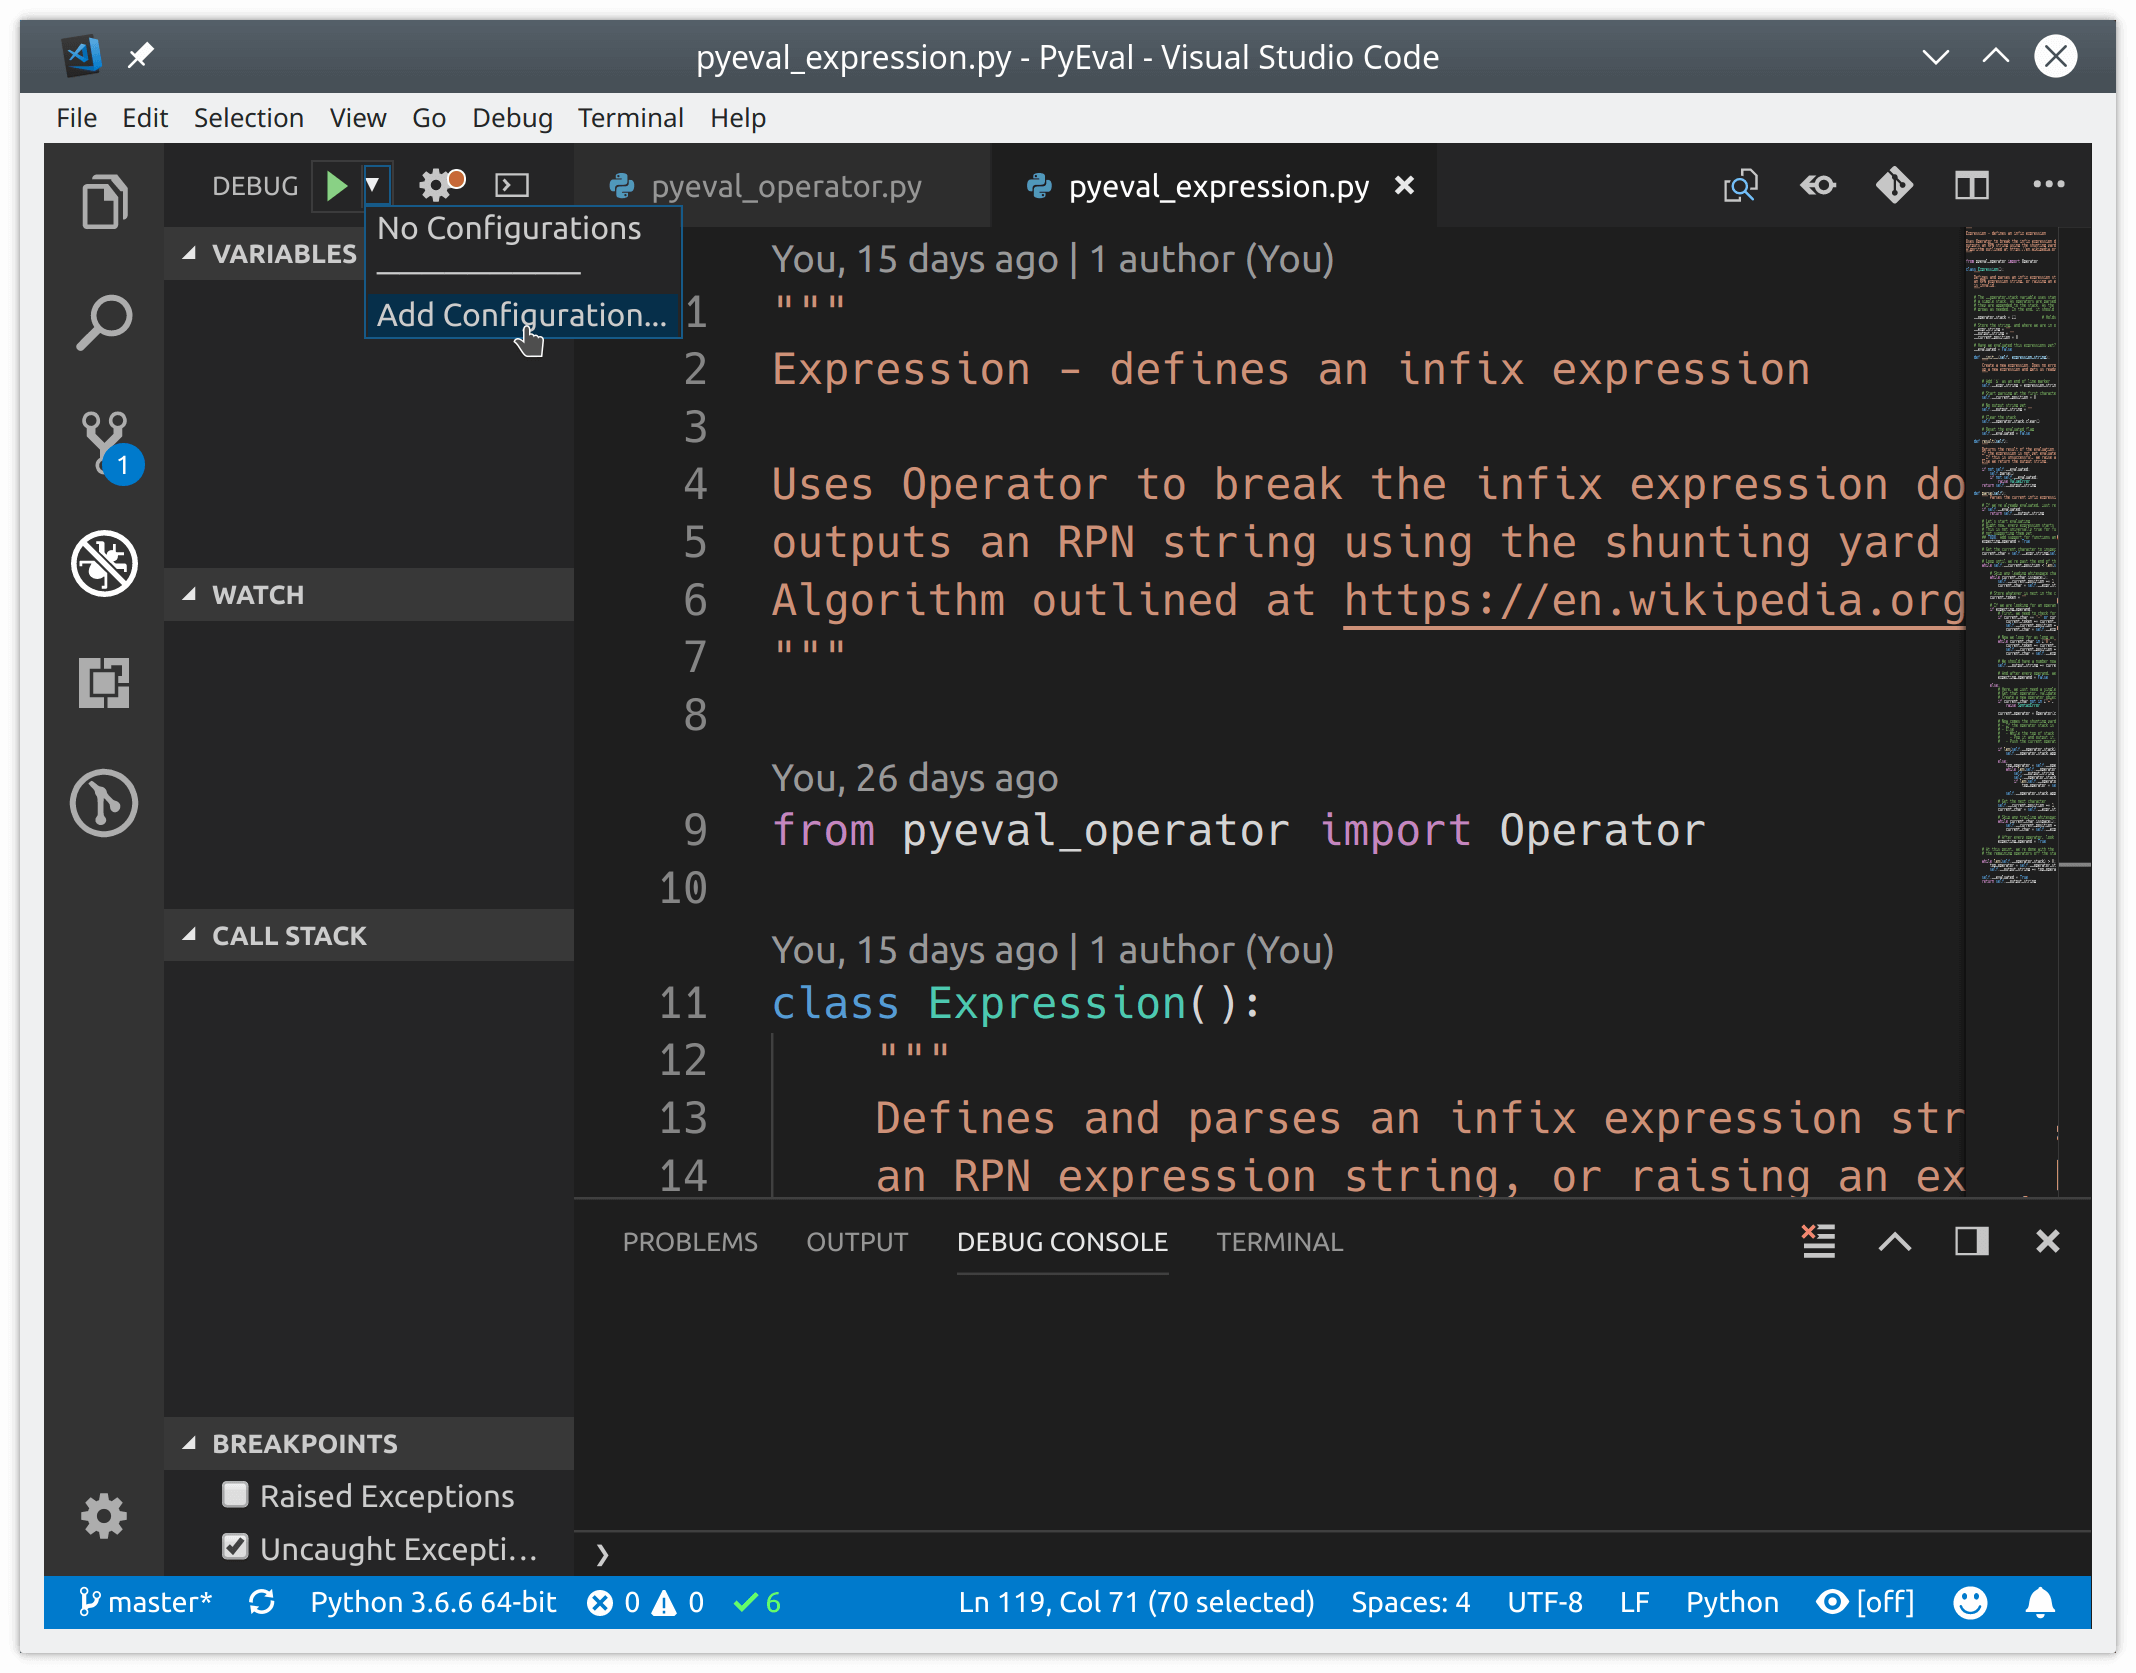
VS Code создаст и откроет файл .vscode/launch.json, в котором можно настроить конфигурации Python, а также отладку приложений.
Вы даже можете выполнять удаленную отладку и дебажить шаблоны Jinja и Django. Закройте launch.json и выберите нужную конфигурацию приложения из раскрывающегося списка.
Посмотрите также:
- Инструменты для анализа кода Python. Часть 1 и Часть 2
Интеграция с Git
В VS Code прямо из коробки есть встроенная поддержка управления версиями. По умолчанию подключен Git и GitHub, но вы можете установить поддержку других систем. Все работа происходит во вкладке Source Control левого меню:
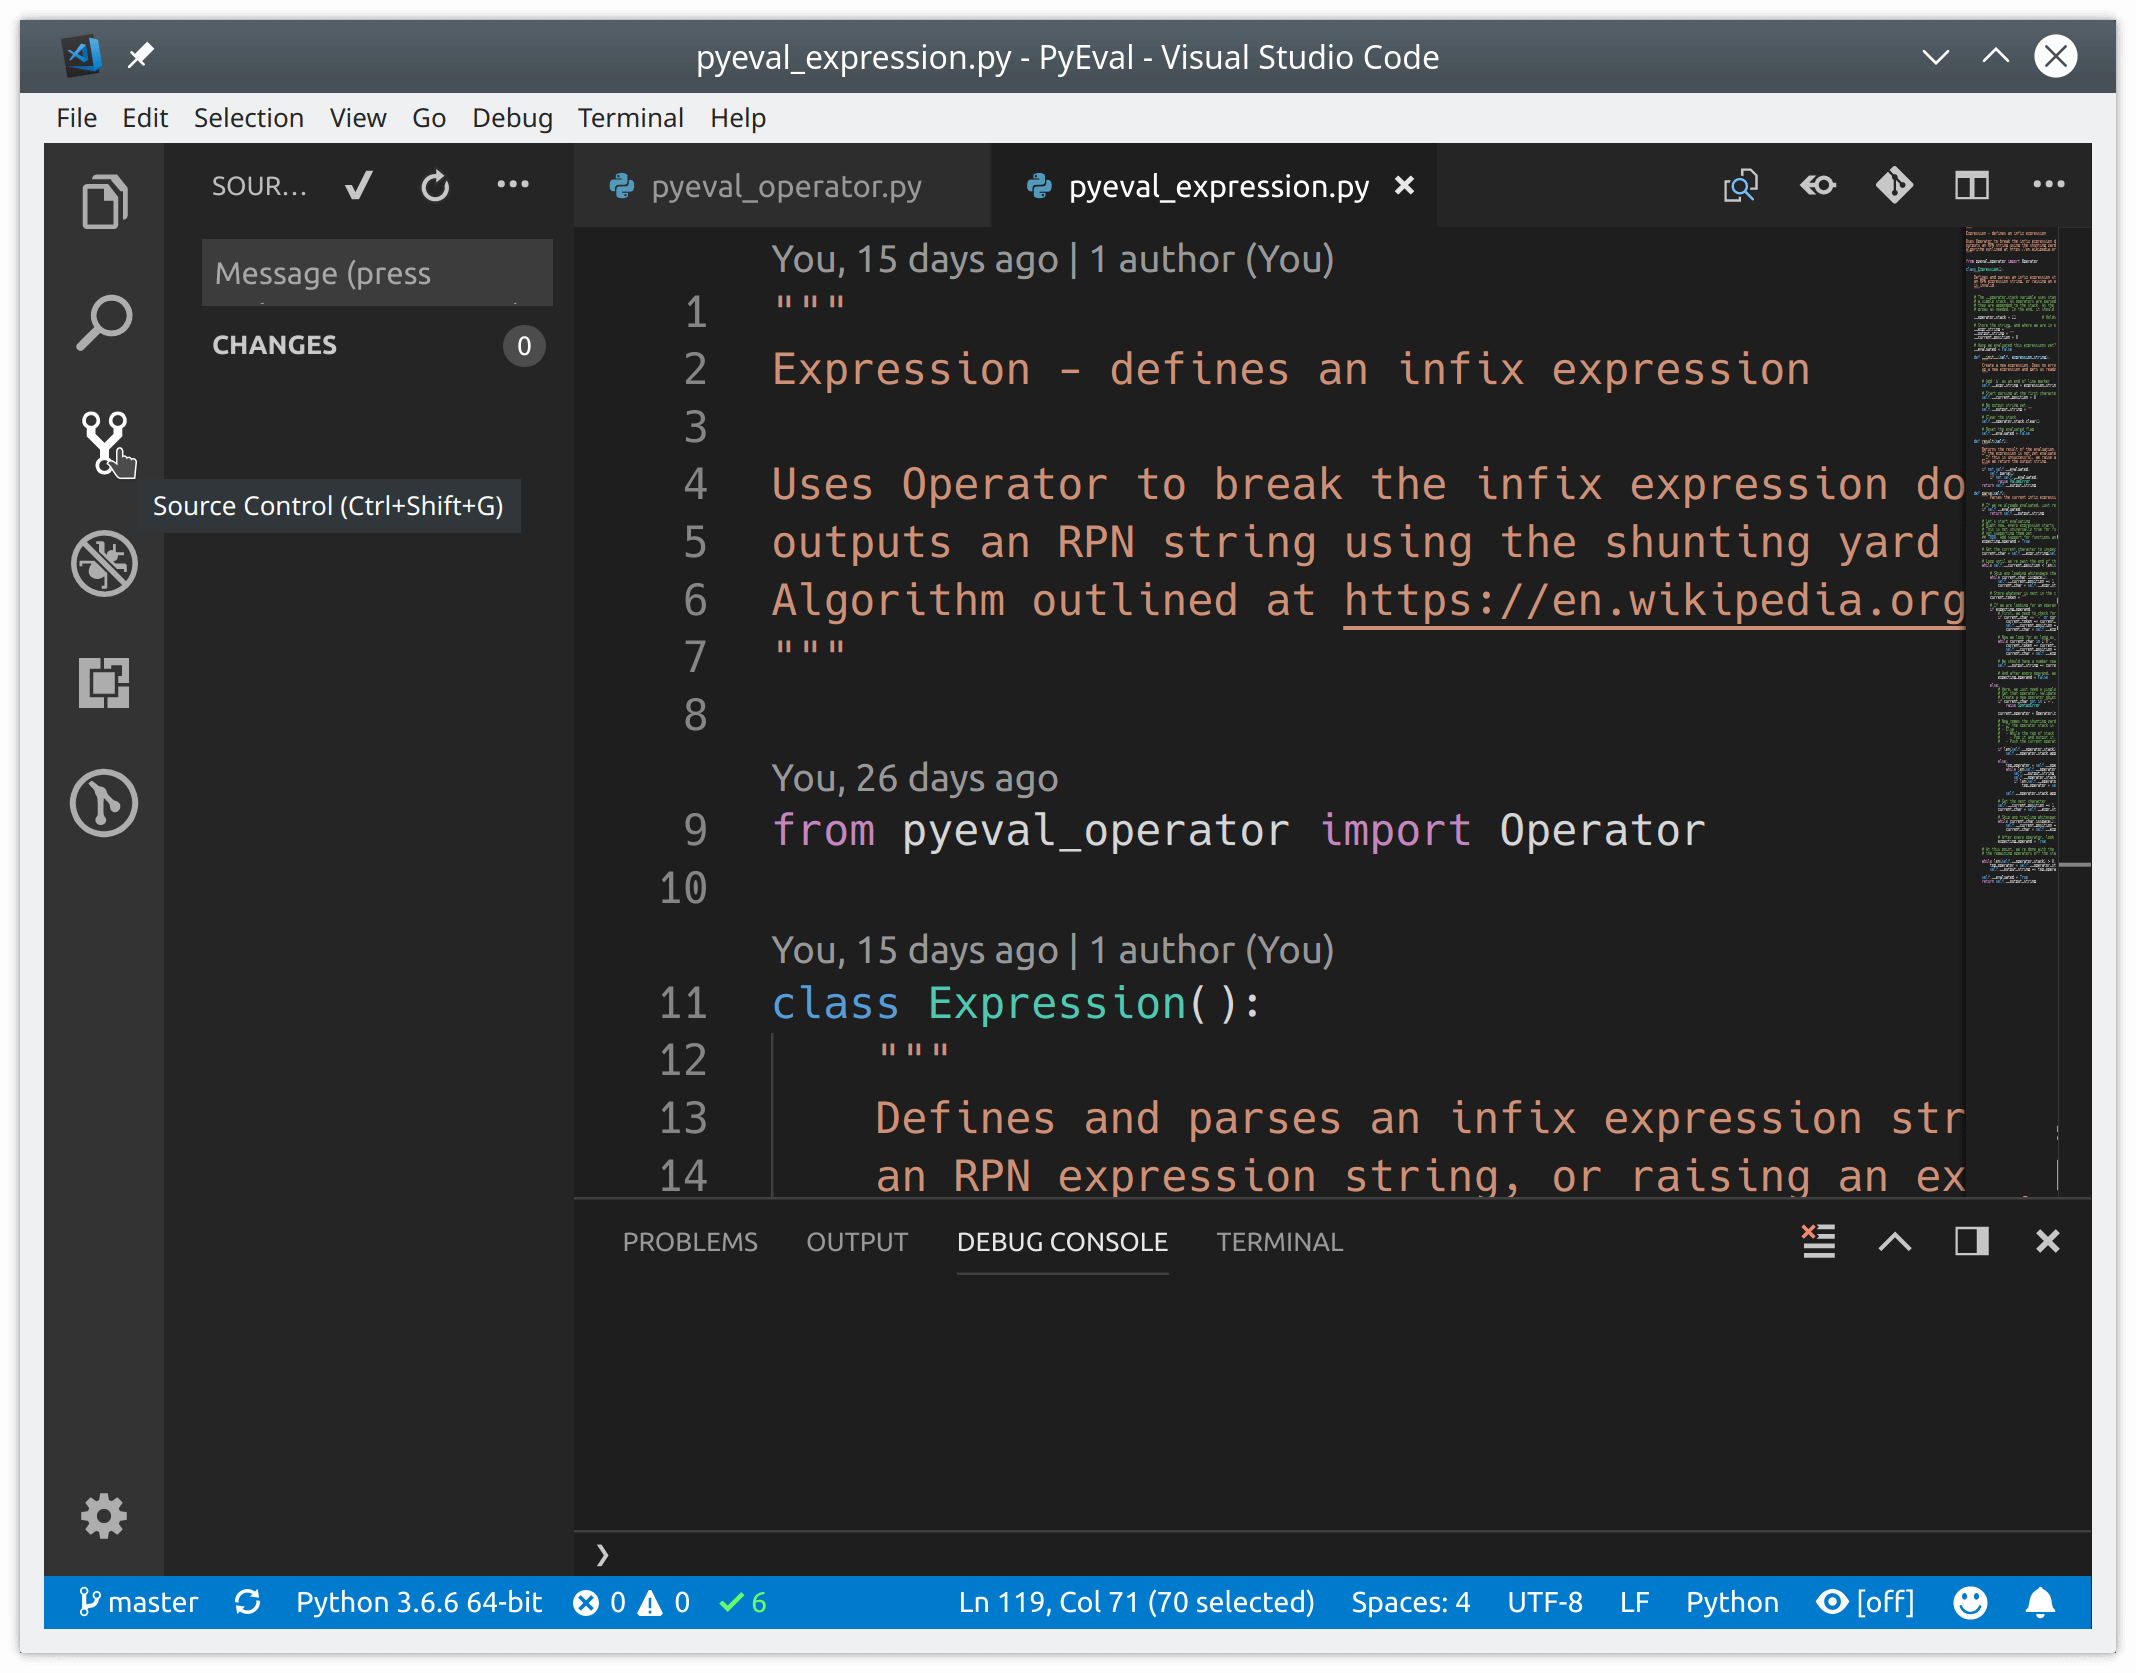
Если в проекте есть папка .git, весь спектр функций Git/GitHub включается автоматически. Вы можете:
- Коммитить файлы
- Обновлять проект из удаленного репозитория, и отправлять туда свои изменения
- Работать с существующими ветками и тегами и создавать новые
- Просматривать и разрешать конфликты слияния
- Просматривать диффы
Все эти функции доступны прямо из пользовательского интерфейса:
VS Code также распознает изменения, внесенные вне редактора.
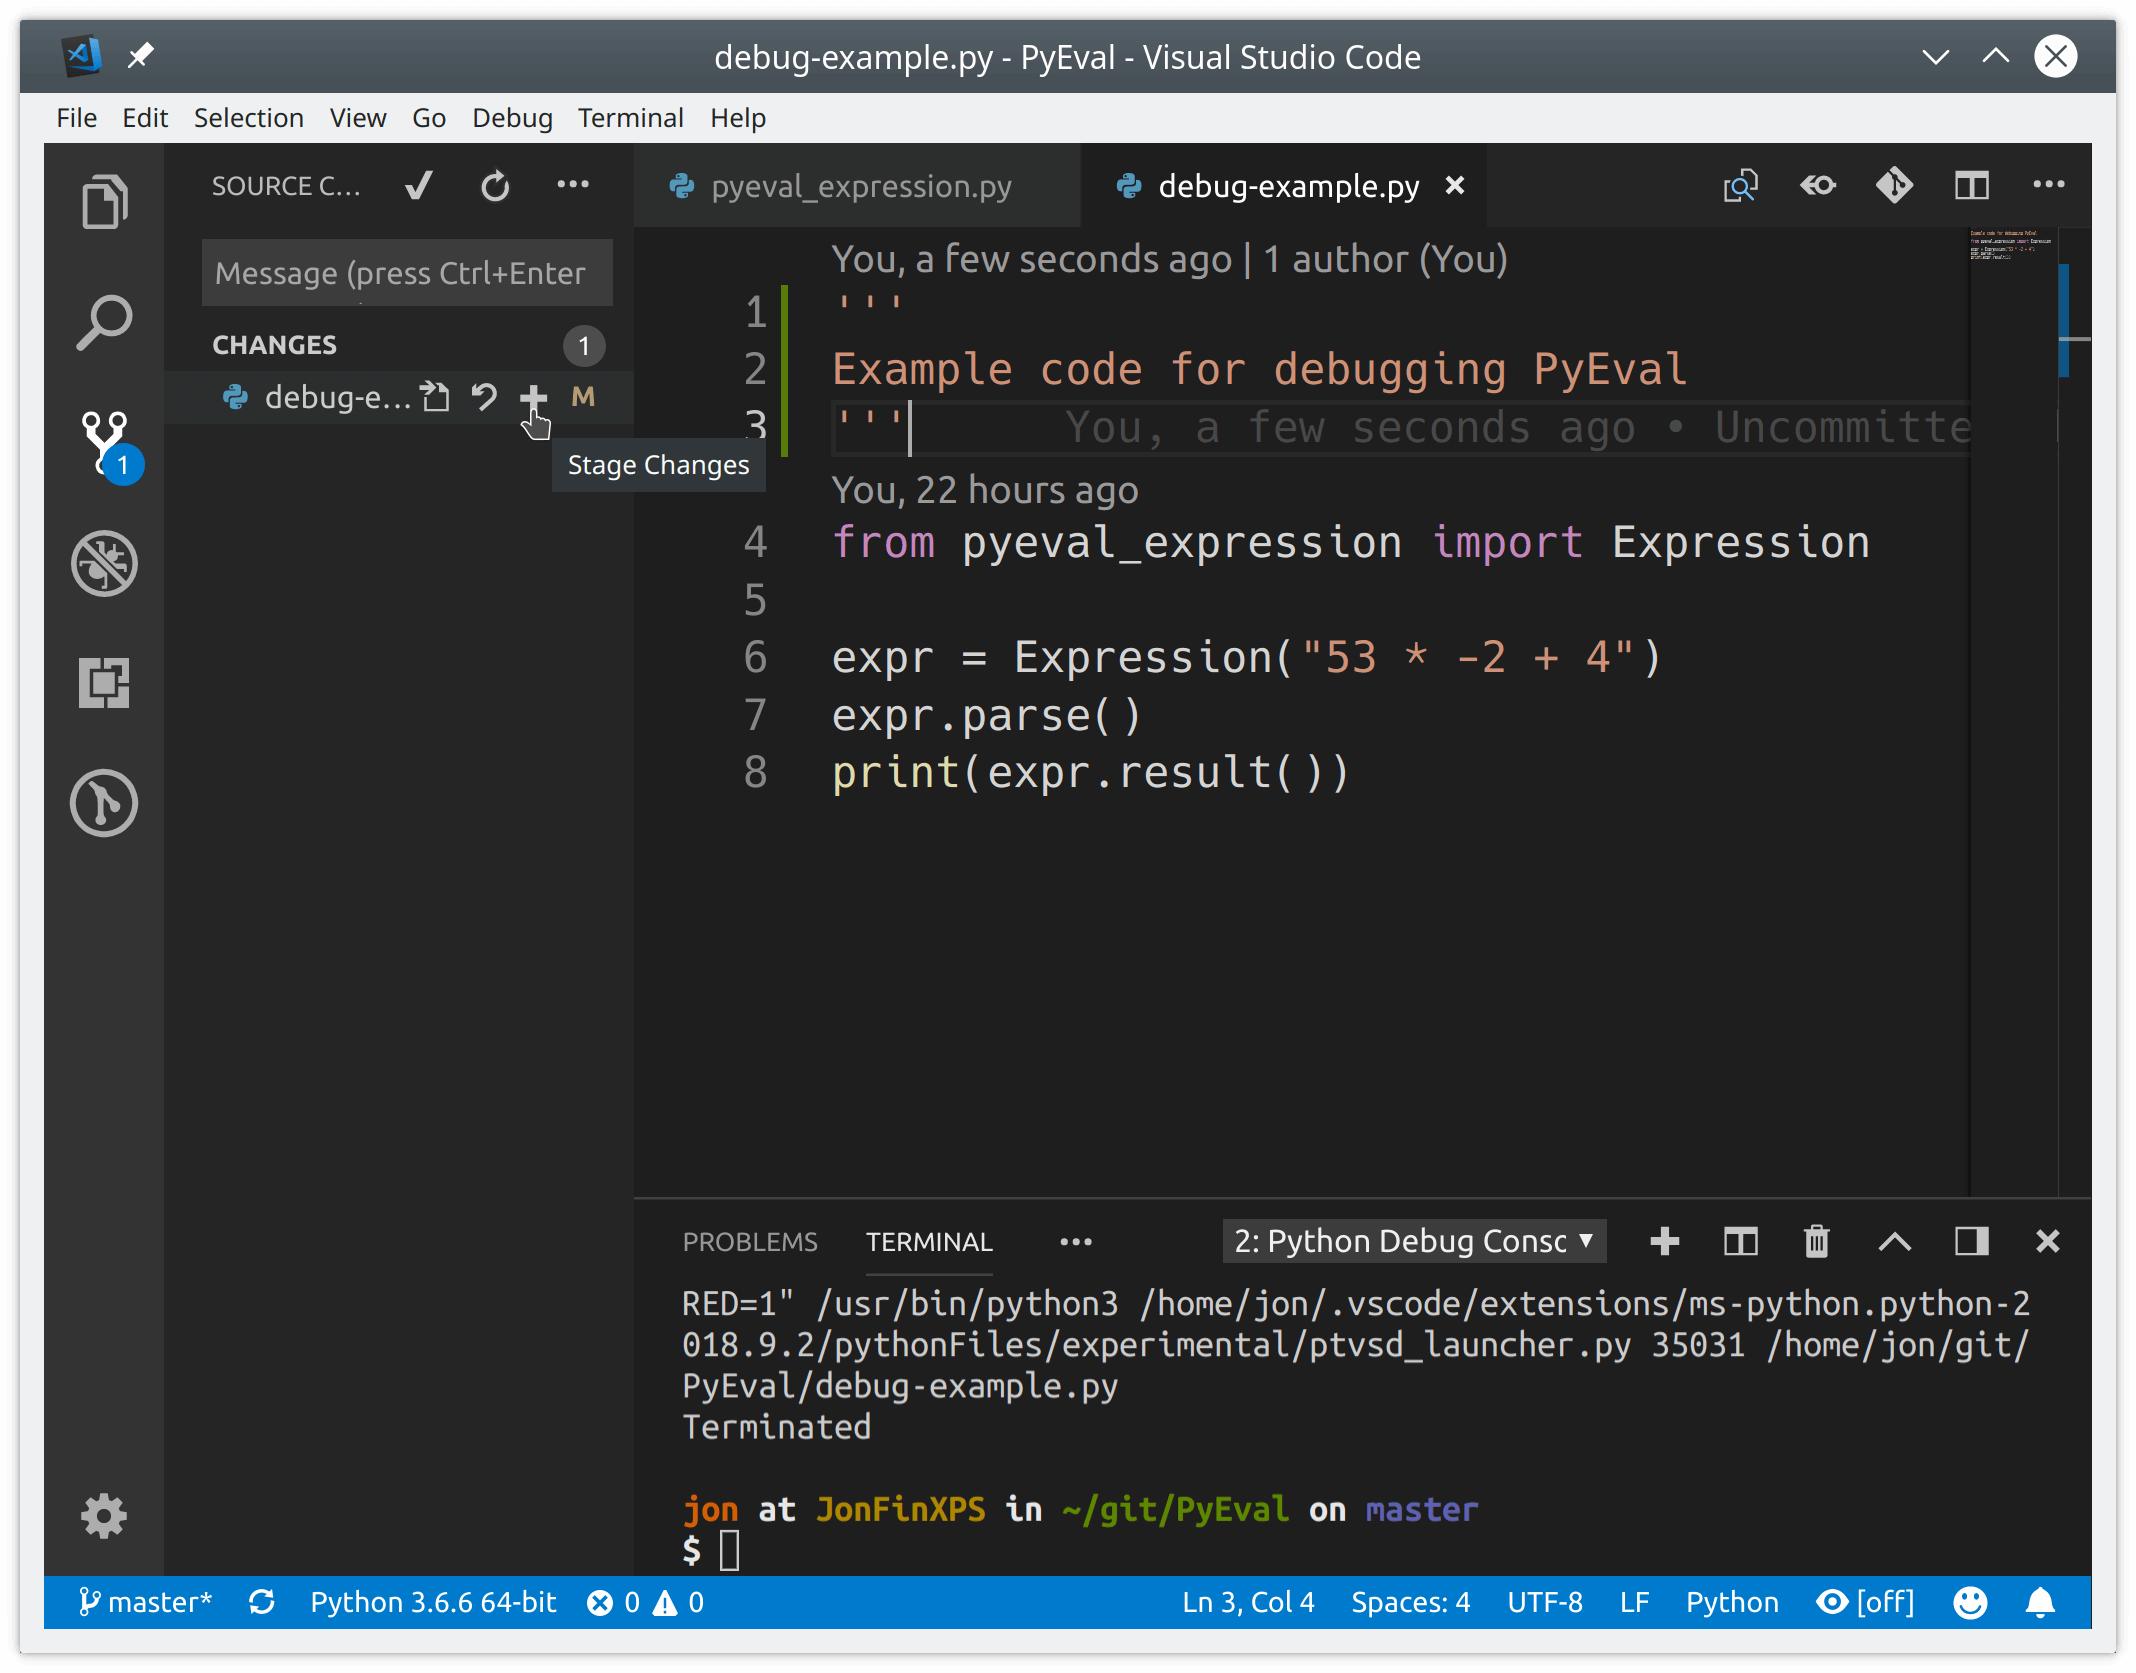
Все измененные файлы помечены маркером M, а неотслеживаемые – U. Символ + подготавливает файлы к коммиту. Чтобы сохранить изменения, введите сообщение и нажмите галочку.
Локальные коммиты можно отправить на GitHub прямо из редактора. Выберите в меню пункт Sync или кликните по значку Synchronize Changes в статус-баре в самом низу редактора (рядом с индикатором текущей ветки).
Visual Studio Code + Python = довольный разработчик
Visual Studio Code – один из самых крутых редакторов кода и замечательный инструмент для разработки. Редактор из коробки предлагает множество полезных возможностей и гибко подстраивается под все ваши потребности. Программирование на Python становится проще и эффективнее.
А какой редактор (или полноценную IDE) для разработки на Python используете вы?
Оригинал статьи: Python Development in Visual Studio Code
Полезные статьи и книги по Python:
-
- ООП на Python: концепции, принципы и примеры реализации
- Самые эффективные ресурсы и материалы для изучения Python
- 100+ крутых проектов, созданных с помощью Python
Онлайн-компиляторы Python хороши, когда нужно быстро протестировать что-то простое, но для полноценной работы их недостаточно. Чтобы использовать всю мощь Python, нужно установить его на свой компьютер, и тогда можно подключать к нему любые библиотеки и писать код любой сложности.
В этой статье покажем, как установить Python под Windows и как с ним работать. Для MacOS всё почти то же самое, а если у вас Linux, то вы лучше нас знаете, как это сделать.
Скачивание и установка
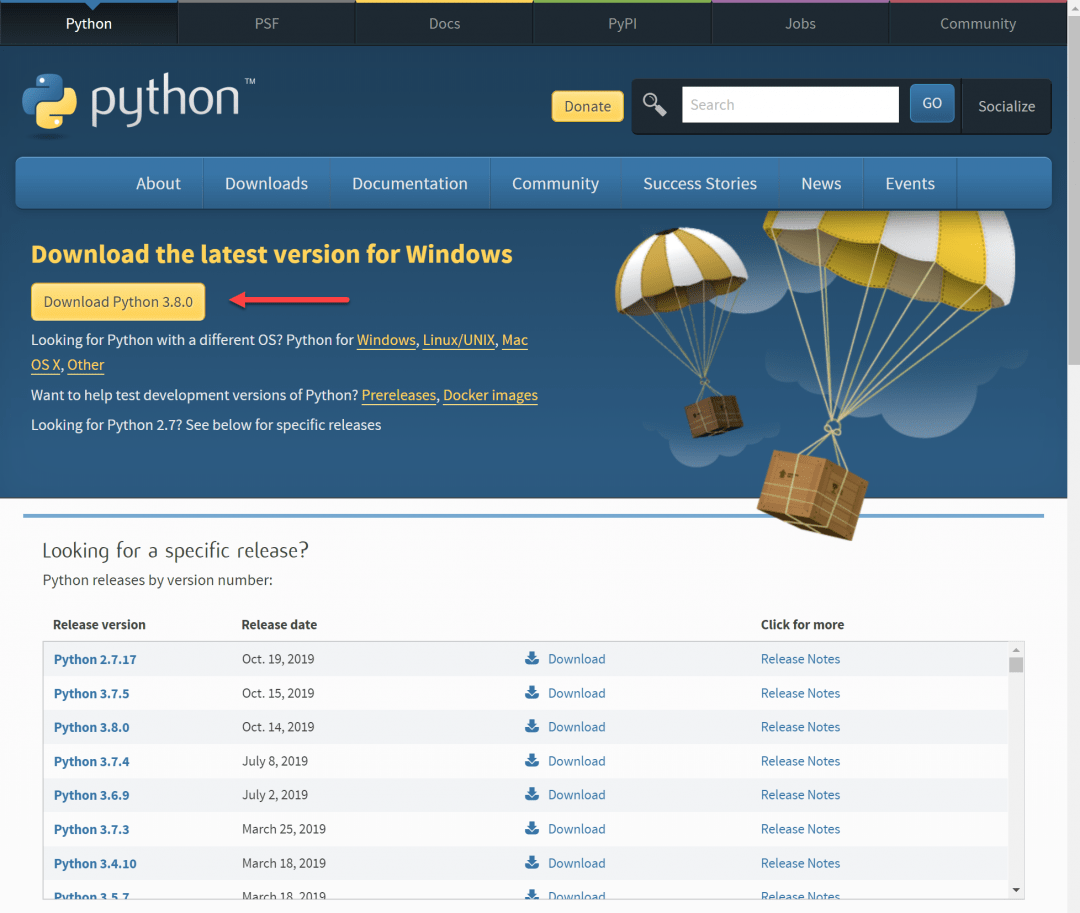
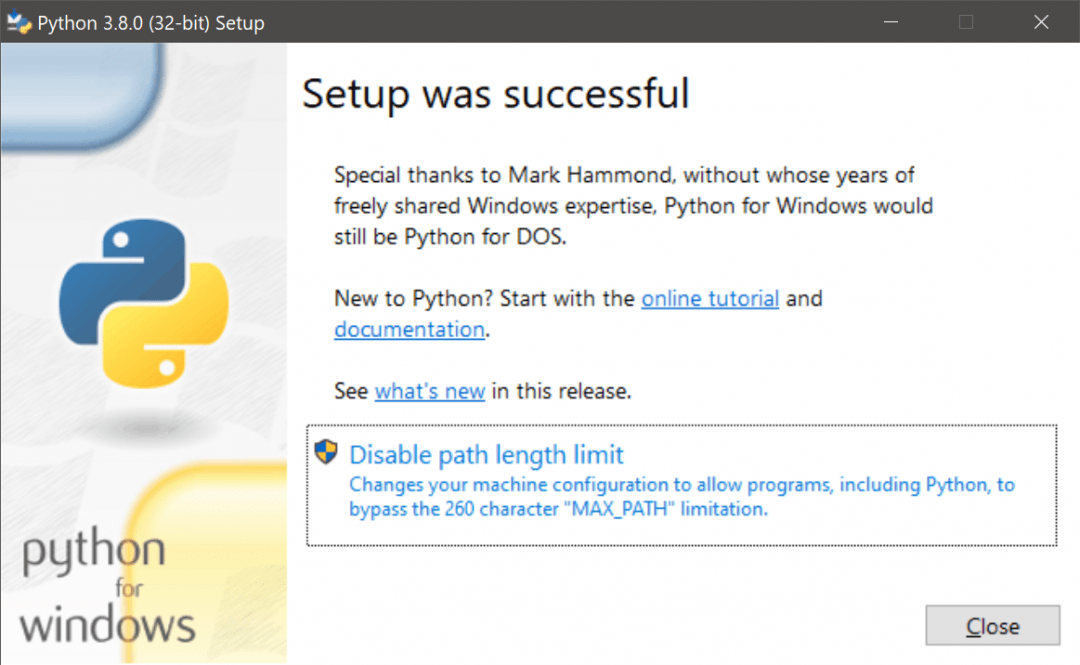
Для начала нам нужно скачать установщик с официального сайта — python.org. Если качать Python с других сайтов, можно подцепить вирус или троян. Скачивайте программы только с официальных сайтов.
Несмотря на то, что Python 3 вышел 10 лет назад, до сих пор многие спорят про то, какую версию лучше использовать — вторую или третью. Мы за прогресс, поэтому качаем Python 3, но вы можете выбрать любую другую.
На главной странице сразу видим большую жёлтую кнопку, на которой написано «Download Python». Нажимаем, сохраняем и запускаем файл. Он весит около 25 мегабайт.
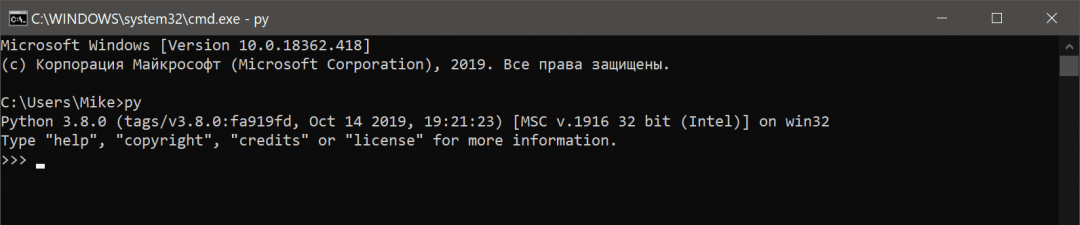
Когда установка закончится, нужно проверить, что всё было сделано правильно. Для этого в командной строке наберите py (латиницей) или python и нажмите клавишу ввода. Если всё хорошо, в ответ Python вам напишет номер своей версии и сборки и предложит несколько команд для знакомства с собой:
Запуск программ
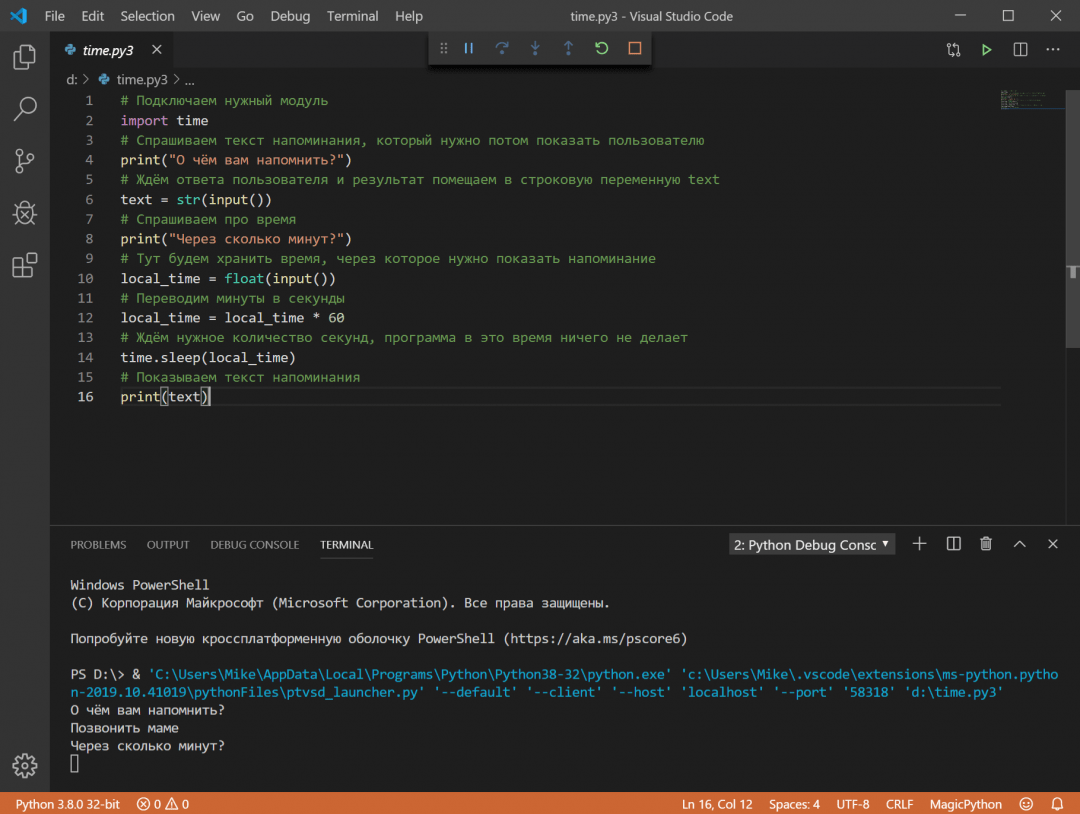
Пока наш Python может работать только через командную строку — какие команды введёте, те он и выполнит. Многим разработчикам это нравится, но для старта это неудобно. Например, чтобы запустить программу, нужно написать в командной строке так:
py полное_имя_файла
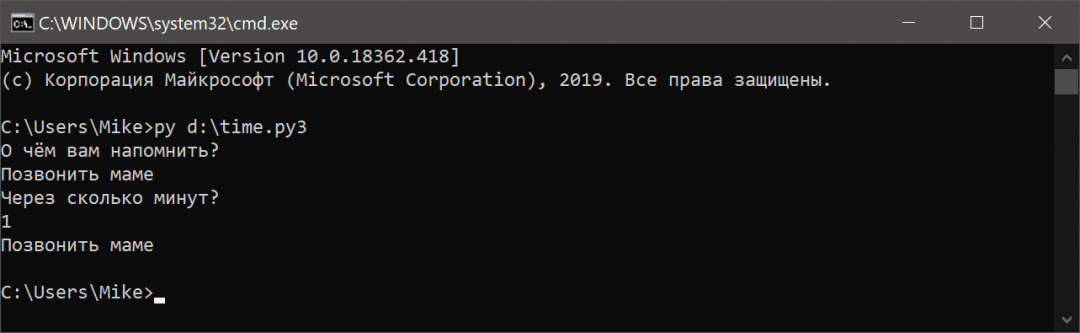
Полное имя означает, что нужно написать не только название файла, но и диск с папкой, где он находится. Чтобы было понятнее, давайте возьмём наш код из статьи про таймер на Python и сохраним его в файле time.py3 на диске D. Py3 означает, что внутри этого файла будет код на Python3. Можно просто назвать файл python.py, без тройки, но для некоторых моментов это может быть важно.
Теперь, чтобы запустить наш код, напишем в командной строке:
py D:\time.py3
Результат работы — выполненный алгоритм:
Подключаем VS Code
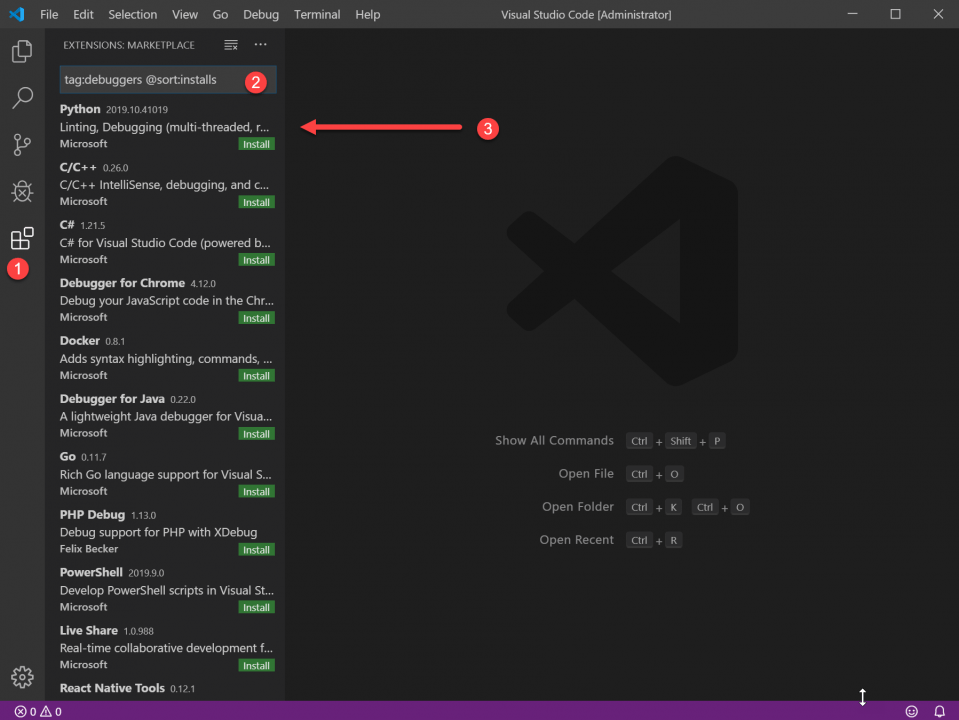
Мы уже рассказывали об этом редакторе кода — он быстрый, бесплатный и есть много плагинов. Чтобы работать с Python-файлами было проще, научим VS Code понимать и запускать их. Для этого нам нужно найти и установить специальный плагин для этого языка. Открываем вкладку Расширения (Extensions) и пишем такое:
tag:debuggers @sort:installs
В результатах поиска находим Python и нажимаем Install:
Затем то же самое делаем для подсветки синтаксиса: пишем в Расширениях команду ext:py3 и устанавливаем плагин MagicPython. После этого перезапускаем VS Code, открываем наш файл и нажимаем F5. Когда выпадающее окошко спросит, с чем будем работать — выбираем Python. В итоге мы получаем редактор кода с нужной нам подсветкой синтаксиса и результатом работы в том же окне. Красота!