Hi all. So you tried Pop OS! 20.04 (https://bln364.com/how-to-try-system-76s-pop-os-on-windows-10-laptop/) and now you want to install Pop OS! alongside Windows 10. This will show you how to dual boot Pop OS! and Windows 10.
Short overview:
- Download Pop!_OS 20.04
- Create Bootable USB stick
- Shrink Windows 10 partition
- Create Pop OS! partition
- Install Pop OS!
- Configure GRUB
And I must add. Please be careful with this process. Formatting the wrong partition can cause you to lose all your data. Please be careful, back up your data and do next steps on your own risk.
If you are maybe not ready to install Linux on you hard drive maybe you can try Linux inside Virtual Machine. If you are interested in something like that please check out my first online Udemy Course Virtualization with VirtualBox.

Also check out my other post on how easy it is to dual boot Ubuntu and Windows 10 in 2022 in next post https://blnlabs.com/dual-boot-ubuntu-and-windows-10-in-2022/
What is Dual Boot?
So, what is Dual boot Pop OS? What is good to know before we start. When we say dual boot we are saying that on our PC and/or laptop there are two Operating Systems installed. It can be Windows and Linux, Linux and Linux, Windows and Mac in some cases, and so on. Basically If you can install an OS on your machine, you can dual boot it with Another OS that can run on your machine.
To get more detailed with this we need to know a bit about the boot process, and how does our PC know to start our OS.
Check out my other post about the best 14-inch laptop with dual NVMe SSDs at link.
At the beginning PC doesn’t know anything about its hard drives, and the first thing is to perform something that is called Power On Self-Test or POST. Now, the firmware searches somewhere to find the entry point for your OS and that information can be found in Master Boot Record MBR for Legacy Boot or in GUID Partition Table (GPT) for UEFI boot. This is a bit too technical but don’t worry you only need to know that there is info where your OS is stored, and PC but need to have this info in order to boot your PC.
In these two places firmware will find the location of your installed OS and then give control to your OS.
But then how are we dual booting and as always there are a couple of ways (freedom :)).
If you are adding the second drive to your PC for the second OS, you can simply do the next thing. Power of your PC and unplug your first drive and then plug in the second drive and install a second OS on that drive. After install, simply plug back the first drive and you are done. Now, at the boot up of your PC you need to go inside the UEFI or BIOS and just choose the drive to boot from. This is not the optimal way, but if you don’t switch between the OSes frequently, maybe this solution can make your life easier because you don’t have to modify or change MBR or GPT.
The other way is to use GRUB, which is done in this post. Just to say there are a lot of ways to do dual boot, but in this post I will cover just those two. What is GRUB?
“GNU GRUB is a Multiboot boot loader. It was derived from GRUB, the GRand Unified Bootloader, which was originally designed and implemented by Erich Stefan Boleyn. Briefly, a boot loader is the first software program that runs when a computer starts. It is responsible for loading and transferring control to the operating system.” by WiKi.
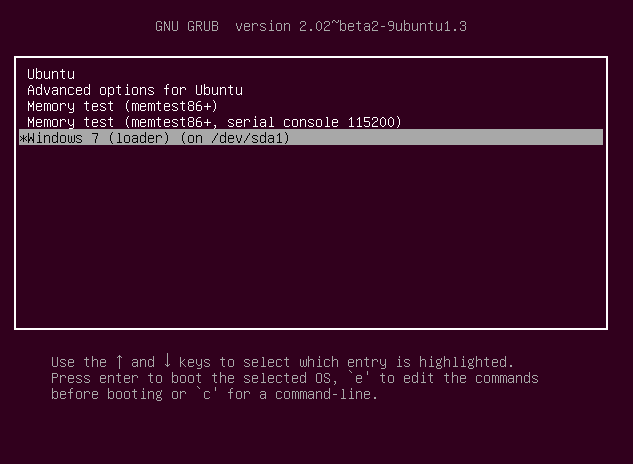
So we can install GRUB in part of our hard drive and then point MBR or GPT to it. That instead of our OS grub will control, create GUI for us, scan drives for installed OSes and then give us a choice which OS we want to use. Below you can see a couple of GRUB examples that are themed by Linux distros Ubuntu and Manjaro.

The Grub way (or with programs like GRUB) is the only way if you are dual booting on the one hard drive. If you have only a hard drive you will need to install your second OS to separate the partition that your first OS and then install GRUB. In a lot of Linux distributions Grub is installed by default, but for some reason GRUB is not installed with Pop!_OS from the box. So, don’t worry if you don’t see windows after you installed Pop!_OS, maybe you just need to install GRUB in order to Dual boot Pop OS.
Intro to Pop!_OS
Pop!_Os is Linux distribution create and maintained by System76 and it’s based on other Linux distro Ubuntu. It’s very good for beginners because it’s easy to setup and start using it.
Download Pop!_OS 20.04
In order to download Pop!_Os go to system76 site and select download https://pop.system76.com/.

Now, we have couple of options in order to download Pop!_Os. There are two versions for Pop!_Os, normal release and something that is called LTS (Long Term Support). This follows the release cycle of Ubuntu, that is show below.

Basically, there should be new release of OS every 6 months, but every 2 years there is major release that is called LTS and that version will get much longer official support then normal release. Advantage for normal release is, if it’s after roiling release, that it might sooner have support for new hardware and/or some new feature, but because that it can be a bit unstable. If you are downloading Pop!_Os for the first time and trying Linux for the first time, maybe stick with LTS version at first.

When we have LTS selected now we can download Pop!_Os with NVidia or open source drivers. What this means. If you have NVidia graphics card download Pop!_Os LTS (NVIDIA) and this will download OS with NVidia drivers preinstalled. If you have AMD or Inter integrated graphics download Pop!_Os LTS.
Now, we have .ISO file with our OS. We need to create bootable USB or CD/DVD form our .ISO file and for that there is good program called balenaEtcher.
Create Bootable USB stick (Live USB)
In this post I will create bootable USB flash drive (Live USB) using balenaEtcher, but first go to https://www.balena.io/etcher/, download and install balena.

In order to create Live USB with Pop!_Os (on Windows) we need:
- Installed BalenaEtcher (done)
- Downloaded Pop!_OS ISO file (done)
- USB flash drive with at least 8GB
Insert USB stick into your PC and start balenaEtcher. Again, be careful. Back up your data from USB flash drive before this. USB Drive will be formatted for new OS and your current data will be gone.
Select Pop!_Os ISO file in section Flash from file and your USB flash drive at Select Drive section. Then press Flash.

Shrink Windows 10 partition
Now, you have a bootable USB stick, and you need to boot from it. If you have a problem with booting from USB stick check out my blog for solution (https://bln364.com/how-to-try-system-76s-pop-os-on-windows-10-laptop/).


On windows shown above we select do we want to continue with Demo Mode, or do we want to install Pop OS! 20.04 on your hard disk. I’m using for this example 120GB internal SSD disk (Kingston 120GB A400). If we want to install Pop OS! on your hard disk in this case select Custom (Advanced) install and you will get next window.

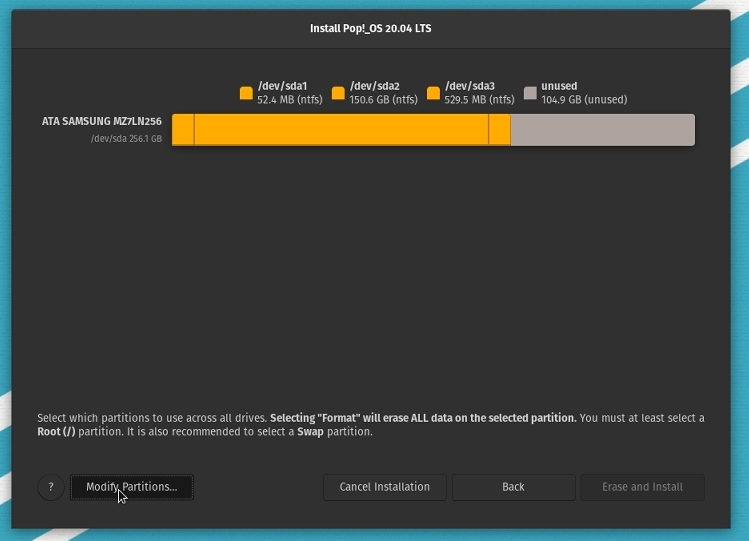
Currently, we have only Windows 10 installed on our hard disk, so we have only two partitions, Windows Recovery and the main Windows NTFS partition. Next thing to do is to shrink our existing partition and create space for Linux partitions. Two do that we need to press Modify Partitions…
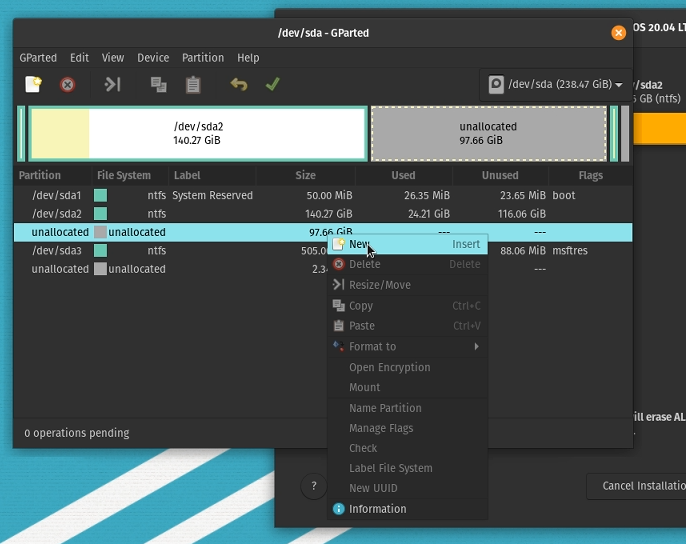
This will open Gparted Linux partition tool that will look something like this. In the top right corner important thing is to set your hard disk. In this example, I have selected /dev/sda.

When we have selected the right hard disk, we need to unmount our partitions. This will allow us to change existing partitions.

Then we need to resize our existing partition. Let us use half a space for Windows and half for Linux.


Create Pop OS! partition
Now, we can create 3 partitions for Pop OS!, and that are root, boot, and swap. We can do that in the next way.


For this blog, I’m installing Pop OS! on a very old HP Compaq nc6400 laptop, so I’m setting the size of my /swap partition to 2GB, and 512MB for /boot. Everything else will be /root partition.
After creating and formatting new 3 partitions, click Apply All Operations and when all is done close Gparted. Now you should see updated hard disk preview with new partitions like on the image below.

Now we need to use Pop OS! installer to define which partition will be allocated for Pop OS!.


Install Pop OS!
Now we can you press Erase and Install and wait for Pop OS! to be installed.


Configure GRUB
And we have Pop OS! installed beside our Windows 10. We can simply reboot and remove USB stick for PC and enjoy in two compliantly different Operating systems.
Now laptop boots directly to Pop OS!. This was very strange for me, because, usually, on other Linux distributions GRUB (Linux boot loader) will be automatically setup when installing and after powering on you will be greeted with something like this:

In this case, GRUB was nowhere to be seen so we can not say that we have Dual boot Pop OS! and Windows 10 system? We went straight to Pop OS!. Windows 10 is still installed but we need to configure GRUB to know where to find Pop OS! and where to find Windows 10.
To update and setup GRUB lets first update the hole system. That can be done with two simple commands from terminal:
sudo apt update
sudo apt upgrade
Now we need to install one packet, os-prober with:
sudo apt install os-prober
We need this packet because without it GRUB will not be able to find Windows 10 partition.
Result from running the os-prober should be something like this:
/dev/sda1:Windows 10:Windows:chain
Finally we can run:
to update and activate GRUB on Pop OS!.
And this is it. Now after powering on you will be greeted with GRUB screen in which you can select Pop OS! or Windows 10.

Final words
This was a fun project for me and it brings life in my old laptop. Pop OS! 20.04 isn’t maybe the best option for low-end hardware, or there are maybe better Linux Distribution for low-end hardware, but said that it runs better than Windows 10.
Process of installing Pop OS! alongside Windows 10 went pretty much smooth, if we don’t count GRUB part, what was very strange for me.
Let finish. Did you find something missing in this tutorial? How do you like Pop OS!? Did you manage to Dual boot Pop OS!? Please comment down below and check out my other post at https://bln364.com/
Check out my other Pop OS 20.04 related posts:


If you are currently coding or used to code or just interested in computers, there’s a very high chance that you thought to yourself, «I should also try Linux.» but then it hit you that things might go wrong, and you were worried that you might somehow break your system. This tutorial will also show how to fix something if you somehow break some software (meager chances).
There are many Distributions (flavors) when it comes to Linux. Some are very hard to install (Vanilla Arch, Gentoo). Some are very beginner-friendly (Ubuntu, Pop OS!, Elementary OS).
Pop OS! is the most beginner-friendly distribution I have found yet. It will have all the drivers, including Nvidia’s drivers. So all you need to do is follow the following guide, and everything would be working fine.
There are many guides and videos over the internet, but somehow, they all miss some crucial steps. You can find the solution if you search a little. But as a beginner, it can be very overwhelming. That’s why I decided to write this very comprehensive guide.
So here’s the guide. I suggest you read steps 4 and 5 multiple times and keep them open while installing if you are a newbie/beginner.
Some of the guides I found showed a way to install windows on the side, i.e., pop OS was already installed on the system. But that’s not very user-friendly. Windows is not flexible and has to manage partitions and its bootloader on its own terms. As this is a beginner’s guide, we will assume that you have only windows installed on your system as it came out of the box.
I also assume that your system runs on UEFI boot mode. If you don’t know what that is and have bought your laptop in the last ten years, there’s a 99.9999% chance that you do run UEFI
So here are the steps you need to go through:
- Manage partitions.
- Create a bootable USB.
- Add bios settings to show bootable USB first.
- Boot up the flash drive and setting up the installer.
- Set up the bootloader.
- Enjoy.
1. Managing partitions:
Some basic things.
- Linux will need a root partition and a boot partition.
- The root partition must have at least 10 GB and stores the operating system, and the boot partition should be given 500 MB.
- There are two extra optional partitions. The Home partition and the swap partition.
- The home partition is where your extra files can be stored.
- The swap partition is the slower version of ram. It keeps the passive background processes running without loading them on the ram, but on the storage drive—Suggested:4 to 8 GB, OPTIONAL.
- Here are some optional but essential suggestions. Keep your Root, Boot, and Swap partitions on an SSD if you have one. Otherwise, everything can be done on a Hard Disk.
-
Boot is boot/efi. EFI requires FAT32 type viz known as ESP(EFI system partition) which tells the ram which OS to load.
Now the steps.
-
Search for «create and format hard disk partitions» in the windows search bar.

-
You will see your drives(C, D, E…) and some extra partitions.
Do NOT touch the extra partitions. -
shrinking image


Now there are two ways to go about this:
A. If you have SSD+HDD setup
-
Here’s what you do, Right-click on the SSD drive(C:) and shrink it. Set the shrinking space to be anything from 20 GB (Root And Boot) to as much as possible. If you have extra storage, shrink an additional 2 to 8 GB for the swap partition. The rest of it will be kept for your C drive. Make sure you do not shrink the C drive too much, or your windows will start to lag.
-
(Optional but suggested) Shrink the HDD drive and give it whatever storage you like. (Home)
-
My scheme- I gave 50 GB from C drive and 50 GB from HDD. I have 256GB SSD and 1 TB HDD.
B. If you only have SSD or HDD:
- Shink the combined storage (Boot, Root, Home, Swap)
Now you will have some unallocated space; leave it that way. We will set this up in step 4.
2. Creating a bootable device:
Some things to understand:
- Flash drives(or pen drives) must be flashed with proper file formats. (iso, img…)
- This can be done using multiple softwares. (rufus, balenaEtcher, Ventoy)
- Usually, only one iso can be flashed at once. (windows, pop, or any but only 1)
- Not everyone has multiple flash drives lying around. So we take care of this issue using Ventoy.
Download links
-
Ventoy
-
Pop OS! 21.04 iso without nvidea drivers
-
Pop OS! 21.04 iso with Nvidia drivers
-
Windows Tool. Make sure you do select the iso option and not the write to USB, or it will remove pop and ventoy from it. Optional. In case you ever want to remove everything and clean install windows. comes in handy
Side Note: Use latest isos if available using Pop OS
Steps:
-
Extract the zip of ventoy, run Ventoy2Disk.exe, select your drive and click Install.
Running this step will erase all data from your flash drive.
-
After completing the above step successfully, you will see your drive names as Ventoy. Transfer the isos to it.


As you can see, there are multiple isos on my drive, but you only need to transfer the pop os iso.
3. bios settings
This step will take some research of your own. You will have to find out what key is required to go into bios settings. Each brand has its own. Just google «{laptop model} UEFI settings». Don’t worry if you can’t find it; leave a comment below, and I will reply with the key.
Assuming that the key is F12
- Turn off fast startup.
To disable Fast Startup, press the Windows Key + R to bring up the Run dialog, type powercfg.cpl, and hit Enter. The Power Options window should appear. Click «Choose what the power buttons do» from the column on the left.

Scroll down to «Shutdown settings» and uncheck the box for «Turn on fast startup.»
Note: If these options are greyed out, then you may need to click «Change settings that are currently unavailable.»
- Shut down and start your machine. When it is starting, spam F12(your key).
- You should now enter UEFI settings.
- Find safe boot option and disable it.
- Find boot menu settings and put your flash drive above windows boot manager.
- Save settings and restart.
- Ventoy should boot now. Select Pop OS!…iso
4. Setting up the installer

This is the screen you will be greeted with. It might take a lil for the first time, do not worry.
After selecting Language and keyboard, you will be given two options:
-
Clean install. This is for those who do not want windows. It will format your storage drive and install it without choosing any partitions.
-
For dual-booting, you need to select the 2nd (advanced) option.

After selecting this, you will see your different drives with your windows partitions and the unallocated space.
As I am using VMware, you will only see unallocated space, but you only have to use the unallocated space and not touch the windows partitions. So just do what I am doing with your drives.

Select the modify partitions option on the bottom left of the installer.
Now GParted will open. If you have multiple drives(HDD+SSD), you can select them from the drop-down list.

In GParted, you will see multiple partitions. Don’t worry about them; just let them be.
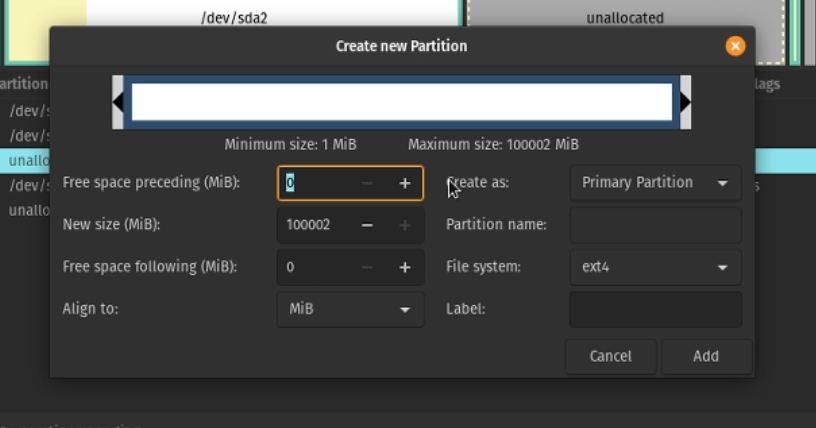
-Right-click on the unallocated space and select new.

Use the slider and select the space for your partition.
- I am giving ~20 GB to root. label it as /. [Ext4]
- 1 GB for boot (ESP) and label it as boot/efi. [Fat32] select file-system as fat32 instead of Ext4
- 4 GB for the swap partition. [linux-swap]. Make sure you select file-system as Linux swap
- rest for /home. [Ext4]

Use the green tick to confirm changes.
Some points to note.
- In this image, there are no other partitions, but if you are dual booting, there will be other windows partitions as well. Make sure you do NOT confuse them for the ones you created. Use labels.
- There is only one drive used in this screenshot as it is VMware. Your scheme can have multiple drives. Make sure you keep your Root, Swap, and Boot on SSD and Home on HDD if you have multiple drives.
- The above sizes are just for example. You can change them however as you like. They don’t need to be proportionate. Just keep your root>20 GB and boot>500MB. Rest 2 can also be 0.
I add my own partitioning system for better clarification in the below images.

See the last 3 partitions in my SSD in the above image.


- First Drive(HDD) —> Green(50 gb) is home(ext4)
- Last drive(SSD)—>Green (57 gb) is root(ext4), Red(8 gb) is swap(linux-swap) and yellow is ESP(fat32)
- Click on different partitions. and select the partitions as above images. Again, sizes can be different and you can skip swap and home. Ignore the rest of the windows partitions.
- Click on erase and install.
- Set username and password.
- Install.
- Re-boot after installing. Remove flash drive only after installation is complete.
Setting Up Boot-Loader
After rebooting, did it just boot into Pop OS! without asking about which OS to boot? This is because Pop OS! uses systemd bootloader. It has 0 seconds time out, so it does not ask for any OS options and chooses the default OS (Pop-OS).
Now, we can edit the configuration file of the systemd bootloader and change the time out to 10 sec or 20 sec but we are not going to as it is not for beginners.
EDIT: after consulting with some good folks at r/pop_os, it is to be noted that grub might not be the best choice as it can break in the future updates, instead we’ll use rEFInd.
- Open up Terminal.
- Type the following command
sudo apt update
sudo apt install -y refind
- Select yes and hit enter when it asks for it to be added automatically to esp. If yes or no is not highlighted, please use the tab key to select.
- Wait for an error-free installation.
for an advanced guide of multibooting, please refer to Linux Multi-boot
with refind
DO NOT INSTALL GRUB IF YOU HAVE INSTALLED rEFInd
Very Important: Do not skip any step or reboot in between. DO NOT DO ANY OF THIS IF YOU HAVE DONE THE FOUR STEPS(rEFInd) ABOVE. THIS IS FOR ADVANCED USERS WHO WANT TO USE GRUB KNOWING THAT IT MIGHT BREAK.
Same thing, more details
- Open terminal.
- Type
sudo apt update && sudo apt upgrade -y - Enter your password. It will not show anything typed, but it will work if you type the correct password and hit enter.
- Type
sudo apt install grub-efi grub2-common grub-customizer - Type
sudo grub-install - Make sure it says no errors.
- Type
sudo cp /boot/grub/x86_64-efi/grub.efi /boot/efi/EFI/pop/grubx64.efi - Open grub-customizer (it will be available in the app drawer ), go to file (top bar), and select change environment.
- In the OUTPUT_FILE, change value to
/boot/efi/EFI/pop/grub.cfg - Save this.
- Open a terminal again and type
sudo update-grub
You are all done now.
When you reboot now, you will be given the option to choose the OS you want to boot.
Thank you for reading.
Special thanks to wisdomy folks at r/pop_os and Rishabh Nayaran from the pop_OS telegram group.
If you have any doubts or suggestions or any discussion, don’t hesitate to comment.
Pop!_OS is one of, if not the best distributions based on Ubuntu to date. It has sparked the interest of the dedicated Linux community and new users alike. Dual-booting has helped with this!One major hesitation of the new Linux user is wiping Windows from their life completely. Luckily this is not a necessity. In this guide, we will go over step-by-step instructions on how to install Pop!_OS alongside windows and update the boot loader.
Getting Ready
First we will need to gather some resources. These instructions are assuming you’re doing this from a Windows machine. We will start by downloading Pop!_OS and installing a USB flashing tool.
1. Download Pop!_OS
Pop!_OS by System76
Imagine an OS for the software developer, maker and computer science professional who uses their computer as a tool to discover and create. Welcome to Pop!_OS.
When you download Pop!_OS make sure you download the right version. You can check your system to see if you need the version pre-loaded with the proper NIVIDA drivers. You can check by going into Device Manager and looking under ‘Display adapters’.
2. Download and Install Etcher
Download and Install the balenaEtcher tool. We will use this to flash the Pop!_OS ISO image to the USB to ensure that it is bootable.
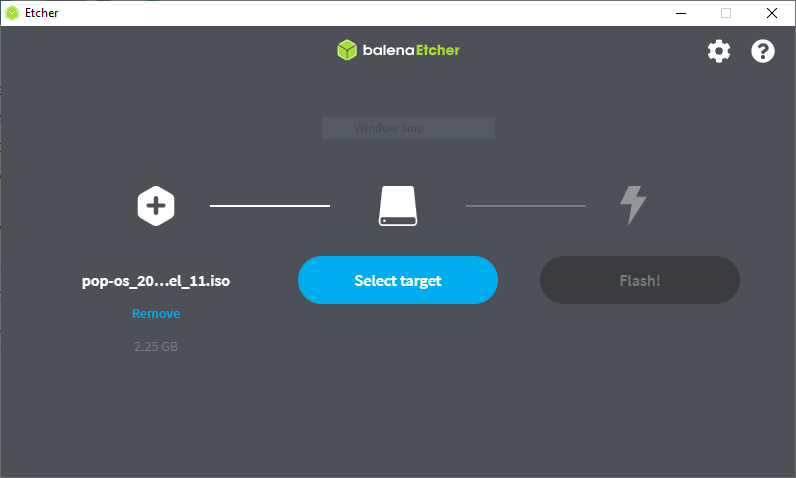
Once Etcher is installed, select the ISO file from the directory that you downloaded it. Insert a blank USB with at least 4gb of free space. Click on ‘Select target’ and pick the USB drive you’d like to use to install Pop!_OS.
Once everything is selected click on ‘Flash!’ and it will begin to burn the image onto the USB. Once it is done it will validate and give the finished prompt.
3. Free Up Some Space
This can be done though the live disk image, but doing this on the Windows side will prevent some issues from arising later.
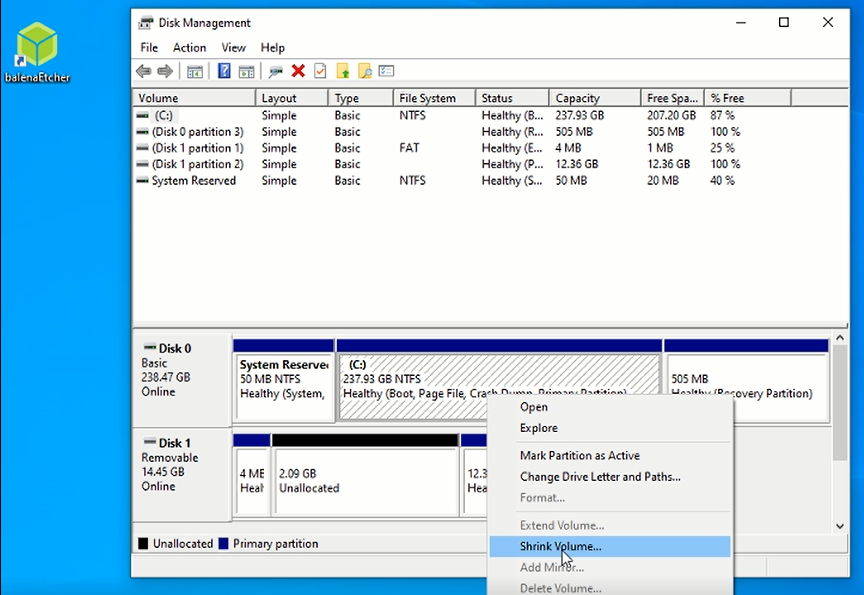
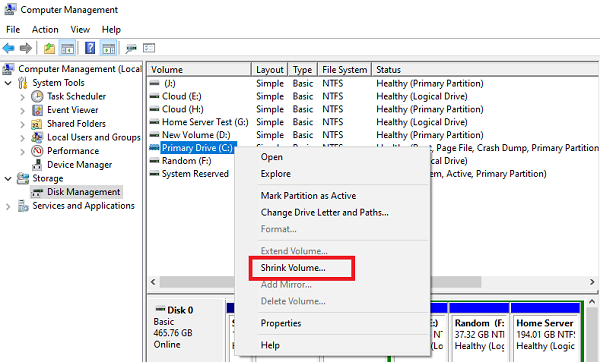
- Open the ‘Disk management’ tool
- Right click on your main boot partition that holds your Windows 10 operating system. Click on ‘Shrink Volume’
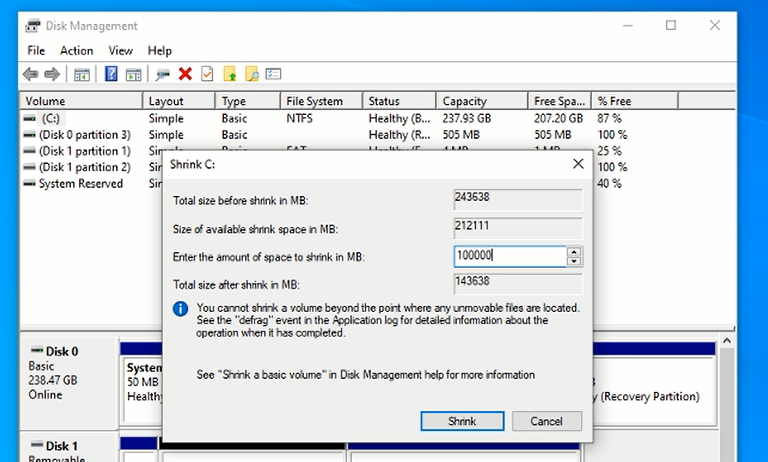
- Here is where you will select the amount of free space to make available for the new Pop!_OS installation. Make sure you leave enough space for Windows depending on the work you need to do within the operating system.
- Click on ‘Shrink’ and you’ll see the the new Unallocated space. This is where we will be installing the new Linux distro.
👉
Important: Ensure everything in your system that is important is completely backed by before performing any system changes.
Once you have everything backed up and all of your active programs are shut down run the command in the Windows terminal below. This will ensure your entire system is not in hibernation and ensures the system completely shuts down.
shutdown /s /f /t 0
All the prep work is done! Lets install Pop!_OS
Installing Pop!_OS
Now we get to the fun part. Lets boot into the live disk image we burnt on the the USB drive. See some tips below if you run into any issues booting.
- Enable Legacy Boot Sources. If you are installing on an older computer using BIOS, selecting the option under Legacy Boot Sources or Legacy USB will let you start Windows setup from a USB or CD drive.
- Disable Secure Boot. Security technologies included in UEFI such as Secure Boot can be a blocker and prevent the system from booting external storage sources. Disabling Secure Boot, temporarily—normally accessible under the security menu or tab—will often resolve this.
1. Boot to the USB
Enter your systems screen to boot to a temporary device. When you turn on your computer there will be an option to either enter BIOS or select a start-up device. Depending on your system this may be different. Checkout this article from Lifewire if you’re having issues finding the temp boot menu.
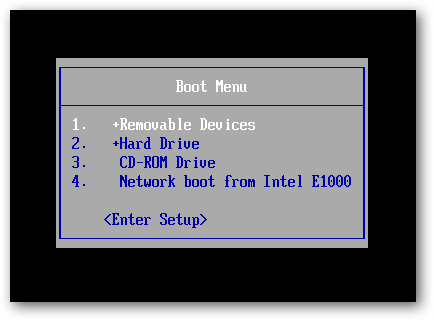
Select your USB HDD or Removable devices from the boot menu and it should boot into Pop!_OS.
2. Install Pop!_OS
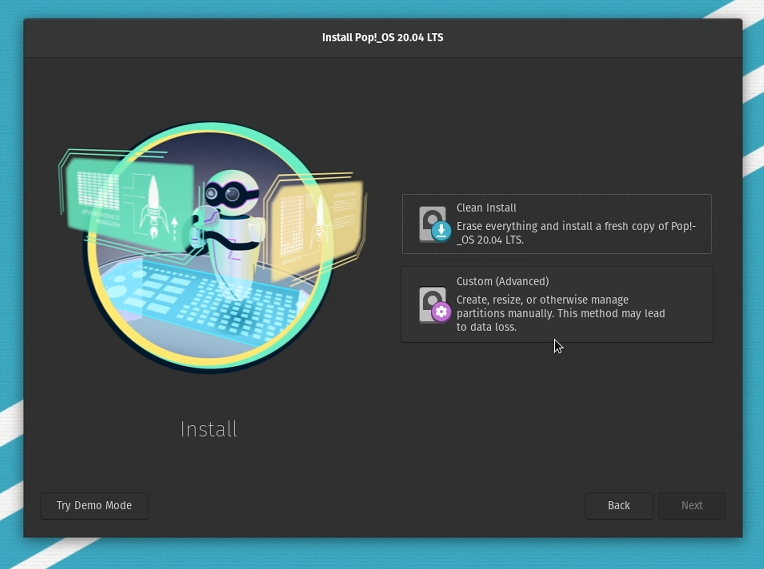
Once you successfully boot to the new Pop!_OS USB you’ve created, run through the setup process selecting your language and keyboard layouts. When you arrive at the option for a clean or custom install, select custom.
From the custom installation menu, you should be able to see a preview of the partitions on the system, including the space you freed up. This will be called “unused” space. Click on ‘Modify Partitions…’ near the bottom.
A GParted window will open. Right click on the unallocated space and select ‘New’.
Now a window will come up allowing you to format the partition to the Linux file system. Ensure the the free space remaining is set to 0 and the file system will be formatted as ext4. Click Add.
Now click the green check and click apply. Once the operation is done you can close out GParted.
Click on the new partition and make sure ‘Use partition’ is selected. Select it to format and ensure it is being used as the ‘Root (/)’ with the ext4 file system.
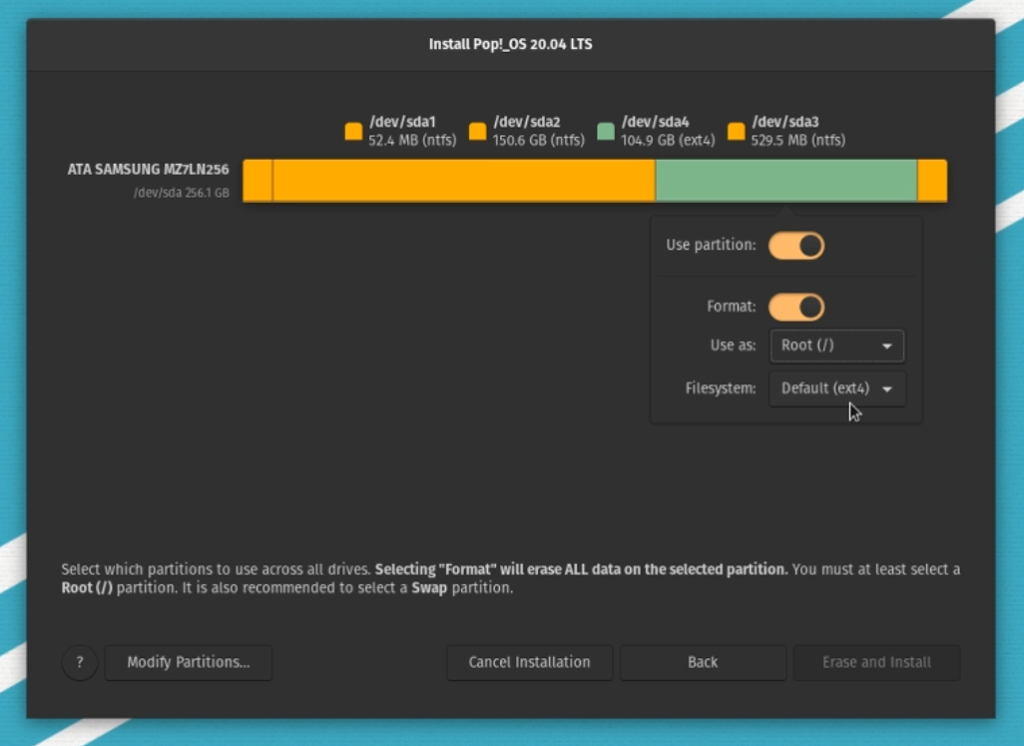
Now click on ‘Erase and Install’. Pop!_OS will install on your system alongside Windows. Once it is done restart your computer.
Important! Windows uses it’s /boot partition as a part of its update process. Your boot partitions available space may eventually be filled with Linux Kernels, this will prevent Windows from updating correctly. To fix this occasionally run the following commands after rebooting Linux, this will clean out older Kernels, freeing up space. sudo apt autoremove sudo apt auto clean
Updating GRUB
You may have noticed your system booted directly into the Linux partition without the Windows 10 option. Now we will update our system and help GRUB recognize the Windows partition.
1. Update Your System
Open a terminal and run the following commands:
sudo apt update sudo apt upgrade
2. Installing OS-Prober
Now we will install a tool to help Pop!_OS recognize the Windows partition.
Run the following commands:
sudo apt install os-prober sudo os-prober
You should see something similar to /dev/sda#:Windows 10:Windows;chain
Run this command so GRUB can update with the new partition data:
sudo update-grub
Dual Boot Complete!
Now when you restart your computer you will be greeted with the GRUB boot loader on start-up. You will be able to select the partition to boot into. By default it will be set to Pop!_OS so you will have a few seconds to select Windows before it automatically boots into Pop!_OS.
This tutorial will illustrate how to set up a dual boot Pop!OS + Windows 10/11 system very easily, without losing much disk space or installing not officially supported alternative boot loaders like GRUB or rEFInd.
The main issue with dual booting Pop!OS and Windows is that unlike most other distributions, Pop!OS uses the systemd-boot bootloader, which in its default configuration does not support loading kernels from partitions other than the EFI partition. Thus, Pop!OS requires the EFI partition to be at least 500 MiB in size, whereas the size of the EFI partition created during the installation of Windows is just 100 MiB. This would suffice for GRUB or rEFInd, since these bootloaders are able to load the kernel from the root partition, but not for systemd-boot. In this guide, we will perform a customized Windows installation with an enlarged EFI partition, and use that for a 100% default Pop!OS installation.
WARNING : this will not work on already existing installations of Windows or Pop!OS, you will have to install both from scratch.
- Start a regular Windows install. Once you get to the screen where you choose between «Recommended» and «Custom» install, press Shift + F10 to enter command prompt. Start the
diskpartutility. WARNING: the usual Linux disk utilities don’t write any changes to disk until you’ve finished setting it up.diskpartwrites every command to disk immediately. Be very careful while usingdiskpart, you can very easily lose data:
diskpart
List the connected drives:
list disk
Find the drive you want to use as boot drive and select it:
select disk N
Create the enlarged EFI partition:
create partition efi size=500
Create a regular MSR partition:
create partition msr size=16
Finally, create a primary partition of desired size (in MiB, not MB):
create partition primary size=XXXXX
Exit the utility and the command prompt:
exit
exit
Continue the installation by selecting the «Custom» option, then select the primary partition you just created. The Windows installation will continue normally. Finish installing Windows.
- Boot into the Pop!OS installer. When you get to the choice between a «Recommended» and «Custom» installation, select «Custom».
Create an appropriately sized swap partition (same size as your system’s RAM) and a root partition with a filesystem of your choice.
After creating the partitions, select the Windows EFI partition and mount it at /boot. Select the swap partition. Then select the root partition and mount it at /. Continue the installation normally.
- After booting into Pop!OS, edit the
/boot/efi/loader/loader.conffile and make it look like this:
default Pop_OS-current
timeout 5
console-mode max
editor no
- Reboot. Now, at boot you will have 5 seconds to choose to boot into Windows instead of Pop!OS.
Do you want to dual boot Pop!_OS and Windows on your system? Here is a complete guide showing you the steps you need to follow to install Pop!_OS on your PC alongside Windows OS.

Pop!_OS is a free and open-source Linux distribution developed by System76. It is based on Ubuntu and is specially designed for STEM and creative professionals who focus on deep learning, engineering, bioinformatics, etc. It has a lot of useful features that you may want to use. Some of its functionalities include Workflow Customization, Fast Navigation, Seemless Workspace Organization, Auto-Tiling, and more. Now, if you wish to install Pop!_OS on Windows PC, this post will help you.
Before you get started, we recommend you see the risks and benefits of Dual Booting Operating Systems.
How to boot Pop OS from USB?
To boot Pop!_OS from a USB flash drive, you first need to create a bootable USB drive. Download the Pop!_OS from its official website and burn the ISO file to the USB drive using ISO burner software like Rufus. When done, attach the USB drive to a computer where you want to install Pop!_OS and run the setup file to complete the installation process.
How much RAM is needed for Pop OS?
The minimum RAM required to install Pop!_OS on a system is 4 GB. However, to utilize it best, a RAM of 8 GB is recommended. In addition to that, 20 GB of storage is needed for running the OS smoothly.
Now, if you want to dual boot Pop!_OS alongside Windows OS on your PC, you can follow the steps mentioned below.
To dual boot Pop!_OS and Windows, you can use the below step-by-step procedure:
- Check Pop!_OS system requirements.
- Download Pop!_OS from the official website.
- Create a Pop!_OS installation media.
- Shrink the Windows partition and create a Pop!_OS partition.
- Create a Pop!_OS VM.
- Install Pop!_OS.
- Set up GRUB.
1] Check Pop!_OS system requirements
Before installing Pop!_OS on Windows 11/10, check the system requirements and prerequisites of Pop!_OS and make sure your Windows PC can run it. Here are the minimum system requirements of Pop!_OS:
- CPU: 64-bit x86, ARM (RAS PI 4) architectures
- RAM: 4 GB
- Drive Storage: 20 GB
In addition to that, you must disable secure boot in your BIOS before you proceed to install Pop!_OS on Windows.
If the above requirements are fulfilled, you can proceed with the below steps to dual boot POP OS and Windows.
2] Download Pop!_OS from the official website
The next step is downloading Pop!_OS from its official website. You can download the OS ISO file from the pop.system76.com website. Visit the aforementioned page and click on the Download button. Now, you need to select a suitable download. For example, if you have NVIDIA GPU, click on the NVIDIA version to download a copy of Pop!_OS on your system. In the case of Raspberry Pi 4, select the respective version to download Pop!_OS.
After downloading the POP OS, verify the checksum of the downloaded file to verify the integrity of the file and to ensure that download is not corrupted. The SHA256 Sum of the download is mentioned when you download the ISO file. You can compare the checksum you get in Command Prompt using CertUtil with the checksum provided on POP OS’s official website and make sure both are the same.
Read: How to change Mac trackpad scrolling direction in Dual Boot setup in Windows?
3] Create a Pop!_OS installation media
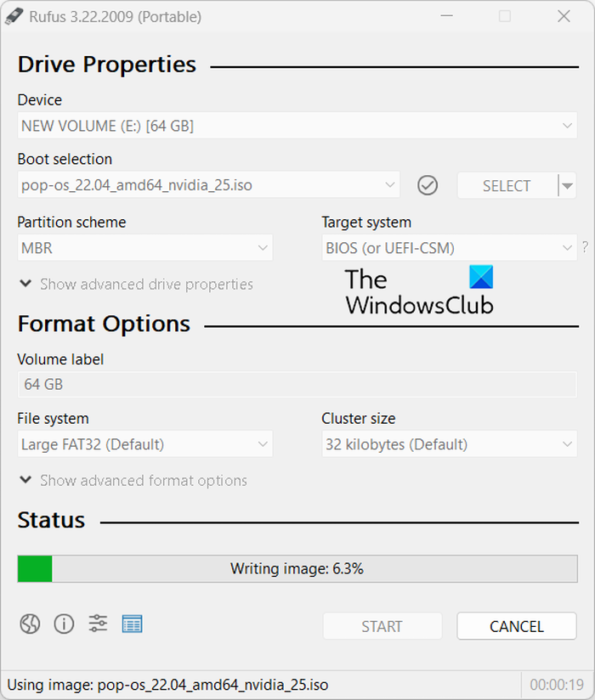
Now, you can create an installation media for Pop!_OS. For that, connect a USB drive greater than 8 GB and install an ISO burning program like Rufus. You can then use it to burn the downloaded ISO file of Pop!_OS to your USB flash drive. Here’s how:
Once you have downloaded and installed Rufus, launch the program and select the target USB drive. Next, press the SELECT button to browse and choose the ISO file of Pop!_OS and press the START button to burn the ISO file to the selected USB drive. After that, you can insert the created bootable USB drive into the Windows PC where you want to install the OS. Simply run the setup file and follow the prompted guide to complete the installation.
4] Shrink the Windows partition and create a Pop!_OS partition
You need to create an individual VM partition and for that, you need to shrink the Windows partition. Here are the steps you need to follow to shrink the Windows partition:
First, open the Disk Management app, right-click on a partition that holds Windows OS, and choose the Shrink Volume option. After that, enter the amount of space you need for Pop!_OS installation and then hit the Shrink button to generate a new unallocated space where we will be installing Pop!_OS.
See: Install and Run Ubuntu on Windows using Wubi Ubuntu Installer.
5] Create a Pop!_OS VM
Next, we will be creating a Pop!_OS VM on the partition that we created for Pop!_OS. You can download and install VMware Workstation Player on your PC and use it to create a Pop!_OS VM.
Firstly, you need to download and install VMware on your system and then launch it. Now, press the File > New Virtual Machine option, choose Custom (advanced), and tap on Next. After that, choose the Installer disc disk image file (iso) option and then browse and import the Pop!_OS ISO file. Next, choose Linux and Ubuntu 64-bit and press Next. Then, name the VM as Pop OS and set the location to the partition you created in step (4). Now, follow the onscreen steps accordingly and tap on the Finish button to complete the process.
6] Install Pop!_OS
You can now install Pop!_OS by switching on the above-created Pop OS VM. Pop OS install wizard will appear where you can follow the prompted instructions to complete the process.
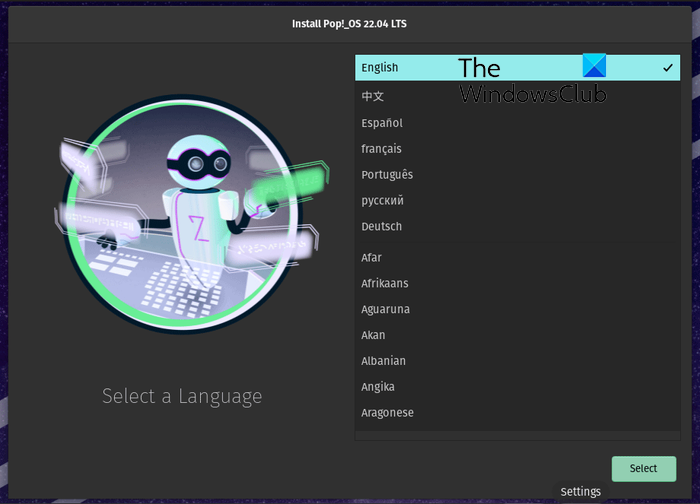
First, you need to choose a language and then press the Select button.
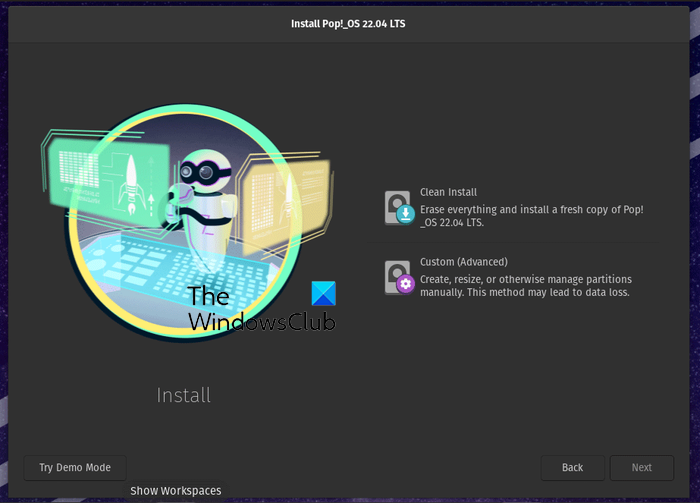
In the next step, select the Clean Install option which will delete everything, and install a fresh copy of Pop!_OS on the target drive. In case you want to manually install the OS, you can choose the Custom (Advanced) option.
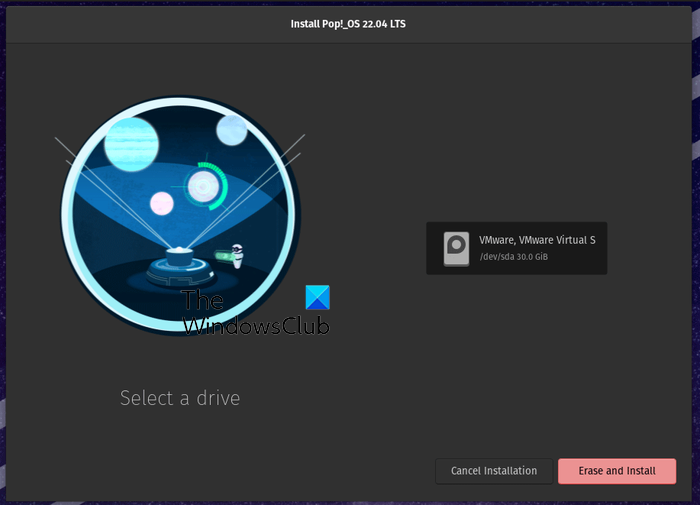
Now, choose the VMware drive and tap on the Erase and install button. And then, set up your full name and username and press the Next button.

Next, if you want to encrypt the system drive, choose the Encrypt option and set a password. If you don’t want to use encryption, press the Don’t Encrypt button.
It will start installing the Pop!_OS on your drive. The process will take some time, so be patient.
Once the installation finishes, restart your computer and then sign into your user account to use Pop!_OS.
Read: How to access Windows Subsystem for Linux files on Windows?
7] Set up GRUB
When the Pop!_OS is installed on your system alongside Windows, you may notice that your system directly boots to Pop!_OS. So, in that case, you need to configure GRUB (Grand Unified Bootloader). It is a bootloader available from the GNU project. You must set it up to enable it to recognize the Windows partition.
To update GRUB, you can use the below simple commands:
sudo apt update
sudo apt upgrade
Next, you need to install the OS-Prober tool to enable GRUB to recognize the Windows partition. Use the below command to do so:
sudo apt install os-prober sudo os-prober
Finally, you can run the following command to update and enable GRUB on Pop!_OS:
sudo update-grub
So, this is how you can dual boot Pop!_OS and Windows.
Now read: How to uninstall Linux in Windows Dual Boot setup?