Oracle Database 11g is an enterprise database by Oracle. It delivers industry-leading performance, scalability, security, and reliability on a choice of clustered or single servers running Windows, Linux, and UNIX along with comprehensive features to easily manage the most demanding transaction processing, business intelligence, and content management applications.
Below are the new features introduced,
- Database Replay
- Flashback Data Archive
- Edition-based Redefinition
Let’s see how to install Oracle 11G Database on Windows 10.
1. Download 11G Database
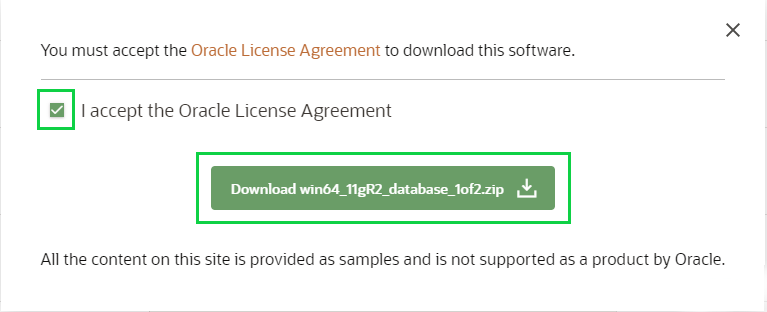
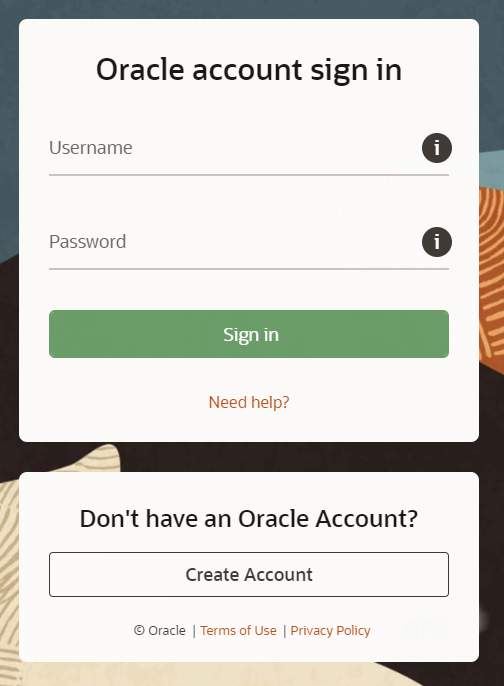
Click to Download Oracle 11G database. You need an Oracle account to download any software. Click on Accept License Agreement. Enter the username and password.
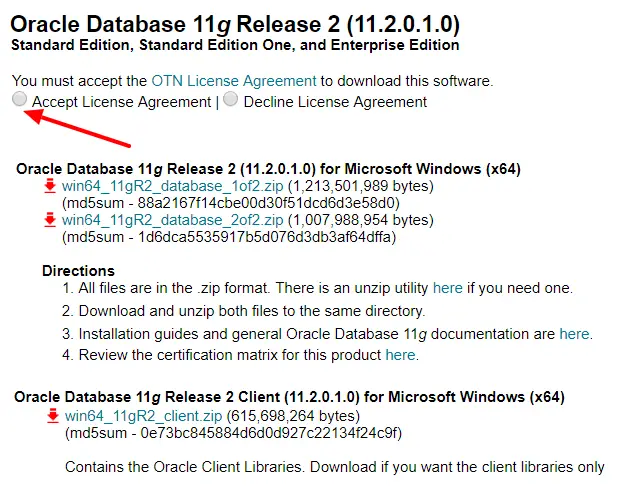
Download both win64_11gR2_database_1of2.zip, win64_11gR2_database_2of2.zip.Below is the step-by-step installation steps.
2. Unzip installer files
Next, unzip both zip files in the same folders. If you unzip in a different folder then copy the stage folder from win64_11gR2_database_2of2\database\ to \win64_11gR2_database_1of2\database\ folder.
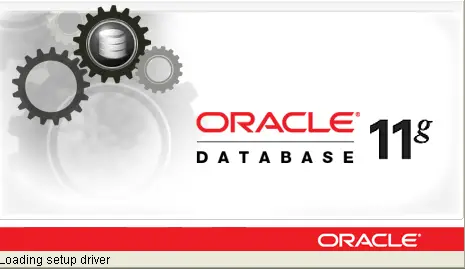
Now click on the setup.exe file to start the installation. Oracle quickly does the pre-requisite check and launches the Universal Installer.
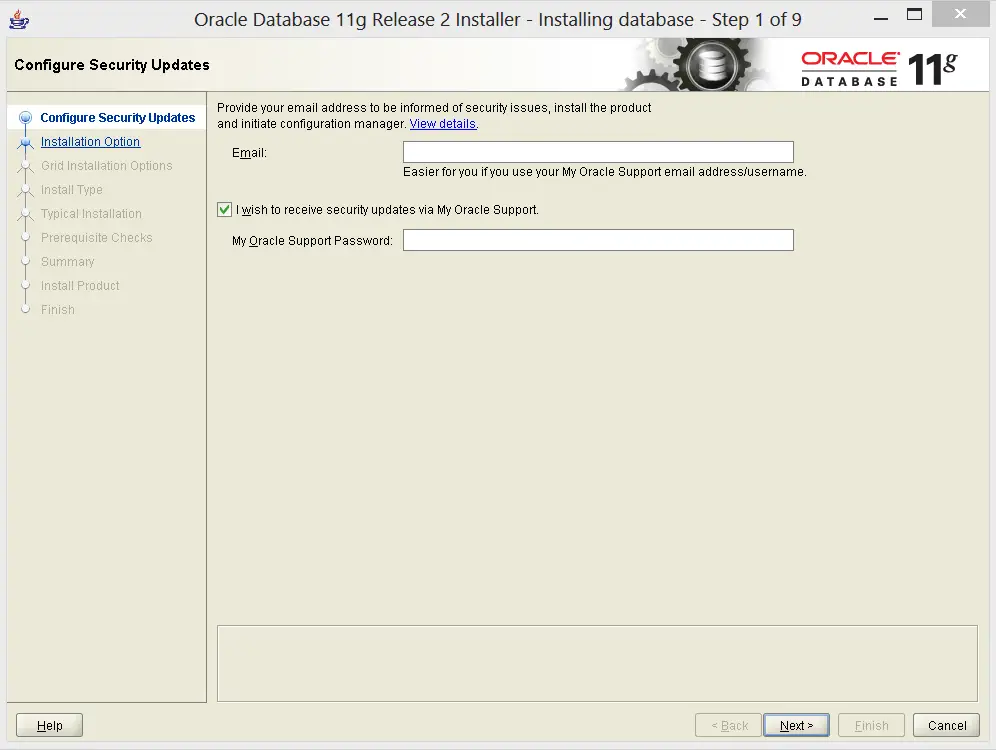
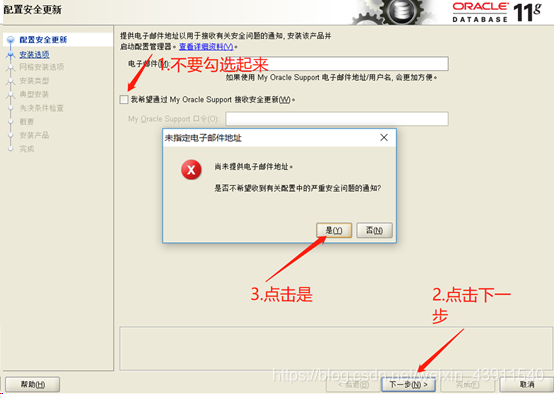
3. Configure Security Updates
Provide your email address to receive security issue information. It is optional. Unselect I wish to receive security updates via My Oracle Support.
If you have this information you can enter it.
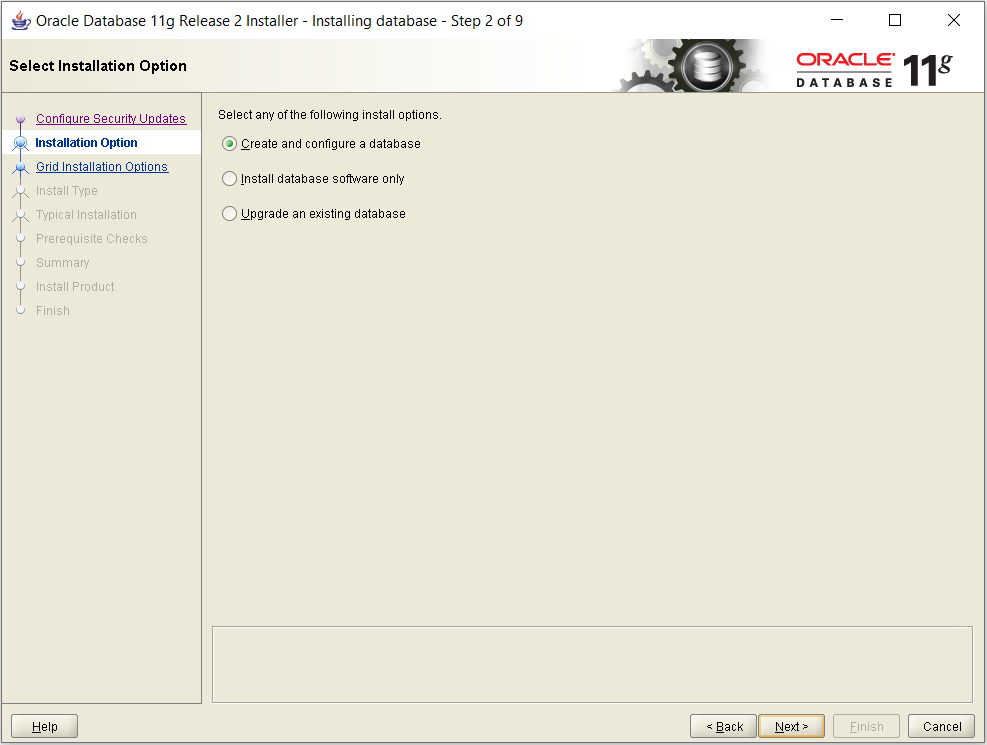
4. Installation option
Now select the database installation option.
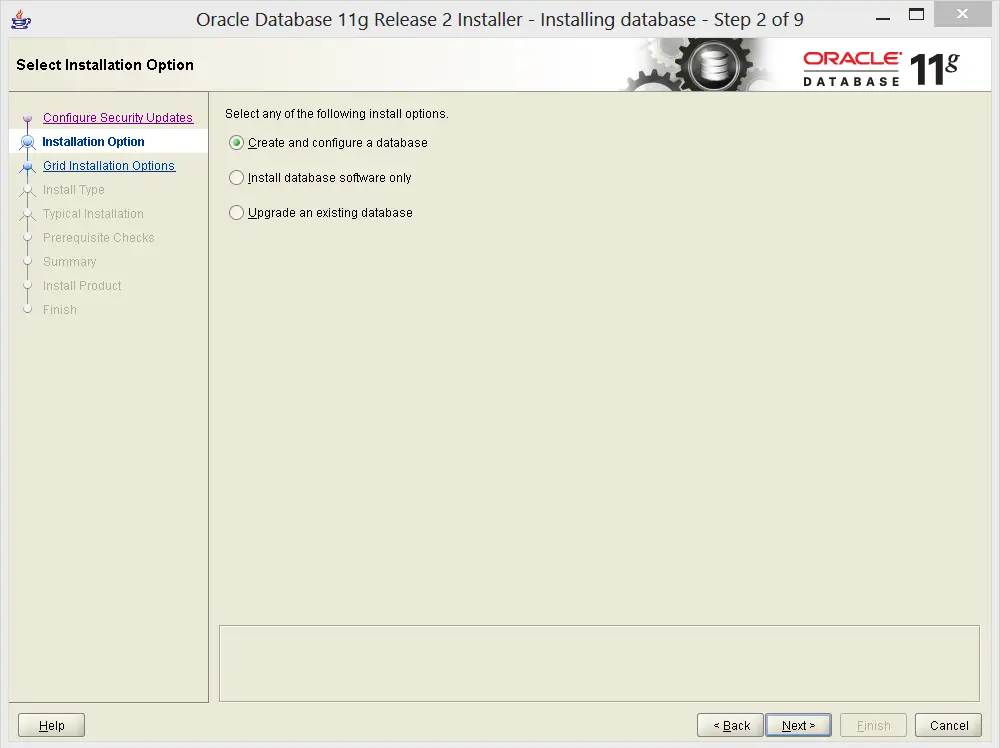
- Create and configure database – This option creates and configures a database.
- Install database software only – This installs only database software. Post-installation you need to manually create and configure the database.
- Upgrade existing database – This upgrades the existing database.
Select the default and click the Next button.
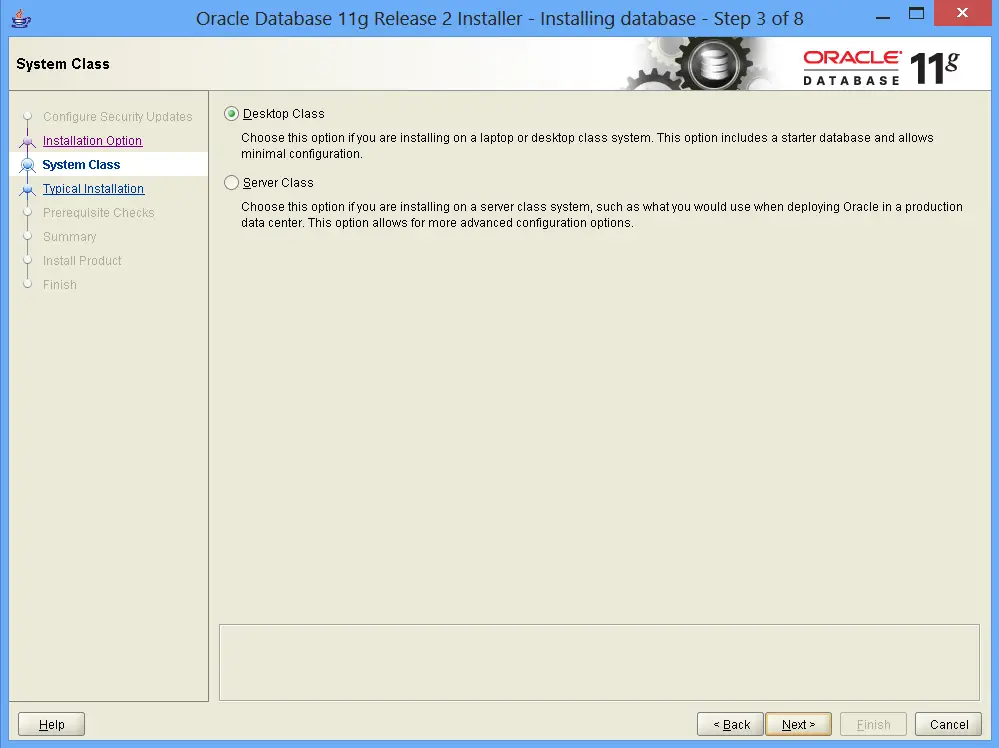
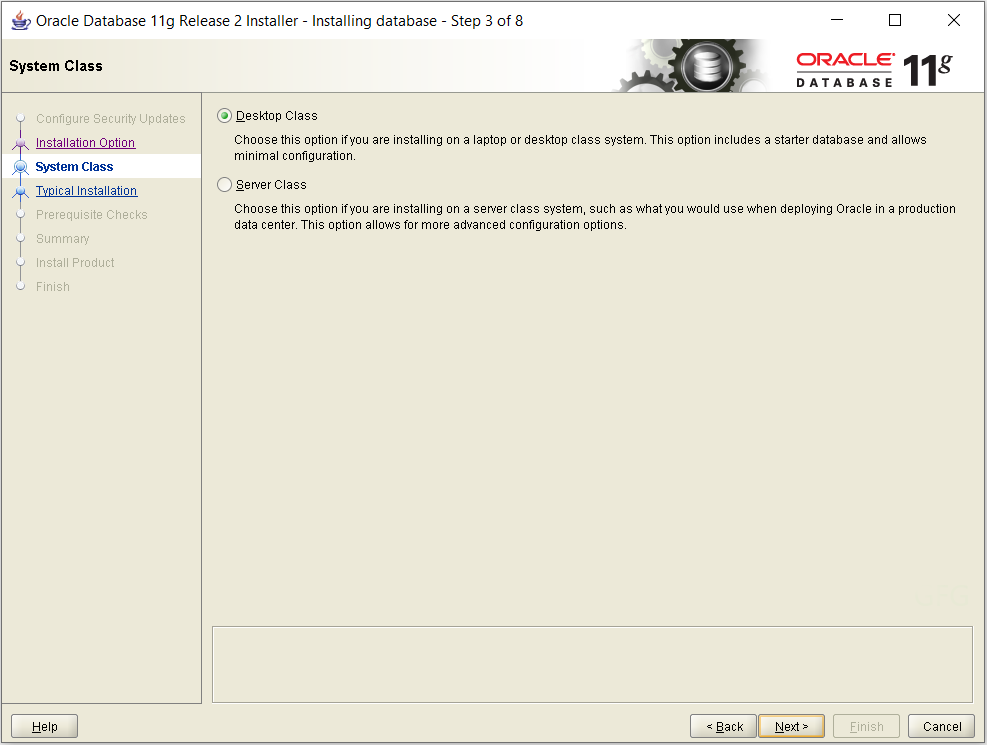
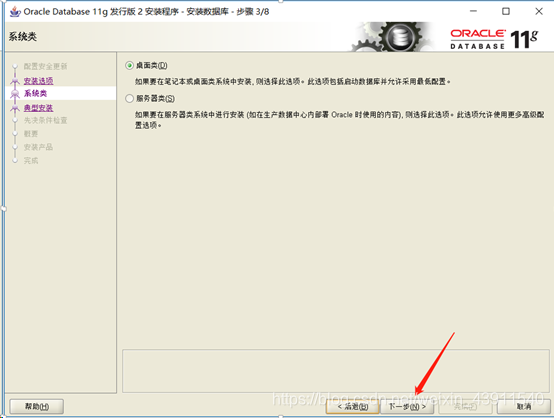
5. System Class
Select either Desktop Class or Server Class and click the Next button.
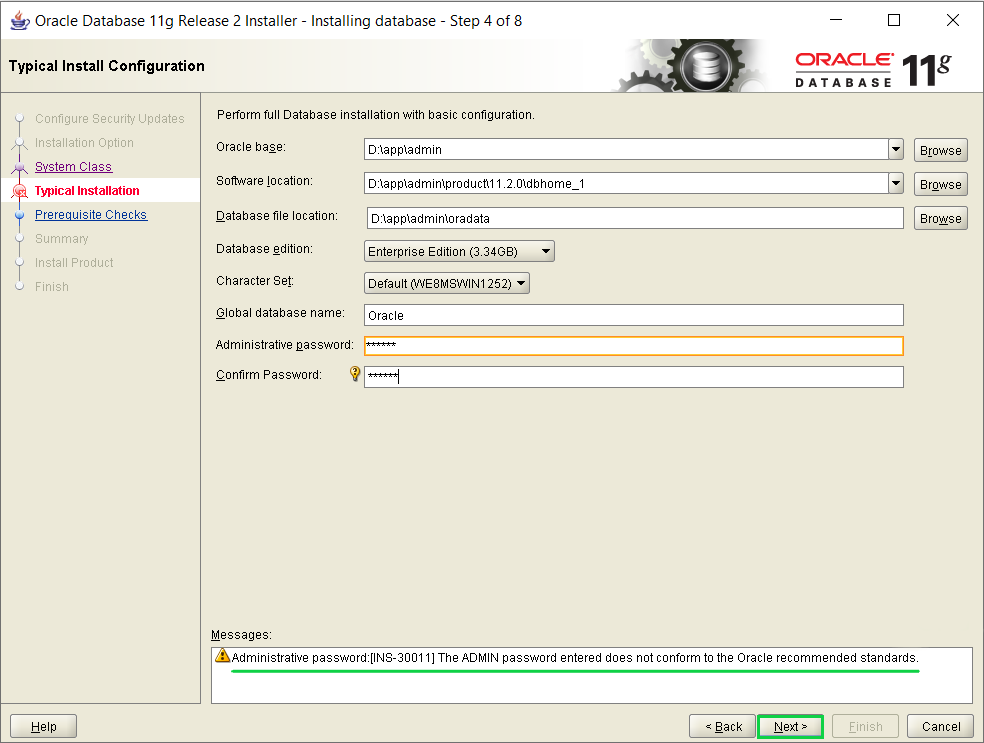
6. Database configuration
Installed defaults on all basis configurations like Oracle base, Software location, and Database file location. Click browse and select a different location to change it.
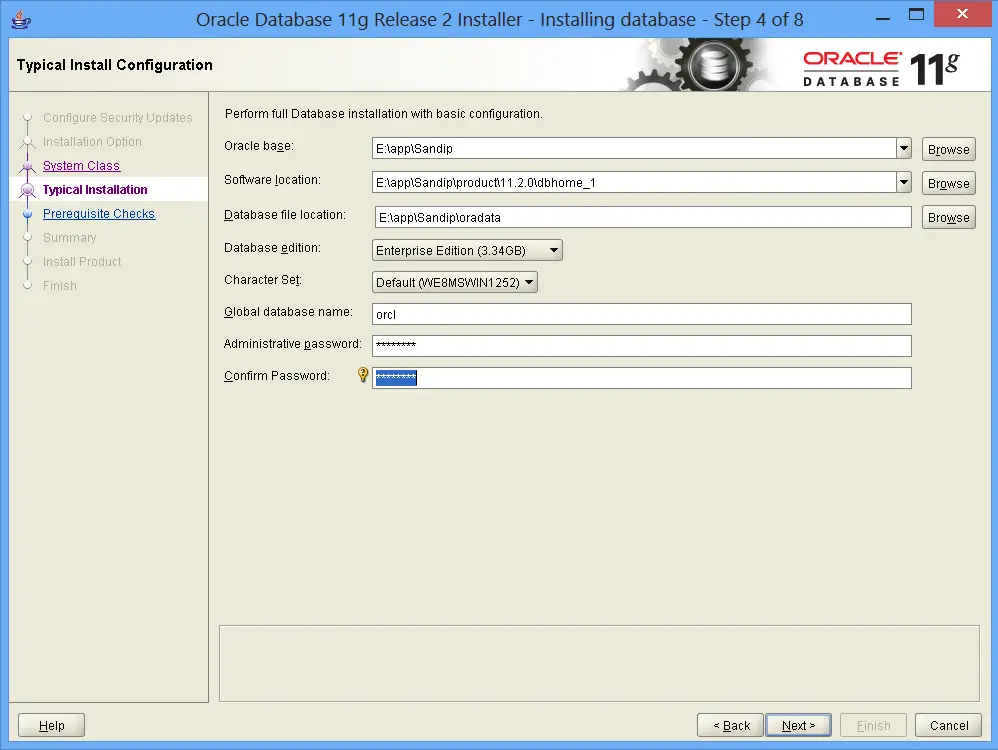
The installer creates a global database with the name orcl. Enter the Administrative password and enter the same password in Confirm Password field and click Next
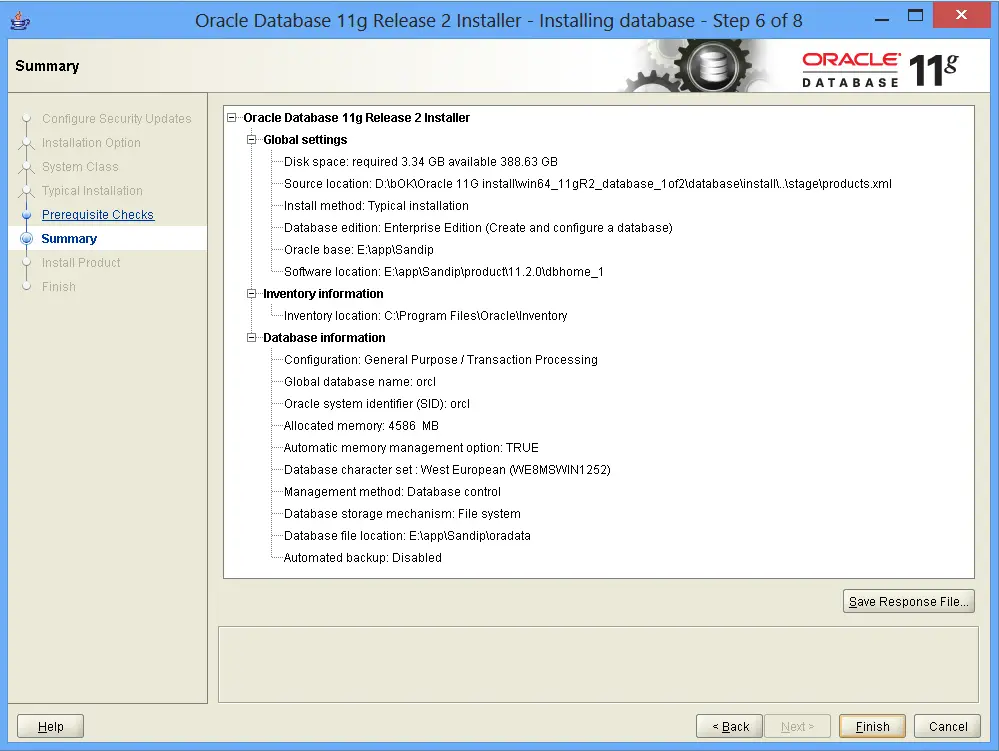
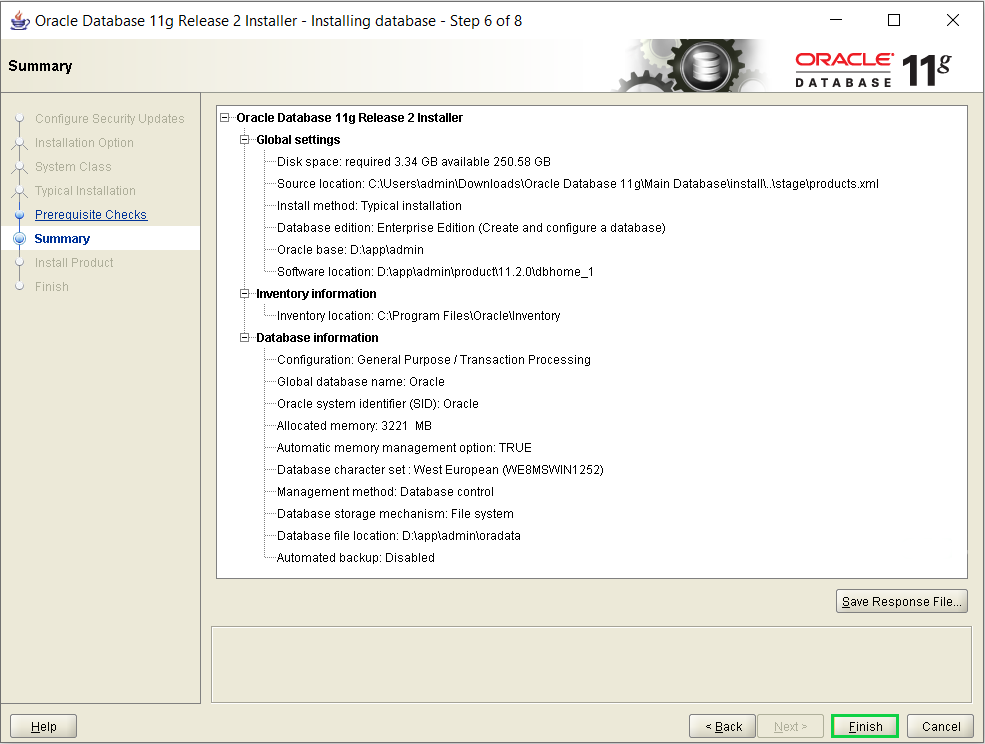
7. Summary
This screen shows a summary of the installation. Review it. If it is fine click on the Finish button or click on the Back button to change.
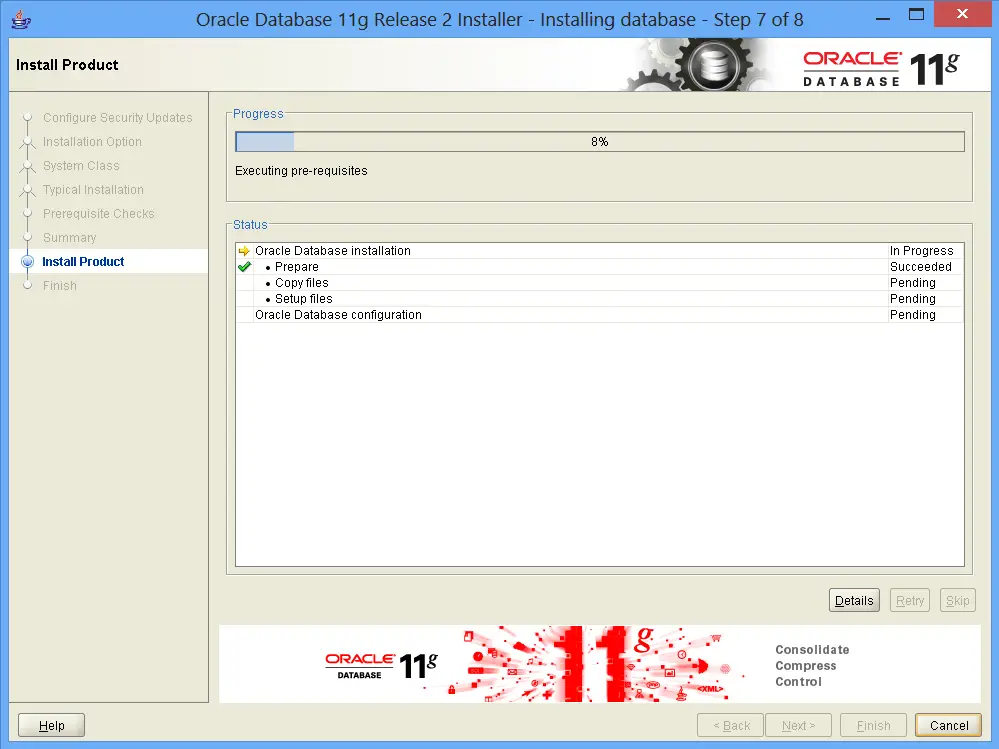
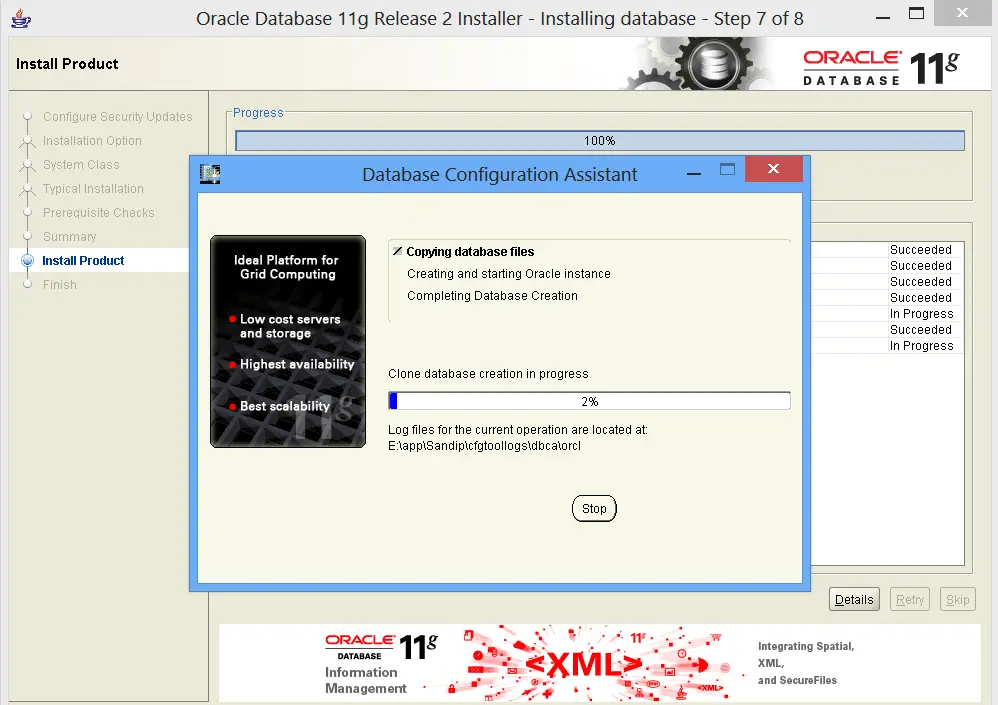
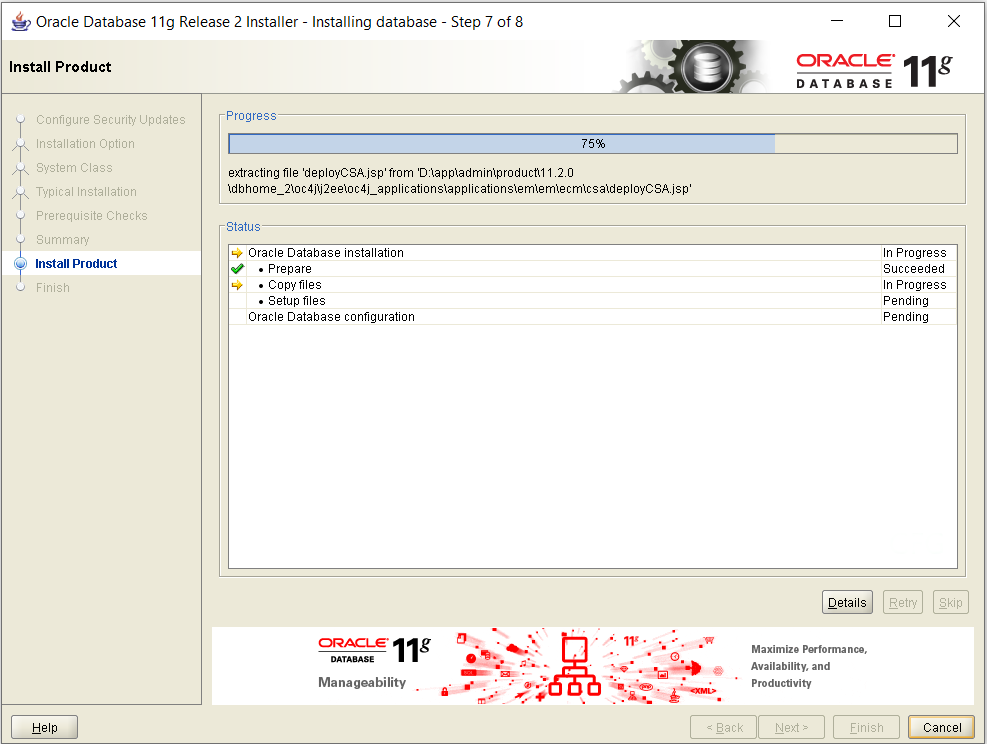
8. Install Product
The installer starts and copies all necessary files.
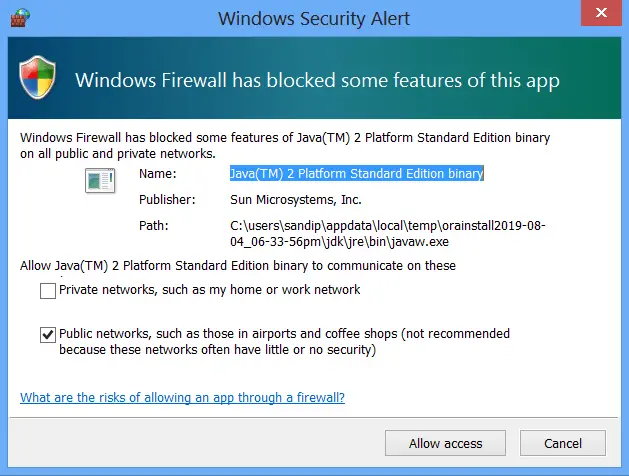
Click Allow Access.
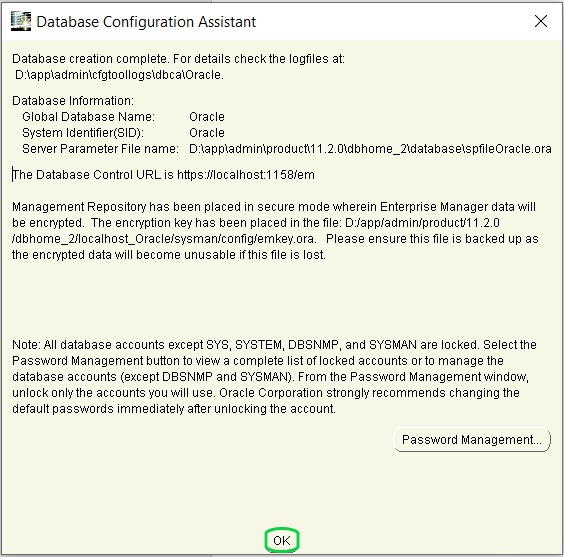
9. Database Configuration Assistant
The installer creates and configures the database.
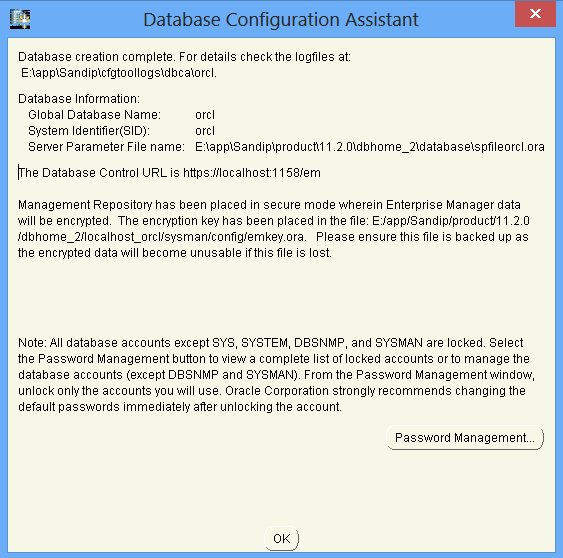
The below popups shows database information. Click Ok to finish the installation.
Summary
In this guide, we explained how to install Oracle Database 11G Release 2 on Windows.
Oracle Database (known as Oracle RDBMS) is a Database Management System produced and marketed by Oracle Corporation.
The Most Fundamental and common usage of Oracle Database is to store a Pre-Defined type of Data. It supports the Structured Query language (SQL) to Manage and Manipulate the Data that it has. It is one of the most Reliable and highly used Relational Database Engines.
There are many versions of Oracle Database like Oracle Database 10g, Oracle Database 11g, Oracle Database 12c, Oracle Database 19c, etc. from which Oracle 19c is the Latest Version. In this article, we will learn how to Install version 11g on Windows.
Downloading the Installation Files
Step 1: Go to oracle.com and Click on Options Menu.
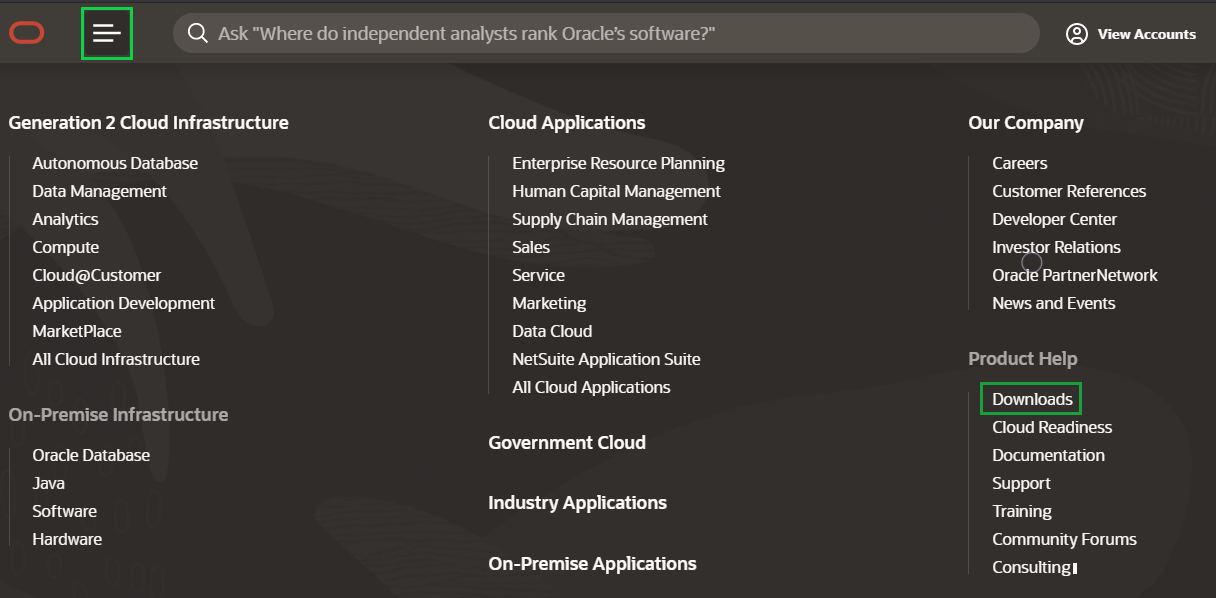
Step 2: Click the Download Button and Scroll Down to Database Section.
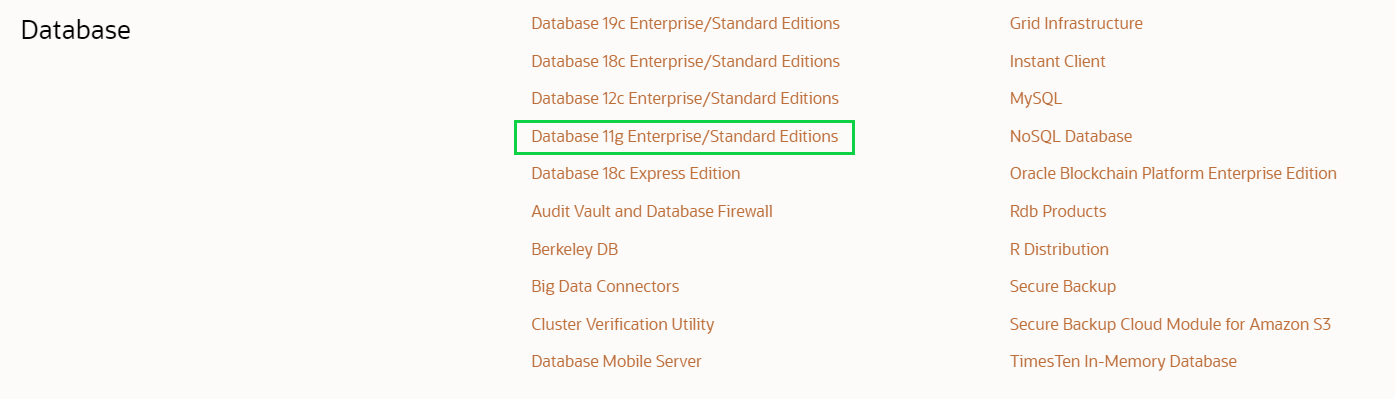
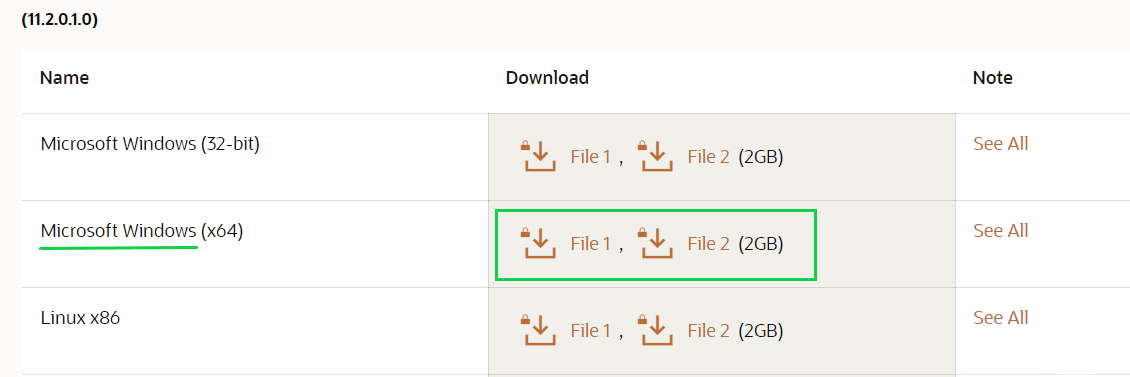
Step 3: Click Database 11g Enterprise/Standard Editions, after which you’ll find different versions of Oracle for different OS. Download the Files according to your OS.
Step 4: After Clicking the Download Button, the page will be directed to Login Screen where you’ll need to Sign In in Oracle Account. If you don’t have one, then you must Sign Up, because without that you won’t be able to download the Files.
Step 5: Repeat the same steps for both the Files and Download them.
After downloading the files Successfully, you’ll find both Files in Downloads Folder where both of them will be in Compressed Form, so you’ll need to Extract them.

Extraction of Downloaded Files
Step 1: Extract both the files with the use of WinRAR or any other extraction tool of your choice in the same directory.

Step 2: Go to Folder database -> Stage -> Components Copy all the content of this Folder
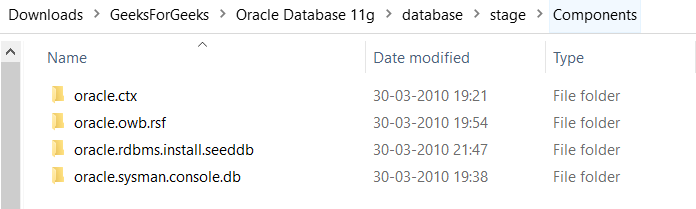
Step 3: Go to Main Database -> Stage Paste the copied content in Components Folder
Installation of Oracle Database
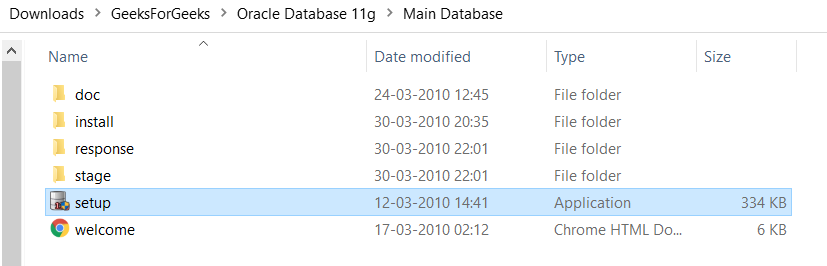
Step 1: Go to Main Database Folder where you’ll find Setup. Right click the setup.exe file and choose Run as Administrator.
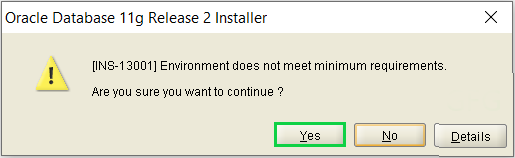
Step 2: Click Yes to continue. This will start Oracle Universal Installer.
Step 3: Provide your Email Address to receive all the Notifications and News Alerts from Oracle.
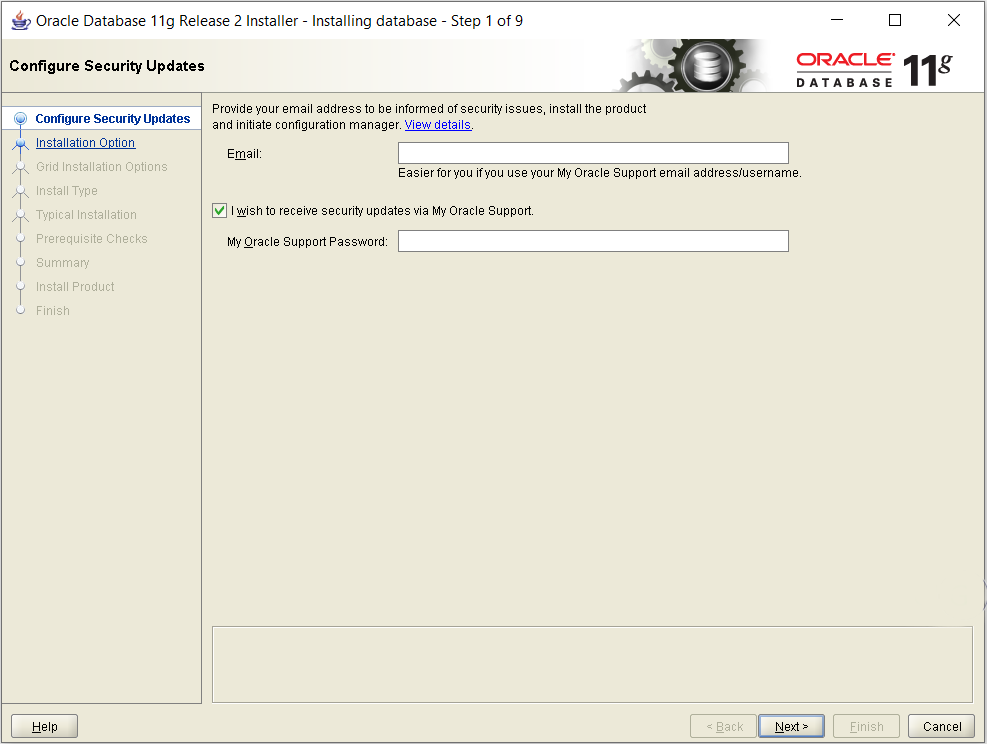
In case you don’t want to receive any Alerts from Oracle, then Simply leave these fields empty and click on Next to move ahead.
Step 4: Select any of the three different Installation Options according to your needs.
- Option 1 – If you want to Install Oracle Server Software and want to Create Database also.
- Option 2 – If you want to Install Oracle Server only.
- Option 3 – If you want to Upgrade your Existing Database.
Step 5: Choose between Server Class and Desktop Class as per your requirement and click on Next.
Note: Ignore the warning related to the Admin Password.
Step 6: Configure the basic settings and create a Password for your database. Once the configuration is done click on Next to continue.
Step 7: Here, Oracle Universal Installer(OUI) will check for the Prerequisites such as Hardware compatibility.
If there will be any Errors, then OUI will show them here and will recommend the changes.
Step 8: Click on Finish to start the Installation process. This installation might take some time depending on your Hardware.

Step 9: Click OK to finish the installation.
Step 10: Copy the localhost link provided to open your Enterprise Manager.
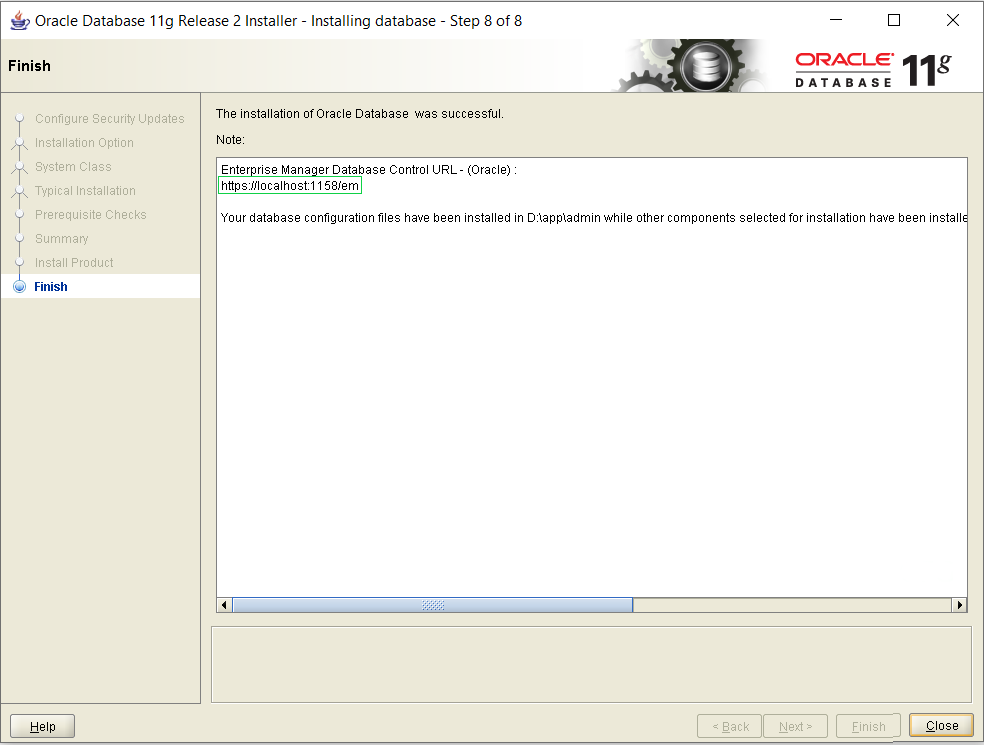
Click the Close Button and you are done with the Installation Process.
Getting Started with Oracle Enterprise Manager
There are two ways to start Oracle Enterprise Manager:
- One way to launch Enterprise Manager is using the Link provided in last step of Installation Process.
Note: In case if you misplace this link in the future, follow the next step to start it the other way.
- Go to Start Menu and
- Search Oracle Folder
- Click on Database Control – Oracle (Your Global Database Name)
- This will take you to the Login Screen of your Oracle Enterprise Manager.
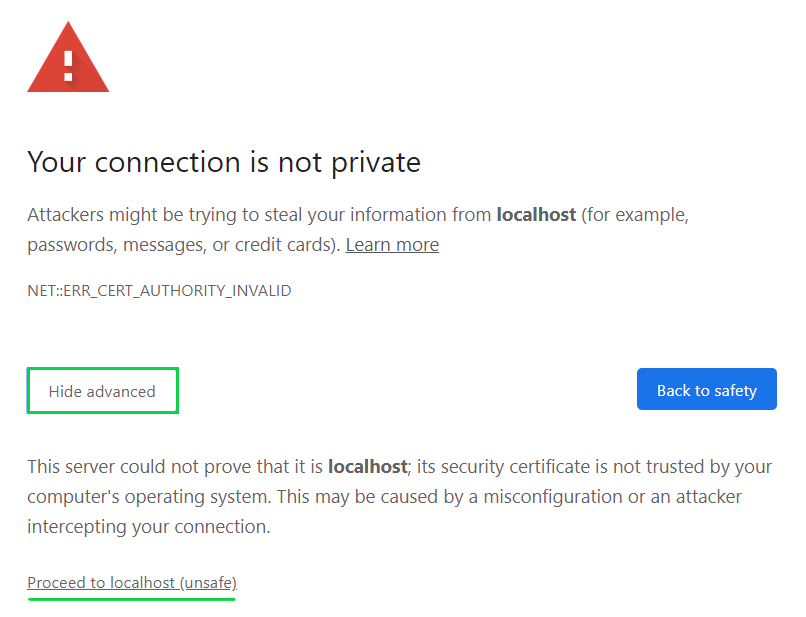
- Incase the above Error arises, just Click Advanced ->Proceed To Localhost
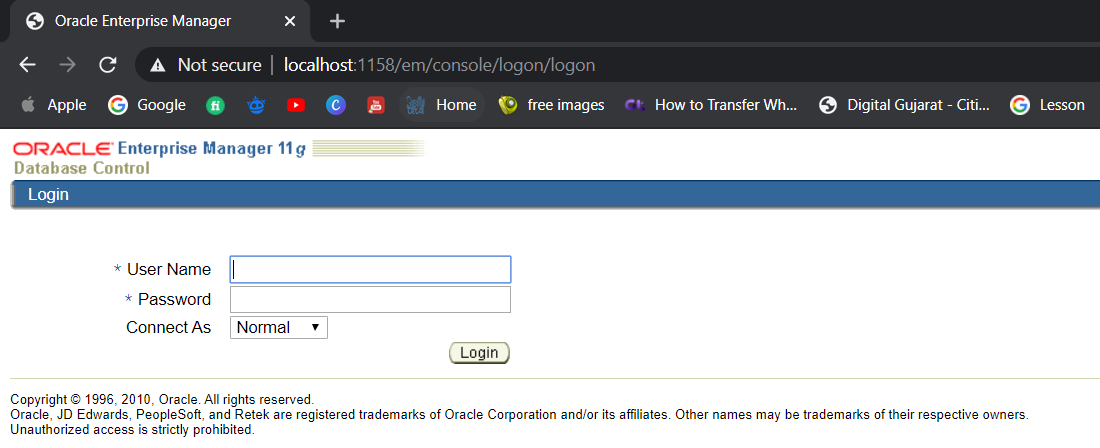
Login with your Credentials and begin using the Oracle Database 11g on your Windows.
Last Updated :
24 Oct, 2021
Like Article
Save Article
Руководство по установке Oracle 11g R2 в win10
-
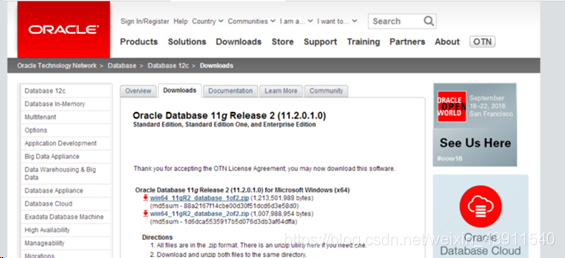
Сначала загрузите сжатый пакет Oracle, адрес загрузки следующий:
Официальный веб-сайт:
https://www.oracle.com/technetwork/database/enterprise-edition/downloads/index.html
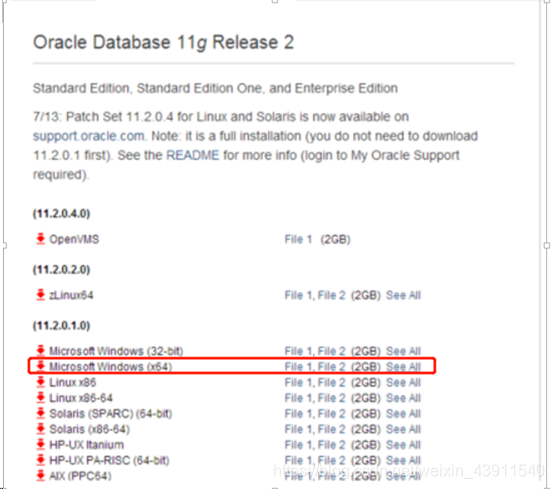
Выберите Oracle Database 11g Release 2. Это бесплатно для обучения. Выберите подходящий вариант в зависимости от того, является ли ваш компьютер 64-разрядным или 32-разрядным. Нажмите, чтобы увидеть все, вот 64-разрядный

выберите win64_11gR2_database_1of2.zip и win64_11gR2_database_1of2.zip для загрузки
-
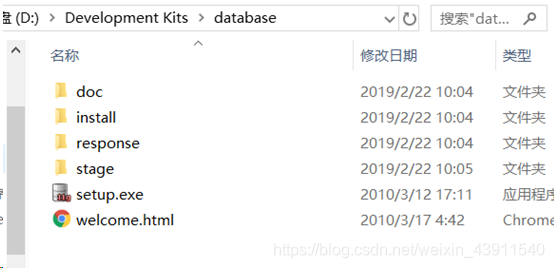
При распаковке двух сжатых пакетов обратите внимание на то, чтобы распаковать их в одну и ту же папку, иначе могут возникнуть проблемы. Результаты распаковки следующие
-
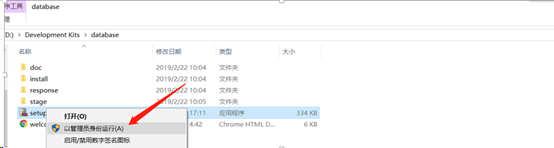
Щелкните правой кнопкой мыши файл setup.exe и выберите «Запуск от имени администратора»,

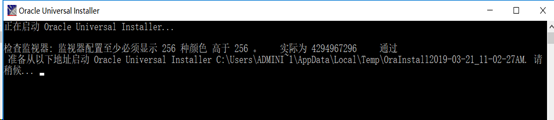
Запустите OUI, после выполнения программы установки появится следующая командная строка.
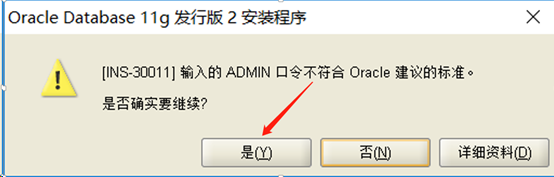
Если отображается сообщение «[INS-13001] Среда не соответствует минимальным требованиям», проигнорируйте его, нажмите «Да», чтобы продолжить работу.
4. После входа в центр безопасности конфигурации адрес электронной почты можно не указывать, а флажок перед надписью «Я хочу получать обновления безопасности через службу поддержки My Oracle» не следует ставить, потому что он предназначен для вашего личного использования и не требуется Просто обновите, нажмите да
5. Параметры установки, категории системы: просто нажмите «Далее».
6. Обычная установка: измените путь установки, и пароль управления можно ввести для облегчения запоминания: orcl, нажмите Далее.
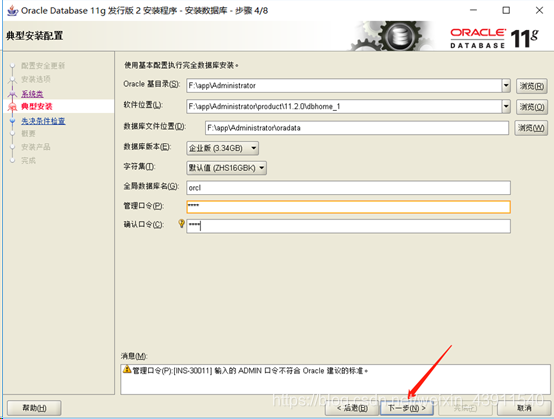
Не обращайте внимания на предупреждение, нажмите «Да».
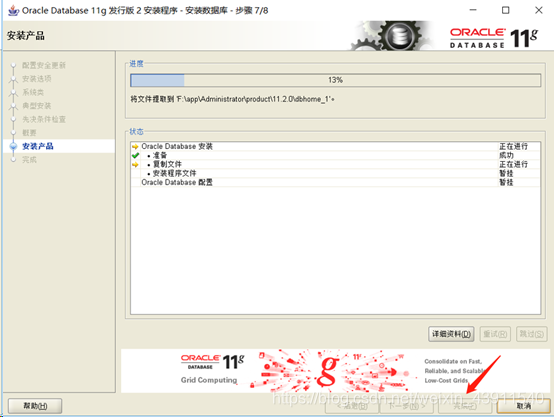
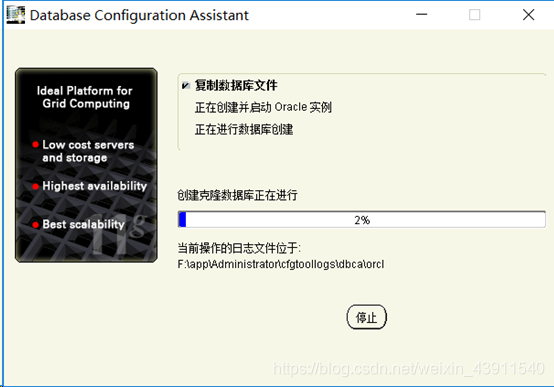
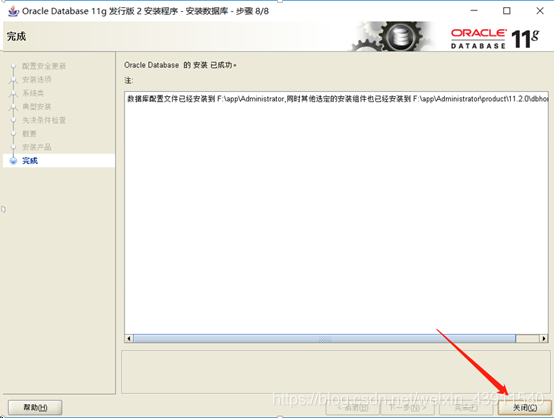
7. Нажмите «Готово». (Этот процесс должен подождать 15 минут)
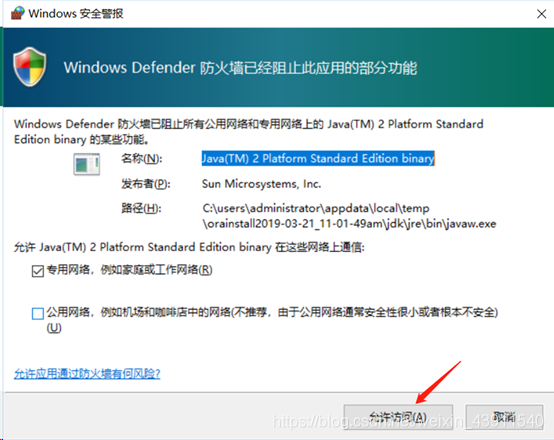
8. Если вы не отключили брандмауэр раньше, брандмауэр выдаст запрос во время этого процесса, и вы должны разрешить доступ в это время
Появятся эти окна, дайте ему запуститься автоматически, терпеливо подождите 20 минут.
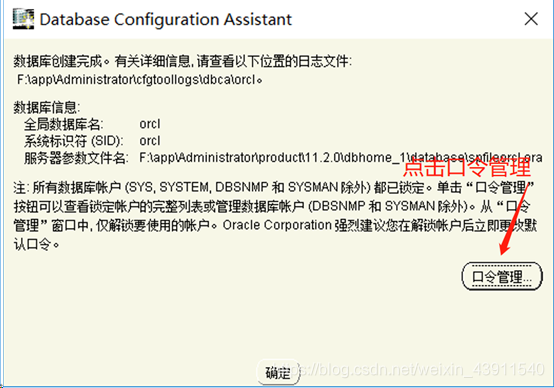
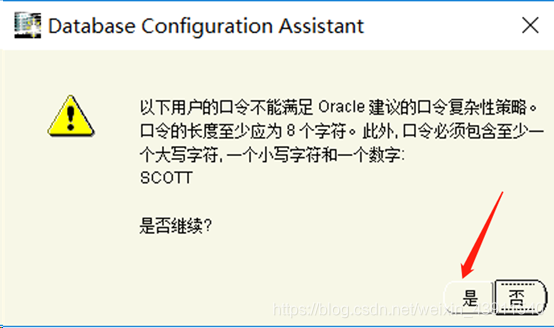
9. Важное управление паролем: найти SCOTT, удалить √, пароль: тигр,
 ! [Вставьте сюда описание изображения] (https://img-blog.csdnimg.cn/20190321135300415.png?x-oss-process=image/watermark,type_ZmFuZ3poZW5naGVpdGk,shadow_10,text_aHR0cHM6Ly9ibG9nLmNzZG4ubmV0L3dlaXhpbl80MzkxMTU0MA==,size_16,color_FFFFFF,t_70
Таким же образом найдите SYS и SYSTEM, разблокируйте их и установите пароль, совпадающий с именем пользователя, которое легко запомнить.
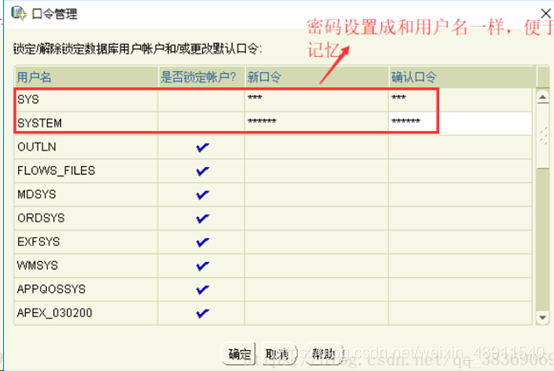
Нажмите «ОК» и игнорируйте предупреждение.
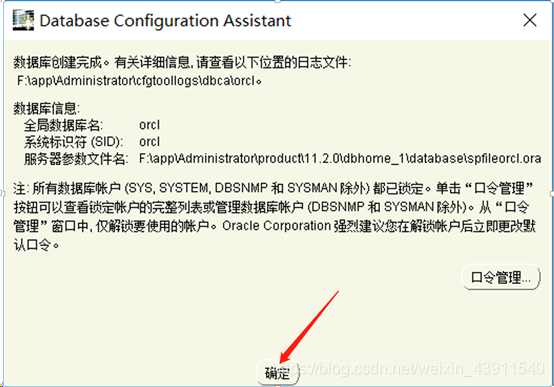
 10. Щелкните «Закрыть».
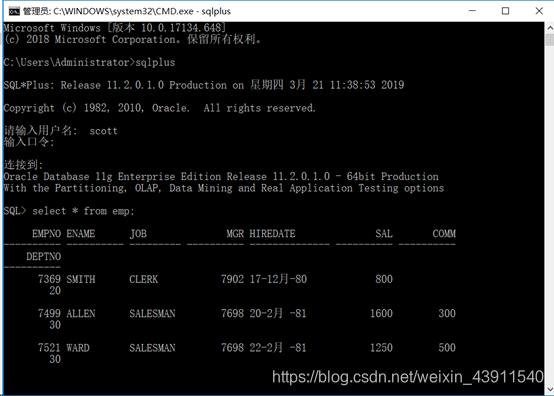
11. После завершения установки вы можете ввести sqlplus в командной строке для тестирования. В этом процессе введите ранее разблокированного пользователя scott, нажмите Enter, а затем введите пароль tiger.Пароль, введенный в это время, невидим.
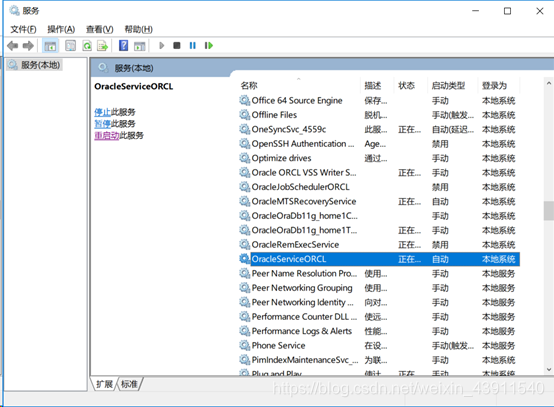
12. В это время откройте win + R, введите services.msc, чтобы просмотреть локальную службу, Oracle работает.
13. Теперь Oracle установлен.
How do I Install 11g on Windows 10?
Step 1: Go to oracle.com and Click on Options Menu . Step 2: Click the Download Button and Scroll Down to Database Section. Step 3: Click Database 11g Enterprise/Standard Editions, after which youll find different versions of Oracle for different OS. Download the Files according to your OS.
How do I Download and Install Oracle 11g?
Go to Oracle Database 11g Release 2 for Microsoft Windows x64 .
Click OTN License Agreement, read the license agreement, and then close the window.
Select Accept License Agreement.
Under «Oracle Database 11g Release 2 Client 11.2.
Save the win64_11gR2_client.
Is Oracle 11g Free for Download?
It is the same powerful Oracle Database that enterprises rely on worldwide, packaged for simple download, ease-of-use, and a full-featured experience. You get an Oracle Database to use in any environment, plus the ability to embed and redistribute – all completely free!
How to Install Oracle Database 11g on Windows 10 By …
We have to download the software which you can do by visiting the oracle website go to Oracle comm. And click the download from the menu. And choose Oracle database.
Is Oracle 11g Supported on Windows 10?
Oracle 11g Release 2 is not compatible with Windows 10. Windows 10 users should download the Oracle 12.1 client instead.
How do I Start Oracle 11g Express on Windows 10?
On Windows: Click Start, point to Programs or All Programs, point to Oracle Database 11g Express Edition , and then select Start Database. On Linux with Gnome: In the Applications menu, point to Oracle Database 11g Express Edition, and then select Start Database.
How do I Start Oracle 11g after Installation?
On Windows, from the Start menu , select Programs or All Programs, then Oracle Database 11g Express Edition, and then Get Started.
On Linux, click the Application menu on Gnome or the K menu on KDE, then point to Oracle Database 11g Express Edition, and then Get Started.
How do I Download and Install Oracle 11g Database Client?
Download and unzip Oracle 11g Client ODTODAC 11.2.
Launch the Setup. exe file . …
Click Next to continue.
Select the option to install Oracle Data Access Components for Oracle Client.
Retain the default paths if they appear as shown here with references to 11g.
How do I Install Oracle 11g Express on Windows 10 64 Bit?
Click Free Download and follow the instructions to select and download the Microsoft Windows version of Oracle Database XE. After downloading the Oracle Database XE installation executable, setup.exe , doubleclick it.
How to Install Oracle Database 11g on Windows?
Step 1: Go to oracle.com and Click on Options Menu. Step 2: Click the Download Button and Scroll Down to Database Section. Step 3: Click Database 11g Enterprise/Standard Editions, after which youll find different versions of Oracle for different OS. Download the Files according to your OS.
How do I Install Oracle 11g Express on Windows 10?
Log on to Windows with Administrative privileges .
Click Free Download and follow the instructions to select and download setup.exe , the Microsoft Windows version of Oracle Database XE.
Check the response file and modify the settings if necessary.
How do I Download and Install Oracle 11g on Windows 7 64 Bit?
First, we have to download the software from the Oracle website.
When the download completes, unzip the downloaded file and you will get a setup.exe file.
You can skip the «configure security updates» option.
How do I Download Oracle on my Laptop?
To install Oracle database on your computer, you need to download the installer from the download page of Oracle website. After having the installation files which are in ZIP format, you need to extract them into a specific folder on your computer.
How to Install Oracle Database 11g on Windows 10 By …
Oracle Database (known as Oracle RDBMS) is a Database Management System produced and marketed by Oracle Corporation.
The Most Fundamental and common usage of Oracle Database is to store a Pre-Defined type of Data. It supports the Structured Query language (SQL) to Manage and Manipulate the Data that it has. It is one of the most Reliable and highly used Relational Database Engines.
There are many versions of Oracle Database like Oracle Database 10g, Oracle Database 11g, Oracle Database 12c, Oracle Database 19c, etc. from which Oracle 19c is the Latest Version. In this article, we will learn how to Install version 11g on Windows.
Downloading the Installation Files
Step 1: Go to oracle.com and Click on Options Menu.

Step 2: Click the Download Button and Scroll Down to Database Section.

Step 3: Click Database 11g Enterprise/Standard Editions, after which you’ll find different versions of Oracle for different OS. Download the Files according to your OS.

Step 4: After Clicking the Download Button, the page will be directed to Login Screen where you’ll need to Sign In in Oracle Account. If you don’t have one, then you must Sign Up, because without that you won’t be able to download the Files.


Step 5: Repeat the same steps for both the Files and Download them.
After downloading the files Successfully, you’ll find both Files in Downloads Folder where both of them will be in Compressed Form, so you’ll need to Extract them.

Extraction of Downloaded Files
Step 1: Extract both the files with the use of WinRAR or any other extraction tool of your choice in the same directory.

Step 2: Go to Folder database -> Stage -> Components Copy all the content of this Folder

Step 3: Go to Main Database -> Stage Paste the copied content in Components Folder
Installation of Oracle Database
Step 1: Go to Main Database Folder where you’ll find Setup. Right click the setup.exe file and choose Run as Administrator.

Step 2: Click Yes to continue. This will start Oracle Universal Installer.

Step 3: Provide your Email Address to receive all the Notifications and News Alerts from Oracle.

In case you don’t want to receive any Alerts from Oracle, then Simply leave these fields empty and click on Next to move ahead.
Step 4: Select any of the three different Installation Options according to your needs.

◉ Option 1 – If you want to Install Oracle Server Software and want to Create Database also.
◉ Option 2 – If you want to Install Oracle Server only.
◉ Option 3 – If you want to Upgrade your Existing Database.
Step 5: Choose between Server Class and Desktop Class as per your requirement and click on Next.

Note: Ignore the warning related to the Admin Password.
Step 6: Configure the basic settings and create a Password for your database. Once the configuration is done click on Next to continue.

Step 7: Here, Oracle Universal Installer(OUI) will check for the Prerequisites such as Hardware compatibility.
If there will be any Errors, then OUI will show them here and will recommend the changes.

Step 8: Click on Finish to start the Installation process. This installation might take some time depending on your Hardware.


Step 9: Click OK to finish the installation.

Step 10: Copy the localhost link provided to open your Enterprise Manager.

Click the Close Button and you are done with the Installation Process.
Getting Started with Oracle Enterprise Manager
There are two ways to start Oracle Enterprise Manager:
◉ One way to launch Enterprise Manager is using the Link provided in last step of Installation Process.
Note: In case if you misplace this link in the future, follow the next step to start it the other way.
◉ Go to Start Menu and
◉ Search Oracle Folder
◉ Click on Database Control – Oracle (Your Global Database Name)
◉ This will take you to the Login Screen of your Oracle Enterprise Manager.

◉ Incase the above Error arises, just Click Advanced ->Proceed To Localhost

Login with your Credentials and begin using the Oracle Database 11g on your Windows.
Source: geeksforgeeks.org