You might find it useful to install OpenSSH on your Windows server. Running SSH on your Windows server means that you can transfer files using Secure Copy (SCP) or SFTP. Aside from SCP and SFTP, you can open a secure Powershell shell or a Bash shell if Windows Subsystem for Linux (WSL) is enabled on your Windows server.
By default, you will enter into a Windows CMD shell when you connect to the server using SSH.
This guide will explain the steps to install and configure OpenSSH in Windows Server 2016. It would be best if you were prepared to log in to your Hostwinds Windows Server to continue with this guide.
Step 1: Download and Install OpenSSH
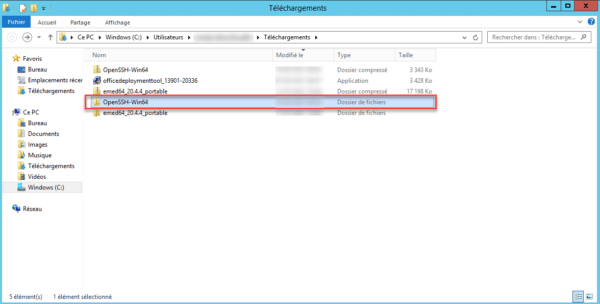
Start by accessing your server via RDP (from Mac), and download the latest release of OpenSSH (OpenSSH-Win64.zip).
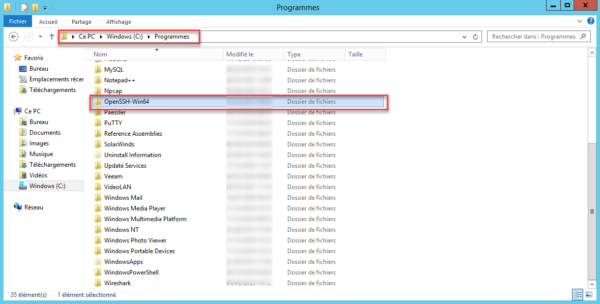
Locate the downloaded file, right-click it, and Extract All to C:\Program Files\OpenSSH-Win64.
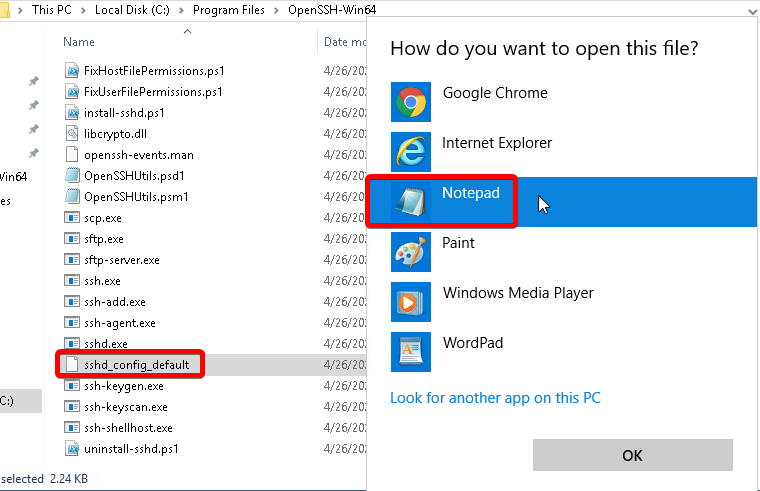
Optional: To change the default SSH port to something other than 22, select the sshd_config_default file in the OpenSSH folder and open with a text editor:
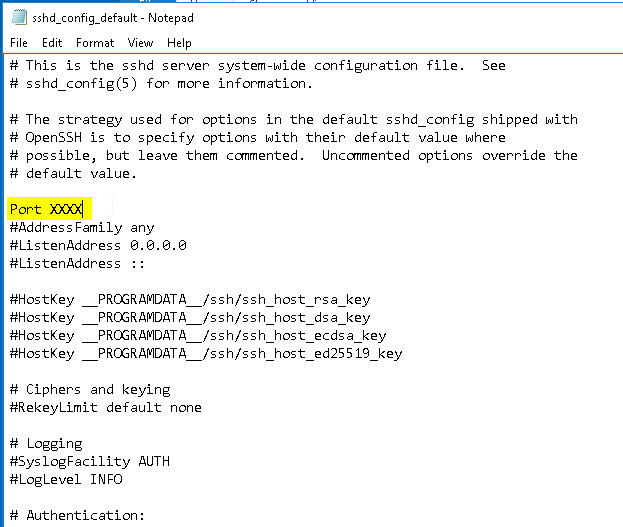
Uncomment Port 22 and change it to your desired port, then save the file:
End optional step.
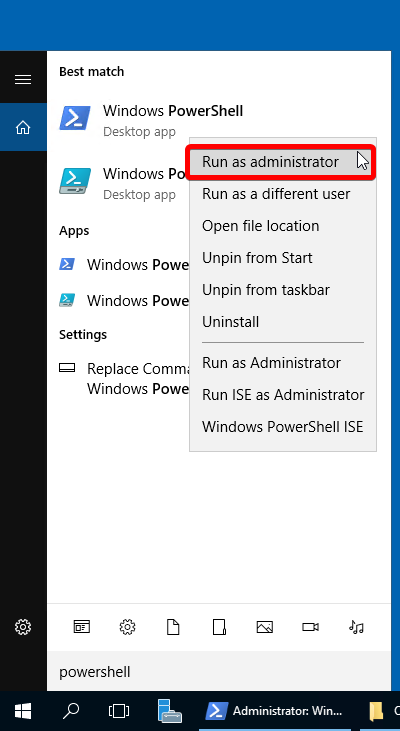
Next, search for and right-click Powershell to Run as administrator:
Modify the Path system environment variable by running the command:
setx PATH "$env:path;C:\Program Files\OpenSSH-Win64" -m
You should see the following output:
SUCCESS: Specified value was saved.
Next, change to the OpenSSH directory:
cd "C:\Program Files\OpenSSH-Win64"
Then run the install script:
.\install-sshd.ps1
Next, enable automatic startup and start sshd and ssh-agent:
Set-Service sshd -StartupType Automatic; Set-Service ssh-agent -StartupType Automatic; Start-Service sshd; Start-Service ssh-agent
Step 2: Allow Access in Windows Firewall
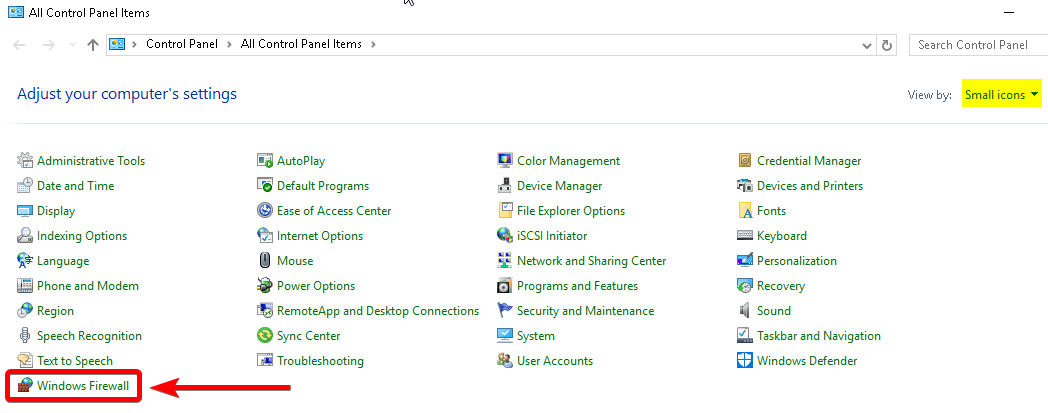
Start by opening Control Panel > Windows Firewall:
Select Advanced Settings on the left-hand side, then select Inbound Rules > New Rule…:
Under Rule Type, select Custom > Next.
Under Program, select All programs > Next.
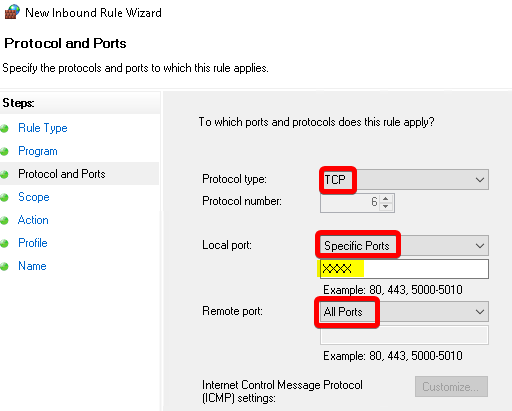
Under Protocols and Ports, enter your desired SSH port with the following selections:
Under Scope, let the rule apply to Any IP address for remote and local IP addresses, then Next.
Under Action, select Allow the connection > Next.
Under Profile, leave Domain, Private, and Public checked > Next.
Lastly, name the rule and select Finish.
Now you can access your Windows server using SSH!
С помощью встроенного пакета OpenSSH для Windows вы можете легко настроить безопасную передачу файлов между клиентом и серверов Windows по защищенному протоколу передачи файлов SFTP (Secure FTP). В этой статье мы покажем, как установить и настроить установить SFTP сервер в Windows 10/11 или Windows Server 2022/2019/2016/2012R2 с помощью встроенных средств (Win32-OpenSSH).
Содержание:
- Установка OpenSSH в Windows
- Настройка SFTP сервера на базе OpenSSH в Windows
- Подключение к SFTP серверу с помощью PowerShell и WinSCP
- Настройка SFTP аутентификации по ключам
Протокол SFTP (Secure File Transfer Protocol , Secure FTP или SSH FTP) это расширение протокола SSH, являющимся стандартом мира UNIX/Linux систем. Хотя с точки зрения пользователей он похож на FTP, но на самом деле это абсолютно другой протокол, не имеющий с FTP ничего общего. Данные между клиентом и сервером передаются по порту 22 через SSH туннель.
Основные преимущества протокола SFTP:
- Передача файлов и команд происходит внутри защищенной SSH-сессии;
- Для передачи файлов и команд используется одно соединение;
- Поддерживаются символические ссылки, доступны функций прерывания, возобновления передачи, удаления файла и другие;
- Обычно на каналах, где FTP работает медленно или с перебоями, SFTP-соединение работает более надежно и быстро;
- Возможность аутентификации с помощью SSH ключей.
Не нужно путать протоколы SFTP и FTPS. FTPS – это по сути обычный FTP с SSL сертификатом, а SFTP – это передача FTP данных и команд внутри SSH сессии.
В современные версии Windows по-умолчанию встроен порт OpenSSH для win32 (Win32-OpenSSH). Вы можете использовать его для организации защищенного SFTP сервера вместо таких сторониих продуктов как Core FTP, FileZilla, CYGWIN, OpenSSH, FTP Shell, IPSwitch и пр.
Установка OpenSSH в Windows
Пакет OpenSSH уже включен в операционную систему в современных билдах Windows 10 (начиная с 1803), Windows 11, Windows Server 2022/2019 в виде Feature on Demand (как и RSAT).
В этих версиях Windows вы можете установить сервер OpenSSH с помощью PowerShell:
Add-WindowsCapability -Online -Name OpenSSH.Server*
Или с помощью DISM:
dism /Online /Add-Capability /CapabilityName:OpenSSH.Server~~~~0.0.1.0
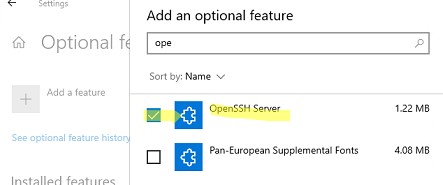
Также можно установить OpenSSH из графического интерфейса Windows 10 (Settings -> Apps -> Optional Features -> Add a feature -> Open SSH Server -> Install).
Чтобы проверить, установлен ли пакет:
Get-WindowsCapability -Online | ? Name -like 'OpenSSH*'
Исполняемые файлы OpenSSH находятся в каталоге:
C:\windows\system32\OpenSSH\
Конфигурационный файл sshd_config находится в каталоге C:\ProgramData\ssh (каталог создается после первого запуска службы).
Лог — c:\windows\system32\OpenSSH\logs\sshd.log
Файл authorized_keys и ключи хранятся в каталоге %USERPROFILE%\.ssh\.
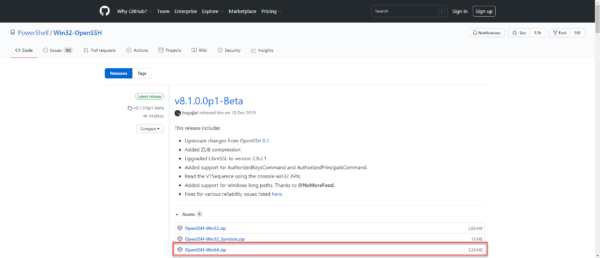
В предыдущих версиях Windows 10, в Windows 8.1 или в Windows Server 2016/2012 R2 вам придется скачать Win32-OpenSSH для Windows с GitHub и установить вручную (https://github.com/PowerShell/Win32-OpenSSH/releases). Нам нужна версия для 64 битной версии Windows: OpenSSH-Win64.zip (4,15 Мб).
- Распакуйте содержимое архива в целевой каталог, к примеру:
C:\OpenSSH-Win - Запустите командную строку PowerShell с правами администратора и перейдите в каталог OpenSSH:
cd C:\OpenSSH-Win - Добавьте путь к каталогу OpenSSH в переменную окружения Path;
- Установите сервер OpenSSH:
.\install-sshd.ps1
должно появиться зеленое сообщение “sshd and ssh-agent services successfully installed”).
Настройка SFTP сервера на базе OpenSSH в Windows
Теперь вам нужно настроить OpenSSH для режима SFTP.
Включите автозапуск для службы SSHD и запустите ее с помощью следующих PowerShell команд управления службами:
Set-Service -Name sshd -StartupType ‘Automatic’
Start-Service sshd
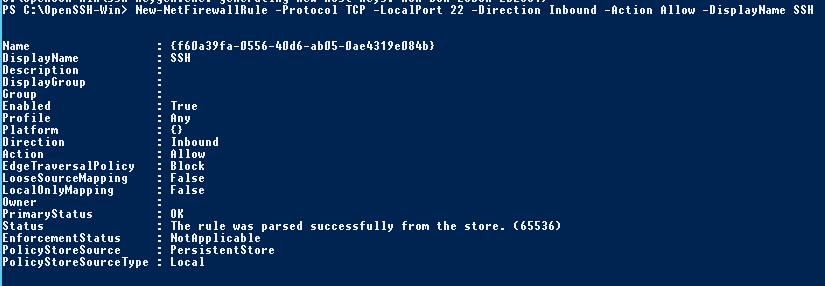
С помошью PowerShell отройте в брандмауэре Windows порт TCP 22 для входящего трафика на SSH сервер:
New-NetFirewallRule -Protocol TCP -LocalPort 22 -Direction Inbound -Action Allow -DisplayName SSH
Рассмотрим полезные директивы в конфигурационном файле sshd_config:
# разрешить подключение к OpenSSH только для пользователей из этой группы
AllowGroups corp\admingroup
# включить аутентификацию по паролю (нельзя использовать ключи SSH)
AuthenticationMethods password
ForceCommand internal-sftp
#каталог для SFTP пользователей (по умолчанию пользователь подключается в каталог со своим профилем в папке C:\users\username)
ChrootDirectory C:\SFTPRoot
#Для каждого пользователя можно индивидуальную chrootdirectory:
Match User user1
ChrootDirectory c:\SFTPRoot\user1
ForceCommand internal-sftp
X11Forwarding no
 AllowTcpForwarding no
Match User user2
ChrootDirectory c:\SFTPRoot\user2
ForceCommand internal-sftp
X11Forwarding no
AllowTcpForwarding no
Подключение к SFTP серверу с помощью PowerShell и WinSCP
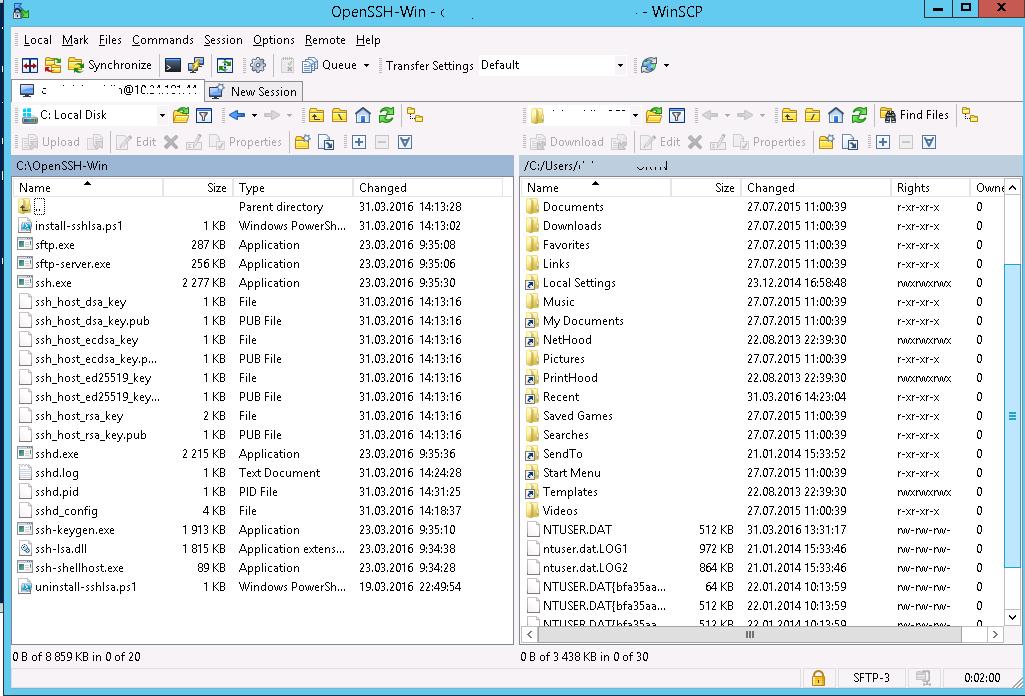
Теперь вы может подключиться к вашему SSH серверу на Windows по протоколу SFTP. Ниже мы покажем, как подключиться к SFTP серверу с помощью бесплатного клиента клиент WinSCP, консоли PowerShell и встроенной утилиты sftp.exe.
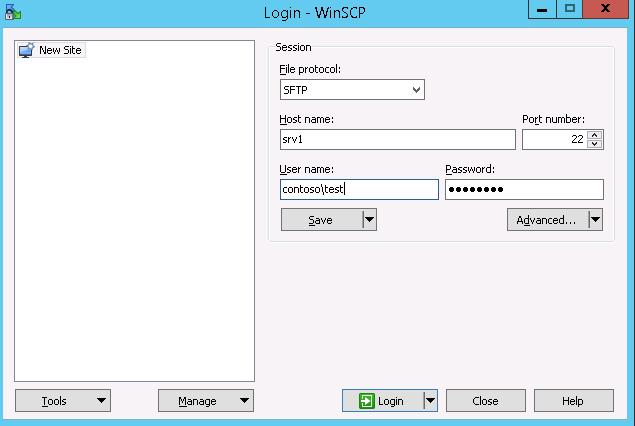
В окне настройки подключения выберите протокол передачи файлов SFTP, укажите имя сервера и данные учетной записи Windows (в формате
user@domain
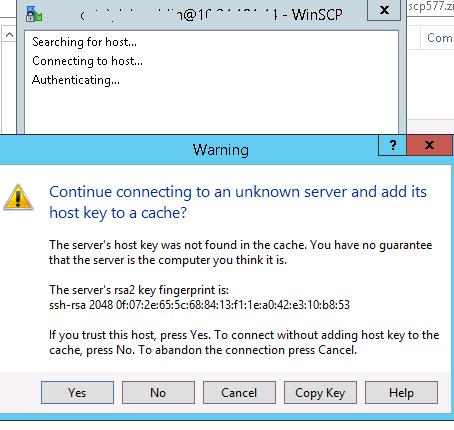
для доменных пользователей), под которой осуществляется подключение (возможно также настроить авторизацию по ключам). При первом подключении появится окно с предупреждением о том, что ключ хоста отсутствует в локальном кеше.
С помощью привычного интерфейса файлового менеджера можно безопасно копировать файлы между сервером и клиентом по защищённому протоколу SFTP.
Для подключения к SFTP серверу из PowerShell можно использовать модуль Posh-SSH. Вы можете скачать установить модуль из PowerShell Gallery или офлайн:
Install-Module -Name Posh-SSH
Для подключения к SFTP серверу с помощью пароля, нужно получить имя пользователя и пароль через Get-Credential:
$usrCreds= Get-Credential
Теперь можно подключиться к вашем SFTPS серверу:
$SFTPSession = New-SFTPSession -ComputerName 192.168.13.200 -Credential $usrCreds
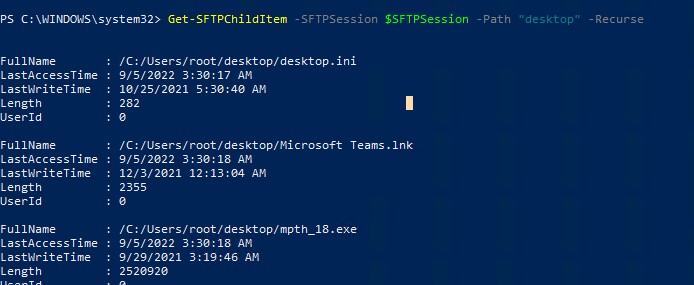
Теперь вы можете вывести список файлов в удаленном каталоге на SFTP сервере. В этом примере я получу список файлов на рабочем столе пользователя (профиль пользователя в этом случае будет являться корнем)
Get-SFTPChildItem -SFTPSession $SFTPSession -Path "desktop" –Recurse
Чтобы скачать файл с удаленного SFTP сервера:
Get-SFTPItem -SessionId $SFTPSession.SessionId -Path "desktop/OpenVPNScript.log" -Destination c:\temp
Чтобы закачать файл с вашего компьютера на удаленный SFTP хост:
Set-SFTPItem -SessionId $SFTPSession.SessionId -Path C:\Temp\mytestfile.log -Destination “desktop”
Завершить SFTP сессию:
Remove-SFTPSession -SFTPSession $SFTPSession
В Windows вы можете использоваться встроенную утилиту sftp.exe (устанавливается вместе с клиентом OpenSSH) для подключения к SFTP серверу.
Подключиться к sftp серверу:
sftp [email protected]
Подключиться с помощью ssh ключа:
sftp -i .ssh/id_rsa [email protected]
Вывести список файлов в удаленном каталоге:
pwd
Скачать файл с SFTP в локальный каталог на ваш компьютер:
get file-test1.txt
Загрузить файл с вашего компьютера на SFTP сервер:
put file-test2.txt
Закрыть сессию:
exit
Настройка SFTP аутентификации по ключам
Вы можете настроить SFTP аутентификацию по ключам. В этом случае при подключении к SFTP серверу вам не нужно будет указывать пароль пользователя.
Подробно настройка SSH аутентификации по ключам описана в этой статье.
Для этого нужно:
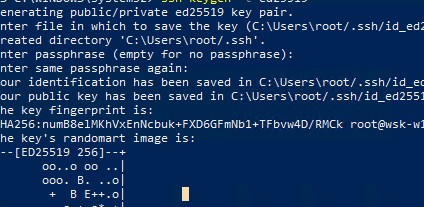
- Создать на вашем компьютере (SFTP клиент) ключи для пользователя, под которым вы будете подключаться к серверу:
ssh-keygen -t ed25519
- Утилита сгенерирует два файла
id_ed25519
(закрытый ключ для клиента) и
id_ed25519.pub
(открытый ключ для сервера); - Теперь нужно добавить ваш SSH ключ на сервер. Скопируйте файл id_ed25519.pub(или id_rsa.pub в зависимости от типа ключа) в каталог .ssh профиля пользователя, под которым вы будете подключаться к SFTP серверу. Переименуйте файл в authorized_keys (например для пользователя alex путь будет выглядеть так:
C:\Users\alex\.ssh\authorized_keys
)
Теперь вы можете использоваться файл id_ed25519 для аутентификации на SFTP сервере в настройках WinSCP (настройки подключения Advanced -> to SSH > Authentication page -> Private key file).
Если вы хотите задать SSH ключ при подключении к SFTP из PowerShell, используйте такую команду:
New-SFTPSession -ComputerName 192.168.13.200 -Credential user1 -KeyFile C:\Users\alex\.ssh\id_ed25519" -Verbose
In this tutorial, I will explain how to install the OpenSSH client and Server on Windows Server 2012R2 and 2016.
At the time of writing this tutorial, this feature is native to Windows 10 and Windows Server 2019 and you might also want to have OpenSSH client or server on an earlier version.
Personally, I use the SSH client very regularly through PowerShell or Command Prompt windows, it avoids having to install Putty.
- Recover Win32 OpenSSH
- «Installation» of files on the server
- Adding the environment variable
- Use the SSH client of Windows Server 2012R2 / 2016
- Install the OpenSSH server on Windows Server 2012R2 / 2016
- Connect to Windows on the SSH server
- Conclusion
Recover Win32 OpenSSH
The first step is to retrieve from the GitHub repository PowerShell/Win32-OpenSSH: Win32 port of OpenSSH (github.com), the latest version available.
Go to the realeases page and download the latest version available corresponding to the architecture of the Windows installation (32 or 64 bits).
For me, it will be the 64 Bits version.
Once the archive has been downloaded, unzip it.
“Installation” of files on the server
Now, we will copy the folder from the unzipped archive to the C: \ Program Files folder.
The SSH client is now functional, but for ease of use, we will configure its location in the environment variables so as not to have to call the executable by its full path.
Adding the environment variable
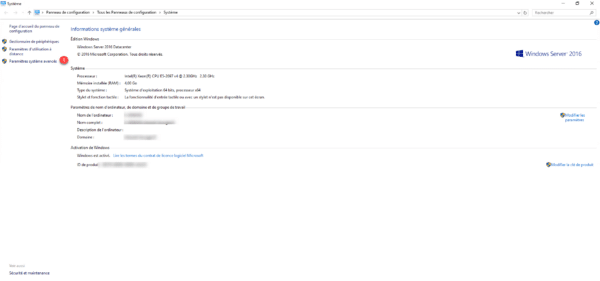
Open the system window and click on Advanced system settings 1.
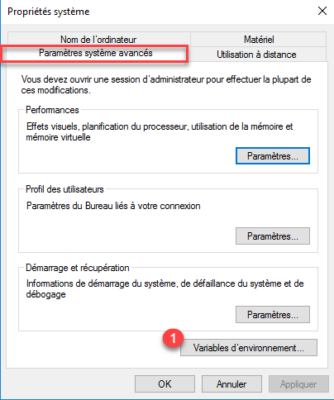
On the Advanced system parameters tab, click on the Environment variables 1 button.
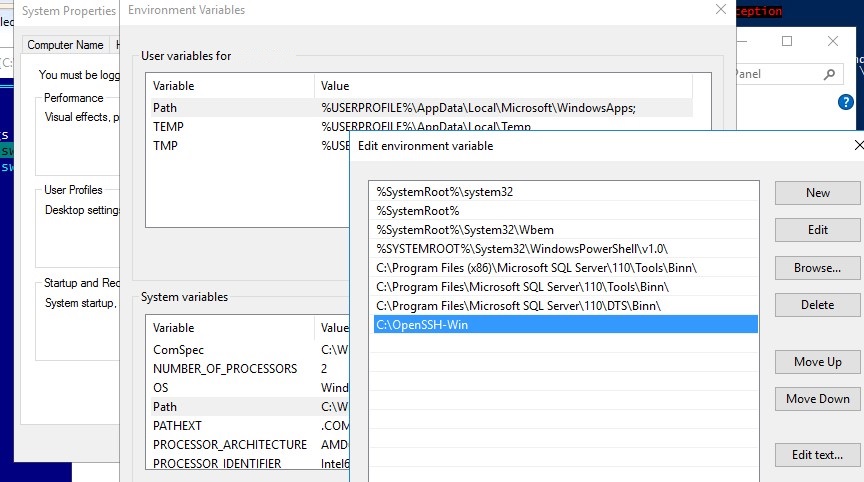
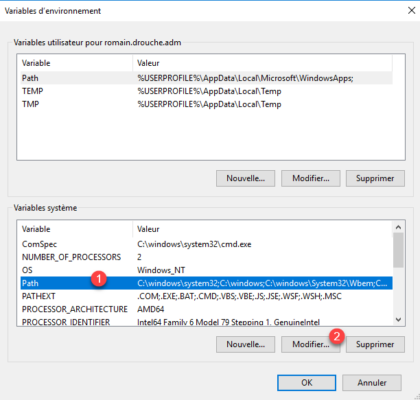
In the System variable part, find the Path 1 variable, once selected, click on the Modify 2 button.
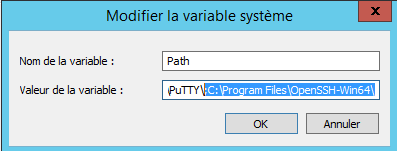
On Windows 2012R2, add at the end; C: \Program Files\OpenSSH-Win64\
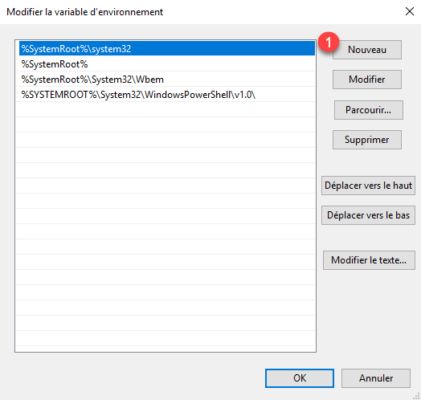
On Windows 2016, click on New 1.
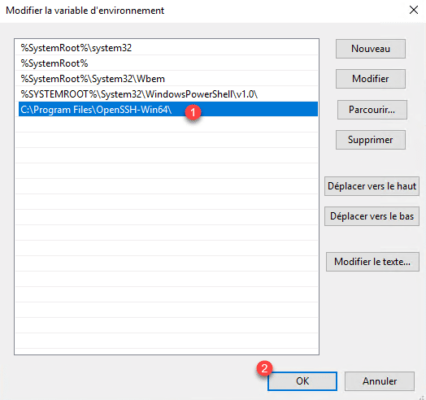
Add the location of the OpenSSH folder: C:\Program Files\OpenSSH-Win64\ 1 and click on OK 2.
Close the various windows.
Use the SSH client of Windows Server 2012R2 / 2016
Open a command prompt or PowerShell.
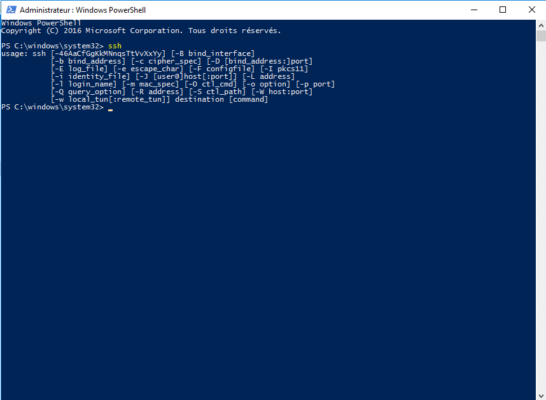
The easiest way to find out if it’s okay is to enter the ssh command. This command should return the various parameters of the SSH utility.
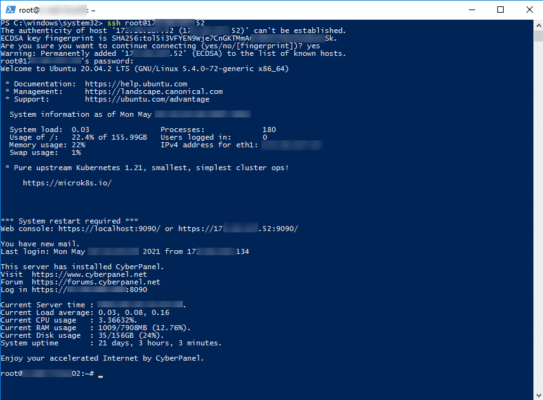
To connect to a server (Linux) enter the command ssh USER @ IP_SERVER
It is also possible to configure an OpenSSH server on Windows Server with Win32 OpenSSH which will allow you to connect to the Windows server in the same way as a Linux OS.
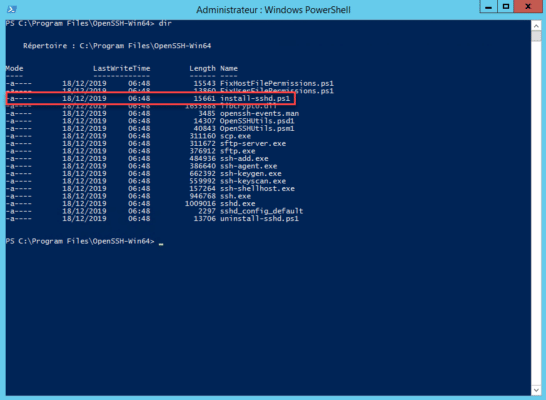
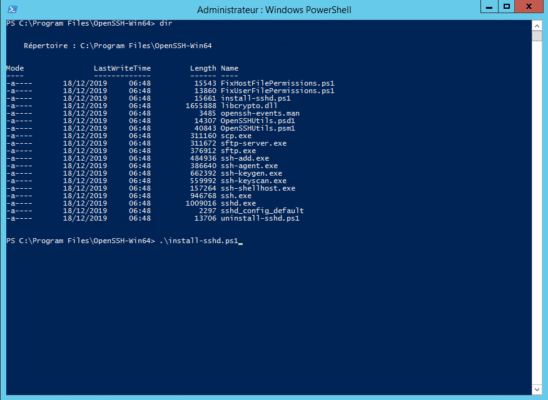
From a PowerShell window, go to the C: \ Program Files \ OpenSSH-Win64 \ folder, in the folder is a PowerShell script that will configure the server part.
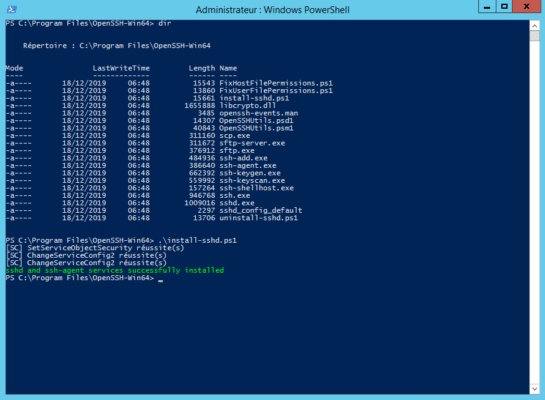
Run the install-sshd.ps1 PowerShell script
If the installation is successful, the message is displayed: sshd and ssh-agent services successfully installed.
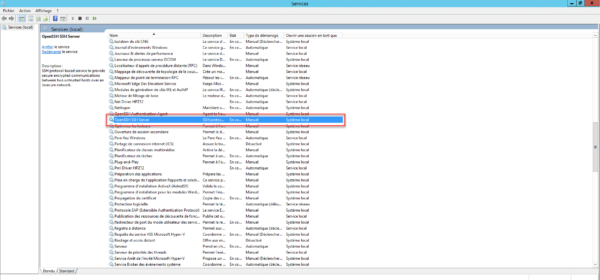
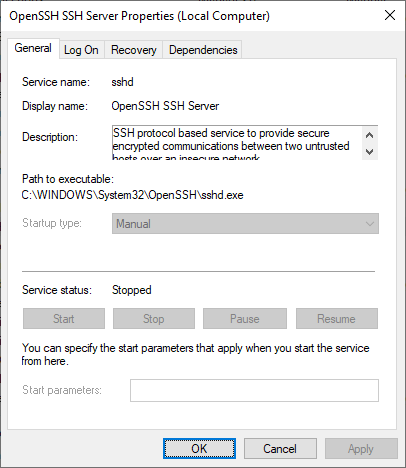
Open Windows Service Manager and search for OpenSSH SSH Server, by default it is stopped. Start the service.
If necessary, configure the service to start automatically
Depending on your configuration, remember to allow incoming connections on port 22.
The server part is operational.
Connect to Windows on the SSH server
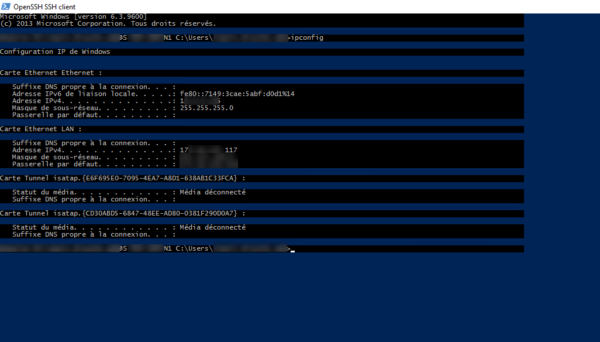
From another computer, use an SSH client to connect, being in an Active Directory environment, I just need to use the ssh IP_SERVER command and then enter my password.
Once connected, enter a command such as ipconfig or hostname to validate that the command has been executed on the remote server.
Conclusion
For the client part, for my part, I find the use in native practical which avoids going through a third-party tool and we quickly get used to when we use Windows 10 and the SSH client I find, missing on Windows 2012R2 and Windows 2016 , the problem is now resolved 🙂
For the server part, I find it useful for non-domain servers, because configuring WinRM and PSSession for connection can quickly become “a headache”.
OpenSSH is an ideal and secure way of performing remote maintenance & administration on your servers. Even on Windows Server! 
In this small tutorial, I’ll show you how to manually install OpenSSH in Windows Server (all versions). You’ll notice I’m not using PowerShell’s Add-WindowsCapability cmdlet, because it errors out on unsupported platforms. And I want to be able to customize the sshd installation directory. If you follow this post, you can install Microsoft OpenSSH Server on Windows Server 2022 through even Windows Server 2012 R2, in a destination folder of your choosing. Sweet 
Please note that a lot has changed in recent years, like Microsoft releasing .msi Windows Installer installation files, and you no longer have to depend on PowerShell Add-WindowsCapability or .zip files. Wherever possible, use the OpenSSH .msi installation option.
Want to know how to extract files from an MSI package file?
Prerequisites
In order to be able to install OpenSSH on Windows, you need the software. Doh! 
- Download the latest release from GitHub: https://github.com/PowerShell/Win32-OpenSSH/releases (OpenSSH-Win64.zip for example).
Install “Windows for OpenSSH” using PowerShell
- Unblock the downloaded OpenSSH archive if necessary:
Unblock-File .\Downloads\OpenSSH-Win64.zip - Extract the archive:
Expand-Archive .\Downloads\OpenSSH-Win64.zip -DestinationPath . - Copy the OpenSSH-Win64 folder to your desired location, e.g c:
Copy-Item -Recurse .\OpenSSH-Win64\ 'C:\' - The libcrypto.dll file has to be accessible for all users:
&icacls C:\OpenSSH-Win64\libcrypto.dll /grant Everyone:RX - Run
install-sshd.ps1to create the OpenSSH Authentication Agent and OpenSSH SSH Server services. It also sets some permissions and registers an Event Tracing (ETW) provider. - Change the service startup to Automatic. The OpenSSH SSH Server service is set to Manual startup, not automatic:
&sc.exe config sshd start= auto,&sc.exe config ssh-agent start= auto - Start the OpenSSH Authentication Agent and SSH Server services:
&sc.exe start sshd,&sc.exe start ssh-agent - Make sure your Windows Defender Firewall is open for port 22, rule OpenSSH-Server-In-TCP must be enabled. If this rule is not available, manually create it:
New-NetFirewallRule
  -Name sshd
  -DisplayName 'OpenSSH SSH Server'
  -Enabled True
  -Direction Inbound
  -Protocol TCP
  -Action Allow
  -LocalPort 22
  -Program "C:\Windows\System32\OpenSSH\sshd.exe"
Replace C:\Windows\System32\OpenSSH\sshd.exe with the actual path to the sshd.exe (C:\OpenSSH\sshd.exe, if you followed this instruction). Or go to Control Panel > System and Security > Windows Firewall > Advanced Settings > Inbound Rules and add a new rule for port 22.
Let’s connect!
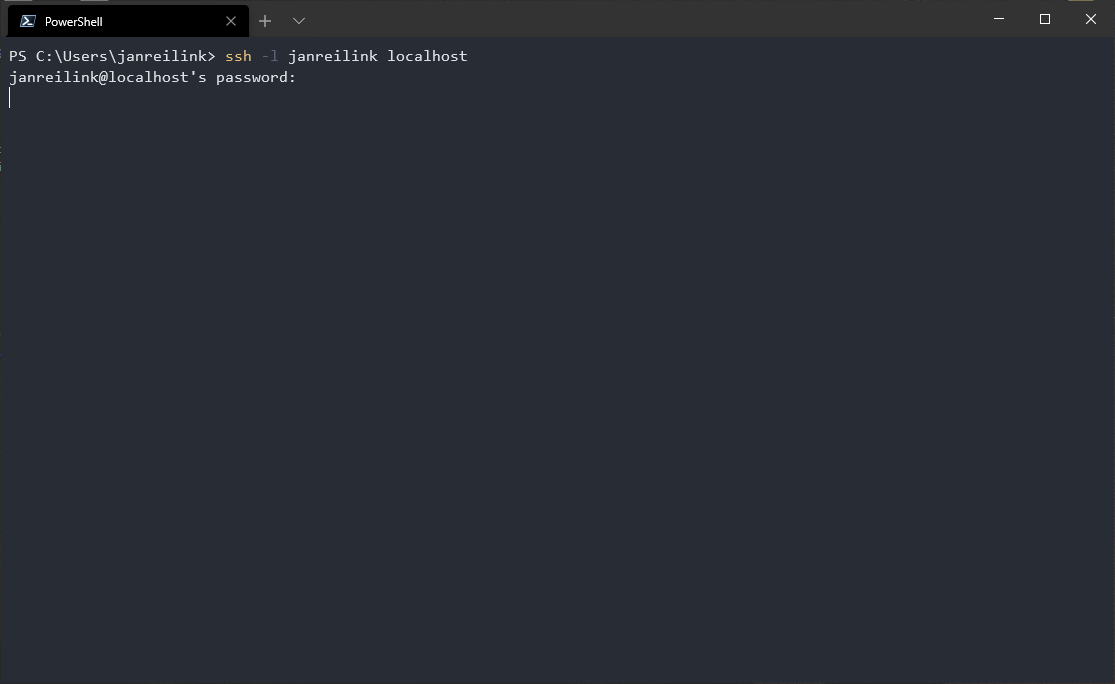
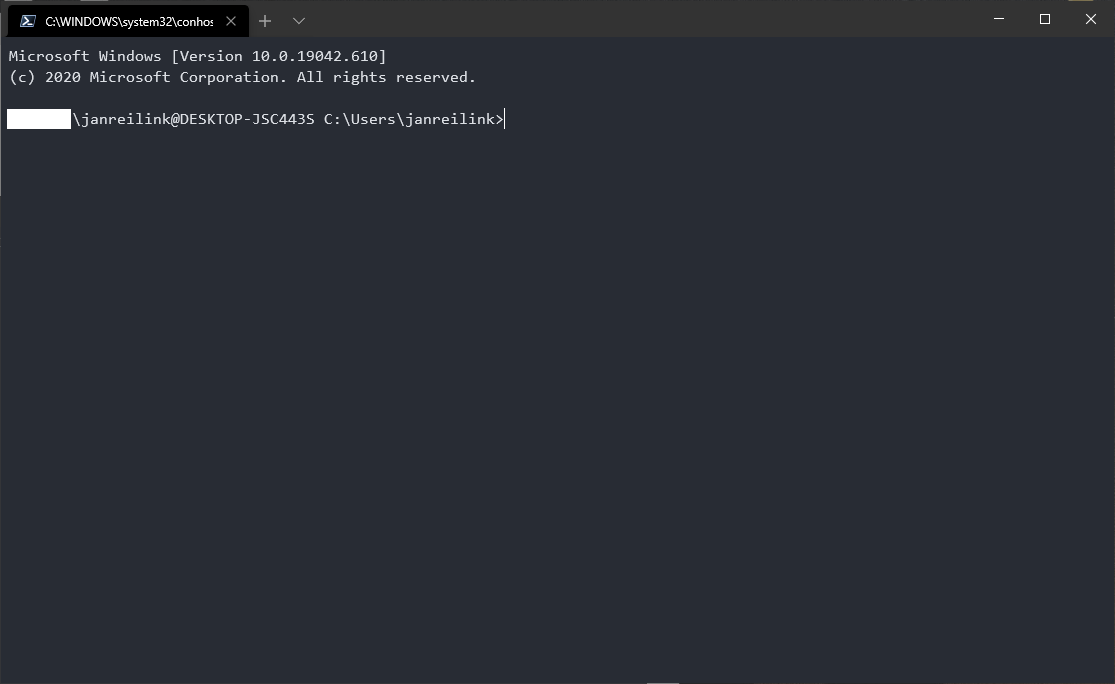
PS C:\> ssh -l janreilink localhost
Install Win32-OpenSSH Server using MSI Installer
If you have downloaded the .msi Windows Installer MSI-file of Microsoft OpenSSH (OpenSSH-Win64-v8.9.1.0.msi for example), you can install OpenSSH server and client easily. The following command installs both OpenSSH Server and OpenSSH Client:
msiexec /i path to OpenSSH-Win64-v8.9.1.0.msiThis, however installs OpenSSH in the location C:\Program Files\OpenSSH, and doesn’t update your $env:path environment variable. There are some other caveats. You can follow my guide “install Microsoft OpenSSH Client properly in Windows 11 and Windows 10 to support FIDO/U2F security keys” on Windows Server 2022 / 2019 to install and configure OpenSSH Server and Client using .msi installer files.
sshd_config
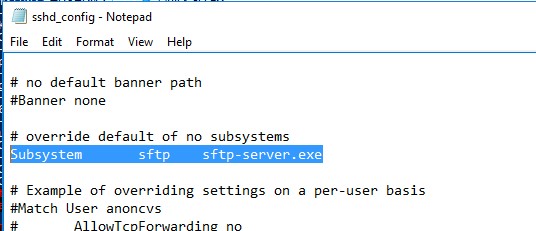
Often you not only need to install OpenSSH, you also need to configure it. For this, OpenSSH on Windows uses an mechanism where the default sshd_config (called “sshd_config_default“) is located in the directory to where you’ve unpacked the OpenSSH-Win64.zip archive. When you start the service, the file is copied to C:\ProgramData\ssh\sshd_config.
In Windows, sshd reads configuration data from %programdata%\ssh\sshd_config by default, or a different configuration file may be specified by launching sshd.exe with the -f parameter. If the file is absent, sshd generates one with the default configuration when the service is started.
https://docs.microsoft.com/en-us/windows-server/administration/openssh/openssh_server_configuration#windows-configurations-in-sshd_config
So you can either make you configuration in the sshd_config_default file, that is copied when you start the service for the first time, or you start and stop OpenSSH, edit C:\ProgramData\ssh\sshd_config and restart OpenSSH again.
Install OpenSSH on Windows Server 2012
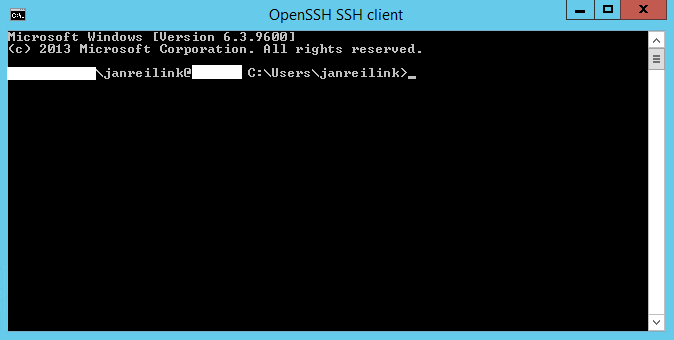
OpenSSH Server on Windows Server 2012 R2, you said? Yes, you can use the same method to install OpenSSH in Windows Server 2012 R2 (version 6.3.9600). Here is a screenshot of connecting to sshd on Windows version 6.3.9600:
Conclusion and giveaway
In this post I showed you how you can install OpenSSH server in various Windows Server versions, using the downloaded .zip file archive and PowerShell. You can use this approach to customize and streamline your Microsoft OpenSSH Server environment. This goes very well with SSH keys stored in Active Directory. If you want to use FIFO/U2F security keys like YubiKey in Windows OpenSSH, follow that guide.
In an other post I’ll show you how to install OpenSSH Client in Windows 11 and Windows 10. Using the OpenSSH-Win64-v8.9.1.0.msi file.
How to Install OpenSSH Server/Client on Windows Server 2016 1607 or Before
OpenSSH is the premier connectivity tool for remote login with the SSH protocol. It encrypts all traffic to eliminate eavesdropping, connection hijacking, and other attacks. In addition, OpenSSH provides a large suite of secure tunneling capabilities, several authentication methods, and sophisticated configuration options. Installation of OpenSSH server/client on Windows 2016 1709 onward is really easy. its just few powershell commands away from using it but for older versions it can be a time wasting activity. The easiest way to install is still very long but I would to wrap in few basic steps:
Download OpenSSH
First you need to Download OpenSSH using the attached URL. A zip file will be downloaded on your desired system. Unzip it and copy it under Windows\system32 directory.
Open PowerShell ISE
Open PowerShell ISE with administrative privileges so that you can run the desired commands without any problem. Change the directory to c:\windows\system32\openssh
Run the Commands
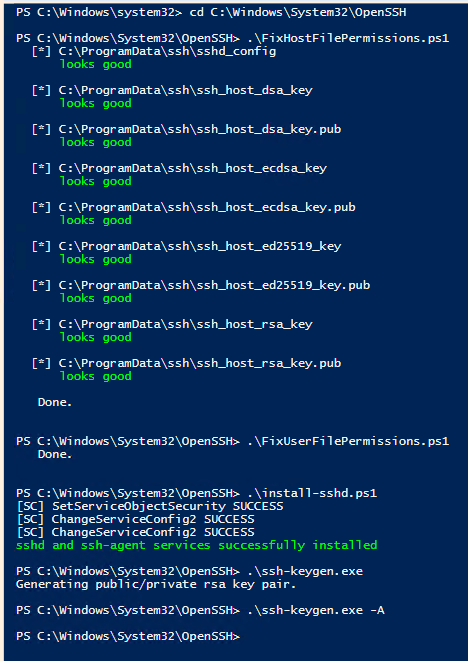
First you need to modify the required permission so run the under given command from OpenSSh Directory. The commands are given in the picture below:
Run the commands in the given order and OpenSSH server will be installed on the Windows Server 2016 1607 or earlier version.
Environment Variables
Copy the directory path and set the system environment variables so that the commands can work without giving the exact path. You can use PowerShell commands to set the path or go to system settings and manually set the path.
Start the services
Change the service startup type from manual to automatic and start the service to use OpenSSH server.
Windows Firewall Settings
SSH works on TCP port 22 so you need to open in-bound port in Windows firewall so that in-coming connections can be accepted. Opening firewall port is pretty simple and I think there is no need to share any command or process to do it.
Thanks for visiting. I hope you like the post.
