How to Install MySQL Server on Windows Server 2019. In this article we will introduce MySQL server and talk about it’s features and proceed to the installation phase on Windows server 2019.
What is MySQL

MySQL is a free, open source, and one of the most popular database management systems. It is easy to use, scalable and uses a relational database and SQL to manage its data. Generally, it is used in the modern web application as part of the popular LAMP and LEMP stack. MySQL server uses tables to store the data. A table is a collection of related data and it consists of columns and rows. It uses Structured Query Language to manipulate, control and query data.
Features of MySQL
- Free and open source.
- Supports large databases.
- Scalable and customizable.
- Concurrency Control.
- Storage Engines
- Supports many languages including, PHP, PERL, C, C++, JAVA, etc.
- Stored Procedure.
- Triggers.
- Foreign key constraints.
- Connectivity and Security.
- Client/Server Architecture.
- Secure and fast.
Follow this post next and we will explain how to install a MySQL server on Windows Server 2019.
Install MySQL Server on Windows 2019

At the time of writing this tutorial, the latest version of MySQL is version 8.0. Follow the below steps to install MySQL server on Windows 2019.
Step 1 – First, go to the MySQL download page and download the Full MySQL installer package as shown below:

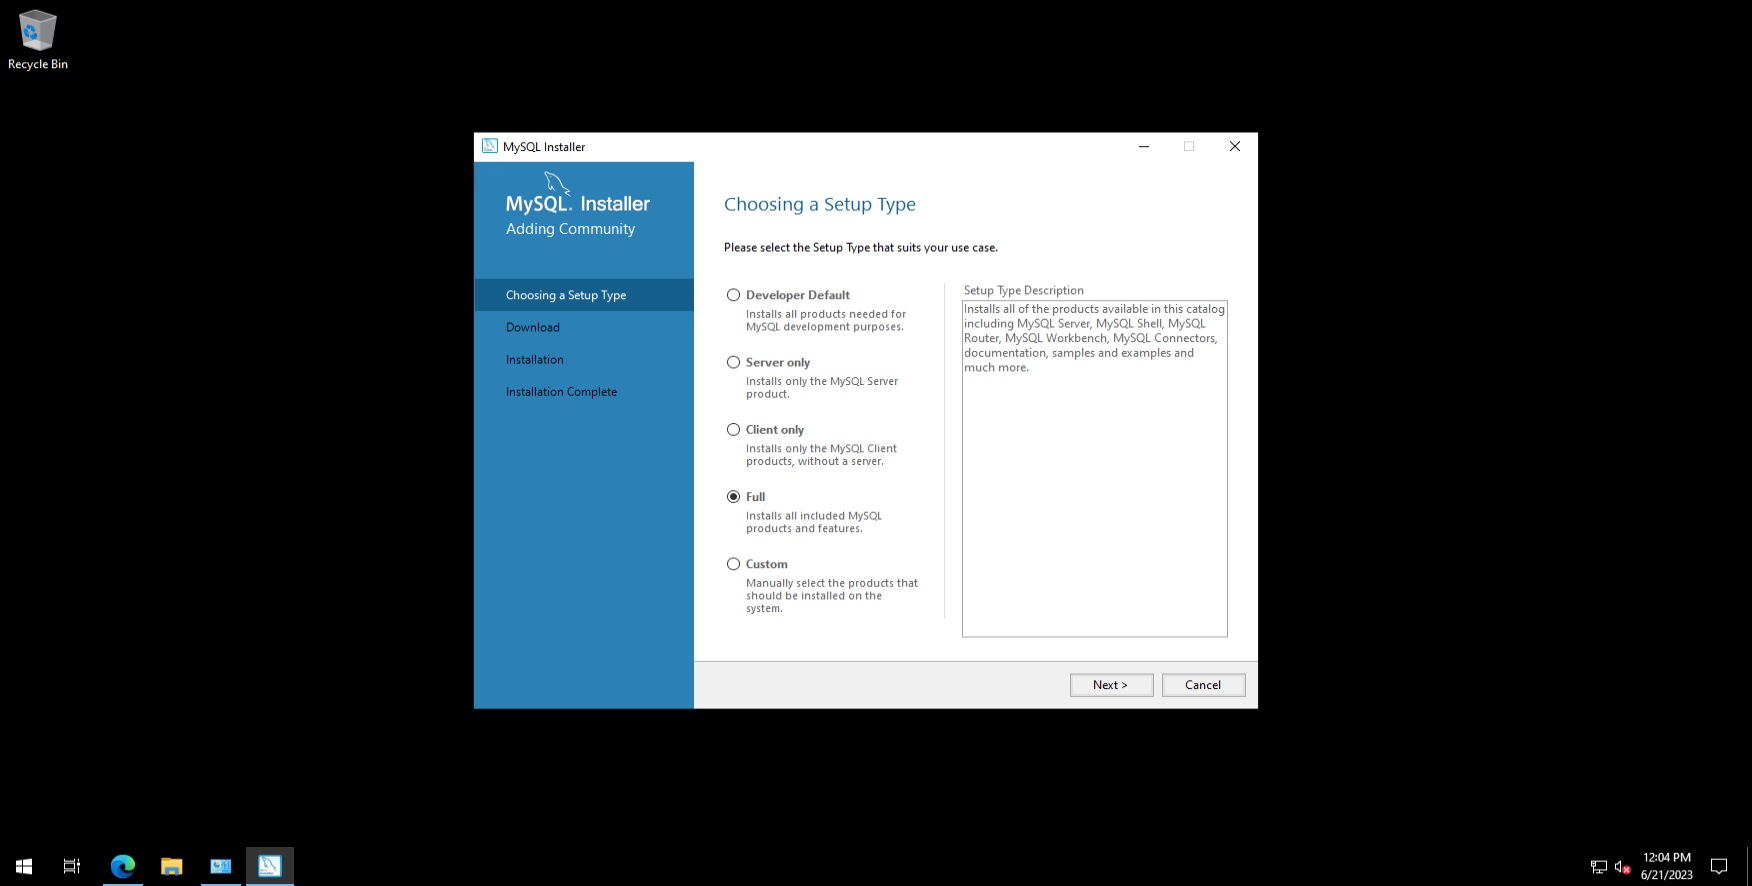
Step 2 – Once the download is completed, double click on it to start the installation. You will be asked to select the setup type as shown below:

Step 3 – Select Full and click on the Next button to install all MySQL products. You should see the requirements check screen:

Step 4 – Click on the Execute button to install all required packages. Once all the packages are installed, you should see the following screen:

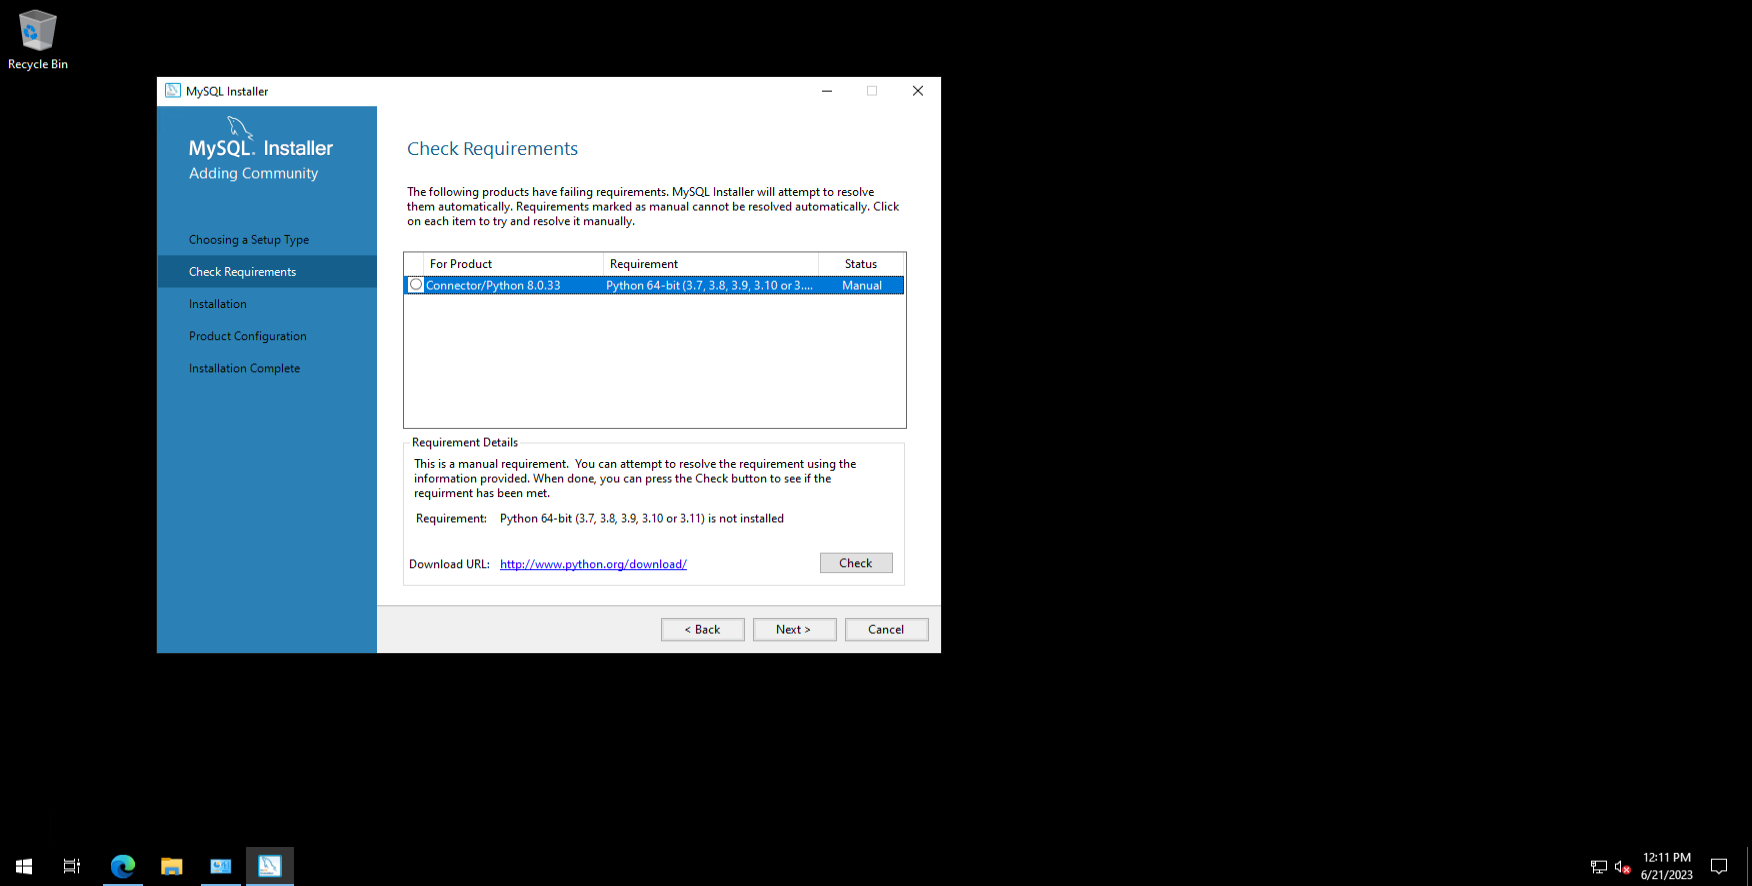
Step 5 – Click on the Next button. You will be prompt that “One or more product requirements have not been satisfied”:

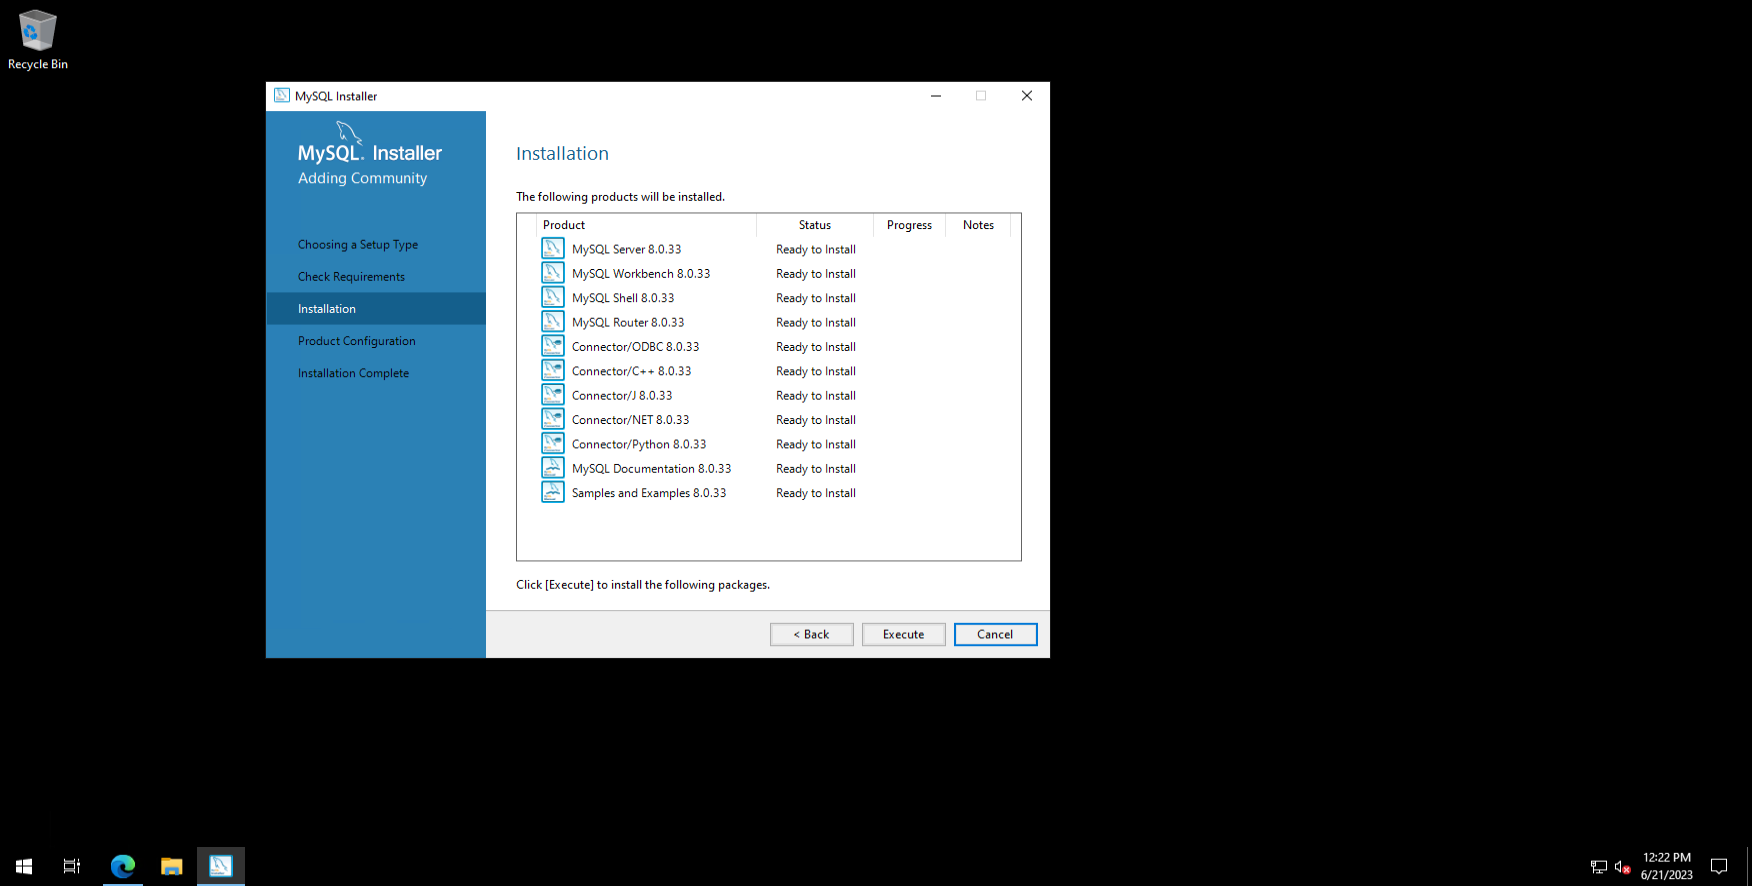
Step 6 – Click on the Yes button. You should see the installation screen:

Step 7 – Click on the Execute button to start the installation. Once all the components have been installed, you should see the following screen:

Step 8 – Click on the Next button. You should see the product configuration screen:

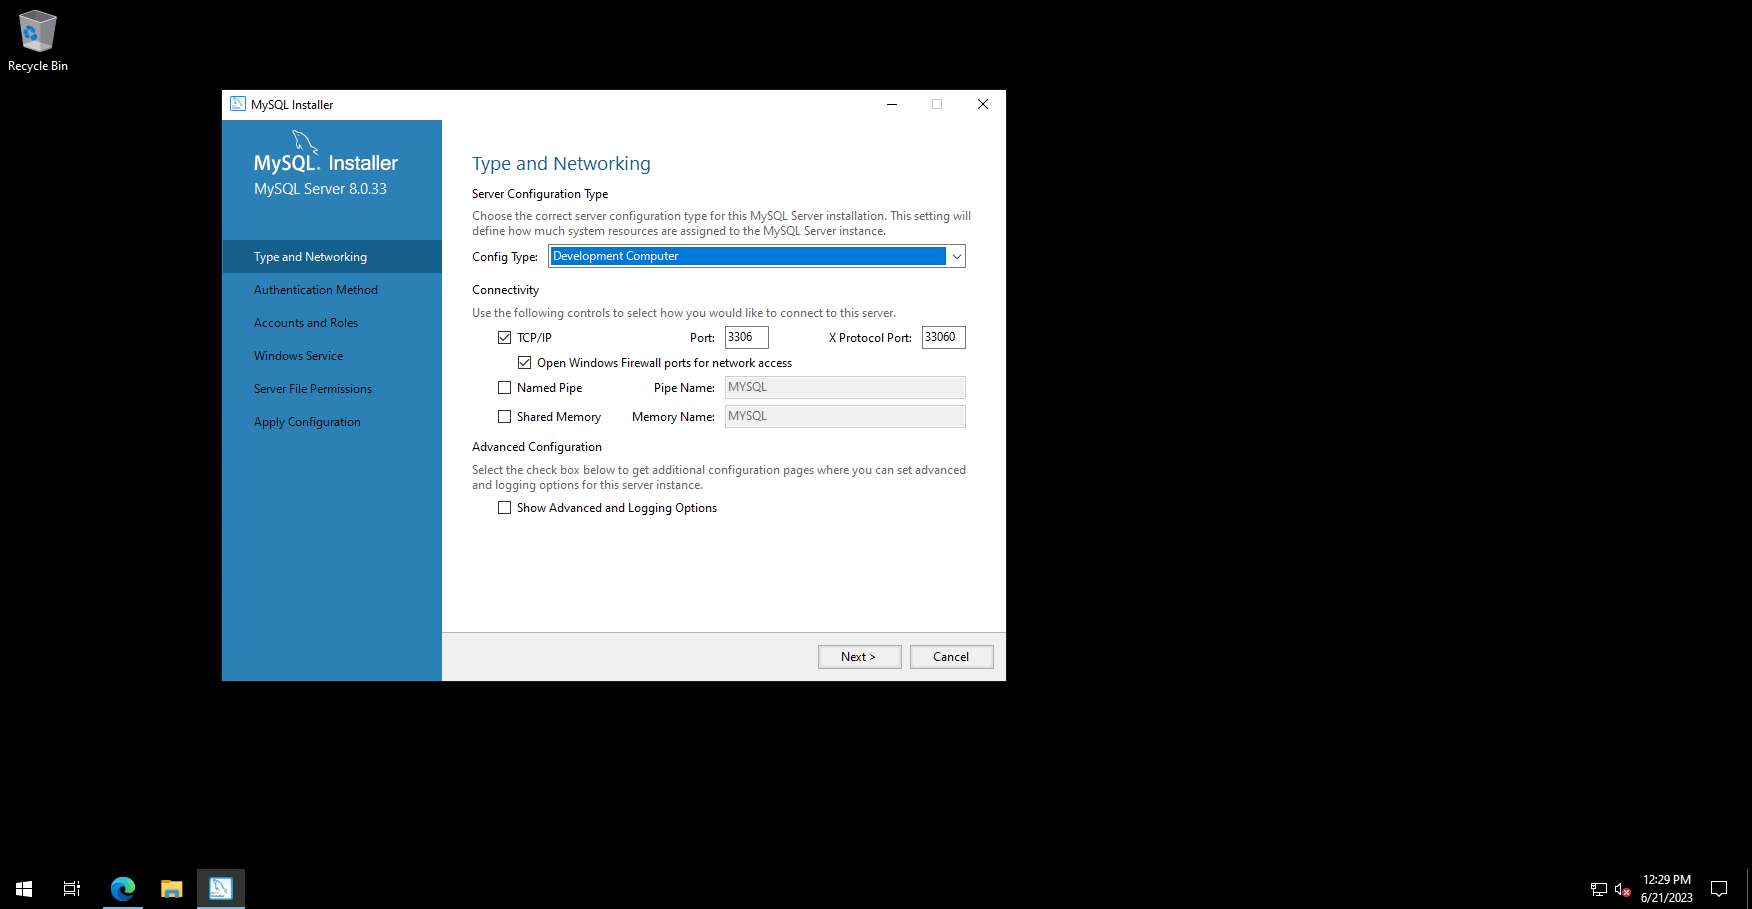
Step 9 – Click on the Next button to configure the MySQL server. You should see the MySQL networking configuration screen:
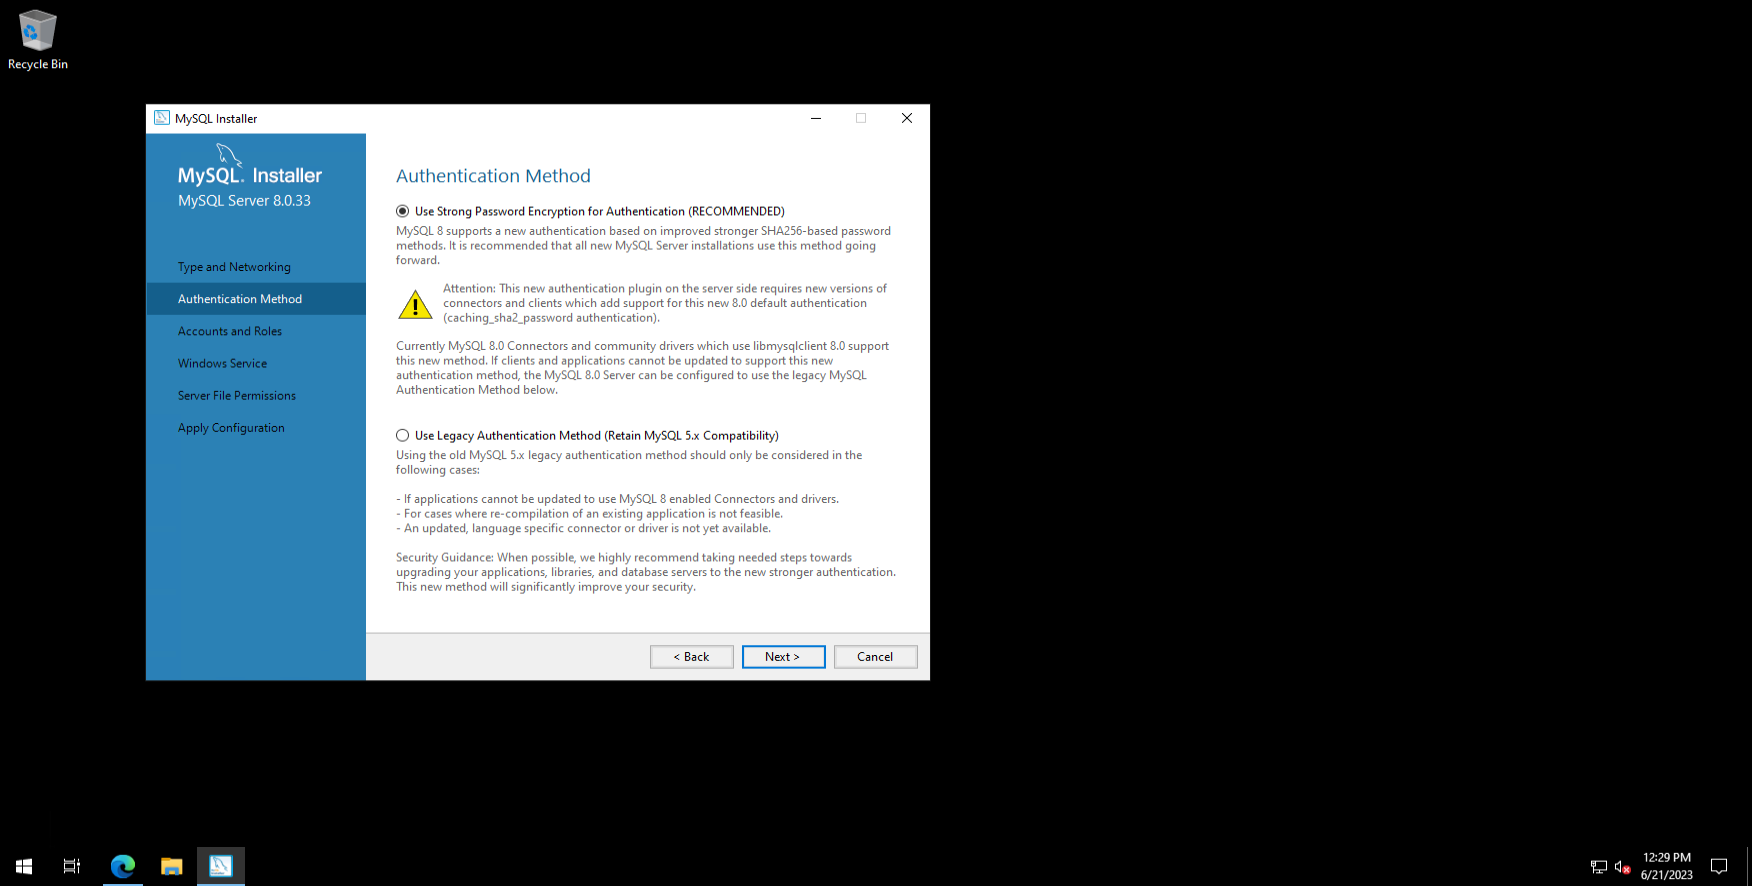
Step 10 – Select your required configuration options and click on the Next button. You should see the authentication method screen:


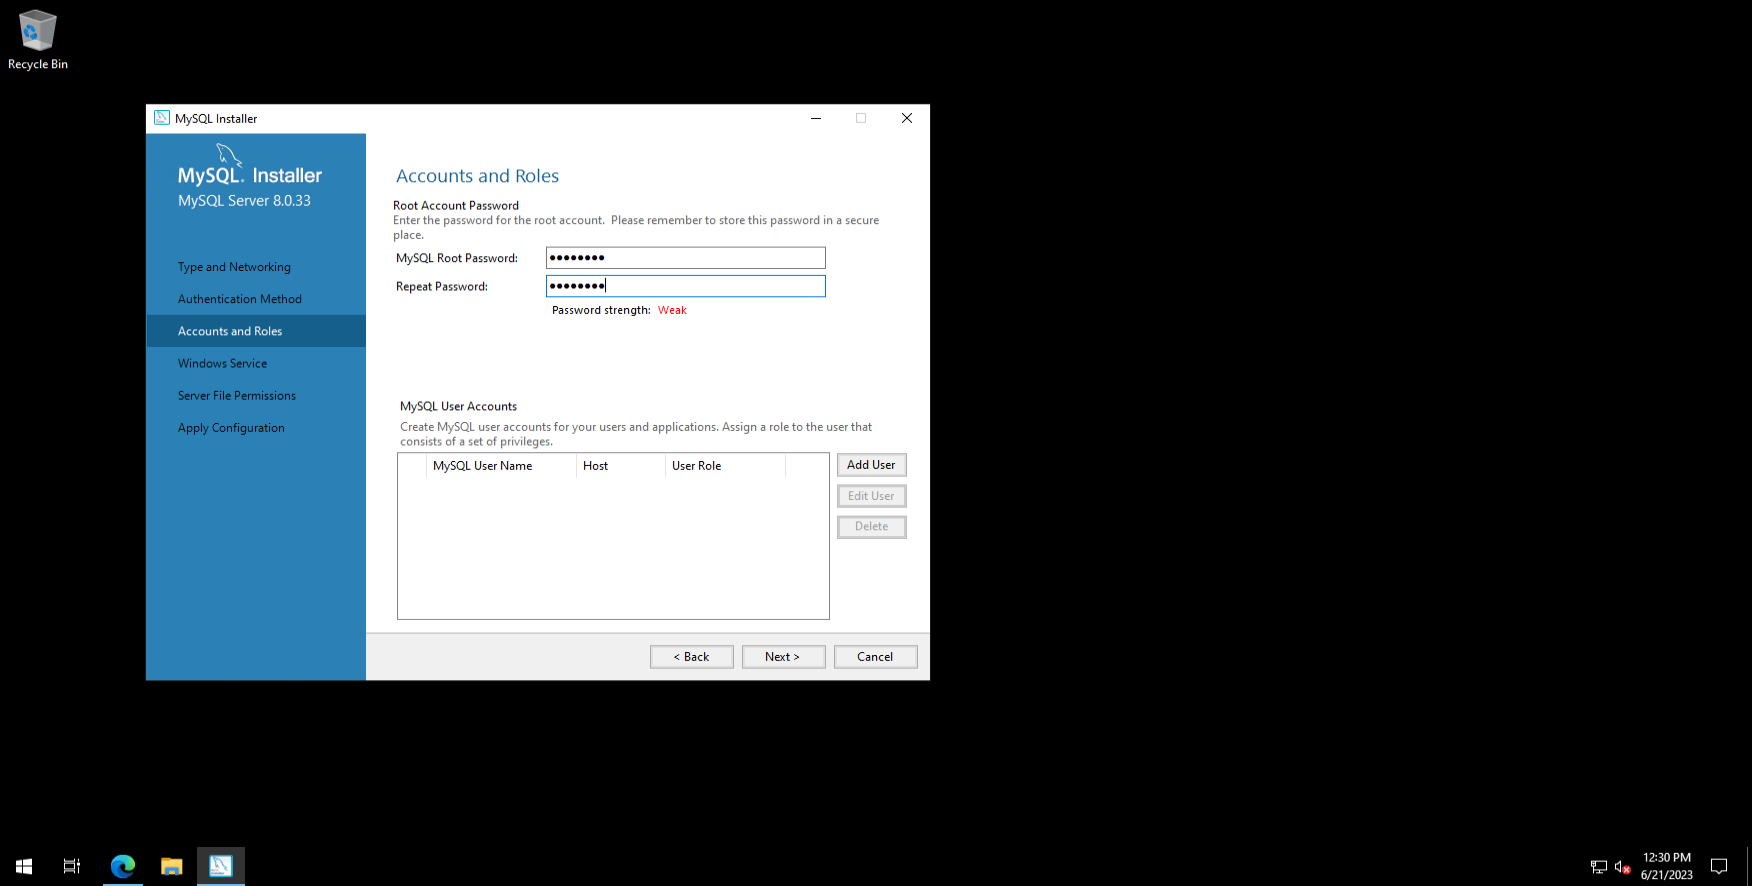
Step 11 – Select your authentication method and click on the Next button. You should see the account and roles screen:

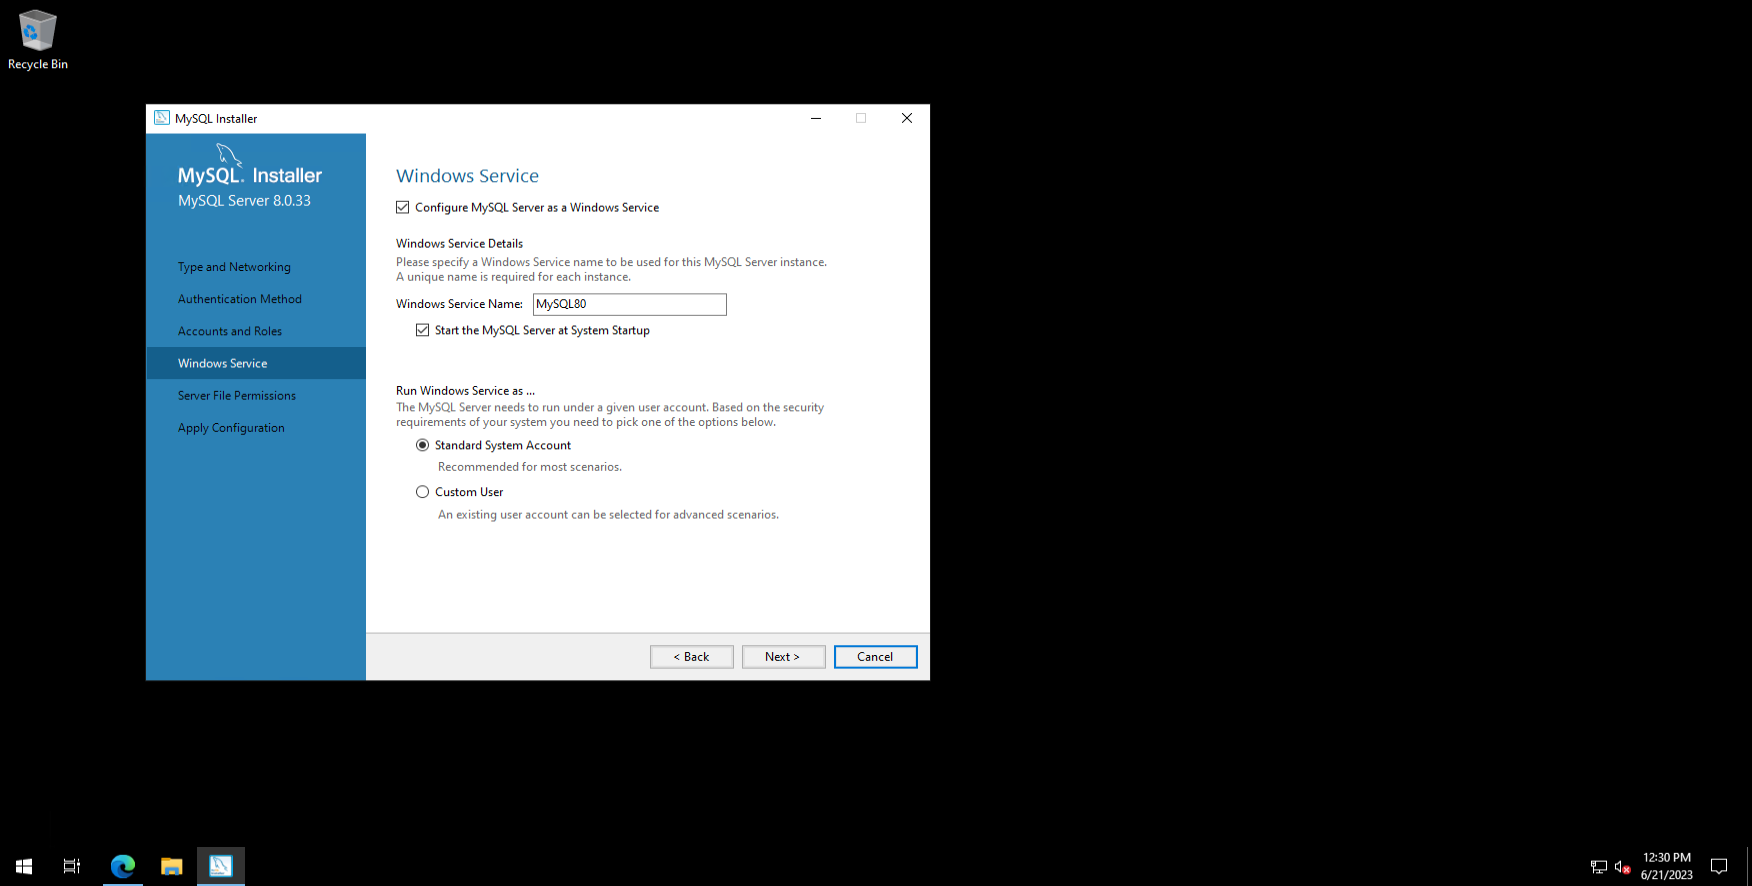
Step 12 – Define your root password and click on the Next button. You should see the MySQL service configuration screen:

Step 13 – Configure MySQL service and click on the Next button. You should see the MySQL logging option screen:

Step 14 – Select your logging options and click on the Next button. You should see the advanced options screen:

Step 15 – Define your server id and click on the Next button. You should see the Apply configuration screen:

Step 16 – Click on the Execute button to apply all the configurations. Once all the configurations are applied, you should see the following screen:

Step 17 – Click on the Finish button. You should see the MySQL product configuration screen:

Step 18 – Click on the Next button to configure the MySQL router. You should see the following screen:

Step 19 – Leave all options as it is and click on the Finish button. You should see the MySQL connect screen:

Step 20 – Provide your MySQL root username, password and click on the Check button. Once the connection is established, you should see the following screen:

Step 21 – Click on the Next button. You should see the following screen:

Step 22 – Click on the Execute button to apply all configuration, you should see the following screen:

Step 23 – Click on the Finish button to finish the product configuration. You should see the following screen:

Step 24 – Click on the Finish button to close the MySQL installation wizard.
After completing the MySQL server installation, proceed to the next step to verify the MySQL installation and interact with MySQL command line client.
MySQL CLI
At this point, a MySQL server has been installed on your server. Now, let’s open the command line interface and see how to interact with MySQL.
Click on the search in the taskbar, type MySQL, and open the MySQL command line client. You should see the MySQL client on the following screen:

Now, run the following command to verify the MySQL version:
You will get the MySQL version in the following output:
					+-----------+
| version() |
+-----------+
| 8.0.27    |
+-----------+
1 row in set (0.00 sec)
Next, create a database called testdb using the following command:
Please verify the created database using the command below:
You will get the following output:
					+--------------------+
| Database           |
+--------------------+
| information_schema |
| mysql              |
| performance_schema |
| sakila             |
| sys                |
| testdb             |
| world              |
+--------------------+
Then create a user called testuser using the following command:
CREATE USER 'testuser'@'localhost' IDENTIFIED BY 'password';
Next, grant all the privileges to the testdb using the following command:
GRANT ALL ON testdb.* TO 'testuser'@'localhost';
Flush the privileges to apply all the changes:
To list the MySQL users, run the following command:
SELECT USER from MySQL.user;
You will get the following output:
					+------------------+
| USER             |
+------------------+
| mysql.infoschema |
| mysql.session    |
| mysql.sys        |
| root             |
| testuser         |
+------------------+
Next, exit from the MySQL shell using the following command:
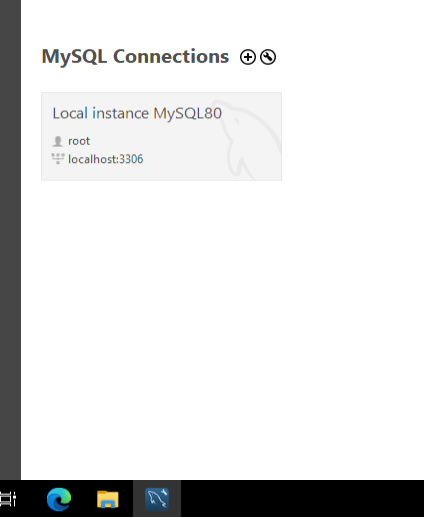
Access MySQL Workbench
MySQL Workbench is a graphical tool to manage the MySQL database from the graphical interface. It is installed automatically with MySQL full package installation.
To access it, search for MySQL Workbench in the search bar and click on it. You should see the MySQL Workbench interface on the following screen:

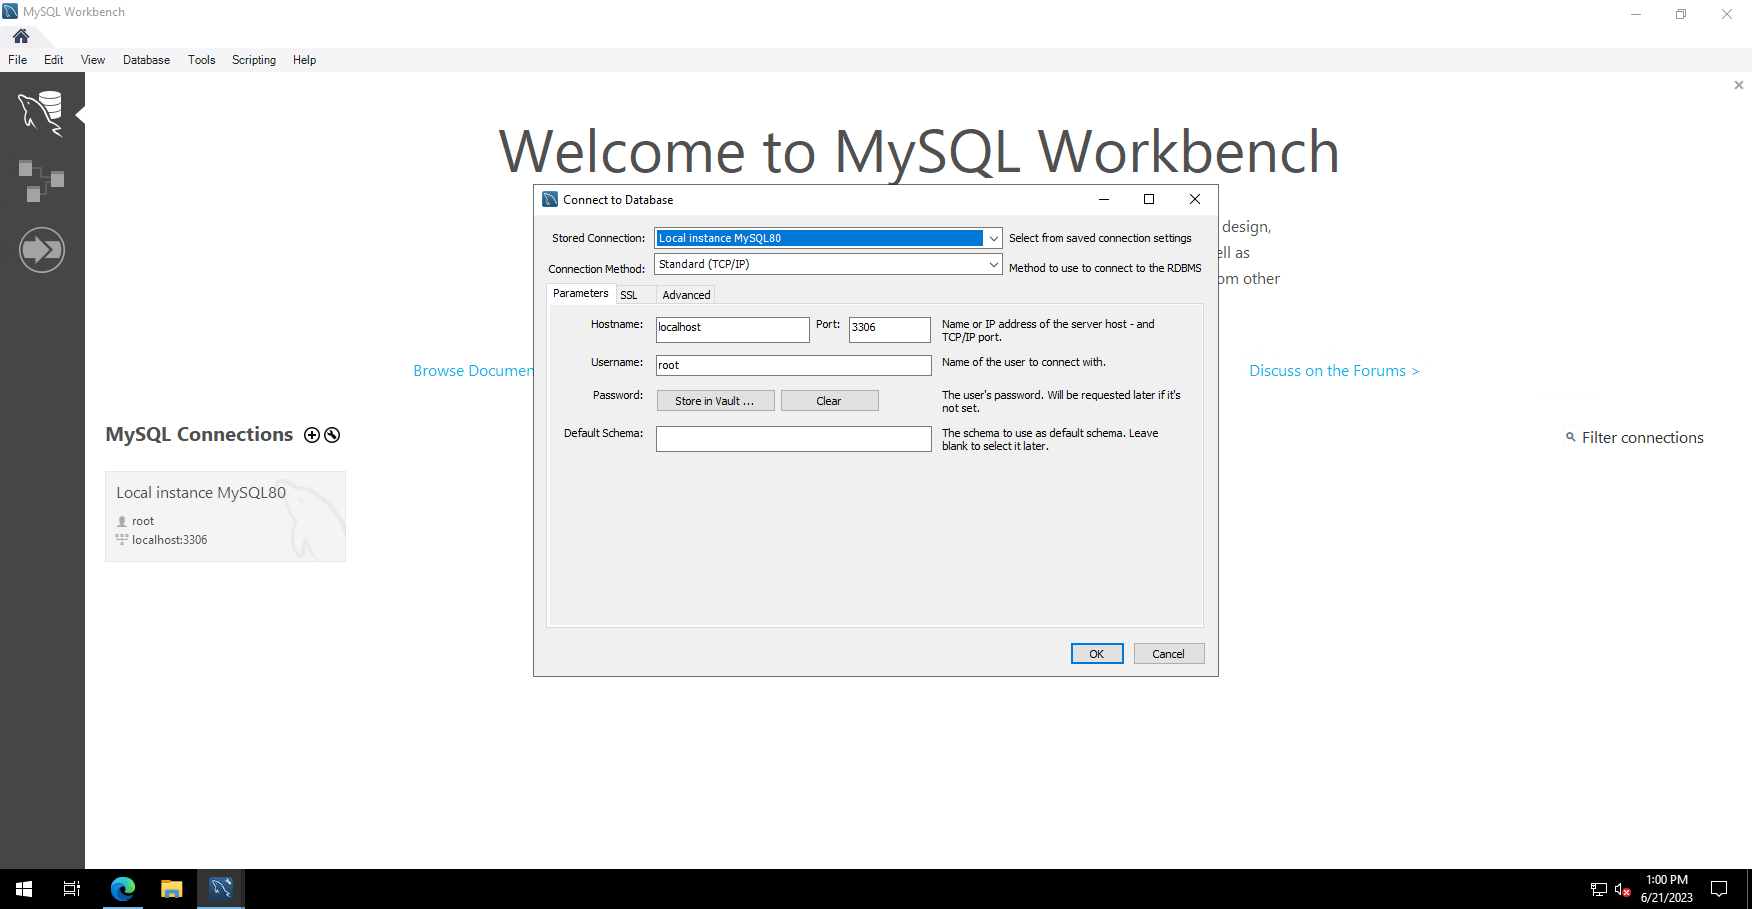
Click on the Database menu, you should see the following screen:

Provide your database host, root username, and click on the OK button. You will be asked to provide a MySQL root password as shown below:

Provide a MySQL root password and click on the OK button. Once the connection is established, you should see the MySQL Instance in the following screen:

You can now create and manage MySQL database and users from the graphical interface.
How to Install MySQL Server on Windows Server 2019 Conclusion
In the above guide, you learned how to install MySQL server on Windows server 2019. You also learned how to interact with MySQL using MySQL command line client and MySQL Workbench. For more information, visit the MySQL documentation page.

Introduction
In this article, you will learn how to install MySQL on Windows Server 2019.
MySQL is a database that can be downloaded for free and is used by many people. It is a relational database management system that is used by a lot of people. Even though Linux servers use it more often, it works just as well with Windows Servers.
Install MySQL
Step 1: Start by installing the Windows Server 2019 MySQL Installer. Select the version that fits on your machine, then click Download.

Step 2: Run the programme from the pop-up window at the bottom of your computer after you’ve downloaded the file.

MySQL Installer Setup
Step 1: When you ran the programme in the last step, a new window came up with the MySQL Installer setup. It asks you which MySQL items you want to put on the host.

One choice is to choose the setup type that is already set up and fits your needs. Here’s a quick look at each mode:
Developer Default: Installs MySQL Server, Shell, Router, Workbench, MySQL for Visual Studio, MySQL Connectors (for.NET, Python, ODBC, Java, and C++), MySQL Documentation, and MySQL Samples and Examples.
Server only: Only puts the MySQL server in place. This type of setup runs the GA (general availability) or development release server you chose when you downloaded MySQL Installer. It uses the download and data paths that are set by default.
Client only: Only downloads the latest MySQL applications and MySQL connectors. This setup type is similar to the Developer Default type, but it does not include the MySQL server or the client programmes that usually come with it, such as MySQL or mysqladmin.
Full: Installs all available MySQL tools.
Custom: With the custom setup type, you can search for and choose specific MySQL items from the MySQL Installer collection.
For this article, select Server only.
Step 2: Click on Execute.

Step 3: Click on terms and conditions, then click install.

Step 4: Once the setup is done, it will show the message below, which says that the installation was successful. Click the close.

Step 5: Click on Check Requirements, which is on the left side of the screen.

Step 6: Click on Execute.

Step 7: Click on next.

Step 8: Click on Next to configure the MySQL server.

Step 9: Choose the setting that works your needs, then click Next.

Step 10: Use Strong Password Encryption for Authentication and click Next in the Authentication Method area.

Step 11: The Accounts and Role window is the next screen. This is where you can set your MySQL Root Password. Fill out this part, then click Next.

Step 12: You can set up MySQL Server as a Windows service and give the service a name on the Windows Service screen. The given name for this lesson is MySQL8.0.
You can also start the service at System Startup and use the normal system account or a custom user to run it. Choose what you want and then click Next.

Step 13: Click «Execute» after selecting «Configuration Steps.»

Step 14: When the operation is finished, click the Finish button.

Using Command Prompt to access MySQL
If you use the Windows Start menu to open Command Prompt and then run the mysql command, you may see an error below.
# mysql

This mistake happens because MySQL Bin has not been added to the path. To find where the MySQL Bin is, use the File Manager to go to This PC. Then go to C drive > Program Files > MySQL > MySQL Server 8.0 > bin. Right-click on «bin» in the bar at the top and choose «Copy address.»
# cd C:\Program Files\MySQL\MySQL Server 8.0\bin
And then run the following to access your MySQL.
# mysql -u root -p

Conclusion
Hopefully, now that you have learned how to install MySQL on Windows Server 2019.
Also read: How to Block or Allow TCP/IP Port in Windows Firewall
Thank You 🙂
Hi friends, welcome back to the Kitsake blog. In this post, I will discuss how to install MySQL Server on Windows Server 2019.
MySQL Server is a popular and widely used database engine for production systems in businesses. Therefore, you should also know how to install it if you work as a system engineer.
In the case I presented in this post, the firewall on Windows Server 2019 is disabled. and in this article, I will provide step-by-step instructions until it can be accessed either locally or through a client computer. So, please read it until the end.
Preparation
Before you install MySQL Server, you need to install its dependencies, namely Microsoft Visual C++ and Python. For the download links, you can directly visit their official website through the following link:
- Microsoft Visual C++
- Python
And of course, you must download MySQL Community Server because that’s the topic I’m covering in this post. You can download it from the Official Website or click the following link: MySQL Community Server.
Recommended Download: Click Go to Download Page.
 |
| Go to Download Page |
Windows (x86, 32-bit), MSI Installer: Click Download.
 |
| MSI Installer: Click Download |
Login Now or Sign Up for a free account.: Click No thanks, just start my download.
 |
| Click No thanks, just start my download |
Don’t forget to match the OS bit version with the downloaded installer to ensure compatibility and smooth operation.
Installing
After you have downloaded the installer, you can proceed to the next step, which is installing it into Windows Server 2019 to install MySQL Server 8.0.33.
Step 1 : Installing Python 3.11.4 (64-bit)
Double Click on Installer python-3.11.4-amd64 - Install Now
") |
| Install Python 3.11.4 (64-bit) |
Please wait for the installation process to complete successfully.
Step 2 : Installing Microsoft Visual C++ Redistributable
Double Click on Installer VC_redist.x64 - Checklist I agree to the license terms and conditions - Install
 |
| Install Microsoft Visual C++ Redistributable |
Please wait for the installation process to complete successfully.
Step 3 : Installing MySQL Community Server
Double Click on Installer mysql-installer-community-8.0.33.0 - Choosing a Setup Type Developer Default - Next
 |
| Install MySQL Community Server Developer Default |
Installation : Click Execute - Next
 |
| Execute Installation |
 |
| Next Installation |
Configure MySQL Server 8.0.33
Product Configuration : Click Next
 |
| Product Configuration |
Type and Networking : Choose Config Type Server Computer - Next
 |
| Type and Networking |
Authentication Method : Choose Next
 |
| Authentication Method |
Account and Roles : Type Password for account root - and Add User for DB Admin - Next
 |
| Account and Roles |
Windows Service : Click Next
 |
| Windows Service |
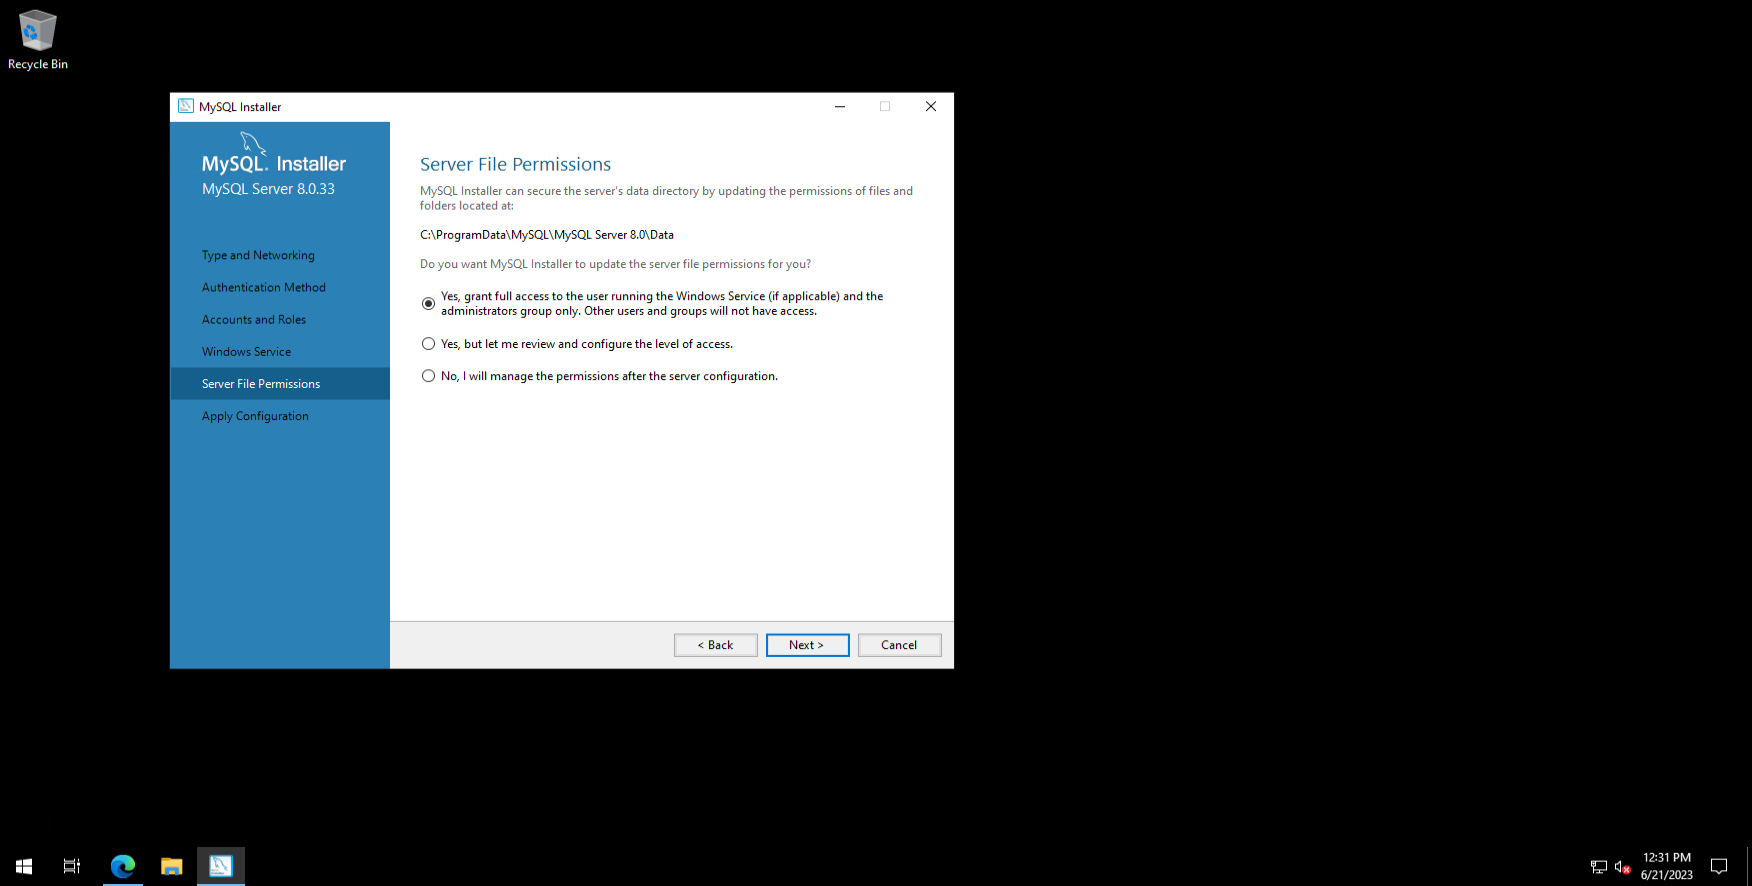
Server File Permissions : Click Next
 |
| Server File Permissions |
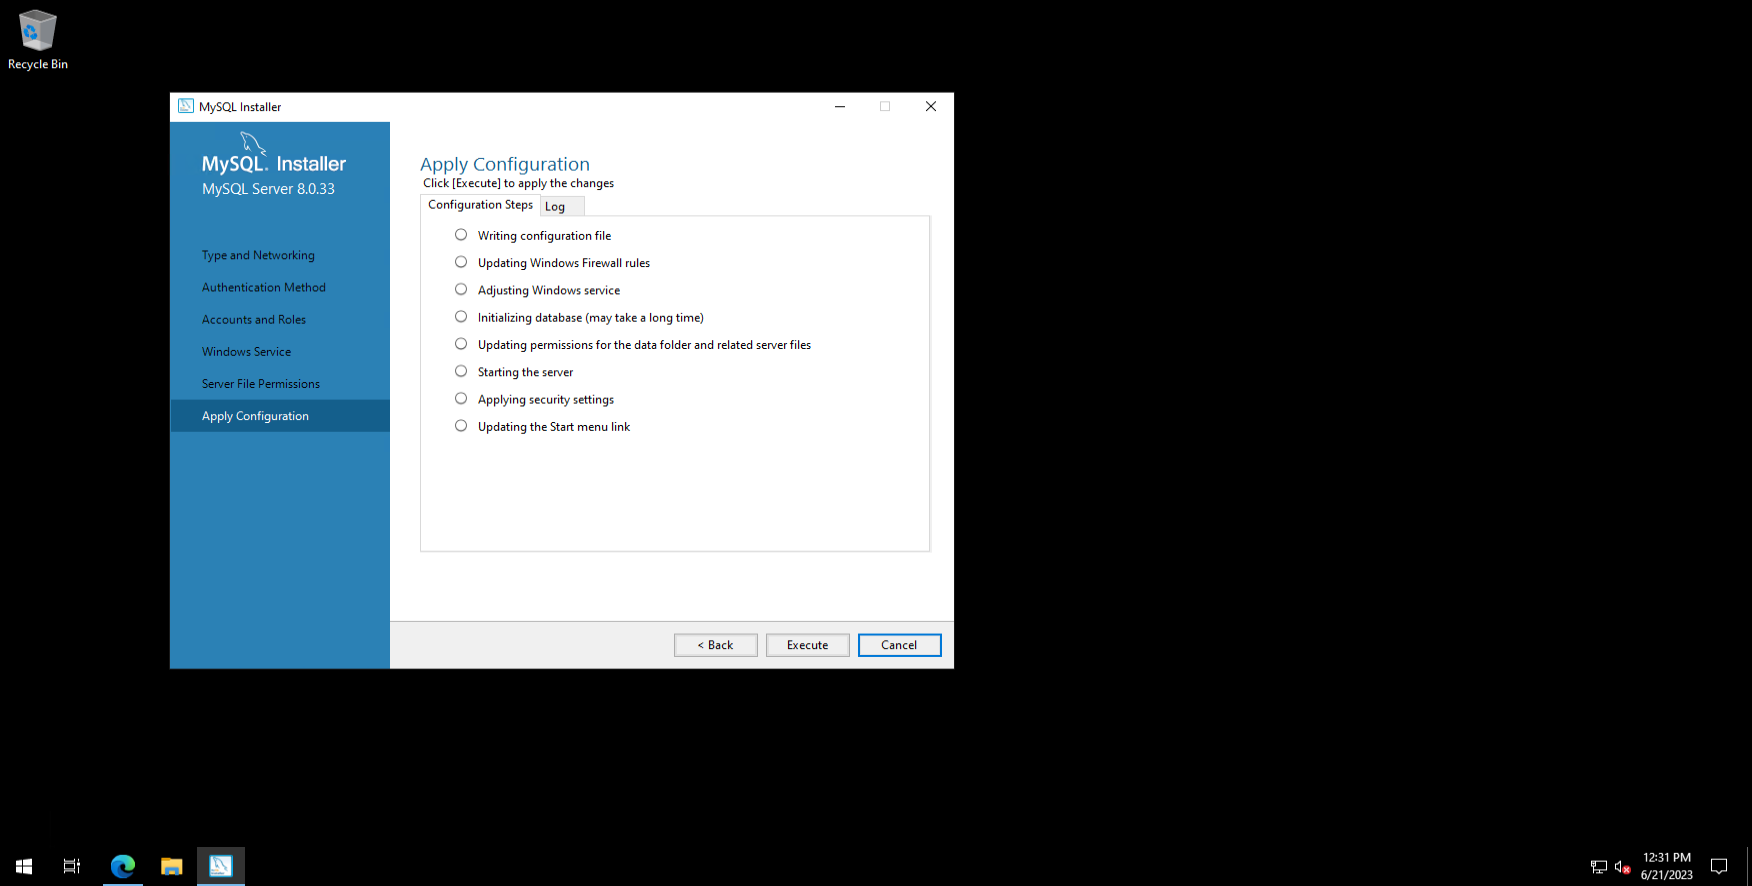
Apply Configuration : Click Execute - Finish
 |
| Apply Configuration |
 |
| Click Finish |
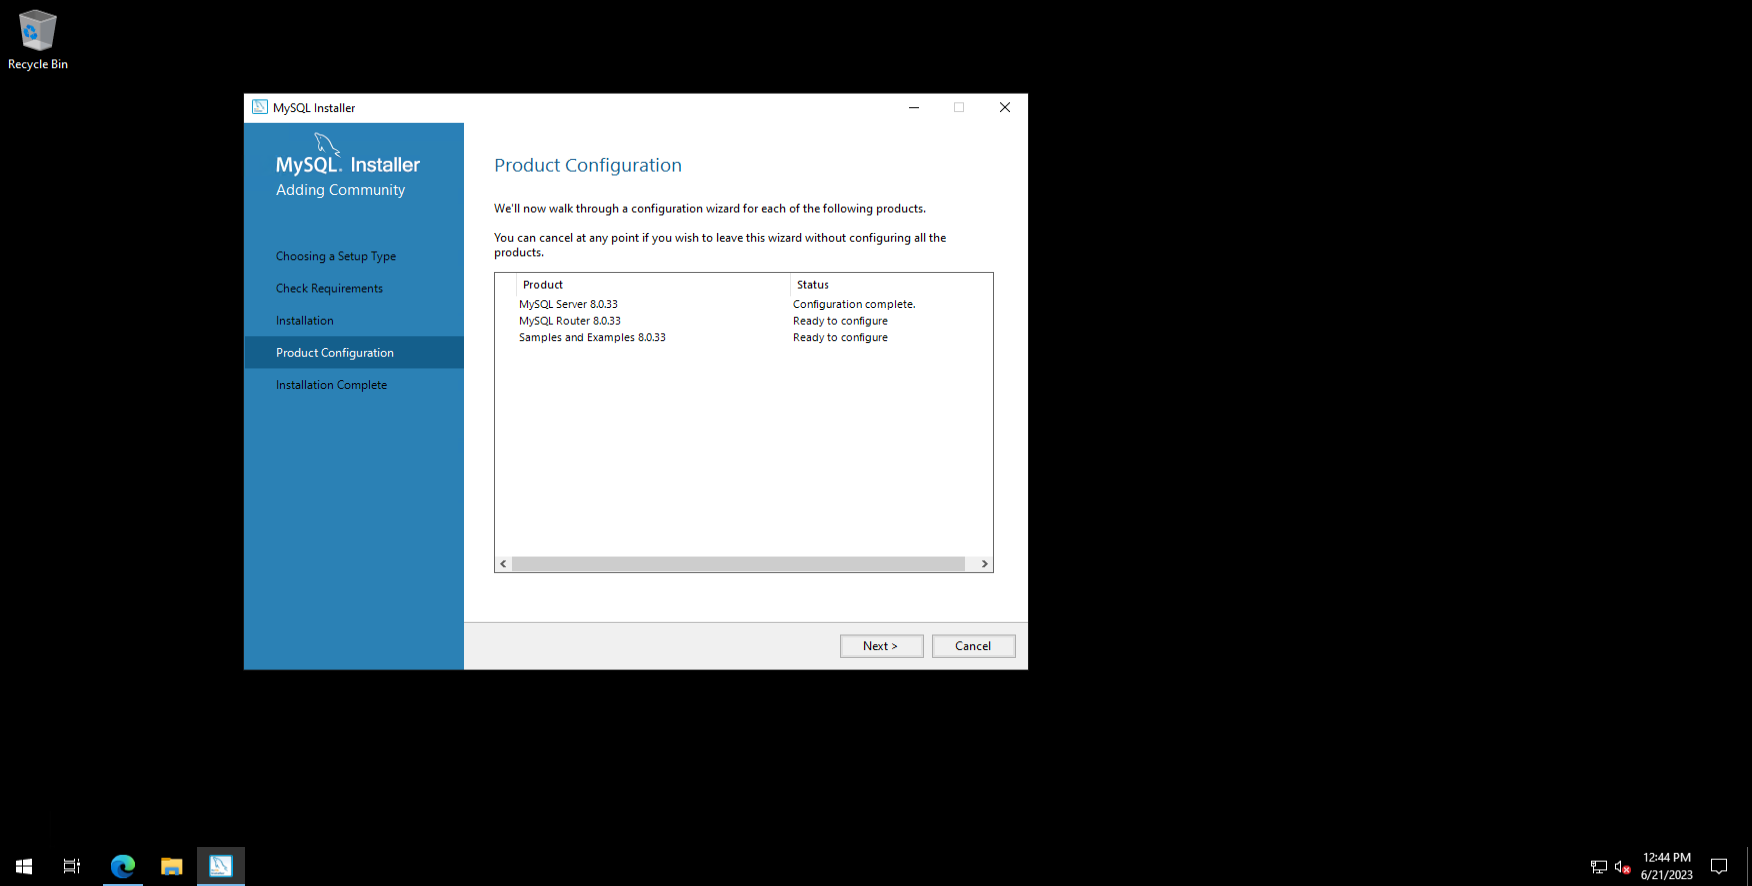
Configure MySQL Router 8.0.33
Product Configuration : Click Next
 |
| Product Configuration |
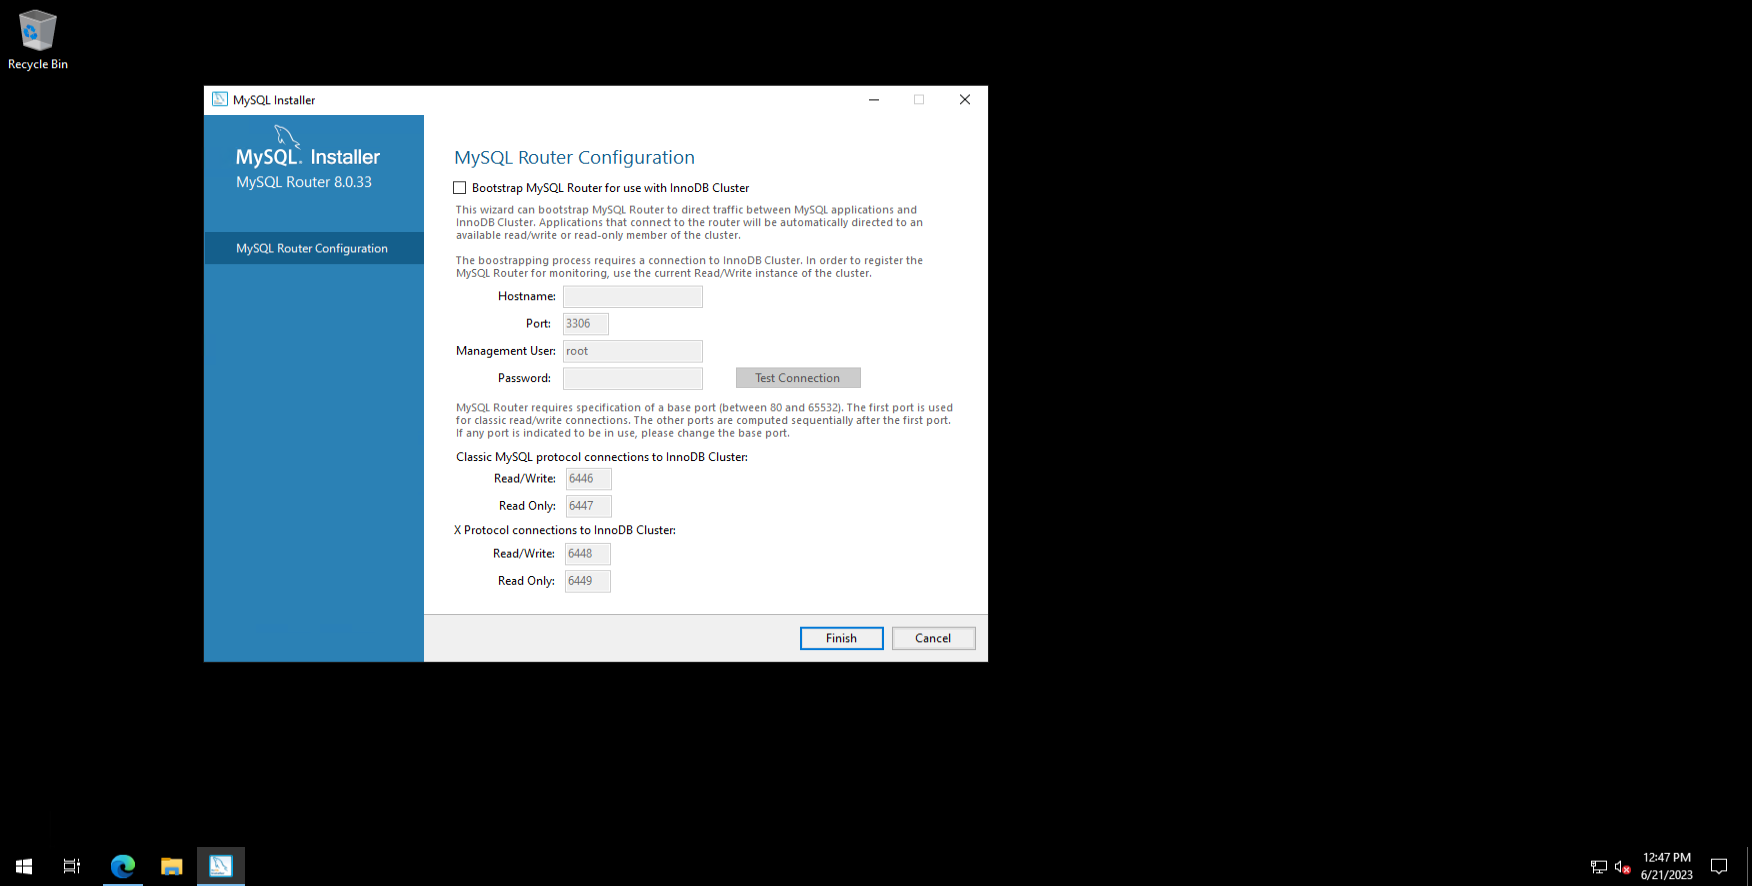
MySQL Router Configuration : Click Finish
 |
| MySQL Router Configuration |
Configure Samples and Examples 8.0.33
Product Configuration : Click Next
 |
|
Product Configuration |
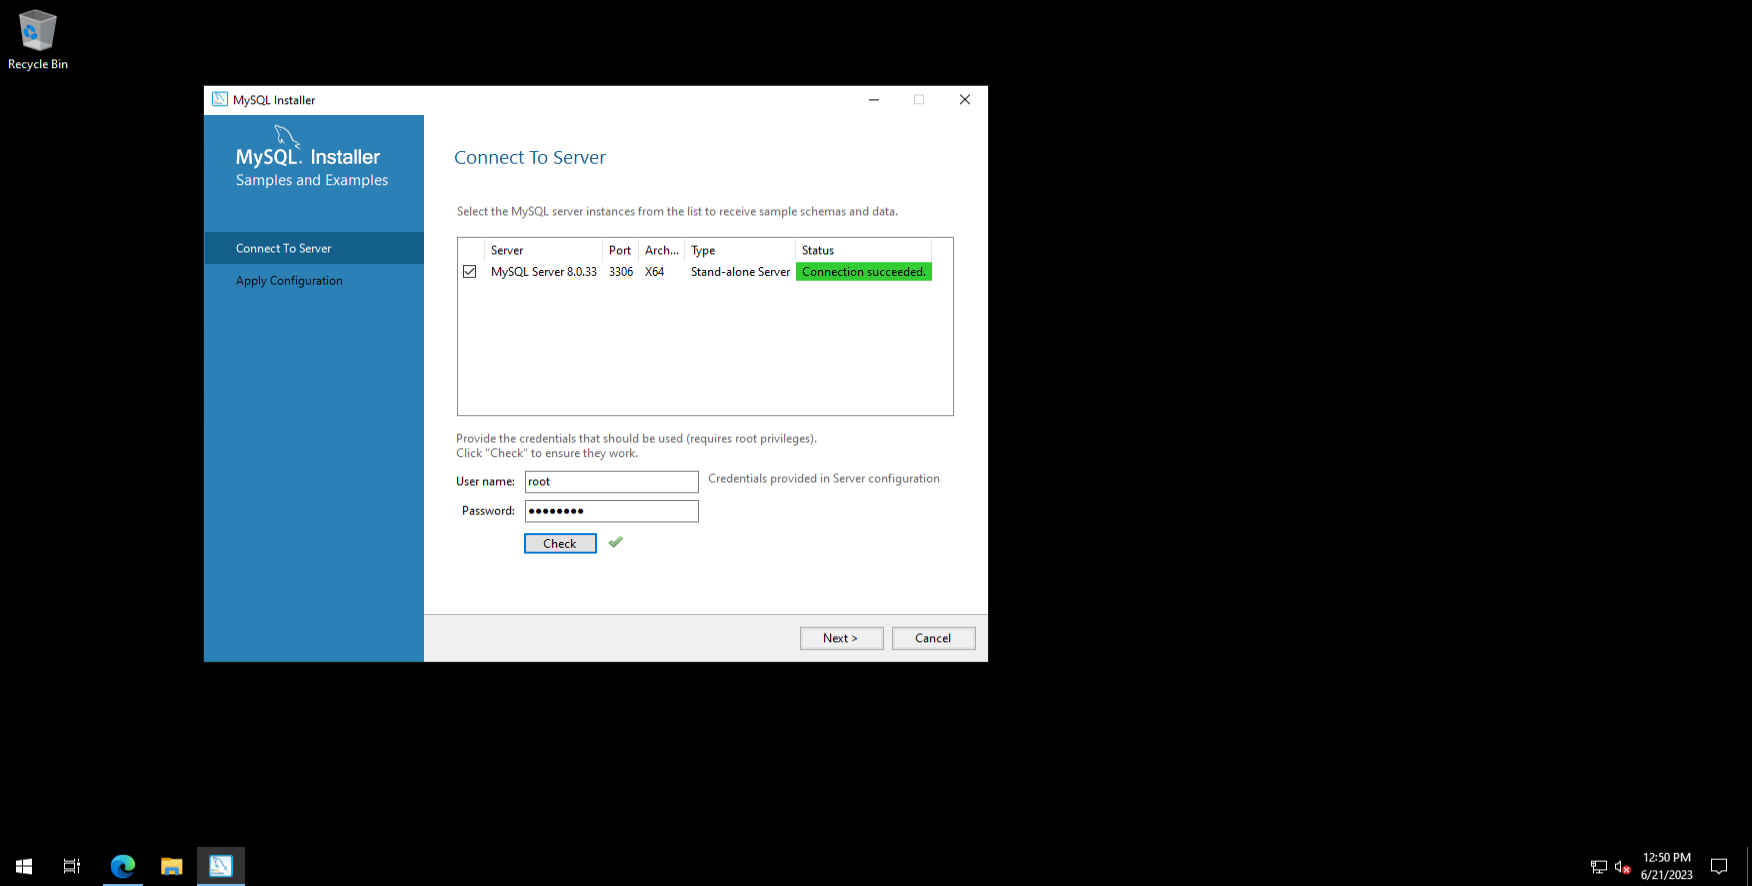
Connect To Server : Input Password - Click Check - Click Next
 |
| Connect To Server |
Apply Configuration : Click Execute - Click Finish
 |
| Apply Configuration |
Product Configuration : Click Next
 |
| Product Configuration |
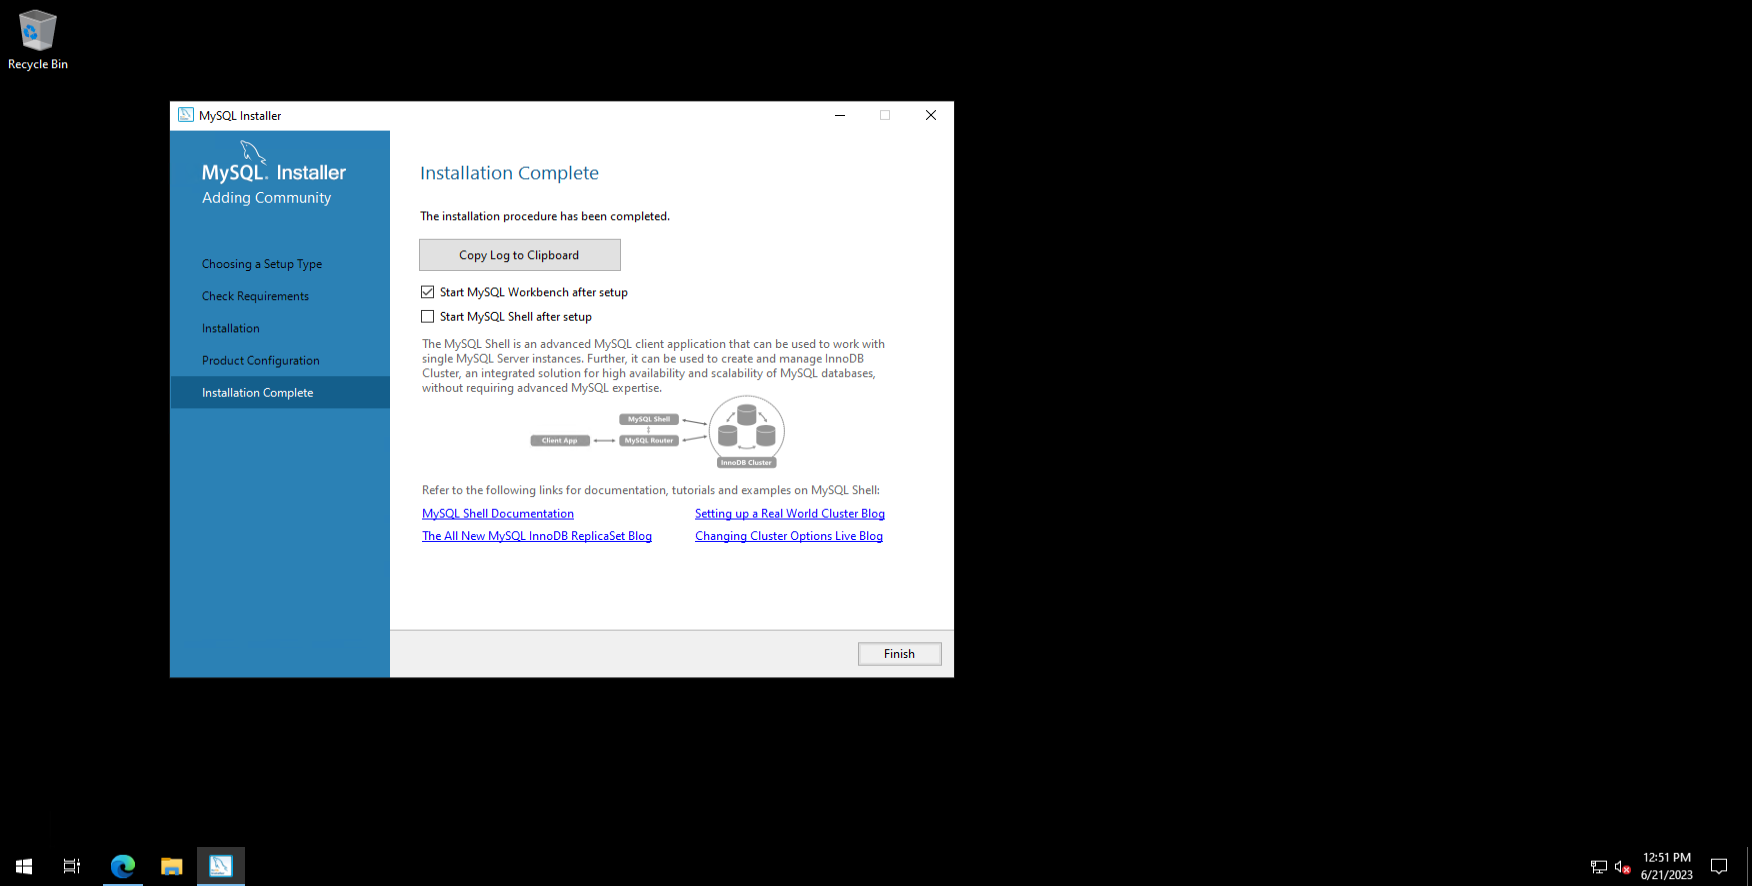
Installation Complete : Click Finish
 |
| Installation Complete |
Trying
After you have installed it step by step as I described above, you should have succeeded. The next step is to process the data using the editor that you feel most comfortable with.
Here, I’m using two examples of editors that I often use, namely MySQL Workbench and Heidi. Here’s how to do it:
MySQL Workbrench
Open MySQL Workbrench - Click (+) - IP Address/localhost/127.0.0.1 - Input User - Click Store in Vault - Input Password - Ok
 |
| Login MySQL Server with MySQL Workbrench |
Setup New Connection : Click Test Connection - Ok - Ok
MySQL Connection : Click Kitsake-DB
HeidiSQL Editor
Open Heidi - Input IP Address MySQL Community Server - Input User - Input Password - Open
 |
| Open MySQL Community Server with Heidi |
Maybe that’s all I can share with you guys, hopefully this article will be useful.
Thank You
Table of Contents
1
MySQL is one of the most widely used open-source relational database management systems in the world. It can be used to store, manage and retrieve data for a vast array of web applications. Installing MySQL on Windows Server 2019 can seem like a daunting task, however, once you have the right resources and knowledge, it can be a straightforward process.
In this blog post, we will guide you through the different methods to install MySQL on Windows Server 2019, along with the detailed steps and the pros and cons of each method. By the end of this article, you will have a comprehensive knowledge of how to install MySQL on Windows Server 2019 and which method is the best for your particular use case.
Video Tutorial:
What’s Needed
Before you start installing MySQL, you need to ensure that you have the following prerequisites:
- A copy of MySQL installer. You can download the latest version from the official MySQL website.
- Access to Windows Server 2019, either locally or remotely via RDP
- Administrator privileges on the system
What Requires Your Focus?
Installing MySQL on Windows Server 2019 requires your focus on the following aspects:
- Ensuring that the system meets the prerequisites mentioned above
- Selecting the appropriate installation method based on your needs
- Configuring MySQL settings based on your specific requirements
- Troubleshooting issues during and after the installation
Different Methods to Install MySQL on Windows Server 2019
Method 1: Installing MySQL Using the MSI Installer
This method involves downloading and installing the MSI (Microsoft Installer) package for the latest MySQL Community Server version from the MySQL website and following the steps in the installation wizard.
Step 1: Download the latest MySQL MSI package from the official MySQL website.
Step 2: Double-click on the MSI package to launch the installation wizard.
Step 3: Select the Setup Type (Typical or Custom), then click Next.
Step 4: Choose the particular features you want to install on your system, then click Next.
Step 5: Configure the MySQL Server instance by specifying the port number, the service name, and the root password, then click Next.
Step 6: Choose the authentication method, then click Next.
Step 7: Save the configuration file, then click Next.
Step 8: Complete the installation wizard by clicking on the Install button.
Pros:
- Straightforward installation process for novices
- Customizable installation, allowing you to select specific features you want to install
Cons:
- Not suitable for advanced users as they do not have as much control over the installation process
Method 2: Installing MySQL Using MySQL Installer
This method involves downloading the MySQL Installer from the official MySQL website and using it to install MySQL on your system.
Step 1: Download the MySQL Installer from the official MySQL website.
Step 2: Double-click on the MySQL Installer to launch it.
Step 3: Select the MySQL Products and Features you want to install, then click Next.
Step 4: Check the System Requirements, then click Execute.
Step 5: Configure the MySQL Server instance by specifying the port number, the service name, and the root password, then click Next.
Step 6: Choose the authentication method, then click Next.
Step 7: Save the configuration file, then click Next.
Step 8: Complete the installation wizard by clicking on the Install button.
Pros:
- Easy-to-use interface, providing a wide range of preconfigured options for installation
- Option to upgrade or uninstall an existing MySQL installation
- User-friendly configuration options for advanced users
Cons:
- The installer may not detect preexisting installations and might overwrite or remove them
- A bit slower compared to other methods
Method 3: Installing MySQL Using Command Line
This method involves downloading and extracting the MySQL ZIP archive from the official MySQL website, then using the command prompt to install MySQL on your system.
Step 1: Download the MySQL ZIP Archive from the official MySQL website.
Step 2: Extract the ZIP Archive to a directory of your choice.
Step 3: Launch a Command Prompt window with Administrator privileges.
Step 4: Navigate to the extracted directory using the cd command.
Step 5: Use the following command to install MySQL as a Windows service:
`mysqld –install [servicename]`
Step 6: Configure the MySQL Server by editing the my.ini file in the MySQL installation directory.
Pros:
- Full control over the installation process
- Good for advanced users who are comfortable with the command line interface
Cons:
- Not recommended for novice users
- Very time-consuming compared to other methods
- Requires technical knowledge of the command line interface
There are a few reasons why you might be unable to install MySQL on Windows Server 2019. Here are some of them and fixes:
1. You do not have administrative rights on the system
Fix: Log in to the system with an administrator account or grant your account administrative privileges
2. Another instance of MySQL is already running on the system.
Fix: Stop the running MySQL instance before attempting the installation
3. A third-party antivirus or firewall application is blocking the installation
Fix: Disable the antivirus or firewall temporarily during the installation process or whitelist MySQL installer in the antivirus or firewall settings.
Implications and Recommendations
MySQL is a powerful and widely used database management system. It provides users with a reliable, scalable solution for storing and retrieving data for web applications. Installing MySQL on Windows Server 2019 can seem like a daunting task for beginners, but it is a relatively straightforward process once you have the right resources and knowledge.
Based on our evaluation of the methods described above, we recommend using the MySQL Installer method for most users, as it offers a user-friendly interface, customizable installation options, and easy configuration settings. However, if you have advanced technical knowledge and want full control over the installation process, you may prefer using the Command-Line method.
5 FAQ’s about Installing MySQL on Windows Server 2019
Q1: What are the system requirements for installing MySQL on Windows Server 2019?
A: The minimum system requirements are Windows Server 2019 (Desktop Experience or Core), 1 GB RAM, and 1.5 GB of free disk space.
Q2: Can I install MySQL on Windows Server 2019 remotely?
A: Yes, you can install MySQL on Windows Server 2019 remotely via Remote Desktop Protocol (RDP).
Q3: How do I uninstall MySQL from Windows Server 2019?
A: You can uninstall MySQL from Windows Server 2019 via the Control Panel, the MySQL Installer, or the command line using the MySQL Installer.
Q4: How do I start and stop MySQL server on Windows Server 2019?
A: You can start and stop MySQL server on Windows Server 2019 using the Services Control Panel or the command line by executing these commands as administrator:
`net start mysql` to start MySQL server
`net stop mysql` to stop MySQL server
Q5: How do I secure my MySQL installation on Windows Server 2019?
A: You can secure your MySQL installation on Windows Server 2019 by setting a strong root password, disabling root access from a remote location, implementing SSL/TLS encryption, and limiting access to the MySQL server’s network port.
In Conclusion
Installing MySQL on Windows Server 2019 can be a daunting task, but with the right resources and knowledge, it can be a relatively straightforward process. In this article, we have provided you with a comprehensive guide on the different methods to install MySQL on Windows Server 2019, along with the detailed steps, pros and cons, and the implications and recommendations. Select the installation method that suits your needs, and you will be on your way to using one of the most versatile and powerful database management systems in the world.
A widely used DBMS for storing and organizing large volumes of data with high speed and performance is MySQL, which is an open-source system. It supports SQL language, allowing for various manipulations with databases, for instance, creating tables, modifying, deleting, inserting data. Additionally, MySQL supports the use of triggers, functions, and stored procedures. Its popularity comes from its ease of use, high performance, and wide variety of software available for working with it. Below we will discuss the installation process on the Windows Server 2019 operating system.
Preparatory work
To install the DBMS correctly, it is required to have Python package installed, in version not less than 3.7. It is necessary to download and install it on the server in advance. Additionally, it is desirable to update the operating system with the latest patches from Microsoft.
Download msi distribution from the site and install by following the installation wizard, almost everywhere by clicking «Next».
Downloading the MySQL Distribution
In order to start installing, we will download MySQL install files available on their website. Select «MySQL Installer for Windows» option, download and start the file on your server.
Starting the installation and selecting components
After the download is successfully finished, MySQL installer interface will appear on the screen. To install only MySQL, select «Custom». However, if we decide that need other Oracle products, choose «Developer Default». Please note that some components may depend on others, and if you do not select them, you will not get the necessary functionality of the system. It is needed to choose one of the options that is most suitable for the tasks of the server, in this case, select «Full» and click «Next» to proceed with the installation.
On the next «Installation» page, click «Execute»
Configuring Connection Types
The next step is to set up connection types. If you need standard settings, leave the following items unchanged. At the stage of creating an administrator user, you will need to change its password. This account will be used to manage the MySQL system.
Server setup
After the installation is complete, you need to configure the MySQL server. If there are problems, the installer will be able to provide detailed information about what needs to be configured.
Checking the installation
Once the system is installed, we recommend testing performance of new installed server. This can be done using tool MySQL Workbench or any other database management software. Launch Workbench, and connect to the local server :
After connecting to the database, you can use the following query to check the version of the DBMS:
SELECT version();
The result will look like the screenshot below:
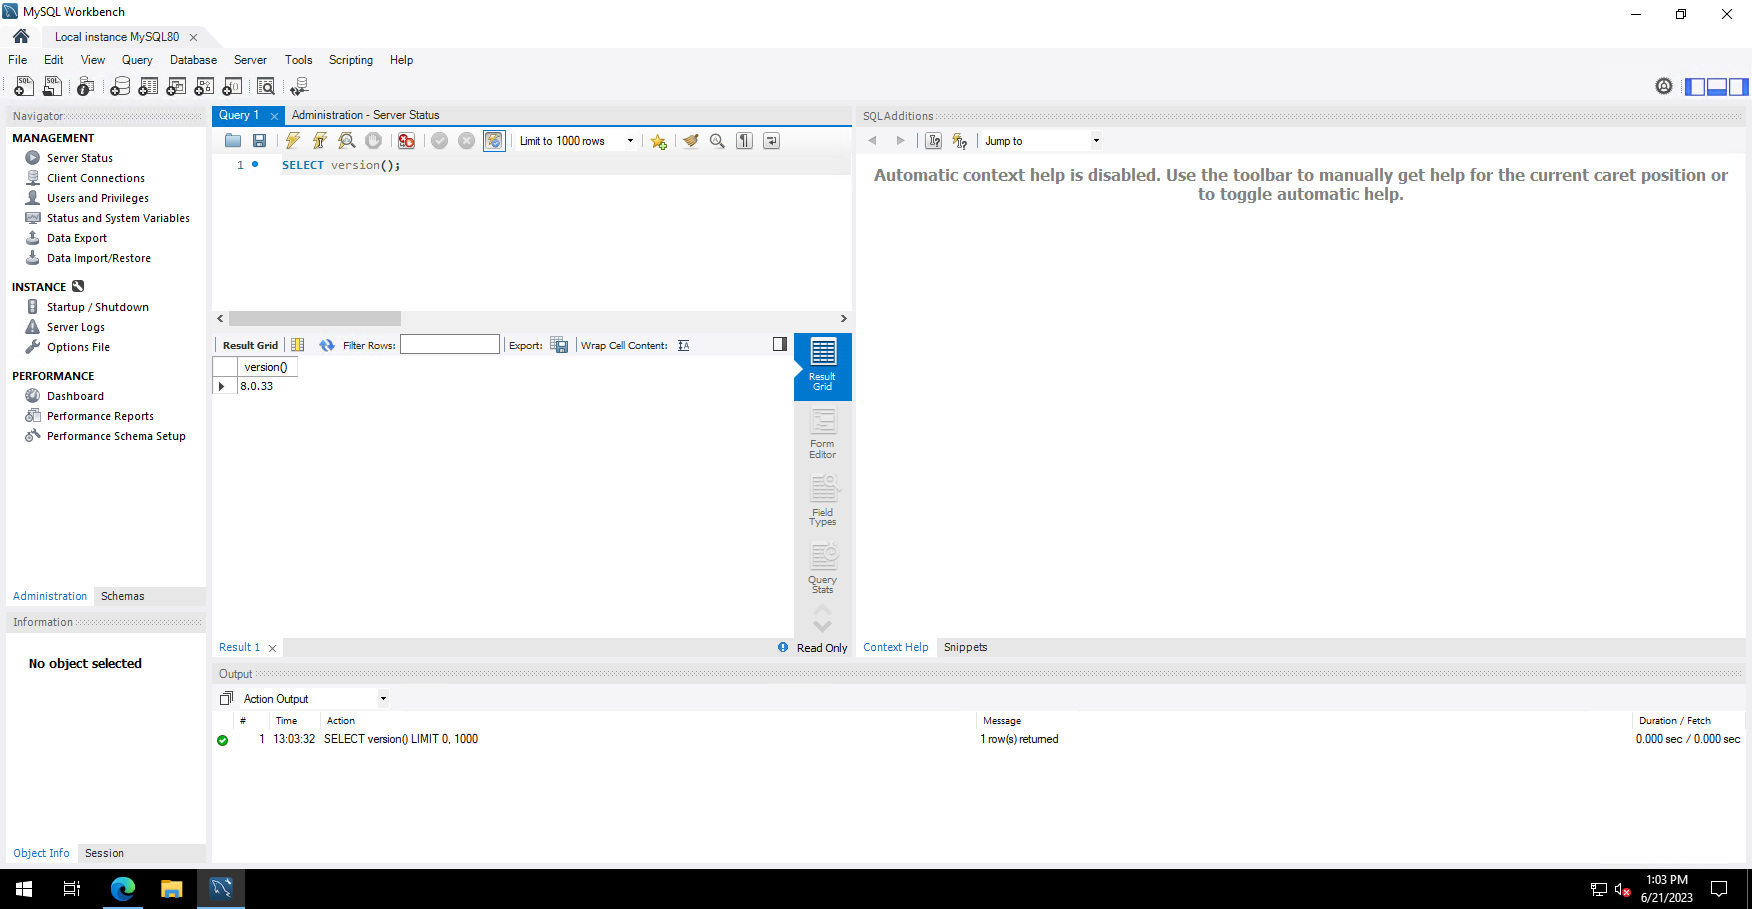
As a result, we can say that the installation was successful.
Conclusion
The main steps for installing this DBMS on a server were covered in this article. If you follow the mentioned steps carefully, installing MySQL on Windows Server 2019 should be a relatively simple process. In case you encounter any difficulties, or need further assistance, we recommend consulting the MySQL documentation or reaching out to the developer community for additional support.
1101
CT Amsterdam
The Netherlands, Herikerbergweg 292
+31 20 262-58-98
![]()
700
300
ITGLOBAL.COM NL
1101
CT Amsterdam
The Netherlands, Herikerbergweg 292
+31 20 262-58-98
![]()
700
300
ITGLOBAL.COM NL