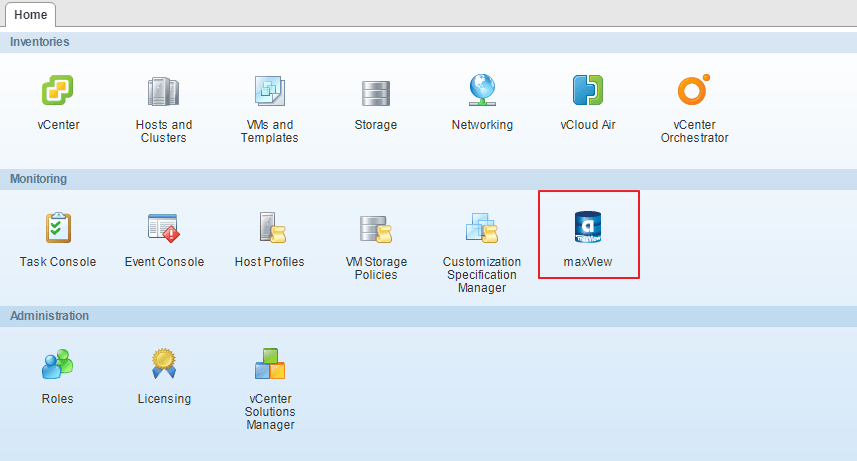
О LENOVO
+
О LENOVO
-
Наша компания
-
Новости
-
Контакт
-
Соответствие продукта
-
Работа в Lenovo
-
Общедоступное программное обеспечение Lenovo
КУПИТЬ
+
КУПИТЬ
-
Где купить
-
Рекомендованные магазины
-
Стать партнером
Поддержка
+
Поддержка
-
Драйверы и Программное обеспечение
-
Инструкция
-
Инструкция
-
Поиск гарантии
-
Свяжитесь с нами
-
Поддержка хранилища
РЕСУРСЫ
+
РЕСУРСЫ
-
Тренинги
-
Спецификации продуктов ((PSREF)
-
Доступность продукта
-
Информация об окружающей среде
©
Lenovo.
|
|
|
|
This section describes how
to install maxView Storage Manager on Windows systems.
Note: You need administrator privileges to install maxView
Storage Manager. For details on verifying privileges, refer to your
operating system documentation.
- Open Windows Explorer or My
Computer, then change to the directory where the Windows setup program
is located (see Downloading
the Installer Package for details). - Double-click the setup program for
your operating system version:Option Description Windows
64-bitsetup_asm_x64.exe Windows
32-bitsetup_asm_x86.exe The
Installation wizard opens. - Click Next to begin the
installation, click I
accept…, then click Next. - Add the following configuration
settings:- CIM Server Port: 5988.
- Web Server Port: 8443.
- User Name default:
Administrator - Operating system password.

- Click OK on the password
verification window and on the CIM Server and Web Server port number
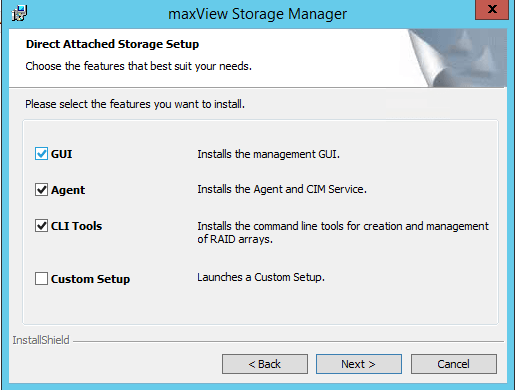
verification window. - In the Features screen, ensure that
GUI and
Agent is selected. Optionally, select CLI Tools and maxCache Plus.
Then click Next.Note: maxCache Plus
is supported on qualifying Adaptec Series Q controllers only (see
the Readme for a complete list). For non-qualifying controllers,
the maxCache Plus option is grayed out. - Click Install to begin the
installation. - Repeat these steps to install
maxView Storage Manager on every Windows system that will be part of
your storage space.


When
the installation is complete you receive a confirmation message and the
maxView Storage Manager icon is placed on your desktop.
To manage your Microsemi Adaptec SmartRAID controller, as well as its RAID volumes and logical disks, you can use its BIOS accessible via the keyboard shortcut «CTRL + A» (or «CTRL + Q» on an AZERTY keyboard) at start up of your computer.
However, you can also download the «maxView Storage Manager 3» software from the official Microsemi website to manage all of this through a simple web browser.
- Download maxView Storage Manager 3
- Install maxView Storage Manager 3
- Web interface : maxView Storage Manager
- Logging in to maxView Storage Manager
- Enterprise View
- Information about the computer / server (localhost)
- Information about your Microsemi Adaptec controller
- Information about maxCache devices
- Information about your hard drive arrays and logical drives
- Information about a hard drives array
- Information about a logical device
- Information about the physical hard drives connected to your Microsemi controller
- Discovering the maxView Storage Manager ribbon
- Home
- System
- Controller
- Array
- Logical Device
- Physical Device
- maxCache
1. Download maxView Storage Manager 3
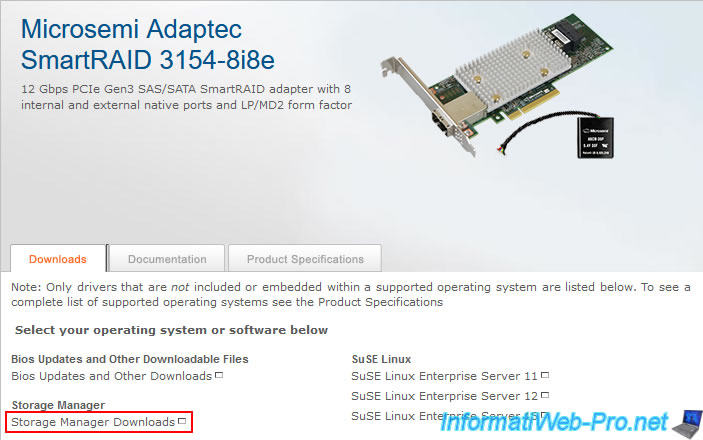
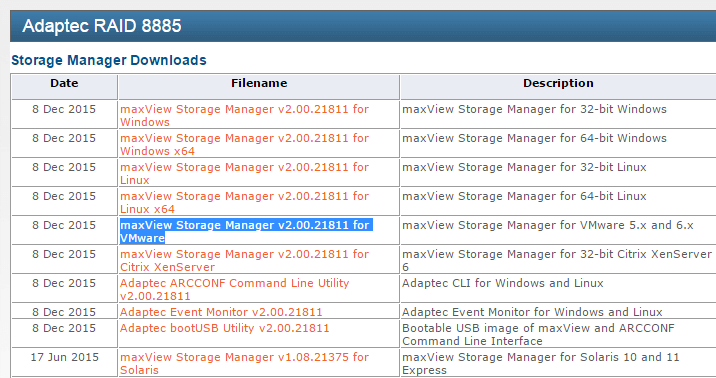
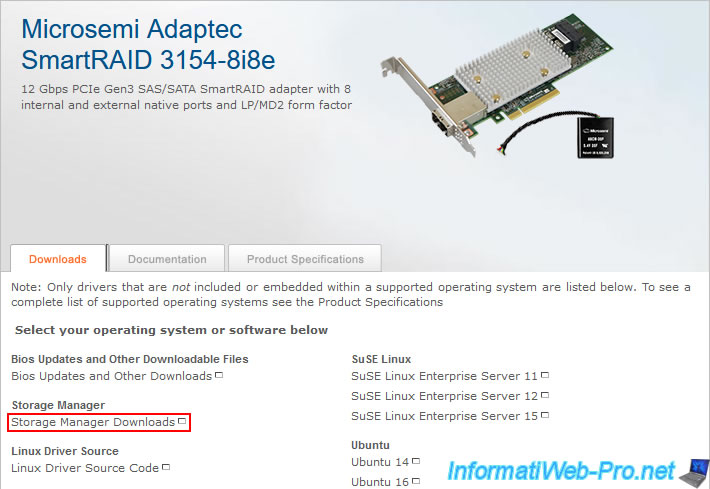
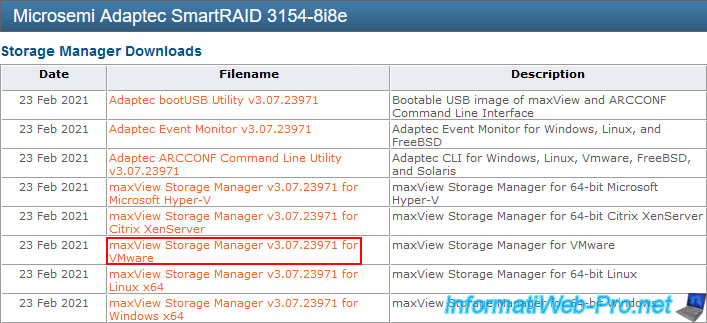
To download the latest version of maxView Storage Manager 3 compatible with your Microsemi Adaptec SmartRAID controller, go to your Microsemi Adaptec SmartRAID controller page on the Microsemi official website and go to the «Downloads» tab of this page. In our case, we have a Microsemi Adaptec SmartRAID 3154-8i8e controller.
At the top of this tab, you will find a «Storage Manager Downloads» link. Click on it.
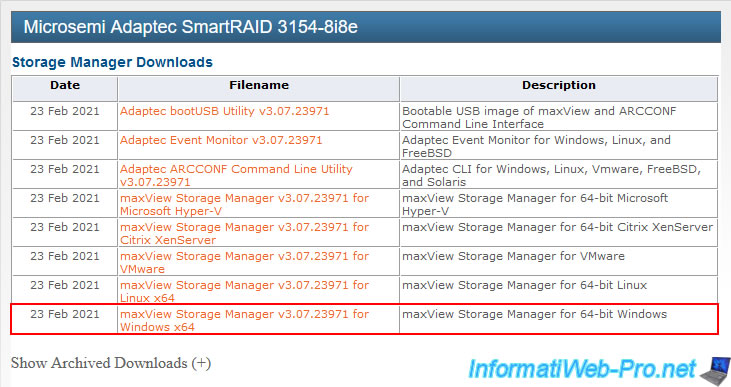
As you can see, maxView is available for Windows (at the very bottom of the list), as well as for other operating systems, such as : Linux, VMware, Citrix XenServer, …
Click on the «maxView Storage Manager v3 …. for Windows x64» link.
As expected, your Microsemi Adaptec SmartRAID controller appears in the list of compatible products.
In our case, the Microsemi Adaptec SmartRAID 3154-8i8e controller.
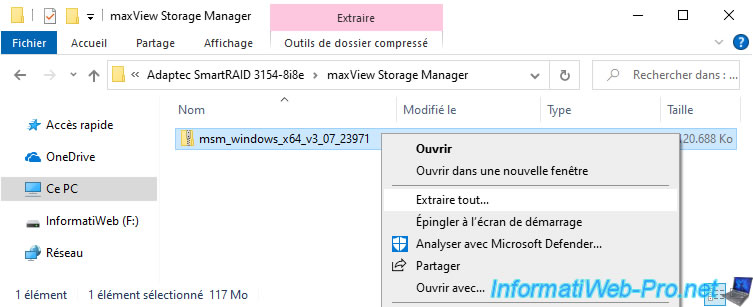
Click on the «Download Now» button, accept the contract that will be offered to you and click on the proposed download button.
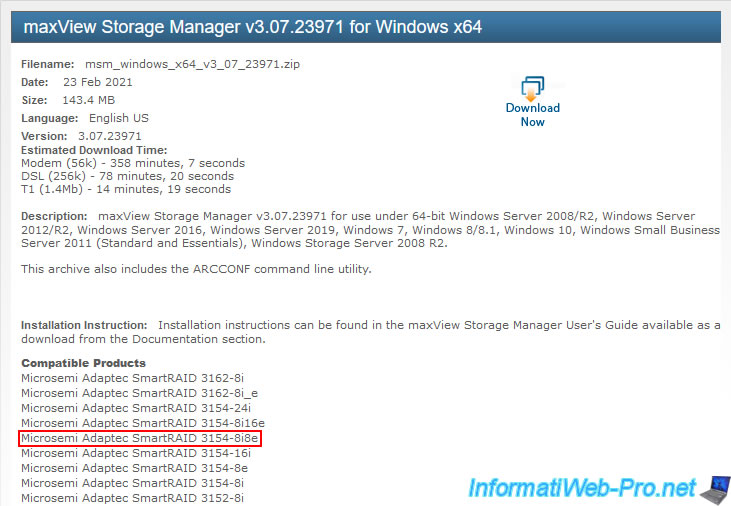
Once downloaded, you will have a compressed file like this : msm_windows_x64_v3_07_23971.zip.
2. Install maxView Storage Manager 3
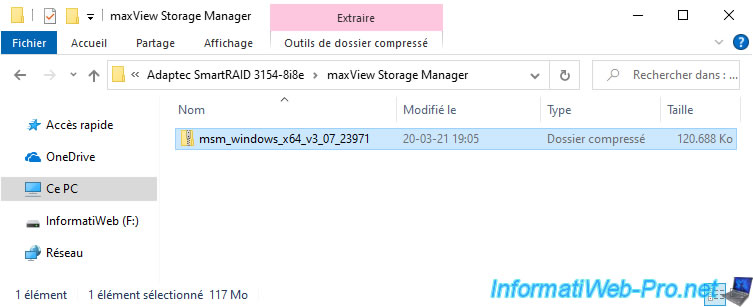
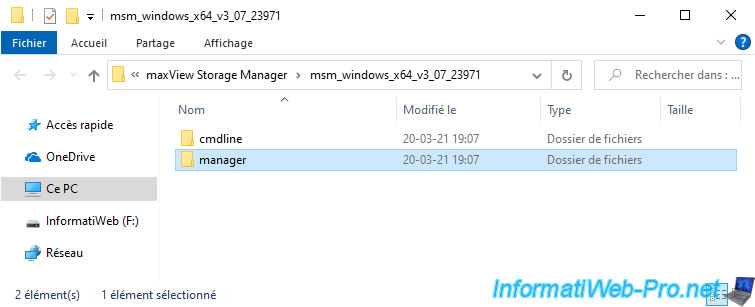
To install maxView Storage Manager 3, unzip the downloaded «msm_windows_x64_v3_07_23971.zip» file.
In the extracted folder, you will find 2 folders :
- cmdline : contains command line tools, including the ARCCONF program
- manager : contains the maxView Storage Manager 3 installation file
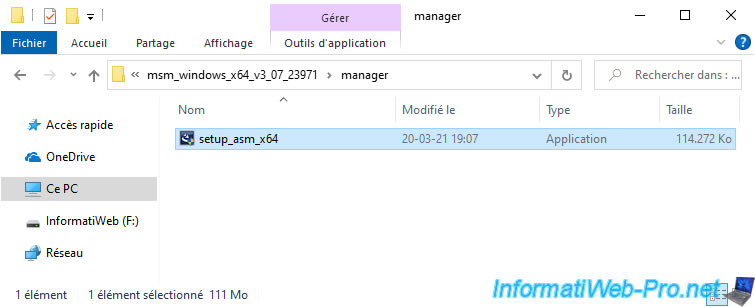
Open the «manager» folder and run the «setup_asm_x64.exe» file there.
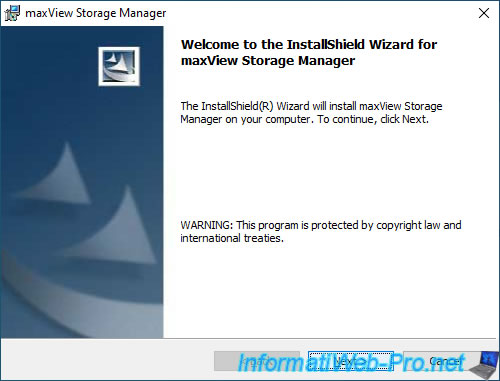
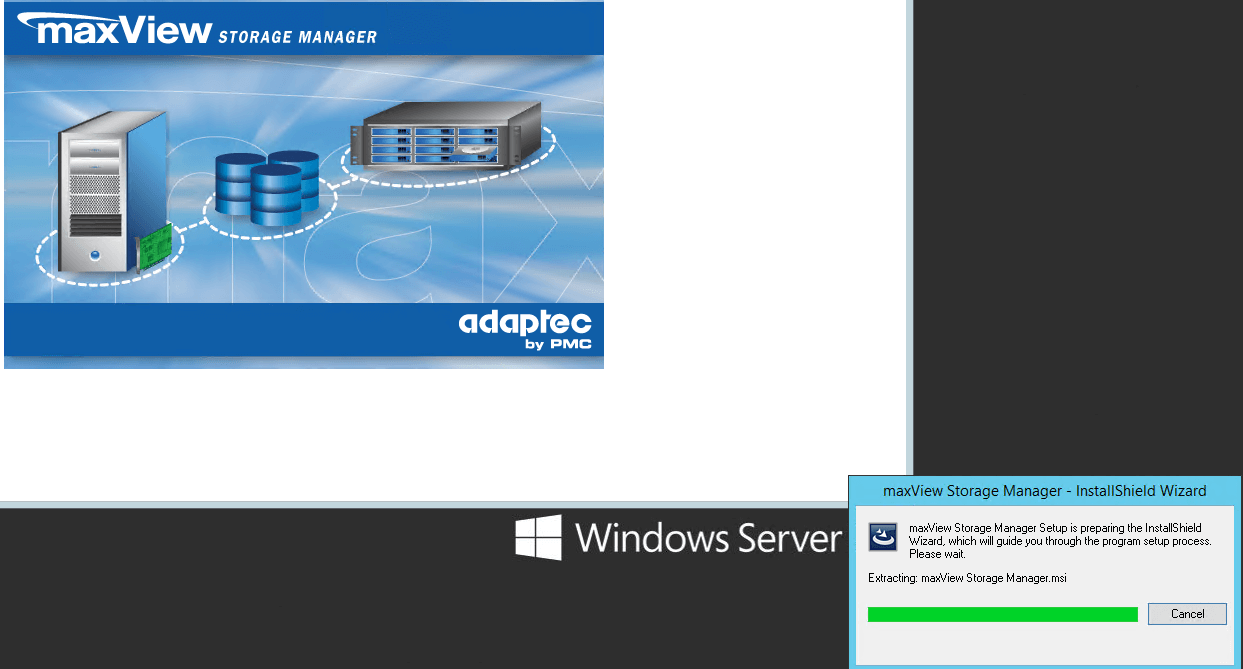
The Microsemi maxView Storage Manager 3 logo appears.
![]()
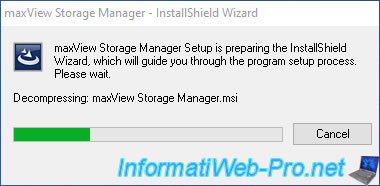
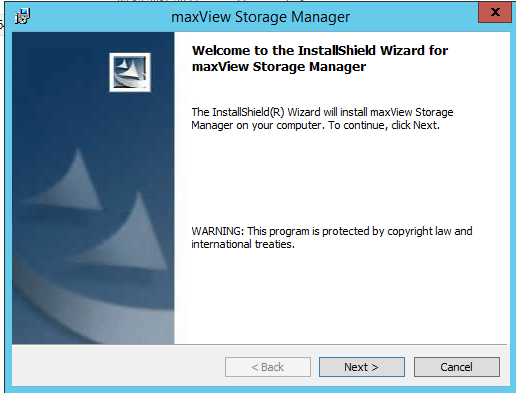
And a «maxView Storage Manager — InstallShield Wizard» window appears.
The maxView Storage Manager installation wizard appears.
As you can see, the web interface will be available by default on port 8443.
For the «Standalone Mode» box, this corresponds to the «LocalHost Mode» box which was present on older versions of maxView Storage Manager and allows you to disable remote access to the maxView Storage Manager web interface.
It will therefore be accessible only on the local computer via the address «https://localhost:8443/» (therefore on the local IP address : 127.0.0.1).
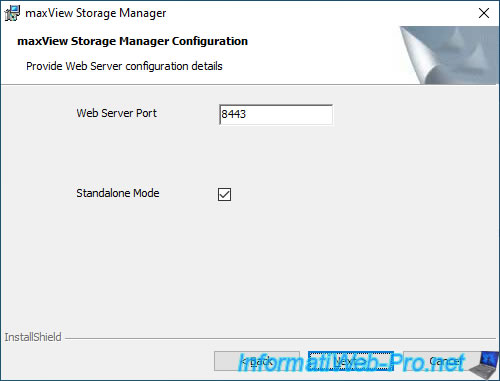
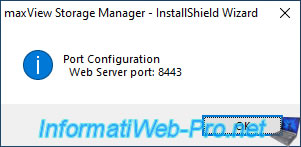
The web port is : 8443.
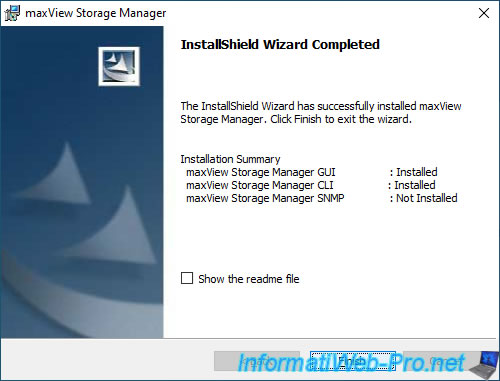
For version 3 of maxView Storage Manager, you will be able to install :
- GUI : the management graphical interface (maxView Storage Manager)
- CLI Tools : command line tools for creating and managing RAID volumes
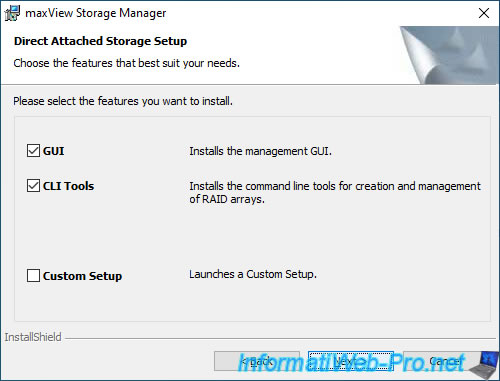
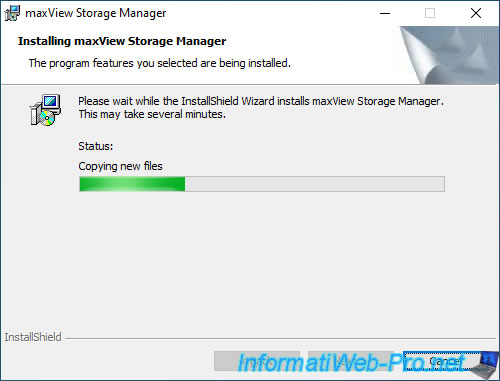
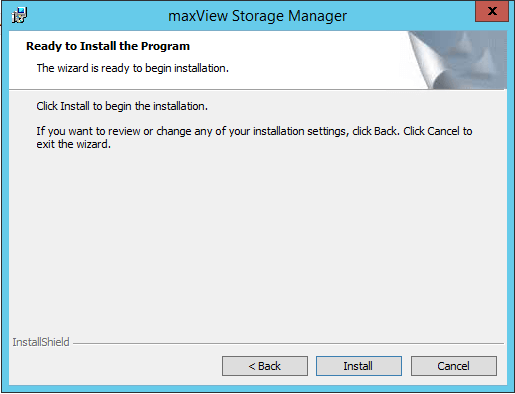
Click on : Install.
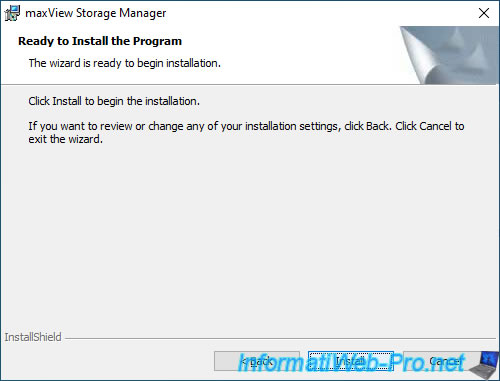
Wait while the maxView Storage Manager is installed.
maxView Storage Manager is installed.
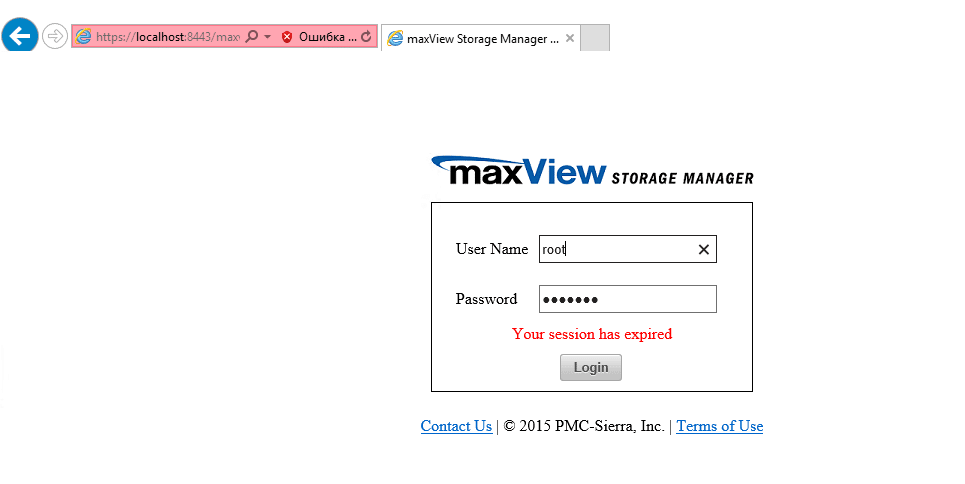
3.1. Logging in to maxView Storage Manager
Once maxView Storage Manager is installed, you will find a «maxView Storage Manager» shortcut.
Double click on it.

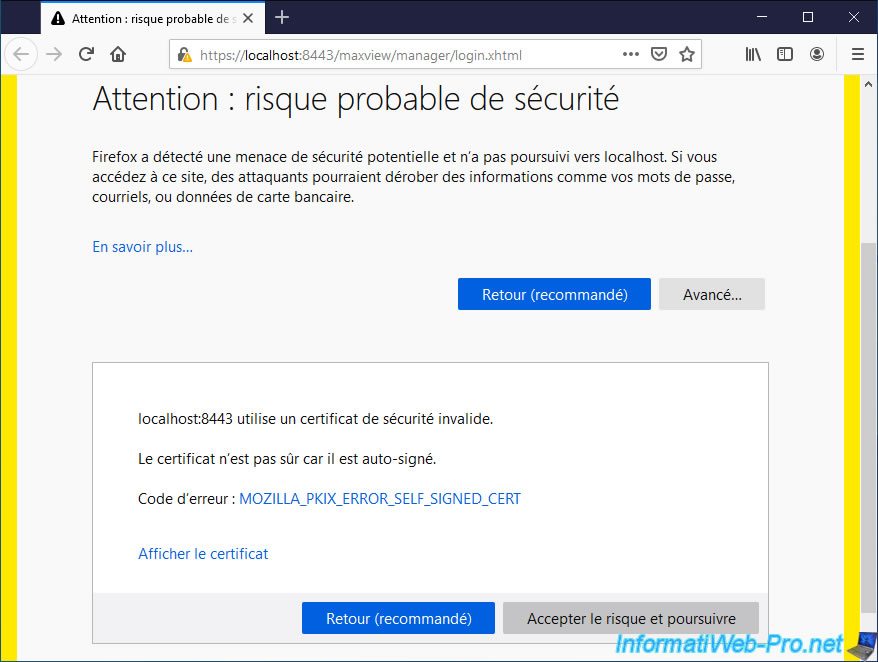
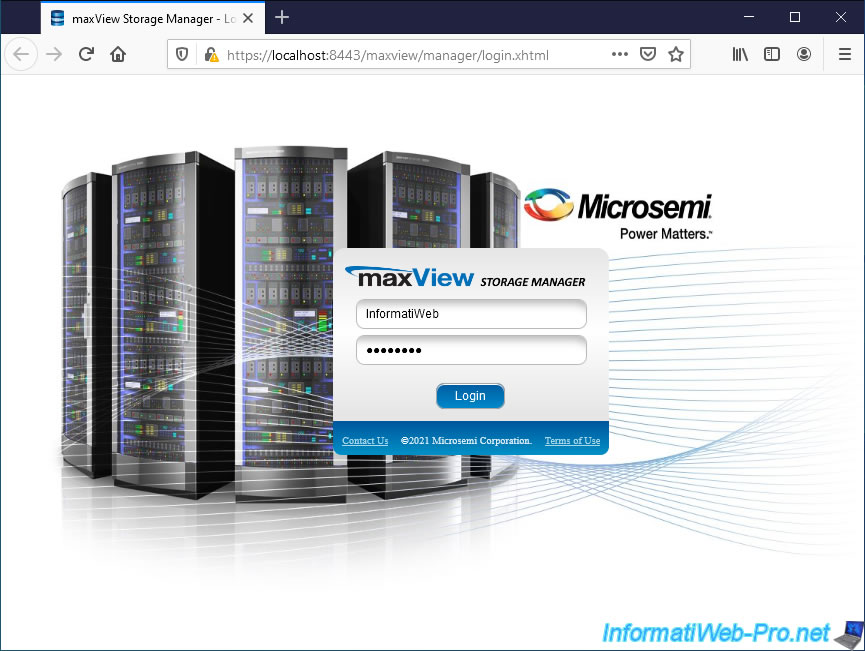
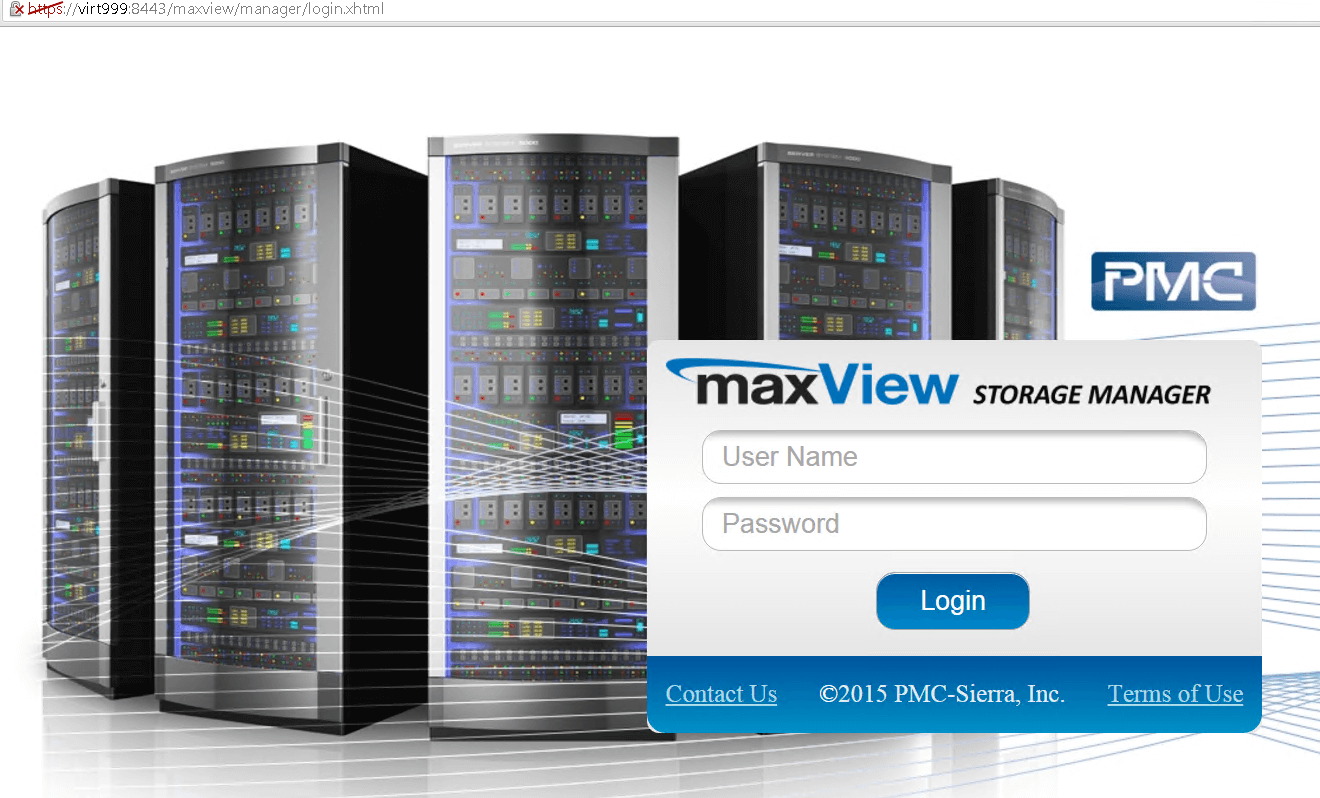
Your web browser will open and connect to the «https://localhost:8443/maxview/manager/login.xhtml» address.
To secure the connection, maxView Storage Manager uses a SSL certificate, but this is self-signed because it’s generated free of charge during its installation.
Hence the warning that your web browser displays.
With Mozilla Firefox, you can ignore this warning by clicking on : Advanced.

Then, click on : Accept the Risk and Continue.
To log in to maxView Storage Manager, you will need to provide a username and password.
The identifiers to use are those of the Windows accounts present on the computer where maxView is installed.
Note that your Windows account must be password protected in order for you to log into maxView Storage Manager with this account.
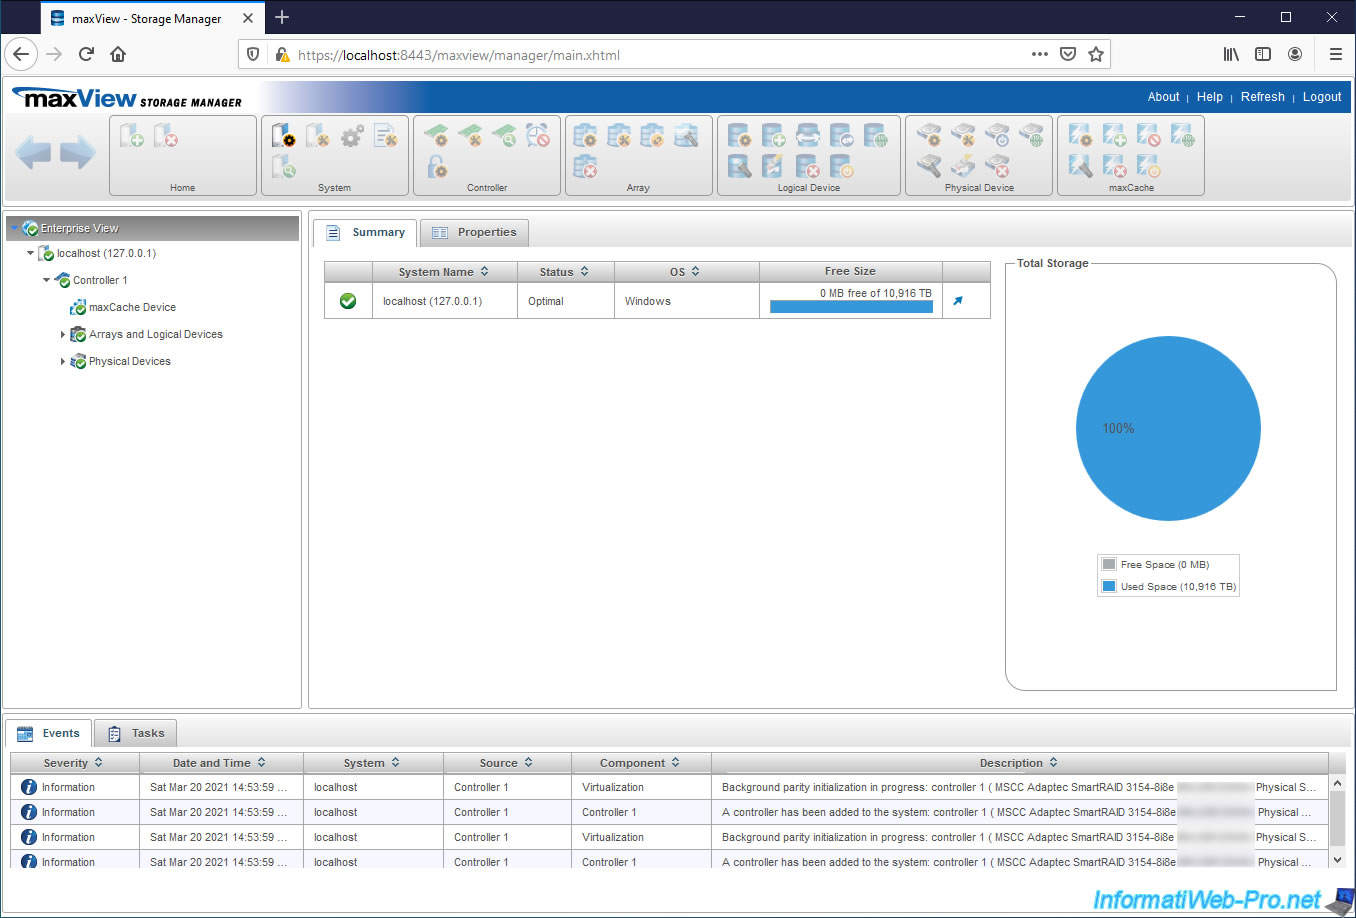
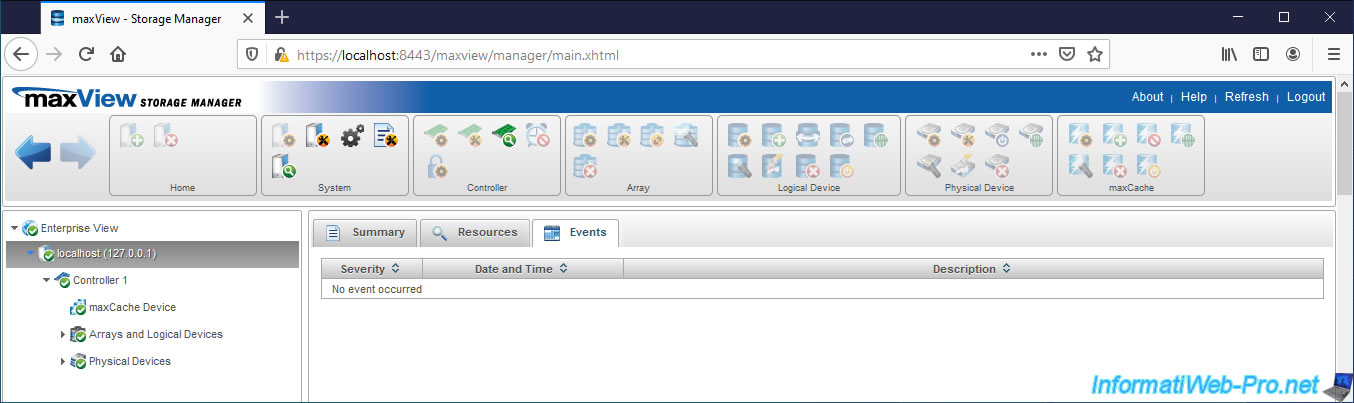
3.2. Enterprise View
The root node of maxView Storage Manager is called «Enterprise View» and allows you to list all the computers / servers available on your network.
By default, you only have one.
At the bottom of the page, you will always find the latest events triggered by your Microsemi Adaptec SmartRAID controller.
In our case, you can see that parity initialization is in progress in the background on our Adaptec SmartRAID 3154-8i8e MSCC controller.
Note that if you checked the «Standalone Mode» box when installing maxView Storage Manager, your computer will appear as «localhost».
Regarding the global properties, you will find :
- system information about the type of event to be saved : errors, warnings and informations
- the status of the sound alarm
- the status of the Auto Discovery and its refresh interval
- SMTP settings to automatically send email notifications about the status of your Microsemi Adaptec SmartRAID controller
- the settings for the web server used by maxView : port used (8443 by default), if the https (Secure Protocol) is used and on which IP address the server is listening (127.0.0.1 if the Standalone mode was enabled during the installation of maxView)

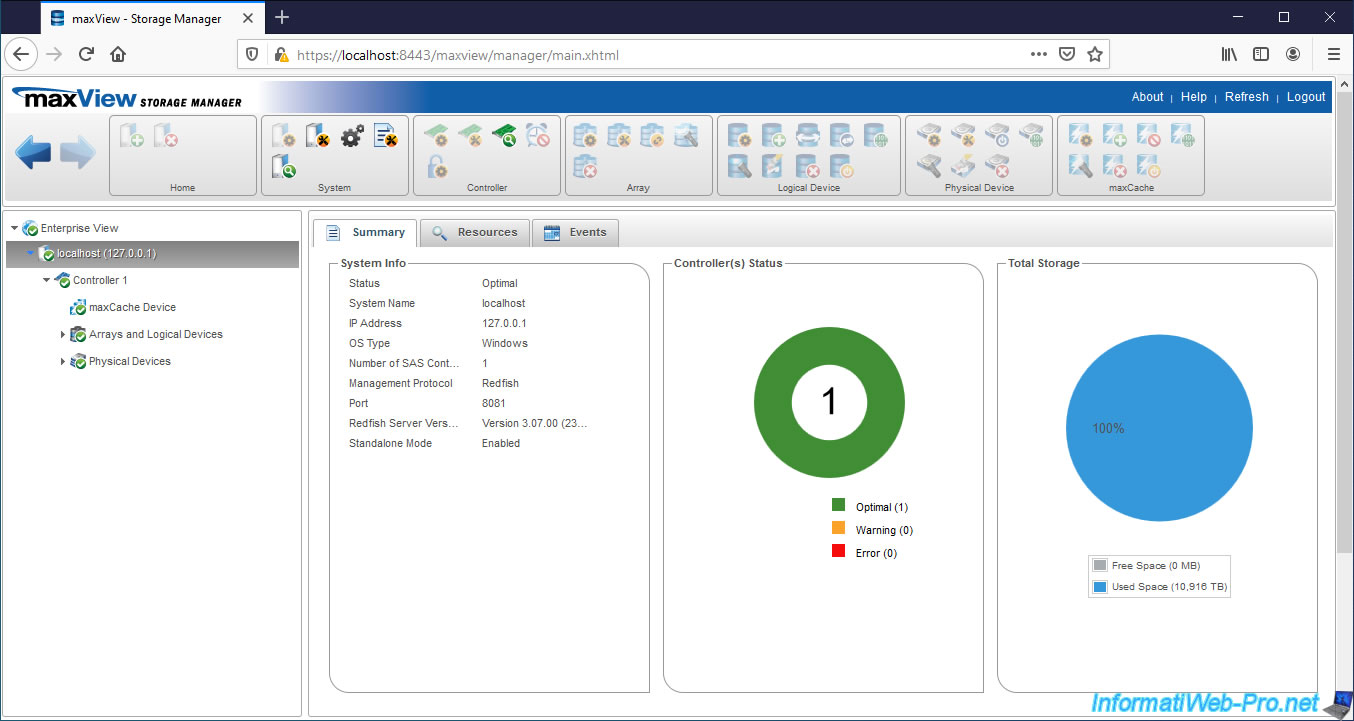
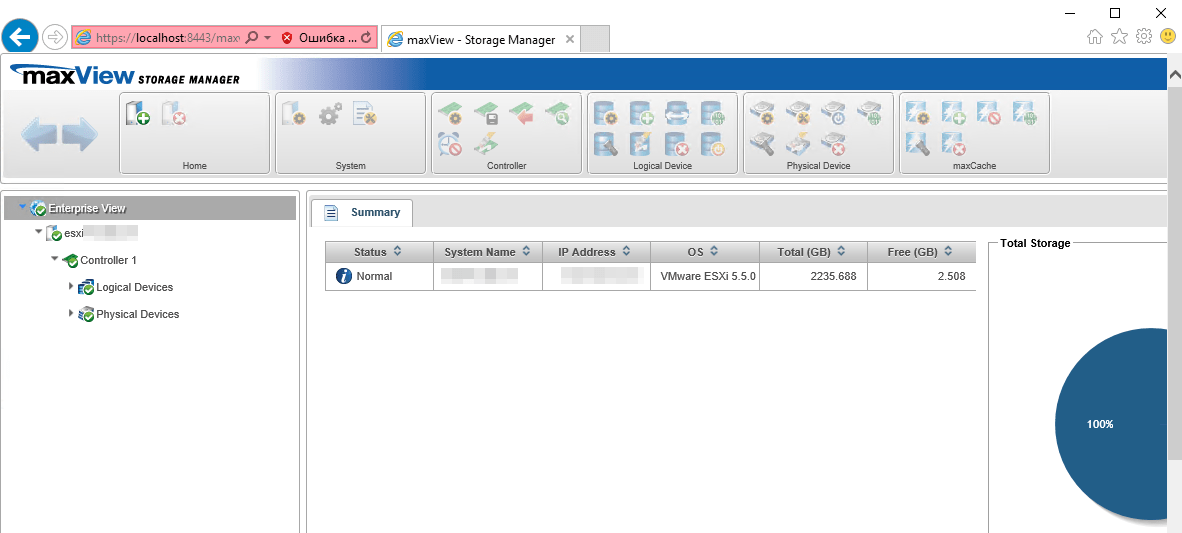
3.3. Information about the computer / server (localhost)
If you checked the «Standalone Mode» box when installing maxView Storage Manager, your computer / server will appear as «localhost (127.0.0.1)».
In the «Summary» tab, you will find a summary with the status of your different Microsemi controllers, the free space and the total space available on them.
In the «System Info» section, you can find out :
- Status : his status. Optimal = no problem detected.
- System Name : the name of the computer / server when you access maxView Storage Manager remotely or «localhost» if maxView Storage Manager has been installed in Standalone mode
- IP Address : the local IP address (LAN) of the computer / server where maxView Storage Manager is installed or «127.0.0.1» if maxView Storage Manager has been installed in Standalone mode
- OS Type : the type of operating system installed on this computer / server. Ex : Windows, Linux, …
- Number of SAS Controller : the number of SAS controllers detected
- Management Protocol : the Redfish protocol corresponds to an instance of Nodejs and allows you to manage your controllers, monitor them and provide notifications about it to maxView Storage Manager
- Port : port used for the Redfish protocol shown above
- Redfish Server Version : the version of the Redfish server. In our case : 3.07.00 (23971)
- Standalone Mode : whether the standalone mode is enabled or not (Disabled)
Dans l’onglet «Resources», vous trouverez la liste de vos contrôleurs Microsemi Adaptec.
Dans notre cas, nous avons 1 seul contrôleur «MSCC Adaptec SmartRAID 3154-8i8e», dont :
- the status is : Optimal
- the firmware version is : 1.60
- the version of the driver installed on Windows is : 106.270.0.1043 Build QA
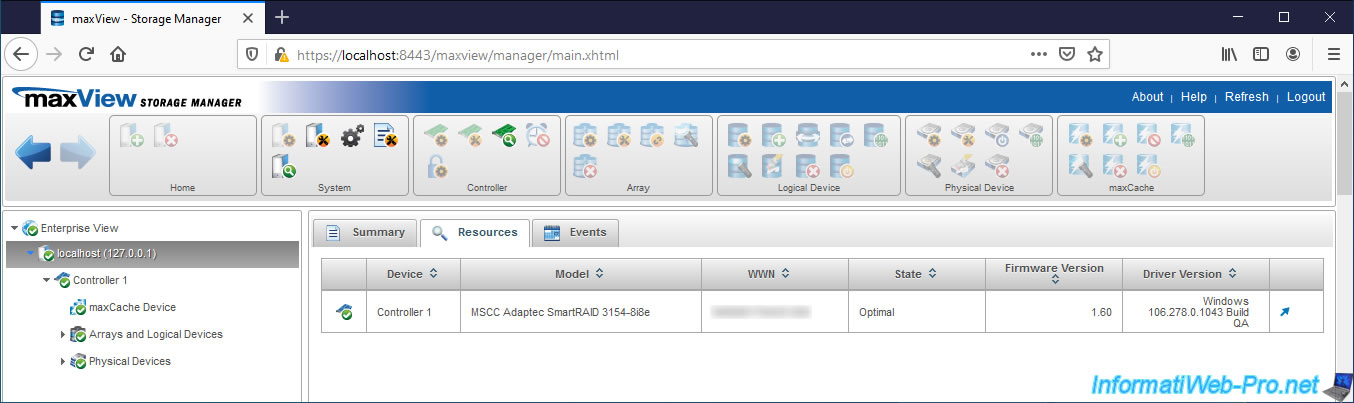
In the «Events» tab, you will find all the events that have occurred on the controllers present in your computer / server.
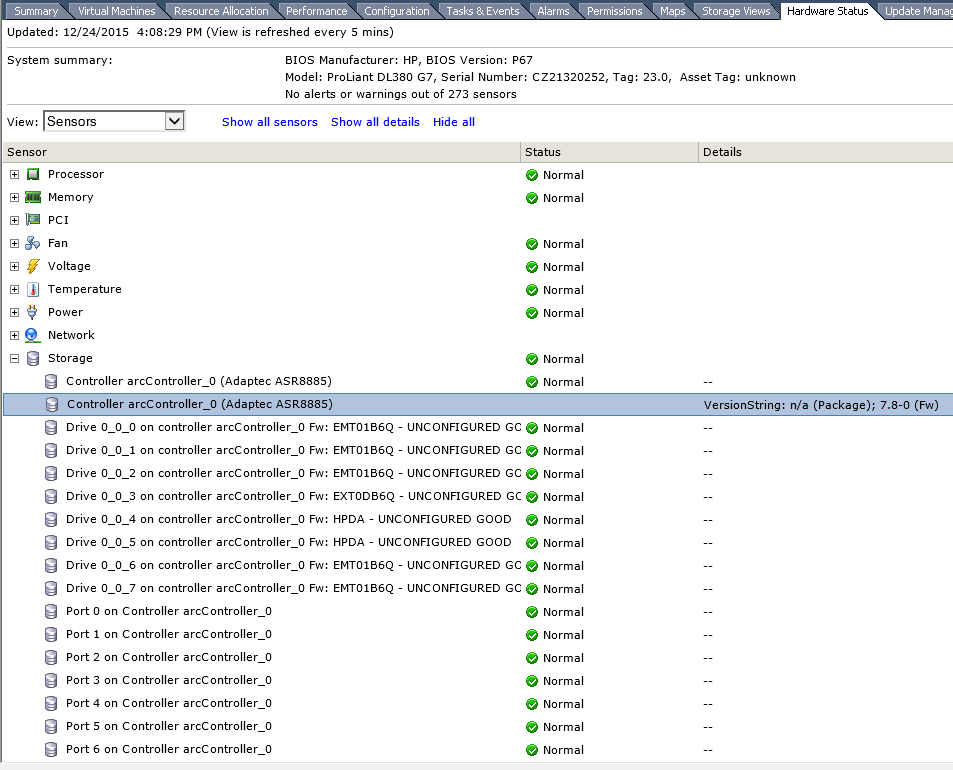
Рэйд-контроллер Adaptec. Дружим с vmware.
Тем, кто использует в своей работе рэйд-контроллеры Adaptec и систему виртуализации VMware vSphere, наверняка известно, что организовать удобное управление и мониторинг состояния рэйд-контроллера, логических и физических дисков, является делом далеко не очевидным и нетривиальным. В этой статье я решил описать свой опыт в настройке мониторинга и управления рэйд-контроллером Adaptec в среде VMware. Описанные в статье действия производились с использованием »древнего» контроллера Adaptec 5805 и VMware vSphere 5.5.
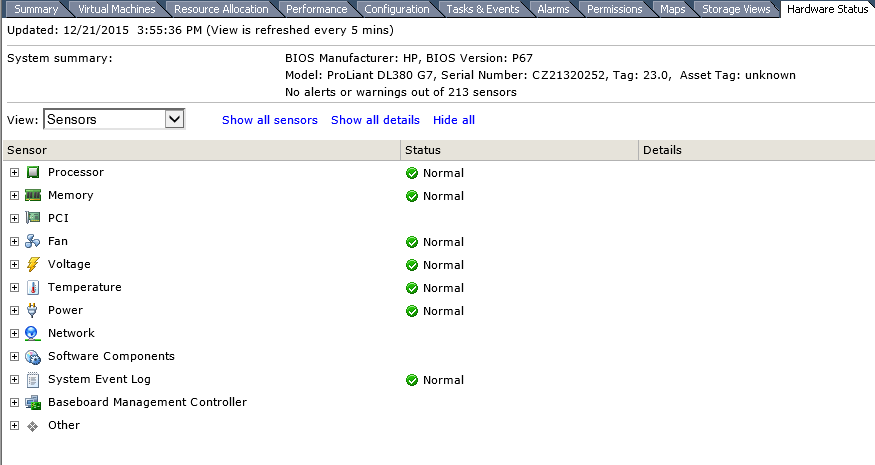
Проблема заключалась в том, что состояние рэйд-контроллера и управление им было доступно только в утилите контроллера, доступной из БИОС. В VCenter, на вкладке Hardware Status никакой информации о рэйде доступно не было.
Согласитесь, не очень здорово узнавать о неисправности диска только по писку сервера. Поэтому будем дружить Adaptec с VMware.
Собственно, причина проблемы в том, что в дистрибутиве ESXi отсутствуют драйвера и другие компоненты, необходимые для управления рэйд-контроллером.
Установка необходимых компонентов.
Скачать нужные компоненты для Adaptec можно здесь. Выбирайте нужную модель адаптера и операционную систему.
Для установки подключаемся к хосту ESXi по SSH. Копируем нужные файлы на хост(нужны будут vmware-esxi-drivers-scsi-aacraid-your-version.x86_64.vib, vmware-esx-provider-arcconf.vib, vmware-esx-provider-arc-cim-provider.vib).
Настраиваем уровень разрешений для установки софта(PartnerSupported или CommunitySupported).
|
esxcli software acceptance set —level=CommunitySupported |
Устанавливаем драйвер
|
esxcli software vib install —v /vmfs/volumes/your_path/vmware—esxi—drivers—scsi—aacraid—your—version.x86_64.vib |
Устанавливаем утилиту arcconf(CLI) и cim-provider(для удаленного взаимодействия)
Предварительно можно проверить наличие предыдущих версий
|
esxcli software vib list | grep arcconf esxcli software vib list | grep arc—cim—provider |
Если найдутся — удаляем
|
esxcli software vib remove —n arcconf esxcli software vib remove —n arc—cim—provider |
Ставим arcconf
|
esxcli software vib install —no—sig—check —v /vmfs/volumes/your_path/vmware—esx—provider—arcconf.vib |
и cim-provider
|
esxcli software vib install —no—sig—check —v /vmfs/volumes/your_path/vmware—esx—provider—arc—cim—provider.vib |
Перезагружаем хост. Теперь на вкладке Hardware Status будет отображаться статус нашего хранилища.

Управление рэйд-контроллером Adaptec.
Для управления рэйд контроллером Adaptec предлагает утилиту командной строки arcconf и графическую утилиту Maxview Storage Manager(ранее Adaptec Storage Manager). Для управления контроллером нужно установить Maxview Storage Manager и(или) arcconf на гостевую! ОС виртуальной машины, расположенной на хосте, где установлен рэйд-контроллер. Скопируйте файл setup_maxview_gos_x64.exe или x86.exe, если используете Windows в качестве гостевой ОС. Запустите установщик и следуйте указаниям мастера. Введите следующие данные:
- Host IP Address (ESXi or XenServer host)
- Web Server Port: 8443
- Host user name (default: root)
- Operating system password/password confirmation
Запустите Maxview Storage Manager и введите для логина учетные данные от хоста ESXi.
Подключиться можно и с другого компьютера по IP-адресу или имени ВМ, на которой установили maxview storage manager:
https://ip-address:8443/maxview/manager/login.xhtml
После этого вы попадете в меню программы и сможете управлять рэйд-контроллером.
Несколько слов об arcconf.
После установки можно запускать утилиту из консоли CMD или Powershell, запущенных от имени администратора.
Запуск без параметров выведет список доступных команд. Вот несколько полезных из них:
arcconf getconfig 1 — выводит информацию о конфигурации контроллера 1;
arcconf getconfig 1 ld — выводит информацию о логических дисках;
arcconf getconfig 1 pd — выводит информацию о физических дисках;
arcconf rescan 1 — сканирует доступные диски контроллера 1;
arcconf getstatus 1 — показывает фоновые операции(например, ребилд);
Подробная инструкция по использованию arcconf доступна здесь.
Ну и, напоследок, еще об одной «плюшке» для VMware от Adaptec, а именно maxView Plugin for vSphere Web Client. Это плагин, позволяющий отслеживать состояние рэйда в веб-клиенте VMware. К сожалению, управлять рэйд-контроллером через этот плагин нельзя, но, тем не менее, он есть. Установка производится только на ВМ с windows версией VCenter Server путем запуска файла setup_maxView_VWC_Plugin_x64.exe
После установки перезагрузите машину с вцентром.
После перезагрузки в веб-клиенте будет доступен этот плагин.
Вот так выглядит страница плагина:

На этом, наверное, можно закончить. Надеюсь, кому-то статья будет полезна при установлении »дружеских отношений» между vmware и рэйд-контроллером Adaptec.
This section describes how
to install maxView Storage Manager on Windows systems.
Note: You need administrator privileges to install maxView
Storage Manager. For details on verifying privileges, refer to your
operating system documentation.
- Open Windows Explorer or My
Computer, then change to the directory where the Windows setup program
is located (see Downloading
the Installer Package for details). - Double-click the setup program for
your operating system version:Option Description Windows
64-bitsetup_asm_x64.exe Windows
32-bitsetup_asm_x86.exe The
Installation wizard opens. - Click Next to begin the
installation, click I
accept…, then click Next. - Add the following configuration
settings:- CIM Server Port: 5988.
- Web Server Port: 8443.
- User Name default:
Administrator - Operating system password.
- Click OK on the password
verification window and on the CIM Server and Web Server port number
verification window. - In the Features screen, ensure that
GUI and
Agent is selected. Optionally, select CLI Tools and maxCache Plus.
Then click Next.Note: maxCache Plus
is supported on qualifying Adaptec Series Q controllers only (see
the Readme for a complete list). For non-qualifying controllers,
the maxCache Plus option is grayed out. - Click Install to begin the
installation. - Repeat these steps to install
maxView Storage Manager on every Windows system that will be part of
your storage space.
When
the installation is complete you receive a confirmation message and the
maxView Storage Manager icon is placed on your desktop.
Обновлено 16.06.2017

Всем добрый день, продолжаем нашу эпопею с raid контроллером Adaptec 8885, мы с вами остановились на том, что произвели установку VMware ESXI 5.5 на данный рейд контроллер. Почитать можно об этом вот тут (Установка esxi на Adaptec Raid 8885). Следующим этапом, является настроить удобное программное обеспечение, для мониторинга и управления raid массивом и самим контроллером, чем мы и займемся, на все про все мы затратим, около 10-15 минут.
Установка maxView Storage Manager в VMware ESXI 5.5
Как видите если зайти на вкладку Hardware у нужного хоста в vCenter, то вы не увидите, информацию о дисках или контроллерах, а ведь надо же.
И так на борту у нас ESXi и нам нужно в нем производить мониторинг состояния жестких дисков или ssd дисков. Для этого есть утилита maxView Storage Manager. Давайте ее скачаем. Переходим на сайт производителя, и скачиваем нужную версию, на момент написания статьи это maxView Storage Manager v2.00.21811 for VMware, сам дистрибутив весит порядка 630 мегабайт, очень толстый.Раньше когда был Adaptec CIM Provider, он весил пару мегабайт, но работал через Java, а тут все в браузере, ладно посмотрим.
Когда вышла седьмая серия контроллеров, то была сделана новая утилита maxView в замену Adaptec Storage Manager, так же она еще поддерживает старые контроллеры 6 версии. По сути утилита так же нужна для управления raid и его настройками, но уже работает через веб браузер. Утилита содержит вот такие компоненты:
- CIMOM (CIM Object Manager) для взаимодействия с контроллером
- Web server
- Agent
Установка подразумевает, что у вас есть включенный esxi ssh доступ, далее конектитесь к серверу, я использую утилиту mRemoteNG, очень удобная и позволяет делать много окон в одном большом, советую. Вам в начале нужно проверить есть ли нужный драйвер в системе, делается это командой:
esxcli software vib list | grep aacraid
В идеале вы должны получить вот такой ответ, если у вас его нет то вам нужно его скачать и поставить, где скачать драйвера adaptec я уже писал. Установка аналогична, той, что будет ниже для CIM Object Manager пакета.

Порядок установки maxview storage manager
В начале при любом раскладе нужно перевести хост виртуализации в режим обслуживания, maintenance mode. Затем если драйвера нет, то ставим его и перезагружаемся. Далее копируем из скачанного архива файлы vmware-esx-provider-arcconf.vib и vmware-esx-provider-arc-cim-provider.vib. Как скопировать файл в esxi читаемс. Кладем файлы в папку tmp.
Тепрь нужно проверить нет ли предыдущих версий данных пакетов
esxcli software vib list | grep arc
Если нет, то ко. Если есть то удаляем командой
esxcli software vib remove -n arcconf
esxcli software vib remove -n arc-cim-provider
после удаления перезагружаемся.
Останавливаем агента CIM watchdog
/etc/init.d/./sfcbd-watchdog stop
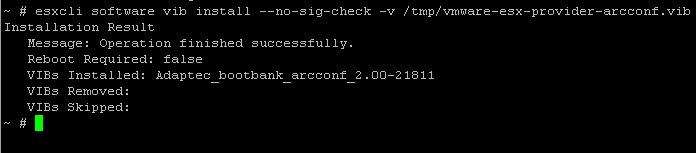
Все начинаем установку, первого компонента который нам поможет запустить мониторинг raid массива
esxcli software vib install —no-sig-check -v /tmp/vmware-esx-provider-arcconf.vib
Installation Result
Message: Operation finished successfully.
Reboot Required: false
VIBs Installed: Adaptec_bootbank_arcconf_2.00-21811
VIBs Removed:
VIBs Skipped:
и ставим второй компонент.
esxcli software vib install —no-sig-check -v /tmp/vmware-esx-provider-arc-cim-provider.vib
Installation Result
Message: The update completed successfully, but the system needs to be rebooted for the changes to be effective.
Reboot Required: true
VIBs Installed: Adaptec_bootbank_arc-cim-provider_2.00-21811
Все перезагружаем хост командой reboot.
В итоге вы должны получить вот такой вид на вкладке hardware, как видите появилась вкладка Storage со всеми дисками.
Как бы все, но не тут то было. Давайте теперь более подробно ознакомимся со схемой работы. Внутри хоста ставим драйвер и CIM провайдера, а вот maxView Storage Manager Agent and Apache Tomcat уже ставятся на виртуальной машине, которая должна лежать на данном хосте, вот такая матрешка. В виртуальной машине должна быть ос linux или Windows, как 32 так и 64 бита. Я честно не знаю зачем Adaptec сделали такую схему с maxview storage manager, раньше с 5 версией Adaptec Raid controller например 5805, было проще хоть и работало все через java.
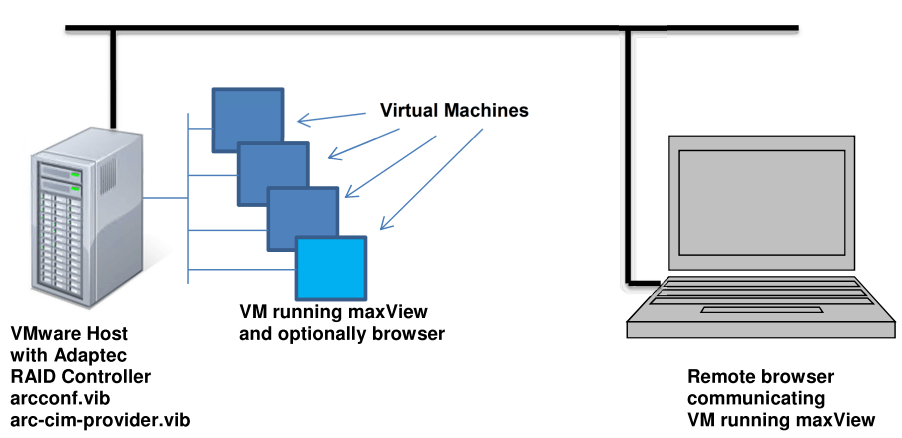
В качестве гостевой операционной системы в виртуальной машине я выбираю Windows Server 2012 R2, где я буду ставить maxView Storage Manager, иначе мы не сможем мониторить и менять настройки у raid adaptec 8885. И так я выложил все дистрибутивы на яндекс диск, и с него вы можете скачать maxView Storage Manager 2.00.00.21811. Запускаем его у вас откроется мастер установки утилиты.
Жмем next.
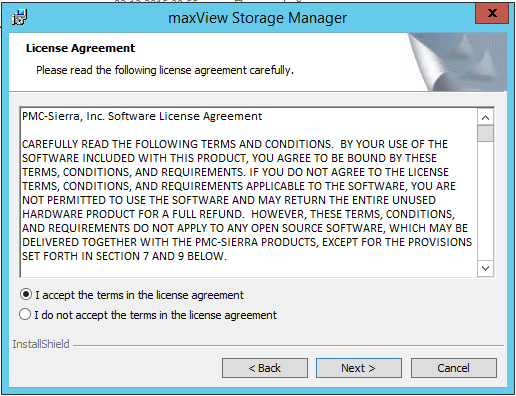
Соглашаемся с лицензионным соглашением и жмем next.
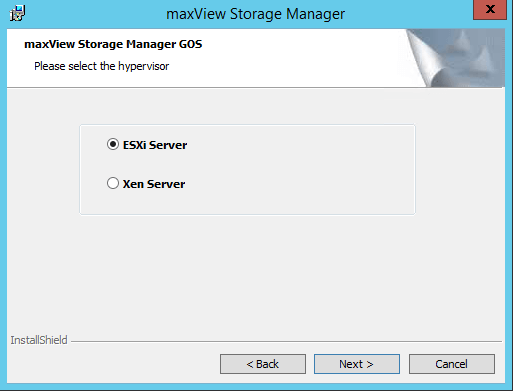
На следующем шаге вас спросят, что вы хотите мониторить, какой гипервизор, выбираем ESXi Server, next.
Указываем параметры:
- ESXI Jost ip Address > адрес хоста виртуализации
- ESXI Host Password > пароль к нему, по умолчанию будет использоваться логин root.
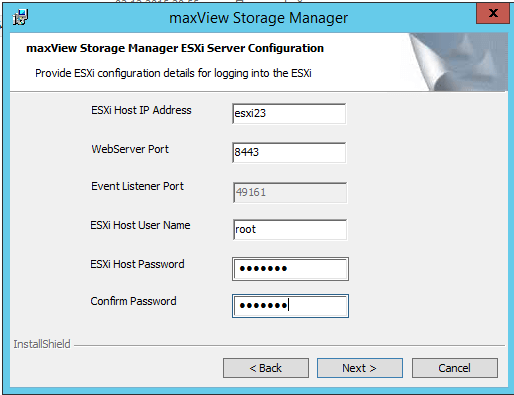
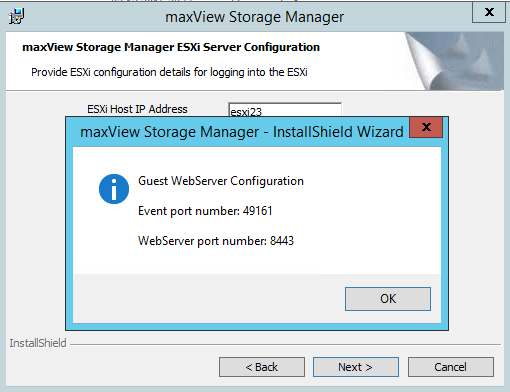
Вас предупредят о выбранных портах для управления Adaptec controller (49161 и 8443, не забудьте их открыть на ос)
Выставляем компоненты установки, первые два обязательные.
install
В итоге у вас появится вот такой значок, для локального запуска утилиты, жмем Finish. На этом установка закончена. Далее вам нужно обратиться по адресу
если локально, по сути щелкнув по ярлыку у вас этот адрес и будет запускаться
https://localhost:8443/maxview/manager/login.xhtml
либо если удаленно
https://адрес виртуальной машины:8443/maxview/manager/login.xhtml
Еще у меня в браузере не работало, перезагрузил виртуальную машину все залетало
В идеале у вас должно появиться вот такое окно входа.
Материал сайта pyatilistnik.org
3
This section describes how to install and uninstall maxView Storage Manager on different operating
systems. It also describes how to run maxView Storage Manager in bootable DVD mode, before the
application is installed on an operating system.
Before You Begin the Installation
Before you begin your installation, prepare the following information:
• Administrator account user name and password for your operating system.
• CIM Server port number. The default port is recommended (5988). If you want to use a different
port, select any one between 65500 and 65535 and it will be assigned as the CIM Server http port
for maxView Storage Manager installation. (The selected port must be free at installation time.) The
installation will verify the availability of this port. There is no guarantee that any port number besides
the default will work in the future as any other application can claim this port. For more information
on the CIM Server,
• maxView Web Server port number. The default port is recommended (8443). If the default port is
not available, another port number will be automatically assigned. For more information on the
Web Server, see
Note: If a previous version of maxView Storage Manager is installed on your system,
you must remove it before beginning a new installation. See
Storage Manager
Installing on Windows
This section describes how to install maxView Storage Manager on systems running Windows.
Note: You need administrator or root privileges to install maxView Storage Manager.
For details on verifying privileges, refer to your operating system documentation.
1. Insert the Adaptec Installation DVD.
The Installation DVD Main Menu opens.
2. Select Install maxView Storage Manager.
The Installation wizard opens. If it doesn’t open, select Browse the CD/DVD, then click Autorun.
3. Click Next to begin the installation, click I accept…, then click Next.
4. Add the following configuration settings:
a) CIM Server Port: 5988.
b) Web Server Port: 8443.
c) User Name default: Administrator
d) Operating system password.
Proprietary and Confidential to PMC-Sierra, Inc.
Document No.: CDP-00278-01-A Rev. A, Issue:
seeAbout the maxView Storage Manager CIM Server
About the maxView Storage Manager Web Server
on page 25 for details.
maxView Storage Manager User’s Guide
on page 15.
on page 15.
Uninstalling maxView
19
On Windows and Linux, you can install the «maxView Storage Manager» web interface which allows you to manage your Adaptec SmartRAID controller, your arrays, your logical disks (logical devices) and your physical disks (physical devices).
However, if you install the VMware ESXi (vSphere) hypervisor, you will not be in either of these situations.
Fortunately, Microsemi has thought of you by developing a version suitable for VMware solutions (such as VMware ESXi or vSphere).
Thus, you will only need to install 2 bundles in «.vib» format which correspond to a CIM server and to the Adaptec command line tool (ARCCONF).
The CIM server is what will allow you to manage your Adaptec SmartRAID controller (and its resources) remotely through a maxView Storage Manager interface installed on another computer.
- Download the VMware version of maxView Storage Manager
- Store the .VIB files to install on the VMware ESXi host
- Install the CIM server and the ARCCONF command line tool
- Install the maxView Storage Manager web interface
- Add the VMware ESXi server to the maxView Storage Manager web interface
- Manage your Adaptec SmartRAID controller remotely from maxView
1. Download the VMware version of maxView Storage Manager
To download the VMware version of maxView Storage Manager, go to your Microsemi Adaptec SmartRAID controller page and click on the «Storage Manager Downloads» link.
Then, click on the «maxView Storage Manager v3 … for VMware» download link.
As expected, the version of maxView Storage Manager offered is compatible with your Microsemi Adaptec SmartRAID controller.
Click the «Download Now» button and accept the Microsemi license agreement.
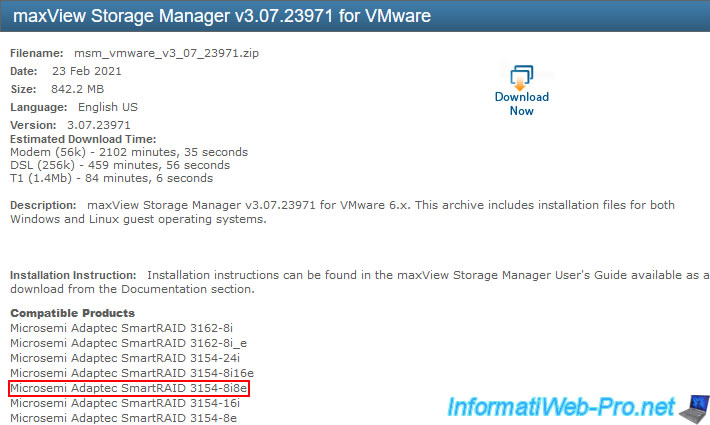
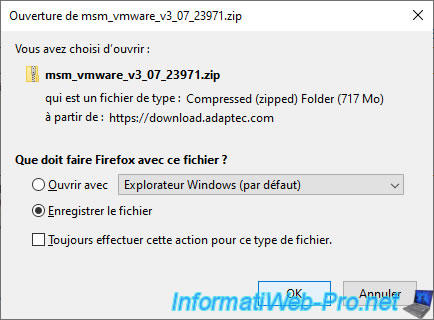
The name of the proposed file will be «msm_vmware_v3_xx_xxxxx.zip».
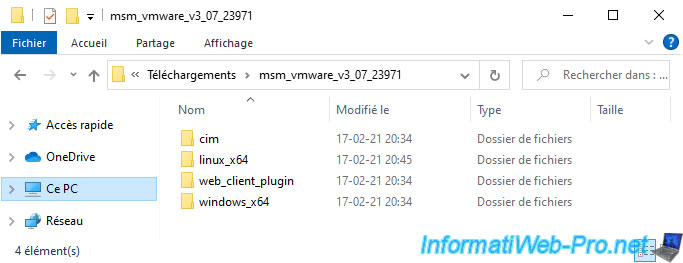
Unzip the downloaded file and you will find 4 folders inside :
- cim : the server allowing you to manage your Microsemi Adaptec controller remotely using maxView Storage Manager.
- linux_x64 : maxView Storage Manager web interface to install on a Linux computer
- web_client_plugin : web interface that you can install directly on your VMware server.
However, this requires the Windows version of VMware vCenter Server (which no longer exists in VMware vSphere 7.0) and the informations displayed will only be available for reading. - windows_x64 : maxView Storage Manager web interface to be installed on a Windows computer
The cim server must be installed on your VMware ESXi (vSphere) hypervisor and the «maxView storage Manager» web interface must be installed on a computer running Windows (thanks to the «windows_x64» folder) or Linux (thanks to the «linux_x64» folder).
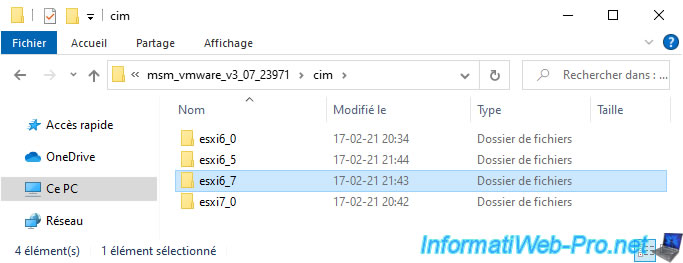
In the «cim» folder, you will find several «esxiX_X» folders that allow you to install the version of the CIM server appropriate for your version of VMware ESXi (vSphere).
In our case, our VMware ESXi hypervisor is in version 6.7, so we open the «esxi6_7» folder.
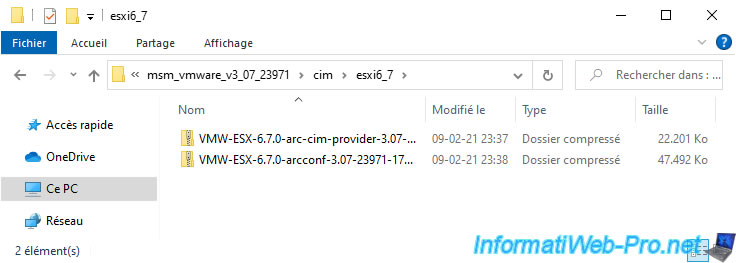
In this «esxi6_7» folder, you will find 2 compressed files (in zip format) :
- VMW-ESX-6.7.0-arc-cim-provider-3.07-23971-17572419.zip : this CIM server provided by Adaptec (Microsemi) collects information about the resources related to the storage of your controller (the controller itself, its logical RAID devices, its physical devices, …).
- VMW-ESX-6.7.0-arcconf-3.07-23971-17572485.zip : command line tool for configuring your Microsemi Adaptec SmartRAID controller.
2. Store the .VIB files to install on the VMware ESXi host
If you enter one of these compressed files (in zip format), you will see that it contains a «.vib» file each time.
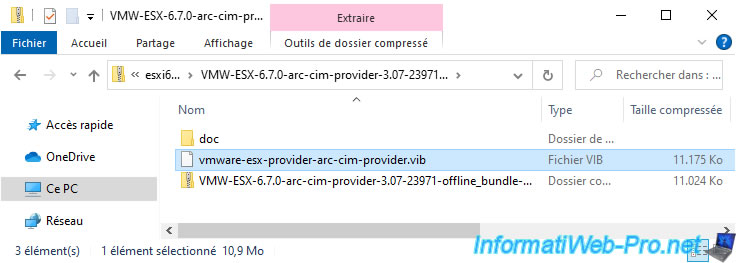
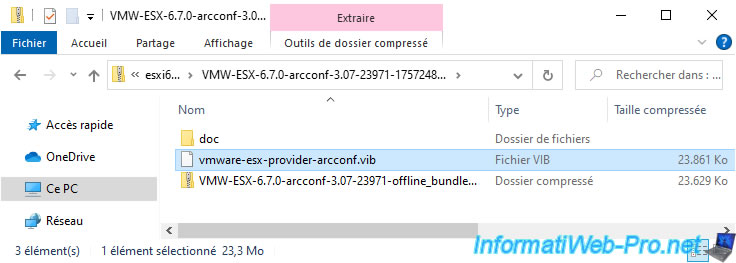
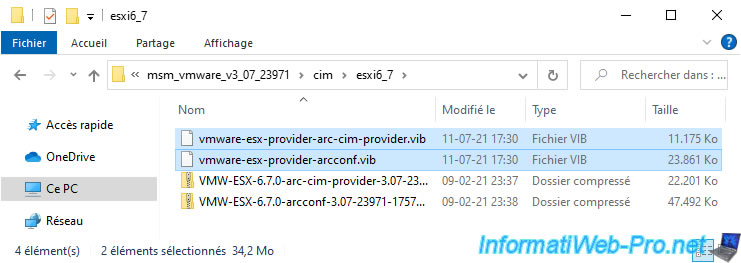
Get these 2 «.vib» files and place it in the current folder (esxi6_7) for example :
- vmware-esx-provider-arc-cim-provider.vib : VMware Installation Bundle of the CIM server adapted to your Microsemi Adaptec SmartRAID controller.
- vmware-esx-provider-arcconf.vib : installation bundle for the Adaptec’s «ARCCONF» command line tool.
To store them temporarily on your VMware ESXi host, you have 2 possibilities :
- enable the SSH protocol on your VMware ESXi host and transfer the 2 «.vib» files wherever you want on your host using the SFTP protocol (which uses the same port «22» as the SSH).
- use the database browser to send these files through your usual web browser.
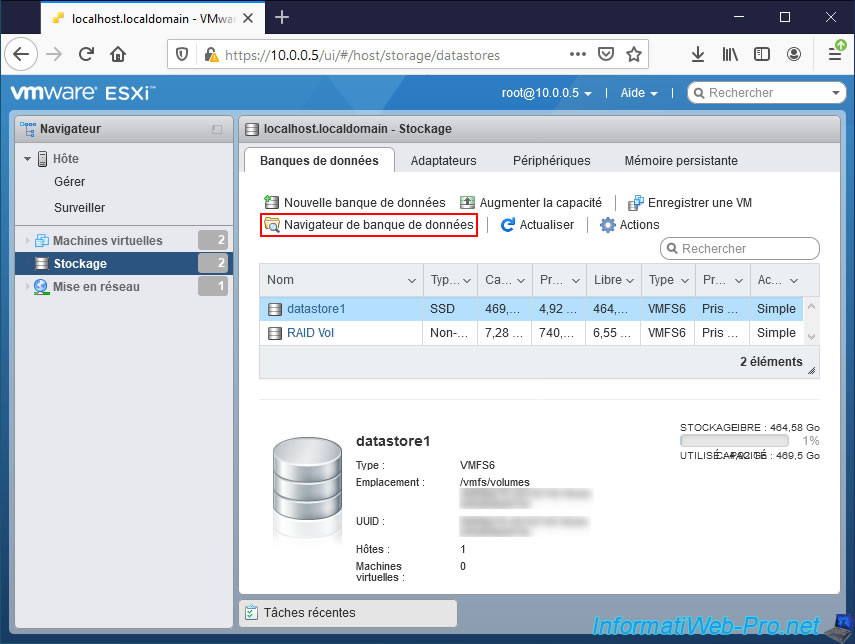
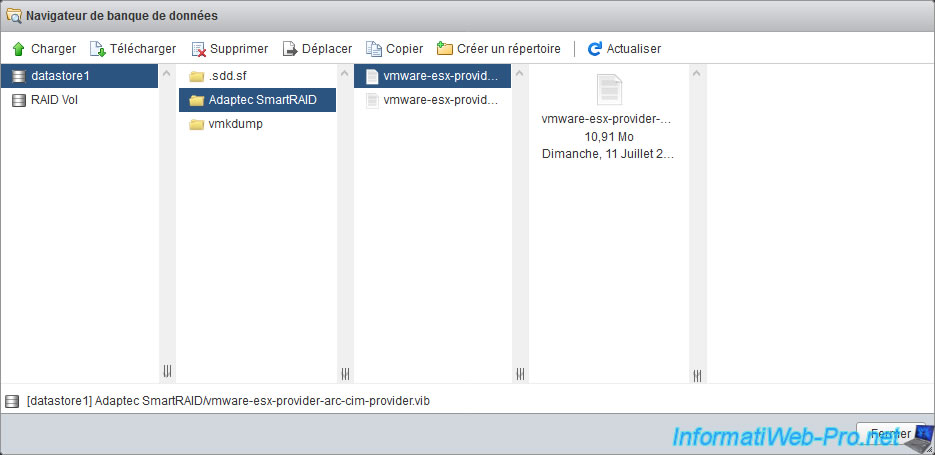
For the tutorial, we are going to create a new directory at the root of our «datastore1» datastore (which is always present by default).
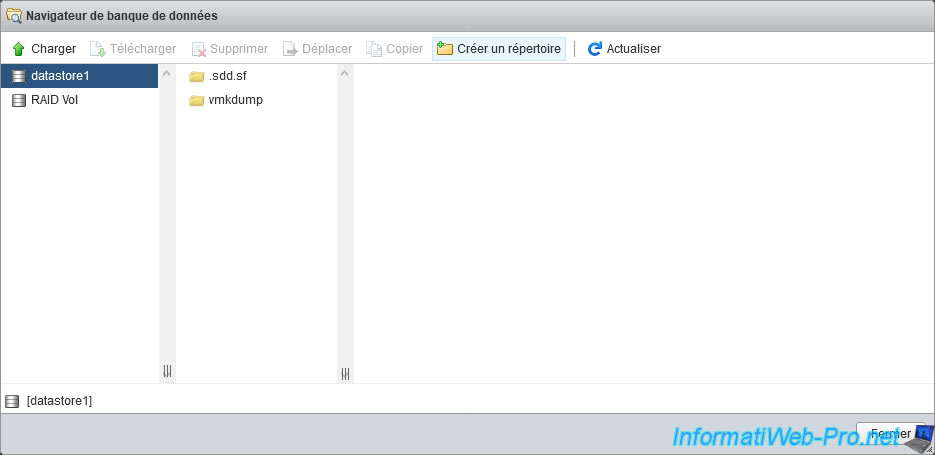
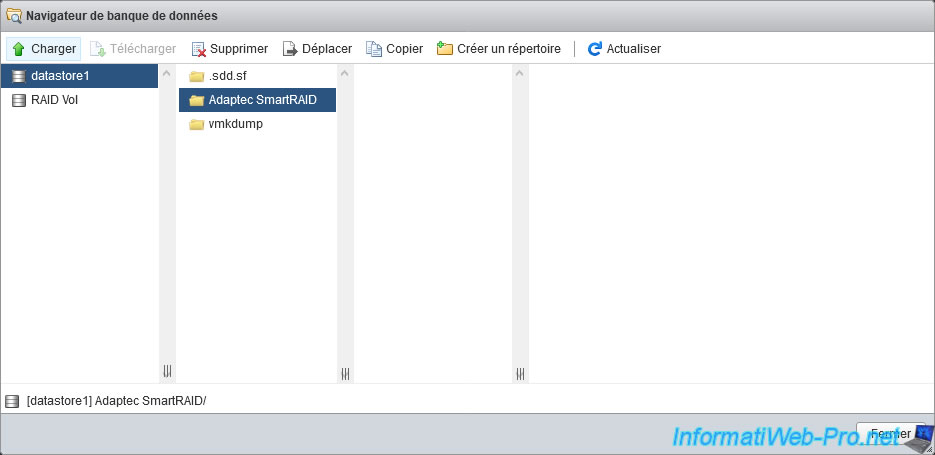
Name this directory «Adaptec SmartRAID» and click on : Create directory.

Select the created folder and click «Upload».
Select the following «.vib» files one by one by clicking each time on «Open» :
- vmware-esx-provider-arc-cim-provider.vib
- vmware-esx-provider-arcconf.vib
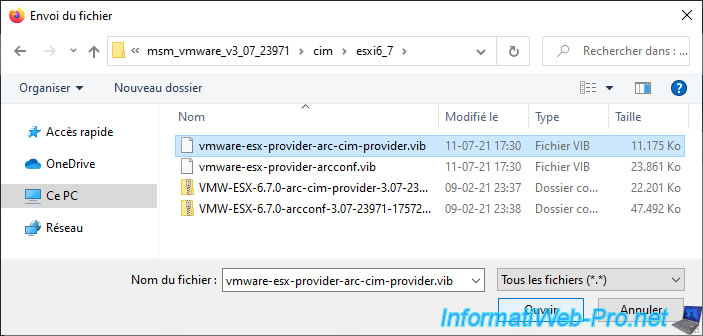
The 2 files have been stored on your VMware ESXi (vSphere) host.
3. Install the CIM server and the ARCCONF command line tool
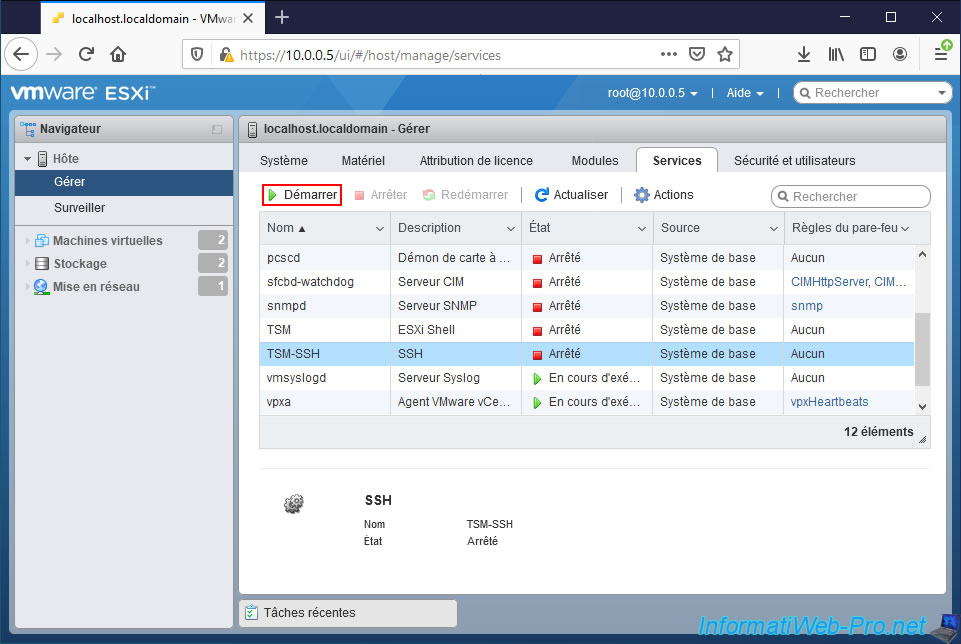
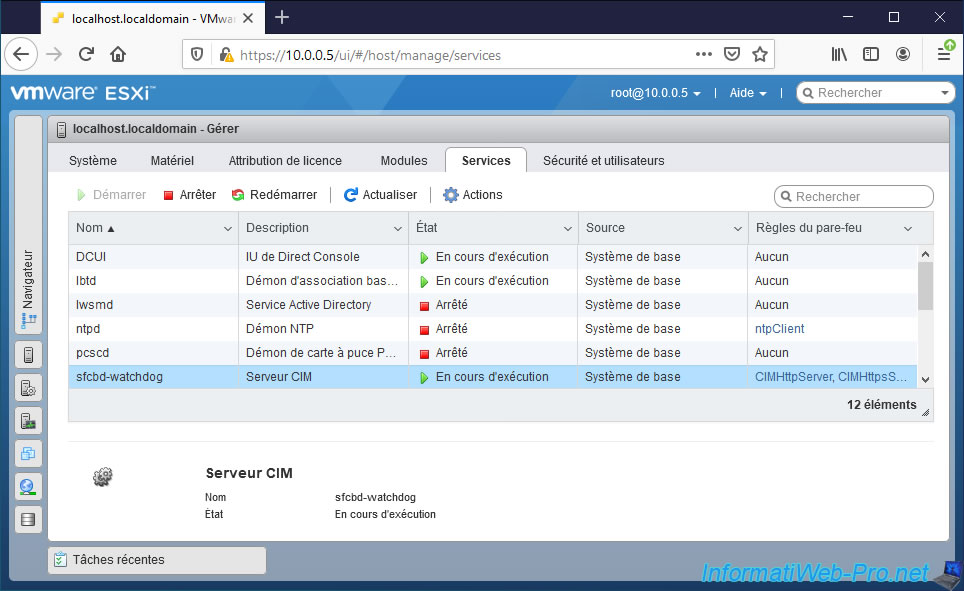
To install the desired «.vib» bundles, you will first need to enable the SSH protocol on your VMware ESXi server.
To do this, go to «Host -> Manage -> Services», select the «TSM-SSH» service and click on : Start.
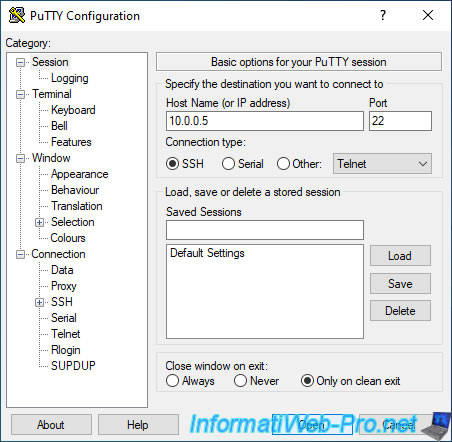
Then, use a SSH client (such as «PuTTY» if you are on Windows) and enter the IP address of your VMware ESXi server.
Then, click on Open.
Log in as root, then verify that «arcconf» is not already installed.
To do this, type the command :
Bash
esxcli software vib list | grep arcconf
If nothing is displayed, it means that it’s not installed.
Otherwise, uninstall it by typing this command :
Bash
esxcli software vib remove -n arcconf
Then, check if the CIM server is already installed with this command :
Bash
esxcli software vib list | grep arc-cim-provider
Again, if nothing is displayed, the CIM server is not installed.
Otherwise, uninstall it using the command below.
Note : if you are prompted for a restart, ignore this for now.
Bash
esxcli software vib remove -n arc-cim-provider
Change your VMware ESXi hypervisor acceptance level for installing VIB files to : Partner.
Bash
esxcli software acceptance set --level=PartnerSupported
Since we have stored our 2 «.vib» files in the «Adaptec SmartRAID» folder of our «datastore1» datastore, these files are therefore located in the «/vmfs/volumes/datastore1/Adaptec SmartRAID» folder.
To install the «ARCCONF» command line tool, use the command below.
Notes :
- IMPORTANT : the path to the «.vib» file to install must be an absolute path (therefore from the root of the file system) and this must be specified even if you have previously moved to the folder which contains these files «.vib».
Otherwise, it may cause errors when installing the desired «.vib» file. - the «» character is an escape character for spaces.
Bash
esxcli software vib install -v /vmfs/volumes/datastore1/Adaptec SmartRAID/vmware-esx-provider-arcconf.vib
Once the «arcconf» package is installed, this will be displayed :
Plain Text
Installation Result
   Message: Operation finished successfully.
   Reboot Required: false
   VIBs Installed: Adaptec_bootbank_arcconf_3.07-23971
   VIBs Removed:
   VIBs Skipped:
Also install the «arc-cim-provider» package :
Bash
esxcli software vib install -v /vmfs/volumes/datastore1/Adaptec SmartRAID/vmware-esx-provider-arc-cim-provider.vib
Once the «arc-cim-provider» package is installed, this will be displayed :
Plain Text
Installation Result
   Message: The update completed successfully, but the system needs to be rebooted for the changes to be effective.
   Reboot Required: true
   VIBs Installed: Adaptec_bootbank_arc-cim-provider_3.07-23971
   VIBs Removed:
   VIBs Skipped:
As requested, restart your VMware ESXi server.
Bash
reboot
Check the installation of installed packages.
Bash
esxcli software vib list | grep arcconf
Plain Text
arcconf 3.07-23971 Adaptec VMwareAccepted 2021-07-11
Bash
esxcli software vib list | grep arc-cim-provider
Plain Text
arc-cim-provider 3.07-23971 Adaptec VMwareAccepted 2021-07-11
Source : User Guide — maxView Storage Manager (page 12)
Once your VMware ESXi hypervisor has restarted, go to : Host -> Manage -> Modules.
At the beginning of the list, you will see that 2 new modules have appeared :
- arc-cim-provider / Adaptec CIM Provider for managing Adaptec RAID controllers on ESXi / Version 3.07-23971 / Vendor Adaptec
- arcconf / Adaptec CLI Provider for supporting remote ARCCONF tool to manage Adaptec RAID controllers on ESXi / Version 3.07-23971 / Vendor Adaptec
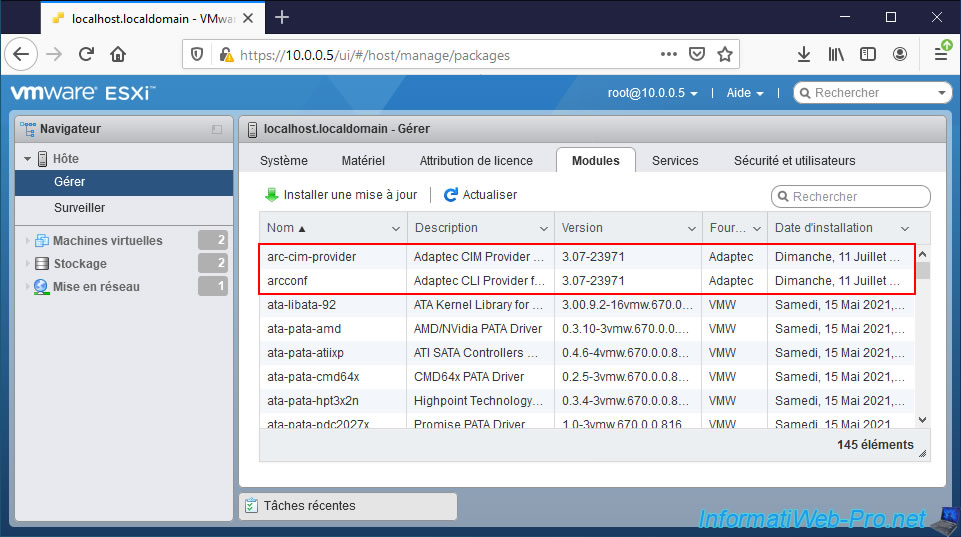
If you look in the list of services of your VMware ESXi hypervisor, it’s very likely that the «sfcbd-watchdog» (CIM Server) service is running since we have just installed a CIM server.
О LENOVO
-
Наша компания
-
Новости
-
Контакт
-
Соответствие продукта
-
Работа в Lenovo
-
Общедоступное программное обеспечение Lenovo
КУПИТЬ
-
Где купить
-
Рекомендованные магазины
-
Стать партнером
Поддержка
-
Драйверы и Программное обеспечение
-
Инструкция
-
Инструкция
-
Поиск гарантии
-
Свяжитесь с нами
-
Поддержка хранилища
РЕСУРСЫ
-
Тренинги
-
Спецификации продуктов ((PSREF)
-
Доступность продукта
-
Информация об окружающей среде
©
Lenovo.
|
|
|
|
В рамках данной статьи будет рассмотрена утилита управления контроллерами фирмы Adaptec, а также будет рассказано ка настроить с помощью нее HotSpare.
RAID-контроллеры фирмы Adaptec зарекомендовали как достаточно надежное аппаратное решение для организации RAID-массивов.

Для управления и контроля состояния массива после установления системы, рекомендуется установить утилиту управления maxView storage manager. Управление производится посредством веб-интерфейса.
Дистрибутивы утилиты доступны под различные операционные системы, также присутсвует возможность удаленного подключения к контроллеру Adaptec.
Установка maxView на примере CentOS 6.
Дистрибутив данной утилиты можно скачать на официальном сайте, например, для контроллера серии 8405, он доступен по ссылке.
Выбрать раздел Storage Manager, согласиться с лицензионным соглашением и перейти к скачиванию.
Через консоль Linux можно скачать командой wget:
wget http://download.adaptec.com/raid/storage_manager/msm_linux_x64_v2_03_22476.tgz
Затем распаковать:
tar zxvf msm_linux_x64_v2_03_22476.tgz
Перейти в директорию manager (появится после распаковки в директории со скачанным архивом):
cd manager
И запустить на установку пакет, сдучае с CentOS запускать необходимо пакет StorMan-2.03-22476.x86_64.rpm, командой
rpm -ivh StorMan-2.03-22476.x86_64.rpm
Ответить на задаваемые при установе вопросы, в частности указать порт для службы CMI.
После установки веб-интерфейс будет доступен по адресу:
https://server_ip:8443/maxview/manager/login.xhtml

В качестве логина/пароля необходимо использовать администраторскую учетку сервера.
Настройка HotSpare
После авторизации в утилите видна страница с общей сводкой по контроллерам, находящимся на мониторинге. Также в виде диаграммы показано соотношение дисков в рейде и свободных дисков.

При переходе в раздел Physical Devices, выбрав устройство можно увидеть слоты (Slot), по сути подключенные на данный момент к контроллеру жесткие диски. Слоты в статусе Ready (на скриншоте это Slot 2), означает, что данный диск не находится ни в одном массиве и не настроен как HotSpare. Также на основной странице можно увидеть различную информацию по выбранному жесткому диску.

Для добавления диска в HotSpare необходимо выбрать соответствующий слот и в разделе Physical Device верхнего меню выбрать Spare Managment. Откроется окно управления spare-устройствами. На первом шаге необходимо выбрать тип Hot Spare. Всего их три:
— Global — назначает диск резервным для всех логических устройств
— Dedicated — назначает диск резервным для одного выбранного логического устройства
— Pooled — назначает диск резервным для выбранного количества логических устройств
В данном примере использован тип Global. Также на данной вкладке можно редактировать HotSpare — пункт Modify, а также убрать диск из HotSpare — Un-asign.

Второй шаг — выбор логического устройства, которое необходимо резервировать, в случае с настройками по типу Global и одним рейд массивом, пропускается — сразу перекидывает на третий шаг: суммарная информация (проверка что корректный массив резервируется) и завершение настройки HotSpare. Для завершения необходимо нажать кнопку Finish.

Если увидели сообщение Assign hot spare operation successful, значит все прошло успешно.

Обозначение резервирующего слота также изменится c ready на указание типа hot spare.
