- Click to view our Accessibility Policy
- Skip to content
Oracle Instant Client Downloads
for Microsoft Windows (x64) 64-bit
See the Instant Client Home Page for more information about Instant Client.
The installation instructions are at the foot of the page.
Oracle Client-to-Oracle Database version interoperability is detailed in Doc ID 207303.1. For example, applications using Oracle Call Interface 19 can connect to Oracle Database 11.2 or later. Some tools may have other restrictions.
Permanent links to the latest packages are: Basic, Basic Light, SQL*Plus, Tools, SDK, JDBC Supplement
, ODBC
Open all
Close all
-
-
Version 21.11.0.0.0
Base — one of these packages is required
Tools — optional packages
Development and Runtime — optional packages
-
Version 19.20.0.0.0
Base — one of these packages is required
Tools — optional packages
Development and Runtime — optional packages
-
Version 18.5.0.0.0
Tools — optional packages
Development and Runtime — optional packages
-
Version 12.2.0.1.0
Base — one of these packages is required
Tools — optional packages
Development and Runtime — optional packages
-
Version 12.1.0.2.0
-
Version 11.2.0.4.0
-
Version 11.1.0.7.0
-
Version 10.2.0.5
-
Instant Client Installation for Microsoft Windows 64-bit
See the Instant Client Home Page for more information about Instant Client packages.
Client-server version interoperability is detailed in Doc ID 207303.1. For example, Oracle Call Interface 19, 18 and 12.2 can connect to Oracle Database 11.2 or later. Some tools may have other restrictions.
- Download the appropriate Instant Client packages for your platform. All installations require the Basic or Basic Light package.
- Unzip the packages into a single directory such as
C:\oracle\instantclient_19_3 - Add this directory to the
PATHenvironment variable. If you have multiple versions of Oracle libraries installed, make sure the new directory occurs first in the path. Restart any terminal windows or otherwise make sure the new PATH is used by your applications. - Download and install the correct Visual Studio Redistributable from Microsoft. Instant Client 19 requires the Visual Studio 2017 redistributable. Instant Client 18 and 12.2 require the Visual Studio 2013 redistributable. Instant Client 12.1 requires the Visual Studio 2010 redistributable.
- If you intend to co-locate optional Oracle configuration files such as tnsnames.ora, sqlnet.ora, ldap.ora, or oraaccess.xml with Instant Client, then create a subdirectory such as
C:\oracle\instantclient_19_3\network\admin - Start your application.
This is the default Oracle client configuration directory for applications linked with this Instant Client.
Alternatively, Oracle client configuration files can be put in another, accessible directory. Then set the environment variable TNS_ADMIN to that directory name.
ODBC users should follow the ODBC Installation Instructions.
-
Skip to content
We know it is too early, still as usual we are kicking in once again trying to install Oracle 10g onwards databases on an OS that’s in the early stages of testing/improvements.
If you are wondering whether Oracle 10g (10.2.0.3 onwards) could be installed on Windows 10 (TP), the shortest answer is yes and as usual the earlier hacks what we specified with http://simpleoracle.com/2010/02/18/install-oracle-10g-onward-database-developer-on-windows-7/ are still valid for the installation on Windows 10 TP
All you need to do is to add an entry to the refhost.xml file like following:
<CERTIFIED_SYSTEMS>
<OPERATING_SYSTEM>
<VERSION VALUE=”5.0″/>
<SERVICE_PACK VALUE=”1″/>
</OPERATING_SYSTEM>
<OPERATING_SYSTEM>
<VERSION VALUE=”5.1″/>
<SERVICE_PACK VALUE=”1″/>
</OPERATING_SYSTEM>
<OPERATING_SYSTEM>
<VERSION VALUE=”5.2″/>
</OPERATING_SYSTEM>
<!–Microsoft Windows Vista–>
<OPERATING_SYSTEM>
<VERSION VALUE=”6.0″/>
</OPERATING_SYSTEM>
<!–Microsoft Windows 7–>
<OPERATING_SYSTEM>
<VERSION VALUE=”6.1″/>
</OPERATING_SYSTEM>
<!–Microsoft Windows 8–>
<OPERATING_SYSTEM>
<VERSION VALUE=”6.2″/>
</OPERATING_SYSTEM>
<!–Microsoft Windows 10–>
<OPERATING_SYSTEM>
<VERSION VALUE=”6.4″/>
</OPERATING_SYSTEM>
</CERTIFIED_SYSTEMS>
You may safely ignore the warnings (if any) and proceed with the Installation. Please note, as usual we warn you not to install unsupported databases on newer Operating Systems as you may risk with your valued data. Below, few screen shots from our installation attempt which was successful.


You will be prompted to install .NET Framework 3.5 (That includes .NET 2.0 and 3.0), and we suggest you install it for better stability of the database


That’s all folks
for Windows7bugs
rajesh
To administer your Oracle Database remotely, you will need to connect to the database instance, especially from an SQL*Plus terminal. To be able to do that, you may install the Oracle Database Client and configure it correctly.
The Oracle Client is a software suite allowing you to administer your database remotely, perform basic network configurations, write PL/SQL applications, connect your database to Java, Python type applications, etc.
This guide provides instructions about installing and configuring Oracle Database Client on Windows. The installation process is identical on Linux.
You can also download my ebook which details the whole installation process.
Oracle Database Client requirements
You can easily install the Oracle Client on a 64-bit Windows PC with a modern processor (AMD or Intel), 2GB of RAM and 2GB of free disk space. Oracle Database Client for Windows x64 is supported on the major x64 distributions (Windows 7, Windows 8, Windows 10, Windows Server 2012 and Windows Server 2016). We recommend you update Windows before starting the client installation.
You also need to connect the client machine to a network and ensure it is able to communicate with the database server. In some cases, you may add exceptions to your firewall on the server side to allow network traffic between the server and the client.
Moreover, we will make sure that the database server is running correctly and is able to serve remote connections. Apart from network connectivity, a listener must be configured on the database server.
Oracle also recommends creating a standard non-administrative user account on the client machine to run the Windows services for the Oracle home. In this tutorial, we’ll call this user Client.
Oracle Database Client Download
You can download the Oracle Database Client for Windows for free from Oracle’s Technology Network website. We will focus here on version 19c. Oracle recommends using an Oracle Client version that matches the highest Oracle database version that you need to connect to. Using older clients to connect to newer database versions can cause issues.
The Oracle Client is available in 32-bit and 64-bit versions. The choice of which version to install depends on the architecture of your OS.
Downloading the Oracle Client requires an Oracle account. This account will allow you to download other Oracle products and access Oracle Cloud services.
Once you have created your account, select the right version for your needs and accept the Oracle License Agreement to start the download.
Related: Configure & Connect SQL Developer to Oracle Database (19c, 18c, 12c)
After checking the hardware and software prerequisites and downloading the Oracle Database Client software, you can install it by following the simple steps below. Note that the installation process is almost similar for versions 12c and 18c of Oracle Database Client. So, let’s get started.
1. Navigate to the installation folder and launch the setup file
After downloading the Oracle Client, you can unzip it to a directory of your choice, then run the setup.exe file.
2. Provide Oracle Home user account details
In this step, enter the Oracle Home user credentials (username and password) you create earlier. You can also create a new account or use a built-in Windows account (for example, the one you use to launch setup.exe).
3. Select a location for Oracle base directory
In this step, you can provide the Oracle base directory which contains the Oracle Client software and related configuration files, then click “Next” to perform prerequisite checks.
After the prerequisite checks, you should have a summary of your installation configuration. If there is no error, then click on “Install” to install the product. Otherwise, go back to section 1 to audit your environment.
Then wait a few minutes for the installation wizard to copy the files, perform setup and basic configuration and finish the installation. You can close the window once the installation is complete.
In the next section, we will configure the Oracle Client to connect with the Oracle Database server.
Configuring and testing Oracle Database Client
After installing the Oracle Client, you can use it to access and administer your Oracle database remotely but you will need to configure it first. This configuration can be done with tools available immediately after the client installation. We’ll use Oracle Network Manager to create a database service linked to the remote Oracle Database instance.
1. Launch Oracle Net Manager from Windows Start menu
2. Add a new database service
Select “Service Naming” and click on the “+” button.
3. Give a name to the remote database service name
Select a name (identifier) for the database service name and click on “Next”.4. Configure the network access protocol
In this step, provide the Oracle Database hostname or IP address and a port number to access the database instance. The port number must be the same as the one configured in the listener at the server side.5. Specify database instance name
Enter the global database name of the remote database (eg. db.ept.sn) and optionally the connection mode. The database name might be ORCL if the database server is installed with default configurations.
6. Perform a connectivity test to the remote database
Before finishing the service name configuration, you can run a test to check if you can access the remote database with the parameters you provided. The wizard will try to connect to the server with a default user account, namely Scott.
Depending on the database creation options on the server side, Scott account might not exit or is locked.
You can change the user account you want to use for the test by clicking on “Change Login”. If the test runs successfully, then you can close the windows and finish the service name configuration.
7. Save the network configuration
Connecting to the remote database using SQL*Plus
You can now access your Oracle Database server from the Client using tools like SQL*Plus or Oracle SQL Developer. For example, you can open a command prompt and connect to the Oracle Database instance with the following command:
sqlplus username/password@service_nameFor example
sqlplus hr/hr@client_accessStill having questions on how to install the Oracle Client? Leave a comment below or let me do it for you.
You might also like: Oracle Database Network configuration
Scenario : You want to install Oracle Client and ODBC driver in Windows 10 – 64 Bit
Files Required :
Oracle Instant Client Basic :
http://download.oracle.com/otn/nt/instantclient/122010/instantclient-basic-windows.x64-12.2.0.1.0.zip
Instant Client Package – ODBC : http://download.oracle.com/otn/nt/instantclient/122010/instantclient-odbc-windows.x64-12.2.0.1.0.zip
Step 1 : Download Above 2 Packages.
Step 2: Copy all the contents to a single folder and name the folder as “oracle”
Step 3: Now copy the folder to c:\
So now the content of c drive should like below
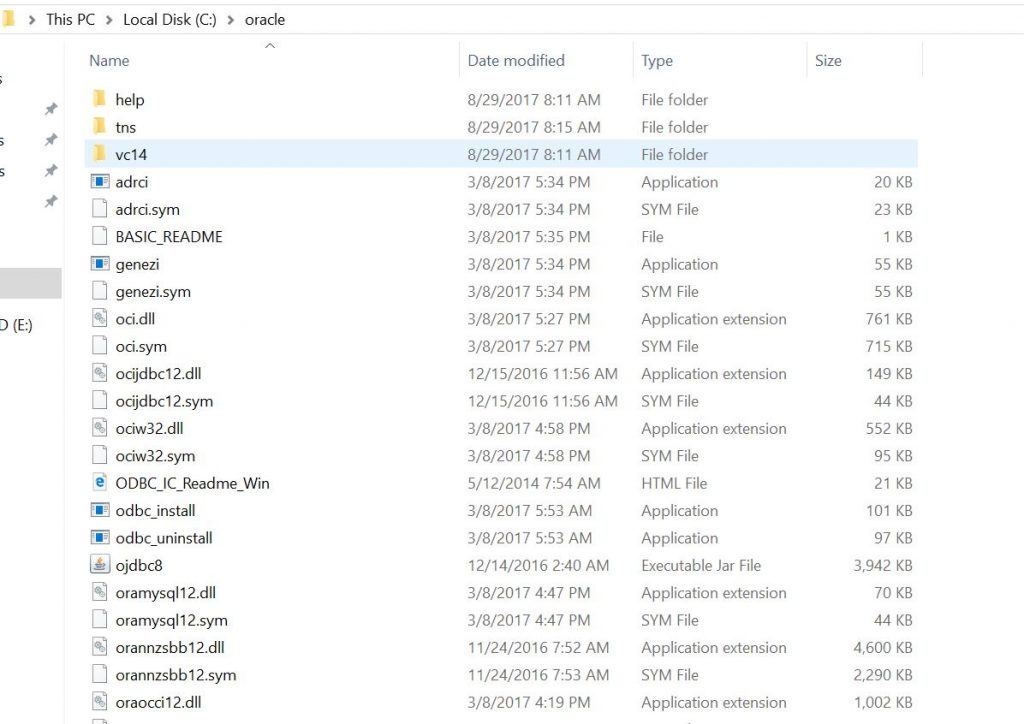
Step 4: Now create a folder called tns inside c:\oracle => this folder will be used to save tnsnames.ora file
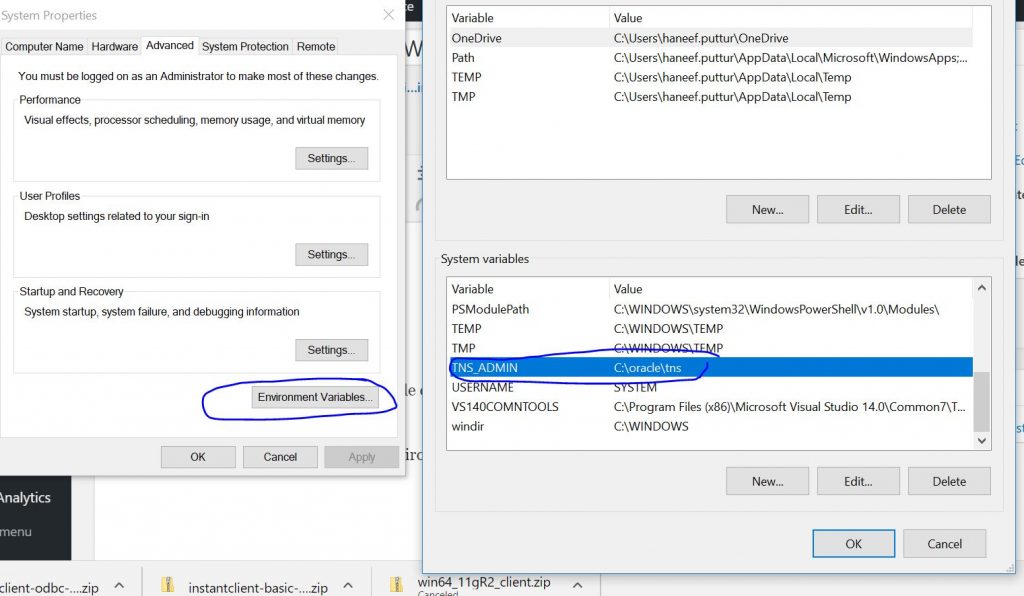
Step 5 : Add TNS_ADMIN variable in Environment Variables
TNS_ADMIN => c:\oracle\tns\
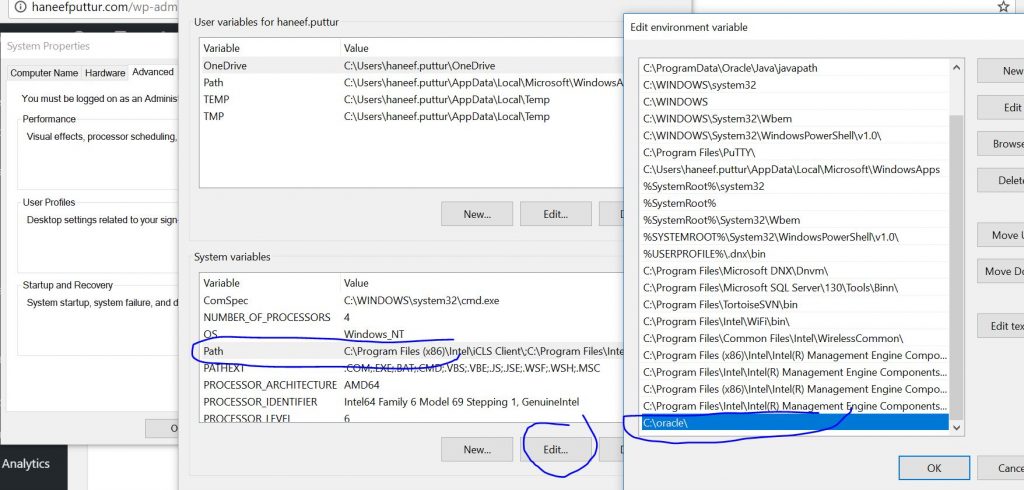
Step 6: Add c:\oracle to the path variable
Step 7 :
Right click the file c:\oracle\
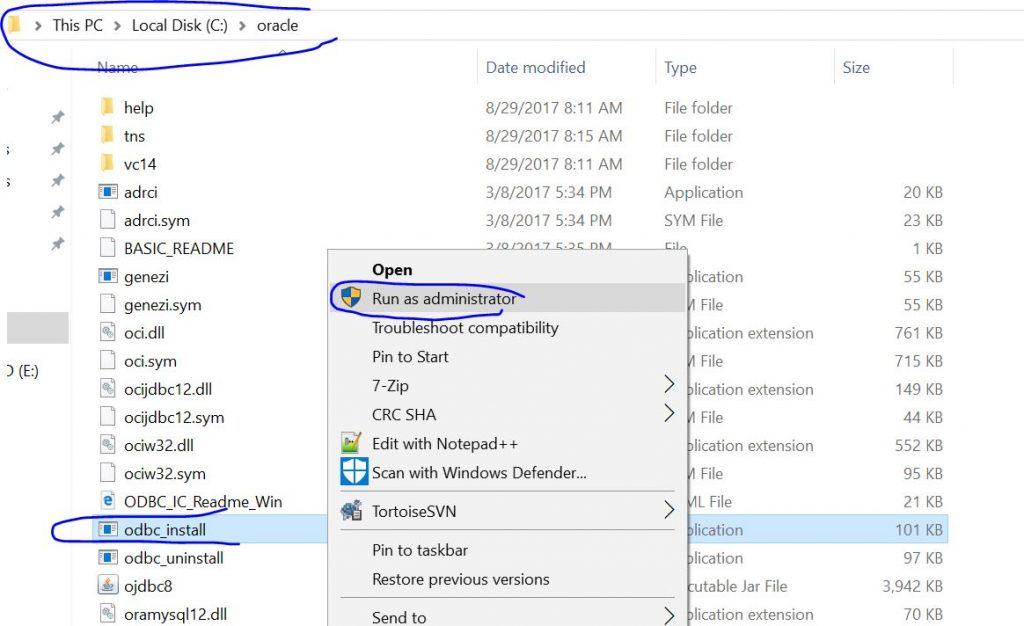
Step 8 : Now create a sample tns file and save in c:\oracle\tns\
PROD=
(DESCRIPTION=
(ADDRESS=
(PROTOCOL=TCP)
(HOST=xxx.oracle.haneefputtur.com
(PORT=1521)
)
(CONNECT_DATA=
(SERVER=dedicated)
(SERVICE_NAME=xxx.haneefputtur.com
)
)
….
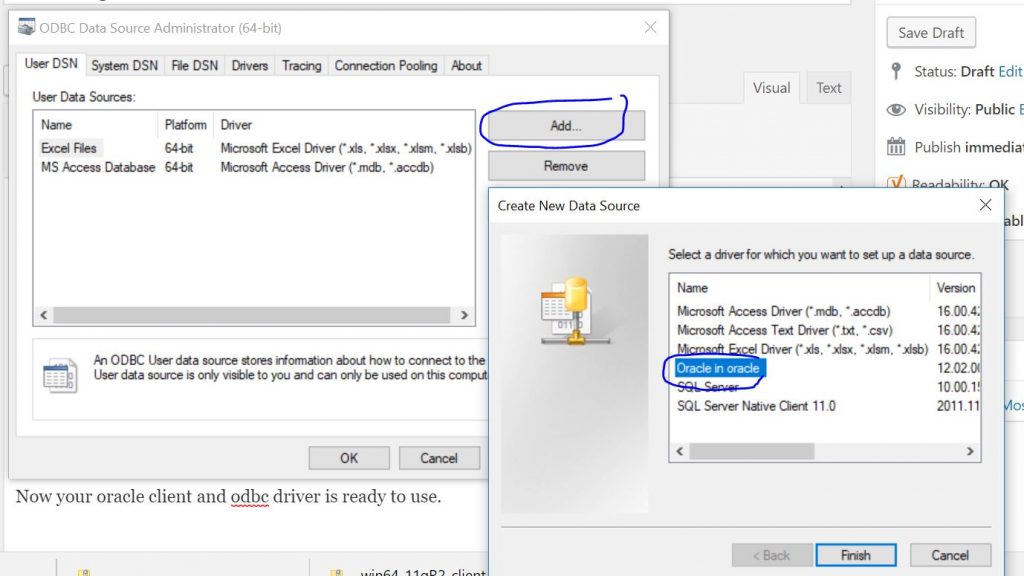
Now your oracle client and odbc driver is ready to use.
Step 9 : Create ODBC DSN as follows
Note For 32 Bit Clients
Link for 32 bit Instant Client : http://download.oracle.com/otn/nt/instantclient/122010/instantclient-basic-nt-12.2.0.1.0.zip
Link for 32 Bit ODBC Driver :
http://download.oracle.com/otn/nt/instantclient/122010/instantclient-odbc-nt-12.2.0.1.0.zip
When installing the certified version of Oracle Developer Suite 10g (10.1.2.0.2) for custom forms/reports development in E-Business Release 12 on windows 10+64 bit client desktop, The command prompt shows up, then gracefully exists; the Oracle Universal Installer never shows up.

You have tried changing the compatibility of the setup.exe to Windows XP and running as an Administrator, But no luck.

Oracle Developer Suite 10g is not officially certified to be installed on Windows’10 64 bit desktop client, But still it can be installed on Windows 10 64 bit by following the below workaround.
- Turn on DEP for essential windows programs option as below.
My computer (This PC) -> Properties -> Advanced System Settings -> Advanced (Tab) -> Performance Settings -> Data Execution Prevention (Tab)
- Select “Turn on DEP for essential Windows programs and services only” -> Apply

- Restart the system and run Setup.exe -> The Oracle Universal Installer shows up

- Next

- Next

- Choose Complete option and proceed with rest of the installation.