Before you begin
Before you install Jira, there’s a few questions you need to answer.
| Are you using a supported operating system? |
Tell me more… Check the Supported platforms page for the version of Jira you are installing. This will give you info on supported operating systems, databases and browsers. Good to know:
|
|
Do you want to run Jira as a Windows Service? |
Tell me more… Running Jira as a service in Windows means that your Jira application will automatically start up when Windows is started. If you choose to run Jira as a service:
See Running Jira applications as a Window’s service for more information. If you choose not to run Jira as a service:
|
| Is your database set up and ready to use? |
Tell me more… To run Jira in production you’ll need an external database. Check the Supported platforms page for the version you’re installing for the list of databases we currently support. If you don’t already have a database, PostgreSQL is free, easy to set up and has been extensively tested with Jira. Good to know:
|
|
Do you have a Jira license? |
Tell me more… You’ll need a valid Jira Software Server, Jira Core Server or Jira Service Desk Server license to use JIRA. Good to know:
|
Install a Jira application
1. Download Jira
Download the installer for your operating system:
- Jira Core at https://www.atlassian.com/software/jira/core/download
- Jira Software at https://www.atlassian.com/software/jira/download
- Jira Service Management at https://www.atlassian.com/software/jira/service-desk/download
2. Run the installer
- Run the installer. We recommend using a Windows administrator account.
- Follow the prompts to install Jira. You’ll be asked for the following info:
- Destination directory – this is where Jira will be installed.
- Home directory – this is where Jira data like logs, search indexes and files will be stored.
- TCP ports – these are the HTTP connector port and control port Jira will run on. Stick with the default unless you’re running another application on the same port.
- Install as service – this option is only available if you ran the installer as administrator.
- Jira will start up in your browser once installation is complete.
Set up your Jira application
3. Choose set up method
Choose I’ll set it up myself.
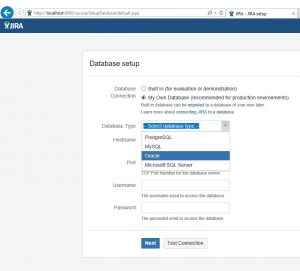
4. Connect to your database
- If you’ve not already done so, it’s time to create your database. See the ‘Before you begin’ section of this page for details.
- Choose My own database.
-
Choose your database type then enter the details for your database.
Show me how to do this…
JIRA connects to your database using a standard JDBC database connection. Connection pooling is handled within JIRA, you can change this using JIRA configuration tool later.
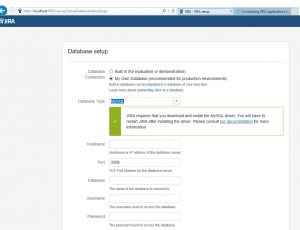
If you’re using Oracle or MySQL there’s an extra step:
- Download and extract the appropriate database JDBC drivers. See Supported platforms to get the right version.
- Drop the JAR file into your
<jira-installation>/libfolder before continuing with the setup wizard.
In the setup wizard:
- Driver Class Name – the Java class name for your database driver. If you’re not sure, check the documentation for your database.
- Database URL – the JDBC URL for your database. If you’re not sure, check the documentation for your database.
- Username and Password – A valid username and password that JIRA can use to access your database.
5. Set application properties
- Give your Jira site a name.
- Choose whether your site should be private or anyone can sign up. You can change this later.
- Enter your base URL — this is the address people will use to access your Jira site.
6. Enter your license
Follow the prompts to log in to my.atlassian.com to retrieve your license, or enter a license key.
7. Create your administrator account
Enter details for the administrator account. You can add more administrators after set up is complete.
8. Set up email notifications
Enter details of your mail server. This will allow Jira to send notifications when issues change.
9. Start using Jira
Troubleshooting
Running into problems installing Jira?
Some anti-virus or other Internet security tools may interfere with the Jira installation process and prevent the process from completing successfully. If you experience or anticipate experiencing such an issue with your anti-virus/Internet security tool, disable this tool first before proceeding with the Jira installation.
Head to Installation Troubleshooting for more help.
Last modified on Mar 28, 2023
Related content
- No related content found
Целью моего эксперимента была оценка порога «вхождения» при работе с продуктом JIRA. Поэтому не судите строго, когда я скажу, что просто решила поставить jIRA в своей инфраструктуре. Ранее я занималась настройкой Jira для реализации потребностей работы с задачами, но никогда до этого не устанавливала ее. Мои знания об установке Jira сводились к 3м пунктам:
- Я знала, что ПО кроссплатформенное,
- Написано на Java
- Должно работать с внешней базой данных.
Я намеренно не смотрела ни одной инструкции, чтобы оценить насколько смогу справиться, опираясь только на интуитивный интерфейс и 8ми летний опыт администрирования серверов и систем. Поскольку я специалист в администрировании систем Windows, выбор операционной системы для Jira Server частично был обусловлен ленью и обеспечением чистоты эксперимента, а частично желанием проверить обоснованность утверждения коллег-линкусоидов о том, что JIRA наWindows «жрет» значительно больше ресурсов, чем ее аналог на Linux. Я понимаю, что «правильные» коллеги скажут, что чтение readme.txt помогает предотвратить массу проблем и экономит время (для них я все же приведу ссылки на инструкцию по установке (http://confluence.atlassian.com/adminjiraserver071/installing-jira-applications-802592161.html) и в частности системные требования confluence.atlassian.com/adminjiraserver071/jira-applications-installation-requirements-802592164.html), но много кто этого не делает. Думаю, материал будет полезен по разным причинам. Что ж – приступим.
Итак, на заботливо подготовленной виртуальной машинке Windows Server 2016 (c 1 виртуальным процессором, 1 ГБ оперативной памяти и 30Гб пространства на жестком диске) я скачала последнюю доступную версию JIRA — 7.3.1. И запустила инсталляцию.
Система спросила, имею ли я достаточно опыта, чтобы внятно отвечать на ее вопросы, и я сочла, что я справлюсь.
На следующих экранах я указала пути к рабочим файлам ПО и к дополнительным объектам, таким как резервные копии, плагины, вложения. Также указала необходимость создания ярлыков программы. Оставила значения портов по умолчанию и указала необходимость инсталляции JIRa как службу Windows. Подучив перед установкой экран с кратким содержанием выбранных настроек я нажала кнопку Install.
Через пару минут установка была завершена и система предложила открыть браузер. Браузер открыл страницу Http://localhoost:8080, и вуаля!…
Jira не открывается. Я уж было расстроилась и пошла заварить чай, но обновление страницы с горячей чашкой в руке возымело свою магию: страница успешно загрузилась и предложила продолжить настройку.
Поскольку я не просто любитель, а планирую заниматься установкой и настройкой Jira и других продуктов Atlassian в продуктивной среде, то мой дальнейший выбор был очевиден.

В моей инфраструктуре уже есть MySQL сервер, поэтому мой выбор пал именно на него. К слову сказать, это оказался самый интересный вариант с точки зрения сложности установки Jira. Только для MySQL нужно скачать дополнительный драйвер.
Я перешла по ссылке, которая рекомендовалась на экране, скачала предложенный архив с драйвером и разархивировала jar файл в папку LIB , находящуюся среди рабочих файлов JIRA.
Не удержавшись, я все же заглянула в другие пункты инструкции по подключению MySQL для Jira.
Проверила параметры MySQL:
default-storage-engine=INNODB
max_allowed_packet=256M
innodb_log_file_size=256M
// remove this if it exists
sql_mode = NO_AUTO_VALUE_ON_ZERO
и отправила систему в перезагрузку для пущей надежности. Пока система грузилась (в моем случае старт сервиса JIRA занял около 4х минут и я наблюдала за этим процессом загрузив страницу http://localhost:8080/secure/SetupMode!default.jspa) я создала новую базу и пользователя.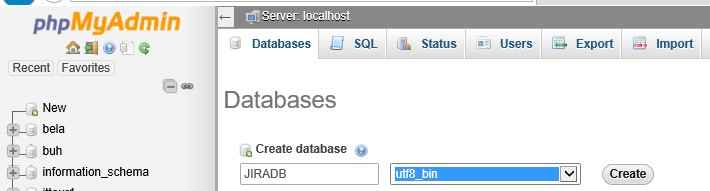
Обратите внимание, что последний скриншот актуален для случая, когда Jira и MySQL установлены на одном хосте. В моем случае в поле Host был указан IP сервера Jira.
Не забывайте о том, что регистр букв имеет значение. Этот факт заставил меня немного напрячься и несколько раз перепроверить верные настройки перед тем, как тестовое соединение прошло успешно.
Нажатием Next я перевела установку на стадию создания базы. Этот процесс также оказался достаточно долгим, в третий раз погрузив меня в мысли о выделенных под виртуальную машину ресурсах. Ну а ошибка, которую я получила на выходе операции, заставила вплотную заняться этим вопросом.

На самом деле ошибка «JIRA Startup Failed» с пояснением «The following plugins are required by JIRA, but have not been started» может быть вызвана разными проблемами. Но в моем случае память размером 1Гб была полностью занята. Служба Atlassian Jira была отправлена мною в перезагрузку и пока она рестартовала, виртуальной машине был добавлен еще 1ГБ оперативной памяти. Благо Hyper-V на Windows 2016 умеет делать это «на лету». Количество добавляемой памяти было выбрано исходя из системных требований (которые, таки да, пришлось прочитать).
Все зашевелилось и засуетилось. Система попросила меня указать имя организации и URL для обращения к jira. Здесь я бы рекомендовала использовать доменное имя, желательно такое, которое можно использовать как внутри, так и снаружи организации. Даже если вы планируете использовать Jira только для внутренних нужд предприятия, вполне вероятен сценарий, когда к этой системе потребуется внешний доступ.
На следующем шаге решался вопрос с лицензией. Можно использовать имеющуюся, или сгенерировать trial лицензию. Второй вариант устроил и меня и систему. При ее активации jira успешно проглотила выделенный системе гигабайт оперативки, напрягла имеющиеся процессорные мощности, и успешно перешла на страницу настройки административного аккаунта. К слову сказать процессорные мощности она вернула, а вот использование оперативной памяти так и осталось висеть полочкой на 2Гб.
Не имея дальнейшего терпения, я добавила системе еще 1 Гб оперативной памяти. Настроила административный аккаунт, для конфигурирования которого система требует e-mail, который вполне может оказаться фейковым.

На следующем шаге сказала, что настрою оповещения по электронной почте позже. И нажала на заветную кнопку Finish.
О, Ура! Я наконец-то вижу:

При этом нагрузка на сервер не отображает чего-то необычного:

В следующих статьях я буду наблюдать за потреблением ресурсов при дальнейшей конфигурации и использовании Jira.
Выводы. Установка Jira вполне по силам среднего уровня техническому специалисту. Нагрузка на систему в период установки не превышает допустимых значений.
Конечно, если Вы хотите использовать в дальнейшем в продуктивной среде, настроить различные модули и функционал, то установку и настройку лучше доверить моим коллегам профессионалам, [email protected]
Step 1: Create a Service Account
- Log on to DC (If ADUC not locally available)
- Launch Active Directory Users and Computers
- Expand the forest to reveal the Service Accounts node
- Right Click the node and select New > User

- Complete the new object wizard (First Name: Jira, Last Name: Service, Logon name: srv_jira) – Next
- Specify a secure password and confirm. Set the account to not require a change, and never expires. – Next
- Click Finish


Step 2 Create a SQL Database
- Logon to SQL Server
- Open SQL Server Management Studio and Login
- Expand the Instance
- Expand Databases OU/Folder
- Right Click the Databases OU and Click New Database
- Give the Database a Name
- Click the Options Tab
- From the Collation Dropown, Select SQL_Latin1_General_CI_AI or SQL_Latin1_General_CP437_CI_AI
- Click OK

Step 3: Give SRV Account Permissions to Database
- In SQL Management Studio, go to the Security OU/Folder and right click
- Select New > Login
- Click Search
- Click Locations
- Select the relevant domain and click OK
- Enter the name of your service account in the Enter the object name to select field and click Check Names
- Select User Mapping from the Right hand pane.
- In the Users mapped to this login pane scroll to the database created in stage 2 and put a tick in the tick box.
- With the Jira Database still selected, In the Database role membership pane select:
– Public
– db_datareader
– db_datawriter
– db_owner - Click OK


Step 4: Install Jira
- Logon to the Application Server where Jira is to be installed
- Download the Jira Installation EXE to the server
- Launch the Application Install EXE
- Click Next
- Select Custom Install (recommended for advanced users) – Click Next
- Specify an Installation Directory (Default is fine) – Click Next
- Specify Attachments Directory (Default is fine) – Click Next
- Check the Start Menu folder name – Click Next
- Select Use Default Ports (we will secure using TMG Later) – Click Next
- Tick the Install JIRA as a Service box – Click Next
- Review the settings and if correct – click Install
- Leave the Launch Jira Software in Browser option selected and click Finish


Step 5: Pair your Jira Instance with the Database
- When the web browser has loaded, select I’ll set it up myself
- Click Next
- Select the Built In radio button (we will associate the MsSQL Later) – Click Next
- Close the Browser
- Launch the Services.msc and stop Atlassian JIRA Service
- Launch Notepad as an Administrator
- Navigate to C:\Program Files\Atlassian\Application Data\JIRA\
- Open the dbconfig.xml
- Make the following changes:<database-type>h2</database-type>
to
<database-type>mssql</database-type><schema-name>PUBLIC</schema-name>
to
<schema-name>dbo</schema-name><url>jdbc:h2:file:C:\Program Files\Atlassian\Application Data\JIRA/database/h2db</url>
to
<url>jdbc:jtds:sqlserver://[SQLServerFQDN]:1433/[DBName];domain=[Domain]</url><driver-class>org.h2.Driver</driver-class>
to
<driver-class>net.sourceforge.jtds.jdbc.Driver</driver-class><username>sa</username>
to
<username>[DomainAccount]</username>
(Note: No Domain is specified here!)<password></password>
to
<password>[domain account password]</password> - Save changes
- Close config file
- Start the Atlassian JIRA Service
- Go to the Log Directory for the installation (Program files/Atlassian/Application Data/Jira/log)
- Open atlassian-jira.log and ensure the service started and connected to the Database successfully

Step 6: Configure your Jira System
- From the Start Menu select Access Jira
- Set the Application title: MindLink Jira
- Set the Mode to Private
- Set the base URL to the required address address you will use to access Jira
- Click Next
- Provide License Key and Click Next
- Specify the Jira Admin Credentials you wish to use and click Next
- Select the option to set up Email Notifications Now
- Specify the SMTP Settings and Click Test Connection
- When successfully connected – Click Finish
- Select English (United Kindom) [Default] – Click Continue
- Click Next to bypass Avatar selection
- Click Skip quick tour
- Create Projects as requires (this can be bypassed and created later if you like)

You’re done! You now have a configured functional Jira!
Jira – это одна из наиболее популярных систем отслеживания ошибок и управления проектами, созданная компанией Atlassian. Если вы хотите использовать Jira на собственном сервере под управлением Windows, вам потребуется провести установку. В этой статье мы рассмотрим подробное руководство по установке Jira на Windows Server.
Прежде чем начать, убедитесь, что ваш сервер удовлетворяет системным требованиям Jira. Вы можете найти подробную информацию на официальном сайте Atlassian. Установка Jira на Windows Server включает в себя несколько шагов, которые мы рассмотрим далее.
Шаг 1: Загрузка Jira
Первым шагом к установке Jira на Windows Server является загрузка установочного файла. Зайдите на официальный сайт Atlassian и перейдите на страницу загрузки Jira. Там вы найдете разные варианты установки, включая установку с использованием инсталлятора или архива. Выберите опцию, которая наиболее подходит для ваших потребностей и загрузите установочный файл.
Шаг 2: Распаковка установочного файла
После того, как установочный файл завершит загрузку, перейдите в папку, в которую он был сохранен, и распакуйте его. Для распаковки установочного файла можно использовать любую программу для архивации, такую как 7-Zip или WinRAR. После распаковки вы увидите несколько файлов и папок, необходимых для установки Jira.
Содержание
- Что такое Jira и зачем она нужна
- Шаг 1: Подготовка сервера
- Установка Windows Server
- Шаг 2: Установка необходимого ПО
- Установка Java Development Kit
- Шаг 3: Скачивание и установка Jira
- Скачивание установочного пакета
- Шаг 4: Настройка базы данных
Что такое Jira и зачем она нужна
Jira помогает:
- Организовать работу команды, определить приоритеты и распределить задачи;
- Создавать и отслеживать задачи, следить за их статусами и сроками выполнения;
- Отслеживать ошибки и проблемы, создавать их баг-репорты и отслеживать процесс их решения;
- Контролировать процесс разработки и управлять проектными ресурсами;
- Генерировать отчеты и статистику по проектам.
Jira предоставляет гибкие и настраиваемые инструменты для управления задачами, проектами и процессами разработки. Благодаря своей мощной функциональности и удобному интерфейсу, Jira позволяет легко взаимодействовать с командой, планировать и отслеживать работу, повышая эффективность и результативность проектов.
Шаг 1: Подготовка сервера
Перед установкой Jira на Windows Server необходимо подготовить серверное окружение, чтобы обеспечить стабильную работу приложения. В этом разделе мы рассмотрим основные шаги подготовки сервера перед установкой Jira.
| Шаг | Описание |
|---|---|
| 1 | Установите необходимые компоненты: JDK (Java Development Kit) и базу данных |
| 2 | Настройте системные переменные среды |
| 3 | Создайте директорию для установки Jira |
| 4 | Установите Jira |
Перед установкой Jira убедитесь, что ваш сервер соответствует минимальным системным требованиям, указанным в документации Jira. Также рекомендуется выполнить все последние обновления операционной системы и установить необходимые компоненты заранее.
Данные шаги представляют собой предварительные мероприятия, которые необходимо выполнить перед установкой Jira. После завершения этих шагов вы будете готовы к установке и настройке Jira на своем сервере.
Установка Windows Server
Перед началом установки Windows Server убедитесь, что у вас есть:
- Лицензионный ключ для Windows Server
- Медиа-носитель с установочным образом Windows Server (например, DVD или USB-флеш-накопитель)
- Компьютер с необходимыми системными требованиями (поддерживающий установку Windows Server)
Следуйте этим шагам для установки Windows Server:
- Вставьте медиа-носитель с установочным образом Windows Server в ваш компьютер.
- Перезагрузите компьютер и выберите загрузку с установочного носителя.
- Выберите язык установки, часовой пояс и введите лицензионный ключ для Windows Server.
- Прочтите и примите условия лицензионного соглашения для Windows Server.
- Выберите тип установки (рекомендуется выбрать «Пользовательский: установка Windows только с исходными настройками»).
- Выберите диск для установки Windows Server и нажмите «Далее».
- Дождитесь завершения установки Windows Server.
- После завершения установки, настройте дополнительные параметры, если это необходимо (например, имя компьютера, пароль администратора и т.д.).
- Перезагрузите компьютер и войдите в систему с использованием учетных данных администратора.
Поздравляем! Теперь у вас установлена операционная система Windows Server на вашем компьютере.
Шаг 2: Установка необходимого ПО
Перед началом установки Jira на Windows Server необходимо убедиться, что все необходимое программное обеспечение установлено и настроено на вашем сервере. В этом разделе мы рассмотрим список программ, которые требуются для успешной установки и работы Jira.
Java Development Kit (JDK)
Для работы Jira необходимо установить Java Development Kit (JDK). Предпочтительно использовать Oracle JDK или OpenJDK. Убедитесь, что у вас установлена 64-разрядная версия JDK, так как Jira не поддерживает 32-разрядную версию.
База данных
Jira может работать с различными СУБД, включая MySQL, PostgreSQL и Microsoft SQL Server. Перед установкой Jira убедитесь, что вы установили и сконфигурировали одну из поддерживаемых СУБД. Также убедитесь, что у вас есть необходимые данные для подключения к базе данных, такие как имя сервера, порт, имя базы данных, имя пользователя и пароль.
Интернет-браузер
Для работы с Jira вам понадобится современный интернет-браузер, такой как Google Chrome, Mozilla Firefox, Microsoft Edge или Safari. Убедитесь, что у вас установлена последняя версия выбранного браузера и он поддерживает все функции Jira.
Операционная система
Jira поддерживает работу на различных операционных системах, включая Windows Server, Linux и macOS. Убедитесь, что ваш сервер работает на одной из поддерживаемых операционных систем и установите все необходимые обновления и патчи перед установкой Jira.
Обратите внимание, что это только базовый список необходимого ПО и для полноценной работы Jira могут потребоваться дополнительные программы или настройки, в зависимости от требований вашего проекта и окружения.
Установка Java Development Kit
Перед установкой Jira необходимо установить Java Development Kit (JDK). Вот пошаговая инструкция по установке JDK на Windows Server:
- Перейдите на официальный сайт Oracle и перейдите на страницу загрузки JDK.
- Согласитесь с лицензионным соглашением Oracle, выбрав соответствующую опцию.
- Выберите версию JDK, соответствующую вашей операционной системе.
- Нажмите кнопку «Скачать» и сохраните файл установщика JDK на вашем компьютере.
- Дважды щелкните по файлу установщика, чтобы запустить процесс установки JDK.
- Выберите путь установки JDK и нажмите «Далее».
- Выберите компоненты, которые вы хотите установить, и нажмите «Далее».
- Дождитесь завершения процесса установки JDK.
- Убедитесь, что переменная среды JAVA_HOME установлена и указывает на папку, в которую был установлен JDK.
После установки JDK вы будете готовы установить Jira на вашем Windows Server.
Шаг 3: Скачивание и установка Jira
Прежде чем приступить к установке Jira, необходимо скачать установочный файл с официального сайта Atlassian. Для этого выполните следующие действия:
- Откройте веб-браузер и перейдите на официальный сайт Jira.
- На странице загрузки выберите версию Jira, соответствующую вашим требованиям и операционной системе (Windows).
- Нажмите на кнопку «Download», чтобы начать загрузку установочного файла Jira.
После того, как установочный файл Jira будет загружен на ваш компьютер, выполните следующие шаги для его установки:
| 1. | Запустите установочный файл Jira (.exe) двойным щелчком мыши. |
| 2. | Выберите язык установки и нажмите кнопку «Next». |
| 3. | Ознакомьтесь с лицензионным соглашением, примите его условия и нажмите кнопку «Next». |
| 4. | Выберите путь установки Jira на вашем компьютере и нажмите кнопку «Next». |
| 5. | Выберите компоненты, которые вы хотите установить, и нажмите кнопку «Next». |
| 6. | Введите имя пользователя и пароль для доступа к Jira и нажмите кнопку «Next». |
| 7. | Настройте параметры соединения с базой данных и нажмите кнопку «Next». |
| 8. | Выберите опции запуска службы Jira и нажмите кнопку «Next». |
| 9. | Ознакомьтесь с настройками для установки Jira и нажмите кнопку «Install». |
| 10. | Дождитесь завершения процесса установки Jira. |
| 11. | После успешной установки Jira нажмите кнопку «Finish» для завершения установочного процесса. |
Поздравляю! Теперь вы готовы приступить к настройке и использованию Jira на вашем Windows Server.
Скачивание установочного пакета
Прежде чем приступить к установке Jira на Windows Server, необходимо скачать установочный пакет программного обеспечения. Для этого следуйте инструкциям ниже:
Шаг 1:
Откройте веб-браузер и перейдите на официальный сайт Atlassian, разработчика Jira.
Шаг 2:
На главной странице сайта найдите раздел «Продукты» или «Скачать» и перейдите в него.
Шаг 3:
В списке продуктов найдите Jira и нажмите на кнопку «Скачать».
Шаг 4:
На странице загрузки выберите версию Jira, которую хотите установить. Будьте внимательны и выбирайте версию, подходящую для вашего сервера и системы.
Шаг 5:
Нажмите на кнопку «Скачать», чтобы начать загрузку установочного пакета.
Шаг 6:
После завершения загрузки установочный файл будет сохранен на вашем компьютере. Обычно он сохраняется в папке «Загрузки» или указанной вами папке для сохранения файлов.
Теперь у вас есть установочный пакет Jira, и вы готовы перейти к следующему этапу — установке программы на Windows Server.
Шаг 4: Настройка базы данных
После установки сервера базы данных вы должны настроить соединение с базой данных Jira. Для этого выполните следующие шаги:
- Откройте файл
jira-config.properties, который находится в папке/atlassian/jira/WEB-INF/classes. Может потребоваться права администратора для доступа к этому файлу. - Раскомментируйте строки, начинающиеся с
#jira.jdbc.url,#jira.jdbc.driver,#jira.jdbc.userи#jira.jdbc.password. Затем измените значения этих параметров в соответствии с вашей конфигурацией базы данных. - Сохраните и закройте файл
jira-config.properties. - Запустите сервер Jira с помощью команды
./start-jira.shили./start-jira.bat, в зависимости от вашей операционной системы. - Откройте веб-браузер и введите URL-адрес Jira, чтобы убедиться, что соединение с базой данных работает корректно.
После выполнения этих шагов вы успешно настроили базу данных для Jira. Теперь вы можете переходить к следующему шагу — настройке пользователей и разрешений.
Well, it’s been a week. The long and short of it is that I have a lot of things going on simultaneously and didn’t have a backup article ready when last week’s post fell. Honestly, that one is still being worked on, so no details yet. 😉
I have a few updates to share about Atlassian’s response to Data Center – including a planned AMA scheduled for next week, but I’ll cover those in more detail at the end of the article.
No, today’s post is something I’ve been meaning to cover for a while. I have detailed guides on setting up Jira on Linux and Kubernetes, but I’ve never covered the topic for Windows. So let us change that today.
If I’m being honest, setting Jira up on Windows is more straightforward than either of the options I have covered so far. So why is this not the default option for most people? Well, it’s because Windows – as an OS for a service platform – is not 100% ideal. No matter if someone is logged in or not, Windows will load some infrastructure into memory for a GUI. This means you have a rudimentary memory overhead from day one before you even load any dependency services like a database.
Compare that to Linux – which can be stood up with no GUI elements even installed. In fact, this is often how I – and many others – set up the Linux servers I run. So you get more of the memory allocated to the VM usable by Jira itself.
There is also the widespread perception that Linux is somehow “more stable” than windows long-term. Now, I’m still not 100% sold on this argument. Don’t get me wrong; I’ve seen Linux uptime in the years. I even knew one guy who was so obsessed with his Linux uptime that when he had to move the system, he kept it powered on and hooked up to a backup power supply while he raced across the city to the new building. I wish I were making this up. That being said, I’ve also seen very flaky Linux systems that can’t seem to stay working more than a few weeks at best, and I’ve seen super stable Windows systems that also have uptime in years. While impressive, I start to have security concerns on either platform when they have super-long uptime. An occasional restart is needed in both Linux and Windows to bring in patches and bug fixes into the Kernel.
At the end of the day, the memory utilization argument makes me lean more towards Linux than Windows – but I fault no one for going the other way, especially if that is the platform they know best. I’ll say it again: if you choose to run Jira on Windows, that is a perfectly valid choice. So let’s get started and see what it takes to get it set up!
Basic Windows Setup
DO – just putting this out there – putting your service directories on the same drive as your Operating system is bad. So ideally, your Windows VM should have two drives – C: for your Windows Install and D: for your Service files.

Other than that, You need to make sure you have enough memory and CPU for your database and Jira install. I find around 8 GB Ram, and four vCPU for the VM is a good starting point, but more will never be amiss!

And lastly, If you are doing a Data Center Install, don’t forget that both your Database and Fileshare need to be on separate Systems from your Jira Nodes. The fileshare also needs to be accessible on the Jira Nodes. Today I will be doing a simple Server install, so we won’t need to worry about these steps.
Database
So, truth time. While I’m very familiar with setting up Jira on Windows, I’m less familiar with MySQL. So I’ll be following the installation guide listed here:
- https://dev.mysql.com/doc/refman/8.0/en/windows-installation.html
However, the install directions are “Download installer, run installer.” So I’ll be expanding on them a bit.
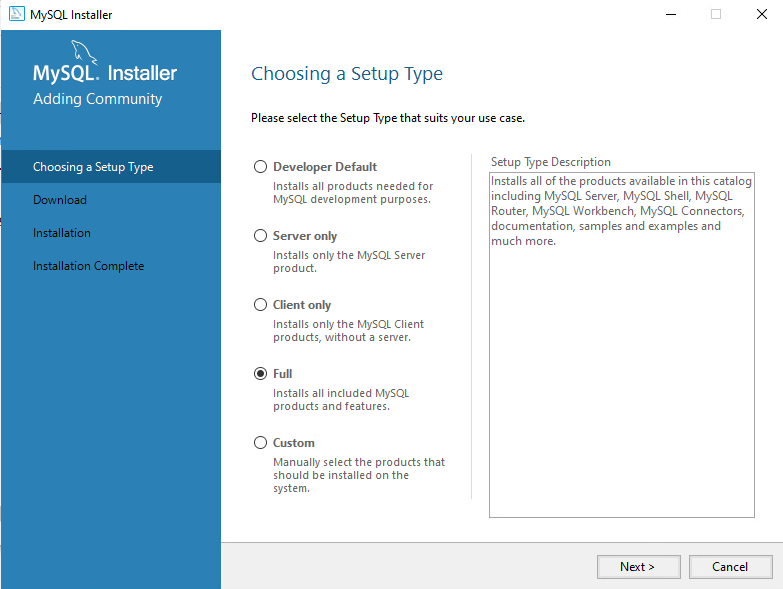
After starting the installer, we are presented with our first choice. While the “Server only” option may be tempting, having the client local on the server will greatly help with debugging, so I don’t mind having the client also on there. So I typically select the “Full” setting.
Next is the requirements check. Unfortunately, both of my warnings are manual, so I need to download and install them manually. Thankfully, clicking on each gives me a direct link for resolution!

The Visual Studio requirement I really only useful for development, which isn’t the point of this machine. So, after installing Python, I clicked next and chose to ignore the missing requirements. This brings me to the next screen:

Click “Execute” and install the packages!

Clicking “Next” will take you into some options to configure the various parts of the install.

This will take us through a wizard that Configures the Database System. On this first page for Server, I use the following settings:
- Config Type: Server Computer
- All other options are kept to the default values

We also use the default values (Strong Encryption) on the Authentication Method screen.

On the next screen, we will set up the Root Password and the various account creation. This is where we’ll go ahead and create an account that we’ll later use to access the system and create the Jira database and user.

Now we’ll set up the service that will start MySQL upon starting the Server. This is critical for coming back up as fast as possible after a server restart. You can keep the default settings though.

And now we can click execute to apply these settings.

Next, we’ll look at the MySQL Router – which I leave configured. Lastly, we’ll check our password and connection, and upon successful test, we can Finish the installation!
Setting up the Jira Database
Now that we have the MySQL service installed let’s set up the Database. We’ll start by opening the MySQL Workbench and opening the Local instance using the Root Password during the install.

I don’t like to save the Password in the vault – it just makes a hacker’s job easier.
Once we’ve logged in, we’ll follow the normal MySQL Guide to setting up the Jira Database.
- https://confluence.atlassian.com/adminjiraserver/connecting-jira-applications-to-mysql-8-0-1018775461.html
Per the document, we will start by executing the following SQL commands to setup a Jira Database.
CREATE DATABASE jiradb CHARACTER SET utf8mb4 COLLATE utf8mb4_bin;
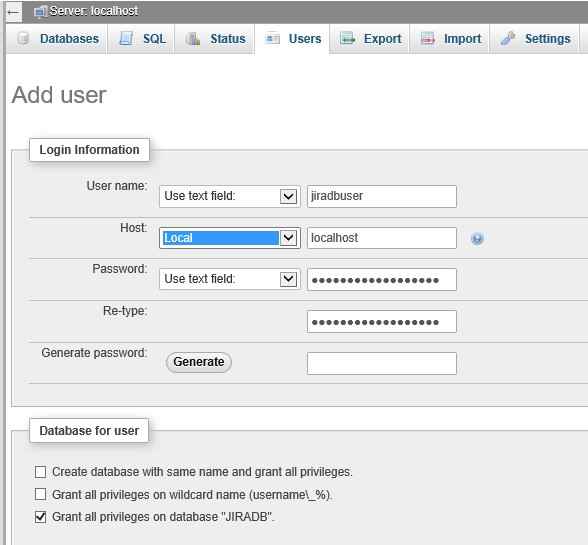
We will then go to Server -> Users and Privileges to create our Jira user. On the Login tab, enter the ‘jira’ for the Username, ‘localhost’ for the “Limit hosts to matching,” and a strong, unique password.

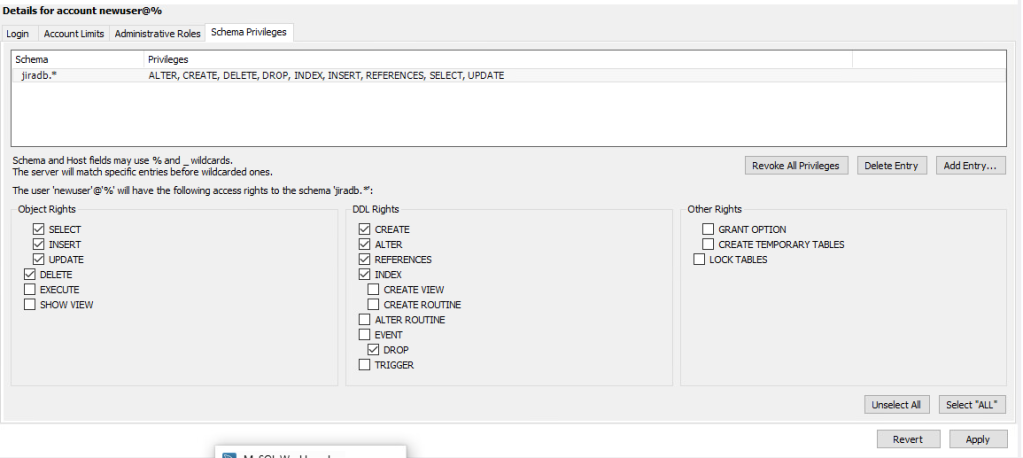
We’ll then go to the Schema Privileges. We will then click “Add Entry,” which will pop up a page. We’ll enter “jiradb.*” for Schemas matching Pattern, then click “OK.” This will take us back to the previous screen. There, we’ll select the checkboxes for “SELECT”, “INSERT”, “UPDATE”, “DELETE”, “CREATE”, “DROP”, “REFERENCES”, “ALTER”, and “INDEX.”

Now we can click “Apply.” And our account is created and ready for Jira!
Next, we need to configure the MySQL Server with some settings. Open up your file browser, and enter “%PROGRAMDATA%\MySQL\MySQL Server 8.0\” into the address bar. Now open the my.ini file in your preferred text editor.
We’ll modify the following settings:
character_set_server=utf8mb4
innodb_log_file_size=2G
Furthermore, we’ll add the following settings to the file.
innodb_default_row_format=DYNAMICWe’ll then restart the MySQL service via the Windows Service Manager.

And with that, our database is ready, and we can move on to the Jira install!
Jira Installer
Given Atlassain’s recent attitudes towards On-Prem instances, It can be rather difficult to find the download links for the instances. However, you have me on your side, who is more than happy list it
- https://www.atlassian.com/software/jira/download-journey
I typically go through this flow:
Upgrade to latest Release -> Server -> Long Term Support -> Windows 64 Bit
You can then click the “I agree” Checkmark and download the Installer. You can then right-click, and click “Run as Administrator.”
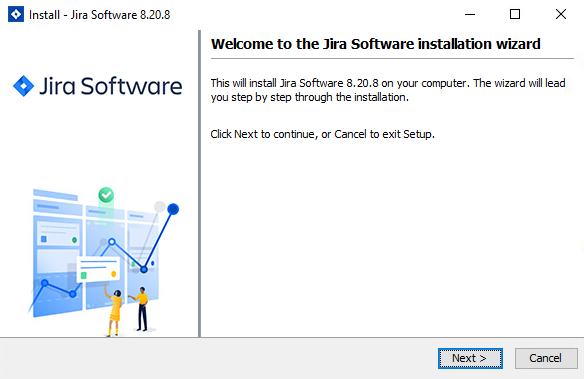
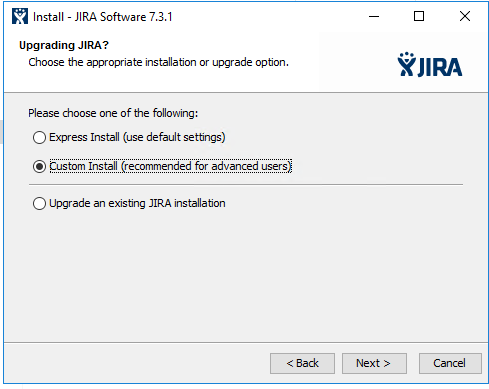
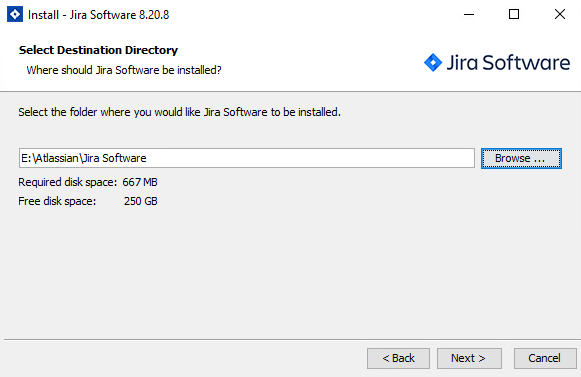
After clicking on “Next,” we are given a choice between “Express install” or “Custom install.” We will be doing a custom install. We will then move the Install directory from its default to our Service Drive. I like to put it in an “Atlassian” subfolder, just for organization’s sake. This is the same as an Install directory on Linux and should be in the local drive and note a remote share.
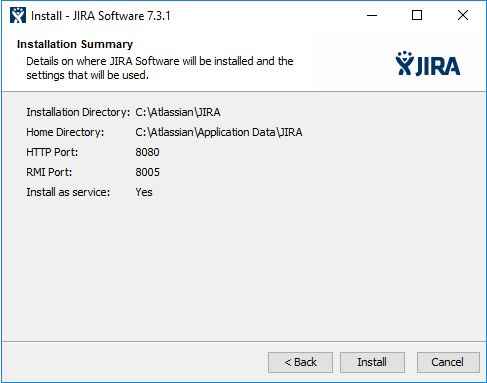
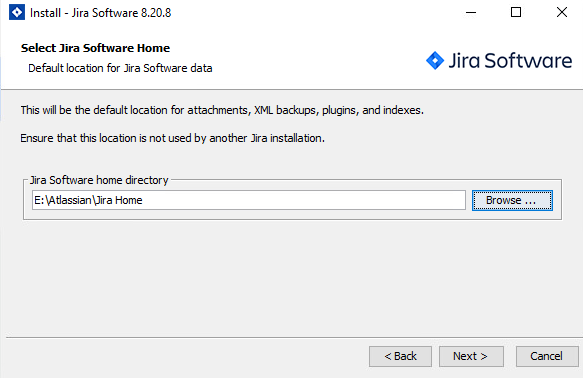
Next, we’ll do the same for the Home directory. putting it in a separate directory than the Install.
The next screen configures the Start Menu settings – which can be useful for starting, stopping, and restarting the service. We’ll be keeping the default settings here.

We’ll keep the default ports as well, so we can click next on the next screen.

We will be installing the Service as well. So we can click “Next” after confirming the check box is checked.

The last option screen is just confirming all the settings. If you are happy, click install!


After the installer finishes, we’ll Uncheck “Start Jira now” and click “Finish.” We have one final step to do before we start Jira, after all!

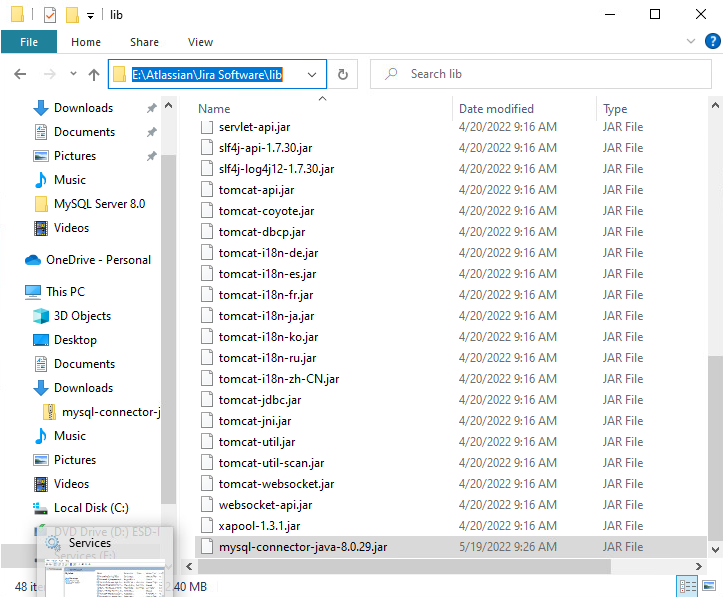
We’ll download the MySQL Driver JDBC Connector. For windows, I’ll download the platform Independent Zip package, then extract the jar file. I’ll then place the jar file to the <jira-installation-directory>/lib (for me, this is E:\Atlassian\Jira Software\lib folder).
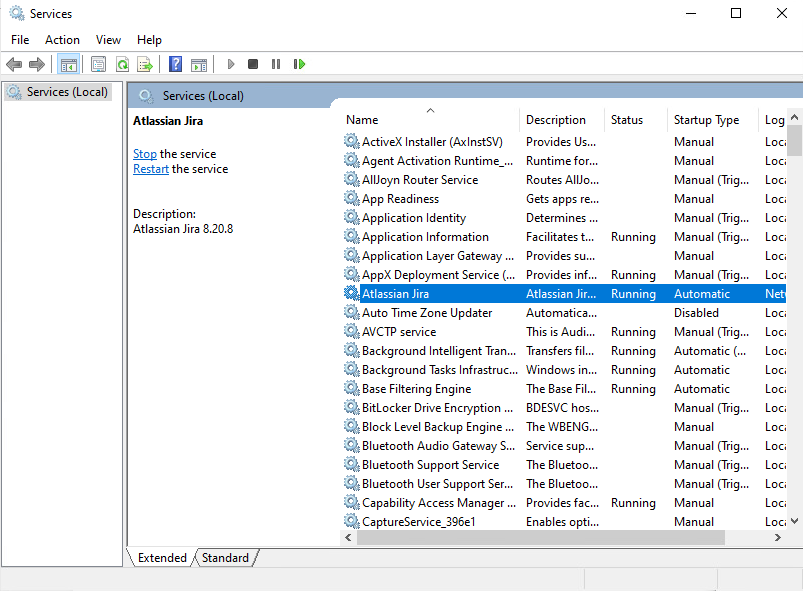
We can now start up Jira from the start menu, or by finding “Atlassian Jira” in the Service Manager.

After it starts up, we can load up Jira from the browser by going to “HTTP://localhost:8080” From here, it is your normal setup! Congrats, you have Jira on Windows!

So, what’s been going on?
So – the past few weeks have not been ideal. I’ve had a few different stressors as of late – the least of which is this baby girl that’s not been feeling herself. I had to take her to the vet yesterday, so I didn’t have the time to do this particular post justice.

I’m hoping to return to my normal posting schedule next week.
In speaking of next week, Next Wednesday, May 25th, 2022, Atlassian will be holding their promised AMA. This is your chance to ask Atlassian directly about Data Center and its plans. I hope you will all add your questions and concerns!
- Future of Data Center Ask Me Anything (AMA)
As always, you can find my social media links via my Linktree. Please share, like, and comment, as this is the best way to let others know about the blog! You can also subscribe directly to the blog below, which will send you an email whenever I have a new post!
But until next time, my name is Rodney, asking, “Have you updated your Jira issues today?”